

Digital Equipment VT510 Installation And Operating Information

dt
VT510VideoTerminal
Installation and Operating
Information
Order Number: EK-VT510-IA. B01

August 1993
Digital Equipment Corporation makes no representations that the use of its
products in the manner described in this publication will not infringe on
existing or future patent rights, nor do the descriptions contained in this
publication imply the granting of licenses to make, use, or sell equipment or
software in accordance with the description.
© Digital Equipment Corporation 1993.
The postpaid Reader’s Comments form at the end of this document requests
your critical evaluation to assist in preparing future documentation.
DEC, OpenVMS, ULTRIX, VMS, VT, and the DIGITAL logo are trademarks of
Digital Equipment Corporation.
ADDS is a trademark of Applied Digital Data Systems, Inc.
IBM, ProPrinter, and PS/2 are registered trademarks of International Business
Machines Corporation.
SCO is a trademark of Santa Cruz Operations, Inc.
TVI is a trademark of TeleVideo, Inc.
UNIX is a registered trademark of UNIX System Laboratories, Inc.
WY and WYSE are registered trademarks of Wyse Technologies.
All Rights Reserved.
Printed in Taiwan.
All other trademarks and registered trademarks are the property of their
respective holders.
FCC ID: AO9-VGB10—NOTE: The North American version of this equipment
has been tested and found to comply with the limits for a Class A digital
device, pursuant to Part 15 of FCC Rules. These limits are designed to
provide reasonable protection against harmful interference when the equipment
is operated in a commercial environment. This equipment generates, uses,
and can radiate radio frequency energy and, if not installed and used in
accordance with the instruction manual, may cause harmful interference to
radio communications. Operation of this equipment in a residential area is
likely to cause harmful interference, in which case, the user will be required to
correct the interference at his own expense.
Canadian Standards Association (CSA) Statement
This digital apparatus does not exceed the Class A limits for radio noise
emissions from digital apparatus as set out in the radio interference regulations
of the Canadian Department of Communications.
Le présent appareil numérique n’émet pas de bruits radioélectriques dépassant
les limites applicables aux appareils numériques de class A prescrites dans
le règlement sur le brouillage radioélectrique édicté par le Ministère des
Communications du Canada.
Use of Ozone Depleting Substance (ODS)
The VT510 is in full compliance with the labeling requirements in the U.S.
Clean Air Act Amendments of 1990. It does not contain, nor is it manufactured
with, a Class 1 ODS, as defined in Title VI Section 611 of this act.
This document was prepared using VAX DOCUMENT Version 2.1.

Contents
Preface ..................................................... v
1 Installation and Set-Up
Install the tilt/swivel stand. . . ........................... 1–1
Install your terminal. .................................. 1–2
Set up your terminal. .................................. 1–4
Select the Set-Up language. . . ........................... 1–7
Select the emulation mode terminal type. .................. 1–8
Select the keyboard language. ........................... 1–8
Select the communication/printer port configuration. .......... 1–9
Select the communication word size. . . . ................... 1–9
Select the communication parity. ......................... 1–10
Select the communication transmit speed. .................. 1–10
Select the communication receive speed. ................... 1–11
Select the printer type. ................................ 1–11
Save your settings. . ................................... 1–12
2 Desktop Features
Invoking Desktop Features . . ........................... 2–1
Overview ........................................ 2–1
Clock feature . . ................................... 2–2
Calculator feature ................................. 2–3
Show Character Sets feature ......................... 2–4
Banner message ................................... 2–4
iii

3 Maintenance and Troubleshooting
Cleaning your Video Terminal ........................... 3–1
Troubleshooting . . . ................................... 3–1
Disposing of your Terminal . . ........................... 3–4
Installing the ROM Cartridge ........................... 3–4
4 Defining Keys
Define Key Editor . ................................... 4–1
A Specifications
B Keyboard Function Keys
User Definable Keys................................... B–1
Local Functions . . . ................................... B–1
Compose Characters .................................. B–6
Figures
1–1 DEC VT-Style Keyboard Layout . . . ................... 1–6
1–2 PC-Style Keyboard Layout ........................... 1–6
A–1 Comm1—Serial Communication/Printer Ports . . .......... A–4
A–2 Comm2—MMJ Port ................................ A–4
A–3 Parallel Printer Port ............................... A–5
Tables
1 Recommendations for Proper Setup and Use . . . .......... viii
3–1 Identifying and Correcting Problems ................... 3–2
B–1 Local Functions ................................... B–2
B–2 Other Available Local Functions . . . ................... B–5
iv

Preface
Overview
Environment
Before You
Start
This guide is for users who wish to install and configure the
VT510 video terminal. This guide describes how to connect
cables and enter the Set-up Menu to make changes, as needed.
This guide also has reference tables for troubleshooting,
specifications, and compose sequences.
For more detailed information on programming the terminal,
refer to the VT510 Video Terminal Programmer Information. See
the inside back cover for ordering information.
Note
This product has been designed and manufactured to
minimize the impact to the environment. The packaging
is recyclable and the terminal can be returned for proper
disposal.
Ensure that you have received the following:
• Video terminal
• Keyboard
• Power cord, if not attached to the terminal unit
A small flat-blade screwdriver may be needed to install the
communication or the printer cables.
v

Obtain the following information before installing your VT510
video terminal. Write any changes to the default setting in the
column on the right.
Information Needed Obtain From . . .
The keyboard country
language that you have.
Bottom of the
keyboard
Desired terminal: System Manager
Emulation: DEC VT,
PCTerm, ADDS, SCO,
TVI, WYSE
Communication
System Manager
Information:
Word size: 8 bits, 7 bits
Parity: none, even, odd,
mark, or space
Transmit speed: 9600
Receive speed: Same as
Transmit speed
Printer Information: System Manager
Printer type: DEC
ANSI, IBM ProPrinter,
or DEC + IBM
Printer serial speed:
4800
Changes to
Default Setting
The factory defaults are in boldface type.
vi
Conventions
The following conventions are used in this document:
Convention Meaning
Shift Tab
Shift Enter
Caps Lock Alt F11
terminal Describes the VT510 video terminal.
Display Menu items are in boldface type.
Note Provides general information.
Caution Provides information to prevent damage
Warning Provides information to prevent injury.
Proper Setup and Use
Indicates two keys that you must press
in combination. Press and hold the first
key while you press the second key.
Indicates two keys that you must press
in sequence. Press and release the first
key before you press the second.
Indicates three keys that you must
press in combination, holding the first
two down while pressing the third.
to equipment.
Important
Information
Certain recent scientific literature suggests that poor posture,
work habits, or office equipment setup may cause injuries. Other
literature suggests that there is no cause and effect. Because the
safety of our users is a great concern, it is important to take the
precautions described in Table 1.
vii
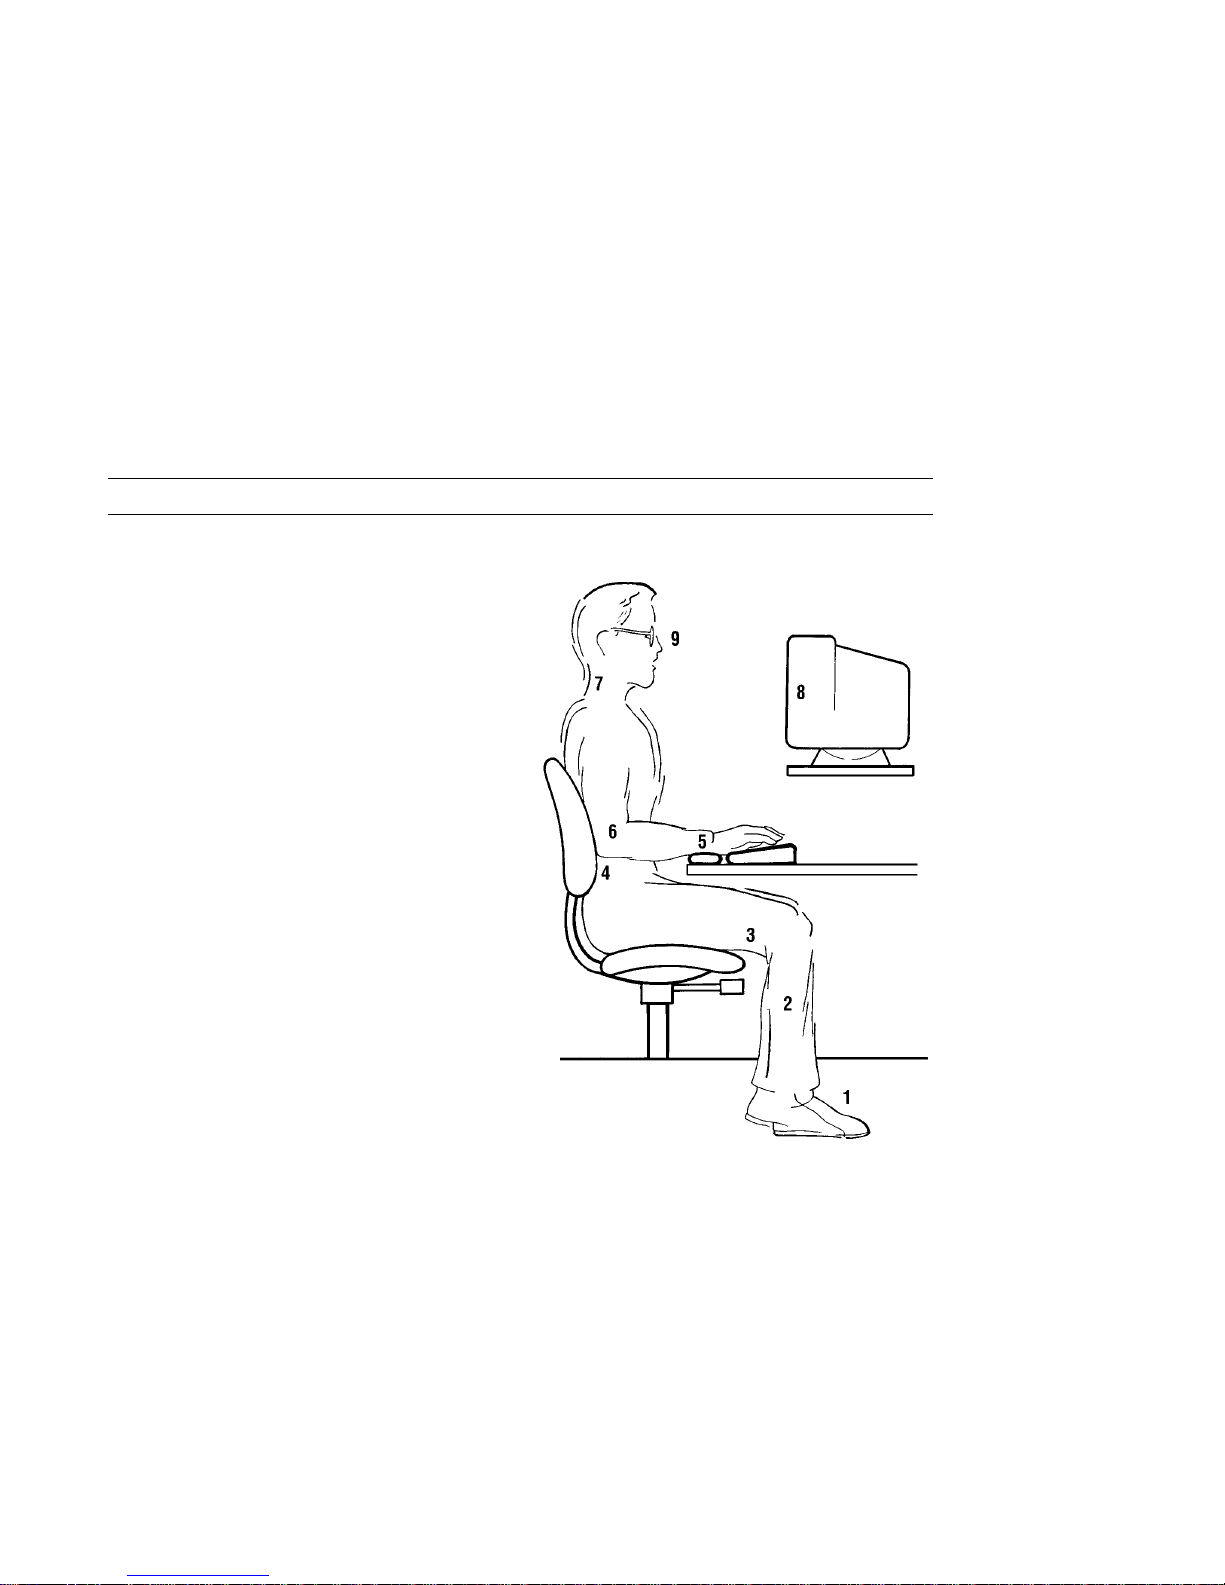
Proper Setup and Use
Table 1 Recommendations for Proper Setup and Use
Adjust So that . . .
Chair 1 Feet are flat on the floor
or footrest, if needed.
2 Legs are vertical forming
a right angle to the floor.
3 Your weight is off your
thighs and are in a
horizontal position. Keep
the back of your knees
away from the seat so you
do not compress the area
behind them, which could
restrict the blood flow.
4 Your upper body is erect
and your lower back is
supported with a backrest.
Keyboard 5 Your wrists are straight
and do not flex more
than 15°. They may be
supported but should not
rest on sharp edges.
6 Upper arms are straight
down at your sides, elbows
are close to your sides and
support your arm weight.
Forearms are at a 70° to
90° angle.
Head 7 Your neck is not strained.
Your head should incline
downward, but no more
than 15° to 20°.
MA–0069–93.IL
viii
(continued on next page)

Proper Setup and Use
Table 1 (Cont.) Recommendations for Proper Setup and Use
Adjust To . . .
Terminal 8 Eye level and at the correct distance for proper vision.
Eyes 9 Avoid eye fatigue, which can be caused by glare, image quality,
uncomfortable furniture, eye height, and uncorrected vision. If you
cannot read the screen at different distances, you may need special
glasses. Relax your eyes periodically by looking at distant objects.
Work
Breaks
Take periodic work breaks. Morning, lunch, and afternoon breaks
meet most recommendations. Take advantage of work breaks to
move around and do other movements.
Lighting Avoid direct lighting or sunlight on the screen, which causes glare
and reflections. The VT510 terminal screen has an antiglare
treatment to reduce glare. Place lighting behind or to the side
of your work area, and distribute the lighting evenly on your work
area. Adjust the terminal brightness and the contrast controls as
needed.
Noise Keep background noise at a minimum. Background noise above
65 dBA is tiring. Sound-absorbing materials, such as curtains,
carpeting, and acoustic tile, can help reduce background noise.
Temperature 20°C to 23°C (68°F to 74°F)
Humidity 30% to 70%
Ventilation Provide adequate air ventilation for equipment operation and to
avoid fatigue.
Space
between
More than 70 cm (28 in) center to center, preferably more than 152
cm (60 in).
terminals
If you experience pain or discomfort during use of the
terminal, then take a substantial break and review the
instructions for posture and work habits. If the pain or
discomfort continues after resuming use of the terminal,
then discontinue use and report the condition to your job
supervisor or physician.
Warning
ix

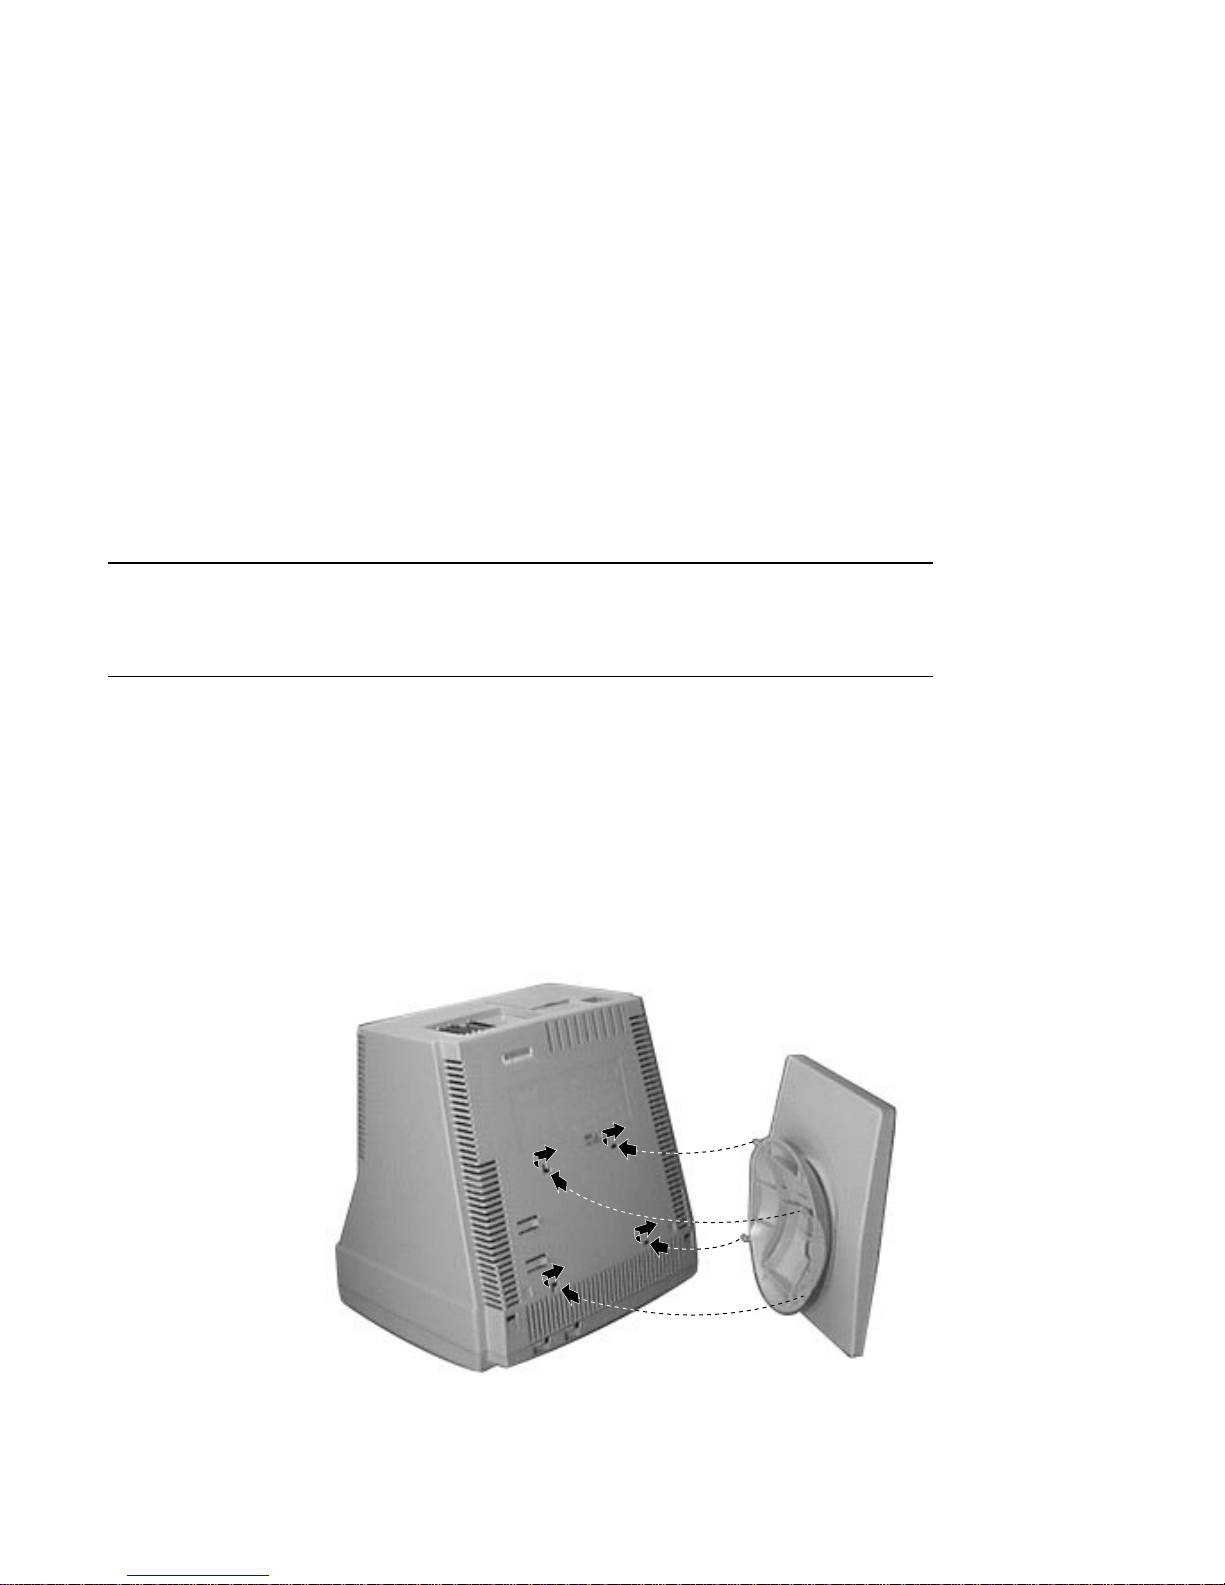
Install the tilt/swivel stand.
1
Installation and Set-Up
Insert hooks
and slide into
position.
1. Carefully set the terminal facedown.
2. Insert the hooks on the stand into the slots at the bottom of
the terminal.
3. Slide the stand to the right until it is locked by the two tabs
at the bottom of the terminal. (To remove the stand, press
the two tabs.)
DSG-000375
Installation and Set-Up 1–1
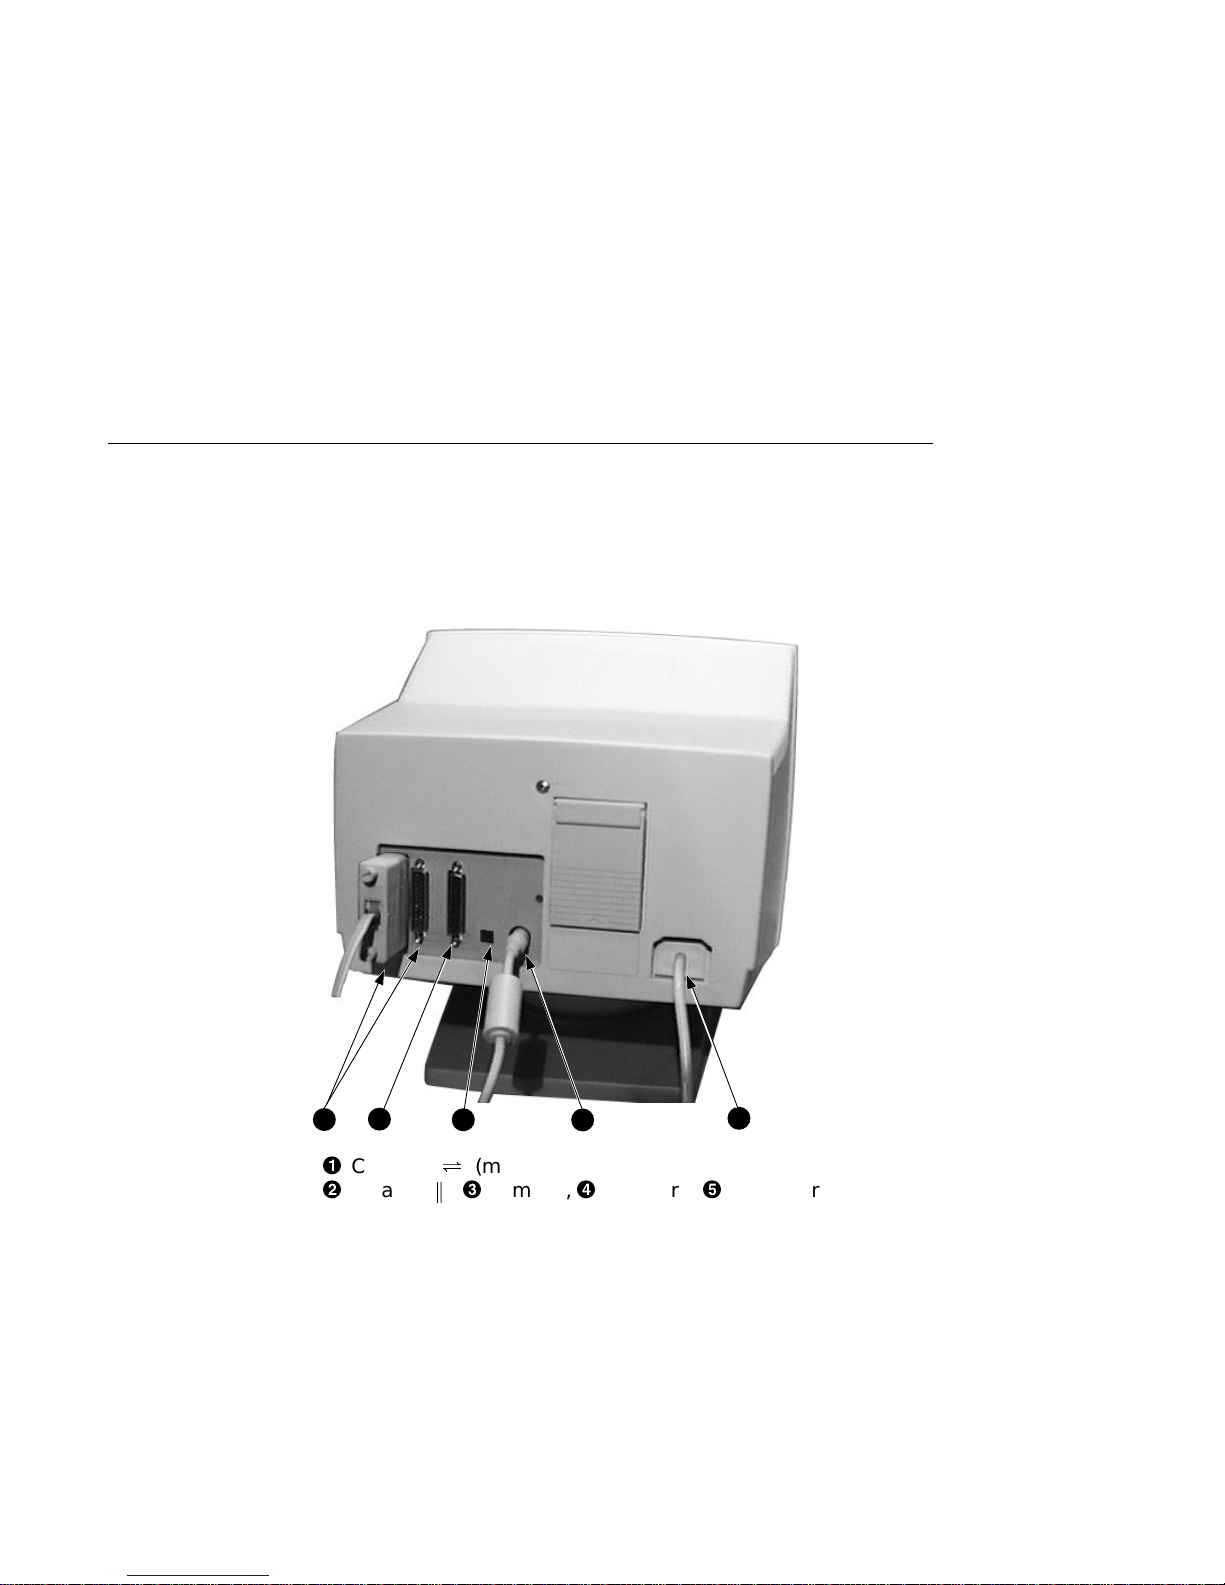
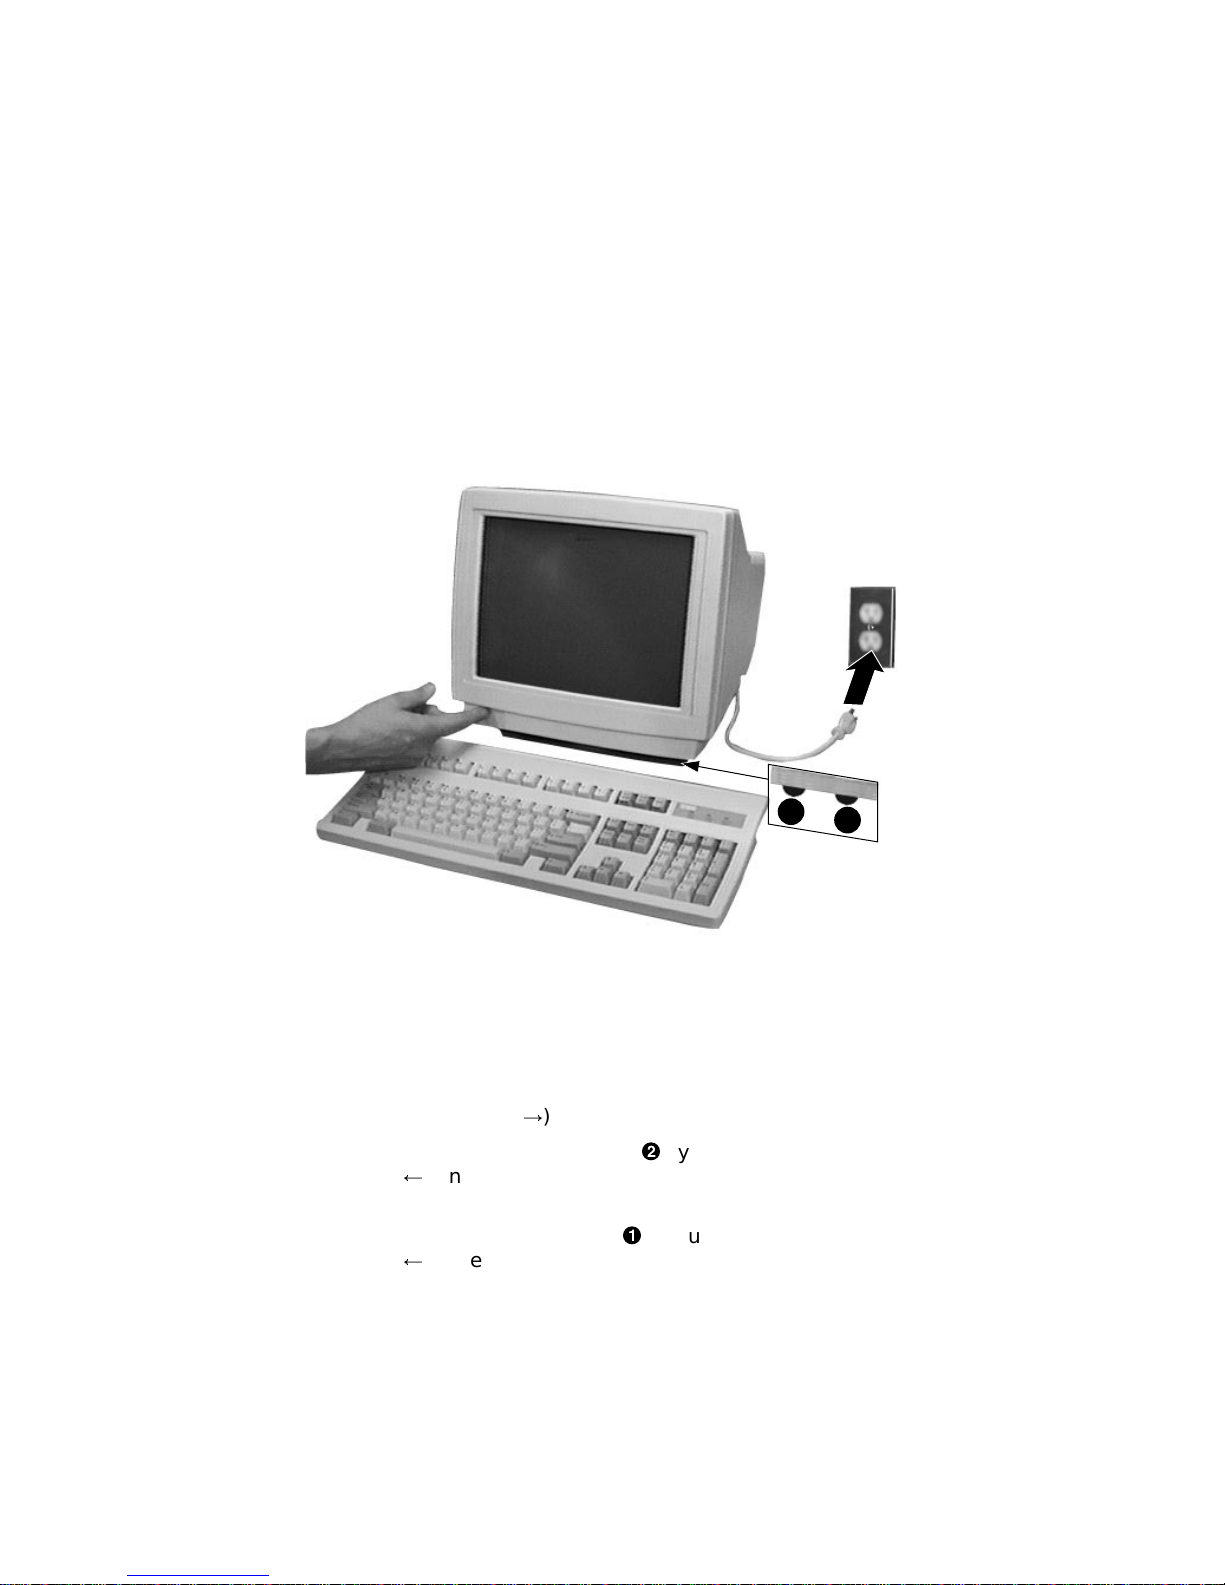
Install your terminal.
Install your terminal.
Connect the
cables to the
terminal.
To install your terminal, connect the cables to the terminal as
shown.
2
1
!
Comm 1 (
"
Parallel (k),#Comm 2,$Keyboard,%Power cord.
3
*
) (male or female),
)
4
5
DSG-000322
1–2 Installation and Set-Up
Install your terminal.
Plug in the
power cord and
push the power
switch on.
The terminal will beep indicating that the power is on.
1
2
DSG-000323
Set the
Brightness
and Contrast
controls.
If necessary, set the brightness and contrast controls by doing
the following:
1. Set both controls to maximum by turning controls all the
way to the right (!).
2. Adjust the Brightness control"by turning the control to the
left ( ) until the background raster is not visible. This sets
the black level.
3. Adjust the Contrast control!by turning the control to the
left ( ) to set the white level for comfortable viewing.
4. Repeat steps 2 and 3 as needed.
Installation and Set-Up 1–3
Install your terminal.
"Selftest OK"
appears on
screen.
The terminal takes a few seconds to warm up and complete its
power up self-tests. Then, the terminal should display ‘‘Selftest
OK.’’ If a problem occurs, go to Chapter 3.
Set up your terminal.
Overview
Use Set-Up to examine or change the terminal operating
features, such as the transmit speed, receive speed, or the
language. The Set-Up menus in this section will get you started
in operating the terminal. Only the basic Set-Up feature is
performed with this procedure. There are many more Set-Up
features in the terminal that you may wish to change.
Before changing the Set-Up features, contact your System
Manager, if necessary, for information on the terminal type,
terminal ID to host, and the communication settings.
Printer operations are suspended upon entering Set-Up and are
resumed upon exiting Set-Up.
Entering Set-up
To enter Set-Up, perform the following procedures:
On a . . . Press . . . Refer to . . .
DEC VT keyboard
PC keyboard
1–4 Installation and Set-Up
F3
Caps Lock Print Screen
Caps Lock Sys Rq
or
Figure 1–1
Figure 1–2
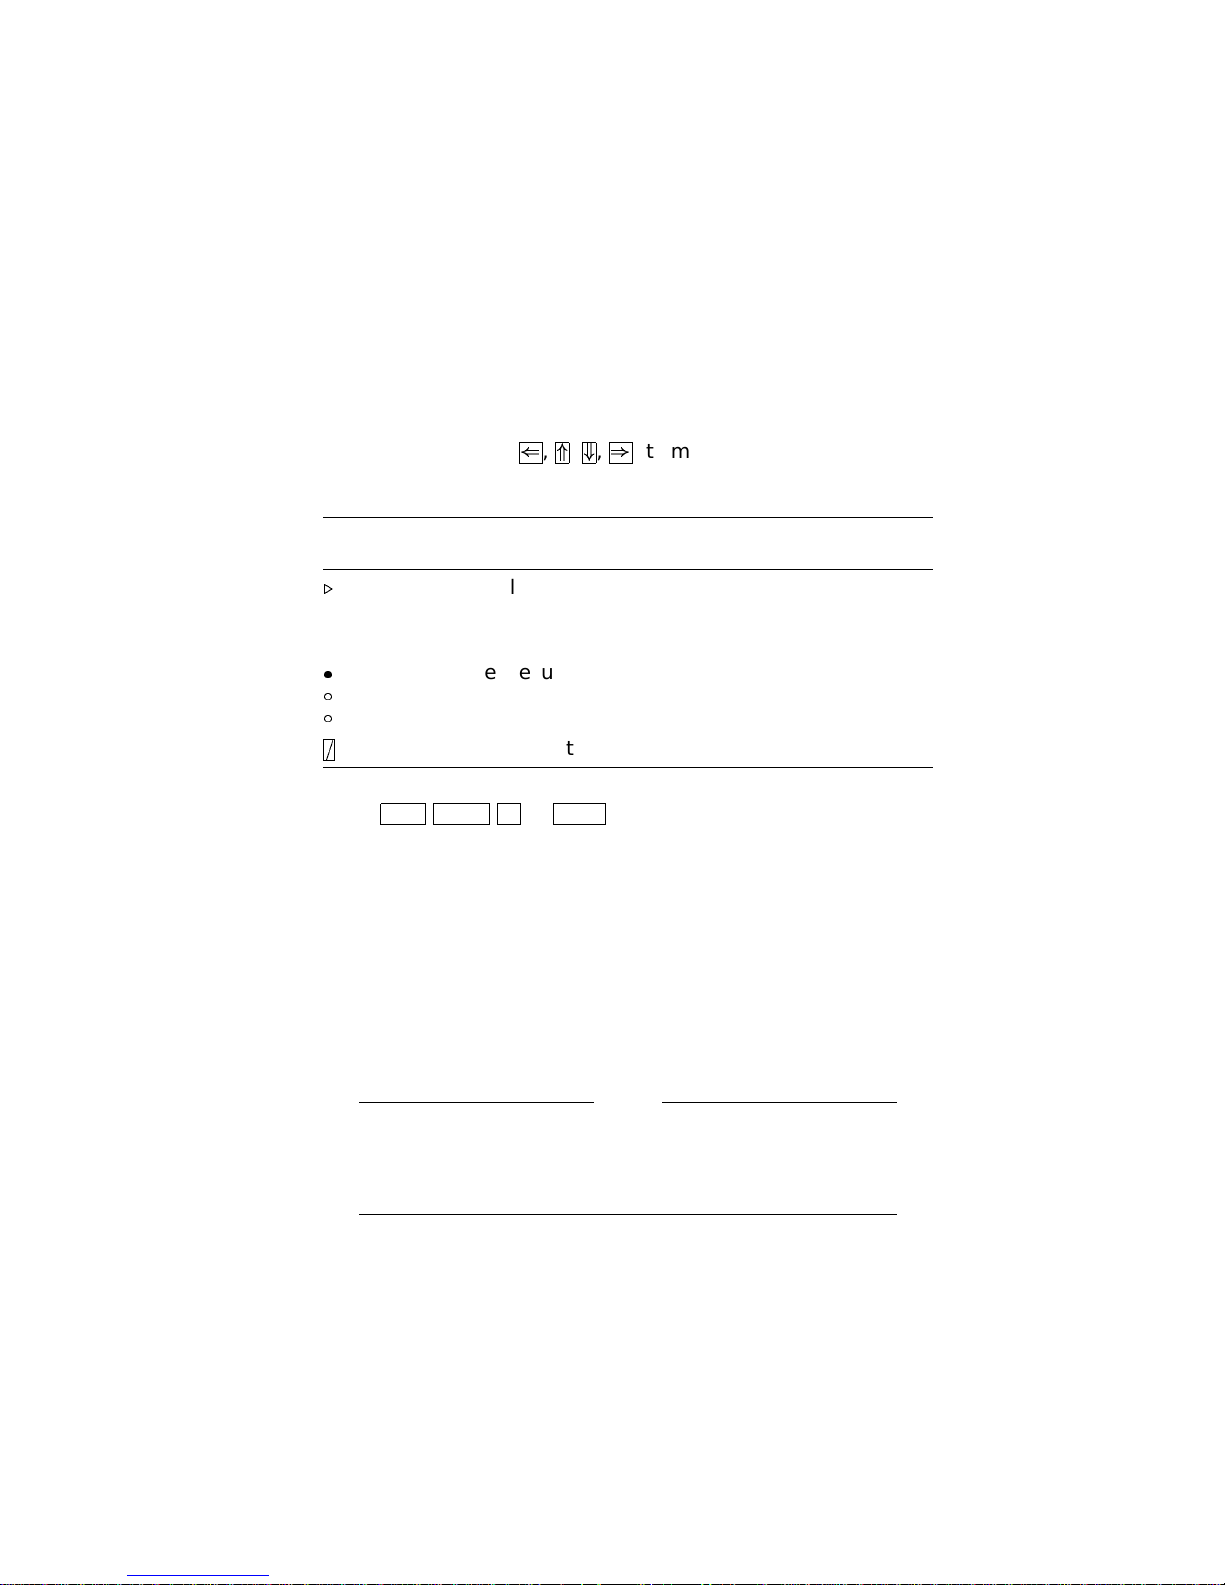
Set up your terminal.
Moving within a
Set-Up Menu
Keyboards
Use the arrow keys ((,*,+,)) to move among the menus or
within a list, or to select buttons.
In a
menu . . . Indicates . . .
.
A pull-right submenu is available.
. . . A dialog box is available for you to specify more
information.
a
b
c
=
Press
Enter Return DoorSelect
The menu item with the filled-in circle is enabled.
Only one of these items can be enabled at a time.
The menu item with the checkbox is enabled.
to start the action or to choose the
currently highlighted feature.
A dimmed menu item does not apply to the currently selected
mode.
A DEC VT keyboard (Figure 1–1) and a PC keyboard
(Figure 1–2) differ in the placement of some of the keys,
such as the arrow keys. A DEC VT keyboard has 20 function
keys (F1 - F20) above the main keypad, while a PC keyboard has
12 function keys (F1 - F12).
Keyboards from other manufacturers may not function
correctly because of differences in their implementation
of the PC keyboard standard.
Note
Installation and Set-Up 1–5
 Loading...