

Page 1
VAX 4000 Model 300
•
Operation
Order Number:
EK~36AB-OP-O02
Page 2

VAX 4000 Model 300
Operation
Order Number EK-336AB-OP-O02
Digital Equipment Corporation
Maynard, Massachusetts
Page 3

March
1990,
July
1990
The information
construed
Digital
Equipment
this document.
The
software,
or
copied only
for
the
use
Corporation or
Restricted Rights:
restrictions
Software clause
Copyright
Printed
The Reader's Comments form
assist
The following
CompacTape
DDCMP
DEC
DEC
DECnet
DECserver
DECsystem
DECUS
DECwriter
in
in
direct
preparing
DELNI
DELQA
in
this
as
a commitment
if
any, described
in
or reliability of software or
its
as
set
forth
at
@1990.
U.S.A.
are
5400
document
Corporation
accordance
affiliated companies.
Use, duplication or disclosure
in
subparagraph
DFARS 252.227-7013.
Digital
Equipment
future
documentation.
trademarks
DEQNA
DESTA
DSSI
IVI8
MicroVAX
PDP
Professional
Q-bus
ReGIS
RQDX
ThinWire
by
in
with
at
of
is
subject to change
Digital
Equipment
assumes
this
document
the
terms
equipment
(c)(1Xii)
Corporation All
the
end
Digital
Equipment
Corporation.
no
responsibility for
is
furnished
of
such
that
of
the
of
this
document
Corporation.
ULTRIX
UNIBUS
VAX
VAX
VAXcluster
VAX
VAXELN
VAXlab
VM8
VT
the
without
license. No responsibility
is
not
by
the
Rights
rights
requests
4000
DOCUMENT
Digital Logo
notice
and
any
errors
that
under
a license
supplied
U.S. Government
in
reserved.
by
Digital
Technical
Data
your critical evaluation to
should
may
and
is
and
not
appear
may
be
used
is
assumed
Equipment
subject to
Computer
be
in
X Window System
FCC NOTICE:
frequency energy. The
a Class A
computing device
to provide reasonable protection
a commercial environment. Operation
interference,
correct
the
This document
is a trademark
The
equipment described
in
which case
interference.
was
prepared
equipment
pursuant
the
user
using
of
Massachusetts
has
been
to
against
at
VAX.
Institute
in
this
manual
type tested
Subpart J of
such
of
this
his
own
DOCUMENT, Version 1.2.
Part
radio frequency interference
equipment
expense
of
generates, uses,
and
found to comply
15
of
in a residential
may
be
Technology.
and
may
emit
the
limits for
operated
may
cause
measures
81466
radio
in
to
to
with
when
area
take
FCC Rules, which are designed
required
Page 4
Contents
Preface
Chapter 1 System Overview
1.1
Front
View
and
1.1.1
1.1.1.1
1.1.1.2
1.1.1.3
1.1.1.4
1.1.1.5
1.1.1.6
1.2
1.2.1
1.2.1.1
1.2.1.2
1.2.1.3
1.2.1.4
1.2.1.5
1.2.2
1.2.2.1
1.2.2.2
1.2.2.3
1.2.2.4
1.2.2.5
1.2.2.6
1.2.2.7
1.3
The
BA440
Mass
Card
Console Module . . . . . . . . . . . . . . . . . . . . . . . . . . . . .
DSSI Connector (DSSI
Power
Fans
Functional Description
Base
System
Central
Console
Main
Network
Embedded DSSI
Optional
Mass
Mass
Mass
Communications Controllers
Real-Time Controllers
Printer
Other
Dual-Host Capability (VMS
Physical
Enclosure.
Storage
Cage
..........................
Supply
........................................
Components
Processing
Serial
Memory.
Controller
Components.
Storage
Storage
Storage
Interfaces.
Available
Description.
. . . . . . . . . . . . . . . . . . . . . . . . . . . .
Shelf
Devices
Subsystems.
Expanders
.....
Controls
of
Base
Unit
Line
Unit
. . . . . . . . . . . . . . . . . . . . . . . . . . . . . .
............................
Host
. . . . . . . . . . . . . . . . . . . . . . . . . .
. . . . . . . . . . . . . . . . . . . . . . . . . . .
Options.
. . . . . . . . . . . . . . . . . .
. . . . . . . . . . . . . . . . . . . . .
. . . . . . . . .
Bus
0)
..
. . . . . . . . . . . . . . . .
and
Indicators.
System
.........................
(CPU)
(SLU) . . . . . . . . . . . . . . . . .
Adapters.
and
..........................
Systems
...................
. . . . . . . . . . . . . . . .
Controllers.
. . . . . . . . . . . . . . . . . . . .
. . . . . . . . . . . . . . . . . . . . . .
.....................
. . . . . . . . . . . . . . . . . . . . . .
Only) . . . . . . . . . . . .
. . . . . . . . . . .
......
. . . . . . . . . . .
. . . . . . . . .
..
..
..
..
..
..
..
..
..
..
..
..
..
..
..
ix
1-1
1-6
1-8
1-9
1-11
1-14
1-15
1-18
1-19
1-19
1-20
1-20
1-20
1-20
1-21
1-21
1-21
1-22
1-22
1-23
1-24
1-25
1-25
1-25
iii
Page 5

Chapter 2 Operating the System
2.1
2.2
2.2.1
2.2.2
2.3
2.4
2.4.1
2.4.2
2.5
2.6
2.7
2.8
2.9
Before
Switch Settings
Turning
Booting the
Using
Halting
Restarting
Turning
Recovering from
You
Operate
..................................
Normal Operation
Special Operation
On
the
System
System
Autobooting
Booting
the
the
Off
the
System
the
System from Console Mode
System
the
.................................
System
System
the
System
an
the
System
..............................
...............................
............................
...............................
...............................
.............................
............................
Over Temperature Condition
......................
..........................
..............
........
Chapter 3 Operating the System Options
3.1 Mass Storage Options
3.1.1 RF-Series Integrated Storage Assemblies
3.1.2 TK70 Tape Drive . . . . . . . . . . . . . . . . . . . . . . . . . . . . . .
3.1.2.1 Design
3.1.2.2 Labeling a Tape Cartridge . . . . . . . . . . . . . . . . . . . . .
3.1.2.3 Write-Protecting a Tape
3.1.2.4 Tape Cartridge Handling
3.1.2.5 Inserting a Tape Cartridge. . . . . . . . . . . . . . . . . . . . .
3.1.2.6 Removing a Tape Cartridge . . . . . . . . . . . . . . . . . . . .
3.1.2.7 Summary ofTK70 Tape Drive Controls
Lights. . . . . . . . . . . . . . . . . . . . . . . . . . . . . . . . . . . . .
3.1.3 TLZ04 Tape Drive
3.1.3.1 Proper Handling of Cassette Tapes
3.1.3.2 Setting the Write-Protect Tab on
3.1.3.3 Inserting a Cassette Tape into
3.1.3.4 System Software
3.1.3.5 Cleaning the
3.1.4
3.1.5 RRD40 Digital Disk Subsystem
RV20
of
the Drive
Optical Disk Subsystem
..............................
............................
Cartridge.
and
Storage
...............................
..............................
Heads.
. . . . . . . . . . . . . . . . . .
......................
.....................
.............
. . . . . . . . . . . . . . . .
Guidelines.
and
................
the
Cassette Tape. .
the
Drive.
. . . . . . . . .
. .
Indicator
..
. . . . .
..
..
..
..
..
..
..
..
..
.
.
.
.
.
.
.
.
.
.
.
.
.
2-1
2-1
2-1
2-2
2-4
2-6
2-6
2-11
2-12
2-12
2-13
2-13
2-14
3-1
3-2
3-6
3-7
3-8
3-9
3-11
3-11
3-14
3-16
3-17
3-19
3-20
3-21
3-22
3-23
3-24
3-25
Iv
Page 6

3.1.6
3.1.7
3.2
3.2.1
3.2.1.1
3.2.1.2
3.2.2
3.2.3
3.3
3.4
3.5
TVS05 Tape Drive . . . . . . . . . . . . . . . . . . . . . . . . . . . . .
TU81-Plus
Communications Controller Options
Asynchronous
Without Modem
With Modem
Synchronous Controllers
Network Controllers
Real-Time
Printer
Adding
Options
Options
Tape
Drive.
Serial
Options
..................................
..................................
Controllers.
Support
Support
.............................
................................
. . . . . . . . . . . . . . . . . . . . . . . . .
. . . . . . . . . . . . . . . . . . . . . .
...........................
.........................
Appendix A Related Documentation
...................
. . . . . . . . . . . . . . . . .
..
..
..
..
.
.
.
.
.
3-25
3-25
3-25
3-25
3-26
3-27
3-28
3-28
3-29
3-30
3-30
Appendix B Programming Parameters for RF-Series
Appendix C Backup Procedures
C.1
C.1.1
C.1.2
C.1.3
C.1.4
C.2
C.2.1
C.2.2
Overview
Installing
Booting
Installing
Booting
Backing
Backing
Restoring
of
Standalone
Standalone BACKUP on System
Standalone
Standalone
Standalone
Up
the
System
Up
the
the
System
BACKUP
BACKUP from
BACKUP on a Tape Cartridge
BACKUP from a Tape Cartridge
Disk
System
Disk
Disk
....................
........................
......................
........................
the
Disk
System
.......
Disk
Appendix D Removing Unwanted VMS Files
D.1
Using
VMSTAILOR . . . . . . . . . . . . . . . . . . . . . . . . . . . . . .
Glossary
ISAs
....
....
...
..
C--1
.
.
C--2
.
C--2
.
C-3
.
C-5
.
~
.
C--7
.
C--9
0-1
v
Page 7

Index
Examples
B-1
SHOW DSSI Display . . . . . . . . . . . . . . . . . . . . . . . . . . . . .
B-2
B-4
B-5
B-6
B-7
Starting
B-3
Setting
Setting a Unit
Changing a Node
Exiting
SHOW DSSI Display
the
DUP
Driver Utility
......................
Allocation Class for a Specified ISA . . . . . . . . . . . .
Number
the
DUP Driver Utility for a Specified ISA
for a Specified ISA
Name
for a Specified ISA . . . . . . . . . . . .
..
...............................
Figures
1-1
VAX.
4000
System.
1-2
Key
Positions.
1-3
Upper Door
1-4
Entire
1-5
Front
1-6
Mass Storage
1-7
1-8
1-9
1-10
Card Cage
Console Module Controls
Connector for
Power Supply Controls
Opened.
Door
Opened.
View
of
.......................................
1-11 Sample Power
1-12
System Air Circulation. . . . . . . . . . . . . . . . . . . . . . . . . . . .
Dual-Host Configuration
1-13
2-1
2-2
2-3
2-4
2-5
2-6
3-1
Language Selection
Sample
Error
Successful Power-On
Successful Power-On to
Selecting a Bootable Device . . . . . . . . . . . . . . . . . . . . . . . . . .
Sample SHOW DEVICE Display . . . . . . . . . . . . . . . . . . . .
2-7
Successful Power-On to Console
RF-Series ISA Controls
3-2
Inserting Bus Node ID
3-3
TK70 Tape Drive . . . . . . . . . . . . . . . . . . . . . . . . . . . . . . . . . .
. . . . . . . . . . . . . . . . . . . . . . . . . . . . . . . . .
. . . . . . . . . . . . . . . . . . . . . . . . . . . . . . . . . . . .
. . . . . . . . . . . . . . . . . . . . . . . . . . . . . . .
. . . . . . . . . . . . . . . . . . . . . . . . . . . . . . .
the
BA440
Shelf.
nSSI
Bus
Enclosure.
. . . . . . . . . . . . . . . . . . .
. . . . . . . . . . . . . . . . . . . . . . . . . . . . . . .
and
Connectors
...............
Bus 0 ...........................
and
Indicators.
. . . . . . . . . . . . . . .
Configuration. . . . . . . . . . . . . . . . . . . .
............................
Menu.
Summary.
and
. . . . . . . . . . . . . . . . . . . . . . . . . .
. . . . . . . . . . . . . . . . . . . . . . . . . . . .
Automatic Boot . . . . . . . . . . . . . . .
List
of Bootable Devices . . . . . . . . . .
and
Indicators
Plugs.
Mode.
. . . . . . . . . . . . . . . . . . . . . . . .
. . . . . . . . . . . . . . .
.................
. . . . . . . . . .
........
..
..
..
..
..
..
..
..
..
B-5
B-6
B-7
B-8
B-9
B-10
B-10
1-2
1-3
1-4
1-5
1-7
1-8
1-10
1-12
1-15
1-16
1-18
1-19
1-26
2-3
2-6
2-7
2-7
2-8
2-10
2-11
3-3
3-5
3-7
vi
Page 8
3-4
3-5
3-6
3-7
3-8
3-9
3-10
3-11
B-1
B-2
Attaching a Unit
Tables
Labeling a Tape Cartridge . . . . . . . . . . . . . . . . . . . . . . . . . . .
Tape
Cartridge
Inserting
Removing a Tape
TLZ04 Tape
Setting
the
Inserting a Cassette
Inserting
DSSI Busses for
Write-Protect
a Tape
Cartridge.
Cartridge.
Drive.
. . . . . . . . . . . . . . . . . . . . . . . . . . . . . .
Write-Protect Tab on
Tape into
the
Head Cleaning
an
Expanded
Number
Label to
Switch
. . . . . . . . . . . . . . . . .
. . . . . . . . . . . . . . . . . . . . . . . .
. . . . . . . . . . . . . . . . . . . . . . .
the
Cassette
the
Drive.
Cassette.
VAX
4000
the
ISA
Tape.
. . . . .
. . . . . . . . . . . . .
. . . . . . . . . . . . . . .
System.
Front
. . . . . . .
Panel. . ..
..
..
..
..
..
..
..
..
3-8
3-10
3-13
3-15
3-18
3-21
3-22
3-24
B-4
B-8
2-1
2-2
3-1
3-2
3-3
3-4
3-5
C-1
Normal
Device
RF-Series Controls
TK70 Tape Drive Controls
TK70 Tape Drive
TLZ04 Drive Indicators (Normal Conditions)
Power-On Indications
Names
...................................
and
Indicators
Indicator
....................
..........................
Lights
....................
............
TLZ04 Drive Indicators (Abnormal Conditions) . . . . . . . . .
Standalone
BACKUP
Qualifiers.
. . . . . . . . . . . . . . . . . . . .
..
..
.
.
.
.
.
2-4
2-10
3-4
3-16
3-16
3-19
3-19
C-7
vII
Page 9

Page 10
This
manual
VAXserver 4000 Model 300
for each
system.
system.
or
VAXELN
full-function node
The
manual
•
Chapter
•
Chapter
•
Chapter
describes how to use
of
these
systems
The
VAX.
4000
The
VAXserver 4000 system
operating
on
is
structured
1 provides
2 describes how to use
3 describes how to use options
differs slightly, according to
is a multiuser
systems. Both systems can function
an
Ethernet
as
an
server
network.
follows:
overview
VAX.
4000 Model 300
systems.
system
is
a single-user system
of
the
each
The
that
systems.
system.
installed
hardware
uses
timesharing
the
the
in
the
Preface
and
and
software
function
VMS
that
as
systems.
of
operating
uses
VMS
an
end-
the
or
• Appendix A
• Appendix B describes how to
RF
-series ISAs.
Appendix C describes procedures for
•
• Appendix D describes how to
VMS files from
• A glossary explains key
NOTE: VAXserver systems are designed to offer
applications
in
this
manual
for server systems.
any
questions about whether use
server system.
lists
related
the
system disk.
that
do
not
require timesharing.
are designed for
Contact
documentation.
set
and
examine
creating
use
VMSTAILOR to remove
tenns.
Some
multiuser
your
Digital service representative
of
a specific device is appropriate for
systems
internal
backup
maximum
of
and
parameters
files.
performance for
the devices referred to
may
not
unwanted
be
suitable
if
you have
your
for
Ix
Page 11

Conventions
The following conventions
Convention
BOLD
NOTE
CAUTION
WARNING
Meaning
A symbol denoting a terminal key used
For example,
keypad.
keypad.
A symbol
Ckey.
This bold type indicates
»>BOOT
This line shows
prompt.
Provides general information about
Provides information to prevent damage to equipment or
Provides information to prevent personal
Return
indicatins
MUAO
are
used
Break
indicates
that
in
indicates
that
that
you hold down
user
the
user
this manual:
in
text
and
examples
that
you press
you press the Return key on your terminal
input.
must
the
the
For
example:
enter BOOT
the
CUlTent
Break key on your terminal
Ctrl key while you press
MUAO
topic.
in
this book.
at
the console
software.
iIUury.
the
x
Page 12
VAX
4000 systems house all components
enclosure is a free-standing
•
Card
cage
•
System
controls
pedestal
Chapter 1
System Overview
in
a BA440 enclosure. This
that
houses
the
following:
Central
•
Memory modules
•
Communications controller modules
•
Tape drive controller module
•
Console module
•
RF
•
TK70
•
Power supply
•
Fans
•
Up
to
series
This
chapter
functions.
Chapters 2 and
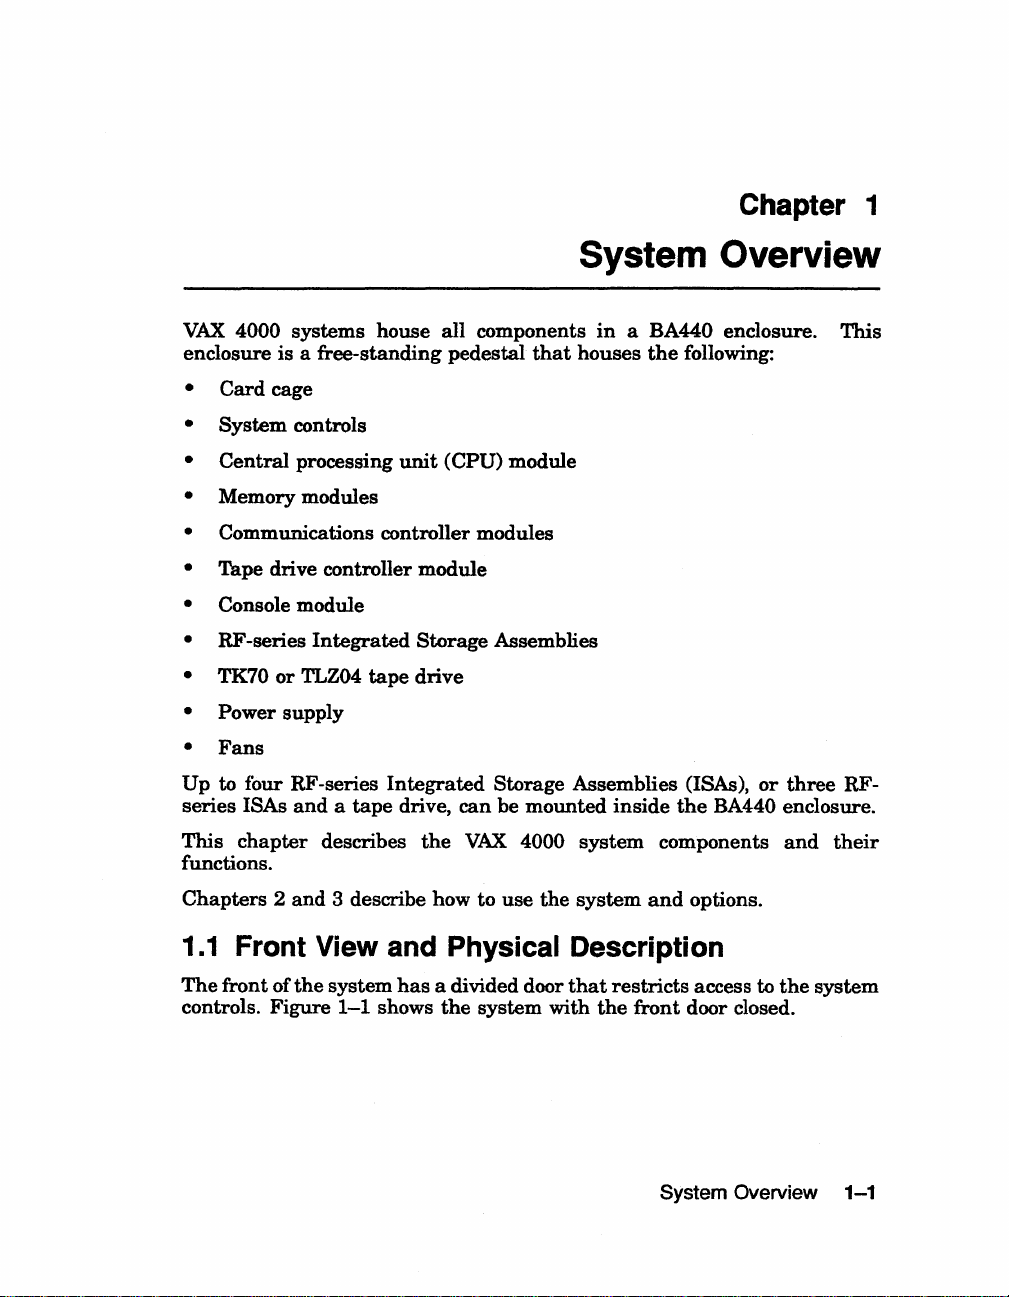
1.1
Front View and
The
front of
controls. Figure
-series
or
four
ISAs
processing
Integrated
TLZ04
RF-series
and a tape
describes
3 describe how to use
the
system
1-1
unit
Storage Assemblies
tape
drive
Integrated
drive,
the
has
a divided door
shows
(CPU) module
can
VAX
PhYSical
the
Storage Assemblies (ISAs),
be mounted
4000 system components
the
inside
system
and
the
options.
Description
that
system with
restricts
the
front
access to
door closed.
or
three
RF-
BA440 enclosure.
and
their
the
system
System Overview
1-1
Page 13
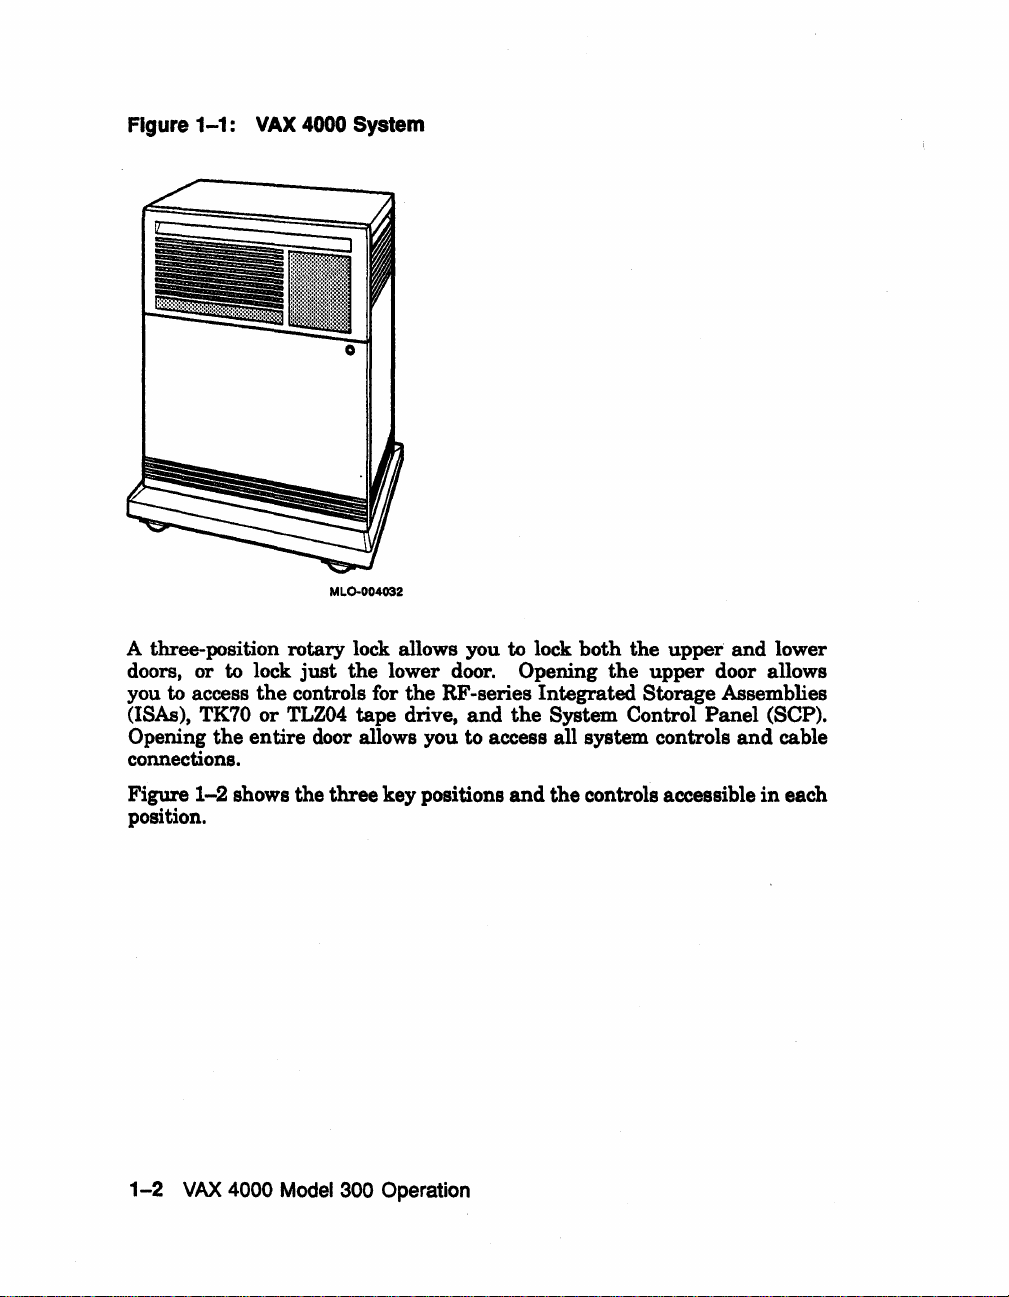
Figure 1-1:
VAX
4000
MLO-004032
System
A three-position rotary lock allows you to lock both the upper and lower
doors, or to lock
you to access
(ISAs),
Opening
TK70
the
just
the
the
controls for
or
TLZ04
lower door. Opening
the
RF -series Integrated Storage Assemblies
tape drive,
and
the
the
upper door allows
System Control Panel (SCP).
entire door allows you to access all system controls
and
cable
connections.
Figure
position.
1-2
VAX
1-2 shows the three key positions
4000
Model
300 Operation
and
the controls accessible
in
each
Page 14
Figure
1-2:
Key
Positions
Door Handle
Rotary Key Lock
Top Key Position:
Access
Tape Drive
Indicators (Upper Door)
Middle Key Position:
No Access
Bottom Key Position:
Access to Power Switch;
All Controls and Indicators
(Both Doors)
Opening
The
divided door allows you
control
----------I~~~~;;~====~
--------=::I!!§§~I~
to
SCP, ISAs, and
to
-------:::==--
Controls and
---:--~;.---=~.::r1III
Controls
-----'==----../
and
Closing
panel
(SCP), while
console module. Open
1.
Insert
the
key
in
position to open
to
open
position
the
the
and
the
just
Divided
to
restricting
close
lock
the
upper
entire
Door
access
the
on
the
door.
the
mass
storage devices
access to
door
as
the
follows:
front door. Turn
portion
of
the
power
the
door,
switch
key
or
to
and
to
the
system
and
the
the
top
bottom
With
the
2.
Swing
3.
To
close
doors closed,
bottom
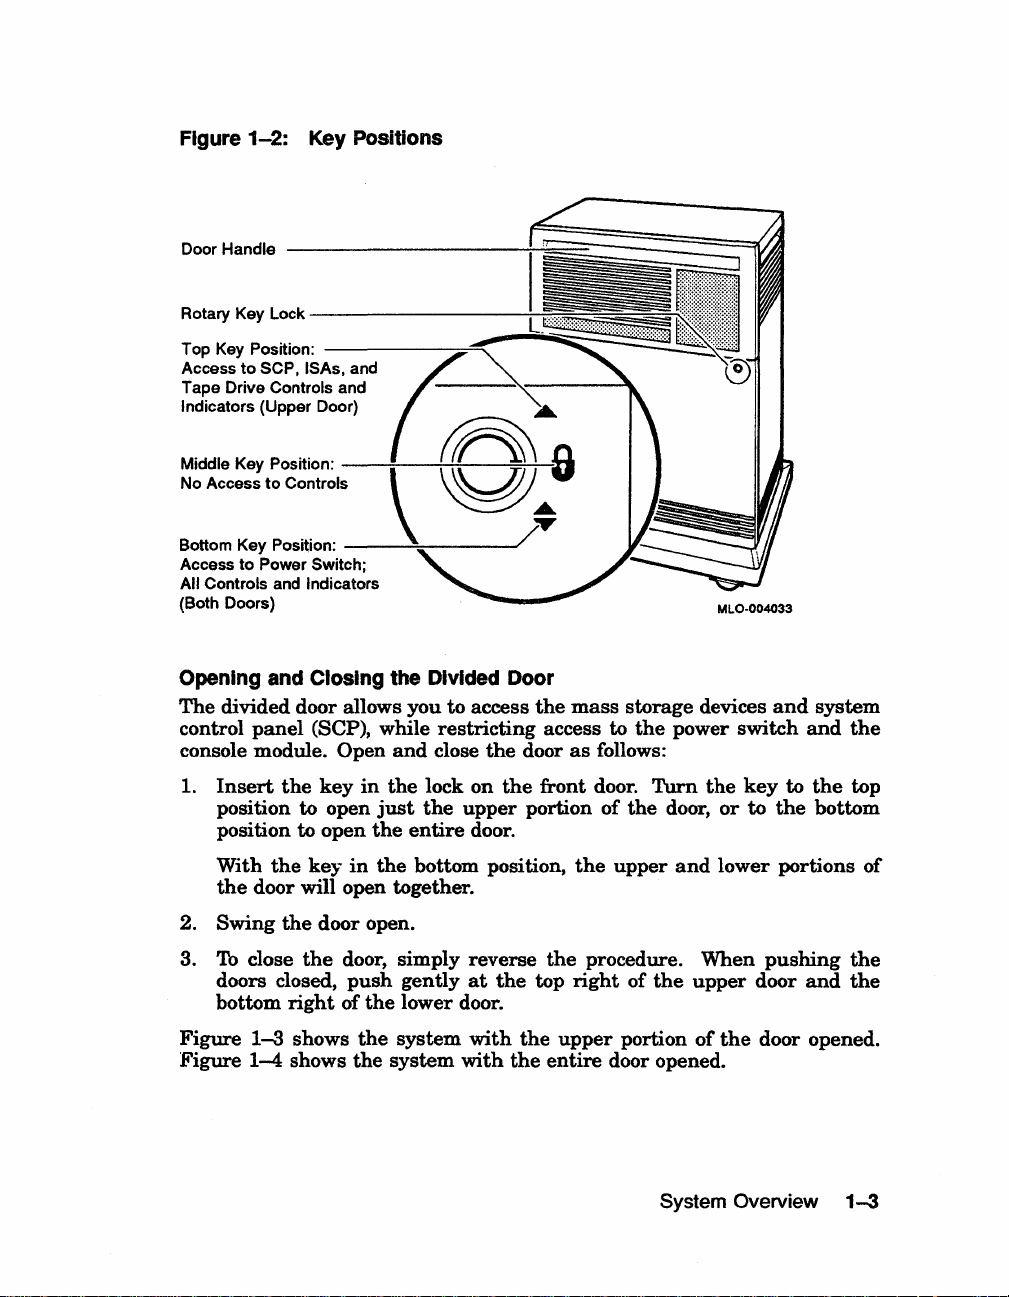
Figure
Figure
1-3
1-4
the
key
in
the
bottom position,
door will open together.
the
door open.
the
door, simply
push
gently
right
of
the
lower door.
shows
shows
the
the
system
system
with
reverse
at
the
with
the
the
the
top
upper
entire
the
upper
procedure.
right
of
portion
door opened.
and
lower portions of
When
the
upper
of
System Overview
pushing
door
the
door opened.
and
the
the
1-3
Page 15
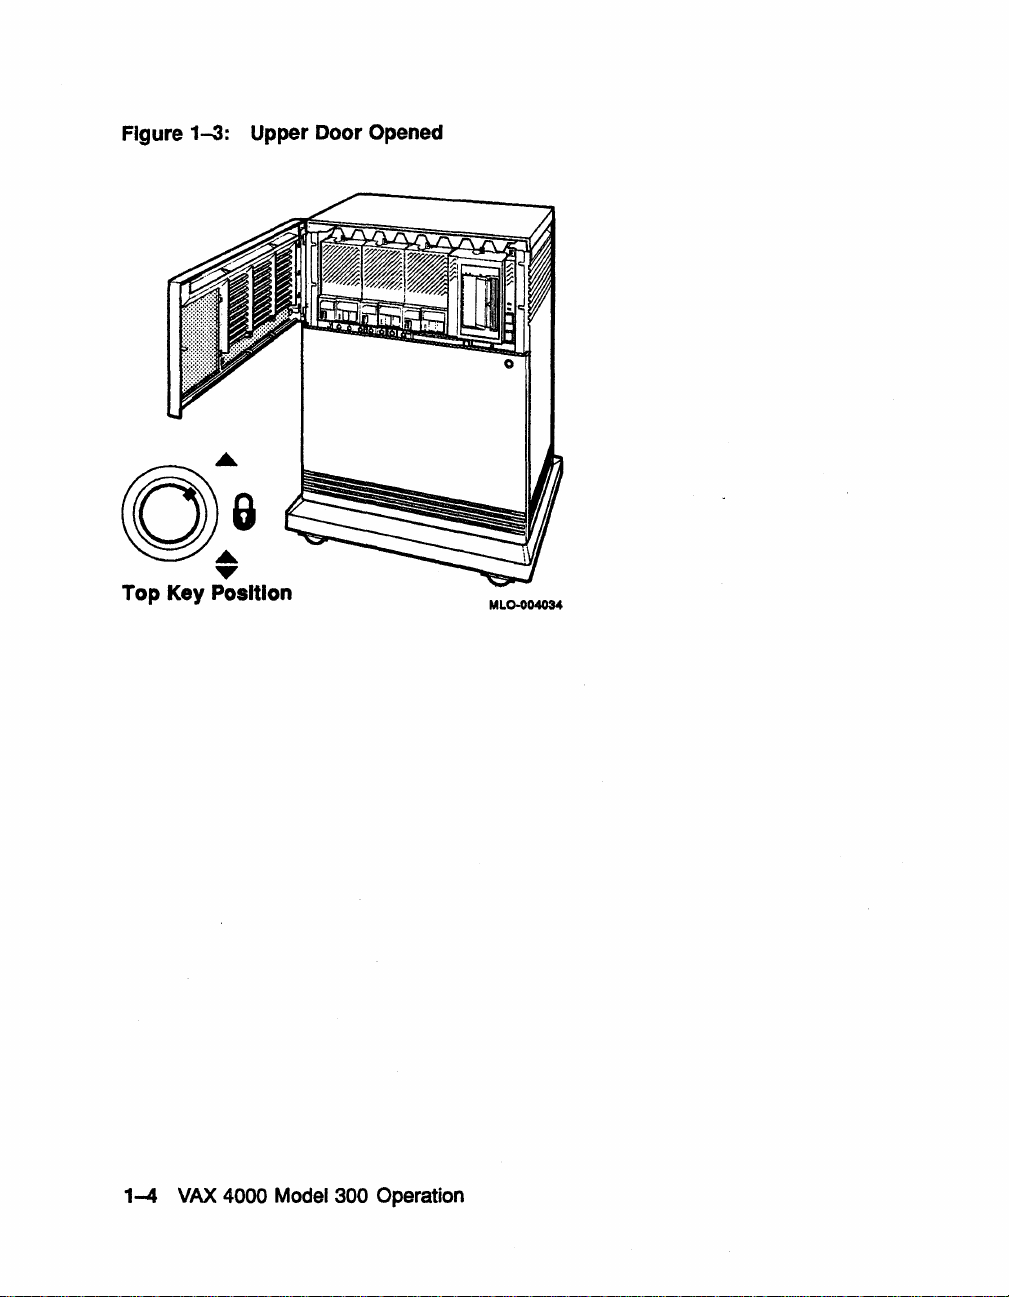
Figure 1-3: Upper Door Opened
0
0:
~
Top Key Position
MLO-OO4034
1-4
VAX
4000
Model
300 Operation
Page 16
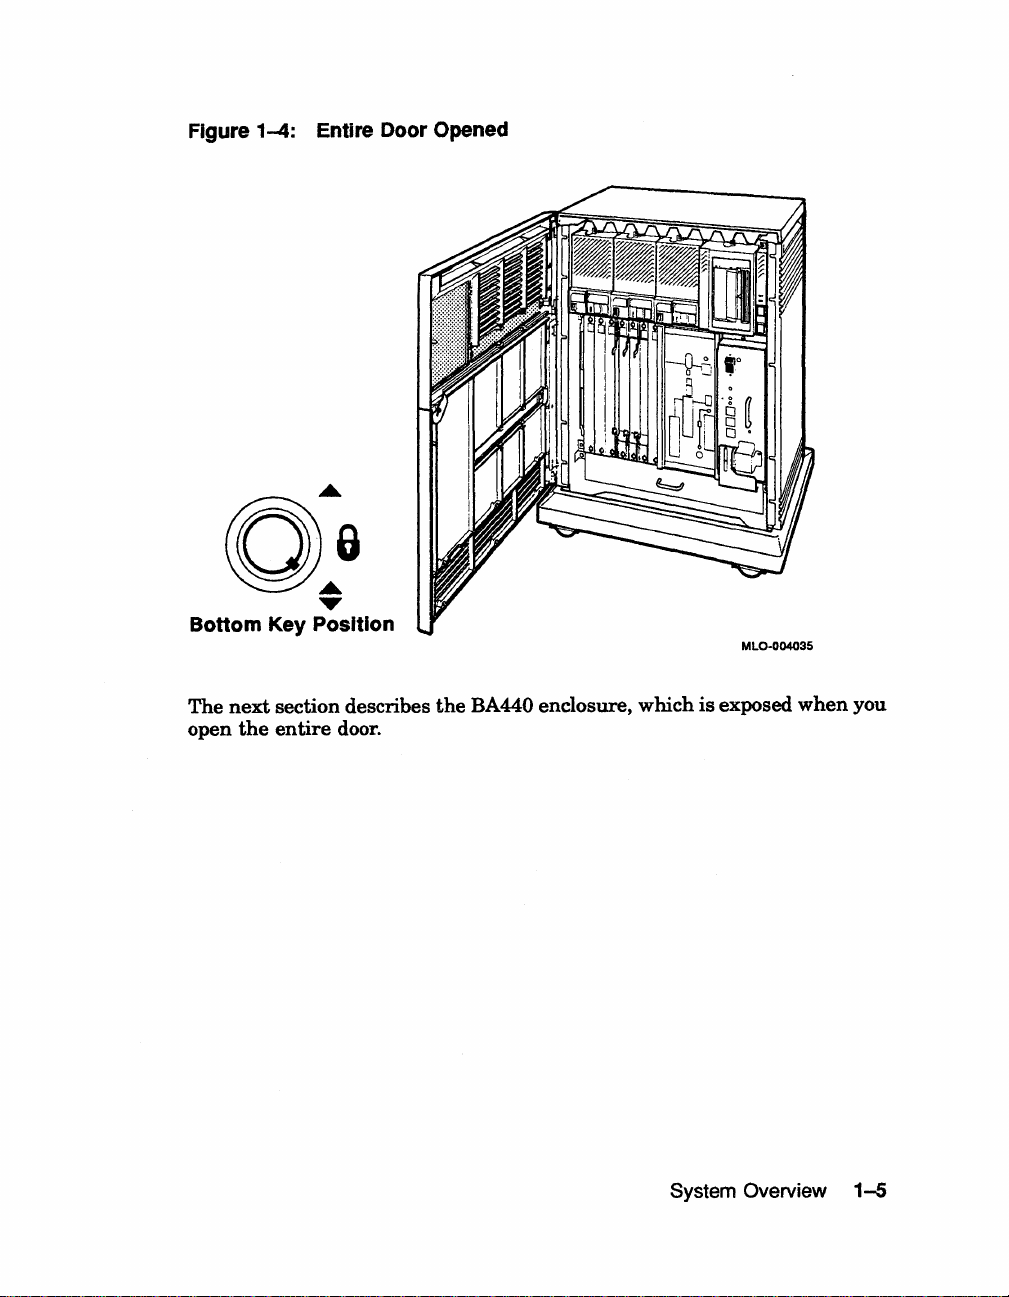
Figure 1-4: Entire Door Opened
O:a
...
Bottom Key Position
The
next
open
section describes
the
entire
door.
the
BA440 enclosure, which
MlO-004035
is
exposed
when
you
System Overview
1-5
Page 17
1.1.1
The BA440 Enclosure
. Opening
BA440 enclosure. Figure
The
• Mass storage - TK70 or TLZ04
the
front door enables you to access
BA440 enclosure
Integrated
Storage Assemblies (ISAs),
can
the
components housed
1-5
shows a typical configuration.
contain
the
following:
tape
drive
and
or
four RF-series ISAs
up
to
three
tape drive
VAX
All
4000 systems contain
the
following:
• System control panel (SCP)
•
Card cage containing modules CPU, memory, communications
mass
controllers,
storage controllers
• Console module
• Power supply
•
Fans
in
the
RF-series
and
no
1-6
VAX
4000
Model
300 Operation
Page 18
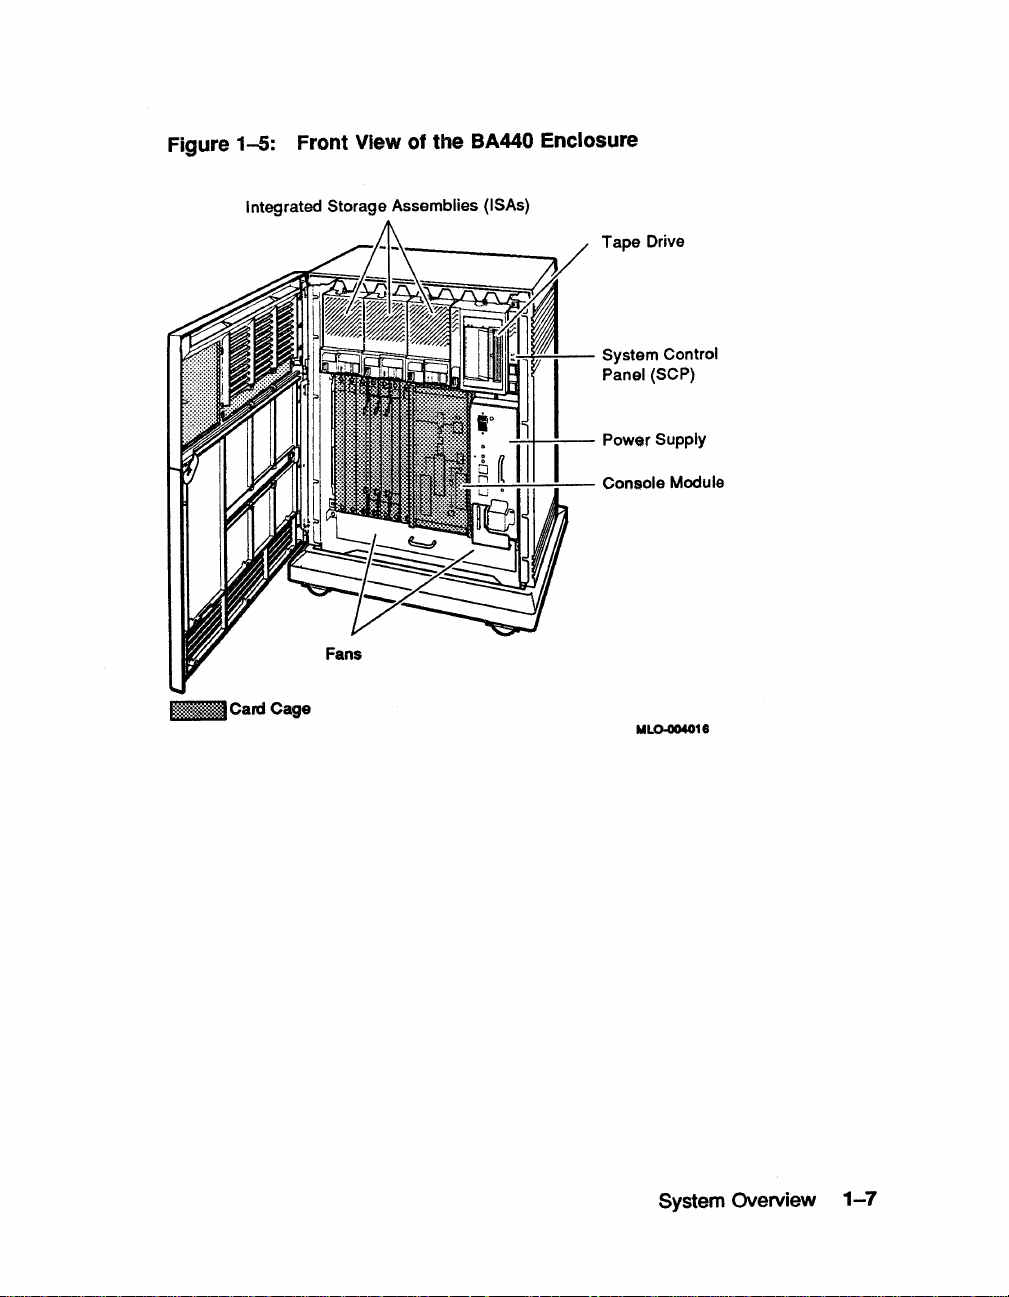
Figure
1-5:
Front View
Integrated Storage Assemblies (ISAs)
of
the
BA440 Enclosure
Tape Drive
i:§~:~::~.::i«.
Card Cage
I~!...!.i~~-
....!:-!..i-!~-
:....;....:......:.,:....-:~-=--
System Control
(SCP)
Panel
Power Supply
Console Module
ML0-004018
System Overview
1-7
Page 19
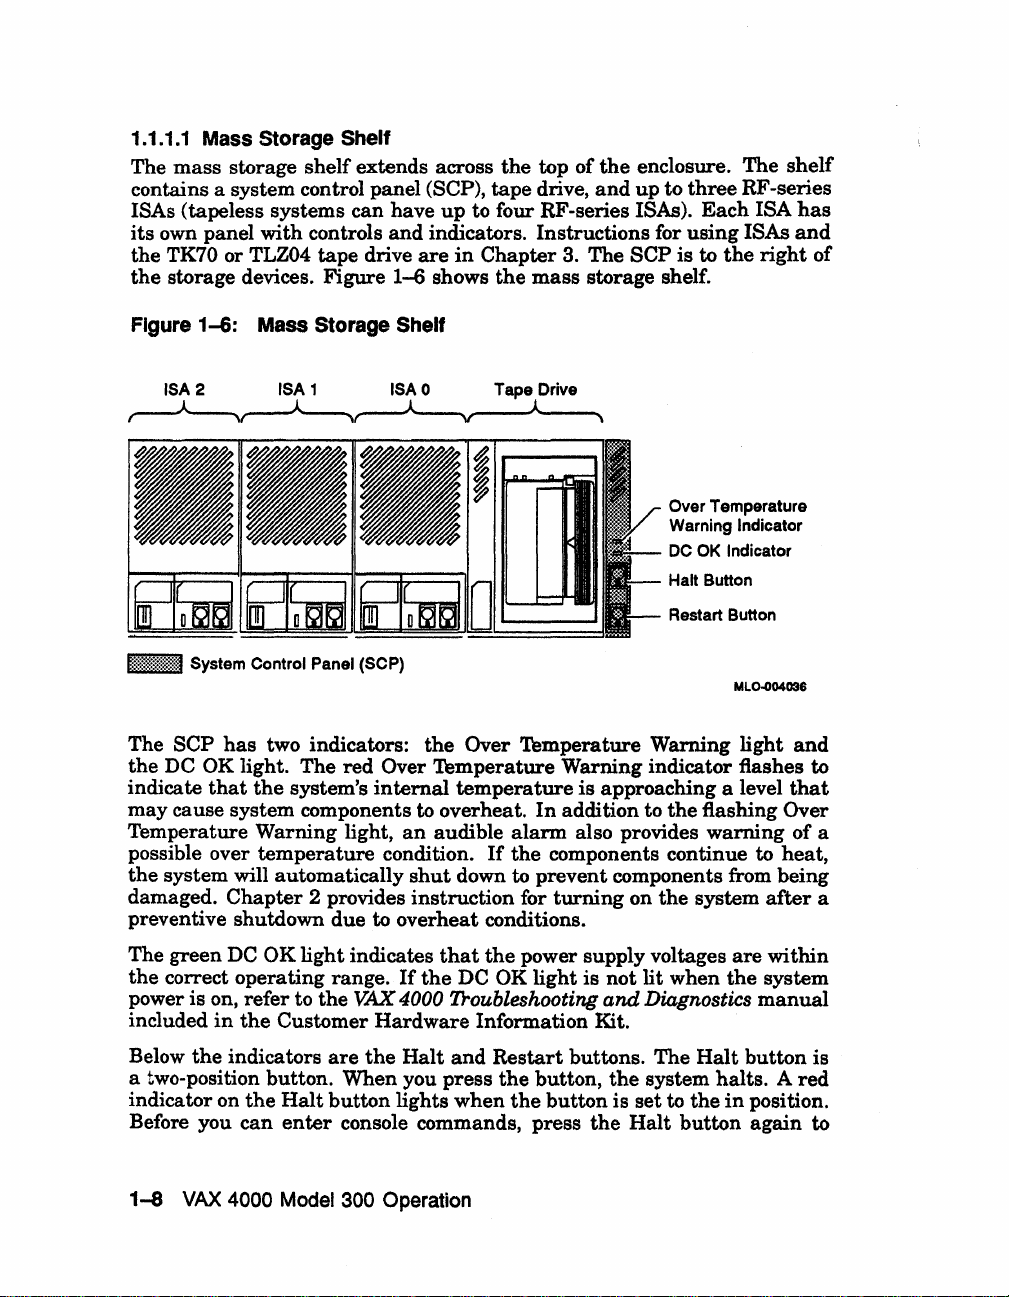
1.1.1.1 Mass Storage Shelf
The
mass
storage
shelf
extends across
contains a system control panel (SCP),
ISAs (tapeless systems can have
its
own panel
the
TK70 or TLZ04
the
storage devices. Figure
with
controls
tape
drive
up
to four RF-series ISAs).
and
indicators. Instructions for
are
in
1-6
shows
the
top of
tape
drive,
Chapter
the
mass
the
enclosure. The
and
up
3. The
SCP
storage shelf.
to
is
three
Each
using
to
the
shelf
RF -series
ISA
has
ISAs
and
right
of
Figure
1~:~~:~:~:i:~1:~1
The SCP
the
indicate
may
Temperature Warning light,
possible over
the
damaged.
preventive shutdown
1-6:
Mass Storage Shelf
ISA 0 Tape Drive
System Control Panel (SCP)
has
two indicators:
DC OK light. The
that
the
system's
red
the
Over
internal
cause system components to overheat.
an
temperature
system will automatically
Chapter
2 provides
condition.
shut
instruction
due
to overheat conditions.
Over Temperature Warning
Temperature
temperature
audible
If
down to
Warning indicator flashes to
is
approaching a level
In
addition to
alarm
the
also provides
components continue to
prevent
for
components from being
turning
on
Over Temperature
Warning
DC
Halt
Restart Button
Indicator
OK Indicator
Button
MLO"()04036
light
the
flashing Over
warning
the
system
after
and
that
of a
heat,
a
The green
the
correct operating range.
power
included
Below
DC
is
on, refer to
in
the
the
indicators
OK
light
the
Customer
are
indicates
If
the
VAX
4000 Troubleshooting
Hardware
the
Halt
a two-position button. When you
indicator on
Before you
1-8
VAX
the
Halt
button
can
enter
4000 Model 300 Operation
lights
console commands, press
that
the
power supply voltages
DC OK
light
Information Kit.
and
Restart
press
the
button,
when
the
is
buttons.
button
the
not
lit
and
Diagnostics
The
the
system
is
set
Halt
when
Halt
halts. A red
to
the
button
are
within
the
system
manual
button
in
position.
again
is
to
Page 20
return
position,
screen. Now you
the
system
it
Halt
in
to
the
the
console mode
button,
more detail.
out
position.
can
enter
type "c I Return I " to continue.
When
prompt
console commands.
the
»>
is displayed on
Halt
Chapter
button
If
you
is
returned
the
console
inadvertently
2 describes
to
the
terminal
halting
out
press
the
CAUTION: Pressing the Halt button halts the system regardless
setting
Below
green
a power-on condition
as
the
your
NOTE: The Halt
activation. Contact your Digital service representative
the controls on the
1.1.1.2
The
mass
of
the
indicator.
the
boot device
system
system
Card
modules
storage
the Break Enable / Disable switch on the console module.
Halt
button
When
will reboot
are
in
and
is
the
Restart
you
press
the
and
self-tests
and
if
the
BreaklEnable
system
Chapter
software.
2.
Restart buttons can
button.
Restart
are
run.
Further
The
Restart
button,
If
Disable switch
be
disabled to prevent accidental
the
you
have
instructions
if
button
system
specified a device
is
set
on
returns
to disable,
restarting
you want
SCP.
Cage
in
your
shelf,
system
as
shown
are
in
Figure
mounted
1-7.
in
a 12-slot
card
cage
under
to
of
the
has
a
to
disable
the
System Overview
1-9
Page 21
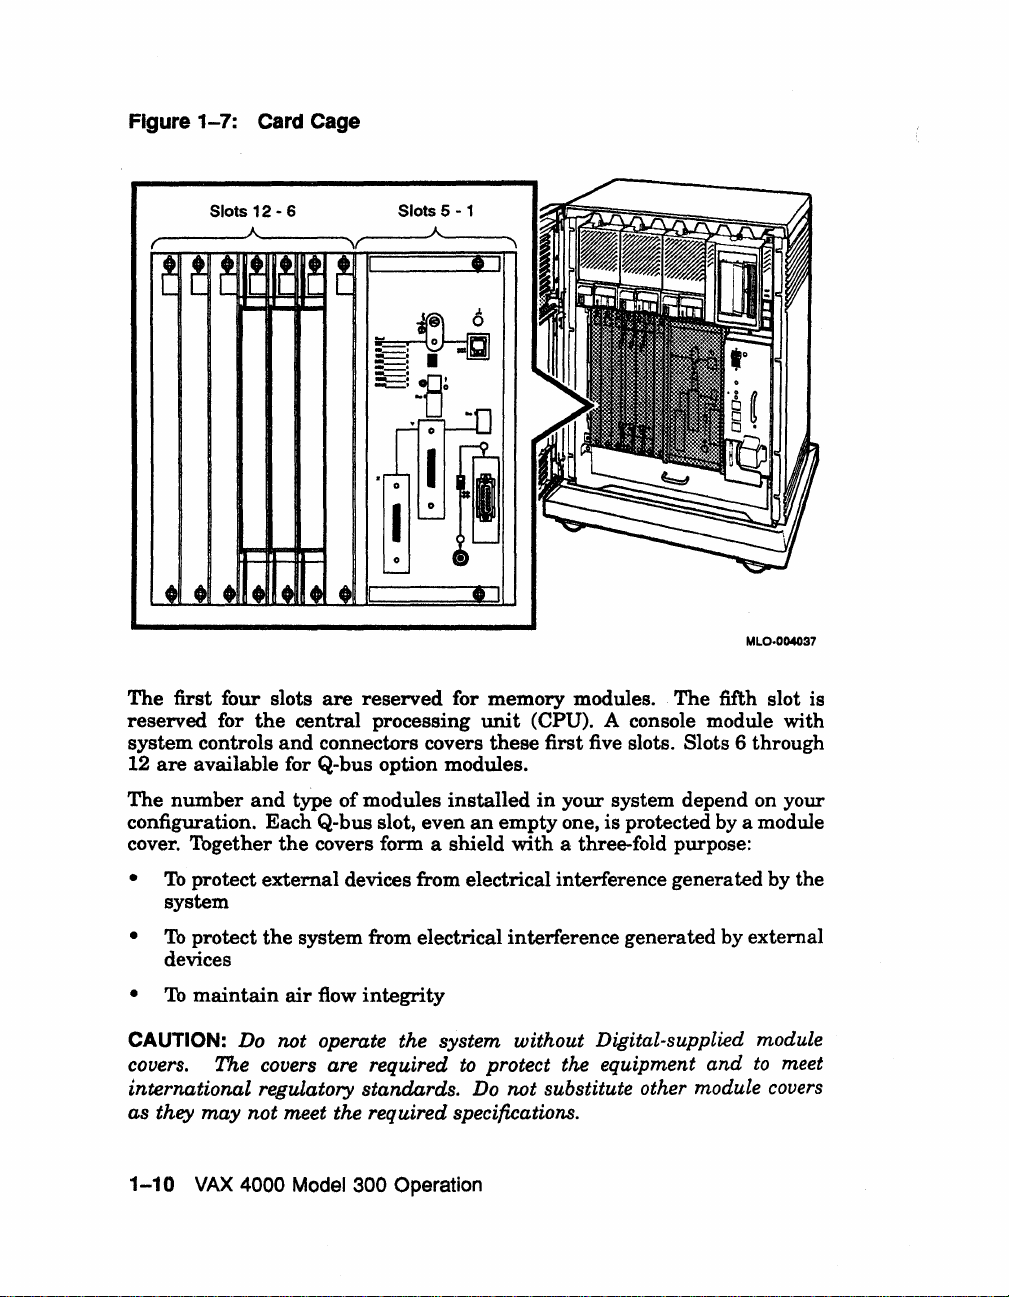
Figure 1-7: Card Cage
Slots 12 - 6
__
-----A------~~----~A~--
The first four slots
reserved for
system controls
12
are
the
available for Q-bus option modules.
are
central processing
and
connectors covers
Slots 5 - 1
reserved for memory modules.
__
\
•
The
unit
(CPU). A console module with
these
first five slots. Slots 6 through
MLO·004037
fifth slot is
The
number
configuration. Each Q-bus slot, even
cover. Together
To
•
system
To
•
devices
•
To
CAUTION: Do not operate the system without Digital-supplied module
covers. The covers are required
international regulatory standards.
and
type
of
modules
the
covers form a shield with a three-fold purpose:
protect external devices from electrical interference generated by the
protect
maintain
the
system from electrical interference generated by external
air
flow
integrity
installed
an
to
Do
in
your system depend on your
empty
one, is protected by a module
protect the equipment and
not substitute other module
to
meet
covers
as they may not meet the required specifications.
1-10
VAX
4000 Model 300 Operation
Page 22
Operating the system without the module covers has the following
consequences:
• The system
• The system will not comply with FCC
electrostatic shielding
may
overheat due
and
to
improper air circulation.
and
VDE requirements for
may
produce electrical interference
that
affects other equipment.
• The system is susceptible to electrical interference or damage from
external sources.
The
design
installed
communications controllers,
the
to
cables. Modules
storage
covered
except
installed
Cables connecting
modems,
cable
and
out
individual lines.
1.1.1.3 Console Module
Your
system
occupy
The
memory
the
first five slots.
system
of
the
in
the
slot. Modules
module.
controllers,
by
those
in
and
can
contain
the
the
controls
The
flush covers which
covering
the
slot.
printers)
back
Chapter
can
have
first four slots
and
and
module covers
recessed module covers allow space for connecting
requiring
are
covered
empty
your
system
are
multiple lines.
or
side
of
3 describes
up
to four
of
CPU
modules
The
console module, shown
connectors.
varies,
requiring
have
recessed covers
no
external
by
may
slots,
to
attached
The
the
enclosure,
memory
the
card
are
depending
external
cable connections,
flush
covers.
be
single
have a label
peripheral
to communications controllers.
cables
behind
these
cage
run
where
connections
modules.
and
the
on
the
type
cable connections,
that
are
riveted
such
Empty
or
double width. All covers,
identifying
devices (such
under
the
the
The
are
followed
console module
in
Figure
slots
the
as
BA440 enclosure
cables
are
in
more
memory
1-8,
by
that
has
of
terminals,
detail.
module
such
directly
as
mass
are
also
module
Each
split
into
modules
the
CPU.
covers
several
as
System Overview 1-11
Page 23
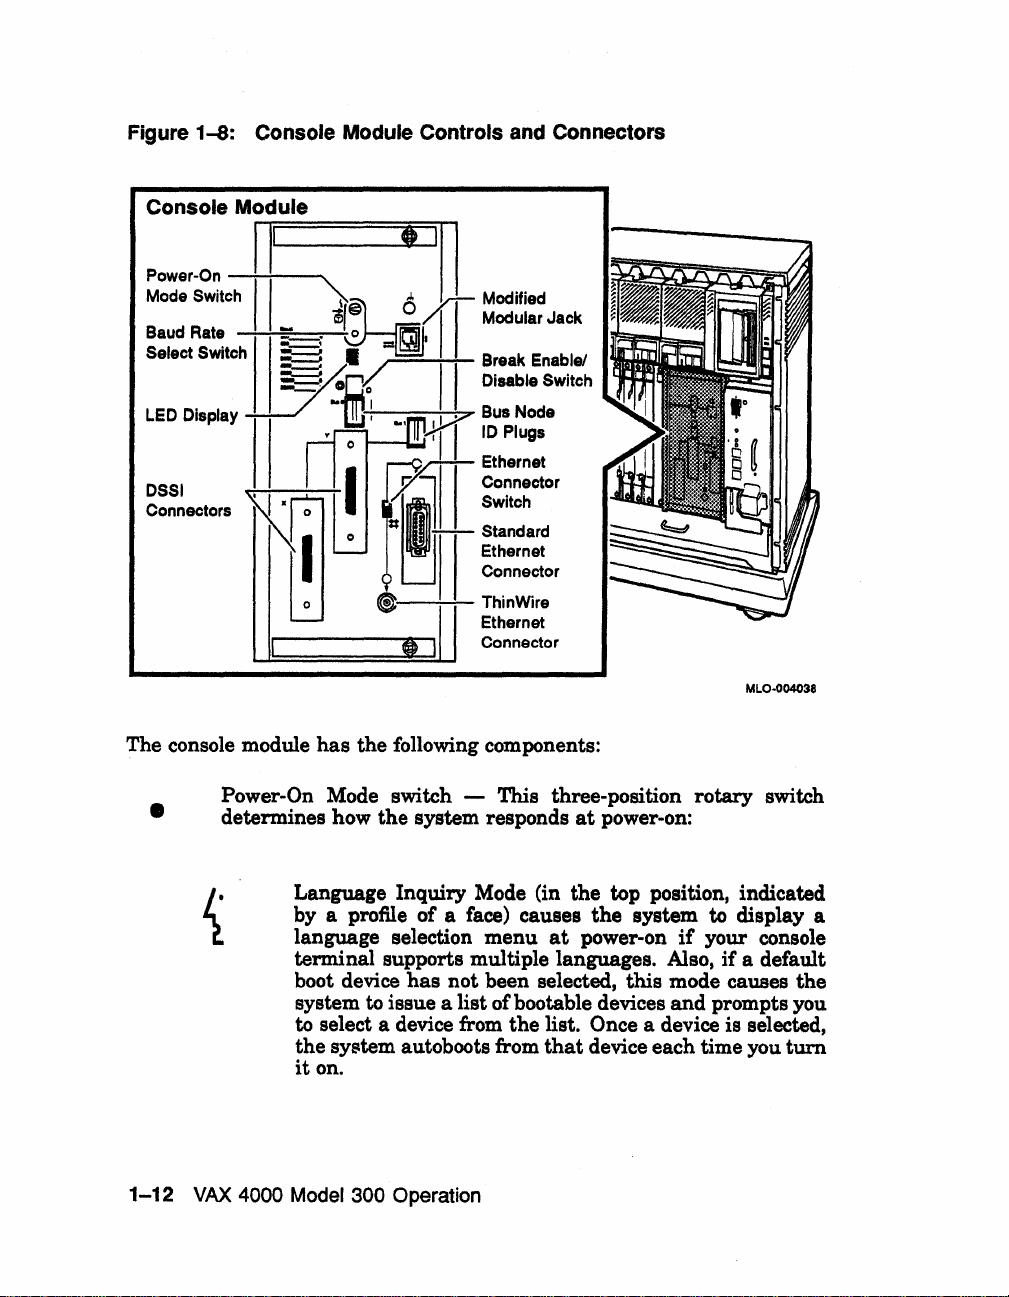
Figure
1-8:
Console Module
Power-On
Mode
Switch
Baud Rate
Select Switch
LED Display
DSSI
Connectors
Console Module Controls and Connectors
II"""Tr===
-';""':"---......
II
~I
IN;
II
==:::::;;;::::=,
~iJ
=:"
__
~
5d
I
=.
~§
~.pI
"'1!!J
~
..
, I I
t----t,;";,,I"i1
~Ethernet
y.
I L
0
=1
'--
I
0
'---
I
~
)
e
1
I
III
Modifiecj
II
Modular Jack
Break Enablel
"Disable
iY
Bus Node
10
~
I I Connector
Switch
Plugs
-,-;;;:
Connector
ThinWire
Ethernet
Connector
I
MLO-004038
The console module
Power-On Mode switch - This three-position rotary switch
•
1-12
determines how the system responds
Language Inquiry Mode (in the top position, indicated
by a profile of a face) causes
language selection menu
terminal supports multiple languages. Also,
boot device
system
to select a device from
the
it
VAX
4000
Model
has
the following components:
has
not been selected, this mode causes the
to
issue a list of bootable devices and prompts you
sY$tem
on.
autoboots from
300
Operation
at
power-on:
the
system
at
power-on
the
list. Once a device is selected,
that
device each time you
to
display a
if
your console
if
a default
turn
Page 24
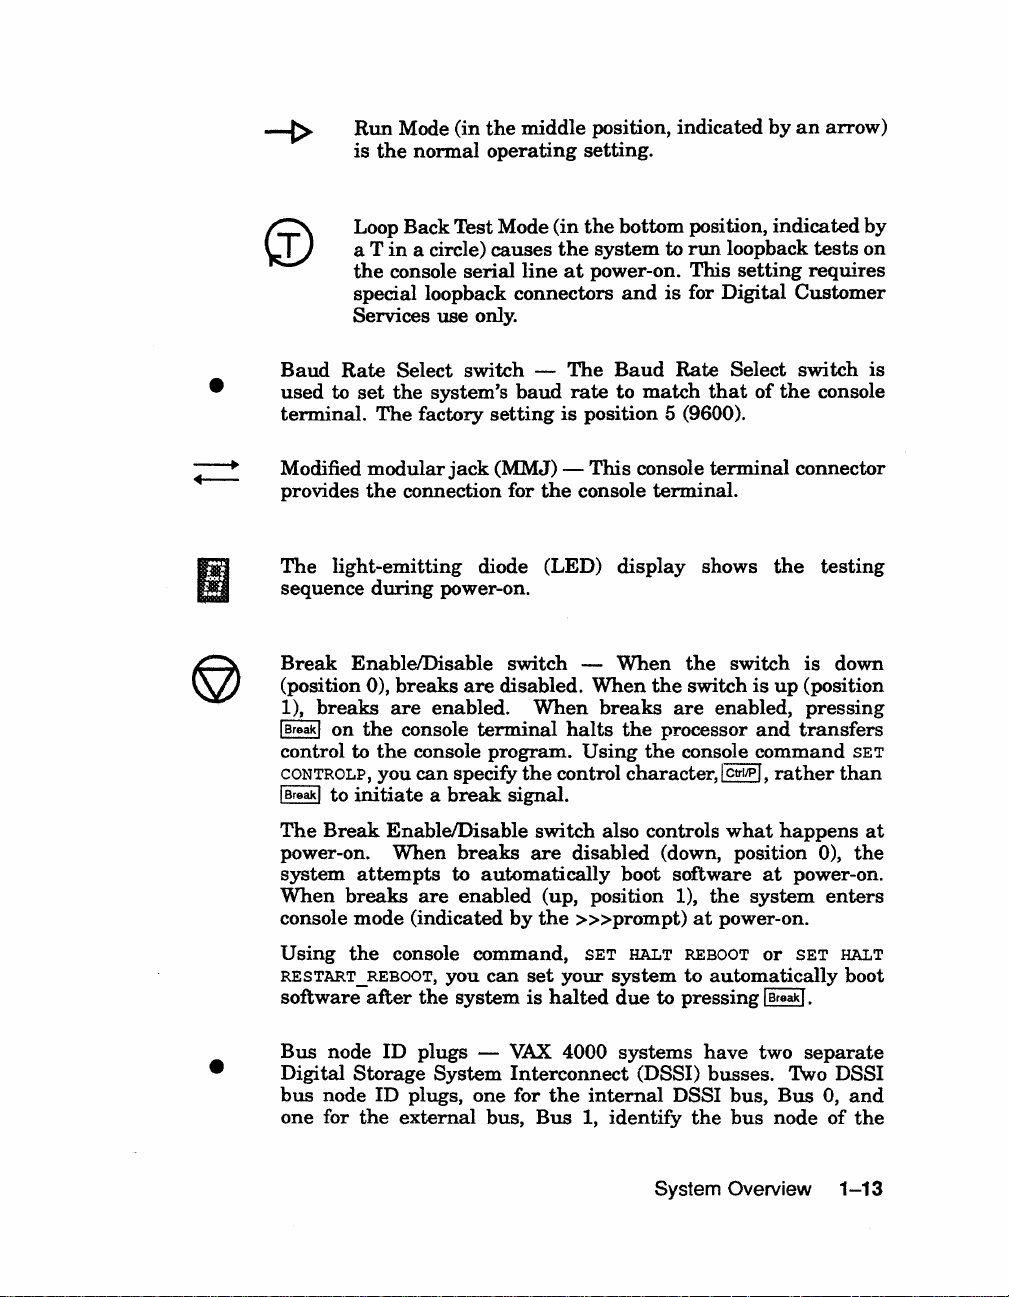
-t>
Run
the
is
Mode (in
nonnal
the
middle
operating
position, indicated
setting.
by
an
arrow)
•
Loop Back Test Mode (in
in
a circle)
a T
the
console serial
specialloopback
Services use only.
Baud
Modified
The
(position
I Break I on
control to
I Break I
Rate
Select switch -
used
to
set
the
system's
terminal.
provides
sequence
Break
1),
CONTROLP, you
The
factory
modular
the
light-emitting diode (LED)
during
EnablelDisable switch -
0),
breaks
the
the
to
initiate a break
jack
connection for
power-on.
breaks
are
console
are
enabled.
terminal
console program.
can
specify
causes
line
connectors
baud
setting
(MMJ) -
the
disabled.
When
the
signal.
the
bottom position,
the
system
at
power-on. This
The
rate
is
position 5 (9600).
This
console
When
breaks
halts
Using
control character, I CtrllP
to
and
is
Baud
to
match
console
tenninal.
display
When
the
the
processor
the
run
loopback
setting
for Digital
Rate
Select switch
that
terminal
shows
the
switch
switch
are
enabled,
console command
indicated
requires
Customer
of
the
connector
the
is
is
up
(position
pressing
and
transfers
I,
rather
by
tests
on
console
testing
down
SET
than
is
•
The
Break
power-on. When
system
When
console mode (indicated
Using
RESTART_REBOOT, you
software
Bus
Digital
bus
node ID plugs, one for
one for
EnablelDisable switch also controls
breaks
attempts
breaks
the
after
node
Storage
the
console command,
ID
to
are
enabled
the
system
plugs -
System
external
automatically
can
bus,
are
disabled (down, position 0),
boot software
(up, position 1),
by
the
»>prompt)
SET
set
your
system
is
halted
VAX
Interconnect
the
Bus
due
4000
systems
internal
1, identify
what
happens
the
at
power-on.
the
system
at
power-on.
HALT REBOOT
to automatically boot
to pressing I Break
have
(DSSI) busses. 1\vo DSSI
DSSI bus,
the
System Overview
or
two
bus
SET
I.
separate
Bus
node
enters
HALT
0,
and
of
the
1-13
at
Page 25
CPU. These plugs
systems, Bus
bus node
are
identified
are
identified
0 is identified
7;
for dual-host systems, both busses on
as
bus node
as
bus node 6.
are
configured
7,
at
the
factory.
as
bus
node 6, bus 1 is identified
and
both busses on the second host
For
the
single-host
as
first host
DSSI connectors (DSSI Bus
•
1.1.1.4
To
the left of
o provides
connector allows you to expand your system
storage devices to the bus.
second system by forming a dual-host configuration. Figure
location of
Interconnect (DSSI) connectors, labeled X
module allow you to expand your system by connecting additional
mass storage devices to
Ethernet
connectors: a BNe-type connector for Thin Wire Ethernet, and
a 15-pin connector for a
The
connection.
set
connection,
light (LED) for each connector indicates which connection is
active.
DSSI
Connector (DSSI Bus 0)
the
the
connectors - The console module has two
Ethernet
the switch
the
card cage is the
nSSI
nSSI
connector switch allows you
To
use
the
to
the
up
set
the
switch to the down position. A green indicator
bus for ISAs installed
You
can also
connector for
1) -Two
the
second DSSI bus. '
standard
standard
position.
nSSI
nSSI
Ethernet
transceiver cable connection,
To
connector for DSSI Bus
in
the
by
connecting additional
share
mass storage devices with a
Bus
O.
Digital Storage System
and
Y,
transceiver cable.
to
use the Thin Wire cable
system enclosure. The
on the console
Ethernet
set
the
type of
O.
Bus
mass
1-9
shows
the
1-14
VAX
4000
Model 300 Operation
Page 26
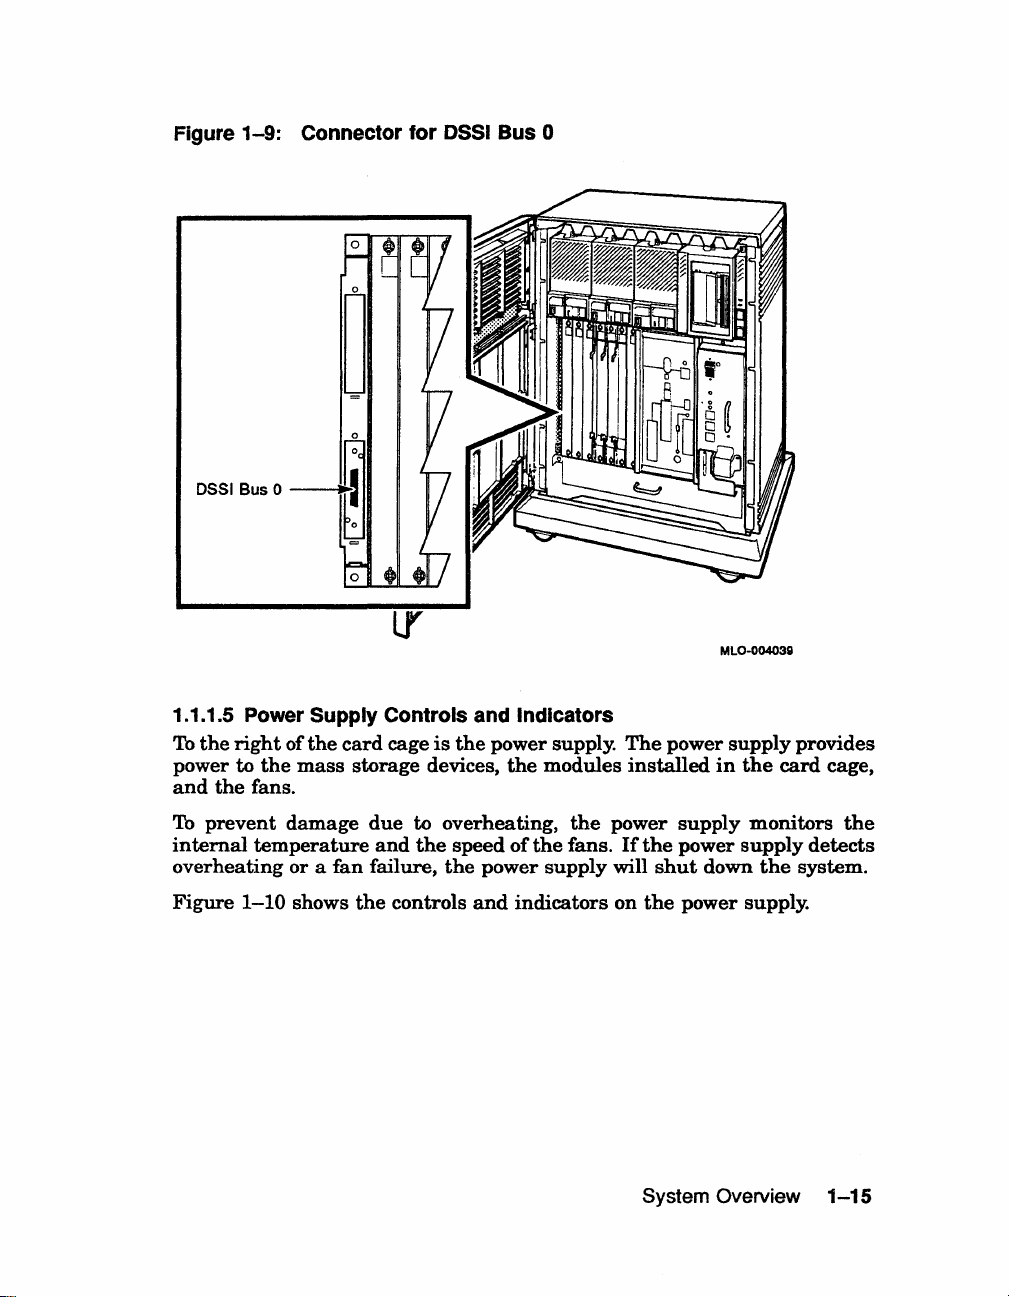
Figure
DSSI Bus 0
1-9:
Connector
for
DSSI
Bus 0
MLO-004039
1.1.1.5 Power Supply Controls and Indicators
To
the
right
of
the
card
cage
is
the
power supply.
to
the
mass
power
and
the
fans.
To
prevent
internal
temperature
overheating
Figure
1-10
damage
or a fan
shows
storage devices,
due
to overheating,
and
the
failure,
the
the
controls
speed
power
and
the
modules
the
of
the
fans.
supply
indicators on
The
power
installed
power
If
the
will
the
System Overview
in
supply
power
shut
down
power supply.
supply
the
card
monitors
supply
the
provides
cage,
the
detects
system.
1-15
Page 27
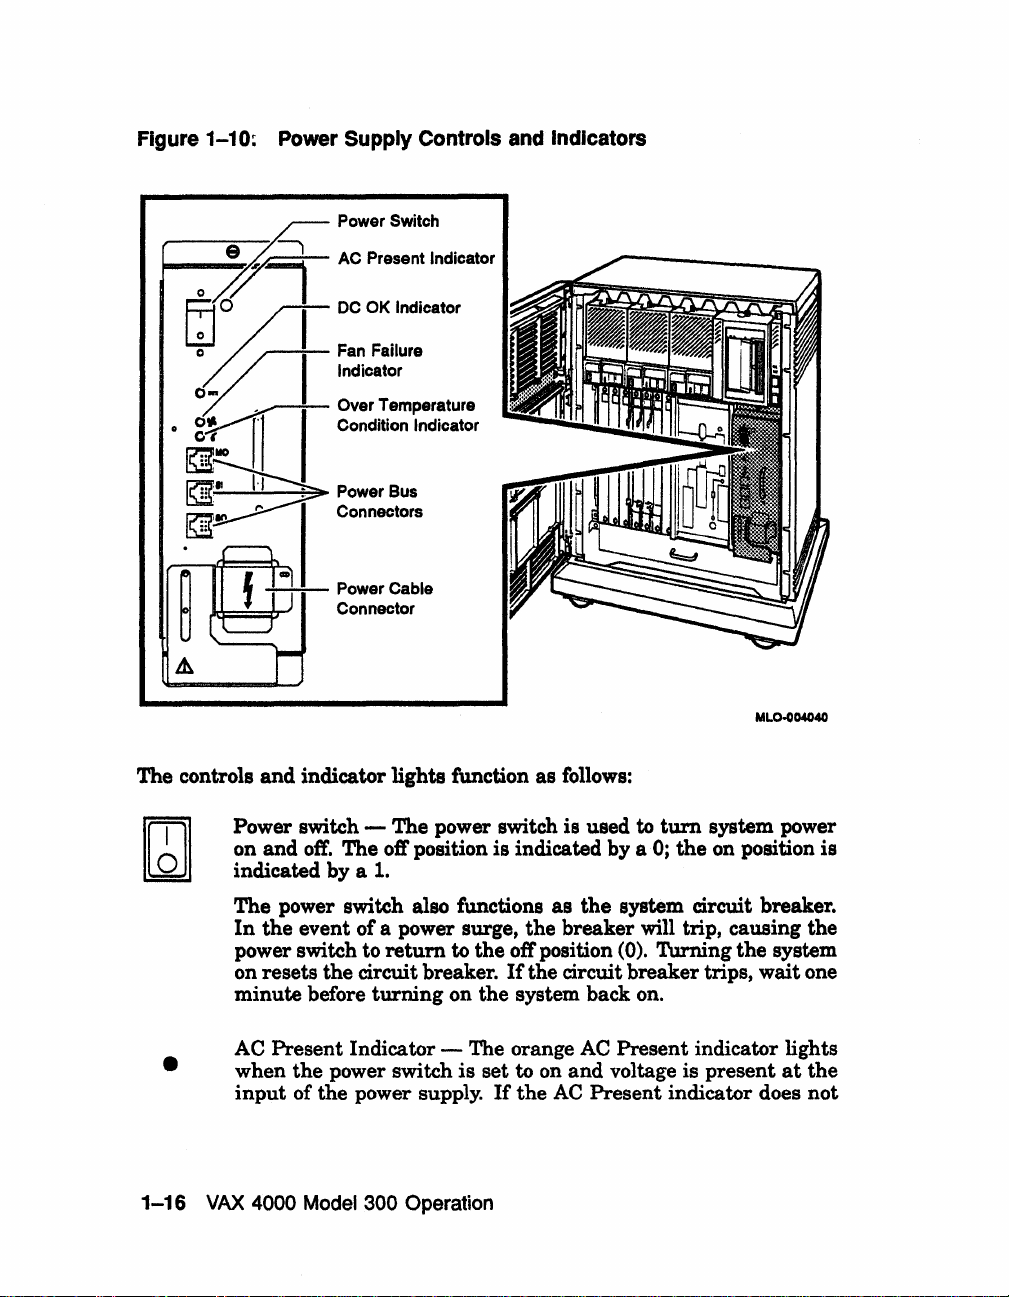
Figure 1-10; Power Supply Controls and Indicators
---e--~
o
7'1
GJ~O
00.
o~
~
o
gYI
n'1
~MO
-:--:-:--
The controls and indicator lights function as follows:
Power Switch
AC Pr
....
nt Indicator
I
DC
OK
Indicator
Fan Failure
Indicator
OVer
Temperatur.
I I Condition Indicator
Power Cable
Connector
MLO-o04040
•
1-16
Power switch - The power switch is used
off.
on and
indicated by a
The power switch also functions as
In
the
power switch to
on resets the circuit breaker.
minute before turning on the system back on.
AC
Present Indicator - The orange
when the power switch
input
VAX
4000 Model 300 Operation
The off position is indicated by a
1.
the
event of a power surge, the breaker will trip, causing the
return
of the power supply.
to the off position
If
the circuit breaker trips, wait one
AC
is
set to on and voltage is present
If
the
AC
Present indicator does not
to
tum
system power
0;
the
on
position
system circuit breaker.
(0).
Turning the system
Present indicator lights
at
is
the
Page 28
light
when
the
Troubleshooting
power
and
switch
Diagnostics
is
set
to on,
manual.
refer
to
your
VAX
4000
+
t
•
DC OK -
supply voltages
DC
OK
to
on,
manual.
Fan
Failure
if
either
will automatically
measure
representative
Over
Temperature
down
instructions
Power
to configure a
or
B400X expander.
and
on
designated
can
control power for
illustrates
system.
When
are
indicator does
refer
to
your
indicator -The
of
the
two cooling fans stop working. The power
when a
Temperature
due
to
bus
off for
fan
if
a fan failure occurs.
Condition
an
over
on recovering from
connectors -
power
one
as
the
a possible power
the
green
within
VAX 4000 7roubleshooting
shut
failure
Condition indicator temperature
bus
The
or
more
main
an
DC
OK
the
correct
not
light
when
amber
down
indicator
Three
for systems
power supply:
the
is
detected. Call
lights
condition. Section 2.9 provides
an
power
power
expanders
entire
bus
expanded
bus
configuration for
over
indicator
operating
the
Fan
system
if
temperature
bus
expanded
allows you to
through
this
is lit,
power switch
Failure
as a precautionary
your
The
the
enclosure
connectors allow
the
way, one power switch
system.
the
range.
and
Diagnostics
indicator
Digital
amber
condition.
with
the
turn
power
Figure
an
expanded
power
If
is
lights
supply
service
has
R400X
power
supply
Over
shut
you
1-11
the
set
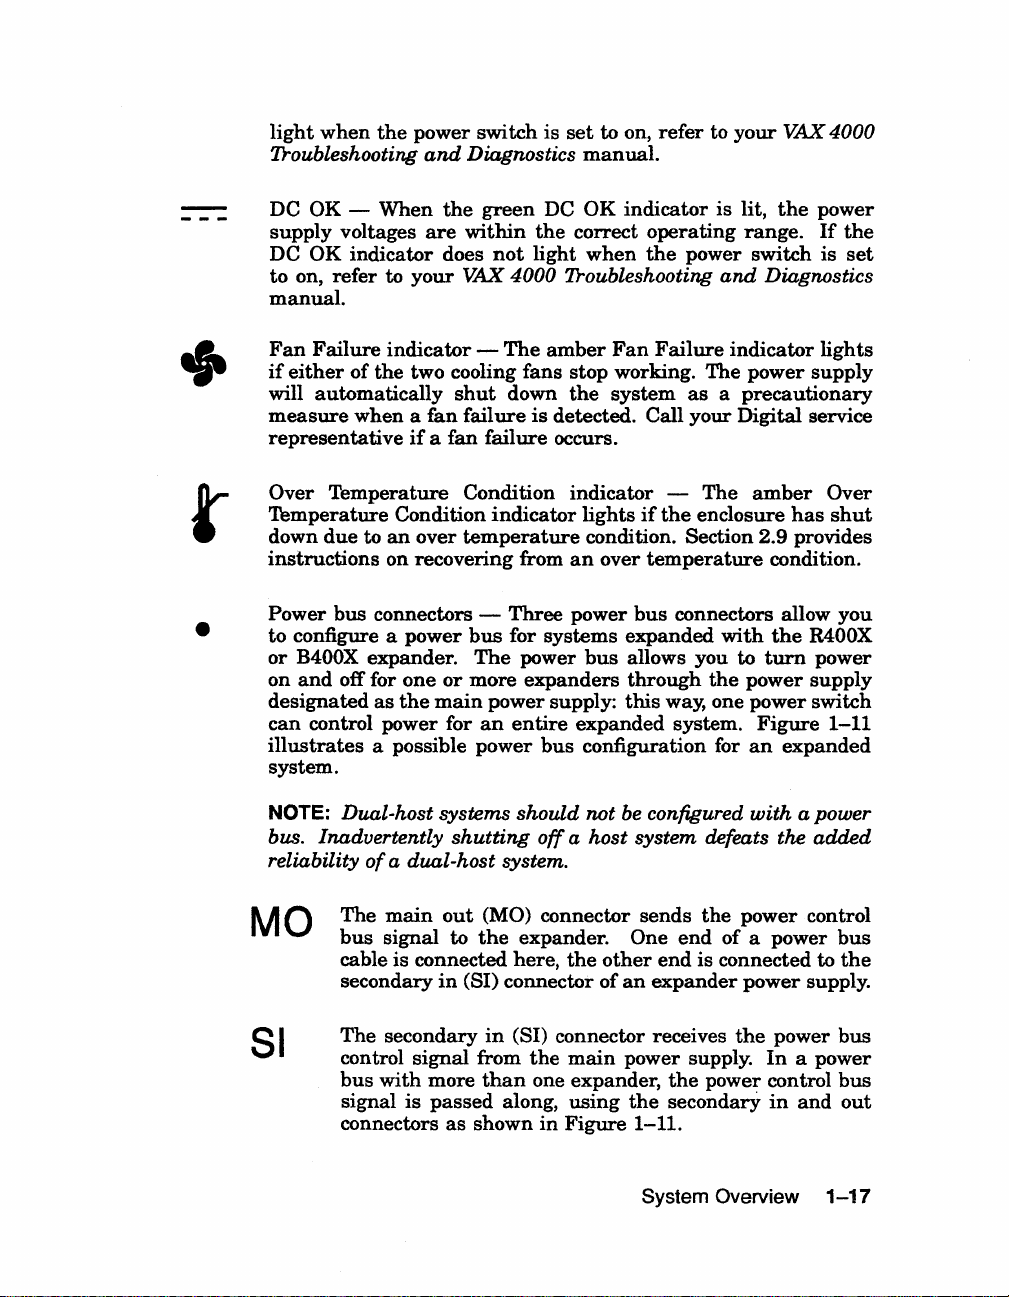
NOTE:
bus. Inadvertently
reliability
MO
81
Dual-host systems should not be configured
of
a dual-host system.
The
main
bus
signal to
cable is connected here,
secondary
The
secondary
control
bus
with
signal
connectors
shutting
out
in
(81) connector
signal
more
is
passed
as
off
a host system defeats the
(MO) connector sends
the
expander. One
the
other
end
of
an
expander
in
(81) connector receives
from
the
main
power supply.
than
one expander,
along,
shown
in
Figure
using
the
1-11.
System Overview
with
the
power control
end
of
a power
is connected to
power
the
In
the
power control
secondary
a power
supply.
power
a power
in
and
added
bus
the
bus
bus
out
1-17
Page 29
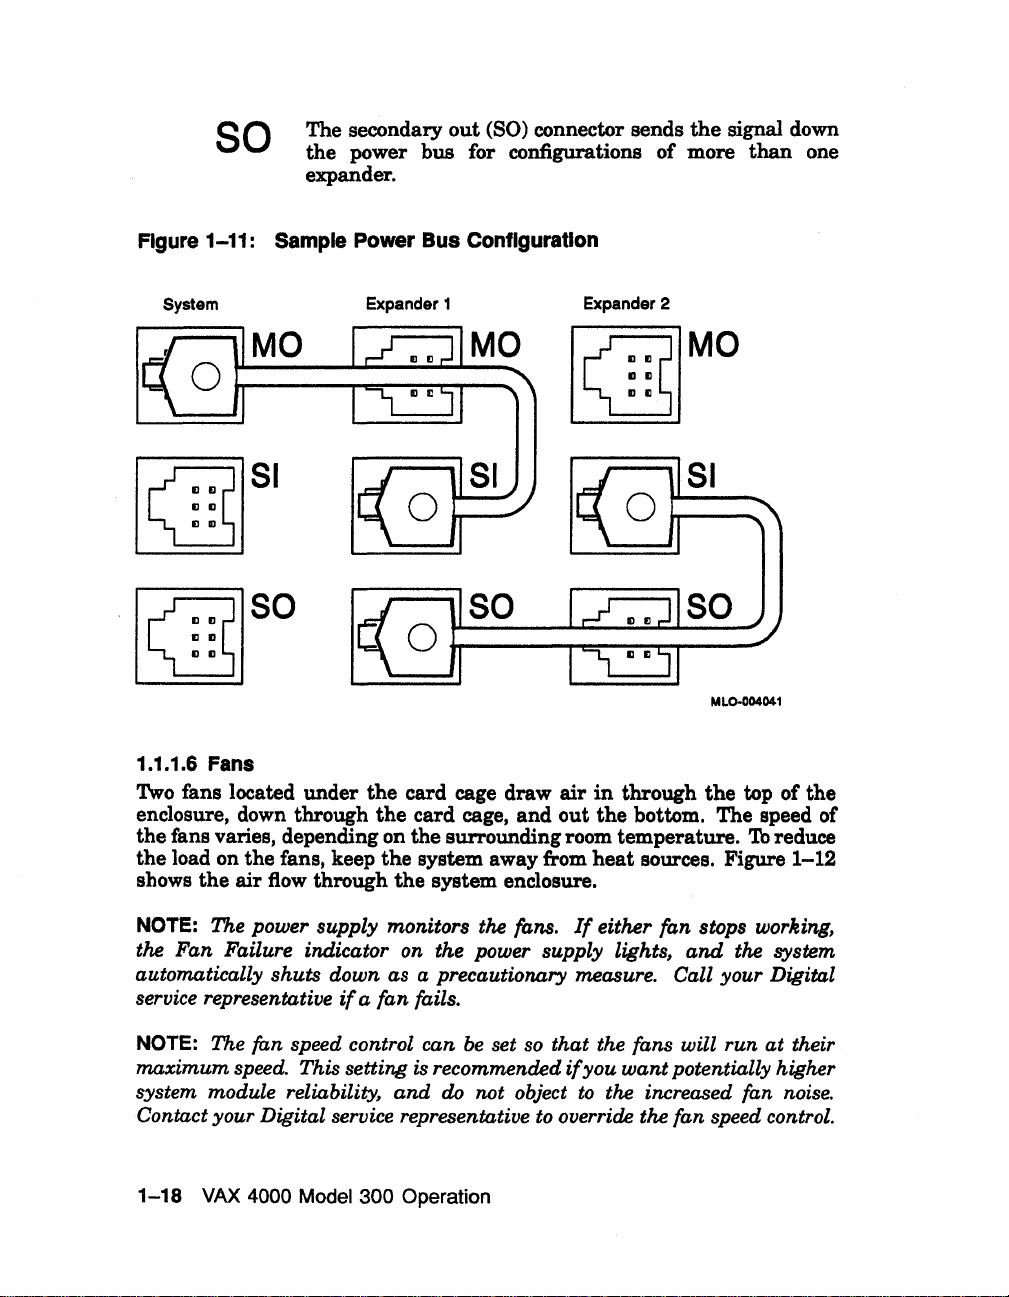
so
Figure 1-11: Sample Power Bus Configuration
The secondary
the power bus for configurations of more
expander.
out
(SO) connector sends
the
signal down
than
one
System
MO
Expander 1 Expander 2
gMO
gSI
gso
1.1.1.6 Fans
1\vo fans located under
enclosure, down through
the fans varies, depending on the surrounding room temperature.
the load on the fans, keep the system away from
shows
the
air
flow
the
the
through
card cage draw
the
so
card cage,
system enclosure.
and
air
out
MLO·004041
in
through
the
bottom. The speed of
heat
sources. Figure
the
top of the
To
reduce
1-12
NOTE: The power supply monitors the fans.
the Fan Failure indicator
automatically shuts down as a precautionary measure. Call your Digital
service representative
NOTE: The fan speed control can
maximum speed. This setting is recommended
system module
Contact your Digital service representative
1-18
VAX
4000 Model 300 Operation
if
reliability~
on
the power supply lights,
a fan fails.
and
do
be
set so that the fans will run at their
not object
If
either fan stops working,
and
the system
if
you
want
potentially higher
to
the increased fan noise.
to
override the fan speed control.
Page 30
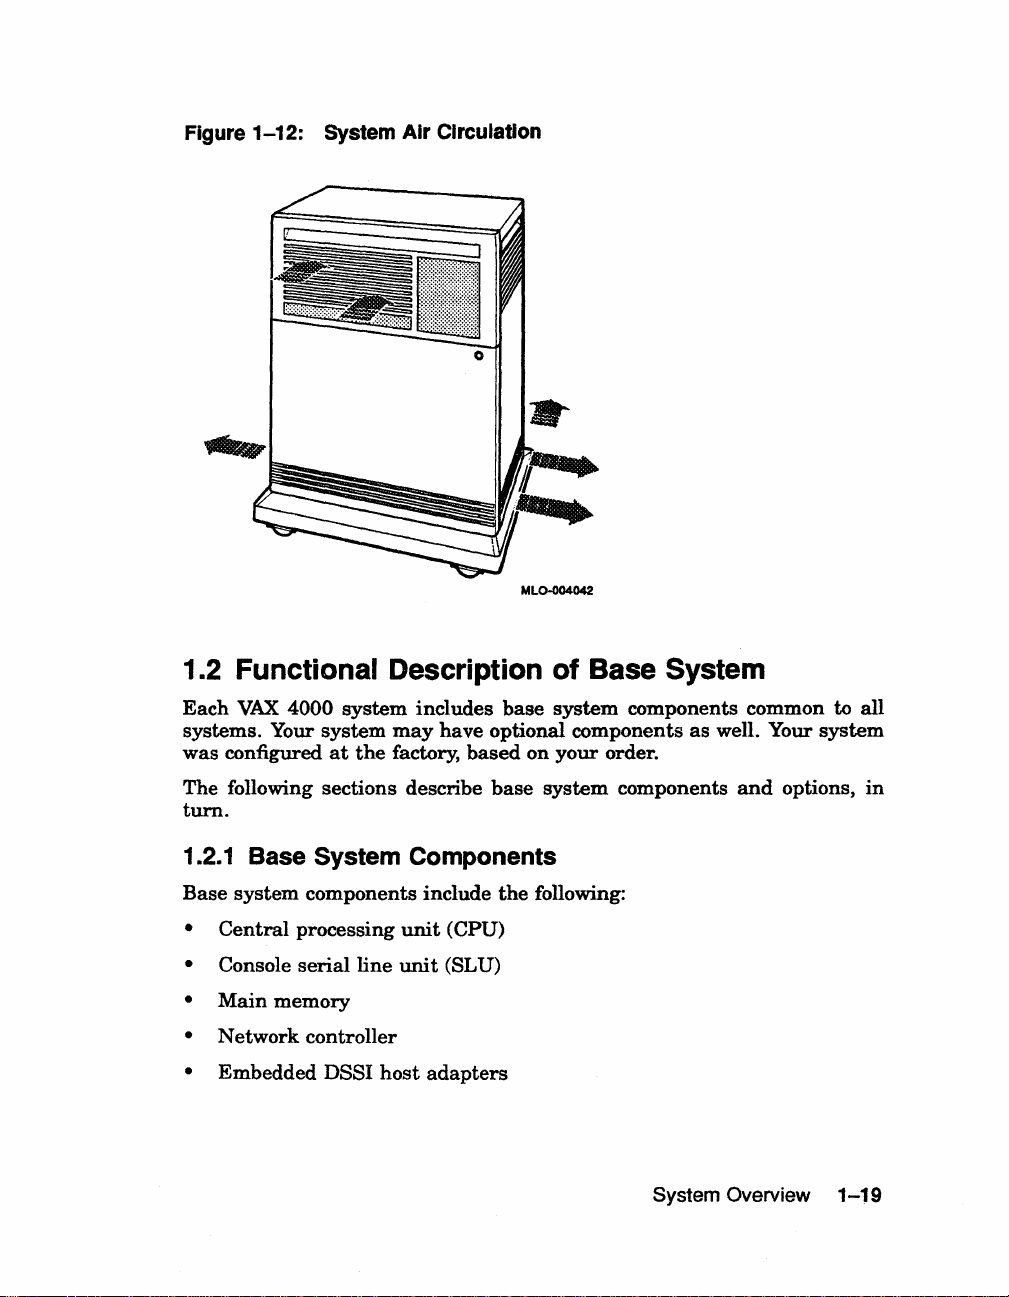
Figure 1-12: System Air Circulation
•
MLO-G04042
1.2 Functional Description of Base System
Each
VAX
4000
systems. Your
was
configured
system
system
at
the
includes
may
have
factory,
base
system
optional components
based
on
your
components common to
order.
as
well. Your
all
system
The following sections describe
turn.
1.2.1
Base
•
•
•
•
• Embedded DSSI
Base System Components
system
Central
Console
Main
Network
components include
processing
serial
memory
controller
line
host
unit
unit
(CPU)
(SL U)
adapters
base
the
system
following:
components
System Overview
and
options,
1-19
in
Page 31

1.2.1.1
The central processing unit (CPU) controls
and
Centra~
Processing Unit
(CPU)
the
execution of all instructions
processes. The CPU circuits contain the logic, arithmetic, and control
functions used by the system.
1.2.1.2 Console Serial Line Unit (SLU)
Each system has a serial line unit connecting
system. The
SLU connector (a modified modular jack) is located on
the
console terminal to the
the
console module. The console serial line provides a means of communicating
with the CPU.
1.2.1.3 Main Memory
Main memory provides the electrical storage area for
used by the
CPU. When you
start
your system, the operating system is
data
and instructions
loaded into main memory. Application programs must also be loaded into
memory.
When the system cannot load everything into memory
in
units of data called pages (512 bytes of data) from disk. A large main
of
memory increases the efficiency
copied
to and from
the
disk. Each configuration comes with a standard
memory option. There is room
processing, since fewer pages must be
for
up to four memory modules.
at
once,
it
By
reads
adding
more main memory, you can increase efficiency.
The contents of memory are volatile.
you turn
off power to the system. Use mass storage devices, such
This means they are lost when
as
integrated storage assemblies and tape cartridges, to store software and
data
permanently.
1.2.1.4 Network Controller
Network communications controllers allow you to connect to
an
Ethemet
network. With a network connection and appropriate DECnet software, you
can use network services, such as mail; access
data
stored on other systems;
perform operations, such as editing and printing on remote systems; and
share resources, such as laser printers.
Ethemet
an
Ethernet network through either standard
Ethemet
controller
that
is
part
cable. Connectors for both types
Your
system comes with
an
onboard
of the CPU. The system can connect to
Ethemet
of
cables are
cable
on
or
Thin Wire
the console
module. .
1-20
VAX
4000
Model
300
Operation
Page 32

1.2.1.5 Embedded
Your system
built
into
the
(Bus 0
series ISAs.
The
to a second
and
DSSI
Bus
Each
host
host
extended to a second system,
Section 1.3 for
to
has
two Digital
CPU.
1)
through
nSSI
adapters
to form a
further
DSSI
Host Adapters
The
DSSI
bus
also allow
discussion
Storage
adapters
which
can
dual-host
both
1.2.2 Optional Components
System
Interconnect (DSSI)
provide two
the
CPU
can
communicate
support
seven RF-series ISAs.
you
to
link
configuration. When a
systems
of
can
share
dual-host systems.
separate
one
of
up
adapters
DSSI
busses
with
the
RF-
the
DSSI
busses
nSSI
bus
is
to six ISAs. Refer
System options
base
system (for example, additional
following kinds
•
Mass
storage devices
•
Mass
storage
•
Mass
storage
can
include
of
options:
subsystems
expanders
multiples
and
controllers
• Communications controllers
• Real-time controllers
•
Printer
1.2.2.1
Mass
not
lost
record over
permanently.
from
of
mass
!D.edia,
Integrated Storage Assemblies
Up to four RF-series ISAs
an
intelligent storage device
Special
interfaces
Mass Storage Devices and Controllers
storage devices record
when
you
turn
the
data.
Use
the
When
mass
the
storage device
storage devices
such
as
tape
cartridges
off
data
are
data
the
mass
or
the
can
that
mounting
bracketry
allows
BA400-series backplane.
of
components
memory
and
adapters
on
magnetic
system,
but
can
storage devices to
software
into
main
RF
-series ISAs
and
compact disks.
be
contains
is
needed,
memory.
installed
its
the
device to plug directly
that
modules
or
media. The
be
altered
store
data
the
The
two
and
devices
in
your
system.
own controller
are
ISAs)
data
or
erased
and
CPU
primary
with
part
of
the
and
the
recorded
if
you
software
transfers
types
removable
An
ISA is
and
server.
into
the
is
it
Devices with Removable Media
Devices
input
with
and
removable media,
output
devices.
In
such
as
tape
cartridges,
are
addition, compact optical disks
System Overview 1-21
used
are
as
both
used
as
Page 33

input
devices when you install software or copy
use tape cartridges
data
from your system.
can copy (back up)
to archive data.
used
Mass Storage Controllers and Adapters
and
tapes
You
the
contents of
as
output devices when you copy software or
can copy individual files or programs,
an
entire fixed disk. Tapes
data
All mass storage devices require a controller, a device
between the
for each RF-series
options require a controller module located
controller for the
for RA-series disk drives. Each
CPU
and
the
ISA is built into
TK70 tape drive is
mass storage devices. While
the
storage assembly,
in
your system's card cage. The
the
TQK70j
the
KDA50 controller supports up to four
series disk drives.
to your system.
are
that
controls activity
the
other
You
or
you
commonly
controller
storage
KDA50 is a controller
RA-
KZQSA
The
drive or
System Interface (SCSI). Each KZQSA
adapter allows
the
CPU to communicate with the TLZ04 tape
RRD40 digital compact disk drive through a Small Computer
adapter
can support up to three
drives.
The
CPU communicates with the ISAs through a Digital Storage System
Interconnect (DSSI) adapter, which is built into
system
has
two DSSI adapters,
and
hence, two separate DSSI busses. Each
the
CPU. Your
VAX
4000
DSSI bus is capable of supporting seven integrated storage assemblies. A
third
and fourth DSSI bus can be added to your system by using
KFQSA DSSI storage adapter modules. Each KFQSA storage
up
support
1.2.2.2 Mass Storage Subsystem.
Several optional
to seven RF -series ISAs.
mass
storage subsystems
are
available for
up
to two
adapter
VAX
can
4000
systems. Such subsystems include RRD40 Digital Disk Subsystems, the
RV20
Optical Disk Subsystem, TS05
Storage
an
manual
1.2.2.3 Mal.
You
Array (with
optional mass storage subsystem, refer to the user's guide or owner's
for
that
Storage
can expand
up
to eight RA90 disk drives).
subsystem for instructions on how to operate
Expander.
the
mass storage
and
TUB1
tape drives,
If
and
Q-bus capacity of your
and
the
SA600
your system includes
the
device.
VAX
4000
system by using expanders. The R400X mass storage expander provides
up
space for
you can
to seven additional RF-series ISAs. Using R400X expanders,
fill
both DSSI busses for a total of 14 ISAs.
The B400X expander provides
to four additional RF-series ISAs. Refer to
11
additional Q-bus slots
expander for more information.
1-22
VAX
4000 Model 300 Operation
the
addendum shipped
and
space for up
with
the
Page 34

1.2.2.4 Communications Controllers
Besides
tions controllers for connecting
ing
controllers provide
system.
data
The
• Asynchronous serial controllers
the
with
other
Many
lines.
following
console
serial
systems
standard
communications controllers provide
types
of
line,
most
additional
over telephone
interfaces
communications controllers
systems
or
between
have
additional communica-
terminals,
network lines. Communications
and
peripheral
support
are
available:
for communicat-
devices
for
and
the
multiple
• Synchronous
•
DECservers
•
Network
Serial
transmitting
end
controllers
assembles
serial
controllers
transmit
end
breaks
incoming
controllers
data
one
bytes
of
bits
into
character
data
bytes
into
bits. A device
of
data.
at
a time. A device
at
the
receiving
Asynchronous Serial Controllers
Asynchronous serial controllers provide low-speed connections
peripheral
the
system
and
stop bits,
Asynchronous
support
You
use
terminals
provides connections for
NOTE: Printers equipped with a microprocessor (intelligent printers)
require modem control signals to function correctly.
requiring modem control signals
Check your printer documentation
devices
and
and
serial
and
and
the
not
on a time
serial
those
with
controllers
printers
the
system. Asynchronous communication
peripheral
controllers
modem support.
to
interval.
without
your
up
to
depends'
16
on
recognition
may
be divided
modem
system.
serial
to
to
For
lines
a controller with no modem support.
determine the proper communications
into
support
example,
with
of a pattern
those
without
to connect additional
the
CXA16
no
modem
Do
not attach a printer
between
between
of
modem
module
support.
interface for your printer.
at
start
may
the
Communications controllers
over telephone lines. With a
access
terminal
Computers
exception
other
or
of
computers
computer.
transmit
digital
leased
with
and
digital signals, while telephone
modem
modem
you
can
lines)
support
connected to your system,
dial
into
transmit
allow you to communicate
your
system from a
analog
signals.
System Overview
you
lin~s
(with
When
can
remote
the
two
1-23
Page 35

computers communicate over telephone lines, a modem is required
the
transmitting
and
receiving ends of
the
line.
At
the
transmitting end, the
at
both
modem converts digital signals from the computer (or terminal) to analog
signals prior to transmission.
the
analog signals back into digital signals the computer can process.
The degree of modem support depends on
signals recognized by
the
standards) requires recognition of eleven signals. The
supports
Synchronous Serial Controllers
up
to eight serial lines with full modem support.
At
the receiving end, another modem converts
the
number of modem control
device. Full modem support (according to Digital
CXYOB
module
Synchronous serial controllers provide high-speed connections between
systems. Communication between synchronous devices depends on time
intervals
Synchronous devices
DECservers
DECservers
that
Ethernet
that
are
synchronized before transmission of
can
also have modem support.
are
terminal servers (a combination of hardware
allow you to connect multiple terminals
Local Area Network
(LAN).
or
printers to hosts
data
and
begins.
software)
in
an
Terminal servers perform
but
switches
multiplex
the
the
lines over
functions of traditional
the
Ethernet. Using a DECserver
data
offloads communications processing from the host system.
Network Controllers
Network communications controllers allow you to connect to
LAN or other network type. With a network connection
DECnet software, you can use network services, such
stored on other systems; perform operations, such
remote systems;
and
share
resources, such as
as
laser
controller function for your system is implemented on
a second network controller,
added
1.2.2.5 Re.I-Tlme Controllers
to your system.
Real-time controllers interface with devices
particular processes,
lor example, laboratory equipment
equipment connected to
parallel devices,
1-24
VAX
4000
not
serial devices.
Model
the
DESQA Ethernet,
adapter
that
the
system. Typically, real-time controllers
300 Operation
and
as
mail; access
editing
and
printers. The network
the
CPU module,
module can be
monitor or control
or
manufacturing
terminal
an
Ethernet
appropriate
data
printing on
but
are
Page 36

1.2.2.6 Printer Interfaces
Some
printers
For
example,
SA
interface module.
1.2.2.7 Other Available Options
Your
system
change,
advise you on
describes
provides
you
require
the
LGOl, LG02,
arrives
can
add
available
the
options
installation
specific interfaces to communicate
and
LP25-LP29
configured
more
options. VAX 4000 Model 300 Thchnical Information
currently
for additional options
with
the
options you ordered. As
options. Your Digital
available for
printers
VAX
that
sales
4000 systems. Digital
you order.
with
the
require
representative
the
your
1.3 Dual-Host Capability (VMS Systems Only)
system.
LPVll-
needs
can
A dual-host
ISAs via a Digital
can
have
shared
a
The
primary
The
simplest
system
disk
physically
access to
either
A
DSSI ISA,
allows
embedded
physically connecting
Using
connected to form a dual-host configuration.
host
configuration
NOTE: Dual-host capability
VMS
(version
VAXclus ter.
same
The
benefits
• VAXcluster
nodes.
system
direct
common
application for such a configuration
disk
to
the
enclosure.
it
to connect to two DSSI
in
an
external
5.3-2
of
consists
Storage
access to
system
dual-host
be
used
resides
system
such
the
with
a dual-host configuration are:
features
any
disk.
configuration, for example, is to configure one
as
in
one enclosure, however,
disk
as
the
system's CPU, allows you to
it
to a second system.
DSSI cable,
two
and
later) when the two systems are configured into the
such
of
two systems
System
the
and
RF71,
VAX
for
Interconnect
of
the
ISAs
in
system
to
host
disk
any
other
has
a built-in dual-host capability
adapters.
any
two DSSI-based
4000 systems.
VAX 4000 systems is only supported under
as
shared
data
in
a VAXcluster
(DSS!) bus.
either
system;
is
a VAXcluster system.
by
both
systems.
both
systems
DSSI
mass
The
DSSI storage
extend
Figure
across systems
1-13
sharing
Each
this
can
The
have
storage
a DSSI
systems
device
adapter,
shows a dual-
and
satellite
their
system
include
system
equal
in
that
bus
by
can
be
•
Higher
unavailable, for example,
system availability -
If
one of
due
to a system malfunction,
the
System Overview
DSSI-based
the
systems
satellites
1-25
is
Page 37

booted through
it
are
able to continue operating through the other
system .
.
If
one of the nSSI-based systems fails, all satellite nodes booted through
that
system lose connections to the system disk. Each satellite node knows,
that
the
however,
satellite nodes establish a new connection through
system disk is also available through a second path. The
the
other system and
continue operation.
To
increase system availability, a second system disk may be added to each
In
the
boot node.
disk would continue
booted through it.
event of one system disk failure,
to serve one nSSI-based system
As
with any VAXcluster, however, a second system disk
the
remaining system
and
the satellite nodes
improves availability while increasing system management tasks.
Figure 1-13: Dual-Host Configuration
MLO·OOo404S
VAX 4000 Dual·Host Systems provides more information on dual· host
configurations.
1-26
VAX
4000
Model
300 Operation
Page 38

Operating the System
This
chapter
the
system
procedures for factory-installed VMS.
2.1
Before
This
chapter
Installation
system
time
the
factory-installed VMS.
products, see
or
require
on
The
installed
been
and
startup
VAX 4000 Model 300 Installation
layered
you
the
console module.
remainder
completed.
describes how to
software
assumes
includes
installing
procedures for factory-installed VMS. Refer to Appendix A
the
product
to
open
and
first
has
You
of
Operate the System
that
running
the
To
install
instructions
installation
the
front
this
chapter
time
startup
been
base
operate
installed
your
the
diagnostic software
operating
other
in
your
manual.
door
of
assumes
procedures for factory-installed VMS
system
manual
operating
system
the
system
your
or
you
has
system,
for
instructions
software
Some
that
system
VAX
have
been
or
completing
system
installation
of
the
to
change
Chapter 2
4000
system
completed
properly
shipped
options
instructions
software
with
on
starting
or
switch
installed.
has
once
startup
your
the
first
of
up
layered
manual
may
settings
been
have
2.2 Switch Settings
Switch
two sections describe switch
Set
2.2.1 Normal Operation
Switch
•
settings
the
switches according
settings
The
Break
(down, position
disabled to
pressing
activity to stop.
vary, depending
for
EnablelDisable switch on
prevent
I Break I on
to
nonnal
0). Digital recommends you
the
the
operation
console
on
settings
your
user
from
terminal.
the
operation
for
normal
needs.
are
the
the
inadvertently
being
performed.
and
for special operations.
following:
console module
run
the
halting
Halting
the
Operating the System 2-1
is
system
system
set
with
the
The
to disable
system
causes
next
breaks
by
all
Page 39

With breaks disabled,
when powered
on.
the
system automatically boots system software
NOTE:
the control character,
Using the console command,
RESTART
software after the system
• The Power-On
(indicated by
You
can use the console command
IClrvpl,
rather than IBreakl,
SET
_REBOOT, you can set your
is halted due
Mode
an
switch on
arrow).
SET
CONTROLP
to
initiate a break signal.
HALT
the
REBOOT
~stem
to
pressing I
to
or
SET
automatically boot
Break
I.
console module is set to Run
to
specify
HALT
• The Baud Rate Select switch on the console module is set to 9600
(indicated by a switch setting of
• The Write-Protect button for each RF-series ISA is
This setting allows system software to write to
• The RunlReady button for each RF-series ISA is
5).
set
to out (not lit).
the
storage element.
set
to
in
(glows green
when the storage element is not being used). This setting makes the
storage element available for use.
• The Halt button on
• For expanded systems using power bus cables to link
the
SCP is set to out (not lit).
the
R400X or
B400X expander, the power switches on all expander power supplies
on
should remain
(set to
sends the power bus signal needed to
1)
at
all times. The system power supply
turn
the expanders on or
off.
2.2.2 Special Operation
Certain operations require
that
you change some of the normal operating
settings.
•
If
you need the ability to
halt
the system from the console terminal, for
example, when installing system software or performing certain types
to
of backup, set the Break EnablelDisable switch
1).
This allows you to
halt
the system by pressing I
enable (up, position
Break!
on the console
terminal.
NOTE:
the control character,
Using the console command,
RESTART
software after the system
2-2
VAX
You
can use the console command
ICtrvpI,
rather than I
SET
HALT REBOOT
_REBOOT, you can set your system
4000
Model
300
is halted due
Operation
to
SET
CONTROLP
Break
I,
to
initiate a break si6nal.
to
pressing I Breakl.
to
or
SET
automatically boot
specify
HALT
Page 40

•
If
you
want
data
set
on a particular
the
Write-Protect switch to
ISA to be write-protected, you
in
(glows).
must
NOTE:
write-enabled.
ISAs
containing system software
ISAs
containing applications or sensitive data
write-protected.
•
If
you
want
language
the
Power-On Mode switch
indicates
Language
a
to
for
the
the
language
Selection
use
the
Language
console program, before you
to
Language
inquiry
Menu
mode.
appears,
Figure 2-1 : Language Selection Menu
KA670-A
1)
2)
3)
4)
5)
6)
7)
8)
9)
10)
11)
12)
13)
14)
15)
(1
Vn.n
Dansk
Deutsch
Deutsch
English
English
Espaiiol
Fran9ais
Fran9ais
Fran9ais
Italiano
Nederlands
Norsk
Portugues
Suomi
Svenska
•.
15):
VMB
n.n
(Deutschland/Osterreich)
(Schweiz)
(United
(United
(Canada)
(France/Belgique)
(Suisse)
Kingdom)
States/Canada)
and
user accounts
must
remain
may
Selection Menu to select a
turn
on
your
system,
Inquiry
When
as
shown
Mode. A
you
tum
in
on
Figure
human
your system,
2-1.
be
new
set
profile
Select a
Save
switch
NOTE:
defaults
If
the
then
subsequent
language
the
language
to
Run
Mode, indicated by
If
you
do not select a language within thirty seconds, the system
to
English (United States / Canada).
Power-On Mode switch
the
language
reboots of
by
typing
you
selected
the
in
have
is
system.
the
selected
an
is
set
to
saved
number
by
rotating
arrow.
Run
Mode (indicated
and
is
listed
next
to
the
language.
the
Power-On Mode
by
an
automatically
used
Operating the System
arrow),
during
2-3
Page 41

NOTE:
(indicated
at
If
the Power-On Mode switch is set to Language Inquiry Mode
by
each power-on.
the
human
profile), the system will prompt
for
the language
In addition to
list of bootable devices and prompt you
If
this happens, refer to Section 2.4.1 for more information.
If
your system
battery
have
unit
run
displayed when you power on your system, regardless of
Mode
switch setting. Once the system is booted,
as described
the
Language Selection Menu,
the
system may issue a
to select a device from the list.
has
been powered off for more
that
saves the system clock and the language selection may
than
10
days,
down. The Language Selection Menu will be automatically
the
Power-On
reset
the system clock
in
your system software manual.
2.3 Turning On the System
Once you have
system. Use
1.
Turn on the console terminal and wait for
2. Turn on the system by setting
NOTE: For systems using the
power bus cable, the power switch on the VAX
control bus
on the VAX 4000 will cause the expander(s)
power switch on the expander(s) should always remain in the on position
(1).
set
the
switches correctly, you are ready to
the
following procedure:
signal
to
the expander(s). Setting the power switch
the
power'switch to
R400X
or
tum
it
to complete its self-tests.
1.
B400X
expander linked by a
4000 provides the power
to
power
on
as
well. The
to
on
on
the
the
(1)
When you
2-1.
tum
on the power, you should see the indications listed in Table
Table 2-1: Normal Power-On Indications
Indicator
System
AC
RF -series
RF-series ISA Fault light
DC
OK lights (power supply and SCP)
Present light (power supply)
ISA Run/Ready lights
2-4
VAX
4000 Model 300 Operation
Normal
Glow
Glows orange
Glow
seconds
Lights temporarily
Indication
green
green steadily within 20
at
power-on.
Page 42

Table
Indicator
2-1
(Cont.): Normal Power-On Indications
Normal
Indication
TK70
tape
drive indicator lights
tape
TLZ04
If
you do
Troubleshooting
Every
CPU
identifying
the
chapter,
firmware
display
countdown
the
described
If
your
summary
drive indicators
not
observe
and
time
you
turn
and
memory. Your console
the
CPU,
primary
system
bootstrap program.
the
CPU
and
primary
actual
version numbers. The console
as
the
system
either
in
autoboots system software
Sections 2.4.1
system detects
consisting
the
Diagnostics.
on
the
is
identified
bootstrap
an
of
several lines
service representative can
Depending on
on
the
console terminal. A sample
the
type
of
indications
your
system,
tenninal
version
tests
and
2.4.2.
error
use
the
error, one
in
Table
it
runs
first displays a line
of
the
firmware,
In
the
sample screens provided
as
a KA670-A,
are
indicated
itself. When
during
its
self-tests,
of
hexadecimal numbers. A Digital
error
summary
or
more
error
summary
Orange, yellow,
glow
during
light
remains
and drive indicators
Tape
during
indicator glows
tests
are
2-1,
a series
and
and
as
n.n. Your system will
terminal
the
self-tests
or
goes
into
to diagnose
error
summaries
is
shown
and
on.
green
green
The
The
when
self-tests.
self-tests.
successfully completed.
refer to VAX 4000
of
self-tests on
of
information
the
version
ofVMB-
in
the
versions
then
are
of
displays a
successful,
console mode,
it
displays
in
an
the
system.
may
display
Figure
lights
green
llash
drive
self-
the
this
the
as
error
2-2.
Operating the System
2-5
Page 43

Figure
2-2:
Sample Error Summary
KA670-A
Performing
66
•.
50
.•
34
••
18
••
?5F 2 15
P1=00000000
P6=00000000
rO=00000054
r5=00000044
06
••
Normal
65
49
33
1 7
05
.•
••
.•
..
•.
Vn.n
normal
64
.•
63
48
••
47
32
..
31.
16
..
15
FF
0000
04
••
03
operation
VMB
n.n
system
..
62
••
.•
46
..
.30
..
..
14
•.
0000
P2=00000002
P7=00000000 P8=00000000
r1=20084019 r2=00008206
r6=000048DC
••
not
61
•.
60
45
••
44
29
•.
28
13
••
12
02
possible.
tests.
.•
59
•.
43
..
27
••
11
P3=5839FFOO
r7=20008000
»>
If
possible,
print
out
the
error
summary
representative.
2.4 Booting the System
VAX
4000
to autoboot
mode.
The
boots.
2.4.1
Autobaoting
systems
on
Break
boot
in
one
of
power-on
or
you
can
EnablelDisable switch
the
System
•.
58
..
57
..
56
•.
42
••
41.
.40
••
26
.•
25
.•
24
••
10
.•
09
••
08
P4=00000000
P9=0000080A
r3=00000000
r8=00008000
and
give
two ways. You
manually
boot
setting
.•
55
..
54
.•
39
•.
38
.•
23
..
22
.•
07
••
it
to
your
can
configure
the
system
determines
•.
53
..
52
..
51.
..
37
.•
36
•.
35
..
21
•.
20
..
19
P5=00000000
P10=00000003
r4=00004210
EPC=FFFF90D6
Digital service
the
system
from console
how
the
system
•
..
.•
When
operating
to load
is
defined
the
system
set
to enable,
using
Break
setting),
EnablelDisable switch
the
system
software. Additionally,
and
the
halt
the
SET
HALT
runs
action REBOOT
command,
to load system software.
Depending on
system
loads
whether
software
or
not
or
prompts
a boot device
Loading System Software (With
When
a boot device
and
the
number
the
countdown continues from 1 to
2-6
VAX
4000 Model 300 Operation
has
been
selected,
"2" displays on
is
set
to
disable
self-tests and,
if
the
the
system
Break
or
RESTART
will
has
on
completion,
EnablelDisable switch
automatically
been
selected,
you to select a boot device.
Boot
Device Selected)
the
system identifies
the
screen. As
the
system
O.
(the
normal
attempts
REBOOT
has
attempt
the
system
the
boot device
begins booting,
been
Page 44

Figure
been
selected
2-3
shows a successful power-on
as
the
boot device.
and
automatic
boot
when
DIAO
has
Figure
KA670-A
Performing
66
50
34
18
Tests
Loading
(BOOT/R5:0
-DIAO
Loading
If
is
of
as
Figure
KA670-A
Performing
66
50
34
18
Tests
Loading
No
Available
-DIAO
-DIAl
-MUAO
-EZAO
Device?
2-3:
Successful
••
65
.•
••
49
•.
••
33
..
••
17
•.
completed.
2
••
1
you
have
set
to disable,
Vn.n,
64
48
32
16
system
•• 0 ••
System
VMB
normal
•.
63
.•
•.
47
•.
.•
31
.•
••
15
•.
software.
DIAO)
Software
not
selected a boot device
the
bootable devices. You
shown
.•
..
••
.•
in
Figure
2-4:
Successful
Vn.n
VMS
65
49
33
17
default
normal
..
64
•.
63
..
•.
48
•.
47
.•
32
..
16
completed.
system
(RF71)
(RF71)
(TK70)
(08-00-2B-06-10-42)
[EZAO]:
..
..
31
.•
•.
15
•.
boot
devices.
software.
n.n
system
62
••
46
••
30
••
14
••
system
2-4.
n.n
system
62
..
46
••
30
••
14
••
device
Power-On
tests.
61
••
60
45
••
44
29
•.
28
13
••
12
(No
runs
are
prompted
Power-On
tests.
61.
.60
45
••
44
29
••
28
13
••
12
has
and
.•
59
..
43
.•
27
.•
11
Boot
••
58
••
42
••
26
••
10
Device
when
Automatic
.•
57
.•
••
41.
.40
••
25
••
••
09
•.
Selected)
the
Boot
56
••
55
•.
••
39
.•
••
23
07
.•
•.
••
24
08
Break. EnablelDisable switch
self-tests and, on completion,
to select a boot device from
to
List
of
Bootable
•.
59
••
58
.•
57
••
56
•.
55
•.
..
43
••
42
•.
41.
.40
••
39
.•
..
been
27
11
••
26
•.
••
10
•.
specified.
25
09
••
••
24
08
.•
•.
23
07
•.
•.
•.
54
.•
53
38
.•
37
22
.•
21.
06
••
05
Devices
54
••
53
38
••
37
22
.•
21
06
.•
05
.•
52
••
51
.•
.•
36
••
35
••
••
19
03
..
.•
••
••
.20
04
issues a list
the
list,
•.
52
••
51
••
•.
36
.•
35
••
••
19
03
••
••
•.
••
•.
20
04
To
select a boot device,
have
selected a boot device,
enter
shows a successful power-on
a device
the
system
when
name
at
boots from
DIAO
the
system prompt.
that
device.
has
been
selected
Operating the System
When
Figure
as
the
you
2-5
boot
2-7
Page 45

device.
The
device you
next
have
time
just
the
system
selected.
is
turned
on,
it
will autoboot from
the
NOTE:
attempts
If
you do not enter a device name within thirty seconds, the system
to
boot from the Ethernet device,
Figure 2-5: Selecting a Bootable Device
KA670-A
Performing
66
50
34
18
Tests
Loading
No
Available
-DIAO
-DIAl
-MUAO
-EZAO
Device?
(BOOT/R5:0
-DIAO
Vn.n
VMB
..
65
..
49
..
33
.•
17
default
2
••
normal
..
64
•.
63
..
48
•.
..
••
completed.
(RF71)
(RF71)
(TK70)
(08-00-2B-06-10-42)
1
47
32
•.
31.
16
•.
15
system
boot
devices.
[EZAO]:DIAO
DIAO)
•• 0 •.
n.n
system
..
62
.•
..
46
•.
.30
••
..
14
•.
software.
device
61
45
29
13
.•
..
••
.•
has
tests.
60
44
28
12
..
•.
•.
•.
been
59
43
27
11.
•.
..
..
58
••
42
•.
26
••
.10
••
specified.
Changing the Boot Device
Once a boot device
time
you
turn
it
is
identified,
on,
until
the
system autoboots from
you do one of
the
EZAO.
57
..
56
41.
.40
25
••
24
09
••
08
following:
••
••
•.
••
55
39
23
07
••
•.
•.
••
54
38
22
06
••
53
.•
37
••
21
••
05
that
..
52
.•
36
.•
20
••
04
device
••
•.
•.
••
51
••
35
•.
19
•.
03
••
each
• Change
position 1).
console mode
halt
a
command). Refer
the
setting
If
you
do
after
completing self-tests
action of REBOOT
to Section 2.4.2 for
console mode.
• Change
2-8
the
boot device by
VAX 4000 Model 300 Operation
of
the
Break
so,
the
or
RESTART_REBOOT
using
EnablelDisable switch to
system will
the
not
autoboot
(assuming
using
instructions
SET
BOOT command.
you
the
enable
but
will
have
not
SET
HALT console
on
booting from
(up,
enter
defined
Page 46

Using the SET BOOT Command
To
direct
the
system to boot automatically from a specific device
the
setting of
at
the
»>
the
default boot device,
prompt,
enter
"SET BOOT device-name".
put
the
system into console mode
For
example,
or
to change
and
»>SBT
sets
Once you have selected a boot device,
each time you
BOOT
BZAO
the
system default boot device to
turn
it
on.
be
the
Ethernet
the
system autoboots from
controller.
Using "SET BOOT device-name,device-name,device-name", you
specify a
string
separated
bootable software.
boots from
»>SBT
directs
BOOT
the
boot devices. When
without specifying a device,
device
NOTE:
that
If
should only
continuously attempt to boot from
To
determine
to Table
»>.
2-2,
Figure
logical device name, preceded by a
of default boot devices (up to 32 characters, with devices
by commas
the
first one
DtJAO,DIAO,MtJAO,BZAO
system to
and
no spaces) for which
The
system checks
that
contains bootable software.
use
DUAO,
the
system autoboots,
the
the
the
DIAO,
devices
MUAO,
or
in
the
and
if
the
BOOT command
system will boot from
system will check for
order
For
EZAO
as
the
first default boot
contains bootable software.
included
be
in
placed
a string
as
of
the last device
boot devices, the Ethernet device,
of
the string. The system will
EZAO.
the
name
of
the
or
enter
the
2-6
shows a sample
device from which to boot
SHOW DEVICE command
list
of devices. The system displays
dash
(-), for
each
the
at
the
console prompt
device.
specified
example,
system, refer
that
can
the
device
also
and
default
is
used
EZAO,
the
NOTE: Selecting a default boot device other than the Ethernet device,
is not appropriate for diskless
and
tapeless systems which
must
boot software
over the network.
Operating the System
EZAO,
2-9
Page 47

Figure 2..0: Sample SHOW DEVICE Display
»>SROW
DSSI
-DIAO
DSSI
-DIAl
DSSI
DSSI
UQSSP
-MUAO
SCSI
-MKAO
Ethernet
-EZAO
Table
Device
RF
-series
RF-series
TK70
TLZ04
PROM
read
Ethernet
Ethernet
RA-series drives
DBVICB
Bus 0 Node
(RF71)
Bus 0 Node
(RF71)
Bus 0 Node
Bus 1 Node
Tape
(TK70)
Adaptor
(DEC TLZ04
Adapter
(08-00-2B-06-10-42)
2-2:
Type
ISA
ISA
tape
drive TQK70
tape
drive KZQSA
(programmable
only memory)
adapter
adapter
0 (CLYDE)
1 (BONNIE)
6
7
Controller
0
(761400),
1989(c)DEC)
Device
(*)
(*)
0
(774500)
SCSI
ID
7
Names
CODtrone~~pter
Embedded DSSI host
(part
of
CPU)
KFQSA storage
adapter
MRVll
module
On-board
DESQA
KDA50
(part
Ethernet
adapter
of
CPU)
controller
adapter
Device
DImnl
2
DUm
MUms
MKAn
PRAn
EZAO
XQAn
2
DUm
Logical
Name
1m
= DSS!
bus
n
=
unit
When
under
2c
= MSCP controller designator
n
=
unit
c
3
= TMSCP controller designator
n
=
unit
For
more information about
adapter
number
operating system control)
number
number
(A
= first
bus
(0»)
B = second
Dffin
devices
(A
= first) B = second)
(A
= first) B = second)
the
VAX.
bus
are
recognized
and
4000 system's booting process,
to VAX 4000 Model 300 Technical Information.
2-10
VAX
4000 Model 300 Operation
(1),
and
and
so on.)
80
on.)
so on.)
as
DIAn devices.
refer
Page 48

2.4.2 Booting the System
from
Console Mode
When
powers
completing
of
Figure
Figure
KA670-A
Performing
66
50
34
18
Tests
the
REBOOT
2-7
2-7:
••
65
••
••
49
••
••
33
••
••
17
••
completed.
Break
on
to console mode (indicated by
its
or
EnablelDisable switch
self-tests
RESTART REBOOT
shows a sucCessful power-on to console mode.
Successful Power-On
Vn.n
VMB
n.n
64
48
32
16
normal
••
63
••
47
••
31.
••
15
•.
••
••
62
46
.30
14
system
.•
61
••
45
••
29
••
13
»>
Loading System Software
To
load
system
"BOOT device name".
»>8001'
tells
If
you
will
by
the
enter
attempt
the
SET
NOAO
system
software from console mode,
For
to boot software from a
the
BOOT command
to boot from
BOOT command.
(assuming
using
tests.
••
60
.•
59
••
44
••
28
12
••
••
43
27
11
••
••
example,
the
default
is
the
you
have
the
to
Console Mode
••
58
.•
57
••
42
••
26
10
••
••
41
25
09
••
••
cartridge
without
specifying a device,
boot device,
set
to enable,
»>
prompt)
not
defined a
SET
HALT console command).
•.
56
.•
55
.•
54
••
40
••
39
••
••
••
24
••
08
••
enter
23
07
in
••
••
the
the
38
22
06
the
after
successfully
halt
••
53
•.
.•
37
••
.•
21
••
••
05
••
BOOT command,
TK70
tape
the
or
string
of
devices defined
system
52
.•
36
••
20
•.
04
••
drive.
system
action
51.
•
35
••
19
••
03
••
Using
a
commas
The
first one
»>8001'
directs
"BOOT device-name,device-name1device-name", you can also specify
string
of
and
system
that
DOAO,
the
boot devices (up to
no spaces) for which
checks
contains bootable software.
DIAO,
system to boot from
bootable software.
NOTE:
should only
If
included in a string
be
placed as the last device
continuously attempt
the
devices
NOAO,
to
boot from
EZAO
32
characters,
the
system
in
the
order
the
first device
of
boot devicesl the Ethernet device,
with devices
will
attempt
specified
For
example,
in
of
the string. The system will
to boot software.
and
boots from
the
list
EZAO.
Operating the System 2-11
separated
that
contains
EZA0
by
the
1
Page 49

NOTE: 7b determine the
refer to
7hble 2-2.
name
of
the device from which to boot the system,
Software
use
manuals
the
BOOT command.
may
instruct
2.5 Using the System
Once
the
system software
appears
described
You
and
Your system software
• Installing software
• Running software to perform
• Making
• Accessing devices
on
the
in
the
are
now
ready
application
and
console
system
to
manuals
restoring
is
loaded,
terminal
software documentation.
use
the
system. Refer
for
more
manuals
on
and
cover
your
system
backup
utilities
2.6 Halting the System
Halting
console program. You
installation. Or,
example, a
software.
the
system
tape
interrupts
may
need
you
may
want
to boot
cartridge containing MicroVAX Diagnostic Monitor (MDM)
you
to power
the
after
specific
the
tasks
copies of system software
in
your
all processes
to
on
with
first display for
a few seconds.
to
the
system
instructions
following:
system
and
returns
halt
the
system
the
system from
break
on
enabled
the
system
That
software
using
or
control
during
another
and
software
display
manuals
the
system.
data
files
to
software
device, for
to
is
the
CAUTION: Halting your system without following the
described in your system software
You
can
halt
the
•
You
can
press
to
enter
console mode.
•
If
the
Break
enable (indicated
terminal.
you wish to
Break
2-12
EnablelDisable switch from disable to enable.
VAX 4000 Model 300 Operation
system
EnablelDisable switch on
If
the
halt
in
two ways:
the
Halt
button
by
1)
Break
the
EnablelDisable switch
system by.pressingIBreakl, change
you
manuals
twice -
can
press
may
result
in
to
halt
the
console module
the I Break
is
shutdown
in
loss
the
system,
I key on
not
set
the
procedure
of
data.
and
is
set to
the
console
to enable
setting
of
out
and
the
Page 50

NOTE:
You
can use the console command
the control character,
IctrllPl,
rather
than
SET
jBreakl,
CONTROLP
to
initiate a break signal.
to
specify
CAUTION:
the system interprets the action as a break,
If
you are using a system
or turn
any
of
When
system
If
you
The
processes
If
you
shut
off
your console terminal while breaks are enabled,
and
that
is
part
of
a VAXcluster, do not halt, restart,
off
the system without consulting the cluster manager. Performing
these activities will interrupt the processes
the
console mode
is
halted.
inadvertently
interrupted
halt
prompt
the
system,
by
the
(»»
halt
is
type
will continue.
displayed
"c
IRetuml"
2.7 Restarting the System
NOTE: Restarting the system aborts all current
prevent loss
Follow the shutdown procedure described
before restarting the system.
Restarting
pending operations
You
restart
panel.
NOTE: The Halt button
of
data, warn all users
returns
the
the
are
system
system
aborted
by
pressing
must
to
log
off
prior to restarting the system.
in
your system software manuals
to
a povrer-on condition. All
and
the
usual
the
Restart
be
out (not lit) to effect a restart operation.
the system halts.
of
the entire cluster.
on
your
at
the
console prompt.
and
pending operations.
power-on
button
on
tests
the
screen,
current
are
system control
the
7b
and
run.
2.8 Turning Off the System
CAUTION: Turning
procedure described
of
data.
Once you
your system by
NOTE: For systems expanded with the
linked
have
by
a power bus cable, you need only turn
expander(s) will power
Note that the orange ac indicator on the expander power supply should
remain lit even though
off
in
your system software manuals may result
completed
setting
the
off
the system is powered off.
your system without following the shutdown
in
loss
the
recommended procedure, you can
power switch to
O.
R400X
or B400X expander
off
the system unit: The
when you set the system power switch
Operating the System
turn
to
off
off
and
(0).
2-13
Page 51

2.9
Recovering from an Over Temperature
Condition
If
your system's
components
Temperature Warning indicator
continues
If
the
Temperature Warning indicator flashes.
to
overheat warnings
internal
to
overheat,
increase,
temperature
an
audible
on
the
system will automatically
are
activated,
approaches a level
alarm
the
SCP
the
will sound
will flash.
alarm
If
the
shut
down.
sounds
that
may
and
the
temperature
and
the
cause
Over
Over
When
Condition indicator on
shutdown,
turning
To
the
on
prevent
• Make
• Check
• Check
in
your
system
set
the
the
system.
an
over
sure
your
that
that
the
VAX
shuts
power switch to off
temperature
system is
the
system's
room
4000 Site Preparation
down
due
the
power supply
condition,
away
air
vents
temperature
to overheating,
remains
(0)
and
wait
use
the
from
heat
sources.
are
not blocked.
is
within
manual.
acceptable limits
the
Over Temperature
lit.
To
recover from a
five
minutes
following precautions:
as
specified
before
2-14
VAX
4000
Model
300 Operation
Page 52

Operating the System Options
This
chapter
system,
are
covered:
•
Mass
• Communications controllers
describes how to
or
that
you
storage
devices
can
add
and
to
controllers
use
your
options
system.
that
The
may
already
following
Chapter 3
be
part
of
your
types
of
options
• Real-
•
NOTE: Some
systems. Contact your Digital representative
whether a specific option is appropriate
3.1
The
• RF-series
• TK70
NOTE:
Subsystems,
4000 system.
time
con trollers
Printers
of
these options
may
Mass Storage Options
following
mass
storage options
Integrated
or
TLZ04
In
addition, the RV20 Optical Disk Subsystem, RRD40 Digital Disk
and
TSV05
If
your system contains one
tape
Storage
drive
and
TUB1
not
be
appropriate for VAXserver 4000
if
you have any questions about
for
your system.
are
included
Assembly (lSA)
tape drives can
of
these options, refer to the user's
guide or owner's manual for instructions on how
This
chapter
and
the
also describes how to
mass
storage device, you
system
system
software documentation for details.
describes how to
TK70
and
and
use
appropriate
TLZ04
insert
must
use
the
tape
drives.
and
remove
properly identify
operating
controls for
In
the
the
tape
system commands. Refer to
with
VAX
4000 systems:
be
attached
to
operate the device.
the
RF
case
of
the
tape
cartridge.
the
device to
to
the VAX
-series ISAs
drives,
To
use
any
the
operating
your
it
Operating the System Options 3-1
Page 53

3.1.1
RF-Series Integrated Storage Assemblies
Your system
ISAs
and
recommends
your system
• ISA 0 contains
may
a TK70
that
has
have
up
to four
tape
drive. When your system
you
separate
two ISAs, you
the
operating system
RF
them
may
-series ISAs,
has
according to function.
want
to
use
and
applications
system.
• ISA 1 contains work
The storage capacities
in
VAX 4000 Model 300 '1echnical Information.
Refer to Appendix B of
internal
RF-Serles Controls and Indicators
Each
the
Figure
NOTE:
you
panel
The
parameters
RF -series ISA
ISA controls you
3-1
shows
If
your system
have a TK70 tape drive, or four without the tape drive, a
with
no controls or indicators is used to cover the
front panels are required
areas
for
each
and
other
specifications for RF-series ISAs
this
manual
for RF-series ISAs.
has
controls
need
the
front panel
has
and
only open
of
less
than
to
meet international regulatory standards.
user
with
for information on
indicators on
the
upper
an
RF-series
the
maximum
or
up
to
three
RF -series
multiple ISAs, Digital
For
example,
them
as
follows:
installed
an
account
on
the
are
setting
its
front
door (top
or
panel.
key
examining
To
position).
ISA
number
of
blank
empty
I8As:
[SA
[SA
on
the
system.
listed
access
three
front
cavities.
if
if
3-2
VAX 4000 Model 300 Operation
Page 54

Figure 3-1: RF·Serles ISA Controls and Indicators
Bus Node
10
Plug
Each
ISA
•
Bus
•
Fault
• Write-Protect
• Run/Ready
Fault Indicator
has
the
following controls
node ID plug
indicator
button
button
Bus node ID plugs identify
as
well
as
the
unit
number
at
the
0,
the
have
Table
factory
center
up
3-1
in
consecutive order from
ISA
as
to four ISAs,
lists
RF-series controls
1,
and
with
the
bus
node
by default.
the
leftmost ISA
the
leftmost ISA
and
MLO-004044
and
indicators
number
Bus
node
right
as
on
its
front panel.
of
the
ISAs to
numbers
to left:
as
the
2. (Tapeless systems
are
rightmost
3.)
indicators.
Operating the System Options
the
system,
configured
ISA
can
3-3
as
Page 55

Table 3-1: RF-Serles Controls
Control
Bus
Node
ID
Fault
RunlReady
Write-Protect
Plug
Position
Installed
Not
Installed
Lit
Not
lit
In
(lit.
green)
Out
(not
In
(lit.
amber)
Out
(not lit)
lit)
and
Indicators
Function
The
bus
node
ID
number
by
default,
node
ID
6.
The
ISA
ISA
fault
Indicates
The
light
on
sequence (normal condition).
Indicates
ISA
is
for
use.
switch
green
are
performed.
ISA
is
green
Run/Ready
ISA
is
software from
ISA
is
software operation.
for
free
to
ID
of
the
the
is
factory
bus
node
indicator
an
error
is
on
an
error-free condition
on-line.
the
green
is
on.
Under
indicator
off-line
indicator
and
button
write-protected.
writing
not
write-protected.
read
from
plug identifies
ISA
to
the
unit
number.
set
number
lights.
condition
temporarily
When
indicator
flashes
cannot
light
cannot
is
or
write
system
to a number 0 through
is
undefined.
during
the
ISA
normal
out.
as
be
Prevents
to
the
System
to
operation
seek
accessed.
be
ISA
Normal
the
the
bus
and is.
The
ISA
in
the
power-
in
the
is
available
light
in
operations
lit
when
system
position
software
ISA
node
bus
The
ISA
ISA
the
the
The
the
is
The
Write-Protect
the
ISA.
The
Write-Protect button.
system
software)
the
If
not
can
write
and
normal operating setting.
you
want
to write-protect
want
changed or accidentally erased,
button
system can
When
to
the
ISAs containing work
(lit).
Changing
Spare
plugs to
expander,
3-4
the
Bus
Node
bus
node ID plugs
renumber
or
if
you
your ISAs
create
VAX 4000 Model 300 Operation
controls
read
whether
from
the
the
Write-Protect
the
system
ISA regardless of
button
is
can
the
out
write
data
setting
(not lit),
of
to
the
the
ISA. Your system disk (the ISA containing system
areas
for
users
should be write-enabled,
an
ISA containing sensitive
10
Plugs
are
supplied
if
you reconfigure
set
with
the
Write-Protect
your
system.
your
data
system
that
button
Use
with
the
an
you do
to
in
spare
R400X
a dual-host configuration.
Page 56

The
bus
number
ID plug,
align
the
into
the
node ID plugs
(and
by
default,
grasp
it
firmly
two
center
slots.
See
Figure
have
the
and
prongs
3-2.
prongs on
unit
number)
pull
straight
with
the
the
out.
two
back
of
the
To
center
that
indicate
ISA.
To
remove a
insert a bus
slots
and
the
node
press
bus
bus
ID
the
node
node
plug,
plug
Figure 3-2: Inserting Bus Node
Use
the
rules
below for
renumbering
10
Plugs
MLO-004045
your
storage assemblies:
•
For
each DSSI bus, do not duplicate
assemblies.
as
bus
You
node 1, one storage assembly
one storage assembly on
assembly
• By convention,
as
2,
and
the
to left.
NOTE:
you
positions
If
you change the bus node ID plugs while the system is operating,
must
turn
off
the system
to
take effect.
can
only
so on.
ISAs
bus
node
have
one storage assembly on
as
2,
and
bus
1 identified
are
numbered
and
then
in
turn
it
Operating the System Options
numbers
so on; you
as
bus
increasing
for your storage
bus
0 identified
can
node
1,
one storage
order
from
back on for the new
only
have
right
plug
3-5
Page 57

3.1.2 TK70 Tape Drive
The
TK70
tape
drive
is
located
the
drive, move
The
TK70
drive
can
cartridge. You
cartridge.
You can
use
to load software
on both
(The
types
TK50 drive records
the
key
to
tape
drive holds one removable
read
data
written
can
identify
a CompacTape
or
data
into your system.
of
cartridges,
data
behind
the
top position
on
the
II
or
written
in
the
upper
and
either
CompacT
a CompacTape
type
of
ape
by
either
a format different from
door
of
the
open
magnetic
cartridge
cartridge
The
TK70 drive
the
tape
by
system.
door.
cartridge.
II
or
the
as
an
can
label on
CompacTape
input
read
To
The
device
data
a TK70 drive or a TK50 drive.
that
of
the
TK70.)
use
the
You should
backups
II
or CompacTape
TK70 Tape Drive Controls
The
tape
(subsequently referred to
the
handle
the
handle
closed to lock a
You
use
rewinding
manuals
The
drive also
• Orange
cartridge
• Yellow
use
a CompacTape
of
software
drive
has
or
that
two
data.
has
primary
as
to
the
can
insert
open to
Unload
or
remove cartridges
insert
tape
cartridge
button
also be controlled by software. Refer to
for appropriate commands.
has
three
indicator
light
(Write-Protected): A
is
write-protected.
light
(Tape
in
Use): A
is loaded. A blinking yellow
• Green
can move
light
(Operate Handle): A
the
handle
to
indicates a cartridge load fault.
the
green
light
is
blinking.
All
three
lights
blinking simultaneously indicates a
II
as
an
output
The
TK70 drive
been previously
controls:
the
"the handle")
and
or
remove a
into
to rewind
lights
tape
position
and
that
steady
steady
light
yellow
indicates
steady
insert
or
remove a tape. A blinking
You
cannot
written
cartridge
and
the
lock
cartridge.
and
unload
tell you
orange
light
that
green
can
also move
device to
write
by
a TK50
insert/release
Unload
them
into position.
Push
load
the
tape.
the
tape. Unloading
your
the
status
light
indicates
indicates
the
tape
light
indicates
the
fault
make
copies
or
to a CompacTape
tape
drive.
handle
button.
You
use
Pull
the
handle
and
system software
of
the
drive.
that
the
that
the
tape
is
in
motion.
that
you
green
light
handle
when
condition.
Figure
3-3
shows
the
TK70
labeled.
3-6
VAX 4000 Model 300 Operation
tape
drive
with
the
controls
and
indicator
lights
Page 58

To
operate
the
drive properly, you
lights. The instructions for
appear
table
Figure 3-3: TK70 Tape Drive
at
later
the
in
end
this
section, tell
of
the
section
must
inserting
you
and
what
summarizes
carefully monitor
the
indicator
removing cartridges, which
should
light
happen
and
control combinations.
at
each
step. A
Orange Light
Yellow Light
Green Light
Unload Button
Handle
3.1.2.1
The TK70
is
a take-up reel
-----/
----/
-----
----
-------.;:....
Design
tape
reel containing
in
the
handle,
in
the
cartridge,
and
winding process
is
complete,
the
of
the Drive
drive
operates
with a leader
the
magnetic tape. When you
the
leader
and
the
is
called loading. When
tape
is
in
the
tape
ready
like
attached. Inside
drive automatically couples
winds onto the take-up reel.
to
use.
MLO-OO2292
a reel-to-reel
insert
the
tape
deck. Inside
the
cartridge
the
cartridge
with
is
The
the
drive
a single
and
push
the
leader
coupling
automatic loading process
Once
the
cartridge
uncoupling
used
the
tape, you
the
When you press
and
the
leaders uncouple.
is
loaded, you cannot remove
it
without
leaders, a process called unloading. Even
must
unload
the
Unload button,
it
before you
the
Operating the System Options
tape
can
remove
rewinds
into
rewinding
if
you
have
the
cartridge.
the
cartridge
and
not
3-7
Page 59

3.1.2.2
When
labeling
recording
a Tape Cartridge
data
convenience, a slot for
Write
the
identification on
front
of
the
cartridge,
the
tape
is
in
the
drive.
on a cartridge, label
the
label
is
provided
the
label
and
insert
as
shown
in
Figure
3-4.
on
its
the
the
The
contents.
front
of
label
in
label
the
the
is
visible
For
your
cartridge.
slot on
the
when
Figure
3-4:
Labeling a Tape Cartridge
To indicate
labeled 296MB.
NOTE: Do
or sides
3-8
that
the
tape
The
95MB box
not
write
on
the tape cartridge or
of
the
cartridge.
VAX 4000 Model 300 Operation
was
recorded
is
used
on
a TK70
for
tapes
attach
MLO-OOOIMIO
tape
drive,
~'teck
the
recorded
on
a TK50 drive.
labels to the top, bottom,
box
Page 60

3.1.2.3 Write-Protecting a Tape Cartridge
Write-protecting a
stored
•
Set
on
the
the
tape
cartridge
tape. You
can
write-protect a
write-protect switch
prevents
on
the
position.
accidental
tape
cartridge
cartridge
erasure
in
to
the
ofinfonnation
two ways:
write-protect
• Write-protect
described
Your system
the
write-protect switch
the
system
set
to
When
cannot
the
write-protect position,
you
use a cartridge
write-protected.
as
shown
in
the
the
When
indicator
protected
•
in
write-protect position.
switch
you
toward
insert
light
under
The
write-protect switch
the
in
your
system
can
read
information
write
Two
icons
Figure
3--5.
the
label slot.
a write-protected
comes on.
anyone
cartridge
or
data
An
of
position.
•
An
• A
operating
tape
recorded on a TK50
system
command
Removing write-protection
how
it
is
write-protected. You
TK50
tape
drive
or
by
using
tape
recorded
protection on
either
software commands.
on a TKSO
tapes
by
recorded on a TK70 drive
by
using
software
whether
to
to
install
on
the
orange
If
manuals.
on
the
writing
the
tape
or
when
software,
switch indicate
rectangle
you
do
cartridge
The
system
the
following conditions:
on
tape
depends
cannot
moving
recognizes
the
cartridge
has
write-protected
drive
on
write-enable a
the
write-protect switch on
The
drive
as
write-protected.
operating
tape
regardless
is
software-disabled. However,
when
the
writing
make
is
visible
not
see
an
into
is
is
inserted
how
the
system
of
write-protect
is
software disabled.
sure
the
write-protect
when
the
the
the
cartridge
commands
position
switch
status,
switch
orange rectangle, slide
the
the
set
tape
drive,
tape
to
the
into
was
tape
the
as
being
the
write-protect
tape.
the
drive.
recorded
recorded on a
the
cartridge
orange
write-
and
TK70 drive always recognizes a
You
can
remove write-
as
follows:
of
is
is
is
•
If
the
the
cartridge
cartridge
is
write-protected only by
and
not
write-enabled position causes
the
executing command.
the
operating
the
write-protect switch on
system, moving
the
orange
Operating the System Options
light
to
go
the
out
switch to
at
the
end
the
of
3-9
Page 61

Figure 3-5: Tape Cartridge Write-Protect Switch
•
If
not
causes
•
If
and
remove
3-10
the
cartridge
the
write-protect switch, l"emoving
the
the
cartridge
is
orange
is
write-protected only
light
to go out.
write-protected
a software command,
the
operating
VAX
4000 Model 300 Operation
system
by
you
must
restriction.
by
the
operating
both
change
a software command
system restriction
the
switch
the
on
switch
the
cartridge
setting
and
and
Page 62

When you use a CompacTape
make
sure
the
light
is
Change
Do
not
not
off, check for
the
switch
begin
your
orange
write-protect
any
setting
and/or operating system restriction
operation
of
until
II
cartridge to
light
the
write-protect conditions described above.
the
orange
on
make
the
TK70 drive
light
goes
a backup copy
is
off.
as
necessary.
off.
of
files,
If
the
3.1.2.4 Tape
•
Do
•
Do
tape
• Allow new
using
• Place
tape
•
Store
• Keep
sources of
10°
•
Store
Cartridge
not
touch
the
not
drop
the
cartridge.
tapes
them.
an
identification label only
cartridge.
tape
cartridges
tape
cartridges
heat.
and
40°C (50°
tape
cartridges
percent.
• Keep
tape
cartridges
magnetic fields, such
equipment.
• Keep
3.1.2.5
Before you
tape
cartridges
Inserting
use
a Tape
the
power switch glows).
last
a few seconds. All
momentarily,
end
of
the
accompanied by a
you can move
then
tests,
the
the
short
cartridge release handle.
Handling
exposed surface
tape
cartridge.
to stabilize
in
a dust-free environment.
away
from direct sunlight,
Store
tape
cartridges
and
104°F).
tape
During
the
yellow
yellow
where
away
away
Cartridge
three
the
from
as
motors, transformers, terminals,
from x-ray equipment.
drive,
make
power-on,
lights (orange, yellow,
light
light
beep. The green
and
Storage
of
The
at
room
in
relative
magnets
blinks
goes off
Guidelines
the
tape.
impact
from a fall
temperature
the
label slot on
in a stable
humidity
and
sure
the
the
TK70 drive
during
and
light
and
for
heaters,
temperature
is
between
equipment
system is
runs
and
the
self-tests.
the
green
the
beep indicate
can
24
the
damage
hours
front
and
the
before
of
the
other
between
20
and
80
that
generate
and
audio
turned
self-tests
on
(the
that
green) come on
At
the
light
comes on,
that
CAUTION: Move the
Moving the
If
all three lights blink rapidly
handle
the Unload button once.
light blinks
during
handle
while the yellow light is on could damage the drive.
If
unloading, then the green light comes on.
only when the green indicator light is on.
at
any
time, a fault condition exists. Press
the fault is cleared, the tape unloads. The yellow
If
the fault
Operating the System Options 3-11
Page 63

is not cleared, the three lights continue to flash. Do not attempt to use
the tape drive or to remove the tape cartridge. Call your Digital service
representative.
Use
the
following procedure to
insert a tape
cartridge (see
Figure
3-6):
1. Pull
2. Position
3.
Refer to Appendix C
files on a
NOTE:
takes approximately
the
handle
the
toward
you feel
Push
The
When
NOTE:
the
the
the
green
the
If
handle
closed, the drive
and
remove the cartridge.
tape
If
a cartridge is new, the drive performs a calibration sequence
open.
cartridge
drive.
cartridge
light
yellow
so
Insert
lock into place.
closed.
goes off
light
glows steadily,
the
arrow on
the
and
cartridge
the
the green light blinks rapidly when you
has
detected a cartridge fault. Pull the
Use
another cartridge.
of
this
cartridge.
30
manual
seconds when the drive receives the first
for
from the operating system. The yellow
during calibration.
the
cartridge faces left
into
yellow
light
the
tape
instructions
light
blinks rapidly
the
blinks
is
on
TK70
as
ready
how to
tape
the
to use.
push
create
and
and
points
drive
until
tape
loads.
the handle
handle
open
backup
that
command
irregularly
3-12
VAX 4000 Model 300 Operation
Page 64

Figure
Green Light is
Handle
Cartridge Arrow
is Facing Left
3-6:
-------;---=--
________
Inserting a Tape
on
---.....;--~~-=--1.
Cartridge
1
....
~
2
--J
Yellow Light Blinks
----=:-~...::....:;.~=-
MLO-OO2459
Operating the System Options
3
3-13
Page 65

3.1.2.6 Removing a Tape Cartridge
You
must
drive. Use
1.
Press
unload
unload a
the
the
the
tape
before you
following procedure (see
Unload button.
You
cartridge. Refer to
appropriate command.
can
remove
Figure
can
also
issue
your
system software
the
cartridge from
the
3-7):
a software command to
manuals
for
tape
the
The yellow
cartridge. This
2. When
hear
CAUTION: Move the
and
the green indicator
light
3. Remove
Push
4.
The
green
that
you
CAUTION: Remove the tape cartridge from the tape drive when
is
not
in
use or before you
may
damage
light
blinks slowly,
may
the
yellow
light
a beep), pull
is
blinking
the
the
handle
light
can
safely move
the tape cartridge.
could damage the drive.
tape
cartridge
closed.
remains
take
up
goes off
the
handle
handle
light
and
on, indicating
the
handle.
turn
off
the system. Failure
as
the
tape
rewinds
to
90
seconds.
and
the
green light comes on (you also
open.
only
when
the yellow indicator
is on. Moving the
store
it
in
its
that
there
and
unloads into
handle
while the yellow
container.
is
power to
to
remove the cartridge
the
the
light
drive
the
is
off
and
cartridge
3-14
VAX 4000 Model 300 Operation
Page 66

Figure
3-7:
Removing a Tape Cartridge
1
Green Light is on
Handle
-----~-_:_:~~
'--=---
1:1:::.,,':7----:---
--~-""';--:'::~=-f
Unload Button
Yellow Light Blinks
3
•
.,---
Cartridge Arrow is Facing
2
left
4
Green Light
is
on
----'".
Operating the System Options
3-15
Page 67

3.1.2.7 Summary
Table
3-2
summarizes
the
meaning
of
the
of
TK70 Tape Drive Controls and Indicator Lights
the
TK70
tape
drive controls. Table 3--3 describes
indicator lights.
Table
Control
Handle
Unload
Table
Orange
Oft'
Oft'
Oft'
On/Off
On/Off
On
Blinking
3-2:
button
3-3:
TK70 Tape Drive Controls
Position
Open
Closed
Momentary
contact switch
Function
Lets you
unload
operations
Locks
tape
sequence.
Rewinds
insert
in
and
or
remove a
are
operating
unloads
TK70 Tape Drive Indicator Lights
Yellow
Oft'
Oft'
Oft'
On
steadily
Blinking
On steadilyl
blinJdng
Blinking
Green
Oft'
On steadily
Blinkjng
Oft'
Oft"
On
Blinking
Condition
No
power
Safe to move
handle.
Load
may
handle
Do
not
Tape
Tape
Cartridge
A
fault
Unload
cartridge.
the
yellow
tape
cames on,
to remove
fault
CQDtinue
to
remove
your
tape
completed.
position
the
tape.
to
Power
fault.
be
defective. Pull
and
use
is
loaded
is
in
motion.
is
is
button
rewinds. When
you
is
not cleared,
to
Dicital
after
the
tape
cartridge
is
present.
The
remove
the
cartridge.
but
write-protected.
occurring. Press
to
If
the
light
blinks
can
move
the
cartridge.
bliDk. Do Dot
the
tape
..mce rep.nMIDtative.
rewind
and
begins
drive.
cartridge
the
cartridge.
not
in
motion.
unload
fault
is
while
the
green
the
all
three
cartridp.
and
load
release
leader
out
the
the
the
tape
cleared,
the
light
handle
If
the
liahta
attempt
CaD
3-16
VAX
4000
Model
300 Operation
Page 68

3.1.3 TLZ04 Tape Drive
The
TLZ04
use
the
The
TLZ04
(DDS)
tape,
helical
on
tape
"crosstalk,"
drive,
and
such
scan
tape
move
tape
digital
as
TLZ04
technology.
by
recording
providing
drive
the
drive
audio
is
located
key
is a backup
tape
cassettes,
This
data
you
with
behind
to
the
(DAT)
takes
technology allows
diagonally. DAT
higher
the
top
position
device
recording
advantage
data
that
integrity.
upper
door
and
open
uses
digital
technologies.
of
the
more
recording
of
the
the
TLZ04
data
also
system.
door.
data
Digital
tape
to
be
minimizes
To
storage
audio
drive's
stored
Digital
audio
backup
intervention.
which
data
tape
for
1.2
gigabytes
ensures
storage
computer
In
addition,
high
uses a recording
applications.
of
data
in
approximately 2 hours
this
format
data
integrity.
format
The
has
TLZ04 Tape Drive Controls and Indicators
Figure
3-8
shows
the
TLZ04
tape
drive.
that
supports
DDSIDAT
three
levels
the
format
with
of
error
use
of
allows
no
operator
correction,
digital
you
to
Operating the System Options
3-17
Page 69

Figure
Unload
3-8:
TLZ04 Tape Drive
----:--,:IEJ
IJ
On
n n n m
II II
Drive Indicator
Button
The Unload button
indicators show
conditions.
CAUTION: Pressing the Unload button during normal tape operations
halt the tape operation
Table
operating conditions. Table
they
3-4
describes
apply to abnormal
~
=u
is
used
the
status
in
progress.
the
TLZ04 drive indicators
operating
IIIII
JII
to eject
of
the
3-5
describes
I:i-':::..!:!..-~-
the
cassette tape.
TLZ04
conditions.
Tape Indicator
MLO-005328
The
and
can
indicate possible
as
they
the
TLZ04 drive indicators
Tape
and
apply to normal
Drive
error
may
as
3-18
VAX
4000 Model 300 Operation
Page 70

Table
Indicator
3-4:
TLZ04 Drive Indicators (Normal Conditions)
Color(s)
Meaning
Tape
Solid
green
Solid yellow Tape loaded
Drive
Solid
green
FlashiDg
Flashing
Table
Indicator
Tape Slow flashing Excessive
Tape
Tape
Drive Solid yellow Power-on self-test failed.
3.1.3.1
Digital
tapes.
the
3-5:
and
TLZ04 Drive Indicators (Abnormal Conditions)
Color(s)
green
Drive Solid yellow
Flashing
1-3
Proper Handling
Equipment
'1b
ensure
following guidelines
green
yellow Power-on self-test
or yellow
yellow Power-on self-test failed.
times
Corporation recommends
optimal performance from
when
Indicates
Tape loaded.
Indicates
Drive
ready
Drive active.
Meaning
If
failure
High
humidity.
of
Cassette Tapes
handling
status
and
status
/power on.
tape
errors.
repeats
Adjust
them.
of
cassette
write
of
TLZ04 drive
in
progress.
itself,
that
your
tape
as
follows.
protected.
as
follows.
Use
the
head
use
another
operating environment.
you
cleaning cassette.
cassette
use
TLZ04 cassette
tape.
cassette tapes, observe
• Avoid placing
interference, such
Emissions from
• Keep cassette
other
sources
• Store cassette
temperatures
• Store cassette
humidity
is
20% to 60%.
the
cassette
as
such
tapes
out
of
heat.
tapes
are
between 5°C
tapes
tapes
terminals,
equipment
of direct
near
and
can
erase
sunlight
sources
video
data
and
away
or
on
(and cleaning cassette) where
and
in
a dust-free
32°C (40°F
environment
Operating the System Options
and
of
electromagnetic
X-ray equipment.
the
tape.
from
heaters
the
and
room
gO°F).
where
the
relative
3-19
Page 71

3.1.3.2 Setting the Write-Protect Tab
If
you wish to
cassette to
integrity. Use a
the
desired position.
read
write
or
copy from a tape,
protect.
pen
(not pencil) to
This
disables
set
on
the Cassette Tape
set
the
write-protect
writing
the
to tape,
write-protect
and
tab
tab
ensures
(Figure
on
data
3-9)
the
to
Observe
•
If
you
the
following guidelines
are
reading
write protected.
•
If
you
are
writing
• Write-protect
data
(copying from tape),
data,
set
tab
position displays
when
setting
the
write-protect
in
the
write-protect tab.
set
the
tab
front panel
write-protect
to write enabled.
tape
indicator.
tab
to
3-20
VAX 4000 Model 300 Operation
Page 72

Figure 3-9: Setting the Write-Protect
Tab
on the Cassette Tape
3.1.3.3
Insert
Inserting a Cassette
the TLZ04 cassette tape into
protect tab
at
the
top,
as
Tape
shown
Into the Drive
the
drive with
in
Figure
3-10.
Operating the System Options 3-21
the
cassette's write-
Page 73

Figure 3-10: Inserting a Cassette Tape Into the Drive
3.1.3.4 System Software
System
the
commands
• Back
• Copy
3-22
software allows you to execute
cassette
tape. Your operating
that
allow you to
up
data
from disk drives to a
data
from disk to tape,
VAX
4000
Model 300 Operation
do
system
the
following:
or
tape
MLO-OO5331
commands
documentation
tape
drive
to
disk
to
read
and
write
describes specific
data
to
Page 74

3.1.3.5 Cleaning
Statistics
associated
strongly recommends
tapes
This
are
the
and
show
and
cleaning
section shows you how to perform TLZ04
components,
from
the
with
media
the
Heads
that
over
ninety
the
media. Therefore,
that
you
the
heads
in
(in
a drive,
this
case, a
of
percent
follow
the
that
of
Digital
the
instructions
drive.
magnetically
cassette
tape).
drive-related problems
Equipment
for
head
cleaning.
read
Corporation
handling
and
write
cassette
The
data
heads
are
to
NOTE: Digital Equipment Corporation recommends
that
you perform the
head cleaning procedure about every two weeks, or after every
drive usage.
Under
normal conditions,
schedule.
If
a particular cassette causes problems,
it
should not be necessary to exceed this cleaning
try
changing
cassette.
CAUTION: Never attempt to clean the heads
in
a manner other
described herein. Doing so will void the product warranty.
To
clean
the
heads,
1. Observe
2.
Insert
drive
3. With
cleans
approximately
4.
In
cassette, place a check
cassette.
Under
approximately 25 cleanings. Additional
your
that
the
as
shown
the
the
the
space provided.
normal conditions,
Digital
the
head
head
head.
sales
use
the
head
drive
indicator
cleaning
in
Figure
cleaning
The
30
se~ondf!.
representative
cassette
3-11.
cassette
drive ejects
on
mark
cleaning
the
card
every
the
cassette
is
lit
solid green.
(part
inserted,
the
enclosed
time
head
cleaning
or
DECdirect.
as
number
the
head
cleaning
with
you
use
cassette
cassettes
follows:
TLZ04-HA)
drive
automatically
cassette
the
head
the
head
are
available from
25
hours
of
to
another
than
into
the
after
cleaning
cleaning
performs for
If
the
head
cleaning
designed to
8 to 10 seconds. No cleaning action will occur.
CAUTION:
cassette. After
You
must
be
used,
Do
25
use a new cassette.
cassette
the
has
been
drive will eject
used
the
cartridge
not exceed the recommended 25 uses
uses, the cleaning cassette
Operating the System Options
no
more
times
than
it
was
in
approximately
of
the cleaning
longer cleans the heads.
3-23
Page 75

Figure 3-11: Inserting the Head Cleaning Cassette
MLO-OO5332
3.1.4 RV20 Optical Disk Subsystem
If
your
system
Optical Disk Subsystem Owner's
the
device.
3-24
VAX 4000 Model 300 Operation
includes
an
RV20 Optical
Manual
Disk
for
Subsystem,
instructions
refer
on
how to
to
the
RV20
operate
Page 76

3.1.5 RRD40 Digital Disk Subsystem
If
your
user's
system
guide for
includes
instructions
an
RRD40
on
operating
Digital
the
3.1.6 TVS05 Tape Drive
If
your
system
Transport System User's Guide for
includes a TVS05
tape
drive,
instructions
Disk
device.
refer
on
how to
Subsystem,
to
the
operate
refer
TVS05
the
device.
to
'.fupe
its
NOTE: The TSV05 is a data interchange device
and
is not supported as a
backup device.
3.1.7 TU81-Plus Tape Drive
If
your
system
7bpe
Subsystem User's Guide for
includes a
TU81-Plus
instructions
tape
drive,
on
how to
refer
to
operate
3.2 Communications Controller Options
The
following types of communications controllers
4000
systems:
• Asynchronous serial controllers (with
• Synchronous
•
Network
3.2.1
The
system,
•
•
•
Asynchronous Serial Controllers
following asynchronous controllers
with
CXAl6-16-line
CXBl6-16-line
CXY08-8-line
serial
controllers
and
without
multiplexer, Q-bus controller
multiplexer
multiplexer
controllers (with
modem support:
with
modem control, Q-bus controller
or
or
are
are
without
without
available for
modem
available for
modem
the
TU81-Plus
the
support)
support)
your
VAX
device.
the
VAX
4000
•
DFAOl-2-line
•
DSRVB-8-line
controller
terminal
with
integral
server,
modems, Q-bus controller
Ethernet
Operating the System Options
device
3-25
Page 77

3.2.1.1
Before
controller,
•
•
•
Without
using
Make
Make
appropriate
Make
choosing
personal
a
terminal
which
setting
to
your
Generally,
Modem
any
check
sure
the
sure
the
power
sure
the
how
choice, for
screen.
data
is
if
the
tenninal
the
Support
peripheral
the
following:
peripheral
peripheral
source,
peripheral
the
device
example,
Others,
transmitted
peripheral
or
printer
default
device
device
device
and
device
operates.
like
over a data
device
manual
settings
connected
is
properly
is
properly
turned
is
Some
the
number
baud
and
system
for
your
to a serial
on.
properly
set-up
of
rate
(a
line),
are
for
complete
terminal
connected
installed,
set
up.
choices
columns
measure
must
match
to
communicate.
set-up
are
acceptable.
communications
to
the
system.
plugged
Set-up
are
that
of
into
an
involves
matters
display
the
the
instructions.
speed
system
Refer
on
at
of
While
The
and
2.
3.
4.
most
default
up
procedure
two
examples
VT200-series
For VT300-Serles Terminals:
1.
Press
ISet-up!
Use
the
arrow
and
press
5.
6.
7.
8.
Make
column
the
Make
column
the
the
Press
Use
I Enter
Select
If
press
sure
setting.
cursor
setting.
ISelect!
the
I.
the
the
port
IEnter!
is
sure
is
arrow
for
your
terminals:
to
display
keys
IEnt.l.
the
set
to 9600.
the
set
to
to
this
to
return
keys
option
in
the
to
select
settings
terminal
below
provide
the
to
select
"Transmit
Use
"Receive
"receive=transmit."
option,
to
to
select
"Comm
"Current
the
"DEC-423"
are
acceptable,
to
Set-Up
Speed"
the
Speed"
and
the
Set-Up
the
Port."
Setting"
you
ensure
set-up
the
"Communications
left
the
"Global
appropriate
instructions
Directory
option
and
right
option
left
in
Use
and
Directory
Set-Up"
column
port.
should
screen.
in
the
arrow
the
the
right
is
selected
perform
for
"Current
"Current
down
arrows
screen.
option
the
set-up
Set-Up"
keys
arrow
for
values.
VT300-series
option
Setting"
to
change
Setting"
to
move
to
change
and
press
"RS-232,"
set-
3-26
9.
Press
VAX
I
Select!
4000
to
return
ModeJ
to
the
Set-Up
300 Operation
Directory
screen.
Page 78

10.
Use
the
arrow
Press
IEnter!
to
save
Set-Up
For
VT20G-Serles Terminals:
1.
Press
2.
Use
Default
3.
Use
display
4.
Use
to
Directory.
I Set-Up I to display
the
arrow
correctly
the
arrow
the
Communications
the
arrow
set
the
speed
keys to select
keys to select
keys to select
all
current
the
Set-Up
keys to select
sets
all
values
to 9600.
the
"Save
settings;
Directory screen.
the
"Default" option
except
the
"Comm" option
Set-Up
the
"Transmit" option
Current
then
transmit
menu.
press
speed.
Settings"
I Set-Up I
to
and
presslEnterI.
and
press
and
option.
exit
the
I Enter I to
presslEnteri
5. Use
the
arrow
keys
to
select
lenter!.
6.
Use
the
arrow
option
Directory.
Your
operating
communications devices. Refer to
3.2. 1.2
Using
modems: one connected
terminal.
Before
1.
2.
3.
Before
following:
1.
With
serial
using
Make
Make
jack.
Set
controls
guide.
using
Make
jack.
Modem
devices
Both
modems
sure
sure
sure
stores
must
each
the
on
the
the
keys to select
the
set-up values.
system
the
modem connected to
may
have
Support
with
modem
to
the
be
connected to
with
your
modem.
modem is properly
modem
is
connected to
modem according
is
properly
the
the
other
your
support
system
phone
system,
installed
"To
Directory" option
"Save" option
Then
press
requirements
system
and
installed
to
software
requires
one connected to
lines.
check
the
the
system.
and
instructions
the
remote
and
and
and
press
IEnterl;
I Set-Up I
to
exit
the
Set-Up
for
using
manual.
that
you
install
the
remote
following:
connected to a phone
in
the
modem
terminal,
connected
check
to
a phone
user's
press
this
serial
two
the
2.
Set
controls on
guide.
the
modem according to
instructions
Operating the System Options
in
the
modem
user's
3-27
Page 79

3. Check
the
on
be
300, 1200,
described
the
type
settings
of
modem
or
in
the
on
the
terminal
and
the
type
2400.
previous section.
Other
settings
attached
of
lines
should
to
the
used,
modem. Depending
the
baud
rate
be
the
same
as
may
those
Before
parameters
details.
using
a phone line
such
as
line speed.
with
modem
See
your
support,
system
you
must
software
set
manuals
3.2.2 Synchronous Controllers
The
following synchronous controllers
system:
•
DPV11-Single-line
•
DSV11-Dual-line
•
KMVlA-Programmable
Before
• The
• Both
using
a synchronous controller you
system
synchronous controller. Synchronous communications require a
synchronous controller
the
software
protocols
are
X.25
the
protocol.
you
transmitting
installed.
that
and
PSI.
programmable
controller
communications interface, Q-bus controller
want
Synchronous communications
define how
to communicate
on
both
and
receiving
data
Appropriate
are
controller
must
the
transmitting
systems
is
interpreted.
host
software
available for
verify
with
must
the
has
and
have
operate
Two common protocols
is
required
your
VAX
following:
an
appropriate
receiving system.
supporting
under
to
3.2.3 Network Controllers
certain
for
4000
host
specific
interpret
NOTE: VAX 4000 systems contain
CPU module.
DESQA module, included
Before
1. Make
3-28
using a network
ThinWire cable)
module).
active connection.
proper position.
VAX 4000 Model 300 Operation
sure
You
the
The
can have a second optional Ethernet controller, the
with
your system.
controller you
Ethernet
is
connected to
light
If
next
not
cable
to
lit,
the
move
an
Ethernet controller embedded
must
do
the
following:
(either
the
connector should
standard
console module (or optional DESQA
the
Ethernet
transceiver
be
lit, indicating
Connector switch to
in
cable
the
or
an
the
Page 80

2. Make
sure
transceiver cable
•
To
an
•
To
a local
to a
larger
a local
A
Thin
Wire cable
•
To
a
single
Ethernet
network
•
To
an
the
H4000
area
Thin
port
Ethernet
can
or
network
Ethernet
network
can
Wire
repeater
or
can
cable
is
properly connected to
be connected
in
one
of
H4005 transceiver located
interconnect (DELNI), which
or
can
serve to connect
be
connected
Ethernet
(DESPR), which
serve
to
multiport
as
connect
follows:
repeater
can
many
available connection on a T-connector
the
the
following ways:
on a traditional
can
up
to
eight
(DEMPR)
be
connected to a
systems
of
other
in
Thin
network. A
Ethernet
be connected
systems
or
Thin
in
Wire
larger
a local
area
Wire nodes
3. Have
4. Register your node
the
recognized
DECnet
by
other
application installed
with
the
network
systems
in
the
Some software products, for example,
use
the
Ethernet
To
find
the
SHOW
ETHER
device displays on
»>SBOW
EZAO
Refer to
E'l'BBRNE'I'
(Oa-OO-2B-03-S0-SC)
your
requirements
hardware
hardware
address
address
from console mode. The
the
terminal
software
and
further
manuals
instructions on
of
as
your
shown
3.3 Real-Time Options
The following
•
DRQ3B-High-speed
channels
•
DRVIW-General
hit
output
•
IEQI1-DMA
busses
real-time
port
controller
options
are
available for
interface
purpose interface
that
connects a Q-bus to two
on
your
system.
manager
so
network.
Ethernet-based
of
other
systems
Ethernet
hardware
in
the
and
DECnet
using
with
two unidirectional 16-bit
with
one 16-bit
VAXcluster systems,
to
device, use
address
following example:
manuals
a network connection.
your
VAX
that
your
operate
properly.
the
of
your
for
4000 system:
input
port, one 16-
independent
node
is
command
Ethernet
other
data
•
IBQ01-DMA
controller
that
connects a Q-bus to RS-485 control
Operating the System Options
3-29
Page 81

•
AAVll-S-Digital-to-analog
•
ADVll-S-Analog-to-digital
•
KWVll--S-Programmable
frequencies
•
AXVII-Input/output
•
ADQ32-Analog-to-digital
circuit
converter
converter
converter
clock
that
board
for
with
with
analog
with
can
DMA
DMA
DMA
count
devices
capability
capability
capability
from one
to
five
Before
controller
device.
using a real-time
are
properly
set
controller,
up. Refer
make
to
the
sure
the
documentation
3.4 Printer Options
Before
tests.
Some
interface.
printer
The
VAX 4000 Model 300 Technical Information for a
interface
using
a printer,
Verify
printers,
documentation
VAX.
that
Other
4000
systems
requirements.
the
such
printers
make
printer
as
the
require
for
the
have
sure
it
is
properly
is connected to
LGOI
interface
several
and
LG02,
modem control signals.
requirements.
printer
options available.
3.5 Adding Options
If
you
have
available Q-bus slots, you
system. Possible limitations to
• Power
• Physical space limitations
• Bus
Your Digital
your
should perform
configured to
limitations
limitations
sales
system
(addc
representative
and
what
the
work
correctly.
loading)
you need to order. A Digital service
installation, since
adding
may
modules include
can
advise you
be
the
able
devices connected
for
set
up
and
passes
an
appropriate
require
list
of
to
about
system
the
printers
add
modules
the
following:
modules
representative
must
the
real-time
any
controller.
LPVll-SA
Consult
Consult
and
printer
to
available
be
properly
to
self-
your
your
the
the
for
CAUTION:
Do
not attempt
to
remove, rearrange, or install modules. Contact
your Digital service representative for assistance.
3-30
VAX
4000 Model 300 Operation
Page 82

Appendix A
Related Documentation
Document
Hardware
KA670 CPU Systems Maintenance EK-347AA-MG
KA670 CPU Module Technical
R400X Expander Addendum to Customer
TSV05 Tape Transport System User's Guide EK-TSV05-UG
RF301RF'11 User
Software
Overview of VMS Documentation
VMS
VAXcluster
VMS Networking
Guide to DECnet-VAX Networking
VMS Installation
VAXELN
VAXELN
Microcomputer
Documentation
Manual
Hardware
Guide EK-RF71D-UG
Information EK-R400X-CM
Documentation
Manual
Manual
and
Operations
Host System Guide
Run-Time Facilities Guide
Handbook
Series
Order
EK-KA670-TM
AA-LA95A-TE
AA-LA27A-TE
AA-LA48A-TE
AA-LA47AA-TE
AA-LB35B-TE
AA-JG87B-TE
AA-JM81B-TE
Number
VAX
Architecture Handbook
VAX
Software Handbook
Documentation
specific
to
supported
options
4000 Model 300 Thchnical Information.
EB-19580-20
EB-21812-20
is
listed
with
the
option
Related Documentation
in
VAX
A-1
Page 83

Page 84

Appendix B
Programming Parameters for RF-Series
ISAs
This appendix describes
parameters
VAX. 4000 Model 300
CPU.
to seven
CPU
and
own controller
to control
Four
• ALLCLASS
UNITNUM
•
• NODENAME
•
Bus
The
ALL CLASS
allocation class
operating
paths
a
default
cluster
of
the
specifying allocation class values.
The
UNITNUM
default,
ISA front panel.
the
use
to supply values to
ISA
parameter
for RF-series ISAs.
Each
host
adapter
RF
-series ISAs.
the
requested
and
server
data
transfers
principal
Node ID
to
should
host
console-based diagnostic
parameters
parameter
is
a numeric
system to derive a
the
same
ISA. RF-series ISAs
allocation class
have
an
system. Refer to
parameter
the
ISA
unit
To
set
the
FORCEUNI.
the
systems
ISA
number
unit
UNITNUM
have
provides a
The
host
on
their
that
contain
over
the
are
associated
determines
value
path-independent
of
zero.
allocation class
the
determines
is
numbers
procedures for
two DSSI
separate
adapters
respective DSSI bus.
the
DSSI bus.
from 0 to 255
are
Each
VMS
supplied
and
and
utility
parameter
host
DSSI
make
intelligence
with
each
the
device allocation class.
shipped from
RF
-series
that
matches
VAXcluster
the
unit
by
the
override
protocol (DUP)
and
setting
adapters
bus
a connection between
that
name
ISA
number
bus
the
to
and
that
can
Each
and
logic necessary
RF
-series ISA:
is
used
for
multiple
the
to
be
the
allocation class
manual
of
node
ID
default
set a value
examining
built
into
support
ISA
has
by
the
access
factory
served
for
the
driver
to
rules
ISA. By
plug
on
values, you
utility
of
zero
the
up
the
its
The
VMS
with
the
for
the
to
The
NODENAME
node
name
parameter
of
up
to eight characters.
allows
Programming Parameters for RF-Series ISAs B-1
each
ISA
RF
-series ISAs
to
have
are
an
alphanumeric
shipped from
the
Page 85

factory with a unique identifier, such
provide a node name of your choosing
The Bus Node ID parameter
lSA
front panel. Each DSSI bus can support
is
as
R7CZZC, R7 ALUC, etc.
if
you prefer.
provided by
the
bus
node ID plug on the
up
to seven lBAs, bus nodes
You
can
o through 6. Refer to Section 3.1.1 for instructions on changing bus node
ID plugs.
NOTE:
programmed
lSA
plUII
With an allocation class of zero,
parameter
operating system uses
in
All
lSA
parameters, with the exception
and
emmined
Bus Node
1D
that inserts into the
values to provide each ISA
the
following
m~~er:
usiT16
the console-based DUP driver utility. The
is physically determined
1&
front panel.
the
operating system can use
with
the
node
name
along with
of
the
Bus
Node
by
the numbered bus node ID
a unique device name. The
the
device logical name
NODENAME$DIAu
where
is
NODENAME
a unique node name
With a nonzero allocation class,
values
allocation class along
to
create a unique device name.
with
the
device logical name
and
u is
the
unit
the
operating system relies on
The
operating system uses
in
number.
unit
the
following manner:
$ALLCLASS$DIAu
where
ALLCLASS is
unique
unit
the
allocation class for
the
system and ISAs,
number. .
Using mass storage expanders, you can fill both DSSI busses
giving a total
nodes
system
0-6). When devices
is
numbers for ISAs on one of
throughout
the
need
and
1).
and
the
class.
of
14
RF-series ISAs. Each bus can have seven ISAs (bus
are
added to
the
second bus (bus
1),
using a nonzero allocation class. you need to assign new
the
the
to
program
system
must
be unique. The following table illustrates
unit
numbers for a system using both DSSI busses
a nonzero allocation class.
operating system sees
busses.
the
ISAs
as
the
unit
numbers for lSAs
In
the
case of
as
having duplicate device names.
the
nonzero allocation
the
and
(0
and
1D,
are
default
number
the
u is a
and
1),
your
unit
(0
B-2
VAX 4000 Model 300 Operation
Page 86

Allocation
Class=O
Nonzero
(E~ample:
Allocation
ALLCLASS=l)
Class
R7CZZC$DIAO
R7 ALUC$DIAI
R7EB3C$DIA2
R7IDFC$DIAO
R7mZC$DIA1
R7IKJC$DIA2
R7ID3C$DIA3
R7XA4C$DIA4
R7QIYC$DIA5
R7DA4C$DIA6
The
following
the
DUP
driver
be
set
to
2,
numbers,
Figure
and
B-1
instructions
utility.
the
ISAs for
the
system disk will
shows
the
describe how
In
the
bus
DSSI
busses
$1$DIAO
$1$DIAI
$1$DIA2
$1$DIAO
$1$DIAl
$l$DIA2
$1$DIA3
$1$DIA4
$1$DIA5
$l$D1A6
sample procedures,
0 (in
the
be
and
4000 system.
NOTE: Your system need not have the
examples
in
this appendix.
to
change ISA
the
allocation class will
VAX
4000) will
be
assigned
assigned a new node
bus
node
IDs
for
maximum
number
parameters
new
name.
an
expanded
of
ISAs, as do the
using
unit
VAX
Programming Parameters for
RF-S~ries
ISAs
B-3
Page 87

Figure B-1:
DSSI
Busses
for
an
Expanded
VAX
4000
System
System
_BusO
mBBus1
1.
Enter
the
console mode.
DSSIOable
E·xpander
MLo.o0404l
The procedure for programming internal parameters for RF -series ISAs
requires
prompt
you issue commands to those RF -series ISAs
(»».
You
may type these commands
in
at
the console
either uppercase
that
lowercase letters. Unless otherwise instructed, type each command,
I
then press
R81Urnl.
or
Enter console mode as follows.
a.
Set
the
Break EnablelDisable switch on
VAX
4000 system to
b.
Set the power switch
system, and any
the
enable position (up, position
for
each unit (both hosts for a dual-host
R400X expanders for expanded systems) to on
Wait for the system to display the console prompt
the
console module of the
1).
(»».
(1).
2. Make sure the lSAs for which you want to set parameters are on line
in
and are not write-protected. The RunlReady button should be
(lit).
and the Write-Protect button should be out (not lit).
B-4
VAX 4000 Model 300 Operation
Page 88

3.
At
the
in
your
The
line
line
type
DIB-devices
DIB.
(*).
In
Example
0-2),
0-6).
console prompt,
expanded
enter
system.
SHOW
firmware displays two lines
contains
contains
in
The
and
the
bus
the
device
parentheses.
on
bus 0 are
DSSI
host
B-1,
the
the
R400X
number, node number,
name
The
device
listed
adapter
for each
system contains
expander
contains
DSSI
for a display
of
information for each ISA.
and
node
and
unit
number
name
consists
as
DIA, devices on
bus
three
seven
followed
of
is
identified
RF71 ISAs
RF71 ISAs
of
all DSSI devices
The
name.
the
bus 1 are
The
by
the
letters
by
an
(unit
(unit
second
device
DIA
listed
asterisk
numbers
numbers
first
or
as
Example B-1: SHOW
»>SBOW DSSI
DSSI
Bus 0 Node 0 (R7CZZC)
-DIAO
DSSI
-DIAl
DSSI
-DIA2
DSSI
DSSI
-DIBO
DSSI
-DIBl
DSSI
-DIB2
DSSI
-DIB3
DSSI
-DIB4
DSSI
-DIBS
DSSI
-DIB6
DSSI
»>
In
system
and
with
guarantee
(RF7l)
Bus 0 Node
(RF7l)
Bus 0 Node
(RF7l)
Bus 0 Node
Bus 1 Node
(RF7l)
Bus 1 Node 1 (DOPEY)
(RF7l)
Bus 1 Node
(RF7l)
Bus 1 Node
(RF7l)
Bus 1 Node
(RF7l)
Bus 1 Node
(RF7l)
Bus 1 Node
(RF7l)
Bus 1 Node
this
example,
disk
will
each
be
1 (R7ALUC)
2
6
0 (SNEEZY)
2 (SLEEPY)
3
4 (BASHFUL)
S
6
7
given a new node
1) contain devices,
the
same
allocation class
that
all device
(R7EB3C)
(*)
(GRUMPY)
(HAPPY)
(DOC)
(*)
DSSI
Display
ISA will be assigned
name.
and
a nonzero allocation
must
have a unique
names
in
the
cluster
an
allocation class
When
both
is
used, each DSSI device
unit
are
unique.
of
DSSI
number.
2,
and
busses
This
is
the
(0
to
Programming Parameters for RF-Series ISAs
B-5
Page 89

In
this
example,
assigned
unit
the
ISAs
numbers
in
10, 11,
the
and
VAX.
12.
4000,
DIAO,
DIAl,
and
DIA2 will
be
Entering
To
activate
you
Use
SET
the
DUP
Driver Utility
examine
want
the
HOST/DOP/DSSI/BOS :
and
change
the
DUP
to modify
command
driver
or
internal
utility
examine
<BUS_NUMBER>
where
<bus_number> is the
bus node
In
ID
(0-6)
Example B-2,
console prompt to
Example B-2: Starting the
»>SBT
Starting
Copyright
PARAMS>
Setting Allocation Class
After
and
BOST/DUP/DSSI/BOS:O 0
DOP
server
(0)
entering
set
the
the
allocation class for
DSSI bus number
for the !SA
SET
HOST/DOP/DSSI/BUS:O 0
start
the DUP server for the ISA
•••
1990
DUP
Digital
driver
RF
-series
by
setting
parameters.
on
the bus.
DUP
Driver
IARaNS
Equipment
utility
the
ISA
ISA
parameters,
host
to
the
specific ISA for which
<NODE_NUMBER>
(0
or 1).
and
PARAMS
PARAMS
<node_number> is
is entered
at
bus 0, node
Utility
Corporatio~
for a specified ISA, you
as
follows:
you
can
must
first
at
O.
examine
the
the
1.
At
the
PARAMS> prompt,
class
of
the
ISA to which you
2.
Enter
3.
Enter
Example
SET
ALLCLASS 2 (or
SHOW
ALLCLASS to verify
B-3
shows
class for a specified lSA.
from
an
allocation class
B-6 VAX 4000 Model 300
enter
SHOW
are
currently
enter
the
the
the
steps examining
In
the
example,
of
0 to
an
Operatio~
ALLCLASS
to check
the
connected.
allocation class you desire).
new allocation class.
and
changing
the
allocation class
the
is
allocation class of 2.
allocation
allocation
changed
Page 90

Example B-3: Setting Allocation Class for a Specified ISA
PARAMS>
Parameter
ALLCLASS
P ARAMS>
PARAMS>
Parameter
ALLCLASS
SHOW
SET
SHOW
ALLCLASS
Current
ALLCLASS
ALLCLASS
Current
Setting Unit Number
Mter
entering
and
set
1.
At
of
2.
Enter
3.
Enter
supplied by
4.
Enter
5.
Enter
parameter
Example
specified
the
the
the
the
DUP
unit
number
PARAMS> prompt,
ISA to which you
SET
UNITNUM
SET
FORCEUNI
the
SHOW
UNITNUM to verify
SHOW
FORCEUNI
is
O.
B-4
shows
ISA from
2
driver
for
10
(or
0 to override
bus
node ID plug.
to verify
the
unit
number
o
2
utility
the
enter
are
currently
enter
steps
Default
o
Default
o
for a specified ISA, you
ISA
as
follows:
SHOW
UNITNUM to check
connected.
the
unit
number
the
default
the
new
unit
number.
that
the
current
for changing
0 to
unit
number
Type
Type
you
unit
value
the
unit
10.
Byte
Byte
can
the
unit
desire).
number
for
the
number
Radix
Dec
Radix
Dec
examine
number
value
FORCEUNI
of
B
B
a
6. Label
shipped
where
the
ISA with
with
your
to affix a
its
unit
unit
system
number
number
and
R400X expander.
label on
using
the
the
ISA front panel.
unit
Figure
Programming Parameters for RF-Series ISAs
number
B-2
labels
shows
B-7
Page 91

Figure
B-2:
Attaching a Unit Number Label to the ISA Front Panel
Attach Unit
Number Label
Example
P
ARAMS>
Parameter
UN I TNOM
PARAMS>
P
ARAMS>
PARAMS>
Parameter
---------
UN I TNOM
PARAMS>
Parameter
---------
FORCEONI
---:-;'-;1"':
8-4:
saow
SaT
saT
saow
saow
ML()'o04237
Setting a Unit Number for a Specified ISA
OHITHOM
Current
Default
o
OHI~
rORCSOHI 0
OHlDUK
Current
----------------
I'ORC&tJKI
Current
----------------
10
Default
----------------
10
Default
----------------
0
o
--------
0
--------
1
Type
Word
Type
Word
Type
Boolean
Radix
Dec 0
Radix
Dec 0
Radix
0/1
0
B-8
VAX 4000 Model 300 Operation
Page 92

Setting
Mter
entering
and
set
1.
At
the
2.
Enter
name
3.
Enter
Node Name
the
the
node
the
P
ARAMS>
ISA
to which you
SET
NODENAME
of
up
to B characters).
SHOW
NODENAME
DUP
name
prompt,
driver
for
the
utility
ISA
enter
are
currently
SYSDSK (or
to verify
for a specified ISA, you
as
follows:
SHOW
NODENAME
to check
connected.
enter
the
desired
the
new node
name.
can
examine
the
node
name
alphanumeric
of
node
Example
ISA from
Example
PARAMS>
Parameter
NODENAME
PARAMS>
PARAMS>
Parameter
NODENAME
Exiting
Mter
you
enter
the
parameters
B-5
shows
the
factory-supplied
8-5:
SHOW
SET
SHOW
the
Changing
NODENAME
Current
NODENAME
NODENAME
Current
DUP Server
have
completed
WRITE command
you
have
the
a Node Name
R7CZZC
SYSDSK
SYSDSK
Utility
setting
changed
steps
at
recorded to nonvolatile memory.
If
you
have
driver
allow
changed
utility
the
will
changes to be recorded,
the
allocation class
ask
you to initialize
for changing
name
to
Default
Default
and
examining
the
PARAMS>
using
the
or
the
and
to
the
node
name
of
a specified
SYSDSK
for
a Specified
RF71
RF71
internal
prompt
SET command. The changes
node
name
controller. Answer
exit
the
DUP
ISA
Type
String
Type
String
ISA
to
of
an
driver
Radix
Ascii
Radix
Ascii
parameters,
save
the
ISA,
the
Yes
utility.
ISA
are
DUP
(Y)
B
B
to
If
you
have
command
at
specified ISA.
changes.
In
the
not
changed allocation class
the
PARAMS>
Example
example,
prompt
B-6
shows
the
controller is initialized.
Programming Parameters for RF-Series ISAs
or
node
to exit
the
DUP
the
procedure for saving
name,
driver
enter
utility
the
EXIT
for
the
parameter
8-9
Page 93

Example
.
PARAMS>
Changes
Stopping
»>
8-6:
WRITS
require
DUP
Exiting the
controller
server
••.
DUP
Driver Utility
initialization,
for
a Specified ISA
ok?
[Y/(N)]
Y
NOTE:
which you want to
Example
unit
10,
and
Example
»>BROW
DSSI Bus 0 Node 0
-DIA10 (RF71)
DSSI Bus 0 Node 1
-DIA11 (RF71)
DSSI Bus 0 Node 2 (R7EB3C)
-DIA12 (RF71)
DSSI Bus 0 Node 6
DSSI Bus 1 Node 0
-DIBO (RF71)
DSSI Bus 1 Node
-DIB1 (RF71)
DSSI Bus 1 Node
-DIB2
DSSI Bus 1 Node 3
-DIB3
DSSI Bus 1 Node
-DIB4 (RF71)
DSS
-DIB5 (RF71)
DSS
-DIB6
DSSI Bus 1 Node 7
~u
must
B-7
shows
numbers for
11,
and
12. Notice
DIA12.
B-7:
DBB!
(RF71)
(RF71)
I Bus 1 Node
I Bus 1 Node
(RF71)
repeat the procedures
change parameters.
the
display for
the
ISAs on
that
the
SHOW
DSSI
(SYSDSK)
(R7ALUC)
(*)
(SNEEZY)
(DOPEY)
1
(SLEEPY)
2
(GRUMPY)
(BASHFUL)
4
(HAPPY)
5
6
(DOC)
(*)
»>
in
this appendix for each
the
SHOW DSSI command
bus
0 have been changed from
0,
after
1,
[SA
and
bus 0 device names are now DIA10, DIA11,
Display
for
the
2 to
8-10
VAX
4000 Model 300
Operatiora
Page 94

This
appendix describes
•
Installing
•
Installing
and
and
the
booting
booting
Backup Procedures
following procedures:
standalone
standalone
BACKUP
BACKUP
on
the
on
a TK50
Appendix C
system
tape
disk
cartridge
• Backing
C.1
Overview of Standalone BACKUP
The
Backup Utility
directories,
is
on
the
you should
the
Backup Utility to back
were
in
will not be recorded on
Use standalone BACKUP to
Standalone
the
support
BACKup, you
procedure
open files. By
you can
can
You
cartridge,
that
you keep standalone BACKUP
cartridge.
Usually you boot standalone BACKUP from
saves time.
tape
cartridge
up
and
restoring
lets
and
user
disks. Because
disk
and
ignores sections
use
it
to back
memory
make
keep standalone BACKUP
and
data
the
BACKUP
of
the
must
sends
shutting
an
or
any
You
in
is
entire
shut
the
contents
exact copy
other
media
should, however, keep a copy of standalone BACKUP on a
case
the
the
you
create
up
user
up
the
about
files
resulting
make
a version
VMS
operating
down
the
of
down
the
of
the
the
system
the
system
disks,
system disk,
of
system
system
system supports. DIGITAL recommends
disk
disk
and
restore backup copies
the
Backup Utility copies only
of
any
open files contained
not
not
yet
written
backup
a complete backup
the
Backup Utility
system. Before you
VMS operating system.
caches back to the disk
and
disk.
on
the
on
the
becomes damaged.
in
the
system disk.
the
portions
back to
copy.
of
the
that
using
system disk, a TK50
system disk
the
standalone BACKup,
system disk because
If
of
the
the
disk
system
runs
use
standalone
The
and
closes
and
on a tape
shutdown
of
files,
what
memory,
you
use
files
that
(cache)
disk.
without
any
tape
it
Backup
~rocedures
C-1
Page 95

C.1.1
You
the
[SYSE]
To
Installing Standalone BACKUP on System Disk
can install standalone BACKUP
system disk from [SYSI] to [SYSE]. However, Digital
as
the
standard
directory for standalone BACKUP.
install standalone BACKUP
in
in
[SYSE] on
any
available root directory on
the
following procedure.
1.
Log
in to
the
SYSTEM account.
Enter
the
2.
$
@SYS$OPDATB:STABACKIT
following command:
SYS$SYSDBVIC8:
has
system disk, use
I~~I
established
the
The procedure places the files
[SYSE.SYS$LDR] on
copied. When
the
the
procedure finishes,
in
the directories [SYSE.SYSEXE]
system disk.
the
It
lists
system displays
message:
The
kit
is
complete.
3.
To
boot standalone BACKUP from
C.1.2
To
Booting Standalone BACKUP from the System Disk
boot standalone BACKUP from the system disk, use
the
system disk, see Section C.1.2.
procedure.
1.
If
the VMS operating system
If
the VMS operating system
to
shut
down the system:
$
@SYS$SYSTBM:SBOTD01IN
Answer
the
questions. When
reboot should be performed, press
is finished,
SYSTEM
the
system displays
SHUTDOWN
COMPLETE -USE
2. Stop the system by pressing
3.
Enter
the
BOOT command
is
not running, go to step 2.
is
running, enter
lRetuml
the
procedure asks
in
Return
the
the
Halt
the
following format:
for No. When
following message:
CONSOLE
TO
button on
the
the
files
as
they
the
following
the
following
following command
if
an
automatic system
the
procedure
HALT
SYSTEM
the
SCPo
and
are
»>
Substitute
example,
following:
C-2
B/BOOOOOOO
if
VAX
4000 Model 300 Operation
device_name
the
device name of the system disk for
the
system disk
I
Return
has
I
a device
name
device_name.
of
DIAO,
enter
For
the
Page 96

»>
4.
Standalone
B/20000000
BACKUP displays a
D~O
I~NmI
message
similar
to
the
following:
VAX/VMS
5. A few
the
PLEASE ENTER
19-APR-1990
minutes
date
and
Version
time
13:00
later
DATE
V5.3-2
the
using
AND
I~NmI
6. The system displays a
example:
Available
Available
Check
the
devices
the
device
device
list
are
MUAO:
DIAO:
of
devices.
connected properly
Model 300 Installation
7.
When
standalone
BACKUP finishes booting,
tion message followed by
%BACKUP-I-IDENT,
19-APR-1990
$
To
back
up
the
To
restore
the
system disk, see Section C.2.1.
system disk, see Section C.2.2.
stand-alone
13:00:00.00
Major
procedure
the
TIME
list
If
manual
the
version
asks
for
id
the
= 1
date
Minor
and
24-hour clock format, for example:
(DD-MMM-YYYY
of
the
local devices on
device
device
the
list
is
to
type
type
incomplete,
the
HH:MM)
TK70
RF71
system. See
for details.
it
displays
dollar-sign
BACKUP
prompt
V5.3--2;
($):
the
your
make
the
version
time.
system, for
sure
that
the
VAX 4000
an
identifica-
date
is
id
Enter
all
= 0
C.1.3 Installing Standalone BACKUP
If
your system
standalone
damaged.
following procedure.
NOTE:
If
you have a tape cartridge distribution kit, you already have
standalone BACKUP on a tape cartridge.
becomes damaged, or
this section.
1.
Obtain a blank
example, you would
version
has a tape
BACKUP on a
To
install
standalone
if
you need
tape
cartridge. Write
use
5.3-2
kit.
Insert
drive, Digital recommends
tape
cartridge
in
BACKUP on
to
make extra copies, use the procedure
the
the
name
Sf A BKUP V5.3-2 TK50 to build a
the
label
into
the
on
a Tape Cartridge
that
you
case
the
system disk becomes
tape
cartridge,
If
the original tape cartridge
name
on
the
paper
use
label.
label slot.
Backup Procedures
keep
the
in
For
C-3
Page 97

2. Write-enable the tape cartridge .
. 3. Insert
the
tape
cartridge labeled
s/A
BKUP V5.3-2 TK50
cartridge drive.
4.
Log
in
to
the
SYSTEM account.
Enter
the
5.
$ @SYS$tJPDATB:
6.
The
following command:
STABAC1tIT
system
asks
for
the
IReunI
name of
the
target
device.
Enter
example:
%STABACKIT-I-SYMDEL,
Enter
MOAO
NOTE:
the
name
of
l!!!!ffi
If
your system uses the TLZ04 tape drive, enter the device 1147ne
the
all
devioe
global
on
symbols
whioh
deleted
to
build
the
MKAO.
7. The system displays
Please
This
Enter
8. When you
plaoe
volume
"YES" when
will
are
ready to continue,
9. The system displays verification messages informing you
being copied.
the
the
following message:
soratoh
reoeive
ready:
tape
the
oartridge
volume
enter
Y (for YES)
label
in
drive
SYSTEM.-
and
in
the
tape
MUAO,
kit:
MUAO:
for
press Return.
that
files
are
10. When standalone BACKUP is installed,
similar to
Ending
Starting
The
$
11.
Remove
kit
the
following:
time
is
the
time
oomplete.
19-APR-1990
19-APR-1990
13:45:29.90
13:22:39.05
tape cartridge labeled Sf A BKUP V5.3-2 TK50 from
tape cartridge drive.
the
tape
12. Write-protect
C-4
VAX 4000 Model 300 Operation
cartridge
and
store
the
system displays a message
it
in
a safe place.
the
Page 98

C.1.4 Booting Standalone BACKUP from a Tape Cartridge
If
the
system disk
you can boot
standalone
BACKUP from a
You need a
distribution
BACKUP from a
1.
If
the
VMS
If
the
VMS
to
shut
standalone
tape
tape
operating
operating
down
containing
cartridge
cartridge
tape
cartridge,
system
system
the
operating
standalone
BACKUP
BACKUP from a
tape
that
or
cartridge
contains
one
that
use
is
is
takes
standalone
you created).
the
following procedure.
not
running,
running,
system:
should
tape
cartridge. Booting
approximately
BACKUP
To
go
to
step
enter
the
following command
become unusable,
20
minutes.
(either
boot
standalone
2.
the
$ @SYS$SYS'l'BM:SBO'l'DOWN I
Answer
reboot should be
is
SYSTEM
2. Stop
3.
Insert
the
finished,
SHUTDOWN
the
system
the
questions.
perfonned,
the
system
by
tape
cartridge
cartridge drive.
4.
To
boot
standalone
console
»>
5.
Standalone
VAX/VMS
6. The procedure
using
PLEASE ENTER
19-APR-1990
7.
The
B
MOAO
prompt
I
Retuml
(»»:
BACKUP displays a message
Version
VS.3--2
asks
the
24-hour clock format, for example:
DATE
13
:00
system displays a
example:
Retum
I
When
the
procedure
press
displays
COMPLETE -USE
pressing
the
the
Halt
containing standalone BACKUP
BACKUP,
for
the
AND
TIME
I
Return
I
list
enter
Major
date
and
(DD-MMM-YYYY
of
the
asks
if
an
Return
for No. When
following message:
CONSOLE
button
the
version
the
local devices
TO
HALT
on
the
following command
similar
time.
id=l
Enter
HH:MM)
to
Minor
on
automatic
the
SYSTEM
system
procedure
SCPO
in
the
tape
at
the
following:
the
version
date
and
id=O
time
your system, for
the
Available
Available
device
device
MUAO:
DIAO:
device
device
type
TK70
type
RF71
Backup Procedures
C-5
Page 99

8. When standalone BACKUP finishes booting,
the
tion message followed by
dollar-sign prompt ($):
it
displays
an
identifica-
%BACKUP-I-IDENT,
19-APR-1990
$
9.
Remove
the
tape
stand-alone
13:00:00.00
BACKUP
V5.3--2;
cartridge containing standalone BACKUP from
tape cartridge drive.
To
back
up
the system disk, see Section C.2.1.
To
restore
C.2 Backing
There
the
system disk, see Section C.2.2.
Up
the System Disk
are
several reasons to back
up
a system disk:
• In case a problem occurs during a VMS upgrade
the installation of other software prod
these procedures, you should back up
can
occurs, you
•
To
you
prevent loss of system files
install
restore
or upgrade
products, you should back
and
renders
and
continue to use
•
In
case
VMS operating system, you can restore
the
continue to use
the
system disk inoperable, you can restore
the
system disk malfunctions:
the
the
backup copy of
the
VMS operating system,
up
the
the
system.
system.
if
system disk.
cts: Before you
ll
the
they
are
If
system disk.
the
system disk.
deleted accidentally: After
If
you have a backup copy of
it
to a functioning disk
the
date
or
update, or during
attempt
If
a problem
or
any
other
a system file
the
backup copy
is
any
software
is
deleted
and
the
of
•
To
eliminate disk fragmentation: Fragmentation happens when files
not
are
stored contiguously on
tape cartridge, diskettes, or
original system disk.
files
are
stored contiguously.
Digital recommends
that
The
you use standalone BACKUP, which uses a subset
the
disk. Back up
another
disk. Then restore
the
system disk to a
the
files to
BACKUP command creates a copy on which
of Backup Utility qualifiers, to back up and restore the system disk.
especially important
!PHYSICAL qualifiers to
that
you
understand
the
BACKUP command before using standalone
the
functions of the !IMAGE
BACKUP.
C-6 VAX 4000 Mode\300 Operation
the
It
is
and
Page 100

Table C-1 : Standalone BACKUP Qualifiers
Qualifier
Function
!IMAGE
!PHYSICAL
For
a complete description of
VMS
Backup Utility Manual.
C.2.1
To
1.
Backing Up
back
up
Decide
to a
tape
tape
whether
tape
that
cartridge
the
cartridge.
you can
Allows you
system
disk
Copies, saves, restores,
terms
of
the
System
system disk, use
you
want
If
you
use
for
that
is
either
need.
2.
If
you
are
cartridge, slide
label.
3.
Determine
the
drive holding
DEVICE
using a
Insert
command
the
the
tape
cartridge, write-enable
the
write-protect switch
tape
cartridge
device
name
the
backup disk
at
the
console
4. Boot standalone BACKUP
to
create
a functionally
or
logical blocks, ignoring
the
Backup Utility
compares
Disk
the
following procedure:
to
back
up
the
system to
are
the
backup
blank
of
as
described
using a
in
the
prompt
tape
copy. A scratch
or
contains files
away
the
tape
drive holding
or
tape
(»».
in
Section C.1.2
equivalent
any
file
and
the
its
copy
entire
structure
qualifiers,
another
cartridge,
it.
from
obtain a scratch
tape
cartridge
that
you
To
write-enable a
the
tape
cartridge drive.
the
system
cartridge.
Enter
or
Section C.1.4.
of
the
system
fixed
no
cartridge
disk
the
entire
disk
see
the
disk
is
longer
tape
and
SHOW
in
or
a
5.
Enter
$
-$
the
BACKUP command
BACKOP/I~GE/VERIFY
$
BACKOP/I~GE/VERIFY
saveset
.BCIt/LABEL--volume_Iabel/REWIND
where:
•
source _ dr i ve
Use
the
device
•
target
holding
drive
the
backup
source_drive:
source
is
the
location of
name
of
is
the
destination. Use
disk
in
one
drive:
the
the
drive holding
or
tape
of
the
following formats:
target_drive:
target
files
that
the
cartridge.
IR.~rnl
drive:-
I~wml
JR;tuml
you
want
to
back
the
system disk.
device
Backup Procedures
name
of
the
up.
drive
C-7
 Loading...