

Page 1
™
Page 2

DIGITAL Server 3100/3200 Series2
hank ou
... for purchasing a DIGITAL Server 3100/3200.
The DIGITAL Server family represents DIGITAL’s
continued commitment to Uncompromising
Quality, backed by award-winning Customer
Service and Support. The following procedures
will help you easily set up your server’s
hardware and software.
Before You Begin
Select a suitable area for assembly and use. Ensure that
your workspace:
■ Is located next to electrical outlets and a tele-
phone jack
■ Is free from excessive heat, dust, and direct sunlight
■ Allows at least 7 inches of clearance on all sides for
proper air flow
■ Is in accordance with local and regional electrical
regulations governing the installation of Information
Technology Equipment by licensed electricians
See “Technical Specifications” in your System Reference
manual for temperature and humidity information.
If you do not wish to install the server yourself, contact
your DIGITAL authorized service provider. A Customer
Service Technician can install the server for you.
WARNING
Use extreme care when unpacking your server.
Due to its weight, two people are required to
unpack it. Failure to use two people might violate
certain safety regulations and can result in severe
personal injury or equipment damage.
YT
DIGITAL ServerWORKS Quick Launch
DIGITAL ServerWORKS Quick Launch delivers
unparalleled achievement in streamlining the installation and configuration of hardware components
and network operating system software on the
DIGITAL Server line of products. Quick Launch
combines an intuitive interface and versatile, time
saving features to produce a consistent and accurate
installation optimized for DIGITAL’s extremely powerful and highly acclaimed DIGITAL Servers.
In addition to its automated yet extensible method
of express installations for Network Operating
Systems, Quick Launch provides a comprehensive
archive of server documentation, troubleshooting
assistance, and indispensable configuration utilities;
all on one bootable CD!
Page 3
Installation Guide
3
ENGLISH
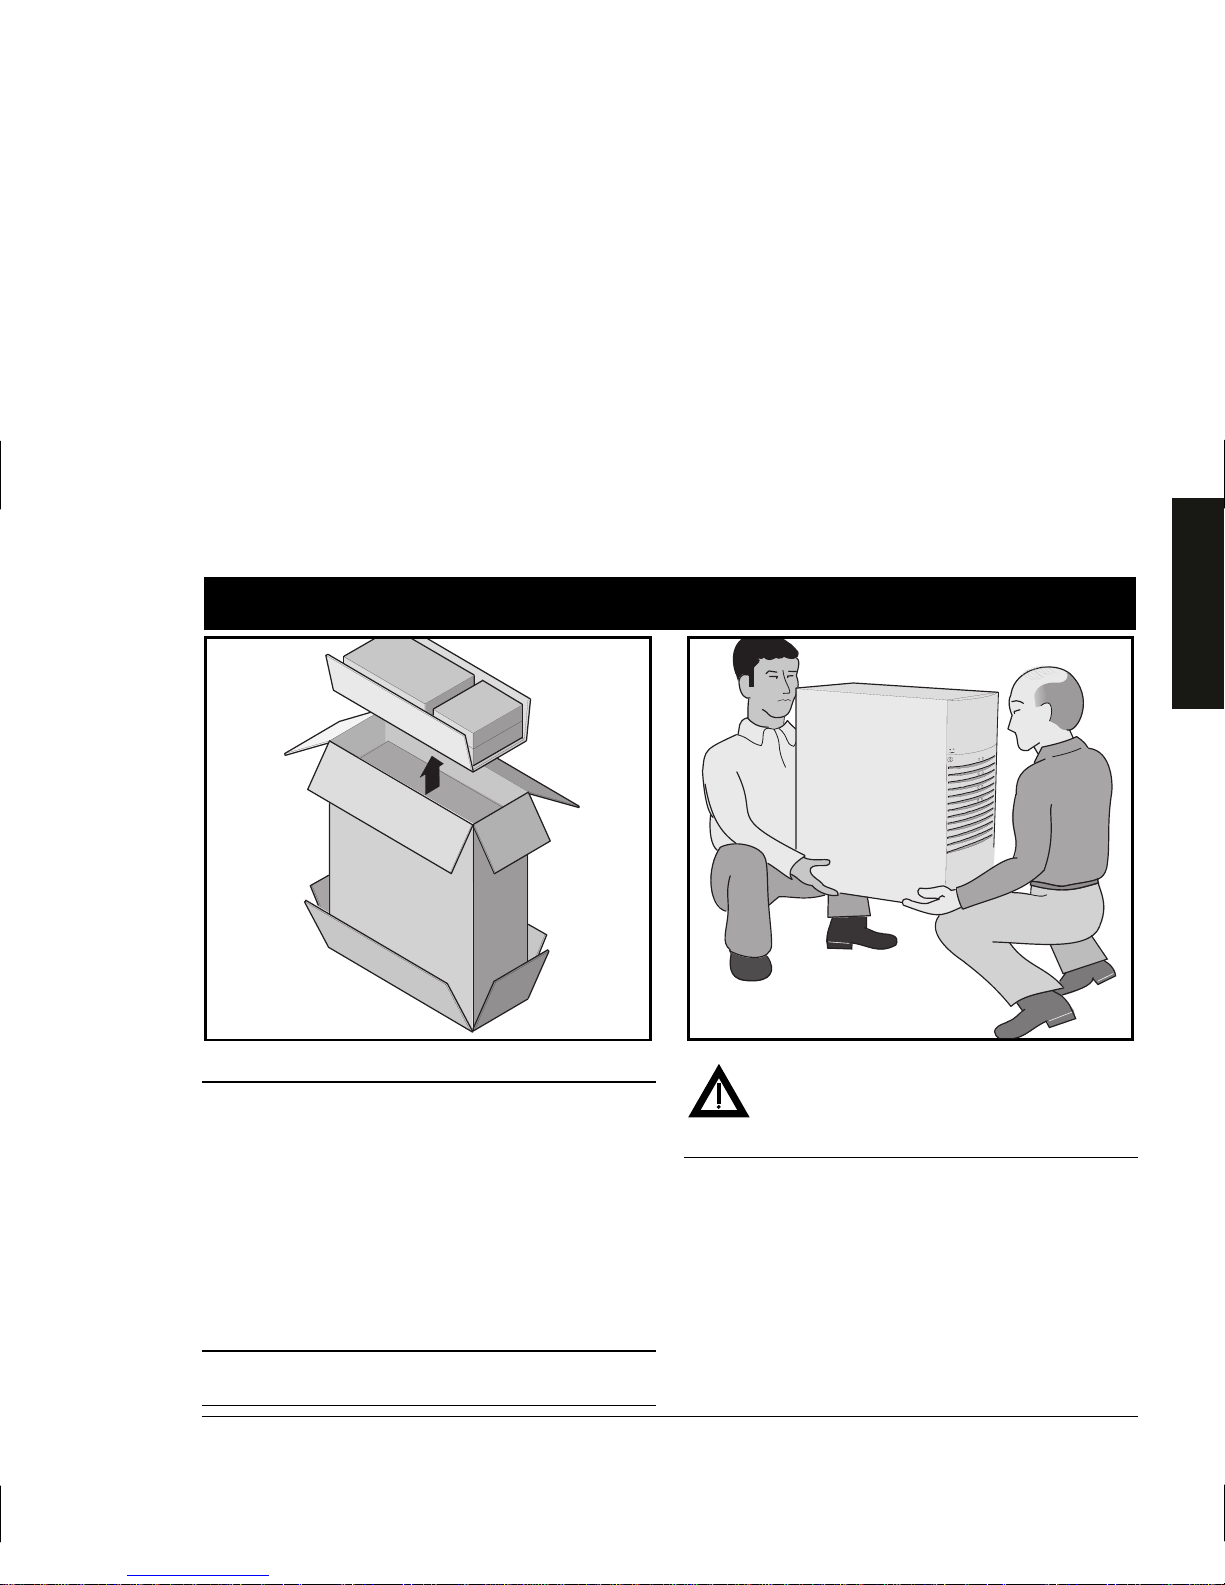
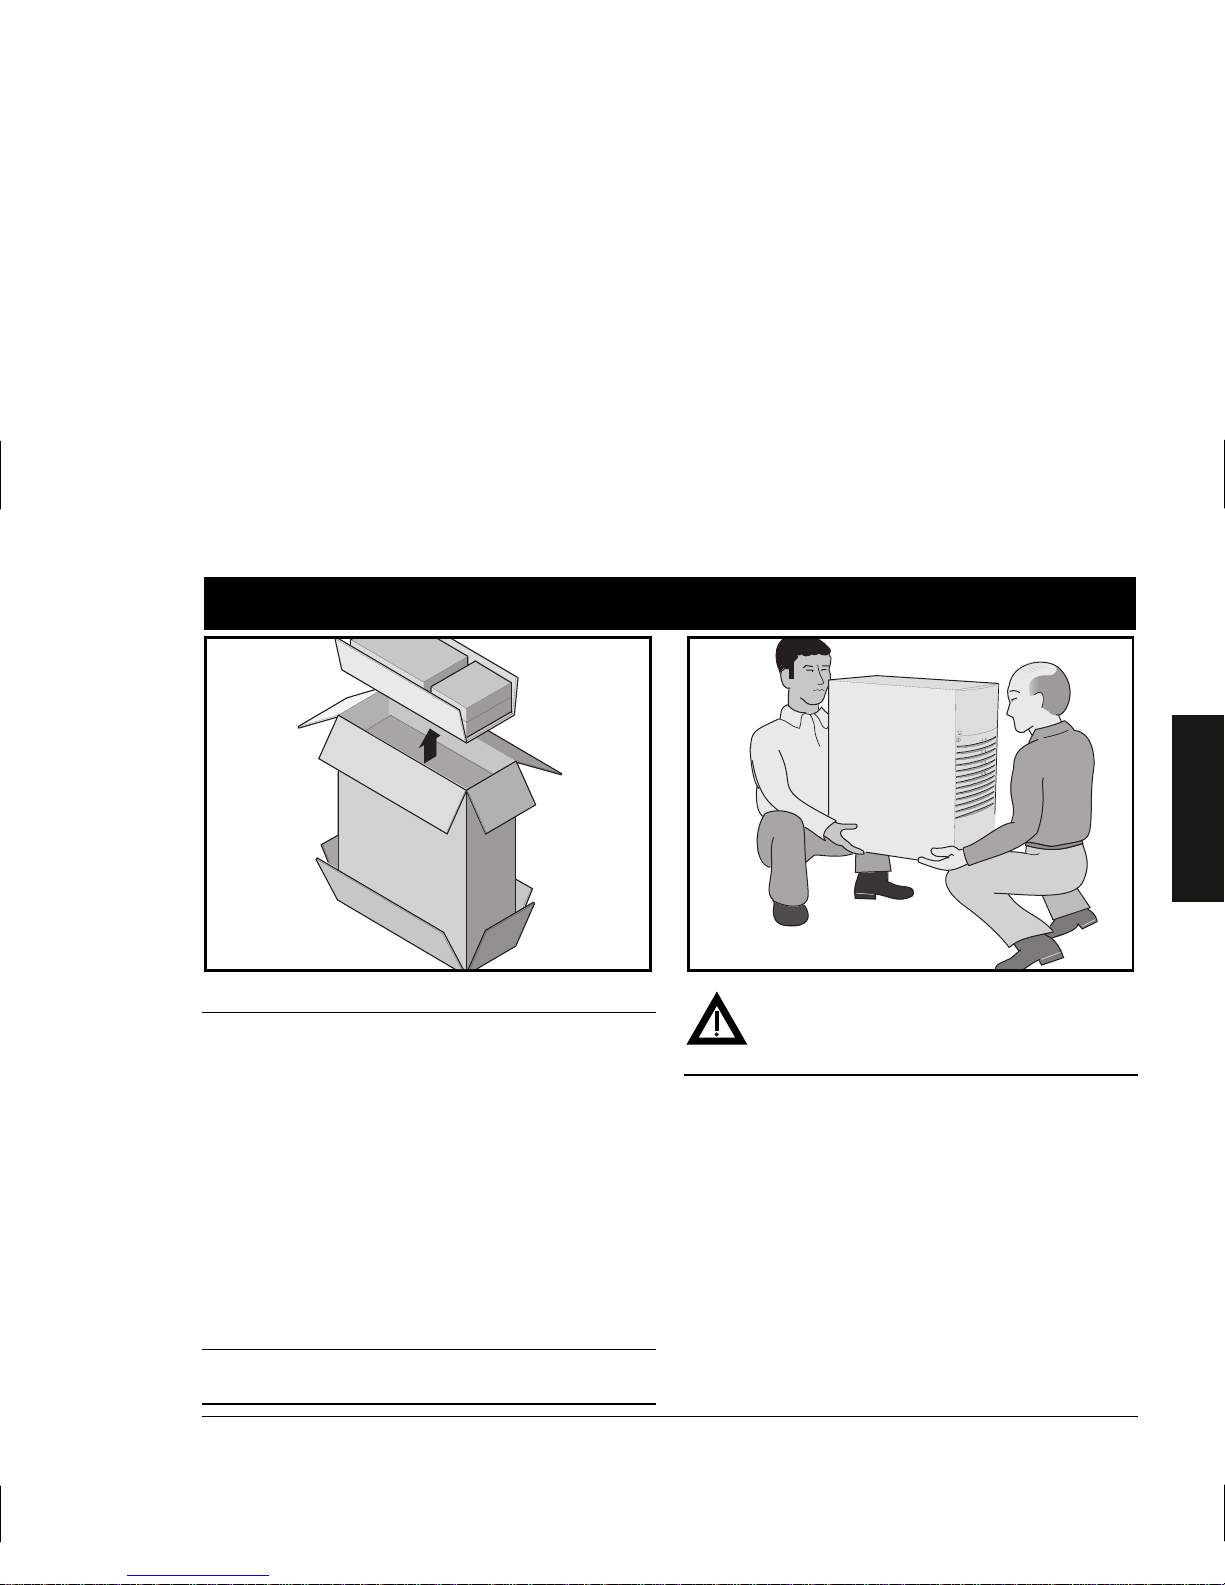
Unpack your server
Unpacking Instructions
1. Tip the box on its side. Open the bottom of the box
and fold the bottom flap under the box.
2. While still in the box, set the server upright.
3. Open the top of the box and remove the country kit.
4. Close the top of the box. Using the handles on the box,
remove it from the top of the server.
5. Move the server to your desired location. Tip the
server slightly and rotate the four pedestal feet outward until they lock into position.
NOTE
The country kit is in the top of the box. If desired, recycle
the packing material.
WARNING
The server is heavy. Do not lift it alone.
If you need to lift the server…
1. Get close to the server. Squat down with your knees
bent and your feet apart for stable footing.
2. Lift with your legs, keeping your back straight.
3. Avoid twisting your upper body. Move your feet to turn.
4. Lower the server gently using your leg muscles to squat
while keeping your back straight.
1
Page 4
DIGITAL Server 3100/3200 Series4
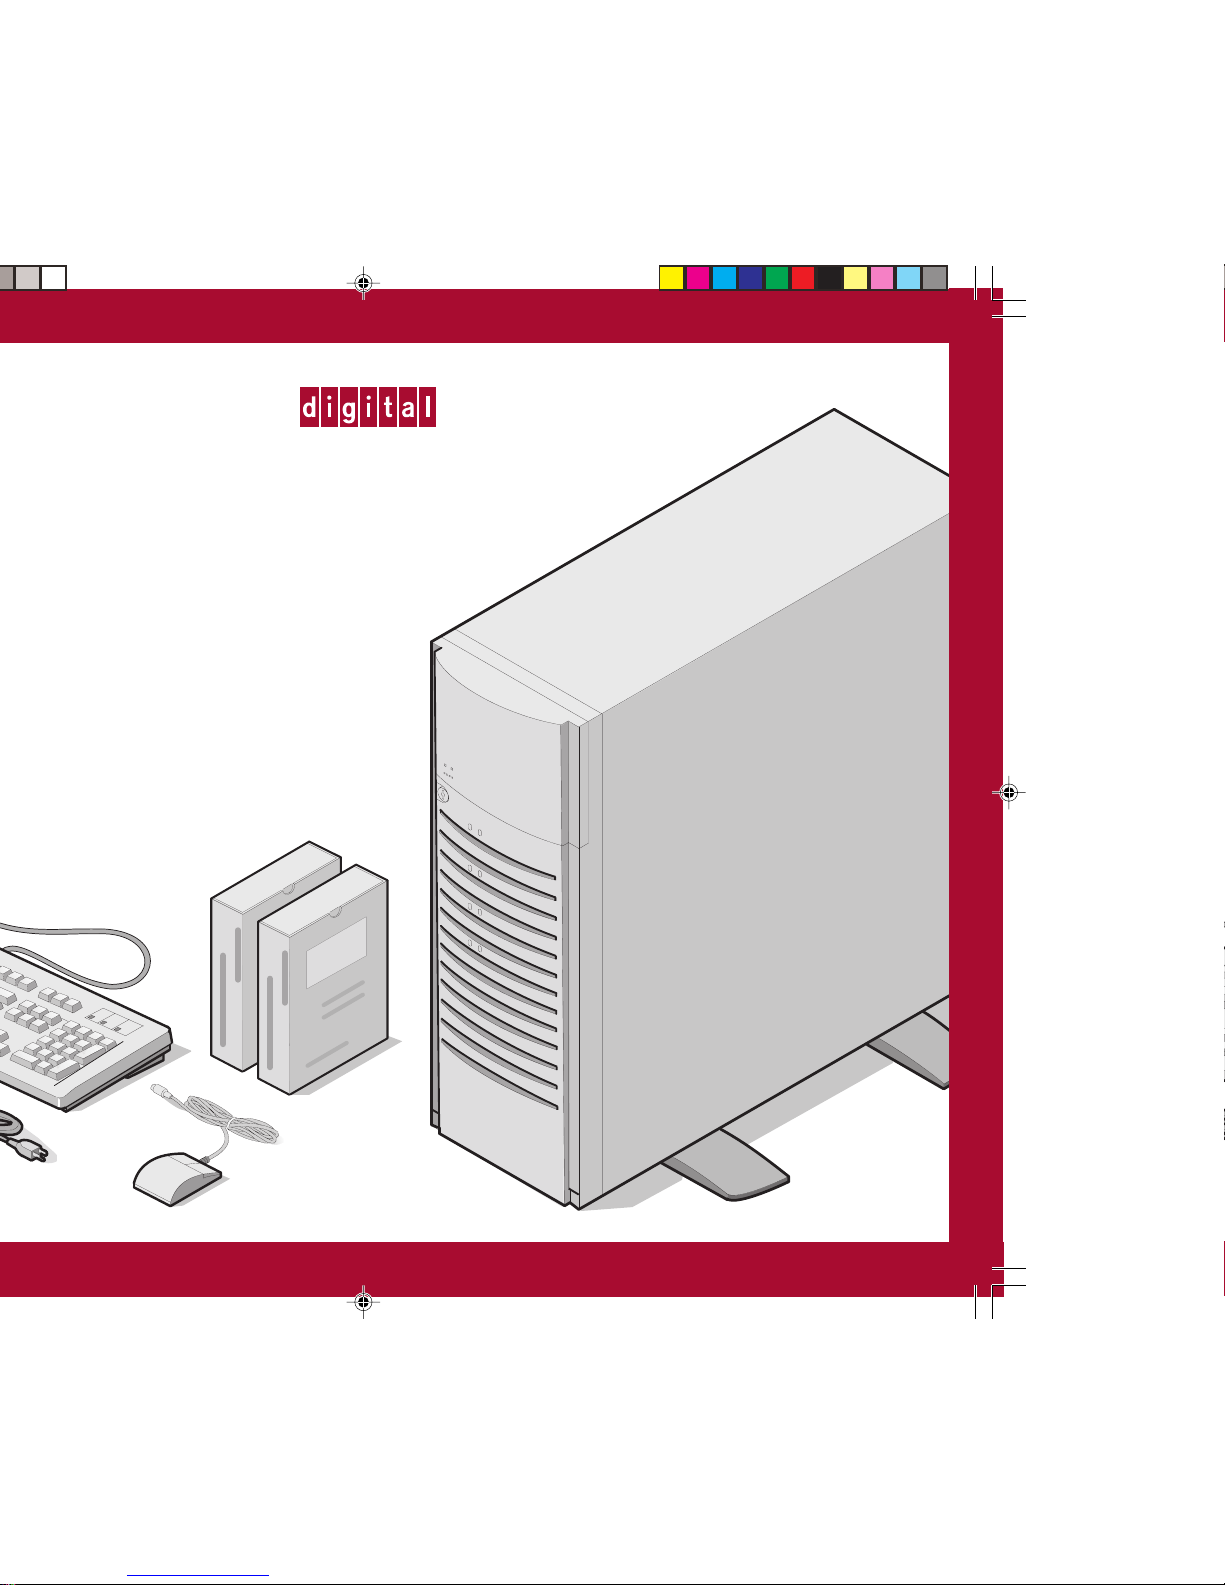
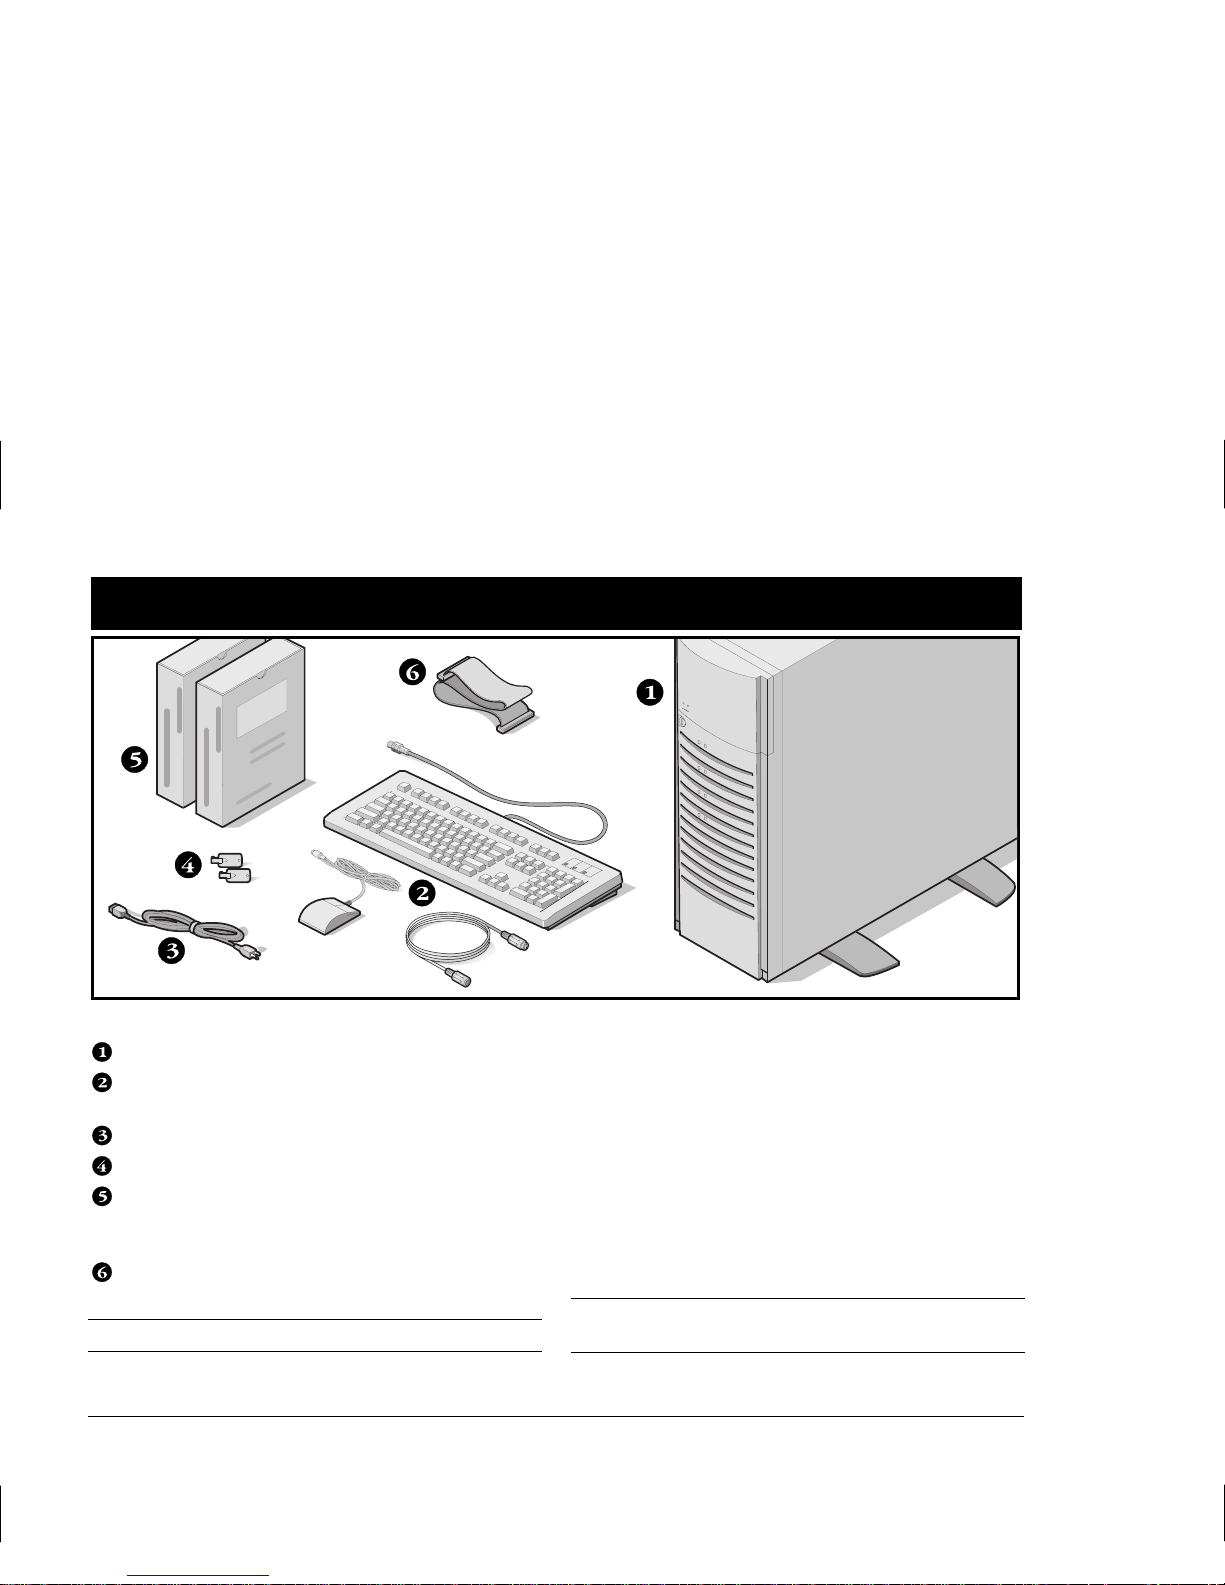
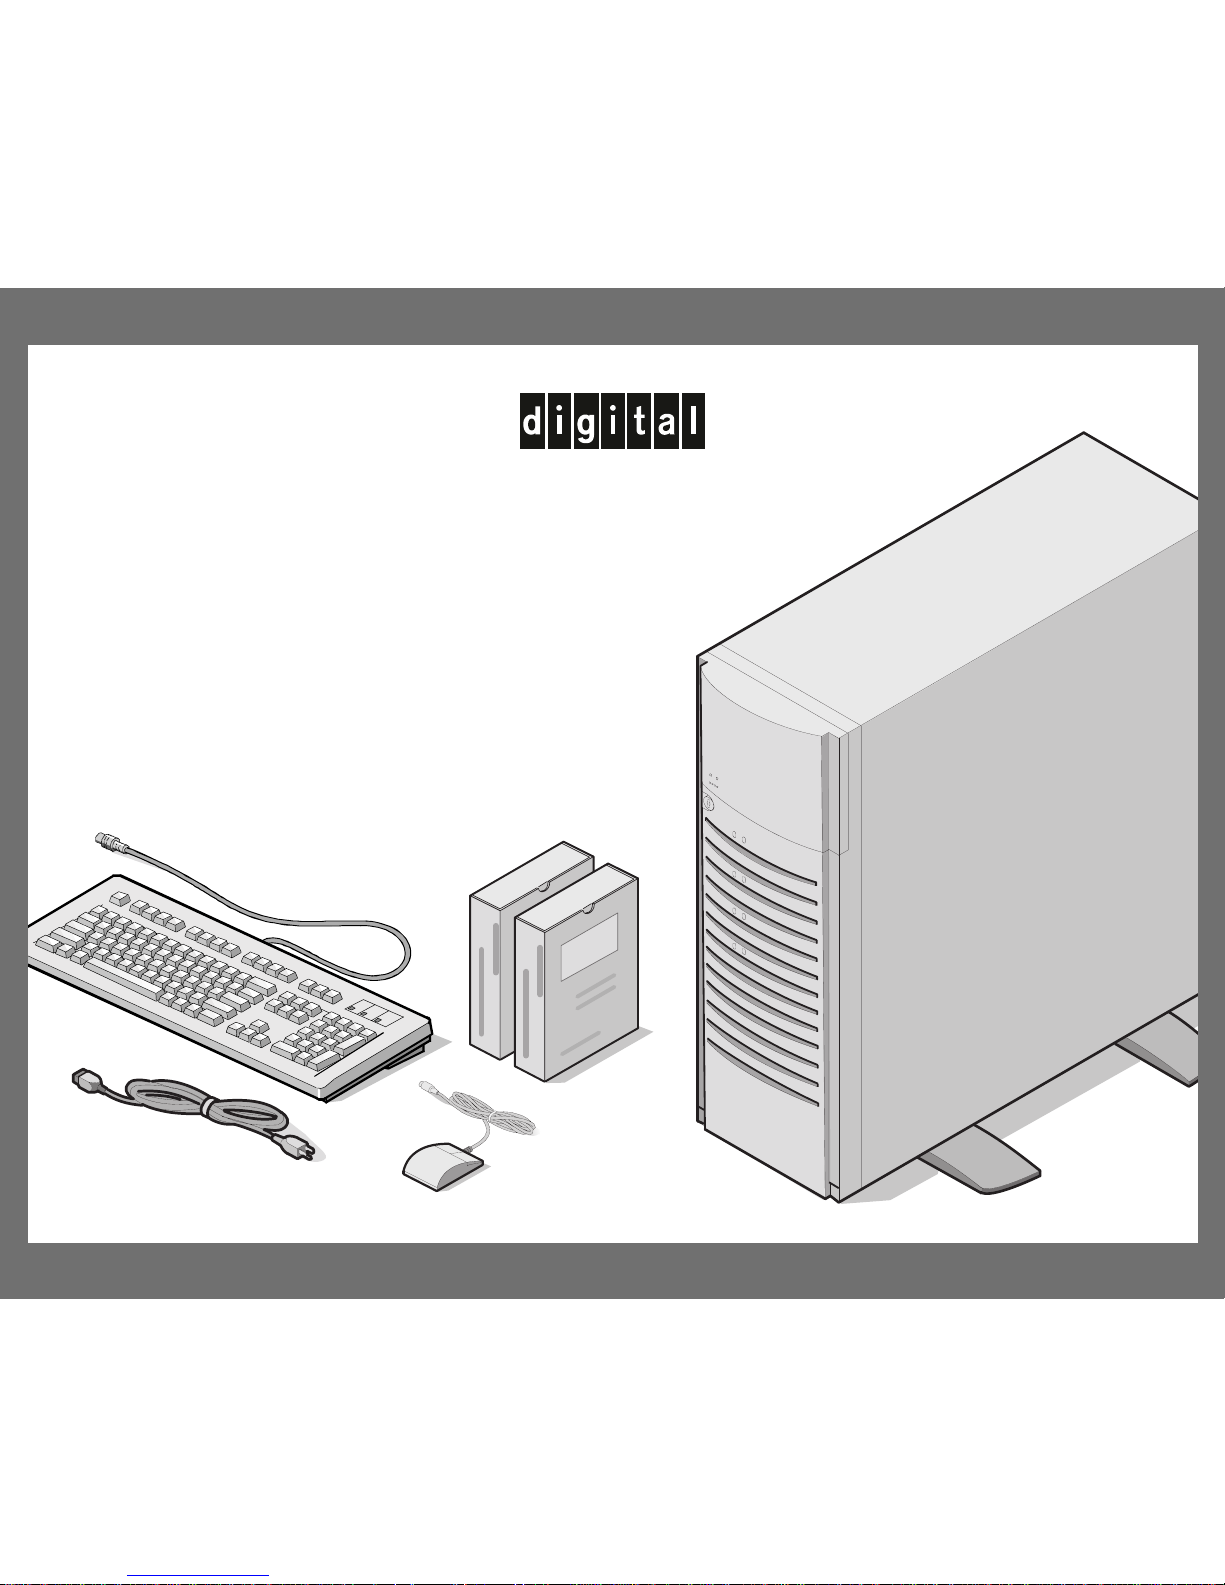
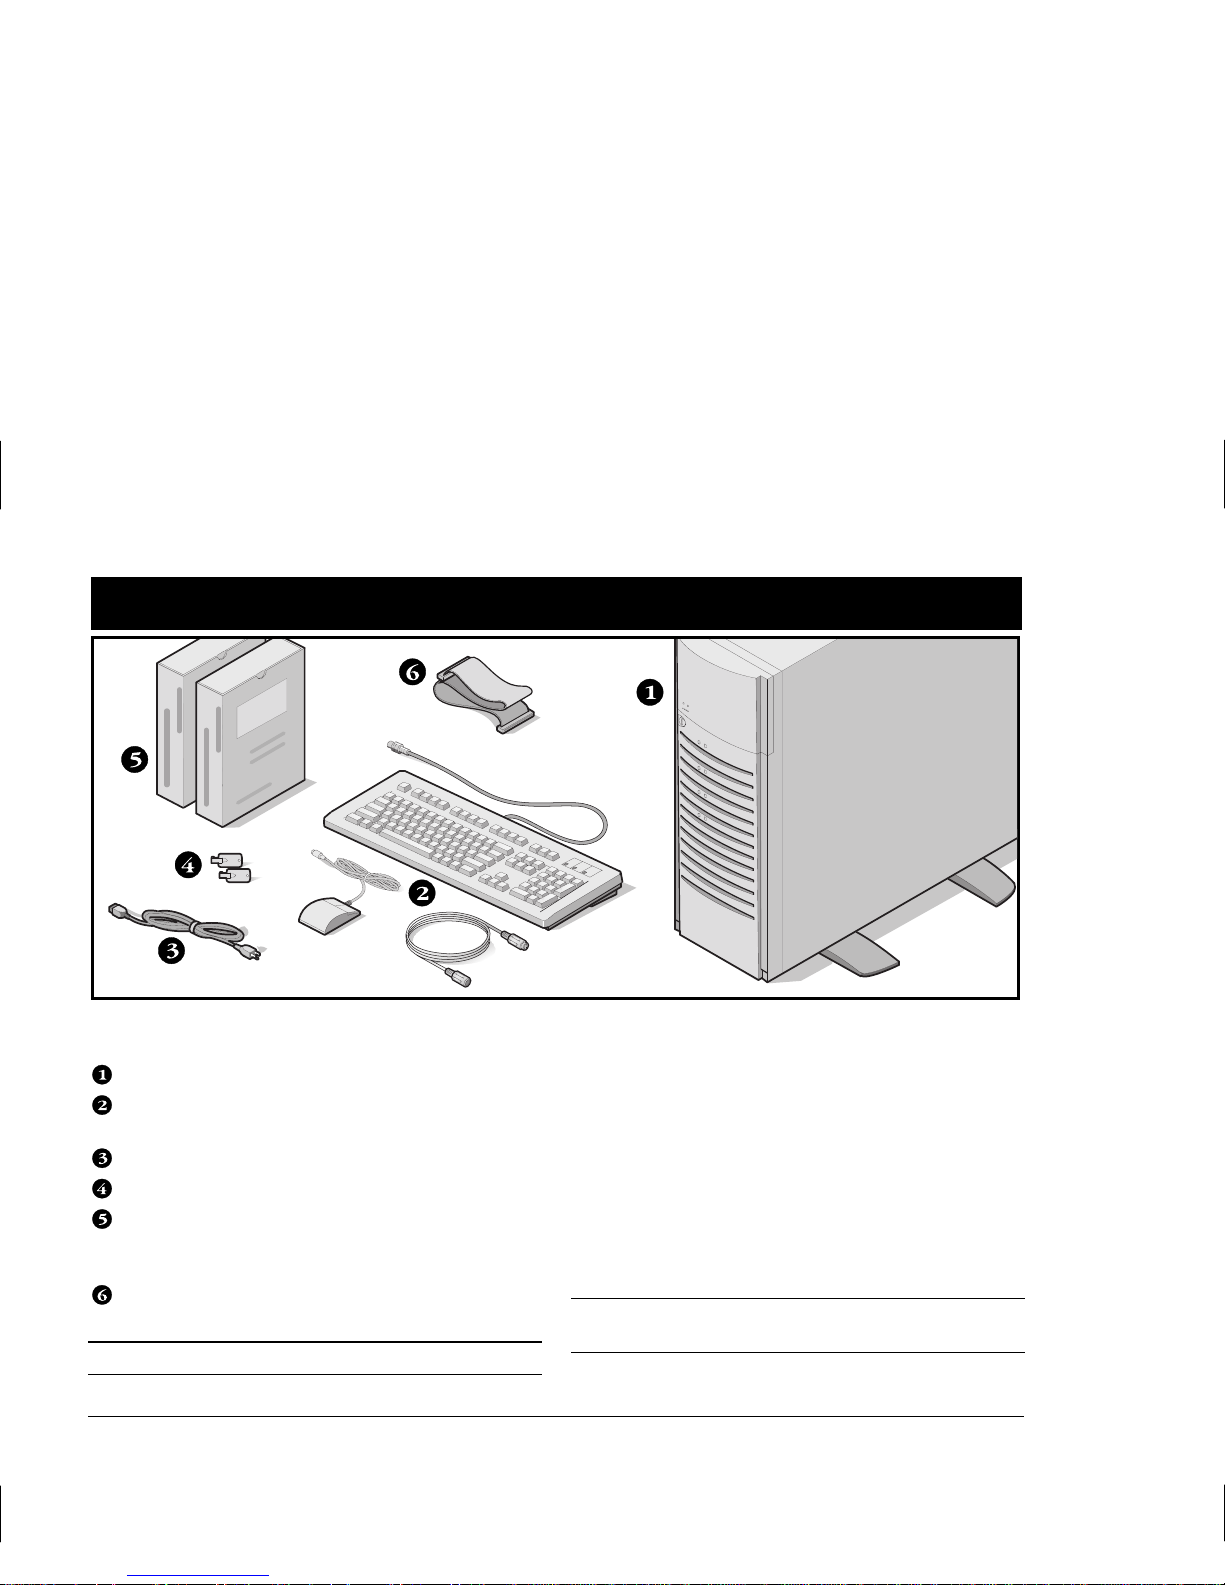
Check the parts
Unpack and identify your server’s components.
DIGITAL Server 3100/3200
Country kit including keyboard, keyboard extension
cable and mouse (ordered separately)
Power cord
Server keys
Server software and documentation kits including
printed manuals and the Quick Launch CD-ROM with
on-line documentation
External 68-pin wide SCSI cable
NOTE
Monitor must be ordered separately.
The DIGITAL ServerWORKS software kit includes:
■ ServerWORKS Quick Launch: ServerWORKS Quick
Launch CD-ROM disc and Getting Started guide.
■ ServerWORKS Manager kit: ServerWORKS Manager
software and documentation.
The DIGITAL Server 3100/3200 Series Documentation kit
includes:
■ This Installation Guide, System Reference manual,
Documentation Overview, Warranty and Service
Information, and Registration Card.
NOTE
On-Line Documentation is also contained on the Quick
Launch CD-ROM.
2
Page 5
Installation Guide
5
ENGLISH
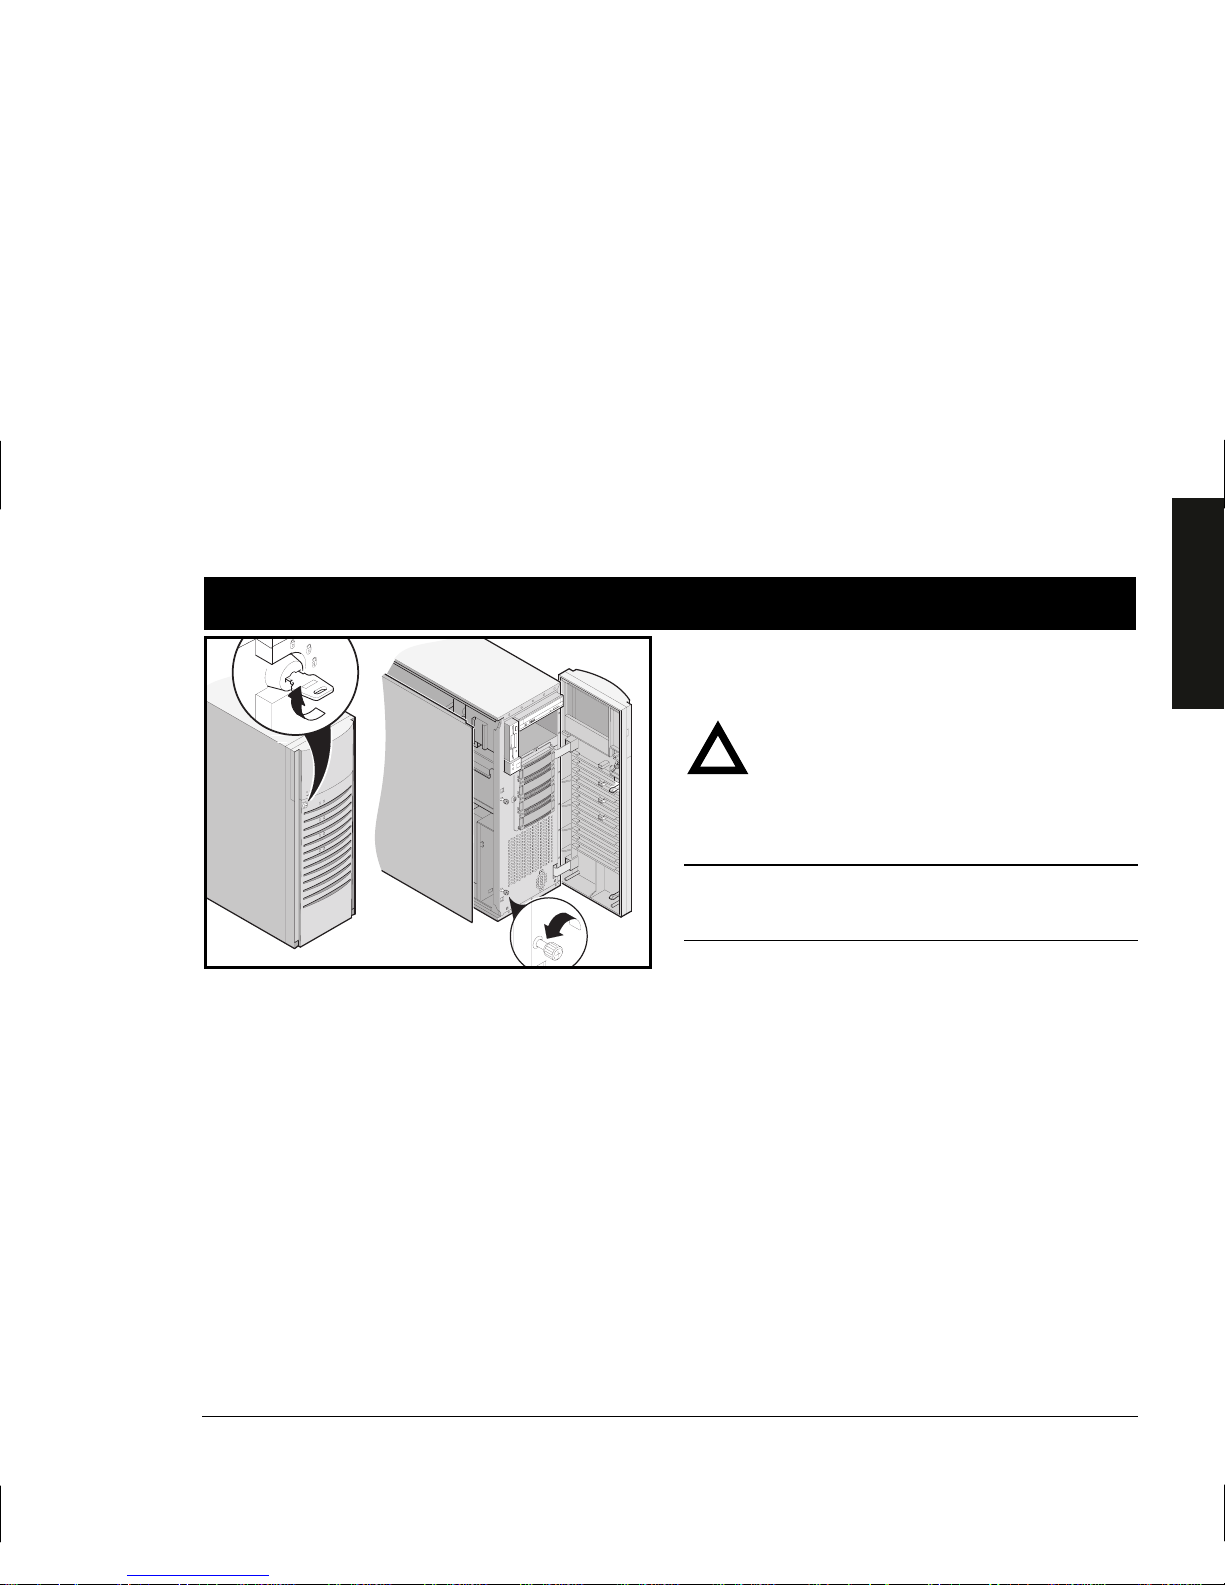
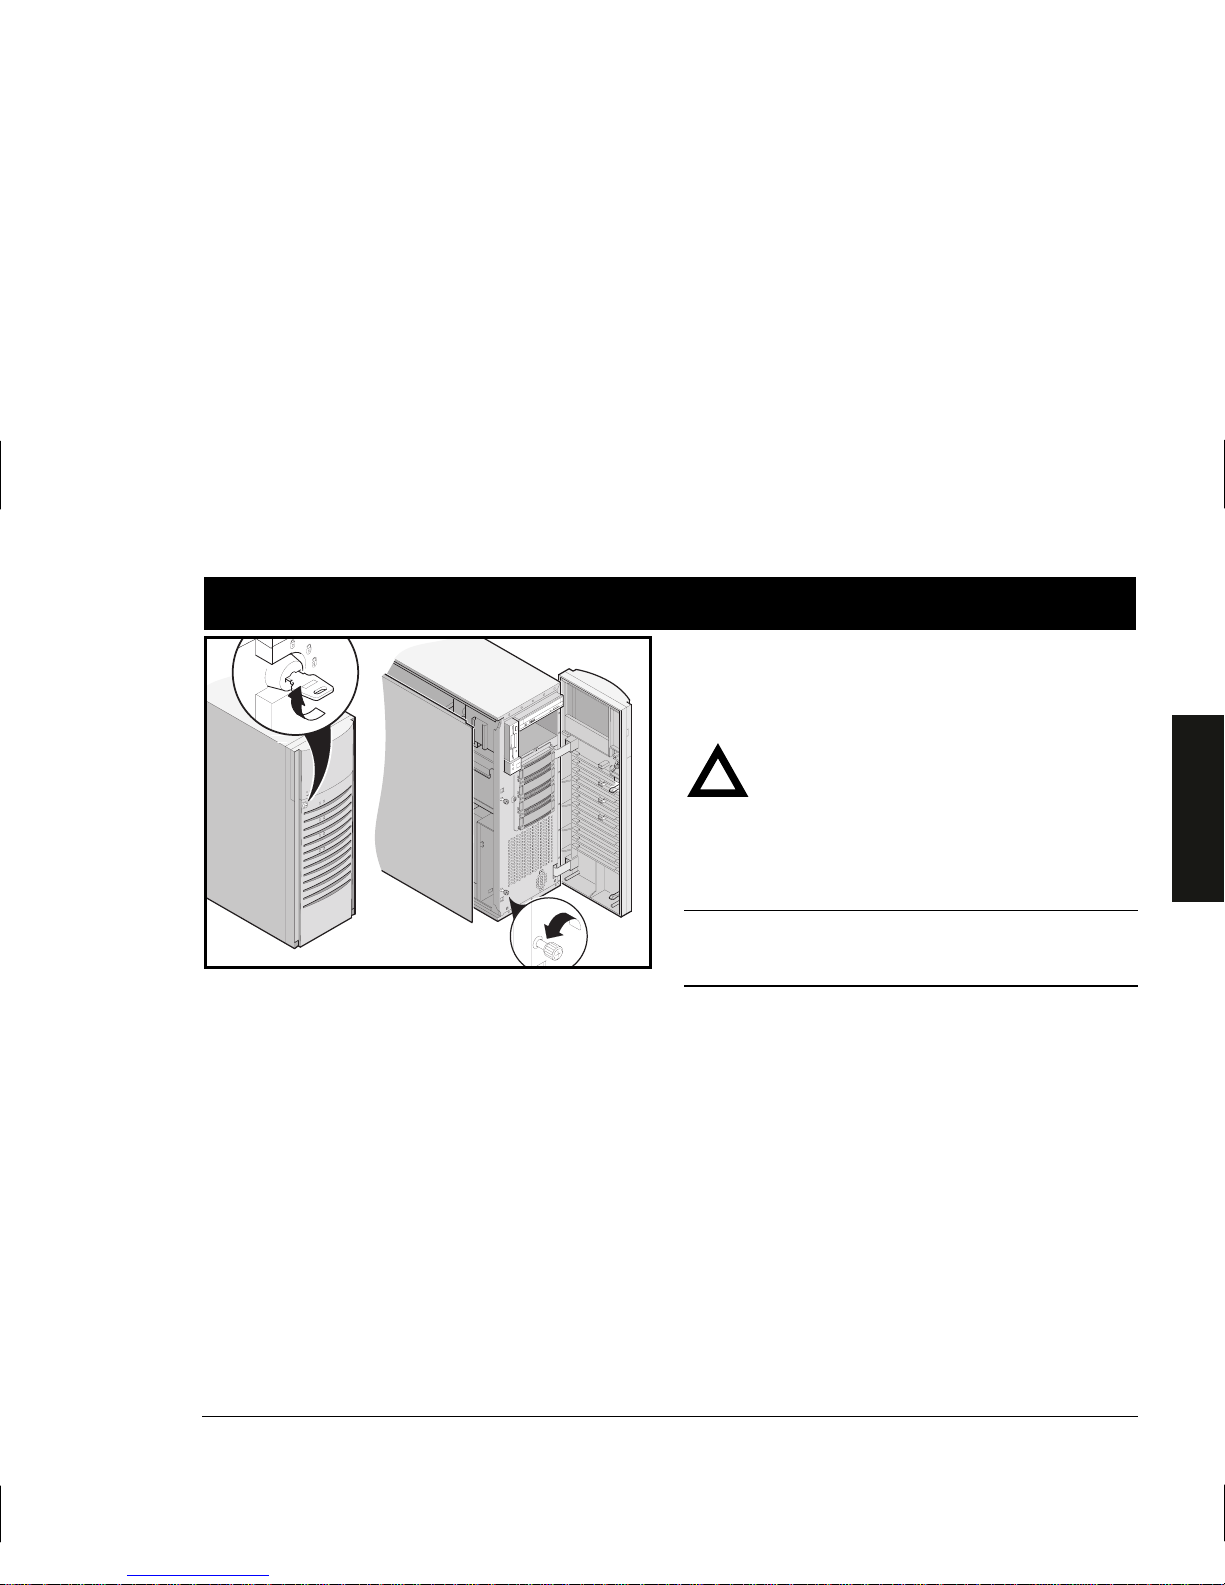
Install any internal options
If you have options to install, install them now.
1. Unlock the door and front bezel.
2. Open the front bezel and loosen the two side panel
thumbscrews.
3. Remove the side panel.
4. Install the options.
Refer to the following chapters in the System Reference
manual for detailed information.
■ Server Software and Utilities
■ Pentium Pro Processor Upgrades
■ Pentium II Processor Upgrades
■ Installing Additional Memory (SIMMs)
■ Installing Additional Memory (DIMMs)
■ Installing Disk and Tape Drives
■ Connecting SCSI and RAID Adapters
Also, refer to the documentation that came with the option
kit for specific installation instructions.
CAUTION
Before touching any circuit board or component,
wear an anti-static wrist strap, properly grounded
to the server chassis, or touch the metal frame to
discharge any static electricity.
NOTE
ISA cards should be installed after you run the System
Configuration Utility (SCU) in Step 7 or 8, since the SCU
will list IRQs already used.
If you plan to use Quick Launch to install your Network
Operating System, your server must meet the following
minimum requirements to proceed with the server installation.
■ 16 MB of RAM
■ SVGA monitor
■ 540 MB minimum hard disk drive
■ Two or three button mouse
■ CD-ROM drive with boot capability attached to the
bootable SCSI controller
■ Keyboard
3
Page 6
DIGITAL Server 3100/3200 Series6
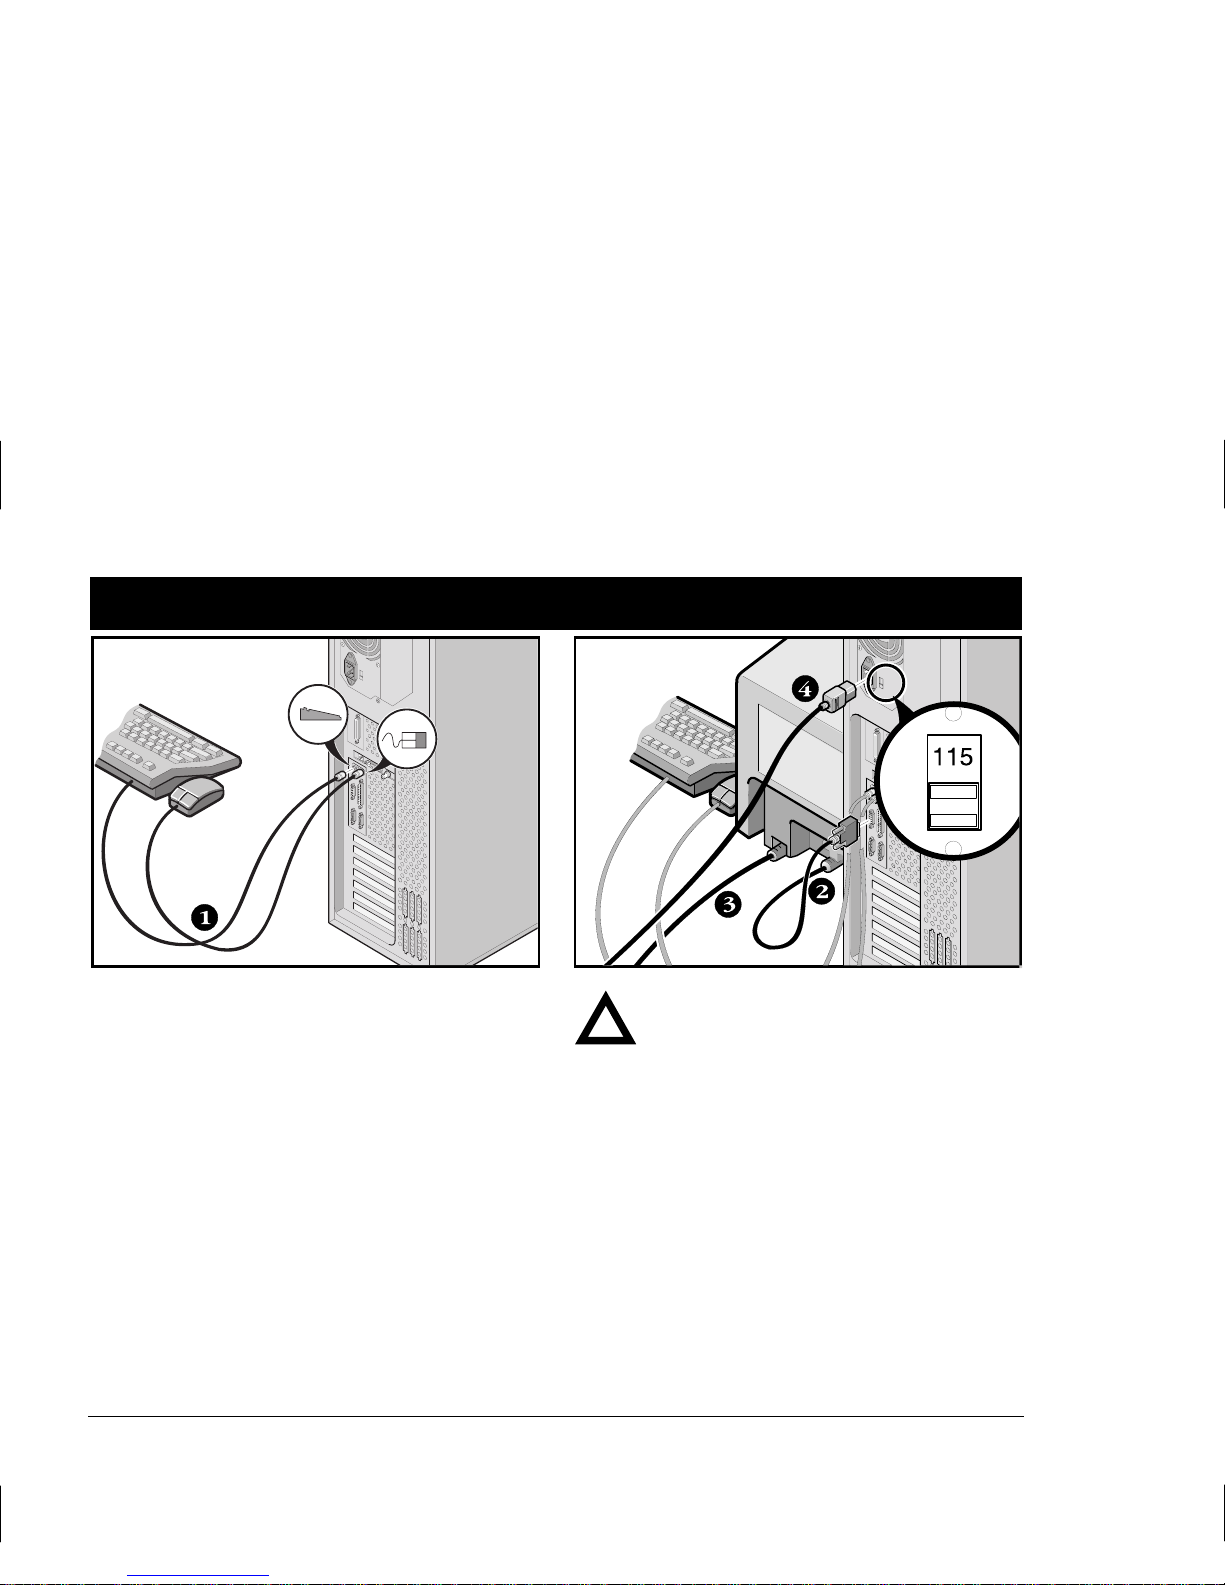
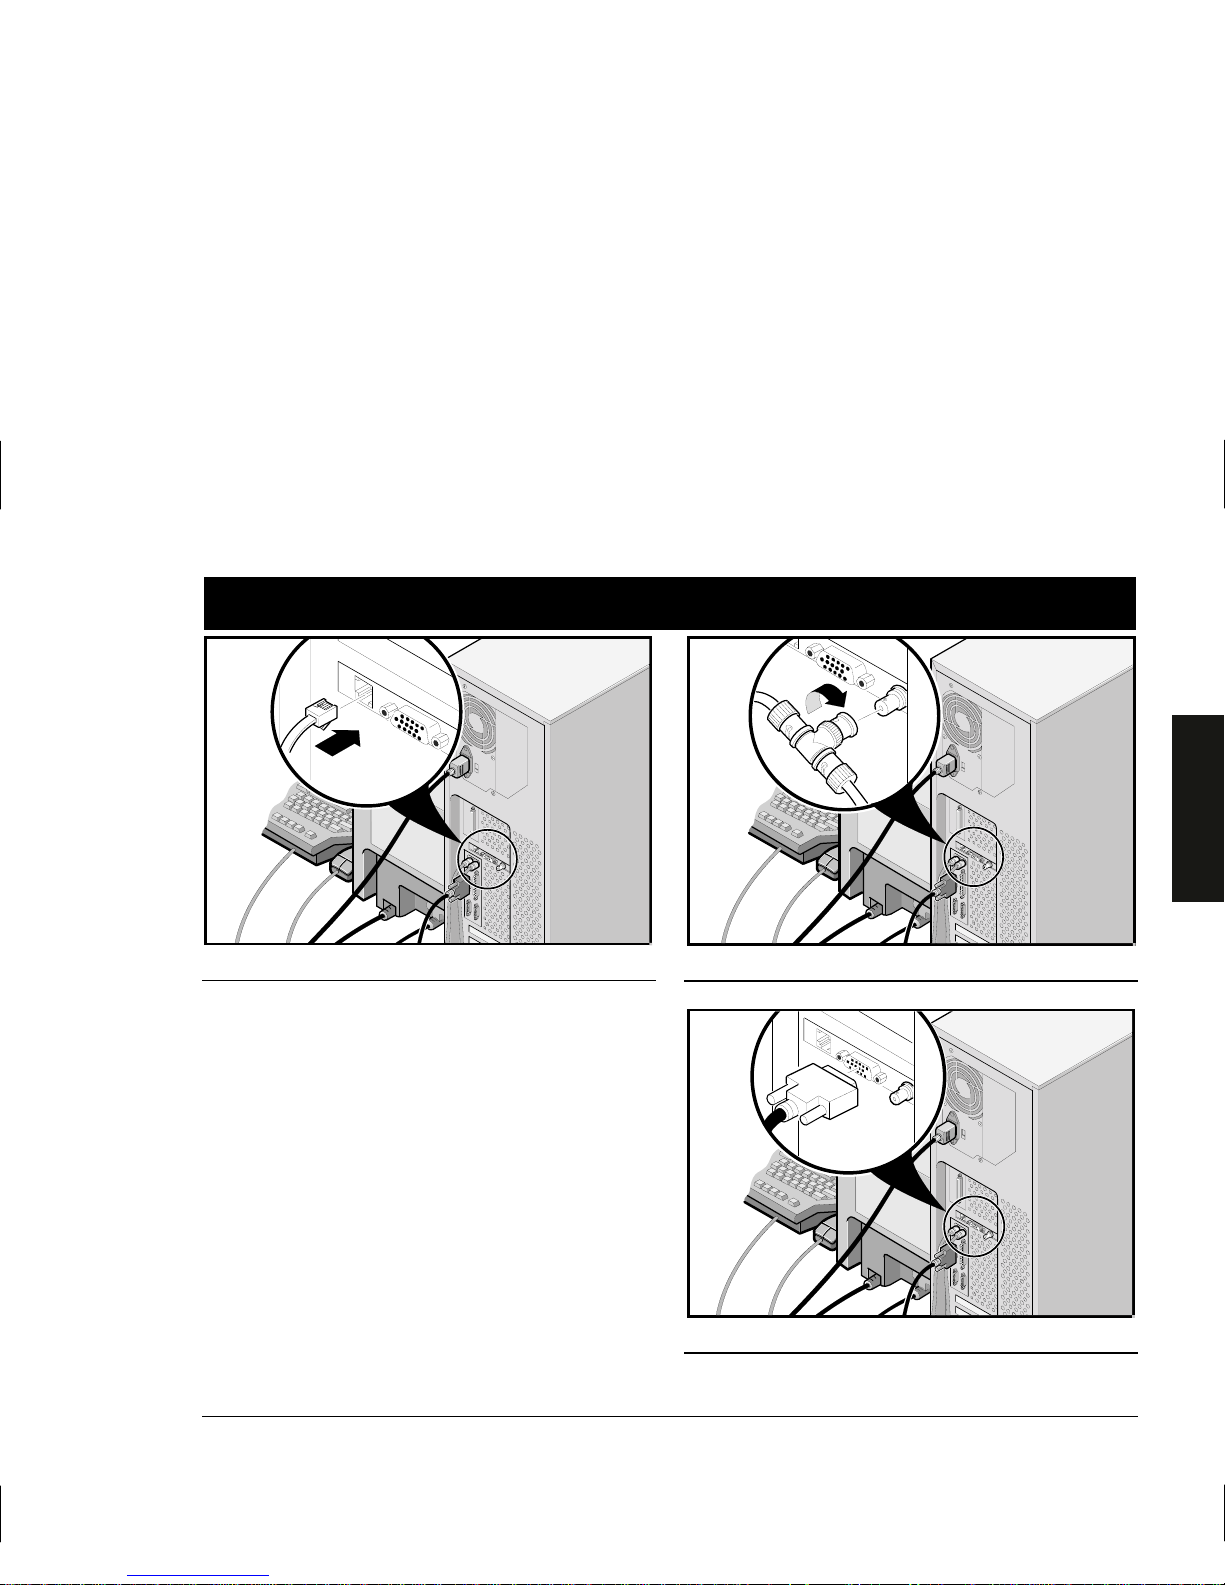
Connect the cables and power cord
1. Connect the mouse and keyboard cables into the
corresponding connectors at the back of the server.
2. Place your monitor near your server. Connect the
monitor signal cable to the back of the monitor and
then connect it to the matching connector at the back
of your server. Note that some monitors have signal
cables permanently attached.
3. Connect the monitor power cord to the back of the
monitor then to a wall outlet.
4. Connect the server power cord to the server, then to
a wall outlet.
CAUTION
Do not attempt to modify or use an external
100 Vac (Japan only) or 115 Vac power cord for
240 Vac input power. Modifying either cord can
cause severe equipment damage.
The voltage selection switch must match the
voltage supplied by your power outlet. In North
America, 115 volts is common. In other countries,
230 volts is common. Ensure that the voltage
selection switch is set to the right voltage. If it is
not set correctly, you can damage your server.
4
Page 7
Installation Guide 7
ENGLISH
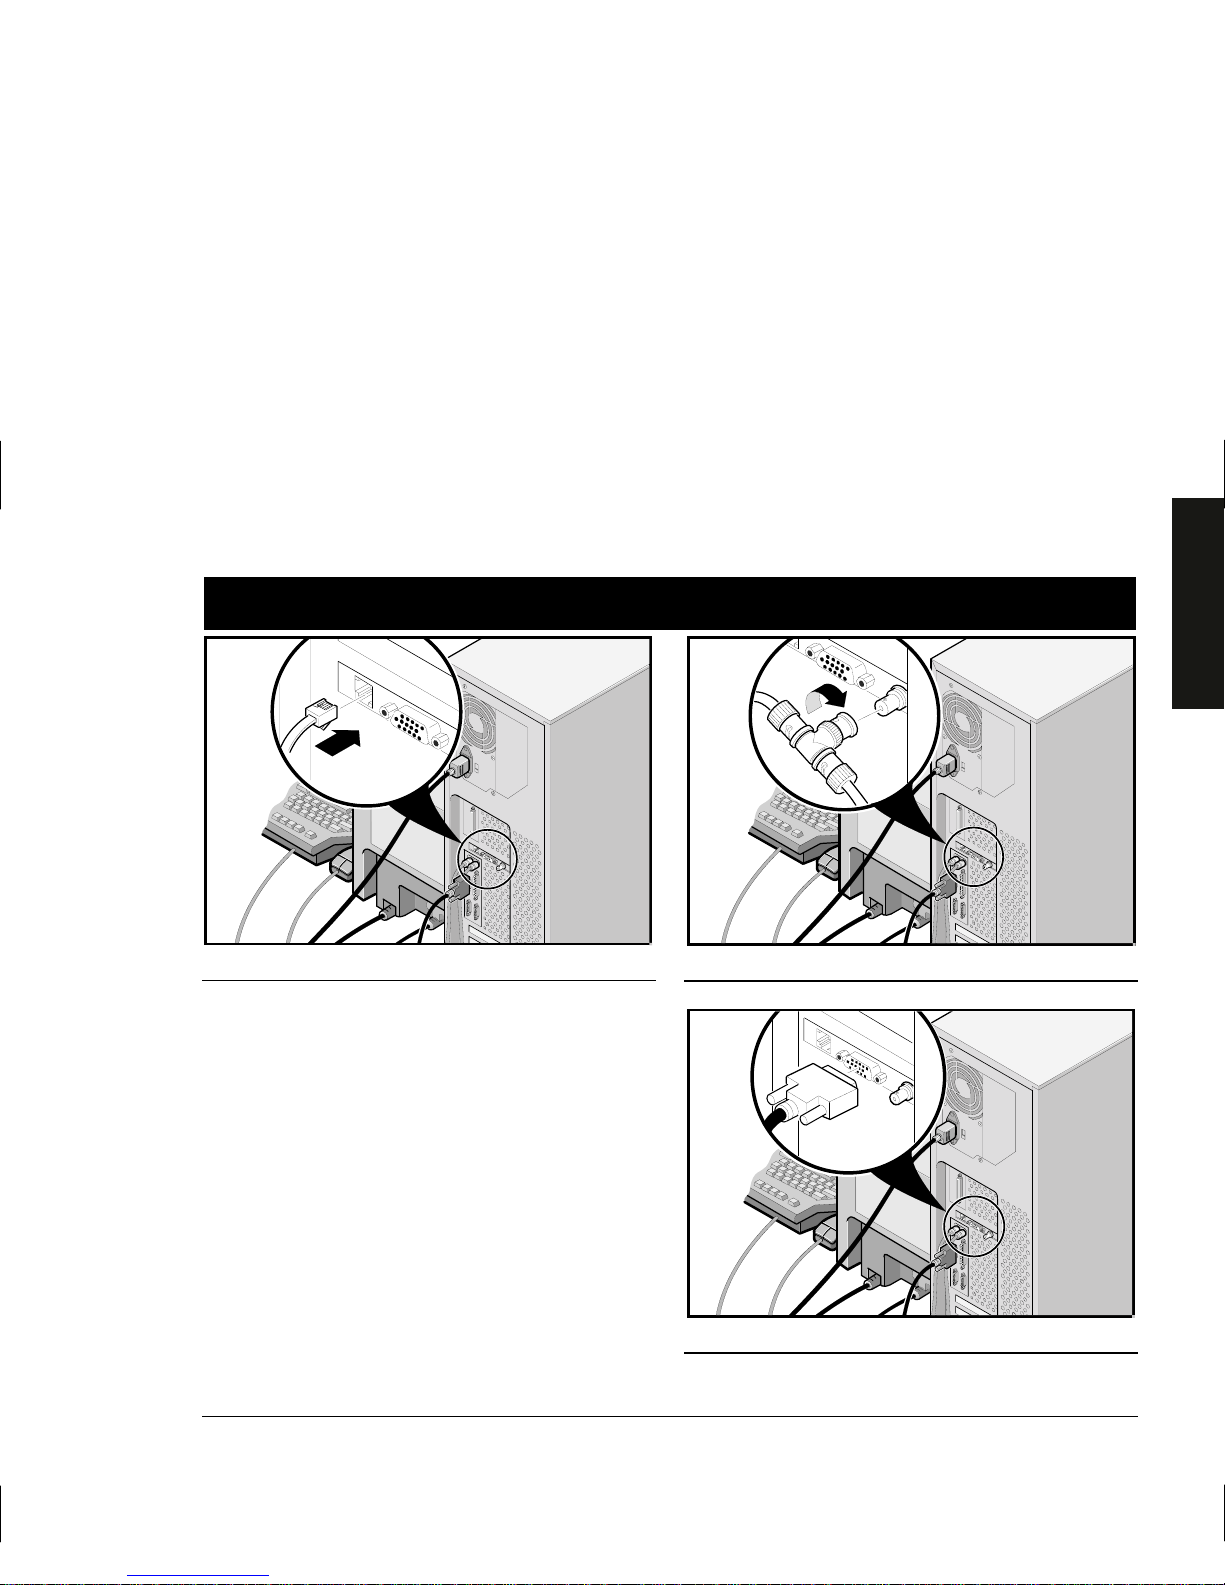
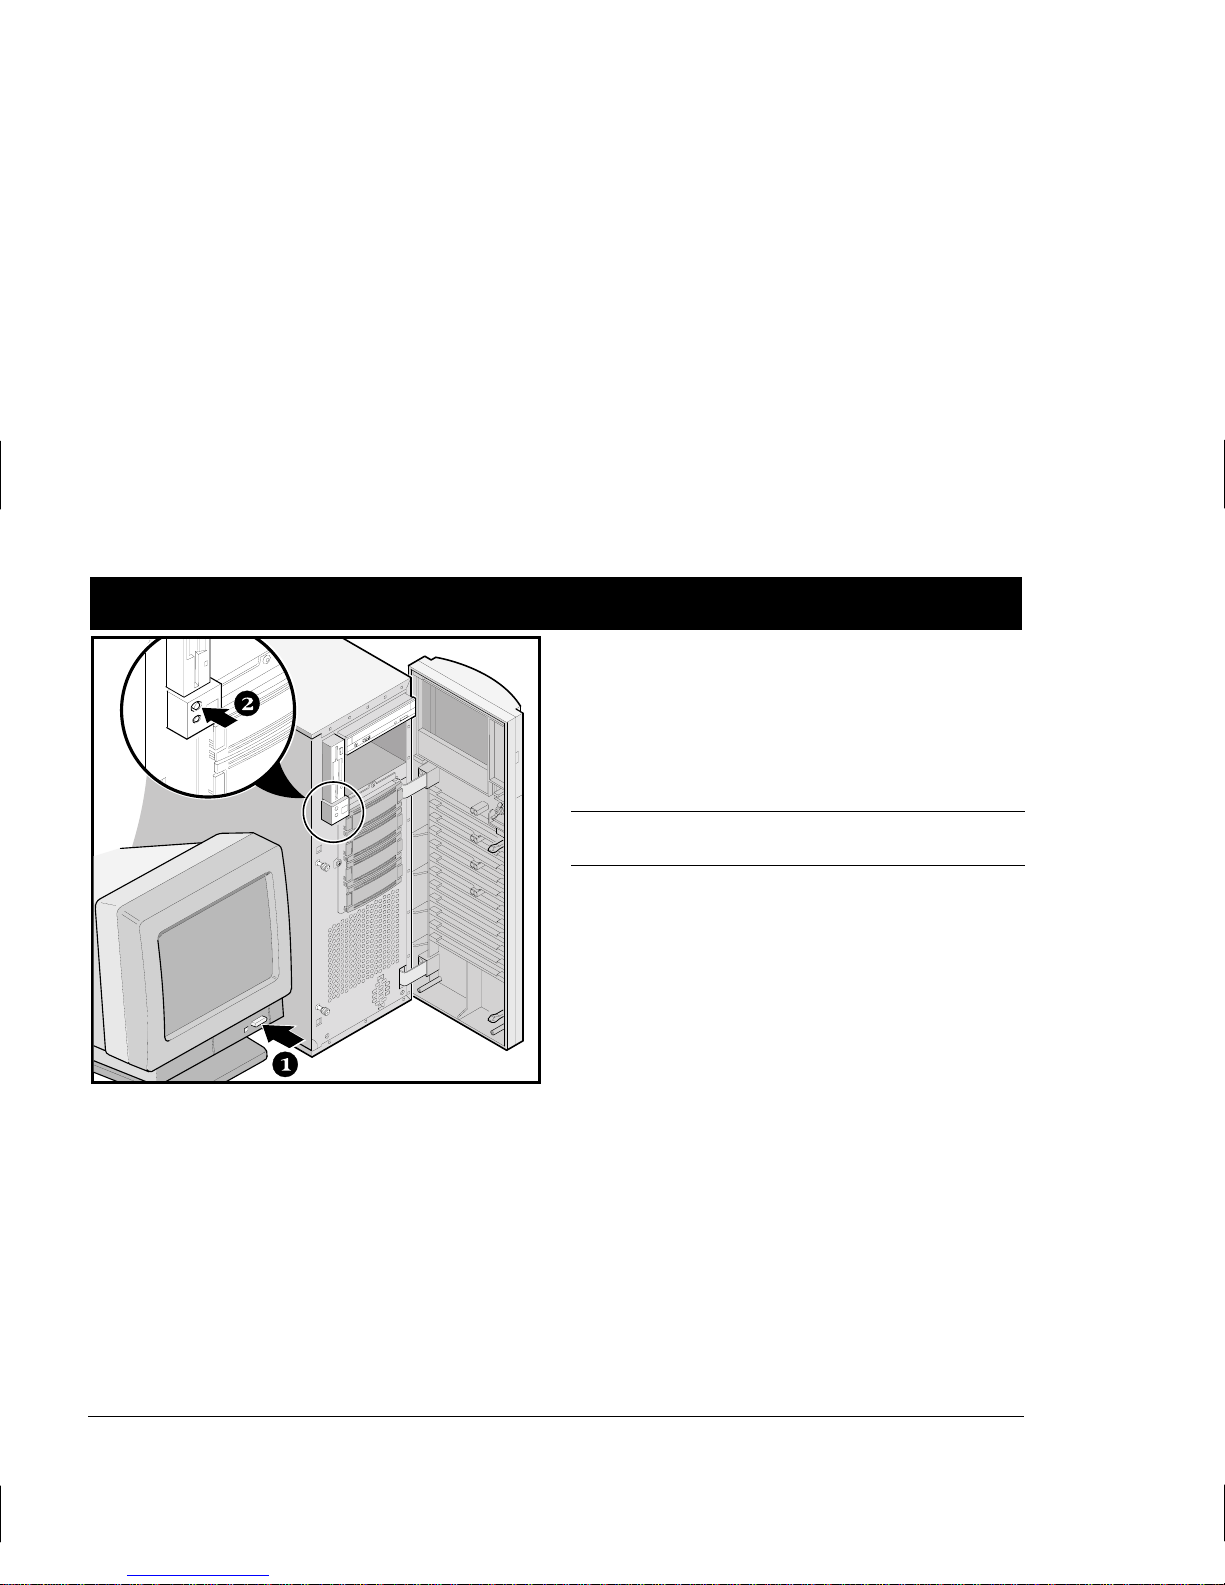
Ethernet connections
10/100Base-T (Twisted-Pair)
Your DIGITAL Server 3100/3200 is shipped network
ready with connectors and onboard circuitry for
10/100Base-T (Twisted-Pair), 10Base-2 (Ethernet ThinWire) and 10Base-5 (AUI) network cabling.
Contact your network administrator before connecting to
your network type.
10Base-2 (ThinWire)
10Base-5 (AUI)
5
Page 8
DIGITAL Server 3100/3200 Series8
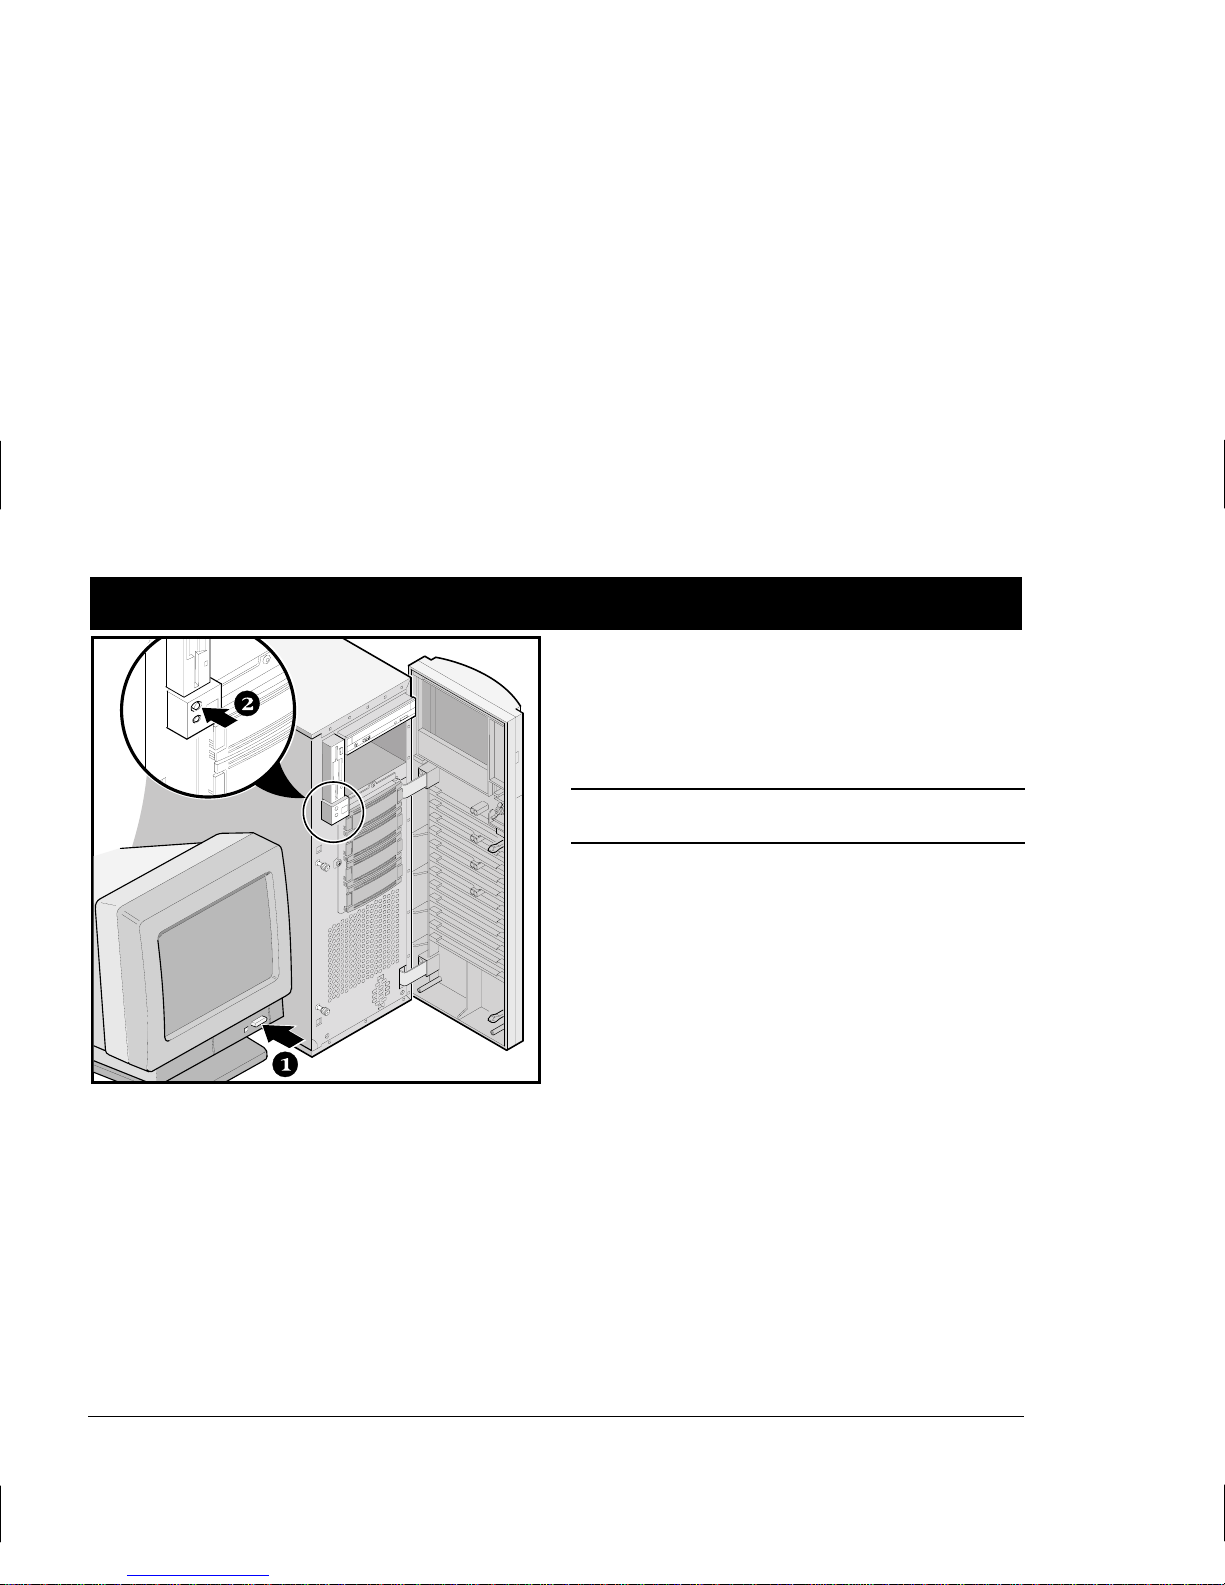
Turn on the monitor and then the server
1. Turn on the monitor.
2. Turn on the server.
3. Adjust the monitor’s contrast and brightness to obtain
a readable screen display.
NOTE
Refer to your System Reference manual for BIOS and
Power-On-Self-Test (POST) messages.
6
Page 9

Installation Guide
9
ENGLISH
If you’re installing optional expansion cards
Make sure you are familiar with using:
■ The System Configuration Utility (SCU)
■ RAID utilities
■ The SCSISelect Utility
Refer to your System Reference manual, SCSI, and RAID
manuals for any additional information.
ISA cards should be installed after you run the System
Configuration Utility, since the SCU will list IRQs already
used. PCI and EISA cards should be installed before running the SCU to take advantage of the SCU’s automatic
detection feature.
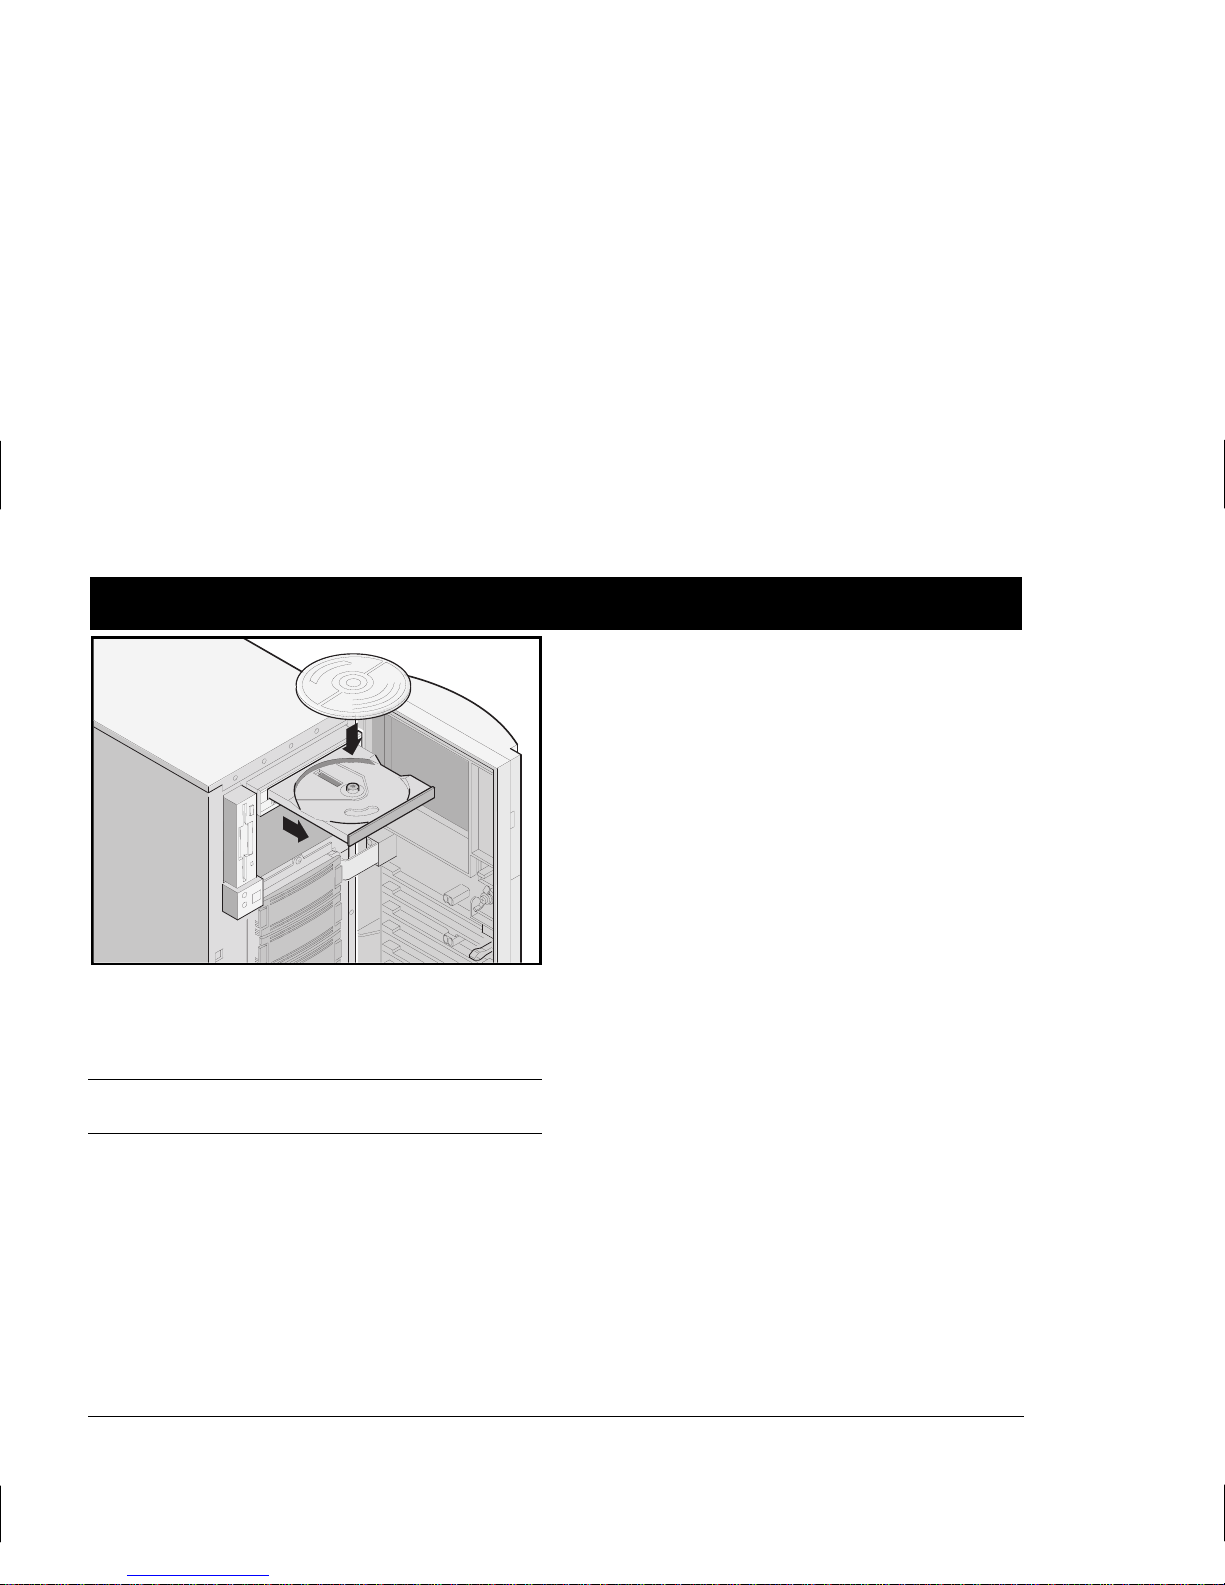
Use the Quick Launch CD-ROM disc to complete the server
installation. Follow these steps to configure your server.
1. Locate the Quick Launch CD-ROM disc in your DIGITAL
ServerWORKS software kit. Power on your server and
insert the CD-ROM disc.
If your server fails to boot from the CD-ROM, press
Ctrl + Alt + Del, then Ctrl + A, when prompted, to run
the SCSISelect utility. Enable the bootable CD-ROM and
INT13 lines. Exit and reboot.
2. Use the SCU, when displayed, to configure the EISA
option cards you installed or to enable the PCI cards.
If you installed ISA cards, check the current card configuration to avoid IRQ conflicts before manually setting jumpers and switches.
Your server automatically reboots after you save and
exit the SCU.
3. If you installed a RAID controller, the RAID configura-
tion utility will be displayed next. Configure your
server for RAID.
NOTE
If you installed additional SCSI or RAID cards, make sure
the MS-DOS partition resides on the drive on which you
want it to be. If not, shut down your server, change the
order of your cards, and reconfigure your server.
7
Page 10
DIGITAL Server 3100/3200 Series10
Run the Quick Launch CD-ROM program
Use the Quick Launch CD-ROM disc to complete the server
installation. Follow these steps to configure your server
and install an operating system.
NOTE
If you installed optional expansion card(s), you first need
to perform the instructions on the previous page.
1. Locate the Quick Launch CD-ROM disc in your DIGITAL
ServerWORKS software kit. Power on your server and
insert the CD-ROM disc.
If your server fails to boot from the CD-ROM, press Ctrl
+ Alt + Del, then Ctrl + A, when prompted, to run the
SCSISelect utility. Enable the bootable CD-ROM and
INT13 lines. Exit and reboot.
2. When prompted, you can create an MS-DOS partition
size appropriate for your operating system. The system
prompts you to confirm your choice. Note that
Windows NT requires a partition size of 35 MB. Other
Windows operating systems require 30 MB.
The Quick Launch main screen appears, and all utilities
and related files (SCU, diagnostics, RAID, etc.) are installed onto the MS-DOS partition.
3. Select Installations & Utilities from the Quick Launch
main screen. Choose Express to automatically install
Microsoft Windows NT or Novell NetWare. Create
Diskettes allows you to create the utilities and driver
diskettes required when installing SCO UNIX, OS/2,
Microsoft Windows NT, or Novell NetWare manually.
Refer to the ServerWORKS Quick Launch Getting Started
guide included with the ServerWORKS software kit for
detailed installation procedures.
8
Page 11

Installation Guide 11
ENGLISH
Express operating system installation
Express Installation of Microsoft Windows NT Server or Novell NetWare
You will be asked to provide the following information during an Express install of Microsoft Windows NT or Novell
NetWare operating systems.
Windows NT Server
Full Name___________________________________________
Organization Name ____________________________________
Server Name* ________________________________________
NT CD Key __________________________________________
NT Server Type_______________________________________
License _____________________________________________
Time Zone __________________________________________
Work Group Name/Domain*_____________________________
Network
❏
Install NWLink
❏
Install NetBEUI
❏
Install TCP/IP
File System
❍
NTFS
❍
FAT
❏
Apply Service Packs
Application Install
❏
Install Oracle
❏
Internet Information Server
* For a Digital cluster, use a different Server Name for each server but
the same Domain name for each server.
Novell NetWare
Server Name_________________________________________
Organization Name ____________________________________
Directory Tree Name___________________________________
Administrator Password ________________________________
Frame Type__________________________________________
IPX External Network Number ___________________________
Time Zone __________________________________________
Fill in the information as required. Have your Microsoft
Windows NT or Novell NetWare software kit ready.
Follow the instructions on the screen to begin your
operating system installation.
NOTE
The Internet Information Server application is available
only when “Install TCP/IP” is selected.
9
Page 12

DIGITAL Server 3100/3200 Series12
Creating server utility and device driver diskettes
If desired, you can create the required diskettes from
Windows-based workstations using these procedures:
1. Locate the Quick Launch CD-ROM disc in your Server-
WORKS software kit. Insert the CD-ROM disc into the
CD-ROM drive.
2. From the Start Menu, select Run qlaunch.exe from the
root directory of the CD-ROM disc. The program will
start automatically if Windows 95 or Windows NT V4.0
and greater are installed.
3. Select the Installations & Utilities button.
4. Choose either the Create Diskettes tab or the Utilities
tab. Utilities is the default. If you choose Create Diskettes, first select a model, then a network operating
system and its version. Select Continue. If you choose
Utilities, select a server model to see the utilities for
that server.
5. Select the utility or driver you want, then select
Continue.
6. Insert a formatted, high density diskette into Drive A
and select Continue.
NOTE
For more information, refer to the ServerWORKS Quick
Launch Getting Started guide and the on-line help in the
ServerWORKS Quick Launch program.
The following is a list of device drivers you might need:
■ SCSI—enables your server to operate using the on-
board Adaptec 7880 SCSI controller.
■ Video—enables your server to operate using the on-
board video controller or other supported video cards.
■ RAID—enables your server to operate using a Mylex
RAID controller.
■ Network—choose from several device drivers for
DIGITAL supported network interface cards.
The following is a list of bootable server utilities:
■ SCU—enables you to make a bootable SCU diskette for
use when configuring your server and adding options.
■ RAID—enables you to make a bootable RAID configura-
tion utility diskette for use when configuring your
RAID array.
■ Diagnostics—enables you to make bootable diskettes
for use when troubleshooting your server.
10
Page 13

Installation Guide 13
ENGLISH
Register your server and review your documentation
Register
1. Record the server’s model number and serial number
here.
■ Server Family Description:
DIGITAL Server 3000
________________________________________
(located on the front of the server)
■ Server Model Number:
________________________________________
(located on the back of the server)
■ Server Serial Number:
________________________________________
(located on the back of the server)
2. Send in the registration card contained in your
DIGITAL Server Documentation box.
Warranty
■ 3-year on-site hardware warranty.
■ Refer to your Warranty and Service Information for
specific warranty terms and conditions.
If You Need Help
If you have questions about your server hardware, software, or warranty, please contact DIGITAL’s Customer
Service organization.
Before You Call DIGITAL
1. Run the diagnostics shipped with your server to
isolate the problem. You can run the diagnostics from
the MS-DOS partition created by Quick Launch or you
can create diagnostics diskettes from Quick Launch by
using the Utilities option located under the Installa-
tions & Utilities button.
2. Have the server’s model number and serial number
available before you call.
3. Record any error messages and be prepared to de-
scribe the sequence of events that led to your problem.
4. Call 1-800-354-9000.
Technical information is available 24 hours a day on the
Internet. For product information, use the address:
http://www.windows.digital.com
For technical support, use the address:
http://www.windows.digital.com/
support/support.asp
For access directly to the software library for BIOS and
driver updates, use the address:
http://www.windows.digital.com/~ftp/
00-index.stm
11
Page 14

DIGITAL Server 3100/3200 Series14
Install the DIGITAL ServerWORKS Manager software
After your server and network operating system installation is complete, install the DIGITAL ServerWORKS
Manager software to:
■ Access an easy-to-use server management interface
■ Monitor critical PC server statistics
■ Obtain an easy-to-read topology map of the network
■ Manage server fault conditions
■ Support distributed SNMP network devices from any-
where on the LAN
NOTE
Refer to the Overview and Installation Guide in the
DIGITAL ServerWORKS Manager software kit for installation information and a list of supported operating systems.
12
Page 15
DIGITAL-Server der Baureihe 3100/3200
Installationshandbuch
™
Page 16
DIGITAL-Server der Baureihe 3100/32002
erzlich illkommen
... im Kreis der DIGITAL 3100/3200 ServerKunden. Die DIGITAL Server-Familie bietet
kompromißlose Qualität zusammen mit preisge-
kröntem Kundendienst und Support. Die nachfol-
genden Anweisungen werden Ihnen helfen, die
Server-Hardware und -Software schnell und
problemlos einzurichten.
Bevor Sie anfangen
Wählen Sie einen geeigneten Montage- und Standort aus,
der folgenden Anforderungen genügt:
■ Netz- und Telefonsteckdosen müssen erreichbar sein.
■ Er ist weder übermäßiger Hitze, starker Staubentwick-
lung noch direkter Sonneneinstrahlung ausgesetzt.
■ Zur ordnungsgemäßen Belüftung müssen auf allen
Seiten mindestens 18 cm Abstand vorhanden sein.
■ Der Aufstellungsort muß alle lokalen bzw. regionalen
elektrotechnischen Auflagen betreffend der Installation
von Informationstechnologiegeräten durch geprüfte
Elektriker erfüllen.
Nähere Informationen zu Temperatur und Luftfeuchtigkeit
finden Sie unter „Technische Daten “ im Systemreferenzhandbuch.
Falls Sie den Server nicht selbst installieren wollen,
setzen Sie sich mit dem DIGITAL-Kundendienst in Verbindung. Ein Kundendiensttechniker wird die Installation
vornehmen
VORSICHT
Den Server unter größter Vorsicht auspacken. Auf
Grund seines hohen Gewichts benötigt man zum
Auspacken stets zwei Personen. Zuwiderhandlung
kann einen Verstoß gegen bestimmte Sicherheitsvorschriften darstellen sowie zu Personen- oder
Sachschaden führen.
W
H
DIGITAL ServerWORKS Schnellstart
Mit dem DIGITAL ServerWORKS Schnellstartprogramm ist das Installieren und Konfigurieren von
Hardware und Netzwerk-Betriebssystemen auf den
Servern von DIGITAL so einfach wie noch nie. Das
Schnellstartprogramm kombiniert eine intuitive
Benutzeroberfläche mit flexiblen, zeitsparenden
Funktionen. Die Installation ist exakt, konsistent
und für die hoch angesehenen, leistungsstarken
Server optimiert.
Neben einer automatisierten aber gleichzeitig flexiblen Methode der Expreßinstallation für NetzwerkBetriebssysteme bietet das Schnellstartprogramm auf
einer neustartfähigen CD ein umfassendes Archiv an
Server-Dokumentation, Hinweisen zur Fehlerbeseitigung und praktischen Dienstprogrammen.
Page 17
Installationshandbuch
3
DEUTSCH
Auspacken des Servers
Anweisungen zum Auspacken
1. Legen Sie den Karton auf die Seite. Öffnen Sie den Boden
des Kartons und falten Sie ihn unter den Karton.
2. Stellen Sie den Server aufrecht, während er sich noch
im Karton befindet.
3. Öffnen Sie die Oberseite des Kartons und nehmen Sie
das Länderpaket heraus.
4. Schließen Sie die Oberseite des Kartons. Greifen Sie
die Griffe am Karton und ziehen Sie ihn nach oben
vom Server.
5. Transportieren Sie den Server an den gewünschten Aufstellungsort. Kippen Sie den Server leicht und drehen Sie
die vier Standfüße nach außen, bis sie einrasten.
HINWEIS
Das Länderpaket befindet sich oben im Karton. Falls gewünscht, kann das Verpackungsmaterial recycelt werden.
VORSICHT
Der Server ist schwer. Heben Sie ihn nicht alleine.
Wenn der Server angehoben werden soll…
1. Stellen Sie sich mit den Füßen auseinander und mit
gutem Halt vor den Server. Beugen Sie Ihre Knie und
halten Sie Ihren Rücken dabei gerade.
2. Suchen Sie einen festen Griff am Gehäuse. Heben Sie
mit Ihren Beinen und halten Sie Ihren Rücken dabei
unbedingt gerade.
3. Vermeiden Sie eine Verwindung Ihres Oberkörpers.
Drehen Sie sich mit Ihren Füßen.
4. Vorsichtig absetzen und dabei Beinmuskeln einsetzen.
Halten Sie Ihren Rücken gerade.
1
Page 18
DIGITAL-Server der Baureihe 3100/32004
Teile überprüfen
Packen Sie die Teile des Servers aus und machen Sie sich
mit ihnen vertraut.
DIGITAL Server 3100/3200
Landespaket mit Tastatur, Tastaturkabel und Maus
(separat zu bestellen).
Netzkabel
Server-Schlüssel
Server-Software- und Dokumentations-Pakete mit den
gedruckten Handbüchern und der Quick Launch
CD-ROM mit der Online-Dokumentation.
Externes 68-Pin Wide SCSI-Kabel
HINWEIS
Bildschirm muß separat bestellt werden.
Zum DIGITAL ServerWORKS-Softwarepaket gehören:
■ ServerWORKS Schnellstart: ServerWORKS Schnellstart-
CD-ROM und Handbuch für den direkten Einstieg.
■ ServerWORKS Verwaltung: ServerWORKS Ver-
waltungssoftware und Dokumentation.
Zum 3100/3200 DIGITAL Server-Dokumentationspaket
gehören:
■ Dieses Installationshandbuch, die Systemreferenz,
die Dokumentationsübersicht, Garantie- und Service-
Informationen und Registrierungskarte.
HINWEIS
Die Online-Dokumentation befindet sich auf der Quick
Launch CD-ROM.
2
Page 19
Installationshandbuch
5
DEUTSCH
Installation interner Optionen
Etwaige interne Optionen müssen jetzt installiert werden.
1. Speeren Sie die Gerätetür und die Frontplatte auf.
2. Öffnen Sie die Frontplatte und lösen Sie die zwei Rän-
delschrauben für die Seitenabdeckung.
3. Entfernen Sie die Seitenabdeckung.
4. Installieren Sie die Optionen.
Weitere Informationen finden Sie in den folgenden
Kapiteln des Systemreferenzhandbuchs.
■ Server-Software und Dienstprogramme
■ Pentium Pro Prozessor-Upgrades
■ Pentium II Prozessor-Upgrades
■ Installieren von zusätzlichem Speicher (SIMMs)
■ Installieren von zusätzlichem Speicher (DIMMs)
■ Installieren von Festplatten- und Bandlaufwerken
■ Anschließen von SCSI- und RAID-Adaptern
Spezifische Einzelheiten zur Installation von Optionen
finden Sie in der mit den Optionen mitgelieferten
Dokumentation.
ACHTUNG
Bevor Sie eine Leiterplatte oder ein Bauteil berühren sollten Sie eine Antistatik-Armband tragen,
das über das Server-Chassis geerdert ist, oder den
Metallrahmen des Servers berühren, um ggf. existierende statische Aufladung zu eliminieren.
HINWEIS
ISA-Karten sollten installiert werden, nachdem das Dienstprogramm SCU in Arbeitsschritt 7 oder 8 ausgeführt wurde, da das Programm SCU die bereits verwendeten IRQs.
Wenn Quick Launch zur Installation eines Netzwerkbetriebssystem (Network Operating System) verwendet werden soll, muß der Server folgende Minimalanforderungen
erfüllen, damit die Installation durchgeführt werden kann:
■ 16 MByte RAM
■ SVGA-Bildschirm
■ Festplatte mit mindestens 540 MByte
■ Maus mit zwei oder drei Tasten
■ CD-ROM-Laufwerk mit Systemstartfähigkeit, ange-
schlossen an einen startfähigen SCSI-Controller
■ Tastatur
3
Page 20

DIGITAL-Server der Baureihe 3100/32006
Signal- und Netzkabel anbringen
1. Maus- und Tastaturkabel mit den entsprechenden
Buchsen auf der Server-Rückseite verbinden.
2. Den Bildschirm neben dem Server aufstellen und das
Bildschirm-Signalkabel mit dem Bildschirm und mit der
Bildschirmbuchse auf der Server-Rückseite verbinden.
3. Stecken Sie das Bildschirmnetzkabel zuerst auf der
Rückseite des Bildschirms und dann in eine Netzsteckdose ein.
4. Das Netzkabel am Server anbringen und dann in die
Wandsteckdose einstecken.
ACHTUNG
Netzkabel, die für 100 V-Wechselstrom (nur für
Japan) oder 115 V-Wechselstrom vorgesehen
sind, dürfen nicht an ein 240 V-Stromnetz angeschlossen oder für ein 240 V-Stromnetz modifiziert werden, da dies zu schwerem Sachschaden
führen kann.
Der Spannungsauswahlschalter muß auf die
entsprechende lokal zur Verfügung stehende
Netzspannung eingestellt sein. In Nordamerika
werden normalerweise 115 Volt verwendet. In
anderen Länder werden häufig 230 Volt verwendet. Stellen Sie sicher, daß der Spannungsauswahlschalter auf die richtige Spannung für Ihre
lokalen Gegebenheiten eingestellt ist. Eine falsche
Stellung dieses Schalters kann zu Beschädigungen
am Server führen.
4
Page 21
Installationshandbuch 7
DEUTSCH
Ethernet-Verbindungen
10/100Base-T (Twisted-Pair)
Der DIGITAL 3100/3200-Server wird netzwerkbereit mit
Steckverbindungen und Onboard-Schaltkreisen für
10/100Base-T (Twisted-Pair), 10Base-2 (EtherNet ThinWire)
und 10Base-5 (AUI) -Netzwerkverkabelung ausgeliefert.
Fragen Sie Ihren Netzwerkadministrator bevor Sie den
Anschluß an einen dieser Netwerktypen vornehmen.
10Base-2 (ThinWire)
10Base-5 (AUI)
5
Page 22
DIGITAL-Server der Baureihe 3100/32008
Erst den Bildschirm und dann den Server einschalten
1. Bildschirm einschalten.
2. Server einschalten.
3. Stellen Sie den Kontrast und die Helligkeit des Bild-
schirms so ein, daß die Bildschrimanzeige deutlich
lesbar ist.
HINWEIS
Informationen zu den BIOS- und Power-On-Self-Test
(POST)-Meldungen finden Sie in der Systemreferenz.
6
Page 23

Installationshandbuch
9
DEUTSCH
Bei der Installation von optionalen Erweiterungskarten
Sie müssen mit den folgenden Dienstprogrammen vertraut
sein:
■ System-Konfigurationsprogramm (SCU)
■ RAID-Dienstprogramme
■ Dienstprogramm SCSISelect
Nähere Informationen finden Sie im Systemreferenzhandbuch bzw. in den SCSI- und RAID-Handbüchern
ISA-Karten sollten installiert werden, nachdem das SystemKonfigurationsprogramm SCU ausgeführt wurde, da SCU
die bereits belegten IRQs anzeigt. PCI- und EISA-Karten
sollten installiert werden, bevor das Programm SCU ausgeführt wird, um die Funktion zur automatischen Feststellung
von Erweiterungskarten des Programms SCU zu nutzen.
Führen Sie die Server-Installation mit Hilfe der Schnellstart-CD-ROM durch. Folgendermaßen wird der Server
konfiguriert.
1. Schalten Sie den Server ein und legen Sie die Quick
Launch CD-ROM ein (gehört zum mitgelieferten ServerWORKS Software-Paket).
Wenn der Server nicht von der CD-ROM startet, drükken Sie Strg + Alt + Entf und bei der entsprechenden
Eingabeaufforderung Strg + A, um das Dienstprogramm
SCSISelect aufzurufen. Aktivieren Sie die Optionen
Bootable CD-ROM und INT13. Verlassen Sie das Programm und starten Sie den Server erneut.
2. Mit dem Programm SCU (wenn angezeigt) können
installierte EISA-Karten installiert bzw. die installierten
PCI-Karten aktiviert werden. Wenn ISA-Karten installiert wurden, überprüfen Sie die aktuelle Kartenkonfiguration, um IRQ-Konflikte zu vermeiden, bevor Sie
manuell die Jumper und Schalter einstellen.
Nach dem Speichern und Beenden des System-Konfigurationsprogramms führt der Server automatisch einen
Neustart durch.
3. Ist ein RAID-Controller installiert, steht als nächstes ein
RAID-Konfigurationsprogramm zur Verfügung, mit dem
sich der Server für RAID konfigurieren läßt
HINWEIS
Sind zusätzliche SCSI- oder RAID-Karten installiert, vergewissert man sich, daß sich die MS-DOS-Partition auch tatsächlich auf dem gewünschten Laufwerk befindet. Andernfalls schaltet man den Server aus, ändert die Reihenfolge
der Karten oder konfiguriert den Server neu.
7
Page 24

DIGITAL-Server der Baureihe 3100/320010
CD-ROM-Schnellstartprogramm ausführen
Die Server-Installation mit Hilfe der Schnellstart-CD-ROM
durchführen. Nachfolgende Schritte erläutern die Konfiguration des Servers und die Installation eines Betriebs
systems.
HINWEIS
Wenn optionale Erweiterungskarten installiert wurden,
müssen zuerst die Anweisungen auf der vorherigen Seite
befolgt werden.
1. Schalten Sie den Server ein und legen Sie die Quick
Launch CD-ROM ein (gehört zum mitgelieferten
ServerWORKS Software-Paket).
Wenn der Server nicht von der CD-ROM startet, drükken Sie Strg + Alt + Entf und bei der entsprechenden
Eingabeaufforderung Strg + A, um das Dienstprogramm
SCSISelect aufzurufen. Aktivieren Sie die Optionen
Bootable CD-ROM und INT13. Verlassen Sie das Programm und starten Sie den Server erneut.
2. Bei der entsprechenden Eingabeaufforderung können
Sie eine MS-DOS-Partitionsgröße angeben, die den Anforderungen Ihres Betriebssystems entspricht. Das System erbittet eine Bestätigung Ihrer Auswahl. Beachten
Sie, daß Windows NT eine Partitionsgröße von 35 MB
erfordert. Andere Windows-Betriebssysteme erfordern
30 MB.
Die Quick Launch-Hauptbildschirmanzeige erscheint,
und alle Dienstprogramme samt dazugehöriger Dateien
(SCU, Diagnose, RAID usw.) werden in die MS-DOSPartition installiert.
3. Wählen Sie in der Quick LaunchHauptbildschirmanzeige die Option Installations &
Utilities. Wählen daraufhin Express, um Microsoft
Windows NT bzw. Novell NetWare automatisch zu installieren. Mit der Option Create Diskettes können Sie
die zur manuellen Installation von SCO UNIX, OS/2,
Microsoft Windows NT oder Novell NetWare erforderlichen Disketten mit den Dienstprogrammen und Treibern erstellen.
Detaillierte Informationen zur Installation finden Sie im
ServerWORKS Quick Launch-Handbuch für den direkten
Einstieg, das zum ServerWORKS Software-Kit gehört.
8
Page 25

Installationshandbuch 11
DEUTSCH
Expreßinstallation des Betriebssystems
Express Installation of Microsoft Windows NT Server or Novell NetWare
Zur Expreßinstallation der Betriebssysteme Microsoft Windows NT bzw. Novell NetWare müssen folgende Angaben
gemacht werden.
Windows NT Server
Voller Name _________________________________________
Name der Organisation _________________________________
Server-Name _________________________________________
NT CD-Schlüssel ______________________________________
NT Server-Typ________________________________________
Lizenz______________________________________________
Zeitzone ____________________________________________
Arbeitsgruppenname/Domäne____________________________
Netzwerk
❏
NWLink installieren
❏
NetBEUI installieren
❏
TCP/IP installieren
Dateisystem
❍
NTFS
❍
FAT
❏
Einsatz von Service-Paketen
Anwendungsinstallation
❏
Oracle installieren
❏
Internet Information Server
* In einem Digital-Cluster sollten Sie für jeden Server zwar einen ande ren Server-Namen, aber denselben Domänennamen verwenden.
Novell NetWare
Server-Name _________________________________________
Name der Organisation _________________________________
Name der Verzeichnisstruktur ____________________________
Verwalter-Paßwort ____________________________________
Rahmentyp __________________________________________
IPX Externe Netzwerknummer ___________________________
Zeitzone ____________________________________________
Füllen Sie die geforderte Information aus und halten Sie
das Microsoft Windows NT oder Novell NetWare Softwarepaket bereit. Folgen Sie zur Installation des Betriebssystems den Angaben auf dem Bildschirm.
HINWEIS
Die Internet Information Server-Anwendung ist nur
verfügbar wenn “TCP/IP installieren” ausgewählt ist.
9
Page 26

DIGITAL-Server der Baureihe 3100/320012
Disketten für Server-Dienstprogramme und
Gerätetreiber anlegen
Falls gewünscht, können Sie die erforderlichen Disketten
mit auf Windows basierenden Workstations wie folgt
erstellen:
1. Das ServerWORKS Softwarepaket enthält die Schnellstart-CD-ROM. CD-ROM ins Laufwerk einlegen.
2. Wählen Sie im Menü Start die Option Run (bzw. Aus-
führen) qlaunch.exe aus dem Stammverzeichnis der
CD-ROM. Dieses Programm, wird automatisch gestartet
wenn Windows 95 oder Windows NT V4.0 und höher
installiert ist.
3. Klicken Sie auf die Schaltfläche Installations & Utilities.
4. Wählen Sie entweder die Registerkarte Create Disket-
tes oder Utilities. Utilities ist die Voreinstellung. Wenn
Sie Create Diskettes wählen, geben Sie zuerst ein Modell und dann ein Netzwerk-Betriebssystem und dessen
Version an. Klicken Sie dann auf Continue. Wenn Sie
Utilities wählen, wählen Sie ein Server-Modell, um die
Dienstprogramme für diesen Server anzuzeigen.
5. Wählen Sie das gewünschte Dienstprogramm bzw. den
gewünschten Treiber und klicken Sie dann auf Continue.
6. Legen Sie eine formatierte High-Density-Diskette in
Laufwerk A ein und wählen Sie Continue.
HINWEIS
Weitere Informationen hierzu finden Sie im ServerWORKS
Quick Launch-Handbuch für den direkten Einstieg sowie
in der Online-Hilfe des ServerWORKS Quick LaunchProgramms.
Nachfolgend eine Liste der u.U. benötigten Treiber:
■ SCSI—Damit kann der Server den Onboard Adaptec
7880 SCSI-Controller nutzen.
■ Video—ermöglicht das Arbeiten des Servers mit den
Onboard Bildschirm-Controller und anderen unterstützten Grafikkarten.
■ RAID—Server arbeitet mit einem Mylex RAID-
Controller.
■ Netzwerk—Auswahl aus mehreren Gerätetreibern für
von DIGITAL unterstützte NetzwerkSchnittstellenkarten.
Nachfolgend eine Liste der startfähigen Server-Dienstprogramme:
■ SCU—erlaubt das Anlegen von startfähigen SCU-Dis-
ketten zur Konfiguration des Servers und für das Hinzufügen von Optionen.
■ RAID—erlaubt das Anlegen einer startfähigen Diskette
für das RAID-Konfigurationsprogramm, mit dem sich
ein optionaler externer RADI-Festplatten-Array konfigurieren läßt.
■ Diagnostics—erlaubt das Anlegen von startfähigen Dis-
ketten zum Einsatz bei der Fehlersuche und -behebung
auf dem Server.
10
Page 27

Installationshandbuch 13
DEUTSCH
Server registrieren und Dokumentation noch
einmal durchsehen
Registrieren
1. Tragen Sie hier die Modellbezeichnung und die Seriennummer des Servers ein.
■ Server-Familie:
DIGITAL Server 3000
________________________________________
(auf der Server-Vorderseite)
■ Modellnummer:
________________________________________
(auf der Server-Rückseite)
■ Seriennummer:
________________________________________
(auf der Server-Rückseite)
2. Senden Sie die im DIGITAL-Handbuch enthaltene
Registrierkarte ein.
Gewährleistung
■ 3 Jahre Onsite-Gewährleistung für die Hardware.
■ Nähere Einzelheiten zu spezifischen Gewährleistungs-
bedingungen finden Sie unter „Garantie- und Serv iceinformationen“.
Wenn Sie Hilfe brauchen
Wenden Sie sich mit allen Fragen zu Hardware, Software
oder Garantieleistungen an den DIGITAL-Kundendienst.
Bevor Sie sich mit DIGITAL in Verbindung setzen
1. Kreisen Sie das Problem mit Hilfe des mitgelieferten
Diagnoseprogramms ein. Das Diagnoseprogramm kann
von der MS-DOS-Partition, die von Quick Launch erstellt wurde, oder von den Diagnose-Disketten, die mit
der Quick Launch-Option Utilities (wird mit der Schaltfläche Installations & Utilities aufgerufen) erstellt
wurde, ausgeführt werden.
2. Halten Sie die Modell- und Seriennummer des Servers
bereit.
3. Notieren Sie sich etwaige Fehlermeldungen und merken Sie sich die Reihenfolge der Ereignisse, die zu dem
Fehler führen.
4. Wählen Sie 1–800–354–9000.
Für technische Informationen
Technische Informationen sind über das Internet rund um
die Uhr verfügbar. Verwenden Sie folgende InternetAdresse für Produktinformationen:
http://www.windows.digital.com
Verwenden Sie folgende Internet-Adresse für Technischen
Support:
http://www.windows.digital.com/
support/support.asp
Verwenden Sie folgende Internet-Adresse für den direkten
Zugriff auf die Software-Bibliothek, z.B. für BIOS- und
Treiber-Updates:
http://www.windows.digital.com/~ftp/
00-index.stm
11
Page 28

DIGITAL-Server der Baureihe 3100/320014
DIGITAL ServerWORKS Software installieren
Nach erfolgreicher Installation von Server und Betriebssystem installiert man nun die ServerWORKS Verwaltungssoftware. Diese bietet:
■ Zugriff auf eine einfach zu benutzende Oberfläche,
■ Überwachung kritischer Server-Statistiken,
■ einfach zu lesende Topologiekarte des Netzwerks,
■ Verwaltung von Server-Fehlerbedingungen und
■ Unterstützung von verteilten SNMP-Netzwerkgeräten
von beliebigen Punkten im LAN aus.
HINWEIS
Installationsinformationen und eine Liste der unterstützten
Betriebssysteme finden Sie im Übersichts- und Installationshandbuch im DIGITAL ServerWORKS Manager Software-Kit.
12
Page 29

Servidor DIGITAL 3100/3200
Guía de instalación
™
Page 30

Servidor DIGITAL 3100/32002
racias
...
por adquirir un servidor DIGITAL 3100/3200.
La familia de servidores DIGITAL representa
el compromiso de DIGITAL de ofrecer calidad
absoluta, respaldada por servicio y soporte
de primera. Los procedimientos siguientes le
ayudarán a configurar con facilidad el
hardware y el software de su servidor
.
Antes de comenzar
Busque un sitio adecuado para ensamblar y utilizar el
servidor. Asegúrese de que su lugar de trabajo:
■ Esté ubicado cerca de tomas eléctricas y telefónicas
■ Esté libre de calor y polvo excesivos y protegido de
la luz solar directa
■ Tenga por lo menos 17 cm de espacio libre alrededor
del equipo para facilitar la circulación de aire
■ Esté en conformidad con los reglamentos eléctricos
locales y regionales que rigen la instalación de equipos
de informática por electricistas autorizados.
Consulte “Especificaciones técnicas” en el manual Referencia para el sistema para obtener información sobre temperatura y humedad.
Si no desea instalar el servidor por su cuenta, comuníquese con el departamento de servicio al cliente de DIGITAL.
Un técnico de servicio podrá realizar la instalación por
usted.
PRECAUCIÓN
Utilice extrema precaución al desembalar el
servidor. Debido a su peso, se requieren dos
personas para desembalarlo. Si no se usan dos
personas, es posible que se violen ciertas normas
de seguridad y que se produzcan lesiones personales graves o daños al equipo.
G
DIGITAL ServerWORKS Quick Launch
DIGITAL ServerWORKS Quick Launch facilita al
máximo la instalación y configuración de componentes de hardware y del software de sistemas operativos de red en la línea de servidores de DIGITAL.
Quick Launch combina una interfaz intuitiva con características versátiles que le permiten ahorrar tiempo y ejecutar instalaciones precisas y óptimas en los
potentes y ovacionados servidores DIGITAL.
Además de su método automático pero ampliable de
instalación rápida para sistemas operativos de red,
Quick Launch ofrece un archivo completo de documentación del servidor, ayuda para resolver problemas y utilidades de configuración indispensables,
todo en un solo disco CD-ROM.
Page 31

Guía de instalación
3
ESPAÑOL
Desembale el servidor
Instrucciones de desempaque
1. Incline la caja sobre uno de sus costados, abra la parte
inferior de la misma y doble la solapa inferior de manera que quede debajo de la caja.
2. Dejando el servidor en la caja, colóquelo verticalmente.
3. Abra la parte superior de la caja y retire el kit para el
país del destinatario.
4. Cierre la parte superior de la caja. Utilizando las manijas
de la misma, retírela de la parte superior del servidor.
5. Lleve el servidor al lugar en el que se desea instalar.
Inclínelo ligeramente y gire los cuatro pies hacia afuera
hasta que queden anclados en posición.
NOTA
El kit para el país del destinatario se encuentra en la parte
superior de la caja. El material de empaque es reciclable.
PRECAUCIÓN
El servidor es pesado. Se requiere más de una
persona para levantarlo.
Si necesita levantar el servidor…
1. Agáchese, con las rodillas dobladas y la espalda recta.
Acérquese al servidor, con los pies separados en una
posición firme.
2. Agarre el servidor con firmeza, levante con las piernas
y mantenga recta la espalda.
3. Evite torcer la parte superior del cuerpo. Mueva los
pies cuando necesite girar.
4. Bájelo suavemente usando los músculos de las piernas
y manteniendo recta la espalda.
1
Page 32

Servidor DIGITAL 3100/32004
Verifique las piezas
Desembale el servidor e identifique sus componentes.
Servidor DIGITAL 3100/3200
Kit local, incluyendo teclado, cable de extensión para
el teclado y ratón (se debe pedir por separado)
Cable de alimentación eléctrica
Llaves del servidor
Juegos de software y documentación del servidor,
incluyendo manuales impresos y el CD-ROM Quick
Launch con documentación en línea
Cable externo ancho de 68 patillas para SCSI
NOTA
Se debe pedir el monitor por separado.
El juego de software ServerWORKS de DIGITAL incluye:
■ ServerWORKS Quick Launch: disco CD-ROM y la guía
Para comenzar.
■ ServerWORKS Manager: software y la documentación
de ServerWORKS Manager.
El juego de documentación del Servidor DIGITAL
3100/3200 incluye:
■ Esta Guía de instalación, más el manual Referencia
para el sistema, Información sobre la documentación,
Información de garantía y servicio, Manual del usuario
para diagnóstico y Tarjeta de registro.
NOTA
También se incluye documentación en línea en el CD-ROM
Quick Launch.
2
Page 33

Guía de instalación
5
ESPAÑOL
Instale cualquier opción interna que tenga
Si tiene opciones que necesita instalar, hágalo ahora.
1. Destrabe la puerta y el panel frontal.
2. Abra el panel frontal y afloje los dos tornillos del panel
lateral.
3. Retire el panel lateral.
4. Instale las opciones.
Para obtener información detallada, consulte los siguientes
capítulos en el manual Referencia para el sistema.
■ Software y utilidades del sistema
■ Actualización de procesador Pentium Pro
■ Actualización de procesador Pentium II
■ Instalación de memoria adicional (SIMMs)
■ Instalación de memoria adicional (DIMMs)
■ Instalación de unidades de disco y de cinta
■ Conexión de adaptadores SCSI y RAID
Además, consulte la documentación proporcionada
con la opción para obtener instrucciones de instalación
específicas.
AVISO
Antes de tocar cualquier tarjeta de circuitos u
otro componente, póngase una muñequera antiestática, conectada adecuadamente al chasis del servidor
como conexión a tierra, o toque la caja metálica del
servidor para descargar electricidad estática.
NOTA
Las placas ISA se deben instalar después de ejecutar la
utilidad de configuración del sistema (SCU) en el Paso 7
u 8, ya que la SCU indicará las IRQ que ya están en uso.
Si piensa usar Quick Launch para instalar el sistema operativo de red, antes de proceder asegúrese de que el servidor satisfaga los siguientes requisitos:
■ 16 MB de memoria RAM
■ monitor SVGA
■ disco duro con un mínimo de 540 MB
■ ratón de dos o tres botones
■ unidad de CD-ROM iniciable conectada al controlador
SCSI iniciable
■ teclado
3
Page 34

Servidor DIGITAL 3100/32006
Conecte los cables, incluyendo el cable de alimentación
1. Conecte los cables del ratón y del teclado a los
conectores correspondiente en la parte posterior
del servidor.
2. Coloque el monitor cerca del servidor. Conecte el cable
de señal del monitor a la parte posterior del monitor y
después conéctelo al conector correspondiente en la
parte posterior del servidor.
3. Conecte el cable de alimentación del monitor a la parte
posterior del mismo y después a una toma de corriente
en la pared.
4. Conecte el cable de almentación CA al servidor y después a la toma de corriente.
AVISO
No intente modificar o utilizar un cable de alimentación externo de 100 V CA (sólo en Japón) o de
115 V CA para una red de energía de 240 V CA.
La modificación de cualquiera de los cables de
alimentación puede causar graves daños al
equipo.
El selector de voltaje debe coincidir con el voltaje
suministrado por la toma de corriente que utilice.
En Norteamérica, es común 115 voltios. En otros
países, es común 230 voltios. Asegúrese de que el
selector de voltaje indique el voltaje correcto, de
lo contrario, podría dañarse el servidor.
4
Page 35

Guía de instalación 7
ESPAÑOL
Conexiones Ethernet
10/100Base-T (Twisted-Pair)
El Servidor DIGITAL 3100/3200 se entrega equipado para
redes, con conectores y circuitos en la placa para cableado
de redes 10/100Base-T (Twisted-Pair), 10Base-2 (Ethernet
ThinWire) y 10Base-5 (AUI).
Comuníquese con el administrador de la red antes de
conectarse a cualquier tipo de red
10Base-2 (ThinWire)
10Base-5 (AUI)
5
Page 36

Servidor DIGITAL 3100/32008
Encienda el monitor y después el servidor
1. Encienda el monitor.
2. Encienda el servidor.
3. Ajuste el contraste y el brillo del monitor para obtener
una pantalla legible.
NOTA
Consulte el manual Referencia para el sistema si desea
obtener información sobre los mensajes del BIOS y de
la prueba POST.
6
Page 37

Guía de instalación
9
ESPAÑOL
Si se han instalado placas de expansión opcionales
Asegúrese de que esté familiarizado con el uso de:
■ la utilidad de configuración del sistema (SCU)
■ utilidades para RAID
■ la utilidad SCSISelect
Consulte el manual Referencia para el sistema y los manuales de SCSI y RAID para obtener información adicional.
Instale las placas ISA después de ejecutar la utilidad de
configuración del sistema (SCU), ya que ésta indicará las
IRQ en uso. Las placas PCI y EISA deben instalarse antes
de ejecutar la SCU a fin de aprovechar la característica de
detección automática disponible en la SCU.
Utilice el disco CD-ROM Quick Launch para completar la
instalación del servidor. Siga estos pasos para configurar
el servidor e instalar un sistema operativo.
Siga estos pasos para configurar el servidor.
1. Localice el disco CD-ROM Quick Launch en el juego de
software ServerWORKS. Encienda el servidor e inserte
el disco CD-ROM.
Si el servidor no logra iniciarse desde el CD-ROM,
presione Ctrl + Alt + Supr, y después Ctrl + A, cuando
el mensaje se lo pida, a fin de ejecutar la utilidad
SCSISelect. Active las líneas Bootable CD-ROM e INT13.
Salga y reinicie el servidor.
2. Utilice la SCU, cuando aparezca en pantalla, para configurar las placas EISA que haya instalado o para activar
las placas PCI. Si ha instalado placas ISA, consulte la
configuración actual de la placa para evitar conflictos
de IRQ antes de ajustar manualmente los puentes e
interruptores.
El servidor se vuelve a iniciar automáticamente después de que guarde y salga de la SCU.
3. Si ha instalado un controlador RAID, aparecerá entonces la utilidad de configuración de RAID. Configure su
servidor para RAID.
NOTA
Si se han instalado placas SCSI o RAID adicionales, asegúrese de que la partición de MS-DOS resida en la unidad
deseada. Si no es así, apague el servidor, cambie el orden
de las placas y vuelva a configurar el servidor.
7
Page 38

Servidor DIGITAL 3100/320010
Ejecute el programa Quick Launch del CD-ROM
Use el disco CD-ROM Quick Launch para completar la instalación del servidor. Si ha instalado placas de expansión
opcionales, primero necesita seguir las instrucciones de la
página anterior.
NOTA
Si ha instalado placas de expansión opcionales, primero
necesita seguir las instrucciones de la página anterior.
1. Localice el disco CD-ROM Quick Launch en el juego de
software ServerWORKS. Encienda el servidor e inserte
el disco CD-ROM.
Si el servidor no logra iniciarse desde el CD-ROM,
presione Ctrl + Alt + Supr, y después Ctrl + A, cuando
el mensaje se lo pida, a fin de ejecutar la utilidad
SCSISelect. Active las líneas Bootable CD-ROM e INT13.
Salga y reinicie el servidor.
2. Cuando se le indique, podrá crear un tamaño de partición de MS-DOS adecuado para su sistema operativo. El
sistema le solicitará que confirme su selección. Observe
que Windows NT requiere una partición de 35 MB.
Otros sistemas operativos Windows requieren 30 MB.
Se presentará la pantalla principal de Quick Launch y
todas las utilidades y los archivos relacionados (SCU,
diagnóstico, RAID, etc.) se instalarán en la partición de
MS-DOS.
3. En la pantalla principal, seleccione Installations &
Utilities. Elija Express para instalar automáticamente
Microsoft Windows NT o Novell NetWare. Create
Diskettes le permite crear los disquetes de utilidades y
controladores requeridos para instalar manualmente
SCO UNIX, OS/2, Microsoft Windows NT o Novell
NetWare.
Consulte la guía Para comenzar de ServerWORKS Quick
Launch incluida en el juego de software ServerWORKS,
para procedimientos detallados de instalación.
8
Page 39

Guía de instalación 11
ESPAÑOL
Instalación rápida del sistema operativo
Instalación rápida de Microsoft Windows NT Server y Novell NetWare
Se le solicitará que proporcione la siguiente información antes de realizar una instalación rápida de los sistemas operativos
Microsoft Windows NT o Novell NetWare.
Windows NT Server
Nombre completo_____________________________________
Nombre de la organización ______________________________
Nombre del servidor___________________________________
Clave de CD NT_______________________________________
Tipo de servidor NT ___________________________________
Licencia_____________________________________________
Zona horaria_________________________________________
Nombre de grupo de trabajo/Dominio _____________________
Red
❏
Instalar NWLink
❏
Instalar NetBEUI
❏
Instalar TCP/IP
Sistema de archivos
❍
NTFS
❍
FAT
❏
Aplicar Service Packs
Instalación de aplicaciones
❏
Instalar Oracle
❏
Internet Information Server
❏
Internet Information Server
* En un cluster Digital, utilice un nombre de servidor diferente para
cada servidor, pero use el mismo dominio para cada uno de ellos.
Novell NetWare
Nombre del servidor___________________________________
Nombre de la organización ______________________________
Nombre del árbol de directorios __________________________
Contraseña de administrador ____________________________
Tipo de marco _______________________________________
Número de red externa IPX _____________________________
Zona horaria_________________________________________
Llene la información según se requiere. Tenga a mano
su juego de software de Microsoft Windows NT o Novell
NetWare. Siga las instrucciones que aparezcan en la pantalla para comenzar la instalación del sistema operativo.
NOTA
La aplicación Internet Information Server sólo está disponible cuando se selecciona “Instalar TCP/IP”.
9
Page 40

Servidor DIGITAL 3100/320012
Creación de disquetes de utilidades y controladores
de dispositivos para el servidor
Si así desea, puede usar estos procedimientos para crear
los disquetes requeridos desde estaciones de trabajo basadas en Windows:
1. Busque el disco CD-ROM Quick Launch en el juego de
software ServerWORKS. Inserte el disco CD-ROM en la
unidad de CD-ROM.
2. En el menú Inicio, seleccione Ejecutar y ejecute
qlaunch.exe desde el directorio raíz del CD-ROM. El
programa se iniciará automáticamente si está instalado
Windows 95 o Windows NT V4.0 ó una versión posterior.
3. Seleccione el botón Installations & Utilities.
4. Elija la ficha Create Diskettes o Utilities. Utilities es
la predeterminada. Si elige Create Diskettes, primero
deberá seleccionar un modelo y luego un sistema operativo de red y su número de versión. Seleccione Continue. Si elige Utilities, deberá seleccionar un modelo
de servidor para ver las utilidades que corresponden
al mismo.
5. Seleccione la utilidad o el controlador deseado y luego
elija Continue.
6. Inserte un disquete de alta densidad con formato en
la unidad A y seleccione Continue.
NOTA
Para obtener más información, consulte la guía Para
comenzar de ServerWORKS Quick Launch y la ayuda
en línea de dicho programa.
A continuación se enumeran los controladores de dispositivos que pudiera necesitar:
■ Dispositivo SCSI—permite que el servidor funcione uti-
lizando el controlador Adaptec 7880 SCSI en la placa.
■ Vídeo—permite al servidor operar usando el controla-
dor de vídeo en la placa u otras placas de vídeo compatibles.
■ RAID—permite al servidor operar usando un controla-
dor RAID Mylex.
■ Red—elija entre varios controladores de dispositivos
para placas de interfaz de red compatibles con
DIGITAL.
A continuación se indican las utilidades del servidor que
se pueden ejecutar:
■ SCU—permite crear un disquete iniciable de SCU
que se podrá usar para configurar el servidor y añadir
opciones.
■ RAID—permite crear un disquete iniciable de la utili-
dad configuración de RAID que se podrá usar al configurar un equipo RAID externo opcional.
■ Diagnóstico—permite crear disquetes iniciables para
resolver problemas del servidor.
10
Page 41

Guía de instalación 13
ESPAÑOL
Registre su servidor y revise la documentación
Registro
1. Registre aquí el número de modelo y el número de
serie del servidor.
■ Descripción de la familia de servidores:
DIGITAL Server 3000
________________________________________
(ubicada en la parte frontal del servidor)
■ Número de modelo del servidor:
________________________________________
(ubicado en la parte posterior del servidor)
■ Número de serie del servidor:
________________________________________
(ubicado en la parte posterior del servidor)
2. Envíe la tarjeta de registro incluida en el juego de
documentación del Servidor DIGITAL.
Garantía
■ Garantía de 3 años en sitio para el hardware.
■ Consulte la Información de garantía y servicio para
conocer los términos y las condiciones específicas de
la garantía.
Si necesita ayuda
Si tiene preguntas acerca del hardware, el software o la
garantía de su servidor, por favor comuníquese con la
organización de servicio al cliente de DIGITAL.
Antes de llamar a DIGITAL
1. Ejecute las pruebas de diagnóstico suministradas con
el servidor a fin de aislar el problema. Puede ejecutar
las utilidades de diagnóstico desde la partición de
MS-DOS creada por Quick Launch o puede crear disquetes de diagnóstico desde Quick Launch usando la
opción Utilities bajo el botón Installations & Utilities.
2. Tenga a mano el número de modelo y de serie del
servidor antes de llamar.
3. Anote cualquier mensaje de error que haya recibido y
prepárese para describir la secuencia de eventos que
precedió el problema.
4. Llame al 1-800-354-9000.
Para información técnica
A través de Internet, está disponible información técnica
las 24 horas al día. Para información sobre productos,
utilice la dirección:
http://www.windows.digital.com
Para soporte técnico, utilice la dirección:
http://www.windows.digital.com/
support/support.asp
Para ir directamente a la biblioteca de software para actualizaciones de controladores y el BIOS, utilice la dirección:
http://www.windows.digital.com/~ftp/
00-index.stm
11
11
Page 42

Servidor DIGITAL 3100/320014
Instale el software DIGITAL ServerWORKS
Una vez terminada la instalación del servidor y el sistema
operativo de red, deberá instalar DIGITAL ServerWORKS
Manager a fin de:
■ Tener acceso a una interfaz de administración de
servidores que es fácil de usar
■ Llevar un control de las estadísticas esenciales del s
ervidor
■ Obtener un mapa de la topología de red que es fácil
de interpretar
■ Administrar las condiciones de fallos del servidor
■ Lograr compatibilidad con dispositivos de red SNMP
distribuidos desde cualquier parte de la LAN
NOTA
Para obtener información sobre la instalación y una lista
de los sistemas operativos aceptados, consulte la Información general y la Guía de instalación en el kit de software
de DIGITAL ServerWORKS Manager.
12
Page 43

Serveur DIGITAL 3100/3200 Series
Guide d’installation
™
Page 44

Serveur DIGITAL 3100/3200 Series2
élicitations
...pour l’achat de votre serveur 3100/3200
DIGITAL. La famille des serveur DIGITAL
perpétue l’engagement continuel de DIGITAL
à délivrer une qualité absolue, appuyée par
une assistance technique et un service clientèle
reconnus. Les procédures suivantes vont
vous aider à installer facilement le logiciel
et le matériel du serveur.
.
Avant de commencer
Trouvez un espace convenable à l’assemblage et à
l’utilisation. Assurez-vous que votre espace de travail :
■ soit situé à proximité de prises de courant et d’une
prise téléphonique
■ soit éloigné de sources de chaleur et de poussière
excessives, à l’abri du soleil
■ dispose d’une aération convenable. Laissez au moins 7
pouces (17.5 cm) d’espace libre tout autour du serveur
■ conforme aux règlements électriques locaux et régio-
naux gouvernant l’installation d’équipement informatique par des électriciens agréés
Reportez-vous au chapitre : “Spécifications techniques” de
votre Manuel de référence système pour des informations
sur les conditions de fonctionnement.
Si vous ne désirez pas installer votre serveur par vousmême, contactez votre centre de service agréé DIGITAL.
Un technicien du service clientèle peut installer le serveur
pour vous.
DANGER
Procédez avec précaution au déballage du serveur. Du fait de son poids, deux personnes sont
nécessaires au déballage du serveur. Ne pas procéder à deux personnes peut contrevenir à certains règlements de sécurité et peut résulter en
des blessures personnelles sérieuses ainsi qu’à
l’endommagement du matériel.
F
ServerWORKS Quick Launch de DIGITAL
ServerWORKS Quick Launch de DIGITAL est un
succès sans égal en ce qui concerne la rationalisation
de l’installation et de la configuration des composants matériels et du système d’exploitation réseau
avec la gamme de serveurs DIGITAL. Quick Launch
combine une interface intuitive et versatile ainsi que
des fonctions produisant une installation précise,
consistante et rapide, optimisée pour les serveurs
DIGITAL extrêmement puissants et hautement
acclamés.
En plus de sa méthode d’installation rapide tout
à la fois automatique et extensible pour les systèmes d’exploitation réseau, Quick Launch fournit
une documentation extensive sur le serveur, des
conseils de dépannage détaillés et des utilitaires
de configuration indispensables, le tout sur un
CD-ROM amorçable!
Page 45

Guide d’installation
3
FRANÇAIS
Déballez votre serveur
Instructions de déballage
1. Basculez le carton sur son côté. Ouvrez le dessous du
carton et pliez les rabats sous le carton.
2. Tout en gardant le serveur dans son carton, mettez-le
en position droite.
3. Ouvrez le haut du carton et sortez le kit du pays.
4. Fermez le haut du carton. En utilisant les poignées du
carton, retirez le carton vers le haut du serveur.
5. Déplacez le serveur à l’emplacement désiré. Penchez
légèrement le serveur et faites tourner les quatre pieds
vers l’extérieur jusqu’à ce qu’ils se verrouillent en position.
Remarque
Le kit du pays se trouve en haut du carton. Si désiré, recyclez les matériaux d’emballage.
DANGER
Les serveurs sont lourds. Ne les soulevez
pas tout seul.
Pour soulever le serveur…
1. Placez-vous près du serveur avec les jambes écartées
pour plus de stabilité. Accroupissez-vous tout en gardant votre dos droit.
2. Saisissez le serveur fermement et soulevez-le tout en
gardant votre dos droit.
3. Evitez de tourner le haut de votre corps. Tournez avec
vos pieds.
4. Abaissez le serveur délicatement en vous accroupissant
et en gardant votre dos droit.
1
Page 46

Serveur DIGITAL 3100/3200 Series4
Inspectez les composants
Déballez et identifiez les composants du serveur.
Serveur 3100/3200 DIGITAL
Le kit du pays comprend un clavier, un cordon secteur
et une souris (à commander séparément)
Cordon secteur
Clefs du serveur
Les coffrets de logiciel et de documentation du serveur
comprennent les manuels imprimés et le CD-ROM
Quick Launch intégrant la documentation en ligne
Câble Wide SCSI externe à 68 broches.
Remarque
Le moniteur doit être commandé séparément.
Le coffret de logiciels ServerWORKS DIGITAL comprend :
■ ServerWORKS Quick Launch : CD-ROM ServerWORKS
Quick Launch et Guide de Premiers pas.
■ ServerWORKS Manager : logiciel ServerWORKS Mana-
ger et documentation.
Le coffret de documentation Serveur 3100/3200 DIGITAL
comprend :
■ Ce Guide d’installation, le manuel Référence sys-
tème, La Vue d’ensemble de la documentation, les
informations de Garantie et de Service, et la fiche
d’enregistrement.
Remarque
La documentation en ligne se trouve sur le CD-ROM Quick
Launch.
2
Page 47

Guide d’installation
5
FRANÇAIS
Installez chacune des options internes
Si des options existent, installez-les à présent.
1. Déverrouillez la porte et la face avant.
2. Ouvrez la face avant et desserrez les deux écrous à
oreilles du panneau latéral
3. Retirez le panneau latéral.
4. Installez les options.
Reportez-vous aux chapitres suivants du Manuel de
référence système pour de plus amples informations.
■ Logiciel et utilitaires du serveur
■ Mises à niveau du processeur Pentium Pro
■ Mises à niveau du processeur Pentium II
■ Installer de la mémoire supplémentaire (SIMMs)
■ Installer de la mémoire supplémentaire (DIMMs)
■ Installer des lecteurs de disques ou de bandes
■ Connecter des interfaces SCSI et RAID
Reportez-vous aussi aux manuels livrés avec les composants optionnels pour obtenir des instructions spécifiques
sur l’installation de ces options.
ATTENTION
Avant de toucher au circuit imprimé du serveur,
munissez-vous d’un bracelet antistatique correctement connecté au châssis du serveur, ou touchez l’armature métallique du serveur pour vous
décharger de toute électricité statique.
Remarque
Avant d’installer des cartes ISA, exécutez l’utilitaire de
configuration système (SCU) en suivant les étapes 7 et 8
pour obtenir une liste des interruptions déjà utilisées.
L’installation du système d’exploitation réseau (NOS) ne
peut se faire avec Quick Launch que si votre serveur possède les caractéristiques minimales suivantes :
■ 16 Mo de RAM
■ un moniteur SVGA
■ un disque dur de 540 Mo minimum
■ une souris à deux ou trois boutons
■ un lecteur de CD-ROM amorçable connecté au
contrôleur SCSI amorçable
■ un clavier
3
Page 48

Serveur DIGITAL 3100/3200 Series6
Connectez les câbles et le cordon secteur
1. Connectez les câbles du clavier et de la souris aux
connecteurs correspondants à l’arrière du serveur.
2. Placez votre moniteur à proximité du serveur. Connec-
tez le câble de signalisation à l’arrière du moniteur puis
au connecteur correspondant à l’arrière du serveur.
Notez que certains moniteurs disposent de câbles fixes
ne pouvant pas être détachés.
3. Connectez le cordon secteur du moniteur à l’arrière
du moniteur puis dans une prise de courant murale.
4. Connectez le cordon secteur au serveur, puis à une
prise de courant.
ATTENTION
N’essayez pas d’utiliser ou de modifier un cordon
secteur 100 Vca (Japon uniquement) ou 115 Vca
pour une tension secteur de 240 Vca. La modification de l’un ou l’autre des cordons peut gravement endommager le matériel.
Assurez-vous que la position du sélecteur de tension correspond à la tension délivrée par votre
prise de courant. Dans les pays d’Amériques du
Nord, une tension de 115 volts est commune.
Dans d’autres pays, une tension de 230 volts est
commune. Si le sélecteur de tension n’est pas positionné correctement, vous pouvez endommager
votre serveur.
4
Page 49

Guide d’installation 7
FRANÇAIS
Connectez-vous au réseau Ethernet
10/100Base-T (paire torsadée)
Votre serveur DIGITAL 3100/3200 est livré préconfiguré
réseau avec les connecteurs et les circuits intégrés pour les
câblages réseau 10/100Base-T (paire torsadée), 10Base-2
(Ethernet ThinWire) et le 10Base-5 (AUI).
Contactez votre administrateur réseau avant de vous connecter à l’un ou l’autre de ces types de réseaux.
10Base-2 (ThinWire)
10Base-5 (AUI)
5
Page 50

Serveur DIGITAL 3100/3200 Series8
Allumez le moniteur, puis le serveur
1. Allumez le moniteur.
2. Allumez le serveur.
3. Réglez le contraste et la luminosité du moniteur pour
obtenir un affichage correct.
Remarque
Reportez-vous à votre manuel de références système pour
obtenir la liste des messages du BIOS et de l’auto-test à la
mise sous tension (POST).
6
Page 51

Guide d’installation
9
FRANÇAIS
Installez les cartes d’extension en option, si nécessaire
Assurez-vous que vous êtes familier avec :
■ l’utilitaire de configuration du système (SCU)
■ les utilitaires RAID
■ l’utilitaire SCSISelect
Reportez-vous aux Manuel de référence système SCSI et
RAID pour toute autre information supplémentaire.
Les cartes ISA doivent être installées après avoir exécuté
l’utilitaire de configuration système (SCU) pour déterminer
quelles sont les interruptions déjà utilisées. Les cartes PCI
et EISA doivent être installées avant d’exécuter le SCU
pour profiter des fonctions de détection automatique
du SCU.
Utilisez le CD-ROM Quick Launch pour compléter
l’installation du serveur. Suivez les étapes suivantes pour
configurer votre serveur.
1. Trouvez le CD-ROM Quick Launch dans votre coffret du
logiciel ServerWORKS. Allumez votre serveur et insérez
le CD-ROM dans le lecteur.
Si votre serveur n’arrive pas à démarrer à partir
du CD-ROM, appuyez sur Ctrl + Alt + Eff, puis sur
Ctrl + A, quand invité à le faire, pour lancer l’utilitaire
SCSISelect. Activez le CD-ROM Amorçable et les lignes
INT13. Quittez puis réamorcez.
2. Utilisez le SCU, quand affiché, pour configurer les
cartes EISA optionnelles que vous venez d’installer ou pour
activer les cartes PCI. Si vous avez installé des cartes ISA,
vérifiez la configuration des cartes courantes pour éviter
les conflits d’interruptions (IRQ) avant de configurer manuellement les cavaliers et les interrupteurs.
Le serveur se réamorce automatiquement après avoir
sauvé et quitté le SCU.
3. Si vous avez installé un contrôleur RAID, l’utilitaire
de configuration RAID sera affiché dans l’étape suivante. Configurer votre serveur pour un fonctionnement RAID.
Remarque
Si vous avez installé des cartes SCSI ou des cartes RAID
supplémentaires, assurez-vous que la partition MS-DOS
réside sur le disque désiré. Si ce n’est pas le cas, changez
l’ordre de vos cartes et reconfigurez le serveur.
7
Page 52

Serveur DIGITAL 3100/3200 Series10
Lancez le programme Quick Launch du CD-ROM
Utilisez le CD-ROM Quick Launch pour compléter
l’installation du serveur. Suivez les étapes suivantes pour
configurer votre serveur et installer un système
d’exploitation.
Remarque
Si vous avez installé une ou plusieurs cartes d’extension,
commencez par suivre les instructions données dans la
page précédente.
1. Trouvez le CD-ROM Quick Launch dans votre coffret du
logiciel ServerWORKS. Allumez votre serveur et insérez
le CD-ROM dans le lecteur.
Si votre serveur n’arrive pas à démarrer à partir
du CD-ROM, appuyez sur Ctrl + Alt + Eff, puis sur
Ctrl + A, quand invité à le faire, pour lancer l’utilitaire
SCSISelect. Activez le CD-ROM Amorçable et les lignes
INT13. Quittez puis réamorcez.
2. Quand invité, vous pouvez créer une partition MS-DOS
de taille appropriée pour votre système d’exploitation.
Le système vous invite à confirmer votre choix. Notez
que Windows NT requiert une partition de 35 Mo.
Les autres systèmes d’exploitation Windows requièrent
30 Mo.
L’écran principal de Quick Launch s’affiche et tous les
utilitaires ainsi que les fichiers associés (SCU, diagnostics, RAID, etc.) sont installés sur la partition MS-DOS.
3. Sélectionnez Installations et utilitaires dans l’écran
principal de Quick Launch. Choisissez Rapide pour installer Microsoft Windows NT ou Novell NetWare automatiquement. Créer des disquettes vous permet de
créer les disquettes d’utilitaires et de pilotes nécessaires
à l’installation manuelle de SCO UNIX, OS/2, Microsoft
Windows NT ou Novell NetWare.
Reportez-vous au manuel de Guide de premiers pas de
ServerWORKS Quick Launch inclus dans le coffret de
logiciels ServerWORKS pour obtenir les procédures
d’installation détaillées.
8
Page 53

Guide d’installation 11
FRANÇAIS
Installation rapide du système d’exploitation
Installation rapide de Microsoft Windows NT Serveur et de Novell NetWare
Les informations suivantes vous seront demandées lors de l’installation Rapide des systèmes d’exploitation Microsoft
Windows NT ou Novell NetWare.
Serveur Windows NT
Nom et prénom ______________________________________
Nom de l’organisation__________________________________
Nom du serveur* _____________________________________
Clé du CD-ROM NT ____________________________________
Type de serveur NT____________________________________
Licence _____________________________________________
Fuseau horaire _______________________________________
Nom du groupe de travail/Domaine*_______________________
Réseau
❏
Installez NWLink
❏
Installez NetBEUI
❏
Installez TCP/IP
Système de fichiers
❍
NTFS
❍
FAT
❏
Applique les Service Packs
Installation des applications
❏
Installer Oracle
❏
Serveur d’information Internet
* Pour un cluster Digital, utilisez un Nom de serveur différent pour chaque
serveur, et gardez le même Nom de domaine pour chaque serveur.
Novell NetWare
Nom du serveur ______________________________________
Nom de l’organisation__________________________________
Nom de l’arborescence des répertoires _____________________
Mot de passe de l’administrateur _________________________
Type de paquet_______________________________________
Numéro réseau externe IPX______________________________
Fuseau horaire _______________________________________
Remplissez les informations comme demandé. Ayez
votre les éléments du logiciel Microsoft Windows NT
ou Novell Netware sous la main. Suivez les instructions
affichées sur l’écran pour commencez l’installation du
système d’exploitation.
Remarque
L’application Serveur d’informations Internet n’est disponible que si “Installer TCP/IP” est sélectionné.
9
Page 54

Serveur DIGITAL 3100/3200 Series12
Créez les disquettes de pilotes et d’utilitaires du serveur
Si désiré, vous pouvez créer les disquettes requises à partir
d’une station de travail Windows en utilisant les procédures suivantes :
1. Trouvez le CD-ROM Quick Launch dans le coffret
ServerWORKS et insérez-le dans le lecteur.
2. A partir du menu Démarrer, sélectionnez Exécuter
qlaunch.exe qui se trouve dans le répertoire racine du
CD-ROM. Le programme démarrera automatiquement
si Windows 95 ou Windows NT V4.0 (ou plus récent)
sont installés.
3. Sélectionnez le bouton Installations et utilitaires.
4. Choisissez l’onglet Créer des disquettes ou l’onglet
utilitaires. Utilitaires est le défaut. Si vous choisissez
Créer des disquettes, commencez par sélectionner un
modèle, puis un système d’exploitation réseau et sa
version. Sélectionnez Continuer. Si vous choisissez
Utilitaires, sélectionnez un modèle de serveur pour
voir les utilitaires disponibles pour ce serveur.
5. Sélectionnez l’utilitaire ou le pilote désiré, puis sélectionnez
Continuer.
6. Introduisez une disquette haute-densité formatée dans
le lecteur A, puis sélectionnez Continuer.
Remarque
Pour de plus amples informations, reportez-vous au Guide
premiers pas de ServerWORKS Quick Launch et à l’aide
en ligne du programme ServerWORKS Quick Launch.
Les pilotes de périphériques suivants peuvent vous être
nécessaires :
■ SCSI—Permet à votre serveur de fonctionner en utili-
sant le contrôleur SCSI Adaptec 7880 intégré.
■ Vidéo—permet au serveur de fonctionner en utili-
sant le contrôleur vidéo ou d’autres cartes vidéo
supportées.
■ RAID—permet au serveur de fonctionner en utilisant
un contrôleur RAID Mylex.
■ Réseau—permet de choisir entre plusieurs pilotes
de périphériques supportés par les cartes d’interface
réseau de DIGITAL.
Les utilitaires suivants sont amorçables :
■ SCU—vous permet de créer une disquette SCU amor-
çable pour une utilisation lors de la configuration du
serveur ou lors de l’ajout d’options.
■ RAID—vous permet de créer une disquette amorçable
d’utilitaires de configuration RAID pour une utilisation
lors de la configuration de matrices RAID externes
optionnelles.
■ Diagnostics—vous permet de créer des disquettes
amorçables qui seront utilisées pour dépanner le
serveur.
10
Page 55

Guide d’installation 13
FRANÇAIS
Enregistrez votre serveur et étudiez la documentation
Enregistrement
1. Notez ci-dessous les numéros de modèle et de série du
serveur.
■ Description de la famille de serveurs :
DIGITAL Server 3000
________________________________________
(situé sur la face avant du serveur)
■ Numéro de modèle du serveur :
________________________________________
(situés sur la face arrière du serveur)
■ Numéro de série du serveur :
________________________________________
(situés sur la face arrière du serveur)
2. Envoyez la fiche d’enregistrement incluse dans le
coffret de documentation du serveur DIGITAL.
Garantie
■ 3 ans de garantie sur site du matériel.
■ Reportez-vous à la brochure “Informations de garantie
et de service” pour de plus amples informations sur les
termes et conditions de la garantie.
Si vous avez besoin d’aide
Si vous avez des questions au sujet du matériel, du logiciel
ou de la garantie du serveur, contactez le service clientèle
de DIGITAL.
Avant d’appeler DIGITAL
1. Lancez le logiciel de diagnostic livré avec le serveur
afin d’isoler le problème. Les diagnostics peuvent être
exécutés à partir de la partition MS-DOS créée par
Quick Launch ou vous pouvez créer des disquettes de
diagnostics avec Quick Launch en utilisant la rubrique
Utilitaires située sous le bouton Installation et
utilitaires.
2. Ayez les numéros de modèle et de série du serveur
disponibles avant d’appeler.
3. Notez tout message d’erreur et soyez préparé à décrire
la séquence d’événements ayant conduit au problème.
4. Appelez le 1-800-354-9000.
Pour obtenir de l’assistance technique
Des informations techniques sont disponibles 24/24 heures
sur l’Internet. Pour des informations sur le produit, utilisez
l’adresse :
http://www.windows.digital.com
Pour de l’assistance technique, utilisez l’adresse :
http://www.windows.digital.com/
support/support.asp
Pour accéder directement à la librairie logicielle et aux
mises à niveau du BIOS et des pilotes, utilisez l’adresse :
http://www.windows.digital.com/~ftp/
00-index.stm
11
Page 56

Serveur DIGITAL 3100/3200 Series14
Installez DIGITAL ServerWORKS Manager
Après avoir installé votre serveur et le système
d’exploitation réseau, installez le logiciel DIGITAL
ServerWORKS Manager pour :
■ disposer d’une interface d’administration du serveur
facile d’utilisation
■ visualiser les données statistiques cruciales du serveur PC
■ obtenir un plan topologique du réseau facile à lire
■ gérer les conditions d’anomalies du serveur
■ contrôler les périphériques de type SNMP distribués
sur le réseau à partir de n’importe quel point du
réseau
Remarque
Reportez-vous au Guide de présentation et d’installation
du kit logiciel DIGITAL ServerWORKS Manager pour obtenir les informations d’installation et une liste des système
d’exploitation supportés.
12
Page 57

Server DIGITAL Serie 3100/3200
Guida di installazione
™
Page 58

Server DIGITAL Serie 3100/32002
razie
...
per avere acquistato un server 3100/3200
della DIGITAL. La famiglia server
della DIGITAL rappresental’impegno continuo
della DIGITAL per una qualità senza compro-
messi, sostenuto daun’assistenza e supporto
clienti da primato. Le seguenti procedure
vi aiuteranno a impostare facilmente
l’hardware ed il software del server
.
Prima di iniziare
Selezionare un’area adatta per l’assemblaggio e l’uso. Assicurarsi che nel posto di lavoro prescelto:
■ vi siano prese elettriche e una presa telefonica
■ non vi siano quantità eccessive di calore, polvere e
luce solare diretta
■ vi siano almeno 18 centimetri liberi su tutti i lati per
una corretta circolazione dell’aria
■ sia conforme a tutte le normative elettriche vigenti
relative all’installazione di apparecchiature informatiche da parte di elettricisti qualificati
Vedere il “Manuale di riferimento del sistema” nel Manuale
utente per informazioni sulla temperatura e sull’umidità.
Se non si vuole installare il server da soli, contattare il
Servizio Assistenza della DIGITAL. Un tecnico del Servizio
Assistenza può installare il server per voi.
ATTENZIONE
Usare estrema cautela quando si disimballa il server. A causa del suo peso, occorrono due persone
per disimballarlo. L’inosservanza di adoperare
due persone potrebbe violare alcuni regolamenti
di sicurezza e potrebbe provocare ferite personali
gravi o danni all’equipaggiamento.
G
ServerWORKS Quick Launch DIGITAL
ServerWORKS Quick Launch della DIGITAL permette di conseguire una facilità senza pari
nell’installazione e configurazione dei componenti
hardware e del software del sistema operativo di rete sulla linea di server della DIGITAL. Quick Launch
combina un’interfaccia intuitiva e caratteristiche versatili e veloci per produrre un’installazione coerente
e accurata, ottimizzata per i server della DIGITAL,
estremamente potenti e molto acclamati.
Quick Launch in aggiunta al suo metodo di installazione automatico ma nello stesso tempo estensibile,
per sistemi operativi di rete, offre un archivio completo di documentazione sul server, assistenza nella
ricerca dei guasti e utility di configurazione indispensabili; tutto in un CD auto-partente!
Page 59

Guida di installazione
3
ITALIANO
Disimballare il server
Istruzioni per il disimballaggio
1. Appoggiare la scatola su un lato. Aprire il fondo della
scatola e piegare il lembo inferiore sotto la scatola stessa.
2. Riposizionare il server verticalmente lasciandolo nella
scatola.
3. Aprire il lato superiore della scatola e rimuovere il kit
specifico per il paese di utilizzo.
4. Chiudere il lato superiore della scatola. Afferrandola
per le maniglie, rimuovere la scatola dal server.
5. Spostare il server sul luogo di installazione prescelto.
Inclinare leggermente il server e girare i quattro piedini di supporto verso l'esterno fino a quando scattano
in sede.
NOTA
Il kit specifico per il paese di utilizzo è imballato sulla parte
alta della scatola. Se lo si desidera, si possono riciclare i
materiali di imballaggio.
ATTENZIONE
Il server è pesante. Per sollevarlo, farsi aiutare da
una seconda persona.
Se occorre sollevare il server…
1. Stare in piedi vicino al server con le gambe divaricate
per maggiore stabilità. Abbassarsi, piegando le ginocchia e mantenendo la schiena diritta
2. Afferrare saldamente il server, sollevarsi facendo leva
sulle gambe e mantenendo la schiena diritta.
3. Evitare movimenti di rotazione con la parte superiore
del corpo. Spostare i piedi per girarsi.
4. Abbassarsi con cautela usando i muscoli delle gambe
per accovacciarsi, mantenendo la schiena diritta.
1
Page 60

Server DIGITAL Serie 3100/32004
Controllare i pezzi
Disimballare e identificare i componenti del server.
Server 3100/3200 DIGITAL
Kit per ciascun Paese, con tastiera, cavo di prolunga
per la tastiera e mouse (da ordinare separatamente)
Cavo di alimentazione
Chiavi del server
Il software del server e i kit di documentazione
includono manuali stampati e CD-ROM Quick Launch
con documentazione in linea
Cavo SCSI wide esterno da 68 pin
NOTA
Il monitor deve essere ordinato separatamente.
Il kit software ServerWORKS DIGITAL include:
■ ServerWORKS Quick Launch: il disco CD-ROM Ser-
verWORKS Quick Launch e la guida introduttiva.
■ ServerWORKS Manager: il software e la documenta-
zione di ServerWORKS Manager.
Il kit di documentazione del server 3100/3200 include:
■ la presente Guida all’installazione, il manuale di
riferimento del sistema, una panoramica sulla do-
cumentazione, informazioni sulla garanzia e la manu-
tenzione, la scheda di registrazione.
NOTA
La documentazione è anche contenuta in linea nel CD-ROM
Quick Launch.
2
Page 61

Guida di installazione
5
ITALIANO
Installare tutte le opzioni interne
Se si hanno delle opzioni da installare, farlo adesso.
1. Sbloccare lo sportello e il pannello anteriore.
2. Aprire il pannello anteriore e allentare le due viti a
testa zigrinata del pannello laterale.
3. Rimuovere il pannello laterale.
4. Installare le opzioni.
Fare riferimento ai seguenti capitoli del Manuale utente
per maggiori informazioni su:
■ software e utility del server
■ aggiornamenti per processore Pentium Pro
■ aggiornamenti per processore Pentium II
■ installazione di memoria addizionale (SIMMs)
■ installazione di memoria addizionale (DIMMs)
■ installazione di unità a dischi e a nastri
■ Collegamento degli adattatori SCSI e RAID
Consultare i capitoli seguenti nel Manuale di riferimento
del sistema per informazioni dettagliate.
AVVERTENZA
Prima di toccare qualsiasi scheda con circuiti o
componenti elettronici, indossare un cinturino da
polso antistatico, correttamente messo a terra al
telaio del server, oppure toccare la struttura metallica per scaricare l’eventuale elettricità statica
accumulata.
NOTA
Le schede ISA dovrebbero venire installate dopo l’esecuzione dell’utilità di configurazione del sistema nella fase 7
o 8 dato che la SCU elencherà gli IRQ già usati.
Se si prevede di usare Quick Launch per installare il Sistema operativo di rete, il server deve soddisfare i requisiti
minimi per procedere all’installazione del server:
■ 16 MB di RAM
■ Monitor SVGA
■ 540 MB come minimo di disco rigido
■ Mouse a due o tre tasti
■ Lettore CD-ROM collegato al controller SCSI auto
partente
■ Tastiera
3
Page 62

Server DIGITAL Serie 3100/32006
Collegare i cavi e il filo di alimentazione
1. Collegare i cavi del mouse e della tastiera nei rispettivi
connettori posti dietro al server.
2. Posizionare il monitor vicino al server. Collegare il
cavo di segnale del monitor dietro il monitor e poi
collegarlo al corrispondente connettore posto dietro
al server.
3. Collegare il cavo di alimentazione del monitor al retro
del monitor e ad una presa a muro.
4. Collegare il filo di alimentazione ca al server e poi alla
presa di corrente.
AVVERTENZA
Non provare a modificare o usare un cavo di
alimentazione esterno da 100 V c.a. (solo in
Giappone) o da 115 V c.a. se l’alimentazione di
ingresso è di 240 V c.a., in quanto ciò può causare
gravi danni all’apparecchiatura.
Il selettore di tensione deve corrispondere alla
tensione di rete del paese in cui si utilizza
l’apparecchiatura. In Nord America, è comune
una tensione di 115 volt. In altri paesi, è comune
una tensione di 230 volt. Un’impostazione errata
del selettore di tensione può provocare danni
al server.
4
Page 63

Guida di installazione 7
ITALIANO
Collegamenti Ethernet
10/100Base-T (Twisted-Pair)
Il DIGITAL server 3100/3200 viene spedito già pronto
per la rete con connettori e circuiteria incorporata per
10/100Base-T (a doppino intrecciato), 10Base-2 (filo
Thin EtherNet) e cablaggio di rete 10Base-5 (AUI).
Rivolgersi all’amministratore del sistema prima di collegarsi ad uno di questi tipi di rete.
10Base-2 (ThinWire)
10Base-5 (AUI)
5
Page 64

Server DIGITAL Serie 3100/32008
Accendere il monitor e poi il server
1. Accendere il monitor.
2. Accendere il server.
3. Regolare il contrasto e la luminosità del monitor per
ottenere la migliore visualizzazione.
NOTA
Per una descrizione dei messaggi del BIOS e della procedura POST (Power-On-Self-Test), consultare il manuale di
riferimento del sistema.
6
Page 65

Guida di installazione
9
ITALIANO
Se occorre installare schede di espansione opzionali
Accertarsi che si sappiano usare:
■ L’utility di configurazione del sistema (SCU)
■ Utility RAID
■ L’utility SCSISelect
Fare riferimento al Manuale di riferimento del sistema e ai
manuali SCSI e RAID per qualsiasi informazioni aggiuntiva.
Poiché la SCU elenca gli IRQ già in uso, le schede ISA devono essere installate dopo aver eseguito la SCU. Le
schede PCI e EISA devono venire installati prima di eseguire la SCU per avvantaggiarsi della funzione di rilevamento automatico della SCU.
Usare il disco CD-ROM Quick Launch per completare
l’installazione del server. Seguire questa procedura per
configurare il server.
1. Individuare il disco CD-ROM Quick Launch nel kit del
software ServerWORKS. Accendere il server ed inserire
il disco CD-ROM.
Se il server non riesce ad avviarsi dal CD-ROM, premere Ctrl + Alt + Canc e poi Ctrl + A, quando lo
richiede il sistema, per eseguire l’utilità SCSISelect.
Attivare le righe Bootable CD-ROM e INT13. Uscire
e riavviare il server.
2. Usare la SCU, quando viene visualizzata, per configurare le schede di opzione EISA installate o per attivare
le schede PCI. Dopo l’installazione di schede ISA, verificare la configurazione di scheda corrente per evitare
conflitti di IRQ prima dell’impostazione manuale di
ponticelli e di interruttori.
Il server automaticamente si riavvia dopo che si salva
e si esce da SCU.
3. Se si è installato un controller RAID, l’utility di configurazione RAID verrà visualizzata dopo. Configurare il
server per RAID.
NOTA
Se si sono installate schede SCSI o RAID aggiuntive, accertarsi che la partizione di MS-DOS risieda sul drive desiderato. Se no, spegnere il server, cambiare l’ordine delle schede e riconfigurare il server.
7
Page 66

Server DIGITAL Serie 3100/320010
Eseguire il programma Quick Launch su CD-ROM
Usare il disco CD-ROM Quick Launch per completare
l’installazione del server. Seguire le seguenti istruzioni per
configurare il server e installare un sistema operativo.
NOTA
Se sono state installate schede di espansione opzionali,
occorre serguire le istruzioni elencate nella pagina precedente.
1. Individuare il disco CD-ROM Quick Launch nel kit del
software ServerWORKS. Accendere il server ed inserire
il disco CD-ROM.
Se il server non riesce ad avviarsi dal CD-ROM,
premere Ctrl + Alt + Canc e poi Ctrl + A, quando lo
richiede il sistema, per eseguire l’utilità SCSISelect.
Attivare le righe bootable CD-ROM e INT13. Uscire
e riavviare il server.
2. Verrà visualizzato un messaggio che chiede all’utente
se desidera creare una partizione MS-DOS delle dimensioni adatte per il sistema operativo in dotazione. Il sistema chiede in seguito di confermare la scelta.
Si noti che Windows NT richiede una partizione di 35
MB. Altri sistemi operativi Windows richiedono 30 MB.
Viene visualizzata la schermata principale di Quick
Launch e vengono installate nella partizione MS-DOS
tutte le utility e i file relativi (SCU, diagnostica, RAID,
e così via).
3. Dalla schermata principale di Quick Launch, selezionare
Installations & Utilities (installazioni e utility). Scegliere l’opzione Express per installare automaticamente
Microsoft Windows NT o Novell NetWare. L’opzione
Create Diskettes consente di creare i dischetti con le
utility e i driver necessari per l’installazione manuale
di SCO UNIX, OS/2, Microsoft Windows NT, Novell
NetWare.
Per ulteriori dettagli sulla procedura di installazione,
consultare la guida introduttiva di ServerWORKS Quick
Launch allegata al kit del software di ServerWORKS.
8
Page 67

Guida di installazione 11
ITALIANO
Installazione Express del sistema operativo
Installazione Express di Microsoft Windows NT Server & Novell NetWare
Prima di poter installare con Express i sistemi operativi Microsoft Windows NT o Novell NetWare, verrà richiesto di forni-
re le seguenti informazioni.
Windows NT Server
Nome completo_______________________________________
Nome organizzazione __________________________________
Nome server_________________________________________
Chiave CD NT ________________________________________
Tipo di server NT _____________________________________
Licenza _____________________________________________
Fuso orario__________________________________________
Nome gruppo di lavoro/Dominio _________________________
Rete
❏
Installare NWLink
❏
Installare NetBEUI
❏
Installare TCP/IP
File System
❍
NTFS
❍
FAT
❏
Applicazione Service Packs
Installazione applicazioni
❏
Installazione Oracle
❏
Internet Information Server
* Per un cluster Digital, utilizzare un Nome di server diverso per ciascun
server ma il medesimo Nome di dominio.
Novell NetWare
Nome server_________________________________________
Nome organizzazione __________________________________
Nome albero directory _________________________________
Password dell’amministratore____________________________
Tipo di frame ________________________________________
Numero rete esterna IPX________________________________
Fuso orario__________________________________________
Completare le informazioni come richiesto. Tenere pronto
il kit software di Microsoft Windows NT o Novell Netware.
Seguire le istruzioni sullo schermo per iniziare
l’installazione del sistema operativo.
NOTA
L’applicazione Internet Information Server è disponibile
soltanto quando è selezionata l’opzione “Install TCP/IP”.
9
Page 68

Server DIGITAL Serie 3100/320012
Creare dischetti di utility e di driver di dispositivi del server
Per creare i dischetti necessari da stazioni di lavoro basate
su Windows, attenersi alle seguenti istruzioni.
1. Individuare il disco CD-ROM Quick Launch nel kit software ServerWORKS. Inserire il disco CD-ROM nel lettore di CD-ROM.
2. Dal menu Avvio, selezionare Esegui qlaunch.exe dalla
directory principale del disco a CD-ROM. Il programma
viene avviato automaticamente se è installato
Windows 95 o Windows NT V4.0 o superiore.
3. Selezionare il pulsante Installations & Utilities
(installazioni e utility.)
4. Scegliere la scheda Create Diskettes o quella Utilities.
Utilities è la selezione predefinita. Se si sceglie Create
Diskettes, selezionare prima un modello, quindi un
sistema operativo di rete e la relativa versione. Selezionare Avanti. Se si sceglie Utilities, selezionare un
modello di server per visualizzare le utility del server
specifico.
5. Selezionare la utility o il driver e premere Avanti.
6. Inserire un dischetto formattato ad alta densità
nell’unità A e scegliere Avanti.
NOTA
Per ulteriori informazioni, consultare la guida introduttiva
di ServerWORKS Quick Launch e la guida in linea nel
programma ServerWORKS Quick Launch.
Qui di seguito sono elencati i driver di dispositivo di cui
si potrebbe avere bisogno.
■ SCSI—consente al server di utilizzare il controller SCSI
Adaptec 7880 incorporato.
■ Video—permette al server di operare usando il control-
ler video su scheda o altre schede video supportate.
■ RAID—permette al server di operare usando un con-
troller RAID Mylex.
■ Rete-scegliere tra diversi driver di dispositivi per sche-
de di interfaccia di rete supportate dalla DIGITAL.
Qui di seguito sono elencate le utility auto-partenti del
server.
■ SCU—permette di creare un dischetto auto-partente
SCU da usare quando si configura il server e si aggiungono opzioni.
■ RAID—permette di creare un dischetto auto-partente di
utility di configurazione RAID da usare quando si configura un array RAID esterno opzionale.
■ Diagnostica—consente di creare dischetti avviabili da
utilizzare nelle procedure di diagnostica del server.
10
Page 69

Guida di installazione 13
ITALIANO
Registrare il server e revisionare la documentazione
Registrare
1. Annotare qui il numero di modello e il numero seriale
del server.
■ Descrizione della famiglia di server:
DIGITAL Server 3000
________________________________________
(posizionato nella parte anteriore del server)
■ Numero di modello del server:
________________________________________
(posizionato nella parte posteriore del server)
■ Numero di serie del server:
________________________________________
(posizionato nella parte posteriore del server)
2. Spedire la scheda di registrazione contenuta nel kit di
documentazione del server DIGITAL.
Garanzia
■ 3-anni di garanzia hardware sul posto.
■ Fare riferimento alle Informazioni di Garanzia e di
Assistenza per termini e condizioni di garanzia
particolari.
Se serve aiuto
Se si hanno domande sull’hardware, il software o la garanzia del server, si prega di contattare l’organizzazione di
Assistenza Clienti della DIGITAL.
Prima di chiamare la DIGITAL
1. Eseguire il programma diagnostico fornito con il
server per isolare il problema. La diagnostica può essere avviata dalla partizione di MS-DOS creata da Quick
Launch o si possono creare i dischetti di diagnostica da
Quick Launch usando l’opzione Utilities che si raggiunge tramite il pulsante Installations & Utilities.
2. Avere a portata di mano il numero di modello e il
numero seriale del server prima di chiamare.
3. Annotare qualsiasi messaggio di errore ed essere pronti
a descrivere la sequenza di eventi che hanno portato al
problema.
4. Chiamare 1-800-354-9000.
Per informazioni tecniche
Informazioni di carattere tecnico sono disponibili su
Internet 24 ore su 24. Pr informazioni sui prodotti, collegarsi al seguente indirizzo:
http://www.windows.digital.com
Per l’assistenza tecnica, collegarsi al seguente indirizzo:
http://www.windows.digital.com/
support/support.asp
Per accedere direttamente alla biblioteca di software e
ottenere gli aggiornamenti al BIOS e ai driver, collegarsi al
seguente indirizzo:
http://www.windows.digital.com/~ftp/
00-index.stm
11
Page 70

Server DIGITAL Serie 3100/320014
Installare il software ServerWORKS Manager della DIGITAL
Una volta effettuata l’installazione del server e del sistema
operativo di rete, installare il ServerWORKS Manager della
DIGITAL per:
■ accedere ad un’interfaccia di gestione del server facile
da usare;
■ controllare statistiche critiche del server PC;
■ ottenere una mappa topologica della rete facile da
leggere;
■ gestire condizioni di guasto del server;
■ supportare dispositivi di rete distribuiti SNMP da qual-
siasi punto della LAN.
NOTA
Per informazioni sull’installazione ed un elenco dei sistemi operativi compatibili, consultare la panoramica e la
guida all’installazione nel kit del software ServerWORKS
Manager della DIGITAL.
12
Page 71

Copyright © Digital Equipment Corporation, 1997
All Rights Reserved
DIGITAL and ServerWORKS are trademarks of Digital Equipment Corporation.
SCO is a trademark of The Santa Cruz Operation, Inc.
UNIX is a registered trademark of The Open Group, Inc.
OS/2 is a registered trademark of International Business Machines Corporation.
MS-DOS and Windows are registered trademarks and NT is a trademark of Microsoft Corporation.
NetWare is a U.S. registered trademark of Novell, Inc.
All other trademarks and registered trademarks are the property of their respective holders.
PRINTED IN U.S.A.
Printed on
recycled paper
 Loading...