

Page 1

PrintServer32Printer
OptionalLargeCapacityInputTray
Operator’sGuide
Revision/Update Information: This is a new manual.
Order Number: EK–PSLCO–OC. A01
Digital Equipment Corporation
Maynard, Massachusetts
Page 2

First Printing, March 1994
Digital Equipment Corporation makes no representations that the use of its products in the
manner described in this publication will not infringe on existing or future patent rights, nor do
the descriptions contained in this publication imply the granting of licenses to make, use, or sell
equipment or software in accordance with the description.
Possession, use, or copying of the software described in this publication is authorized only pursuant
to a valid written license from Digital or an authorized sublicensor.
© Digital Equipment Corporation 1994. All Rights Reserved.
Printed in U.S.A.
The postpaid Reader’s Comments forms at the end of this document request your critical evaluation
to assist in preparing future documentation.
The following are trademarks of Digital Equipment Corporation: PrintServer, VAX, VAX
DOCUMENT, and the DIGITAL logo.
All other trademarks and registered trademarks are the property of their respective holders.
FCC Notice
This equipment has been tested and found to comply with the limits of a Class A digital device,
Pursuant to Part 15 of the FCC Rules. These limits are designed to provide a reasonable protection
against harmful interference when the equipment is operated in a commercial environment. The
equipment generates, uses, and can radiate radio frequency energy and, if not installed and used in
accordance with the instruction manual, may cause harmful interference to radio communications.
Operation of this equipment in a residential area is likely to cause harmful interference in which
case the user will be required to correct the interference at his own expense.
Any changes or modifications not expressly approved by the manufacturer could void the user’s
authority to operate the equipment.
Canadian Department of Communications compliance statement:
This equipment does not exceed Class A limits per radio noise emissions for digital apparatus
set out in the Radio Interference Regulation of the Canadian Department of Communications.
Operation in a residential area may cause unacceptable interference to radio and TV reception
requiring the owner or operator to take whatever steps are necessary to correct the interference.
Avis de conformité aux normes du ministère de Communications du Canada:
Cet équipement ne dépasse pas les limites de Class A d’émission de bruits radioélectriques pour les
appareils numériques telles que perscrites par le Règlement sur le brouillage radioélectrique établies
par le ministère des Communications du Canada. L’exploitation faite en milieu résidential peut
entraîner le brouillage des réceptions radio et télé, ce qui obligerait le propriétaire ou l’opérateur a
prendre les dispositions nécessaires pour en éliminer les causes.
This document was prepared using VAX DOCUMENT Version 2.1.
S2425
Page 3

Contents
1 Using the Optional Large Capacity Input Tray
1.1 Supported Paper Sizes . . . . . . . . . . . . . . . . . . . . . . . . . . . . . . . . . . . . . . . . 1–1
1.2 Adding Paper . . . . . . . . . . . . . . . . . . . . . . . . . . . . . . . . . . . . . . . . . . . . . . . 1–3
1.3 Clearing Paper Jams . . . . . . . . . . . . . . . . . . . . . . . . . . . . . . . . . . . . . . . . . 1–8
1.4 Troubleshooting . . . . . . . . . . . . . . . . . . . . . . . . . . . . . . . . . . . . . . . . . . . . . 1–11
1.5 Service Notes . . . . . . . . . . . . . . . . . . . . . . . . . . . . . . . . . . . . . . . . . . . . . . . 1–12
Figures
1–1 Parts of the OLCIT . . . . . . . . . . . . . . . . . . . . . . . . . . . . . . . . . . . . . . . 1–2
Tables
1–1 Conventions . . . . . . . . . . . . . . . . . . . . . . . . . . . . . . . . . . . . . . . . . . . . . 1–1
1–2 OLCIT LEDs . . . . . . . . . . . . . . . . . . . . . . . . . . . . . . . . . . . . . . . . . . . . 1–11
1–3 Print Errors . . . . . . . . . . . . . . . . . . . . . . . . . . . . . . . . . . . . . . . . . . . . . 1–11
1–4 OLCIT Diagnostics . . . . . . . . . . . . . . . . . . . . . . . . . . . . . . . . . . . . . . . . 1–12
iii
Page 4

Page 5

1
Using the Optional Large Capacity Input Tray
This book describes the following operator functions for the PrintServer 32
Printer Optional Large Capacity Input Tray (OLCIT).
• Adding paper (capacity 3000 sheets of 20 lb paper)
• Clearing paper jams
• Troubleshooting
Refer to the PrintServer 32 Printer Operator’s Guide for information on using the
PrintServer 32 printer.
Conventions
The following conventions are used in this manual:
Table 1–1 Conventions
Note A note provides important additional information.
Key
A key name is shown enclosed in a box to indicate that you press
that key on the control panel. Key names are always shown in initial
capital letters.
1.1 Supported Paper Sizes
The Optional Large Capacity Input Tray (OLCIT) is designed to accept the
following paper sizes printed in either landscape (long edge feed) or portrait
(short edge feed) mode:
• Letter (LT) (8.5 inch x 11 inch)
• Letter (LTR) (11 inch x 8.5 inch)
• A4 (297 mm x 210 mm)
• A4R (210 mm x 297 mm)
Use recommended paper only, as listed in the PrintServer 32 Printer Operator ’s
Guide.
Using the Optional Large Capacity Input Tray 1–1
Page 6
Using the Optional Large Capacity Input Tray
1.1 Supported Paper Sizes
Parts of the OLCIT
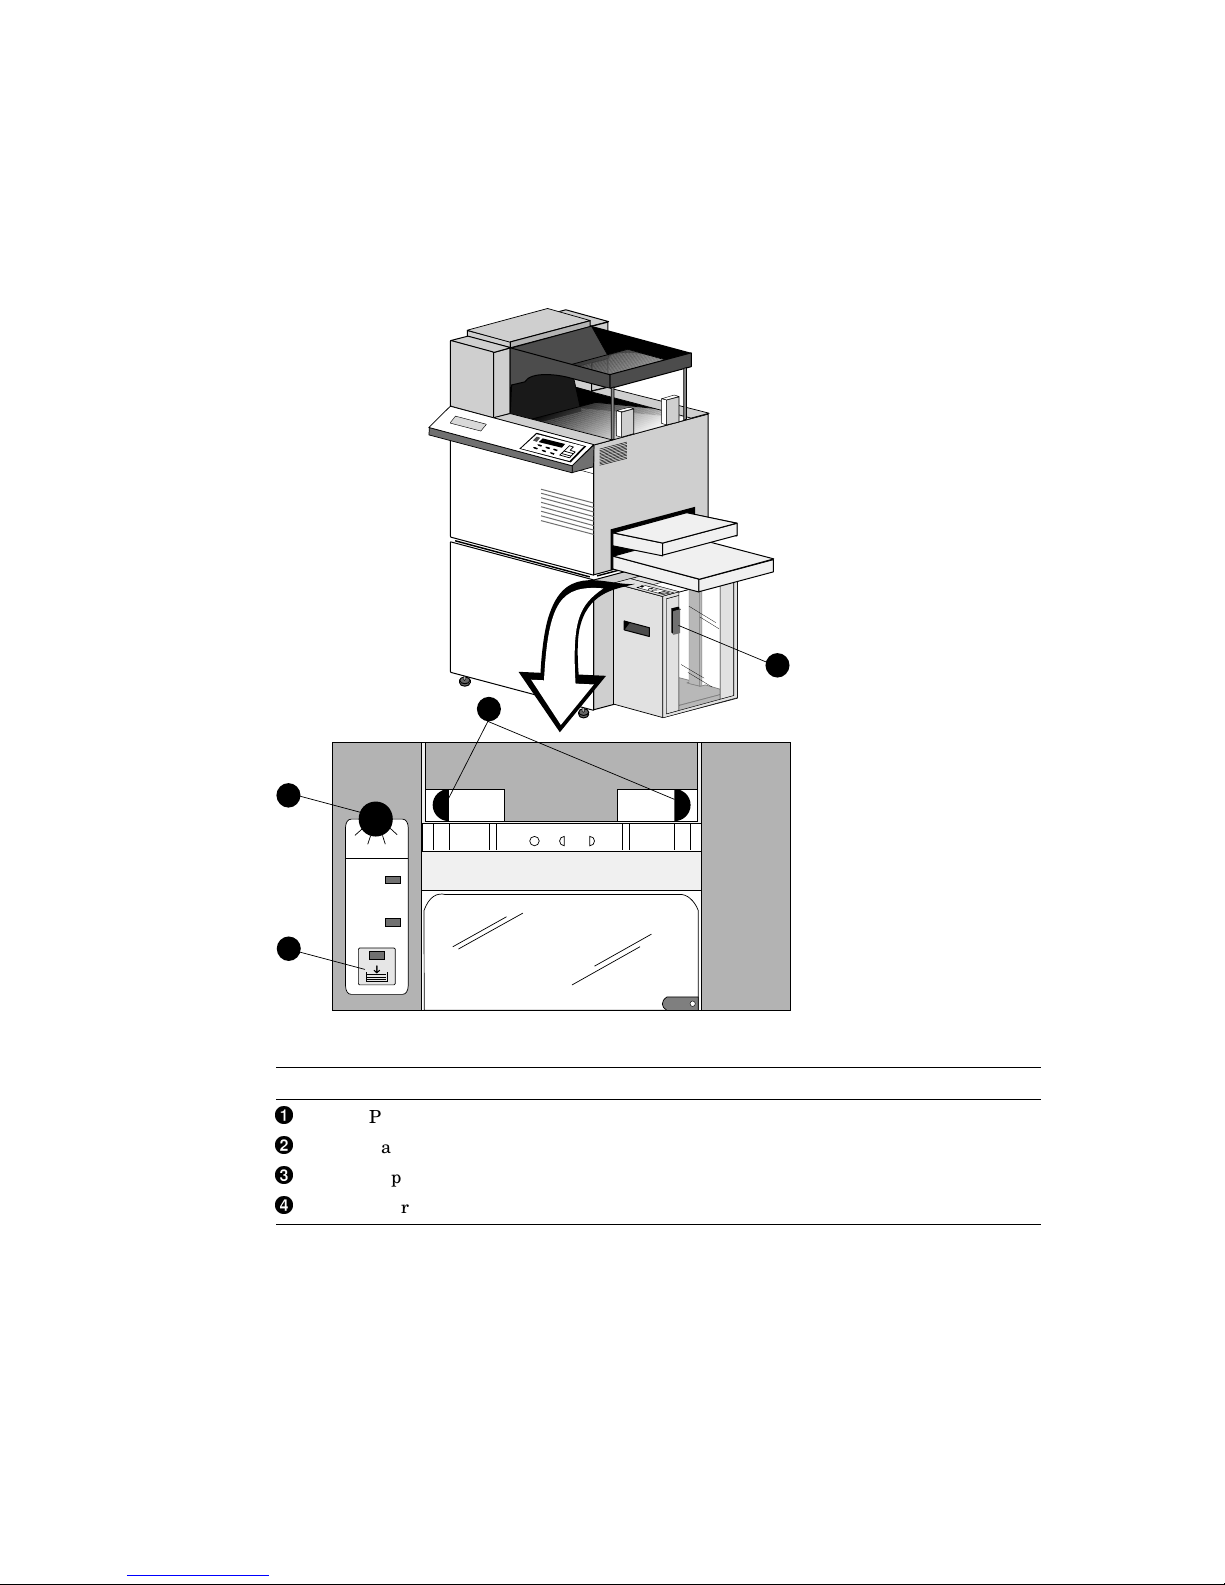
The following illustration and table describe the parts of the OLCIT.
Figure 1–1 Parts of the OLCIT
2
A4RA4
LT
Paper
Mis-set
Cover
Open
LTR
LT
1
Number Description
Paper Tray Down button
Paper Size selection knob
Paper adjustment levers
Door
3
ADJUST AT 3 PLACES
1 32
A4RA4LTR
A4RA4LTR
4
LT
DSG-000495
1–2 Using the Optional Large Capacity Input Tray
Page 7

1.2 Adding Paper
This section explains how to add paper to the OLCIT.
When adding paper, make sure the PrintServer is not in the process of
printing and the operator panel reads Ready.
Using the Optional Large Capacity Input Tray
1.2 Adding Paper
Note
1. Press
Pause
on the PrintServer 32 operator panel.
Using the Optional Large Capacity Input Tray 1–3
Page 8

Using the Optional Large Capacity Input Tray
1.2 Adding Paper
2. Press the Tray Down buttonon the OLCIT.
Be sure the paper tray has stopped before continuing with the procedure.
LT
Paper
Mis-set
Cover
Open
A4RA4
LTR
LT
ADJUST AT 3 PLACES
1 32
A4RA4LTR
A4RA4LTR
LT
1
DSG-000496
Note
If the tray runs out of paper while printing, the tray automatically lowers.
The elevator tray hesitates momentarily about half way up or down in its
travels and the Cover Open LED goes on momentarily. This is normal
operational behavior of the elevator tray and the Cover Open LED.
1–4 Using the Optional Large Capacity Input Tray
Page 9

Using the Optional Large Capacity Input Tray
3. Open the OLCIT door.
Remove the two smaller paper trays above the OLCIT. This makes for
easy loading of paper and reduces the likelihood of paper jams.
1.2 Adding Paper
4
DSG-000500
4. Fan about half a ream of paper at a time to release any static electricity.
Tap the paper on a hard surface to align the edges.
Insert the paper until the leading edge touches the back of the tray.
Make sure the edges or corners of the paper are not folded during
loading.
DSG-000498
Using the Optional Large Capacity Input Tray 1–5
Page 10

Using the Optional Large Capacity Input Tray
1.2 Adding Paper
Sloppy paper loading or folded/damaged paper edges and corners can
cause printer paper jams.
• Use recommended paper only, as listed in the PrintServer 32 Printer
Operator’s Guide.
• Do not add more than six reams of paper to the paper tray. Adding more
paper or loading the paper unevenly puts stress on the paper tray motor
and causes paper jams.
5. Close the OLCIT door.
Note
1–6 Using the Optional Large Capacity Input Tray
4
DSG-000497
Page 11

Using the Optional Large Capacity Input Tray
1.2 Adding Paper
6. Make sure the two paper adjustment leversand the paper selection knob
are set to the identical setting for the paper size you just loaded.
3
2
7. Press
LT
LTR
Paper
Mis-set
Cover
Open
Resume
A4RA4
LT
A4
LTR
ADJUST AT 3 PLACES
1 32
A4R
A4RA4LTR
on the PrintServer 32 operator panel.
LT
DSG-000499
Using the Optional Large Capacity Input Tray 1–7
Page 12

Using the Optional Large Capacity Input Tray
1.3 Clearing Paper Jams
1.3 Clearing Paper Jams
This section explains how to clear paper jams from the OLCIT.
1. Press
Pause
on the PrintServer 32 operator panel.
2. Press the Tray Down buttonon the OLCIT.
Be sure the paper tray has stopped before continuing with the procedure.
A4RA4
LT
LTR
Paper
Mis-set
Cover
Open
1
1–8 Using the Optional Large Capacity Input Tray
ADJUST AT 3 PLACES
LT
1 32
A4RA4LTR
A4RA4LTR
LT
DSG-000496
Page 13

Using the Optional Large Capacity Input Tray
3. Open the OLCIT door.
1.3 Clearing Paper Jams
4
DSG-000500
4. Remove all jammed paper from the PrintServer and the PrintServer’s cavity.
DSG-000501
Using the Optional Large Capacity Input Tray 1–9
Page 14

Using the Optional Large Capacity Input Tray
1.3 Clearing Paper Jams
5. Close the OLCIT door.
4
DSG-000497
Note
The elevator moves the paper stack to the top of the OLCIT automatically.
6. Press
Resume
on the PrintServer 32 operator panel.
1–10 Using the Optional Large Capacity Input Tray
Page 15

1.4 Troubleshooting
If the paper selection knob and the paper adjustment levers are not set to
the paper size loaded in the OLCIT, paper jams will occur.
Table 1–2 shows the LEDs and what to do to correct the situations listed.
Table 1–2 OLCIT LEDs
This LED . . . Lights When . . . And you need to . . .
Using the Optional Large Capacity Input Tray
1.4 Troubleshooting
Note
Paper Mis-set The paper size selection knob
Cover Open OLCIT cover is open. Make sure the OLCIT cover is
Elevator Push
Button
is between detented settings.
Elevator is moving. None
Position the paper size selection
knob correctly.
closed.
Table 1–3 shows the print errors that might occur and what to do to correct
them.
Table 1–3 Print Errors
Print Error Corrective Action
Paper Jam Clear the jam. See the PrintServer 32 Printer
Operator’s Guide for instructions on clearing paper
jams inside the PrintServer. See Section 1.3 of this
guide for clearing paper jams in the OLCIT, then see
the Corrective Action section of Table 1–2 in this guide
for instructions.
If you cannot correct the problem or the operator panel instructs you to call
Customer Services, the OLCIT requires servicing by a qualified Customer
Services engineer.
Digital has a service center in your area to help keep your system running
properly.
Where Type of Service Telephone Number
North America On-site warranty 1–800–354–9000
All Other
Locations
Call your local sales office
Using the Optional Large Capacity Input Tray 1–11
Page 16

Using the Optional Large Capacity Input Tray
1.5 Service Notes
1.5 Service Notes
The OLCIT is similar in operation and service to the 1000 sheet LCIT. The
OLCIT has an internal controller that operates the elevator tray motor and
signals the PrintServer duplexer-table controller.
The 1000 sheet LCIT has no internal controller and its motor and other functions
are controlled directly by the duplexer-table controller.
It is this difference that accounts for the small changes in response to the
PrintServer 32 diagnostic service procedures.
Use the diagnostic procedures for the LCIT (in the PrintServer 32 service
manual) to diagnose the OLCIT. Table 1–4 shows the failure modes and actions
for the user and service personnel. Refer to the PrintServer 32 Service Manual
for service procedures.
Table 1–4 OLCIT Diagnostics
PrintServer
Control
Problem
Panel
Message OLCIT Panel
User
Actions
Service
Actions
Elevator does
not move up or
down
Small white
OLCIT
connector not
engaged
Large blue
OLCIT
connector not
engaged
Wrong printing
position on
paper or image
position
Printing is
skewed on the
paper
Error 41 Elevator green
Close paper
tray door
Error 52 No power Verify connection; if
None None Set paper size rotary
None None Adjust paper guides on
LED blinking
Red LED on Verify connection; if
Call service Replace OLCIT
error persists, call
service
error persists, call
service
knob to correct size. You
must change the Paper
Size setting when the
cover is open.
OLCIT to paper edges.
Verify that Paper Size
selection knob setting
corresponds to the Paper
Adjustment lever. You
must change the Paper
Size setting when the
cover is open.
Verify that harness is
OK. If no good, replace
OLCIT
Verify that harness is
OK. If no good, replace
OLCIT
None
None
If you have an LCIT (1000 sheet feeder), verify that the OLCIT (3000
sheet feeder) is the problem by installing the LCIT. If the LCIT works,
then replace the OLCIT.
1–12 Using the Optional Large Capacity Input Tray
Note
Page 17

How to Order Additional Documentation
Technical Support
If you need help deciding which documentation best meets your needs, call 800-DIGITAL (800-344-4825)
and press 2 for technical assistance.
Electronic Orders
If you wish to place an order through your account at the Electronic Store, dial 800-234-1998, using a
modem set to 2400- or 9600-baud. You must be using a VT terminal or terminal emulator set at 8 bits, no
parity. If you need assistance using the Electronic Store, call 800-DIGITAL (800-344-4825) and ask for an
Electronic Store specialist.
Telephone and Direct Mail Orders
From Call Write
U.S.A. DECdirect
Puerto Rico Phone: (809) 781-0505
Canada Phone: 800-267-6215
International ————— Local Digital subsidiary or
Internal Orders
(for software
documentation)
Internal Orders
(for hardware
documentation)
1
Phone: 800-DIGITAL
(800-344-4825)
Fax: (603) 884-5597
Fax: (809) 749-8377
Fax: (613) 592-1946
DTN: 264-3030
(603) 884-3030
Fax: (603) 884-3960
DTN: 264-3030
(603) 884-3030
Fax: (603) 884-3960
Digital Equipment Corporation
P.O. Box CS2008
Nashua, NH 03061
Digital Equipment Caribbean, Inc.
3 Digital Plaza, 1st Street
Suite 200
Metro Office Park
San Juan, Puerto Rico 00920
Digital Equipment of Canada Ltd.
100 Herzberg Road
Kanata, Ontario, Canada K2K 2A6
Attn: DECdirect Sales
approved distributor
U.S. Software Supply Business
Digital Equipment Corporation
10 Cotton Road
Nashua, NH 03063-1260
U.S. Software Supply Business
Digital Equipment Corporation
10 Cotton Road
Nashua, NH 03063-1260
1
Call to request an Internal Software Order Form (EN–01740–07).
Page 18

Page 19

Reader’s Comments PrintServer 32 Printer
Optional Large Capacity Input Tray
Your comments and suggestions help us improve the quality of our publications.
Thank you for your assistance.
I rate this manual’s: Excellent Good Fair Poor
Accuracy (product works as manual says)
Completeness (enough information)
Clarity (easy to understand)
Organization (structure of subject matter)
Figures (useful)
Examples (useful)
Index (ability to find topic)
Page layout (easy to find information)
I would like to see more/less
What I like best about this manual is
Operator’s Guide
EK–PSLCO–OC. A01
What I like least about this manual is
I found the following errors in this manual:
Page Description
Additional comments or suggestions to improve this manual:
For software manuals, please indicate which version of the software you are using:
Name/Title Dept.
Company Date
Mailing Address
Phone
Page 20

Do Not Tear – Fold Here and Tape
TM
BUSINESSREPLYMAIL
FIRST CLASS PERMIT NO. 33 MAYNARD MASS.
POSTAGE WILL BE PAID BY ADDRESSEE
DIGITAL EQUIPMENT CORPORATION
Information Design and Consulting
MRO1–2/L12
2 RESULTS WAY
MARLBORO, MA 01752-9840
No Postage
Necessary
if Mailed
in the
United States
Do Not Tear – Fold Here
 Loading...