

Digital Equipment LA75 plus companion User Manual

!
LA75PlusCompanionPrinter
InstallationandUserGuide
Digital Equipment Corporation

First Printing, July 1991
The information in this document is subject to change without notice and should
not be construed as a commitment by Digital Equipment Corporation. Digital
Equipment Corporation assumes no responsibility for any errors that may appear
in this document.
The information in this document is subject to change without notice and should
not be construed as a commitment by Digital Equipment Corporation. Digital
Equipment Corporation assumes no responsibility for any errors that may appear
in this document.
The software described in this document is furnished under a license and may be used
or copied only in accordance with the terms of such license.
No responsibility is assumed for the use or reliability of software on equipment that is
not supplied by Digital Equipment Corporation or its affiliated companies.
Restricted Rights: Use, duplication, or disclosure by the U.S. Government is subject to
restrictions as set forth in subparagraph (c)(1)(ii) of the Rights in Technical Data and
Computer Software clause at DFARS 252.227-7013.
© Digital Equipment Corporation 1991.
All Rights Reserved.
Printed in U.S.A.
The postpaid Reader’s Comments forms at the end of this document request your critical
evaluation to assist in preparing future documentation.
All Rights Reserved.
Printed in Japan
The following are trademarks of Digital Equipment Corporation:
DEC DIBOL RSX
DEC/CMS EduSystem UNIBUS
DEC/EDI IAS VAX
DECnet MASSBUS VAXcluster
DECsystem-10 Message Router VMS
DECSYSTEM-20 PDP VT
DECUS PDT
DECwriter RSTS
dt
IBM is a registered trademark, and IBM Proprinter is a trademark of International
Business Machines Corporation.
This document was prepared using VAX DOCUMENT, Version 1.2.

FCC NOTICE
This equipment generates and uses radio frequency energy and if not installed
and used properly, that is, in strict accordance with the manufacturer’s
instructions, may cause interference to radio and television reception. It has
been type tested and found to comply with the limits for a Class B computing
device in accordance with the specifications in Subpart J of Part 15 of FCC
Rules, which are designed to provide reasonable protection against such
interference in a residential installation. However, there is no guarantee that
interference will not occur in a particular installation. If this equipment does
cause interference to radio or television reception, which can be determined by
turning the equipment off and on, the user is encouraged to try to correct the
interference by one or more of the following methods.
Reorient the receiving antenna.
Relocate the computer or peripheral with respect to the receiver.
Move the computer or peripheral away from the receiver.
Plug the computer or peripheral into a different outlet so that they are on
different branch circuits than the receiver.
If necessary, the user should consult the dealer or an experienced radio/television technician for additional suggestions. The user may find the
booklet How to Identify and Resolve Radio/TV Interference Problems, prepared
by the Federal Communications Commission helpful. This booklet is available
from the U.S. Government Printing Office, Washington DC, 20402, Stock No.
004-000-00345-4.
To meet FCC requirements, a shielded parallel cable is required to connect the
device to a personal computer or other Class B device.
iii


Contents
Preface ..................................................... viii
1 Installing the Printer
1.1 Checking the Contents of the Box . . . ...................... 1–1
1.2 Site Considerations .................................... 1–3
1.3 A First Look at the Printer .............................. 1–4
1.3.1 Installing the Power Cord ............................ 1–6
1.3.2 Removing the Packing Material . . ...................... 1–7
1.3.3 Installing the Ribbon Cartridge . . ...................... 1–8
1.4 Testing the Printer ..................................... 1–11
1.5 Connecting the Printer to a Computer System. . .............. 1–16
1.5.1 Cables ........................................... 1–19
1.5.2 Printing a File ..................................... 1–19
1.5.3 If You Have Difficulties Printing a File .................. 1–20
2 Using the Operator Control Panel
2.1 About the LA75 Plus Control Panel . . ...................... 2–1
2.1.1 Printer Operating Switches and Indicators . .............. 2–2
iii

3 Loading thePaper
3.1 Paper Controls . ....................................... 3–1
3.2 Loading Paper . ....................................... 3–5
3.2.1 Rear Loading ...................................... 3–7
3.2.1.1 Viewing the Last Printed Line ...................... 3–12
3.2.1.2 Document on Demand ............................ 3–13
3.2.2 Single-sheet Loading . ............................... 3–14
3.2.2.1 Printing Multiple Single Sheets ..................... 3–17
3.2.3 Switching to Bottom Loading .......................... 3–18
3.2.4 Bottom Loading .................................... 3–22
3.3 Adjusting the Printhead for Paper Thickness . . .............. 3–26
4 Using Fonts
4.1 Using the Optional Font Cartridges . . ...................... 4–1
5 Configuring the Printer
5.1 What is Configuration? . . ............................... 5–1
5.1.1 Determining the Printer’s Configuration . . . .............. 5–2
5.2 Features and Values ................................... 5–3
5.3 Set-up Mode Switches and Indicators ...................... 5–4
5.3.1 Changing the Printer’s Configuration (Set-up Mode) . . ...... 5–4
5.3.2 Saving New Values and Exiting Set-up Mode ............. 5–5
5.4 Protocol Selection ...................................... 5–5
6 Maintaining the Printer
6.1 General Maintenance ................................... 6–1
6.2 Correcting Simple Problems .............................. 6–2
6.2.1 Power-related Problems .............................. 6–2
6.2.2 No Printout ....................................... 6–3
6.2.3 Operation-related Problems ........................... 6–4
6.2.4 Print-related Problems ............................... 6–5
6.2.5 Ribbon or Carriage-related Problems .................... 6–6
6.3 Removing and Replacing the Ribbon Cartridge . .............. 6–7
6.4 Removing and Replacing the Fuse . . . ...................... 6–12
iv

7 Reference Information
7.1 Service .............................................. 7–1
7.2 Digital Equipment Corporation Services .................... 7–1
7.3 Calling the Service Center ............................... 7–2
7.4 Summary of Set-up Features ............................. 7–2
7.5 Specifications . . ....................................... 7–4
7.6 Printer Accessories ..................................... 7–9
A Set-up
A.1 Set-up Mode . . . ....................................... A–1
A.1.1 List of Set-up Features and Values ..................... A–1
B Printing Control Characters
C DEC PPL2 Quick Reference
D IBM Proprinter X24E Quick Reference
Figures
C–1 Designating and Invoking Character Sets ................... C–7
C–2 Standard 8-bit Code Table (Left Half) ...................... C–12
C–3 Standard 8-bit Code Table (Right Half) ..................... C–13
C–4 DEC Special Graphics Character Set . ...................... C–16
C–5 DEC Technical Character Set............................. C–17
C–6 ISO Latin-1 Supplemental Character Set ................... C–18
C–7 Legal Character Set .................................... C–19
C–8 DEC 7-bit Hebrew Character Set .......................... C–20
C–9 DEC Hebrew Supplemental Character Set .................. C–21
C–10 ISO Latin-Hebrew Supplemental Character Set .............. C–22
C–11 ISO Latin-Greek Supplemental Character Set . . .............. C–23
C–12 DEC Greek Supplemental Character Set .................... C–24
C–13 ISO Latin-5 Supplemental Character Set ................... C–25
C–14 DEC Turkish 7-bit Character Set .......................... C–26
C–15 DEC Turkish 8-bit Supplemental Character Set .............. C–27
v

C–16 ISO Latin-Cyrillic Supplemental Character Set . .............. C–28
C–17 ISO Latin-2 Supplemental Character Set ................... C–29
C–18 JIS Katakana Character Set ............................. C–30
D–1 All Character Set, All Code-pages, Left Side . . . .............. D–9
D–2 All Character Set, Code-page 437 U.S.A. , Right Side .......... D–10
D–3 All Character Set, Code-page 850 Multilingual, Right Side ...... D–11
Tables
3–1 Loading Methods and Types of Paper ...................... 3–5
A–1 Set-up Features and Values - Common Features for both Dec and
IBM protocols . . ....................................... A–2
A–2 Set-up Features and Values - Dec Protocol Features ........... A–6
A–3 Set-up Features and Values - IBM Protocol Features .......... A–11
A–4 Set-up Features and Values - Factory Setting . . .............. A–13
C–1 Conventions . . . ....................................... C–2
C–2 Positioning Controls .................................... C–2
C–3 Sheet size and margins . . ............................... C–3
C–4 Type size and spacing, managing implicit cursor motion . . ...... C–3
C–5 Font management and attribute selection ................... C–4
C–6 Tabs................................................ C–5
C–7 Selecting character sets . . ............................... C–6
C–8 Character Sets Power-up Settings . . . ...................... C–7
C–9 Reports.............................................. C–8
C–10 Miscellaneous . . ....................................... C–9
C–11 SCS Final Characters . . . ............................... C–10
C–12 National Replacement Character sets ...................... C–14
D–1 Conventions . . . ....................................... D–1
D–2 Control Characters ..................................... D–2
D–3 Terminal Management . . . ............................... D–2
D–4 Vertical Form Handling . . ............................... D–3
D–5 Horizontal Form Handling and Printing Modes . .............. D–4
D–6 Print-Mode Priority Chart ............................... D–6
D–7 Graphics Modes ....................................... D–6
D–8 Alternate Graphics Mode (AGM)1......................... D–7
D–9 Character Set Selection . . ............................... D–7
vi


About This Guide
The LA75 Plus Companion Printer Installation and User Guide is part of the
LA75 Plus documentation package. This guide, which explains how to install
and operate the printer. is written for someone with little or no computer
experience. You should read the whole of the guide.
Even if you are familiar with this kind of desk-top printer, you should, at the
very least, read Chapter 3, Loading the Paper, to familiarize yourself with the
LA75 Plus’s new features.
The guide is divided into seven chapters and four appendixes.
Chapter 1, Installing the Printer describes how to unpack and install the
printer. It names the printer parts, shows you how to test the printer, and
how to connect your printer to your computer system, personal computer or
video terminal. Read this chapter completely before you begin the installation
procedure.
Chapter 2, Using the Operator Control Panel describes how to use the
printer’s operating controls.
Preface
viii
Chapter 3, Loading the Paper provides a detailed explanation of the
different ways to load paper.
Chapter 4, Using Fonts describes how to insert and access the optional font
cartridges available for the LA75 Plus.
Chapter 5, Configuring the Printer explains how to configure the printer so
that it can communicate with your computer system.
Chapter 6, Maintaining the Printer shows how to keep the printer clean,
how to replace the ribbon cartridge and the fuse, and how to install or
replace the printhead. The chapter also suggests how you can identify simple
problems, and so avoid having to contact your Digital sales representative.

Chapter 7, Reference Information contains general user reference material,
including a summary of the printer’s set-up features, and printer and paper
specifications.
Appendix A, Set-up contains details of the set-up process, and a complete list
of the available values for each of the printer’s features. The factory setting of
each feature is marked.
Appendix B, Printing Control Characters explains how to print printer
control characters.
Appendix C, DEC PPL2 Quick Reference contains basic information on
using DEC PPL2 control codes and escape sequences.
Appendix D, IBM Proprinter X24E Quick Reference contains basic
information on using IBM Proprinter X24E control codes and escape sequences.
Conventions Used in This Guide
Warnings, Cautions, and Notes
The warnings, cautions, and notes in this guide have the following specific
purposes:
WARNING Contains information about preventing personal injury.
CAUTION Contains information about preventing damage to equipment.
NOTE Contains general information of which you should be aware.
ix

Associated Documentation
The other guides in the LA75 Plus documentation package are the LA75 Plus
Companion Programmer Reference Manual, part number EK–LA75S–RM–001,
and the LA75 Plus Companion Printer Sheet Feeder Guide, part number
EK–LA75S–SF–001.
The optional Automatic Sheet Feeder is documented separately in the LA75
Plus Companion Printer Sheet Feeder Guide.
Software Requirements
The LA75 Plus has many features. The features you can use depend on the
following conditions:
The computer system (also known as the host) to which the printer is
connected
The operating software used by your computer
The software program you are using
Check the documentation for the software you are using to learn what
printer features you can use. Your software may allow insertion of the
printer attribute escape sequences. Some basic escape sequences are listed in
Appendix C. Refer to your software documentation for information about how
to insert escape sequences.
If you need help choosing the correct computer software for your application
needs, contact your Digital sales representative.
x

About the Printer
The LA75 Plus is a narrow-carriage, impact dot-matrix printer, designed to be
a personal desk-top printer, and suitable for general business applications. It
has flexible paper handling, and is capable of printing on continuous pinfeed
paper, single sheets, multiple-part forms, and envelopes. An Automatic Sheet
Feeder (LA75Y-SF) is available as an option, to hold and automatically load
up to 80 sheets of cut paper. The print quality is suitable for limited word
processing in a small-to-medium computer environment.
The LA75 Plus has the following features that were not present in the LA75:
The LA75 Plus is a 24-pin printer.
The printer is able to print in four colors once the color ribbon (PN
LA75R-KC) has been installed.
The printer also has a Document on Demand capability (automatic or
manual) which prevents wasting forms or paper between printing jobs.
The printer has an Automatic Viewing capability, which allows the user to
see the last printed line after a job has finished.
The printer can be connected at the same time to serial and parallel ports,
and switches automatically between them when data is received.
The printer is compatible with the IBM Proprinter X24E which is the
default protocol at power-up when the parallel port is used.
Replacing the Fuse
Your printer is equipped with a fuse which has the following value according to
the mains voltage. If you need to change it, you must replace it with a fuse of
equal value.
Mains Voltage Fuse Value
100V and 120V models 1.6 A - 250V
220V and 240V models 1 A - 250V
xi


Installing the Printer
1.1 Checking the Contents of the Box
Unpack the LA75 Plus and make sure you have all the items shown in
the table. If any items are missing or damaged, contact your Digital sales
representative.
Please complete the installation procedure in sequence. After you install the
LA75 Plus, keep this guide near the printer for easy reference.
Item Number Item Name
1. Printer
2. Documentation
3. Ribbon Cartridge
4. Power Cord
5. Interface Cable
6. Pinfeed Paper
1
Installing the Printer 1–1
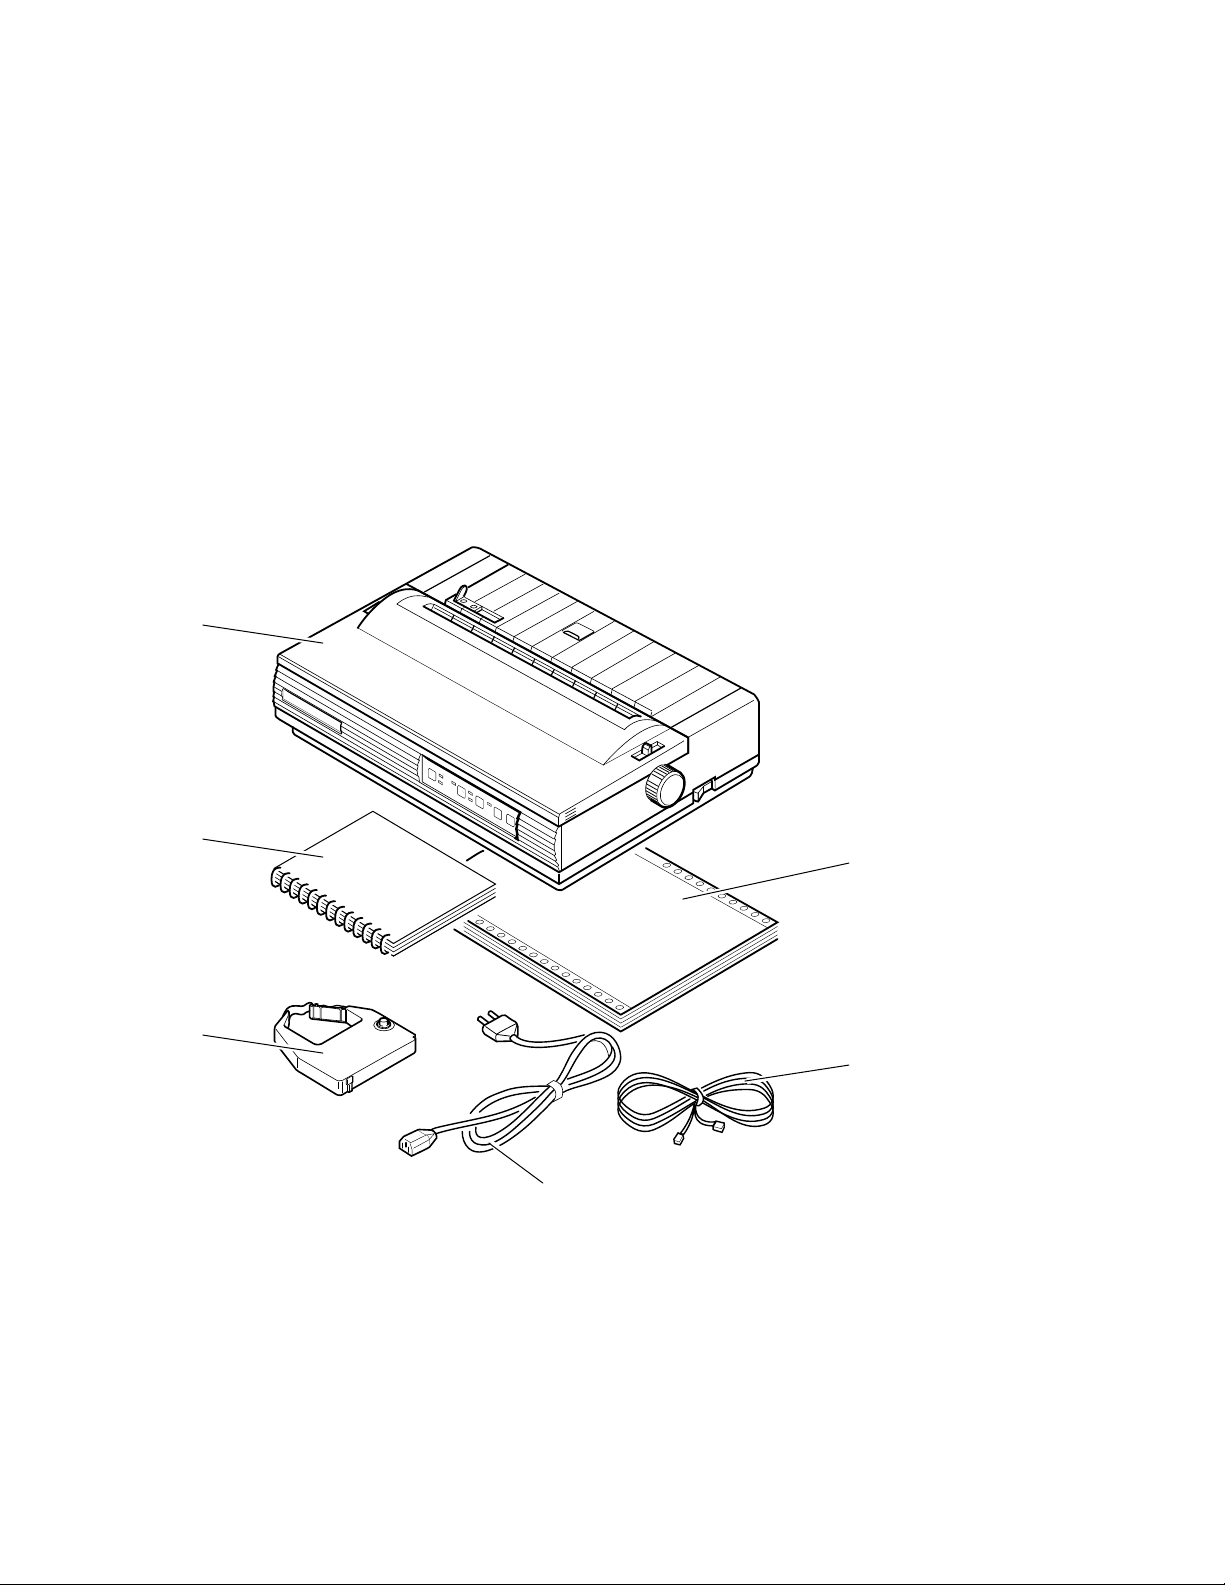
1
LA75 Plus Companion Printer
2
6
3
5
4
1–2 Installing the Printer

1.2 Site Considerations
The LA75 Plus can be installed in your office, school, or home.
Environmental Conditions
Install the printer in an area away from a heater or other heat source, and
away from an air conditioner or strong drafts.
Avoid installing the printer in a dusty or humid environment.
Work Location
Place the printer on a flat, solid, level area such as a desk or printer stand.
Allow enough space around the printer to ensure correct ventilation and
easy access to all sides of the printer.
Power Requirements
No special wiring is required. A typical household or office wall outlet is
sufficient.
Do not plug other equipment such as coffee pots, office copiers, or air
conditioners into the same wall outlet.
See Chapter 7 for more detailed specifications.
Installing the Printer 1–3

1.3 A First Look at the Printer
Before installing the LA75 Plus, spend a little time familiarizing yourself with
the printer.
Item Number Item Name
1. Access Cover
2. Tractor Release Lever
3. Paper Release Lever
4. Printhead Adjustment Lever
5. Control Panel
6. Printhead
7. Paper Parking Lever
8. Paper Cover
9. Bail Bar
10. Parallel Port
11. Serial Port
12. Power Cord Socket
13. Platen Knob
1
1
Only turn the platen knob to manually clear a paper jam.
1–4 Installing the Printer
1
2
9
8
3
4
5
12
7
LA75 Plus Companion Printer
6
2
1
13
8
11
10
Installing the Printer 1–5
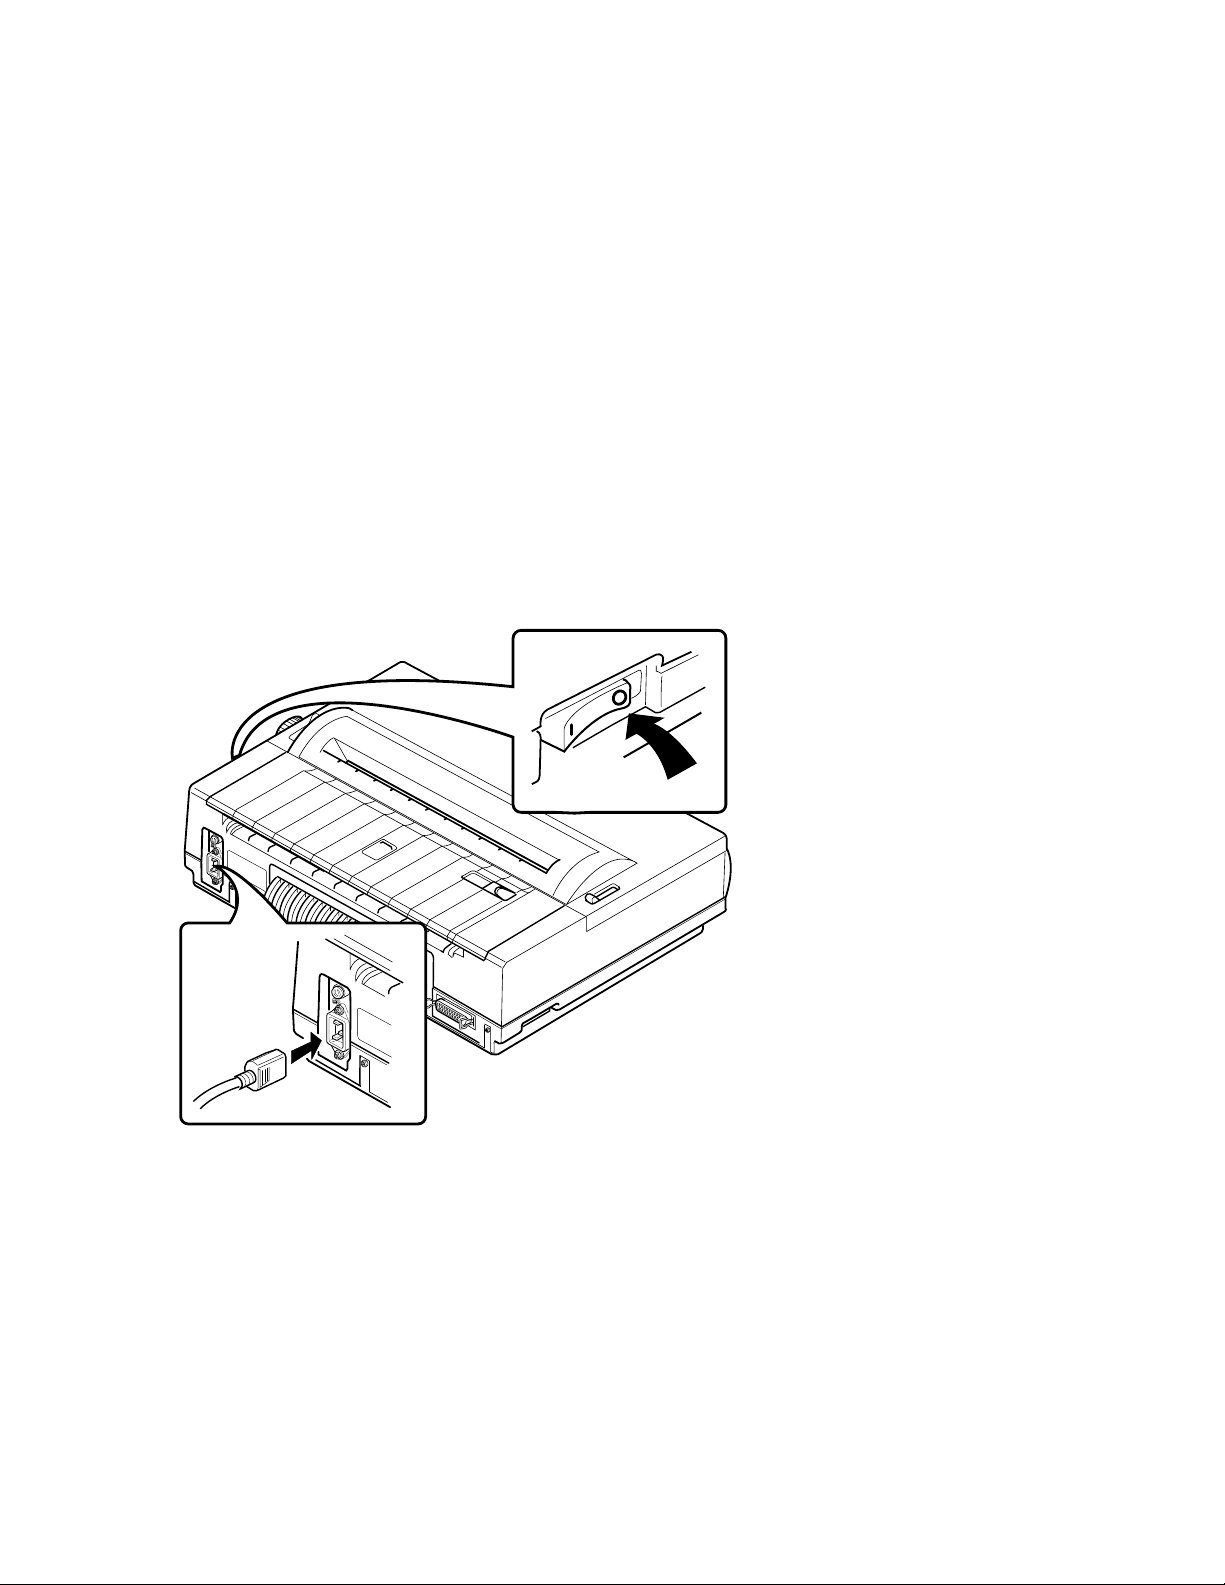
1.3.1 Installing the Power Cord
1 Make sure the power switch is set to 0 (off).
2 Plug the power cord into the socket at the back of the printer.
3 Plug the other end of the cord into your electrical outlet.
1–6 Installing the Printer
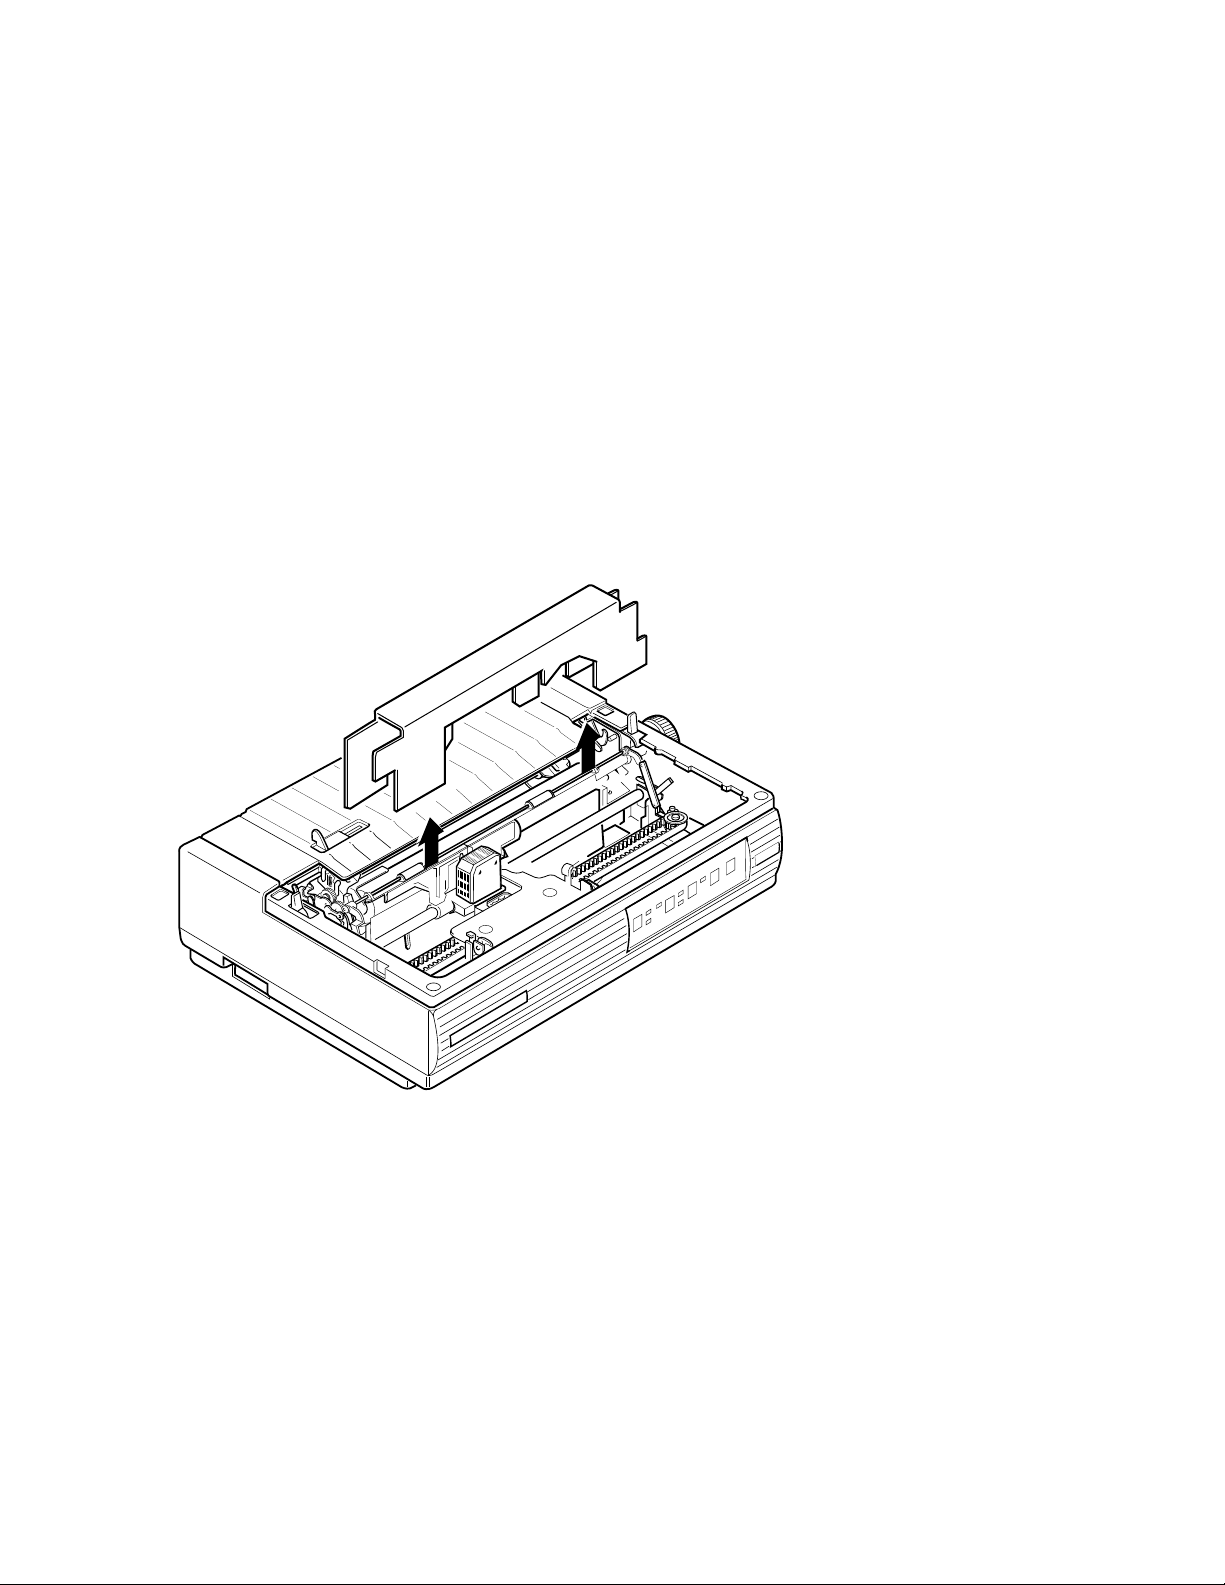
1.3.2 Removing the Packing Material
1 Remove the access cover.
2 Remove the cardboard packing.
LA75 Plus Companion Printer
Installing the Printer 1–7
1.3.3 Installing the Ribbon Cartridge
Note: The printer will automatically detect a color ribbon as soon as one has
been installed.
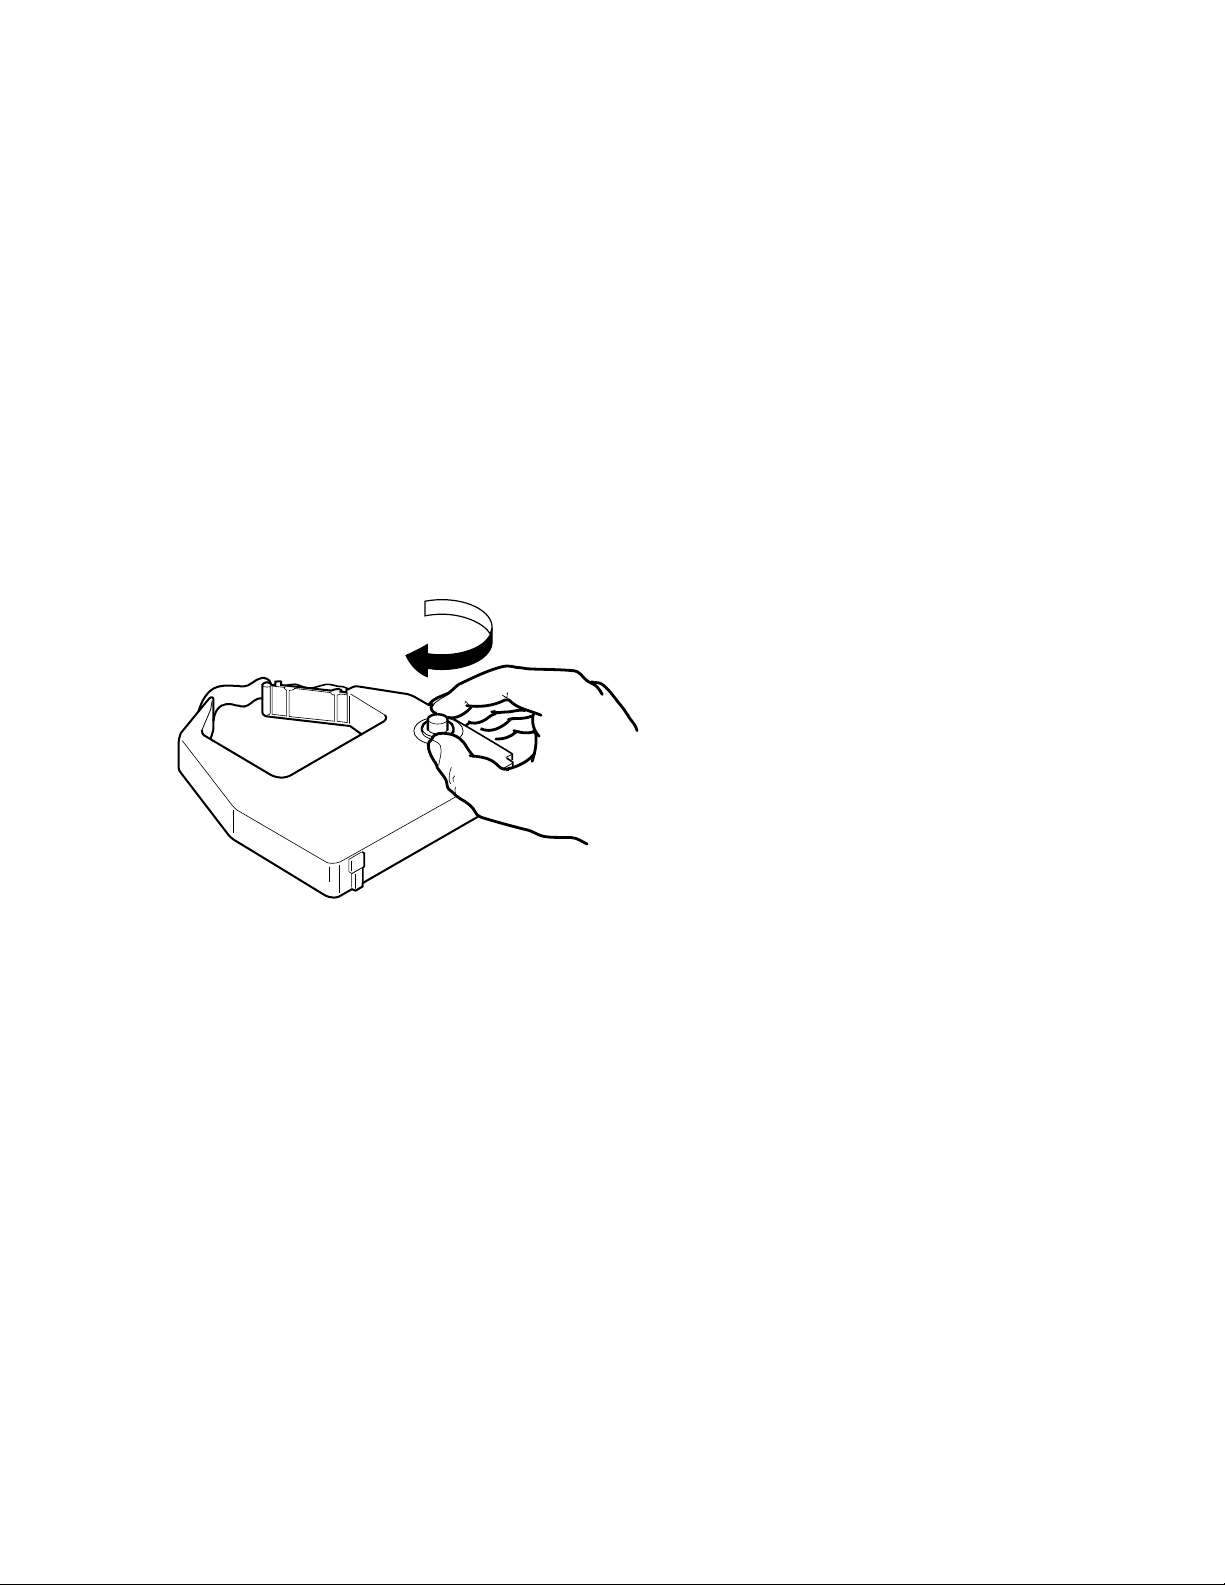
1 Remove the ribbon cartridge from its wrapper. To tighten the ribbon, turn
the ribbon adjustment knob in the direction indicated on the cartridge.
1–8 Installing the Printer
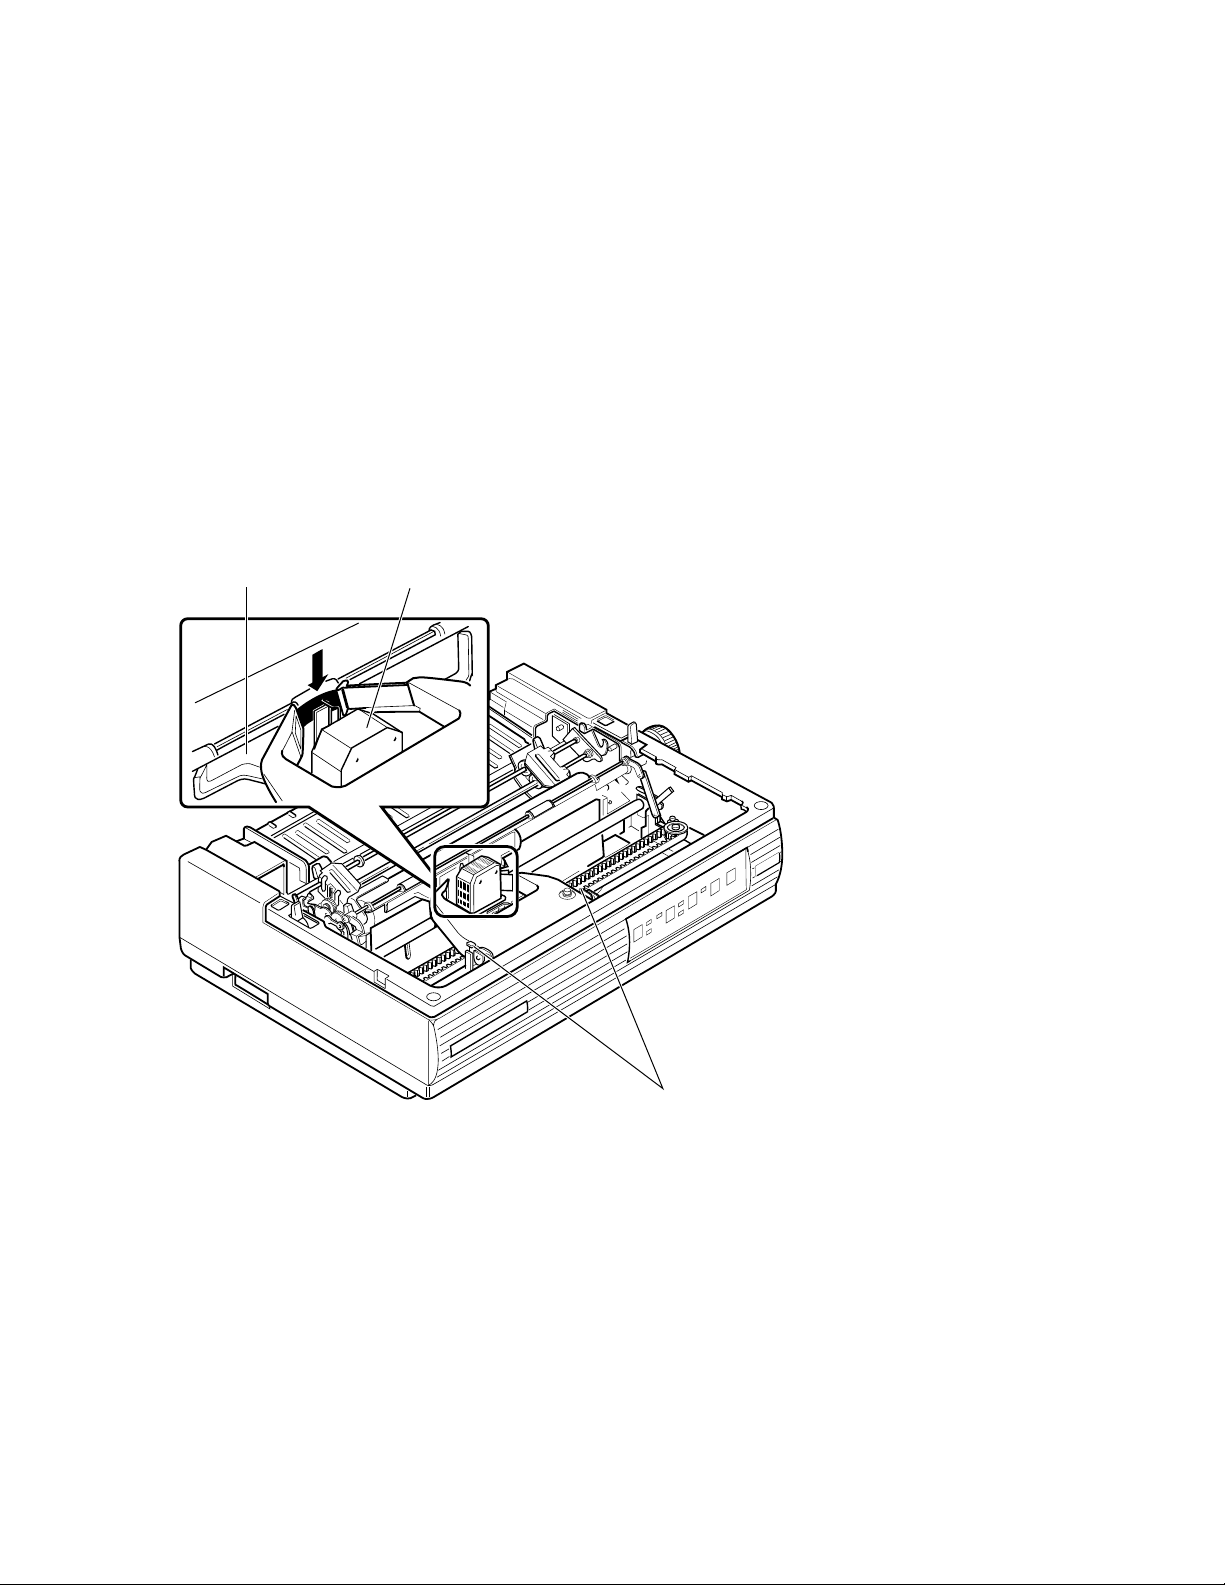
2 Fit the ribbon cartridge between the mounting clips (C) on the carriage.
Make sure the ribbon fits between the front of the printhead (B) and the
clear plastic smudge guard (A). Press down on the cartridge until you hear
it click into place.
Note: Make sure the ribbon is secured on both the left and right sides.
AB
LA75 Plus Companion Printer
C
Installing the Printer 1–9
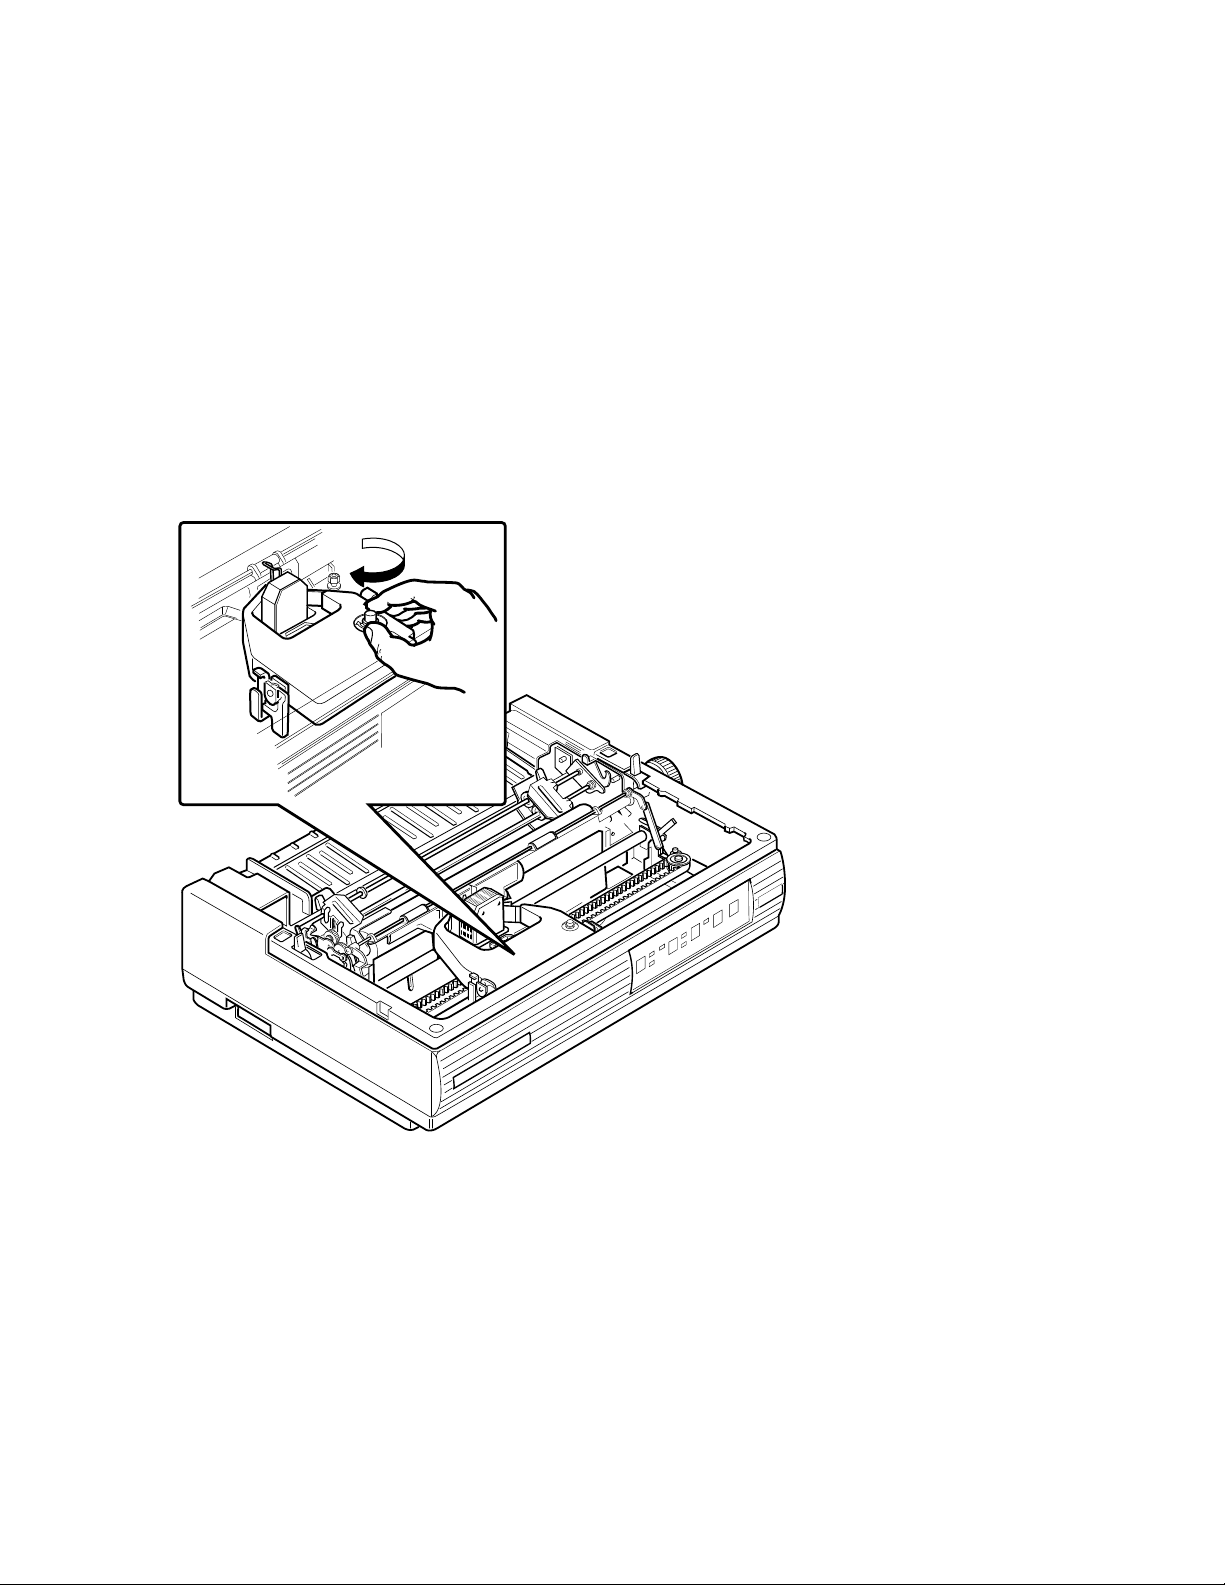
3 Turn the ribbon adjustment knob enough to tighten the ribbon against the
printhead.
1–10 Installing the Printer
LA75 Plus Companion Printer

1.4 Testing the Printer
The printer self-test allows the printer to check its operations independently.
To load paper into the printer and run the self-test, perform the following
steps:
1 Make sure the power switch is set to 0 (off).
2 Remove the access cover and the paper cover.
LA75 Plus Companion Printer
Installing the Printer 1–11
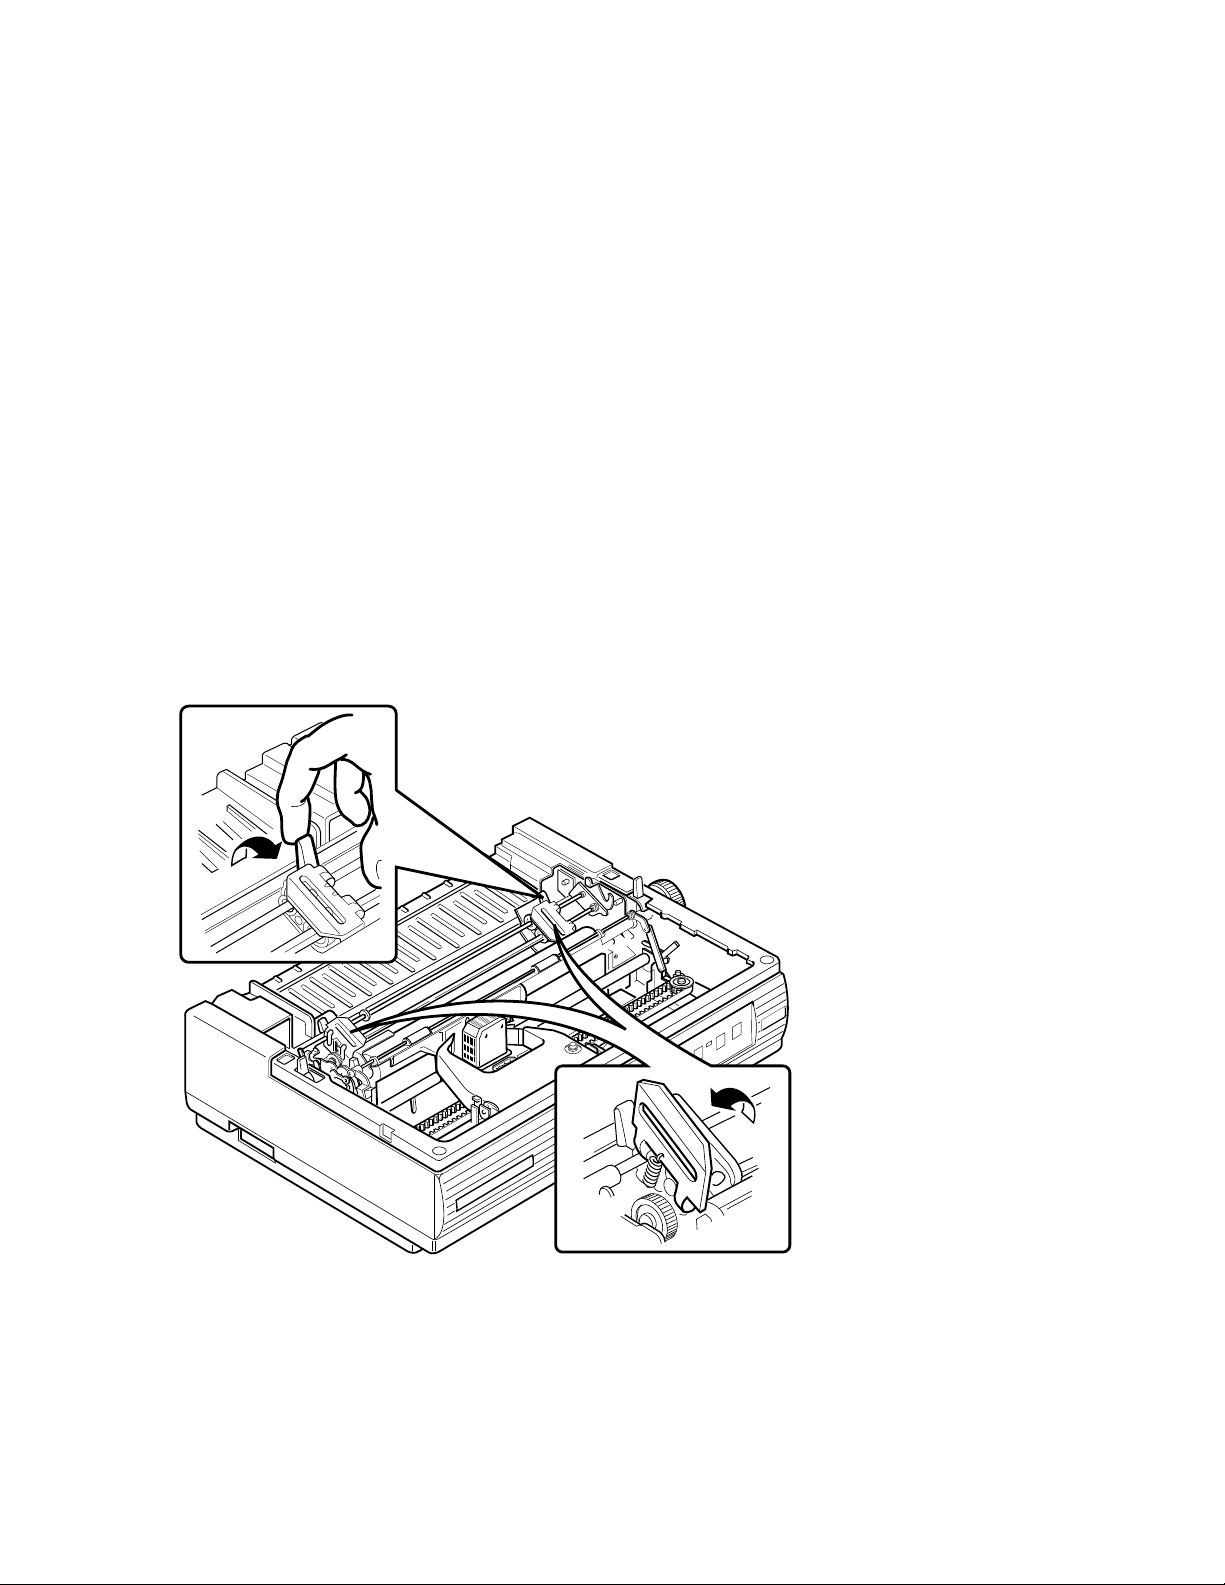
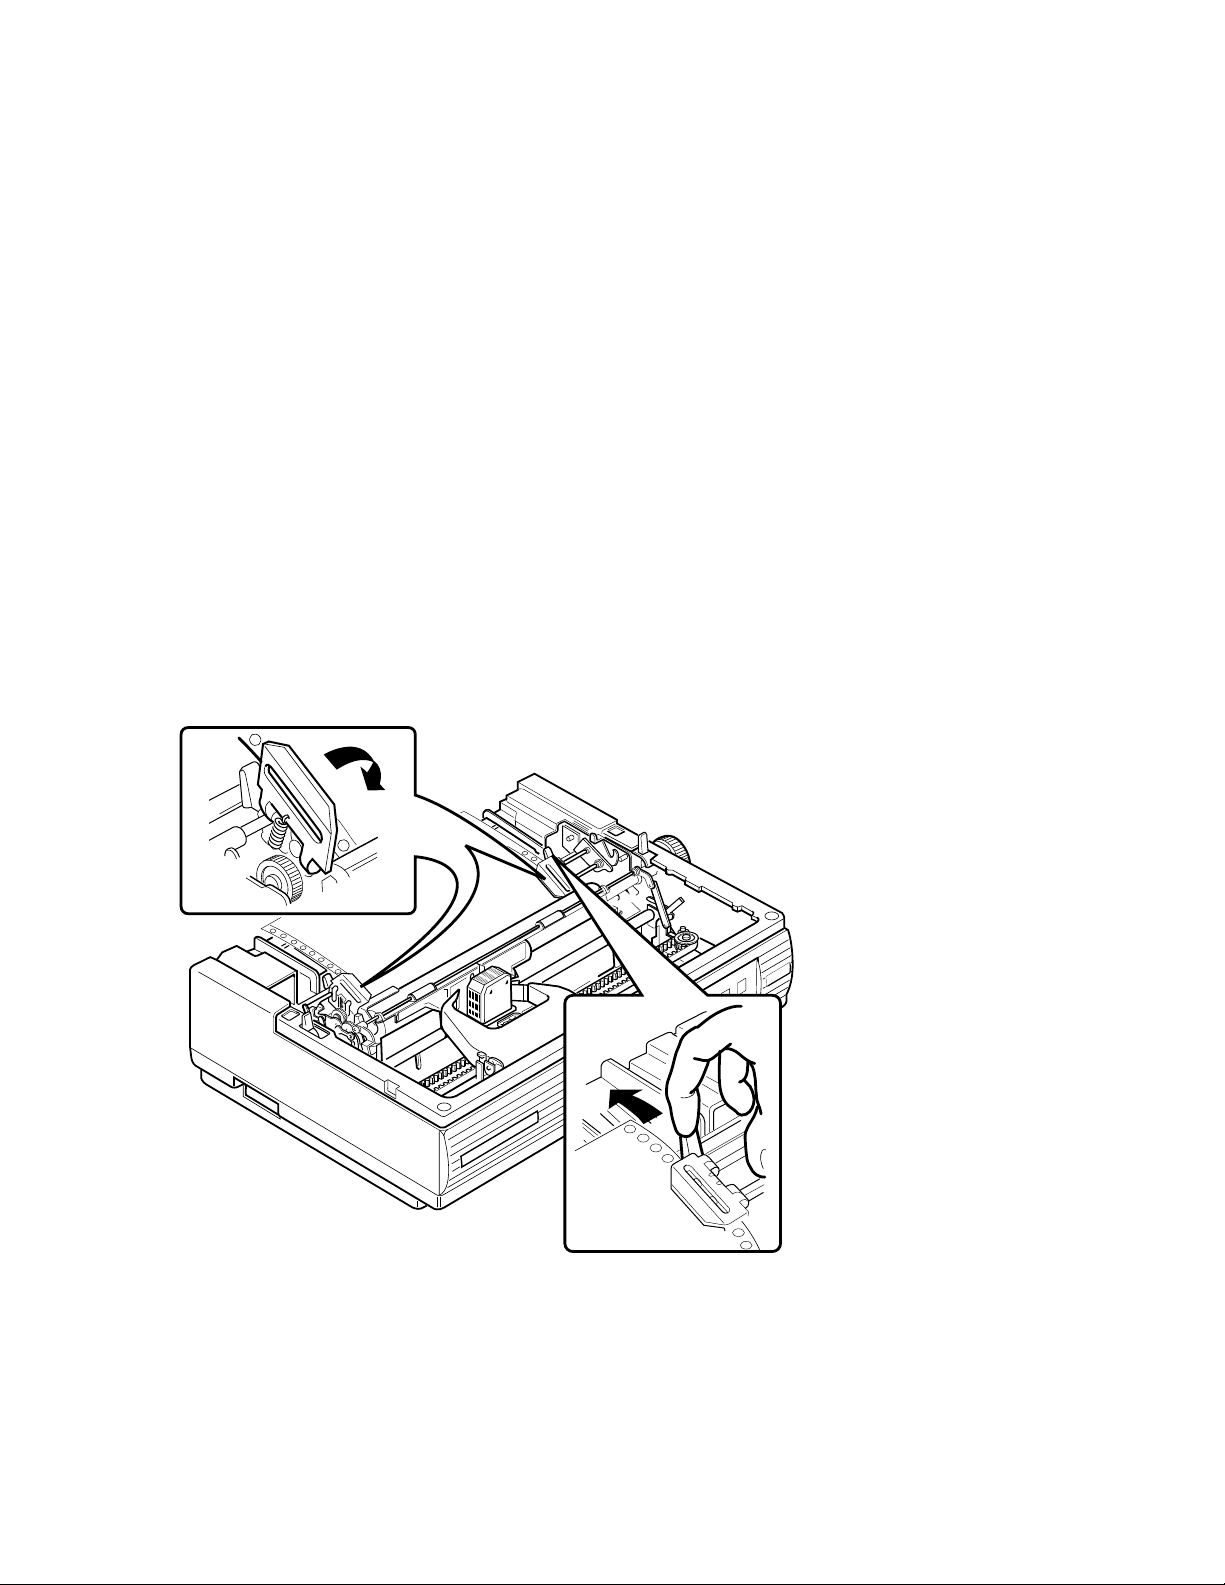
3 Unlock only the clamp on the right tractor by pulling the clamp towards
the front of the printer.
Note: The left tractor has been factory set so that the left edge of the
paper (column 1) lines up correctly with the printhead when it starts
printing. Digital recommends that you do not unlock the left tractor clamp.
Only unlock it if, for some reason, the leftmost character does not line up
with the edge of the paper.
4 Open both tractor doors.
1–12 Installing the Printer
LA75 Plus Companion Printer
5 Align the pinfeed holes on both edges of the paper with the tractor pins.
Close the tractor doors to secure the paper.
Note: The red marks on the bail bar indicate the print area for a standard
sheet of paper. Use these marks to help position the paper correctly.
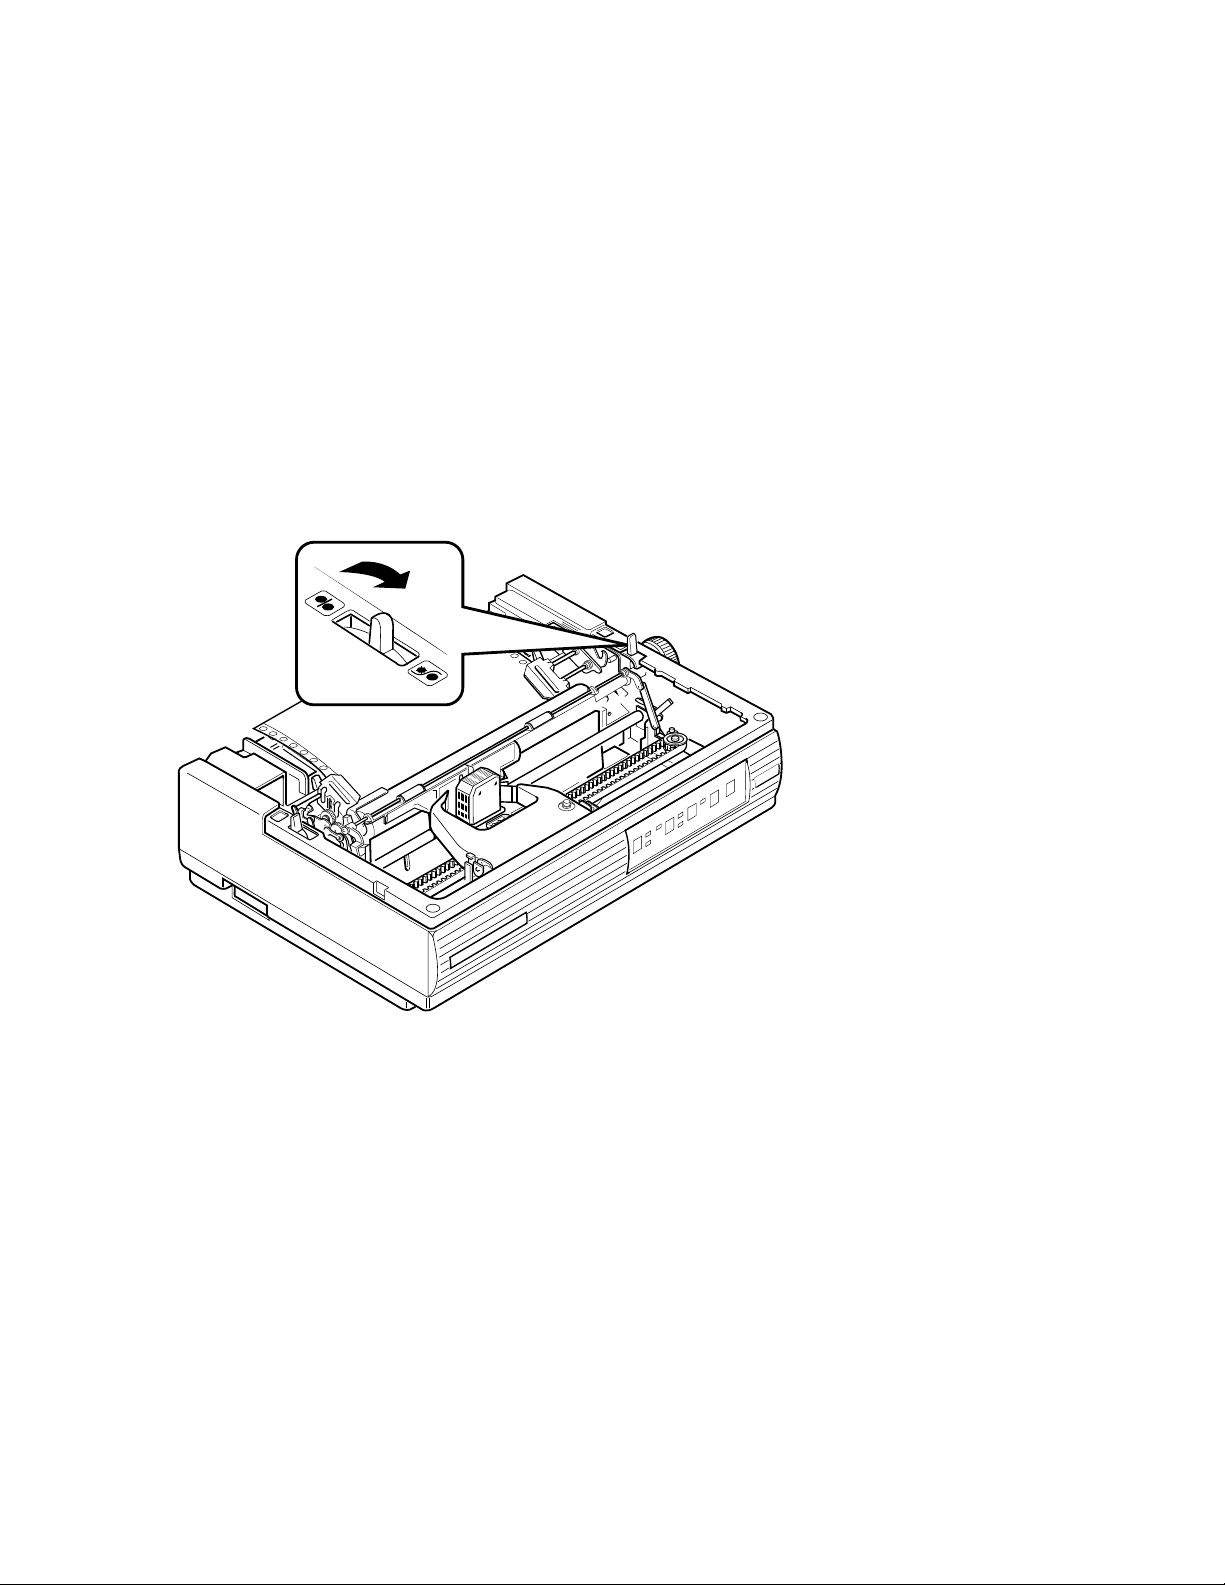
6 Readjust the right tractor position by moving it to the right so that the
paper extends smoothly between the two tractors. (The pinfeed holes
should not be mis-shaped by too much tension on the paper.) Lock the
right tractor by pushing the tractor clamp towards the back of the printer.
LA75 Plus Companion Printer
Installing the Printer 1–13
7 Pull the paper release lever towards the front of the printer to set the
printer in tractor mode.
8 Replace the access cover and the paper cover.
Note: The printer will not work if the covers are not on, or if they are
replaced incorrectly.
1–14 Installing the Printer
LA75 Plus Companion Printer

9 On the control panel, press and hold down the Form Feed switch (FF), and
turn the power switch to 1 (on).
Note: The paper is fed through automatically, so do not turn the platen
knob. Only turn the platen knob to manually clear a paper jam.
10 Release the Form Feed switch as soon as the printer begins to print. The
printer produces the following pattern.
!"#$%&'()*+,-./0123456789:;<=>?@ABCDEFGHIJKLMNOPQRSTUVWXYZ[\]^_`abcdefghijklmno
!"#$%&'()*+,-./0123456789:;<=>?@ABCDEFGHIJKLMNOPQRSTUVWXYZ[\]^_`abcdefghijklmnop
"#$%&'()*+,-./0123456789:;<=>?@ABCDEFGHIJKLMNOPQRSTUVWXYZ[\]^_`abcdefghijklmnopq
#$%&'()*+,-./0123456789:;<=>?@ABCDEFGHIJKLMNOPQRSTUVWXYZ[\]^_`abcdefghijklmnopqr
$%&'()*+,-./0123456789:;<=>?@ABCDEFGHIJKLMNOPQRSTUVWXYZ[\]^_`abcdefghijklmnopqrs
%&'()*+,-./0123456789:;<=>?@ABCDEFGHIJKLMNOPQRSTUVWXYZ[\]^_`abcdefghijklmnopqrst
&'()*+,-./0123456789:;<=>?@ABCDEFGHIJKLMNOPQRSTUVWXYZ[\]^_`abcdefghijklmnopqrstu
'()*+,-./0123456789:;<=>?@ABCDEFGHIJKLMNOPQRSTUVWXYZ[\]^_`abcdefghijklmnopqrstuv
()*+,-./0123456789:;<=>?@ABCDEFGHIJKLMNOPQRSTUVWXYZ[\]^_`abcdefghijklmnopqrstuvw
)*+,-./0123456789:;<=>?@ABCDEFGHIJKLMNOPQRSTUVWXYZ[\]^_`abcdefghijklmnopqrstuvwx
*+,-./0123456789:;<=>?@ABCDEFGHIJKLMNOPQRSTUVWXYZ[\]^_`abcdefghijklmnopqrstuvwxy
+,-./0123456789:;<=>?@ABCDEFGHIJKLMNOPQRSTUVWXYZ[\]^_`abcdefghijklmnopqrstuvwxyz
,-./0123456789:;<=>?@ABCDEFGHIJKLMNOPQRSTUVWXYZ[\]^_`abcdefghijklmnopqrstuvwxyz(
-./0123456789:;<=>?@ABCDEFGHIJKLMNOPQRSTUVWXYZ[\]^_`abcdefghijklmnopqrstuvwxyz(|
./0123456789:;<=>?@ABCDEFGHIJKLMNOPQRSTUVWXYZ[\]^_`abcdefghijklmnopqrstuvwxyz(|)
/0123456789:;<=>?@ABCDEFGHIJKLMNOPQRSTUVWXYZ[\]^_`abcdefghijklmnopqrstuvwxyz(|)~
0123456789:;<=>?@ABCDEFGHIJKLMNOPQRSTUVWXYZ[\]^_`abcdefghijklmnopqrstuvwxyz(|)~
123456789:;<=>?@ABCDEFGHIJKLMNOPQRSTUVWXYZ[\]^_`abcdefghijklmnopqrstuvwxyz(|)~.!
11 After a few lines of printout, turn off the power to stop the self-test. (If the
printer does not pass the self-test, see Section 6.2 in Chapter 6.)
Installing the Printer 1–15

1.5 Connecting the Printer to a Computer System
A. Connecting to a Digital Computer, Server, or Terminal
You should connect to the serial port before following the steps described in
this section.
B. Connecting to a Digital PC or PC Compatible
You should connect to the parallel port, and select the IBM Proprinter X24E
driver from the PC application software before following the steps described in
this section.
Note: If the above cabling strategy is followed, the LA75 Plus will be ready,
once the power is switched on, to communicate:
1 In Digital protocol through the serial port.
2 In IBM Proprinter X24E protocol through the parallel port.
1–16 Installing the Printer
 Loading...