

Digital Equipment DECserver 90L Owner's Manual

DECserver90LOwner’sManual
Order Number EK-DSRVD-OM-001
Digital Equipment Corporation

February 1991
The information in this document is subject to change without notice and should not
be construed as a commitment by Digital Equipment Corporation. Digital Equipment
Corporation assumes no responsibility for any errors that may appear in this document.
The software described in this document is furnished under a license and may be used or
copied only in accordance with the terms of such license.
No responsibility is assumed for the use or reliability of software on equipment that is not
supplied by Digital Equipment Corporation or its affiliated companies.
Restricted Rights: Use, duplication, or disclosure by the U. S. Government is subject to
restrictions as set forth in subparagraph ( c) (1) (ii) of the Rights in Technical Data and
Computer Software clause at DFARS 252.227–7013.
Copyright © Digital Equipment Corporation 1991
All Rights Reserved.
Printed in U.S.A.
FCC NOTICE: The equipment described in this manual generates, uses, and may emit
radio frequency energy. The equipment has been type tested and found to comply with
the limits for a Class A computing device pursuant to Subpart J of Part 15 of FCC
Rules, which are designed to provide reasonable protection against such radio frequency
interference when operated in a commercial environment. Operation of this equipment in
a residential area may cause interference, in which case the user at his own expense may
be required to take measures to correct the interference.
The following are trademarks of Digital Equipment Corporation: DEC, DECbridge,
DECconnect, DECnet, DECserver, Digital, VMS, LAT, VAX, and the DIGITAL logo.
This document was prepared and published by Educational Services Development and
Publishing, Digital Equipment Corporation.

Contents
About This Manual vii
1 Overview
Features .............................................. 1–1
Quick Start . . . ........................................ 1–2
2 Installation
Standalone Installation . . ................................ 2–1
Backplane Installation . . . ................................ 2–5
3 Operation
Using a Terminal or Personal Computer ..................... 3–1
Establishing a Terminal Session . ........................ 3–1
Ending a Terminal Session ............................. 3–2
‘‘Last Number Redial’’ . ................................ 3–3
Interrupting a Terminal Session . ........................ 3–3
Resuming an Interrupted Terminal Session . . ............... 3–3
Disconnecting an Interrupted Terminal Session .............. 3–4
Using a Printer ........................................ 3–4
DECserver 90L Commands ............................... 3–4
DECserver 90L Information and Error Codes . . ............... 3–6
iii

iv Contents
4 Managing the DECserver 90L
Local Management ...................................... 4–2
Remote Management .................................... 4–2
Security .............................................. 4–2
Management Commands . ................................ 4–3
Set Command........................................ 4–3
Setting Port Parameters ............................. 4–3
Setting Server Parameters ............................ 4–7
Changing Password by Menu . . ........................ 4–10
Set and Clear Authorized Operation .................... 4–11
Enable and Disable Manager Mode ..................... 4–14
Show Command ...................................... 4–17
Show Port ........................................ 4–17
Show Server ....................................... 4–20
Reset Command ...................................... 4–22
Command Line....................................... 4–23
Using a Printer ........................................ 4–25
5 Troubleshooting
A Specifications
Physical Dimensions .................................... A–1
Environmental Specifications .............................. A–2
Power Specifications..................................... A–3
Connector Pin Out ...................................... A–3
LAT Specifications ...................................... A–5
B Related Documentation
Index

Contents v
Figures
1–1 Sample DECserver 90L Connection .................... 1–2
1–2 DECserver 90L . . . ................................ 1–4
2–1 DECserver 90L Standalone Installation . . ............... 2–2
2–2 Removing the Back Cover of the DECserver 90L . . . ....... 2–3
2–3 DECserver 90L Backplane Installation . . ............... 2–6
A–1 Port Circuit ...................................... A–4
Tables
1–1 Supported Terminal Characteristics .................... 1–3
3–1 DECserver 90L User Commands ...................... 3–5
3–2 DECserver 90L Information and Error Codes ............ 3–6
4–1 Port Parameters . . . ................................ 4–4
4–2 Server Parameters . ................................ 4–8
4–3 Port Status Description ............................. 4–17
5–1 DECserver 90L Troubleshooting ...................... 5–1
A–1 MMJPinOut..................................... A–4
A–2 LAT Server Characteristics . . ........................ A–5
A–3 LAT Port Characteristics ............................ A–5

AboutThisManual
This guide gives an overview of the DECserver 90L and describes how to
install, operate, manage, and troubleshoot the DECserver 90L. This guide
also gives the specifications and related documentation for the DECserver
90L.
Organization
This guides has five chapters and two appendices.
Chapter Meaning
1 Provides an overview of the DECserver 90L including
the features and a quick start procedure.
2 Describes how to install the DECserver 90L.
3 Describes how to start, interrupt, resume, and end a
terminal session.
4 Describes how to manage the DECserver 90L locally or
from a remote device on the network.
5 Describes how to troubleshoot the DECserver 90L.
Appendix A Describes the physical dimensions; environmental,
electrical, and LAT specifications.
Appendix B Provides a list of related documentation and how to
order information.
vii
viii About This Manual
Conventions
Convention Meaning
italic Indicates a new term or in command syntax examples, italic
Return
NOTE Provides general information.
bold text Bold text represents user input. For example:
[] The characters in brackets [ ] do not need to be entered for the
words represent elements of a command for which you supply a
value. For example:
-> service
Key names appear in a box.
-> Set
DECserver 90L to recognize the command. For example:
D[ISCONNECT]
Return

1
Overview
This chapter describes the features of the DECserver 90L and provides a
summary of the installation procedure.
Features
The DECserver 90L contains the following features:
• Simplified human interface
• Plug-and-go installation
• Small in size
• Rack mountable in DEChub
90 Ethernet backplane
• Network Management
through MOP and TSM
(future release of TSM)
The DECserver 90L terminal server is an eight line, single session per
line, terminal server that supports terminals and printers. Each line
or port can establish a connection to one computer or service at a time.
DECserver 90L supports Digital’s Local Area Transport (LAT) protocol
and is designed to work in a ThinWire Ethernet Local Area Network
(LAN), as shown in Figure 1–1.
• Eight ports
– 1.2K bits to 38.4K bits per second
– 8-bit characters
– One stop bit
– No parity
• One session per port
• Printer support, including queuing
• LAT compatible, V5.0 or higher
1–1

1–2 Overview
TERMINAL TERMINAL PERSONAL COMPUTER PRINTER
TERMINAL TERMINAL TERMINAL TERMINAL
DECserver 90L
TERMINAL SERVER
THINWIRE ETHERNET
COMPUTER 1 COMPUTER 2 COMPUTER 3 COMPUTER N
Figure 1–1 Sample DECserver 90L Connection
Quick Start
To install and begin using your DECserver 90L is simple. It does not
require any programming or other assistance from system management.
After unpacking the unit:
1. Plug the power supply in a working AC outlet and plug the power
connector from the power supply in to your DECserver 90L.
The green power LED turns on to indicate DC power is getting to the
unit. The green self-test turns on to indicate that the unit successfully
completed its internal self-test. The self-test takes approximately five
seconds to complete.
2. Connect the unit to a properly terminated ThinWire Ethernet.
The green network LED turns on to indicate a good connection.

Overview 1–3
3. Connect a working terminal to one of the terminal ports. Refer to
Table 1–1 for supported terminal characteristics.
4. Turn the power on to the terminal and press
Return
twice to get the
DECserver 90L prompt (->).
Pressing
Return
twice causes the green activity LED to blink and
automatically sets the port’s baud rate.
5. Enter the name of the network node you want to connect to and press
Return
. The DECserver 90L will display a string of dots ‘‘.....’’, one per
second, until the connection is made.
For more detailed information on installing and using the DECserver 90L
refer to Chapter 2, Installation and Chapter 3, Operation of this manual.
Table 1–1 Supported Terminal Characteristics
Characteristic Setting
Transmit speed 1200 to 38.4K
Receive speed Receive = Transmit
Flow control XON/XOFF
Data and parity 8 Bits, No Parity
Stop bits 1
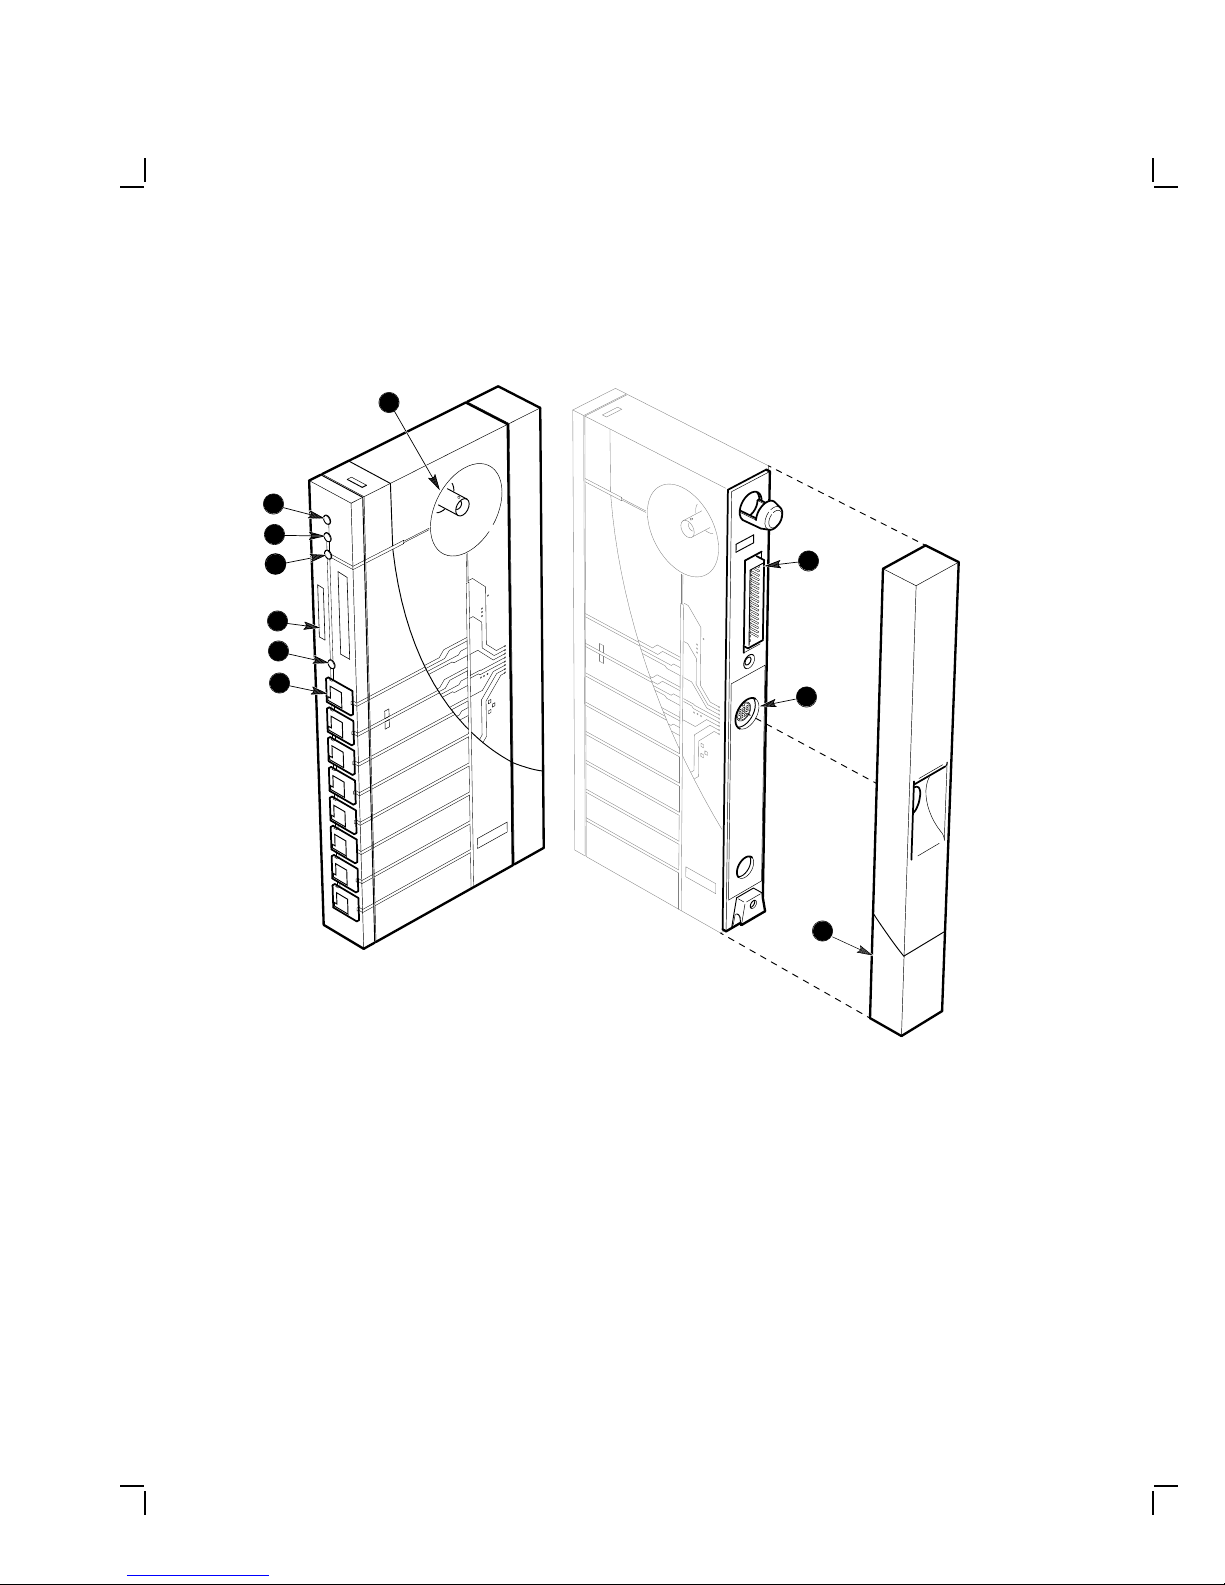
Figure 1–2 shows the DECserver 90L and calls out its features.
1–4 Overview
1
2
3
5
4
7
6
9
8
Figure 1–2 DECserver 90L
10
LJ-00072-TI0
Overview 1–5
!
Power Indicator - Turns on when +5 volts is supplied to the unit.
"
Self-Test OK Indicator - Turns on when the unit has successfully
completed its diagnostics.
#
Network OK Indicator - Turns on when the unit is connected to a
properly terminated network.
$
Activity Indicator - Turns on when data is being transmitted or received
by any of the ports.
%
Ethernet Address - Unique physical address of the unit.
&
Network Connector (BNC) - Connects unit to the network. Not used
when the unit is installed in the DEChub 90 Ethernet backplane.
'
Port Connector (MMJ) - Connect terminals and printers to the
DECserver 90L.
(
Power Connector - Provides +5 volts from the DECserver 90L power
supply. Not used when the unit is installed in the DEChub 90 Ethernet
backplane.
)
Backplane Connector - Provides network and power connections to
the DECserver 90L when it is installed in the DEChub 90 Ethernet
backplane.
+>
Cover - Present on standalone units only. Covers the backplane connector
and mounting assembly.

2
Installation
The DECserver 90L can be installed on a table, mounted to a wall, or in
the DEChub 90 Ethernet Backplane. Refer to Standalone Installation
when installing the unit on a table or mounting it to a wall. Refer
to Backplane Installation when installing the unit in the DEChub 90
Ethernet backplane.
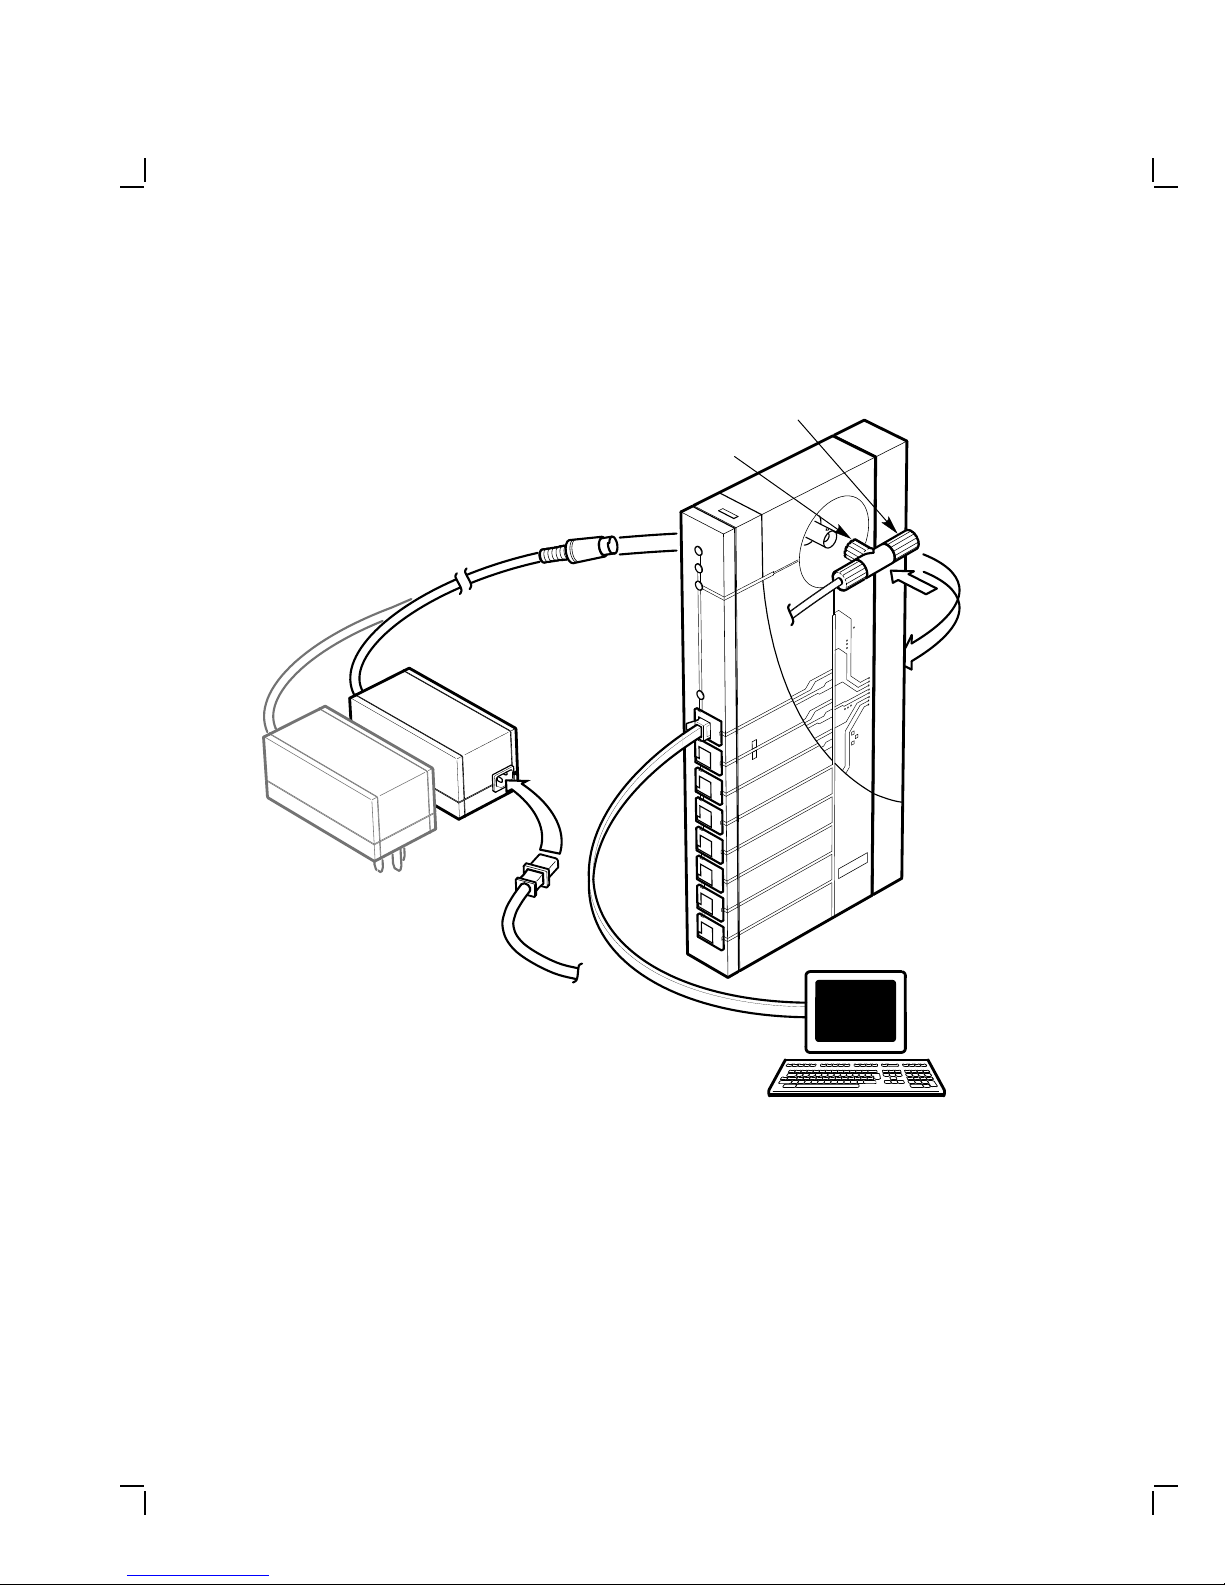
Standalone Installation
To install the DECserver 90L as a standalone unit, perform the following
procedures and refer to Figure 2–1.
Mount DECserver 90L.
Locate and mount the DECserver 90L. For wall mounting, remove the
back cover on the unit and use the mounting holes on the cover as a
template to locate the mounting screws.
2–1
2–2 Installation
50 OHM
Terminator
T-Connector
Figure 2–1 DECserver 90L Standalone Installation
Terminal
LJ-00073-TI0.DG
Installation 2–3
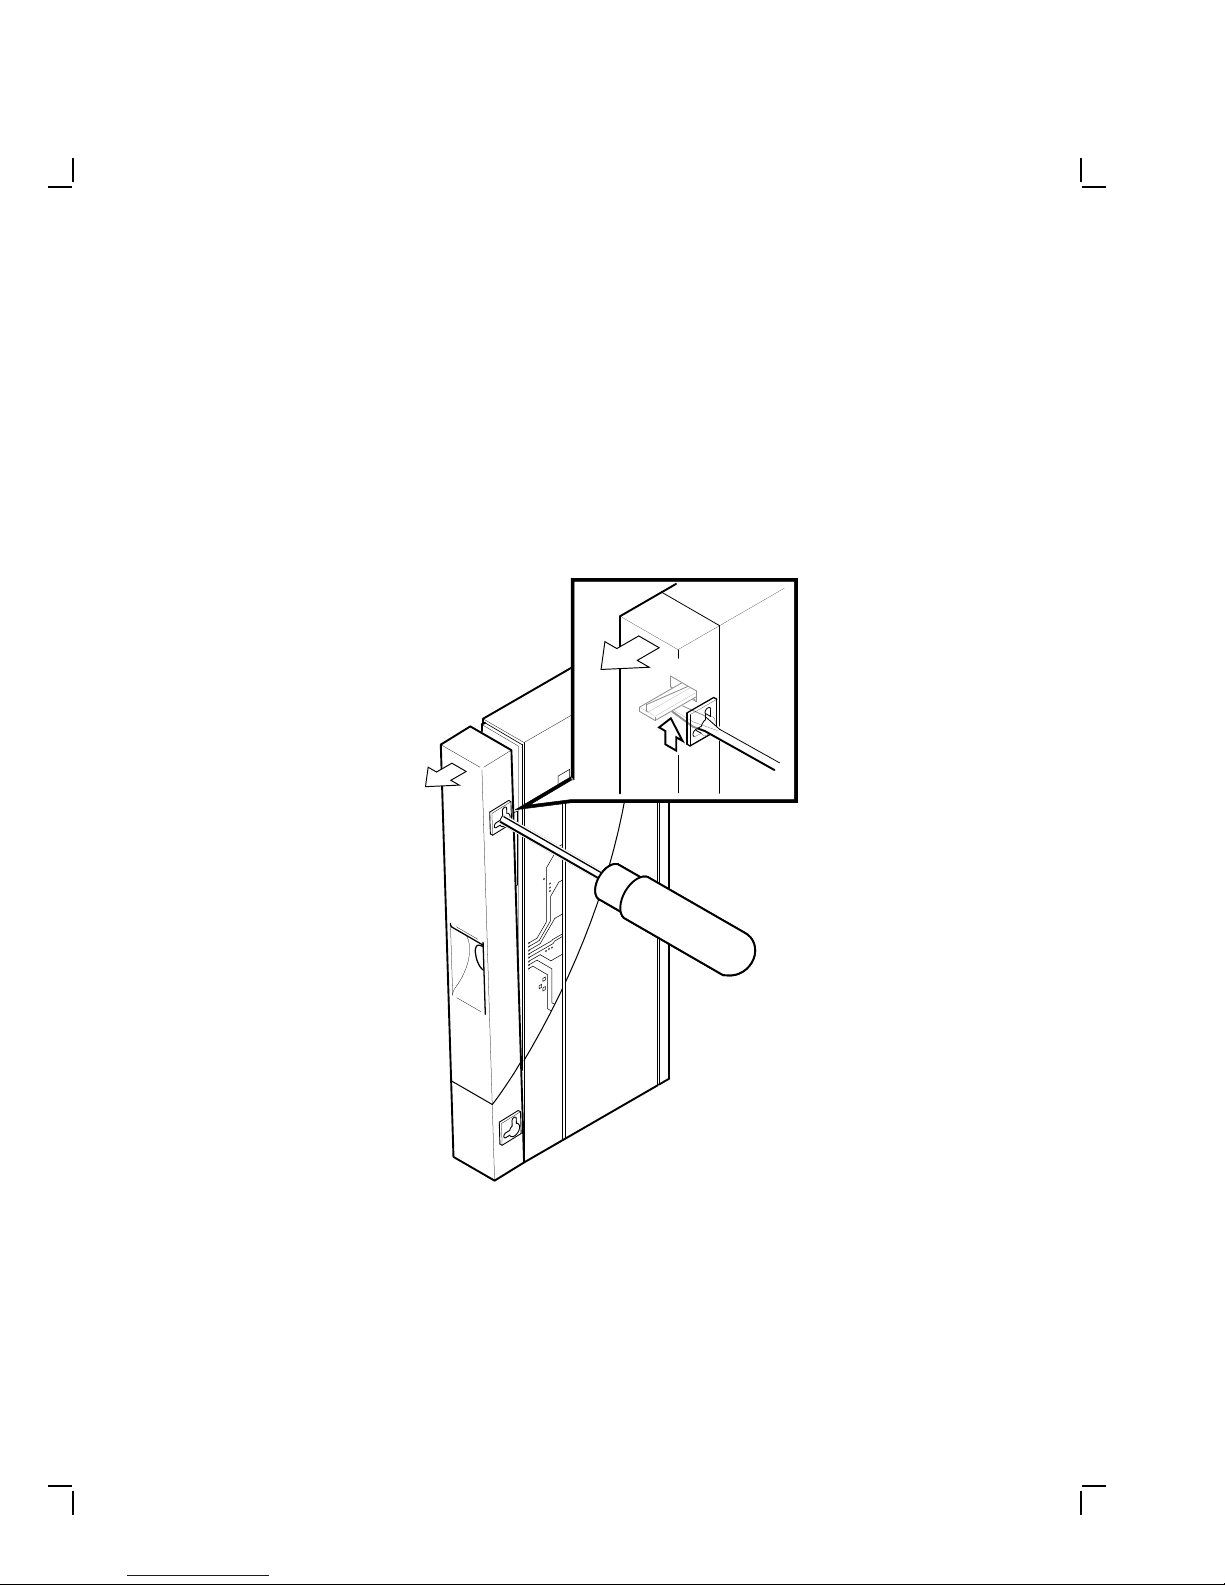
Remove Cover (if necessary).
To remove the back cover of the DECserver 90L (Figure 2–2):
1. Insert a small screwdriver into the top mounting hole in the cover.
2. Lift up on the latch.
3. While lifting up on the latch, pull the top of the cover away from the
unit and down.
Figure 2–2 Removing the Back Cover of the DECserver 90L
LJ-00320-TI0

2–4 Installation
Make Connections.
1. Plug the power supply into the DECserver 90L.
2. Attach the Ethernet T-connector to the BNC connector on the
DECserver 90L. Make sure the Ethernet segment is properly
terminated at each end.
3. Attach the power cord to the power supply, if needed.
4. Plug the power supply into a working AC outlet.
5. The following indicators should be lit: Power, Self-Test OK, and
Network. The self-test takes approximately five seconds to complete.
Verify Ports.
Verify the operation of each port by connecting a terminal to the port.
Refer to Table 1–1 for supported terminal characteristics. Press
Return
twice (autobaud) to set the operating speed of the port. While watching
the Activity LED type a character on the terminal. The LED should turn
on and off, indicating activity on the port. Perform this procedure for each
port.
Start Terminal Session.
1. Connect terminals to ports as needed.
2. To start a terminal session using a terminal connected to one of the
ports:
a. With the terminal turned on, press
Return
twice. This sets the
baud rate of the port to that of the terminal.
b. At the prompt ‘‘->’’, enter a node and press
Return
.
The DECserver 90L responds by displaying a string of dots "......"
while connecting to the selected node. Once the connection is
established, your terminal will display the system dependent login
message or prompt.
NOTE
The DECserver 90L can take a maximum of one minute
when connecting to a node for the first time.

Installation 2–5
For more information on using the DECserver 90L, refer to Chapter 3 in
this manual.
Backplane Installation
To install the DECserver 90L in the DEChub 90 Ethernet backplane,
perform the following procedures and refer to Figure 2–3.
Remove Cover (if necessary).
1. If the unit to be installed in the backplane has a cover on the back of
the unit, remove the cover (Figure 2–2).
To remove the back cover on the DECserver 90L unit:
a. Insert a small screwdriver into the top mounting hole in the cover.
b. Lift up on the latch.
c. While lifting up on the latch, pull the top of the cover away from
the unit and down.
Mount DECserver 90L.
1. Place the lower mounting tab, located on the back of the DECserver
90L, in the appropriate mounting slot on the backplane.
NOTE
The DECserver 90L can be installed in the DEChub 90
Ethernet backplane while power is applied to the backplane
(hot-swap).

2–6 Installation
2. Rock the unit into place. An audible ‘‘click’’ is heard when the unit is
securely latched in place.
3. With the power applied to the backplane, the following indicators on
the DECserver 90L should be lit: Power, Self-Test OK, and Network.
The self-test takes approximately five seconds to complete.
Figure 2–3 DECserver 90L Backplane Installation
LJ-00074-TI0

Installation 2–7
Verify Ports.
Verify the operation of each port by connecting a terminal to the port.
Refer to Table 1–1 for supported terminal characteristics. Press
Return
twice (autobaud) to set the operating speed of the port. While watching
the Activity LED type a character on the terminal. The LED should turn
on and off, indicating activity on the port. Perform this procedure for each
port.
Start Terminal Session.
1. Connect terminals to ports as needed.
2. To start a terminal session using a terminal connected to one of the
ports:
a. With the terminal turned on, press
Return
twice. This sets the
baud rate of the port to that of the terminal.
b. At the prompt ‘‘->’’, enter a node and press
Return
.
The DECserver 90L responds by displaying a string of dots "......"
while connecting to the selected node. Once the connection is
established, the system-dependent login message or prompt will
appear.
NOTE
The DECserver 90L can take a maximum of one minute
when connecting to a node for the first time.
For more information on using the DECserver 90L, refer to Chapter 3 in
this manual.
3
Operation
Using the DECserver 90L terminal server is as easy as turning on your
terminal, pressing
(nodename) you want to connect to at the -> prompt. You may also set a
port for use by a printer.
This chapter describes how to operate the DECserver 90L. This section
describes how to start, interrupt, resume, and end a terminal session.
NOTE
LAT Version 5.0 or higher must be installed and running on a
host system before you can use the DECserver 90L. If you cannot
connect to a selected system and you are not sure if the LAT
Version 5.0 or higher is installed and running, see your system
manager for help.
Using a Terminal or Personal Computer
This section explains how to use the DECserver 90L with a terminal or
Personal Computer (PC) running terminal emulation software.
Establishing a Terminal Session
Return
twice, and entering the name of the service
To establish a terminal session:
1. Turn your terminal on or start the terminal emulation software on
your PC.
2. Press the
->
3. At the prompt (->), type your node name and press
DECserver 90L indicates that it is attempting to connect to the node
by displaying a string of dots "...." on the screen.
Return
key twice, you will see the DECserver 90L prompt:
Return
. The
3–1
 Loading...