

Digital Equipment VAXstation VLC, DEC 3000 Model 300 AXP, DEC 3000 Model 300L AXP Upgrade Instructions
Page 1

VAXstation VLC to
DEC 3000 Model
300/300L AXP
Upgrade Instructions
MLO-010693
Order Number: EK–VSAXP–UP. A01
Page 2
Options You Can Upgrade
Can Cannot
Upgrade Upgrade
Expansion SZ03
Boxes: SZ12
SZ16
Hard Disks: RZ23L RZ57
RZ24L
RZ24*
RZ25*
RZ26*
RZ55*
RZ56*
RZ58*
Removable TZK10 RX23
Media:* TZ30 RX33
TLZ04
TLZ06
RRD42
RX26
Memory
Option: None
* Available only in expansion boxes
Page 3

Options You Can Upgrade
Can Cannot
Upgrade Upgrade
Monitors VRC16-Cx/Hx VR262-Ax
VRM17-Ax/Hx VR290-Dx
VR319-Dx** VR297-Dx
VR320-Dx** VR299-Dx
VRT16-Hx** VRT16-Dx
VRT19-Hx** VRT19-Dx
VRT13
VR319-Cx
VR320-Cx
Input
Devices: VSxxx-AB
VSxxx-AA
VSxxx-FA
VSxxx-JA
VSxxx-GA
LK401
LK201
Ethernet
Adapter: DECXM-AA
** Available only on the Model 300.
Page 4
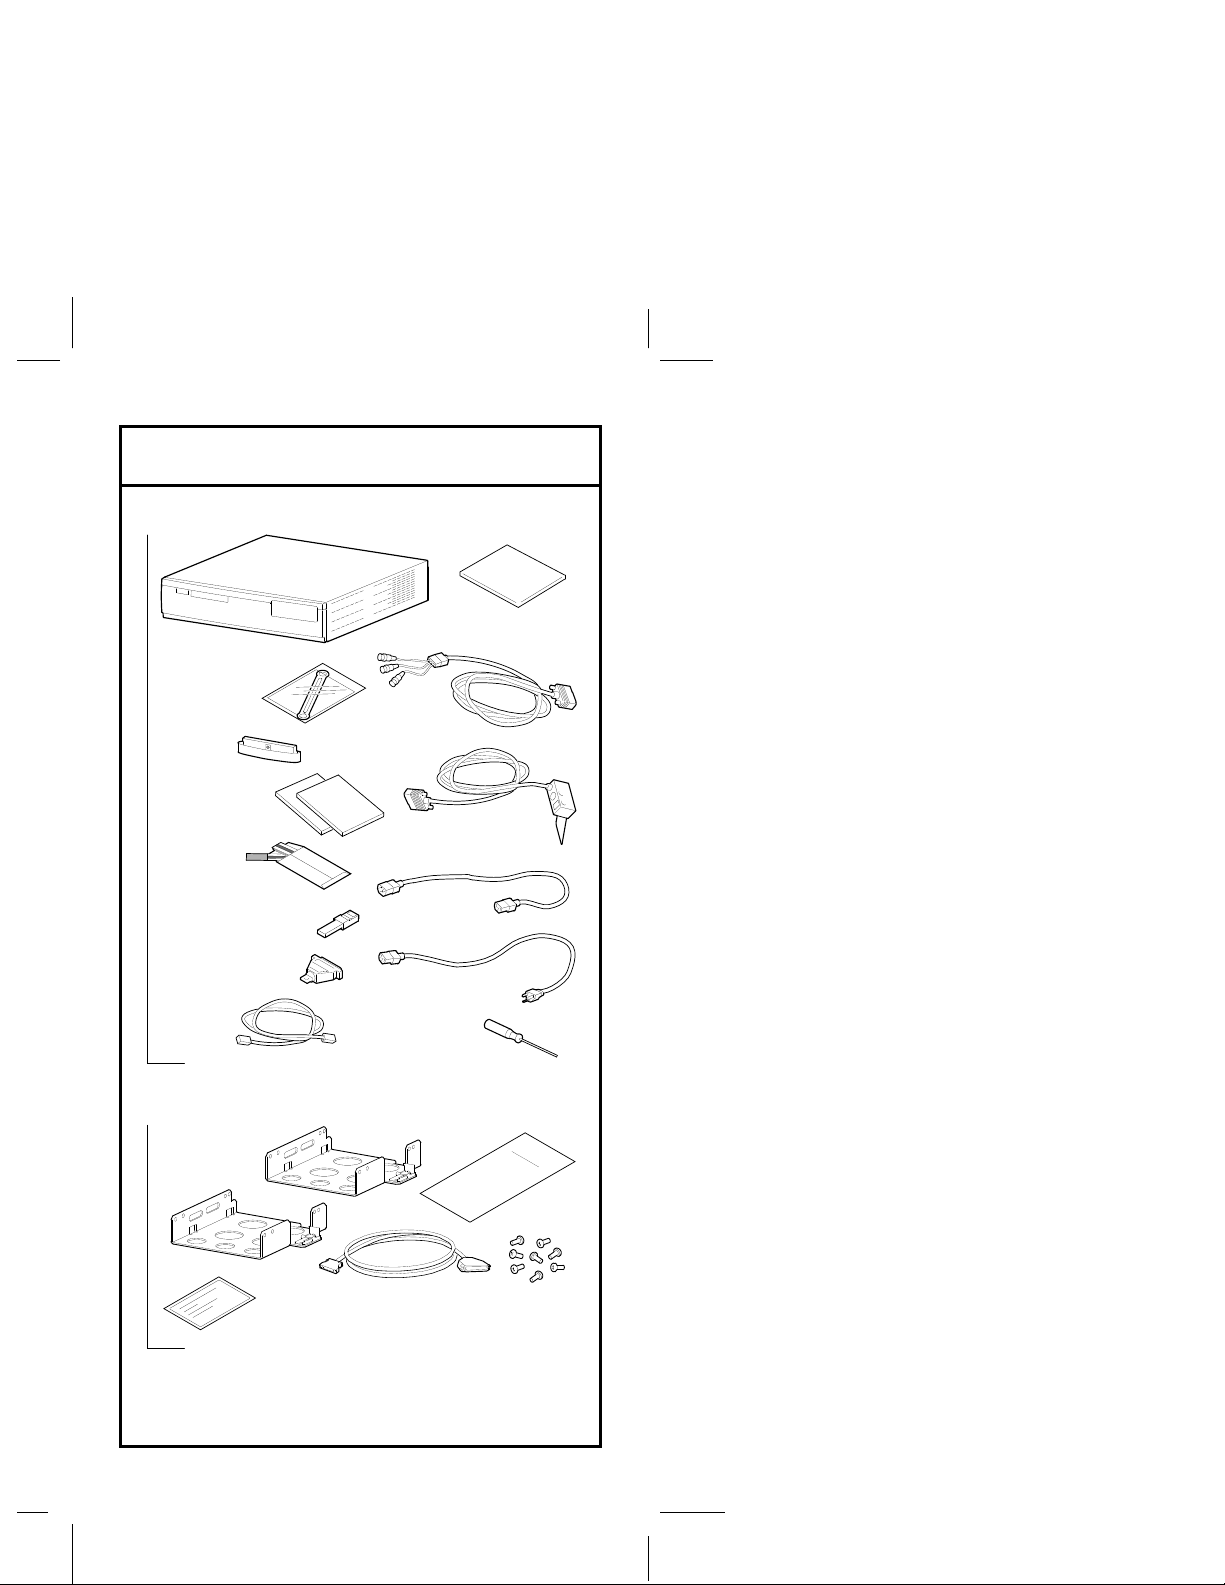
Check the Box Contents
System Kit:
Mousepad
System Unit
Universal
Strain Relief
Strap
SCSI
Terminator
Monitor
Video Cable
Documentation
Antistatic
Wrist Strap
10BASE-T Loopback
Connector
Modem Loopback
Connector
Network
Cable
Accessory Kit:
Mounting
Brackets (2)
Return
Address
Label
Keyboard/Mouse
Extension Cable
Monitor
Power Cord
System Power
Cord
Screwdriver
External
SCSI Cable
Upgrade
Card
Screws (8)
xxxxxxx
xxxxxxxxxxx
xxx
MLO-010694
Page 5
Check the SCSI ID Settings
If your DEC 3000 system has factoryinstalled drives, check the SCSI ID settings
on the drives you are upgrading.
To find out the SCSI ID settings on your
VAXstation drives, enter these commands:
• To shut down your system software:
$ SYS$SYSTEM:SHUTDOWN
• To show the drives and their SCSI ID
settings: >> SHOW CONFIG
A screen similar to this will display:
>>> SHOW CONFIG
KA48-A V1.3-343-V4.0
08-00-2B-1D-28-6C
8MB
DEVNBR DEVNAM INFO
------ ------ ------------------------------- 1 NVR OK
2 LCG OK
3 DZ OK
4 CACHE OK
5 MEM OK
8MB = S0/1=0MB, S2/3=0MB, S4/5=0MB
6 FPU OK
7 IT OK
8 SYS OK
9 NI OK
10 SCSI OK
11 AUD OK
>>>
5-RX26 6-INITR
LR - 8 PLN FB - 5.2
SCSI
ID Numbers
MLO-010730
Write your system drive names and SCSI ID
settings here:
Page 6
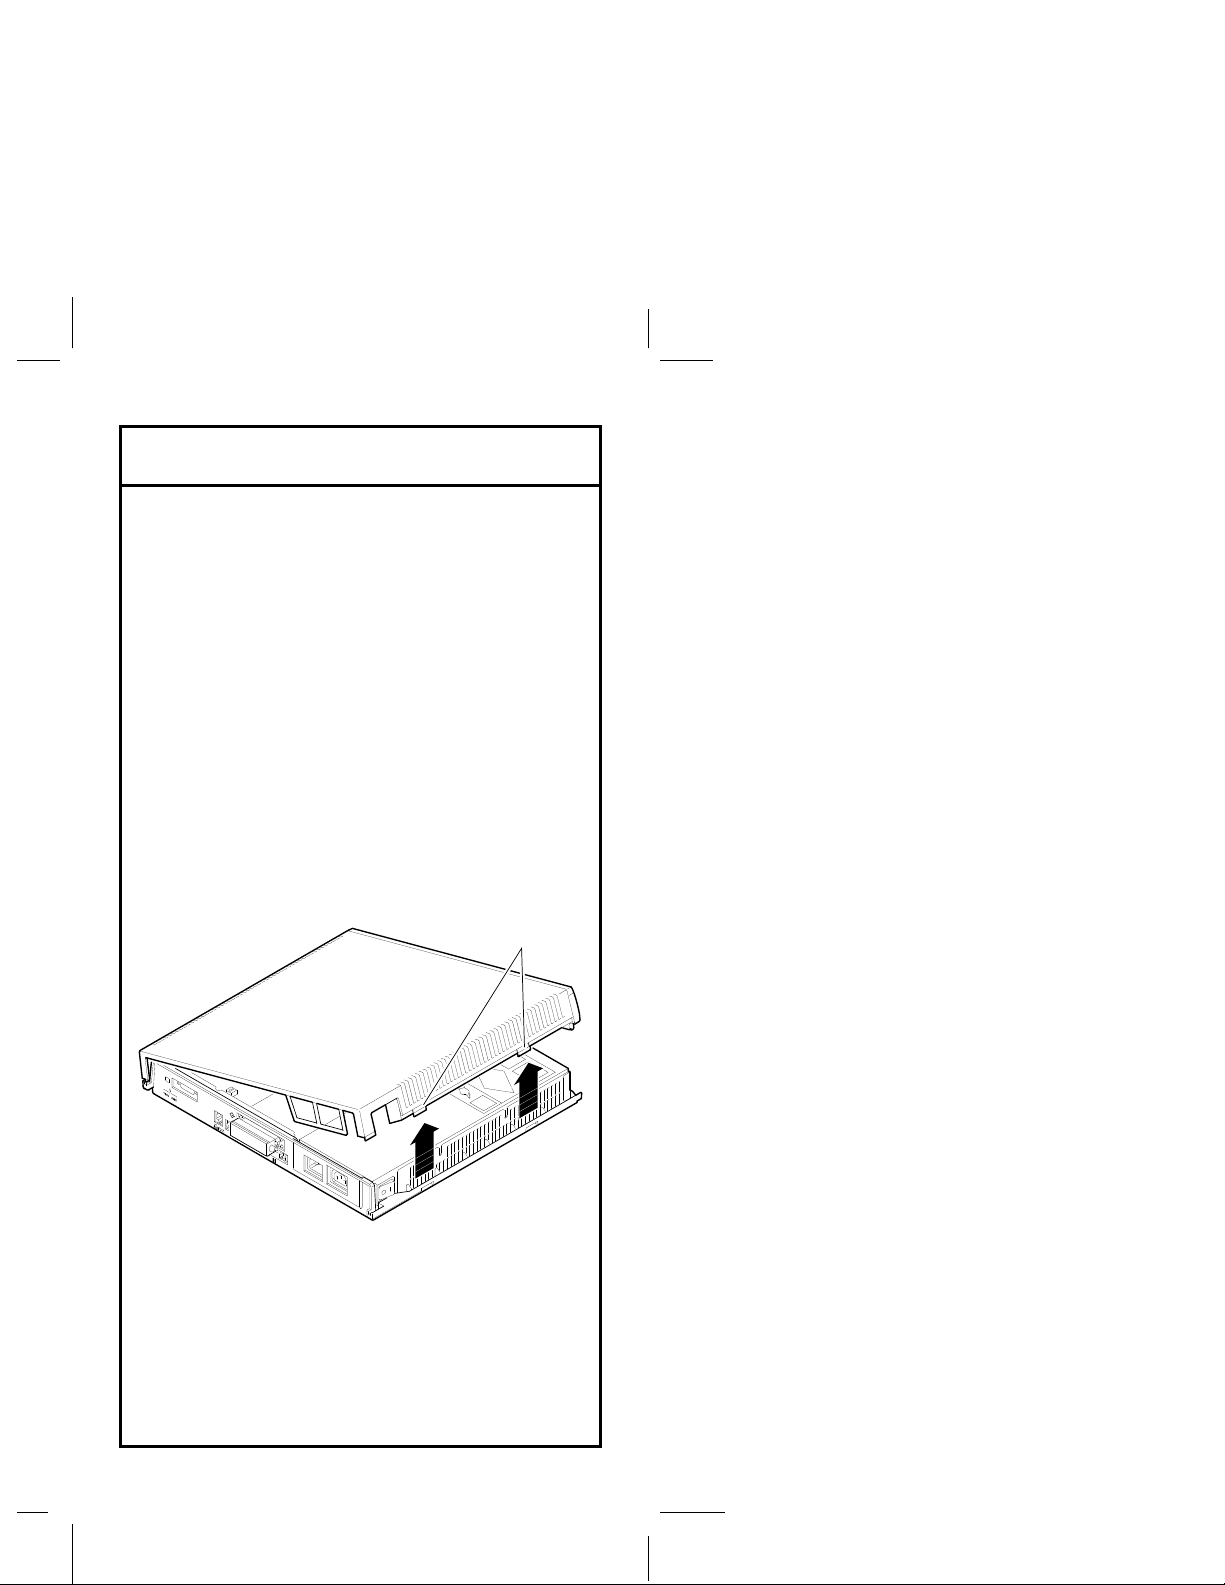
Turn Off/Open the VAXstation
1. Turn off the VAXstation system unit by
pressing O on the On/Off switch.
Caution: After you turn off the system,
wait 15 seconds before
unplugging the power cord.
2. Unplug all the cables.
3. To open the cover, press firmly on
the latches located on the side of the
system unit.
• Push the latches in and up until the cover
releases.
• Pull the cover up and off.
Latches
C2
C1
MLO-010695
Caution: You may damage the equipment
if you do not wear an antistatic
wrist strap when working inside
the system unit.
Page 7

Remove/Prepare the Disk Drive
Your VAXstation may have an RZ23L or an
RZ24L fixed disk drive installed.
4. Locate the small metal clip attached to
the disk mounting bracket.
• Push in on the metal clip to unlock the
bracket, then slide the drive away from
the power supply.
• Remove the drive from the system unit.
• Disconnect the SCSI and power cable
connectors from the drive.
5. Remove the drive bracket and clip by
using a Phillips screwdriver to remove
the rubber feet.
C2
C1
Power
Supply
MLO-010696
Page 8

Set the SCSI ID on the Drives
You need change a SCSI ID setting only if
two or more drives have the same setting.
Check the SCSI ID setting for the VAXstation drives, which you noted previously. If
you need to change a SCSI ID on a drive
that is not covered here, see the DEC 3000
Model 300/300L AXP System Hardware
Reference Guide.
RZ23L Drive SCSI ID Settings:
E1
E2
E3
SCSI
Settings:
0
4
1
5
2
6
3
MLO-010587
Page 9

Set the SCSI ID on the Drives
RZ24L Drive SCSI ID Settings:
A0
A1
A2
SCSI
Settings:
0
4
1
5
2
6
3
MLO-010732
Page 10

Insert a Drive Into a Bracket
If you are upgrading an RZ23L or RZ24L
drive from a VLC to a DEC 3000 300/300L,
you must put the drive into either of the
brackets included in your accessory kit.
• Stand the bracket on its side with the
sliding latch up. Place the drive in the
bracket with the connectors facing you,
as shown below.
• Attach the two screws on each side of
the drive bracket.
MLO-010844
Page 11

Complete the Upgrade
6. Follow the instructions in Chapter 2 of
the DEC 3000 Model 300/300L AXP
Reference Guide to install the fixed disk
drive.
7. Follow the instructions in the DEC 3000
Model 300/300L AXP Setting Up Your
System card.
8. Test the installation by turning on your
system and entering the show device
command at the console prompt (>>>).
The options you upgraded should appear
in the display. If an option does not
display, it has not been installed
properly.
Page 12

Complete the Upgrade
9. Return your VAXstation and any
devices that are not upgradable to
Digital:
• Pack the VAXstation and devices se-
curely in the DEC 3000 300/300L packing material.
• Attach the return-address label that was
in your upgrade kit.
• Contact your Digital service representa-
tive to upgrade your hardware service
contract.
© Digital Equipment Corporation 1993. All rights reserved.
Printed in U.S.A.
S2252
 Loading...