

Digital Equipment 900 AXP, DEC 3000 900 AXP Information

DEC3000Model900AXP
UpgradeInformation
Order Number: EK–D39AX–UP. A01
Digital Equipment Corporation
Maynard, Massachusetts

Fourth Printing, July 1994
Digital Equipment Corporation makes no representations that the use of its
products in the manner described in this publication will not infringe on
existing or future patent rights, nor do the descriptions contained in this
publication imply the granting of licenses to make, use, or sell equipment or
software in accordance with the description.
Possession, use, or copying of the software described in this publication
is authorized only pursuant to a valid written license from Digital or an
authorized sublicensor.
© Digital Equipment Corporation 1994. All Rights Reserved.
The following are trademarks of Digital Equipment Corporation: Alpha AXP,
AXP, Bookreader, DEC, DECaudio, DECchip, DECconnect, DEC GKS, DEC
PHIGS, DECsystem, DECsound, DECwindows, DECwrite, DELNI, Digital,
MicroVAX, OpenVMS, RX, ThinWire, TURBOchannel, ULTRIX, VAX, VAX
DOCUMENT, VAXcluster, VAXstation, VMS, and the DIGITAL logo.
The following are third-party trademarks:
CD is a trademark of Data General Corporation.
Open Software Foundation is a trademark of Open Software Foundation, Inc.
OSF, OSF/1, and OSF/Motif are registered trademarks of Open Software
Foundation, Inc. Motif is a registered trademark of Open Software Foundation,
Inc., licensed by Digital.
ISDN is a registered trademark of Fujitsu Network Switching of America.
Trinitron is a registered trademark of Sony Corporation.
Mylar is a registered trademark of E.I. DuPont de Nemours & Company, Inc.
Velcro is a registered trademark of Velcro USA, Inc.
UNIX is a registered trademark of Unix System Laboratories, Inc., a
wholly-owned subsidiary of Novell, Inc.
All other trademarks and registered trademarks are the property of their
respective holders.
FCC Notice: This equipment has been tested and found to comply with the
limits for a Class A digital device, pursuant to Part 15 of the FCC Rules.
These limits are designed to provide reasonable protection against harmful
interference when the equipment is operated in a commercial environment.
This equipment generates, uses, and can radiate radio frequency energy and, if
not installed and used in accordance with the instruction manual, may cause
harmful interference to radio communications. Operation of this equipment in
a residential area is likely to cause harmful interference, in which case users
will be required to correct the interference at their own expense.
S2622
This document was prepared using VAX DOCUMENT Version 2.1.

Contents
1 Options You Can Upgrade
Overview ................................................. 1–1
Chapter Overview ....................................... 1–1
Purpose of Manual ....................................... 1–1
Options You Can Upgrade . ................................... 1–2
Internal/External Options ................................. 1–2
External Options ........................................ 1–4
Warning ............................................... 1–8
Mounting Bracket ....................................... 1–8
What to Read Next ......................................... 1–8
Using This Manual . . . ................................... 1–8
2 Upgrading a VAXstation 4000 Model 90/90A
Topics Covered in This Chapter . . ........................... 2–1
Upgrade Procedure ......................................... 2–1
Step 1: If Your System Has Factory-Installed Drives . . .......... 2–1
Step 2: Shut Down System ................................ 2–3
Step 3: Disconnect Cables ................................. 2–3
Step 4: Remove System Cover . . . ........................... 2–3
Step 5: Remove H-Bracket ................................. 2–4
Step 6: Remove Drives from the H-Bracket . ................... 2–5
Step 7: Remove SPXgt Graphics Module . . . ................... 2–6
Step 8: Remove Removable-Media Bracket . ................... 2–8
Step 9: Remove Drive from Bracket.......................... 2–9
Step 10: Set SCSI IDs on Drives . ........................... 2–10
Step 11: Install New Mounting Brackets . . . ................... 2–10
Note: Other Accessory Kit Brackets ......................... 2–11
Step 12: Complete the Upgrade . . ........................... 2–11
Step 13: Return Your VAXstation to Digital ................... 2–11
iii

3 Upgrading a DECstation 5000 Model 240/260
Topics Covered in This Chapter ............................. 3–1
Upgrade Procedure . ........................................ 3–1
Step 1: If Your System Has Factory-Installed Drives ............ 3–1
Step 2: Shut Down System ................................ 3–2
Step 3: Disconnect Cables . ................................ 3–2
Step 4: Remove System Cover .............................. 3–3
Step 5: Remove Option Modules ............................ 3–4
Step 6: Set the SCSI IDs on the Drives ....................... 3–5
Step 7: Complete the Upgrade .............................. 3–5
Step 8: Return Your DECstation to Digital .................... 3–5
4 Upgrading a DEC 3000 Model 500/500X AXP
Topics Covered in This Chapter ............................. 4–1
Upgrade Procedure . ........................................ 4–1
Step 1: Removing Options . ................................ 4–1
Mounting Brackets for Drives .............................. 4–1
Step 2: Set SCSI IDs on Drives ............................. 4–1
Step 3: Complete the Upgrade .............................. 4–2
Step 4: Return Your System to Digital ....................... 4–2
Step 5: Upgrade Service Contract . . . ........................ 4–2
A SCSI ID Settings for Drives
Setting a Unique SCSI Address ................................ A–1
Selecting SCSI ADDRESS . ................................ A–1
Changing the Setting..................................... A–2
Setting the Unit Select Switch .............................. A–7
Remote SCSI Address Jumpers ............................. A–13
Figures
1–1 Upgrade Kit Contents .............................. 1–7
2–1 SPXgt 24-Plane Graphics Module ..................... 2–6
2–2 Removing the SPXgt 24-Plane Graphics Module . . . ....... 2–7
A–1 TZK10/11 Tape Drive SCSI ID Settings . ................ A–3
A–2 RRD42 Compact Disk Drive SCSI ID Settings ............ A–4
A–3 RRD43 Compact Disk Drive SCSI ID Settings ............ A–5
A–4 RX26 Diskette Drive SCSI ID Settings . ................ A–6
A–5 RX26 Unit Select Switch ............................ A–7
iv

A–6 TZ30 SCSI Switches................................ A–8
A–7 TLZ06 Tape Drive SCSI ID Settings ................... A–9
A–8 RZ23L Fixed Disk Drive SCSI Settings ................. A–10
A–9 RZ24L/24 Fixed Disk Drive SCSI Settings ............... A–11
A–10 RZ25 Fixed Disk Drive SCSI Settings .................. A–12
A–11 RZ25 Secondary SCSI Address Port . ................... A–13
A–12 RZ25L Fixed Disk Drive SCSI Settings ................. A–14
A–13 RZ26 Fixed Disk Drive SCSI Settings .................. A–15
A–14 RZ26B Fixed Disk Drive SCSI Settings ................. A–16
A–15 RZ26L Fixed Disk Drive SCSI Settings ................. A–17
A–16 RZ28 Fixed Disk Drive SCSI Settings .................. A–18
A–17 RZ28B Fixed Disk Drive SCSI Settings ................. A–19
v


Overview
1
Options You Can Upgrade
Chapter
Overview
Purpose of
Manual
This chapter contains the following topics:
• Options You Can Upgrade
• Upgrade kit contents
• Using the Manual
The purpose of this guide is to tell customers and Digital
Services which options can be removed from the current system
and used, either internally or externally, in the DEC 3000 Model
900. Step-by-step instructions are provided for removing the
options.
Options You Can Upgrade 1–1

Options You Can Upgrade
Options You Can Upgrade
Internal/External
Options
Options that are supported internally or externally on the
DEC 3000 Model 900 are listed in the following tables:
Fixed Disk Drives Comment
RZ23L
RZ24
RZ24L
RZ25
RZ25L
RZ26
RZ26B OpenVMS support only
RZ26L
RZ28
RZ28B
Removable-Media
Drives Comment
RRD42 Including tabletop devices
RRD43 Including tabletop devices
TLZ06 Including tabletop devices
TZK10
TZK11
RX26
1–2 Options You Can Upgrade

Options You Can Upgrade
Graphics Modules Comment
PMAGB–BA/BB
PMAGB–BC/BD
PMAGB–BE/BF
PMAGB–JA/JB OSF/1 AXP support only
PMAGB–DA/DB DEC Open3D required for software support
PMAGB–DC/DD DEC Open3D required for software support
PMAGB–EA/EB DEC Open3D required for software support
PMAGB–EC/ED DEC Open3D required for software support
PMAGB–FA/FB DEC Open3D required for software support
PMAG–DA/DB
PMAG–EA/EB
PMAG–FA/FB
PMAGC–AA/BA
PMAGD–AA/BA
AV300
PEXGA–AA OSF/1.3 AXP support and KWS 1.3 required
PEXGA–BA OSF/1.3 AXP support and KWS 1.3 required
PEXGA–CA OSF/1.3 AXP support and KWS 1.3 required
PEXGA–AB OSF/1.3 AXP support and KWS 1.3 required
PEXGA–AC OSF/1.3 AXP support and KWS 1.3 required
Memory Comment
MS15–BA
MS15–CA
MS15–DA
MS15–EA
MS15–FA
TURBOchannel
Options Comment
DEFTA–FA
Options You Can Upgrade 1–3

Options You Can Upgrade
External
Options
Options that are supported externally on the DEC 3000
Model 900 are listed in the following tables:
Expansion Boxes Comment
SZ16
SZ03
SZ12
PMTcE Minimum revision required is D03
BA350
BA353
1–4 Options You Can Upgrade

Options You Can Upgrade
Tape/Disk Drives Comment
RZ55
RZ56
RZ57 Requires firmware update 6000
RZ58
RZ73
RZ74
RX23 OSF/1 AXP support only
TKZ08 OSF/1 AXP support only
TKZ09
TLZ04
TZ30
TZ85
TZ86
TZ87
TZ867 Requires DEC NSR for OSF/1 AXP support
TZ875 Requires DEC NSR for OSF/1 AXP support
TZ877 Requires DEC NSR for OSF/1 AXP support
TZ857 Requires DEC NSR for OSF/1 AXP support
TSZ07
RWZO1 OpenVMS support only
TKZ60
Options You Can Upgrade 1–5

Options You Can Upgrade
Monitors Comment
VRC21–H%
VR319–CA Appropriate 66 Hz graphics option required
VR319–DA
VR320–CA Appropriate 66 Hz graphics option required
VR320–DA
VRC16–H%
VRM17–A%
VRM17–H%
VRT16–H%
VRT19–DA Appropriate 66 Hz graphics option required
VRT19–H%
Input Devices Comment
VSXXX–AB
VSXXX–FA
VSXXX–AA
VSXXX–JA
VSXXX–GA
LK201/LK401
VSX10–AA/A3 DEC Open3D required for software support
VSX20–AA/A3 DEC Open3D required for software support
VSX30–AA/A3 DEC Open3D required for software support
1–6 Options You Can Upgrade

Figure 1–1 Upgrade Kit Contents
System Kit:
Mouse with
Mousepad*
System Unit
Ethernet Loopback
Connector
Universal
Strain Relief
Strap
Network
Label
Antistatic
Wrist Straps (2)
Modem Loopback
Connector
Screwdriver
Documentation
Printer Port
Terminator
Keys
(Attached to
System Unit)
Options You Can Upgrade
Keyboard*
Monitor*
Keyboard/Mouse
Extension Cable
Monitor
Power Cord
System Power
Cord
Accessory Kit:
Upgrade
Guide
Return Address Label
*included in some configurations
xxxxxxx
xxxxxxxxxxx
xxx
Rubber
Grommets
TZ30 RFI
Shield
Metal Support
Plate
RX26 Bezel
RX26 Brackets
Screws
MLO-012115
Options You Can Upgrade 1–7

Options You Can Upgrade
Warning
Mounting
Bracket
Attach an antistatic wrist strap before you begin this upgrade.
As you remove options from your system, place them on an
antistatic mat.
Static discharge can cause irreparable damage to options
modules.
If you are upgrading a disk drive from a VAXstation 4000 Model
90/90A or a DECstation 5000 Model 240/260 to a DEC 3000
system, you must attach a mounting bracket provided in the
accessory kit to each drive before installing it into your new
system.
If you are upgrading a disk drive from a DEC 3000 Model
500/500X AXP, the correct mounting bracket is already attached.
What to Read Next
Using This
Manual
Use the following table to determine which upgrade procedure to
use.
If you have this workstation... Go to...
VAXstation 4000-90/90A Chapter 2
DECstation 5000-240/260 Chapter 3
DEC 3000-500/500X AXP Chapter 4
1–8 Options You Can Upgrade

2
Upgrading a VAXstation 4000 Model
90/90A
Topics Covered
in This Chapter
• Upgrading your system
• Removing drives
• Completing the upgrade
Upgrade Procedure
Step 1: If Your
System Has
Factory-Installed
Drives
If your DEC 3000 system has factory-installed drives, you may
need to change the SCSI IDs on the drives you are upgrading.
To determine the SCSI ID settings on your drives:
1. Shut down your software following the instructions in your
2. Put the VAXstation into console mode by pressing the halt
software documentation.
button located behind the door on the front of the system
unit.
Upgrading a VAXstation 4000 Model 90/90A 2–1

Upgrade Procedure
3. Enter the
SHOW CONFIG
command.
A screen similar to the following appears:
>>> show config
KN4n-A Vn.n
08-00-2B-OA-7D-CB
32 MB
DEVNBR DEVNAM INFO
-------------------------------------1 NVR OK
2 LCSPX OK
.
.
10 SCSI 0-RZ24 3-RZ25
This information shows an RZ24 drive set to SCSI ID 0 and an
RZ25 drive set to SCSI ID 3.
Write down your system drives and SCSI ID settings here. You
will need them for future use.
2–2 Upgrading a VAXstation 4000 Model 90/90A
Upgrade Procedure
Step 2: Shut
Down System
Step 3:
Disconnect
Cables
Step 4:
Remove
System Cover
Turn off the system unit by pressing 0 on the On/Off switch on
the front of the system unit.
Caution: After you turn off the system, wait 15 seconds before
unplugging the power cord.
Disconnect all cables from the rear of the system unit.
Disconnect the power cord from the wall outlet and then from
the system unit.
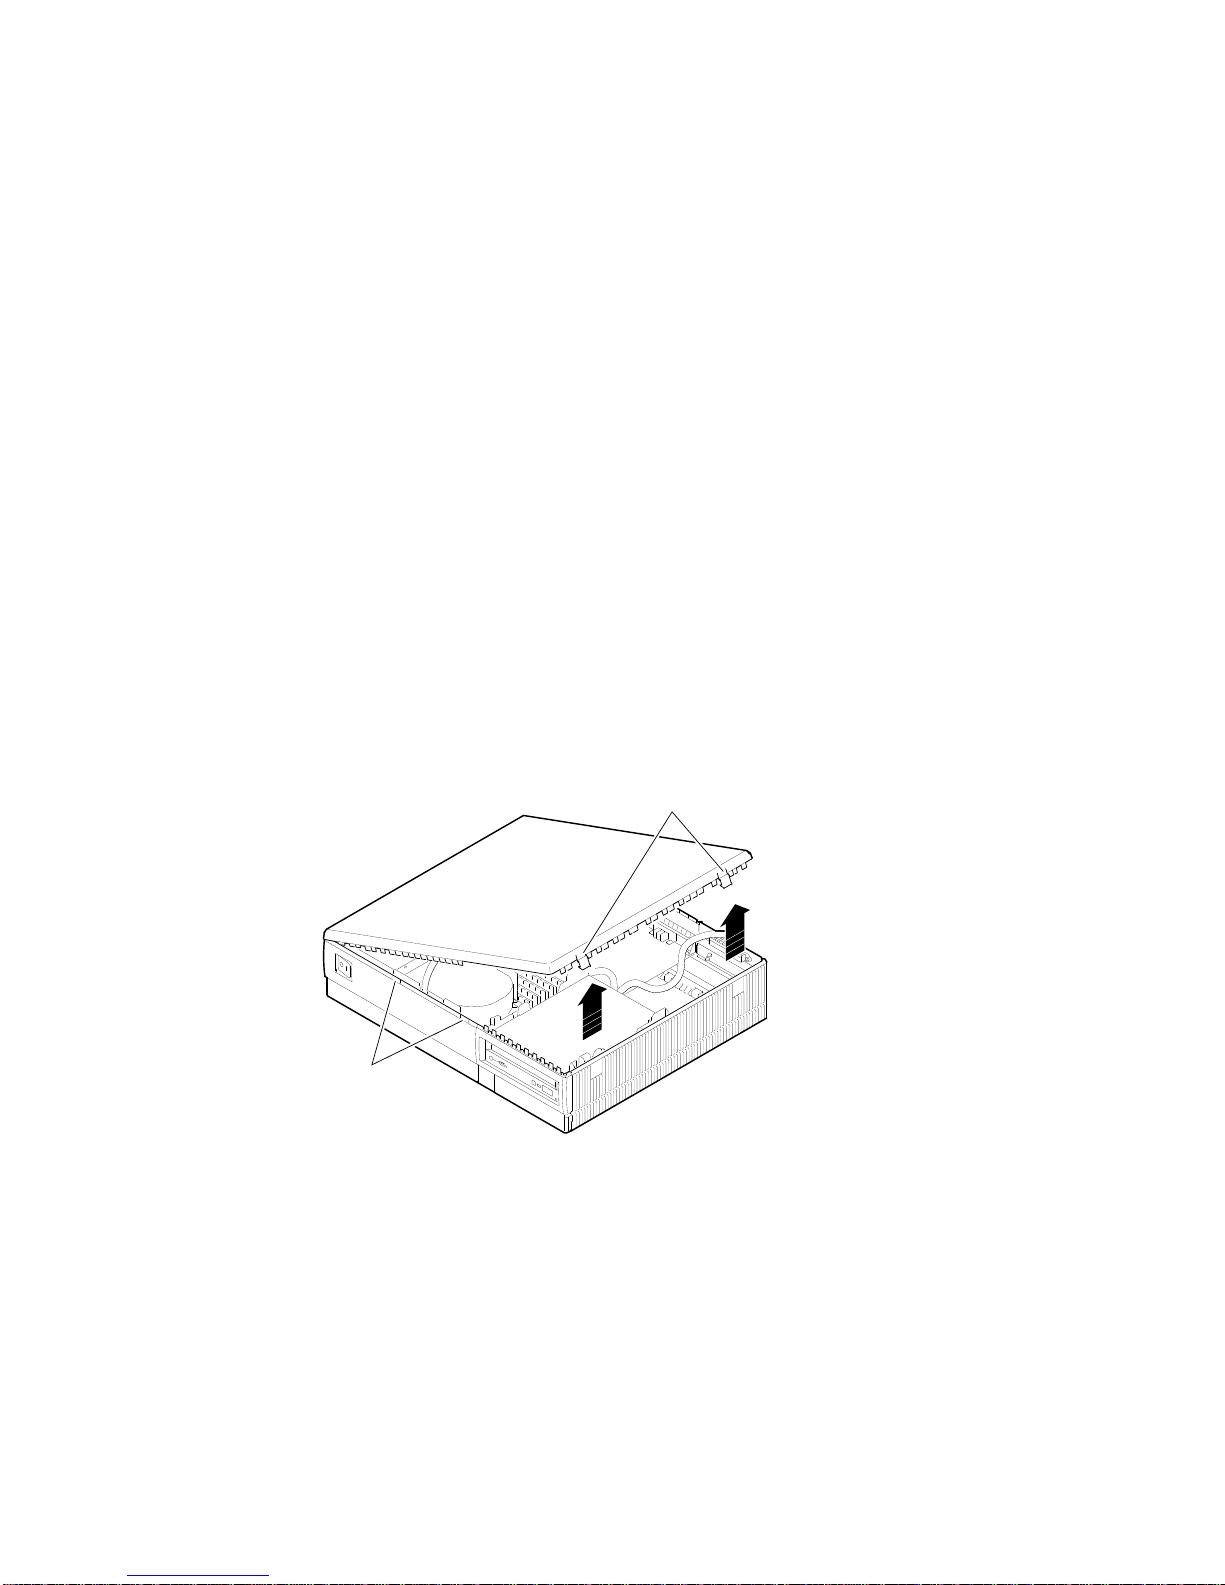
Release the latches on the right side. Then pull the cover up and
away. You need to pull forcefully to release the retention devices.
Latches
Retention
Devices
MLO-010581
Upgrading a VAXstation 4000 Model 90/90A 2–3

Upgrade Procedure
Step 5:
Remove
H-Bracket
To remove the H-bracket from the VAXstation system unit:
1. Push in on the cantilever catch on the bracket (as shown)
and lift the bracket straight up with the strap handle.
Touch here
Masse
Toque aqui
Hier beruhren
MLO-010582
2. Disconnect the SCSI and power cables from the drives in the
bracket.
2–4 Upgrading a VAXstation 4000 Model 90/90A
 Loading...