

Page 1

TM
DIGITAL AlphaServer 1000 and DIGITAL AlphaStation 600 Rackmount Installation
Information
EK-RMALP-IN. F01
June, 1998
Introduction
This installation sheet gives the necessary information to install the rackmount kit for the DIGITAL AlphaServer
1000, DIGITAL AlphaServer 1000A, and DIGITAL AlphaStation 600. Basic knowledge of installing computer
systems is presumed.
For additional information, refer to the
AlphaServer 1000 Rackmount Owner’s Guide
AlphaServer 1000A Rackmount Owner’s Guide
Information
(EK-AS800-UI).
(EK-RMNOR-OG), or the
AlphaStation 600 Series User
(EK-RMALP-OG), the
Preparing for Installation
Table 1 lists the parts of your AlphaServer 1000/AlphaServer 1000A/AlphaStation 600 rackmount kit. Ensure that
you have all the parts before you assemble the rackmount kit.
Table 1 Parts List
Part Description Part Number Qty.
1 Front bezel, Tower 74-52719-01 1
2 System shelf, Tower 74-52718-01 1
3 Locking bracket 74-49530-01 1
4 Slide bracket, front right-hand (RH) 74-49532-01 1
5 Slide bracket, front left-hand (LH) 74-49532-02 1
6 Slide bracket, rear right-hand (RH) 74-49533-01 1
7 Slide bracket, rear left-hand (LH) 74-49533-02 1
8 Shipping bracket 74-49529-01 1
9 Interlock actuator 74-48999-16 1
10 Nut bar 74-49534-01 4
11 Concealed pull 12-40436-02 1
12 Pan head screw (10 mm) 90-40005-06 2
13 Ball Stud #10-32 90-11337-01 2
14 Keps nut #10-32 90-06565-00 2
15 Truss head screw (0.5 in long) 90-00063-39 3
16 Pan head screw (0.375 in long) 90-00062-23 20
17 Flat washer 90-06661-00 20
18 Helical split washer 90-06690-00 8
19 Hex nut #8-32 90-06561-00 8
© Digital Equipment Corporation. 1998. All Rights Reserved.
™ AlphaServer, AlphaStation, DIGITAL, and the DIGITAL logo are trademarks of Digital Equipment Corporation.
S3722
Page 2

Table 1 (cont.) Parts List
Part Description Part Number Qty.
20 Cable Clamp, screw mounted 90-07082-00 10
21 Chassis slide, ball bearing 12-44373-01 2
22 Keps nut #6-32 90-06560-00 4
23 Installation sheet EK-RMALP-IN 1
24 Not used
25 Not used
26 Keps nut #8-32 90-06563-00 2
27 Bracket, Cable Mngt 74-48881-01 1
28 Nut, u-nut 90-07786-00 4
29 Stabilizer bracket 74-48996-01 1
30 Actuator Latch 74-48997-02 1
31 Nut Plate 74-48998-01 1
32 Set Screw #6-32 90-06291-10 2
33 Screw # 10-32 90-00063-37 2
34 Screw, machine 90-06231-09 8
35 Washer, lock 90-07651-00 8
36 Pan head sems screw #8-32 90-09312-00 6
Installation Requirements
System installation requires the following:
A cabinet with an internal rail dimension range of 24.25 inches to 25.0 inches.
•
A vertical cabinet mounting space of 10.5 inches for the shelf assembly.
•
The chassis slides must be installed at the first hole above a one-half inch RETMA space.
•
Some cabinets or configurations may require cable retraction or cable management devices other than the one
included in this kit.
Required Installation Tools
To install your rackmount kit, you need the following tools:
Wrench to tighten the ball studs
•
Socket wrench to install the front bezel to the tray
•
Phillips-head screwdriver
•
Flat-head screwdriver
•
2
Page 3
Assembling the Slides
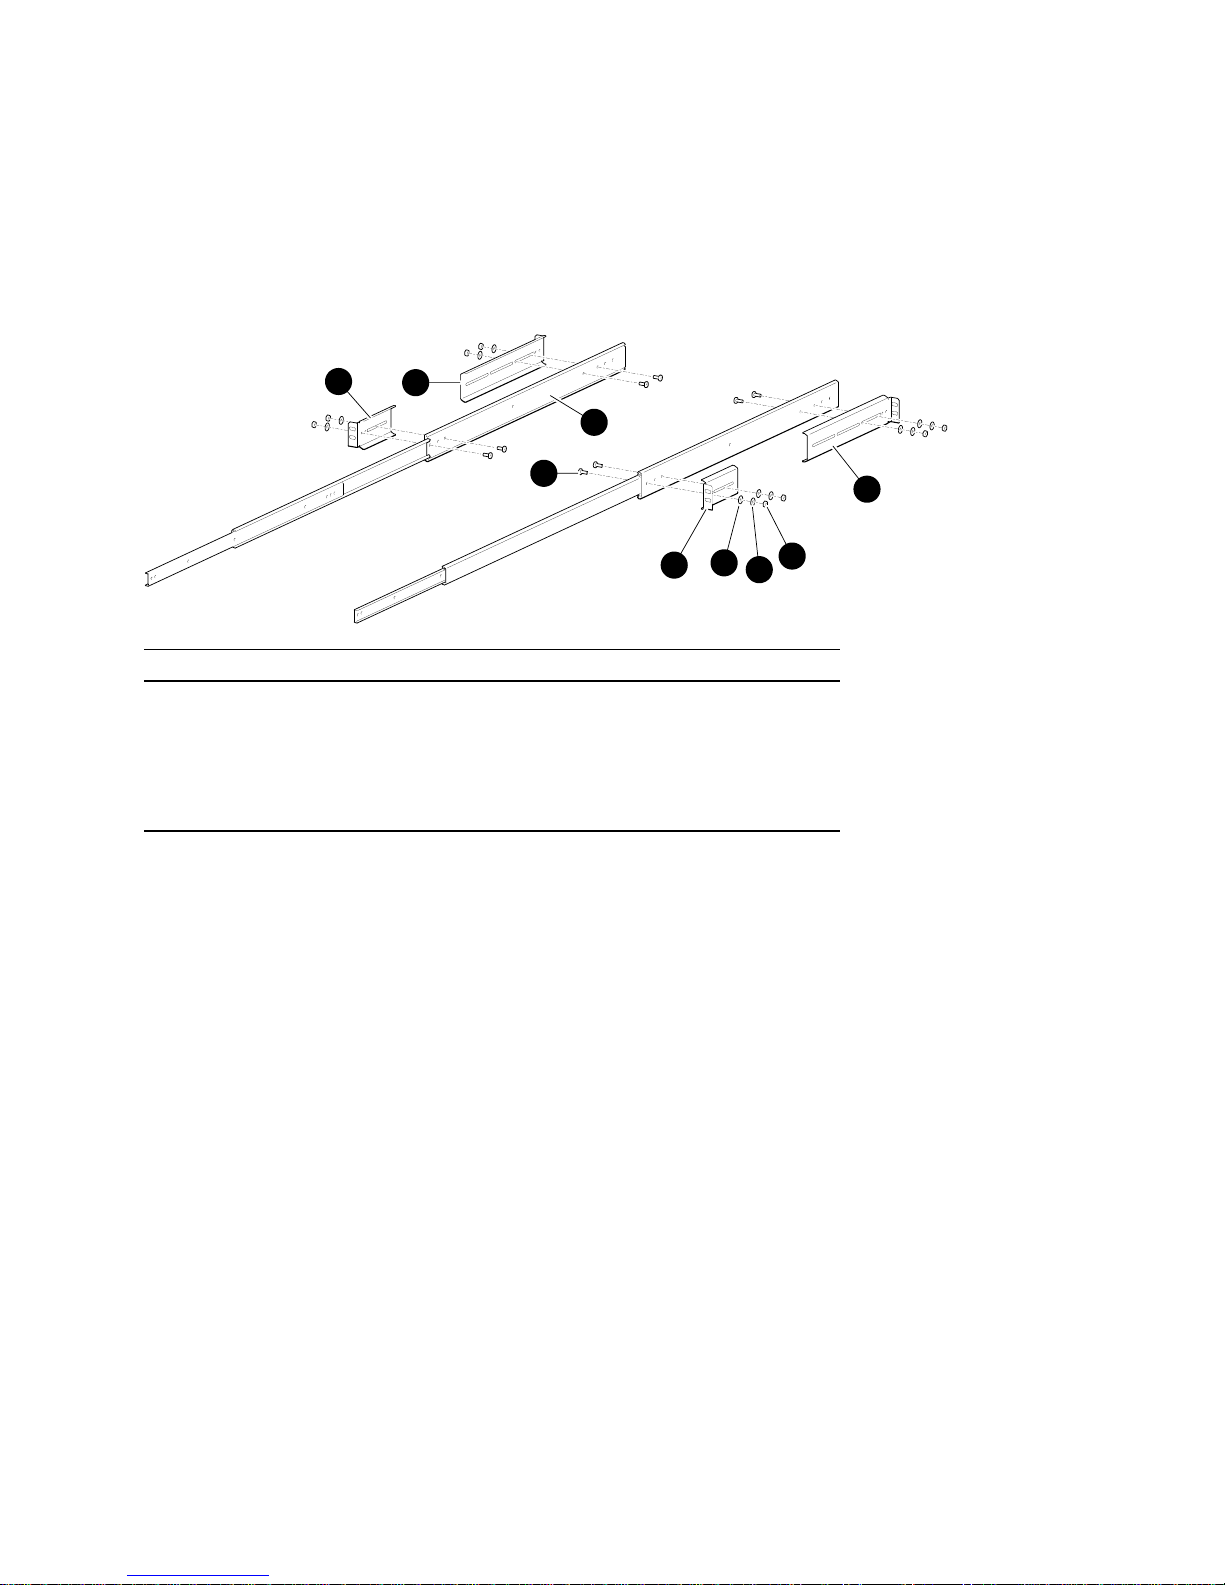
Figure 1 shows the chassis slides, which support the shelf. The slides require some assembly before mounting
them in the cabinet. The callouts in the figure refer to the parts listed in Table 1.
Figure 1 Slide Assembly
4
6
21
16
18
19
17
5
7
MLO-011564
Part Description Part Description
4 Slide bracket, front right-hand (RH) 17 Flat Washer
5 Slide bracket, front left-hand (LH) 18 Helical split washer
6 Slide bracket, rear right-hand (RH) 19 Hex nut #8-32
7 Slide bracket, rear left-hand (LH) 21 Chassis slide, ball bearing
16 Pan head screw
To assemble the slides, perform the following steps:
1. The short slide with the chamfered edge on the upper side goes in the front of the cabinet and the long slide
with the chamfered edge on the upper side goes in the rear.
2. Attach the front slide bracket , RH (4) and the rear slide bracket, RH (6) by using the pan head screws (16),
flat washers (17), lock washers (18), and hex nuts (19).
3. Repeat step 2 for the front slide bracket, LH (5) and the rear slide bracket, LH (7).
3
Page 4

Determining the Installation Area
Figure 2 shows the mounting pattern requirements for mounting the chassis slides into the vertical cabinet rails.
Figure 2 Determining the Installation Area
10 1/2"
"Installation Area"
8 3/4"
7 "
5 1/4"
6
5
4
3
2
1
0.625 inch
0.500 inch
0.625 inch
0.625 inch
0.500 inch
0.625 inch
"1.75 Rule"
3 1/2"
1 3/4"
MLO-011567
1. Empty hole 4. Hole for attaching chassis slides
2. Hole for attaching chassis slides 5. Empty hole
3. Nut bar (10) 6. Hole for attaching ball stud (13)
with #10-32 keps nut (14)
Installing the Slides into the Cabinet
To install the slides into the cabinet, perform the following steps:
1. Before installing the slides into the cabinet, select the cabinet location for your server system. The server
needs 10.5 inches of rack space. Mark the bottom of the 10.5-inch space with a pencil mark.
2. Locate the first hole above the 1/2 inch RETMA space (hole 1), and count up to holes 2 and 3 on the front and
on the rear of the cabinet.
3. Skip hole 1 and place the slides behind the cabinet rail in holes 2 and 3, front and rear.
4. Place the eight screws (34) and washers (35) in the holes and fasten to the four nut bars (10), and tighten.
5. Place the two kep nuts, #10-32, (14) over hole 5 on the front cabinet rails. Add the two ball studs (13) and
tighten with a wrench.
4
Page 5

Assembling the Front Bezel
To assemble the front bezel, perform the following steps:
1. Install the concealed pull (11), to the front bezel (1) by using the two plastic screws and caps (supplied with
the pull).
2. Fasten the bezel to the system shelf (2) by using keps nuts (22) and tighten with a socket wrench.
3. Extend the slides all the way out of the cabinet. Use the six sems screws with external tooth lock washers
(36) and tighten three screws on each side of the shelf. The screws go through the slides and into the shelf.
Installing the Server Unit
To install the server unit into the cabinet, refer to Figure 3 and perform the following steps:
Figure 3 Placing the Chassis in the Rack
12
16
17
20
2
1
11
22
9
26
35
34
16
17
3
13
10
15
8
15
14
36
MLO-011566
Caution
The server unit weighs 70 pounds. Please use the proper number of personnel to move the unit.
1. Pull the shelf out of the cabinet.
2. Put the server unit in the cabinet shelf.
3. Slide the server unit forward. Install the locking bracket (3) in the middle rear of the shelf with two 8-32
screws (16) and two flat washers (17). Two metric screws (12) go through the bracket and into the back of the
server assembly.
4. Ten cable clamps (20) are available for 10 additional holes that house cables. Place the hole of the cable
clamp over the assembly hole and secure with the screw and washer (16 and 17).
5
Page 6

Installing the Interlock Actuator Latches
If additional products are installed into the cabinet, actuator latches for those products should be installed. To
install actuator latches, refer to Figure 4 and proceed as follows:
Note
Part numbers (40), (41), and (42) are not part of this kit, rather they are part of the H9A10 cabinet.
1. Remove the screws securing the bottom mounting bracket to the cabinet (41).
2. Slide the mounting bracket off the bottom of the vertical bar (40).
3. Slide the stabilizer bracket (29) for the new product onto the bottom of the vertical bar.
4. Slide the actuator latch (30) for the new product onto the bottom of the vertical bar.
5. Replace the bottom mounting bracket (41) and install the screws removed in step 1 but do not tighten them.
6. Position the stabilizer bracket so that the bottom hole in the stabilizer bracket (42) aligns with the RETMA
rail hole adjacent to the bottom of the installed product. This may require the loosening and sliding of other
latches and stabilizer brackets to accommodate the new configuration.
7. Place the nut plate (31) behind the RETMA rail and install and tighten the two 10-32 truss-head screws (33)
provided to secure the stabilizer bracket.
8. Position the new actuator latch (30) to properly engage the interlock actuator (9), and tighten the two 6-32 set
screws (32) to secure the latch.
9. Now tighten the screws to secure the bottom mounting bracket (41).
The expanded view (A) shows the position of the actuator latches when all systems are pushed into the cabinet.
The expanded view (B) shows the position of all actuator latches after one system has been pulled out.
Note
The interlock system is compatible with the AlphaServer 1000, AlphaServer 1000A, and AlphaStation 600 RM
series systems. Other systems may not be compatible because the interlock actuator may not engage properly. In
these cases, do not install the interlock actuator on those systems.
WARNING
If a system is installed without an interlock actuator or the vertical bar in the cabinet does not engage
properly with the interlock actuator, it is the customer's responsibility to provide a stable cabinet.
6
Page 7

Figure 4 The Interlock System
A
29
42
9
30
40
B
40
41
MLO-013167
Installing a Shipping Bracket
To lock the shelf into place for shipping or moving, perform these steps:
1. Face the rear of the cabinet and place the wide end of the shipping bracket (8) to the left over two holes on
the left side of the shelf.
2. Tighten two truss head screws (15) on the side holes and tighten another truss head screw (15) to hold the
shelf to the back of the rail.
7
Page 8

Help
 Loading...