

Page 1

USB 2.0 Intraoral Camera
Camera
Installer
Manual
MA0023 REV C
Digital Doc LLC
Powered by
lly
Congratulations on your
purchase of the IRIS camera.
This manual will guide you
step by step through
the installation and setup
of your new camera.
Page 2

Table of Contents
1. Safety Instructions
2. Cautions
3. Important Safeguards
4. System Requirements / Compatible Software
5. START HERE Installing the Iris Camera Driver
6. Installer Setup 1
7. Installer Setup 2
8. Installer Setup 3
9. Installer Setup Finish
10. Connecting the Camera
11. Connecting the Camera 2
12. The Iris Handpiece functions and Mirror
13. The Iris Handpiece Focus and Camera Controls
14. The Iris Handpiece Sheaths
15. Iris camera Accessories
16. Trouble Shooting
17. Warranty, Tech Support & Repair Procedures
Page 3
Safety Instructions
This symbol alerts the user that important literature concerning the
operations and maintenance of this unit have been included. Therefore, it
!
should be read carefully in order to avoid any problems.
TO REDUCE THE RISK OF ELECTRIC SHOCK, DO NOT
REMOVE COVER. NO USER-SERVICEABLE PARTS
INSIDE. REFER MAINTENANCE TO QUALIFIED SERVICE
TO PREVENT FIRE OR ELECTRICAL SHOCK,
DO NOT EXPOSE THIS DEVICE TO EXCESSIVE
THIS DEVICE IS NOT SUITABLE FOR USE IN THE
PRESENCE OF A FLAMMABLE ANESTHETIC MIXTURE
WITH AIR OR WITH OXYGEN OR NITROUS OXIDE
ATMOSPHERIC PRESSURE RANGE: 700-1060 hPa
CAUTION
PERSONNEL
WARNING
MOISTURE
WARNING
Type BF
Equipment
CAUTION
CHANGES OR MODIFICATIONS NOT EXPRESSLY APPROVED
BY THE MANUFACTURER COULD VOID THE WARRANTY
MODE OF OPERATION: CONTINUOUS OPERATION ALTHOUGH THE
UNIT WILL GO INTO STANDBY AFTER 20 MIN. OF NON-USE
ENVIRONMENTAL OPERATING SPECIFICATIONS
Temperature Range
Operating: 10 C to 40 C (50 F to 104 F)
Storage: -40 C to 70 C (-40 F to 158 F)
Relative Humidity
Operating: 30% to 75% (non-condensing)
Storage: 10% to 100% (non-condensing)
WATER INGRESS
PROTECTION:
ORDINARY EQUIPMENT
1
Page 4

Cautions
Federal law restricts this device to sale by or on the order of a
Licensed Dental practitioner.
Cautions on Safety
Be careful not to damage the USB cable. Be sure to hold the plug when
disconnecting the cable.
Do not place a container with water or liquid, or any small metallic objects on
this unit. If water, liquid, or any metallic object enters this unit, disconnect the USB cable
immediately and contact Digital Doc.
If smoke, abnormal sound or smell occurs, disconnect the USB cable and contact
Digital Doc.
When the unit is not in use for a long time, disconnect the USB cable.
Do not apply impacts to this unit
Cautions on Installation
It is required that this device is plugged into a computer that complies with
IEC60601. Medical grade computer.
Do not install this unit in a poorly ventilated place, a dusty place, an unstable place,
or where soot or steam occurs.
Do not use this unit in high temperatures (higher than 40 degrees C) or at
temperatures ( lower than 0 degrees C)
Do not use in surgical theaters in hospitals where safety requirements are different
from a standard dental clinic.
It is recommended the unit be turned OFF after 10 Minutes of use to prevent increase of
temperature at L.E.D. head.
Cautions on Cleaning
Disconnect the USB cable before cleaning.
Do not wipe the surface using benzene, Dicide, thinner, or gluderaldihyde. As this may
degrade the lens, or damage the handpiece material.
Lightly wipe off dirt on the cover and or lens with a soft cloth (i.e. flannel, 2x2, etc.)
2
Page 5

Important Safeguards
Installation
Read and follow Instructions- All of the safety and operating instructions
should be read before the intraoral camera is operated. Follow operating
and usage instructions.
Retain instructions - The safety and operating instructions should be retained
for future reference
Heed warnings - Comply with all warnings on the camera and in the
operating instructions
This camera should be operated only from the type of power source indicated.
USB 2.0
Attachments - Do not use attachments unless recommended by the camera
manufacturer.
Do not use this camera near water.
CAUTION
MAINTAIN ELECTRICAL SAFETY. POWER LINE OPERATED
EQUIPMENT OR ACCESSORIES CONNECTED TO THIS UNIT
SHOULD NOT HAVE BEEN MODIFIED SO AS TO DEFEAT
THE SAFETY FEATURES. THIS WILL HELP TO AVOID ANY
POTENTIAL HAZARD FROM ELECTRICAL SHOCK OR FIRE.
IF IN DOUBT, CONTACT QUALIFIED SERVICE PERSONNEL.
3
Page 6

System Requirements and Software
Compatibility
Computer system requirements
Refer to the minimum requirements of your imaging software
2
Ghz Pentium 4 processor
1 GB of RAM minimum 2 GB or above recommended
USB 2.0 interface with high power port
CD-ROM or DVD drive
Imaging Software
Internet connectivity recommended
Windows XP Professional or above with a minimum of Service Pack 2
IRIS Compatible Imaging Software
AbelDent
Adstra
Aptery
Cadi
Capture-Link
CIEOS
Cleardent
DBS Win
Dental Vision
DentiMax
Dentrix Image 4.5
Dent-X Pro Image
Dexis
Dimaxis Pro
Dolphin
Eaglesoft
Easy Image
Genesis
Image FX
Image XL
Image DDS
Kodak Digital Imaging
Mogo
OMS Vision
Patient Gallery
Patterson Imaging
Romexis
Schick CDR
Sidexis
TDO
VixWin Platinum
VixWin Pro
Tiger View
Tracker
Visora
XDR Digital Radiography
Visix
4
OEM Versions of Apteryx
CliniView
Dentimax
Image DDS
Lightyear
One View
SUNI Medical Imaging
XL Dent
X-Ray Vision
Page 7
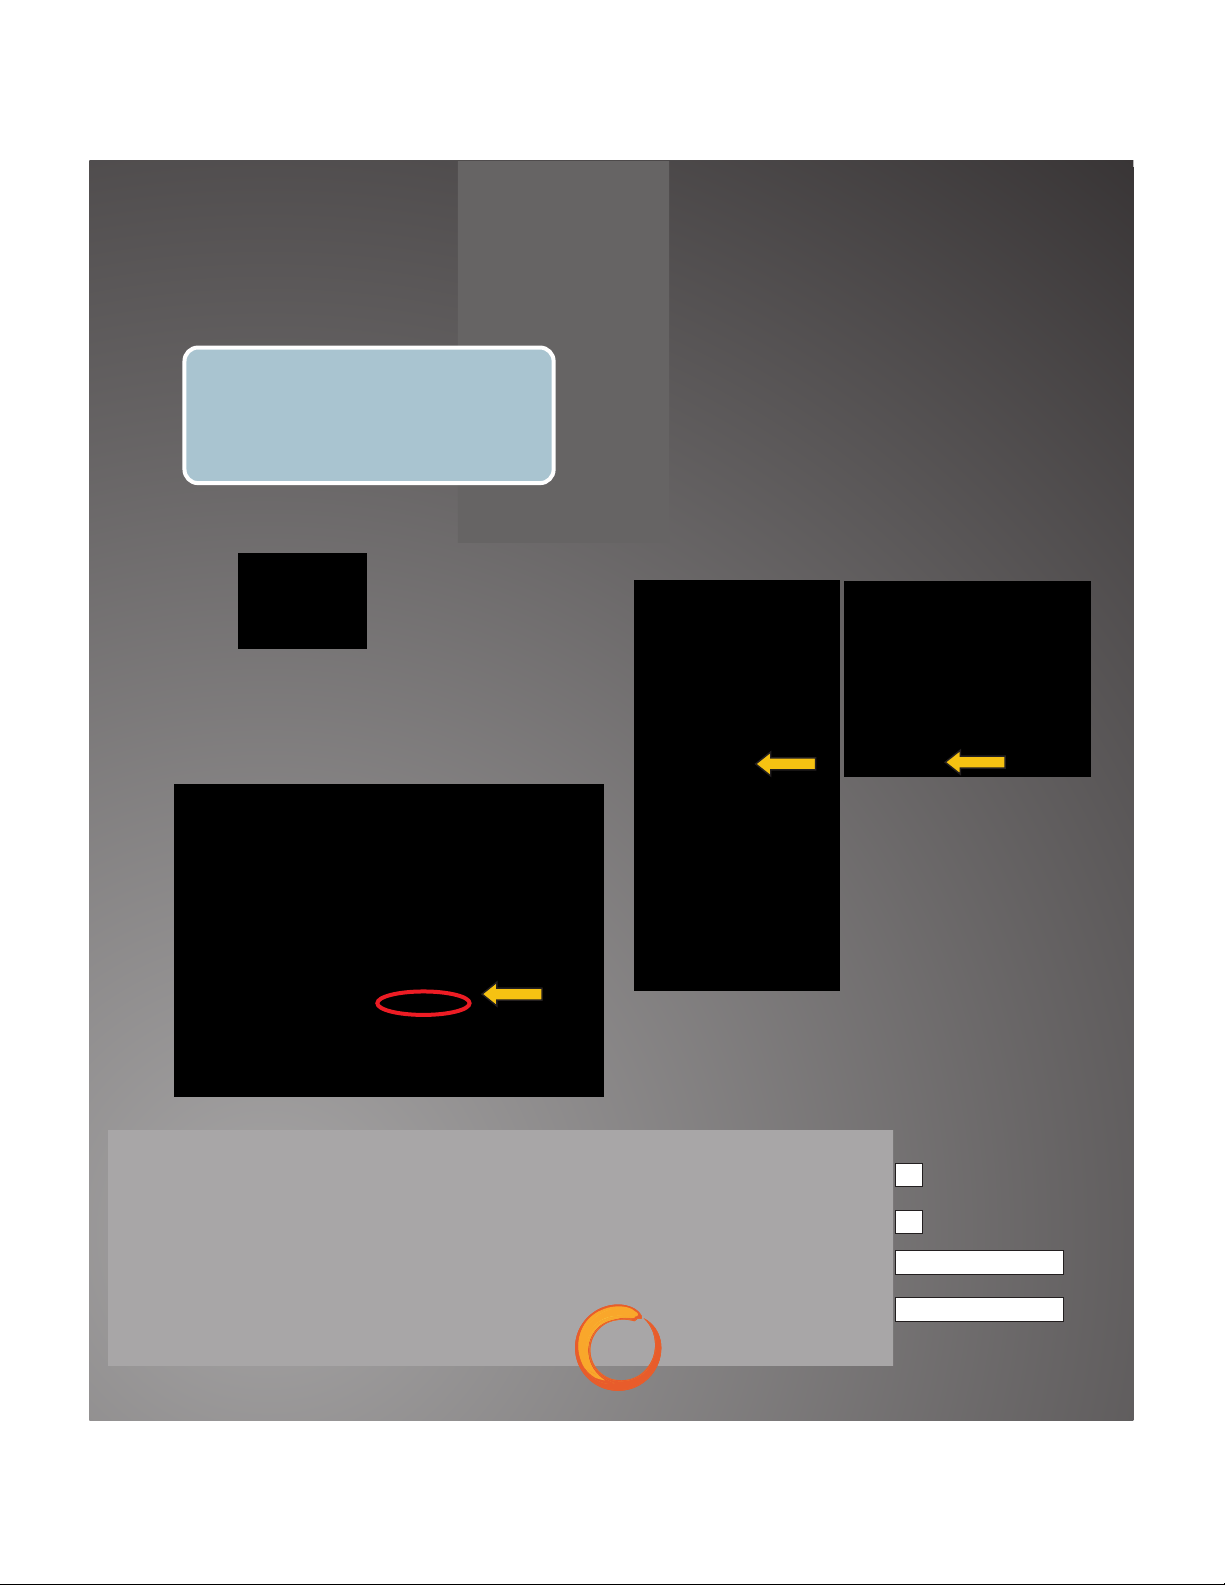
Installing the IRIS
START HERE
Step 1: The first step in the
installation is to determine if you
are using a 32 or 64bit operating
system.
Select Start from the left or top
1
of your task bar.
3
Computer information
Camera Driver
RIGHT click on Computer
2
and select Properties
This page will show either 32-bit or 64-bit
under system type.
You will also find system requirement
information on this page for available
RAM and processor type as well as speed.
This information will be used to confirm system requirements.
5
Record your operating system,
4
processor type, and RAM
below for use in future steps
32-bit
64-bit
Processor type
RAM
Page 8
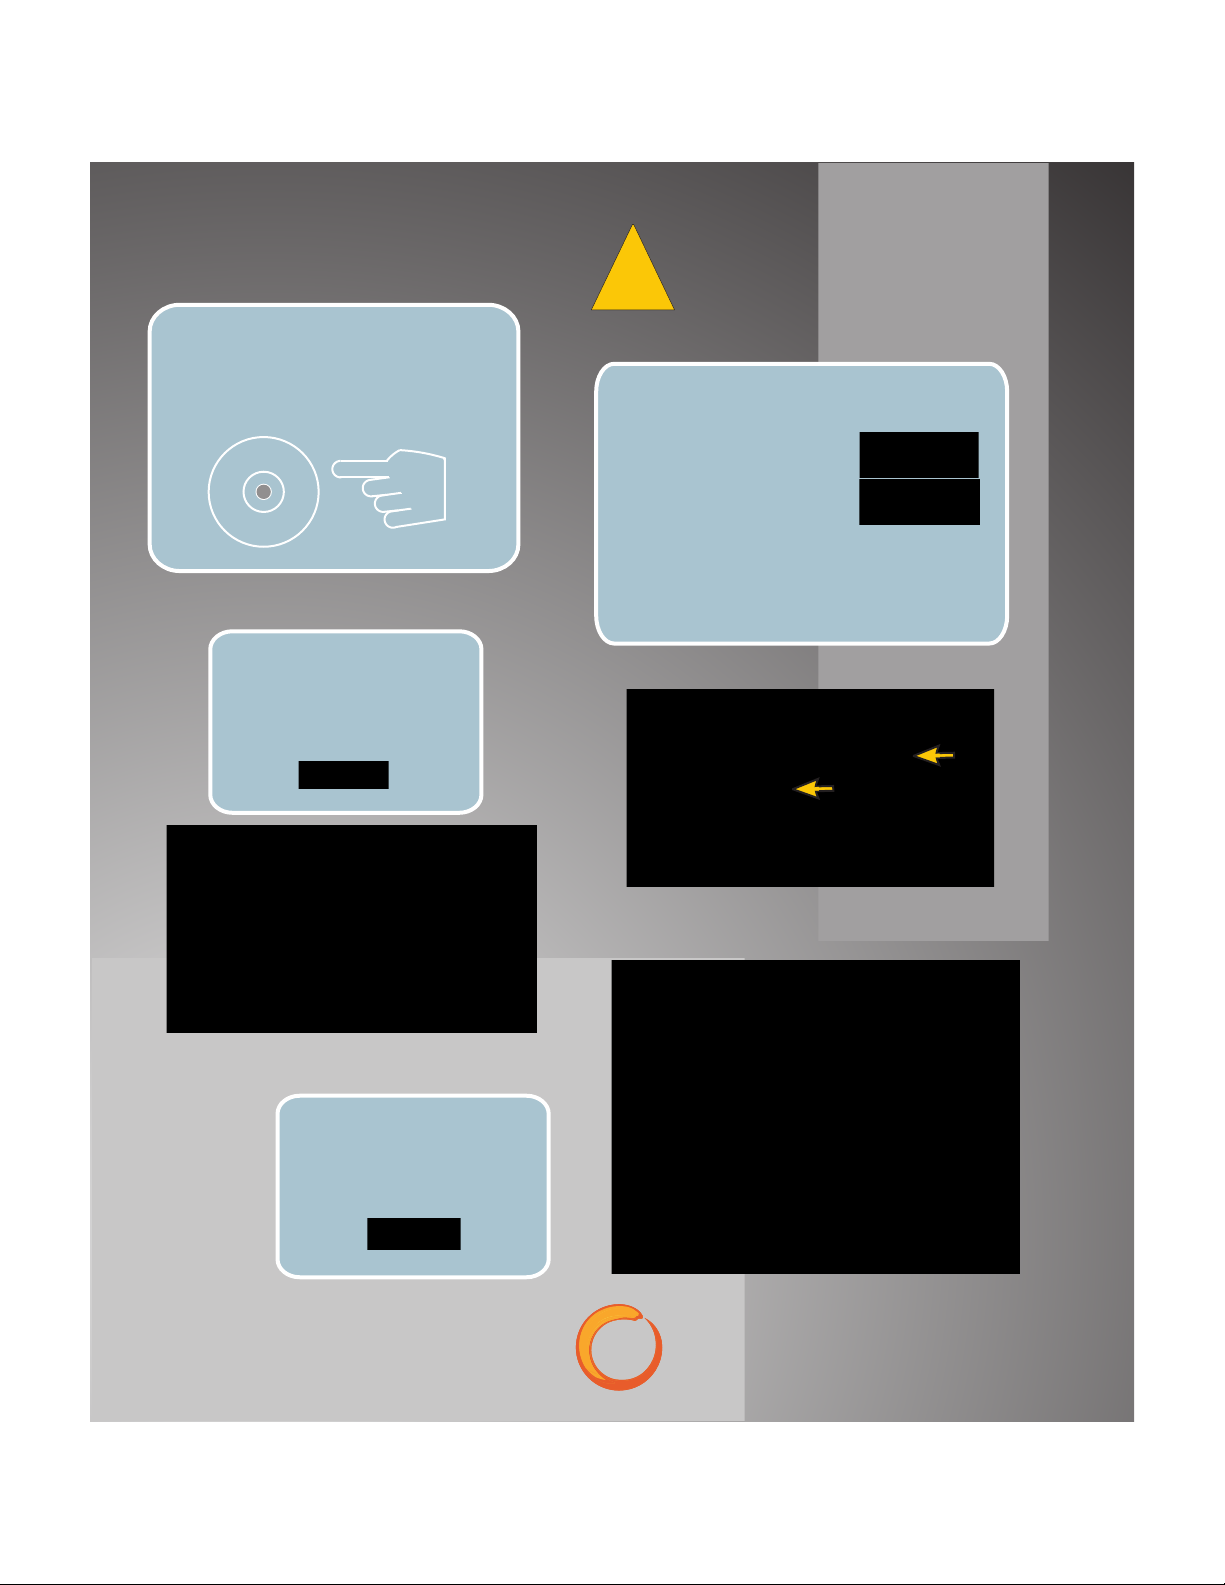
Installer Setup 1
DO NOT connect the camera
until you have completed
!
the driver installation
Step 2: Insert the driver disc from
the side panel of this manual
into your CD drive.
Step 4:
If the User Account
Control screen appears
choose
Step 3: Browse to your CD
ROM drive and Choose either the
32-bit (X86)
or
64-bit (X64)
driver file and double click to open.
Refer to the previous page if you
do not know the version of your
operating system.
32-bit
64-bit
Step 5:
Choose Next from the
welcome screen
6
Page 9
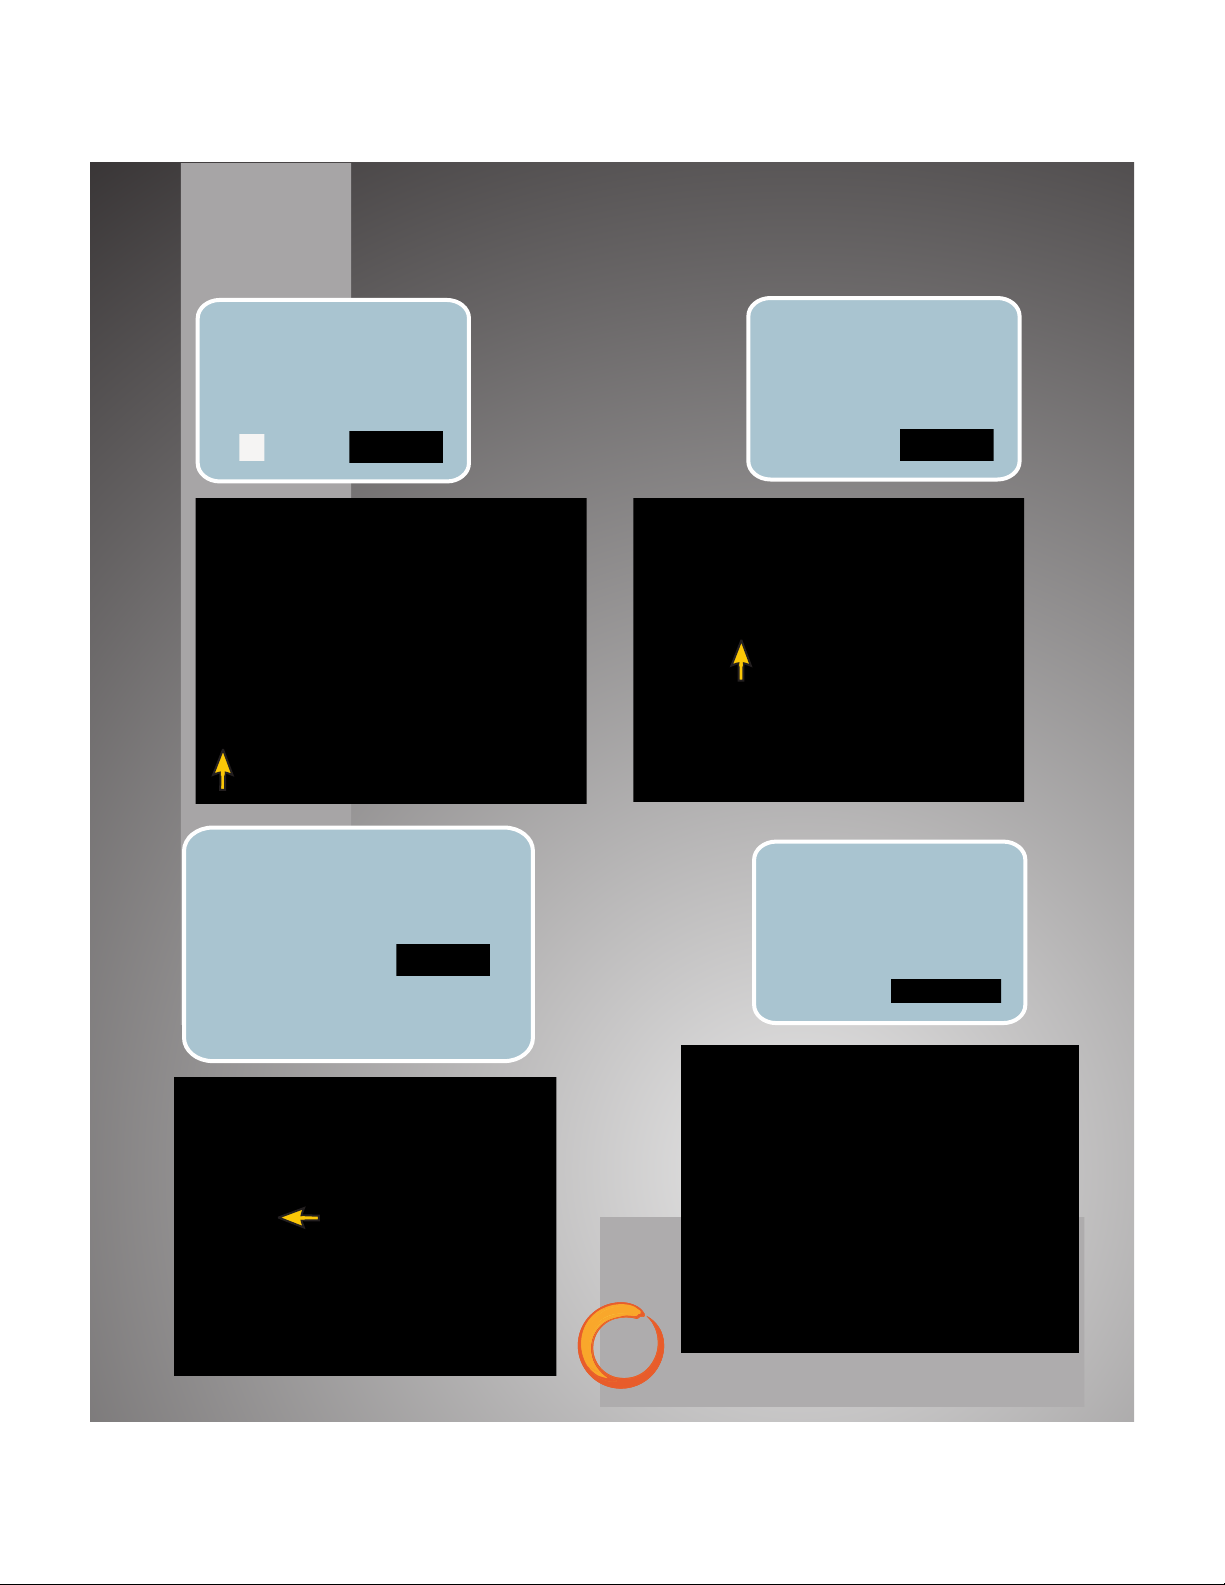
Installer Setup 2
Step 6:
Accept the terms in the
License Agreement
and then choose Next
Step 8:
Select the Software you will be
using to view images from the
camera and then choose next.
Step 7:
Confirm the location to
install the driver
and then choose Next
Only change this location if you
are an advanced user
Step 9:
Choose Install after
confirming your Software
selection
If your Software is not listed
please contact Digital Doc
1.800.518.1102
Select your
Software here
7
Page 10
Installer Setup 3
!
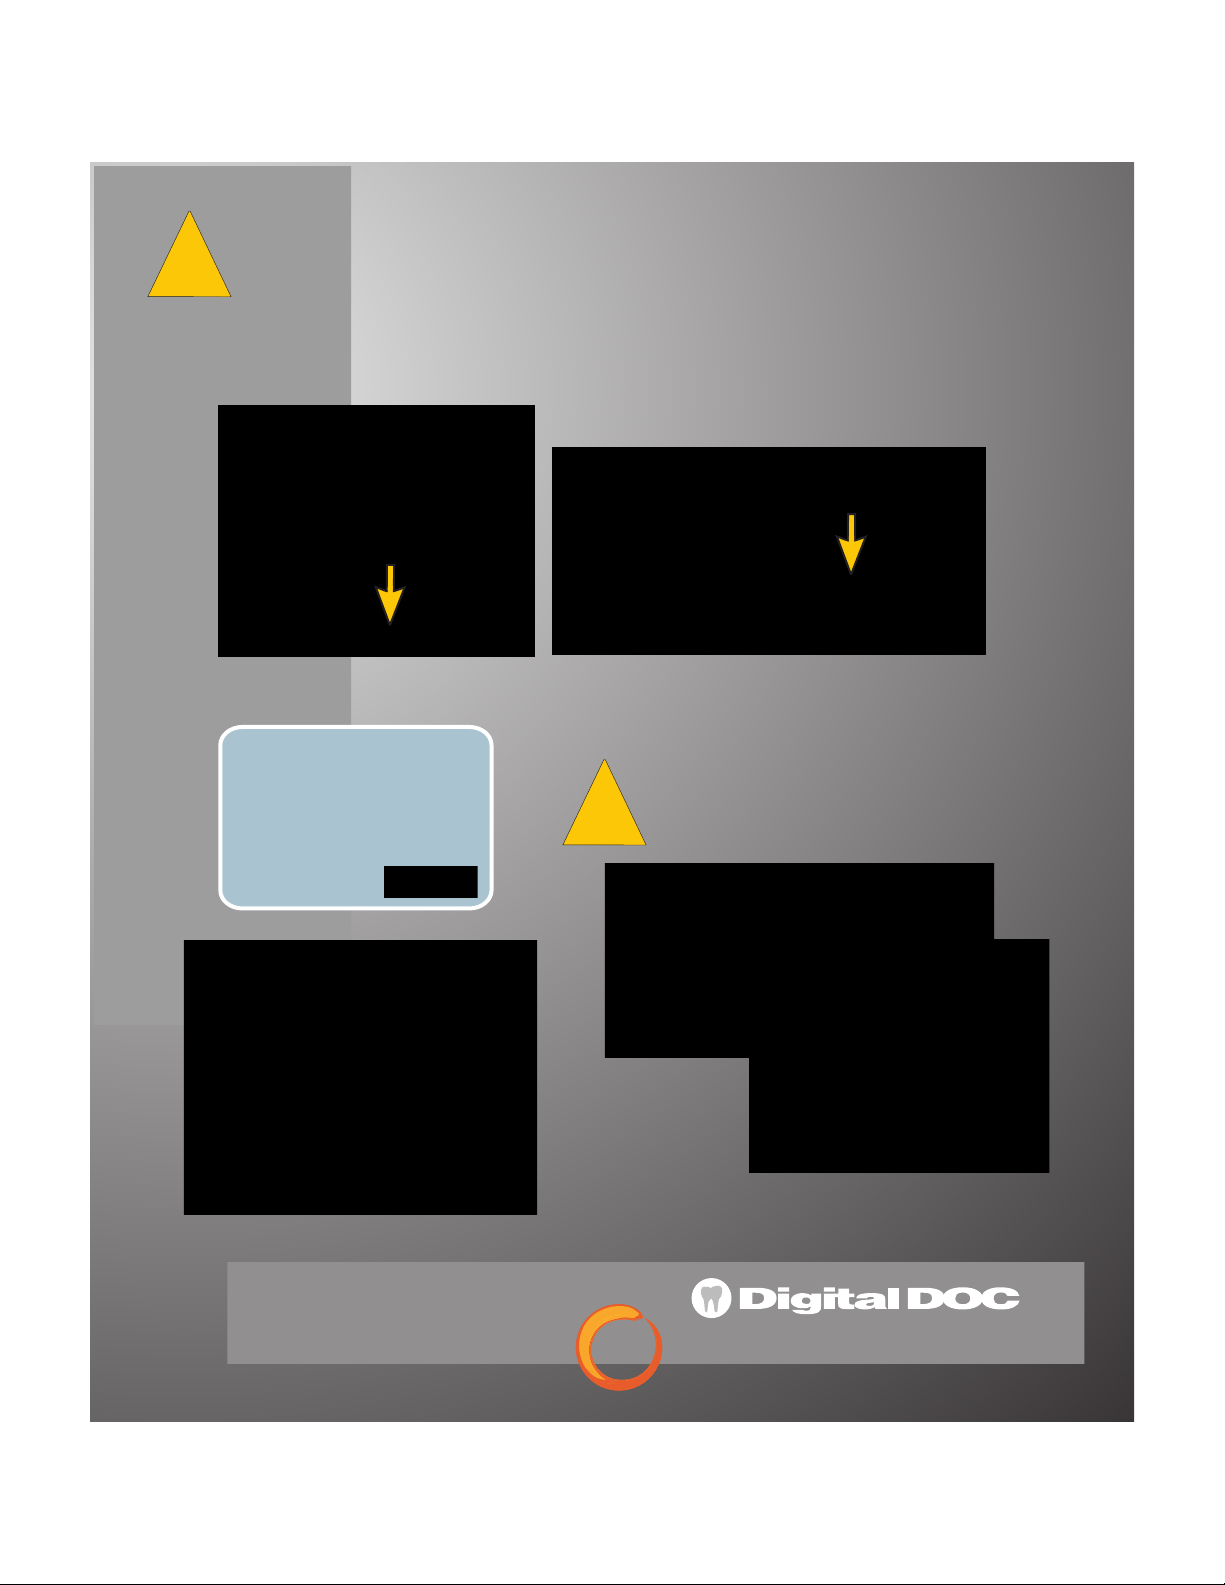
If at any point during the installation a “Windows Security” prompt
appears, select Continue Anyway (Win XP) or Install (Win 7)
Step 10:
Choose Next once the
Status bar has filled
and the drivers have
transferred
DO NOT close any command / DOS
!
screens during the installation
8
1.800.518.1102
Page 11
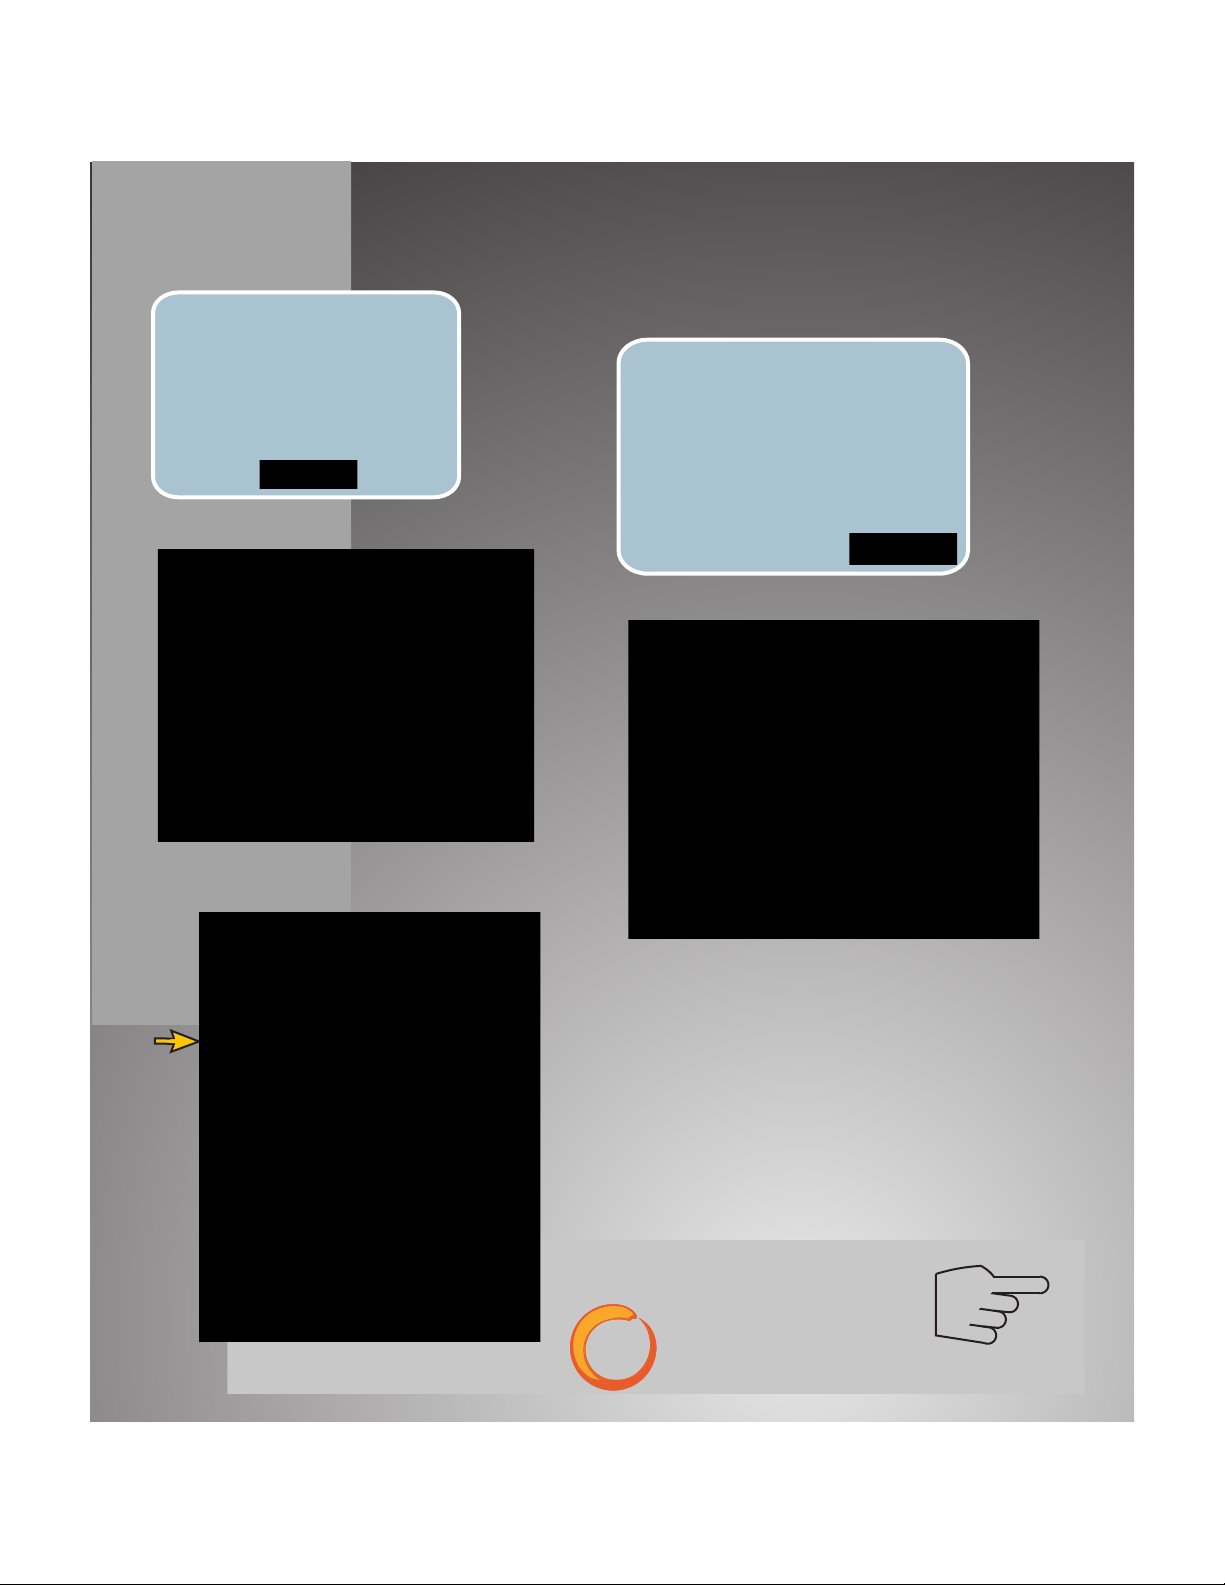
Step 11:
Upon completion of the
installation, your camera is
now ready to connect to the
computer
Choose OK
Installer Setup
Finish
Step 12:
With the drivers now loaded
select the “View Readme”
box to be directed to the
Digital Doc website for setup
instructions on your specific
software
Along with the camera driver package you will now
have a file under All Programs called Digital Doc.
This file contains utilities for testing the camera as
well as refresh and restart services.
9
Continue
Page 12
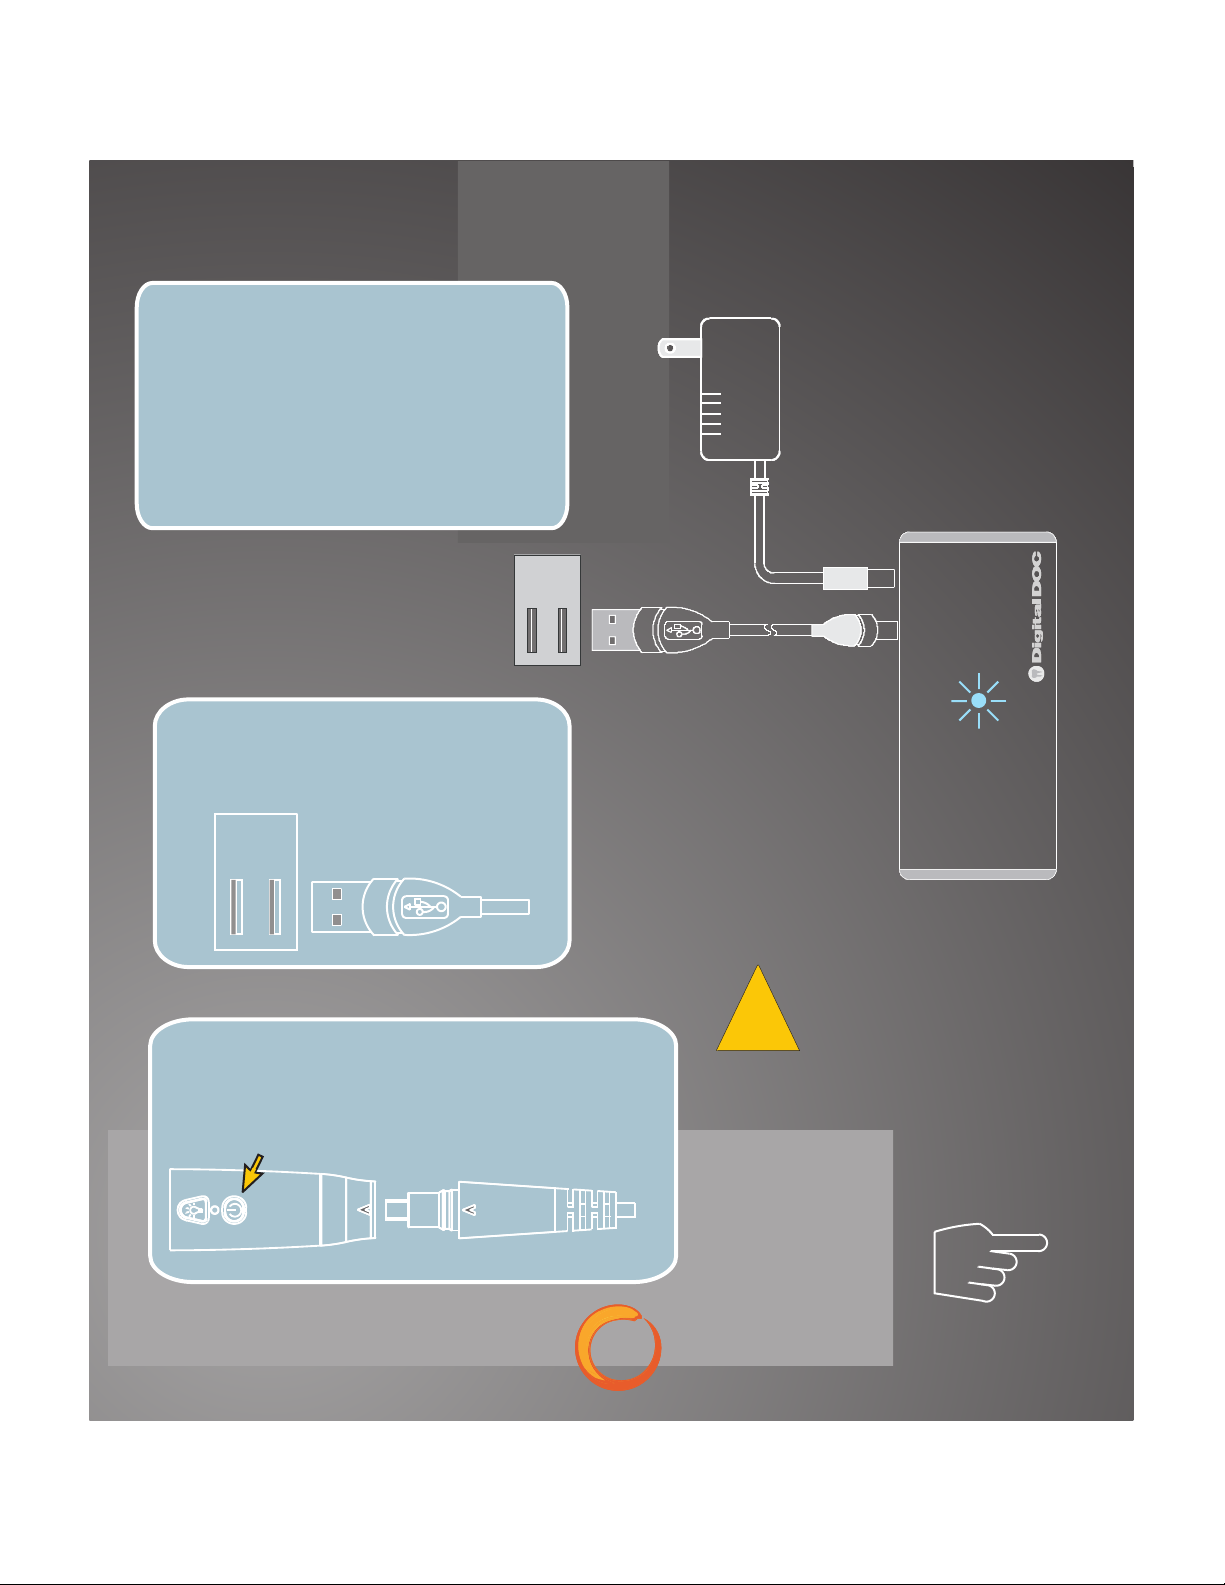
Step 1:
Connect the included 4 port powered
hub to an available USB 2.0 port
on the computer.
Next connect the hub power supply from
the hub to wall power. When the
power to the Hub is connected
correctly the blue indicator light will be
illuminated
Step 2 :
Plug the camera cable
into an available USB 2.0 port
on the powered hub
PC USB
2.0 ports
Connecting the Camera
Powered Hub connection
to wall outlet
Digital Doc 4 port
Powered Hub
USB 2.0 port
on computer
Computer to Hub
USB cable
Blue power
indicator
Step 3 :
Plug the camera cable into the IRIS handpiece.
When attached, the camera status light will blink
green. To turn the camera on press the power
button.
10
Please note that with
Windows XP installs
the camera drivers are
port specific. If the
!
camera is moved
from one port to another
on either the computer or
hub you will have to run
the “refresh driver” utility
from the Digital Doc program.
Continue
Page 13

Connecting the Camera 2
When connecting the camera to Windows XP
machines for the first time, some users will
see the “New Found Hardware Wizard”. If
!
this occurs please follow the steps below.
Step 4:
From the dialog box
choose
No, not this time
then Next
Step 7:
If the Windows
security box appears
Step 6:
Select Next
after the Hardware
Wizard discovers
the Digital Doc IRIS
Driver
choose
Continue Anyway
Step 8:
When the installation
is complete choose
Step 5:
From the second
screen choose
Install Automatically
then Next
Finish
!
11
It is recommended that upon completion
of this step you refresh the driver by
choosing. START - ALL PROGRAMS DIGITAL DOC - UTILITIES - REFRESH
DRIVERS
Page 14
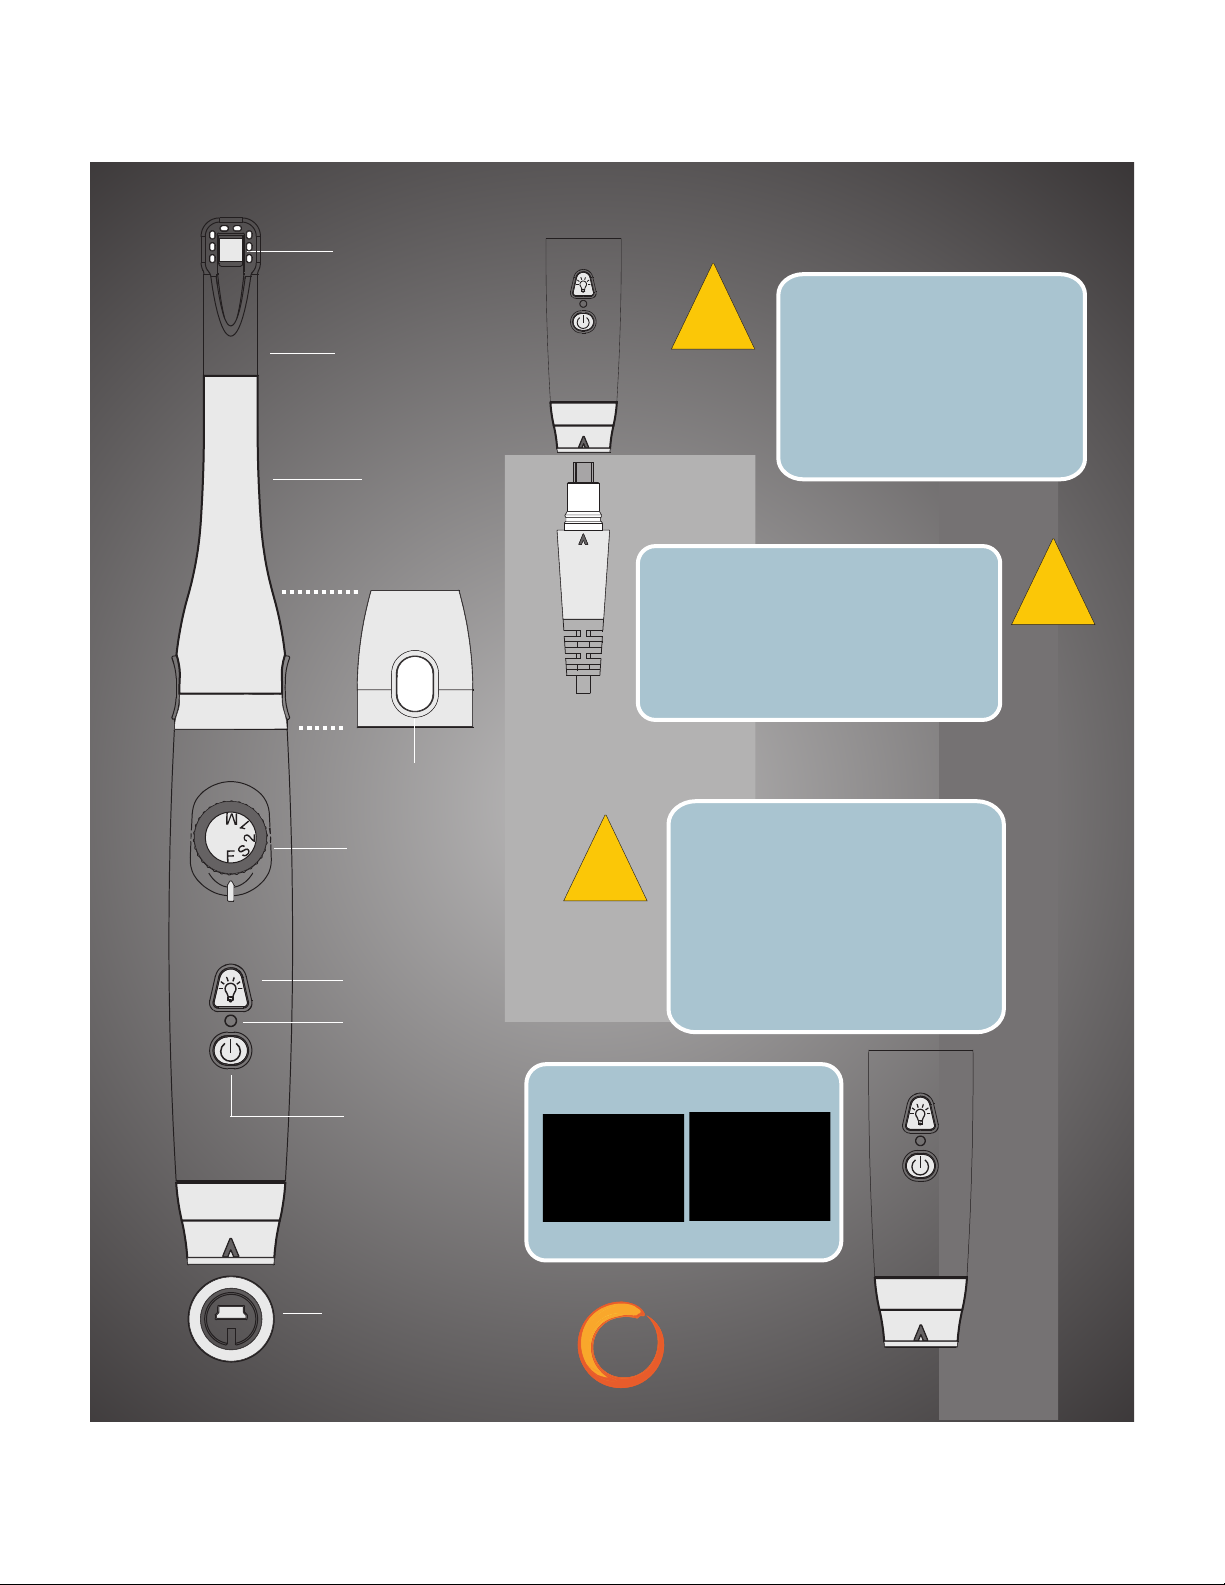
(8) True Spectrum
L.E.D.’s and
glass prism
Soft Acrylic Tip
Stainless Steel
front housing
The IRIS Handpiece
TheIRIS handpiece is NOT
!
The IRIS camera will
automatically shut off
after 10 Minutes, if the
camera is left idle.
submersible and should be
cleaned with an isopropyl
alcohol only. Do not use any
abrasive cleaners such as
Glutaraldehyde or Discide.
!
Dual Capture
Switches
Focus Wheel
Light On / Off
Switch
Camera status
indicator light
On / Off Power
Switch
Snap lock
Mini USB 2.0
Connector
Mirror / Anatomic Image
With the camera unplugged,
press and hold both the power
!
and light button. Plug the USB
cable into the camera, while
holding the buttons. The LED’s
will flash. Unplug the camera
and then plug it back in. The
image will now be flipped
Image
Image
12
Page 15
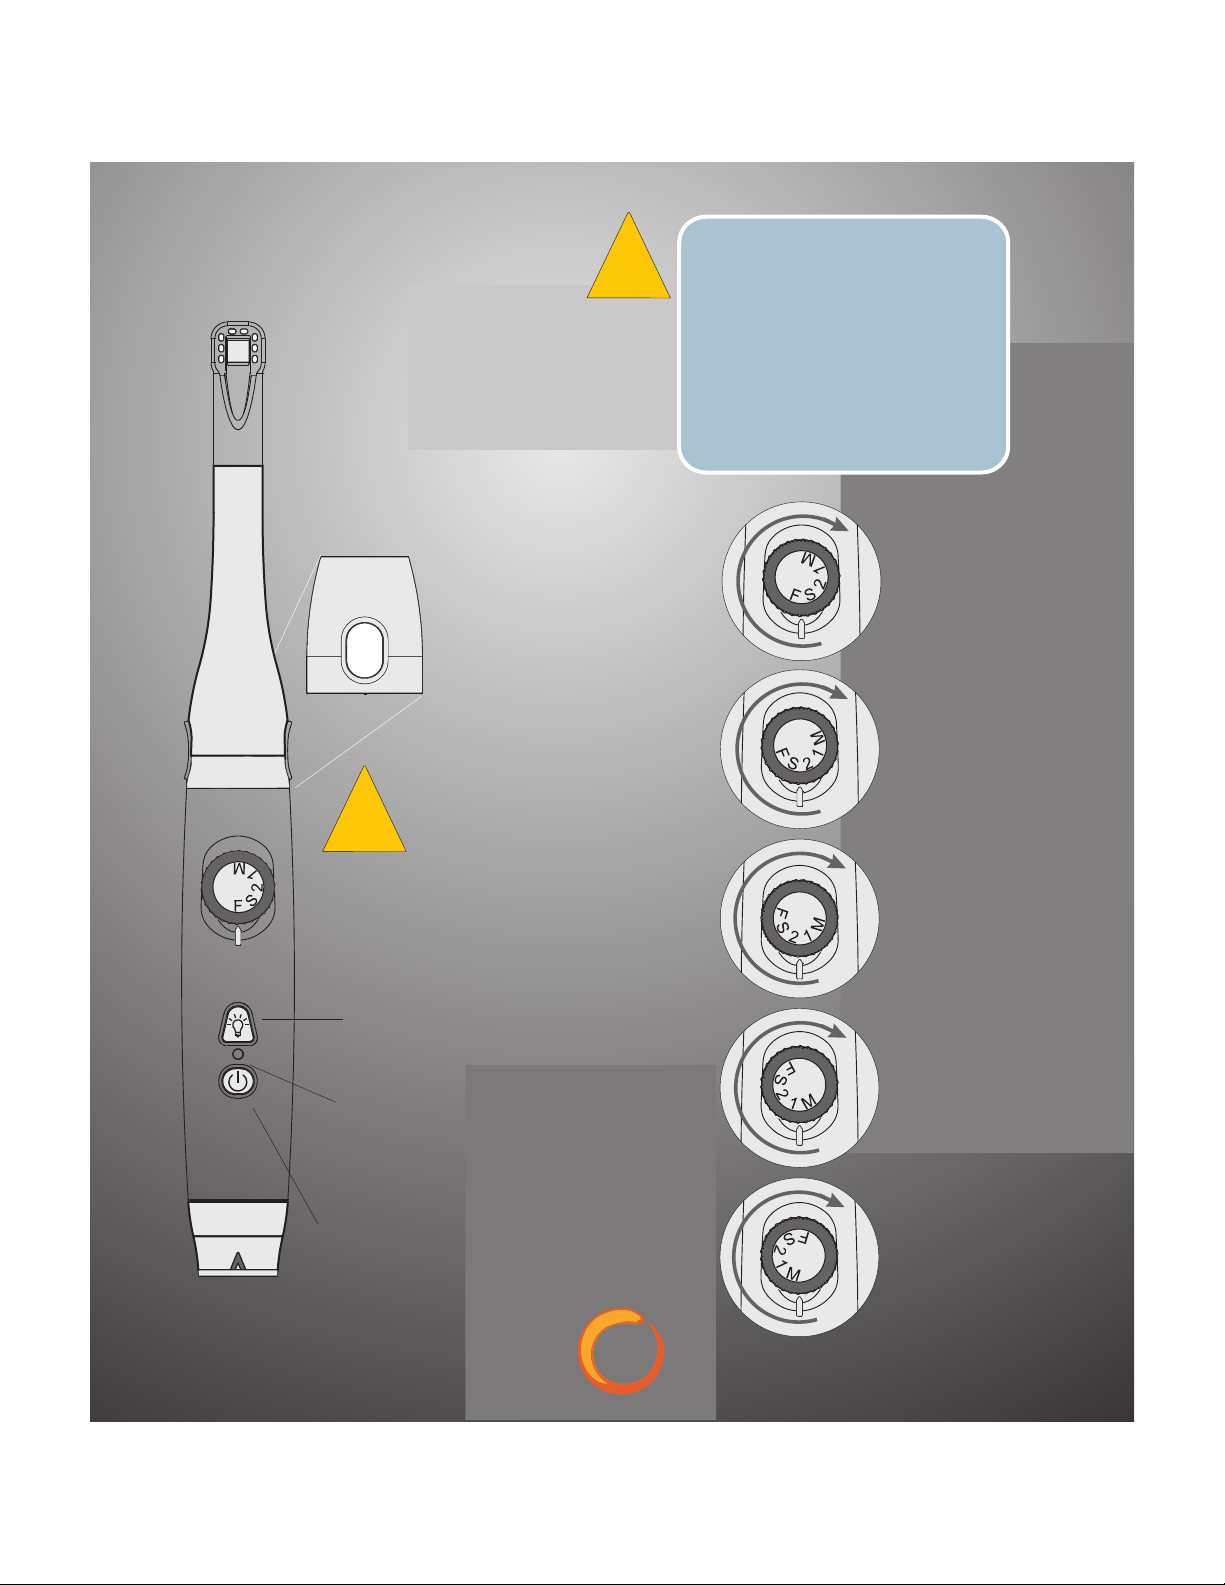
Focusing
and Camera
Controls
Please see the Practice
Software section of this
manual for capture
information.
!
It is normal for the handpiece
to be warm while in use.
Heat is a factor in any
electronic device, It is
recommended that
the IRIS camera be
turned OFF when not in use
and not exceed continued use
of more then 10Min.
Focus Positions
The Light ON / OFF feature
can be used to take images
!
Turns the lights
of the camera ON
and OFF
Blinking green shows
that the camera is in
standby mode
of X-rays that are back-lit
It is recommended that
the camera be turned
OFF when not in use
Position F
Full Face
Position S
Smile
Position 2
2 Surface
Position 1
1 Surface
Turns the camera
power ON and OFF
Position M
Macro
13
Page 16
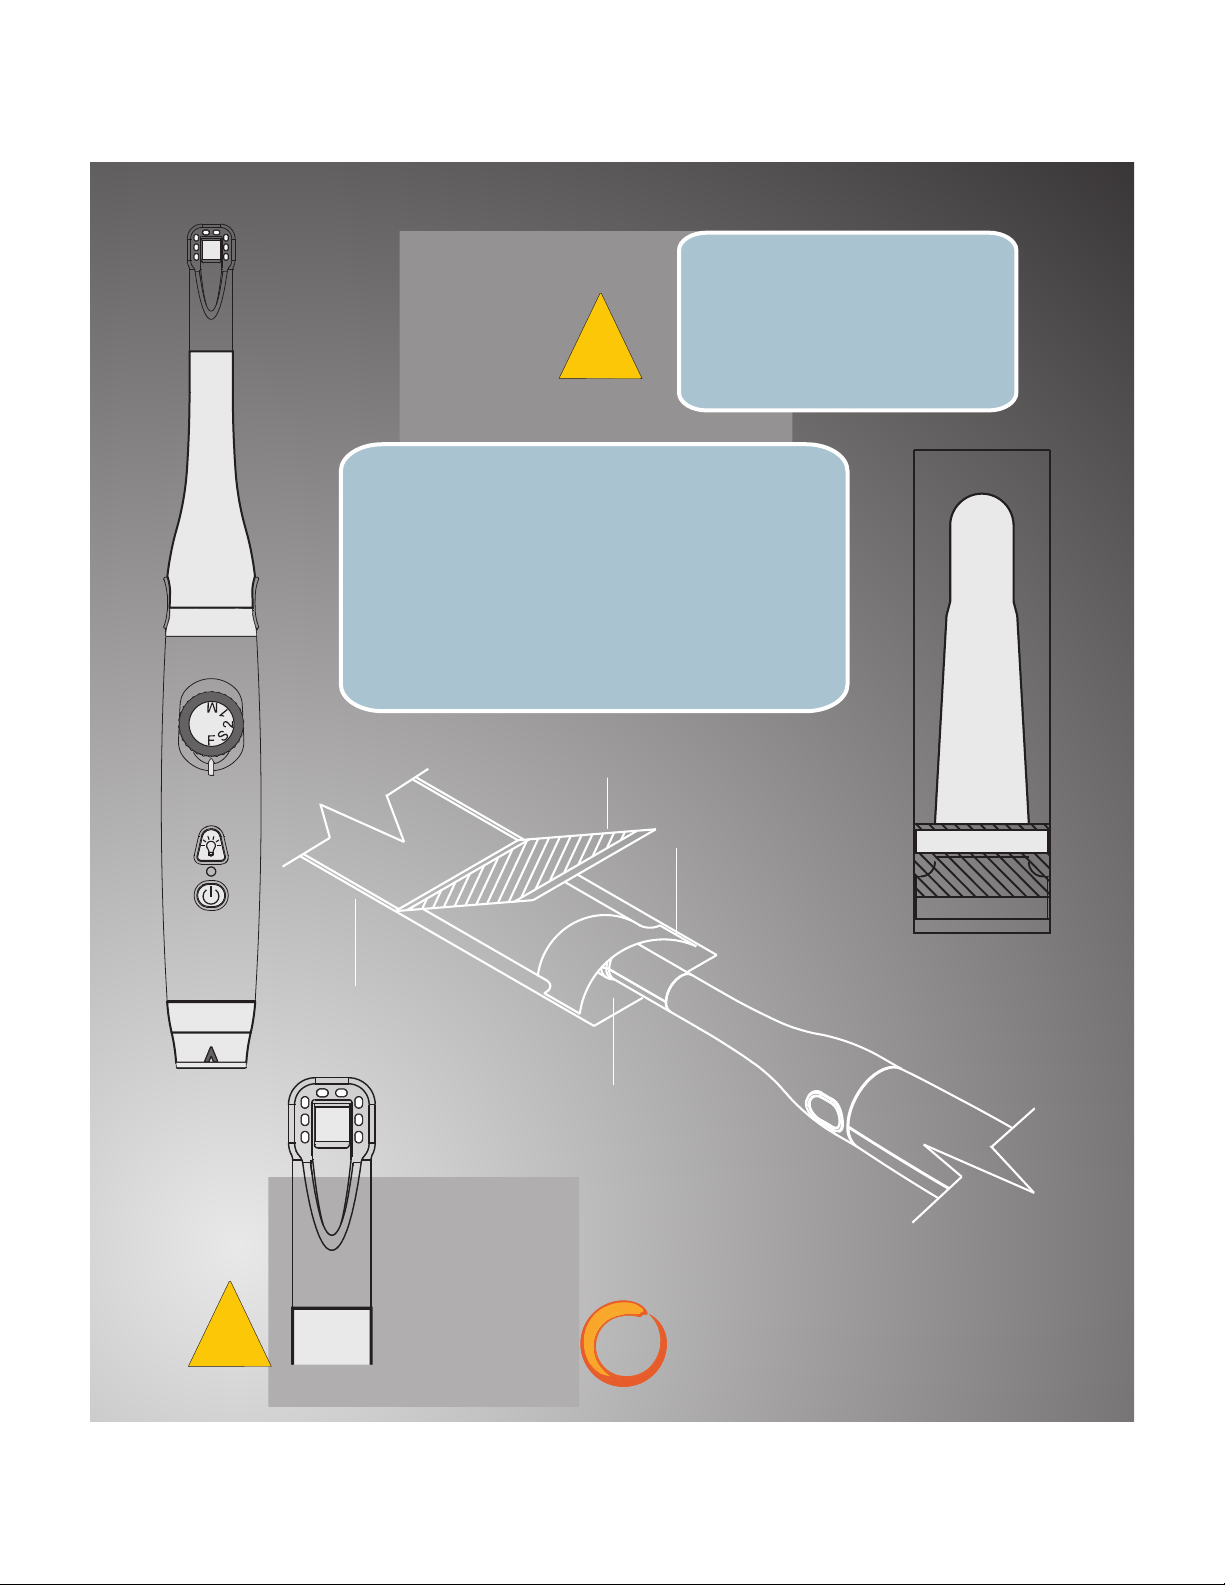
The
IRIS Sheaths
!
When applying the sheaths, slide the handpiece
with the LED’s facing down under the white
flap. Push the handpiece in until the end of the
sheath is taut, then peel away the top blue layer
and the bottom paper layer. It is recommended
that you use the bottom paper layer, or a gloved
hand to press the sheath against the lens for
approximately 3 seconds.
Blue top layer
The IRIS camera will come
with a sample pack of sheaths.
These sheaths are designed for
intra-oral use only.
White flap
!
Bottom paper layer
LED Direction
It is important that the
lens portion of the IRIS
camera not be cleaned
with any abrasive materials
and or chemicals
14
Page 17
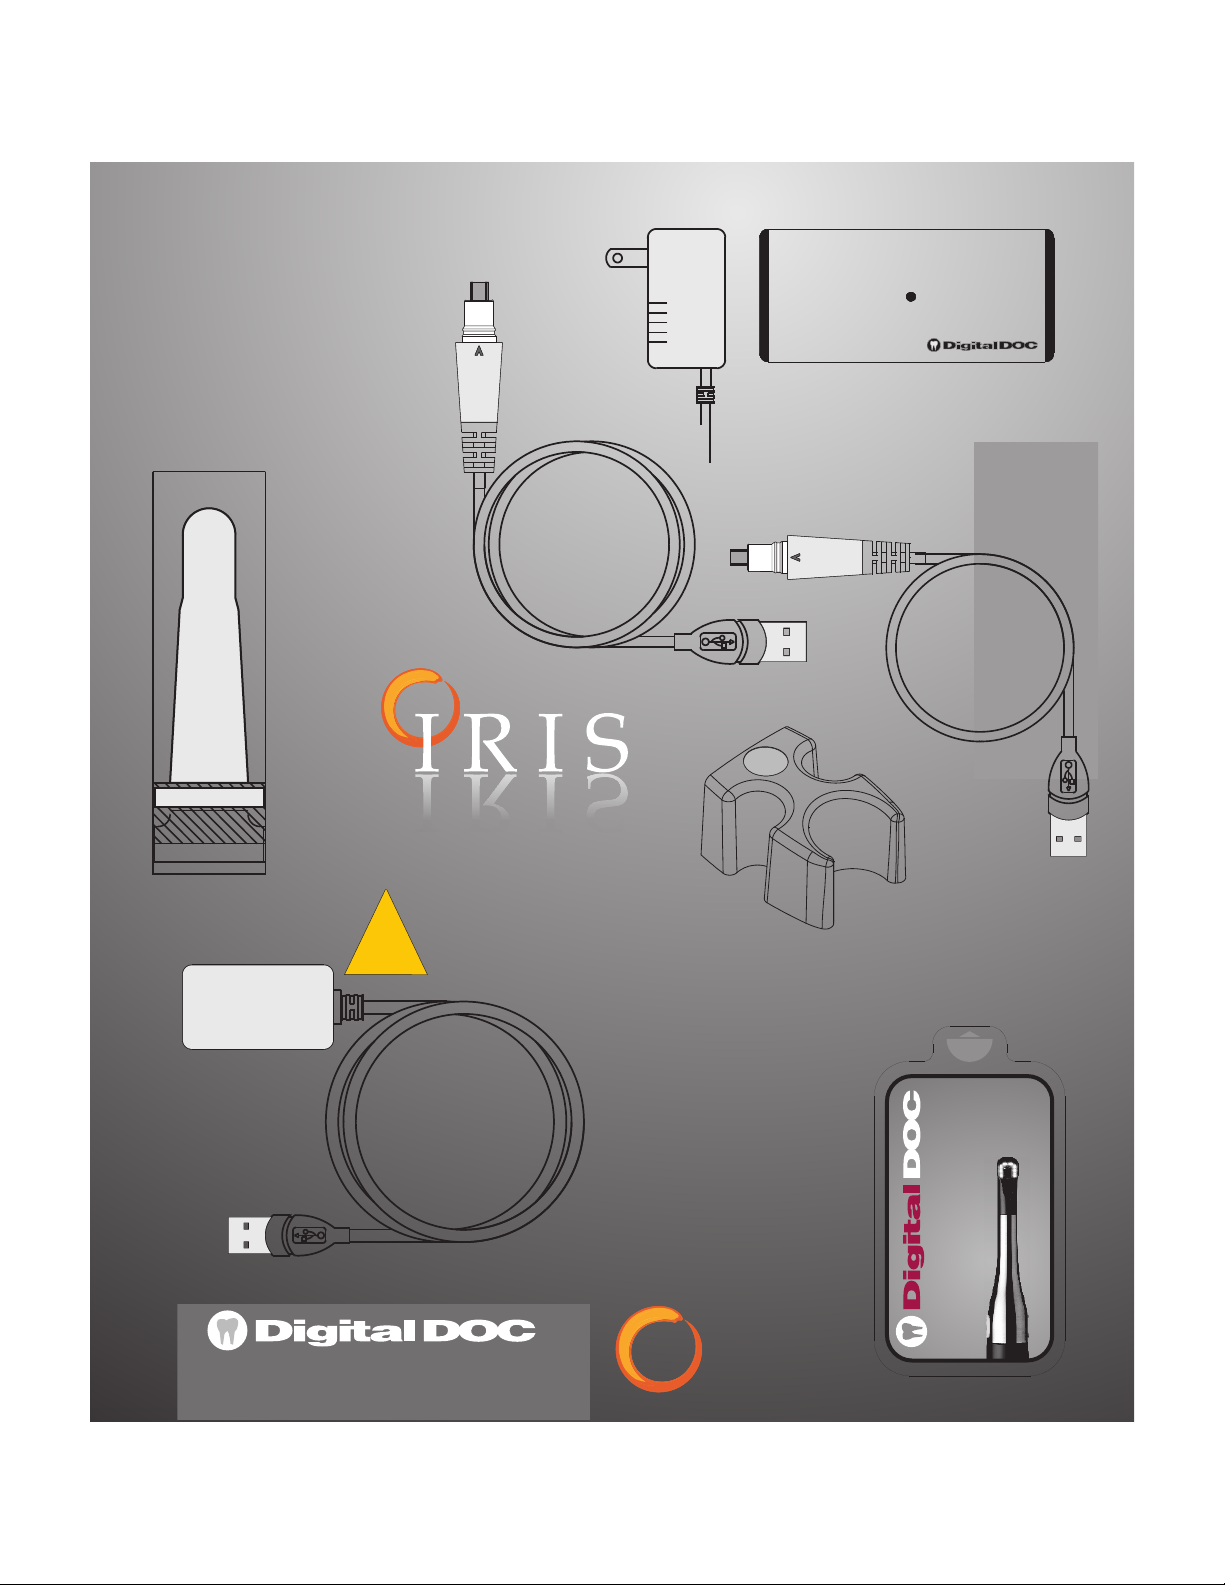
IRIS Camera
Accessories
Protective Sleeves
1 Box (500 units)
Part Number
SH0004
USB 2.0
Active
Repeater Cable
USB Cable
with adapter
15 Ft.
Part Number
CA0050
It is not recommended to
use more than 1 active
repeater in line
!
USB Extension
Repeater Cable
16 Ft.
Part Number
CA0047
USB 2.0
Powered Hub
Part Number
4011565
Handpiece Cradle
Part Number
AS0125
DigiWipe
Camera Cleaners
Part Number
SH0005
USB Cable
with adapter
6 Ft.
Part Number
CA0052-B
OPEN
Digi
wi es
p
1.800.518.1102
15
disinfectant
wipe
alcohol
for use with all
Digital Doc
camera
models.
Page 18
Note: Most issues that arise with video
and or capture are a result of drivers in the
wrong location or a camera that has been
moved to a new USB port. The steps
below will walk you through the
Driver Refresh program for recovery
of these systems. If your issue is not
resolved please contact Digital Doc
at 1.800.518.1102
Choose START, All Programs.
Select Digital Doc, Utilities.
Under Utilities select
Refresh Drivers.
Upon refreshing the drivers a
Command window will appear
and dismiss on it’s own.
Windows XP users will need
to select “Continue Anyway”
from the Windows Security
prompt.
2
3
!
Trouble Shooting
the IRIS Camera
1.800.518.1102
4
1
16
Page 19

Warranty, Tech Support
Digital Doc LLC agrees to guarantee parts and labor for each IRIS camera purchased by the
doctor for the term of two years from the date of purchase, when used in accordance with
manufacturer’s instructions. In the event a product is returned by the dealer, or the end user, and
the warranty has expired, Digital Doc LLC reserves the right to collect a reasonable fee from the
end user for services mutually agreed upon.
Digital Doc LLC does agree to replace any defective camera, free of charge, during the first
nintey (90) days from the date of purchase. After the first ninety (90) days, Digital Doc LLC, will
repair under warranty the defective item and pay the shipping to return the repaired item to the
customer. The customer will be responsible for shipping charges to Digital Doc. If the customer
elects to ship the product three-day economy, Digital Doc LLC, will return-ship in the same
manner. Further, if the customer elects to ship the product overnight, Digital Doc LLC will
reciprocate in the same manner.
Digital Doc LLC will require the end user to phone the Technical Service Department at
800.518.1102. Please have your camera serial number ready prior to contacting Technical
Support. Once the cause of the failure has been determined, Digital Doc LLC will issue a "Return
Merchandise Authorization" (RMA) number to be written clearly on the outside of the package in
which the item is shipped. Items shipped to Digital Doc LLC without the RMA written on the
outside of the package will be returned to the customer at their cost. No items will be received for
warranty or non-warranty work without the RMA number printed clearly on the package. All nonwarranty repairs will need a credit card, or some form of payment prior to the repair work being
authorized.
If your repair is deemed under warranty, Digital Doc LLC agrees to repair or replace the item, at
Digital Doc’s discretion. The item will then be shipped to the person, or persons whose name
appears on the shipping label. All non-warranty repairs will be billed at $135.00 (USD) per hour
plus parts. All refusals to authorize non-warranty work will be subject to a one-hour minimum
charge. Loaner units are not available.
Digital Doc provides Free
Technical Support
& Repair Procedures
at 1.800.518.1102
17
Page 20

Digital Doc LLC
4511 Golden Foothill Parkway, Suite # 1
El Dorado Hills, CA. 95762
1.800.518.1102
www.digi-doc.com
 Loading...