

Digital Devices Cine S2, Duo Flex S2, Cine C/T, Common Interface, Octopus Quick Installation Manual [en, de, ru, fr]
...Page 1
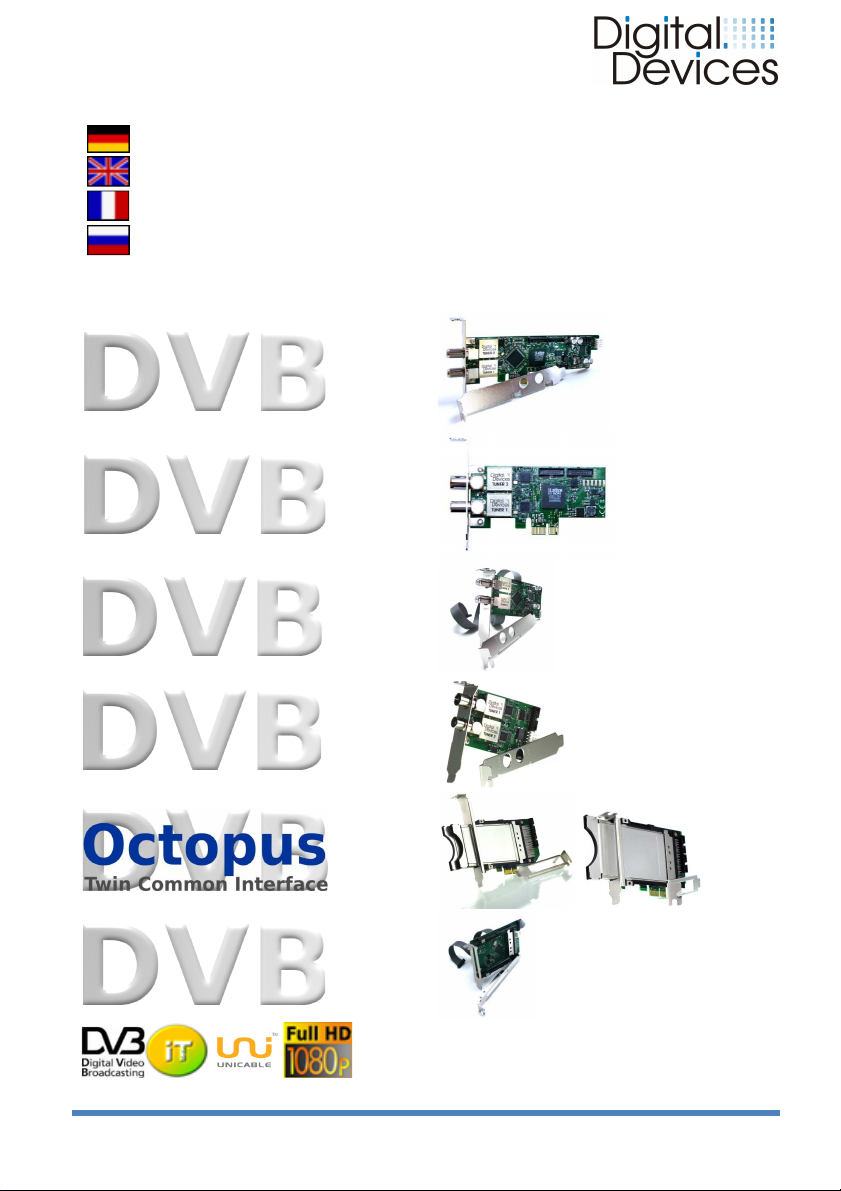
Cine S2
Cine C/T
Flex S2
Duo
Duo
CI
Schnell Installationsanleitung
Quick Installation Guide
Guide d'Installation Rapide
Краткое руководство по установке
(V2)
Common
Interface
Installationsanleitung 05/2012 Digital Devices GmbH® Seite 1 / 8
www.digital-devices.de
Page 2
DEUTSCH
1. Sicherheitshinweise
Auf der beiliegenden CD befindet sich eine umfangreiche
Installationsanleitung. Beachten Sie die Installationshinweise der
Bedienungsanleitung ihres PCs.
2. Betriebssicherheit
• Der Einbau der TV-Karte sollte nur von einem qualifizierten Techniker
oder einer Person mit entsprechenden Kenntnissen erfolgen.
• Vor dem Ein-, Aus- oder Umbau der TV-Karte entfernen Sie bitte alle
Stromkabel vom PC. Wird das Netzkabel nicht entfernt, kann es zur
Verletzung von Personen oder zur Beschädigung am Gerät führen.
• Diese TV-Karte ist zum Betrieb in einem PC bestimmt und wird über den
PCI Express Bus mit Spannung versorgt.
• Die Richtlinien für elektromagnetische Verträglichkeit (EMV) müssen
beim Anschluss der TV-Karte eingehalten werden.
• Führen Sie vor der Installation eine Datensicherung durch. Für
Datenverlust übernehmen wir keine Haftung.
Elektrostatischen Entladungen / electrostaticdischarge (ESD) können
interne Komponenten des PCs beschädigen. Tragen Sie bei der Montage
eine Antistatik-Manschette oder halten Sie Kontakt mit einem gut
leitenden metallischen Körper. Für Schäden, die durch ESD in Folge
unsachgemäßer Handhabung hervorgerufen werden, wird keine Haftung
übernommen.
3. Einbau der TV-Karte / Bridge
•
Lösen Sie die Gehäuseschrauben und nehmen Sie die
Gehäuseabdeckung vorsichtig ab. Bevor die Abdeckung nicht wieder
fest montiert ist, sollten Sie den Rechner nicht wieder starten.
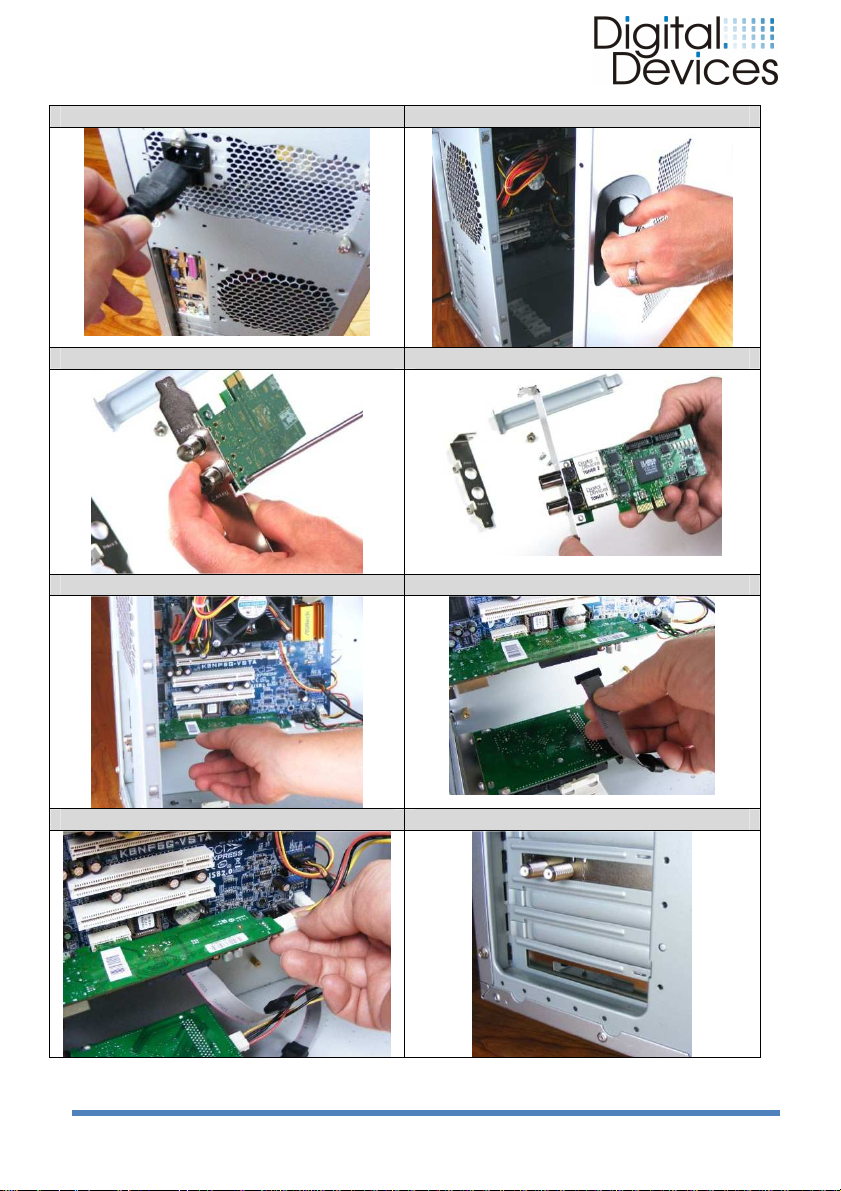
• Drehen Sie die Schraube des Slotblechs eines freien PCIe Steckplatzes
heraus und entfernen Sie das Slotblech.
• Der TV-Karte liegen 2 Slotbleche bei (Full Profile und Low Profile).
Schrauben Sie das Slotblech mit den beiliegenden Schrauben an die
TV-Karte, welches zu ihrem Gehäuse paßt.
• Halten Sie die TV-Karte am Slotblech und stecken sie diese senkrecht in
einen freien PCIe Steckplatz, ohne interne Bauteile zu beschädigen.
(PCIe x1 oder x16)
• Drücken Sie die TV-Karte von oben in den Slot hinein, so dass die TV-
Karte im Slot einrastet.
• Das Slotblech der TV-Karte wird jetzt mit der entfernten Schraube
wieder festgeschraubt.
•
Verbinden Sie einen 4 poligen Floppystecker (zur Stromversorgung des
LNB) mit dem Stecker am hinteren Ende der TV-Karte. (nur S2)
•
Montieren Sie die Gehäuseabdeckung und schließen Sie alle
Verbindungskabel incl. dem Netzkabel wieder an.
•
Schalten Sie ihren PC nun an und installieren die beiliegende Treiber
Software. Nach der Treiberinstallation können Sie die die TV-Karte in
einer TV-Software, wie z.B. Windows® Media Center, installieren.
(siehe Abbildung auf Seite 6,7 und 8)
Installationsanleitung 05/2012 Digital Devices GmbH® Seite 2 / 8
Page 3
ENGLISH
1. Safety Considerations
The enclosed CD contains an detailed installation instructions. Follow the
installation instructions for PC cards in the manual of your PC.
2. Operating Safety
• The TV card should be installed by a properly qualified technician or a
person with relevant knowledge and expertise.
• Before installing the TV card, disconnect the PC from the mains power
supply. Failure to do so could lead to serious injury and/or damage.
• This TV card is intended only for use in a PC and to be powered via PCI
Express bus.
• The guidelines for electromagnetic compatibility (EMC) must be
observed at all times when connecting the TV card. Electrostatic
discharge (ESD) can damage the internal components of a PC. Use an
anti-static wrist strap or maintain constant physical contact with a
highly conductive metal body.
• No liability will be accepted for damage caused by ESD as a result of
improper handling.
•
Always make a backup copy of your data on a suitable external storage
medium (CD, floppy, Zip etc.) before installation. Claims for damages in
respect of lost data and consequential losses arising from lost data will
not be accepted.
3. Installation of the TV card / Bridge
(Please refer to the illustrations on page 6,7 + 8)
• Unscrew and carefully remove the PC cover to gain access to the
inside.
• Unscrew the blank slot bracket from a free PCIe slot and remove it.
• 2 slot brackets (full height & low profile) are enclosed in the package.
• Carefully screw the appropriate slot bracket for your PC to the TV card.
•
Holding the TV card carefully by its edges, position it vertically over a
free PCIe slot (x1 up to x16) and insert it into the slot. Avoid touching
the golden finger of the TV card and do not damage any internal
components.
• Push the TV card into the slot from above, so that the TV card snaps
into position in the slot
• Screw the slot bracket of the TV card to the PC chassis.
•
Connect a standard 4 pin floppy power connector (to power the LNB) to
the connector at the rear of the TV card. (only Cine S2)
• Replace the PC cover and reconnect all cables.
• Connect the mains power cable to the PC and switch on the PC.
• Finally, install the enclosed software driver.
• After the restart you can configure the TV card in Windows® Media
Center or an alternative software TV program.
Installationsanleitung 05/2012 Digital Devices GmbH® Seite 3 / 8
Page 4
FRANÇAIS
1. sécurité
Se CD contient de multiples instructions d'installation détaillées. Suivez les
instructions d'installation dans le Manuel de votre PC.
2. fiabilité
L'installation de la carte TV devrait être effectué uniquement par un
•
technicien qualifié ou une personne ayant une expertise pertinente.
Avant l'importation, l'exportation ou la conversion de la carte TV, retirez
•
tous les câbles d'alimentation de votre PC. Si le cordon d'alimentation n'est
pas supprimé, il peut causer des blessures aux personnes ou des dommages à l'appareil.
Cette carte TV est destinée au fonctionnement d'un PC et est alimenté par
•
la tension de Bus PCI Express.
Les directives de compatibilité électromagnétique (CEM) doivent être res-
•
pectées lors de la connexion de la carte TV.
Avant toutes installations faites une copie de sauvegarde de votre disque
•
dur. En cas de perte de données, nous n'assumons aucune responsabilité.
Les décharges électrostatiques (ESD) peuvent endommager les composants
internes du PC. Les décharges électrostatiques (ESD) peuvent endommager
les composants internes du PC. Les améliorations du système et des changements, doivent être effectuée à une station de travail ESD protégés. Si
vous ne disposez pas d´un tels emplacement, porter un bracelet antistatique
ou reliez vous á une prise de terre á l´aide d´un câble métalliques hautement
conducteur. Nous ne nous portons pas garant pour les dommages causés par
une mauvaise manipulation de votre part.
3.Installation d´TV-carte
(Voir l´illustration page 6,7+8)
Desserrez les visses et retirez le couvercle avec précaution. Ne pas
redémarrer l'ordinateur avant que le couvercle soit remit fermement en
place.
Desserrez les visses d´un support libre et retirez le. Ainsi vous obtiendrez
•
un emplacement pour installer votre carte PCI.
La carte TV- est livrée avec deux supports (profile Full et profile Low). Vissez
•
le support adéquat avec les visses livrée sur la carte TV.
Insérez la carte TV verticalement dans la fente libre d´un emplacement
•
pour PCIe, sans endommager les composants internes. (PCIe x1 or x16)
Introduisez la carte TV dans la fente du support, de sorte qu´elle puisse s´y
•
enclencher.
• Le support de la carte TV peut être maintenant revissé fermement avec les
visses retirée auparavant.
• Branchez le connecteur à 4 broches, (pour alimenter le LNB) au connecteur
à l'arrière de la carte TV. (Uniquement pour S2)
Remontez le couvercle et rebranchez tous les câbles á leur place d´origine.
Démarrez votre PC et installez le logiciel pilote inclus. Après l'installation du
pilote, vous pouvez installer un logiciel de télévision, tels que Microsoft Media
Center sur votre carte TV.
Installationsanleitung 05/2012 Digital Devices GmbH® Seite 4 / 8
Page 5
Russian
1.
Введение по технике безопасности
На прилагаемом компакт-диске содержится подробная инструкция по установке. Также
соблюдайте, пожалуйста, рекомендации по инструкции эксплуатации и по технике
безопасности Вашего компьютера.
2. Рекомендации по эксплуатации
• Инсталляция телевизионной карты (ТВ-тюнера) должна производиться
квалифицированным специалистом или человеком с соответствующим опытом.
• Прежде чем Вы перейдете к монтажу или демонтажу прибора, отключите
полностью Ваш компьютер от сети. Если сетевой/электрический кабель питания
Вашего персонального компьютера не будет удален из розетки, то это может
привести к серьёзным травмам людей или повреждению устройства.
• Данная телевизионная карта предназначена для использования в компьютере и
работает через PCI Express BUS.
•
При подключении ТВ карты должны быть соблюдены рекомендации по
электромагнитной совместимости (EMV).
•
Перед инсталляцией сделайте резервную копию базы данных на внешнем носителе
(CD, диске и т.д.). За ущерб потери базы данных фирма ответственности не несёт.
Электростатические разряды (ESD) могут повредить внутренние компоненты компьютера,
поэтому наденьте антистатический браслет или установите контакт с металличеким телом,
которое может послужить отводу статистического заряда. За ущерб, причиненный
электростатическими разрядами при расширение системы входе неправильной
эксплуатации, фирма никакой ответственности не несёт.
3. Инсталляция ТВ-карт (см. иллюстрацию на стр. 6, 7+8)
• Выключите компьютер и все периферийные устройства.
• Ослабьте винты и снимите крышку компьютера. Пока крышка компьютера плотно и
надёжно не установлена, не включайте компьютер.
• Поверните винт слот скобки PCI и удалите крепление.
• К телевизионной карте прилагаются 2 слот листа (Полный профиль/Full Profil и
низкий профиль/Low Profile). Используйте тот слот лист и соответствующие винты
для ТВ-карты, которые подходят к Вашему компьютеру.
•
Прислоните телевизионною карту к слот листу и вставьте её вертикально без
повреждения внутренних компонентов в свободное место PCI express-выхода
Вашего компьютера (PCIe x1 или x16).
• Вставьте ТВ-карту сверху так, чтобы она вошла в слот и была зафиксирована в
гнезде.
• Теперь зафиксируйте винтами слот.
•
Подключите 4-полюсный ленточный кабель (для источника питания LNB) со
штекером на задней панели ТВ-карты (только S2).
• Установите крышку компьютера и подсоедините все кабеля обратно, включая шнур
питания.
•
Включите компьютер и установите теперь прилагаемые драйвера. После установки
драйверов, вы можете установить в ТВ-тюнере такие программы, как например
Windows ® Media Center
Installationsanleitung 05/2012 Digital Devices GmbH® Seite 5 / 8
Page 6
1. 2.
3. 4.
5. 6.
7. 8.
Installationsanleitung 05/2012 Digital Devices GmbH® Seite 6 / 8
Page 7
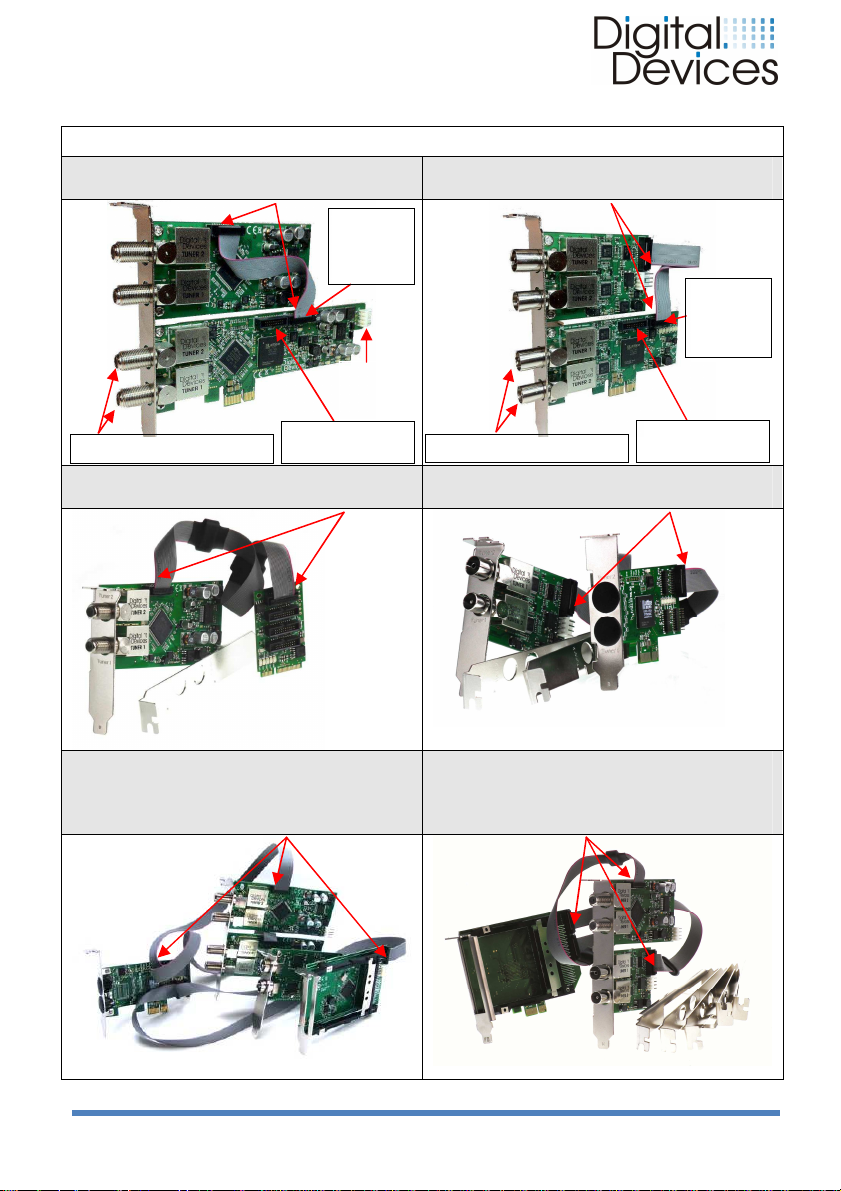
1
Cine S2 +
1
Cine C/T +
1
DuoFlex S2 +
1
DuoFlex C/T +
1
Octopus PCIe bridge +
1
Octopus
Twin CI +
Connection
Tuner
1+2
Connection
TAB 3
Connection
CI 2
Connection
Tuner
1+2
Connection
TAB 3
Connection
LNB
connector
Kabelverbindungen – cable connections - Les connexions de câble
1 DuoFlex S2 PIN 1
TAB 2
Tuner 3+4 /
Power
Tuner 5+6 / CI 3
1 Octopus mini PCIe bridge PIN 1
1 DuoFlex C/T PIN 1
TAB 2
Tuner 3+4 /
CI 2
Tuner 5+6 / CI 3
1 Octopus PCIe bridge PIN 1
2 DuoFlex S2 +
1 DuoFlex C/T +
1 Common Interface PIN 1
Installationsanleitung 05/2012 Digital Devices GmbH® Seite 7 / 8
1 DuoFlex S2 +
1 DuoFlex C/T
PIN 1
Page 8
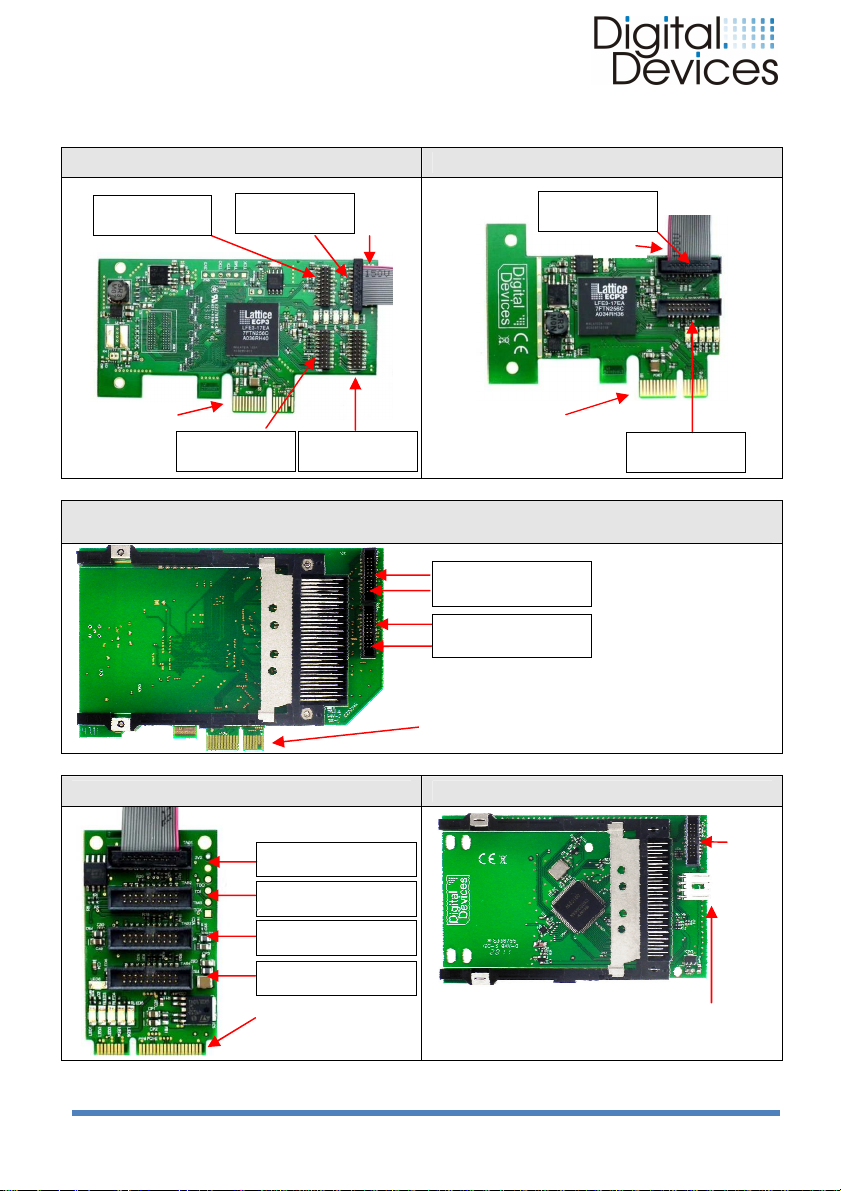
Octopus single CI / Octopus twin CI
Connection
TAB 4
Connection
TAB 3
Connection
TAB 2
Connection
TAB 1
Tuner
1+2 / CI 1
Connection
TAB 1
Connection
TAB 2
TAB 1 Tuner 1+2
/ CI 1
TAB 2
Tuner
3+4 / CI 2
flat
ribbon
Floppystecker für Stromversorgung
/
PCIe
Connector
PIN 1
PCIe
Connector
PCIe
Connector
TAB 1
Tuner
1+2 / CI 1
PIN 1
Octopus PCIe Bridge Octopus LE PCIe Bridge
Tuner 7+8 / CI 4
Tuner 5+6 / CI 3 PIN 1
PCIe X1 / X4 / X8 /
x16
compatible
Tuner 3+4 / CI 2
(single / twin Common Interface + PCIe Bridge)
PCIe X1 / X4 / X8 / x16
compatible
PIN 1
PCIe X1 / X4 / X8 / x16 compatible
Tuner 1+2 / CI 1
Tuner 3+4 / CI 2
Octopus mini PCIe Bridge Common Interface
TAB 2 Tuner 3+4 / CI 2
TAB 3 Tuner 5+6 / CI 3
TAB 4 Tuner 7+8 / CI 4
mini PCIe Connector
Installationsanleitung 05/2012 Digital Devices GmbH® Seite 8 / 8
TAB
für
Datenkabel/
for
cable
Power connector /
 Loading...