

Page 1

User’s Manual
15.0” TFT-LCD Monitor
DCM-150
Ver 1.00E
- 1 -
Page 2
Thank you for selecting our 15.0” TFT-LCD monitor.
Please take a few minutes to read this user’s manual for
the best performance of this monitor.
Please keep this user’s manual for future reference.
The present home appliance is certified and approved by
EMC/EMI and can be used in all places including residency
area.
Information in this manual is subject to change without
prior notice.
FCC Information
This equipment has been tested and found to comply with limits for a class B digital device,
pursuant to Part 15 of the FCC Rules. These limits are designed to provide reasonable
protection against harmful interference in a residential installation.
This equipment can generates, uses, and radiate radio frequency energy and, if not installed
and used in accordance with the instructions, may cause harmful interference to radio
Communications. However, there is no guarantee that interference will not occur in a particular
installation.
If this equipment does cause unacceptable interference to radio and television reception, which
can be determined by turning the equipment off and on, the user is encouraged to try to correct
the interference by one or more of the following measures.
■Reorient or relocate the receiving antenna.
■Increase the separation between the equipment and receiver.
■Connect the equipment into an outlet on a circuit different from that to which the receiver
is connected.
■Consult the dealer or an experienced Radio/ TV technician for help.
Caution : Any changes or modifications in construction of this device whice are not expressly approved by
the party responsible for compliance could void the user's authority to operate the equipment
- 2 -
Page 3

CONTENTS
1. Safety Instructions
2. Product
1) Features -----
2) Package Contents -----
3) Parts ----
4) MENU Button ----
3. Connection
1) Analog RGB (D-Sub) & DVI Cable
2) Audio Cable
4. MENU
1) MENU
2) In / out Select
3) Auto Adjustment
4) Picture
5) Color
6) Image
7) OSD
8) For Optimum Screen Image
5. Troubleshooting
6. SIZE
1) Size
2) Specification
3) The Standard Signal Mode
7. Other & Service
1) Important Safety Instructions
2) Concerning Services
- 3 -
Page 4

1. Safety Instructions
To reduce the risk of fire, electrical shock, and other injuries,
keep these safety precautions in mind when installing, using,
and maintaining your machine
.
▶ Notice Mark
Here is Notice mark with <Warning> & <Caution> and its meanings are as
followed;
! <Warning>
: If you manipulate against the notice, it may cause
serious injury or death to user.
! <Caution>
: If you manipulate against the notice, it may cause
slight injury to user or appliance.
- 4 -
Page 5

▶ <Warning for Power
- Do not use damaged or loose plug and receptacle.
◎ This may cause an electric shock or fire.
- Do not touch the plug with wet hands.
◎ This may cause an electric shock.
- Do not connect too many extension cords or plugs to a wall outlet.
◎ This may cause a fire.
- Do not bend the plug and wire excessively or place heavy objects upon them, which
could cause damage.
◎ Failure to do so may cause an electric shock or fire.
- Plug the power cord perfectly into a wall outlet.
◎ Unstable connection of the power cord may cause a fire.
▶ <Caution for Power
- Hold the head part of power cord when you unplug it from the wall outlet.
◎ Its violation may cause unexpected heating or fire by wires damage.
- Disconnect the plug from the outlet while cleaning the TV.
◎ Its violation may cause an electric shock or fire.
▶ <Warning> for Installation
- Do not put a glass of water, chemical substances or any small metal object on the TV
set.
◎ This may cause damage, electric shock or fire. If a foreign substance gets into the set,
unplug it and contact a service center.
- Keep your monitor out of humidity and dust.
◎ An electric shock or fire could occur in the monitor.
- Do not use or store inflammable substances near the monitor.
◎ This may cause an explosion or fire.
- 5 -
Page 6

- Do not place the monitor on an unstable cart, stand, tripod, bracket or table. Otherwise,
it can fall.
◎ The set can be damaged seriously if this happens.
◎ Place the set on a stable surface.
- Do not place or use any inflammable spray, materials, etc near the set.
◎ This may cause an explosion or fire.
- Do not keep the set under feeble and bad ventilation condition such as on the
bookshelf or in the wall closet.
◎ This may cause a fire by increasing internal temperature of the set.
- Do not place power cord near radiator or heat register.
◎ This may cause an electric shock or fire by melting power cord’s coating.
- Do not place the set on an unstable cart, stand, tripod, bracket or table.
◎ This can cause serious injury to a child or adult and serious damage to the appliance.
- Do not incline the set over 15°.
◎ This may cause serious injure to a child or adult and serious damage to the appliance.
▶ <Caution> for Installation
- Place the set at a certain distance from the wall for ventilation.
◎ If not, it may cause a fire by increasing internal temperature of the set.
- Do not cover the vents on the monitor cabinet.
◎ Bad ventilation may cause a breakdown or fire.
- Place the set on a flat and stable surface.
- Lift the set using both hands when you move it
.
▶ <Warning> for Use
- Disconnect the plug from the outlet during storms, lightening or your long absence.
◎ Failure to do so may cause an electric shock or fire.
- Never insert any metal object into the set’s connectors.
◎ This may cause an electric shock, fire or injury.
- 6 -
Page 7
- Do not remove its cover (or back). No user serviceable parts inside.
◎ This may cause an electric shock or fire. Refer servicing to qualified service personnel.
▶ <Caution> for Use
- Unplug the set from the wall outlet when not being used for a long period of time.
◎ If not, the dust heated in the unit may cause an electric shock or fire.
- Unplug the set from the wall outlet and disconnect all cables when moving it to other places.
◎ If not, it may cause damage to cable system and cause an electric shock or fire.
- Unplug the power cord from the wall outlet if you notice strange smoke, sound or smell from the
set, and refer servicing to qualified service personnel.
◎ This may cause an electric shock or fire.
- Unplug the set from the wall outlet before cleaning. Use a damp cloth but not liquid or aerosol
cleaners.
◎ If not, an electric shock or fire may be provoked.
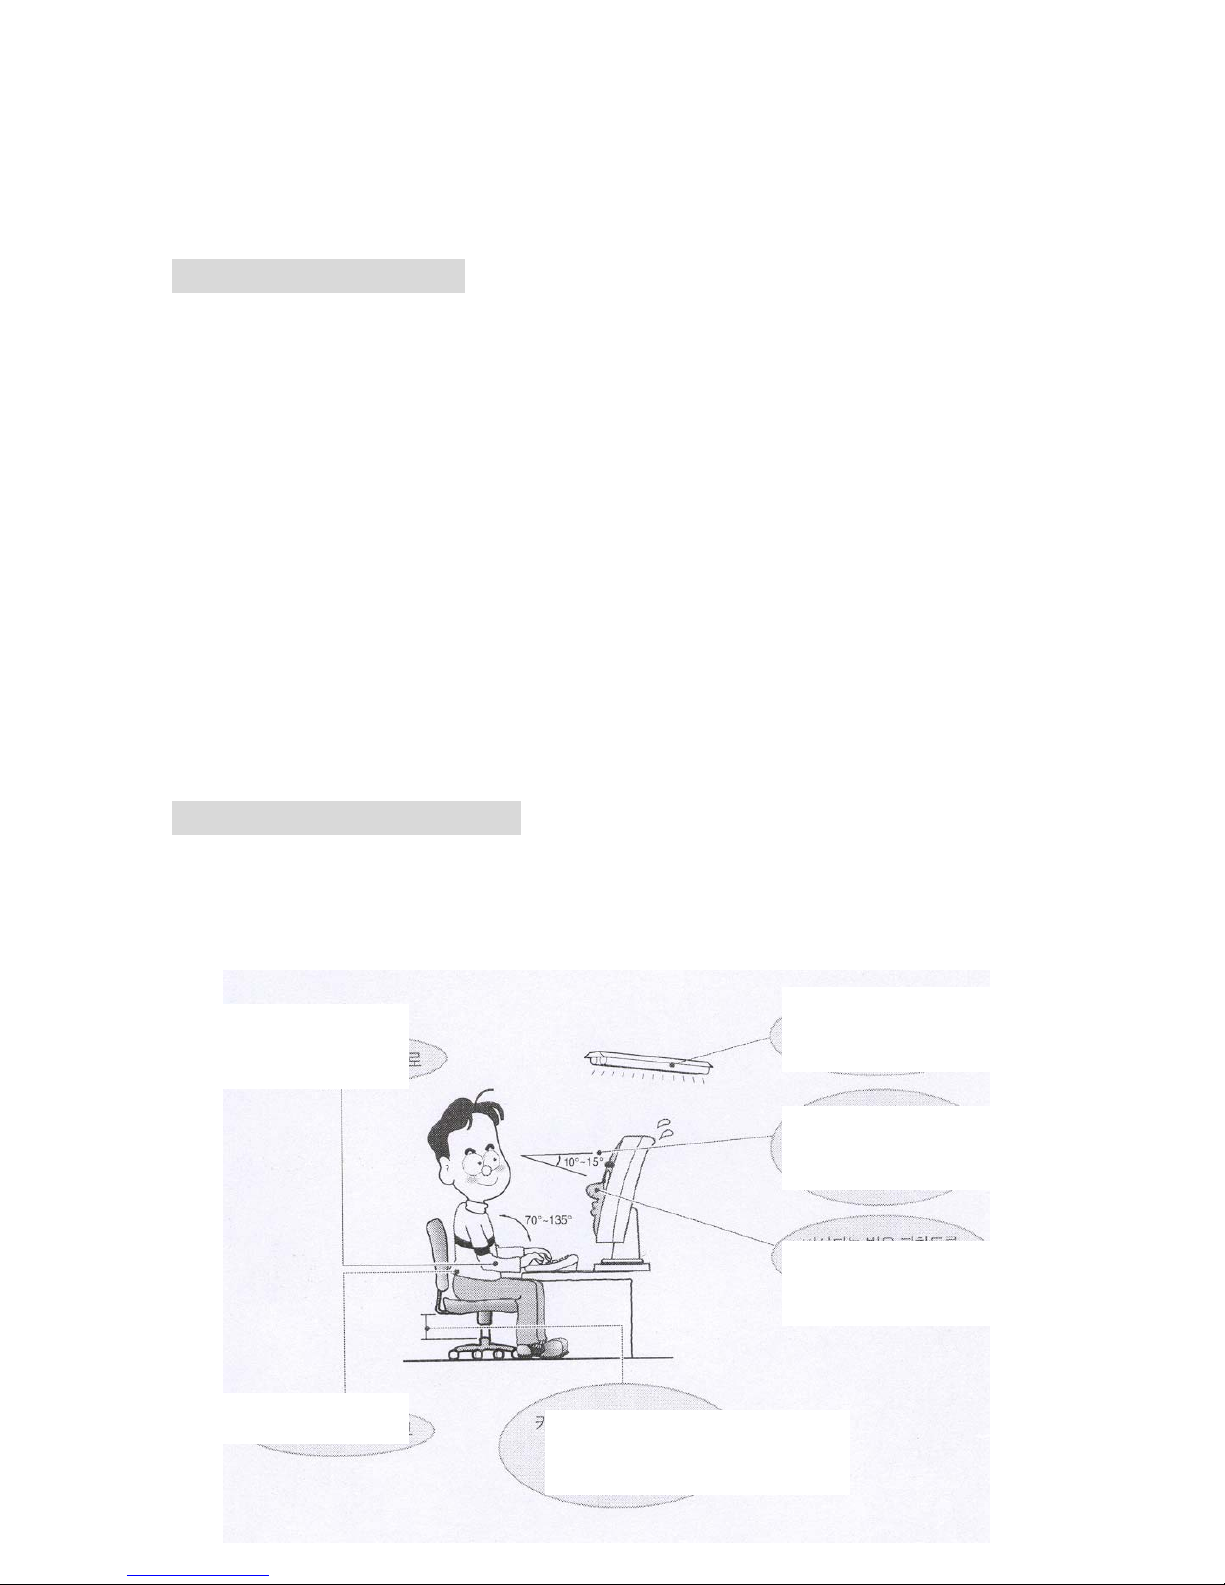
▶ Correct Carriage of Use
For comfortable & efficient use of the monitor, please make your seat and
the monitor position as your need.
Please refer to the below picture.
- 7 -
Avoid direct reflection of
illumination.
Place your arms horizontal
lever or higher than keyboard
Place the screen’s upper side
with same as eye level or lower
Control the screen angle for
avoiding reflection lighting
Sit back to back of a chair
Place keyboard & chair as proper
position of arms & hands
Page 8

2. Product
1) Features
Easy Installation
It is designed light & slime, which is 1/5 size than CRT monitor and 1/2 size
than normal LCD monitor.
Cool Design & Easy-to-Handle
It is easy to carry or use because it is designed slimmest & lightest (1.1kg) in
the same class products.
Adapted Digital Interface (DVI) Type
User can use the monitor with better colors definition of screen image by
adapted dual interface type (D-Sub & DVI : Digital Video Interface).
Auto Adjustment of Image (Auto tuning)
User can adjust the screen to optimum image by controlling menu buttons or
hotkey (Select button).
Simple Installation on the wall
User can install the unit on the wall simply with two screws or nails.
(Attention : The wall should be solid enough to avoid that the monitor is
crooked or dropped.)
Audio IN/OUT Connectors (Option)
If user purchases audio IN/OUT connector option, user can enjoy audio with
headphone or outer speaker.
VESA Wall Mounting (Option)
User can mount the monitor on the wall with 10x10 VESA standard adapter.
- 8 -
Page 9
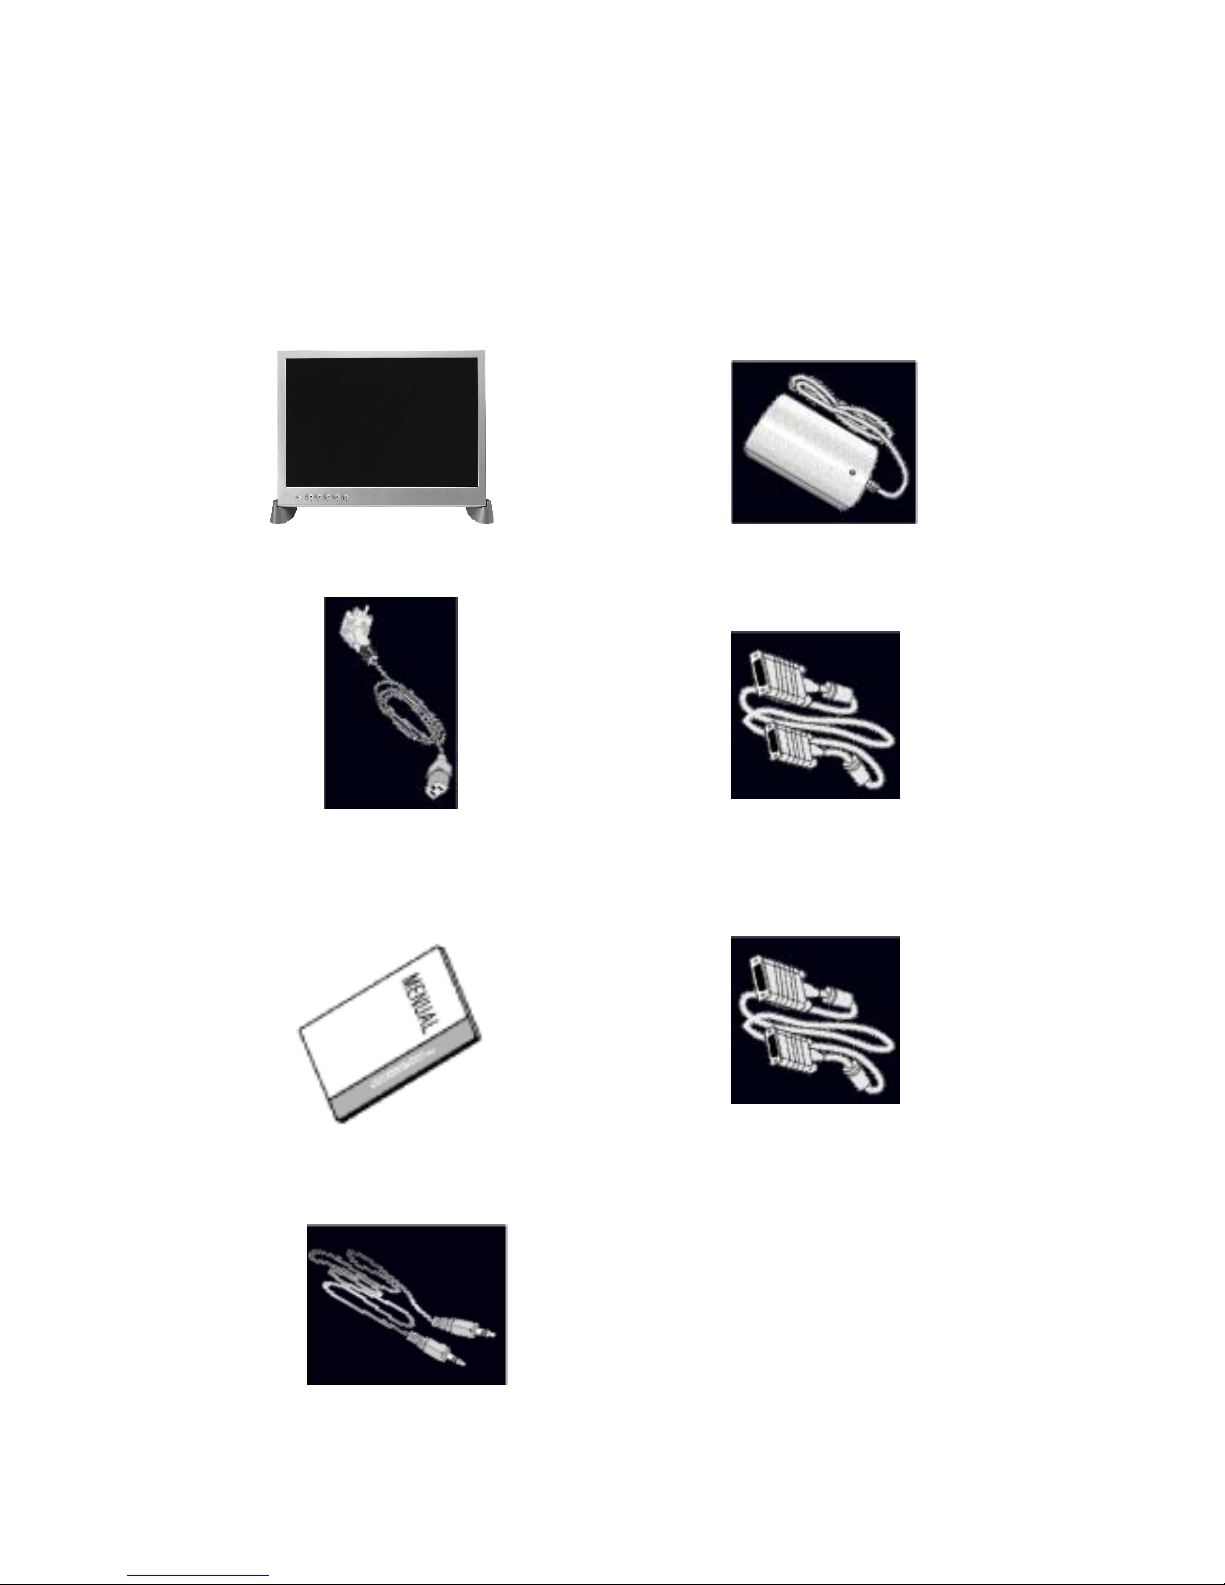
2) Package Contents
☞ Please make sure the following items are included with your LCD TV. If any items are
missing, contact with your dealer.
LCD Monitor Adapter
Power Cord VGA Cable (D-Sub)
User’s Manual DVI Cable (Option)
Audio Cable (Option)
- 9 -
Page 10
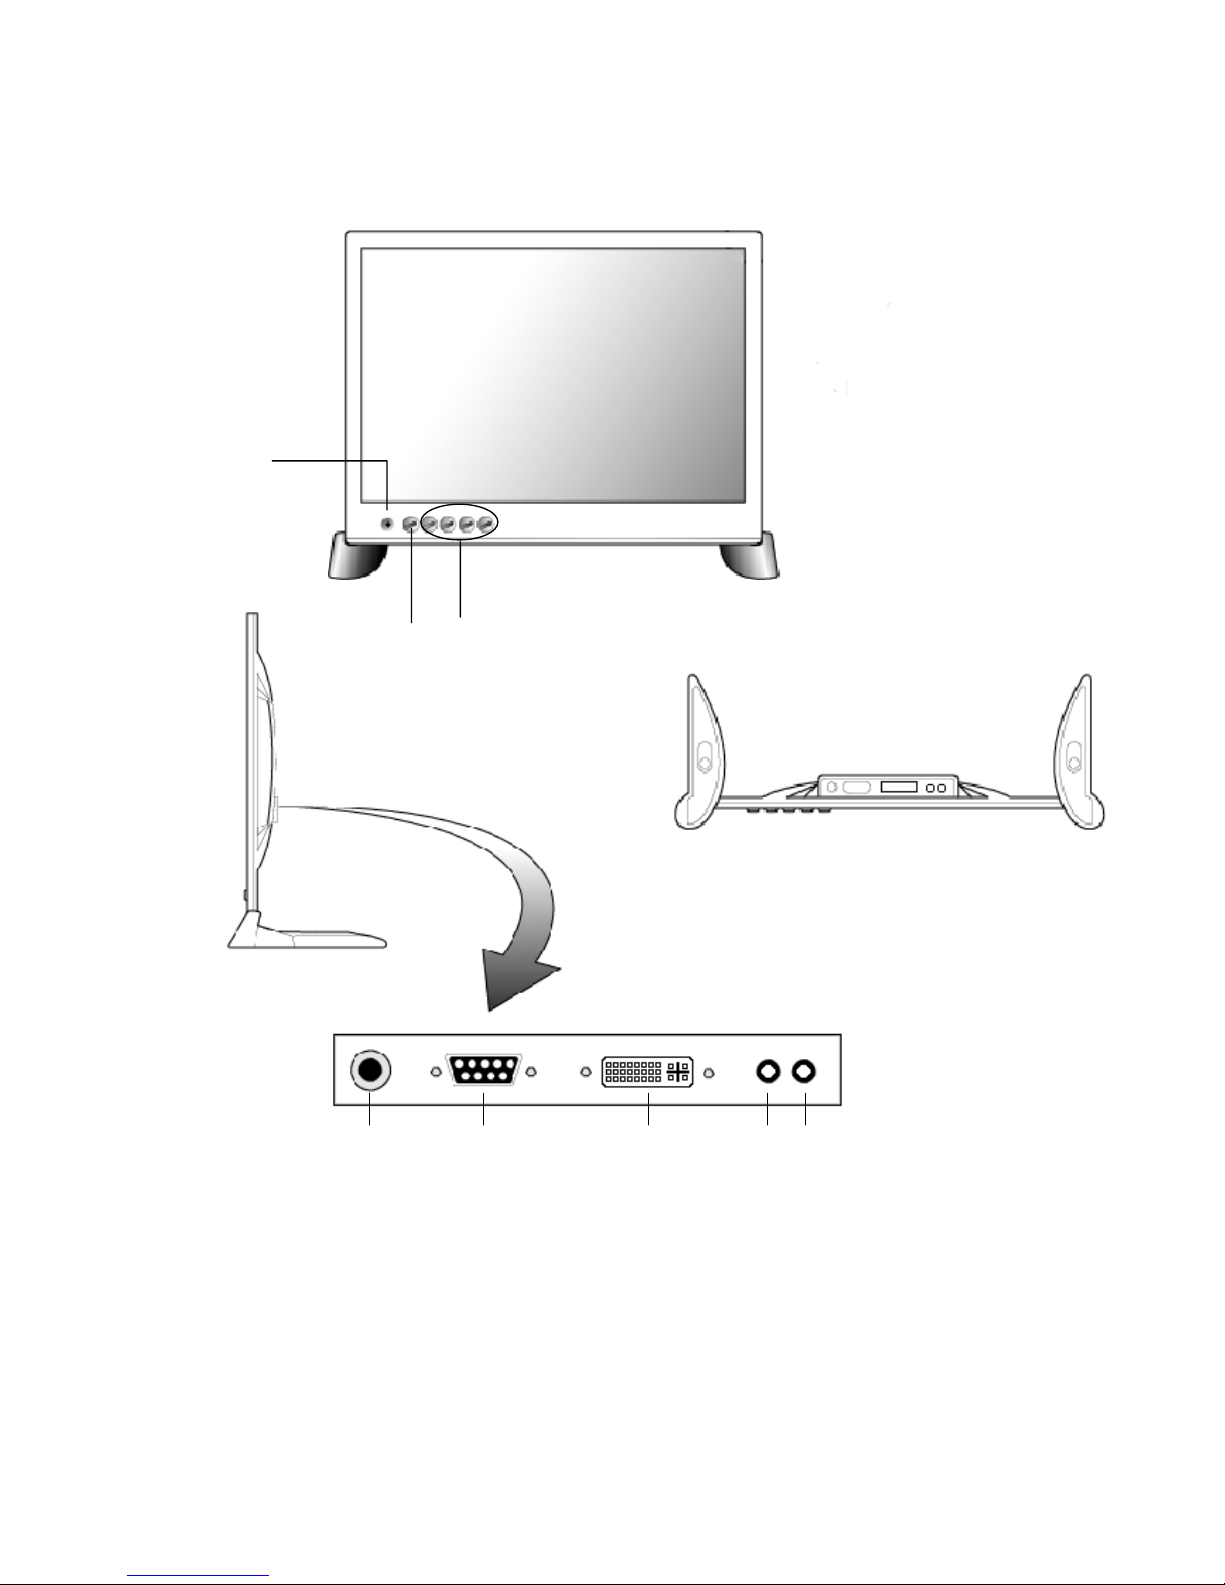
3) Parts
Stand
7
8
5 6
2 1
Front
3
4
1. Power Button
2. Screen Control Buttons (Menu, Select, Left, Right)
3. Power Indicator 4. Power Connector (DC 12V)
5. VGA Cable (D-Sub) Connector 6. DVI Cable connector
7. Audio In Connector (Option) 8. Audio Out Connector (Option)
(Earphone Jack)
- 10 -
Page 11
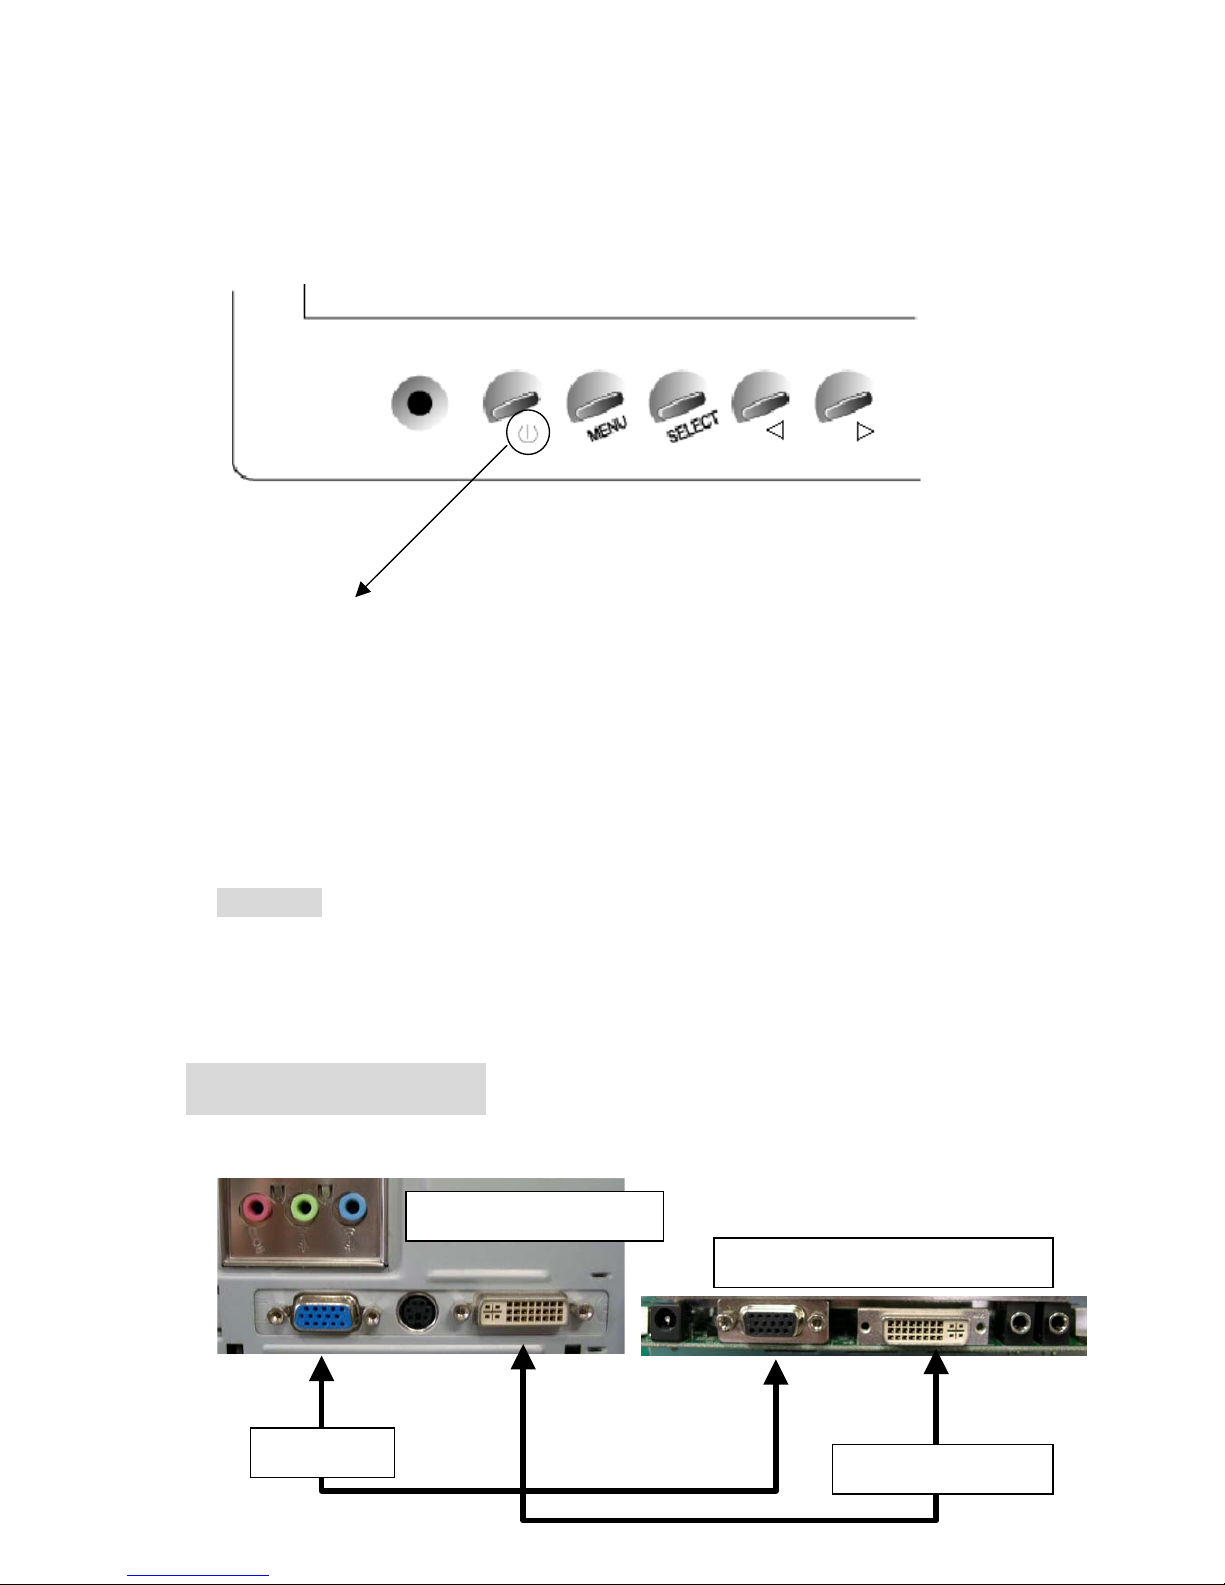
4) MENU Button
MENU Buttons functions are as follows;
To access OSD MENU, press MENU button.
POWER( ) : This button turns on and off.
MENU
- You use the button to start or quit the menu mode.
- You can enter sub menu or return to main-menu section by this button.
SELECT : Select main menu or sub menu.
Left (◁) / Right (▷)
- It moves of main menu or sub menu to left/right.
- It controls value to increase/decrease.
◐ Hotkey
Select : Auto Adjustment
Left (◁) / Right (▷) : Brightness control
3. Connection
1) Analog RGB (D-Sub) & DVI Cable
PC Signal Connectors
DVI Cable
(Option)
VGA Cable
Monitor Signal Connectors
- 11 -
Page 12
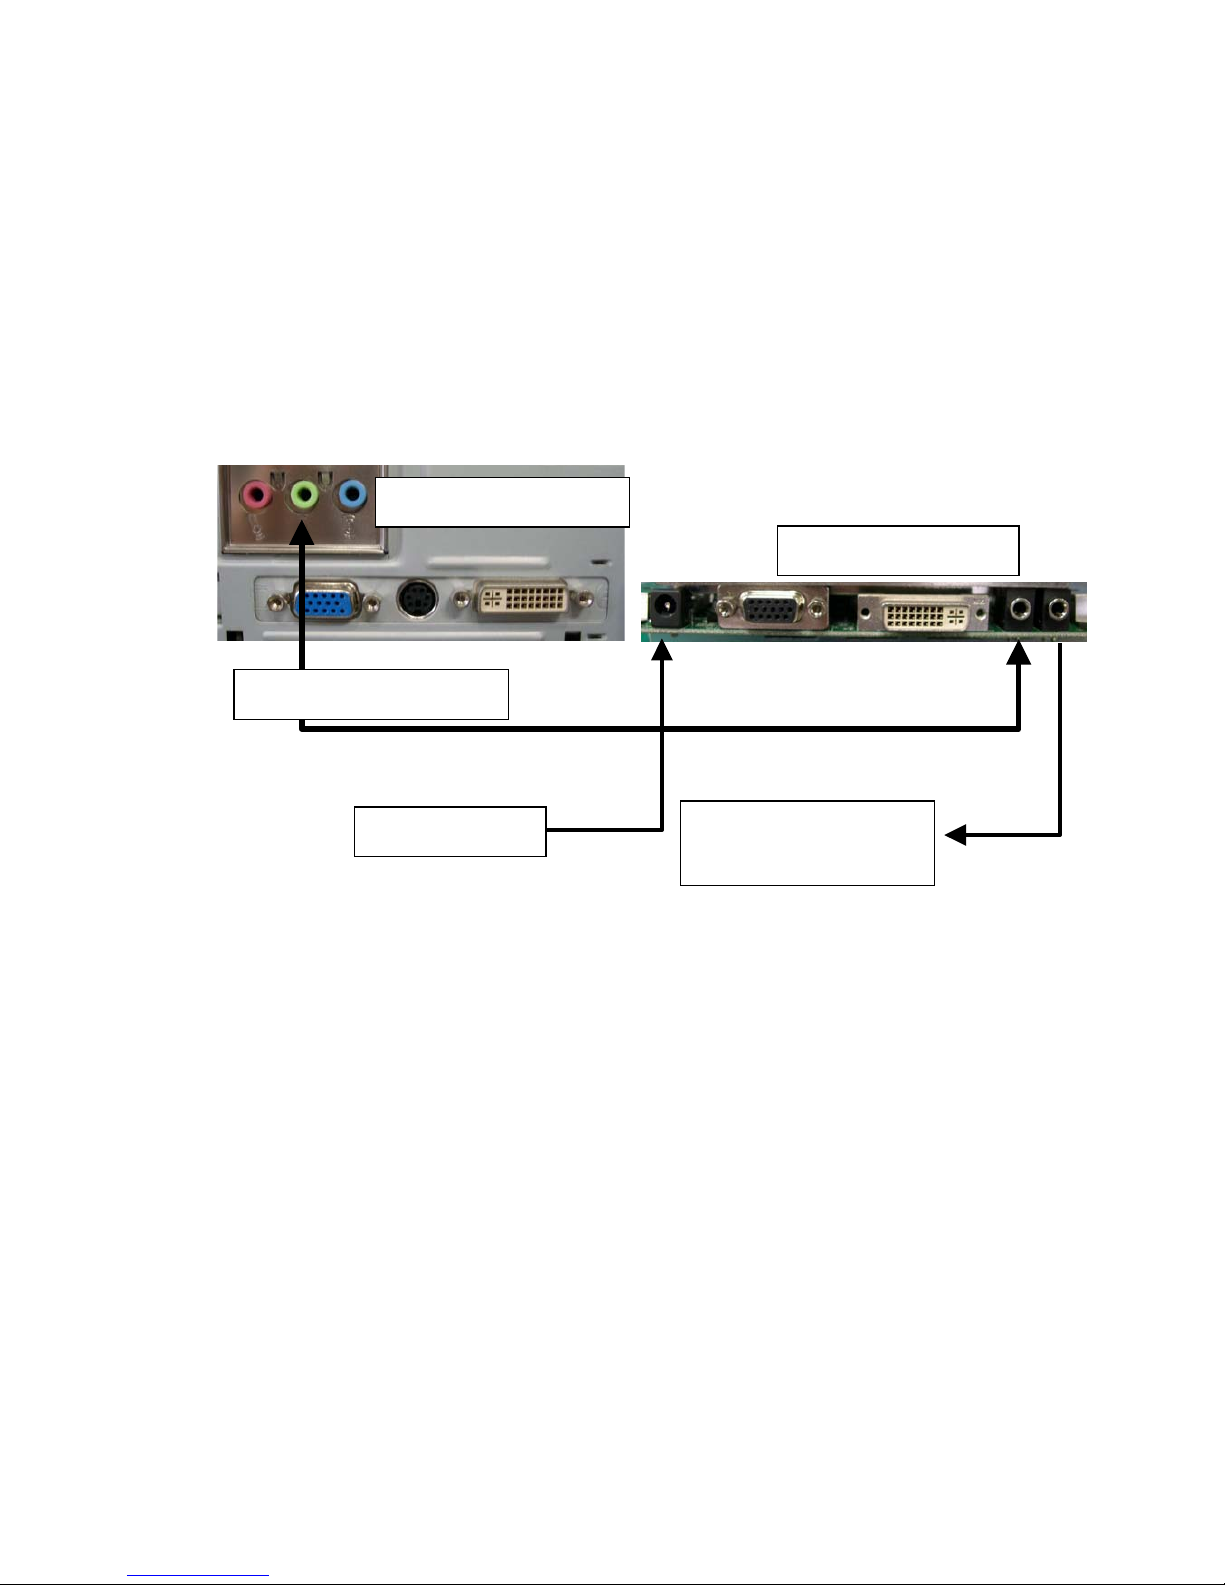
* SAFETY INSTRUCTIONS FOR CONNECTING CABLES
1. Please turn off the monitor before connecting cables.
2. Connect one end of the VGA cable to PC and the other to Monitor and fasten the
screws.
3. DVI cable output is only available with PC(Graphic card) supports DVI output.
4. DVI cable is separate purchasing item.
2) Audio Cable (Optional)
Please use the volume control button of PC or Speaker as monitor does not support
volume control function.
DC 12V Adapter
Audio Cable (Option)
Earphone / speaker
(Option)
Monitor Connectors
PC Audio Connectors
* SAFETY INSTRUCTIONS FOR CONNECTING AUDIO CABLE
1. Please turn off the monitor before connecting cables.
2. Connect one end of the AUDIO cable to the AUDIO OUT connector of PC and the
other end to AUDIO IN connector of Monitor.
3. Connect POWER ADAPTER cable to the rear port of monitor.
4. Audio cable is separate purchasing item.
3) HOW TO INSTALL MONITOR DRIVER
You do not need to install additional monitor driver as this model supports Plug &
Play function.
- 12 -
Page 13
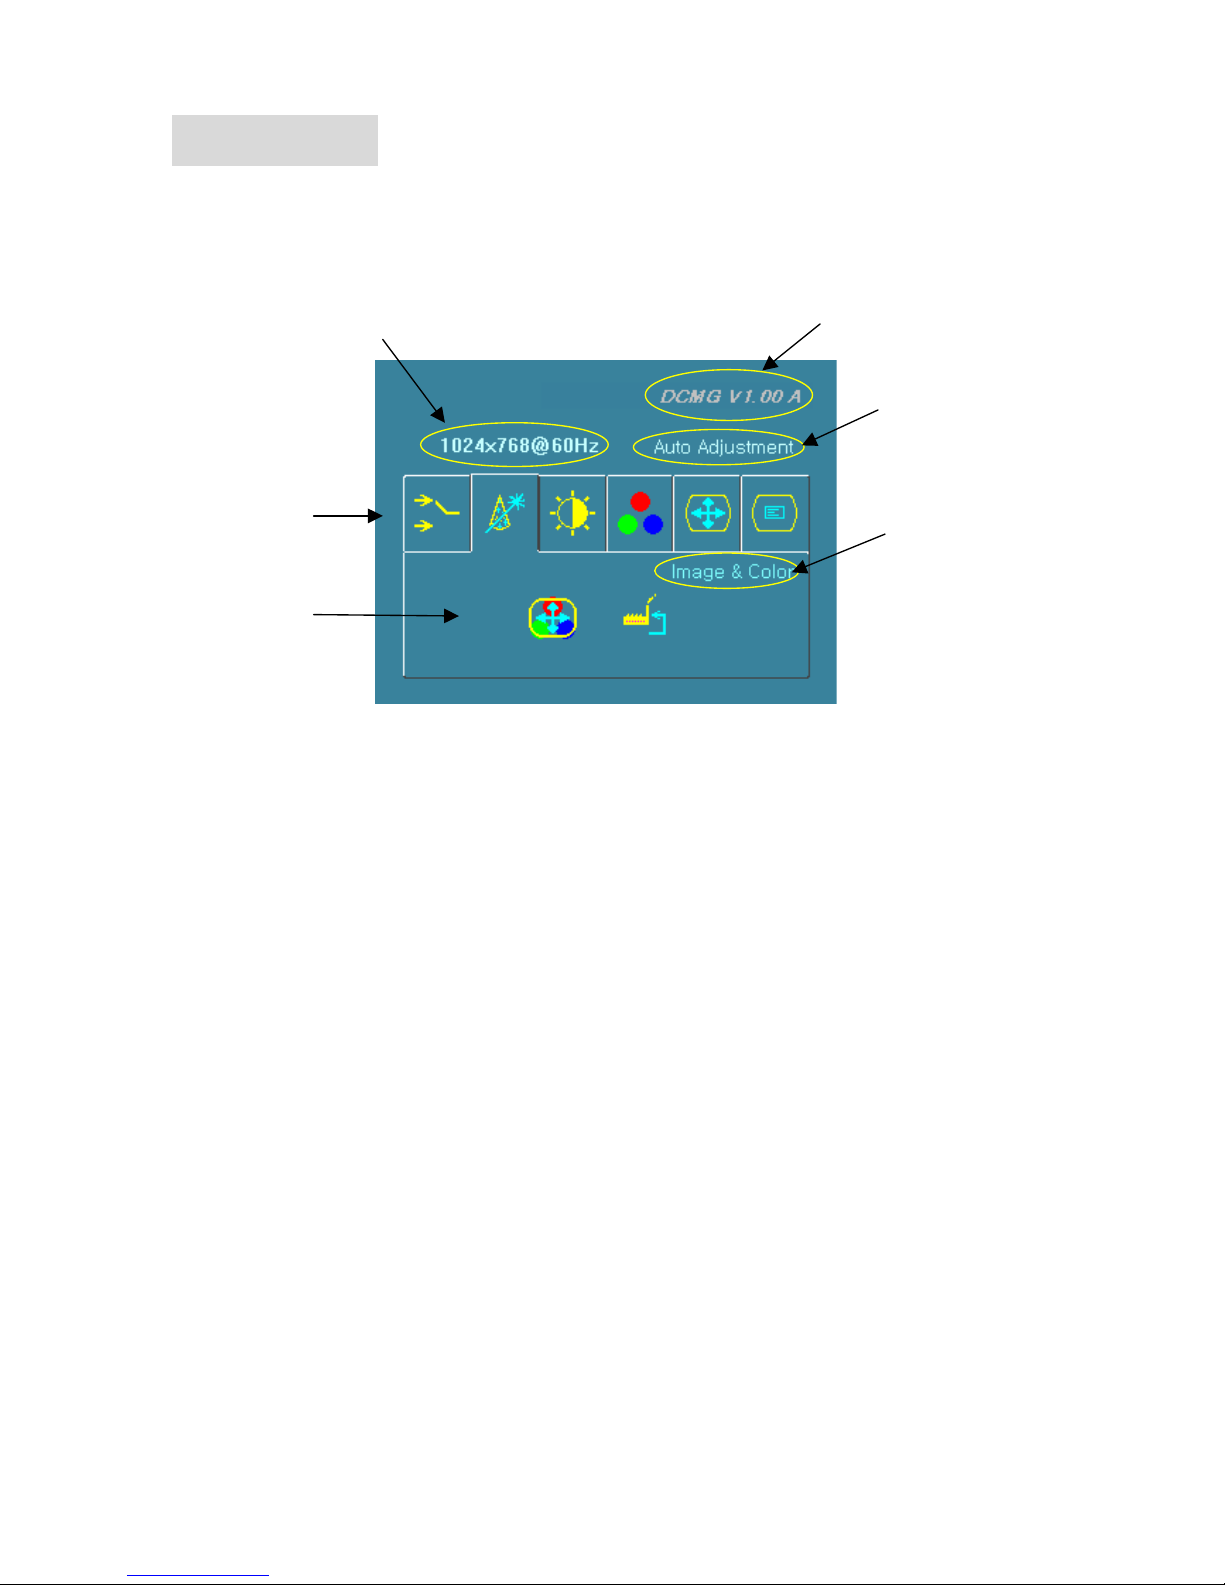
4. MENU
1) Illustration
If you press MENU button, you can see below image of OSD (On Screen Display).
4
6
3
2
1
5
1. Resolution
2. Monitor Version
3. Main MENU Icon
4. Selected Main MENU Icon
5. Sub MENU Icon
6. Selected Sub MENU Icon
.
- Push the button of Left (◁) / Right (▷) to select main-menu.
- Push the SELECT button again to move to sub-menu from main-menu.
- Push the button of Left (◁) / Right (▷) to select menu you want when you are in sub-
menu.
- You can adjust values of menu(specific working environment) with the button of Left
(◁) / Right (▷).
- If you want to move to main-menu from sub-menu or to finish adjusting of menu,
please use MENU button.
- 13 -
Page 14
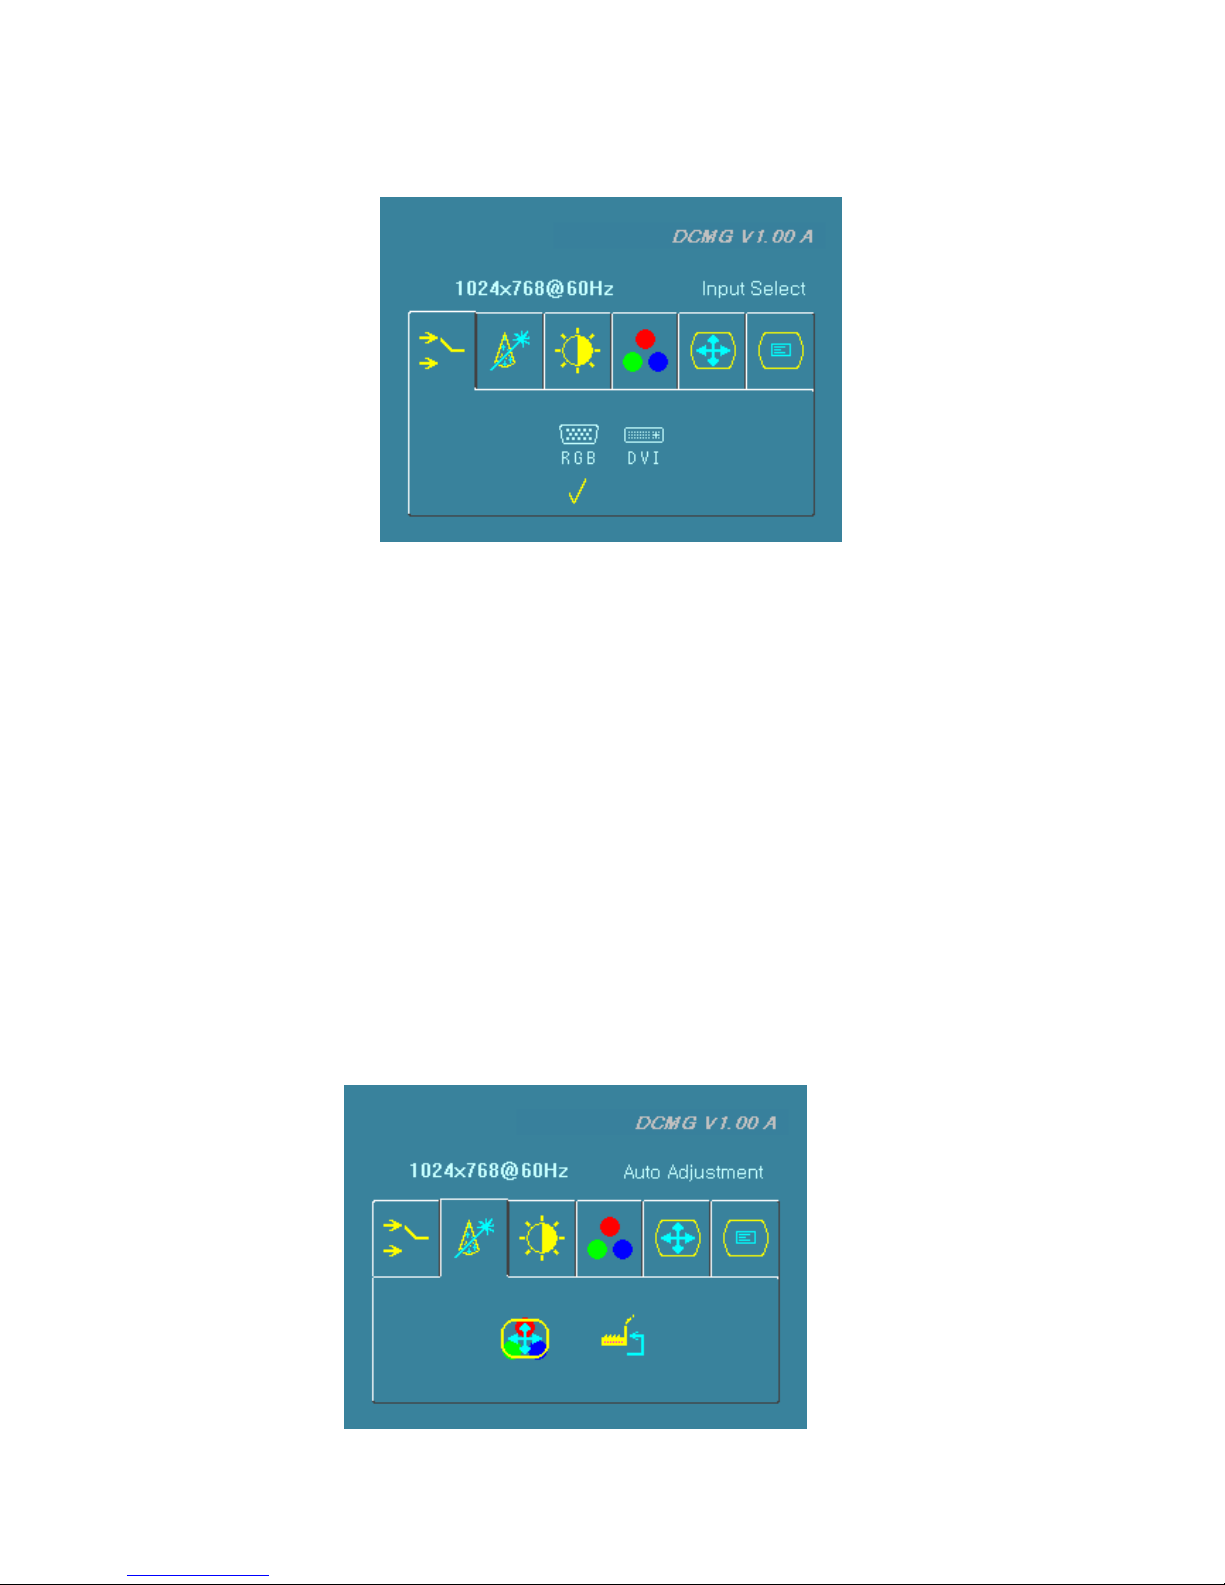
2) Input Select (PC Input Signal Selection)
The monitor has dual input connector, which has one 15-pin D-sub connector and one
24-pin DVI connector. User can select input connector.
The 24-pin DVI connector is for digital signal if your PC has a graphic card with DVI
connector. Please make sure that you can use only DVI-D type of DVI not DVI-I. (DVI
cable is optional item)
If both video signal of the analog(D-sub) and digital(DVI) are connected at the same
time, the signal input can be selected as analog RGB.
If single signal input is connected, it will be automatically adjusted. User does not need
to adjust input signal.
3) Auto Adjustment
- 14 -
Page 15
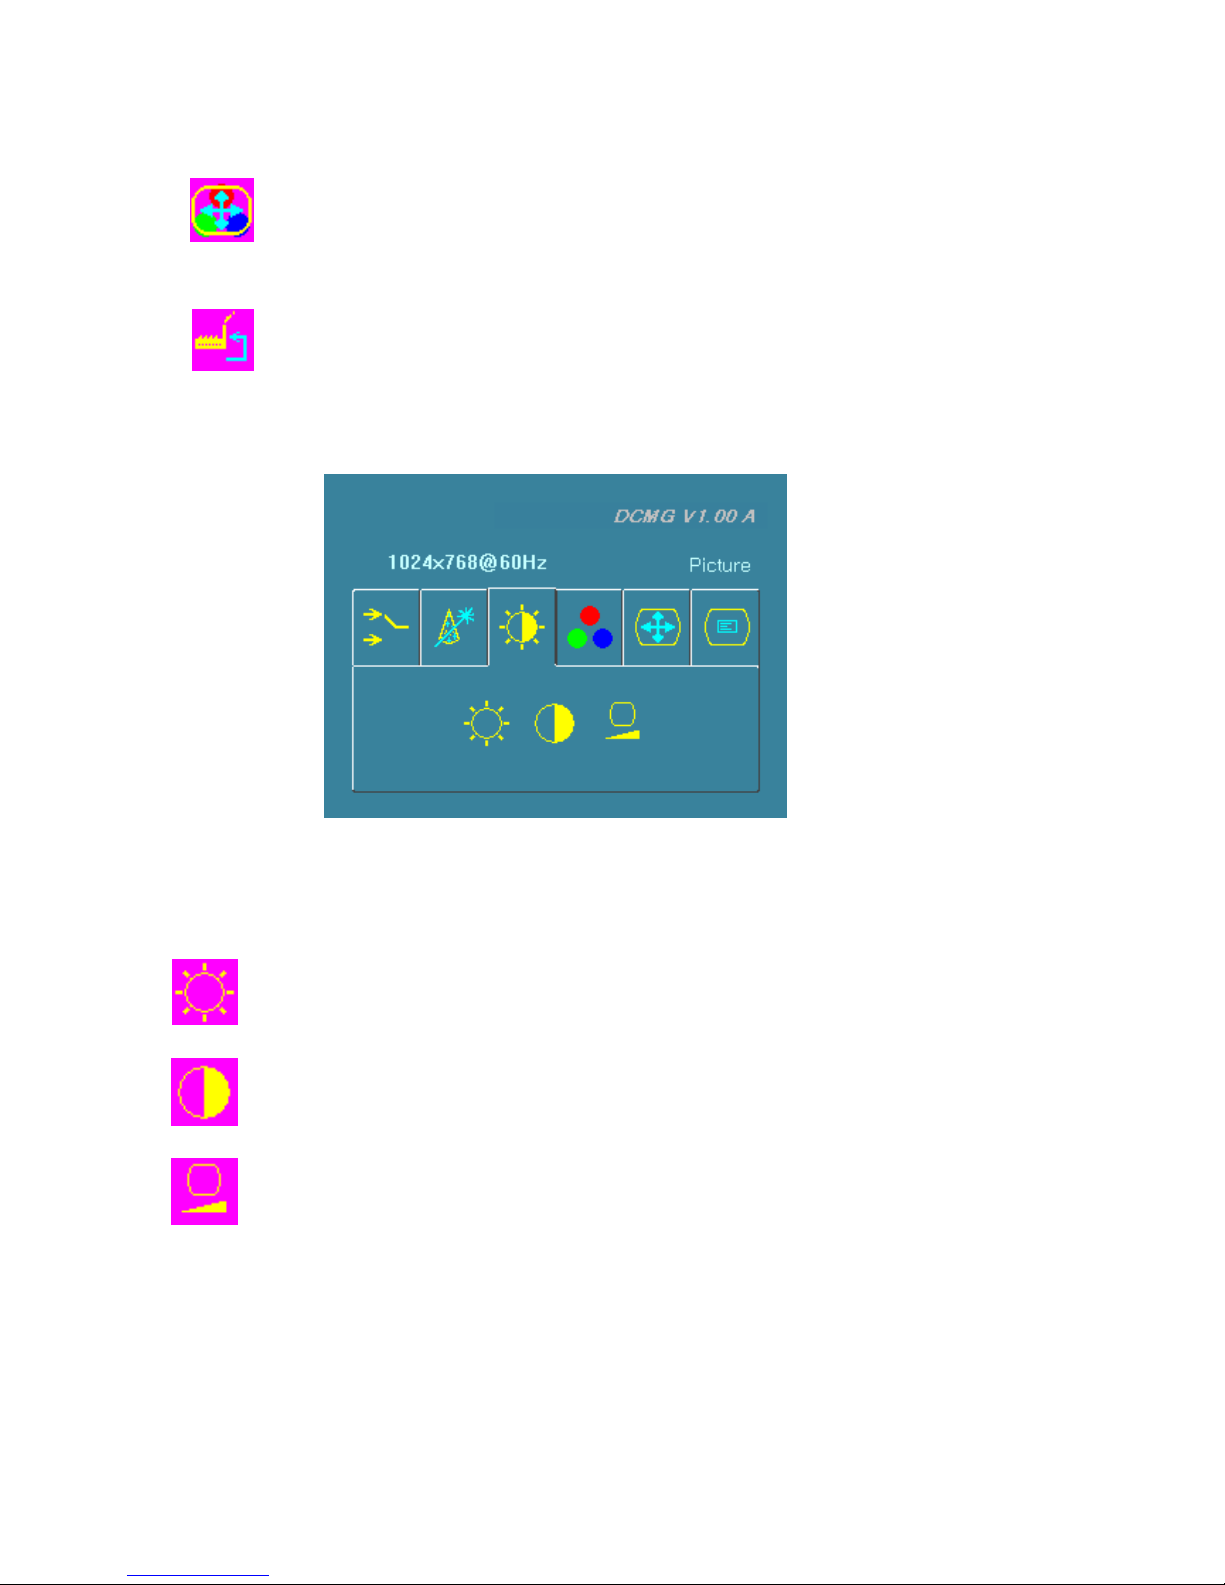
This adjusts the image to optimum status automatically.
Image & Color : Adjust the best condition of image and size of the screen. This
is especially useful to adjust stable and clear display when your PC or resolution
is changed.
Factory Reset : This allows you to reset all the OSD control settings back to the
factory settings.
4) Picture
Brightness : This controls the brightness of the LCD.
Contrast : This controls the contrast of the LCD.
Black Level : This controls the back level of the LCD.
5) Color
- 15 -
Page 16
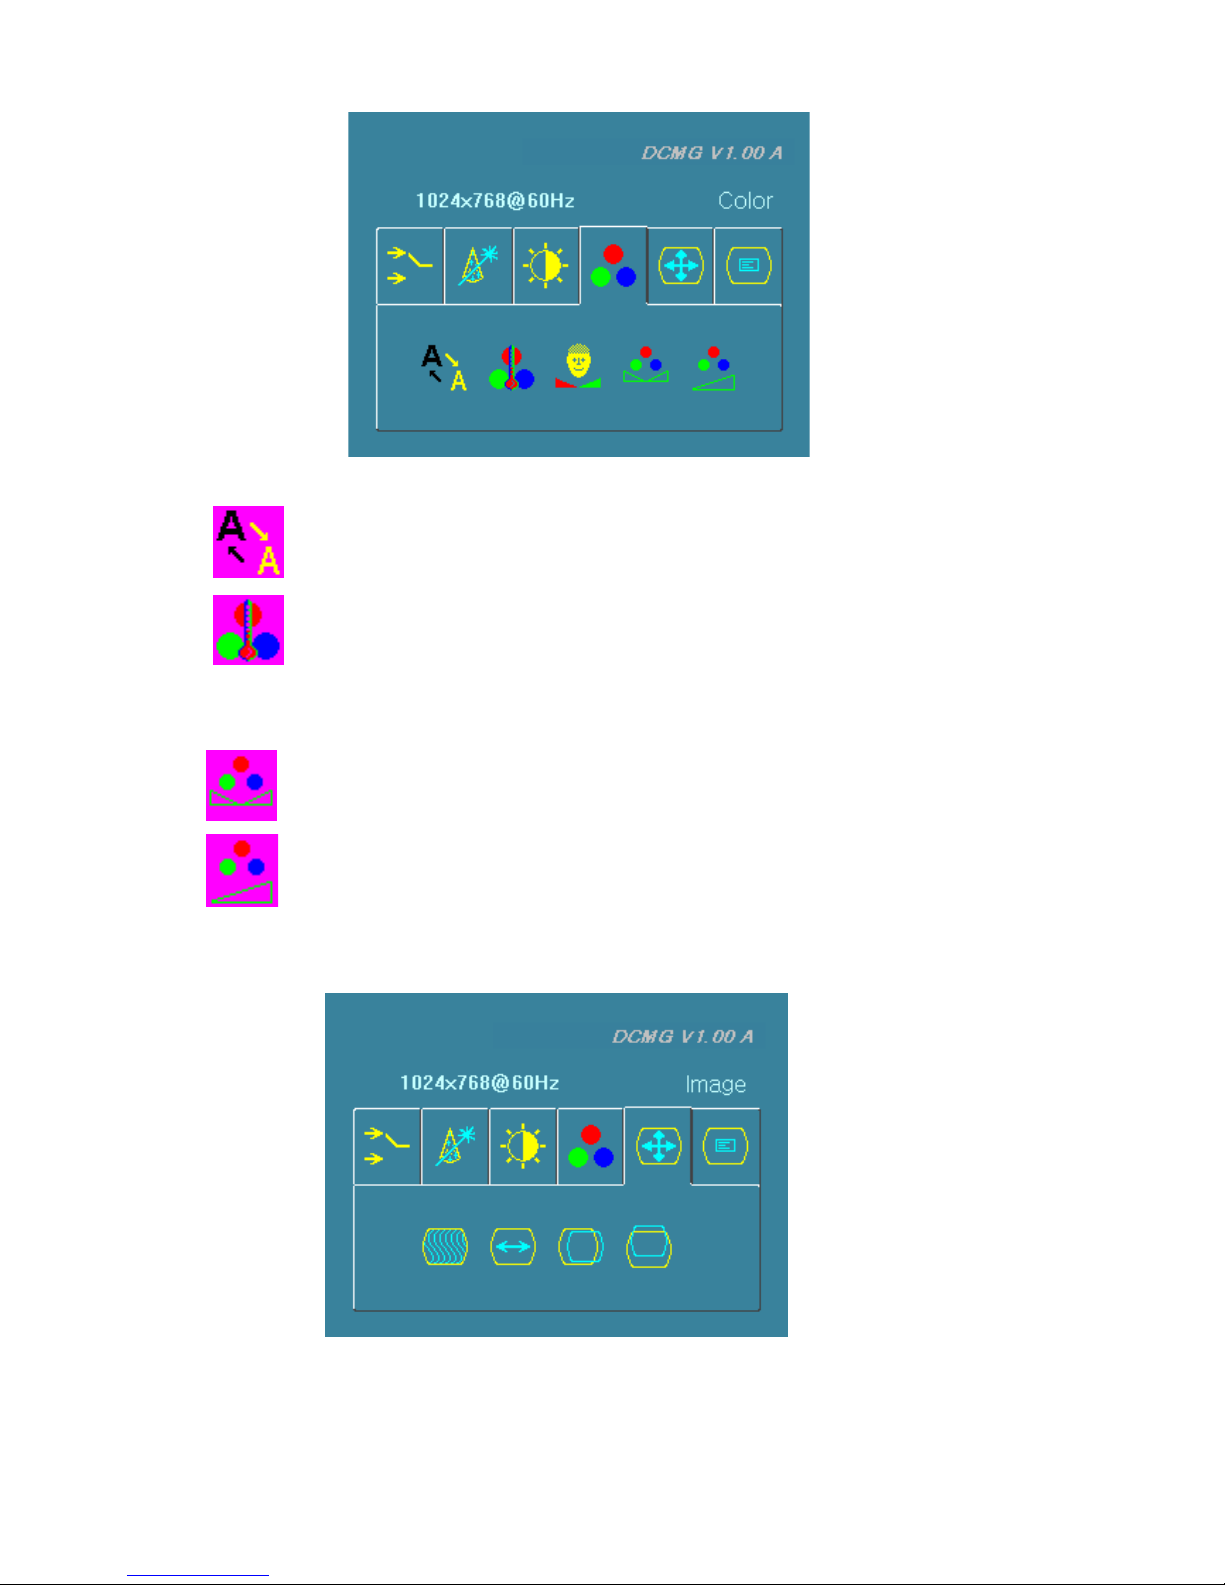
Sharpness : This adjusts the clarity of screen image.
Color Temperature : This adjusts color temperature..
WARM 4200K -> 5000K -> 6500K -> 7500K -> 9300K COOL
USER : User can adjust each of R, G, B.
Flesh Tone : This adjusts tone of skin color.
Hue : This adjusts screen color.
Saturation : This adjusts the 채도 of screen image.
6) Image
- 16 -
Page 17
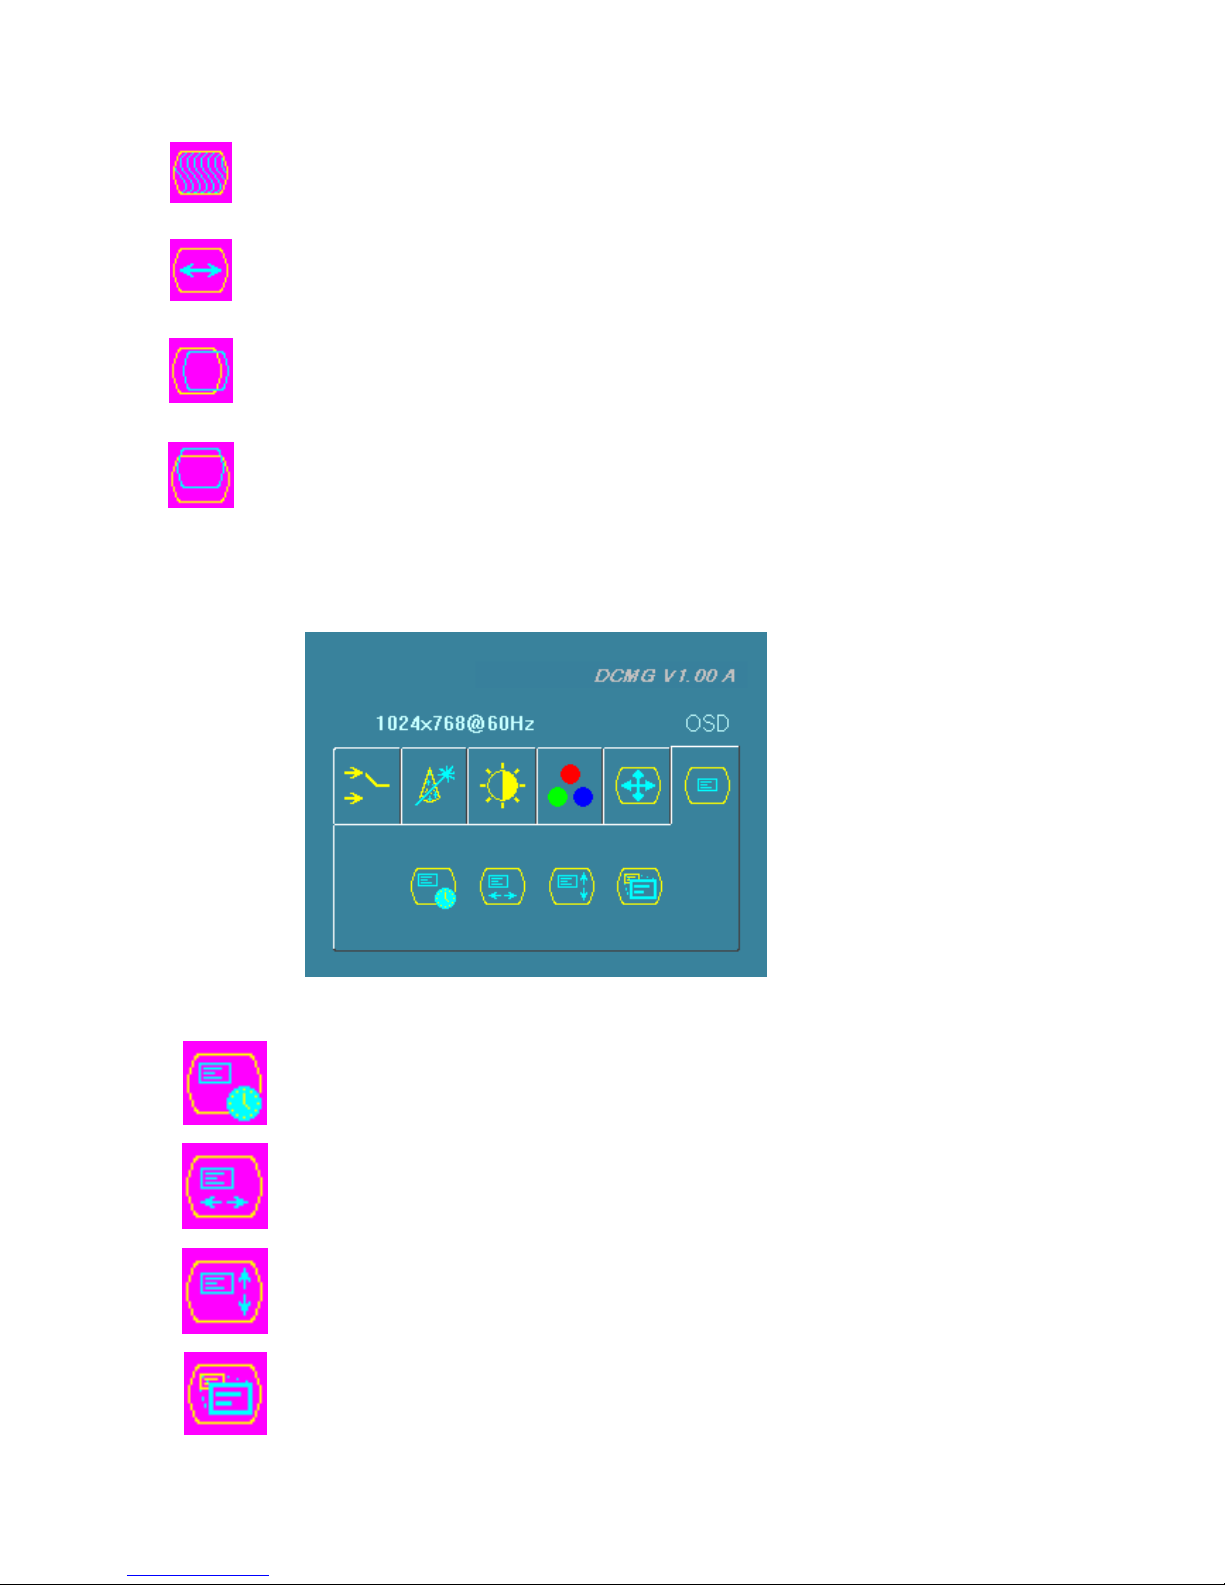
Phase : It adjusts the focus, clarity and stability of image.
Width : It controls horizontal image size.
H. Position : It controls horizontal image position.
V. Position : It controls vertical image position.
7) OSD (On Screen Display)
OSD Timeout : User can select the display time of OSD.
OSD H. Pos : It controls OSD horizontal position.
OSD V. Pos : It controls OSD vertical position.
OSD Size : It controls OSD size.
- 17 -
Page 18

8) For Optimum Screen Image
- You must check if all menus are adjusted properly before use,
Optical Resolution : 1024 x 768 @ 60 Hz
Max. Resolution : 1024 x 768 @ 75 Hz
- You can find the error message of “Out of Range” when the resolution is beyond the
maximum. Then you will see a distortion of screen or nothing will be displayed.
- TFT-LCD, which is used in the monitor, manufactured by using high-end technology of
production is technical limitation of manufacturing and there can be 1/1,000,000
possibility of bad pixel. This is not from bad quality and you can use the monitor
without uneasiness. This monitor has 2,949,120 pixels.
- To stabilize and clarify your display, please use ”Auto Adjustment” menu, which can
simply adjust the PC mode to the best condition. Also you can enjoy better display with
DVI connector than the Analog RGB.
- When you display same picture for a long time, it can cause a stain of LCD due to the
property of the LCD. Please use the function of Power Save Mode etc.
5. Troubleshooting
- If the set seems to have a problem, follow the list of possible problems and solutions
presented below. If none of these troubleshooting tips applies, call your nearest service
center.
-
No image on the screen
The VGA cable (D-Sub) should be connected completely to the set and computer.
The display card should be inserted fully in its slot.
Power switch of both PC and the monitor should be turned on.
Make sure that a supported mode has been selected on the display card or system
in use.
Make sure that the refresh rate (Vertical frequency) is 60Hz.
Check if VGA cable (D-Sub) pin is not bent or took off.
- 18 -
Page 19

Unable to turn on the equipment
Check if the AC cord (Power cord) is plugged in correctly and retry to turn on the
monitor.
Plug the monitor AC cord (Power cord) off the power socket. Connect the AC cord
(Power cord) again in 10 ~ 20 minutes.
LED on the monitor is red flickering without image
Check if the VGA cable (D-Sub) is connected to the monitor and computer correctly.
Check if the computer is in power-saving mode by touching the keyboard or mouse.
Image is unstable and out of focus
Check if the VGA cable (D-Sub) or DVI cable is connected to the computer
correctly.
You need to readjust the image when computer display mode changes. Please
readjust the image by using Auto setting or adjustment menu.
Check if the monitor and graphic card are compatible and if they are set at the
proper refresh rate. If the characters appear distorted, please reset the refresh rate
to 60Hz.
Image size is strange
Please reset the image size using vertical and horizontal positions function of
screen adjustment menu
Please try Auto Adjust function.
- 19 -
Page 20
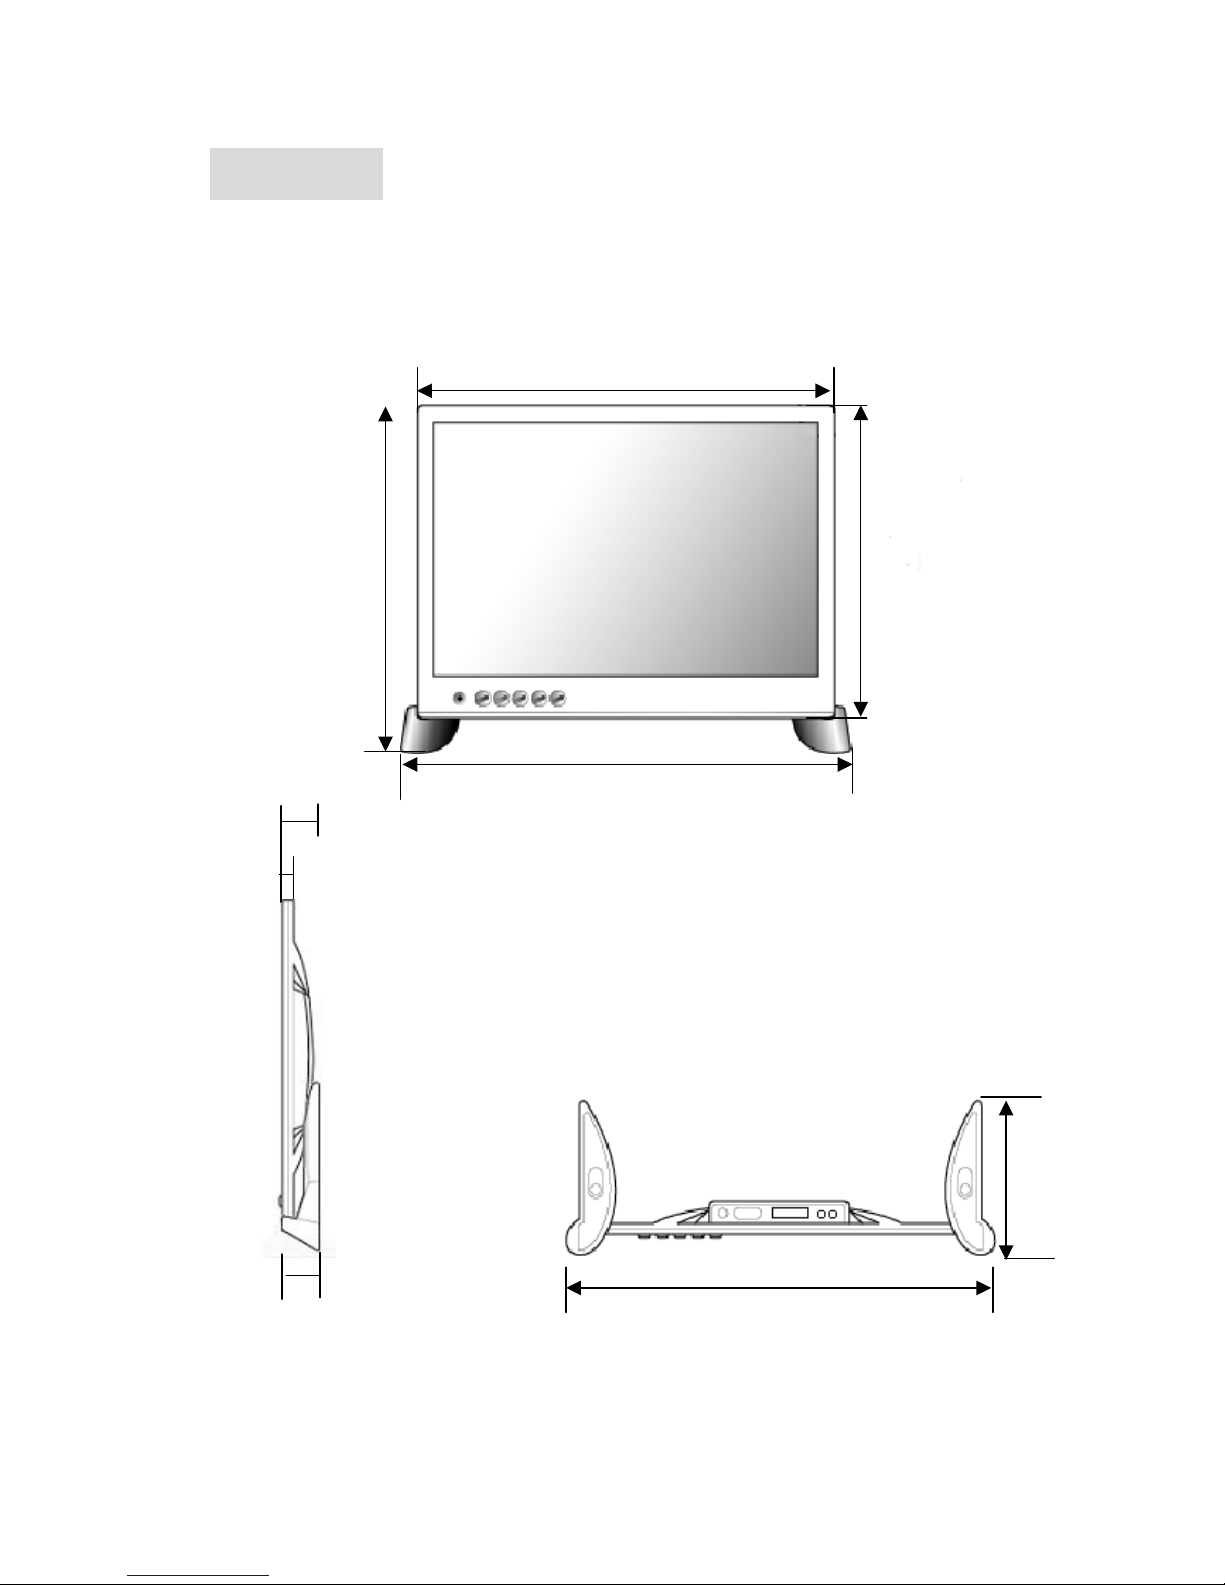
6. SIZE
1) Size
334 mm
305 mm
279 mm
24 mm
133.4 mm
15 mm
33 mm
364 mm
364 mm
- 20 -
Page 21
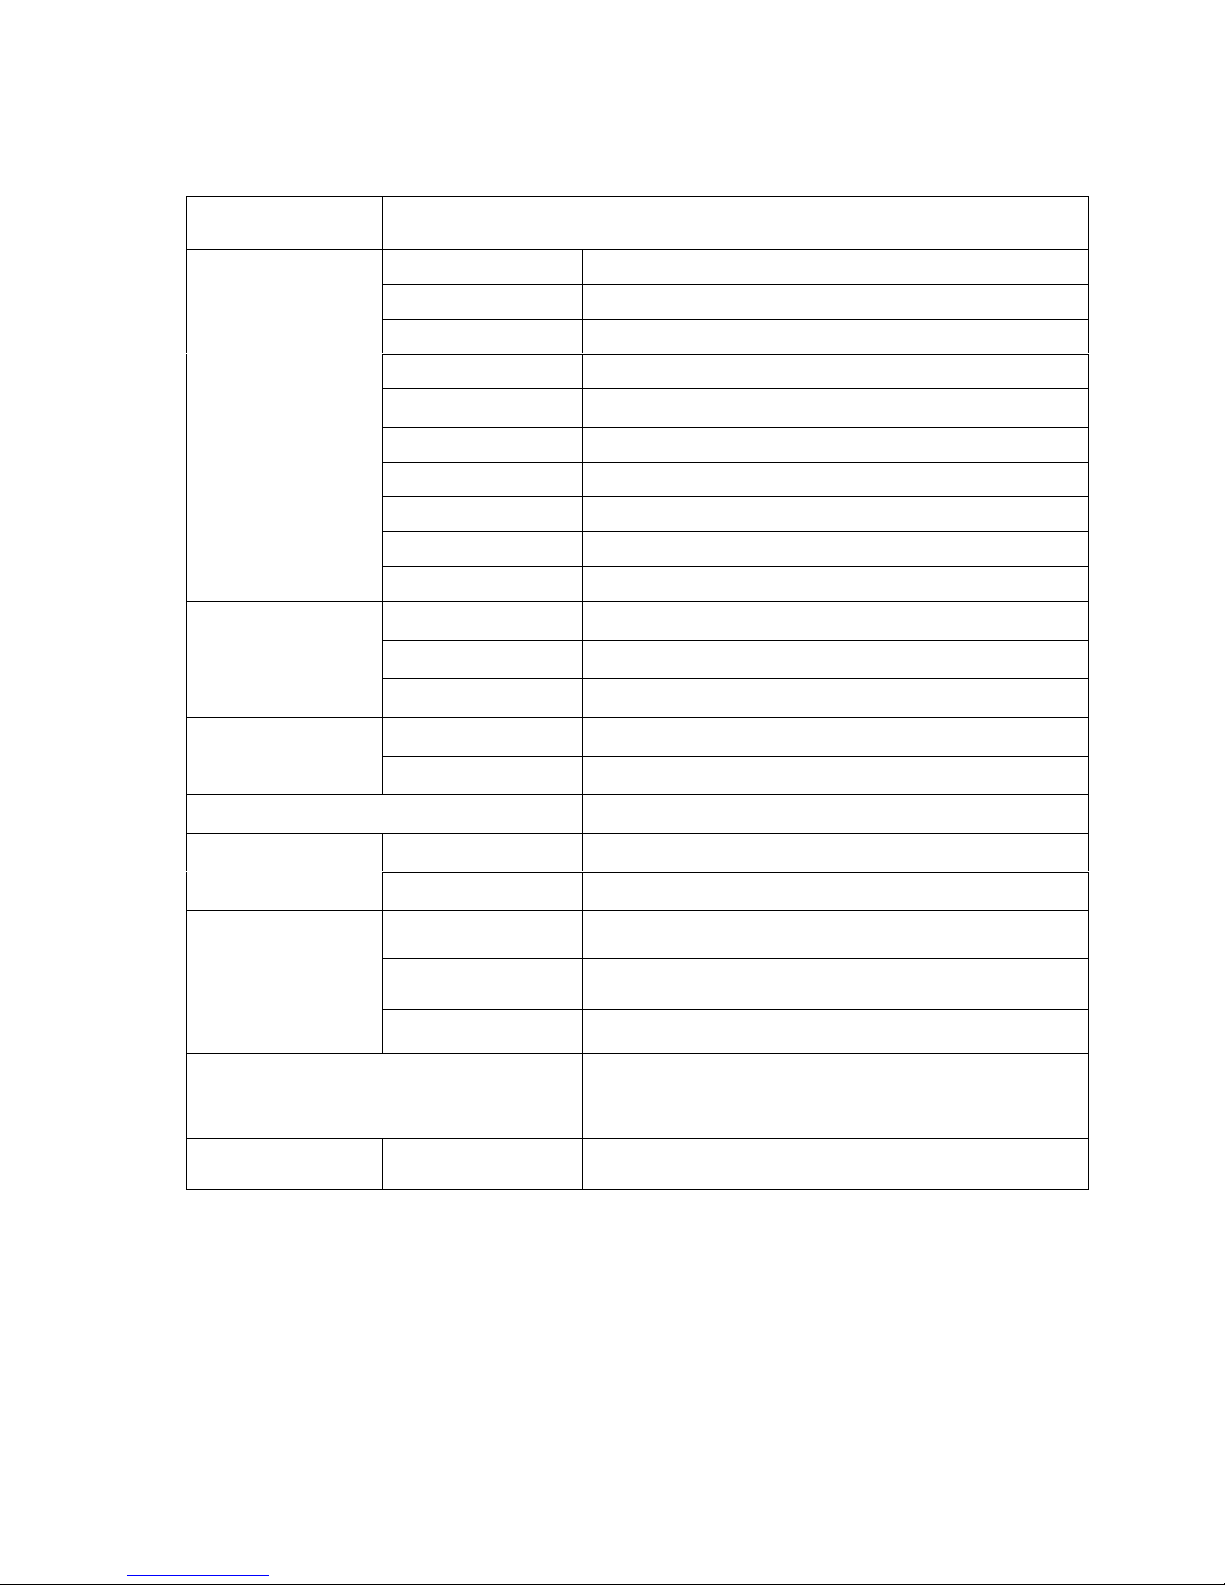
2) Specification
MODEL DCM-150
TYPE a-Si TFT-LCD
LCD Size 15.0” (diagonal length)
Resolution 1024(H) x 768(V)
Pixel Pitch 0.279mm x 0.279mm
Colors 6bit, 262144 Colors (16M colors by dithering)
Contrast Ratio 300 : 1(Typ.)
Brightness
200 cd /㎡
Active Display Area
304.128 mm (H) x 228.096 mm (V)
Viewing Angle
L/R : 60° / 60° U/D : 45° / 45°
LCD
Interface LVDS
Other VGA, SVGA, XGA
Optimum 1024 x 768 @ 60Hz
Resolution
Maximum 1024 x 768 @ 75Hz
Operation < 20W
Power
Consumption
DPMS/OFF < 10W
PLUG & PLAY DDC1/DDC2B
Vertical 30~61 kHz
Frequency
Horizontal 56~75 Hz
Input AC 100V~240V, 50~60Hz
Output DC 12V
Power Supply
Adapter
Power Saving VESA DPMS
Package Contents (Standard)
15Pin VGA Cable (D-Sub), AC Adapter, Power
cord, User’s Manual
Weight
1.1Kg (Net)
The present home appliance is certified and approved by EMC/EMI and can be
used in all places including residency area.
- 21 -
Page 22
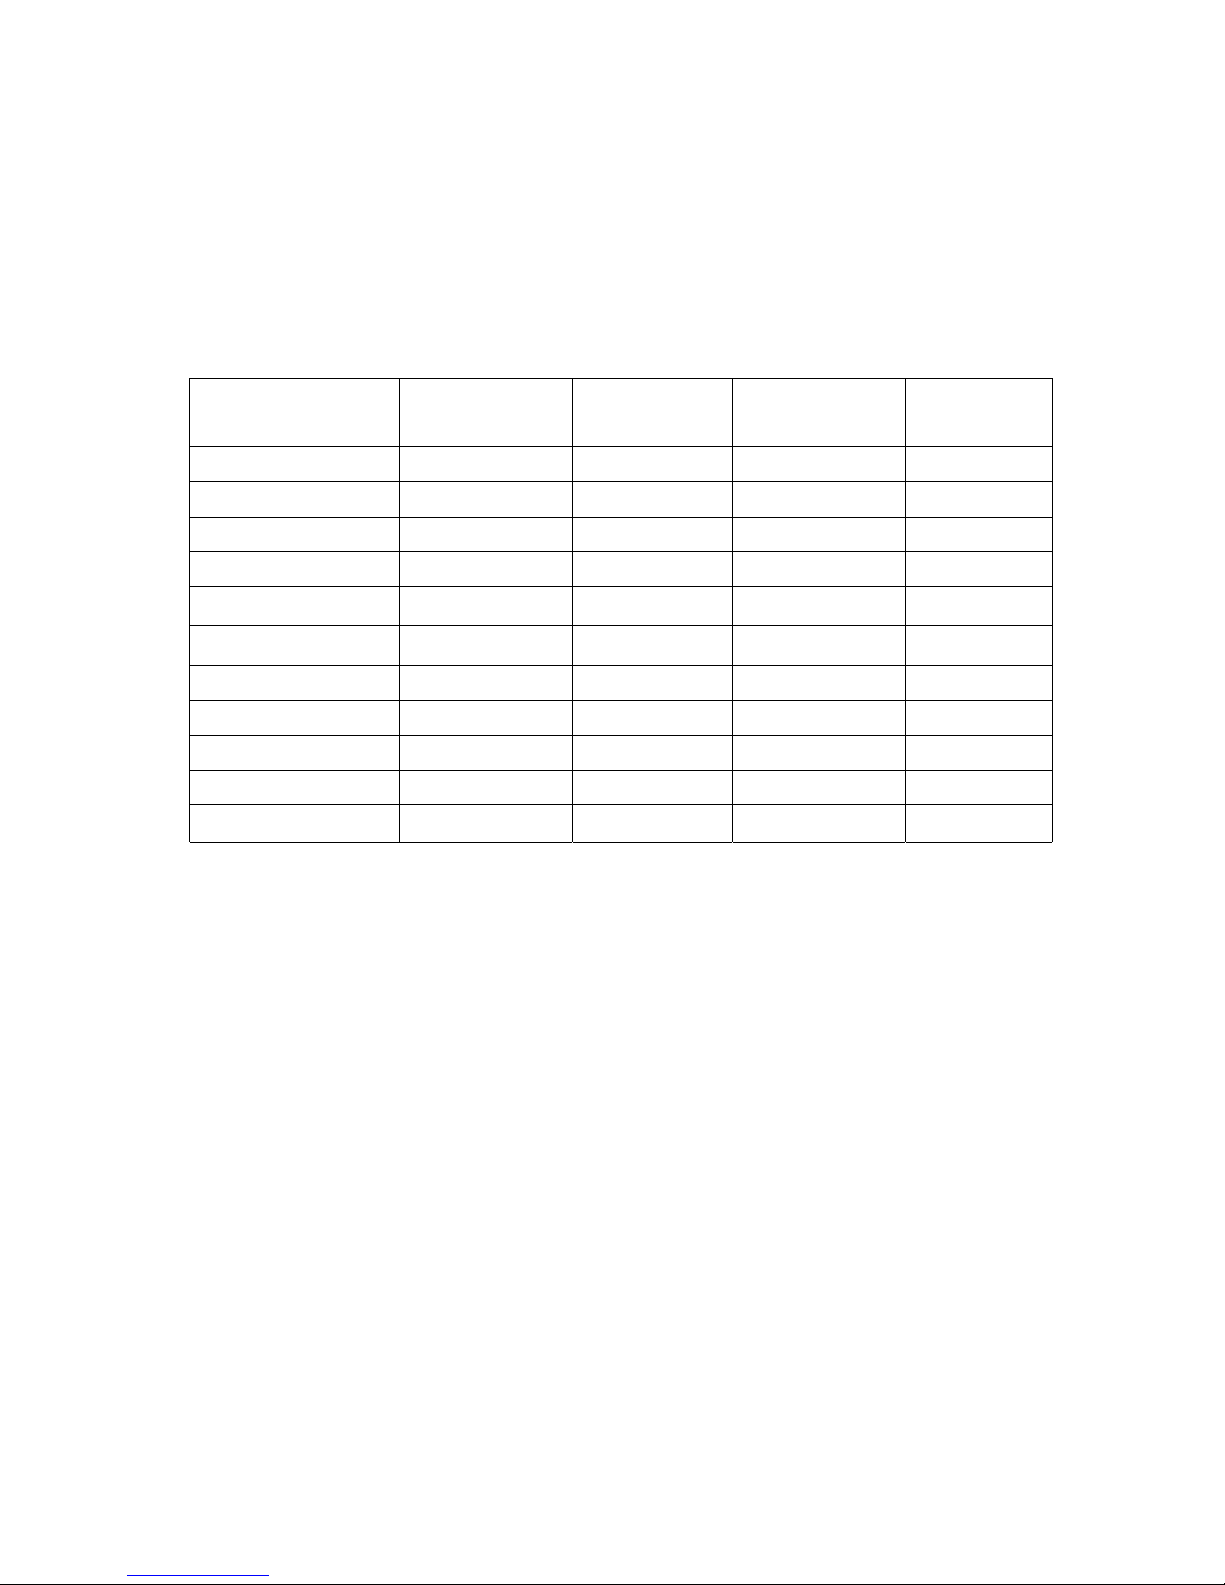
3) The Standard Signal Mode
If the signal from the system corresponds to the standard signal mode, the screen is adjusted
automatically. However, if the signal discords with it, the screen may go blank with the power LED
on or display <Out of Range> error message.
Refer to the display card manual and adjust the screen as follows;
Resolution (H x V)
Horizontal
Frequency (KHz)
Verti cal
Frequency (Hz)
Clock Frequency
(MHz)
Sync Polarity
(H/V)
640*480 31.469 59.94 25.175 - / -
640*480 35 66.667 30.24 - / -
640*480 37.861 72.809 31.5 - / -
640*480 37.5 75 31.5 - / -
720*400 31.469 70.087 28.322 - / +
800*600 37.879 60.317 40 + / +
800*600 48.077 72.188 50 + / +
800*600 46.875 75 49.5 + / +
1024*768 48.363 60.004 65 - / -
1024*768 56.476 70.069 75 - / -
1024*768 60.023 75.029 78.75 + / +
* The table of standard signal modes presented above shows only primary mode suitable for
each resolution level concerned. In most of the cases, the resolution degrees up to XGA (1024
x 768), whether they are included in the table or not, are adjusted automatically to their best
suitable signal mode without additional adjustment by PC graphic card. If the resolution is not
adjusted automatically, please set graphic card’s output mode to signal mode.
* The present unit has Plug and Play function. The computer perceives the monitors as “Basic
Monitor”, “Plug and Play Monitor” or “LCD Monitor”.
- 22 -
Page 23

7. Others & Services
1) Important Safety instructions
Please read the following instructions carefully. This manual should be retained
for future use.
Do not remove the cover or attempt to service this unit by yourselves.
Especially, do not remove the rear cover of the unit as you can be exposed to
electrical shock or any dangerous situation.
You may void the warranty. Servicing of any nature should be performed only by an
authorized technician.
Do not place anything on top of the monitor. It can cause a deformation.
Exposing the monitor to rain, water, moisture or sunlight can severely damage it.
You need a stable level and clean surface near a wall outlet to install a monitor.
If you disconnect a VGA cable(DVI cable) from a monitor when power is on, it can
cause a severe damage to LCD. Please make sure that you should turn off the
power of monitor if you need to disconnect a cable.
When you move or handle the monitor, you should pack the monitor before moving
and be careful from an impact or drop.
Do not apply pressure to the LCD screen. It can cause a permanent damage to the
LCD.
To clean the LCD monitor screen, please make sure the monitor is turned off. Do
not spray liquid cleaners directly on to unit. Stand away form the LCD monitor and
spray cleaning solution on to a rag.
- 23 -
Page 24

2) Concerning Services
For the product’s functional trouble occurred in use, client can benefit from the warranty
during one year from the date of purchase. However, all services for the troubles caused
by client’s erroneous use or by natural calamity will be charged even during the term of
warranty validity.
Situations of charged services (client’s responsibility to pay)
All services will be charged even during the term of warranty validity if requested in the
situations as below
1. The product went out of order because you had put foreign objects (water, liquor,
coffee, etc.)
2. The product is damaged or out of order because you dropped it or the unit was
exposed to a shock.
3. The product’s external cover is harmed or degraded by organic substances such as
thinner or benzene.
4. Some accessories are lost or damaged due to the client’s voluntary disassembly of the
product.
5. The product fell out of order due to the accessories used other than those supplied by
manufacturer. (adapter, etc.)
6. The product fell into trouble due to the wrong voltage applied.
7. The product fell out of order after being serviced by someone other than our client
service staff.
8. Natural calamity (thunderbolt, fire, storm, flood, gas, sea wind, earthquake, etc.) caused
trouble to the product.
9. User did not respect the present instructions manual and caused trouble to the product.
10. The product has trouble due to client’s other faults.
11. If the purchase date cannot be recognized, we count the quality guarantee term from
the first day of the third month after the date of manufacture.
- 24 -
Page 25
Digital Cynos Co., Ltd.
3-906, DaeRyung Technotown, 448, Gasan-dong
Geumcheon-gu, Seoul, 153-803 Korea
Tel) 82 / 2-2107-3450
Fax) 82 / 2-2107-3454
E-mail) [email protected]
URL) www.cynos.co.kr
- 25 -
 Loading...