

Page 1
88067 Talking Digital Camera
User‟s Manual
© 2010 Sakar International, Inc. All rights reserved.
Windows and the Windows logo are registered trademarks of Microsoft Corporation.
All other trademarks are the property of their respective companies.
Page 2

1
Table of Contents
Introduction ......................................................................................................................... 2
Key Features ....................................................................................................................... 2
What your digital camera includes ....................................................................................... 2
Computer System Requirements for Windows XP ............................................................... 3
Computer System Requirements for Windows Vista ............................................................ 3
Computer System Requirements for Macintosh ................................................................... 4
A Quick Look at your Digital Camera ................................................................................... 4
Inserting Batteries ............................................................................................................... 5
Starting Your Camera .......................................................................................................... 6
Taking Photos ..................................................................................................................... 7
The Camera Modes ............................................................................................................. 8
Install the Dora the Explorer Snapshots Software .............................................................. 14
Connect your camera to the computer ............................................................................... 15
Get photos and videos from your camera to your computer ............................................... 15
Get started! ....................................................................................................................... 17
Using Your Camera as a Webcam .................................................................................... 18
Sakar Warranty Card ......................................................................................................... 20
Technical Support ............................................................................................................. 22
Technical Specifications .................................................................................................... 23
Frequently Asked Questions .............................................................................................. 24
Page 3

2
Introduction
Thank you for purchasing the 88067 Talking Digital Camera. Everything you need to take
quality digital photos and videos is included with your device. Please read this manual
carefully FIRST in order to get the most out of your digital camera.
Important Notice:
Please do not plug the camera into the USB port of your computer until you
have installed the Dora the Explorer Snapshots software and the camera`s
driver.
Plugging in your camera at this stage will cause the device to not be recognized
by the computer and no images will be downloaded.
Key Features
Dora the Explorer Snapshots software to get photos and videos from your camera, manage
and organize your images by creating albums, edit images using automatic and manual
tools.
Works as a Webcam on Windows and Macintosh computers
3 Voice hints that are alternately heard before taking photos:
“We did it, yeah!”, “Fantastica” and “…giggle…”
What your digital camera includes
Digital Camera
Dora the Explorer Snapshots software and driver Installation CD
USB cable
Strap
Quick Start Guide
Page 4

3
Computer System Requirements for Windows XP
To be able to download photos and videos to your PC, you will need the following minimum
configuration:
Pentium 4 processor or above with Windows XP service pack 2
512 MB RAM, with 150MB of free disk space
1024 x 768 Recommended screen resolution
16-bit color or higher display adaptor
CD-ROM Drive
QuickTime 6 or higher
Microsoft Internet Explorer 7 or higher
Windows Media Player 10 or higher
Computer System Requirements for Windows Vista or 7
To be able to download photos and videos to your PC your will need the following minimum
configuration:
Windows Vista or 7
800MHz processor and 512 MB of system memory
20GB hard drive with at least 15GB of available space
Support for Super VGA graphics
Available USB Interface
CD-ROM drive
QuickTime 6 or higher
Microsoft Internet Explorer 7 or higher
Page 5
4
Computer System Requirements for Macintosh
Macintosh with Intel processor running Mac OS X v10.5 or later
256 MB RAM, 150 MB free disk space
Display: 1024 x 768 or higher-resolution monitor
QuickTime 6 or higher
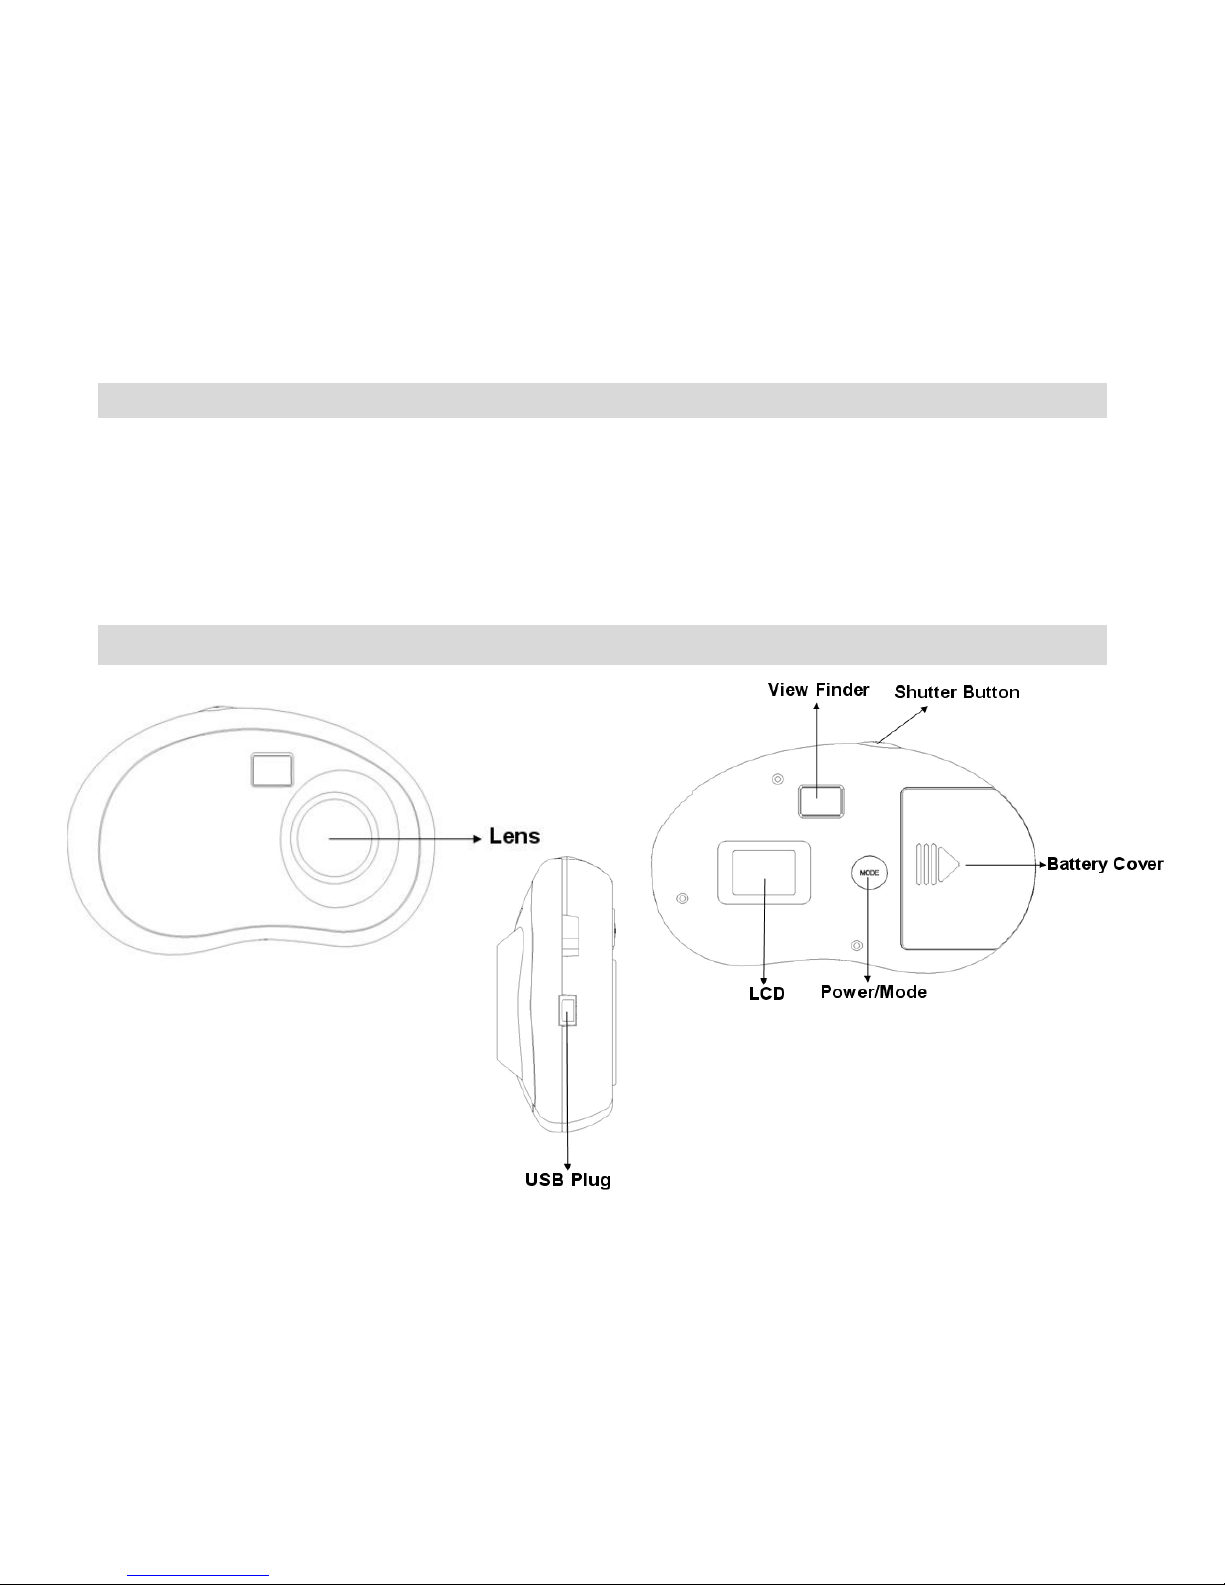
A Quick Look at your Digital Camera
Page 6

5
Inserting Batteries
Your camera requires two AAA batteries. Insert the batteries into the camera:
1. Open the cover of the battery compartment on the back of the camera.
2. Insert the batteries according to the polarities (+ and -) indicated on the
inside of the battery cover.
3. Close the battery cover.
WARNING: Opening the battery compartment and/or removing the batteries will erase
the photos currently stored in the camera. Download your photos as often as possible.
Photos may be lost when the batteries run low.
The LCD will flash when your batteries are running low, in which case you will need to
replace your camera‟s batteries. Please download any photos you have on the camera
before opening the battery compartment. When battery voltage drops to 2.2V the LCD
will display “Lo” and the camera will turn off automatically.
Note: If you do not intend to use your camera for an extended period, remove the
batteries to avoid battery leakage and corrosion.
Page 7

6
Warning:
Please download any photos you have on the camera before opening the
battery compartment
Do not remove the batteries before downloading the photos and videos from
the camera. Doing so will erase everything in the camera`s memory.
Note: We recommend downloading and saving your photos and videos often so as not to
lose them if the battery power becomes too low.
Starting Your Camera
Note: In order to download the photos and videos captured with this camera you need to
install the Dora the Explorer Snapshots and camera specific driver for this device. See
the “Install the Dora the Explorer Snapshots Software” section of this manual to learn
how to install the software before connecting the camera to your computer.
1. Press the MODE button to start the camera.
2. The camera will emit a beep to confirm that your camera is on and ready for use.
3. The current camera resolution will briefly appear on the LCD - for High
Resolution (640 x 480 pixels) and for Low Resolution (320 x 240 pixels).
Page 8

7
Taking Photos
1. Compose your shot using the view finder.
2. Hold the camera steady and press the Shutter button to take the photo.
3. The camera will emit a Dora voice message before the photo is taken.
Note: You need to hold the camera steady until after the voice message ends and a
“click” sound is heard.
4. The photo is saved as a JPEG file in the camera`s memory.
5. The LCD screen will display the number of photos that can be still taken.
If you attempt to take a photo when the memory is full the camera will beep twice
continuously and “ ” will appear on the LCD screen.
Note: The LCD displays the number of photos that may still be taken at the
current resolution and compression. As the LCD can only display 2 digits at the
same time, when the number exceeds 99 the hundreds digit appears briefly
before the last 2 digits appear on the LCD.
Page 9
8
In order to continue taking photos you will need to:
1. Download all the photos and videos from you camera to your computer.
2. After the photos have been downloaded and appear on your computer you
should delete all the photos from your camera.
3. Once your camera memory is empty you are now ready to take more photos
and videos.
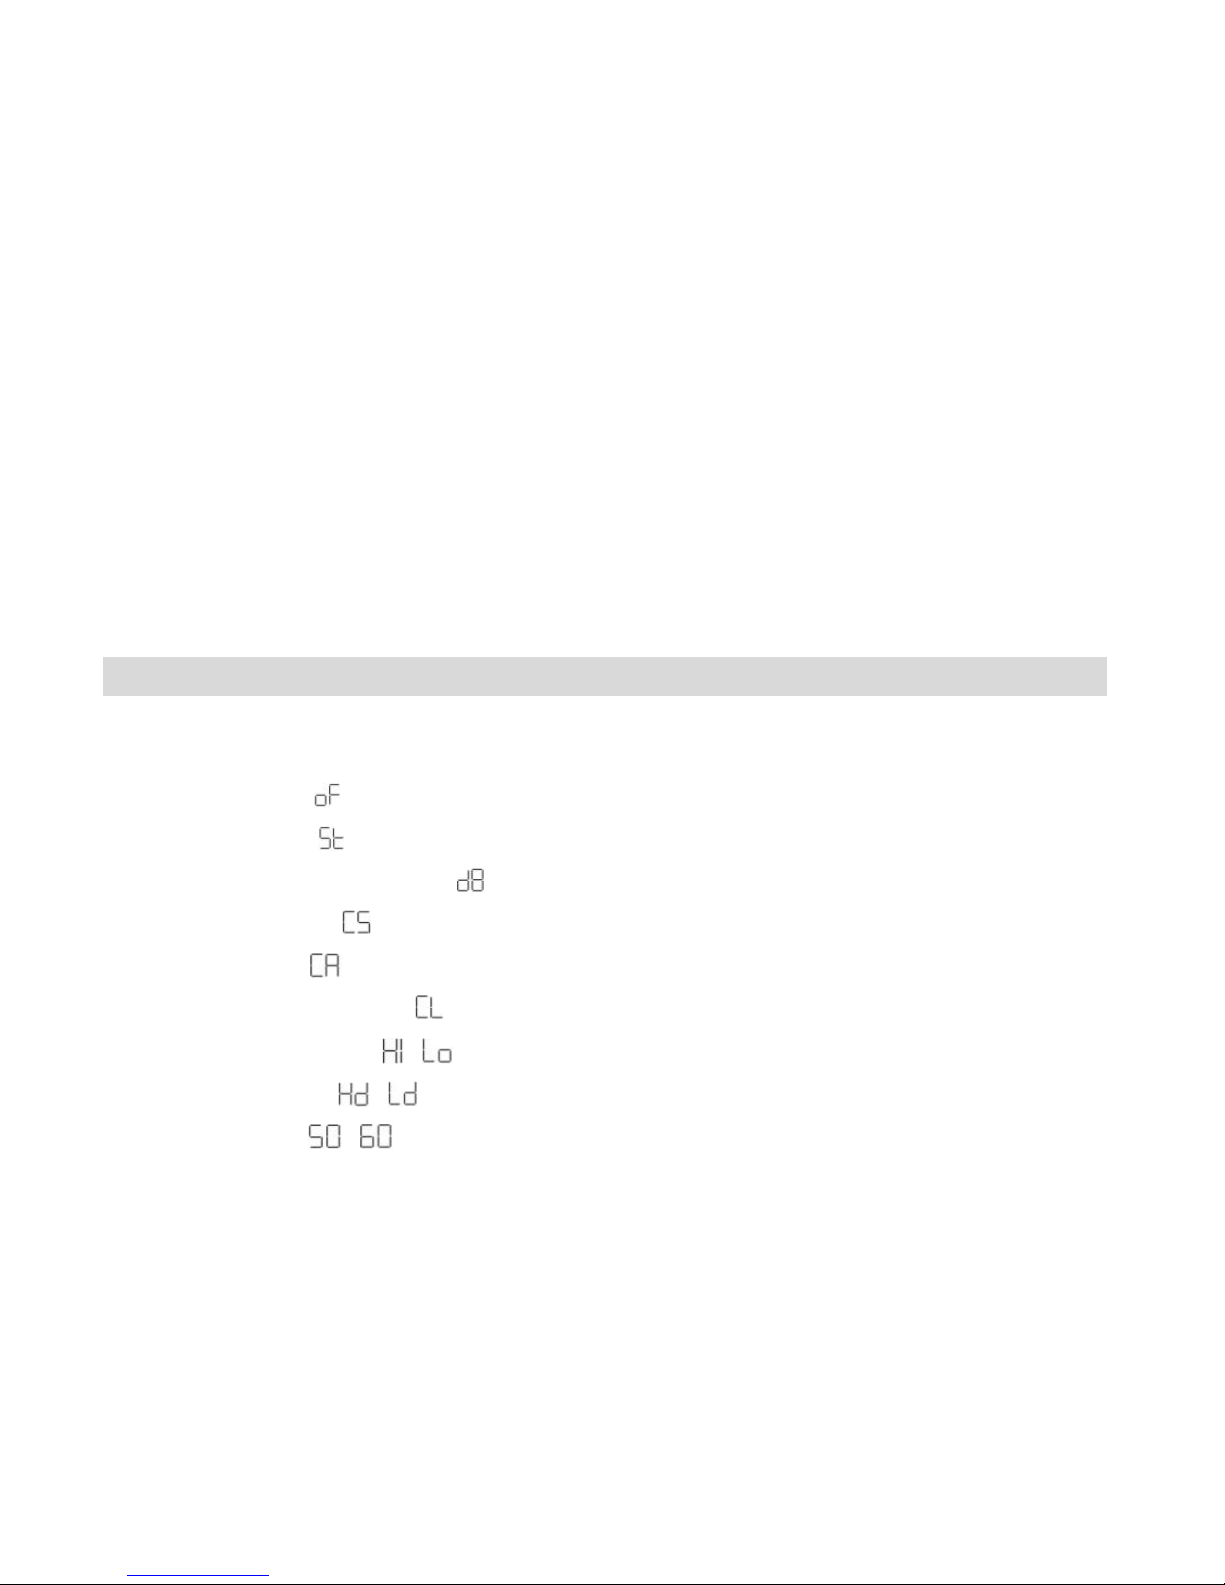
The Camera Modes
You can change the settings of the camera by pressing the MODE button and within 5
seconds press the Shutter button to confirm and save your choice.
Power Off -
Self-Timer -
Continuous Shot Mode - (video)
3 Shot Mode -
Delete All -
Delete (Last Photo) -
Photo Resolution /
Compression /
Frequency /
Page 10

9
Power Off -
1. Press the MODE button for the icon to appear on the LCD screen.
2. Press the Shutter button and the camera will switch off.
Self-Timer -
1. Press the MODE button for the icon to appear on the LCD screen.
2. Press the Shutter button.
3. A 10 second count down will start (the camera will beep once a second).
4. After 10 seconds a photo will be taken.
Continuous Shot Mode - (video)
1. Press the MODE button for the icon to appear on the LCD screen.
2. Hold the Shutter button down for the camera to continuously shoot the video.
3. The camera will beep and the countdown digits will appear all the while the video is being
taken.
4. Lift your finger off the Shutter button to stop shooting the video.
5. The video will be saved as an AVI file with 320 x 240 pixel resolution.
Note: Photos taken in Continuous shot mode may fail under poor lighting conditions.
Page 11

10
3 Shot Mode -
1. Press the MODE button for the icon to appear on the LCD screen.
2. Press the Shutter button once - 3 continuous jpeg shots are taken.
Note: The 3 photos taken in this mode will be downloaded individually.
Delete All -
To delete all photos on the camera:
1. Press the MODE button for the icon to appear on the LCD screen.
2. Press the Shutter button and the photo counter will flash.
3. Press the Shutter button again within 5 seconds and all photos in the camera will
be deleted.
4. The LCD counter will be reset to show the maximum number of photos that can
be taken at the current resolution and compression.
Delete (Last Photo) -
To delete the last photo taken:
1. Press the MODE button for the icon to appear on the LCD screen.
2. Press the Shutter button within 5 seconds and the last photo will be deleted.
Page 12

11
3. The LCD counter will display the updated number of photos that can be taken at
the current resolution and compression.
Photo Resolution / and Compression /
There are 2 photo resolutions to select from, high resolution – or low resolution – .
1. Press the MODE button for the or icons to appear on the LCD screen.
2. If the LCD displays this means the present resolution is . To change to , click the
Shutter button within 5 seconds.
3. If the LCD displays this means the present resolution is . To change to , click the
Shutter button within 5 seconds.
4. All photos taken after changing the resolution setting will be taken at the new resolution.
5. The resolution setting can be changed at anytime.
Note: Photos taken at higher resolution take up more of the camera`s memory and therefore less
photos can be taken at high resolution than with low resolution
There are 2 photo compressions to select from, high density - or low density -
1. Press the MODE button for the or icons to appear on the LCD screen
2. If the LCD displays this means the present compression is . To change to , click
the Shutter button within 5 seconds.
Page 13
12
3. If the LCD displays this means the present compression is . To change to , click
the shutter button within 5 seconds.
4. All photos taken after changing compression will be at the new compression.
5. The compression setting can be changed at anytime.
Note: Photos taken at lower compression take up more of the camera`s memory and therefore
less photos can be taken at lower compression than with high compression.
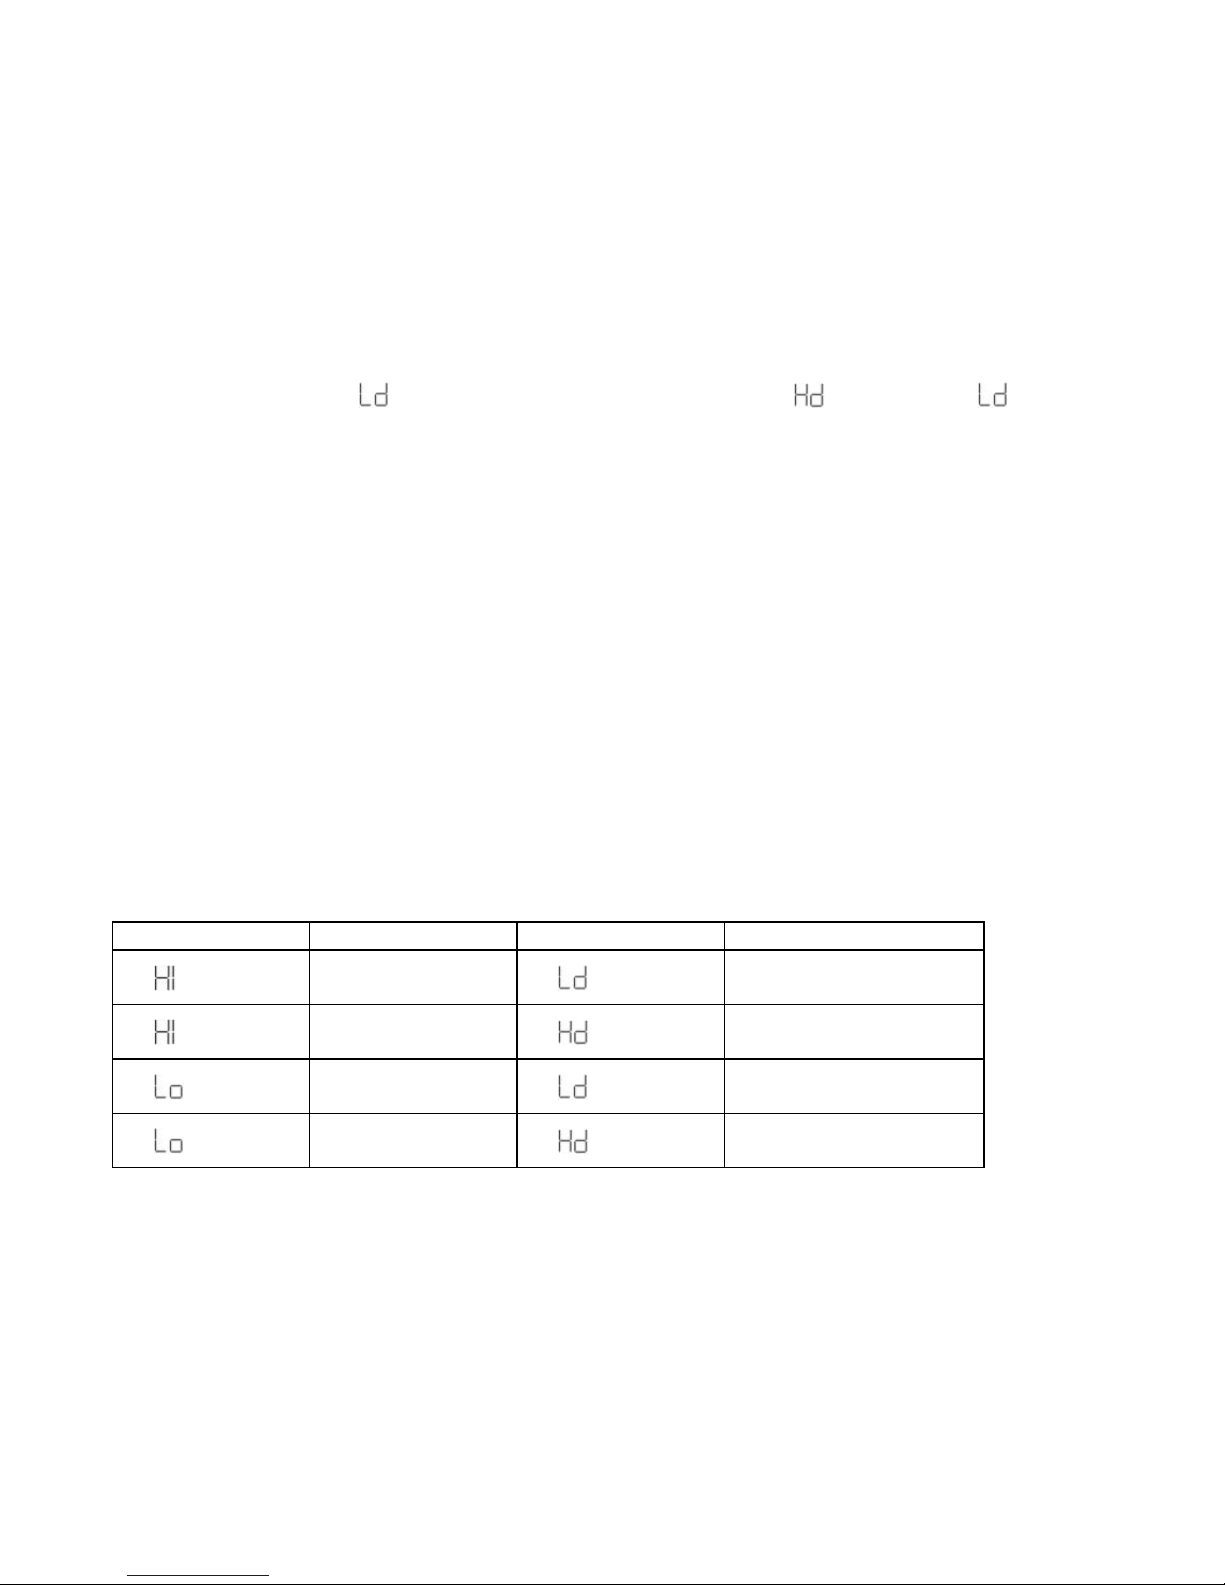
The photo resolution and compression settings determine the number of photos that can be taken
and the amount of memory required for each photo. The following table tells you how many
photos can be taken based on the image resolution and compression:
Resolution
Pixels
Compression
VGA
(640 x 480)
26 photos
VGA
(640 x 480)
52 photos
QVGA
(320 x 240)
104 photos
QVGA
(320 x 240)
About 208 photos
Page 14

13
Frequency - /
The camera has 2 Frequency settings, 50HZ for Asia and Europe, and 60HZ for the
U.S. and Japan. To set the camera for the correct frequency:
1. Press the MODE button for the for 50HZ or the icon for 60HZ icons to appear on the
LCD screen
2. If the LCD displays this means the present frequency is and in order to change to
click the Shutter button within 5 seconds.
3. If the LCD displays this means the present frequency is and in order to change to
click the shutter button within 5 seconds.
4. All photos taken after changing frequency will be at the new frequency.
Energy Save Mode:
To conserve battery power, if the camera is not in use for 30 seconds, it will
automatically power off.
Page 15

14
Install the Dora the Explorer Snapshots Software
Warning: Do not plug your camera into the computer until the Dora the Explorer
Snapshots software installation is complete.
1. Insert the installation CD into your CD-ROM drive. The Dora the Explorer Snapshots will
begin to install.
2. Please review the license terms.
On PC and Macintosh: Click the “I accept the terms of this license agreement” and then
click “Next” to continue.
3. On PC only: Let the “Dora the Explorer Snapshots” installer create the folder to where the
program will be installed, and then click “Install”.
4. Please wait while the application continues the installation process on your computer.
Follow all instructions.
5. On PC: Click the “Close” button when the installation is complete.
The application automatically opens.
On Macintosh: Click the “Quit” button when the installation is complete.
6. If you closed the application, click on the Dora the Explorer Snapshots desktop icon or
open and run the application from the Programs menu on your computer.
Page 16
15
Connect your camera to the computer
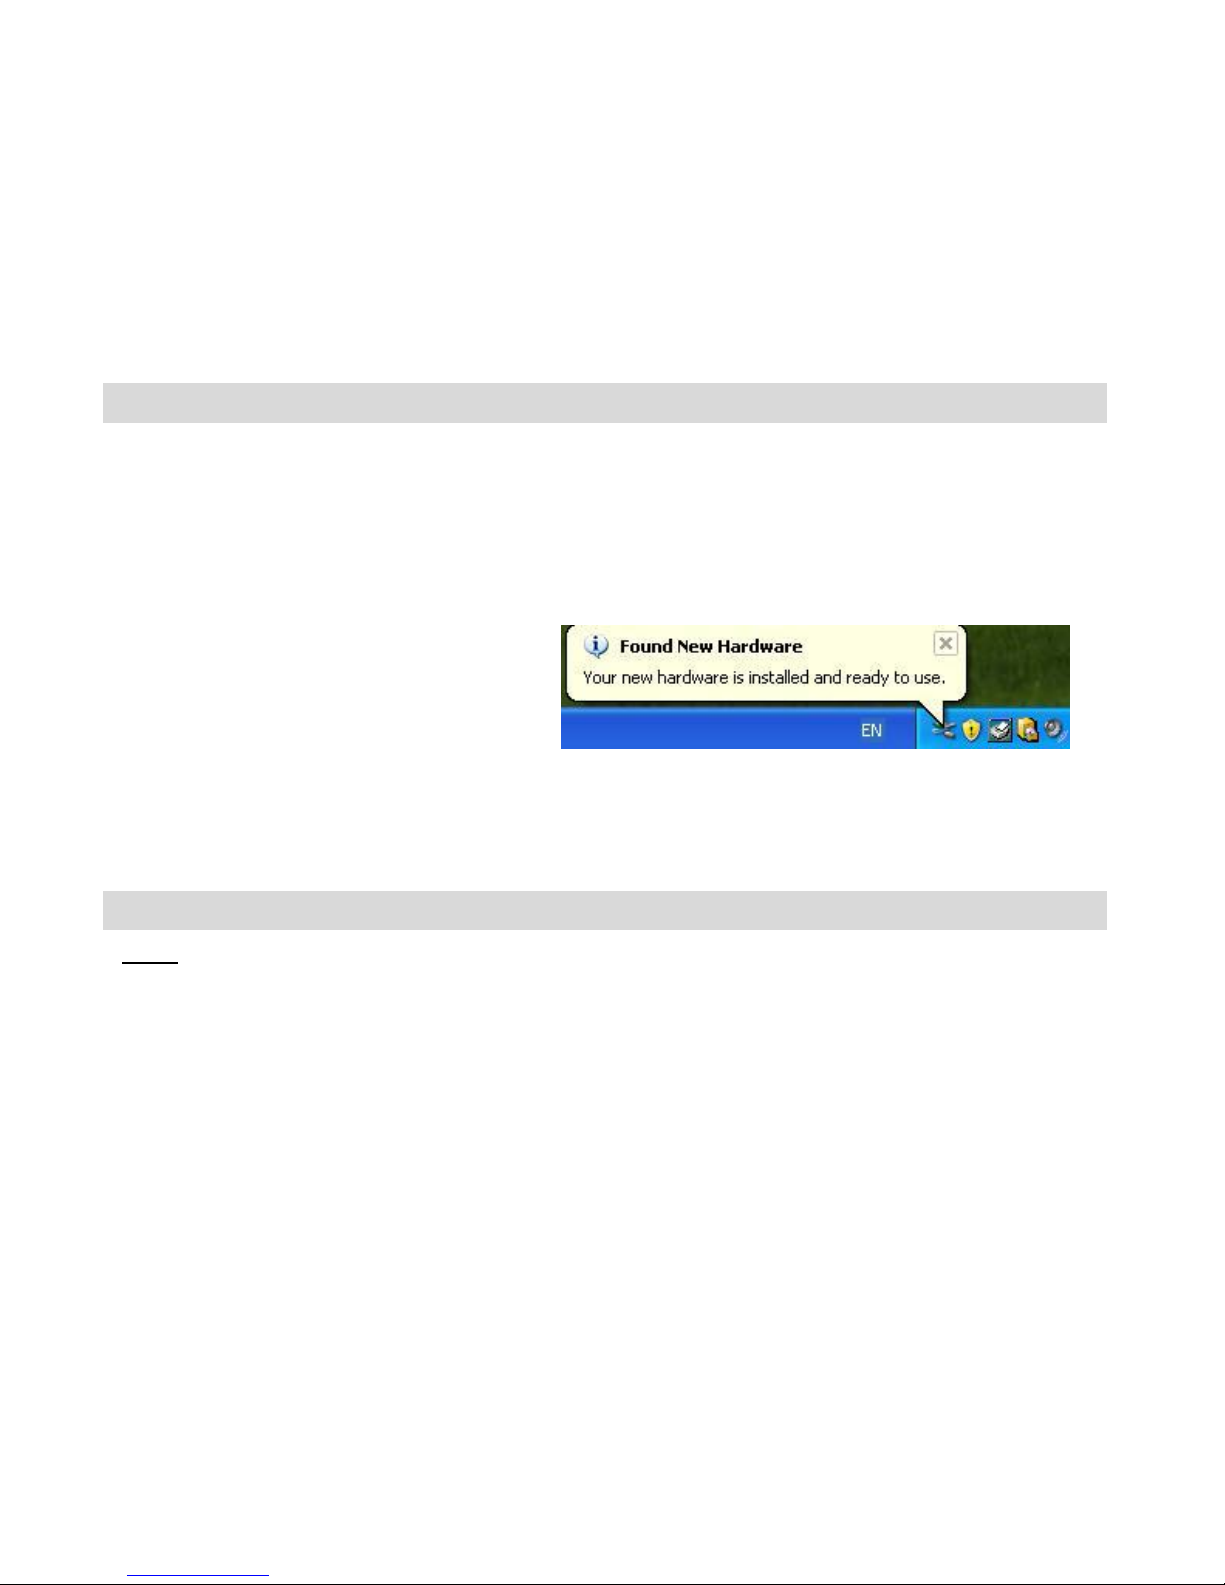
1. Use the USB cable that came with your camera to connect your camera to your computer.
2. Your camera will automatically turn on.
3. The first time you connect the device to the computer you will have to wait a few moments
until the computer recognizes the device.
Get photos and videos from your camera to your computer
Note: The camera can also be used without batteries while connected to the computer with the
provided USB cable. However, the images need to be downloaded before disconnecting the
camera as they will not be stored in the camera`s memory without batteries.
Do not disconnect the cable during transfer. Doing so will cancel the transfer of any files on
their way to your computer.
1. Select the “Get Images” button from the Main menu.
Page 17

16
2. The “Get media from device” window opens.
3. Both photos and videos (if you have captured any) will get downloaded.
4. Select your camera model from the device window. If your camera is the only device
connected then it will be selected automatically.
5. Select a location on the computer where to place the new photo and video files.
6. Add the new photo and video files to albums if desired.
7. Select to remove the media files from the selected device after the import.
8. Click the “Get Images” button to transfer the photos and videos from your camera to your
computer.
Page 18

17
A media download progress window appears in the middle of the screen showing the
number of media files downloading to your computer. A message appears when the
download is complete.
9. The photo and video files that you selected are now downloaded to your computer to the
selected folder and albums ready for your use.
Get started!
Using the Dora the Explorer Snapshots application you can:
Get photos and videos from your camera
Manage and organize your images by creating albums
Edit the images using automatic and manual tools
Use the Creativity Park to create your own – Frame Maker, My Diary or Book,
Scrapbook, Stickers and more...
Play fun games including: Sandwich Shop, Maze Race, Jigsaw Puzzle, Memory and
Sliding Puzzle
For more details on how to use the Dora the Explorer Snapshots, open the Help file or
click the “Take the Tour” button on the application`s Home page.
Page 19

18
Using Your Camera as a Webcam
Your camera when plugged into your computer can also be used as a Webcam with most instant
messenger and web conferencing applications that support video.
On PC: The webcam driver is installed on your computer when you install the software for this
device.
1. Open your web conferencing application to activate the video camera option.
2. Rotating lines will appear on the LCD screen to show that it is active and in webcam
mode.
3. Place your camera and begin to use.
Note:
Use the settings option of your web conferencing application to change the settings if
needed.
If you have a built-in camera on your computer, use the settings option of your web
conferencing application to choose this „Dual Mode Camera‟.
The camera does not have a microphone.
On Mac: The webcam driver is installed on your computer when you install the software for this
device.
To activate the Webcam feature please follow these instructions:
1. Click the “Macintosh HD” icon on the desktop
2. Click the “Library” folder
3. Click the “QuickTime” folder
4. Click the “88067_pccam” to open the Webcam application for Mac.
Page 20

19
5. Rotating lines will appear on the LCD screen to show that it is active and in webcam
mode.
6. Once you see the object appearing in the Webcam application window, you can now
open the instant messenger and web conferencing application that you use to begin using
this camera as a webcam on your computer.
Note:
Use the Control menu / Video settings option of this web conferencing application to
change the settings if needed.
If you have a built-in camera on your computer, use the settings option of your web
conferencing application to choose this „Dual Mode Camera‟.
The camera does not have a microphone.
After you connect your camera to your computer, the camera will remain on all the while it is
plugged into the USB and it won‟t be switched off. On disconnecting the USB cable the camera
will automatically switch off.
Page 21

20
Sakar Warranty Card
This warranty covers for the original consumer purchaser only and is not transferable. Products
that fail to function properly UNDER NORMAL USAGE, due to defects in material or
workmanship. Your product will be repaired at no charge for parts or labor for a period of one
year.
What Is Not Covered By Warranty:
Damages or malfunctions not resulting from defects in material or workmanship and damages or
malfunctions other than normal use, including but not limited to, repair by unauthorized parties,
tampering, modification or accident.
What To Do When Service Is Required:
When returning your defective product (postage pre-paid) for service, your package should
include:
1. Copy of original bill of sale
2. A detailed written description of the problem.
3. Your return address and telephone number (Daytime)
Page 22

21
Mail or return your defective product to the appropriate address:
US and Canada
Sakar International
Attention: Service Department
195 Carter Drive
Edison, NJ 08817
UK and Europe
Sakar UK
2D, Siskin Parkway East
4020 Middlemarch Business Park
Coventry CV3 4PE
For Australia Customers Only
Return faulty camera to the Refund Counter at the store where purchased.
Page 23

22
Technical Support
For technical support issues please visit our website at www.sakar.com. You can find manuals,
software and FAQ‟s at the website. Can‟t find what you are looking for? E-mail us at
[email protected] and one of our technical support team members will answer your questions.
For phone support please call:
US 1-877-397-8200
UK 0800 917 4831
AUSTRALIA 1 800 006 614
If you would like to call from anywhere else, please visit www.sakar.com for your local
toll free number.
International Sales Offices:
Sakar in US
195 Carter Drive
Edison, NJ 08817
Sakar in UK
2D, Siskin Parkway East
4020 Middlemarch Business Park
Coventry CV3 4PE
Sakar in Australia
16 Aquatic Drive
French‟s Forest
NSW 2086
Page 24
23
Technical Specifications
Image Sensor
¼ inch CMOS
Image Specification
640*480 (VGA); 320*240 (QVGA)
Memory
16MB SDRAM
Number of pictures
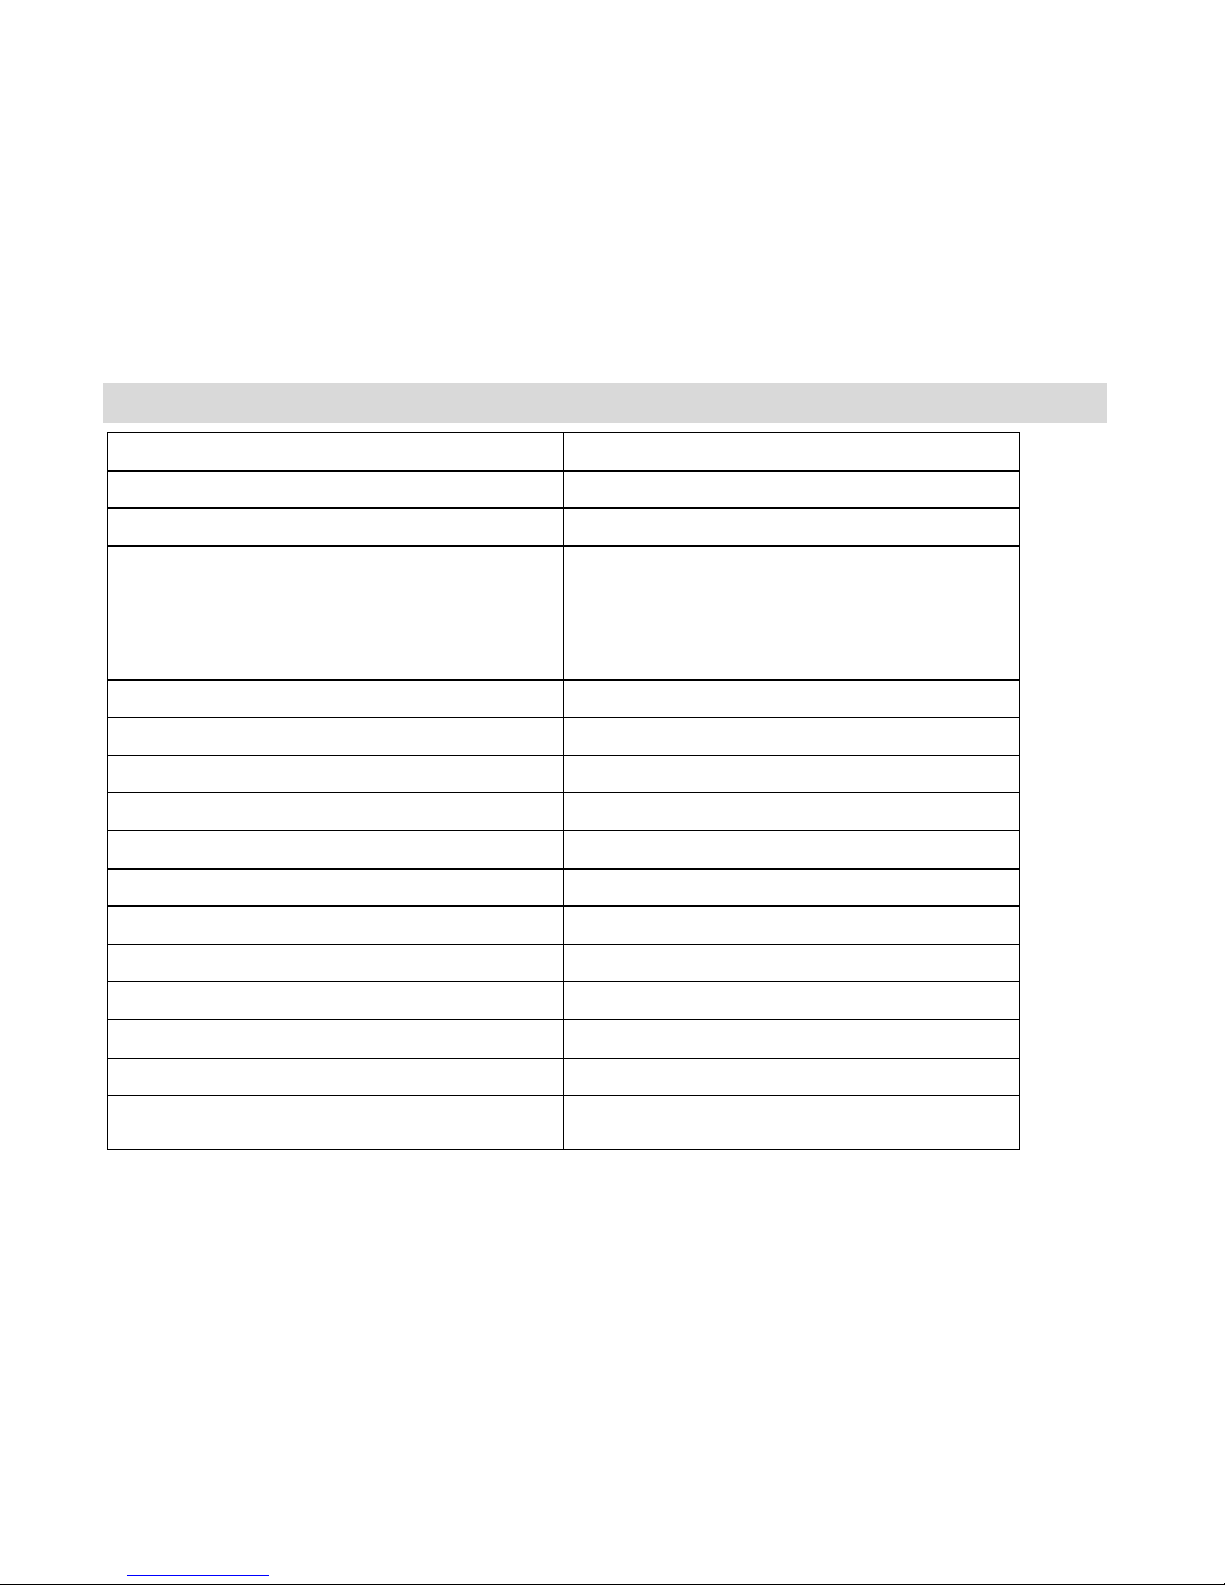
Hi (VGA) 26; Lo (QVGA) 104 ( Ld noncompressed mode)
Hi (VGA) 52; Lo (QVGA) 208 ( Hd
compressed mode)
Lens
¼ inch Fixed Lens: f=3.9mm/F2.8
AVI pixel format
320 * 240 pixels
Shutter speed Range
1/60~ 1/1500 second
LCD display
2 digit display
Self-Timer
Timer with 10 sec. delay
Frame rate
12 frames per second
Video Frame rate
6 – 8 frames per second in d8 mode
Exposure/ White Balance
Auto/Automatic
Power source
2X1.5V AAA alkaline / USB 5V
Auto power off
30 sec.
PC interface
USB 1.1
Operating systems
Windows XP/Vista/7/Mac OS X 10.5 or
higher
Page 25

24
Frequently Asked Questions
Q: I have taken photos, but my computer says "No photos in camera" or “No device is
connected to the computer.” What do I do?
First, ensure that you have taken photos with your camera. Press the shutter button a few times to
take some sample photos and try again.
If a message “No device is connected to the computer” appears, this indicates that
1. The USB cable is not correctly connected to the camera`s USB port and/or to the
computer`s USB port
2. The software was not installed correctly on your computer and needs to be
reinstalled
3. The computer may not meet the minimum system requirements (see the Computer
System Requirements section of this manual).
Q: How do I make sure I don't lose important pictures?
Your camera uses SDRAM memory, which requires a constant electric current to store your
photos.
Should your camera lose power (for instance if the battery dies or run out of power) all stored
pictures will be lost. We recommend always downloading your photos to your computer as soon
as possible to prevent unintentional data loss.
Q: If I have a MAC, will the device work?
Yes. This twain camera also works as a Digital camera and Webcam on Macintosh computers.
Q: If the webcam does not work?
Make sure you have connected the camera correctly into an available USB port or hub, you are
connected to the internet and the webcam application is opened.
A00 – 160110GES
 Loading...