

Page 1
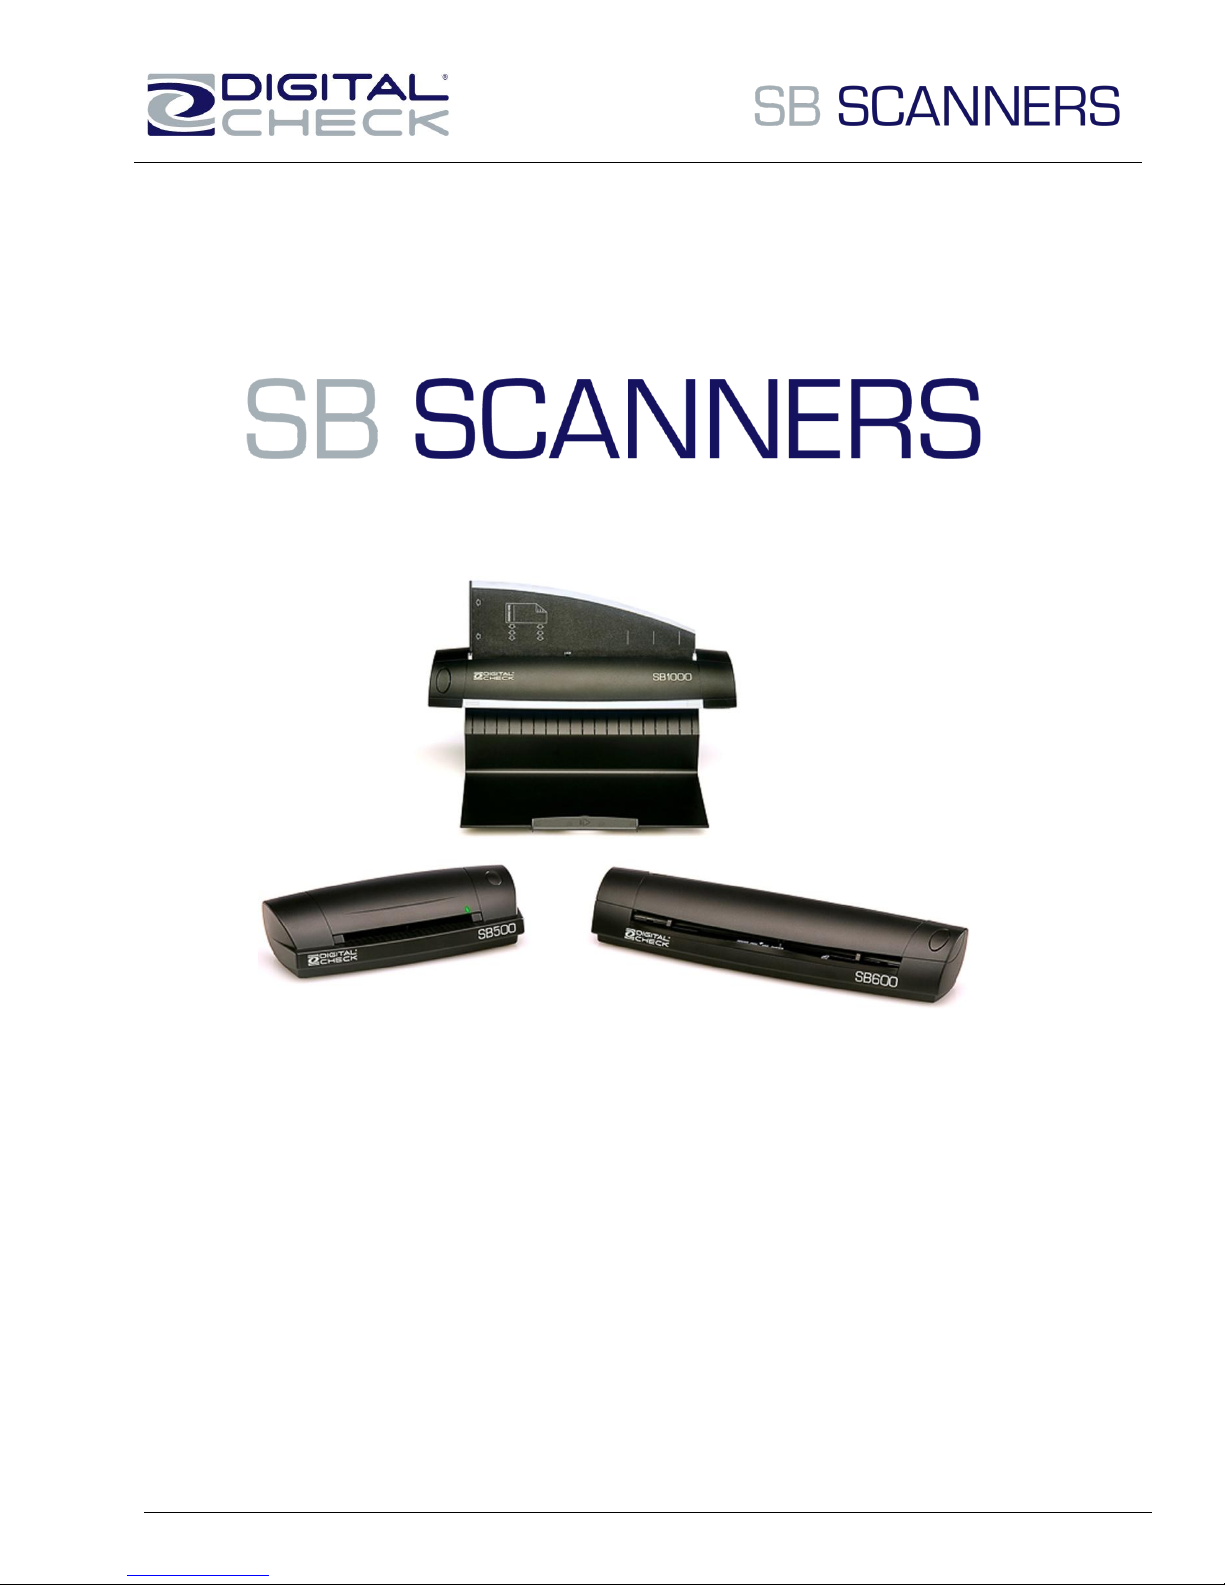
500/600/1000
User Manual
June 2011
Rev. 061311
1 v061311
Page 2

TABLE OF CONTENTS
http://shopping.netsuite.com/digitalcheck
Contents
Radio Frequency Interference ......................................................................................... 3
About the SB Scanner ..................................................................................................... 3
SB Scanner Equipment ................................................................................................... 4
SB Scanner Equipment Checklist ................................................................................... 4
SB Scanner System Requirements ................................................................................. 4
Installing the Optional USB Driver ................................................................................... 5
Install Scanner Driver Software ....................................................................................... 5
Uninstall Scanner Driver Software................................................................................... 6
Getting Started with the SB Scanner ............................................................................... 7
Install Scanner hardware ................................................................................................. 7
Initial Scanner Image Calibration .................................................................................... 9
Loading ID cards into the SB500 Scanner .................................................................... 10
Loading Other Items into the SB Scanners ................................................................... 11
SB Scanner Troubleshooting ........................................................................................ 12
Clearing Jams ............................................................................................................... 12
Document Feeding Problems ........................................................................................ 12
Check Images are streaking or fading ........................................................................... 12
Cleaning the Scanner .................................................................................................... 12
Common Error Codes from the Scanner ....................................................................... 14
SB Scanner Specifications ............................................................................................ 15
2 v061311
Page 3

Radio Frequency Interference
CE Conformity and FCC Statement
This equipment has been tested and found to comply with the limits of the European Council Directive on the approximation
of the member states relating to electromagnetic compatibility according to EN
55022/55024 Part 15 B
This equipment has been tested and found to comply with the limits for a Class B digital device, pursuant to Part 15 of the
FCC Rules. These limits are designed to provide reasonable protection against harmful interference in a residential energy
and, if not installed and used in accordance with the instructions, may cause harmful interference to radio communications.
However, there is no guarantee that interference will not occur in a particular installation. If this equipment does cause
harmful interference to radio or television reception, which can be determined by turning the equipment off and on, the user
is encouraged to try to correct the interference by one or more of the following measures:
Reorient the receiving antenna
Increase the separation between the equipment and receiver
Move the computer away from the receiver
Connect the equipment into an outlet on a circuit different from that to which the
receiver is connected
Trademarks
Windows, Windows 2000, 2003, XP, Vista and Microsoft are the registered trademarks of Microsoft Corporation. Adobe
ACROBAT Signature is registered trademarks or trademarks of Adobe Systems Incorporated in the United States and/or other
countries.
About the SB Scanner
Thank you for purchasing our SB Scanner.
We have designed this product to provide the user with a simple but effective tool to
capture, manage and archive documents of many types. We encourage you to read
this short, but important User Manual carefully.
Your SB Scanner has the latest technology and compatible drivers. These drivers are
tested and certified by our in-house testing lab to be compliant with Windows 7,
Windows Vista, Windows XP (SP2), 2003(SP2), Windows 2000 (SP4) operating
systems. We also feature a TWAIN 1.9 compatible driver that will work with hundreds
of imaging applications. If you experience any difficulty with these drivers, please
check our website www.digitalcheck.com to verify that you are using the latest
version.
3 v061311
Page 4
Recommended
Minimum
2.4 GHz Pentium IV processor or
faster.
2 GB RAM
1.6 GHz Pentium processor
512MB RAM
1.5 GB free disk space
1.5 GB free disk space
XP Professional, Vista, 7
Windows 2000, XP Professional
& Vista, 32 bit
USB 2.0 port
USB 2.0 port
SB Scanner Equipment
SB Scanner Equipment Checklist
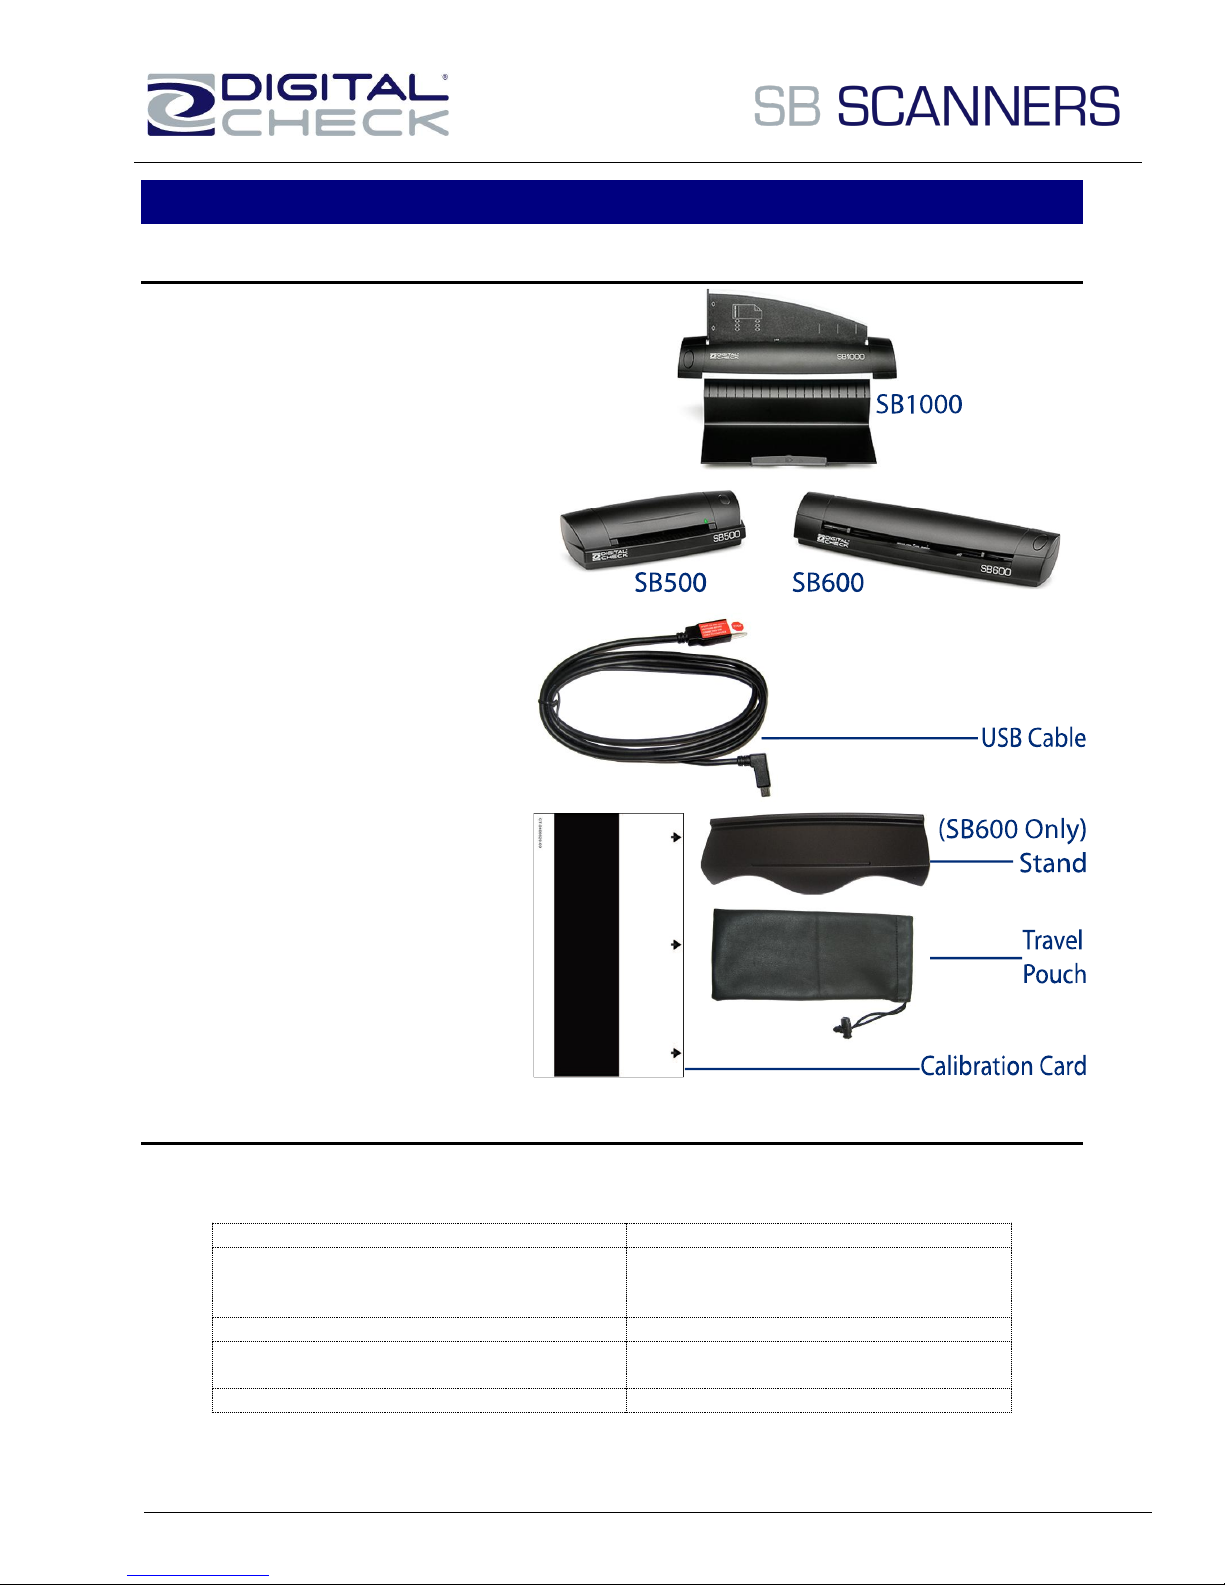
The SB Scanner package
includes the following pieces:
SB Scanner (model 500, 600 or 1000)
USB 2.0 Cable
Image Calibration Card
Travel Pouch (SB500 and 600 only)
Travel Stand (SB600 only)
SB Scanner System Requirements
The following PC specifications are required to operate the SB Scanner with your
scanning application software:
4 v061311
Page 5
Installing the Optional USB Driver
** FOR BEST RESULTS PLEASE INSTALL YOUR SOFTWARE
BEFORE CONNECTING THE SCANNER TO YOUR COMPUTER **
The typical application will automatically install all
necessary scanner drivers. Please contact your bank or check
scanning solution provider for assistance before proceeding.
The enclosed CD contains the standard Windows SB driver, which also installs
the TWAIN driver. Follow your bank’s instructions before using this CD.
Install Scanner Driver Software
a) Insert the installation CD into your CD-ROM drive.
Fig. 1 Fig. 2
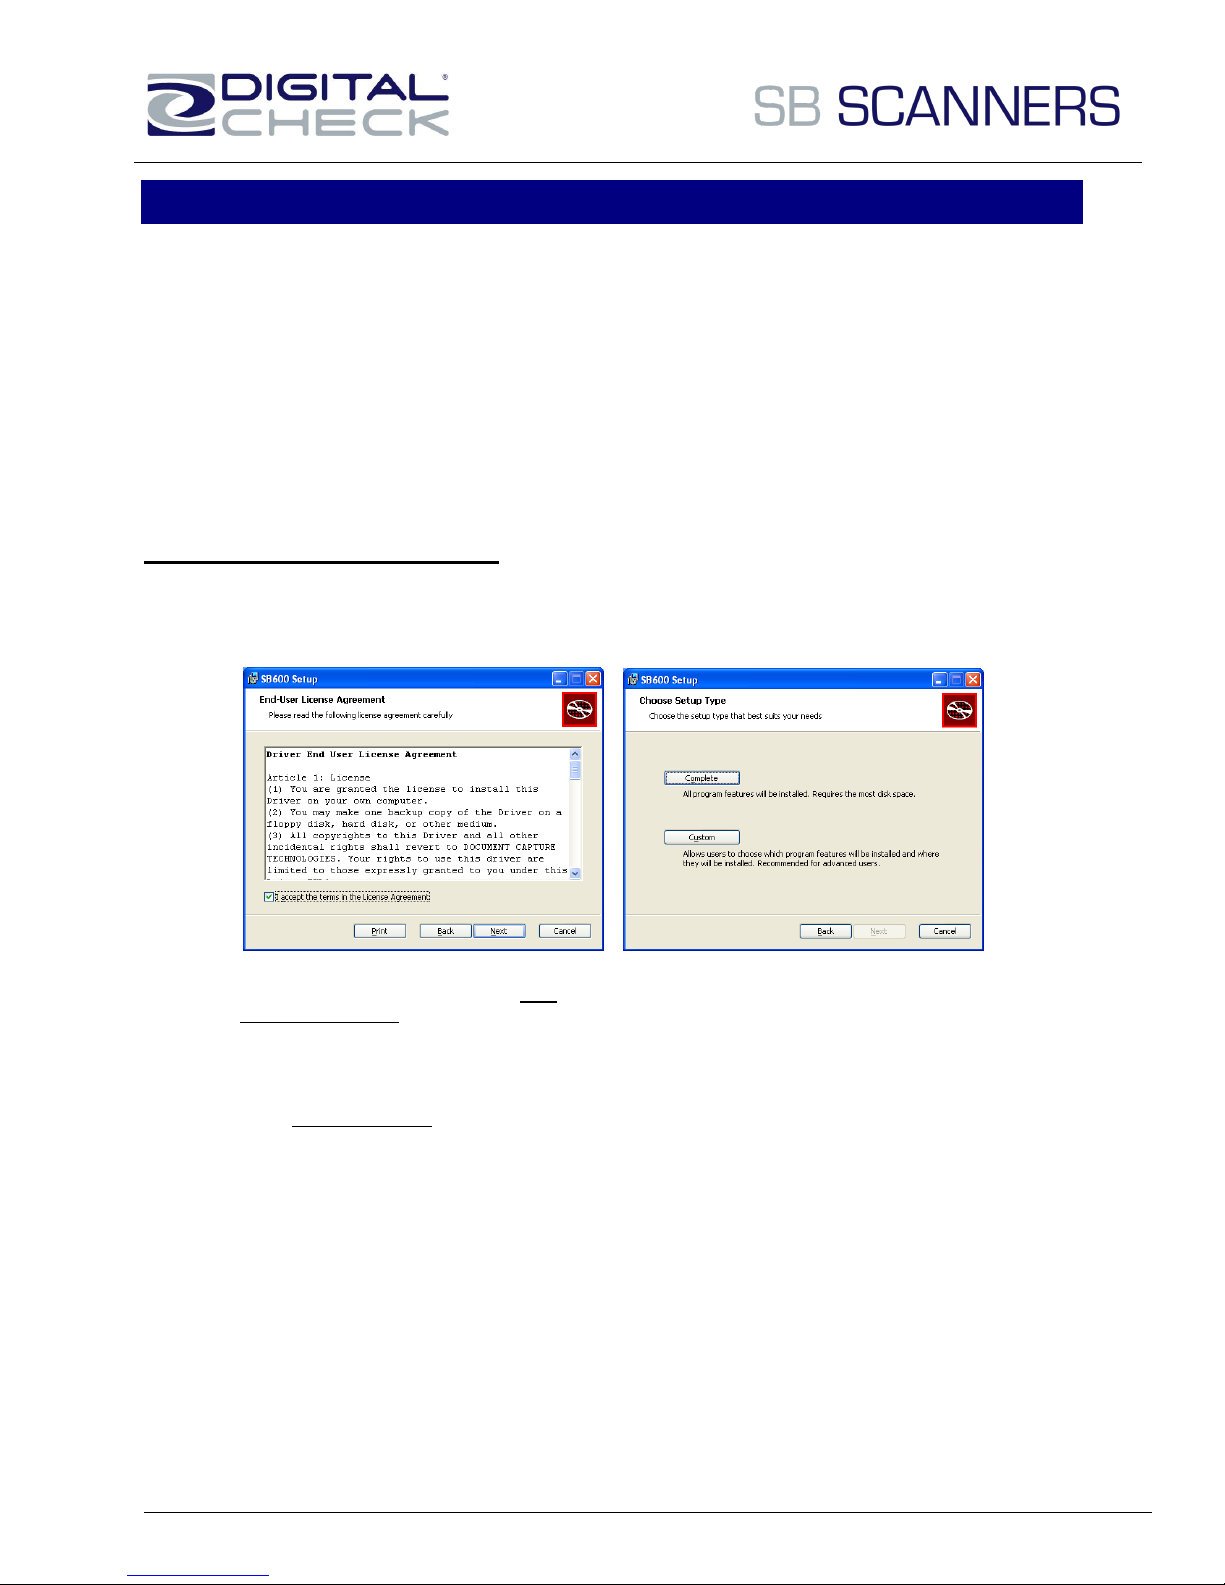
b) Check the EULA accept box then click “Next” (Fig. 1) above.
c) The Choose Setup Type window shows two choices of installations, select the “Complete” button and allow
the full installation (Fig. 2) above.
d) During the installation the Windows Logo screen might appear stating that the software is not Windows
certified.
e) We assure you that our software driver has been fully tested to function properly under Windows environment,
select the “Continue Anyway” button to proceed with the installation, if it displays. (Fig. 3).
5 v061311
Page 6
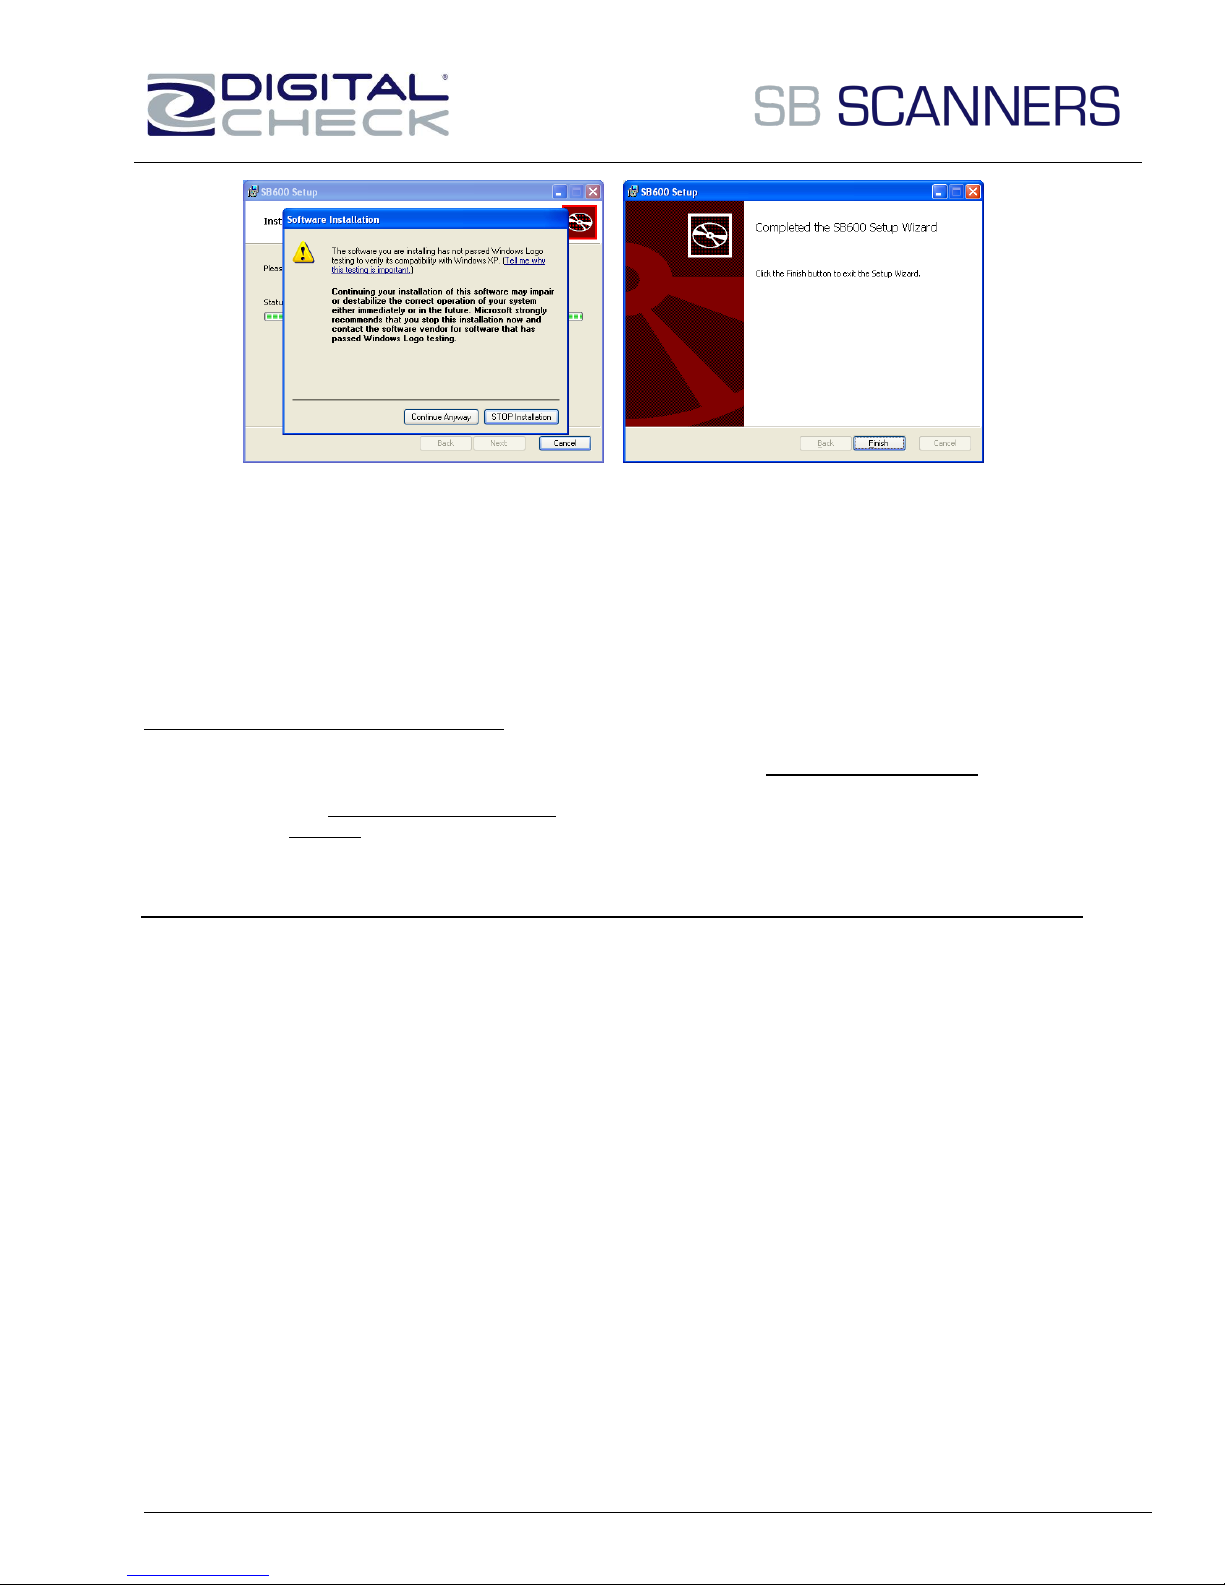
Fig. 3 Fig.4
f) You can now connect the scanner to the PC.
Uninstall Scanner Driver Software
a) If you should need to un-install the scanner driver, you can do so from Add or Remove Programs.
b) Go to: START / Control Panel / Add or Remove Programs.
c) From the list of Currently Installed Programs select your scanner model - SB500/600/1000.
d) Select the Remove button and your driver will be removed from your system.
e) It is important that the scanner is connected to your computer when performing this function.
f) You can also uninstall your PageManger7 or Adobe Reader applications from here.
6 v061311
Page 7
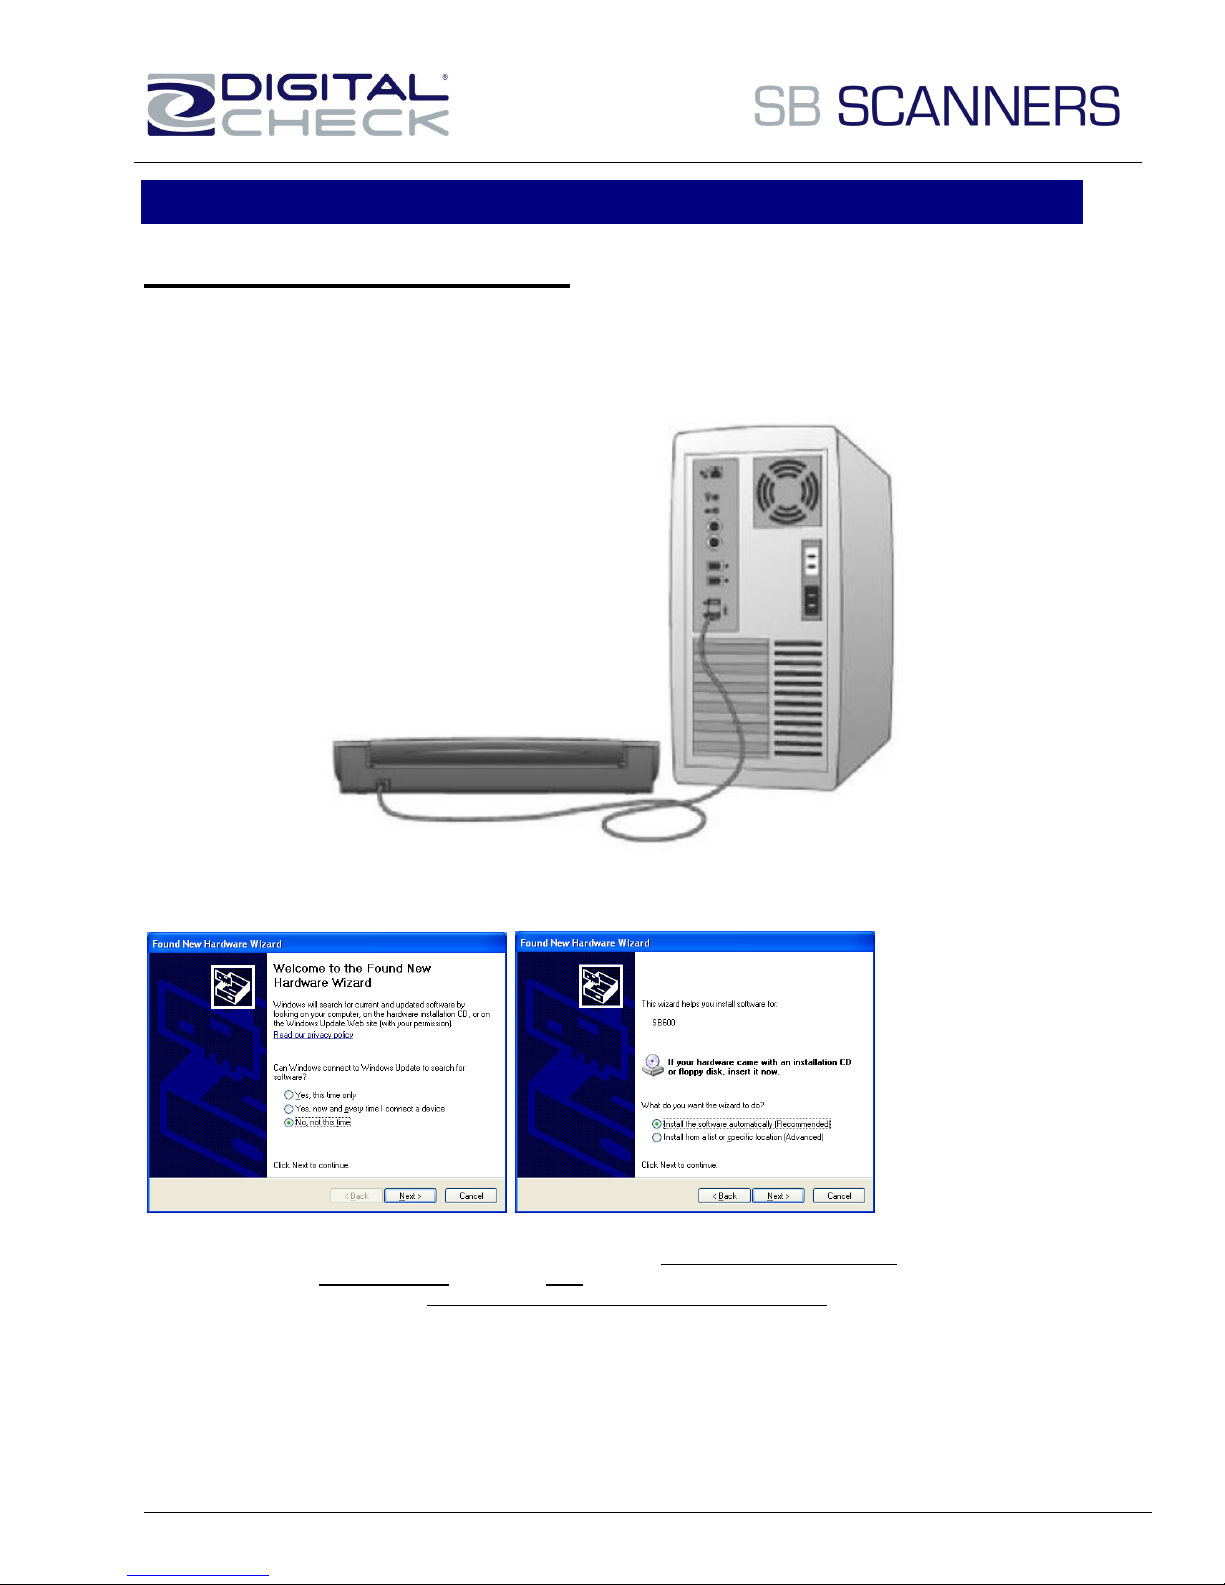
Getting Started with the SB Scanner
Install Scanner hardware
a) Connect the USB cable (provided) to your computer and scanner. (Fig. 1)
b) Make sure the red warning label is removed before connecting this end to your computer.
c) You may need to reconnect the cable to another USB port on your computer if the scanner cannot be
detected. (Check your computer’s user guide to identify other available USB ports and their locations.
Fig. 2 Fig. 3
d) Once your scanner is connected to your computer, the “Found New Hardware Wizard” window will appear.
Choose the “No. not this time” then click “Next”. (Fig. 2)
e) Make sure you select the “Install the software automatically (Recommended)” option in the second screen
that follows. (Fig. 3)
Fig. 1
7 v061311
Page 8
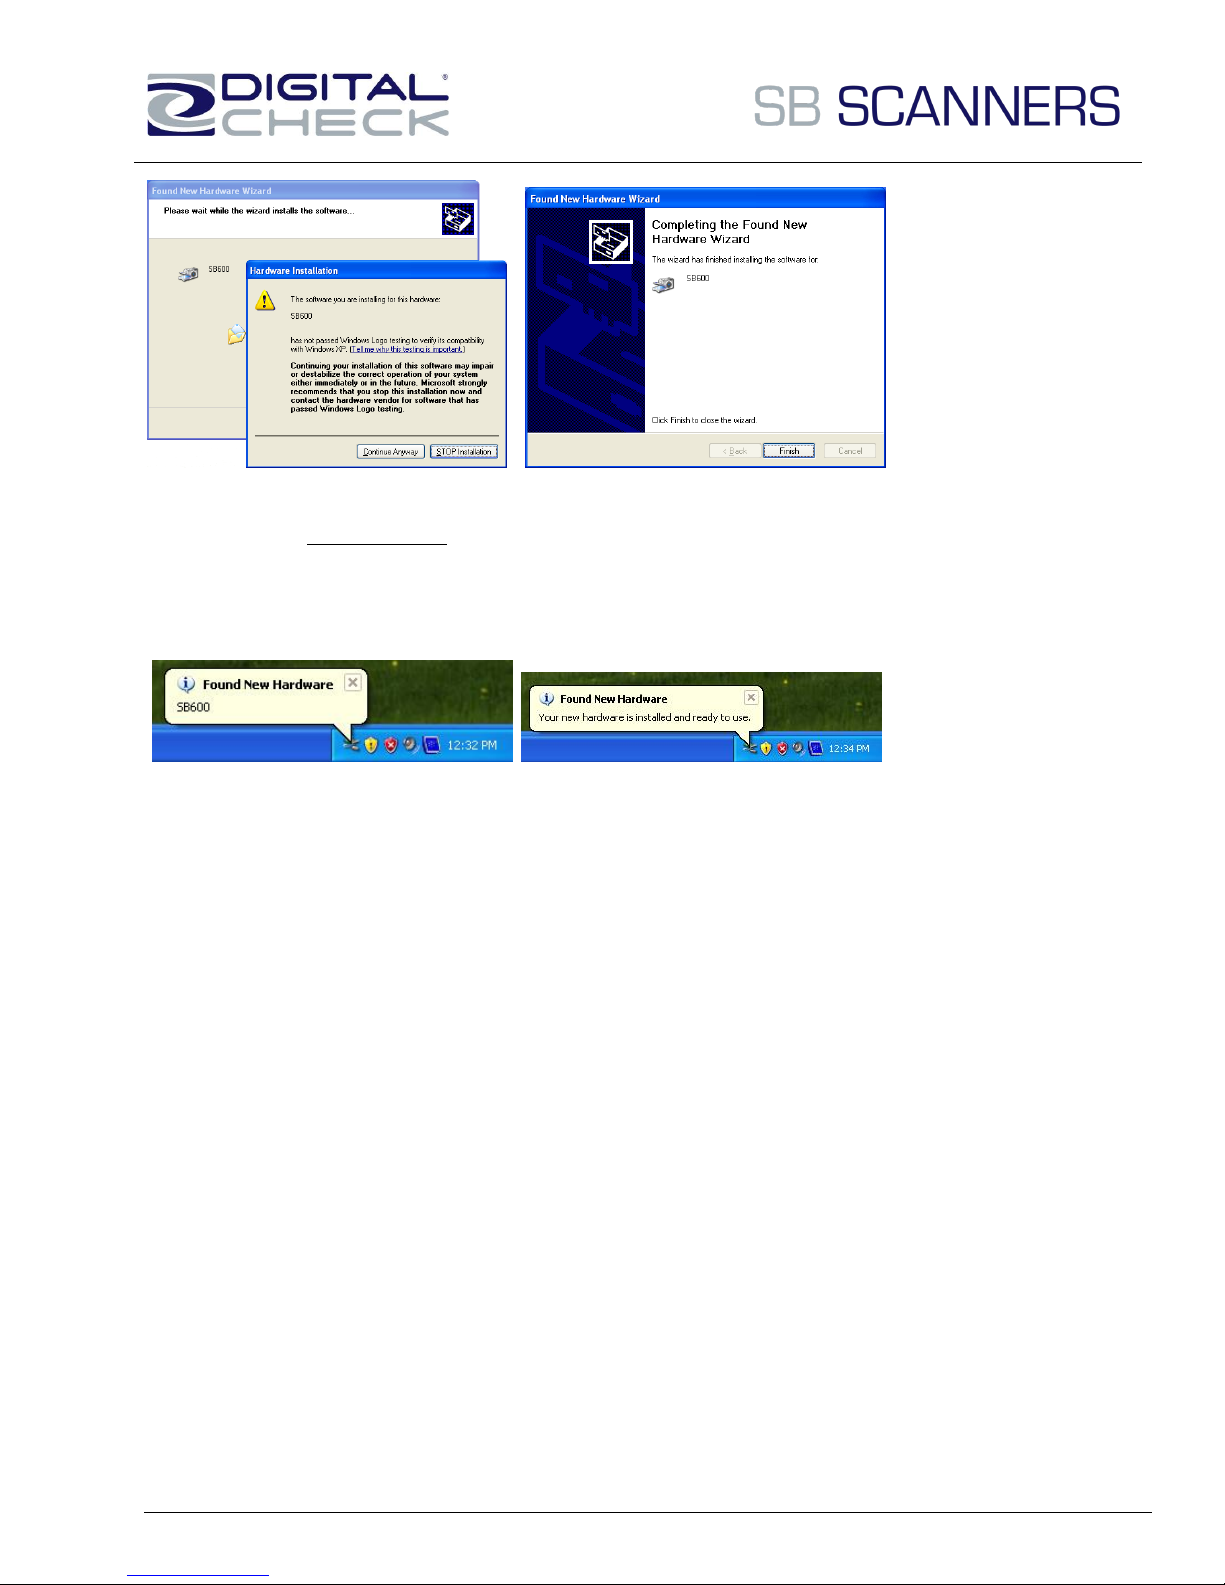
Fig. 4 Fig. 5
f) The “Hardware Installation” window will appear, this is normal and to be expected. (Fig. 4)
g) Select the “Continue Anyway” then the “Finish” button to finalize your scanner installation.
h) When your software and hardware have been installed successfully you will see the following information
displayed from your system tray when your installation is complete.
Fig. 6 Fig. 7
8 v061311
Page 9
Initial Scanner Image Calibration
Note: Before using your scanner for the first time (and/or using
it on a new PC) you must calibrate the unit.
Performing Initial Scanner Calibration
There are two different ways to calibrate your scanner:
1) Calibrate from Scanners and Cameras under Control Panel
a. Go to: Windows “START” / Control Panel / (Printer and Other
Hardware) Scanners and Cameras and you will see your model listed
here.
b. Right click on your scanner model and a pull down window will appear.
c. Select “Calibrate” option to start this process.
d. Vista users need to right click on the scanner model and go to
“Properties”.
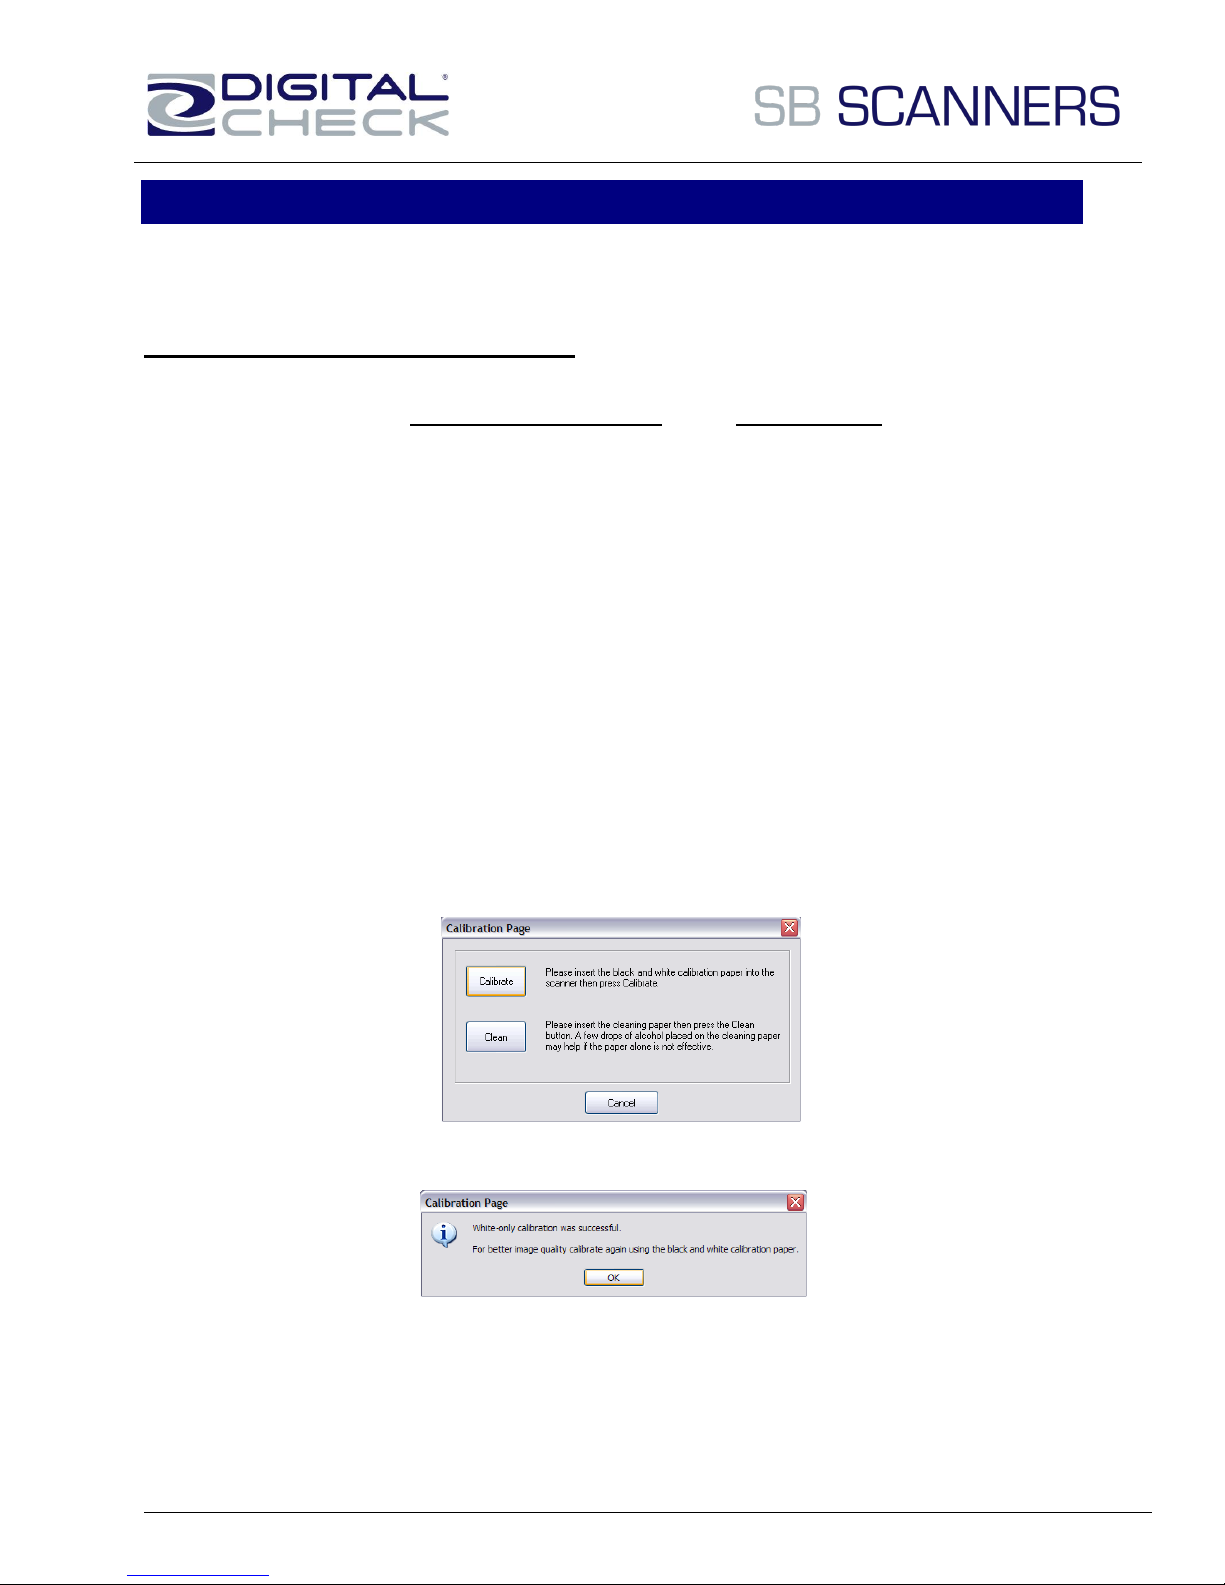
e. Insert the calibration target and select “Calibrate” button.
2) From your bundled software application (or your own TWAIN compliant
application)
a. Under the menu toolbar select: File / Select Source (Scanning Source).
b. Choose your scanner model “SB500, 600, 1000”.
c. Do not select the “SB500, 600, 1000” at this time.
d. Under the menu toolbar select: File / Acquire Image Data…
e. The TWAIN user interface appears (see image below).
f. Insert the calibration target that came with your scanner then select
“Calibrate”.
NOTE: Should you lose or forget the calibration target when traveling, you can simply use any plain
“white” piece of printer paper to perform the calibration. Accept the message to proceed to scanning. (See
below)
9 v061311
Page 10
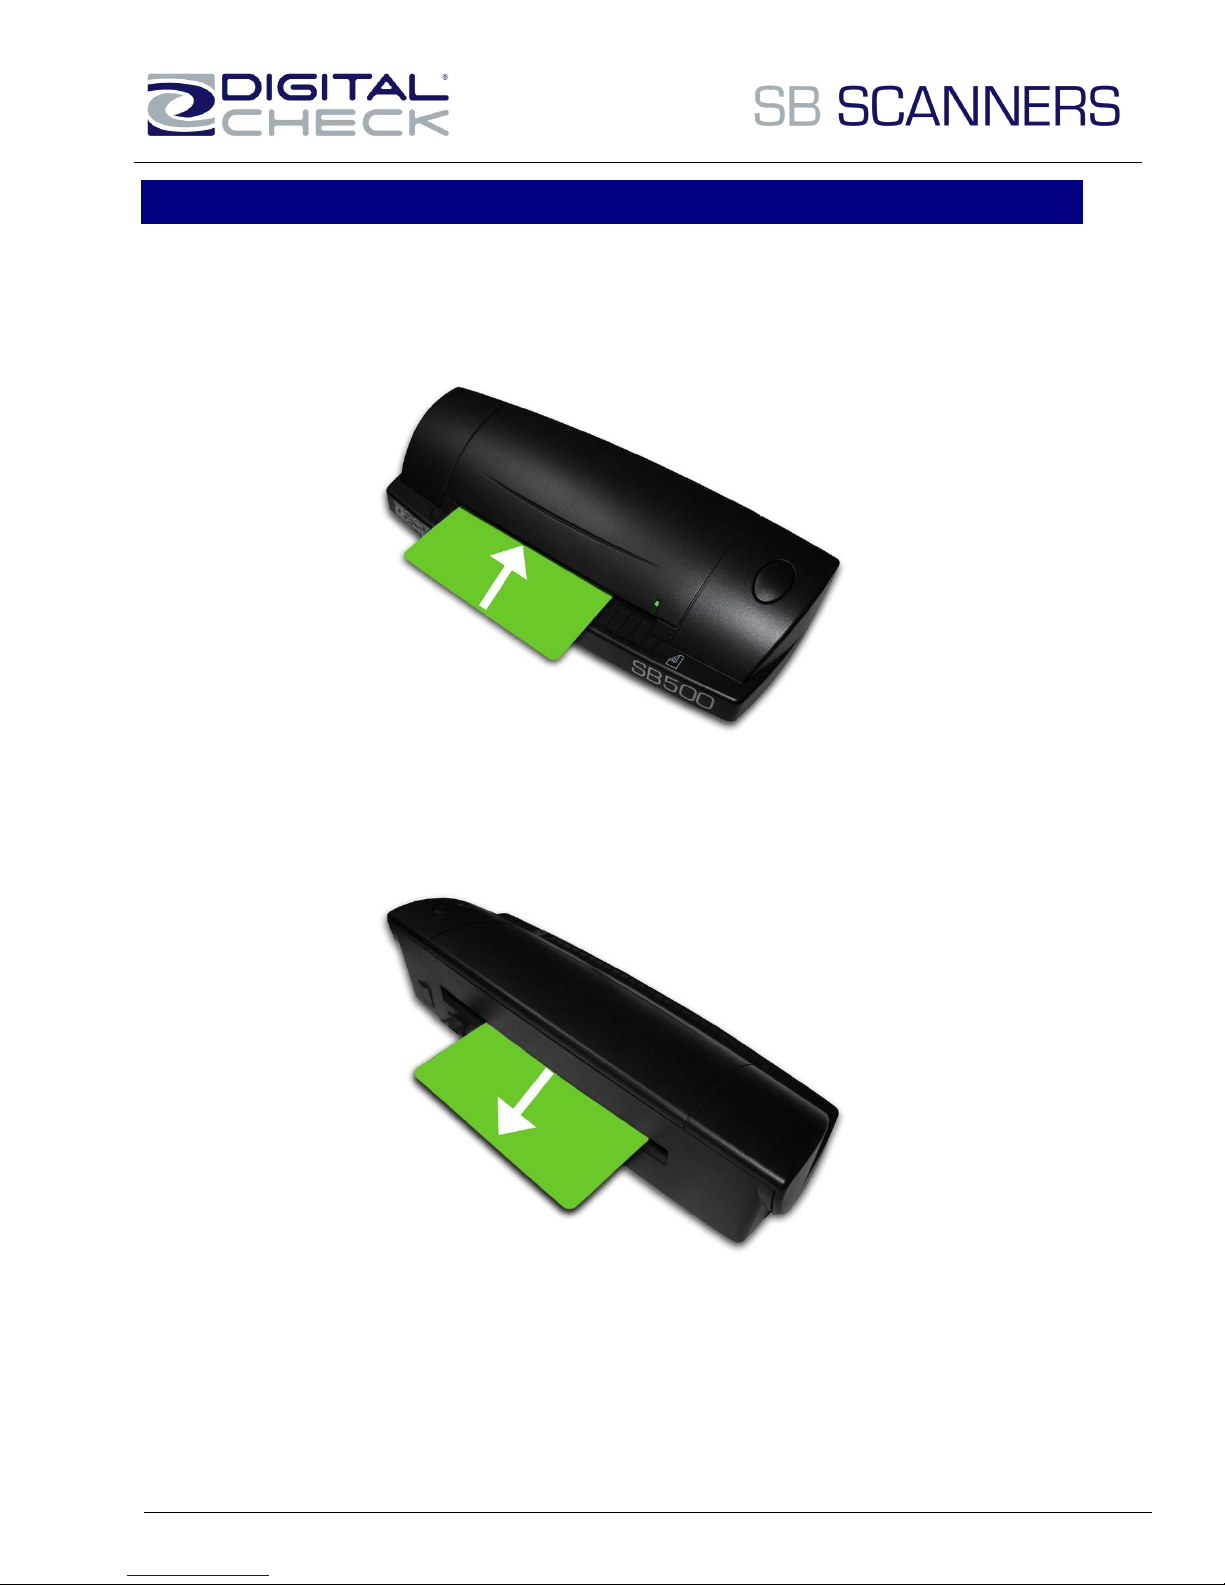
Loading ID cards into the SB500 Scanner
For Driver’s Licenses or other types of wallet sized ID cards, load the item horizontally across and face or
front side down.
The card will begin feeding through the scanner. The card will exit towards the rear of the scanner.
10 v061311
Page 11
Loading Other Items into the SB Scanners
For checks or other similarly shaped items, load the item in a vertical position and face or front side down.
11 v061311
Page 12
SB Scanner Troubleshooting
Clearing Jams
If a jam occurs, the paper path must be cleared. To do this, try to advance the jammed
document by selecting the “EJECT” button within your application (if applicable). In case
the document does not exit the document track, you can follow these steps:
1. Grab one end of the document and slowly pull it out of the scanner.
2. Make sure that the rollers are free of paper and debris.
Document Feeding Problems
The SB Scanner was designed to be a manually fed scanner. If you notice feeding
problems, check the documents for bent or folded edges and for debris in the
scanner document track. Make sure the leading edge of your documents are straight
and not wrinkled or folded. Insert document at level to the intake slot. If your
document has a fold, sharp-bend or is wrinkled, you will need to straighten or flatten
it first before scanning.
Check Images are streaking or fading
If you notice either streaking or fading on the images, the scanheads may require
cleaning. Refer to the section below on cleaning the scanheads.
Cleaning the Scanner
Cleaning Steps
1. Blow out the paper path using compressed air to remove dust or bits of paper.
2. Clean the scanner with the included cleaning sheet and 70% isopropyl alcohol
(not included). Place a few drops along the middle of the cleaning material and
proceed to the Calibrate menu, select CLEAN option instead. Your scanner will
automatically pass the cleaning material back and forth over the internal image
sensor glass.
In severe environments where ink and dirt build up rapidly, it may be necessary to
clean the scanner rollers more often. This simple maintenance will dramatically
improve the reliability of your scanner over its useful life.
12 v061311
Page 13
Helpful Hints
1. Do not use stickers to cover up previously sprayed numbers on documents. The
backing from the stickers can rub off onto the rollers and cause documents to
jam.
2. Do not use “White Out” on scanned documents; the “White Out” can rub off the
documents onto the scanner path and walls.
3. Watch for loose debris getting into the scanner such as staples and rubber
bands.
4. There are no user available adjustments within the SB Scanner.
5. Periodic and scheduled cleaning should be performed before determining if any
further problem determination is needed.
13 v061311
Page 14
-216
Misfeed (The document failed to enter the path on time).
Remove the document and re-insert it.
Check for bent or excessively curled leading edges and straighten as
needed.
If they continue to get -216 errors, this might indicate that;
o The entry drive rollers may be dirty
o Something may be lodged in the path
-220
Document Stopped in the path or did not exit on time
Eject the documents, to clear the error condition.
Check the leading edges and corners of the document and straighten as
needed.
A -220 error code where the document is stopping in the path repeatedly
could indicate debris, paper or a staple in the path. Check if the document’s
leading edge looks OK or is catching on something.
The scanner may need to be cleaned.
-212
No Checks (There are no checks indicated in the entry pocket)
A scan cycle has been initiated, but there is not a document present. Re-insert
the document and try the feeding it again.
-125
No Scanner (The scanner was not found while attempting to initialize the
scanner)
Check the USB cable connections.
Try a different cable.
Try a different USB port.
Verify that the PC has the proper drivers and the scanner firmware file is
installed.
Common Error Codes from the Scanner
14 v061311
Page 15
Paper Size
Paper Size:
SB500: Up to A6 (4.1 x 5.8 inches) (105 × 148 mm)
SB600/SB1000: Up to A4 (8.3 × 11.7 Inches) (250 × 353
mm)
Document Thickness:
0.0039” - 0.0393” (0.1 - 1 mm)
Scanning Method
Concurrent two-sided Duplex
Image Creation: 2 x 1296 cell, 106mm CIS
Light Source: Tricolor LED
Image resolution
100, 120, 200, 240, 300 dpi
600 dpi supported via DCC API 10.09 or newer and TWAIN
Image Format
B/W, 16 or 256 gray levels, 24 bit RGB color
Power-On Self Test
Automatic self-testing when switching on the unit
Software Tools
API Toolkit 32 bit
Supported under:
Windows 2000, Windows XP, Windows Vista, Windows 7
Ubuntu 7.05, Red Hat AS - Version 5, OpenSuse
Electrical
Power consumption: 2 Watts
Standby: 0.2 Watts
Input Voltage: 100 to 240 VAC, 50/60 Hz
MTTR:
15 minutes
Temperature Ratings:
Operating: 60°- 90° F
Storage: 0° - 40° C
Humidity:
Operating: 35-85% (non condensing)
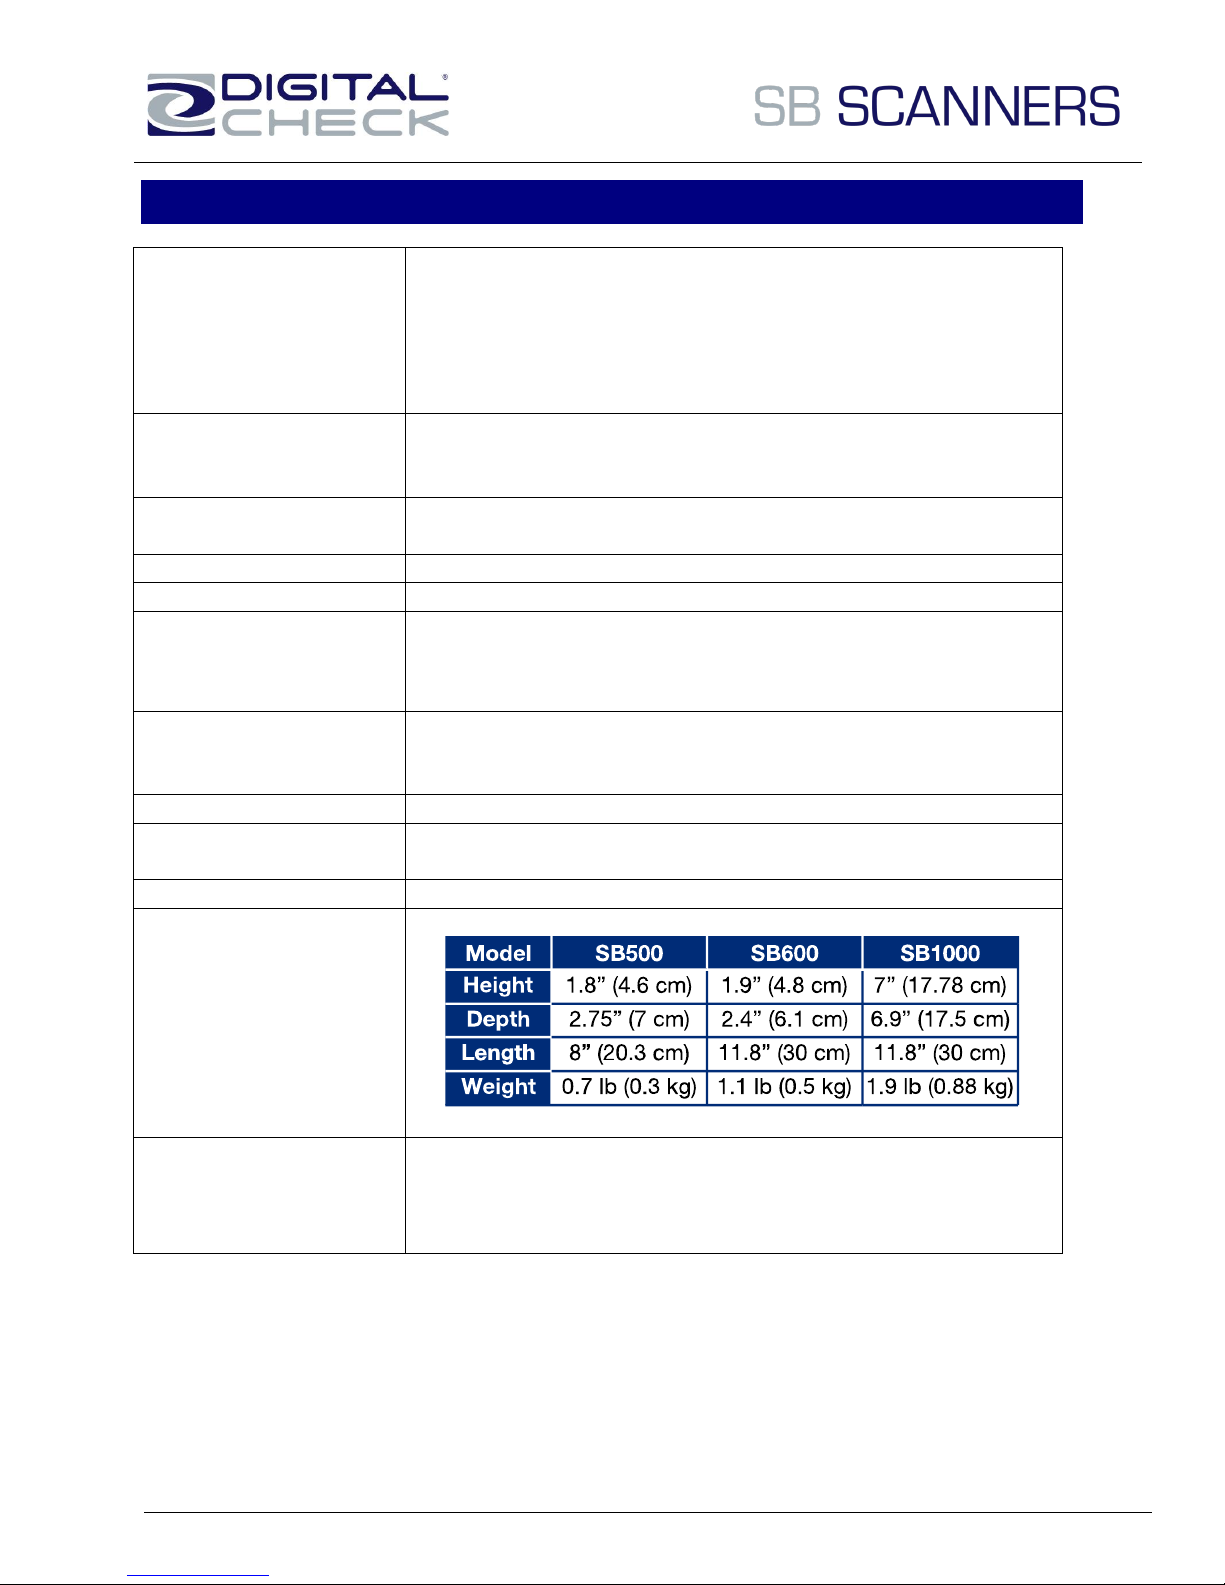
Dimensions
Certifications
Safety: UL, cUL, CE
FCC: Class B (Industrial, Business or Home)
EMC: CE
RoHS Compliant
WEEE Compliant
SB Scanner Specifications
Specifications subject to change
Trademarks and registered trademarks are property of their respective owners
15 v061311
Page 16
Corporate Headquarters:
Digital Check Corp.
630 Dundee Rd., Suite 210
Northbrook, IL 60062
Tel: 847/446-2285
Fax: 847/441-5507
Website: www.digitalcheck.com
Email: [email protected]
16 v061311
 Loading...