

Digital Blue SNAP 5MP User Manual
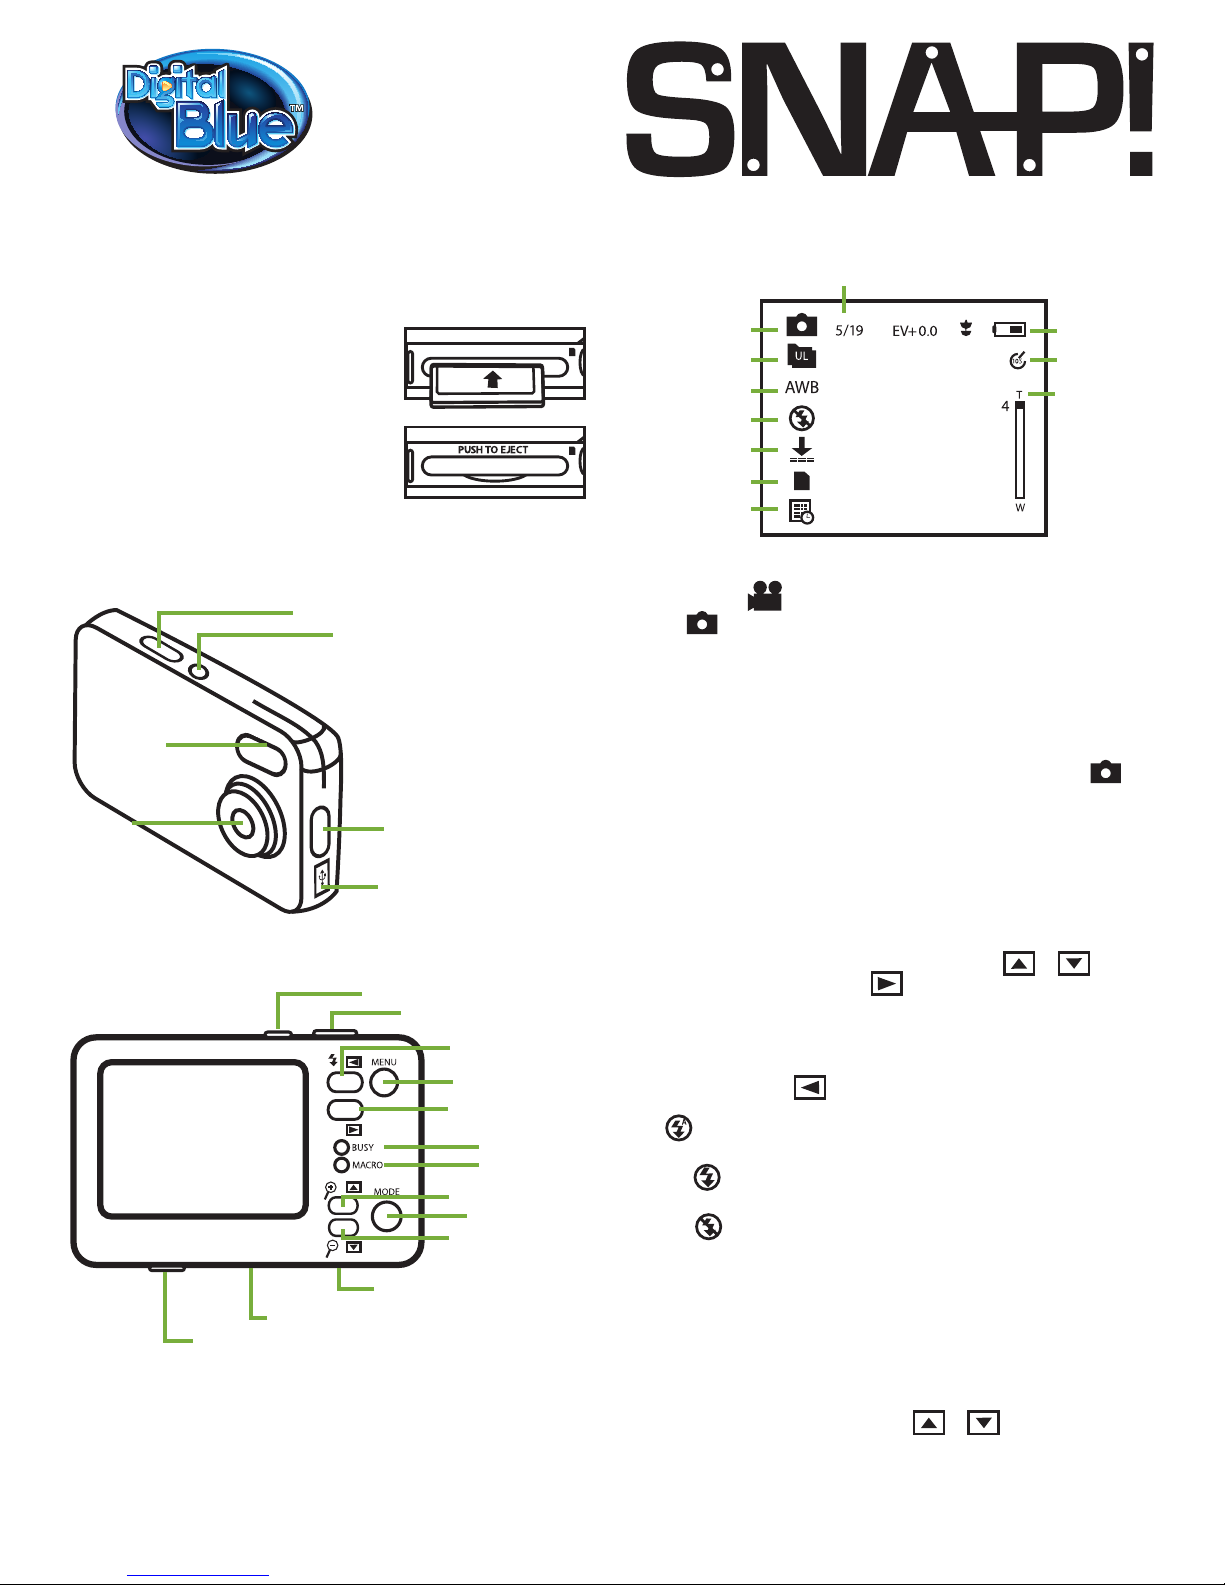
Monitor Display
Image Capture Screen
In video capture, will appear in the upper left corner of the screen in
place of .
Note: Some functions are not available in video capture.
Using the Camera
Taking Pictures with the Camera
1) Press POWER button to turn on camera to image capture mode .
This is the default mode.
2) Press the Shoot button to take pictures.
Note: Do not take the memory card or batteries out when camera is saving
the image, otherwise it won’t be saved completely. The screen will power
off automatically if the camera is not being used for 30 seconds. Press any
key to restart the screen.
In image capture mode, press the MENU button. Use
&
to highlight the menu options. Use
to select an option.
Image: Resolution, Quality, White Balance, Color Effect, Exposure,
DateStamp, Selftimer, and Burst Snapshot
Using the Flash
In image capture, press to set the ash.
Auto:
Automatically turns on/off according to the light
Flash on:
Flash is always on
Flash off:
Turn the ash off
The ash is charged automatically between taking pictures. When the
ash is charging, the screen will turn black. The next image can be taken
after the ash is nished charging.
Note: The ash does not work in Burst Snapshot mode.
Digital Zoom
In image capture or video capture, press & to select digital
zoom. The camera can zoom up to 4X.
Note: The digital zoom may affect the quality of image - the higher digital
zoom, the lower the image quality.
Getting Started
Powering Up the Camera
This camera is powered by two AAA alkaline batteries (not included).
To install the battery:
Open the battery cover and load the batteries according to the polarity (+/-)
indicated on the battery door.
Inserting the Memory Card
Insert the memory card [ sold separately ]
into the card slot carefully.
Note: Be sure to insert the memory
card in the right direction.
Getting to Know Your Camera
Lens
Flash
SHOOT/OK button
POWER button
MACRO switch
USB connector
Mode
Resolution
White Balance
Flash
Quality
Memory Card
Datestamp
Battery Level
SelfTimer
Digital Zoom
Photos Taken/Capacity
SHOOT/OK button
LEFT/Flash
MENU button
RIGHT
BUSY light
MACRO light
UP
DOWN
MODE button
Battery cover
SD card slot
Tripod socket
POWER button
TFT monitor
Recording Video on the Camera
1) Press POWER button to enter default image capture mode.
2) Press MODE button until appears in the upper left of the screen.
3) Press Shoot button to start recording video.
4) Press Shoot button again to stop recording the video.
In video capture mode, press the MENU button. Use & to
highlight the menu options. Use to select an option.
Video: Resolution, Frame Rate, White Balance, Audio
Using Playback
Playback can be accessed by simply:
1) Press POWER button to turn on camera to image capture .
2) Press MODE button to enter Playback.
Review Images
3) Press & to review images.
Play Video
“AVI” will display in the top left corner for videos.
3] Press & to review video les.
4) Press Shoot button to play video le. Press Shoot button again
to stop video playback.
5) Press or to show previous or next image or video.
Thumbnail
3) Press the DOWN button to enter thumbnail view.
4) Press or to scroll through thumbnails.
5) Press shoot button to select a thumbnail.
Playback Menu
In thumbnail playback, press the MENU button to enter delete menu.
Use & or & to select Yes or No. Press the Shoot
button to conrm your selection.
In full screen playback, press the MENU button to enter the menu. The
Play menu is the default selection. Use & to highlight the menu
options. Use to select an option.
Play: Delete Current, Delete All, Lock, Thumbnail, Rotate, Slideshow
Delete Current
1) Press and highlight “Delete Current”.
2) Press to delete current.
Note: By pressing on the “Delete Current” option, the current picture
will be instantly deleted!
Delete All
1) Press to highlight “Delete All” .
2) Press to delete all.
Note: By pressing on the “Delete All” option,
all content will be instantly deleted!
Lock
1) Press the button and highlight “Lock”.
2) Press the button to access lock options.
3) Press or button to scroll through options.
4) Press the MENU to select option.
Thumbnail
1) Press the button and highlight “Thumbnail”.
2) Press the button to select thumbnail.
Slideshow
1) Press the button and highlight “Slideshow”.
2) Press the button to select slideshow.
3) Click Shoot button to return to playback mode.
Using Setup
Setup can be accessed by simply:
1) Press POWER button to turn on camera.
2) At anytime, press the MENU button to enter the Menu. Use
& to select Setup. Use & to select menu options:
Setup: Language, Auto Power, TV Output, Light Frequency, Date/Time,
Format, Default Settings, Firmware Version
3) Use & to scroll through options.
4) Use the arrow button to select options.
5) Press the MENU button to conrm selection.
6) Press the MENU again to exit menu.
Need Additional Help?
For more product support visit our website at:
www.digiblue.com
and click on the Customer Service tab at the top of the page.
If you are still having problems with the product,
contact Customer Support at 888-800-0502
Monday-Friday between 9am and-6pm (CST).
 Loading...