

Digital Blue QX3 ACTIVITY GUIDE
1
Welcome to
the microscopic
world. With
your QX3
™
microscope, you
are limited only
by your
imagination.
Here are a few
things you can
do to get started.
What you
can do
The QX3™microscope
lets you do many
things you can’t do with
an ordinary microscope:
See tiny things on
your computer.
Take the microscope off its base
stand for magnified viewing.
Combine and create new things
using computer tools.
Build a collection of your
discoveries and creations.
Produce your own movies
and slide shows.
Group
activities
Another great thing about the
QX3
™
microscope is that you and
your friends can play with it
together. You can even create slide
shows
together to amaze your
family and friends.
Fun Stuff To Do
Having fun
What you can do.......................... 1
Group activities ............................ 1
Starting out right, and
seeing the light
Button basics............................... 2
Lighting ........................................ 2
Digital Blue
™
QX3™controls ......... 3
Getting the goods and
taking a look
Collecting specimens................... 4
Live View ......................................4
Magnifying ................................... 5
Using handheld mode.................. 6
Making movies............................. 7
Making a time lapse movie.......... 8
Hungering for more?
Investigating Main and beyond....10
Using paint tools ..........................11
Adding special effects .................13
Making a slide show....................14
Printing stuff ................................16
Watch out,
Kids!
An adult should set
up and install
hardware and
software. Also,
only an adult
should replace
the light bulbs.
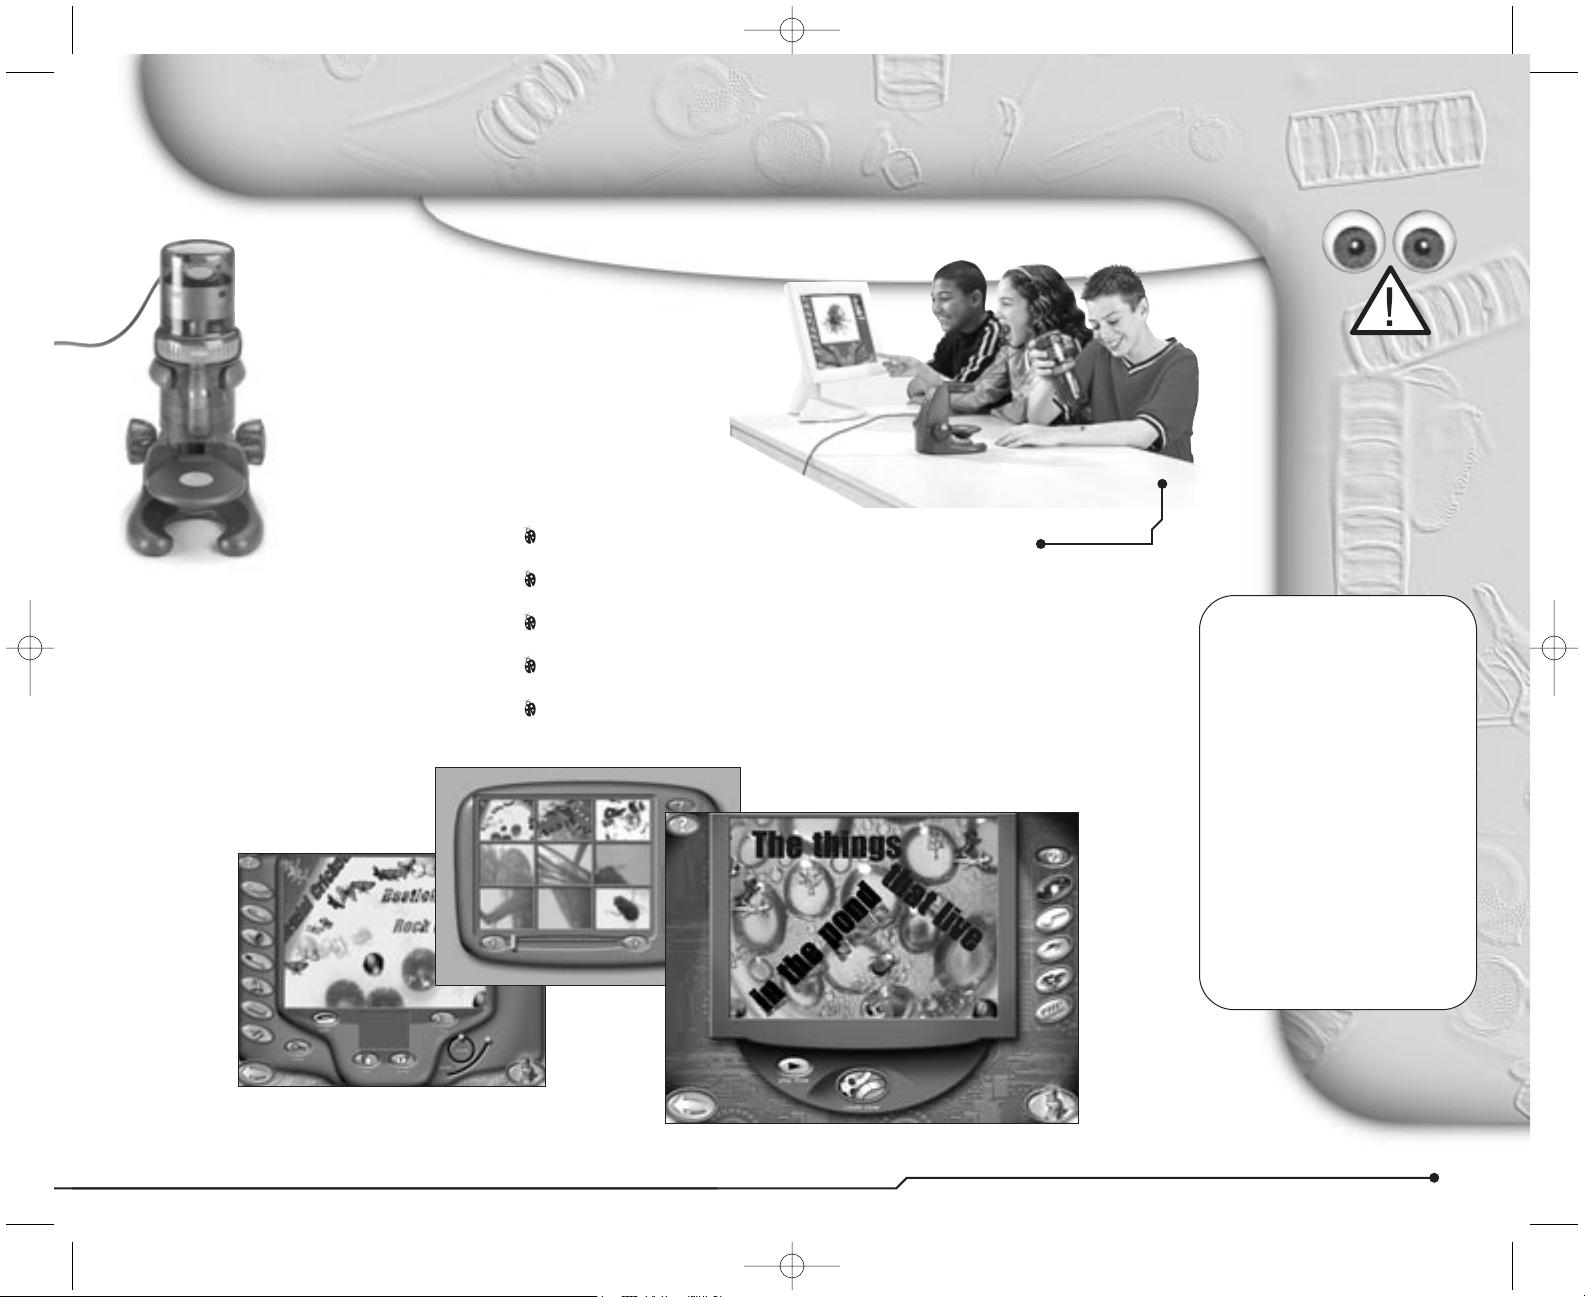
Having fun—letting your imagination soar
Digital Blue™QX3™Computer Microscope
YOUR ACTIVITY BOOK
A50133-001
1318 Activity Guide Final 03/12/2002 04:19 PM Page 1
The QX3™software is easy
and fun to use. Usually, you
just choose an activity from
Main and use the tools.
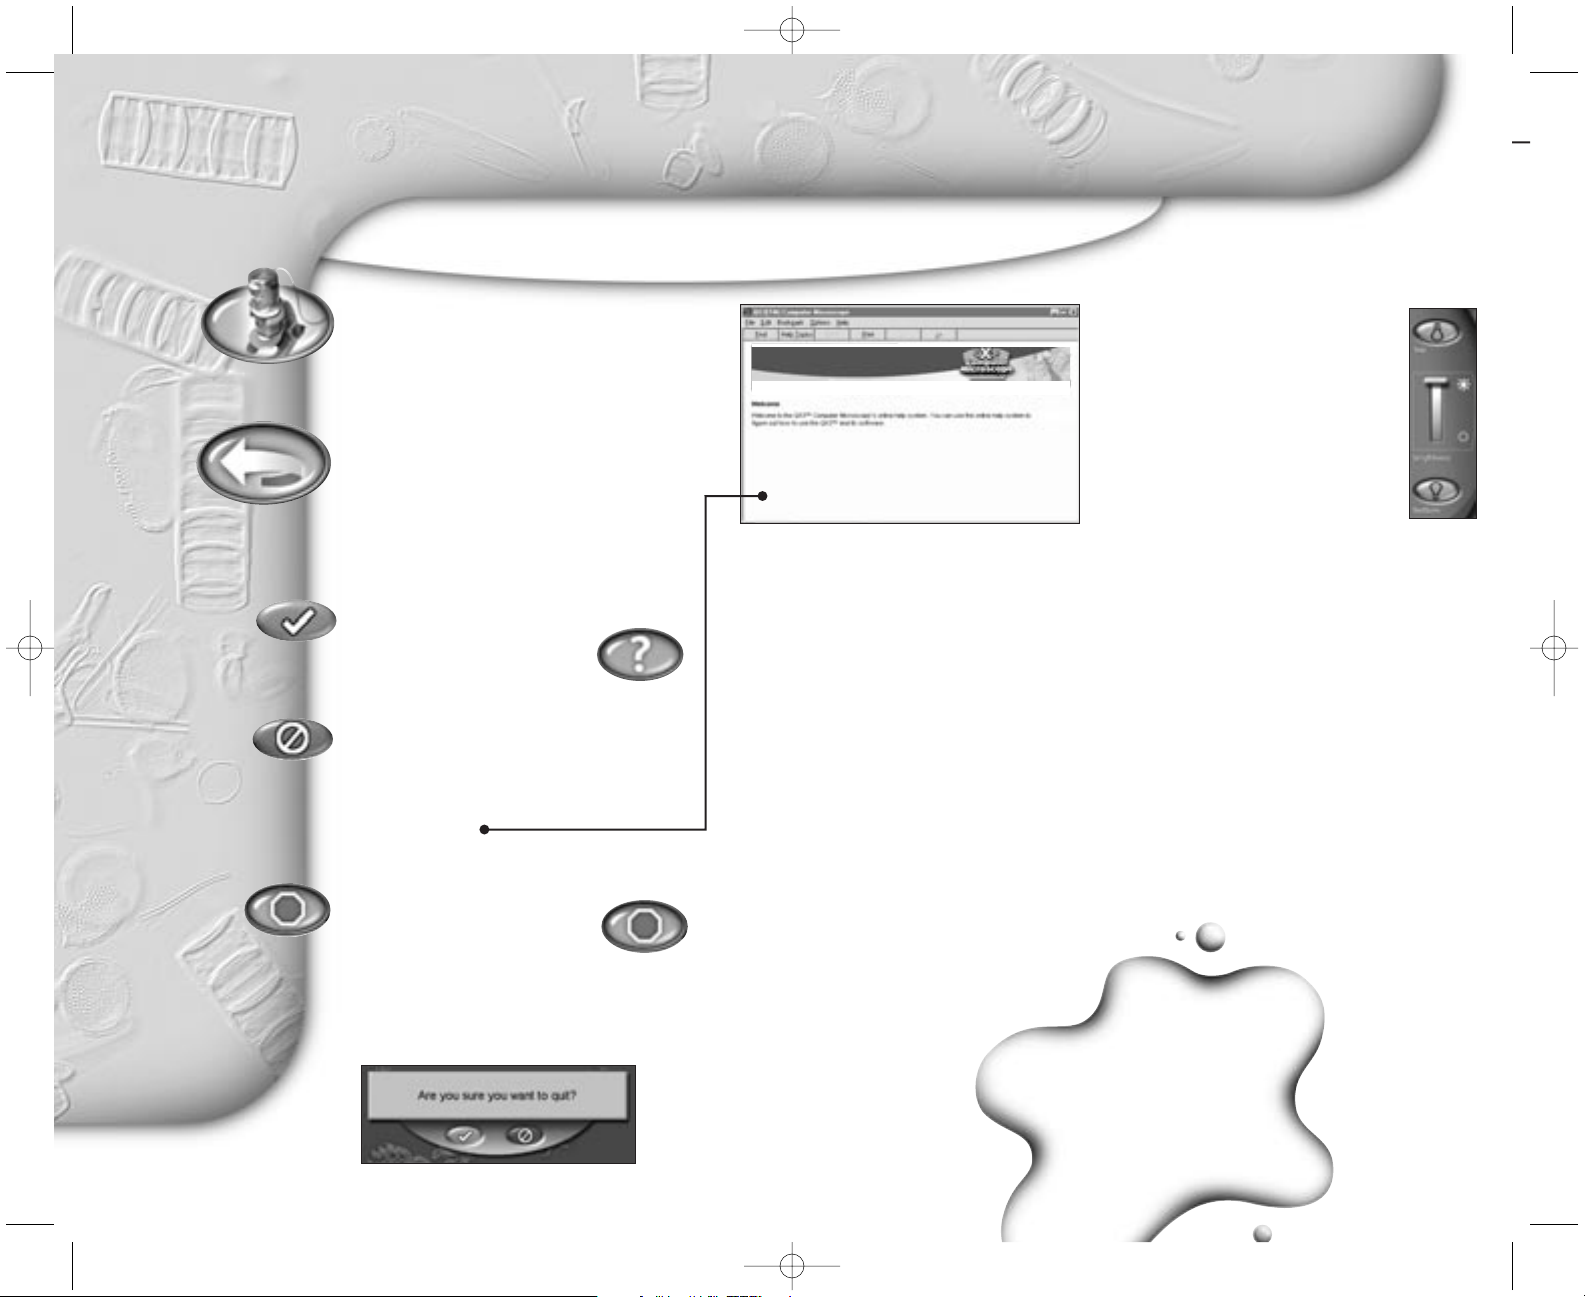
Button basics
Use the software by clicking on buttons
and using tools. You will see different
buttons on different screens. Audio Help
is always there if you need it.
Getting help
You can get help by clicking
Audio Help. It is in the
upper left-hand corner of the
screen. If you pause over buttons, you
will
hear their names and how
to use them.
You may want more information than
Audio Help provides. If so, press
F1 for
Online Help.
Quitting the software
To quit, you should click the
Quit button on Main. This
way you can click the
Cancel button to continue playing if you
change your mind about quitting. (The
Cancel button is on the right in the
picture below.)
Lighting
The microscope light turns on
automatically when you enter
Live View, and turns off when you
go to Main.
Lighting controls
You control the lights in Live View with
the Lighting Controls on the screen. Click
the top bulb to use top lighting. Click the
bottom bulb to shine light up through the
sample platform.
Moving the slider up makes your sample
look brighter. Moving it down makes
your sample less bright. Experiment to
find what works best with your samples.
When you remove the microscope
from the base, the top light comes
on automatically.
Using the right light
Use the bottom light to shine up
through transparent and very thin
samples, like feathers, slices of
vegetables, or onion skin.
The light in the detachable
microscope illuminates objects
that are too large or heavy to be
placed on the microscope’s
sample platform.
You can also use the microscope on
the stand to view small solid objects
and living specimens with top lighting.
You can put a bug or a slug in the
containment dish with lid to look at,
take magnified snapshots, or make
short movies.
Adding light
Ordinary household light works fine
with the QX3
™
microscope. You may
want to place a high-intensity desk
lamp near the microscope to add to
top lighting when using medium or
high magnification.
2
Starting out right, and seeing the light
buttons, lights and controls
Live view
button
Go to Live
View from
Main to view
and add samples to
your collection.
Main
button
Go to
Main, which
lets you choose
fun things to do
with your pictures
and movies.
OK button
Continue your
action. This button
usually appears with
the Cancel button.
Cancel button
Cancel your
action. This button
usually appears
when you enter
special scenes, like
the show editing
window and when
you quit the software.
Quit button
Quit the QX3
™
software. You
need to go to Main
to quit.
Basic buttons
Ear’s looking
at you, kid!
1318 Activity Guide Final 03/12/2002 04:19 PM Page 2

3
YOUR ACTIVITY BOOK
Watch out,
Kids!
Before you use
extra light, check
with your parents
to make sure
you’ve got a safe
light. You don’t
want to use a lamp
with a halogen or
other extra-hot bulb
that could cause
bad burns.
buttons, lights and controls — Digital Blue™QX3™controls
1
2
3
HINT: Use low
magnification and top
lighting to look at
things you can’t see
through, like coins, hair
or paper. Medium or
high magnification may
make the image too
big. Or you may need
extra light.
Frunobulax, the fly that
walks on two legs
Digital Blue™QX3
™
Controls
Once an adult has
set up the QX3
™
microscope,
you can use the
controls to:
Capture pictures
or movies (in
handheld mode).
Change
magnification
level.
Focus.
Capturing
pictures and movies in
handheld mode
In handheld
mode, click the
Capture button to
take a picture.
Click and hold the
button to capture
a movie. If the
Time Lapse
controls are
showing, you can
make a timelapse video in
handheld mode, but once you
release the button on the
microscope your time lapse will
stop recording.
Changing magnification
Gemstones at
high magnification
Choose the magnification by rotating the
ring on the microscope until the label for
the desired level faces you. You will hear
a click when the lens is in place. The
levels are approximately 10x, 60x and
200X*. In this activity book, we refer to
magnification as low, medium, or high.
Think of sizes this way:
Low shows an area like the head of
a thumbtack.
Medium shows a pinhead.
High shows an area the size of a
pencil tip!
Focusing
Adjust the control knob until the
image is clear. Focusing may take
a little
practice. On some
computers, there may be a delay
between your moving the knob
and the image changing on the
screen. Try making small
adjustments and wait for the
screen to catch up.
*These magnification levels are approximate and
have been measured using a 15 in. (38 cm.)
monitor. Actual magnification will vary according
to size of your monitor.
1318 Activity Guide Final 03/12/2002 04:19 PM Page 3
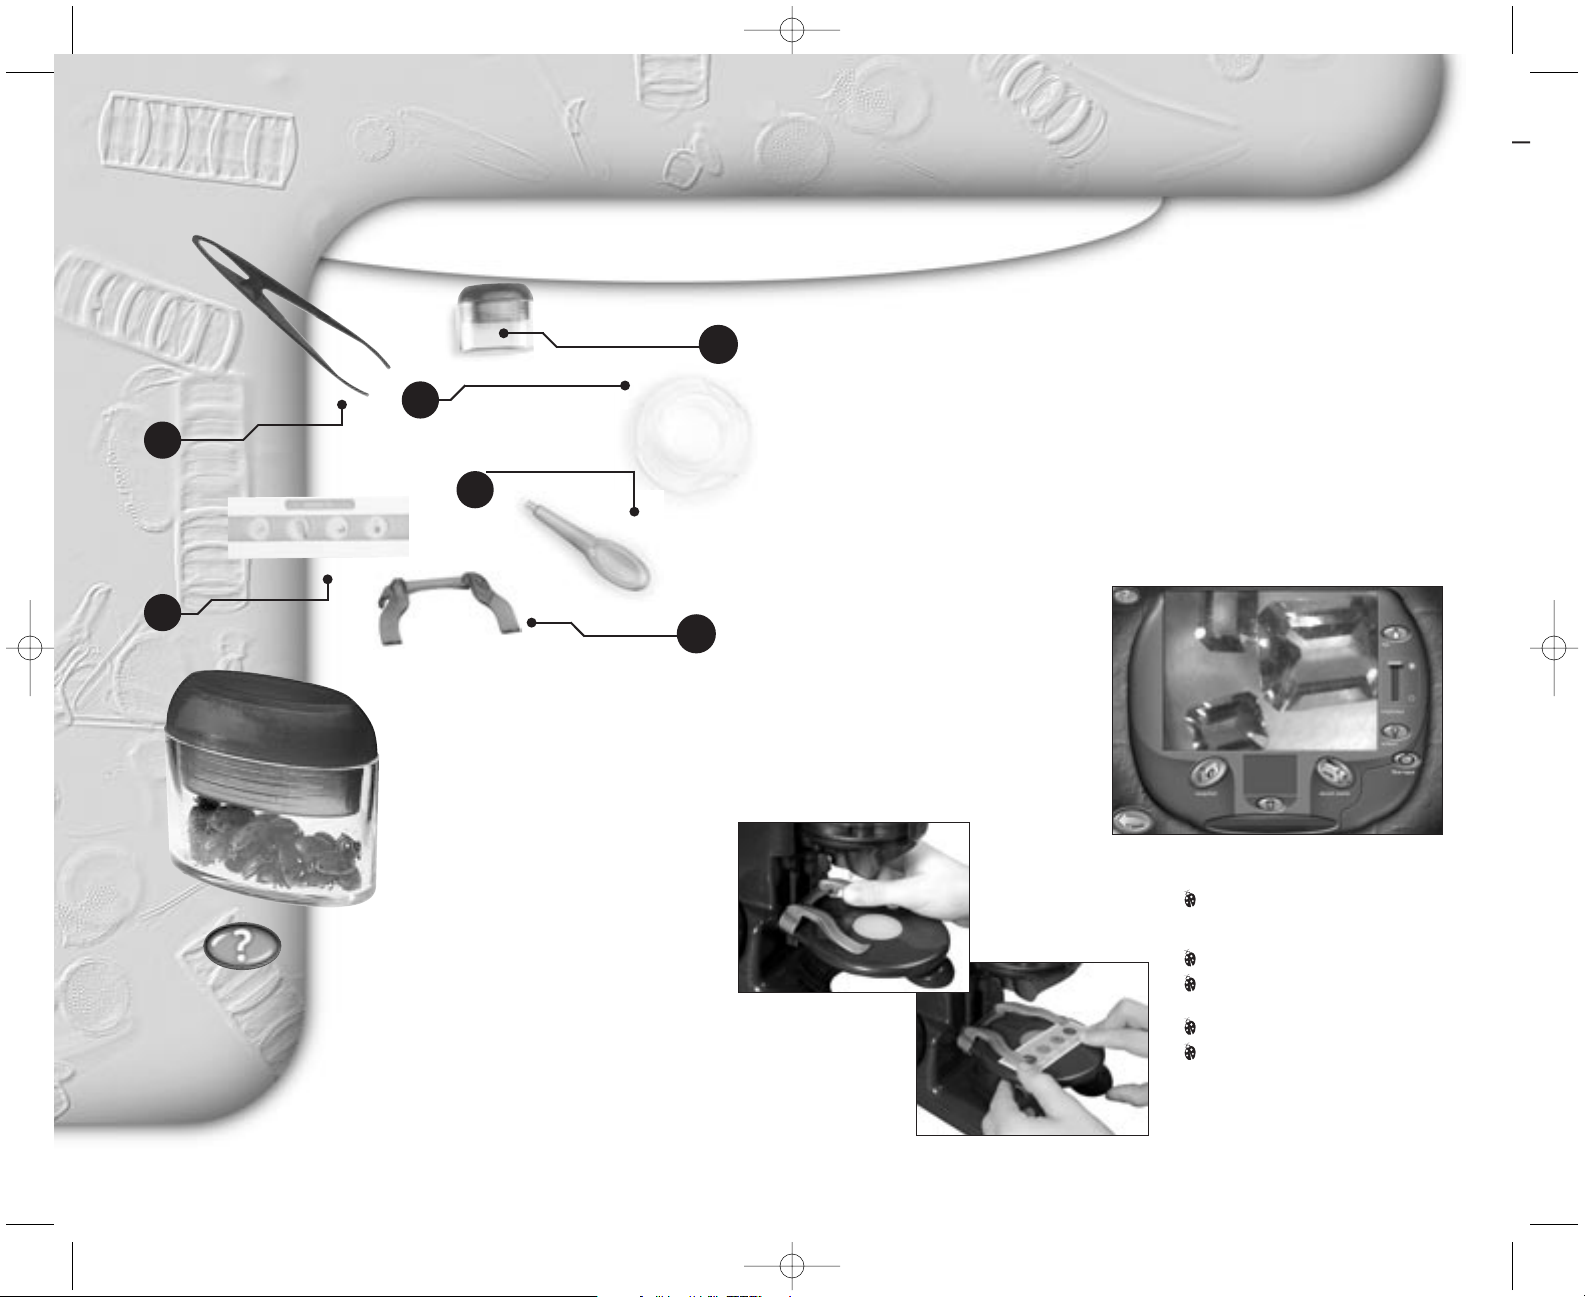
Collecting
specimens
When you’re hunting bugs and
other stuff you want to look at, you
can use the sample jars to hold
them and keep them from getting
away. You can also use film
canisters, small plastic jars with
lids, the plastic boxes nails and
screws come in, and other small
containers you find around the house.
Handling yucky stuff
You can use the tweezers included
with your microscope to pick up bugs
and slugs and worms and muddy junk
and other things you don’t want to
touch with your fingers. What?! You
like to pick up slugs and slimy stuff?
Eeeu-oooo!
Replacing your
accessories
If you lose the tweezers or eyedroppers,
you can find good plastic replacements at a
nearby variety store, toy store, or hobby
shop. Your parents can also order
replacements from Prime Entertainment by
checking in the
Parent Quick Start Guide.
Attaching and using the
slide clip
Use the slide clip to make sure your
specimen stays in place on the
microscope stage. Attach the slide clip
to the microscope by placing the slide
clip on
top of the
stage and
snapping
into
place
.
Place your
specimen slide on
the stage and slide
it underneath the
clip arm to keep it
still.
Live View
When the QX3™software starts you’re
in Live View. Here you can look at things
you’ve collected and take pictures and
movies to save in your collection.
Above is a picture of some gemstones
at low magnification in Live View.
Live View screen
View samples on the sample platform or in handheld
mode.
Adjust lighting.
Capture pictures and
movies.
Start a time-lapse movie.
Go to Main.
4
Getting the goods and taking a look
collecting and viewing
Tweezers
1
Sample slide
2
4
Your Digital Blue QX3™Computer Microscope
comes with
accessories
to get you started.
Containment dish
5
Eyedropper
3
Sample jar
For more
information
about the controls in
Live View, press
F1
for Online Help.
Slide clip
6
1318 Activity Guide Final 03/12/2002 04:19 PM Page 4
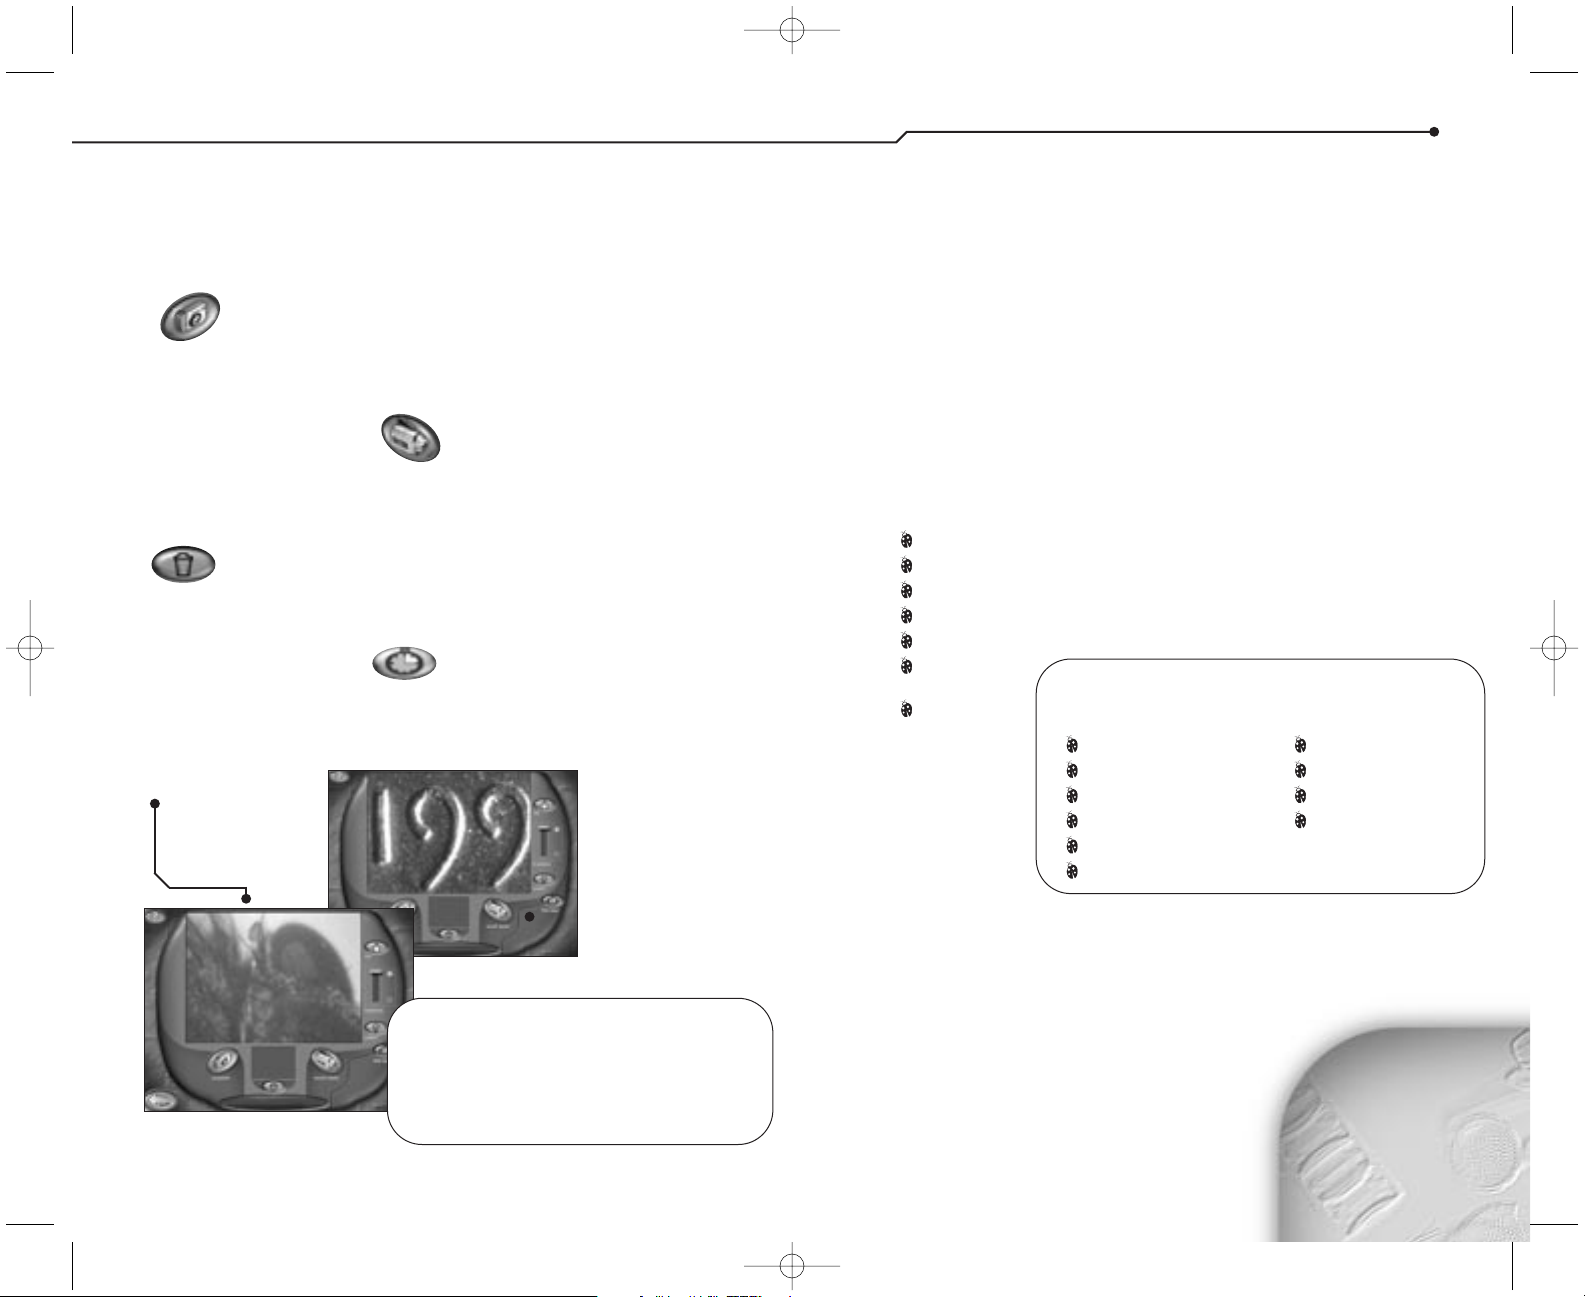
Live View buttons
Snapshot button
Click this button to capture
a picture of your sample.
Clicking the Capture button on
the microscope in handheld mode has
the same effect.
Record button
Click this button to record
a movie of your sample.
Holding the Capture button on the
microscope in handheld mode has the
same effect.
Trash can button
Click this button to remove
the last capture, shown in the
preview window, from your collection.
Time lapse button
Click this button to see
the time lapse controls.
5
YOUR ACTIVITY BOOK
Magnifying
collecting and viewing — magnifying
You also have two sample jars with lids
with which to collect live bugs, flowers
and other objects.
Low—quit bugging
me!
At low magnification, you can watch a
bug in the contain-ment dish and see
how it eats and behaves. And when
you’re done watching and recording
the bug, you can release it back where
you found it.
Medium—can you
spare some
change?
Here’s a coin at medium
magnification. Look at
common coins with your
microscope still on the stand
to get a close-up view. Paper
money looks very different
when you see it with your
QX3
™
microscope.
High—hair ye,
hair ye!
Did you know that various hair colors
and textures look different up close?
There are lots of hair types:
Blond
Brown, brunette, or auburn
Curly
Gray, silver, or white
Red
Processed
or “permed”
Straight
See how many
types of hair
you can get
from your
family and
friends.
Using high
magnification
and bottom lighting, look at the hairs
with your microscope.
You may be
surprised by what you see.
Can you see the differences among the
types of hair? Does dyed hair look
different from natural hair?
Remember
this—
Use top lighting and
low magnification
when looking at
most solid objects.
Use medium and
high magnification
for transparent
things with
bottom lighting.
TIP: We
recommend using
low magnification
when in handheld
mode.
Wrapping paper
Ribbons
Fabric
Dust bunnies
Photographs
Newspaper clippings
Corn silk
Jewelry
Breakfast cereal
That fuzzy stuff
hanging from your
sock!
What else is nearby?
How about:
TIP: Don’t put your specimens directly
on the microscope’s sample platform. Use
one of the containment dishes. If a sample
won’t fit in a containment dish, you can
always look at it in handheld mode.
Your package contains sample slide to help you learn to use
the controls on the Digital Blue QX3
™
Computer Microscope.
These specimens include
bug parts, textile fibers, pollens,
spores and plant sections.
A housefly’s
head
at medium
magnification!
1318 Activity Guide Final 03/12/2002 04:19 PM Page 5
 Loading...