

Digital Blue Disney Pix Max Quick Start Manual


Installing the Batteries
Camera Components
Display Screen
Getting Started Quickly
Camera Modes Summary
Picture Taking Mode
Taking Pictures With the Camera
Photography Tips
Adding a Photo Friend
Setting the Flash
Selecting the Image Size
Setting the Self Timer
Adding A Stamp to your Pictures
Zooming While Taking Pictures
Using the Camera
Table Of Contents
Camera Basics
Installing the Software
Downloading Pictures
Changing the Download Director y
Deleting Pictures from the Downloader
Launching the Software
Software Components
Opening Photos in the Software
Editing Photos
Table of
Contents
Using an SD Card
Viewing Pictures on your Television
Camera Settings
Camera Auto Off
Beep
Lcd Brightness
Setting the Time and Date
Changing the Frequency Setting
Switching Between NTCS and PAL
Version
Formating Memory
Default Setup
Using the Software
Picture Review Mode
Reviewing Pictures - Single Image View
Reviewing Pictures- Collection View
Deleting Pictures From the Camera
Zooming While Reviewing Pictures
Additional Camera Features
1
2
6
9
11
12
13
14
15
16
18
20
21
22
23
24
27
30
32
33
34
36
37
38
38
40
Editing your Photos
Having Fun with your Photos
Saving your Photos
Sharing your Photos
28
29
41
41
43
44
45
46
49
50
51
52
53
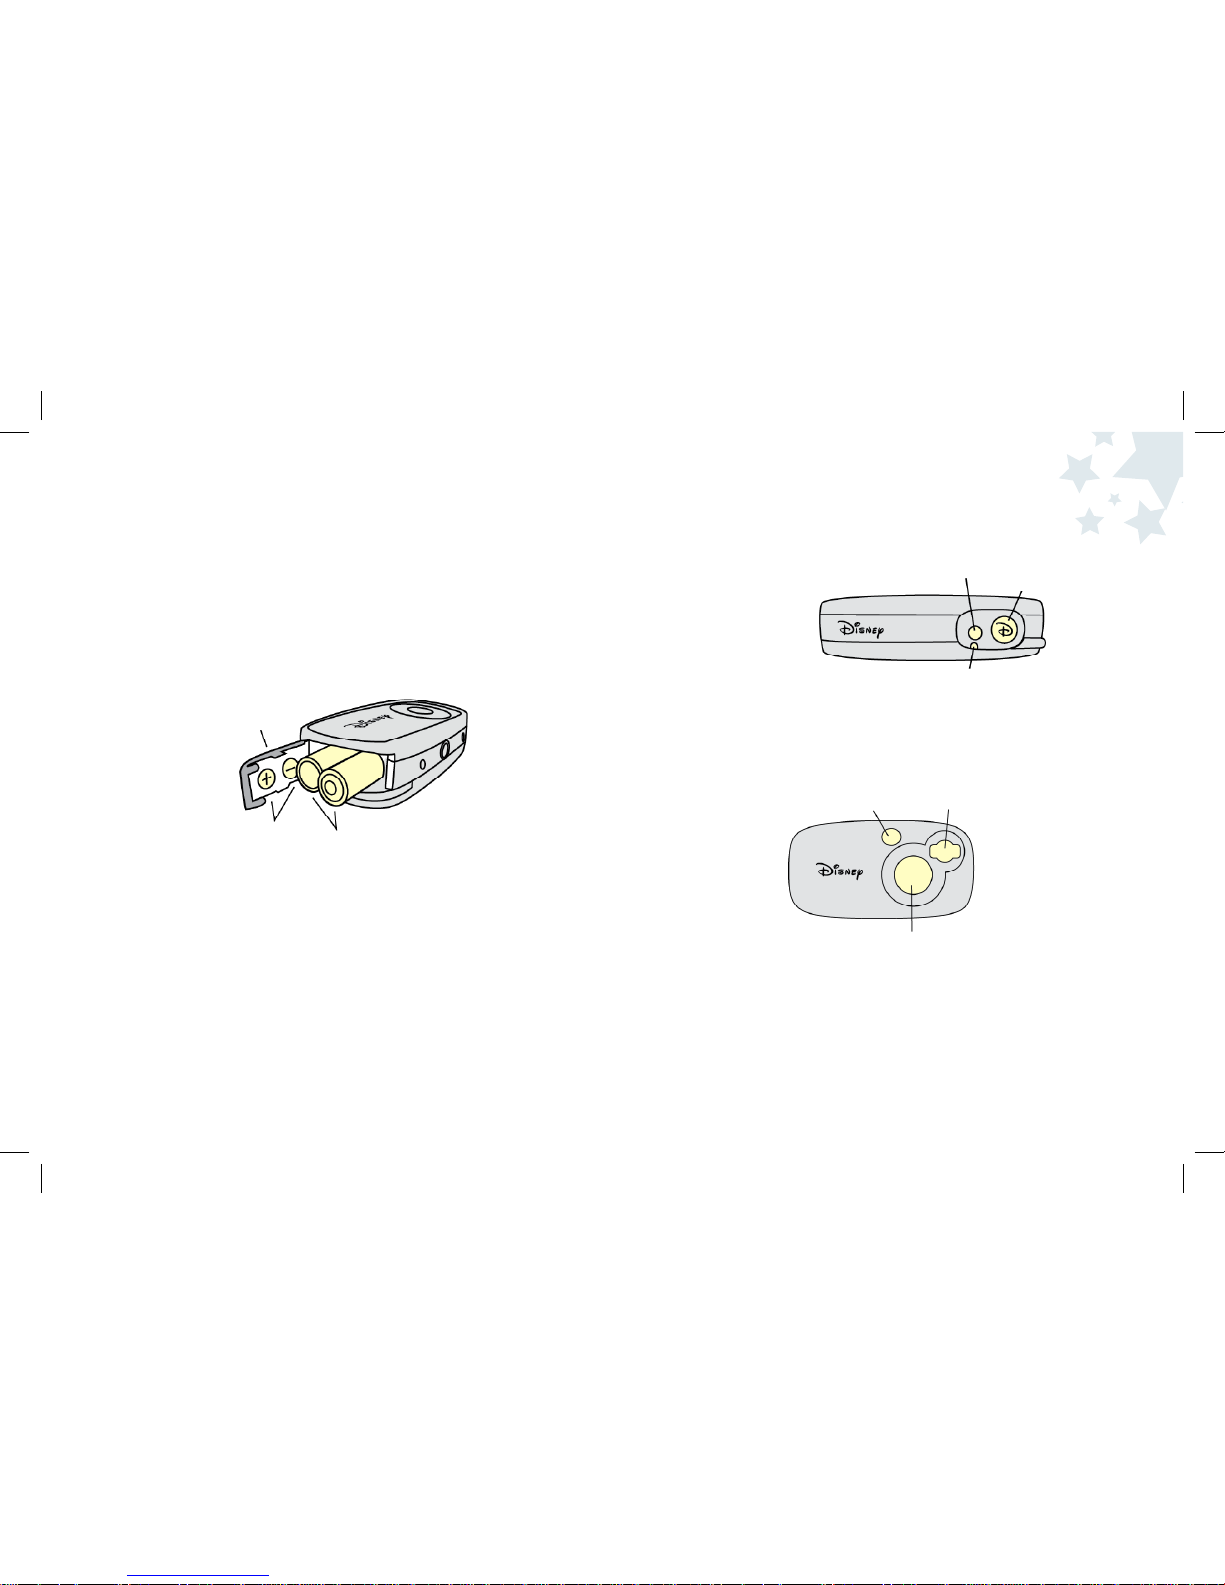
Installing the Batteries
The camera is powered by two AA batteries (not included).
To install the camera batteries:
1. Slide the battery compartment door open. To do this, put your
finger in the indention on the compartment door and slide it down.
The door will pop open.
2. Insert the batteries using the batter y polarity symbols (+/-) as a guide.
These symbols are located on the inside of the battery compartment door.
3. Close the battery compartment door. To do this, press the battery door
down and slide it back into place.
4. Turn the camera on by pressing the Power button and wait a moment.
You will see the Power LED Light flash when the camera is turning on.
To turn the camera off, press the Power button again.
Note: If the camera is not used for 60 seconds, it will automatically shut
down. To restart the camera, press the Power button and wait a moment.
1
2
Camera Basics
Viewfinder Flash Strobe
Camera Lens
Power Button
Snapshot Button
Power LED
2 AA Batteries
(Not Included)
Polarity Symbols
Battery Compartment
Door
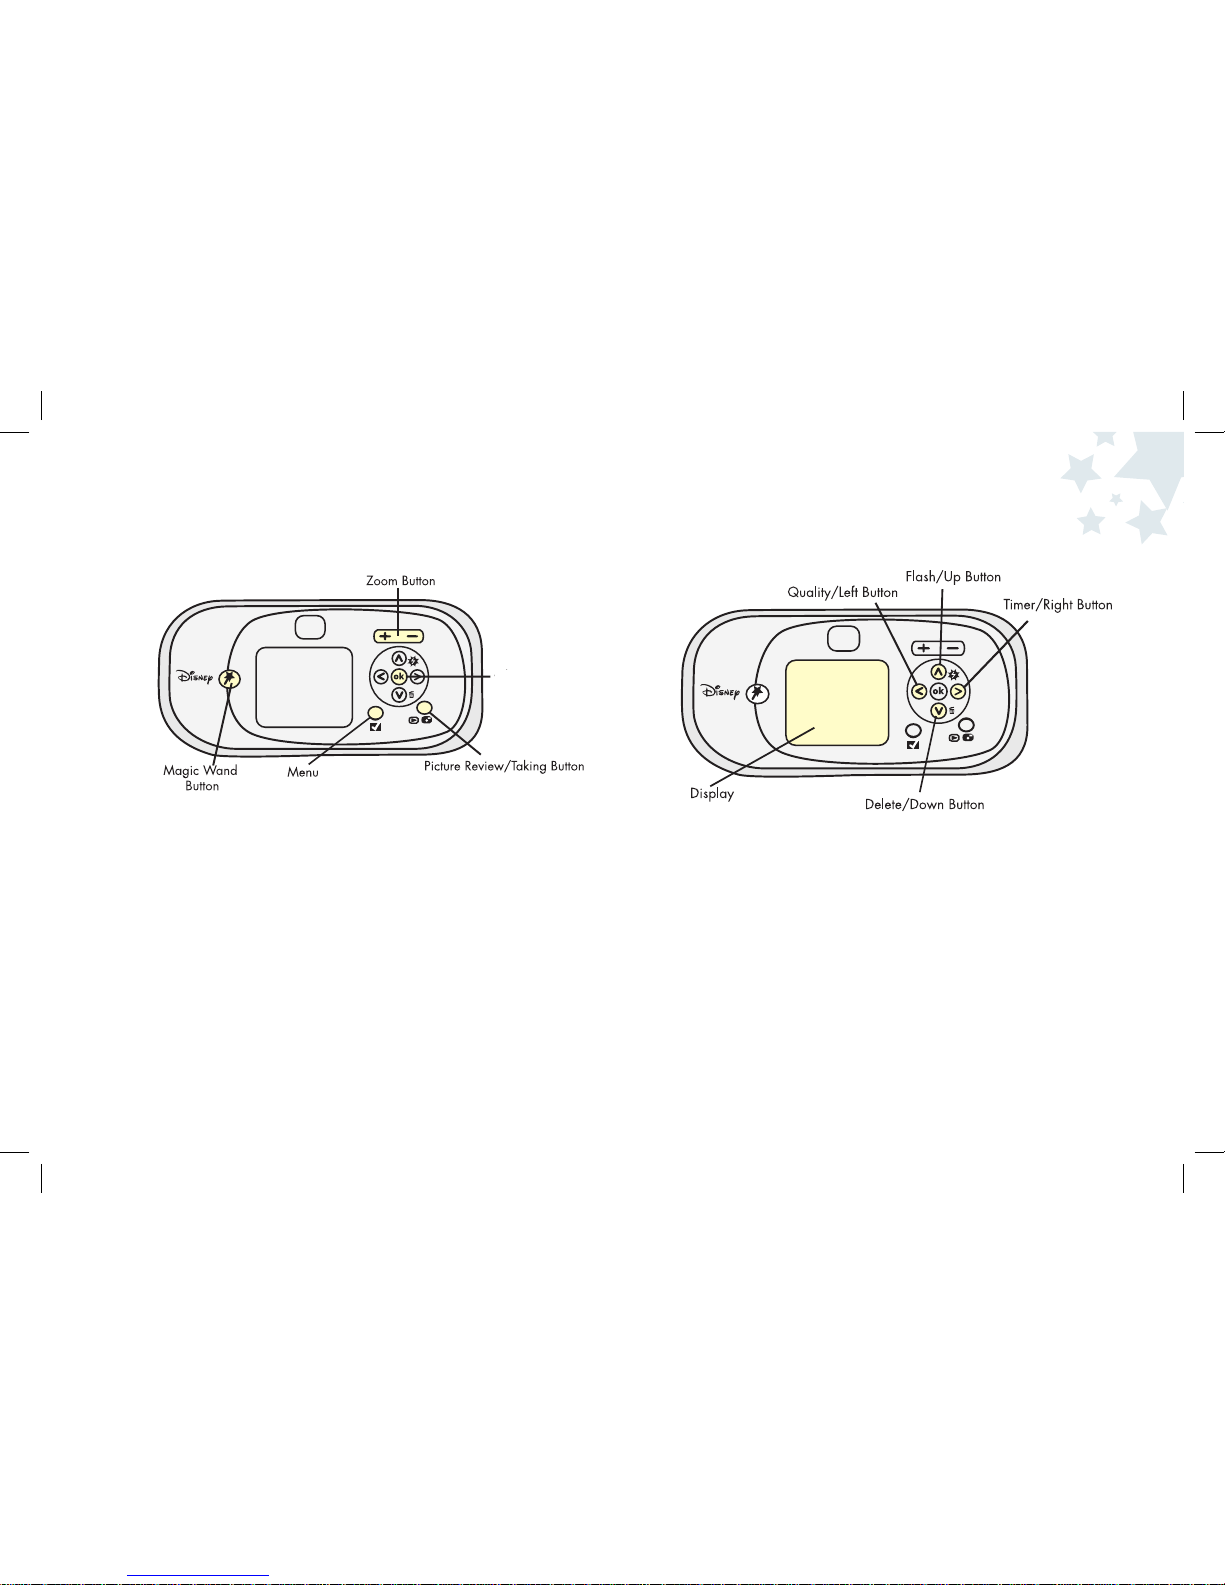
Camera Components
Power Button- Turn the camera on by pressing the Power button
and wait a moment.
Power LED- Illuminates when the camera is performing
various functions.
Snapshot Button- Use the Snapshot button to take pictures.
Flash Strobe- Use the Flash Strobe when you are indoors
or in low-light situations
Viewnder- Use the Viewfinder to frame your pictures.
Camera Lens- Make sure to keep the camera lens clean and clear
when taking pictures. Be sure not to block the lens with
your finger!
3 4
Camera Components (cont.)
Magic Wand Button- Use to add fun Disney characters to your photos.
Zoom Buttons- Magnify your pictures up to 8x.
OK Button- Choose the OK Button to make a selection in the Menu.
Picture Taking/Review Button- Toggles between Picture Taking
mode and Picture Review mode.
Menu Button- Press the Menu button to access camera settings and functions.
Flash/Up Button- Press to change the Flash settings or to make a
selection in the menu.
Quality/Left Button- Use to scroll through options in the Menu
or to adjust Image Quality/resolution.
You can choose from 3MP, 2MP or VGA.
Delete/Down Button- Press to delete one or several images from
the camera in Picture Review mode.
Display Screen- Use the Display Screen to preview the picture you
are going to take, review photos you have taken and
to view camera settings.
Timer/Right Button- Set the timer to On/Off or scroll through
options in the menu
Camera Basics
OK Button

USB Cable Connection- Connects the camera to your computer. Connect
the mini USB cable end to your camera then
connect the USB Cable Connection into the USB
slot on your computer when you are ready to
download your images.
TV Out Connection- Allows you to plug the camera directly into your
television so you can preview your photos on TV!
SD Slot- Increase the camera memory by putting an SD Card (not included)
into the SD Slot.
Tripod Mount- Connect a standard tripod to your camera
using the tripod mount.
Camera Components (cont.)
5 6
Display Screen
The camera’s Display Screen provides information about your camera
settings. Use the Display Screen when shooting your pictures. View the
diagram below to understand the symbols on the Display Screen.
Image Size-
3MP = 2048 x 1536 2MP = 1600 x1200 VGA = 640 x 480
Displays the size of the image you are taking. Each
setting is described in pixel width by pixel height.
Battery Level
Date and Time Stamp
Zoom
Flash
Self Timer
Counter
SD Card

SD Card Slot Status Icon–
No SD Card = No Icon SD Card Locked = SD Card Available =
Panning Arrows–
Pan Up = Pan Down = Left = Right =
7 8
Display Screen (cont.)
Flash Icon– Indicates whether the Flash is On, Off or Auto.
On= Off= Auto=
Self Timer Icon– Indicates if the Self Timer function
has been activated.
Self Timer Inactive = No Icon Self Timer Active =
Counter– Shows the number of images you have taken, followed
by the total number of images that are left.
Zoom Level- Indicates how much magnification you are using to shoot
your subject. You can Zoom In on your subject with up to
eight times magnification.
Date and Time-
Stamp–
Stamp not set = No Icon Stamp set =
Camera Basics
A
The Stamp prints the date and time on your photos. An icon shows
on the Display Screen if you have turned on the Stamp option.
Battery Status Icon –
Full =
2
/3 Power=
1
/3 Power=
Empty =
Shows how much battery life is left in the camera.
When the low battery image appears, make
sure to change your batteries immediately!
Indicates if an SD memory card is being
used by the camera. If your SD Card is
locked, your photos will be saved in the
camera’s onboard memory.
Display when zooming to indicate the direction
you are scrolling your picture. These arrows show
on the Display Screen when you are in Picture
Review mode.
Provides date and time information on your camera
Display Screen. This will not print on your pictures unless
you choose to set the Stamp option in the Menu.

9 10
Getting Started Quickly
With Camera Basics
You are probably excited to start using your new camera right away!
Here is a quick list of steps to get you started. Refer to each specific
area in the manual for detailed instructions.
Follow these quick steps to get started with your camera:
1. Insert the batteries into the camera.
2. Turn the camera on by pressing the Power button and wait a moment.
3. Press the Magic Wand button one time to select a fun Photo Friend to
add to your photo.
4. Use the Right and Left Arrow buttons to scroll through the image
choices until you see the image you would like to use highlighted
on the Display Screen.
Note: If you want to take the Photo Friend off your screen, press
the Magic Wand button a second time.
5. Use the Display Screen to locate the subject of you picture
and hold the camera steady.
6. When you are ready, press the Snapshot button and take a picture!
7. To review your pictures that are stored in memory, press the Picture
Taking/Review button. Use the Arrow buttons to scroll through
your images.
8. Install the Pix software onto your PC. Make sure you connect the USB
cable from your camera to your computer.
9. Download your images by clicking on the Pix Max Downloader icon
on your desktop.
10. Launch the Pix application by double-clicking on the Disney Pix
icon on your desktop.
11. Edit your pictures using the fun frames, stickers, and other photo
editing tools.

Picture Taking
Mode
11 12
Camera Modes Summary
The camera has two modes: Picture Taking and Picture Review.
To toggle between modes, press the Picture Taking/Review button.
Picture Taking Mode
Picture Taking mode is used to view your subject when you are taking
pictures. The camera will be in Picture Taking mode when it is turned on.
You can also access certain features from the Menu in Picture Taking mode.
In Picture Taking mode you will be able to:
• Take pictures
• Add Photo Friends to your pictures
• Set the Flash
• Choose the Image Size
• Access the Menu
• Use the Self Timer
• Zoom when taking pictures
Note: When you go the Menu in Picture Taking mode, it has different
options than when you go to the Menu in Picture Review mode.
In Picture Taking mode, the Menu options are:
Flash Setup, Image Size, Self Timer, Stamp and Setup Mode.
Taking Pictures With The Camera
Taking pictures with your digital camera is a fun way to share memories
with your friends and family!
To take pictures with the camera:
1. Turn the camera on by pressing the Power button and wait a moment.
2. Use the Display Screen to locate the subject of your picture
and hold the camera steady.
3. Press the Snapshot button located on the top of the camera to take
a picture. The camera will beep.
Note:
The counter appears in the upper right corner of the display. The
counter has two numbers. The first number shows you how many
pictures are stored in the camera’s memory. It will increase each
time you take a picture. The second number shows you how many
pictures are remaining. This will decrease as you take snapshots.
When the camera memory is full, the camera will beep three times
and a “Memory Full” message will appear on the Display Screen.

Photography Tips
These general tips will help you improve the quality of the photos you shoot.
Because this is a digital camera, it’s easy to experiment and try different
techniques. If you don’t like the results, you can delete the pictures and try
again. There are many factors that contribute to good photography; the
following list provides some tips.
• For the best images, take lots of pictures to increase your chance
of capturing just the right shot. Afterward, you can go back and
delete the images you don’t want.
• Make sure that your light source is behind or to the side of the
camera, rather than in front of the camera. The person taking
pictures should not be looking directly into a light source.
• When taking a picture, hold the camera as steady as possible to
prevent blurry photos. Try resting your elbows on something stable.
• If you are taking a picture of a person, try to get direct eye contact
with the person to create a more engaging picture.
• When taking a photo, make sure to notice what is in the
background of your photo. Using a plain background will put more
emphasis on the subject of your picture.
• Try using a different angle when capturing an ordinary object to
make the picture more interesting.
Adding A Photo Friend To Your Photo
The Magic Wand button on your camera allows you to permanently add
fun Disney characters and objects (called Photo Friends) to your photos!
To add a Photo Friend to your picture:
1. Turn the camera on by pressing the Power
button and wait a moment.
2. Press the Magic Wand button.
3. Use the Right and Left Arrow buttons to scroll through the image
choices until you find the image you want to use becomes highlighted
on the Display Screen.
4. Use the Display Screen to locate the subject of your picture and
hold the camera steady. You can have some fun by placing your
subject right next to the Disney images so they look like they are in
the picture together!
5. Press the Snapshot button located on the top of the camera to take
the picture. The camera will beep.
6. When you are finished taking pictures using the Photo Friends overlay,
press the Magic Wand button to exit Photo Friends.
Note: When you use the Photo Friends feature, the image overlay will
be permanently attached to your picture when you take a snapshot.
You can decide not to add the Photo Friend to your picture before
you press the Snapshot button. To do this, press the Magic Wand
button to remove the Photo Friend from the Display Screen.
13 14
Picture Taking
Mode
 Loading...