

Digital Blue Digital Movie Creator 3.0 Quick Start Manual
Quick Start Guide

TM and © 2007 Digital Bl ue, Inc. All ri ghts reserved.
Innovation starts here.
www.PlayDigitalBlue.com

Table of Contents
Getting Started
3
Using the Camera
4
Using the Software
23
Additional Help
29
Table of Contents
i

Important: I nstall the software before connecting the camera to your computer.
Installing the software
1. Insert the Digital Movie Creator soft ware CD-ROM into your CD-ROM drive.
2. If the program doesn’t automatically begin, go to the desktop and double-click My
Computer. Double-click the CD-ROM drive that contains the Digital Movie Creator software.
If this doesn’t start the installation program, double click setup.exe.
3. Follow the instructions on the screen.
Note: To install on several computers over a network, see instructions in
NetworkInstall.txt on the installation CD.
Connecting the camera to the computer
To connect the camera to the computer:
1. Connect the USB cable on the camera’s base to the USB port on your computer.
2. Press the camera rmly into the camera base. The camera will beep and
the USB icon is shown on the Display Screen when it connects to the computer.
3. Launch the Digital Movie Creator software application using the shortcut on the desktop.
On the rst launch, the audio setup wizard will open before the application opens.
4. When the audio setup wizard opens, select your PC sound card (usually the rst item on
the list) as the preferred device in order to use your microphone when recording.
2
Getting Started
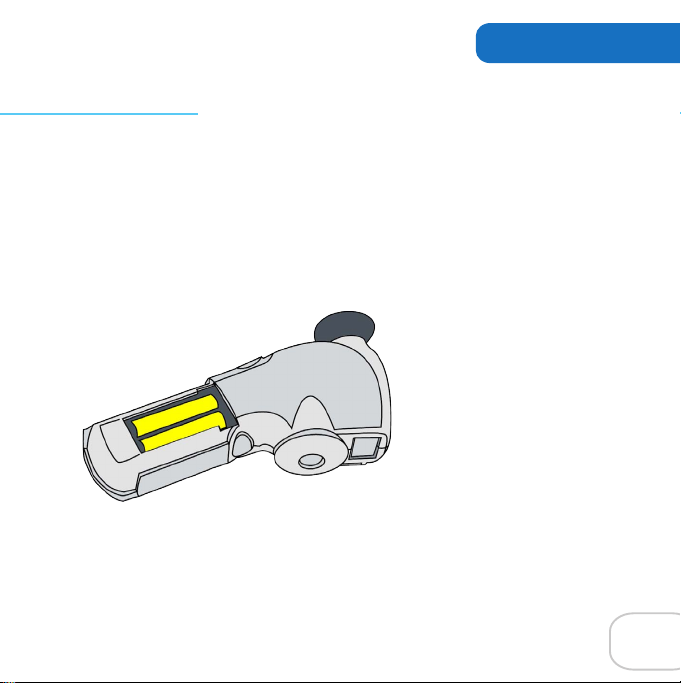
Installing the batteries
The camera is powered by four AAA batteries. To install the camera batteries:
1. Carefully remove the small screw at the bottom of the camera using a small Phillips head
screwdriver.
2. Slide the battery compartment back and lift the cover to the open position.
3. Insert the batteries using the battery polarity symbols (+ and -) as a guide.
4. Turn the camera on by pressing the Snapshot or Record button.
3
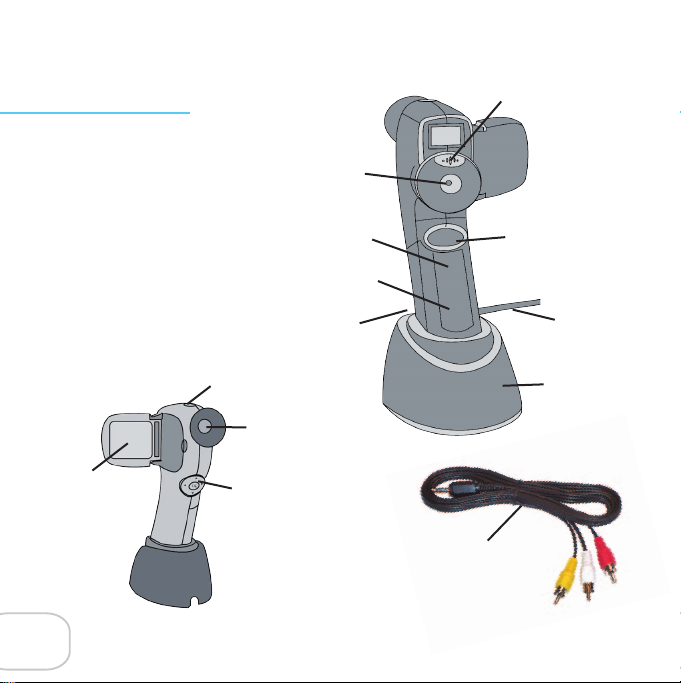
Camera Controls
Built-in Microphone
Camera Lens
Display Screen
4
SD Memory Card Slot
Battery Compartment
Snapshot Button
Eyepiece
Navigation Buttons
Record Button
TV Out
USB Cable
Camera Base
TV Out Cable

Using the Camera
Snapshot Button– Use the Snapshot button to capture still images with your camera.
Built-in Microphone– The microphone automatically records sounds as you capture
video clips.
Camera Lens– Make sure to keep the camera lens clean and clear when tr ying to capture images/video.
Camera Base– The USB cable on the camera’s base connects to your computer. When
the camera is in the base and the software is running, you can download pictures, and
capture images and video clips in the software.
USB Cable– Connects your camera to your computer, so you can download images to
your computer when the camera is in the base.
Eyepiece – Look through the eyepiece to center your subject in the viewnder.
Display Screen– Use the Display Screen to preview your shots and to view the menu.
Record Button– Use the Record Button to record video with your camera.
Navigation Buttons– Use the Navigation buttons for making selections from the menu or
to control zooming while capturing a video. These buttons don’t work when your camera is
attached to your computer.
SD Memory Card Slot– The SD Memory Card slot allows you to use your own memory
card to store more images and videos on your camera. (SD card not included.)
TV Out– View your videos on the TV screen by using the TV Out cable.
Battery Compartment– Change the batteries by opening the Battery Compartment.
TV Out Cable– Connects your camera to your TV allowing you to view your movies on
the screen.
5
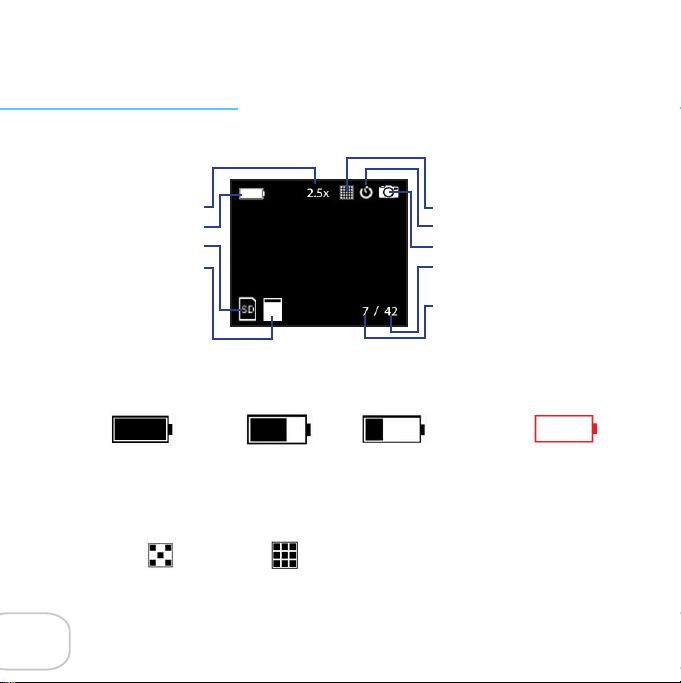
Camera Display Screen
The Camera Display screen provides information about your camera settings.
Zoom level
Battery status
Active storage medium
Memory usage
Battery Status Icon– Shows how much batter y life the camera has left. When the critically low image appears make sure to change your batteries immediately.
Full = Medium = Low = Critically Low =
Zoom Level– Indicates how much digital magnication you are using to shoot your
subject. You can zoom in on your subject with up to four times digital magnication.
Image Quality– Shows whether the camera is lming in Normal or High Quality.
Normal = High =
Image quality
Snapshot type
Capture type
N umber of additional images that
can be stored
Number of stored images
6
Using the Camera
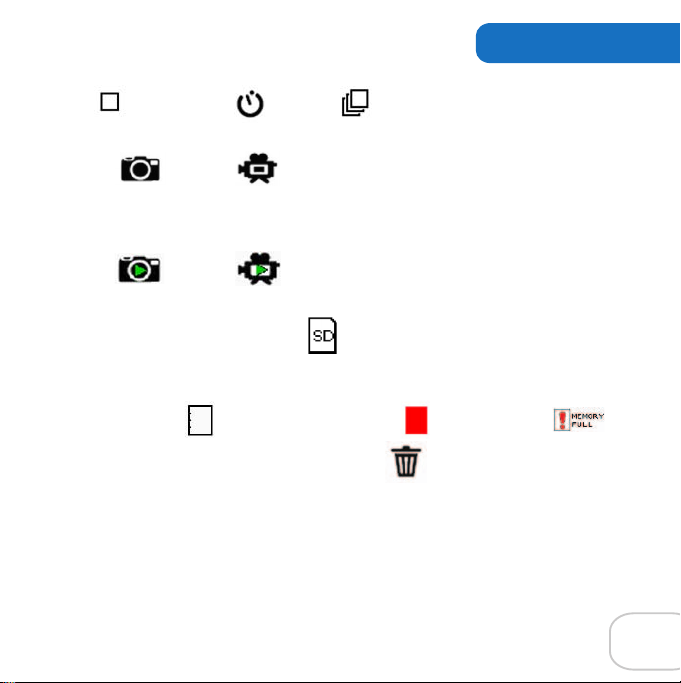
Snapshot Type– Displays the type of capture when the Snapshot button is pressed.
Single = Timer on = Burst =
Capture Type– Indicates whether you are taking a snapshot or a video clip.
Snapshot = Video =
When you are playing back your movies you will see these symbols indicating you are viewing
a snapshot or playing a video clip.
Snapshot = Video =
Memory Type– Shows which type of memory you currently are using.
Internal = No icon SD Memory Card =
Memory Level– Represents the amount of memory that has been used. There are several
stages of memory usage.
Zero Memory Used = Memory Almost Full = Memor y Full =
Delete– Flashes as you delete images from the camera.
Counter– Shows the number of images you have captured and how many you can still capture.
7

Capturing video with the camera
When you turn on the camera, you’re in Live Preview Mode.
To record video:
1. Open the Display Screen and press the Snapshot or Record button to turn on the camera.
2. Locate the subject of your video using the Eyepiece or Display Screen.
3. Press the Record button to start recording.
4. When you have captured all the video you want, press the Record button again to stop
recording.
5. You can play your video on the camera’s Display Screen (see Viewing images and
movies on the Display Screen) or on your computer (by connecting the camera to your computer using the camera base and USB cable) with the Digital Movie Creator software.
Note: To zoom in on your subject, press the Up Arrow button. To zoom out, press the Down
Arrow button.
8
 Loading...