

Digital Blue ALARM CLOCK, LEGO User Manual
GETTING STARTED
Congratulations on purchasing your LEGO Alarm Clock! The LEGO Alarm Clock gives
you a fun way to wake up in the morning. To get started, you will need to use a Philips/
Cross head screwdriver (not included) to remove item from packaging.
POWER SUPPLY
Your new LEGO Alarm Clock operates on 3 AA batteries (not included). 1. Do not mix
old and new batteries. 2. Do not mix alkaline, standard (carbon-zinc), or rechargeable
(nickel-cadmium) batteries. 3. Only use the batteries specified by the manufacturer.
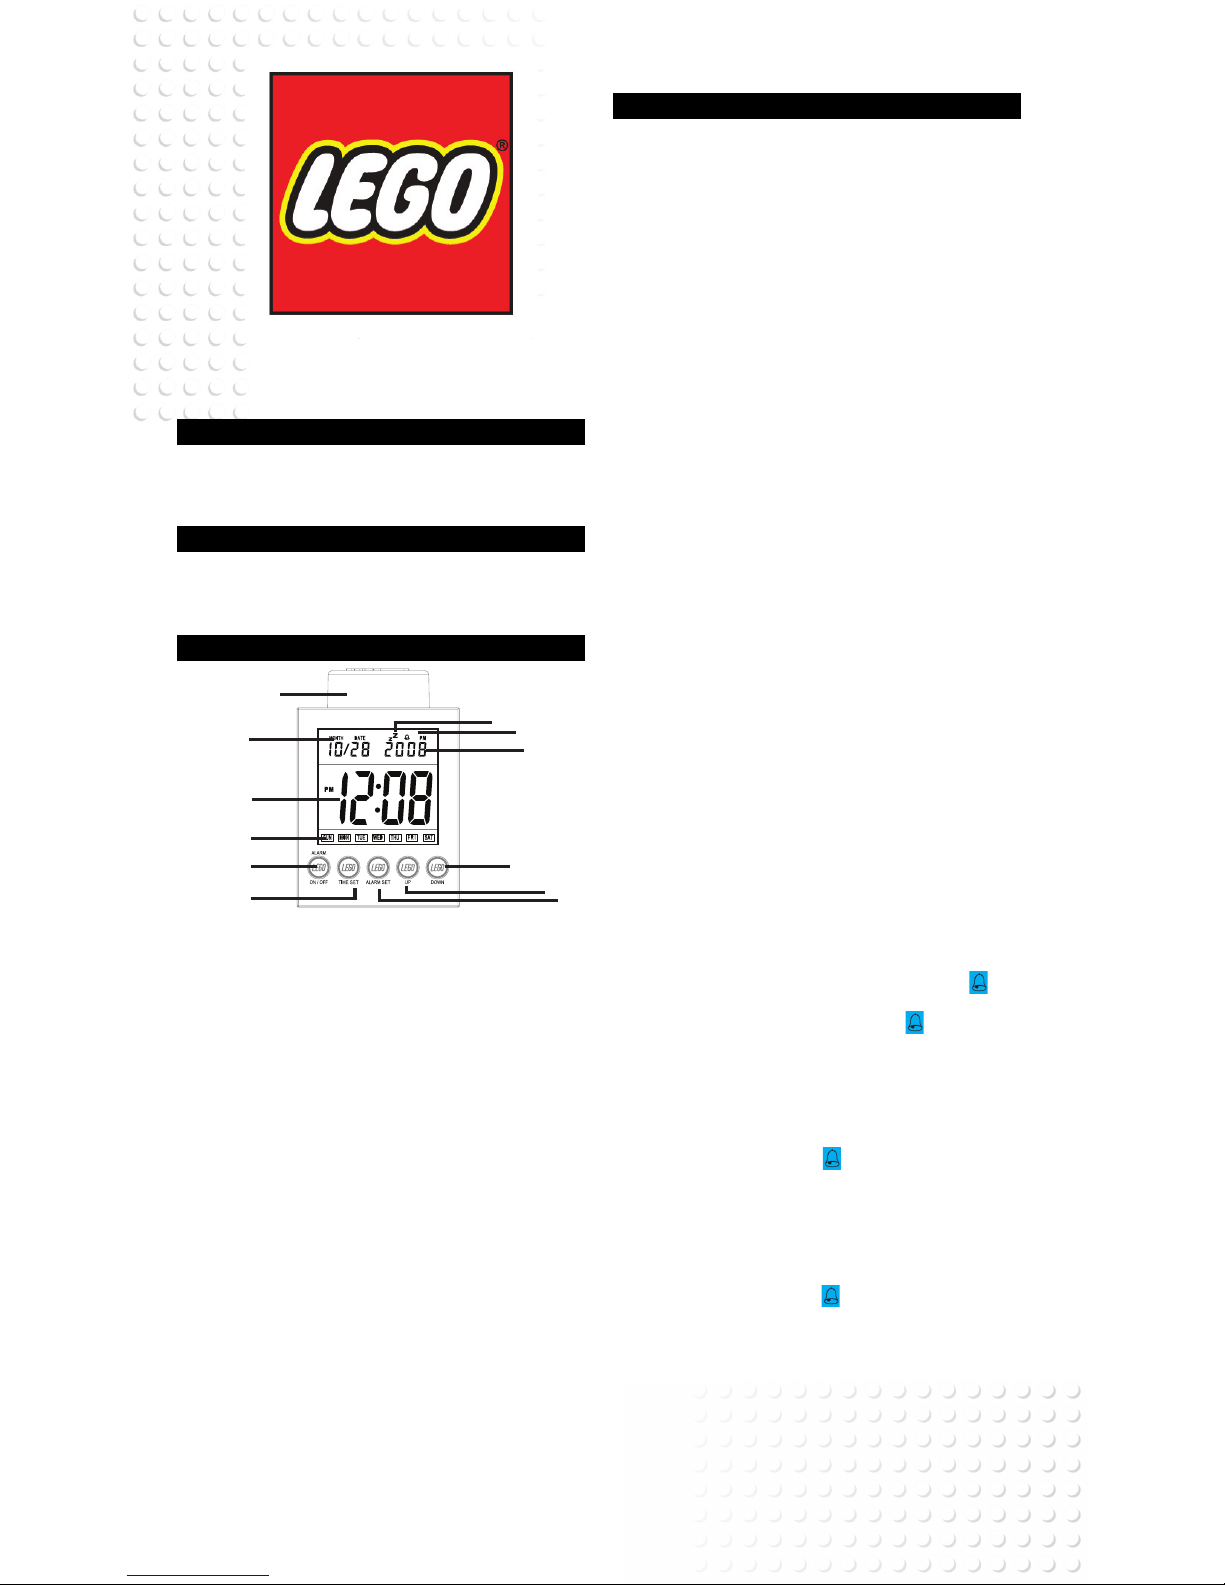
CLOCK RADIO COMPONENTS
1. SNOOZE/LIGHT FUNCTION - Press down on knob to snooze your alarm or
activate backlight of LCD Display screen.
2. DATE FUNCTION - Displays the current Month and Date.
3. TIME/YEAR - Set the TIME and the YEAR. Only the TIME will display. The YEAR
feature displays only when setting the current MONTH, DATE, and YEAR.
4. DAYS OF THE WEEK - Displays the current DAY of the WEEK.
5. ALARM ON/OFF - Use this button to turn ALARM ON or OFF.
6. TIME SET - Press and hold this button when setting the TIME and DATE functions.
7. ALARM SET - Press and hold this button when setting the ALARM time and functions.
8. UP - Use this button to scroll UP through numerical digits when setting the TIME or ALARM.
9. DOWN - Use this button to scroll DOWN through numerical digits when setting the
TIME or ALARM.
10. ALARM - Displays the ALARM time when User has set ALARM. If ALARM time is not
set it will automatically default to 12:00.
11. BELL ICON- This icon indicates that the set alarm is on.
12. Zz ICON - This icon indicates that the SNOOZE function has been activated.
This icon indicates that the set alarm is on.
1.
2.
3.
10.
4.
6.
8.
ALARM CLOCK
9.
7.
12.
USING YOUR ALARM CLOCK
To operate your LEGO Alarm Clock, place 3 AA batteries in the battery compartment of
the device. The battery compartment is located in the back panel. Once the batteries are
placed correctly in the battery compartment the icons, functions, and numerical digits will
display on the LCD screen.
TO SET THE TIME:
To start, press and hold the “TIME SET” button located on the front panel of the device, in
order to enter into the TIME setting mode. Continuously press the “TIME SET” button to
complete the TIME setting feature cycle.
1. Press and hold the TIME SET button, the display will show flashing “12H” or “24H” hour
modes. Use the UP and DOWN buttons to set the hour mode (12 or 24 hour mode).
NOTE: The default setting is 12 hour mode.
2. Once the 12/24 hour mode to selected, press the TIME SET button again and the
HOUR digits will begin to flash. While pressing down the TIME SET button, use the UP
and DOWN buttons to set the correct time. When in 12 hour mode the PM indicates
afternoon hours.
3. After the correct hour is set press the TIME SET button again to set the MINUTE. Like
the hour digits, the minute digits will begin to flash. Use the UP and DOWN button to set
the correct MINUTE. To fast forward or backward when setting the time, press the UP or
DOWN button for one second.
TO SET THE DATE:
1. Before setting the DATE, the three steps to set the TIME must be completed. In order to
set the correct DATE, press the TIME SET button again and the YEAR will begin to flash in
the same location as the time on the LCD screen. Use the UP and DOWN button to set.
NOTE: The default setting is 2008 and is limited to 2099.
2. Press the TIME SET and the UP and DOWN buttons to set the correct MONTH in the
upper left hand corner of the Alarm Clock.
3. Continue on by setting the DATE by pressing down the TIME SET and UP and DOWN
buttons. Once the YEAR, MONTH, and DATE are set the DAY OF THE WEEK will
automatially set and display on the LCD screen.
When all the above TIME and DATE settings are completed, press the TIME SET button to
return to normal TIME display. Leaving the unit for 30 seconds will automatically return to
the correct TIME and DATE display.
TO SET THE ALARM:
1. Press and hold the ALARM SET button. The ALARM HOUR flash, use the UP and
DOWN buttons to set the correct ALARM HOUR.
2. Continue pressing the ALARM SET button again for the ALARM MINUTE to flash. Use
the UP and DOWN buttons to set the correct ALARM MINUTE.
3. Press the ALARM SET button one more like to complete the setting and return to the
normal ALARM TIME display.
NOTE: Alarm time will default to 12:00 (00:00) if not set. The alarm time corresponds
with the same 12/24 hour mode as the mode set for the time. PM will appear on the
display screen if you are using the 12 hour mode.
TO TURN ALARM ON/OFF:
1. Press the ALARM ON/OFF button to turn the ALARM ON. The bell icon will
appear above the ALARM TIME indicating that the ALARM is ON. Press the ALARM ON/
OFF button once more to turn the ALARM OFF. The bell icon will disappear.
WHAT TO DO WHEN ALARM GOES OFF:
NOTE: The alarm clock has a built in power saving mode, which will automatically turn off
the alarm if the User does not press the SNOOZE or ALARM OFF button. When the set
alarm goes off, the User may do one of the following...
1. When the alarm goes off and the User takes no action to turn the alarm off, the alarm
will automatically go off after 1 minute, but continue to stay set so that the alarm goes off
at the same time the next day. The bell icon will continue to display indicating that the
alarm is still set.
2. When the alarm goes off you can press down on the SNOOZE button located on top
of the device. When the SNOOZE button is pressed the alarm will snooze for 5 minutes
before going off again. When SNOOZE is activated, the Zz icon will display.
3. You can also turn the alarm off by pressing any button on the LEGO Alarm Clock,
including the ALARM ON/OFF button. This will stop the current alarm and keep the same
set alarm set for the next day. The bell icon will continue to display also.
TO ACTIVATE THE BACKLIGHT:
1. Press the SNOOZE/LIGHT button on top of the LEGO Alarm Clock to turn the
backlight of the display screen. The light will turn on for 5 seconds and then automatically
turn off until pressed again.
5.
11.
NEED ADDITIONAL HELP?
For additional product support, visit www.digiblue.com and select Customer Service.
If you are still having problems with the product, contact Customer Support at
888-800-0502.
© 2010 The LEGO Group.
LEGO, the LEGO logo, and the Brick and Knob configurations are trademarks of the
LEGO Group. Produced by Digital Blue under license from the LEGO Group.
TM and © 2010 Digital Blue, Inc. All rights reserved.
Distributed in the U.S. by Digital Blue, Inc.
1517 Johnson Ferry Road, Marietta, GA 30062
Distributed in the U.K. by Digital Blue, Inc.
Richmond Hill Farm Chiselhampton Oxford OX44 7XF
Made in China
SAFETY WARNING
Avoid spilling any liquid onto or into your LEGO Alarm Clock.
Do not leave your LEGO Alarm Clock in a location near heat sources; in a location
subject to direct sunlight, excessive dust, sand, moisture, rain or mechanical shock; on an
unlevel surface; or in a car with the windows closed during periods of excessive heat.
For indoor use only.
Retain package for future reference.
MAINTENANCE
- Clean only with a dry cloth
- It is important that no liquid reaches the inside of the unit.
- This model is equipped with non-skid rubber pads to prevent the product from moving
when you operate the controls. The pads are specifically formulated to avoid leaving any
marks or stains on your furniture. However, certain types of oil based
furniture polishes, wood preservations, or cleaning sprays may cause the rubber
material to soften, and leave marks or rubber residue on the furniture. To prevent any
damage to your furniture, we strongly recommend that you purchase small,
self-adhesive felt pads and apply these pads to the bottom of the rubber pads of the rubber pads before you place the product on fine wooden furniture.
Dear Customer:
Selecting fine audio equipment such as the unit you’ve just purchased is only the start
of your musical enjoyment. Now it’s time to consider how you can maximize the fun
and excitement your equipment offer. This manufacturer and the Electronic Industries
Association’s Consumer Electronics Group want you to get the most out of your equipment by playing it at a safe level. One that lets the sound come through loud and clear
without annoying blaring or distortion and, most importantly, without affecting your
sensitive hearing. Sound can be deceiving. Over time your hearing “comfort level” adapts
to higher volumes of sound. So what sounds “normal” can actually loud and harmful to
your hearing. Guard against this by setting your equipment at a safe level BEFORE your
hearing adapts.
IC DECLARATION
This Class B digital apparatus complies with Canadian ICES-003.
Cet appareil numérique de la classe B est conforme à la norme NMB-003 du Canada.
FCC DECLARATION
Warning: Changes or modifications to this unit not expressly approved by the party
responsible for compliance could void the user’s authority to operate the equipment.
NOTE: This equipment has been tested and found to comply with the limits for a
Class B digital device, pursuant to Part 15 of the FCC Rules. These limits are designed to
provide reasonable protection against harmful interference in a residential installation.
This equipment generates, uses, and can radiate radio frequency energy and, if not installed
and used in accordance with the instructions, may cause harmful interference to radio
communications. However, there is no guarantee that interference will not occur in a
particular installation. If this equipment does cause harmful interference to radio or television reception, which can be determined by turning the equipment off and on, the user is
encouraged to try to correct the interference by one or more of the following measures:
-Reorient or relocate the receiving antenna.
-Increase the separation between the equipment and receiver.
-Connect the equipment into an outlet on a circuit different from that to which the
receiver is connected.
-Consult the dealer or an experienced radio TV technician for help.
Shielded cables must be used with this unit to ensure compliance with the Class B FCC limits.
INFORMATION SPECIFICATION
POWER SOURCE: Battery DC 4.5V (LR6, UM-3, AA size x 3)
UNIT DIMENSIONS: (W) 79mm x (D) 79mm x (H) 116mm
NET WEIGHT: APPROX.
GROSS WEIGHT: APPROX.
Information Label:
At the back or bottom of the unit. In accordance with the ration plate of the unit.
This unit compliances with current standards concerning electrical safety and
eletromagnetic compatibility.
*Specifications are subject to change without notice.
 Loading...