

Digital Audio Labs POWERSHAPE PS-2.1 User Manual

POWERSHAPE™ PS-2.1
Class D Amplifier with DSP
User Manual Version 1.2
11/19/2013
DIGITAL AUDIO LABS - 1266 Park Road - Chanhassen, MN 55317
support@digitalaudio.com (952) 401-7700
www.digitalaudio.com

This page intentionally left blank
2

IMPORTANT SAFETY INSTRUCTIONS! 4
WHAT’S IN THE BOX! 5
CONNECTIONS! 6
FRONT PANEL! 6
REAR PANEL! 6
INSTALLATION! 7
GENERAL INSTRUCTIONS! 8
TERMINAL BLOCK WIRING! 9
BLOCK DIAGRAM! 10
INPUT CONFIGURATION! 11
OUTPUT CONFIGURATION! 12
EQ! 12
CROSSOVER! 12
COMPRESSOR! 12
STEREO ENHANCEMENT! 13
MASTER OUTPUT VOLUME! 13
CONTROL AND SETUP OPTIONS! 14
USB! 14
RS-232! 14
ETHERNET! 14
INFRARED (IR)! 14
PRESETS! 14
POWER SAVE MODE! 14
SOFTWARE CONFIGURATION! 15
AUDIO PROCESSING! 15
COMMUNICATION STATUS! 15
SERIAL (RS-232) CONFIGURATION! 16
NETWORK (ETHERNET) CONFIGURATION! 16
SAVE, LOAD AND PRESETS! 16
NEW, OPEN AND SAVE! 16
FACTORY PRESETS! 16
USER PRESETS! 16
FIRMWARE UPDATE! 16
HELP! 16
USER MAINTENANCE! 17
ENVIRONMENTAL CONSIDERATIONS! 17
CLEANING! 17
WARRANTY AND SERVICE! 18
TECHNICAL SPECIFICATIONS! 19
APPENDIX! 20
PROGRAMMER’S GUIDE! 20
TROUBLESHOOTING! 37
3
IMPORTANT SAFETY INSTRUCTIONS
WARNING: TO REDUCE THE RISK OF FIRE OR ELECTRIC SHOCK, DO NOT EXPOSE THIS APPLIANCE TO
RAIN OR MOISTURE.
CAUTION: TO REDUCE THE RISK OF ELECTRIC SHOCK, DO NOT REMOVE COVER. NO USER SERVICEABLE PARTS INSIDE. REFER SERVICING TO QUALIFIED SERVICE PERSONNEL.
The lightning flash with arrowhead symbol, within an equilateral triangle, is intended to alert
the user to the presence of un-insulated “dangerous voltage” within the products enclosure
that may be of sufficient magnitude to constitute a risk of electric shock to persons.
The exclamation point within an equilateral triangle is intended to alert the user to the
presence of important operating and maintenance (servicing) instructions in the literature
accompanying the appliance.
Important Safety Instructions:
1. Read and understand this entire manual.
2. Keep this manual available for reference.
3. Heed all warnings and precautions in this manual and notices marked on the product.
4. Do not use this product near water or damp environments.
5. Do not block any ventilation openings. Install in accordance with the manufacturer’s instructions.
6. Do not install near any heat sources such as radiators, heat registers, stoves, or other products (including amplifiers) that produce
heat or other high ambient temperature environments. Provide for proper airflow around product.
7. Do not defeat the safety purpose of the polarized or grounding-type plug. A polarized plug has two blades with one wider than the
other. A grounding type plug has two blades and a third grounding prong. The wide blade or the third prong is provided for your
safety. If the provided plug does not fit into your outlet, consult an electrician for replacement of the obsolete outlet.
8. Protect the power cord from being walked on or pinched particularly at plugs, convenience receptacles, and the point where they
exit from the product.
9. Only use attachments/accessories specified by the manufacturer.
10. Unplug this product during lightning storms or when unused for long periods of time.
11. Refer all servicing to qualified service personnel. Servicing is required when the product has been damaged in any way, such as
power-supply cord or plug is damaged, liquid has been spilled or objects have fallen into the product, the product has been
exposed to rain or moisture, does not operate normally, or has been dropped.
12. The product shall not be exposed to dripping or splashing and that no objects filled with liquids, such as vases, shall be placed on
the product.
13. Power Sources - The product should be connected to a power supply only of the type described in the operating instructions or as
marked on the product.
14. Object and Liquid Entry - Care should be taken so that objects do not fall and liquids are not spilled into the enclosure through the
openings.
15. Servicing - The user should not attempt to service the appliance beyond that described in the operating instructions. All other
servicing should be referred to qualified service personnel. There are no user serviceable components inside the product.
Precautions:
1. POWER CORD NOTICE FOR INTERNATIONAL OPERATION - Please call Digital Audio Labs Support at (952) 471-7700.
2. Power – WARNING, BEFORE TURNING ON THE POWER FOR THE FIRST TIME, READ THE FOLLOWING SECTION
CAREFULLY. All models are designed for use only with the power supply voltage of the region where they are sold.
3. Voltage Label (Rear Panel) – A label located on the power supply indicates the AC power input for the unit. The label will read
100-240V AC, 50/60Hz, 1.4A.
4. Do not touch the PS-2.1 with wet hands. Do not handle the PS-2.1 or power cord when your hands are wet or damp. If water or any
other liquid enters the PS-2.1 cabinet, take the PS-2.1 to qualified service personnel for inspection.
5. Place the PS-2.1 in a well, ventilated location. Take special care to provide plenty of ventilation on all sides of the PS-2.1 especially
when it is placed in an audio rack. If ventilation is blocked, the PS-2.1 may over heat and malfunction. Do not expose the PS-2.1 to
direct sun light or heating units as the PS-2.1 internal components temperature may rise and shorten the life of the components.
Avoid damp and dusty environments.
6. Care – From time to time you should wipe off the front and side panels and the cabinet with a dry soft cloth. Do not use rough
material, thinners, alcohol or other chemical solvents or cloths since this may damage the finish or remove the panel lettering.
7. Class II wiring required.
8. The manufacturer cannot be held responsible for damages caused to persons, things or data due to an improper or missing ground
connection.
9. Before powering this amplifier, verify that the correct voltage rating is being used.
10. Do not use this amplifier if the electrical power cord is frayed or broken.
11. Do not remove the cover. Failing to do so will expose you to potentially dangerous voltage.
4

WHAT’S IN THE BOX
1. PowerShape 2.1 - Class D Amplifier with DSP
2. Power Supply (24VDC 2.5A)
3. IEC Power Cable (6’ Length)
4. USB Cable (6’ Length)
5. Quick Start Guide
Visit www.digitalaudio.com/powershape for the latest PowerShape 2.1 configuration software and documentation.
5
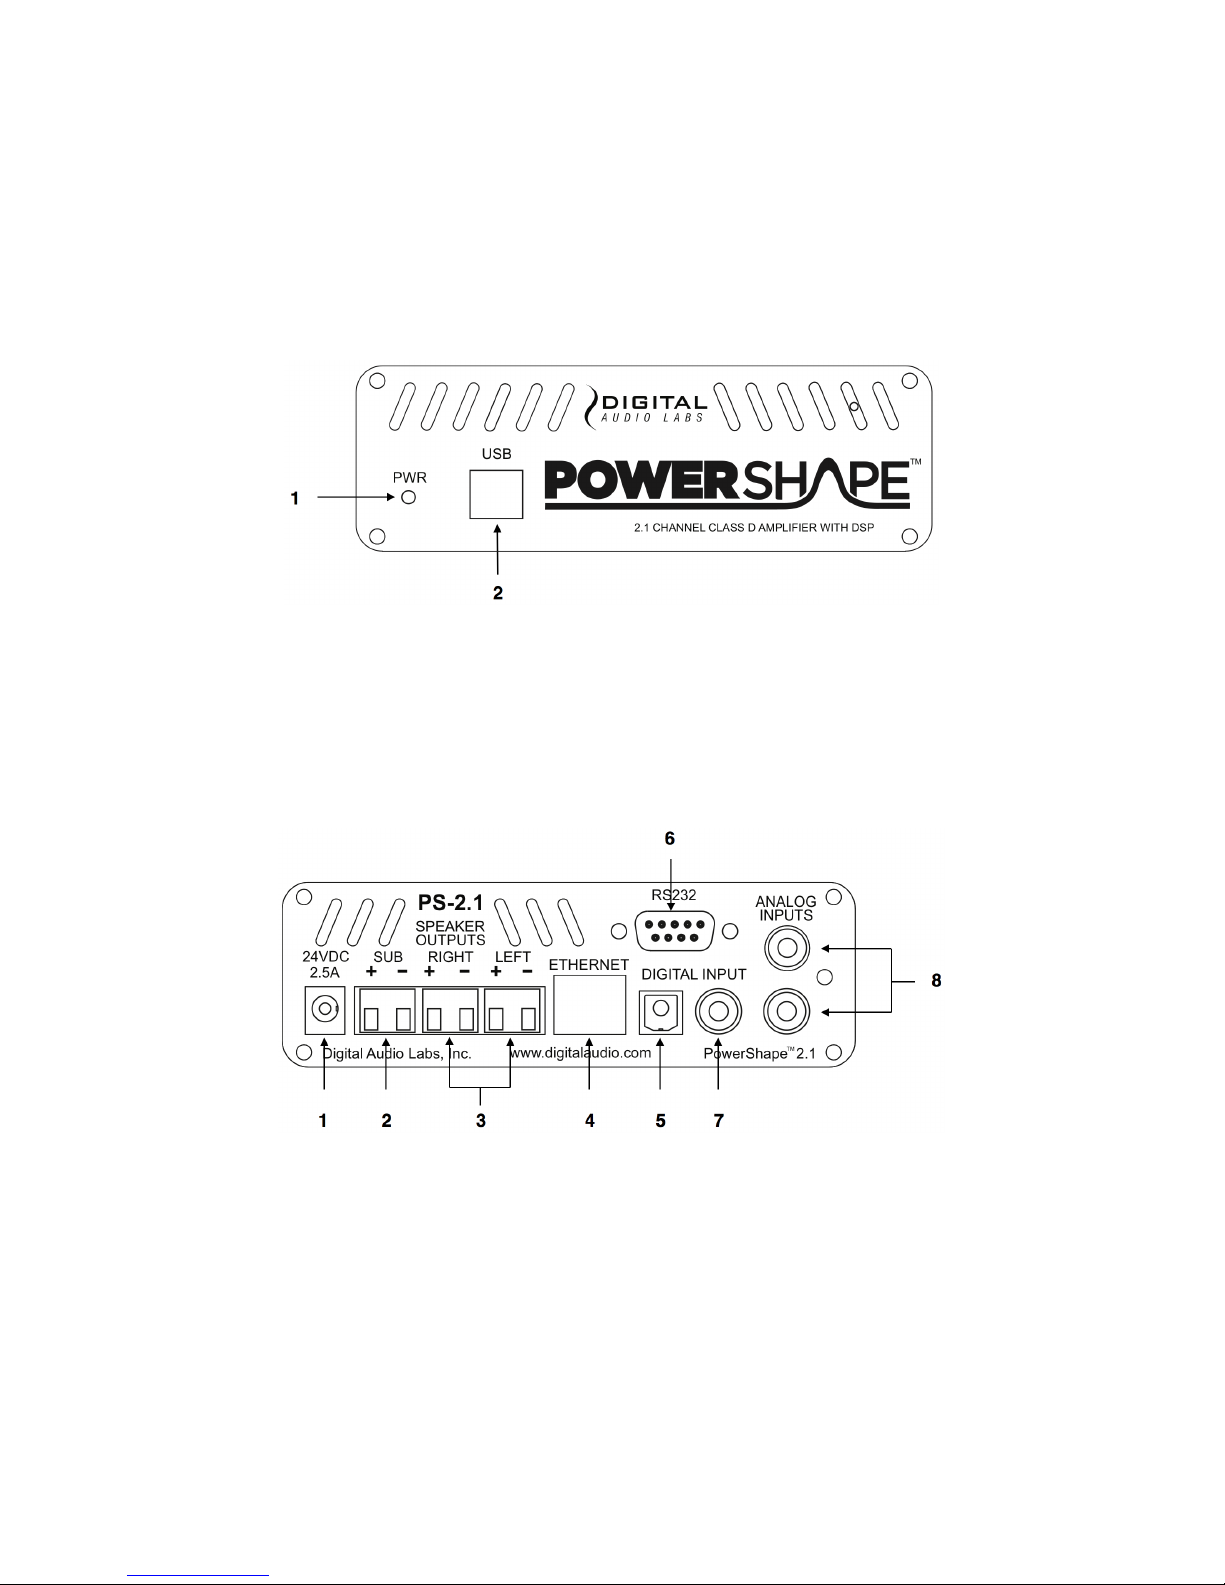
CONNECTIONS
1 - 24VDC Power Input
5 - Digital Optical Input (Stereo)
2 - Subwoofer Output
6 - RS-232
3 - Speaker Outputs (Left/Right)
7 - Digital Coax Input (Stereo)
4 - Ethernet
8 - Analog Inputs (Stereo)
1 - Power Indicator
2 - USB
FRONT PANEL
REAR PANEL
6
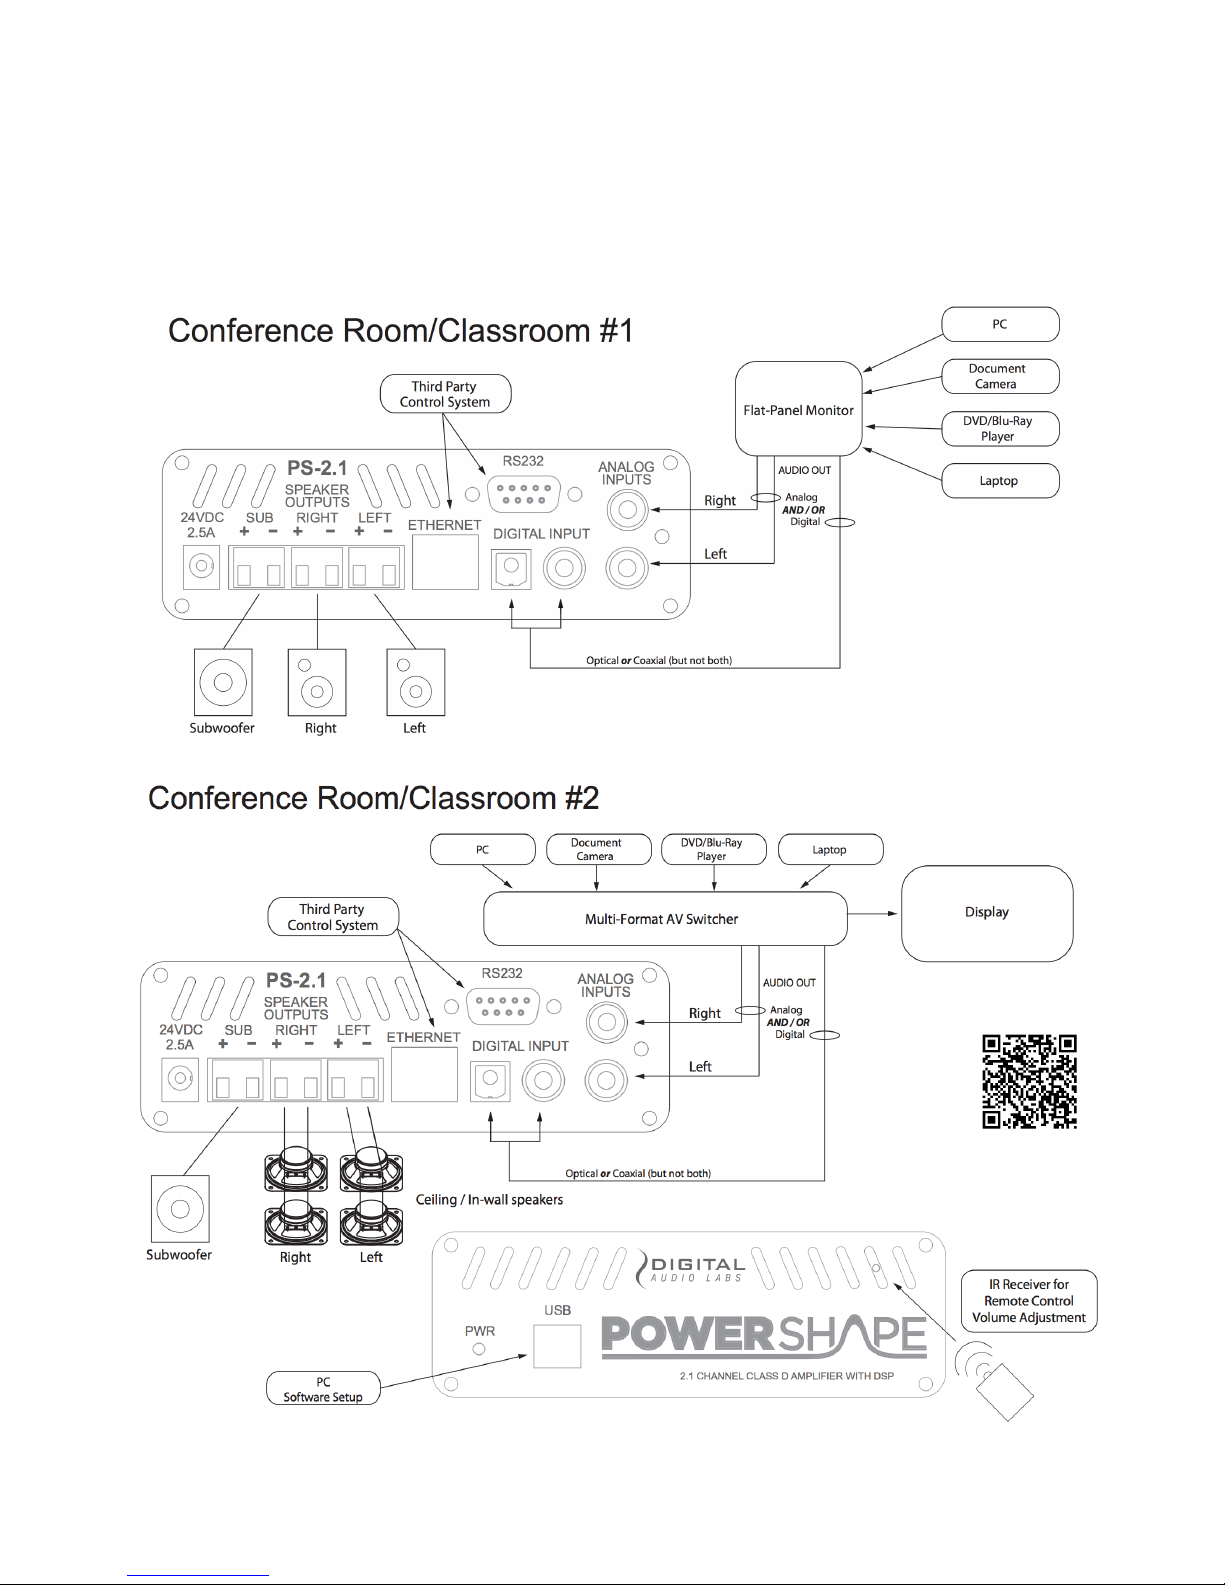
INSTALLATION
There are two factory presets for quick setup: Conference/Classroom #1 & #2.
7

GENERAL INSTRUCTIONS
Review safety warnings on page 4 before preceding.
•
Use only the included 24VDC power supply and power cable.
•
Surge protector or power conditioner recommended.
•
Leave adequate space on rear and sides for proper ventilation.
•
Only plug this device into a grounded outlet.
•
8
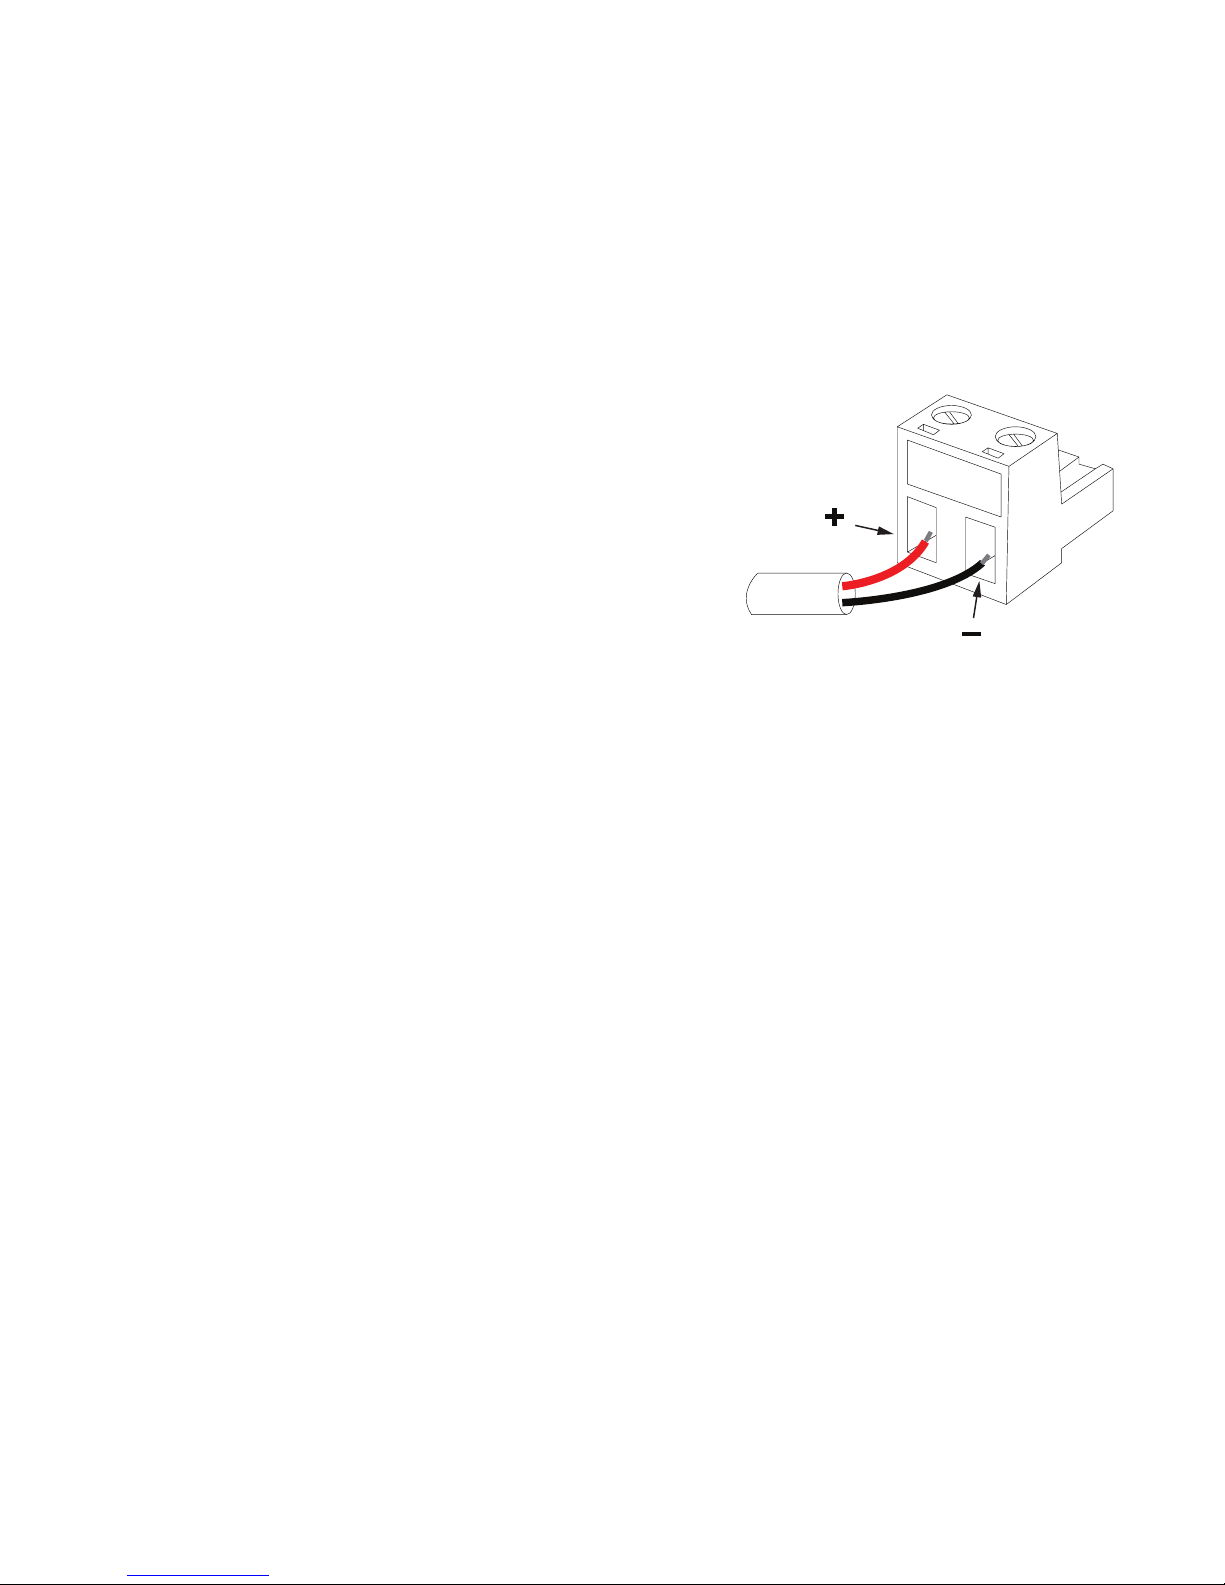
TERMINAL BLOCK WIRING
SPEAKER
OUTPUT
A full set of terminal block connectors is included.
General instructions for terminal block connectors:
! Strip the wire 1⁄4 inch (6 mm) and connect to the plugs as shown.
! Be sure to tighten the screws with a flathead screw driver.
Connector Part Number: OSTTJ020150
9
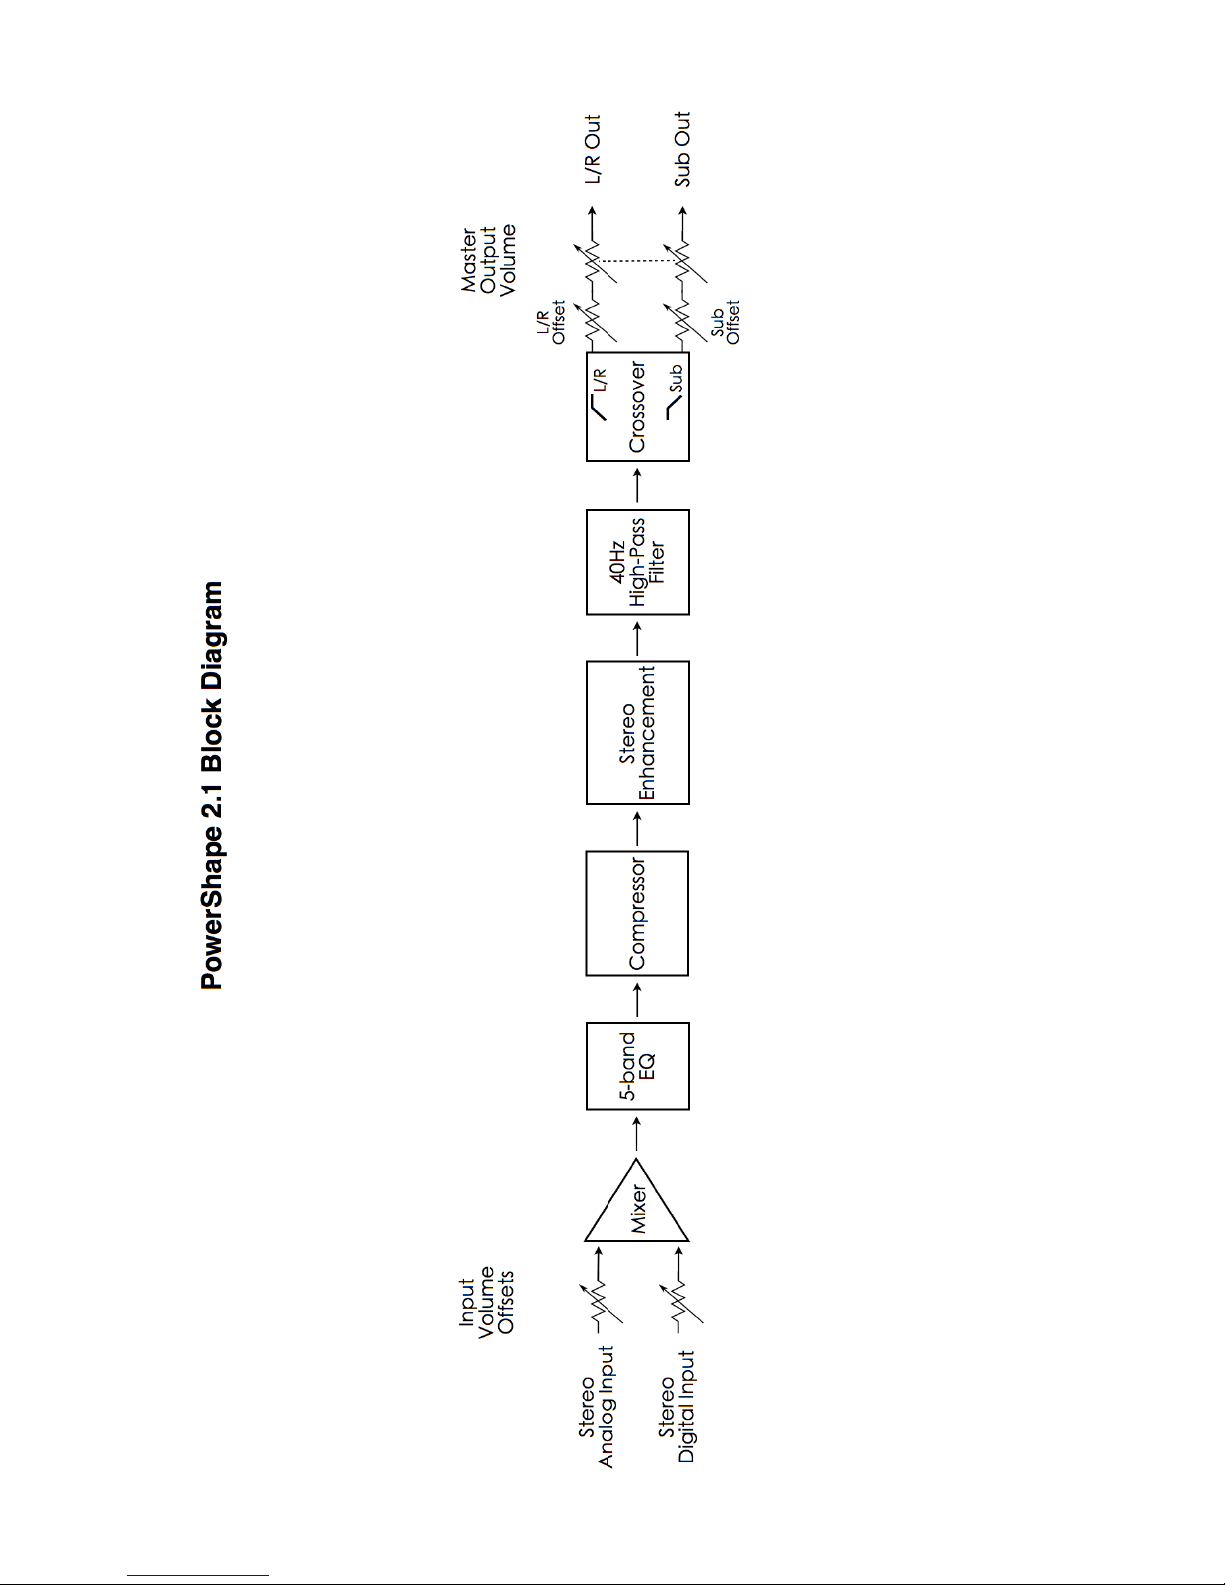
BLOCK DIAGRAM
10

INPUT CONFIGURATION
The PowerShape 2.1 offers both stereo analog and stereo digital inputs.
Analog Input -10dBV (RCA style connectors)
•
Digital Input (S/PDIF Coax or Toslink Optical, only one active at a time)
•
All inputs in the system offer channel specific volume offsets that can be adjusted from -64.0dB to 0.0dB in 0.5dB
steps (note: 0.0dB is full volume). Analog and digital inputs can also be muted independently.
11
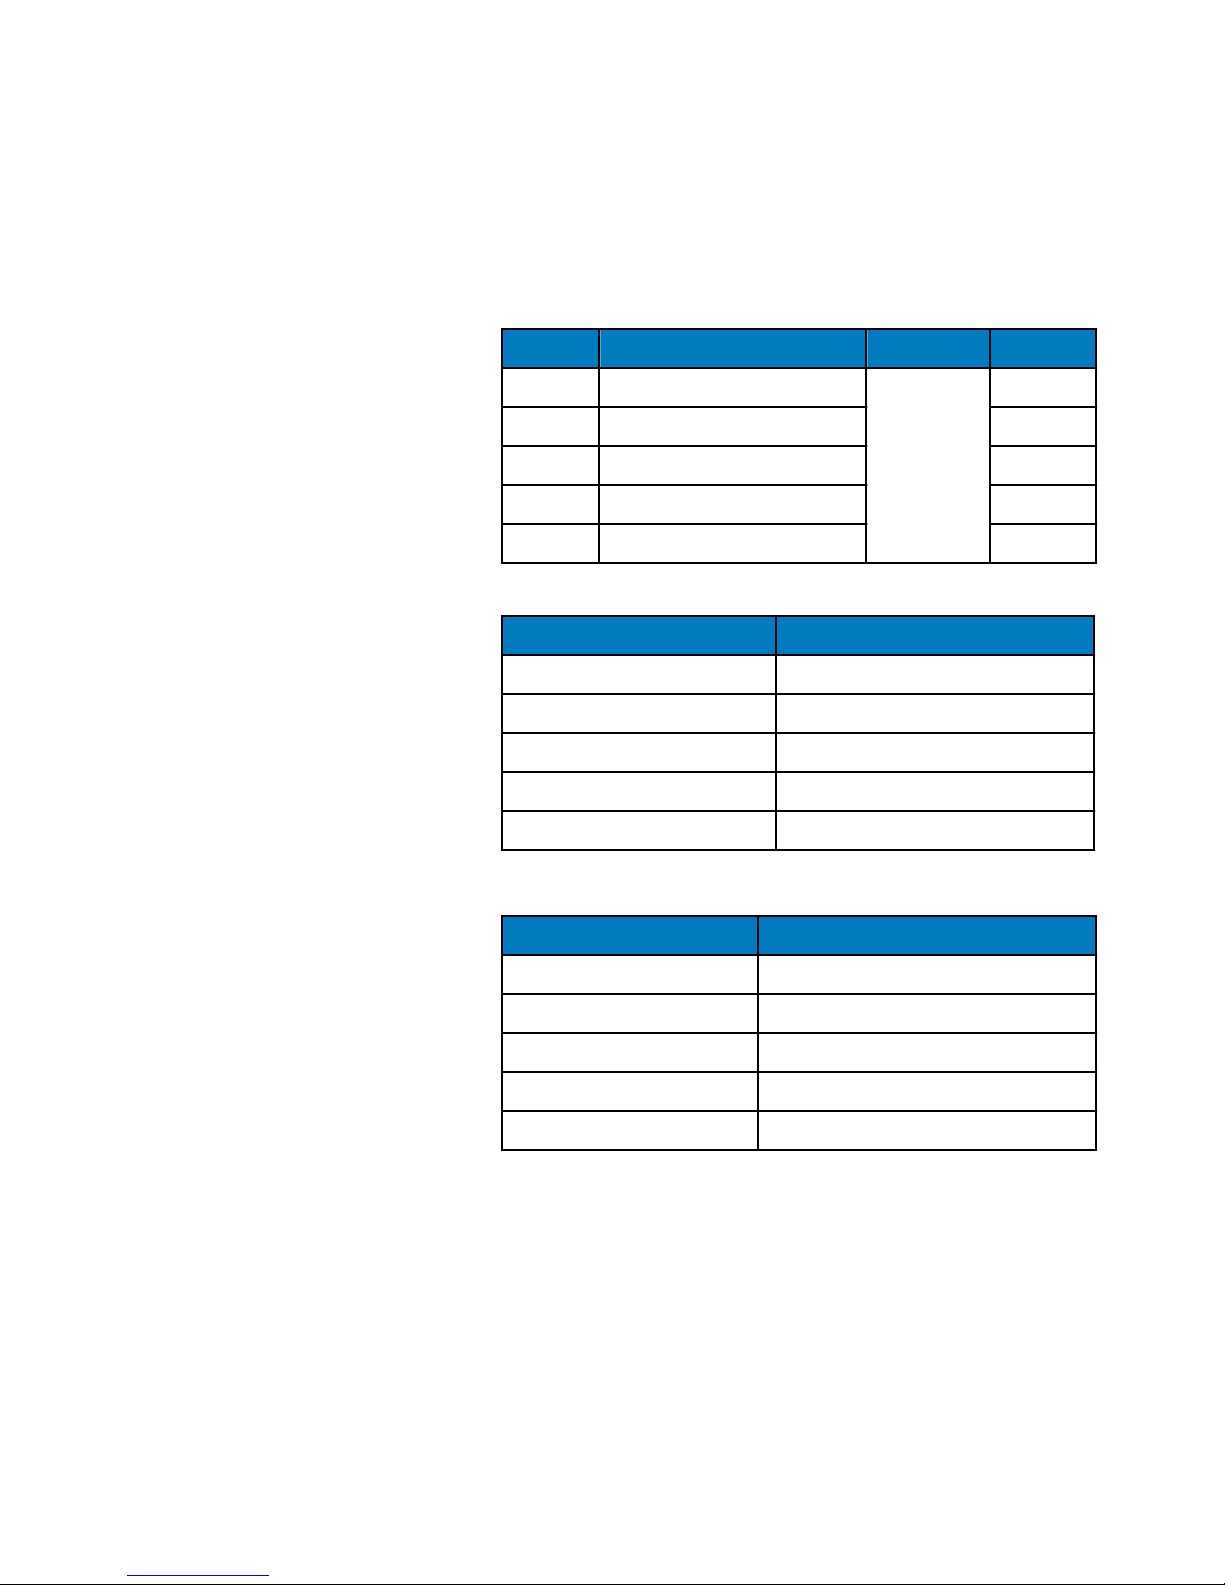
OUTPUT CONFIGURATION
EQ BAND
FILTER TYPE
FREQUENCY
Q
Low
Shelving +/- 12dB in 0.5dB steps
0.707 Fixed
Mid 1
Peak/Dip +/- 12dB in 0.5dB steps
Variable
Variable
Mid 2
Peak/Dip +/- 12dB in 0.5dB steps
Variable
31 Frequency
Variable
Mid 3
Peak/Dip +/- 12dB in 0.5dB steps
Variable
31 Frequency
Band Options
Variable
High
Shelving +/- 12dB in 0.5dB steps
Variable
31 Frequency
Band Options
0.707 Fixed
CROSSOVER PARAMETER
DESCRIPTION
Filter
None, Low Pass, High Pass
Type
Butterworth, Linkwitz-Riley, Bessel
Frequency
20Hz to 20kHz in 1Hz steps
40Hz High Pass
On/Off
L/R and Sub Speaker Offsets
-64dB to 0.0dB in 0.5dB steps
COMPRESSION PARAMETER
RANGE
Threshold
-64.0 to 0.0 in 0.5dB steps
Ratio
1.0:1 to 10.0:1 in 0.1 steps
Attack
0ms to 500ms in 1ms steps
Release
0ms to 2500ms in 1ms steps
Makeup Gain
0 to 24dB in 0.5dB steps
The PowerShape 2.1 provides Left, Right and Sub speaker level, terminal block outputs. A wide range of volume
and processing controls are available to tune the system.
EQ
A stereo 5-Band parametric EQ is
available on the master output. This
audio processing shapes the overall
frequency response of the PS-2.1.
CROSSOVER
When using both high frequency and
subwoofer speakers, a high pass filter
can be inserted on the left/right speaker
outputs and a low pass filter can be
inserted on the subwoofer output.
Additional controls include a 40Hz high
pass filter and speaker offsets that can
be used to balance the levels of different
speakers in a system.
COMPRESSOR
A stereo compressor is available on the
master output. This audio processing
reduces the dynamic range of the
PS-2.1.
12
 Loading...