

Page 1

CS-SOLO USER GUIDE
Version 1.1
February 2017
1266 Park Road
Chanhassen, MN 55317
952-401-7700
[email protected]
www.digitalaudio.com
Page 2

SAFETY INSTRUCTIONS
TO REDUCE THE RISK OF ELECTRIC SHOCK, DO NOT REMOVE COVER. NO USER SERVICEABLE
PARTS INSIDE. CONTACT DIGITAL AUDIO LABS FOR SERVICING.
The lightning ash with arrowhead symbol, within an equilateral triangle, is intended to alert the
user to the presence of uninsulated and/or potentially dangerous voltage within the products
enclosure that may be of sufcient magnitude to constitute a risk of electric shock to persons.
The exclamation point within an equilateral triangle is intended to alert the user to the presence
of important operating and maintenance (servicing) instructions in the literature accompanying
the appliance.
POWER CORD NOTICE FOR INTERNATIONAL OPERATION
Please call Digital Audio Labs Support at 952-401-7700.
IMPORTANT SAFETY INSTRUCTIONS
1. Read and understand this entire manual.
2. Keep this manual available for reference.
3. Heed all warnings and precautions in this manual and notices marked on the product.
4. Do not use this product near water or damp environments.
5. Do not block any ventilation openings. Install in accordance with the manufacturer’s instructions.
6. Provide for proper airow around product. Do not install near products that produce high levels
of heat. Do not expose the unit to direct sun light or heating units as the internal components’
temperature may rise and shorten the life of the components.
7. Do not defeat the safety purpose of the polarized or grounding-type plug. A polarized plug has
two blades with one wider than the other. A grounding type plug has two blades and a third
grounding prong.
8. Protect the power cord from being walked on or pinched particularly at plugs, convenience
receptacles, and the point where they connect to the product. Do not use the unit if the electrical
power cord is frayed or broken.
9. Only use attachments/accessories specied by the manufacturer.
10. Unplug this product during lightning storms or when unused for long periods of time.
11. Refer all servicing to qualied service personnel. There are no user serviceable components inside
the product.
12. The product shall not be exposed to moisture. Do not touch the unit with wet hands. Do not
handle the unit or power cord when your hands are wet or damp.
13. The product should be connected to a power supply only of the type described in the operating
instructions or as marked on the product.
CARE
• From time to time you should wipe off the front and side panels and the cabinet with a dry soft
cloth. Do not use rough material, thinners, alcohol or other chemical solvents or cloths since this
may damage the nish or remove the panel lettering.
• The Livemix system is capable of delivering high levels of volume. Please use caution with
volume levels, listen with the lowest possible volume for proper operation and avoid exposure to
prolonged high volume levels.
• The manufacturer cannot be held responsible for damages caused to persons, personal
possessions, or data due to an improper or missing ground connection.
LIVEMIX CS-SOLO
Page 3

DIGITAL AUDIO LABS LIMITED WARRANTY
Digital Audio Labs warrants their products against defects in material and workmanship for a period of two
years from date of purchase. During this period, Digital Audio Labs will, at its option, repair the defective unit
or replace it with a new or rebuilt one.
The warranty does NOT cover:
• Damage due to abuse, misuse, or accident.
• Damage due to operation contrary to the instructions in the product instruction manual.
• Units on which the product serial number has been removed or altered.
• Units that have been serviced by unauthorized personnel.
All implied warranties, including warranties on merchantability and tness, are limited in time to the length of
this warranty. Some states do not allow time limitations on implied warranties, so this limitation may not apply
to you. Digital Audio Labs’ liability is limited to the repair or replacement of its product. Digital Audio Labs
shall in no way be held liable for incidental or consequential damages resulting from the use of their product
or its software, including, without limitation, damages from loss of business prots, business interruption,
loss of business information or other pecuniary loss. Some states do not allow the exclusion or limitation of
incidental or consequential damages, so the above limitation or exclusion may not apply to you.
REPAIR POLICY
Please do not return the product without obtaining an RMA number rst. Contact Digital Audio Labs at
[email protected] to acquire an RMA number. Do not return the product to the place of purchase.
Please write the RMA number on the outside of the shipping carton. Any product sent to us without a valid
RMA number will be refused. Include the following with the product: a brief description of the problem, your
name, return shipping address, phone number and the RMA number. Do not include any accessories. DAL
is not responsible for any damage to or loss of the product during transit. We recommend that customers
obtain a receipt and tracking number for all packages shipped to us. Turnaround time on repairs is generally
ten business days. If you live outside of the United States, please contact your local distributor for warranty
service.
Please return product to:
Digital Audio Labs
Attn: RMA Number
1266 Park Road
Chanhassen, MN 55317
USA
WARRANTY SERVICE
You will be required to pay the shipping charges when you ship your product to DAL. DAL will pay for return
shipping via UPS ground. We reserve the right to inspect any product that may be the subject of any warranty
claim before repair is carried out. For warranty service, we may require proof of the original date of purchase
if you have not registered your product with DAL. Final determination of warranty coverage lies solely with
Digital Audio Labs.
NON-WARRANTY SERVICE
If it is determined that the product does not meet the terms of our warranty, you will be billed for labor,
materials, return freight and insurance. There is a $80 USD minimum charge for materials and labor.
Appropriate shipping charges will be applied. We require payment in advance of repair by credit card; we
accept Visa and Master Card. In the event the charges are over the minimum charge, DAL will contact you
and inform you of the cost of the repair before any work is completed.
LIVEMIX CS-SOLO
1
Page 4

CONTENTS
SAFETY INSTRUCTIONS .................................................................................................................. II
IMPORTANT SAFETY INSTRUCTIONS ...................................................................................... II
CARE .......................................................................................................................................... II
DIGITAL AUDIO LABS LIMITED WARRANTY................................................................................... 1
REPAIR POLICY .......................................................................................................................... 1
WARRANTY SERVICE ................................................................................................................ 1
NON-WARRANTY SERVICE ...................................................................................................... 1
CS-SOLO PERSONAL MIXER ........................................................................................................... 4
CONTENTS OF BOX ................................................................................................................. 4
FEATURE LIST ............................................................................................................................ 4
CS-SOLO ANATOMY ........................................................................................................................ 5
TOP PANEL ................................................................................................................................ 6
FRONT AND BACK PANEL ....................................................................................................... 7
SETUP AND DIAGRAMS ................................................................................................................... 8
CONNECTING A CS-SOLO ....................................................................................................... 8
CONNECTING TWO CS-SOLOS ............................................................................................... 9
CONNECTING TO IEMS, HEADPHONES AND MONITORS ................................................. 10
OPTIONAL - CONNECTING TO DA-816 ANALOG OUTPUT RACK UNIT ............................ 10
GENERAL CONCEPTS .................................................................................................................... 11
LOCAL VS. GLOBAL ................................................................................................................ 11
KNOBS (MASTER VOLUME, ADJUST VOL & PAN AND ME KNOB) ..................................... 11
CHANNEL OVERVIEW VS. SINGLE CHANNEL VIEW ............................................................ 12
CHANNEL OVERVIEW ................................................................................................................... 13
ACCESSORY CHANNELS ............................................................................................................... 14
AMBIENT MICROPHONE ........................................................................................................ 14
INTERCOM .............................................................................................................................. 14
AUX INPUT ............................................................................................................................... 15
METRONOME .......................................................................................................................... 16
MIX TOOLS ..................................................................................................................................... 17
LOCAL MIX OPTIONS ............................................................................................................. 18
SINGLE CHANNEL VIEW SCREEN .................................................................................. 19
SINGLE CHANNEL VIEW ................................................................................................. 19
CHANNEL NAMING .................................................................................................. 20
MUTE BUTTON .......................................................................................................... 21
SOLO BUTTON .......................................................................................................... 21
GROUP INDICATOR ................................................................................................... 21
CHANNEL EQ & DYNAMICS PRESETS ..................................................................... 22
CHANNEL EQ ............................................................................................................ 23
CHANNEL HIGH PASS FILTER (HPF) ......................................................................... 24
CHANNEL DYNAMICS .............................................................................................. 25
MASTER OUTPUT SETTINGS ........................................................................................... 26
MASTER EQ ............................................................................................................... 26
HIGH PASS FILTER (HPF) ........................................................................................... 27
MASTER DYNAMICS ................................................................................................. 27
MASTER REVERB ....................................................................................................... 28
MASTER OUTPUT ...................................................................................................... 29
LIVEMIX CS-SOLO
Page 5

GROUPS AND THE ME GROUP ....................................................................................... 30
CONFIGURE A GROUP ............................................................................................. 30
ADJUSTING THE VOLUME OF A GROUP ................................................................ 30
ADJUSTING THE VOLUME OF THE ME GROUP ..................................................... 30
ADJUSTING THE VOLUME OF A SINGLE CHANNEL IN A GROUP ........................ 31
LCD BRIGHTNESS............................................................................................................. 32
MUTE/SOLO OPERATION ................................................................................................ 33
SAVING & LOADING A PERSONAL MIX ......................................................................... 34
MIRRORMIX® REMOTE MIXING ............................................................................................. 35
AUDITION A REMOTE MIXER .......................................................................................... 35
MIRRORMIX FUNCTIONS ................................................................................................ 36
PUSH MIX SETTINGS TO A REMOTE MIXER ........................................................... 36
MIRRORMIXING A REMOTE MIXER ......................................................................... 37
WHAT ELSE CAN I DO WITH MIRRORMIX? .................................................................... 37
GLOBAL CONFIGURATION .................................................................................................... 38
GLOBAL OPTIONS ........................................................................................................... 39
SET GLOBAL CLOCK ................................................................................................. 39
GLOBAL MUTE .......................................................................................................... 39
PASSCODE ................................................................................................................. 40
GLOBAL DIM LCDS ................................................................................................... 40
LIVEMIX VERSION INFO .................................................................................................. 41
INPUT SELECT .................................................................................................................. 42
DIGITAL CONFIGURATION .............................................................................................. 43
DANTE NETWORK CHANNEL SETUP ...................................................................... 43
AUTO ASSIGN DANTE CHANNELS 1-24 ................................................................. 43
MANUALLY ASSIGN DANTE CHANNELS ................................................................ 44
DEVICE/CHANNEL VIEW TOGGLE .......................................................................... 44
IMPORT DANTE NAMES ........................................................................................... 45
DA-816 SOFTROUTE™ ..................................................................................................... 46
ASSIGN A MIX TO DA-816 OUTPUT ......................................................................... 46
UNASSIGN AN OUTPUT ........................................................................................... 46
OUTPUT ID FEATURE ................................................................................................ 47
SAVING & LOADING A GLOBAL TEMPLATE .................................................................. 48
LIVEMIX FIRMWARE INSTRUCTIONS ............................................................................................ 49
CS-SOLO/CS-DUO UPDATE INSTRUCTIONS ......................................................................... 49
CS-SOLO FIRMWARE UPDATE TROUBLESHOOTING ........................................................... 49
MIX-16/MIX-32 FIRMWARE UPDATE INSTRUCTIONS ........................................................... 50
ACCESSORY: FP-2 FOOT PEDAL ................................................................................................... 51
SETTING UP THE FP-2 FOOT PEDAL ..................................................................................... 51
USING THE FP-2 FOOT PEDAL ............................................................................................... 51
ACCESSORY: MT-1 MOUNT ........................................................................................................... 52
LIVEMIX SYSTEM EXAMPLES ........................................................................................................ 53
TROUBLESHOOTING ..................................................................................................................... 54
APPENDIX ....................................................................................................................................... 56
PRESET EFFECTS LIST ............................................................................................................. 56
CREATING A PERSONAL MONITOR MIX .............................................................................. 57
MIXING TIPS ............................................................................................................................ 58
LIVEMIX SUPPORT .......................................................................................................................... 59
TECHNICAL SPECIFICATIONS ....................................................................................................... 59
CS-SOLO SPECIFICATIONS .................................................................................................... 59
LIVEMIX SYSTEM SPECIFICATIONS ....................................................................................... 60
LIVEMIX CS-SOLO
Page 6

CS-SOLO PERSONAL MIXER
The Livemix CS-SOLO performs the following functions:
• Receives audio, communication data and power from the MIX-16/MIX-32
• Supports connecting one additional CS-SOLO
• Provides an easy to use and powerful set of controls
• Provides stereo headphone amplication or mono output of personal mixes
CONTENTS OF BOX
The CS-SOLO contains the following pieces inside the box:
• CS-SOLO unit
• Quick Start Guide
• Registration Card
FEATURE LIST
FEATURE BENEFIT
Channel overview on LCD touchscreen Quick and easy identication of channels
Color LCD Touch Screen Informative displays with direct interaction
Custom channel naming Select instrument or singer by custom name
Continuous rotary/push switch knobs (3 per mix) Quick and easy adjustment of different settings
ME Group plus 4 additional channel groups
CS Thru Port Connect to one additional CS-SOLO
Built-in stereo ambient microphones
Built-in Intercom
Auxiliary Input
Built-in metronome Provides tempo and timing reference for all users
Power and audio over single network cable Reduces stage clutter and simplies setup
24 Channels of input audio Allows for greater mix customization
EQ & Dynamics presets on every channel
EQ, Dynamics & Reverb on the master output Fine tune the overall sound of your mix
MirrorMix® Remote Mixing
Save/Load individual mixes to/from USB
High gain headphone amplier Provides clean, great-sounding audio quality
Mute and Solo on each channel
Optional foot pedal for hands-free mixing
¼” Balanced mono output option Allows output to powered oor monitors
Allows for quick volume adjustments of groups, such as
drums, background vocals, etc.
Allows the ambient sound of the stage and audience to be
included in each personal mix
Easy communication with other band members on the
stage or in the studio
Connect a media device for sharing audio in rehearsals or
performances
Sweepable EQ, High Pass Filtering and Compression
Settings allow you to craft the channel’s sound
Experienced users can assist performers by pushing out
mix settings and customizing mixes
Allows users to bring previously perfected mixes to
rehearsals or the next venue
Check the sound of an individual instrument, as well as
mute the channel in your mix
Adjust volume and select channels while keeping your
hands on your instrument
LIVEMIX CS-SOLO
4
Page 7
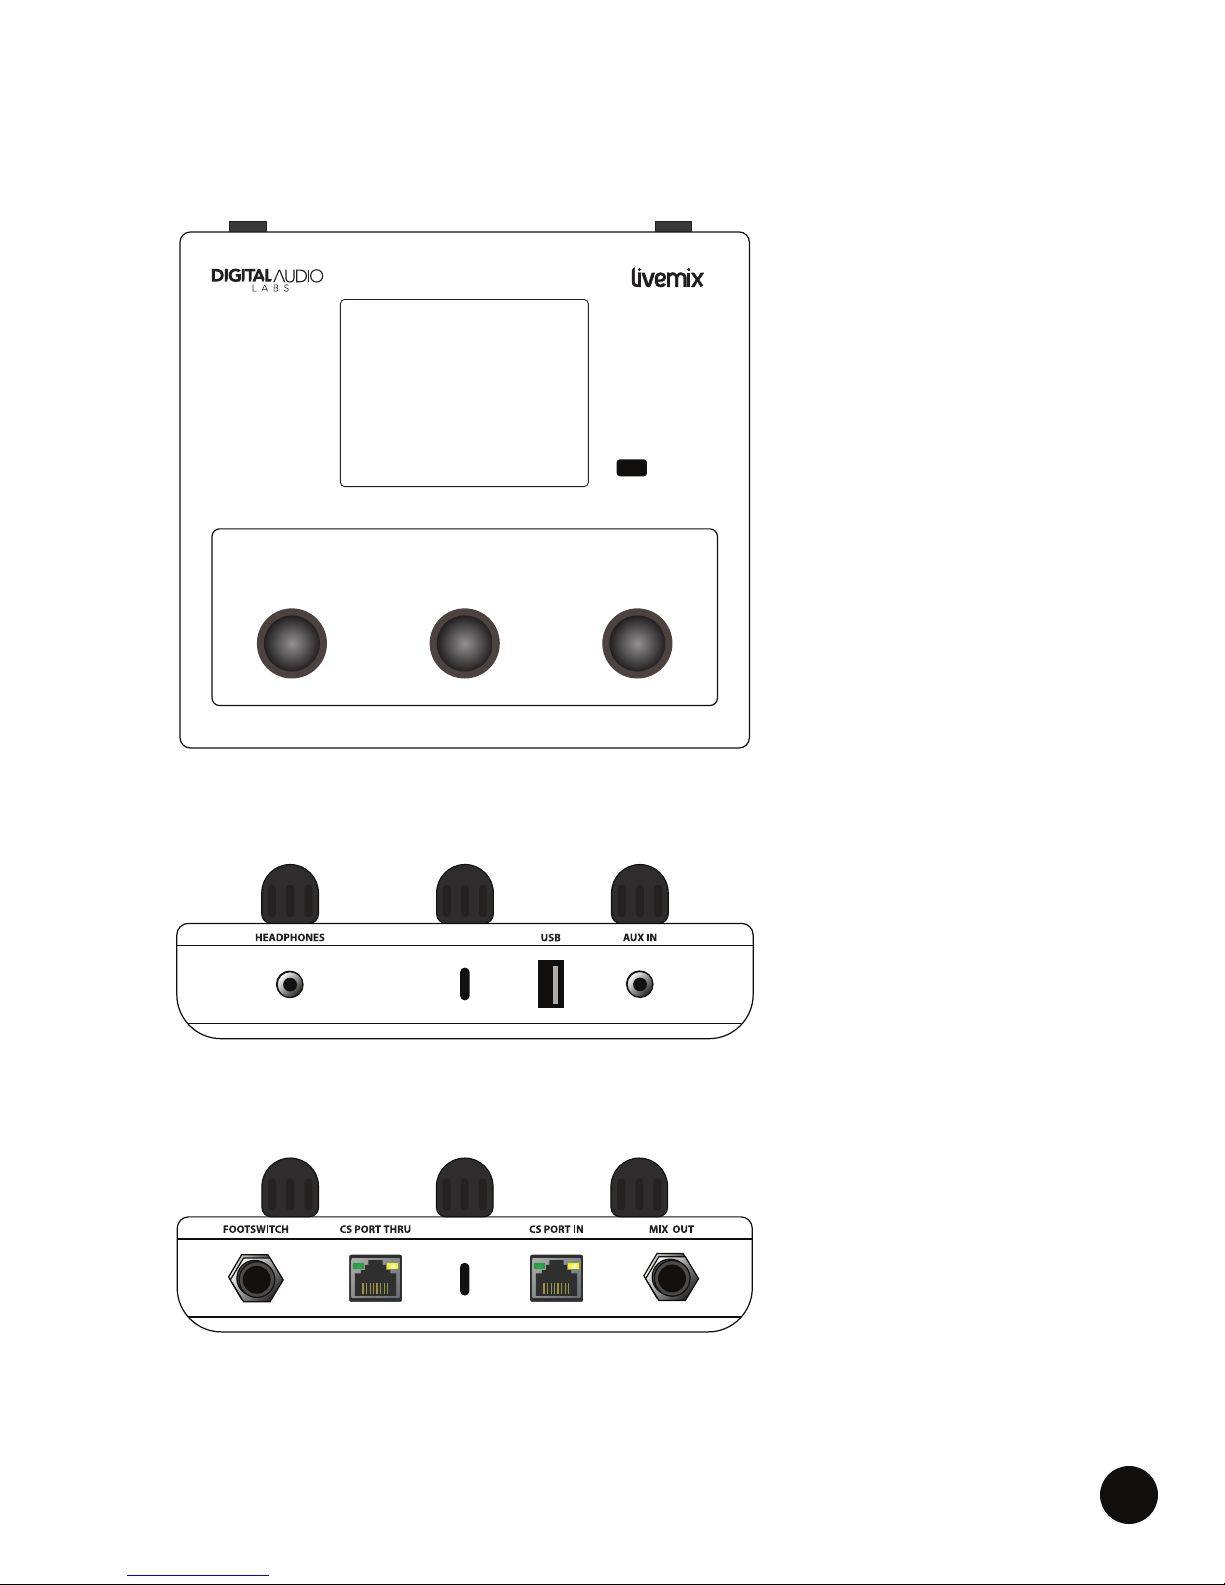
CS-SOLO ANATOMY
|
INTERCOM
ME
PUSH FOR GROUP SETUP
ADJUST
VOL & PAN
PUSH FOR MASTER SETUP
MASTER
VOLUME
CS-SOLO
|
INTERCOM
ME
PUSH FOR GROUP SETUP
ADJUST
VOL & PAN
PUSH FOR MASTER SETUP
MASTER
VOLUME
CS-SOLO
INTERCOM
|
CS-SOLO
CS-SOLO TOP
• Master Volume Knob
• Adjust Vol & Pan Knob
• Dedicated “Me” Knob
• Color Touchscreen
• Intercom Button
MASTER
VOLUME
PUSH FOR MASTER SETUP
ADJUST
VOL & PAN
ME
PUSH FOR GROUP SETUP
CS-SOLO FRONT
• 1/8” Mix Output (TRS)
• 1/8” Auxiliary Input (TRS)
• USB Port
• Ambient Mic
LIVEMIX CS-SOLO
CS-SOLO BACK
• 1/4” Mix Output (TRS)
• 1/4” Footswitch Jack (TRS)
• CS Port In
• CS Port Thru
• Ambient Mic
5
Page 8
TOP PANEL
CS-SOLO
INTERCOM
|
MASTER
VOLUME
PUSH FOR MASTER SETUP
ADJUST
VOL & PAN
ME
PUSH FOR GROUP SETUP
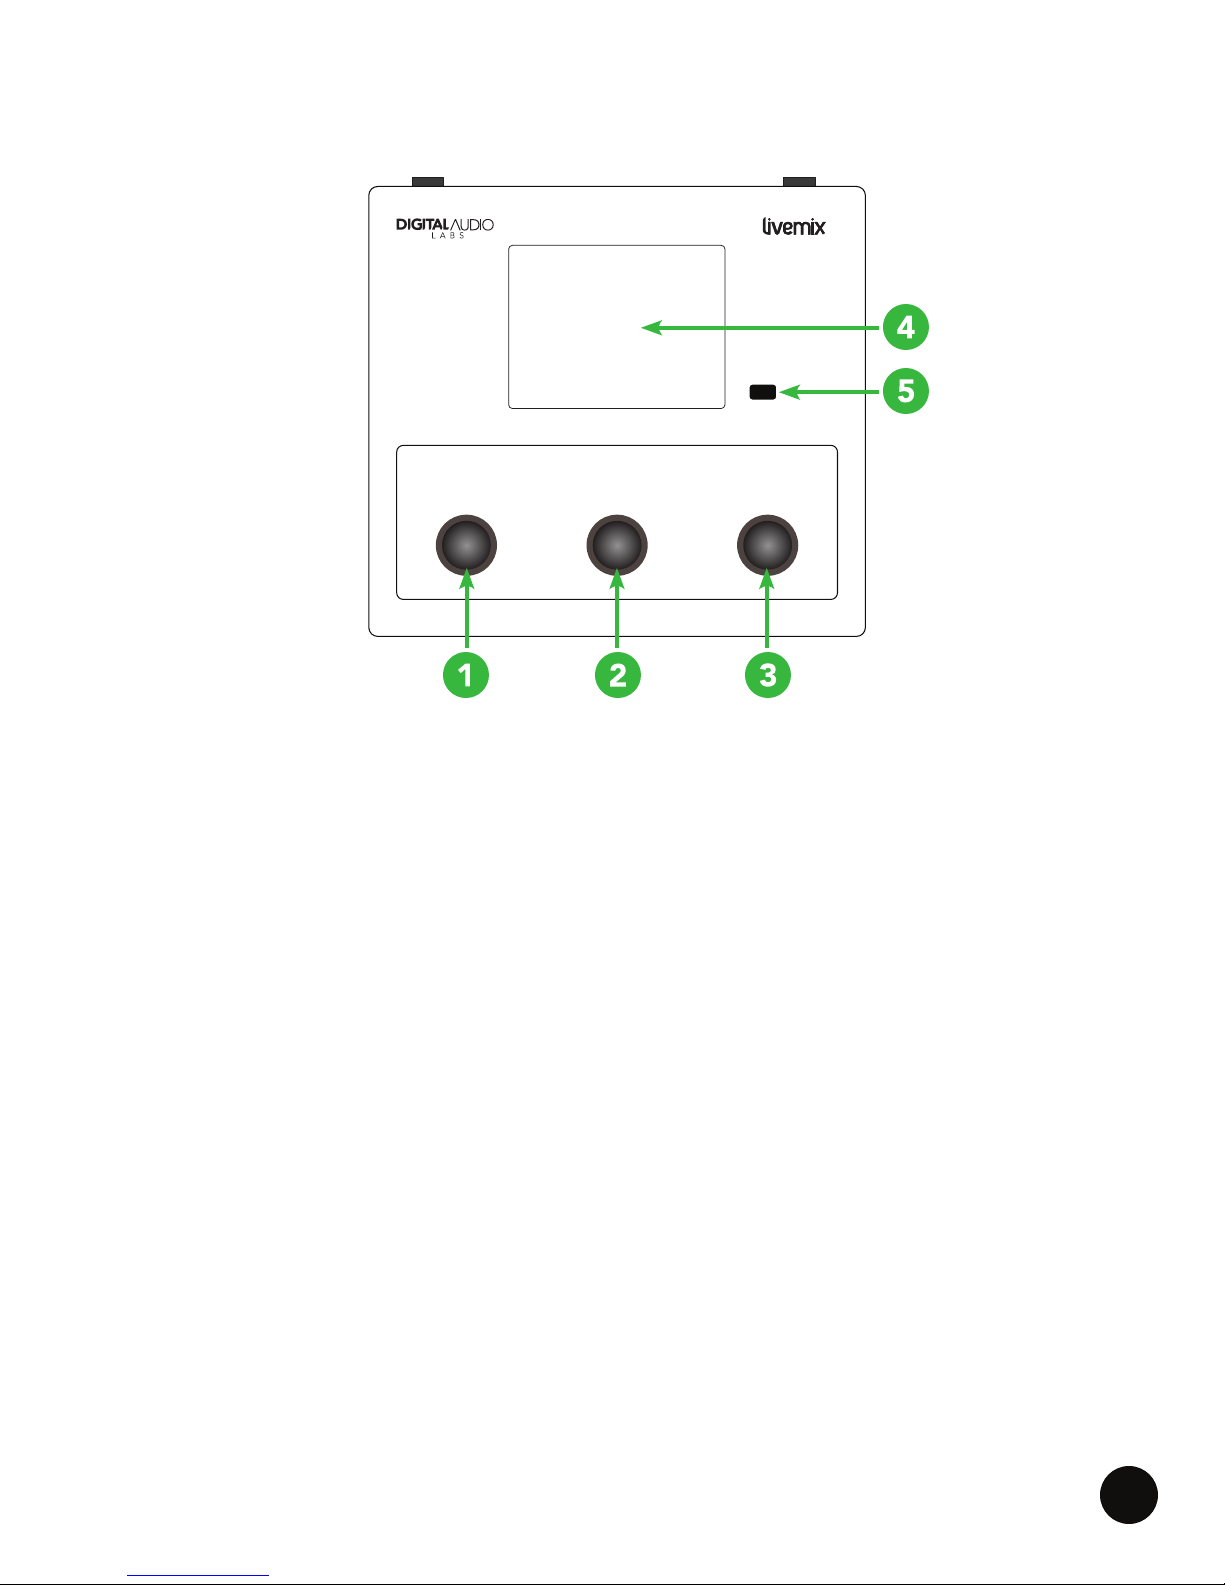
1 MASTER VOLUME KNOB
ROTATE to adjust the overall level of the mix. The master volume affects both the level of the
⅛” and ¼” outputs. PRESS this knob to access the Master Output settings.
2 ADJUST VOLUME & PAN KNOB
On the Channel Overview screen, this knob functions as the VOLUME knob. PRESS the knob to
toggle between volume and pan. On other screens, use this knob to make adjustments or select
other features.
3 ME KNOB
The ME knob adjusts the volume of the assigned ME group. PRESS the ME knob to congure
which channels make up the ME group and other groups.
4 COLOR TOUCHSCREEN
Most Livemix features can be accessed by selecting channels, menus, and deeper features
using the touchscreen. The screen will automatically update to reect changes made. Note: The
touchscreen is resistive not capacitive. It may require a bit more pressure than you are used to.
One of the advantages of this kind of screen is that you can use guitar picks, styluses, or other
rm objects to interact.
5 INTERCOM BUTTON
PRESS and HOLD the Intercom Button to communicate with band members.
LIVEMIX CS-SOLO
6
Page 9
FRONT AND BACK PANEL
|
INTERCOM
ME
PUSH FOR GROUP SETUP
ADJUST
VOL & PAN
PUSH FOR MASTER SETUP
MASTER
VOLUME
CS-SOLO
|
INTERCOM
ME
PUSH FOR GROUP SETUP
ADJUST
VOL & PAN
PUSH FOR MASTER SETUP
MASTER
VOLUME
CS-SOLO
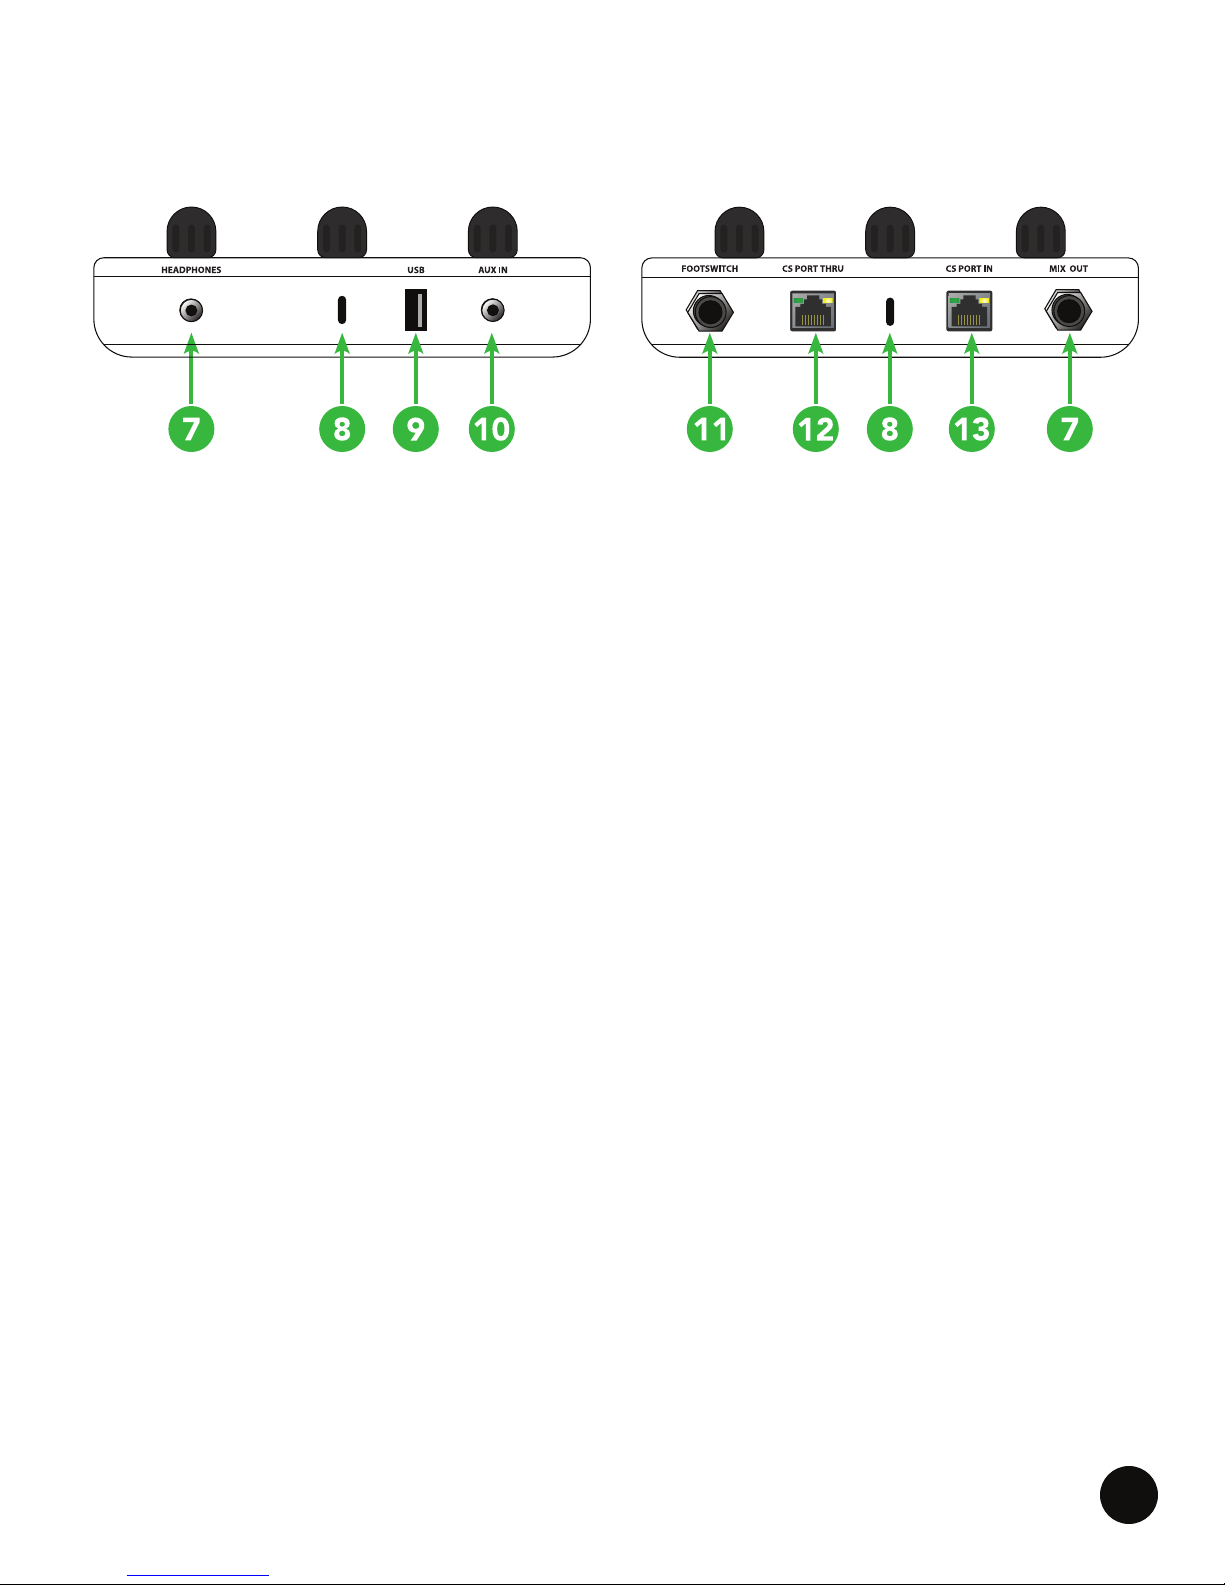
Front Panel Back Panel
7 Headphone and Mix Output
The ⅛” and ¼” jacks share the same stereo output. These can also be congured to be
balanced mono. See the section “Master Output” for more details. Connect headphones to
either output.
8 Ambient Microphones
These ports house the built-in ambient microphones. The volume can be adjusted on the
Accessory Channel’s screen.
9 USB Port
The USB port allows you to load and save personal mixes. It is also used for updating the
personal mixer. See the “Loading/Saving a Personal Mix” for more details.
10 Auxiliary Input
This ⅛” unbalanced stereo input allows you to connect an auxiliary audio device, such as a
portable music player, phone, laptop or metronome. The audio from the auxiliary device can be
shared with other personal mixers.
11 FootSwitch Connector
Connect the optional Livemix FP-2 Foot Pedal to this connector for hands-free mixing.
12 CS Port Thru
The CS-SOLO supports connecting one additional CS-SOLO. Connect from the CS Port Thru.
NOTE: Only two CS-SOLOs can be connected per port on the MIX-16/MIX-32.
13 CS Port In
This connects to one of the Control Surface Ports on the MIX-16/MIX-32 unit and supplies
audio, communication data and power to the CS-SOLO.
LIVEMIX CS-SOLO
7
Page 10
SETUP AND DIAGRAMS
LIVEMIX
DATA
AD-24
24VDC
3.75A
MIX-16/32
LIVEMIX
DATA IN
LIVEMIX
DATA OUT 1
LIVEMIX
DATA OUT 2
12VDC
3.33A
LIVEMIX
DATA OUT
AD-24
SHIELDED
CAT5e
GIGABIT NETWORK SWITCH
DANTE ENABLED MIXER/SNAKE/INTERFACE
CAT5e/CAT6
CAT5e/CAT6
24VDC
3.75A
MIX-16/32
LIVEMIX
DATA IN
LIVEMIX
DATA OUT 1
LIVEMIX
DATA OUT 2
LM-DANTE-EXP
Dante™ is a trademark of Audinate Pty Ltd.
DANTE
NETWORK
LINK/ACT 1G
3.33A
|
INTERCOM
ME
PUSH FOR GROUP SETUP
ADJUST
VOL & PAN
PUSH FOR MASTER SETUP
MASTER
VOLUME
CS-SOLO
|
INTERCOM
ME
PUSH FOR GROUP SETUP
ADJUST
VOL & PAN
PUSH FOR MASTER SETUP
MASTER
VOLUME
CS-SOLO
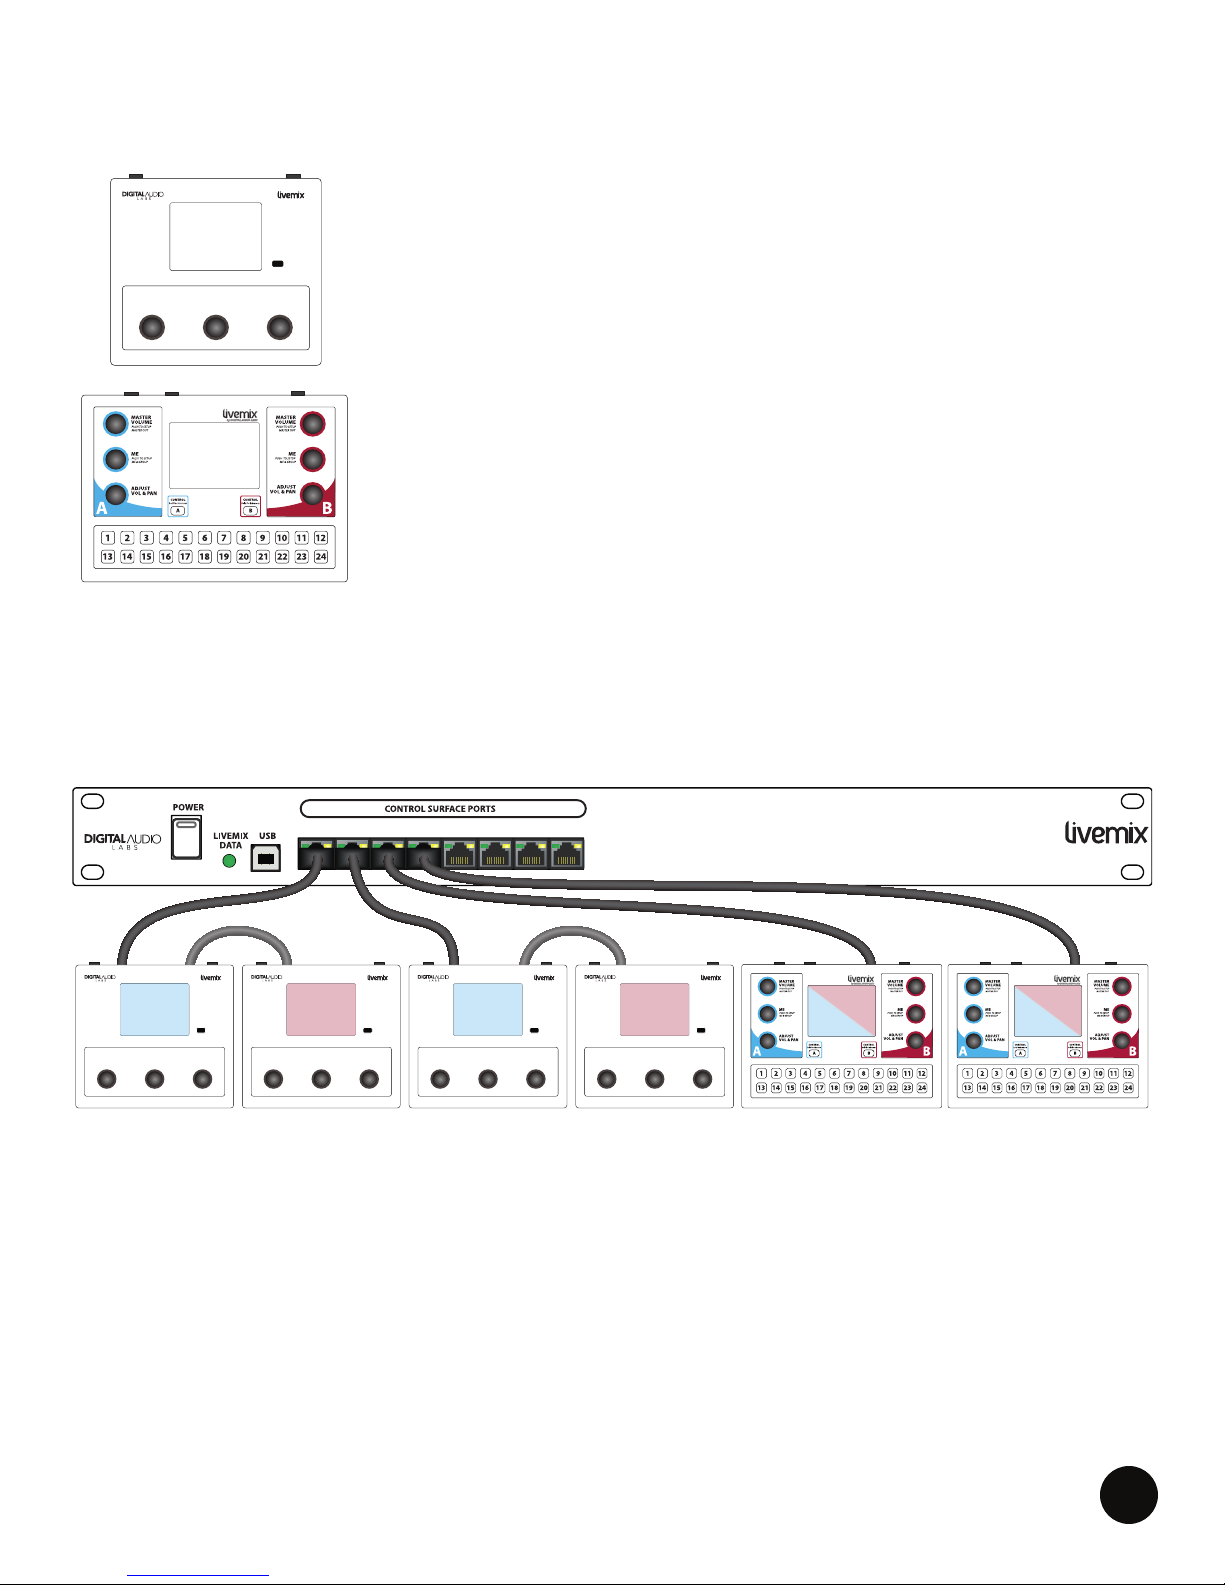
Each Control Surface Port on the MIX-16/MIX-32 supports two mixes.
The CS-SOLO setup is as simple as connecting a CAT5e or CAT6 cable
(shielded recommended) from the CS Port In to an available port on the
MIX-16/MIX-32. To utilize the second available mix on this MIX-16/MIX32 port, connect a CAT5e or CAT6 cable (shielded recommended) from
the CS Port Thru on the rst CS-SOLO to the CS Port In on the second
CS-SOLO.
The CS-DUO supports two mixes. To set up the CS-DUO, connect a
CAT5e or CAT6 cable (shielded recommended) from the CS-DUO to
an available Control Surface Port on the MIX-16/MIX-32. Please note,
only one CS-DUO can connect to a CS Port on the MIX-16/MIX-32. You
cannot connect a CS-DUO to the CS Port Thru on a CS-SOLO.
Once connected, turn on the MIX-16/MIX-32. Audio, communication data and power is supplied by
the MIX-16 or MIX-32 to the personal mixers using a standard network cable. The system will require
some basic setup, which is performed on a personal mixer. See the Global Conguration section for
more information.
CONNECTING A CS-SOLO
1 2 3 4 5 6 7 8
CS-SOLO
CS-SOLO
CS-SOLO
CS-SOLO
* MIX-16 pictured
MIX-16
MASTER
VOLUME
PUSH FOR MASTER SETUP
ADJUST
VOL & PAN
INTERCOM
|
ME
PUSH FOR GROUP SETUP
MASTER
VOLUME
PUSH FOR MASTER SETUP
ADJUST
VOL & PAN
INTERCOM
|
ME
PUSH FOR GROUP SETUP
Each Control Surface Port on the MIX-16/MIX-32 supports either two CS-SOLOs or one CS-DUO.
Connect the CS PORT IN on a CS-SOLO to a Control Surface Port on the MIX-16/MIX-32. If using a
second CS-SOLO, connect the CS Port Thru on the rst CS-SOLO to the CS PORT IN on the second
CS-SOLO. See Connecting Two CS-SOLOs
WARNING: WHILE LIVEMIX DATA IS TRANSMITTED OVER STANDARD NETWORK CABLES, IT IS
NOT IN THE FORMAT THAT A NETWORK CAN READ. DO NOT USE SPLITTERS, COUPLERS OR
HUBS BETWEEN ANY CS-SOLO OR CS-DUO AND THE MIX-16/MIX-32. DO NOT CONNECT THE
CS-SOLO or CS-DUO INTO AN ETHERNET NETWORK. THIS COULD CAUSE DAMAGE TO THE
PERSONAL MIXER.
LIVEMIX CS-SOLO
MASTER
VOLUME
PUSH FOR MASTER SETUP
ADJUST
VOL & PAN
INTERCOM
|
ME
PUSH FOR GROUP SETUP
MASTER
VOLUME
PUSH FOR MASTER SETUP
ADJUST
VOL & PAN
INTERCOM
|
ME
PUSH FOR GROUP SETUP
8
Page 11
|
ME
PUSH FOR GROUP SETUP
ADJUST
VOL & PAN
PUSH FOR MASTER SETUP
MASTER
VOLUME
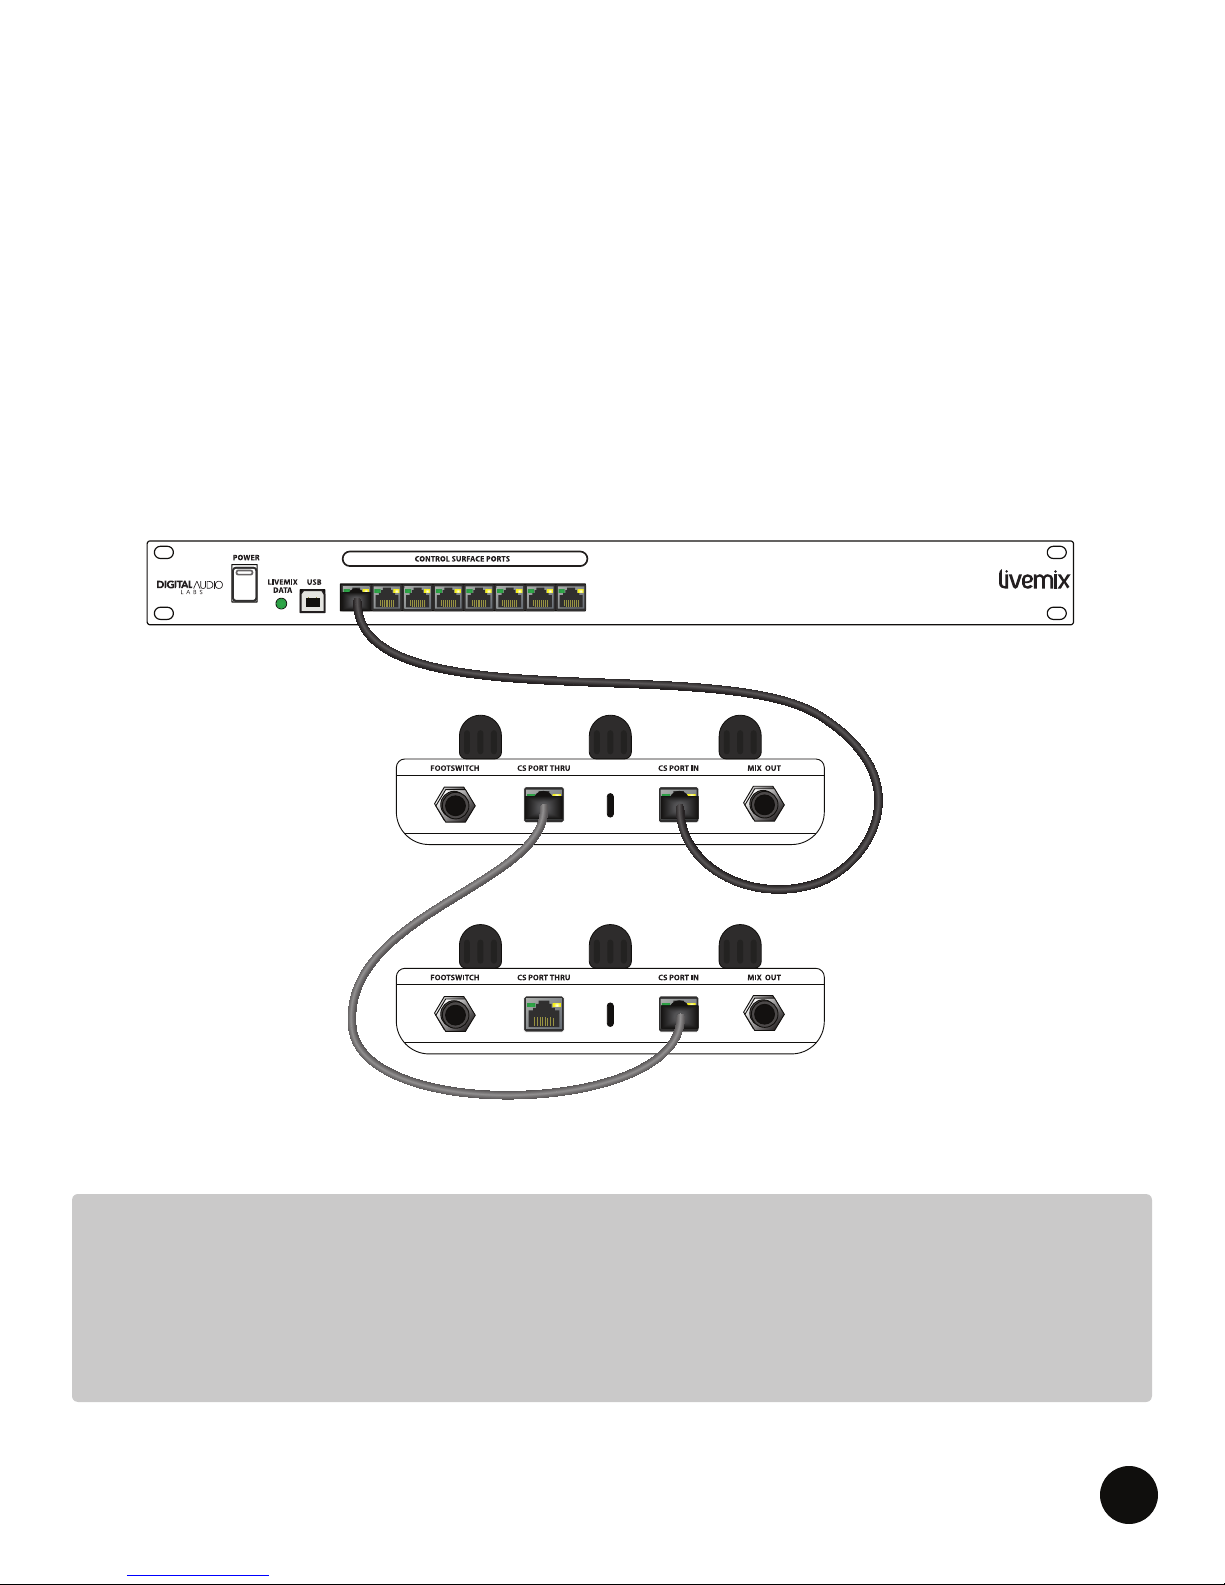
CONNECTING TWO CS-SOLOS
To use two CS-SOLOs, connect one CS-SOLO to a MIX-16/MIX-32 port and a second CS-SOLO to
the CS Port Thru on the rst CS-SOLO. Audio, communication data and power is supplied by the
MIX-16/MIX-32 to the personal mixers using a standard network cable.
To connect two CS-SOLOs:
1. Connect a standard network cable from a MIX-16/MIX-32 Control Surface Port to the CS PORT
IN on the CS-SOLO.
2. Connect another standard network cable from the CS Port Thru on the rst CS-SOLO to the CS
Port In on the second CS-SOLO.
1 2 3 4 5 6 7 8
MIX-16
CAT5e/CAT6
NOTE:
The CS Thru Port does not support a CS-DUO personal mixer. Only a CS-SOLO can connect to a
CS Thru Port.
Each MIX-16/MIX-32 port supports a maximum combined CAT5e (shielded recommended) cable
distance of 100 meters.
LIVEMIX CS-SOLO
9
Page 12
1 2 3 4 5 6 7 8
MIX-16
CAT5e/CAT6
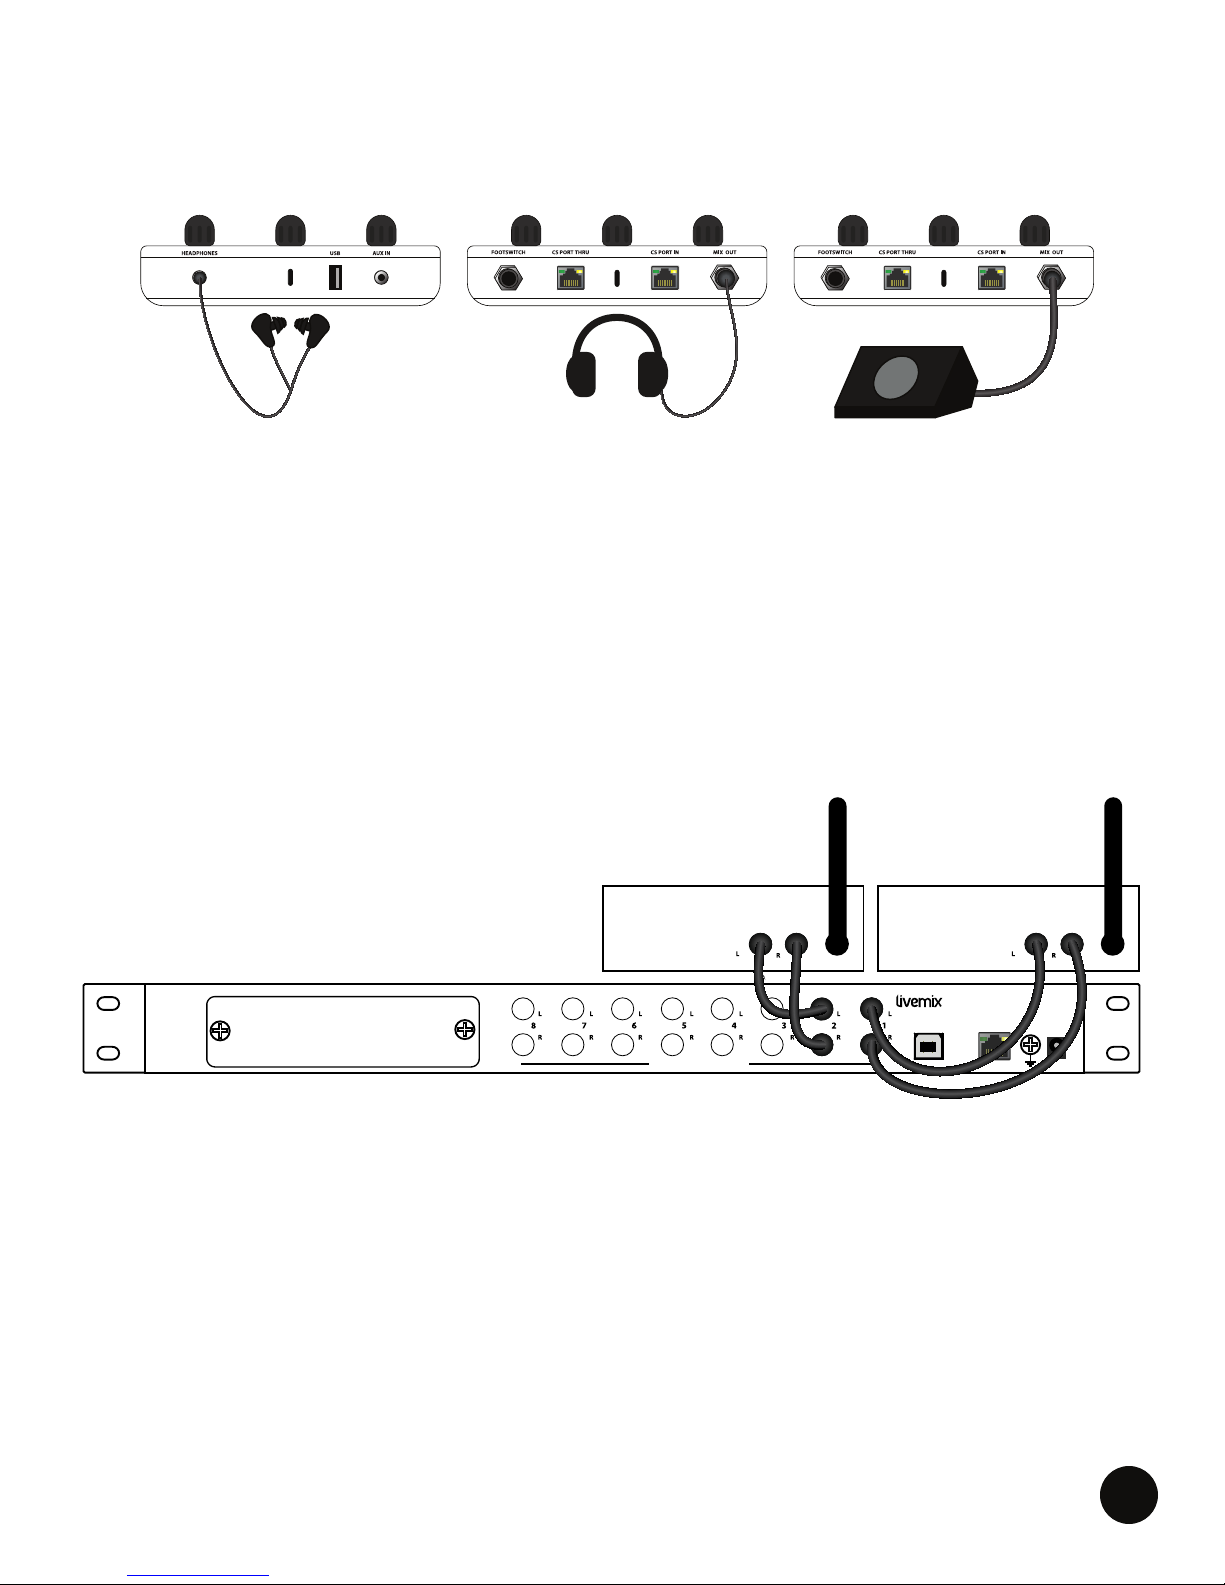
CONNECTING TO IEMS, HEADPHONES AND MONITORS
LIVEMIX
DATA IN
24VDC
3.75A
MIX-16/32
LM-DANTE-EXP
Dante™ is a trademark of Audinate Pty Ltd.
DANTE
NETWORK
LINK/ACT 1G
LIVEMIX DATA
OUT 1
LIVEMIX DATA
OUT 2 (MIX-32 ONLY)
DA-816
ANALOG OUTPUTS
LIVEMIX
DATA IN
24VDC
3.75A
MIX-16/32
LIVEMIX DATA
OUT 1
LIVEMIX DATA
OUT 2 (MIX-32 ONLY)
LM-DANTE-EXP
Dante™ is a trademark of Audinate Pty Ltd.
DANTE
NETWORK
LINK/ACT 1G
LIVEMIX DATA
IN
12VDC
3.33A
DA-816
BALANCED +4dBu LINE OUT
USB
LM-DANTE-EXP
Dante™ is a trademark of Audinate Pty Ltd.
DANTE
NETWORK
LINK/ACT 1G
LIVEMIX DATA
IN
12VDC
3.33A
DA-816
BALANCED +4dBu LINE OUT
USB
WIRELESS TRANSMITTER 1WIRELESS TRANSMITTER 2
LIVEMIX DATA
IN
12VDC
3.33A
DA-816
BALANCED +4dBu LINE OUT
USB
LIVEMIX DATA
IN
12VDC
3.33A
DA-816
BALANCED +4dBu LINE OUT
USB
LIVEMIX DATA
IN
12VDC
3.33A
DA-816
BALANCED +4dBu LINE OUT
USB
The Master Output settings on the personal mixer include Headphones Stereo and Balanced Mono
modes. The ⅛” and ¼” jacks share the same output.
OPTIONAL - CONNECTING TO DA-816 ANALOG OUTPUT RACK UNIT
Personal mixes can be assigned to the optional Livemix DA-816 analog output rack unit from the
CS-SOLO/CS-DUO touchscreen. The DA-816 provides stereo balanced outputs for 8 personal
mixes, such as wireless in-ear transmitters, powered monitors or powered house speakers. See the
DA-816 User Guide for more information.
LIVEMIX CS-SOLO
10
Page 13

GENERAL CONCEPTS
To best understand how to use the CS-SOLO, it is helpful to become familiar with some important
concepts.
1. Some adjustments are local and apply only to your mix. Others are global and apply to the
entire system.
2. The most used functions are available on the touchscreen and knobs, making it easy to access
critical mix functions.
LOCAL VS. GLOBAL
LOCAL FUNCTIONS
Each CS-SOLO can make changes to a local personal mix or be used to make changes that effect
the entire system. Local changes are those that apply to your personal mix only. These include:
• Volume and pan adjustments
• Master Output Settings
• Local Mix Options
GLOBAL FUNCTIONS
Global changes not only affect your mix but also the other personal mixers in the system. Examples
of global changes:
• Adjusting the system time
• Changing the channel effects
• Naming a channel
• Global Mute
• Global LCD Dim
• Passcode
Global Conguration settings (accessible from the Mix Tools) will appear purple, indicating that
changes made are global in nature. The exception to this is the channel effects. These will still
appear in the color of the selected mix. This is explained in the Channel Effects section.
KNOBS (MASTER VOLUME, ADJUST VOL & PAN AND ME KNOB)
Each mix has a dedicated set of controls for the most commonly used functions.
These controls include:
1. The MASTER VOLUME knob controls the mix output volume level. PRESS knob for Master
Output Settings.
2. The ADJUST VOL & PAN knob is used to adjust the volume or pan of the selected channel or to
adjust a selected function. PRESSING the ADJUST knob will toggle between volume and pan,
or tab between selected functions.
3. The ME knob controls the volume of the ME Group. It is always available for adjusting no matter
what screen you are on. PRESS to set up the Me Group and additional groups.
LIVEMIX CS-SOLO
11
Page 14
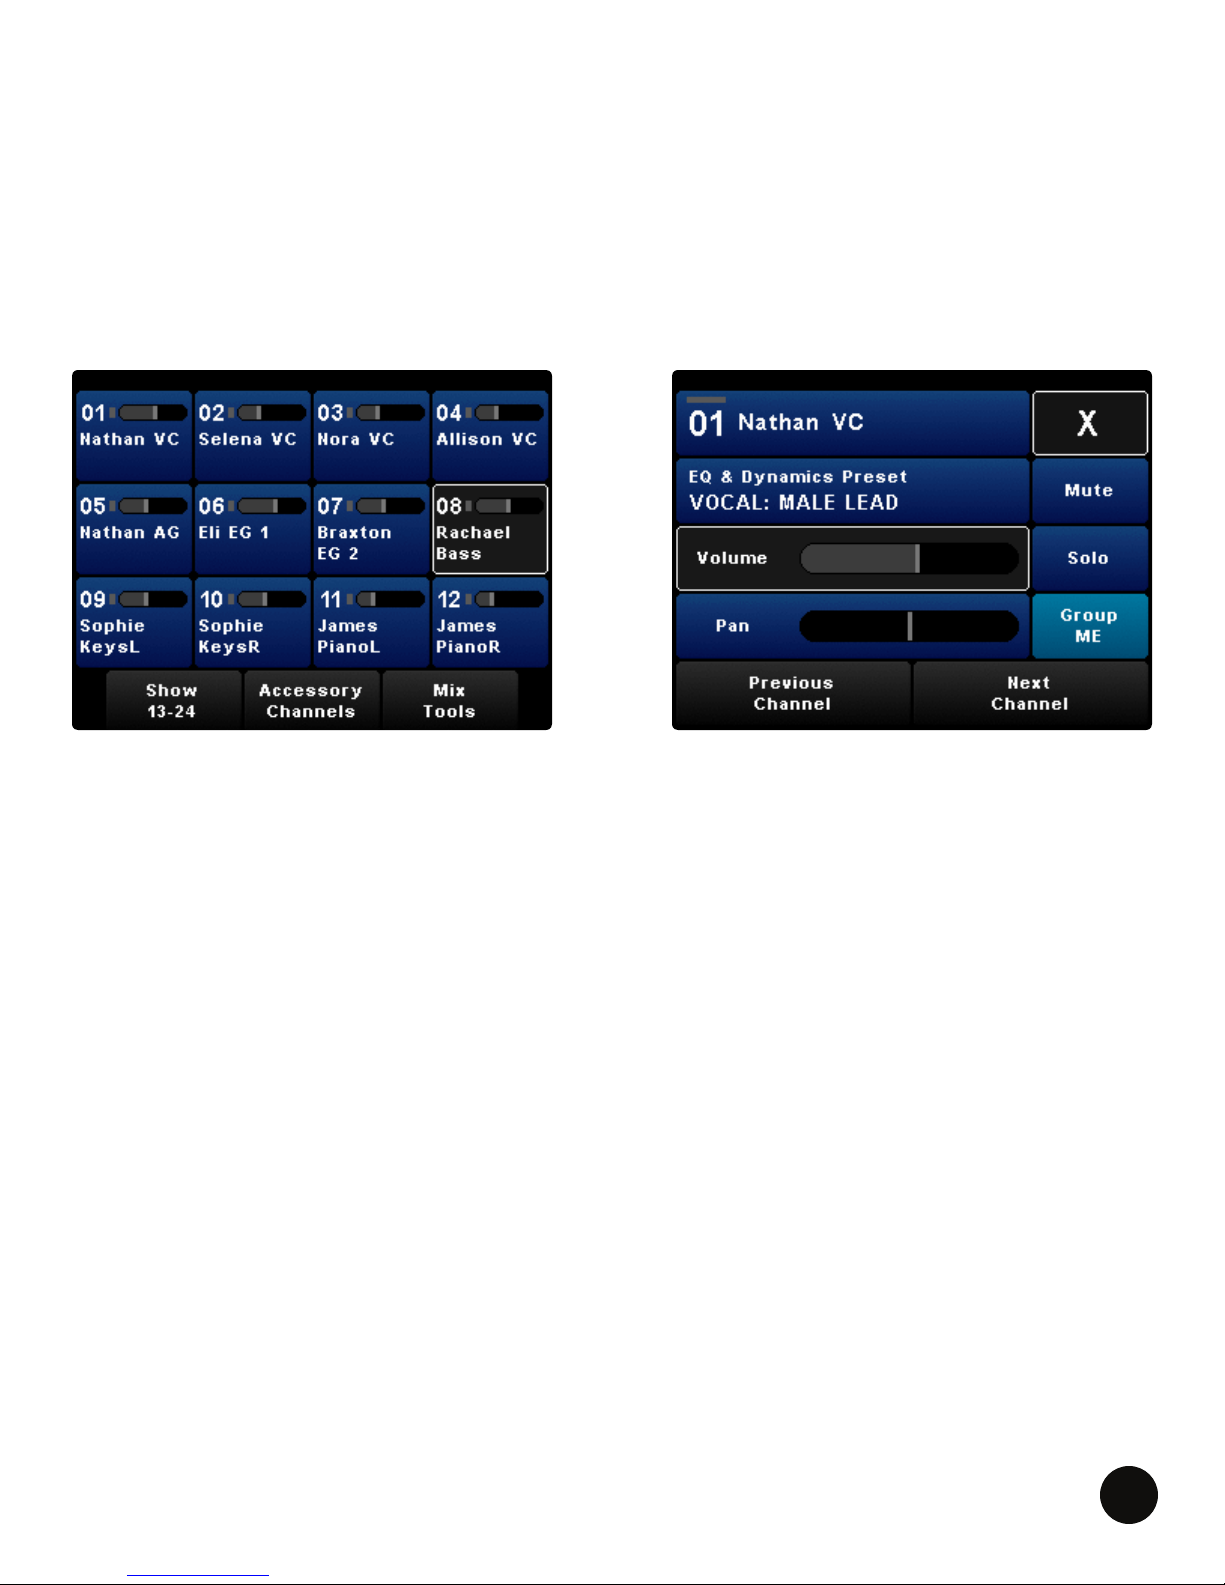
CHANNEL OVERVIEW VS. SINGLE CHANNEL VIEW
Livemix provides a Channel Overview and a Single Channel View. The Channel Overview is best for
mixing, as it allows you to quickly identify which channels you want to adjust. The Single Channel
View provides additional functions. From here, you have access to mixing a single channel and also
other functions; Channel Naming, Channel EQ/Dynamic Presets and mute and solo.
LONG PRESS a channel to access the Single Channel View from the Channel Overview.
PRESS X to return to the Channel Overview.
CHANNEL OVERVIEW SINGLE CHANNEL VIEW
LIVEMIX CS-SOLO
12
Page 15
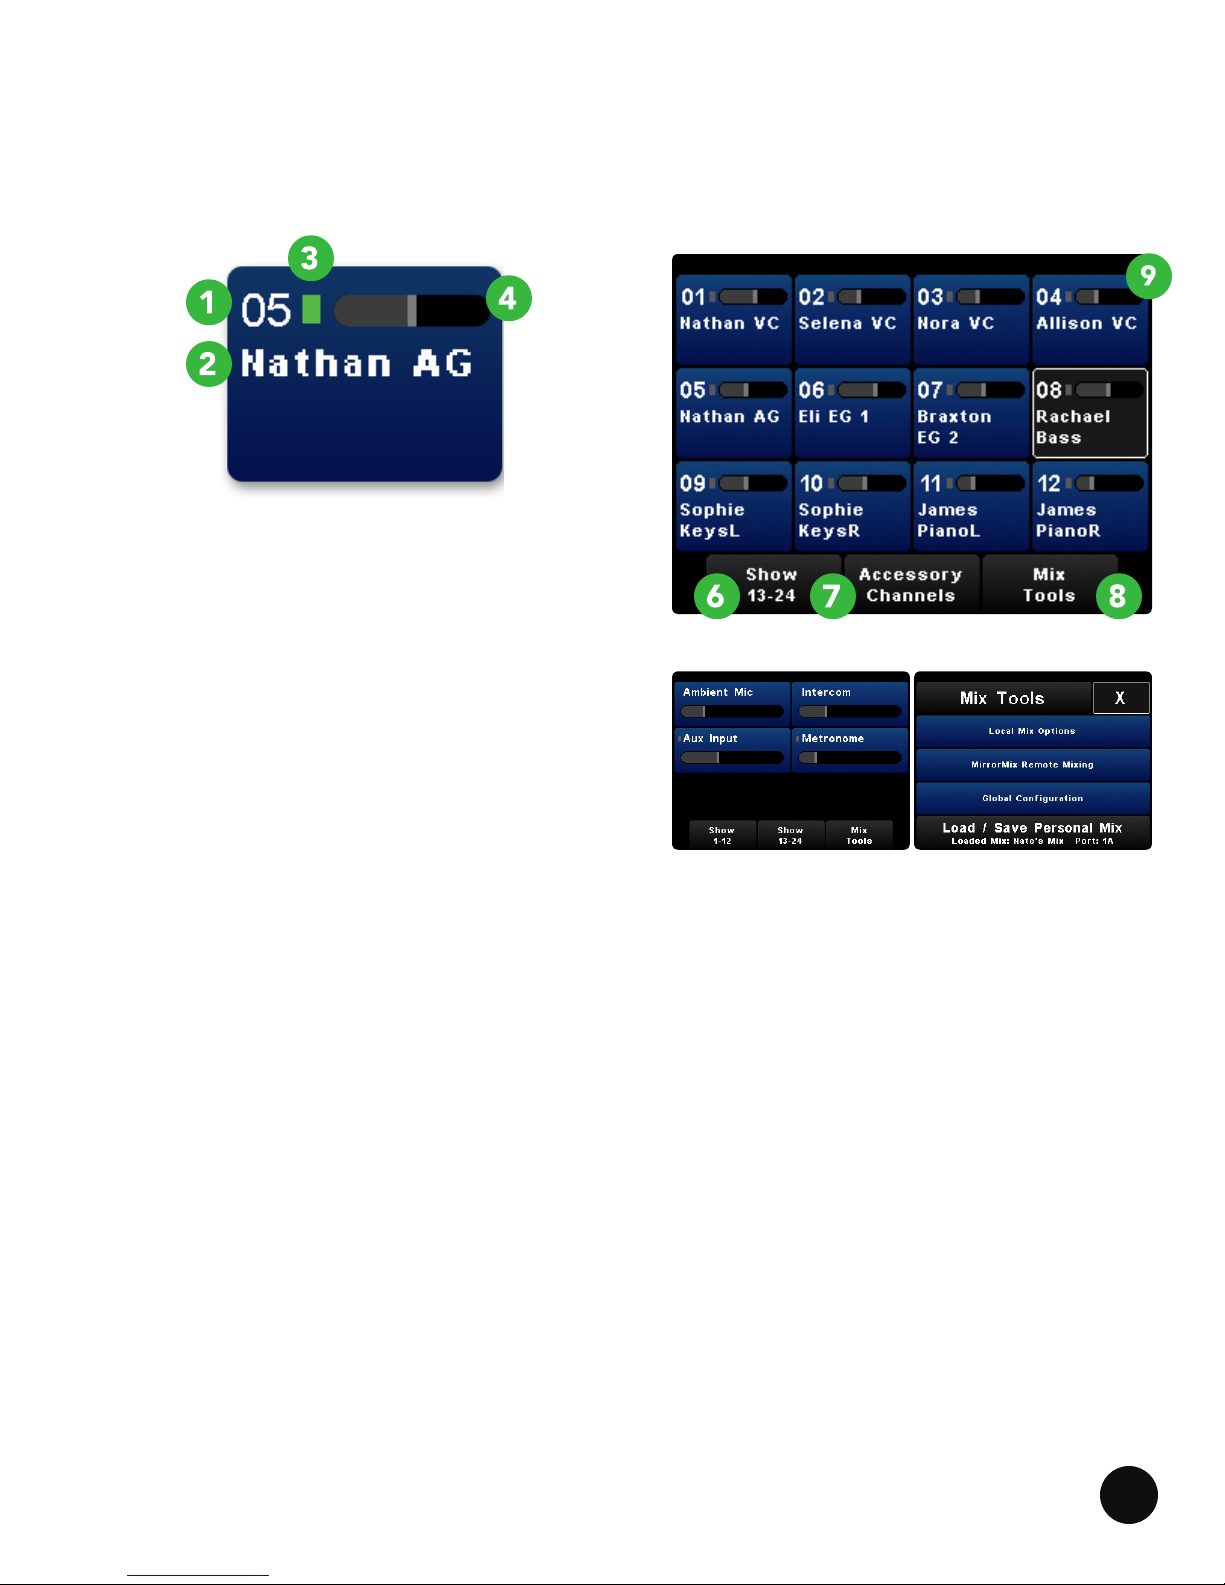
CHANNEL OVERVIEW
The default view when the Livemix CS-SOLO personal mixer is powered up, is the Channel
Overview. Most mixing will be performed on this screen. Each channel in the Channel Overview
shows the following information:
1. CHANNEL NUMBER: This is the number of the
audio channel. The Livemix system allows up to
24 input channels.
2. CHANNEL NAME: This is the custom channel
name.
CHANNEL OVERVIEW
3. SIGNAL LEVEL INDICATOR: This indicator
serves as a signal level meter for the channel.
It is colored gray if no signal is present, then
illuminates in green, yellow and nally red, as the
signal increases in level.
4. VOLUME LEVEL: This horizontal strip shows the
ACCESSORY CHANNELS
MIX TOOLS
current volume level of the channel.
5. PAN LEVEL (NOT SHOWN): The volume strip switches to pan by pressing the ADJUST knob.
6. SHOW 13-24 (SHOW 1-12): This switches the Channel Overview to channels 13-24 or back to
channels 1-12.
7. ACCESSORY CHANNELS: This switches to the Accessory Channels screen. Adjust levels for
built-in intercom, metronome, ambient microphones and the auxiliary input.
8. MIX TOOLS: This switches to the Mix Tools screen. The Mix Tools allow you to perform other
advanced mixing functions.
9. STATUS BAR: Certain features will be indicated or referenced here.
For more details, see the appropriate feature section.
LIVEMIX CS-SOLO
13
Page 16
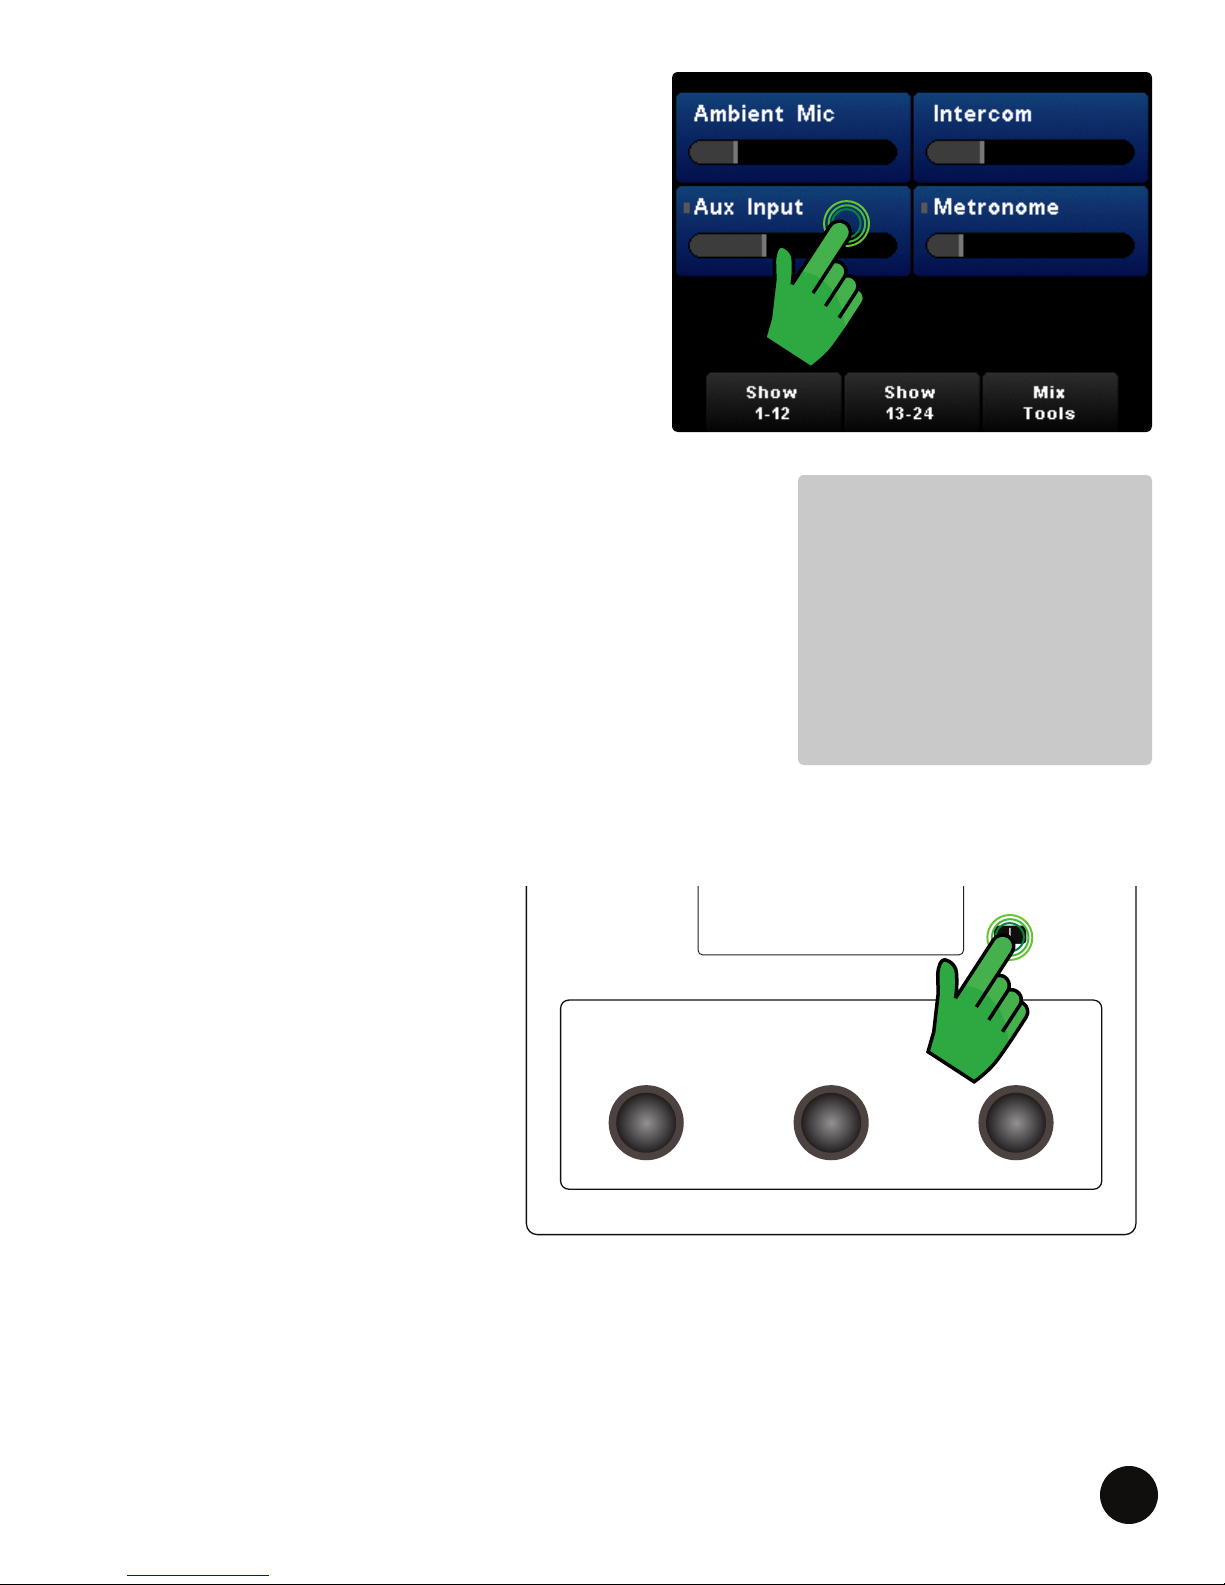
ACCESSORY CHANNELS
CS-SOLO
In addition to the 24 channels of audio, Livemix
provides four accessory channels. PRESS Accessory
Channels on the Channel Overview screen.
Each accessory channels can be blended into your mix
the same as any other channel. Some of the Accessory
Channels offer additional features through their
respective Single Channel View screens. They can be
accessed by LONG PRESSING the channel.
AMBIENT MICROPHONE
Ambient noise is the sound of the stage and room
around you. The personal mixer has two built-in microphones. This
is useful when using headphones or in-ear monitors as it is easy
to feel “closed off” due to the sealed nature of those monitoring
systems. By adding in some of the ambient sound of the stage
and audience, you can make your in-ear mix sound much more
natural, because you are hearing the sound of the audience and
the reverb of the hall you are performing in.
INTERCOM
The Livemix system contains a built-in
intercom for communicating with each
other.
NOTE:
If you nd you are playing
with one in-ear monitor in
and the other out, adjust
the level of ambient noise in
your mix. Playing with one
in-ear monitor out may
damage your hearing.
To use the Intercom, rst adjust the
volume level of the Intercom on the
Accessory Channels screen. This allows
you to hear other performers when they
press Intercom.
To communicate to other performers,
PRESS and HOLD down the
INTERCOM button. The built-in
microphones will pick up your voice
and transmit it to all the other personal
mixers. When done talking, release the
INTERCOM button.
MASTER
VOLUME
PUSH FOR MSTER SETUP
ADJUST
VOL & PAN
INTERCOM
|
ME
PUSH FOR GROUP SETUP
LIVEMIX CS-SOLO
14
Page 17

AUX INPUT
This is the signal from any audio source feeding the ⅛” Aux In connector located on the front
panel of the personal mixer. You can separately adjust the volume of the Aux In signal from the
Accessory Channel’s screen.
In addition to the standard volume and pan options, the Aux Input has two other functions
accessible via the Single Channel View. They can be accessed by LONG PRESSING the channel.
SHARE AUX
The Share Aux button allows you to share your
Auxiliary Input with other personal mixers in the
system.
When Share Aux is not selected, your Aux Input will
be local to your personal mixer. This is useful for a
local click track or rehearsing.
When Share Aux is selected, the audio on your
Auxiliary Input is available to anyone who has
selected Monitor All Aux. Use this for rehearsing or
performing with the band. Verify Monitor All Aux is
selected and adjust Aux Input volume.
MONITOR ALL AUX
The Monitor All Aux button allows you to hear other Auxiliary inputs that are being shared. Leave
this unselected if you do not want to hear other Auxiliary inputs.
LIVEMIX CS-SOLO
15
Page 18
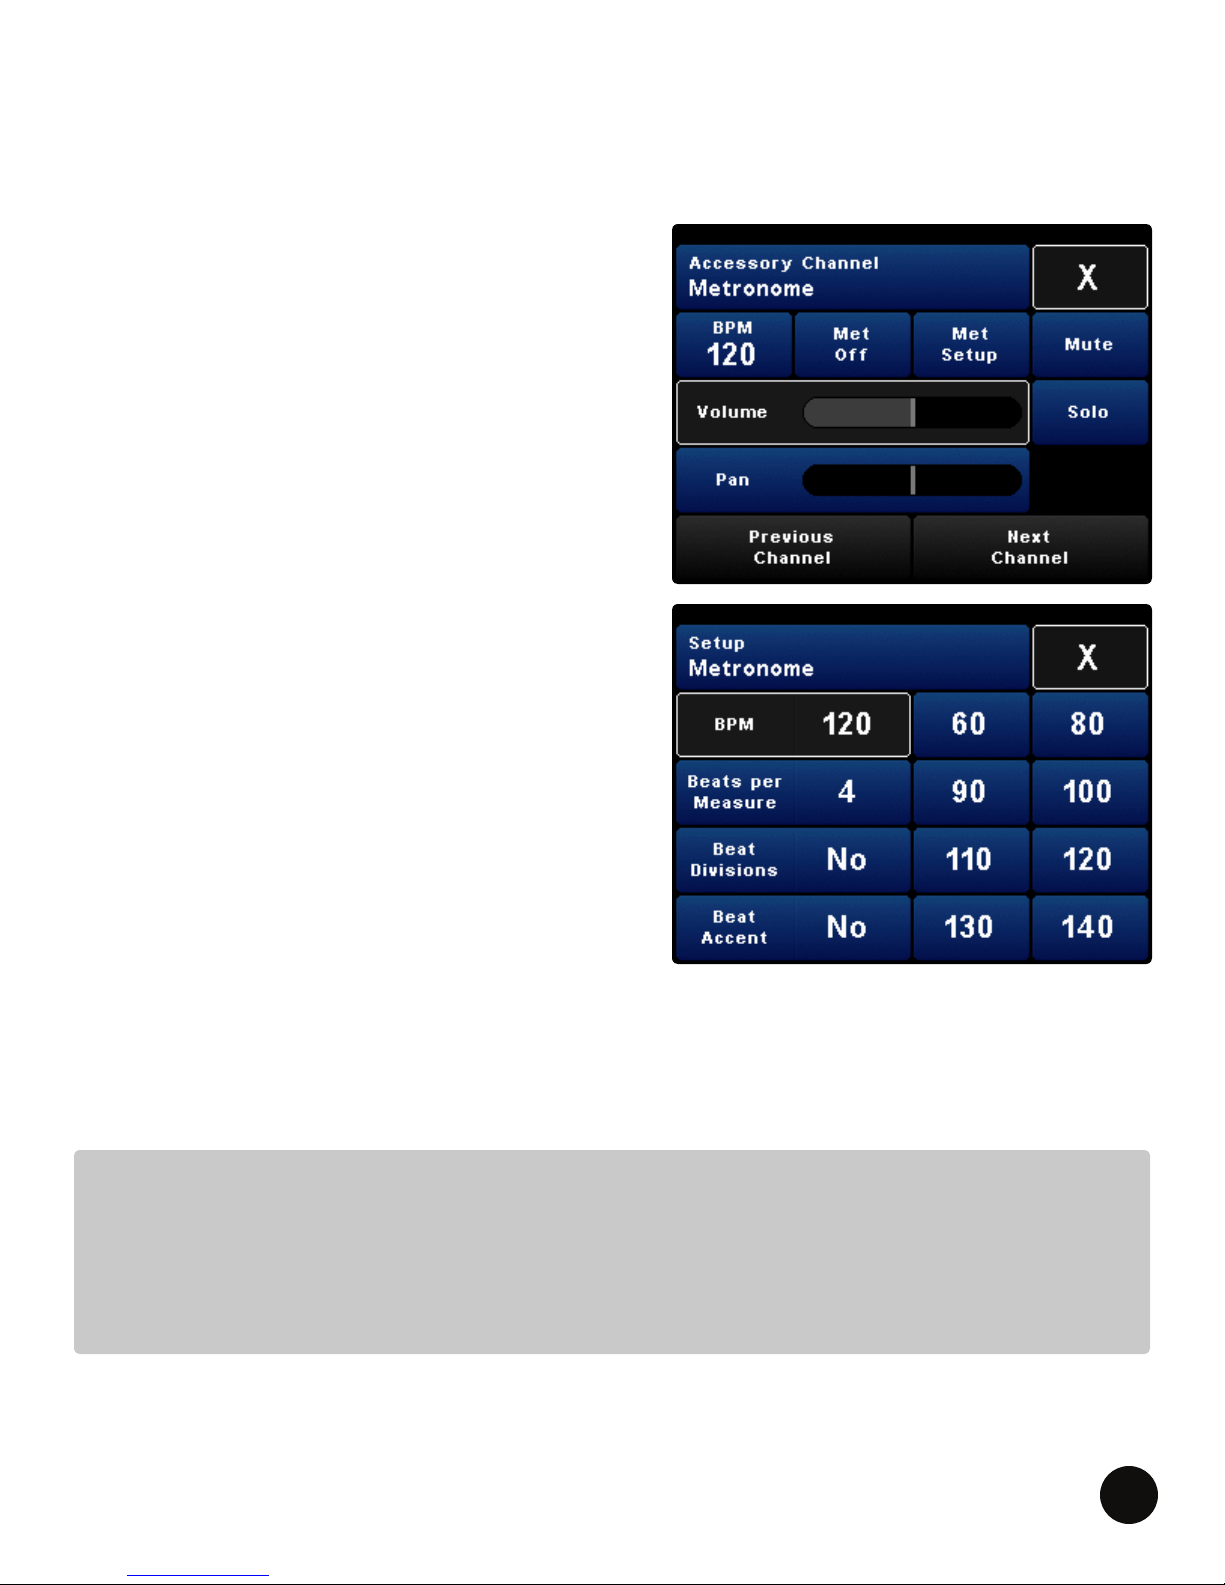
METRONOME
The personal mixer contains an internal metronome. When the Metronome is activated, everyone
can hear the click track as long as the Metronome volume is turned up in their mix. Metronome
conguration is accessible by LONG PRESSING the channel, to enter Single Channel View.
BPM (BEATS PER MINUTE)
BPM displays the current tempo. The quickest way to
set a tempo is to PRESS BPM and use the ADJUST
knob to increase or decrease tempo.
MET ON/OFF
Met On/Off turns the metronome off and on.
MET SETUP
PRESS Met Setup to access the Metronome setup.
SETTING UP THE METRONOME
The internal metronome has a number of options that
can be accessed by pressing Met Setup.
1. BPM: Press BPM to adjust the tempo of the
metronome. Use the ADJUST knob to change
the tempo.
2. BEATS PER MEASURE: PRESS Beats per Measure
to cycle through the options for number of beats
in each measure.
3. BEAT DIVISIONS: PRESS Beat Divisions to cycle
through the options for dividing each beat. Beat
divisions are played with a different click tone.
4. BEAT ACCENT: PRESS Beat Accent to accent the
downbeat of each measure with a different click tone.
5. Beat Presets: SELECT one of the tempo presets to instantly change to that tempo.
MORE ABOUT THE METRONOME
• The Metronome signal is global. If a user starts metronome playback, everyone will hear it if
the metronome volume is turned up for their personal mixer.
• The Metronome can be changed by any personal mixer.
• Use the AUX IN to connect an external metronome.
LIVEMIX CS-SOLO
16
Page 19
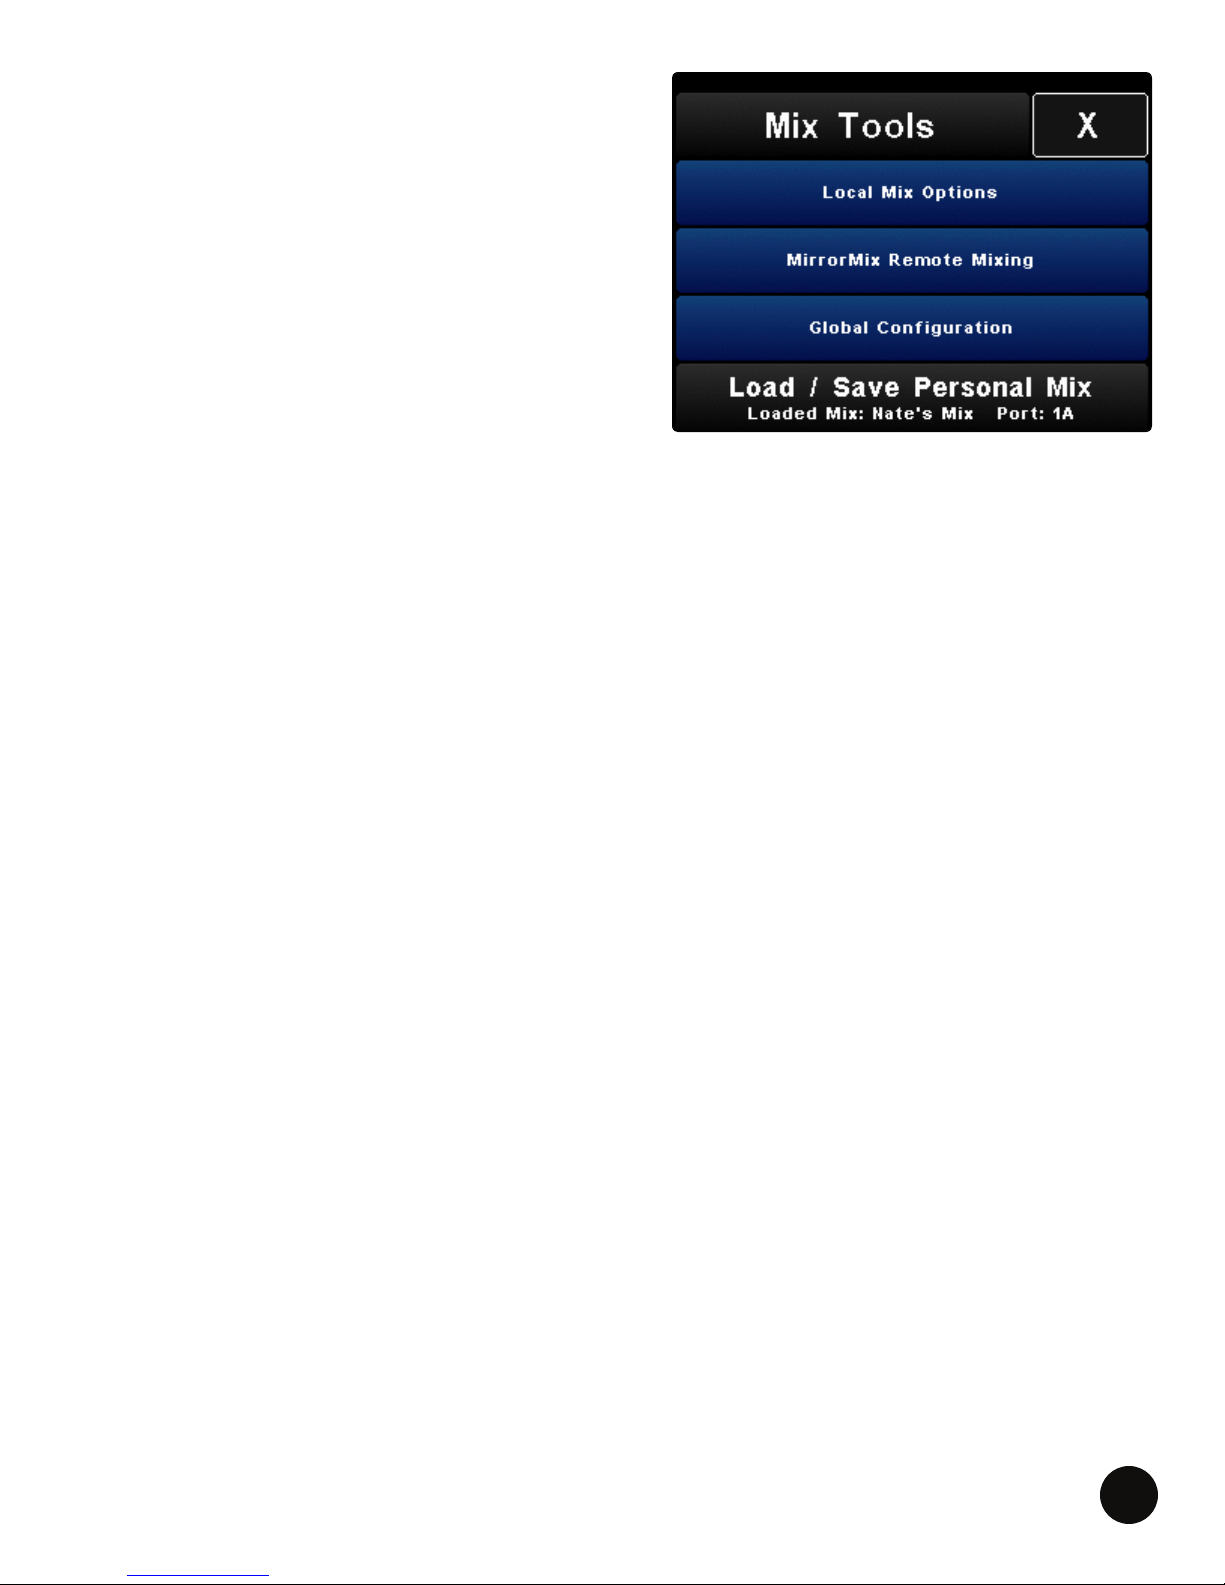
MIX TOOLS
The Mix Tools menu provides access to Local
Mix Options, MirrorMix® Remote Mixing, Global
Conguration and Load/Save Personal Mix.
To view the Mix Tools, PRESS Mix Tools on the
Channel Overview.
LOCAL MIX OPTIONS
The Local Mix Options provide the user with deeper
local mix features. These features and functions
pertain to the local mix only and will not impact other
personal mixes.
MIRRORMIX® REMOTE MIXING
MirrorMix® Remote Mixing allows any experienced user to help performers from any Livemix
personal mixer. Being able to push a starter mix to anyone, allows them to better focus on the music
and audience and further train them on mixing. For more details, see the MirrorMix section.
GLOBAL CONFIGURATION
The Global Conguration provides options to set up the overall system. These features and functions
apply to the whole system. For more details, see the Global Conguration section.
LOAD / SAVE PERSONAL MIX
For more details, see Saving & Loading a Personal Mix section.
LIVEMIX CS-SOLO
17
Page 20
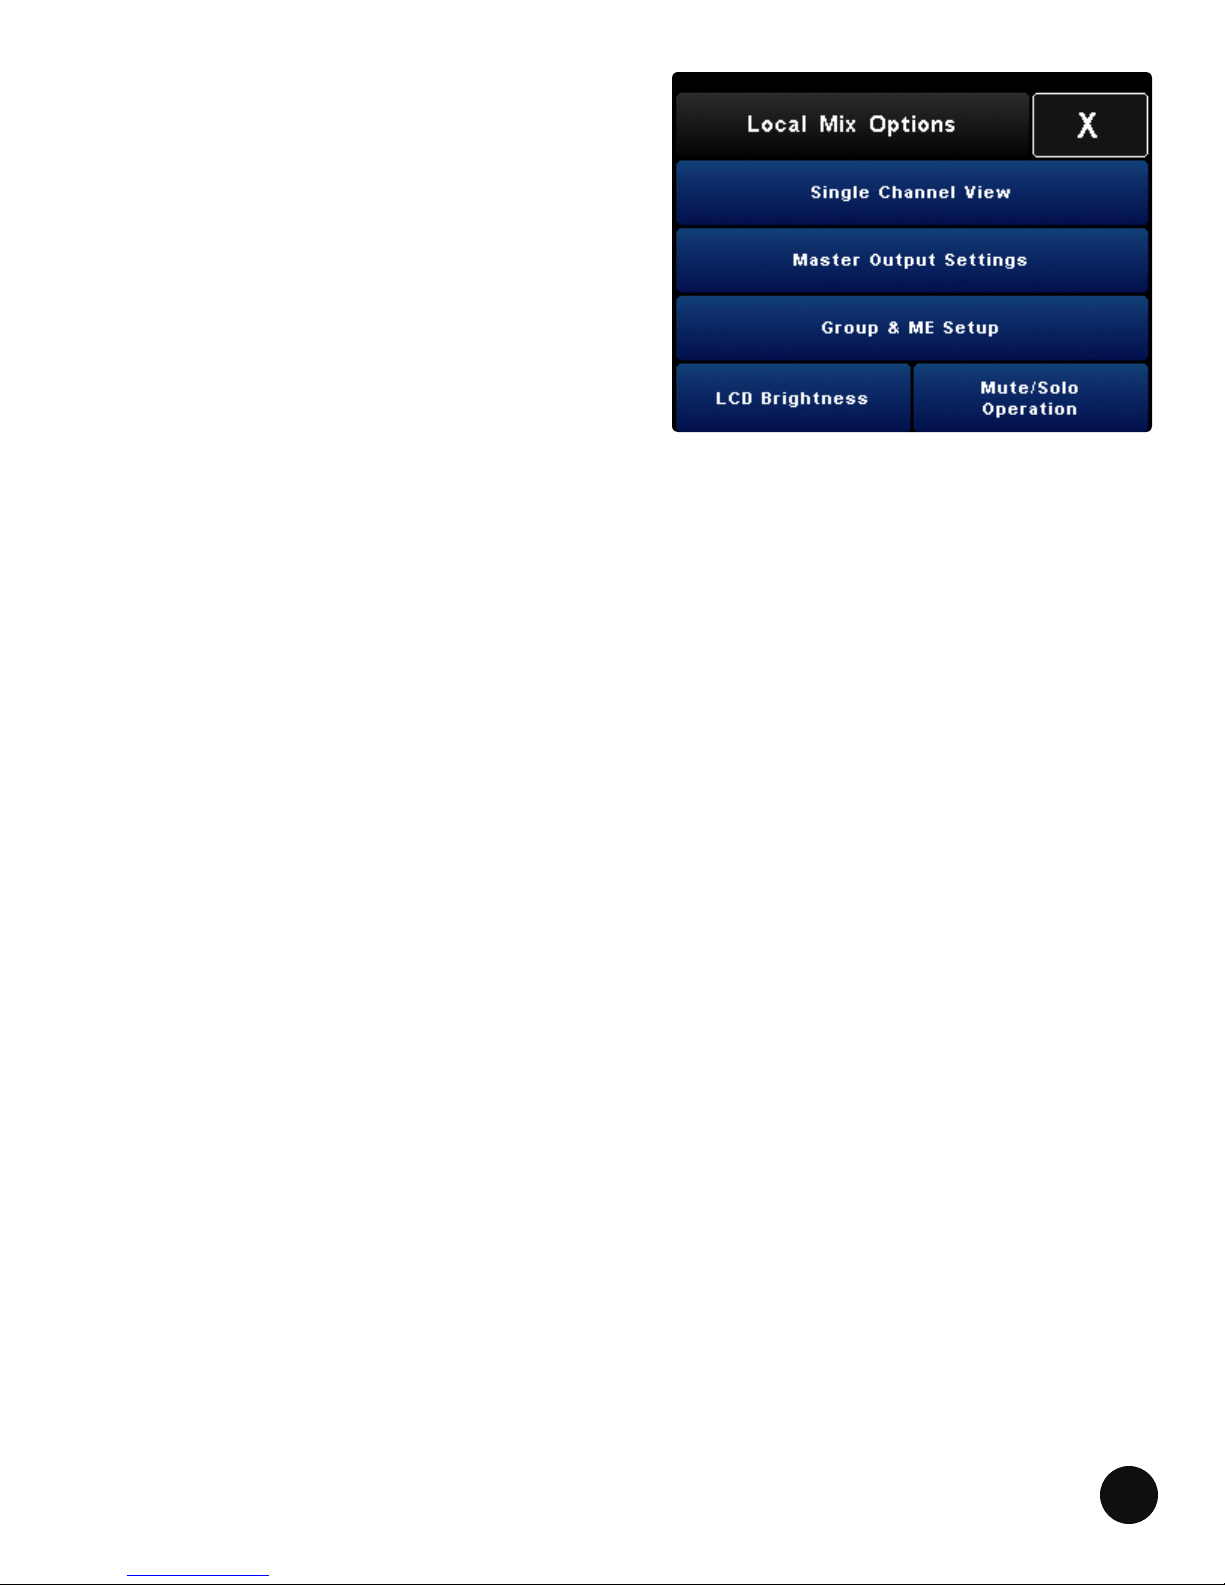
LOCAL MIX OPTIONS
SINGLE CHANNEL VIEW
This provides an alternate way to get to the Single
Channel View. It is the same as performing a LONG
PRESS on a channel. For more details, see the Single
Channel View section.
MASTER OUTPUT SETTINGS
The Mix Output Settings are options that pertain to
the overall output of the Livemix mixer. These settings
affect the stereo or mono mix.
Another way to access these options is to PRESS the
Master Volume Knob. For more details, see the Mix Output Settings section.
GROUP & ME SETUP
This provides an alternate way to get to the Group Setup. It is the same as pressing the ME knob.
For more details, see the Group & Me Setup section.
LCD BRIGHTNESS
This allows you to adjust the brightness of the LCD screen and turn Auto Dim on and off. For more
details, see the LCD Brightness section.
MUTE/SOLO OPERATION
This allows you to adjust local Mute or Solo options. For more details, see the Mute/Solo Operation
section.
LIVEMIX CS-SOLO
18
Page 21
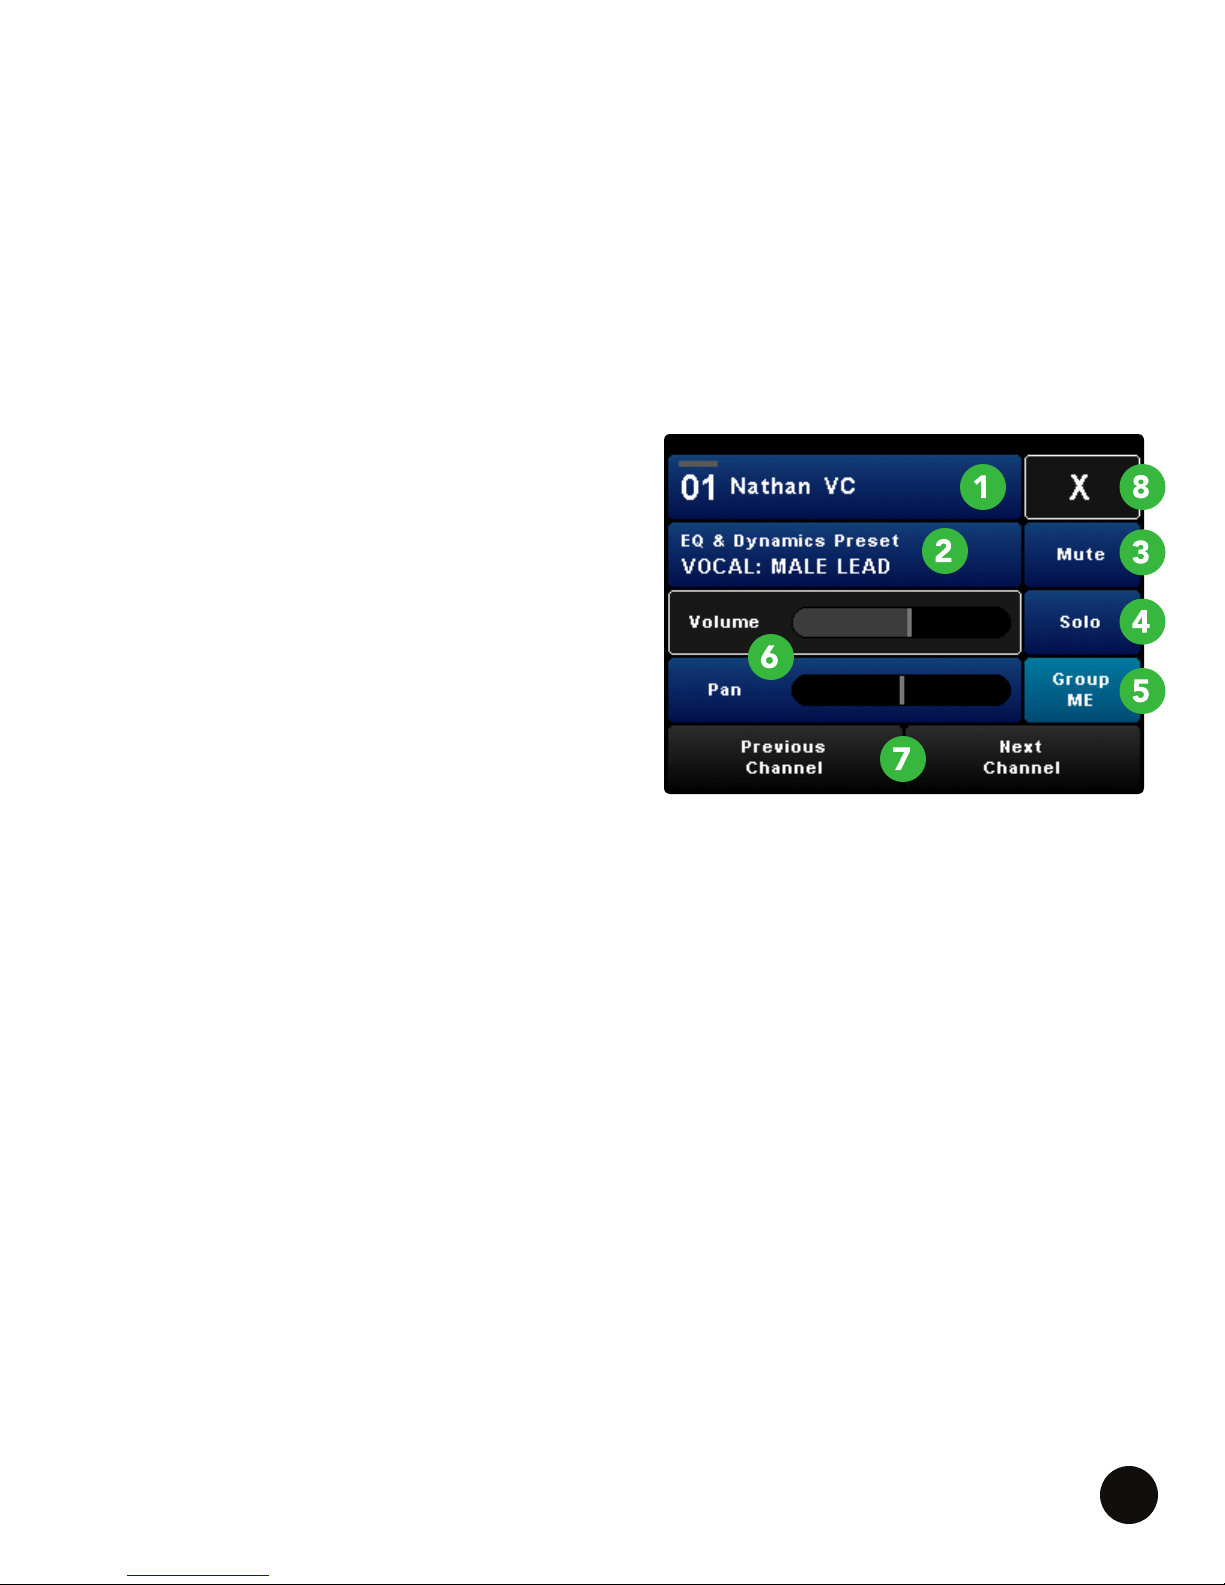
SINGLE CHANNEL VIEW SCREEN
Most mixing can be performed on the Channel Overview screen. However, Livemix provides a
number of professional tools that can be used to help create a better mix. These features are
accessed from the Single Channel View.
To access Single Channel View:
• LONG PRESS the channel.
• PRESS Mix Tools from the Channel Overview, SELECT Local Mix Options and then SELECT
Single Channel View.
SINGLE CHANNEL VIEW
1. CHANNEL NUMBER/NAME: This shows the
channel number and name. LONG PRESS to
customize the name. Name changes are Global.
2. EQ/DYNAMICS PRESET: This shows the EQ &
Dynamics Preset. LONG PRESS to view presets
or customize EQ & Dynamics settings. EQ &
Dynamics Presets are Global.
3. MUTE BUTTON: PRESS Mute to silence the
channel in a mix. A red indicator will illuminate
in the Status Bar on the right. Please note, if the
Global Mute feature is enabled, a muted channel
will be muted globally, or for everyone; Mute will be replaced with Global Mute.
4. SOLO BUTTON: PRESS Solo to solo the channel in a mix. A yellow indicator will illuminate in
the Status Bar on the right.
5. GROUP INDICATOR: If the channel is in a group, the Group button will display which group the
channel is in, otherwise the Group indicator will not be displayed.
6. VOLUME AND PAN DISPLAY: Shows the volume level and pan position of the channel.
7. PREVIOUS/NEXT CHANNEL: PRESS to go to the next or previous channel.
8. X: PRESS X to exit Single Channel View.
See the section “Advanced Monitor Mixing with the Single Channel View Screen” for more details.
LIVEMIX CS-SOLO
19
Page 22
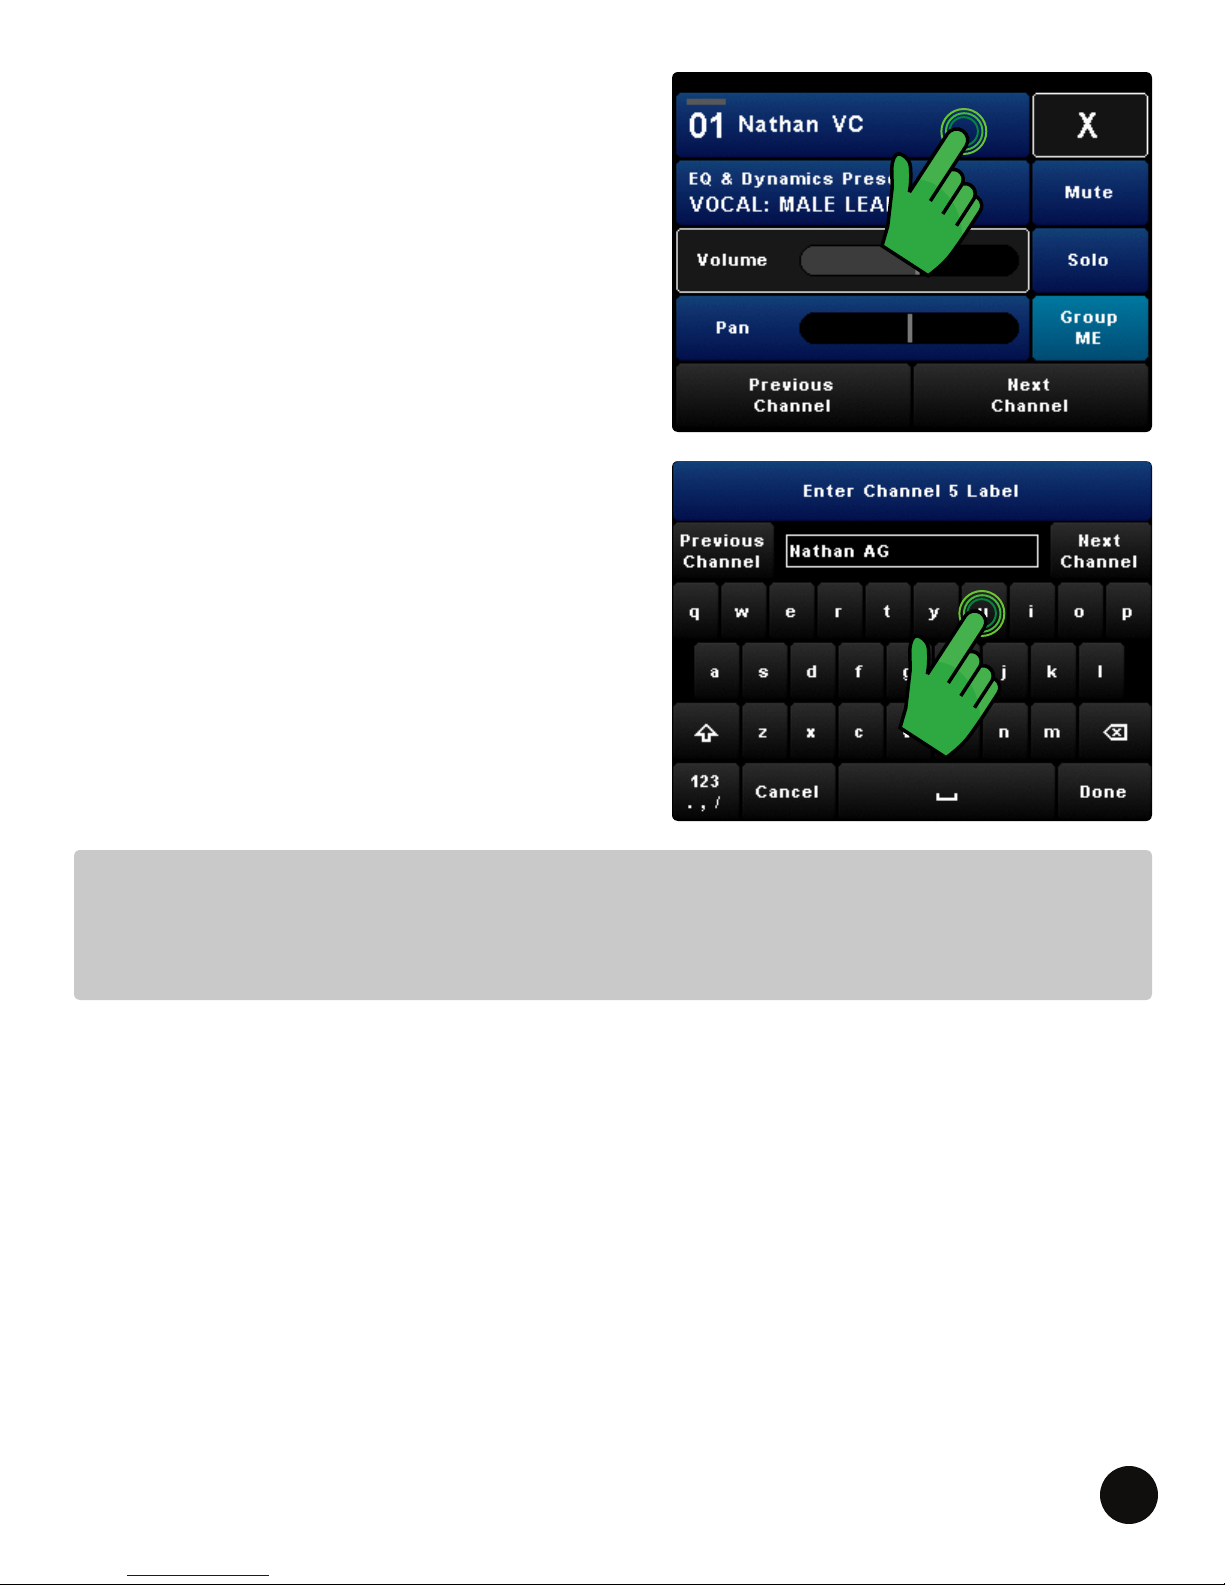
CHANNEL NAMING
Custom channel names can be assigned to each of
the 24 incoming audio channels. Channel names are
displayed in both the Channel Overview screen and
the Single Channel View screen.
To name a channel:
• LONG PRESS the channel to enter Single
Channel View.
• LONG PRESS channel number/name at the top.
• ENTER the channel name.
• PRESS Done.
• Use Next Channel or Previous Channel when
naming multiple channels.
• PRESS Done.
NOTE:
Channel names are global. When you name the channels on your personal mixer, the channel
names will be visible on all the Livemix personal mixers in the system.
LIVEMIX CS-SOLO
20
Page 23
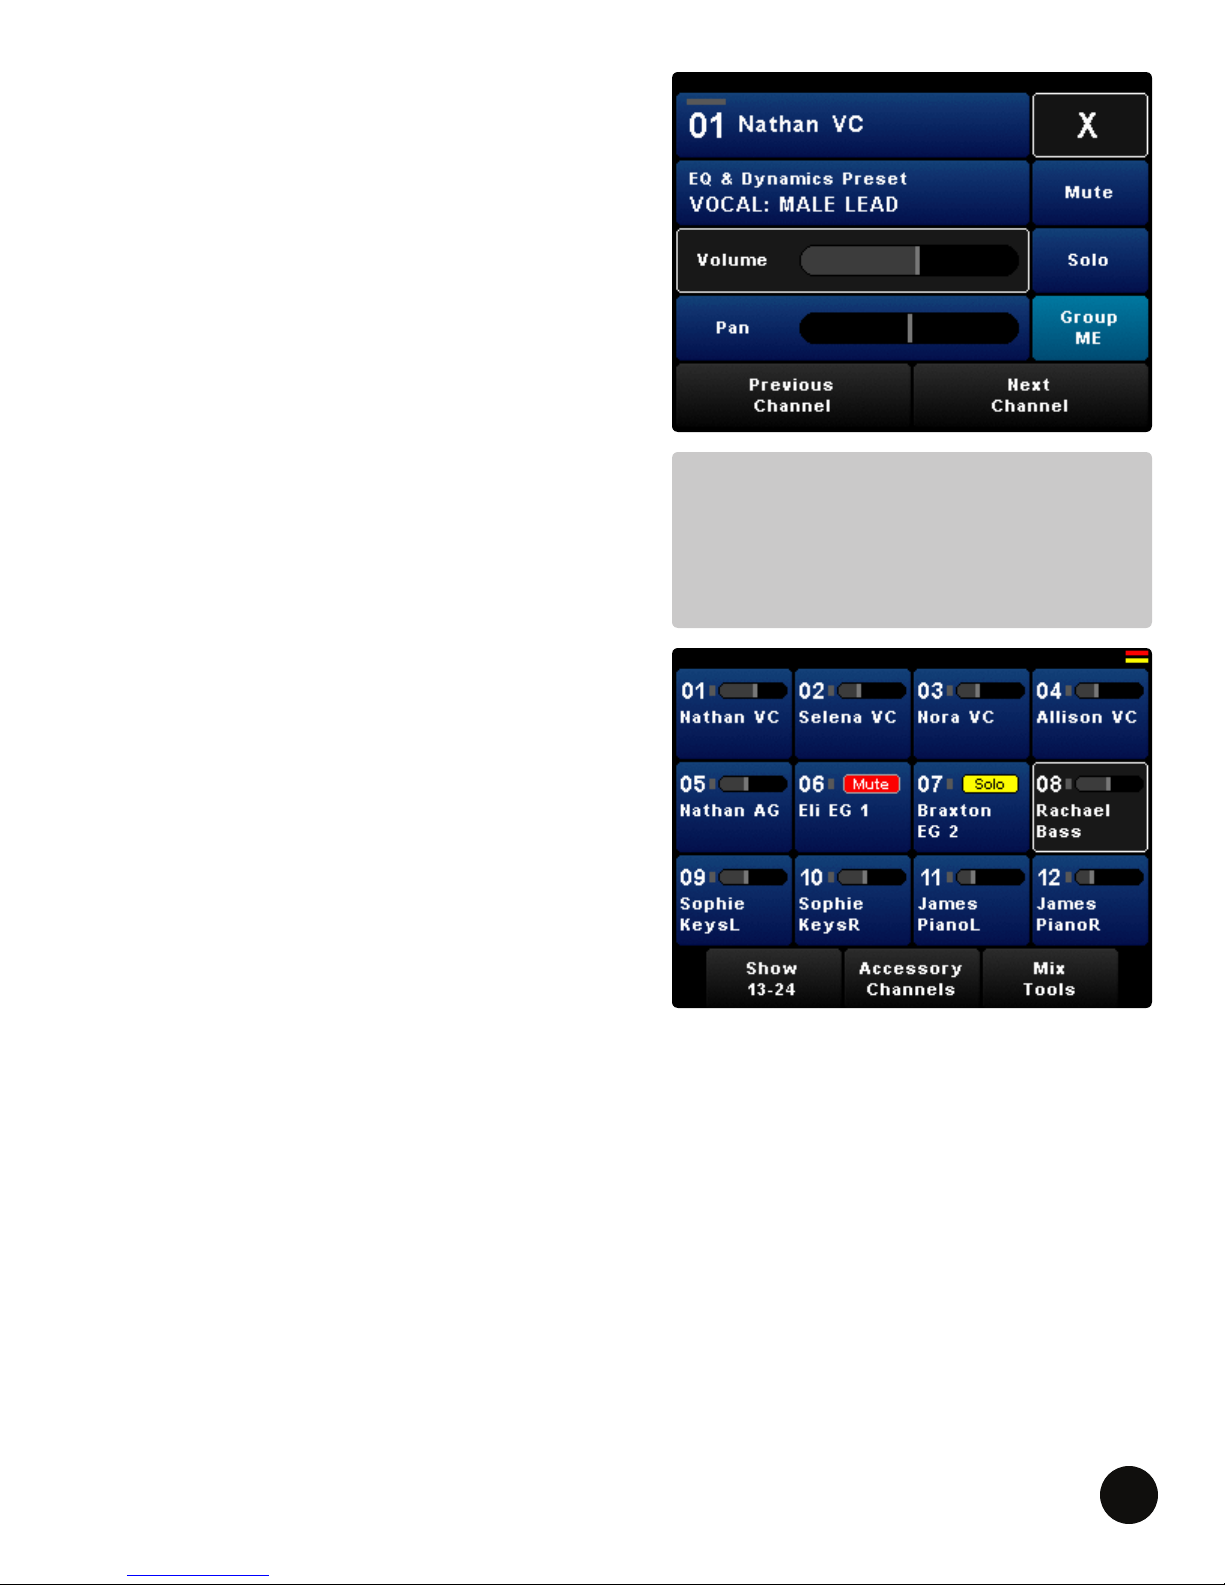
MUTE BUTTON
PRESS Mute to silence the channel in a mix. A red
indicator will illuminate in the Status Bar on the right.
Mute is visible in the Channel Overview for the muted
channel. Please note, if the Global Mute feature is
enabled, a muted channel will be muted for everyone,
or globally; Mute will be replaced with Global Mute.
See the Global Mute section of this guide.
SOLO BUTTON
PRESS Solo to silence all non-soloed channels in
a mix. When a channel is soloed, a yellow bar will
illuminate in the Status Bar on the right. Solo is visible
in the Channel Overview for the soloed channel.
GROUP INDICATOR
If the channel is in a group, the Group button will
display which group the channel is in, otherwise the
Group indicator will not be displayed.
NOTE:
Mute and Solo functions apply to groups
as well. If a channel is in a group and you
press mute, it will mute the entire group.
Temporarily remove a channel from its group by
performing a LONG PRESS on the Group button.
Once the Group button ashes, make adjustments to
the volume of the channel. PRESS the Group button
again to place the channel back in the group.
LIVEMIX CS-SOLO
21
Page 24
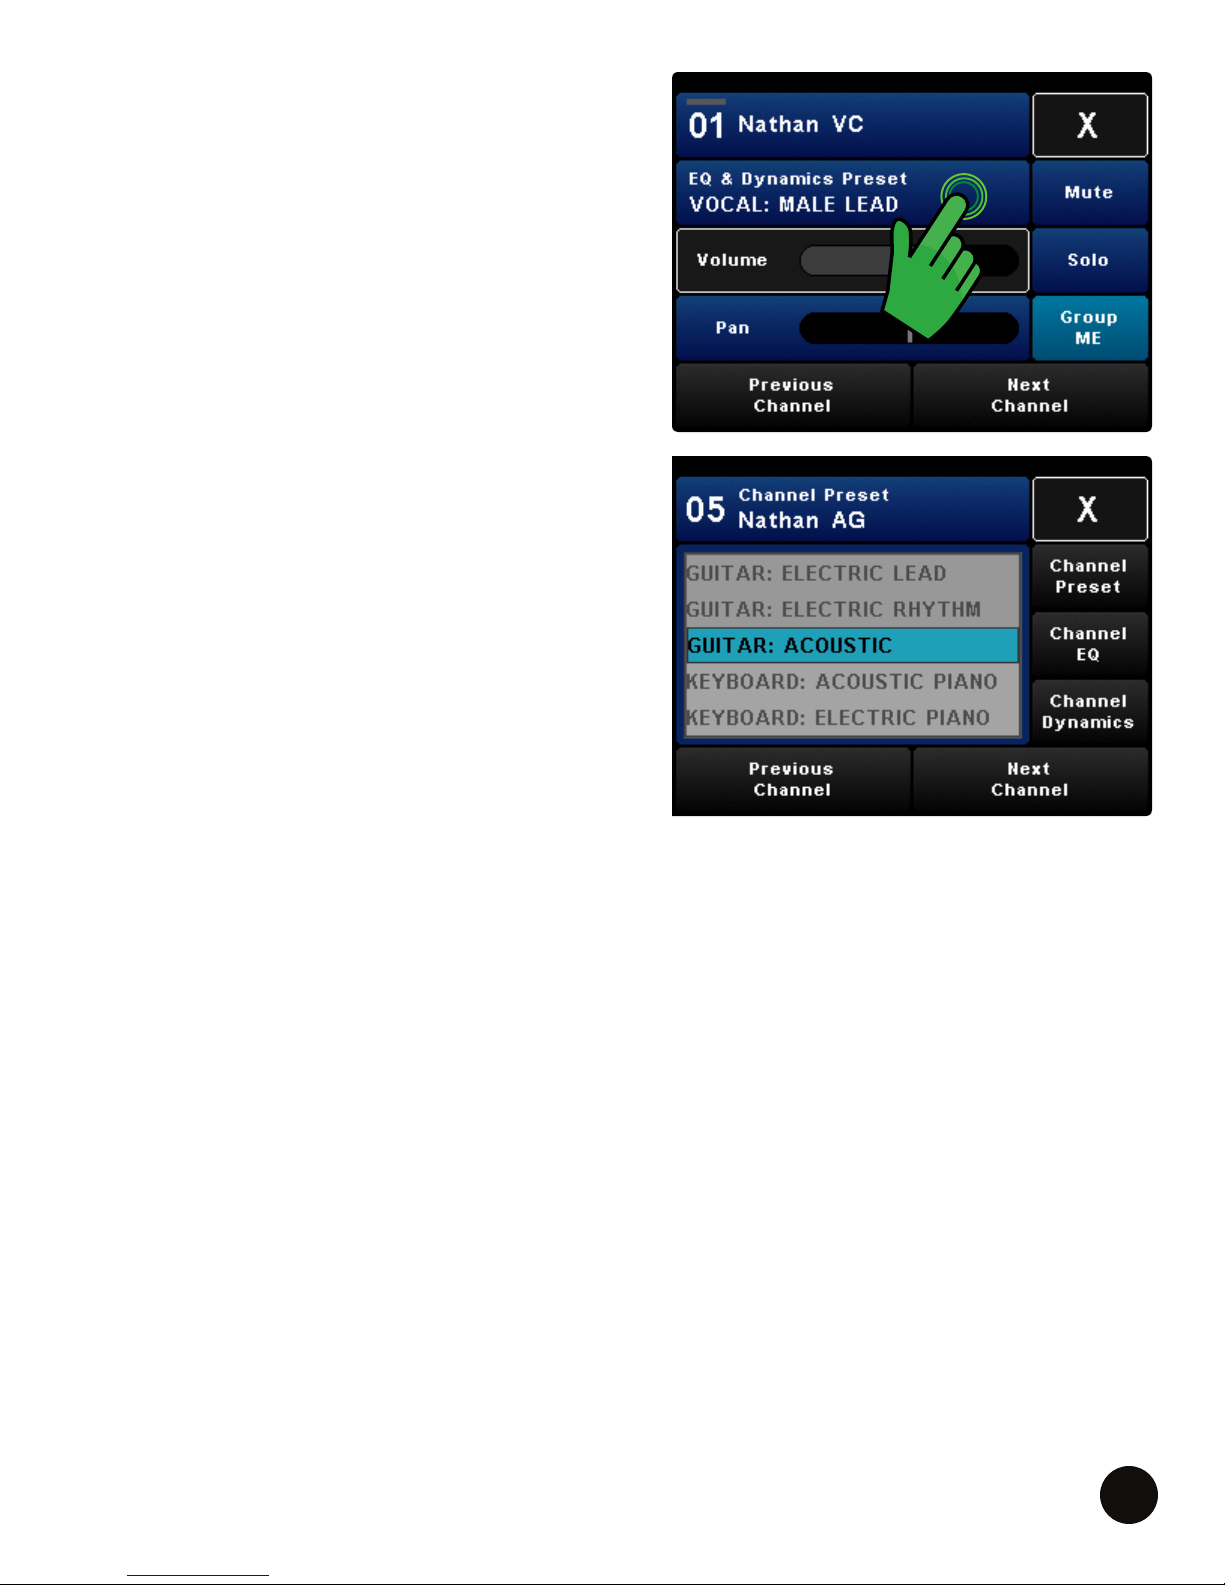
CHANNEL EQ & DYNAMICS PRESETS
The personal mixer allows you to select from a list
of equalization and dynamics presets that enhance
the sound of the selected channel. These presets are
generic so be sure to listen to determine if a preset
works for the channel.
Adding or changing channel effects are global
changes, not local changes. Any preset adjustments
will be heard by everyone.
Presets allow quick set up for EQ & Dynamics levels,
for each of the 24 available channels.
TO SELECT AN EQ & DYNAMICS PRESET:
1. LONG PRESS EQ & Dynamics Preset.
2. PRESS continue on the warning screen.
3. ROTATE the ADJUST knob to select a preset.
4. PRESS X to return to Single Channel View.
In the channel preset screen, you are presented
with a list of useful presets, organized by different
instruments. Each preset is custom designed to
apply equalization and dynamics adjustments that
complement the specic instrument the preset is named after.
PRESS Previous Channel or Next Channel to quickly navigate to other channels. Repeat steps 3.
If a PASSCODE has been set, you will be prompted to enter the passcode before entering Channel
EQ & Dynamics Presets. See the Passcode Section for more details.
The available presets are listed in the Appendix.
LIVEMIX CS-SOLO
22
Page 25
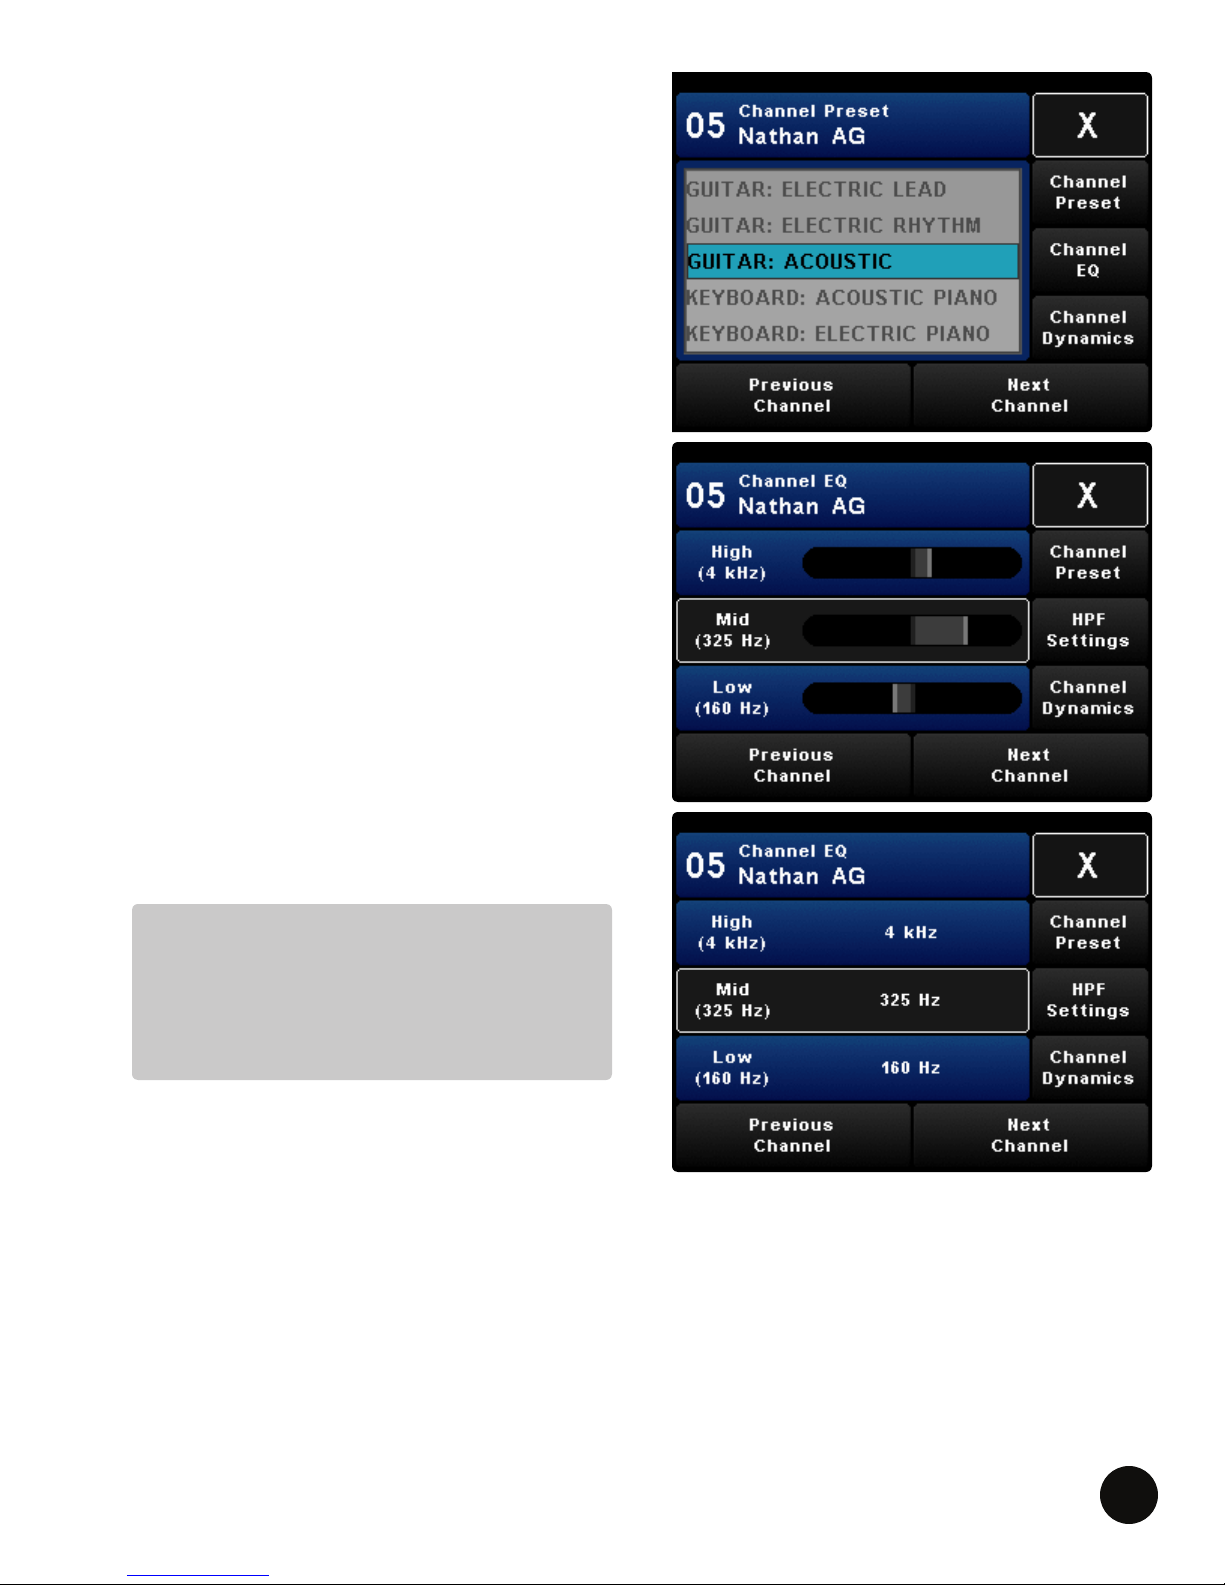
CHANNEL EQ
The 3-band EQ can be used to tailor the overall
sound of the selected channel. The Channel EQ is a
powerful tool. It is best to make small adjustments
and continually listen to make sure that the changes
enhance the source or make it t better in the mix.
TO ADJUST THE LEVEL OF THE THREE EQ
BANDS:
1. While still on the EQ & Dynamics Preset screen,
PRESS Channel EQ.
2. PRESS one of the three bands to adjust.
3. ROTATE the ADJUST knob to cut or boost the
EQ band.
TO ADJUST THE FREQUENCY OF THE THREE EQ
BANDS:
1. LONG PRESS one of the EQ bands.
2. ROTATE the ADJUST knob to change the center
frequency of the EQ curve.
You can also PRESS the ADJUST knob to tab through
the EQ bands, for both the boost or cut and the
frequency modes.
NOTE:
The EQ for the high and lower are
shelving with a Q of 0.707. The mid is
peak/dip with a Q of 1.5.
LIVEMIX CS-SOLO
23
Page 26
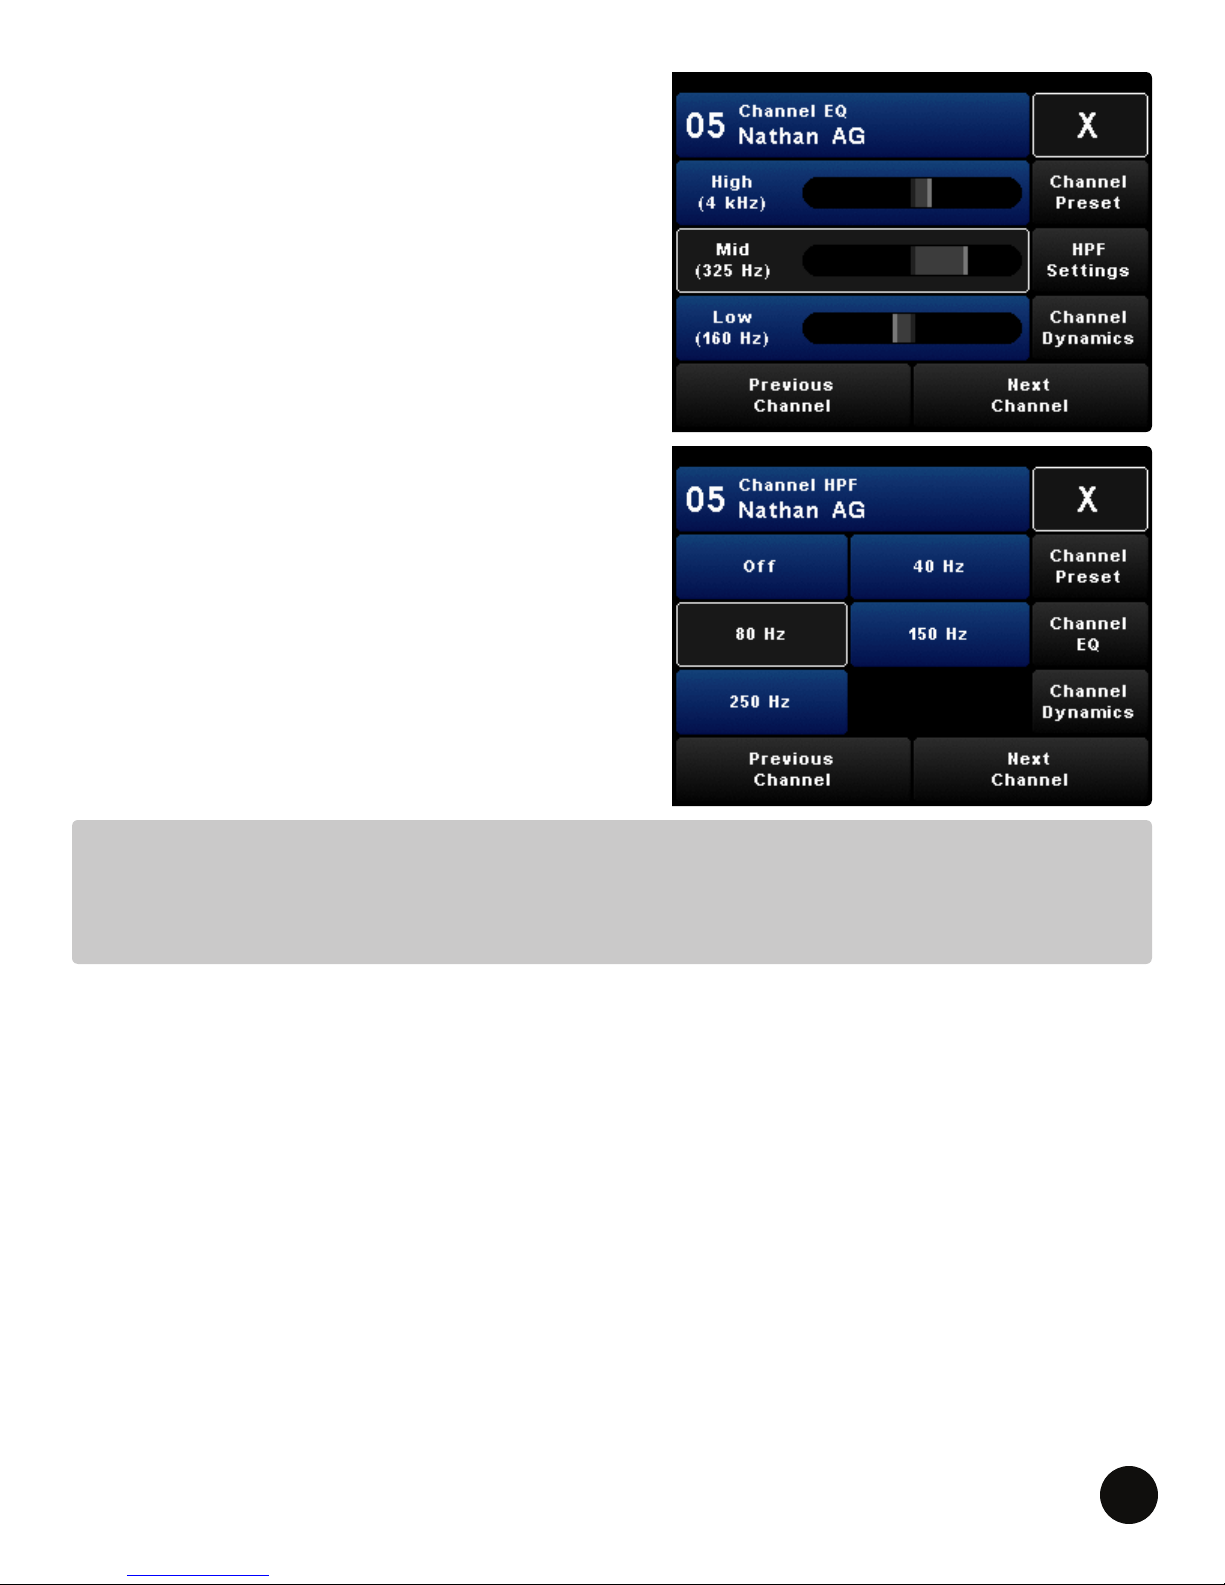
CHANNEL HIGH PASS FILTER (HPF)
The High Pass Filter allows you to roll off some of the
low frequencies that can lead to muddy sounding
mixes. Most channels that do not contribute to the
low end of the mix, should have a HPF.
To access the High Pass Filter, PRESS HPF Settings
from the Channel EQ screen.
PRESS one of the ve HPF frequency choices:
• OFF: HPF bypassed.
• 40Hz: 40Hz or lower will be ltered out. This
setting is good for most instruments.
• 80Hz: 80Hz or lower will be ltered out. This
setting will cut out some 60Hz hum and noise,
good for male vocals.
• 150Hz: 150Hz or lower will be ltered out. This
is another good setting for cutting hum. It is also
good for many stringed instruments.
• 250Hz: 250Hz or lower will be ltered out. This
is a good setting for higher pitched instruments
and female vocals.
NOTE:
The Channel EQ and HPF Settings share a page tab. When on the Channel EQ page, the HPF
Settings tab will be visible. When on the HPF Settings page, the Channel EQ tab will be visible.
LIVEMIX CS-SOLO
24
Page 27
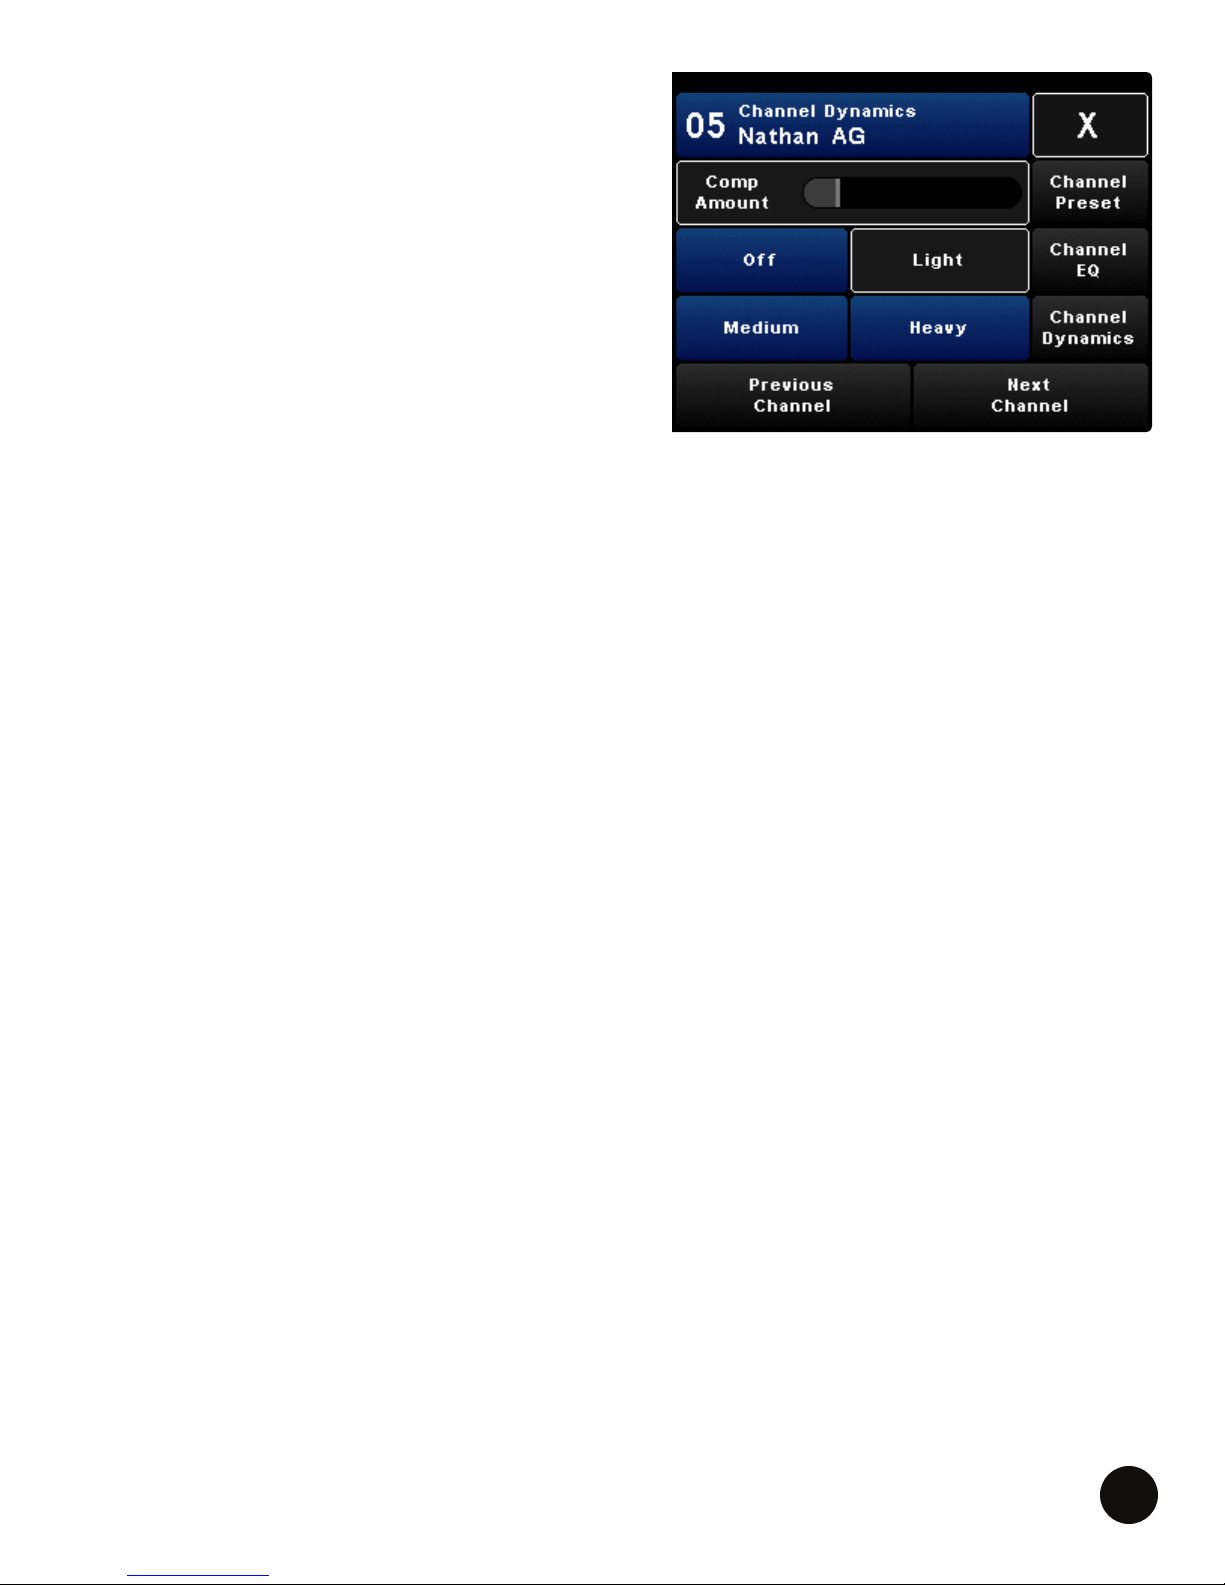
CHANNEL DYNAMICS
Dynamics are the amount of difference, or the
dynamic range, between the softest sound heard in a
mix, and the loudest. To even out the dynamics in a
mix, a compressor is used.
To access the compressor, PRESS Channel Dynamics.
The compressor has two controls; one is the amount
of compression applied to the channel and the
second is the type.
ROTATE the ADJUST knob to adjust the amount of
compression applied to the mix.
PRESS any of the 4 buttons at the bottom of the screen to select how much compression is needed.
1. OFF: Compressor bypassed.
2. LIGHT/MEDIUM/HEAVY: Differing amounts of compression will be applied to the dynamic
range of the mix. Try each setting and see which one sounds best.
LIVEMIX CS-SOLO
25
Page 28
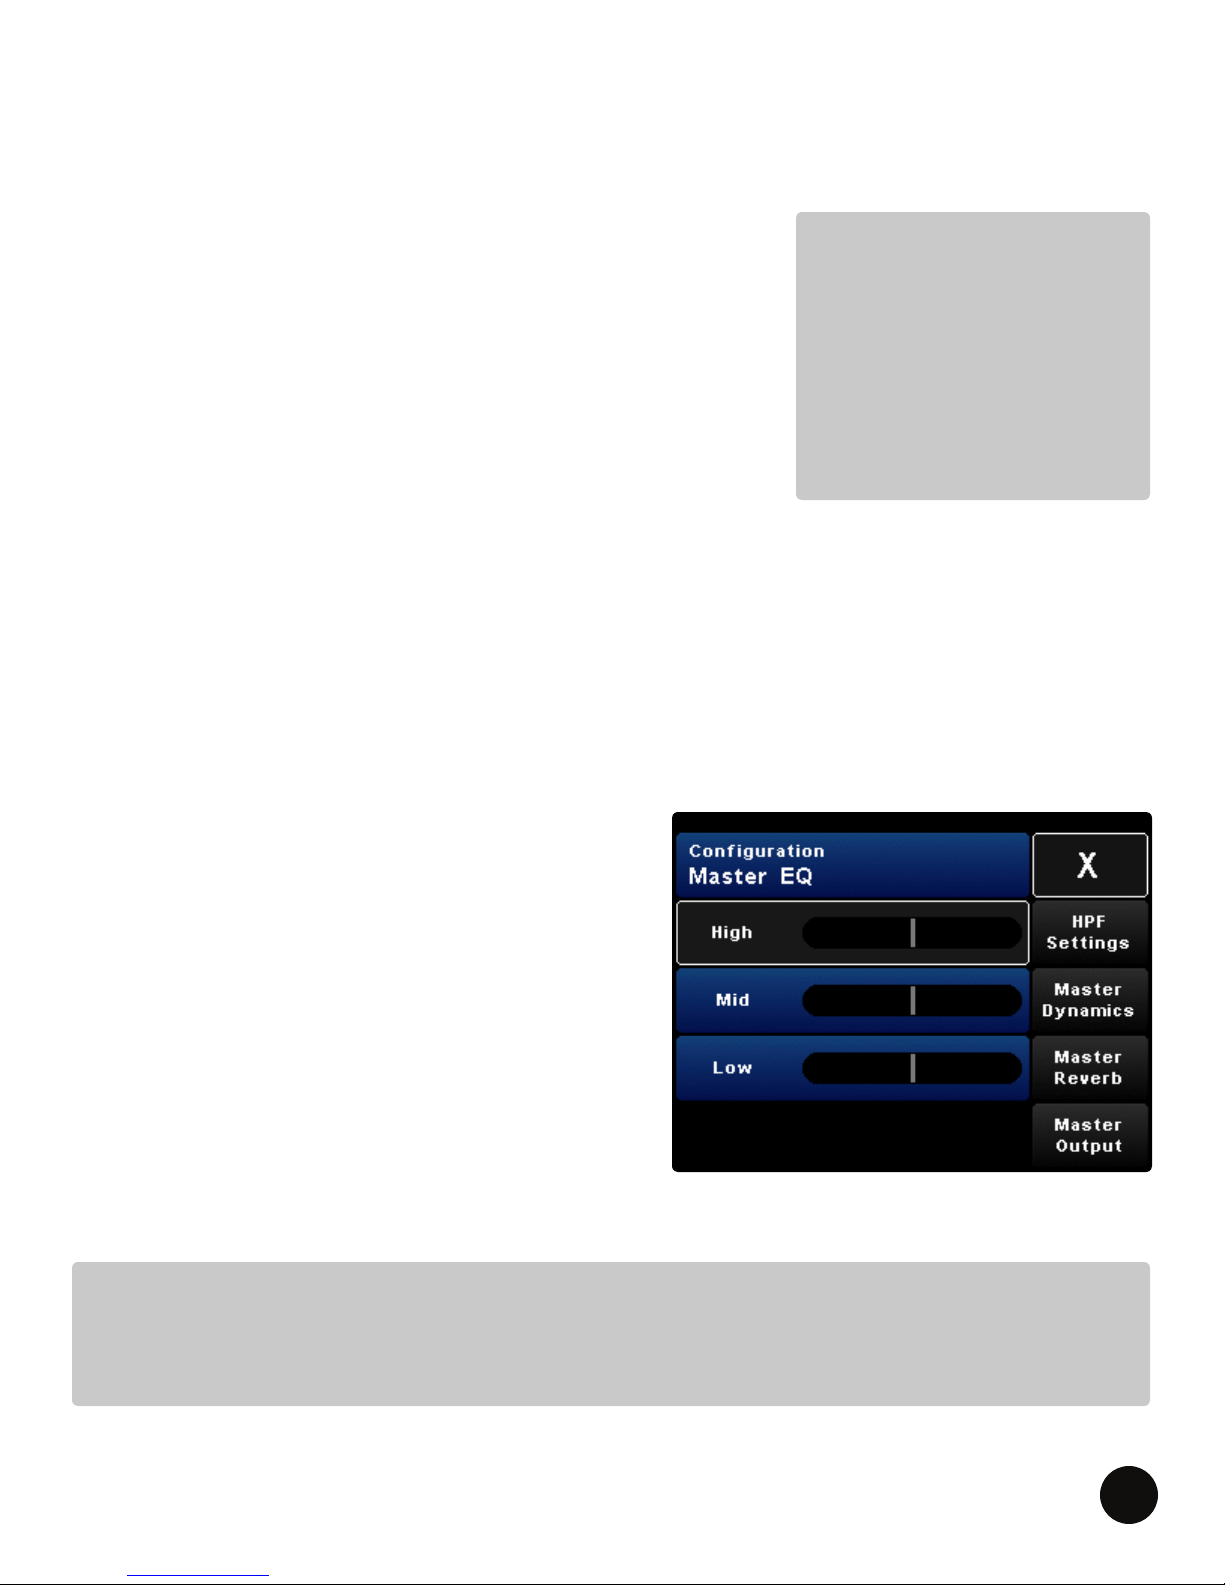
MASTER OUTPUT SETTINGS
This screen allows you to make adjustments to the master output. The Master Output settings are
saved with your personal mix.
MASTER EQ
The Master EQ is a three band EQ that helps shape the overall
master output. It does not have the granularity of the Channel EQ
and is designed to make subtle overall tonal changes.
HPF SETTINGS
The High Pass Filter allows you to roll off the lower frequencies.
MASTER DYNAMICS
The Master Dynamics allow you to apply compression to the
overall mix.
MASTER REVERB
Master Reverb allows you to apply a reverb effect to your stereo mix, in order to make it sound more
natural and mimic the effects of a natural acoustic environment.
MASTER OUTPUT
The Master Output button has output options for the personal mixer. These include Stereo or Mono
mode, Mute Master Output and Limiting options.
NOTE:
The Master EQ and HPF
Settings share a page tab.
When on the Master EQ
page, the HPF Settings tab
will be visible. When on
the HPF Settings page, the
Master EQ tab will be visible.
MASTER EQ
This 3-band EQ can be used to tailor the overall
sound of the monitor mix that you hear; you can
adjust the mix to sound brighter, fuller, have more or
less mid-range, etc. The Master EQ is designed to be
subtle in its application.
To adjust any of the three EQ bands, SELECT the
desired band on the screen (it will turn gray), then
ROTATE the ADJUST knob to boost or cut the
selected EQ band.
You can also PRESS the ADJUST knob to quickly cycle
through the three EQ bands.
NOTE:
The mid Q on the Master EQ differs slightly from the Channel EQ. The mid is peak/dip with a Q
of 1.2. The EQ for the high and lower are shelving with a Q of 0.707, the same as the channel EQ.
LIVEMIX CS-SOLO
26
Page 29
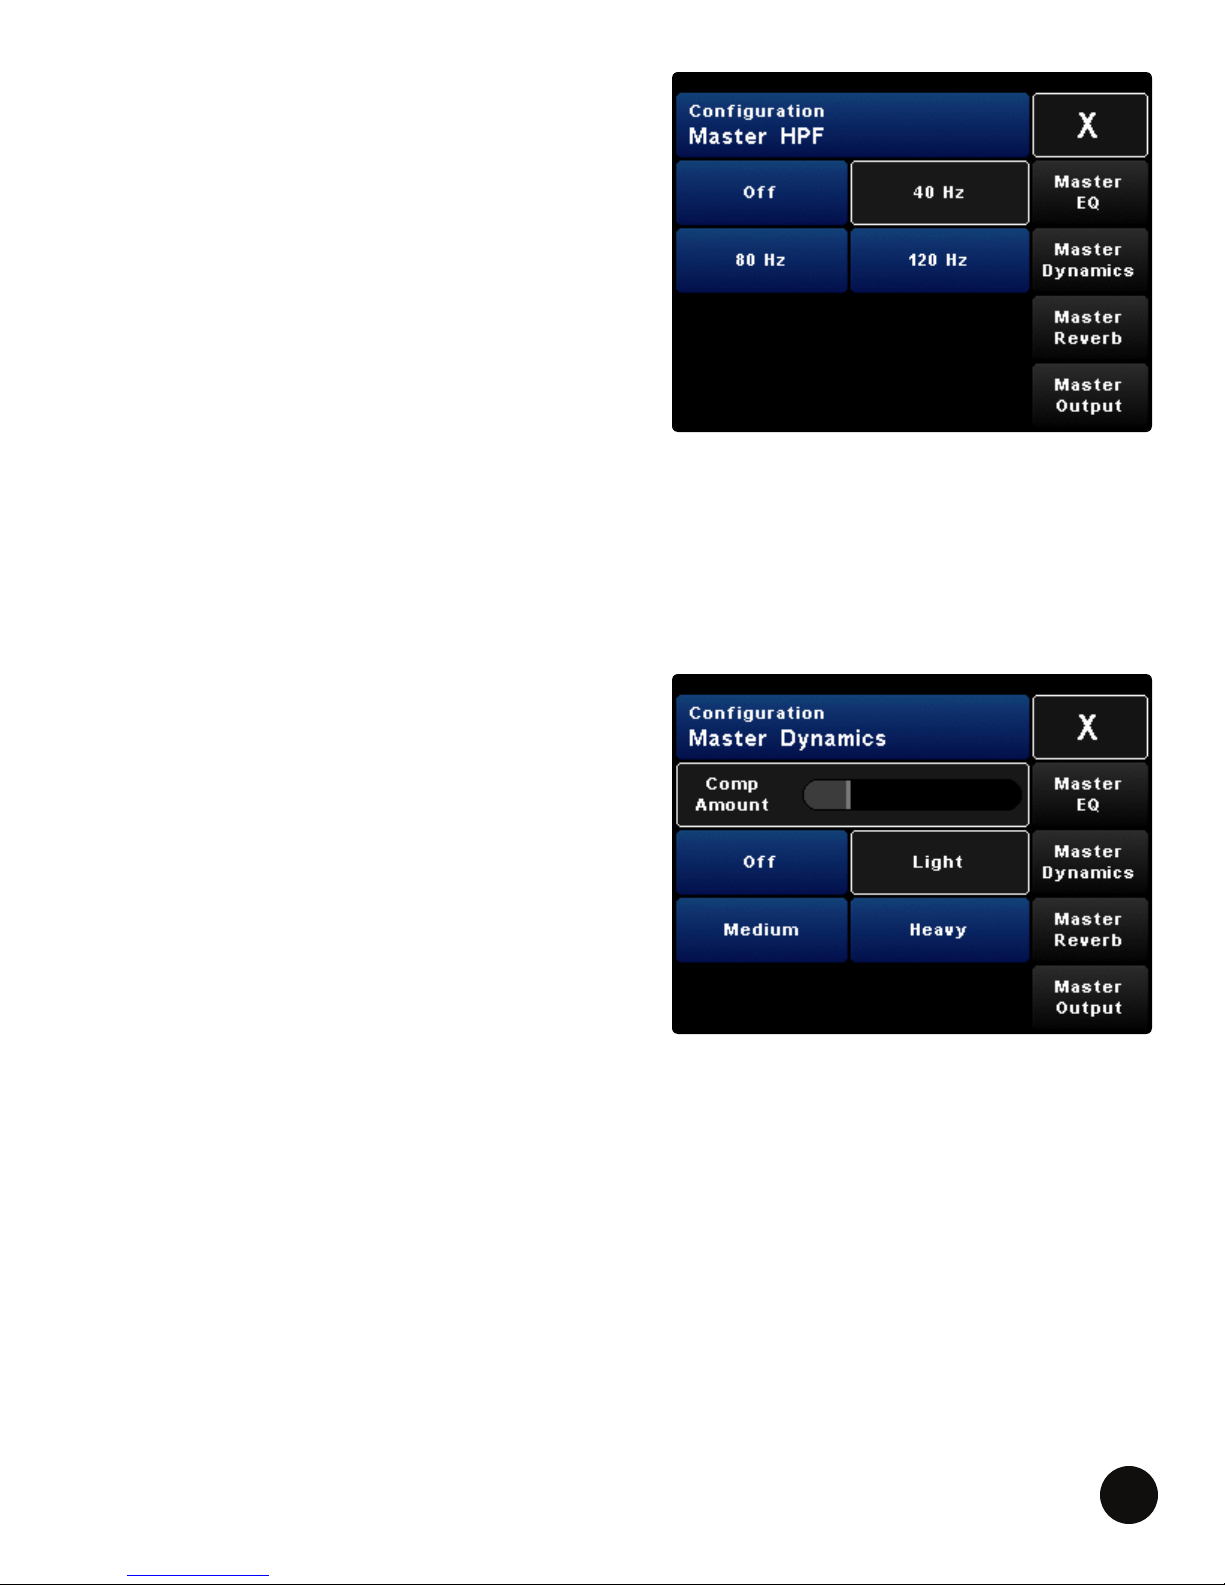
HIGH PASS FILTER (HPF)
A high-pass lter lets the high-frequencies pass
through your mix unaffected, but lters away the low
frequencies. This is a useful with monitors that have
too high a bass-response.
Applying a 80Hz to 120Hz High Pass Filter to oor
monitors will help clean up your mix.
SELECT one of the four HPF settings that sounds best
to you.
1. OFF: High-Pass lter bypassed.
2. 40Hz: Only the very lowest frequencies, 40Hz or lower, will be ltered out.
3. 80Hz: A larger amount of lower frequencies, 80Hz or lower, will be ltered out.
4. 120Hz: The largest amount of lowest frequencies, everything from 120Hz or lower, will be
ltered out.
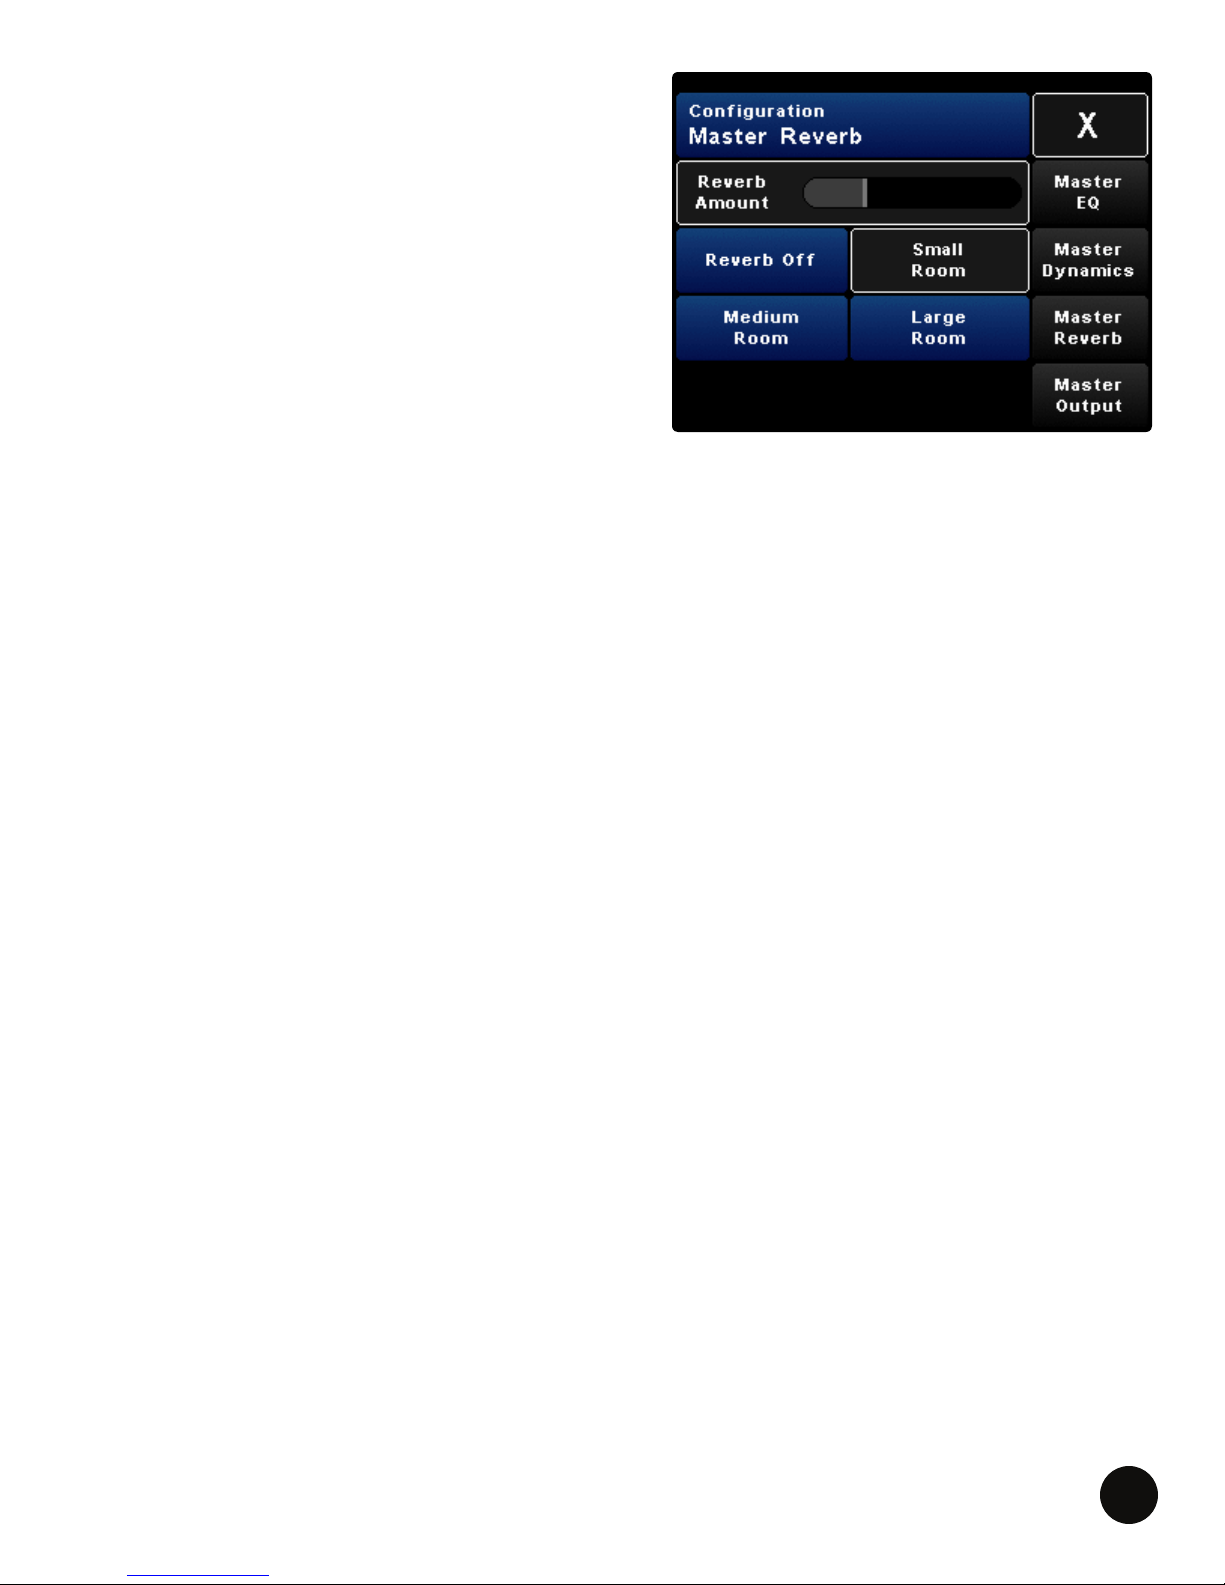
MASTER DYNAMICS
Dynamics are the amount of difference, or the
dynamic range, between the softest sound you hear
in your mix and the loudest. To even out the dynamics
in a mix, a tool called a compressor is used.
SELECT the type of compression you want.
• OFF: Compressor bypassed.
• LIGHT/MEDIUM/HEAVY: Differing amounts
of compression will be applied to the dynamic
range of your mix. Try each setting and see which
one sounds best.
ROTATE the ADJUST knob to adjust the amount of compression applied to the mix.
LIVEMIX CS-SOLO
27
Page 30
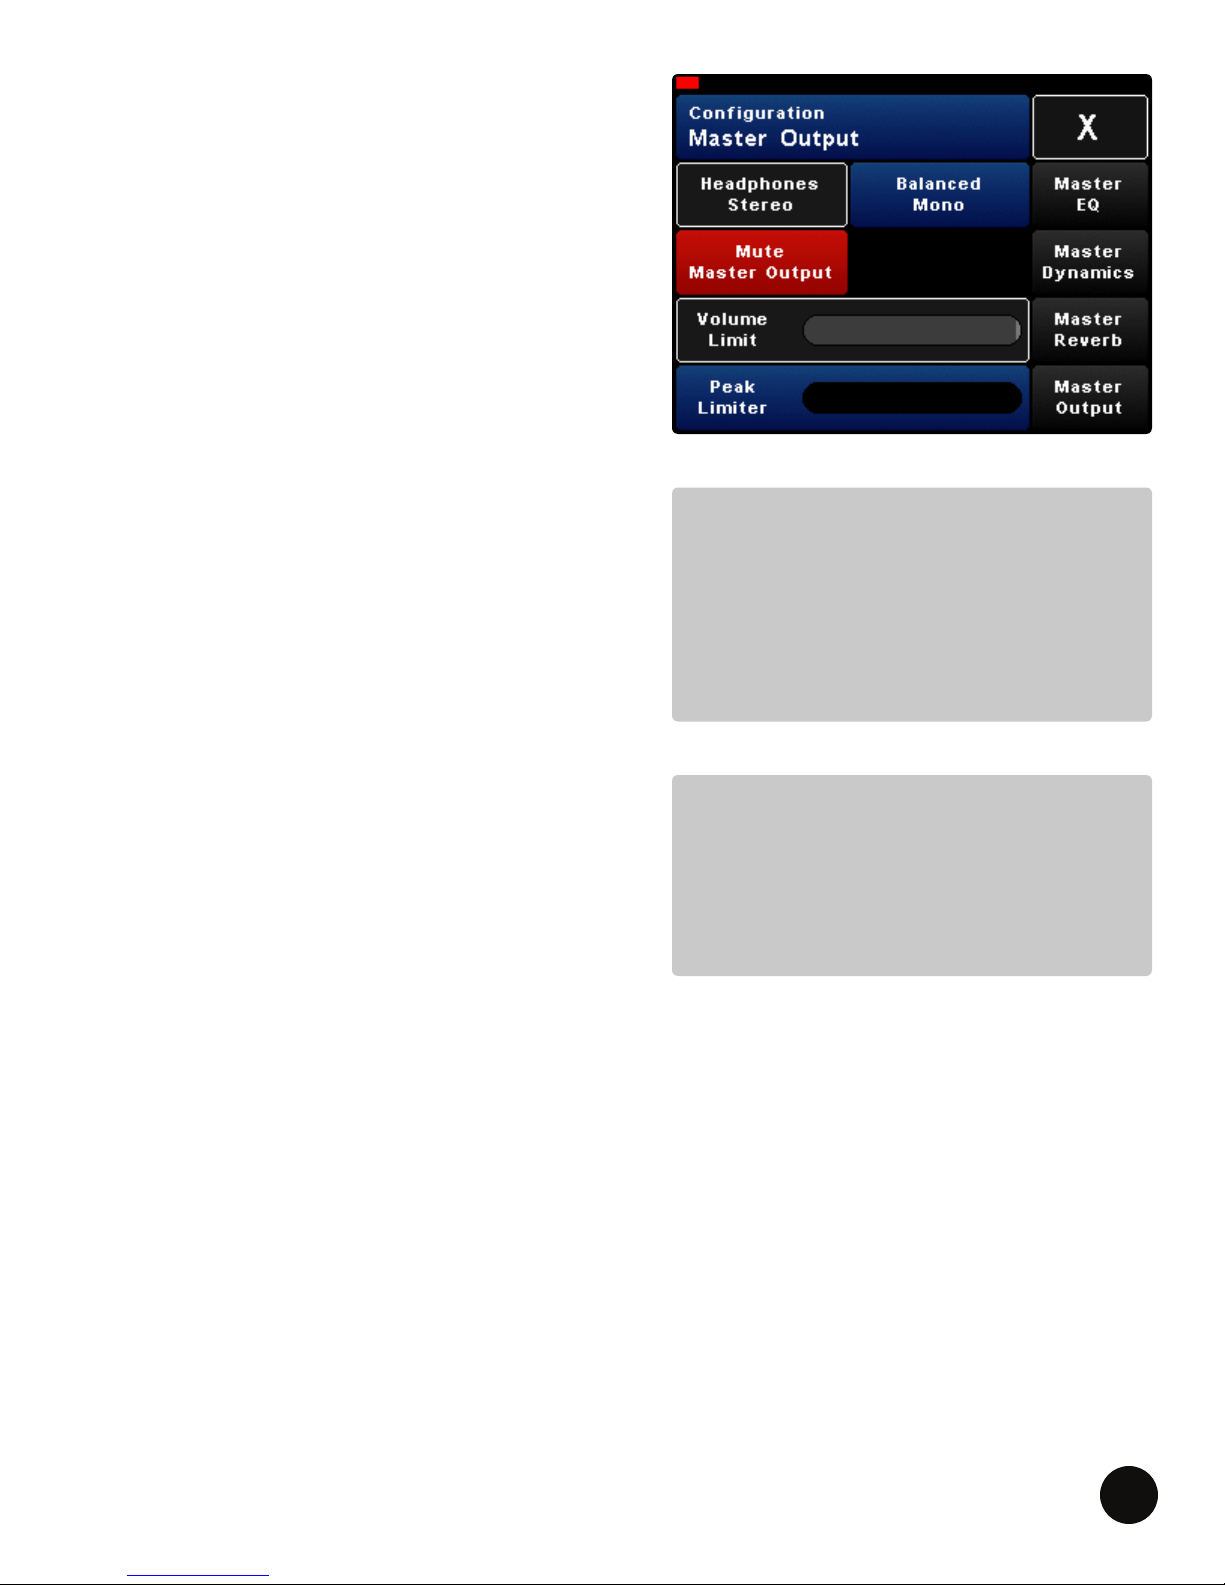
MASTER REVERB
When you hear instruments in an acoustic space such
as a concert hall, theater or stadium, you are always
hearing the natural reverb of the environment.
Livemix allows you to apply a reverb effect to your
stereo mix, in order to make it sound more natural and
mimic these effects.
SELECT one of the four Reverb effect settings that
sounds best to you.
• OFF: Reverb bypassed.
• SMALL ROOM/MEDIUM ROOM/LARGE ROOM: The effect will become heavier and denser
sounding as the selected room gets larger. Experiment to see what sounds best to you.
ROTATE the ADJUST knob to ne tune the amount of reverb applied to the mix.
LIVEMIX CS-SOLO
28
Page 31
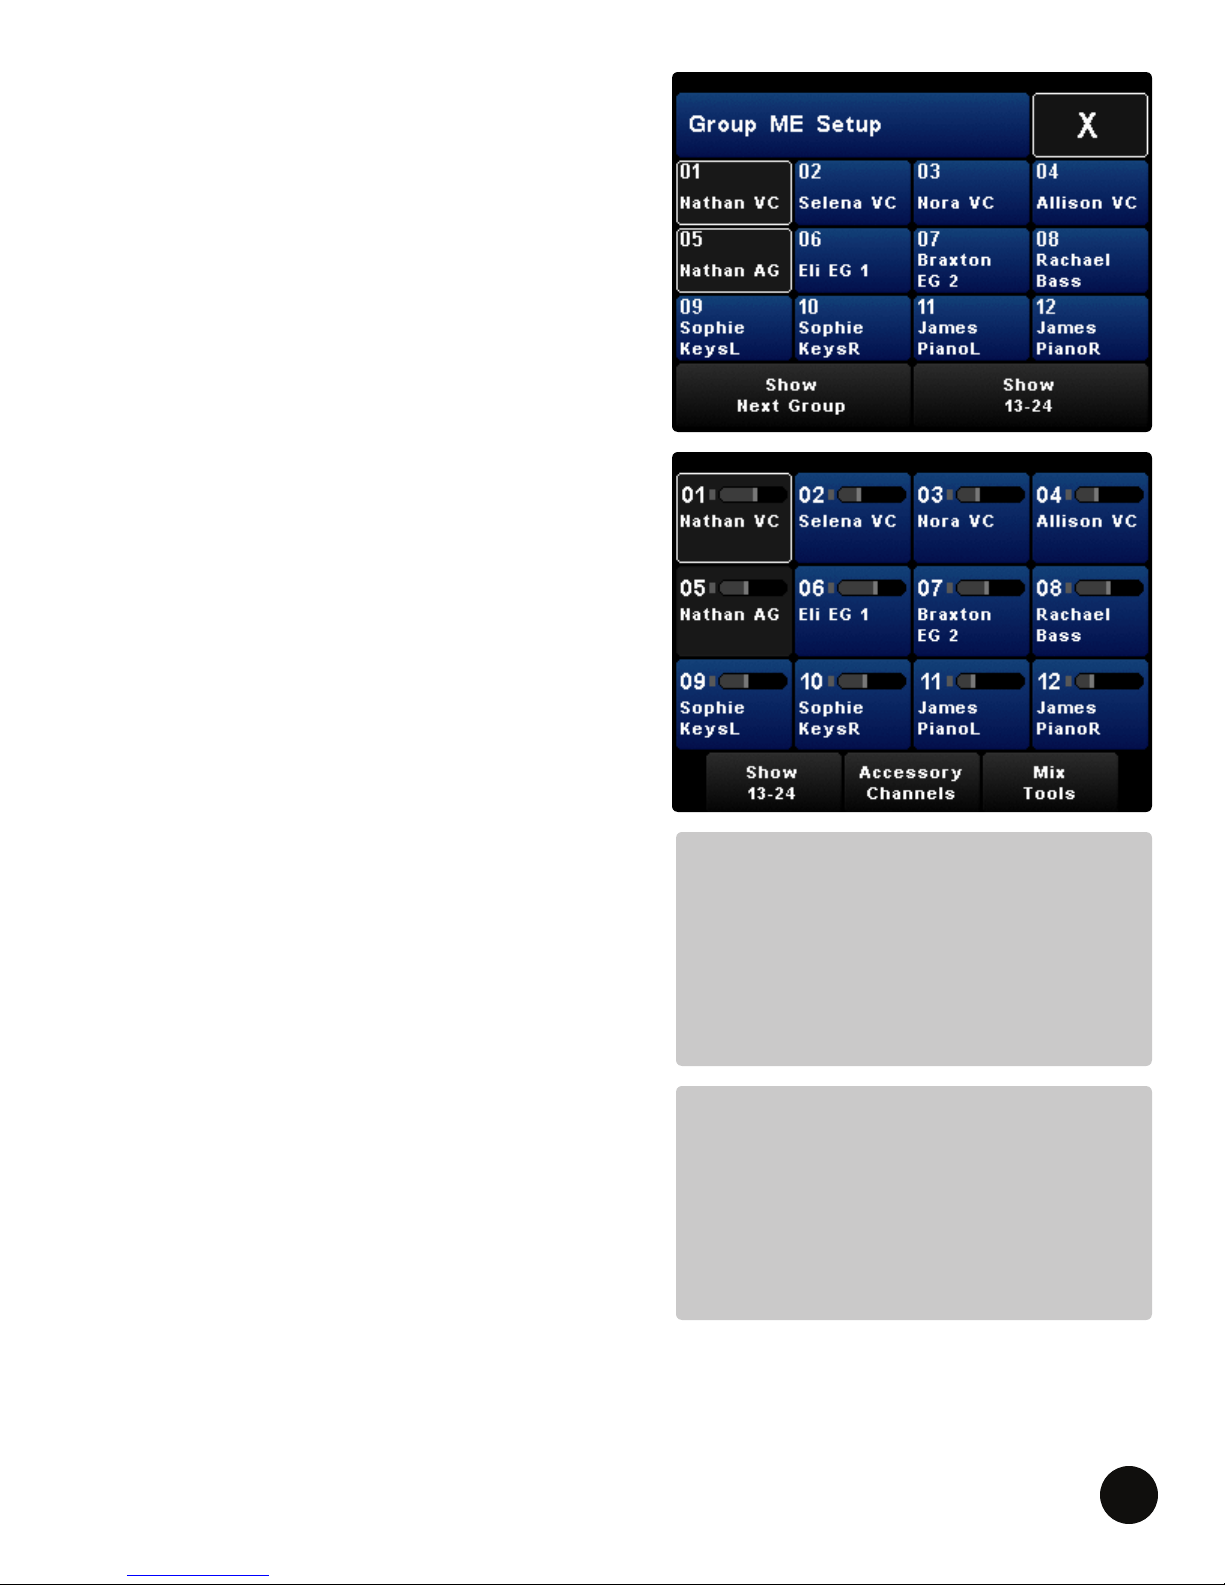
MASTER OUTPUT
The Master Output options allow you to select the
type of output you will be using (stereo or mono),
as well as adjust settings that pertain to the overall
volume of your mix.
HEADPHONES STEREO VS. BALANCED MONO
This setting affects how the ⅛” jack (on the front of
the unit) and the ¼” jack (on the back of the unit)
output audio. The jacks on the personal mixer can be
congured for a Stereo or a Mono mix.
Select Headphones Stereo if using headphones/inear monitors or select Balanced Mono, if sending the
output to oor monitors.
MUTE MASTER OUTPUT
To mute the master output, PRESS Mute Master
Output. When enabled, a red indicator will ash in the
Status Bar.
You can also enable Mute Master Output by
PRESSING and HOLDING down the Master Volume
knob for 3 seconds.
NOTE:
If using Livemix in Balanced Mono,
the Intercom and Ambient Mics will be
turned off. This is to prevent feedback
and team communications from being
heard through oor wedges.
There are three ways to cancel Mute Master Output:
1. Turn the Master Volume Knob.
NOTE:
When the mix is set to Balanced Mono,
BOTH the front and back audio jacks
2. De-select Mute Master Output.
will be set to mono. Channel panning
adjustments will not be heard.
3. PRESS and HOLD down the Master Volume Knob
for 3 seconds.
VOLUME LIMIT
The headphone ampliers in Livemix personal mixers are high performance ampliers. The Volume
Limit reduces the amount of overall volume available with the Master Volume knob. The Volume
Limit will not affect the sound of your mix.
PEAK LIMITER
The Peak Limiter is a compressor that sets a hard limit and stops sound from exceeding that limit.
This function will protect the system and your ears from overly loud transients or other loud audio
levels. The Peak Limiter can affect the sound of your mix.
LIVEMIX CS-SOLO
29
Page 32
GROUPS AND THE ME GROUP
It is often advantageous to group channels together
so you can make volume adjustments to all the
channels in the group at once. The most common
channels to group are drums, stereo instruments (like
keyboards) and background vocals.
The CS-SOLO allows you to create up to ve groups.
The ME group differs from other groups in that it has
a dedicated knob. The ME Knob allows you to quickly
adjust the volume of your own “group”. If you are
singing and playing guitar, you may want to assign
these channels to the ME Knob.
CONFIGURE A GROUP
1. PRESS your ME knob.
2. SELECT your channel(s). To see additional
channels, PRESS Show 13-24.
3. PRESS Show Next Group and SELECT channels
to add to each group. Repeat for each group.
4. PRESS X to exit.
ADJUSTING THE VOLUME OF A GROUP
To adjust the volume of a group, select any one of the
channels in the group and increase or decrease volume
with the ADJUST knob. The grouped channels will be
gray. The selected channel in the group will have a
white outline.
ADJUSTING THE VOLUME OF THE ME
GROUP
To adjust the volume of the ME group, ROTATE the
ME knob.
NOTE:
Although the channels are selected as a
group, the selected channel is indicated
by a white outline. Volume adjustments
affect the whole group. Pan adjustments
only affect the selected channel.
NOTE:
A channel can be in one group at a
time. If you attempt to group a channel
that is part of another group, you will
need to verify that you want to move
that channel to the new group.
LIVEMIX CS-SOLO
30
Page 33
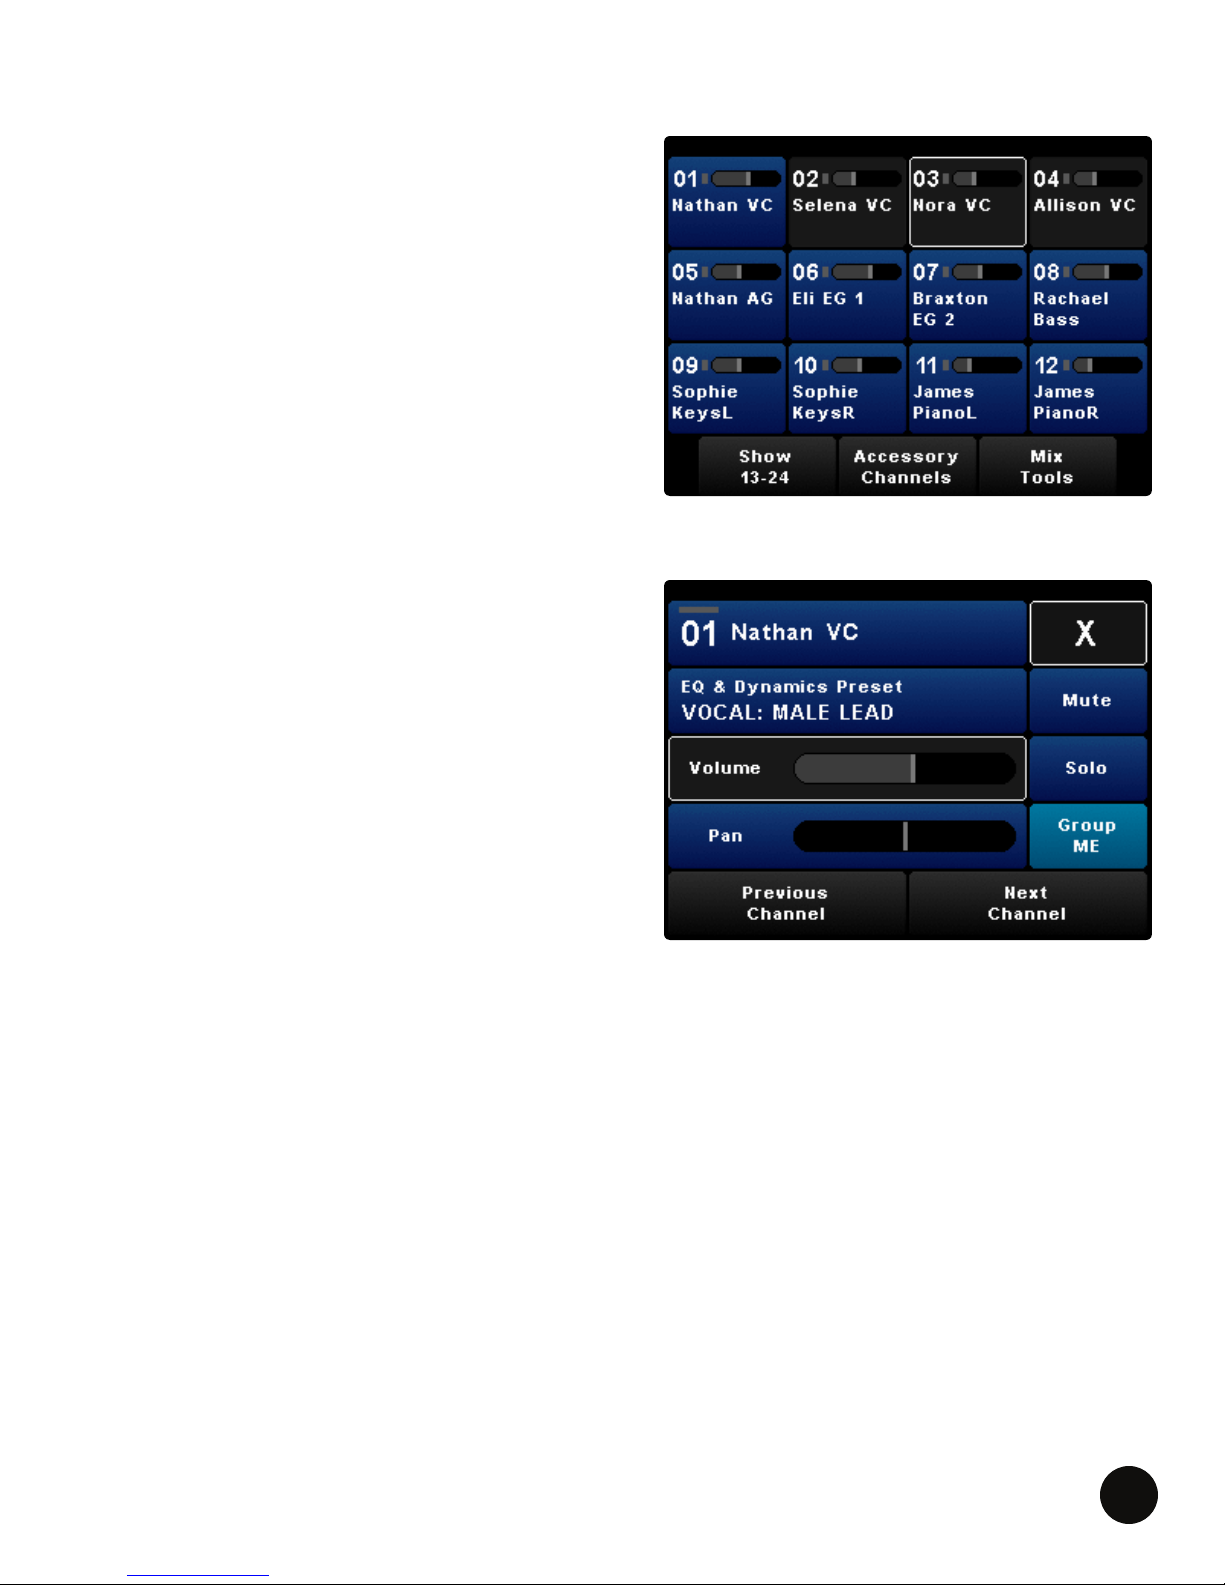
ADJUSTING THE VOLUME OF A SINGLE CHANNEL IN A GROUP
From the Channel Overview:
1. SELECT the channel you wish to adjust that has
been assigned to a group. A white border will
outline the channel.
2. LONG PRESS the ADJUST knob to temporarily
remove the channel from the group. The white
outline of the selected channel will ash.
3. Use the ADJUST knob to adjust the volume of
the channel.
4. PRESS the ADJUST knob to return the channel
to the group.
From the Single Channel View temporarily remove
the channel from a group:
1. LONG PRESS the light blue group button. It will
start ashing.
2. Use the ADJUST knob to adjust the volume of
the channel.
3. PRESS the ashing group button to return the
channel to the group.
LIVEMIX CS-SOLO
31
Page 34
LCD BRIGHTNESS
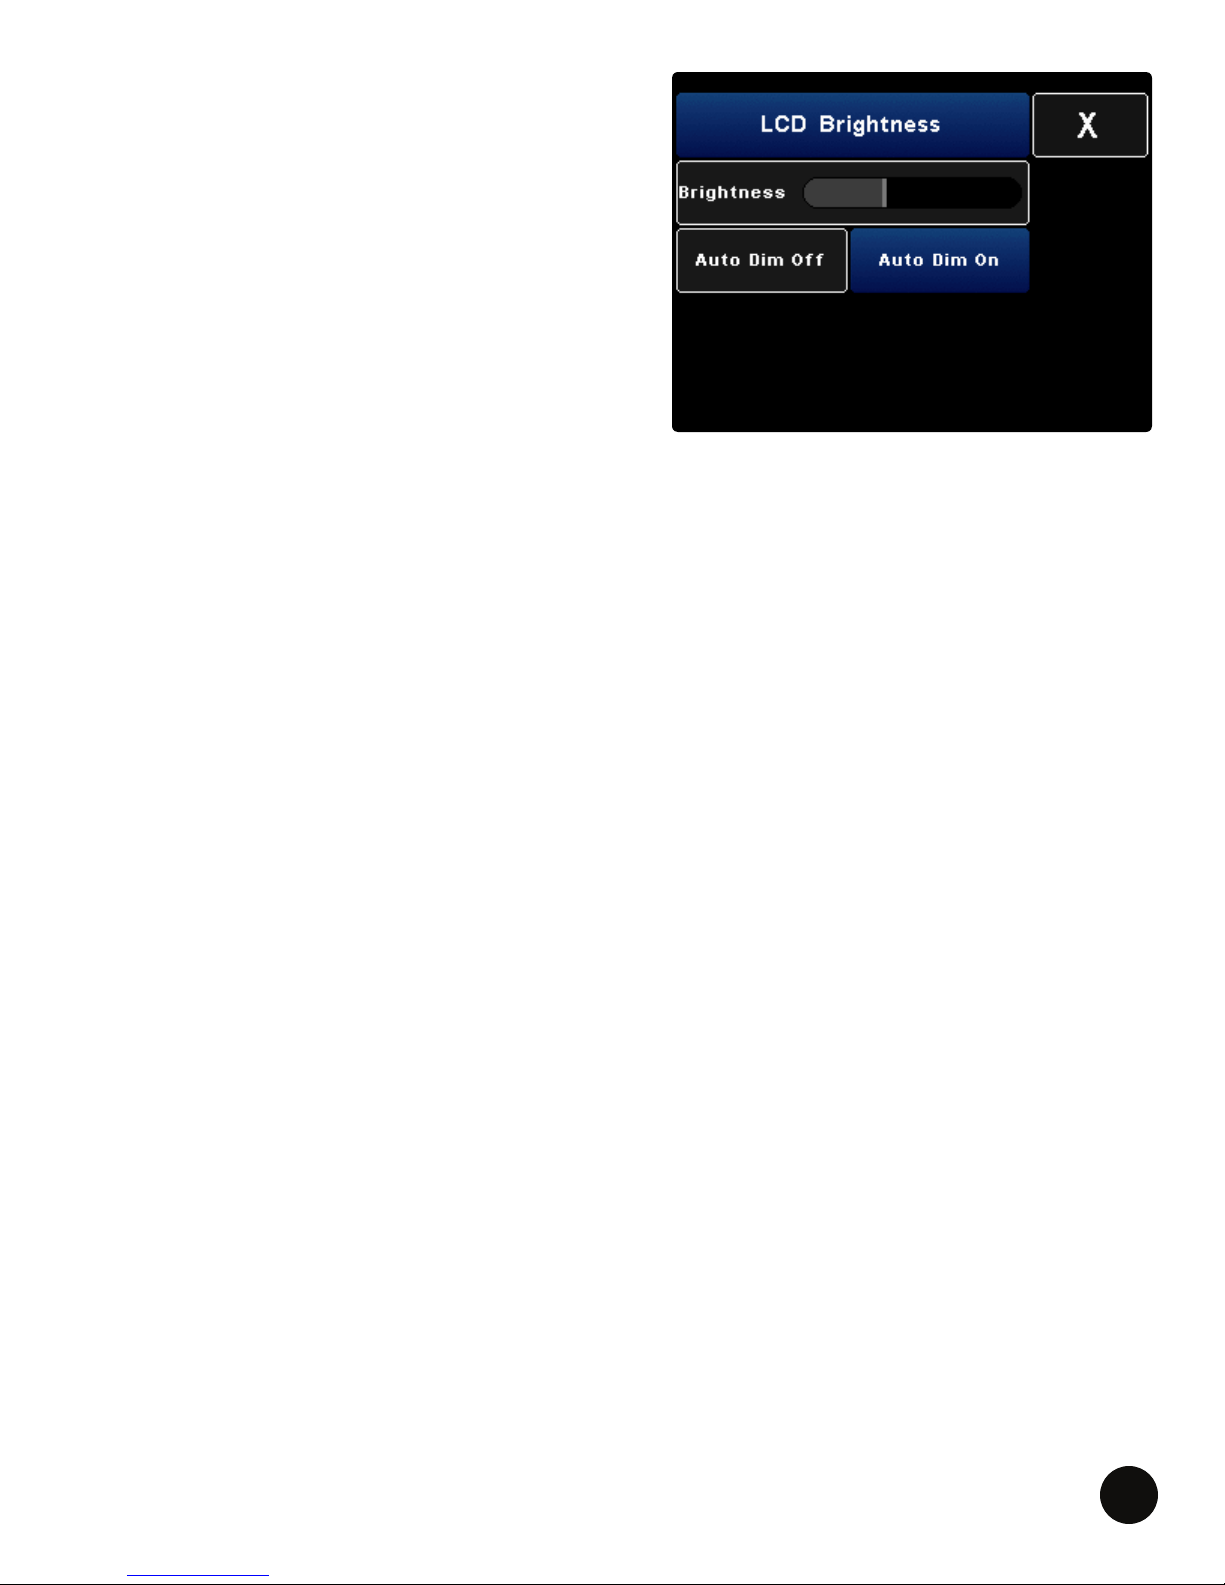
This feature allows you to change the brightness of
the Livemix LCD screen as well as turn Auto Dim on
or off.
To change the brightness of the LCD screen, turn the
ADJUST knob.
The Auto Dim feature will cause the LCD screen to
reduce in brightness after 15 seconds of inactivity.
Touching the screen or any control will bring the
screen back to the preset brightness level. Turn
the Auto Dim Off if you do not want the screen to
automatically dim.
Please see the Global Dim LCDs section for information on how to dim all the LCDs in the system
simultaneously.
LIVEMIX CS-SOLO
32
Page 35
MUTE/SOLO OPERATION
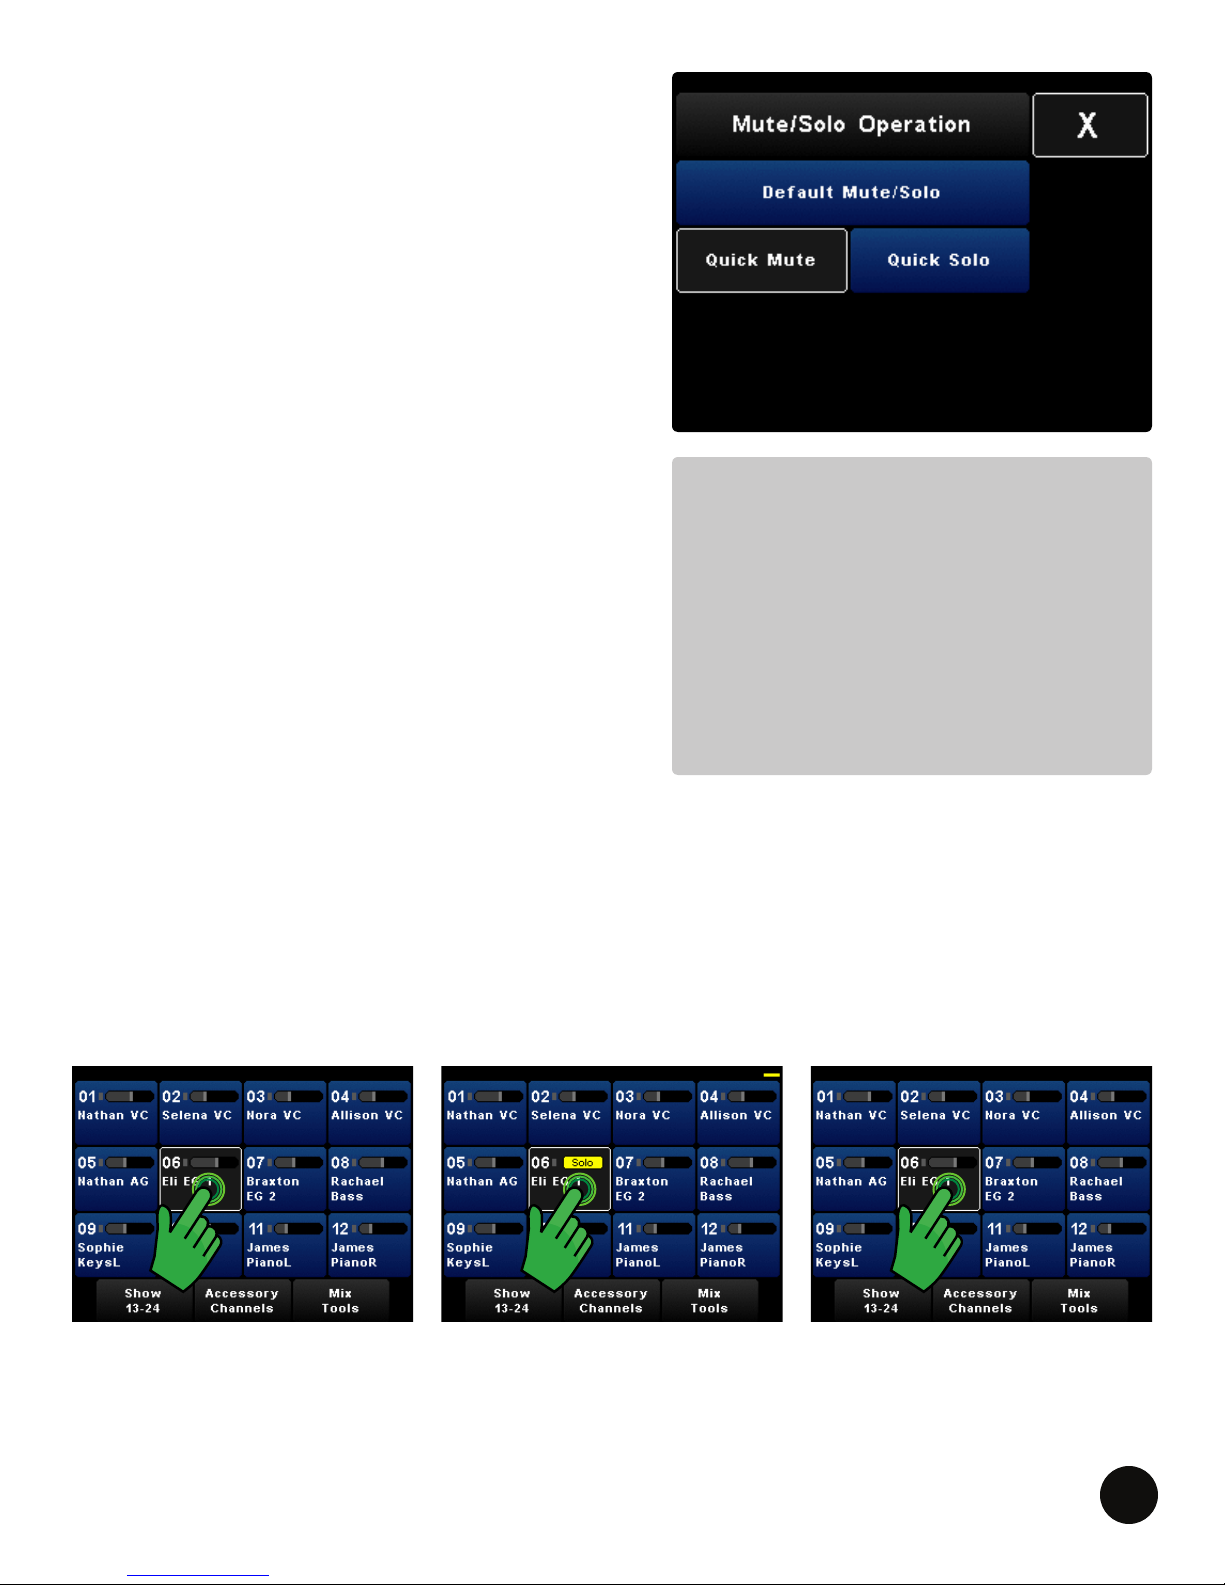
In Default Mute/Solo mode, Mute and Solo functions
are accessed from the Single Channel View. The
Quick Mute or Quick Solo functions allow you to
extend either the mute or solo functionality to the
Channel Overview.
When Quick Mute or Quick Solo is selected, channels
can be muted or soloed on the Channel Overview.
By selecting a channel and then pressing the same
channel again, the channel will be muted or soloed,
depending on which Quick function is selected.
To use the Quick Mute function:
1. PRESS Mute/Solo Operation in Local Mix Options.
2. PRESS Quick Mute.
You can always access Mute and Solo
functions from the Single Channel View.
Quick Mute and Solo functions provide
NOTES:
3. PRESS X three times to exit to the Channel
Overview.
4. You may now quickly mute a channel by selecting
it and then a second time to mute it. PRESS the
channel again to hear the other channels.
quick access to these from the Channel
Overview.
Channels in a group will be muted or
soloed as a group.
To use the Quick Solo function:
1. PRESS Mute/Solo Operation in the Local Mix Options.
2. PRESS Quick Solo.
3. PRESS X three times to exit to the Channel Overview.
4. You may now quickly solo a channel by selecting it and then a second time to solo it. PRESS the
channel again to hear the other channels.
st
1
LIVEMIX CS-SOLO
nd
2
rd
3
33
Page 36
SAVING & LOADING A PERSONAL MIX
Saving a mix makes for an easy starting point for your
next performance. Save and load several versions of your
personal mixes to one of 24 internal save slots or up to 24
save slots on an external USB device.
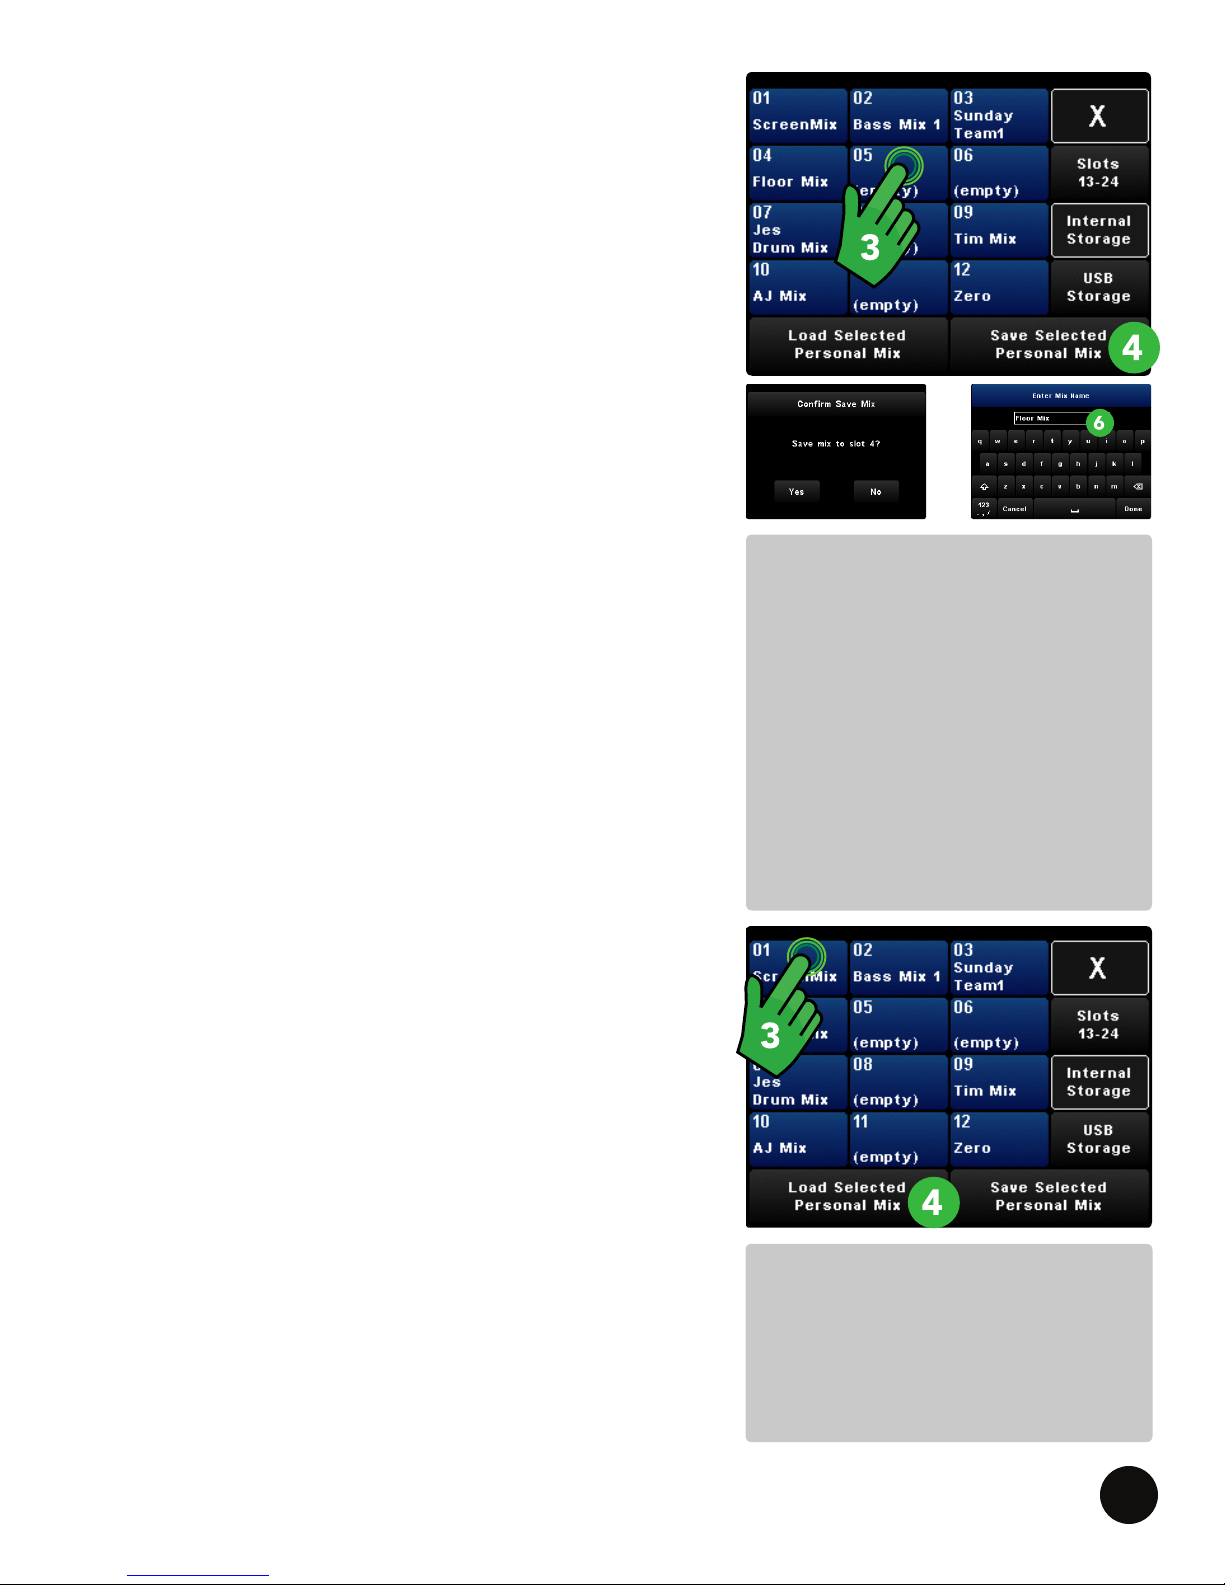
TO SAVE A PERSONAL MIX:
1. SELECT Mix Tools from the Channel Overview.
2. PRESS Load/Save Personal Mix.
3. SELECT a slot to save your mix. PRESS Slots 13-24 to
access additional save mix slots.
4. PRESS Save Selected Personal Mix.
5. PRESS Yes to conrm.
6. ENTER a name for the mix. Each mix name can contain
12 characters. Name the mix as descriptive as possible
since other users may mix on the same personal mixer.
7. PRESS Done.
8. PRESS X to return to Channel Overview.
To save a mix to a USB device, insert a USB ash drive
into the slot on the personal mixer. When the device is
recognized, the USB Storage button will appear on the
Load/Save screen. SELECT the USB Storage button and
follow steps 3-8 above.
TO LOAD A PERSONAL MIX:
1. SELECT Mix Tools from the Channel Overview.
2. PRESS Load/Save Personal Mix.
3. SELECT a mix. PRESS Slots 13-24 to access additional
saved mixes.
4. PRESS Load Selected Personal Mix.
NOTE:
Personal mixes include Channel
Volume/Pan, Groups, Aux Input
Settings and Master Output
Settings (Stereo/Mono Mode,
EQ/HPF/Compressor & Reverb,
Volume & Peak Limiter, Mute
Master Output). If changes are
made, an asterisk (*) will appear
by the mix name on Load/Save
Personal Mix button, in Mix Tools.
5. PRESS X to return to Channel Overview.
To load a mix from a USB device, insert a USB ash drive into
the USB slot on the personal mixer. When the USB device is
recognized, the USB Storage button will appear on the
Load/Save screen. SELECT the USB Storage button and
follow steps 3-5 above.
LIVEMIX CS-SOLO
WARNING:
When a personal mix is loaded,
it replaces the current mix. Save
the current mix before loading
another mix.
34
Page 37
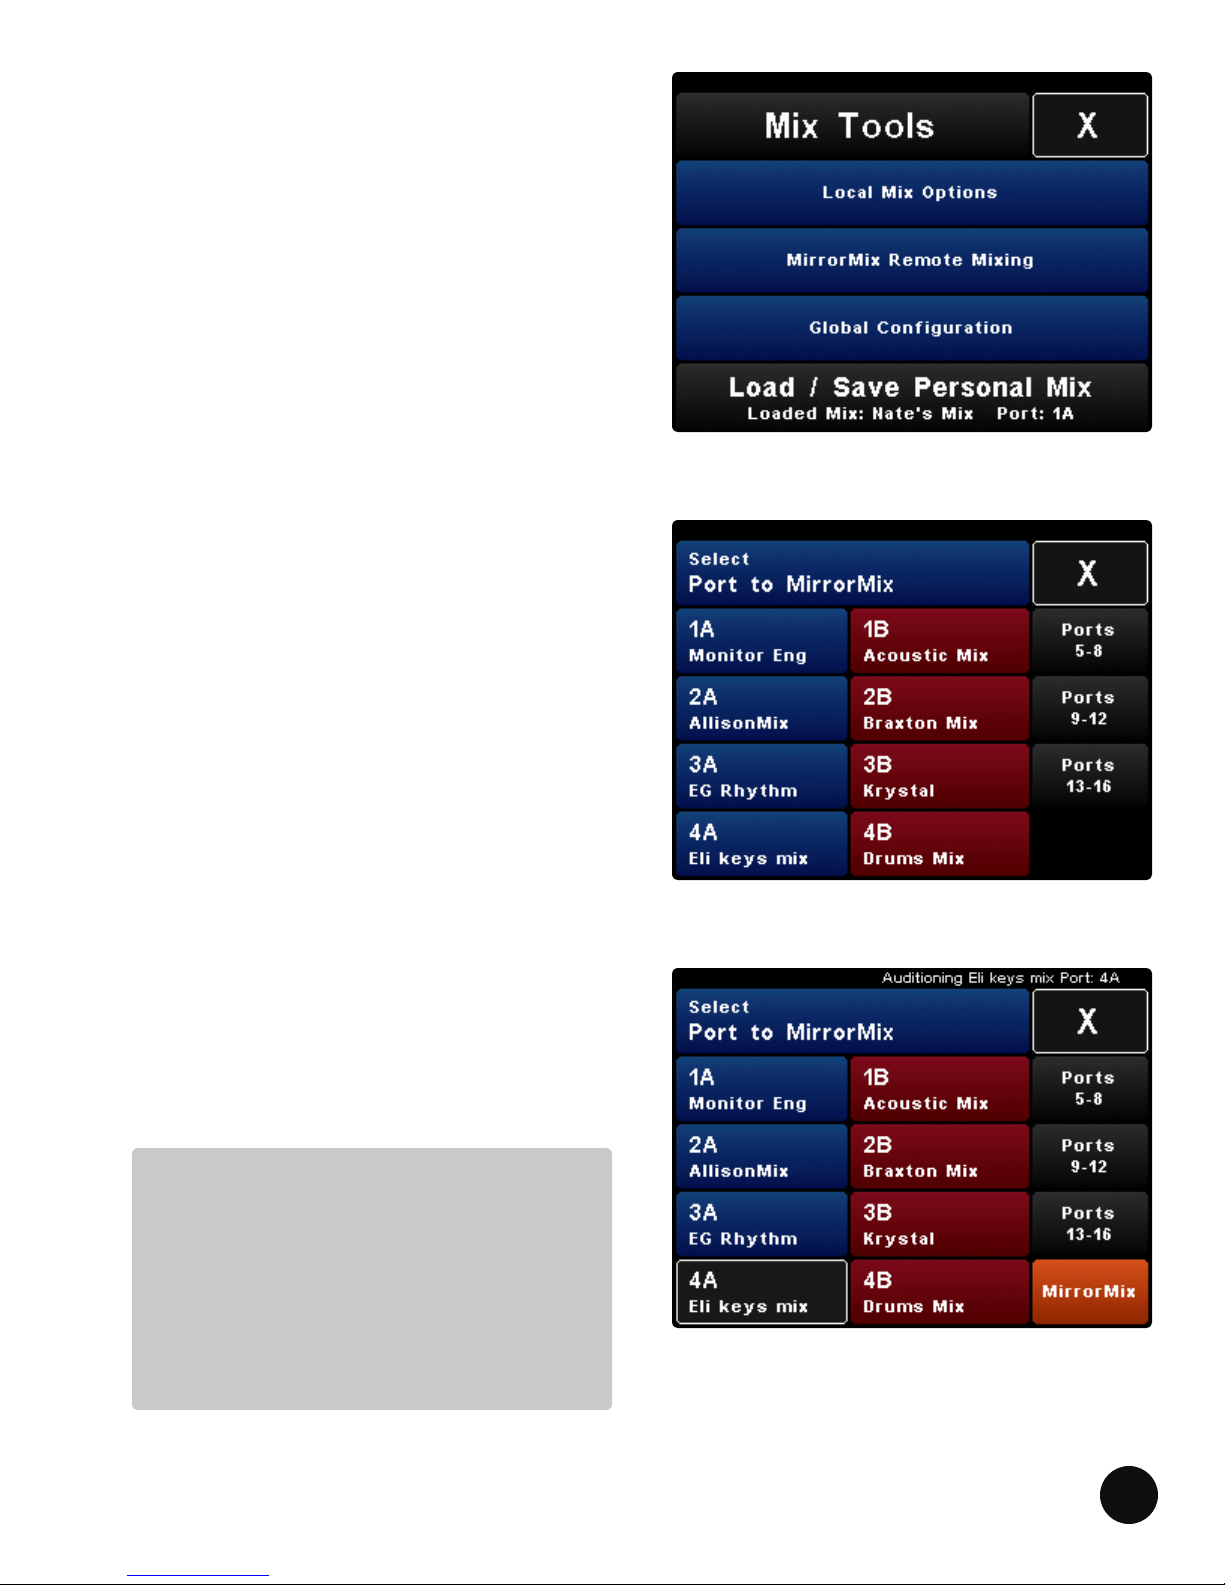
MIRRORMIX® REMOTE MIXING
MirrorMix is a robust remote mixing feature that
allows you to hear and make changes to other
personal mixes in the system. This allows more
experienced users to aid others when necessary. It is
a great tool for a front of house engineer, for training
performers on personal mixing or even using Livemix
as a monitor desk.
To access the MirrorMix Remote Mixing:
• PRESS Mix Tools and then SELECT MirrorMix
Remote Mixing to see the available mixes. Each
hardware port on the MIX-16 or MIX-32 supports
2 mixes: MIX A and MIX B. These are identied
by the Port number and the loaded or saved mix
name of the remote personal mixer.
MIX A (blue) will have an “A” after the port number,
and be colored blue in the MirrorMix selection box.
MIX B (red) will have a “B” after the port number and
be colored red in the MirrorMix selection box.
TIP: Having users save their personal mix, using their
name or instrument, is good practice. The current
mix name and port number are visible from the Mix
Tools screen of the remote mixer. You may need
the performer to let you know what port they are
connected to, using the intercom.
AUDITION A REMOTE MIXER
SELECT the Port/MIX Name. You will immediately be
able to hear or audition the remote mix. The Status
Bar will reference the selected mix.
NOTE:
If you have CS-SOLOs, a single CS-SOLO
will be MIX A. When using two CS-SOLOs
on the same MIX-16 or MIX-32 port, the
rst CS-SOLO is MIX A. The second CS-
SOLO is MIX B (connected to the Thru
Port of the rst CS-SOLO).
LIVEMIX CS-SOLO
35
Page 38
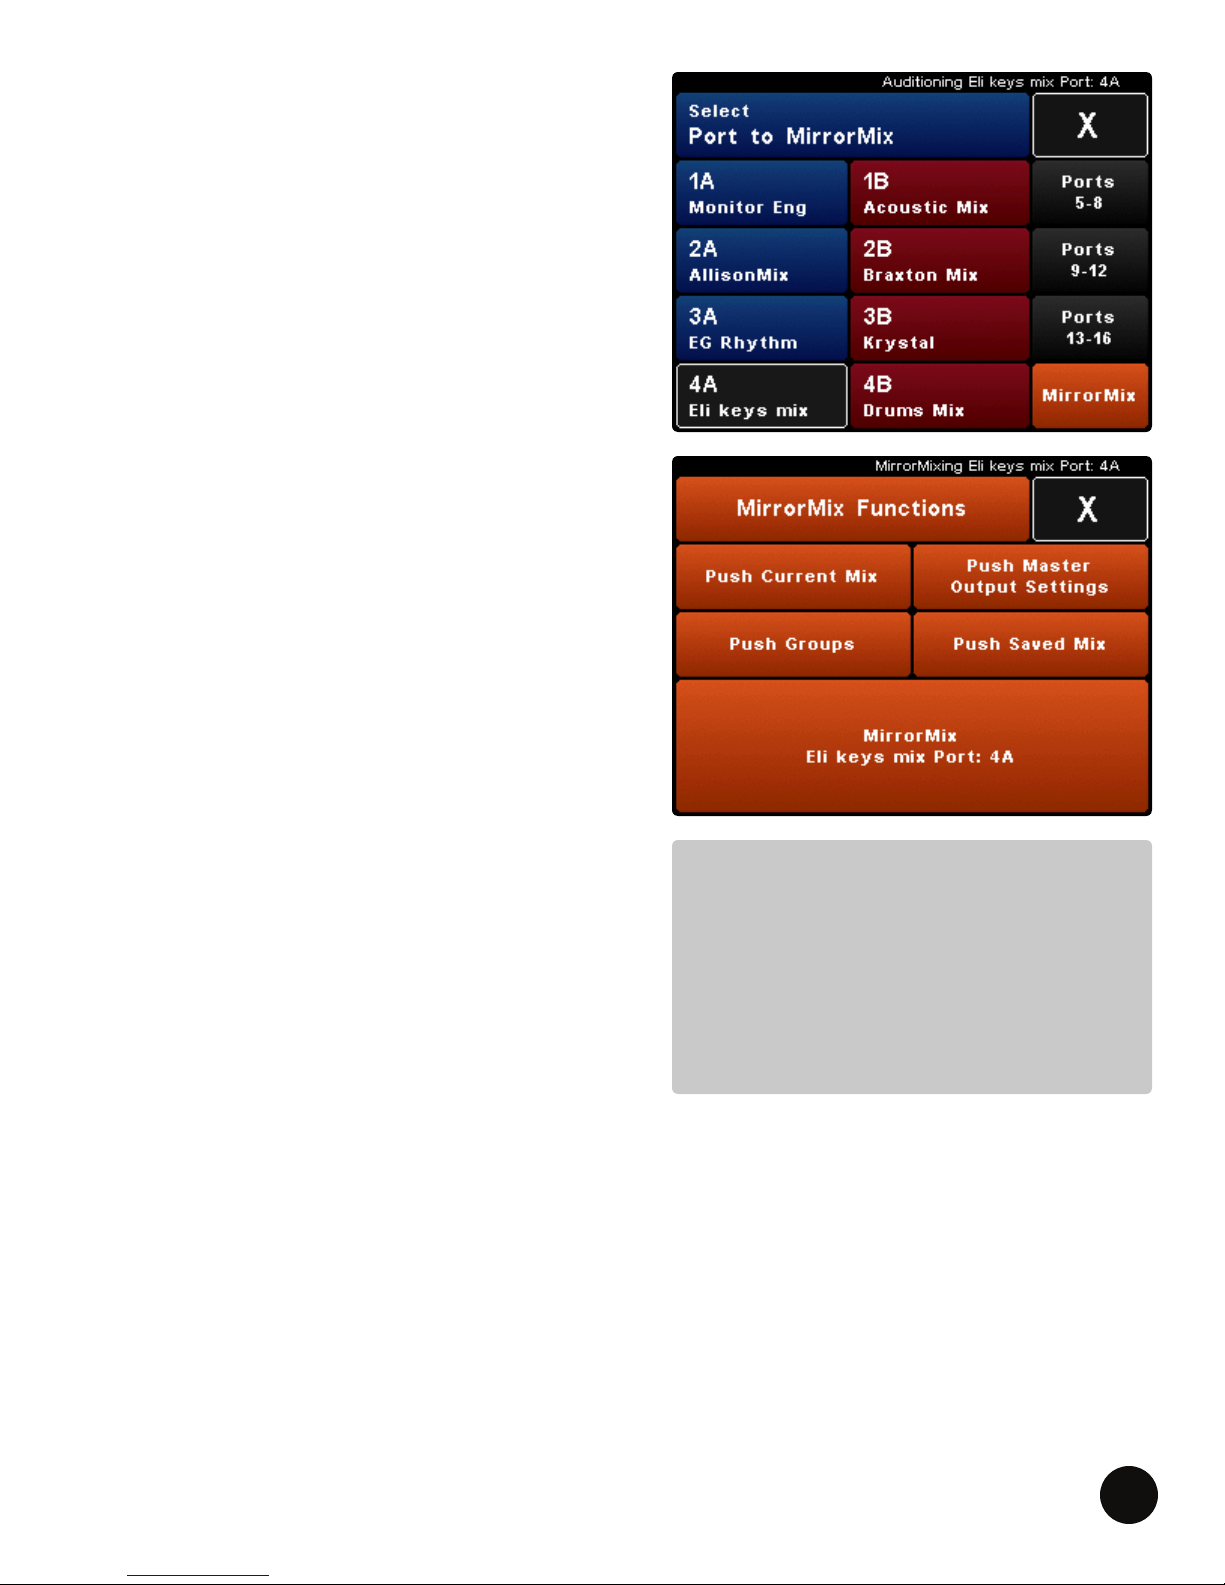
MIRRORMIX FUNCTIONS
After selecting a Port/MIX Name to audition, PRESS
MirrorMix. The screen will change to orange to
indicate you are now mixing the remote mixer.
Multiple options are available on the MirrorMix
Function’s screen. The MirrorMix Push Mix Settings
are mix setup features. The long MirrorMix Port
button allows customization of mix settings. This can
be helpful during a performance.
PUSH MIX SETTINGS TO A REMOTE MIXER
PUSH CURRENT MIX
PRESS Push Current Mix to send your current mix to
the remote mixer. This includes your volume and
pan settings.
PUSH MASTER OUTPUT SETTINGS
PRESS Push Master Output Settings to send your
master output settings to the remote mixer. This will
send all your Master Output Settings, including EQ,
Dynamics, Reverb and other settings.
PUSH GROUPS
PRESS Push Groups to send your current group
settings to the remote mixer.
PUSH SAVED MIX
PRESS Push Saved Mix to send a saved mix from your
personal mixer to the remote mixer. Available saved
mixes will become visible. This is helpful to send a
starter mix to the remote mixer (i.e. Drums, Vocals,
Leader, Keyboard, etc.). PRESS Push Selected Personal
Mix to send the mix.
INTERCOM FUNCTIONALITY IN MIRRORMIX
The Intercom functions differently in MirrorMix mode. When any mix is being auditioned or has been
selected for MirrorMixing, pressing the Intercom button will communicate directly to the remote
mix user ONLY. Use the intercom to verify the mix is working for them. If the remote user uses the
Intercom while being MirrorMixed, the Intercom functions normally and broadcasts to the entire
Livemix system.
NOTE:
While a mix can be pushed to a remote
personal mixer, the mix needs to be
saved to their personal mixer. On the
other hand, a remote user’s settings
can be saved to your mixer when
MirrorMixing.
LIVEMIX CS-SOLO
36
Page 39
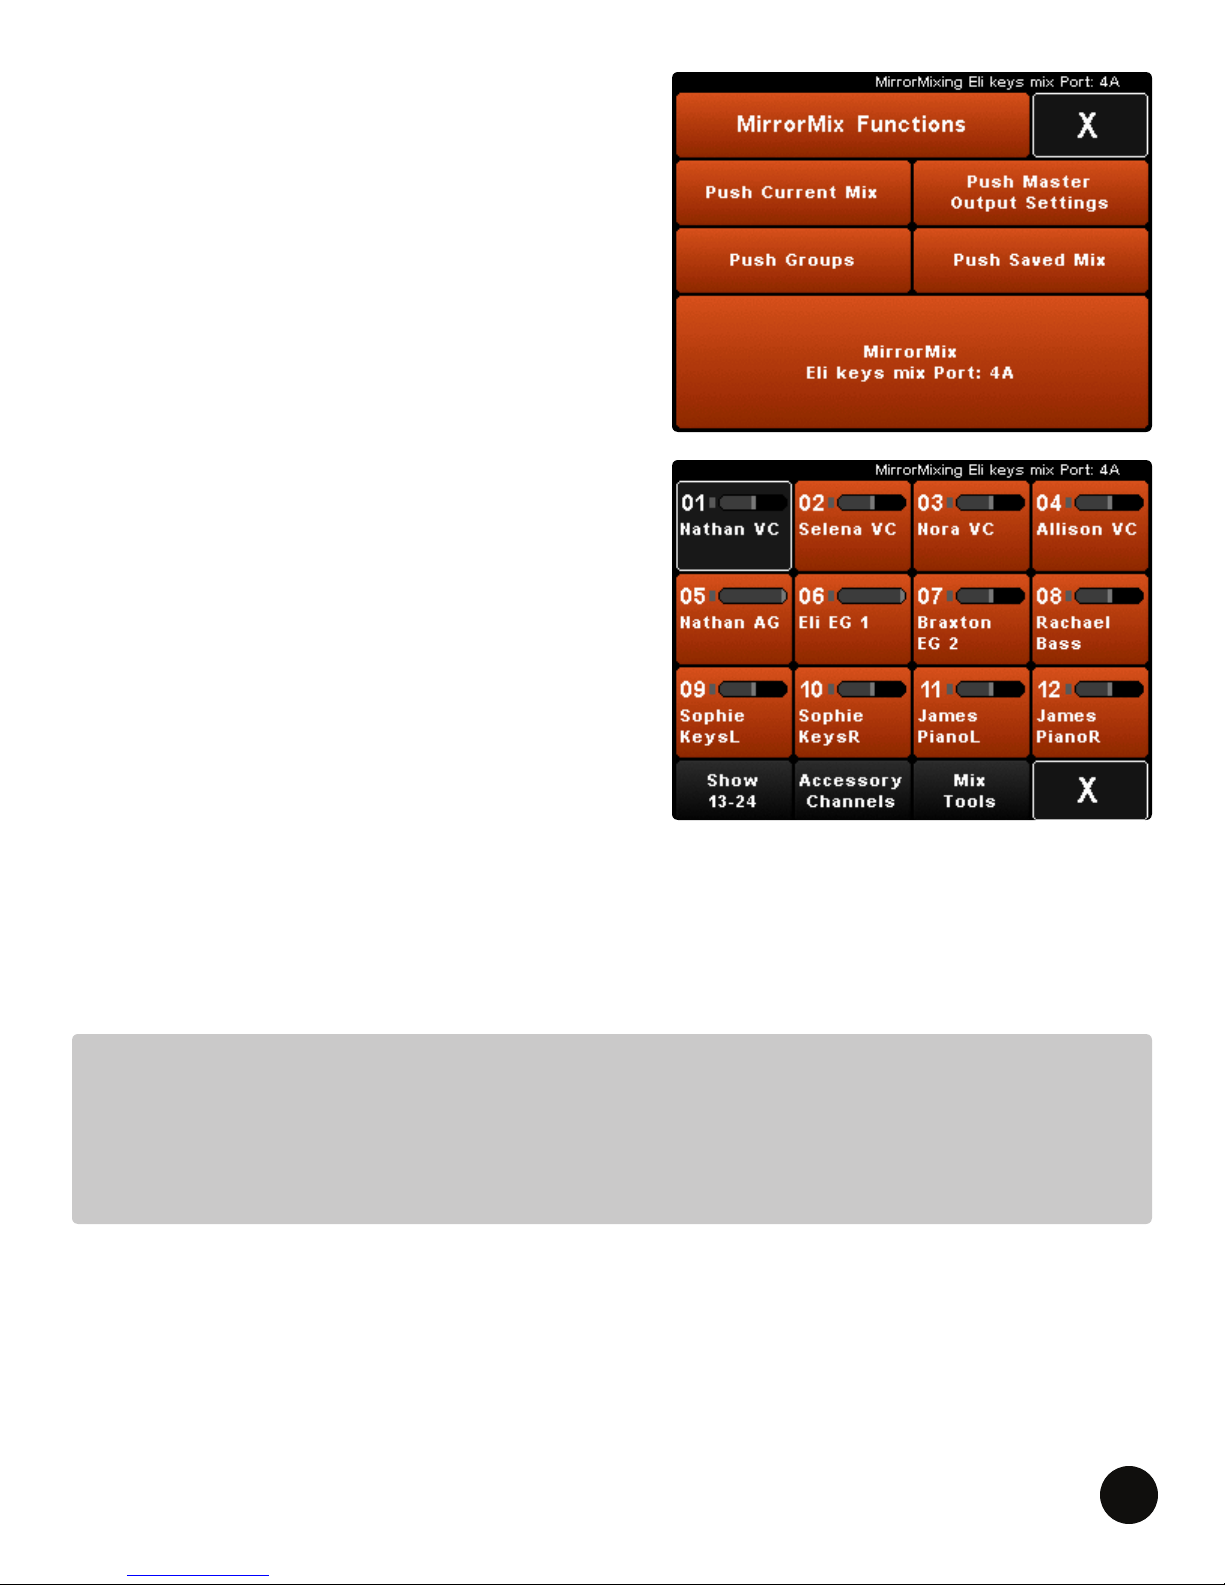
MIRRORMIXING A REMOTE MIXER
PRESS the long MirrorMix button at the bottom of the
MirrorMix Function’s screen. The Channel Overview of
the remote mixer is now visible.
In MirrorMix, you are able to mix, load a mix from
your mixer to the remote mixer and customize other
mix settings.
To exit MirrorMix, PRESS X or SELECT Exit MirrorMix
from Mix Tools.
The mix name and port number are referenced in the
Status Bar.
WHAT ELSE CAN I DO WITH MIRRORMIX?
MirrorMix remote mixing opens up tremendous
possibilities for the Livemix system.
• Front of House engineers can help performers
craft better mixes.
• Front of House engineers can load a mix
remotely and then setup the ME group, allowing
the stage musicians to focus more on the
performance and audience.
• Studio engineers can customize mixes for studio
performers, giving them the perfect cue mix.
• Use Livemix as a full monitor desk replacement. With MirrorMix, monitor engineers can hear
exactly what stage performers hear. Intercom directly to customize mixes as needed.
• Use Livemix to mix oor wedges.
• Remotely enable Mute Master Output on remote mixers that aren’t being used on the stage or
in the studio.
NOTE:
When using MirrorMix to adjust another mix, the Ambient Mics, Intercom and Aux Input (when
not in Shared Mode) are local to your mixer, not the remote mixer. Changes to the LCD brightness
will impact your mixer and not the remote mixer.
LIVEMIX CS-SOLO
37
Page 40
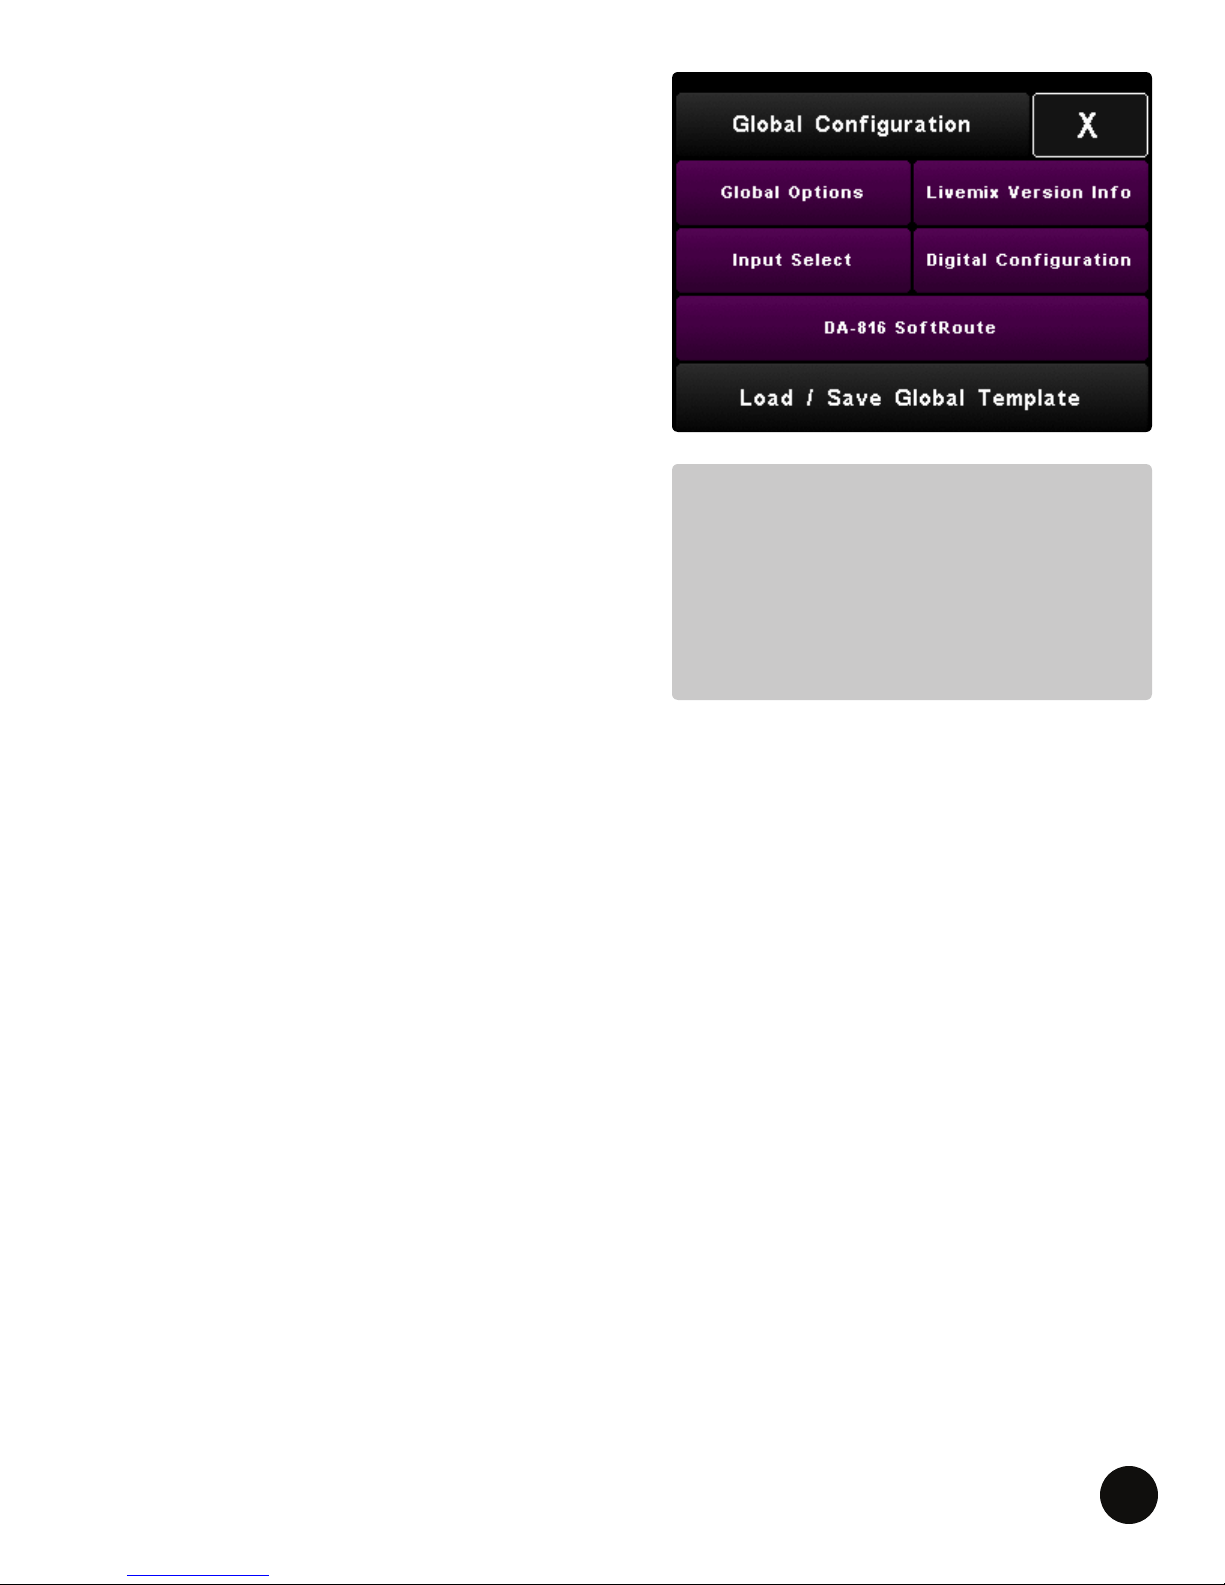
GLOBAL CONFIGURATION
The Livemix system is set up on the personal mixer.
To enter Global Conguration, SELECT Global
Conguration in Mix Tools. This page has multiple
functions related to the entire Livemix system.
GLOBAL OPTIONS
This menu contains additional Global Conguration
Options. Please see the Global Options section for
details on the features below.
• Set Global Clock
• Global Mute
• Passcode
• Global Dim LCDs
LIVEMIX VERSION INFO
This displays rmware version information and allows
for rmware updating.
INPUT SELECT (IF LM-DANTE-EXP INSTALLED)
If a LM-DANTE-EXP is installed, the Input Select
button will appear. This allows you to select analog or
digital input.
NOTE:
The Global Settings screens are purple
to differentiate them from mixing
screens. Global Settings apply to the
entire system and will impact all the
personal mixers in the system.
DIGITAL CONFIGURATION (IF LM-DANTE-EXP INSTALLED)
If a LM-DANTE-EXP is installed, the Digital Conguration button will appear. This function assigns
devices and channels in a digital network.
DA-816 SOFTROUTE™
The DA-816 is an analog output rack unit for sending personal mixes to external devices like wireless
in-ear monitors. This allows you to use SoftRoute to assign personal mixes to the DA-816 outputs.
LOAD AND SAVE A GLOBAL TEMPLATE
The Global Template contains all the channel names, global settings and channel effect information
for the whole system. Save all these parameters for quick recall at a later session.
LIVEMIX CS-SOLO
38
Page 41
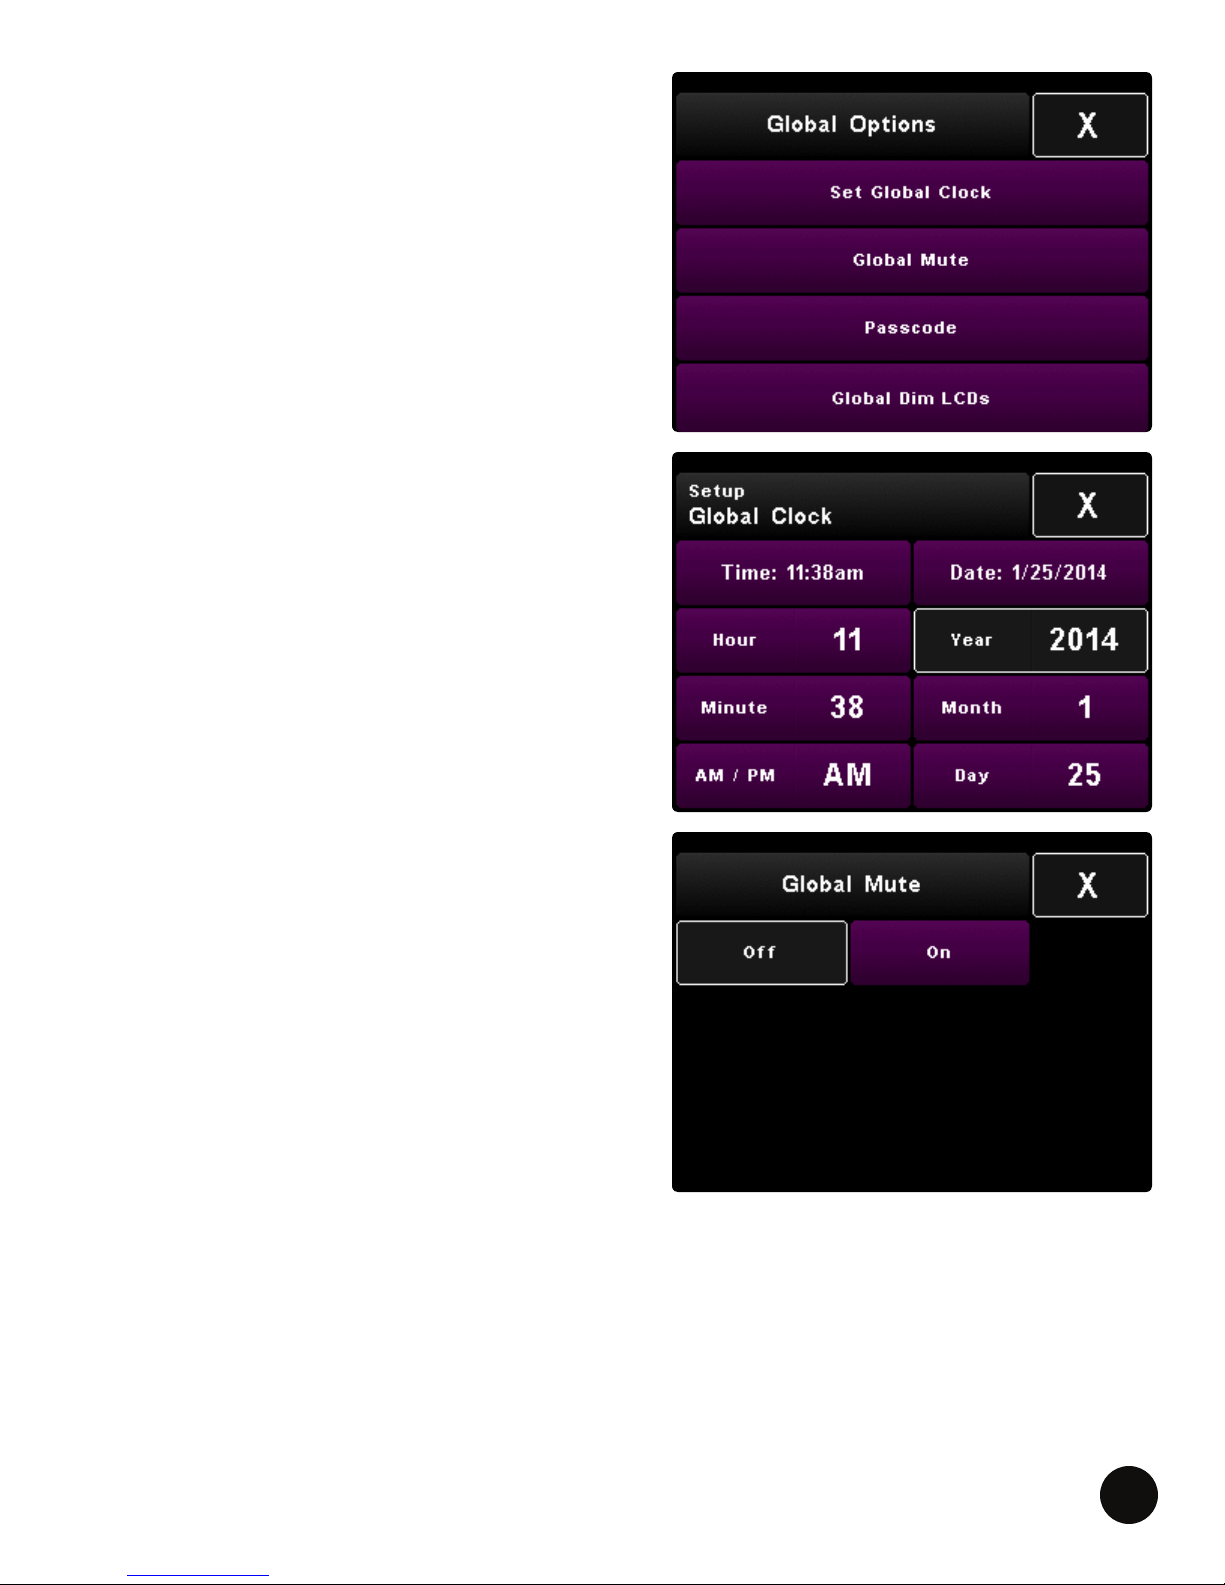
GLOBAL OPTIONS
SET GLOBAL CLOCK
SELECT Set Global Clock to set the time of day and
calendar date for the system.
• PRESS any of the six time/date elds to adjust it,
or alternatively, PRESS the ADJUST knob to cycle
through the six elds.
• The selected eld will turn gray. ROTATE the
ADJUST knob to change the value of that eld.
• PRESS X when nished.
The date and time data will be written to any mixes or
templates saved to a USB ash drive.
GLOBAL MUTE
It may be desirable for the mute feature to mute the
selected channel globally, not just locally. If using
Livemix as a monitor desk for example, this would
allow you, or any other user, to mute a channel for
everyone at one time.
1. PRESS Global Mute in Global Options.
2. SELECT On to enable the Global Mute feature,
or Off for mute to function locally only.
LIVEMIX CS-SOLO
39
Page 42
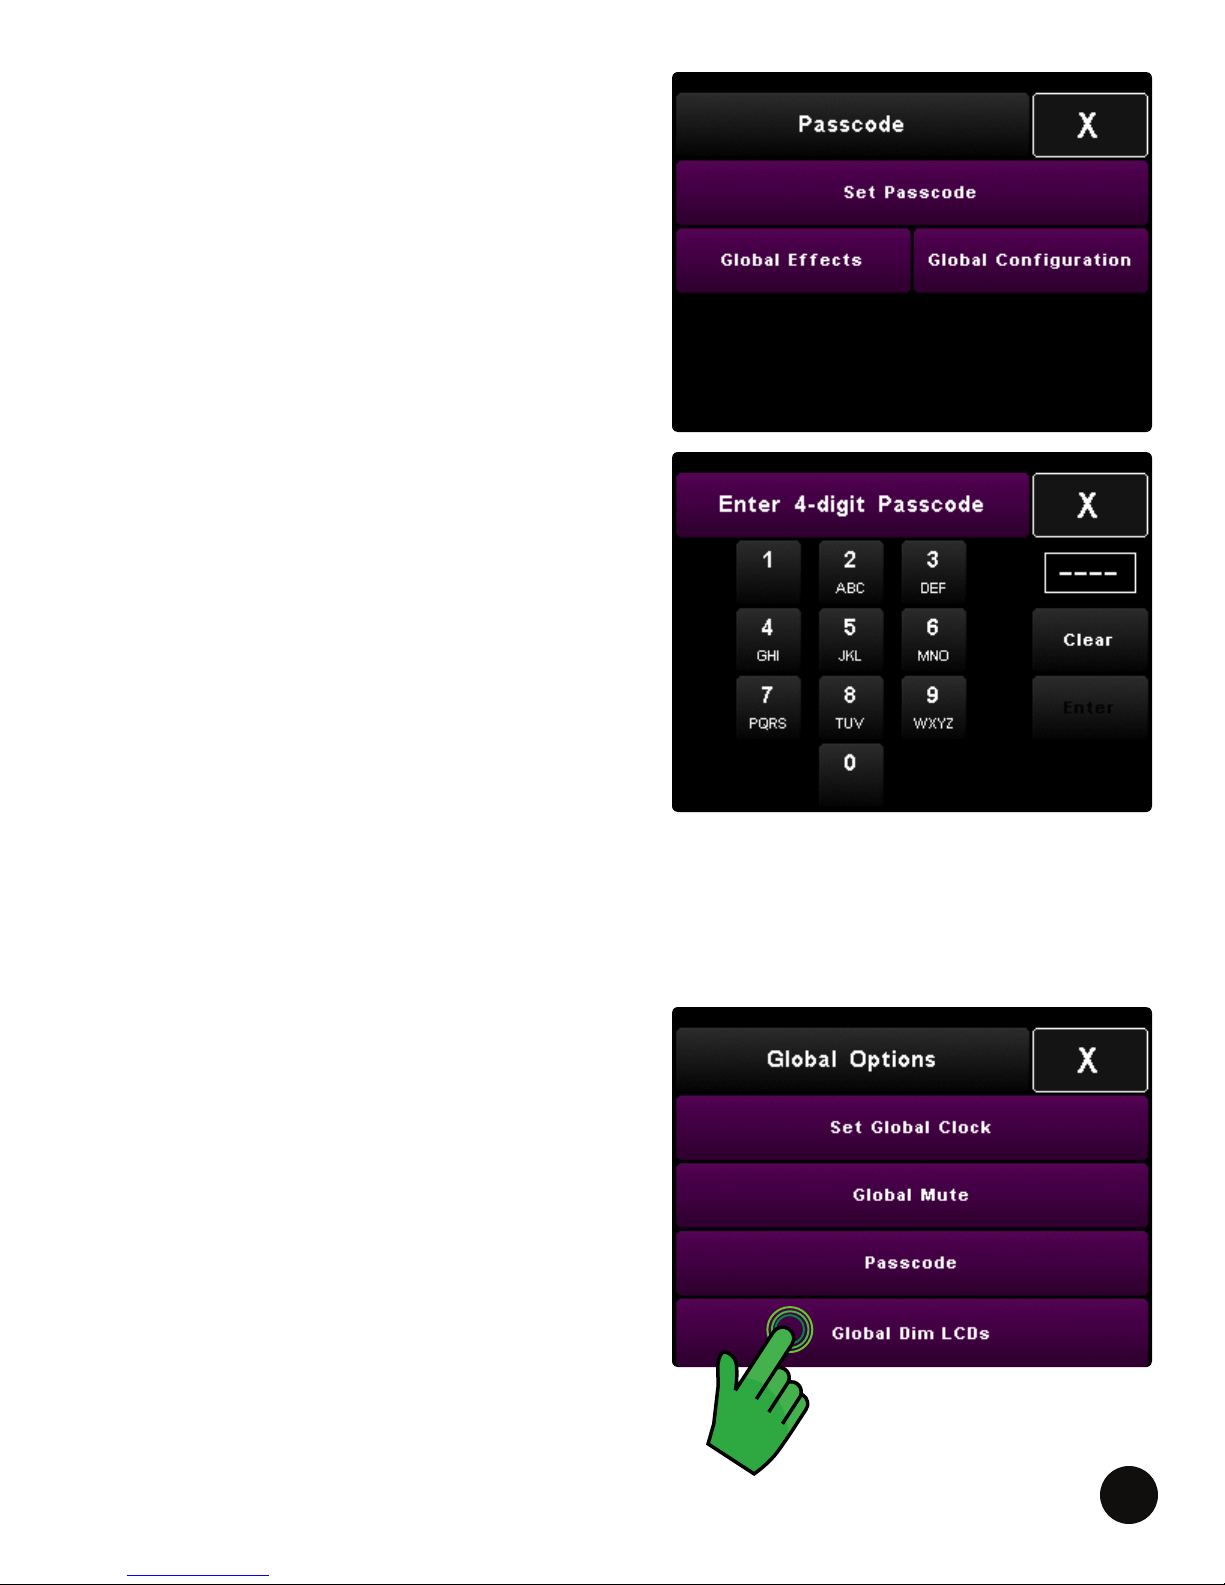
PASSCODE
Livemix allows you to protect certain global
conguration aspects with a passcode. You can select
to protect the Global Effect settings, the Global
Conguration settings, or both.
To set up a passcode:
1. PRESS Passcode in Global Options.
2. Enter a 4 number passcode that is easy to
remember.
3. PRESS Clear to start over.
4. PRESS Enter to accept.
5. You will be prompted to reboot the system after
leaving the Passcode screen, by pressing X.
PRESS Continue to set the passcode and reboot.
What happens if I forget or don’t know the
passcode?
To remove the passcode, LONG PRESS the ME Knob
for three seconds on any screen that prompts you to
enter the passcode. After three seconds, release the
ME Knob and then hold it for three seconds more.
The passcode removal screen will appear. SELECT Yes
to reboot the system, removing passcode protection.
GLOBAL DIM LCDS
The Global Dim LCD feature allows you to dim the
LCD screens of every Livemix personal mixer at once.
This is useful to reduce the ambient light on stage
after a performance. Each mixer can be brought back
to the preset brightness, by touching the screen or a
adjusting a knob.
PRESS Global Dim LCDs in Global Options, to dim all
LCD screens at once.
LIVEMIX CS-SOLO
40
Page 43
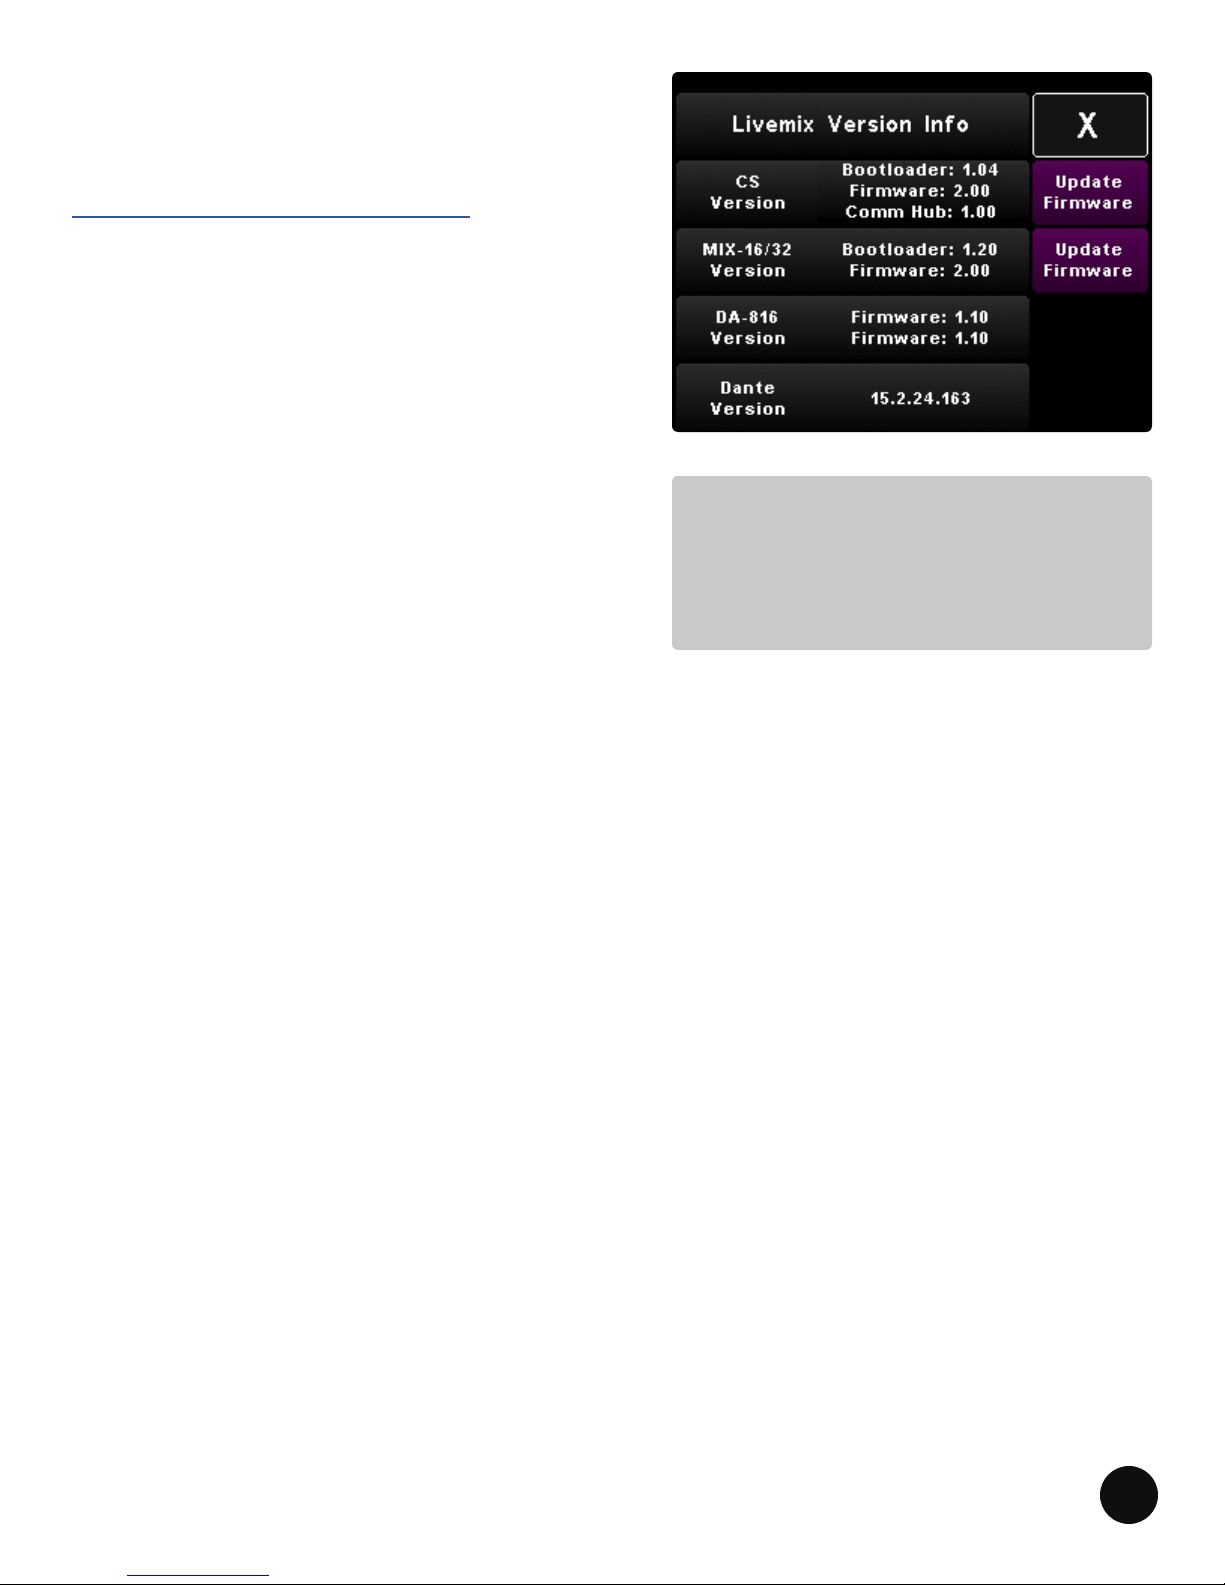
LIVEMIX VERSION INFO
PRESS Livemix Version Info to view rmware versions
for the CS-SOLO, MIX-16/MIX-32, Dante option card
and DA-816. Updates for these are available here:
http://www.digitalaudio.com/support.
The CS-SOLO rmware listed here is for the local
personal mixer. All CS-SOLOs (and CS-DUOs) will
require their own update.
The listed MIX-16/MIX-32 and Dante option card
information are system based.
You may initiate a rmware update by pressing the
“Update Firmware” button. Detailed rmware update
information is in the Livemix Firmware Update section.
NOTE:
The CS-SOLO and CS-DUO use the same
rmware. All units must be updated for
maximum compatibility and consistency.
LIVEMIX CS-SOLO
41
Page 44
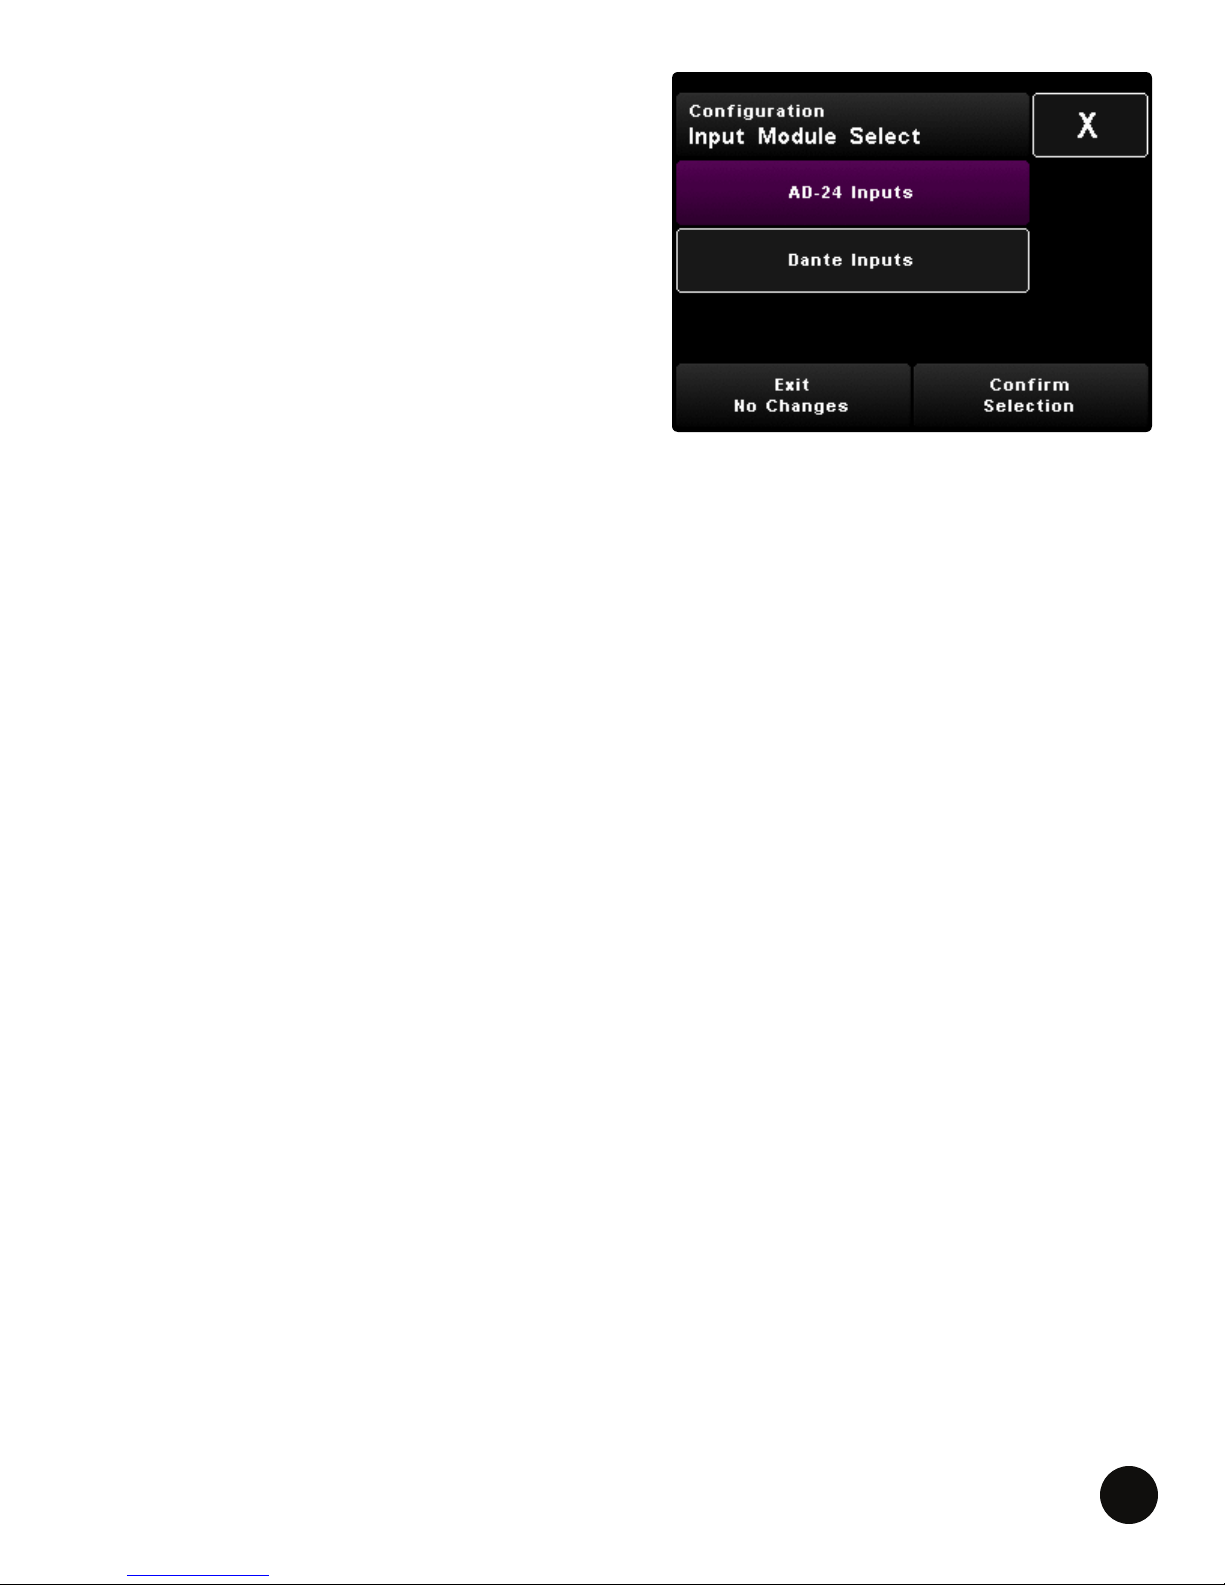
INPUT SELECT
If the LM-DANTE-EXP option card is installed in the
MIX-16 or MIX-32, Input Select will be visible. This
function will prepare the system to accept audio from
the AD-24 or the Dante Network.
1. From Global Conguration, SELECT Input Select.
2. You will be prompted with a warning. PRESS
Continue.
3. SELECT AD-24 for analog inputs or Dante Inputs
to receive audio from the Dante Network.
4. PRESS Conrm Selection.
LIVEMIX CS-SOLO
42
Page 45
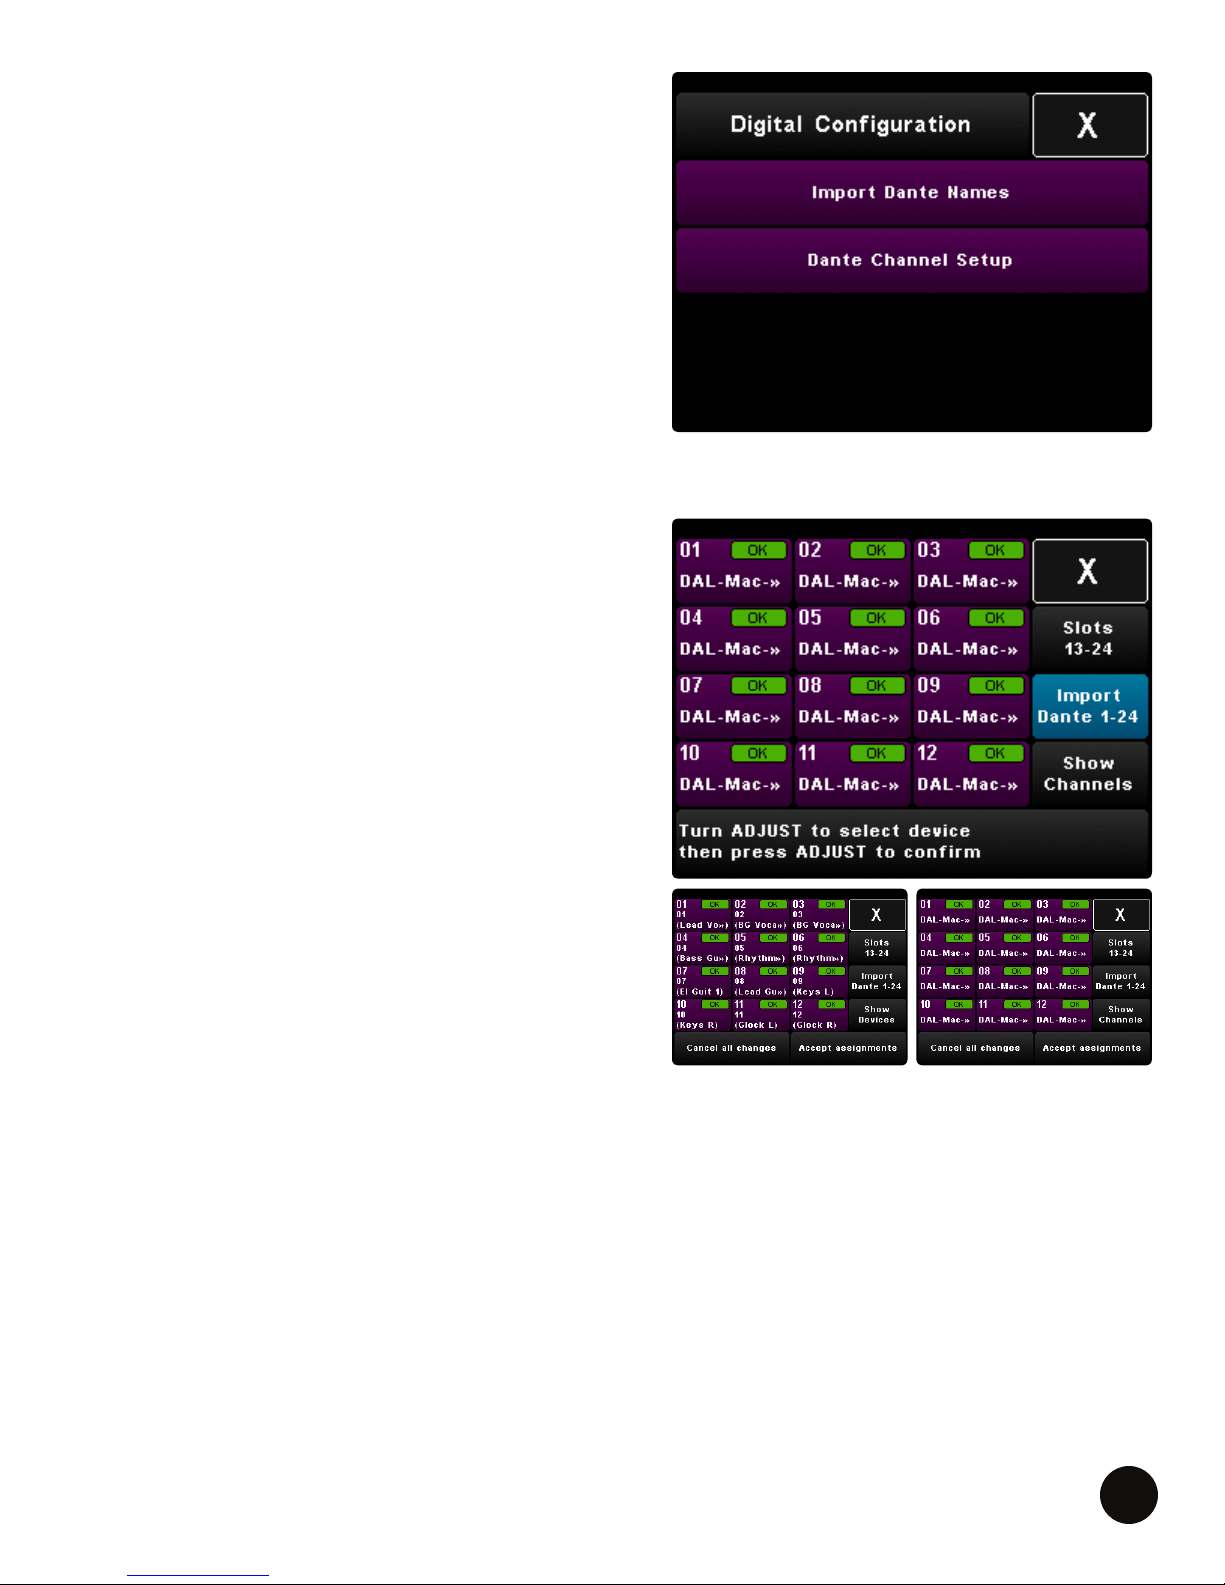
DIGITAL CONFIGURATION
If the LM-DANTE-EXP option card is installed in
the MIX-16 or MIX-32, Digital Conguration will be
visible. This function congures Livemix to accept
audio from a Dante network.
DANTE NETWORK CHANNEL SETUP
Conguring Livemix for use with a Dante network can
be performed on any Livemix personal mixer. You can
also use Dante Controller software provided by Audinate on a Windows or Mac OS X computer. Consult
the user guides of your Dante enabled devices for
information on how each device will transmit/publish
channels to the Dante network.
AUTO ASSIGN DANTE CHANNELS 1-24
With Dante Channel Setup, easily assign the rst 24
networked channels of any Dante device.
1. From the Global Conguration page, SELECT
Digital Conguration.
2. You will be prompted with a warning.
PRESS Continue.
3. SELECT Dante Channel Setup.
4. PRESS Import Dante 1-24. The button will ash
to indicate the import feature is active.
5. Turn the ADJUST knob to select a device on the
Dante network.
6. PRESS the ADJUST knob to conrm the
device selection.
Your Livemix system will now be subscribed to the
rst 24 channels of the chosen Dante device.
LIVEMIX CS-SOLO
43
Page 46
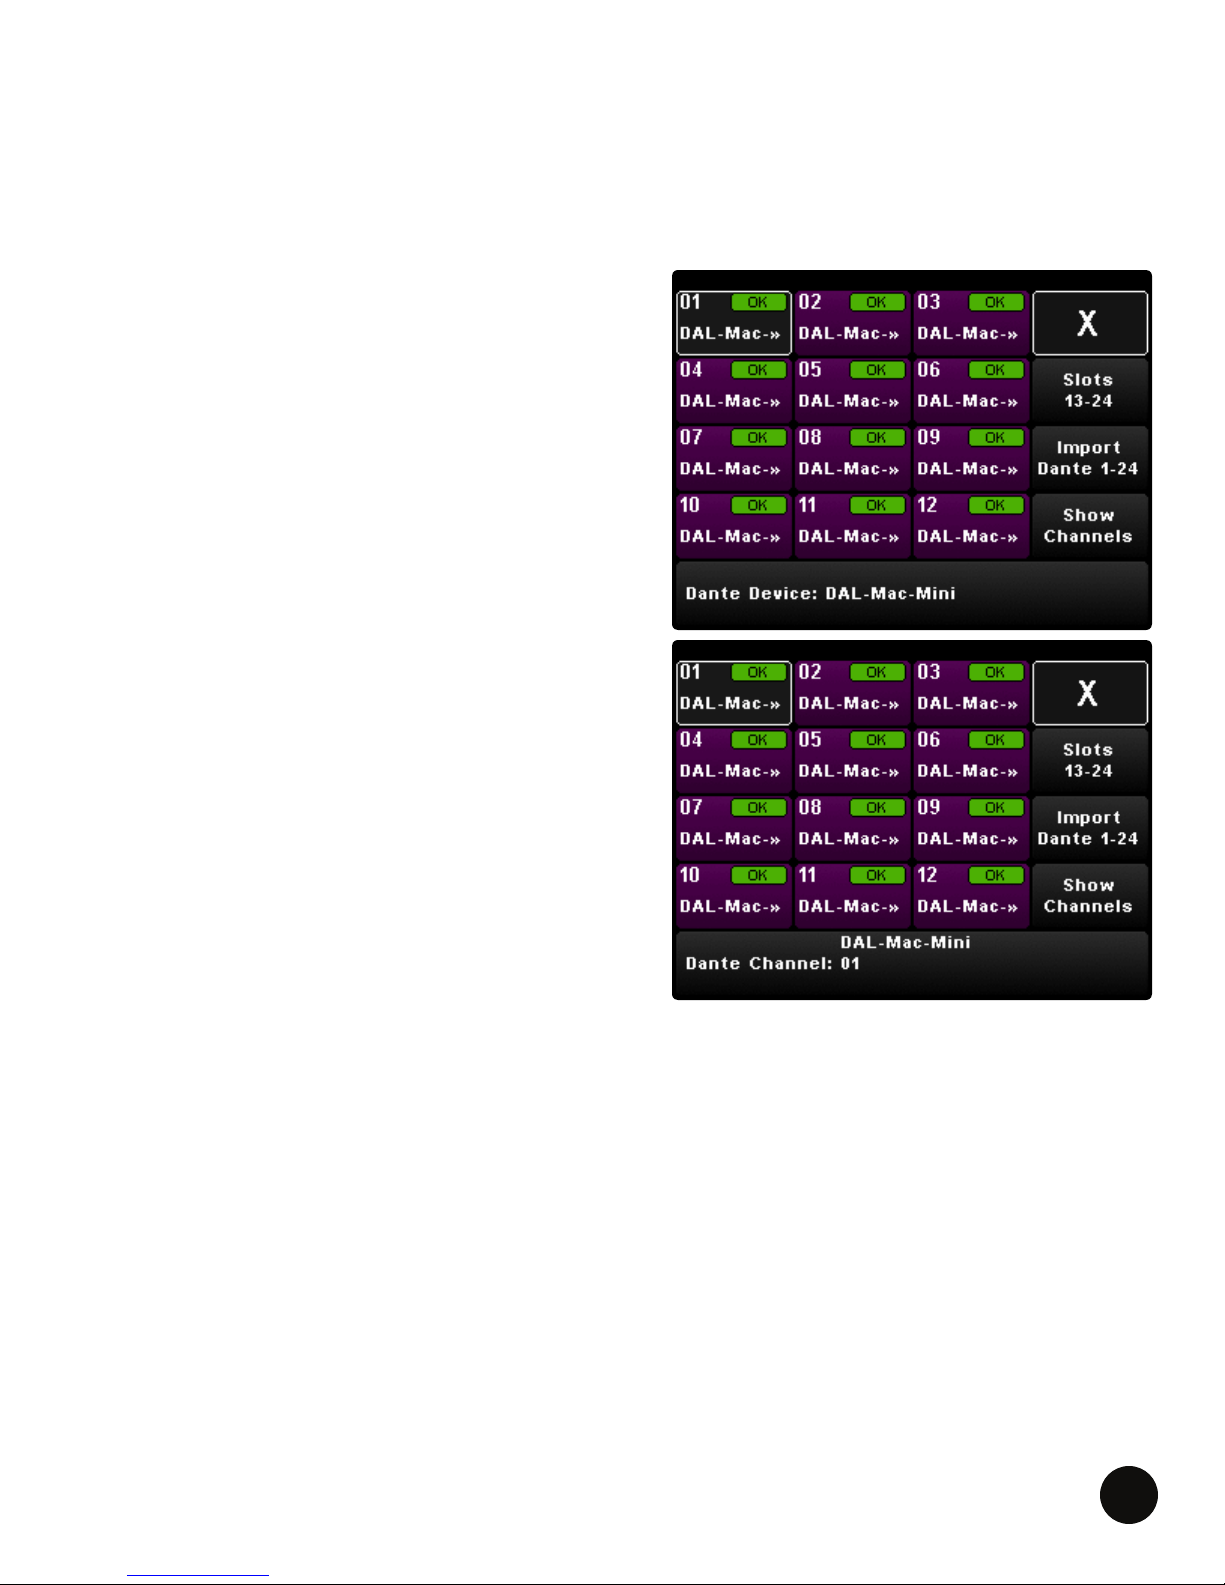
MANUALLY ASSIGN DANTE CHANNELS
You may want to manually subscribe to channels on a Dante network. The manual assign feature
allows you to connect to multiple devices or to change the order of connected devices. An example
of this would be: connecting Dante transmitter channel 24 from a console to channel 4 on the
Livemix personal monitor system.
1. From the Global Conguration screen, PRESS
Digital Conguration.
2. You will be prompted with a warning.
PRESS Continue.
3. PRESS Dante Channel Setup to enter Dante
setup conguration.
4. SELECT a Channel to assign to a Dante channel.
A pop-up will appear on the bottom.
5. Select a Device by rotating the ADJUST knob.
PRESS the ADJUST knob to accept a selected
device. If you have previously assigned a device
to this channel, the selector may be on Channel
Select. If so, PRESS the ADJUST knob to change
to the Device Selector.
6. Select a Channel on the selected device by
rotating the ADJUST knob. After a few seconds,
the channel will be automatically selected.
7. Repeat steps 5-7 as necessary. Press Slots 13-24
to access additional channels.
8. PRESS Accept Assignments to accept the
assigned channels.
DEVICE/CHANNEL VIEW TOGGLE
The Show Device/Show Channels button toggles what information is visible for each channel. By
default, the names of the assigned channels are visible. PRESS Show Devices to see which devices
are assigned to each Livemix channel. PRESS Show Channels to toggle to the Show Devices view.
LIVEMIX CS-SOLO
44
Page 47
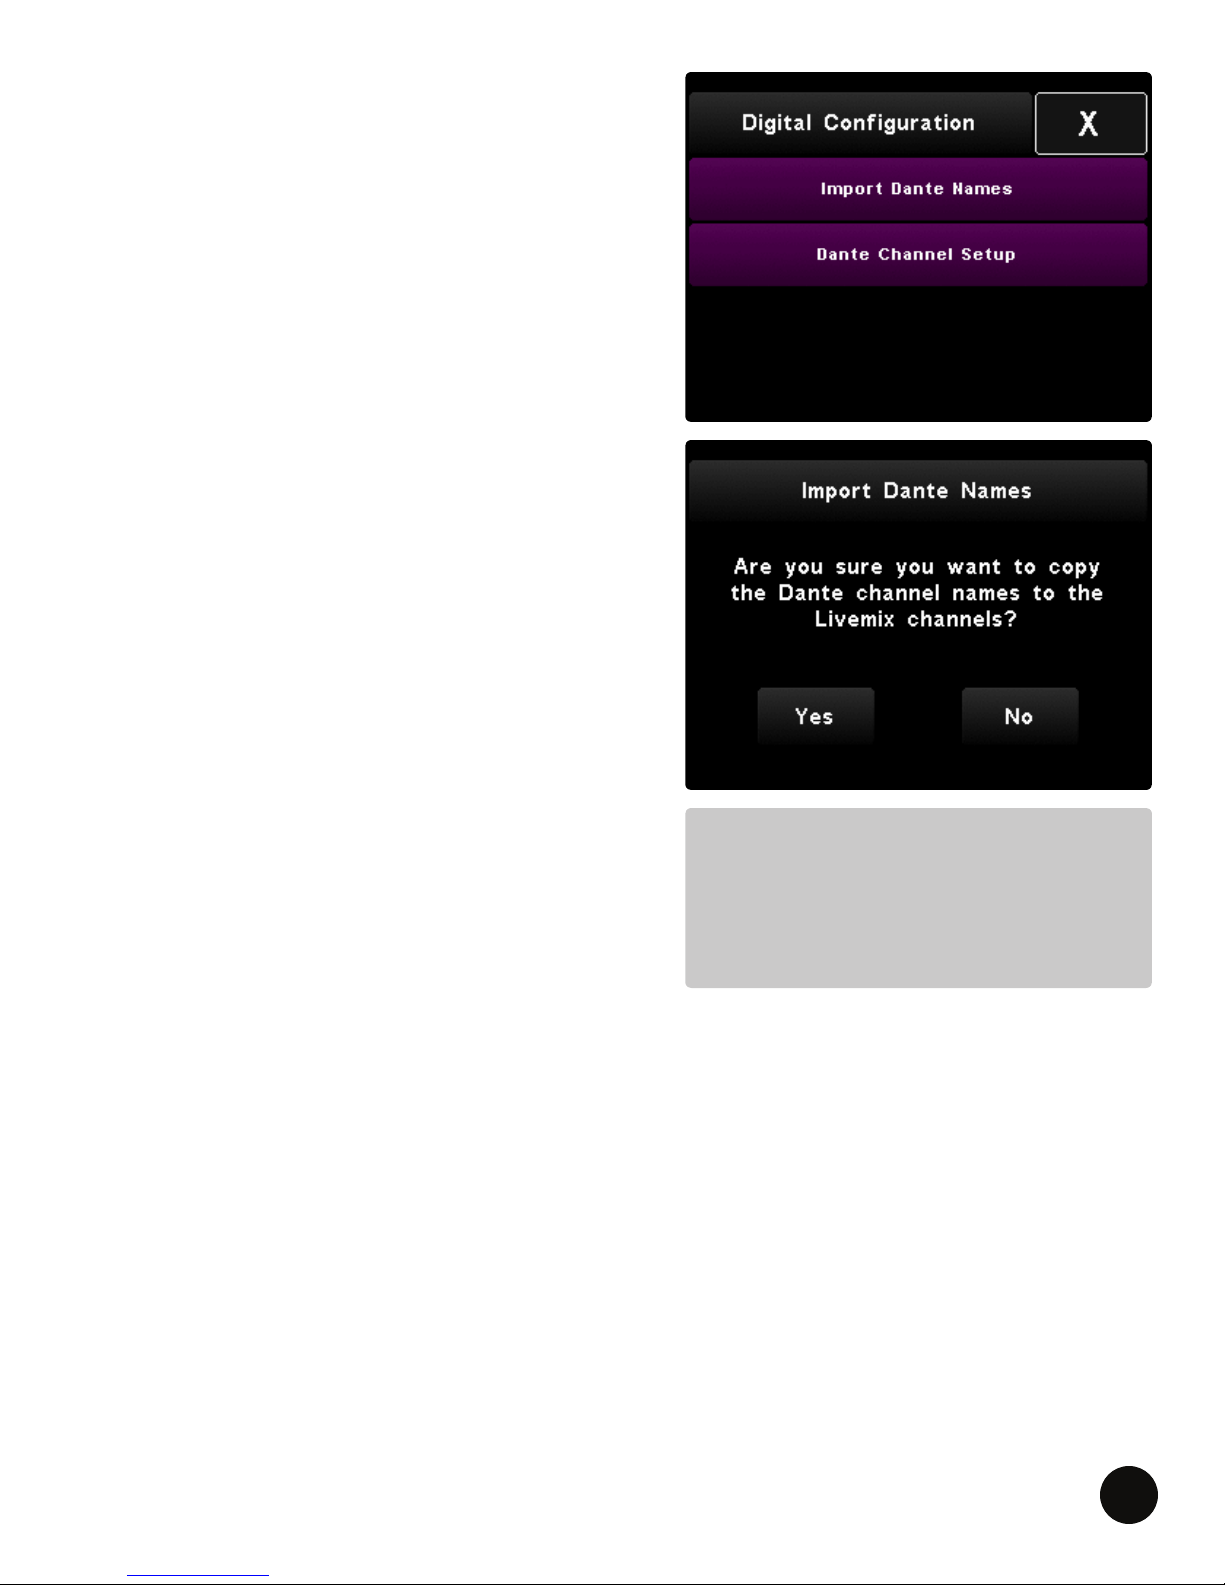
IMPORT DANTE NAMES
If you are using Livemix with an existing system that
has published “Channel Labels” to the network, you
can use those same labels as the Livemix channel
names that appear in the Channel Overview and Single
Channel View.
To import Channel Labels from the Dante network:
1. PRESS Global Conguration in Mix Tools.
2. SELECT Digital Conguration.
3. You will be prompted with a warning.
PRESS Continue.
4. PRESS Import Dante Names.
5. PRESS Yes to copy the Dante Channel names to
the Livemix channel names.
SAVING DANTE CHANNEL DATA
To ensure that Dante channel setup and names
are saved, save the Global Template after changes
are made. See the instructions for Saving a Global
Template section.
NOTE:
Not all Dante network devices use
channel labels. Some only publish the
number of the channel.
LIVEMIX CS-SOLO
45
Page 48
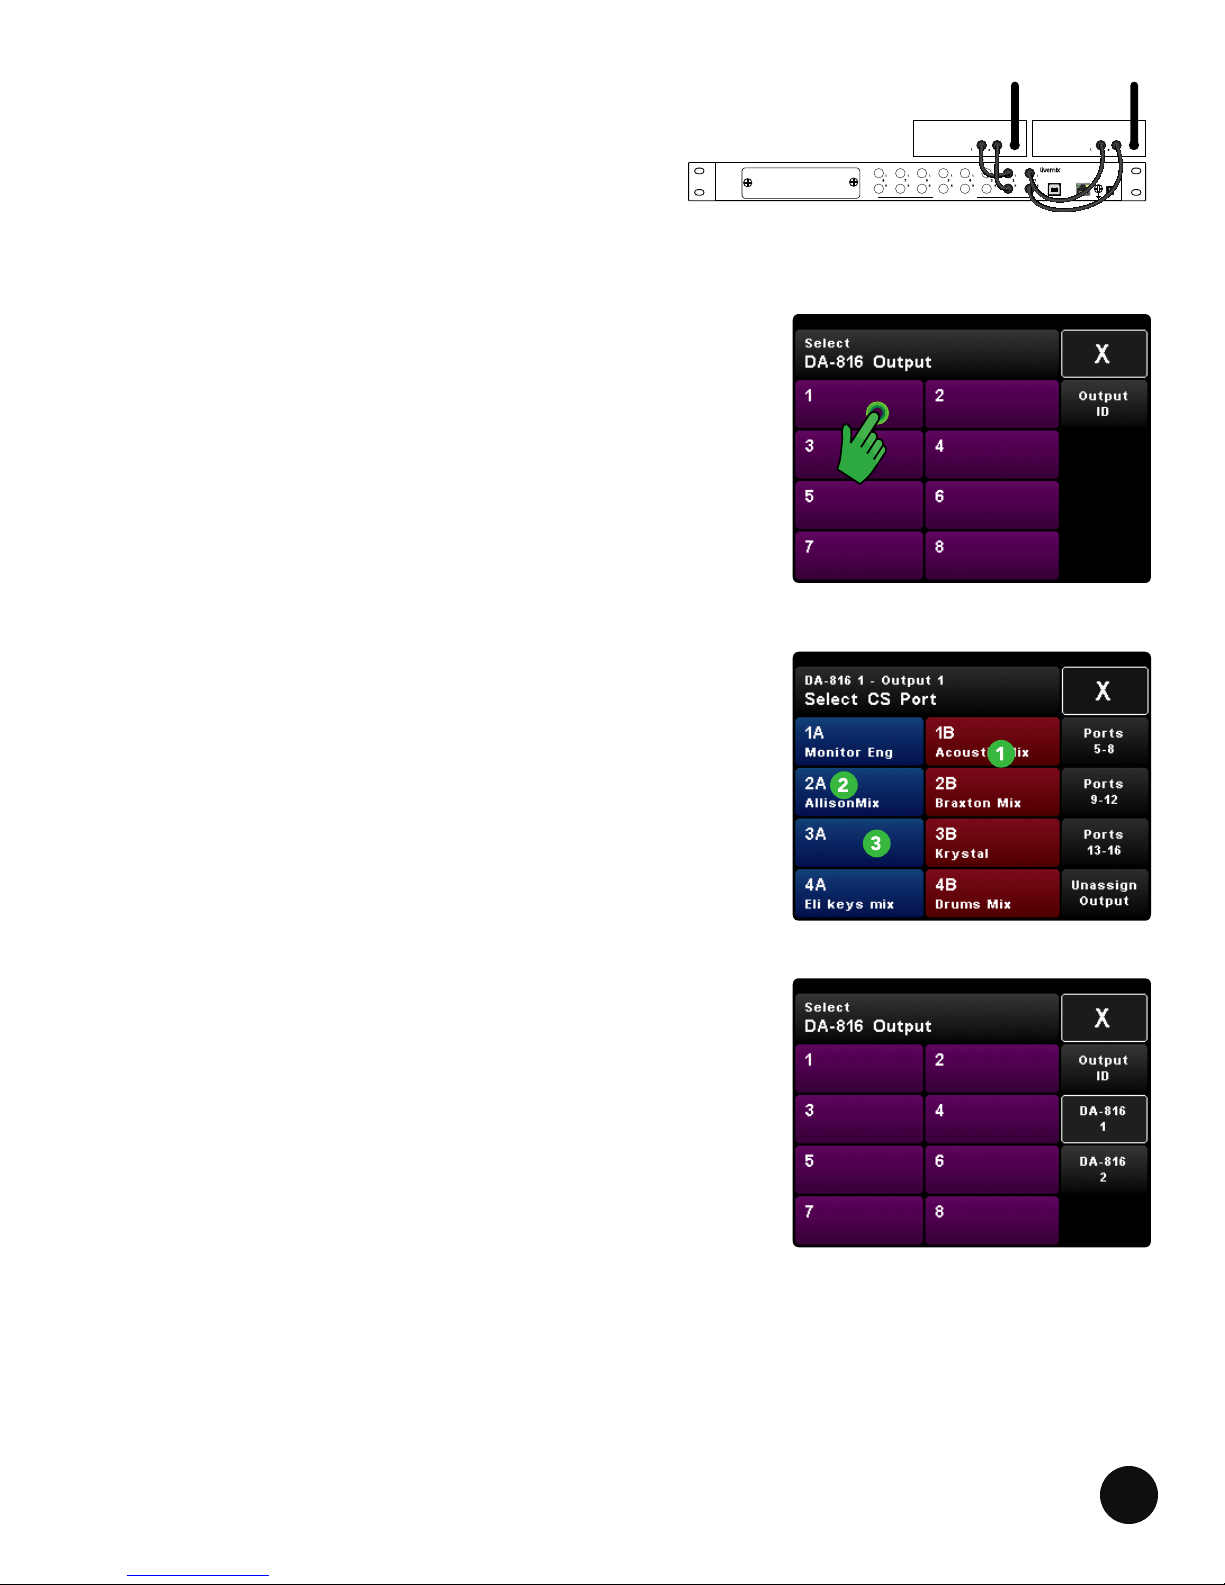
DA-816 SOFTROUTE™
LIVEMIX
DATA IN
24VDC
3.75A
MIX-16/32
LM-DANTE-EXP
Dante™ is a trademark of Audinate Pty Ltd.
DANTE
NETWORK
LINK/ACT 1G
LIVEMIX DATA
OUT 1
LIVEMIX DATA
OUT 2 (MIX-32 ONLY)
DA-816
ANALOG OUTPUTS
LIVEMIX
DATA IN
24VDC
3.75A
MIX-16/32
LIVEMIX DATA
OUT 1
LIVEMIX DATA
OUT 2 (MIX-32 ONLY)
LM-DANTE-EXP
Dante™ is a trademark of Audinate Pty Ltd.
DANTE
NETWORK
LINK/ACT 1G
LIVEMIX DATA
IN
12VDC
3.33A
DA-816
BALANCED +4dBu LINE OUT
USB
LM-DANTE-EXP
Dante™ is a trademark of Audinate Pty Ltd.
DANTE
NETWORK
LINK/ACT 1G
LIVEMIX DATA
IN
12VDC
3.33A
DA-816
BALANCED +4dBu LINE OUT
USB
WIRELESS TRANSMITTER 1WIRELESS TRANSMITTER 2
LIVEMIX DATA
IN
12VDC
3.33A
DA-816
BALANCED +4dBu LINE OUT
USB
LIVEMIX DATA
IN
12VDC
3.33A
DA-816
BALANCED +4dBu LINE OUT
USB
LIVEMIX DATA
IN
12VDC
3.33A
DA-816
BALANCED +4dBu LINE OUT
USB
Personal mixes can be assigned to the optional Livemix
DA-816 analog output rack unit. The DA-816 provides
stereo balanced outputs for 8 personal mixes, such
as wireless in-ear transmitters, powered monitors or
powered house speakers. See the DA-816 User Guide
for more information.
From the Global Conguration screen, SELECT DA-816
SoftRoute to enter the DA-816 setup. You can enter these
screens even if you do not have a DA-816 connected.
Assignments will be saved with the Global Template.
A Livemix personal mixer must be plugged into a MIX-16 or
MIX-32 port to route audio to an external device. If a mix that is
assigned to a DA-816 output is physically disconnected or not
present, audio will not be routed.
ASSIGN A MIX TO DA-816 OUTPUT
The 8 purple slots represent the available outputs. When a mix
is assigned to one or more of the outputs, the Port/Mix Name (if
available) will be visible.
From the Select DA-816 Output screen, SELECT an output you
wish to assign (image 1).
1. The screen will change to display the MIX-16/MIX-32 Ports
(image 2). Each slot is labeled with the loaded or saved mix
name (1) and Port (2). If a mix is not loaded, the mix name
will be blank (3). It is possible to assign Control Surface
Ports (CS)/Mixes even if a personal mixer is not connected.
Please note that audio will not be present on that output.
Saving personal mixes with the performer’s name or
instrument helps identify easier.
2. Select a CS Port to assign to the DA-816 output. The
If you are using two DA-816s, you will be able to select the
assignment will be visible on the DA-816 Output screen.
outputs on the rst or second DA-816. The selected DA-816 will
have a white border (image 3).
image 1
image 2
UNASSIGN AN OUTPUT
To unassign a previously assigned output:
1. SELECT the DA-816 Output (1-8) from the DA-816 Output screen.
2. PRESS Unassign Output. The Output is now unassigned.
LIVEMIX CS-SOLO
image 3
46
Page 49
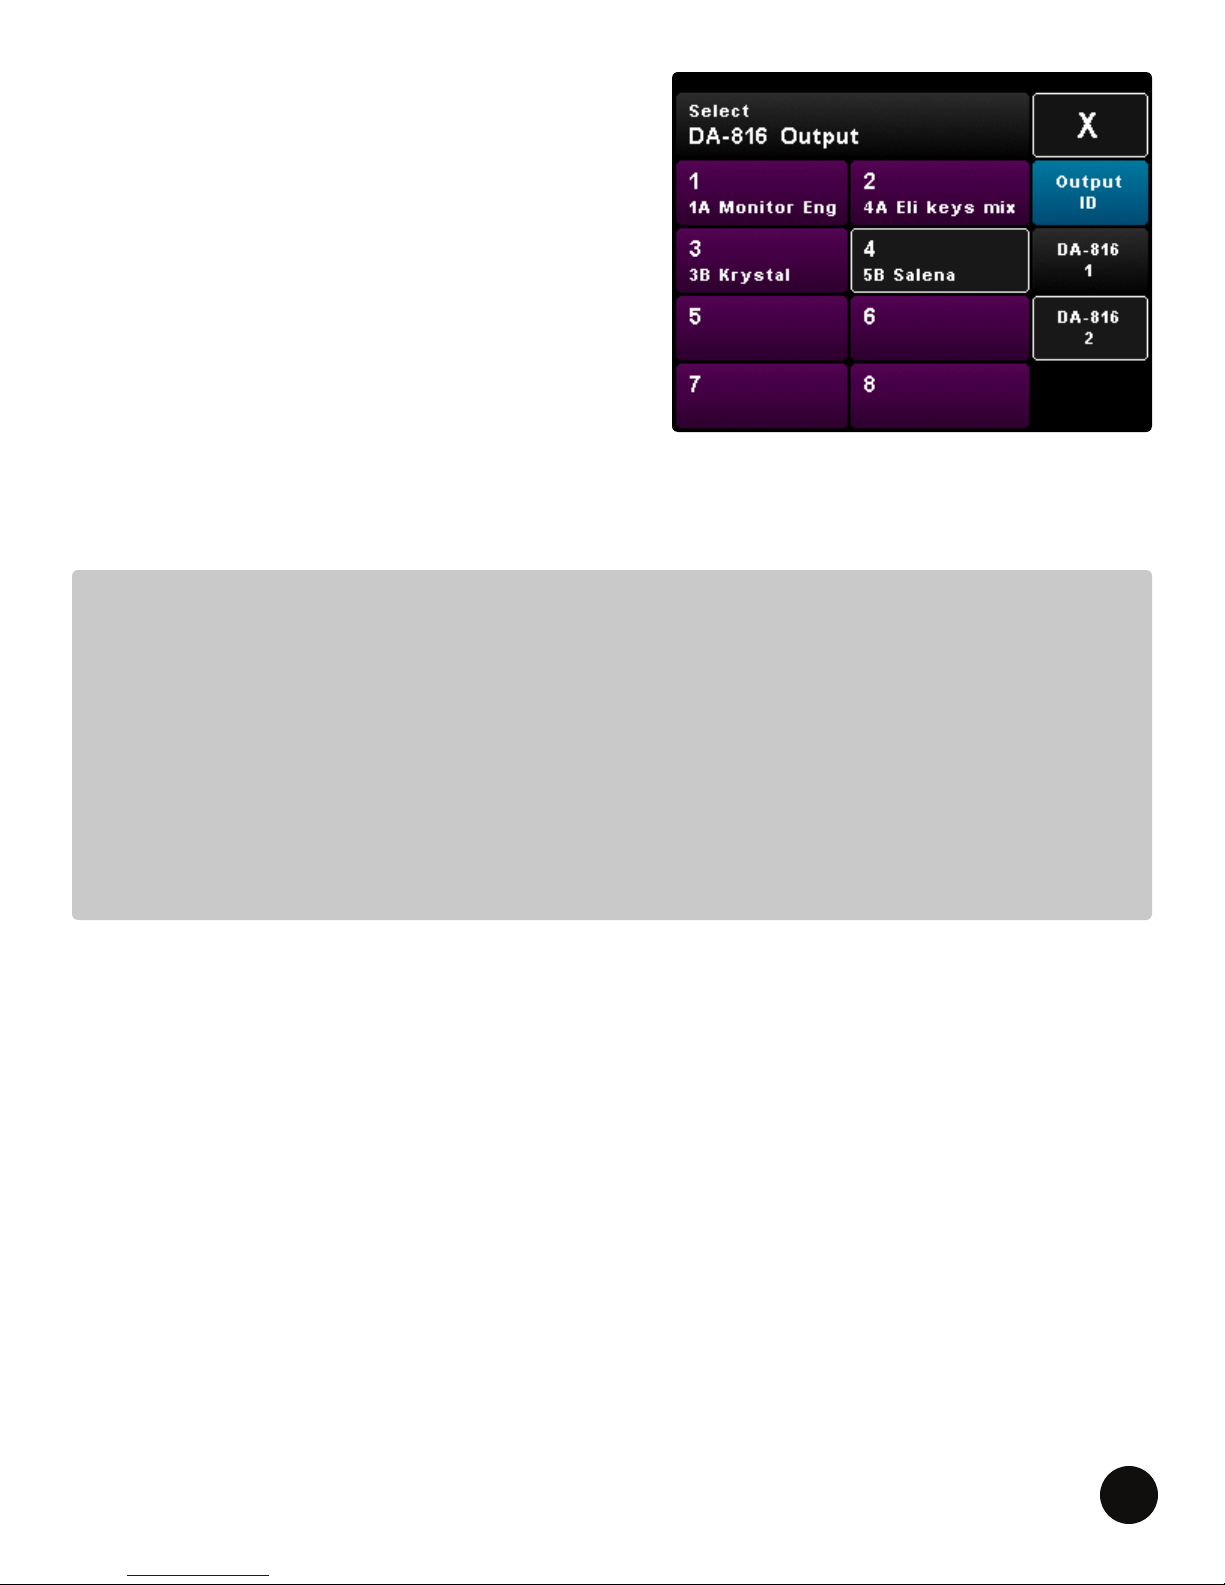
OUTPUT ID FEATURE
The Output ID feature sends a test tone to the
selected DA-816 Output. This allows you to verify
that the desired external device is connected to the
selected output.
1. PRESS Output ID. The Output ID button will ash.
2. SELECT an Output. The slot will turn gray. The
corresponding LED on the front panel of the
DA-816 will ash and a test tone will be sent to
output. The Output ID feature can be used with
multiple outputs, that have been selected at the
same time.
3. PRESS Output ID again to exit this mode.
NOTE:
Observe the VU meters on the connected wireless transmitters or devices. The DA-816 plays
audible tone beeps in this mode to conrm the intended signal chain is setup properly.
The Output ID is a great way to:
• Quickly ensure musicians are given the correct wireless body packs and are assigned to the
correct personal mixer on stage.
• Test which device is connected to the DA-816 outputs.
• Verify proper connection from DA-816 to external devices.
LIVEMIX CS-SOLO
47
Page 50
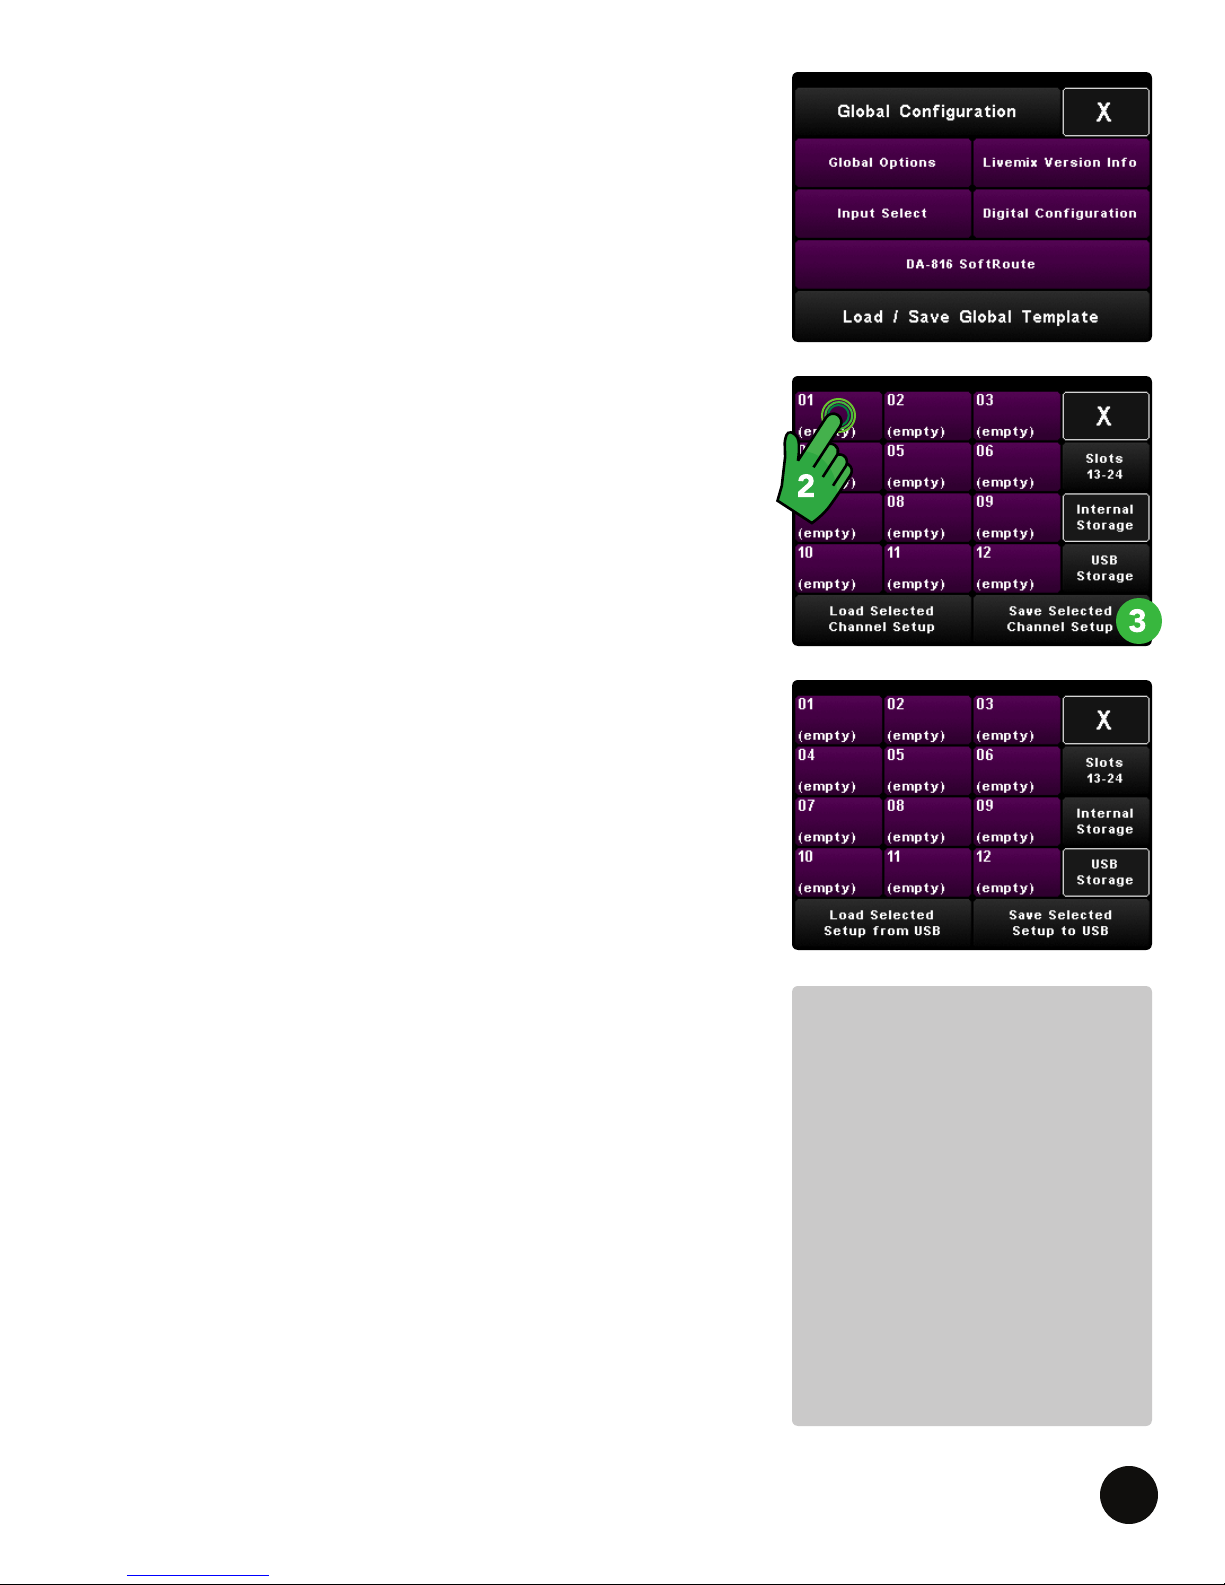
SAVING & LOADING A GLOBAL TEMPLATE
Load/Save Global Template functions the same as loading and
saving a personal mix. Saving a Global Template allows you to
recall it when necessary and reduces the time it takes to setup
the system.
Each Livemix system contains 24 internal save slots and also
allows up to 24 save slots on an external USB device. These are
different from the personal mix save slots.
TO SAVE A GLOBAL TEMPLATE:
1. PRESS Global Template Load /Save.
2. SELECT a save slot. PRESS Slots 13-24 for additional
save locations.
3. PRESS Save Selected Channel Setup.
4. PRESS Yes to conrm.
5. ENTER a name for the template.
6. PRESS Done.
7. PRESS X twice to Exit to the Channel Overview.
To save a template to a USB device, insert a USB ash drive
into the USB slot on the personal mixer. When a USB device is
recognized, the USB Storage button will appear on the Load/
Save screen. SELECT USB Storage and follow steps 2-7 above.
TO LOAD A GLOBAL TEMPLATE:
1. PRESS Global Template Load /Save.
2. SELECT a template to load. PRESS Slots 13-24 for additional
saved templates.
3. PRESS Load Selected Channel Setup.
4. PRESS X twice to Exit to the Channel Overview.
To load a template from a USB device, insert a USB ash drive
into the USB slot on the personal mixer. When a USB device is
recognized, the USB Storage button will appear on the Load/Save
screen. SELECT USB Storage and follow steps 2-4 above.
NOTE:
Global Templates save:
Channel Naming, Channel
EQ/Dynamics Presets,
Global Options (Global
Mute, DA-816 SoftRoute Mix
Assignments), Input Selection
(Analog or Dante) and Dante
device subscriptions. Global
Template Slot 24 (Default
Setup) resets all of the above
Global Settings, except for
the Dante Subscriptions.
LIVEMIX CS-SOLO
48
Page 51

LIVEMIX FIRMWARE INSTRUCTIONS
Firmware updates add features and ensure compatibility with all parts of the Livemix system.
Checking the rmware version of your Livemix system is detailed in the “Livemix Version Info”
section. Please visit http://www.digitalaudio.com/support to verify if your Livemix system has the
most current version, as listed on the Livemix Version Info screen on all CS-SOLOs and CS-DUOs.
PREPARING A USB FLASH DRIVE
To update the CS-SOLO or CS-DUO, you will need a USB ash drive that has been FAT formatted.
Other le systems will not work.
CS-SOLO/CS-DUO UPDATE INSTRUCTIONS
TO UPDATE THE FIRMWARE OF THE CS-SOLO/CS-DUO:
1. Download the latest rmware from http://www.digitalaudio.com/support.
2. Unzip the rmware zip le and copy the LMUPDATE folder to the root directory of a USB ash
drive. Please make sure the LMUPDATE folder is not in another folder.
3. Insert the FAT formatted USB ash drive into the USB port on the personal mixer. The rmware
update process will automatically start by presenting you with a pop up display.
4. Press YES to begin. If you do not want to update the rmware, press NO. Once the rmware
update has started, do not turn off the power to the CS-SOLO/
CS-DUO or MIX-16/MIX-32 as it may cause damage.
5. When prompted, remove the USB ash drive.
6. The CS-SOLO/CS-DUO will now update. When the update is
complete, the personal mixer will reboot.
Perform this update on each CS-SOLO and CS-DUO in the system
for maximum compatibility and consistency.
CS-SOLO FIRMWARE UPDATE TROUBLESHOOTING
If the rmware update process doesn’t start after following the
steps above, you can enter rmware update mode by doing the
following:
NOTE:
For updates to the MIX-16/
MIX-32 and the CS-SOLO and
CS-DUO, the MIX-16/MIX-32
should be updated rst.
Some updates take a while
to complete. If updating
the MIX-16/MIX-32 from
the CS-SOLO or CS-DUO, it
works best to have only one
personal mixer connected to
the system.
• Unplug the network cable to turn the CS-SOLO off.
• Insert the USB drive with the rmware, downloaded per the instructions in steps 1 and 2 above.
• PRESS and HOLD the Intercom button on the CS-SOLO. Continue to HOLD the Intercom
button and reconnect the network cable to power the CS-SOLO on.
• Follow rmware update instructions on the screen.
LIVEMIX CS-SOLO
49
Page 52
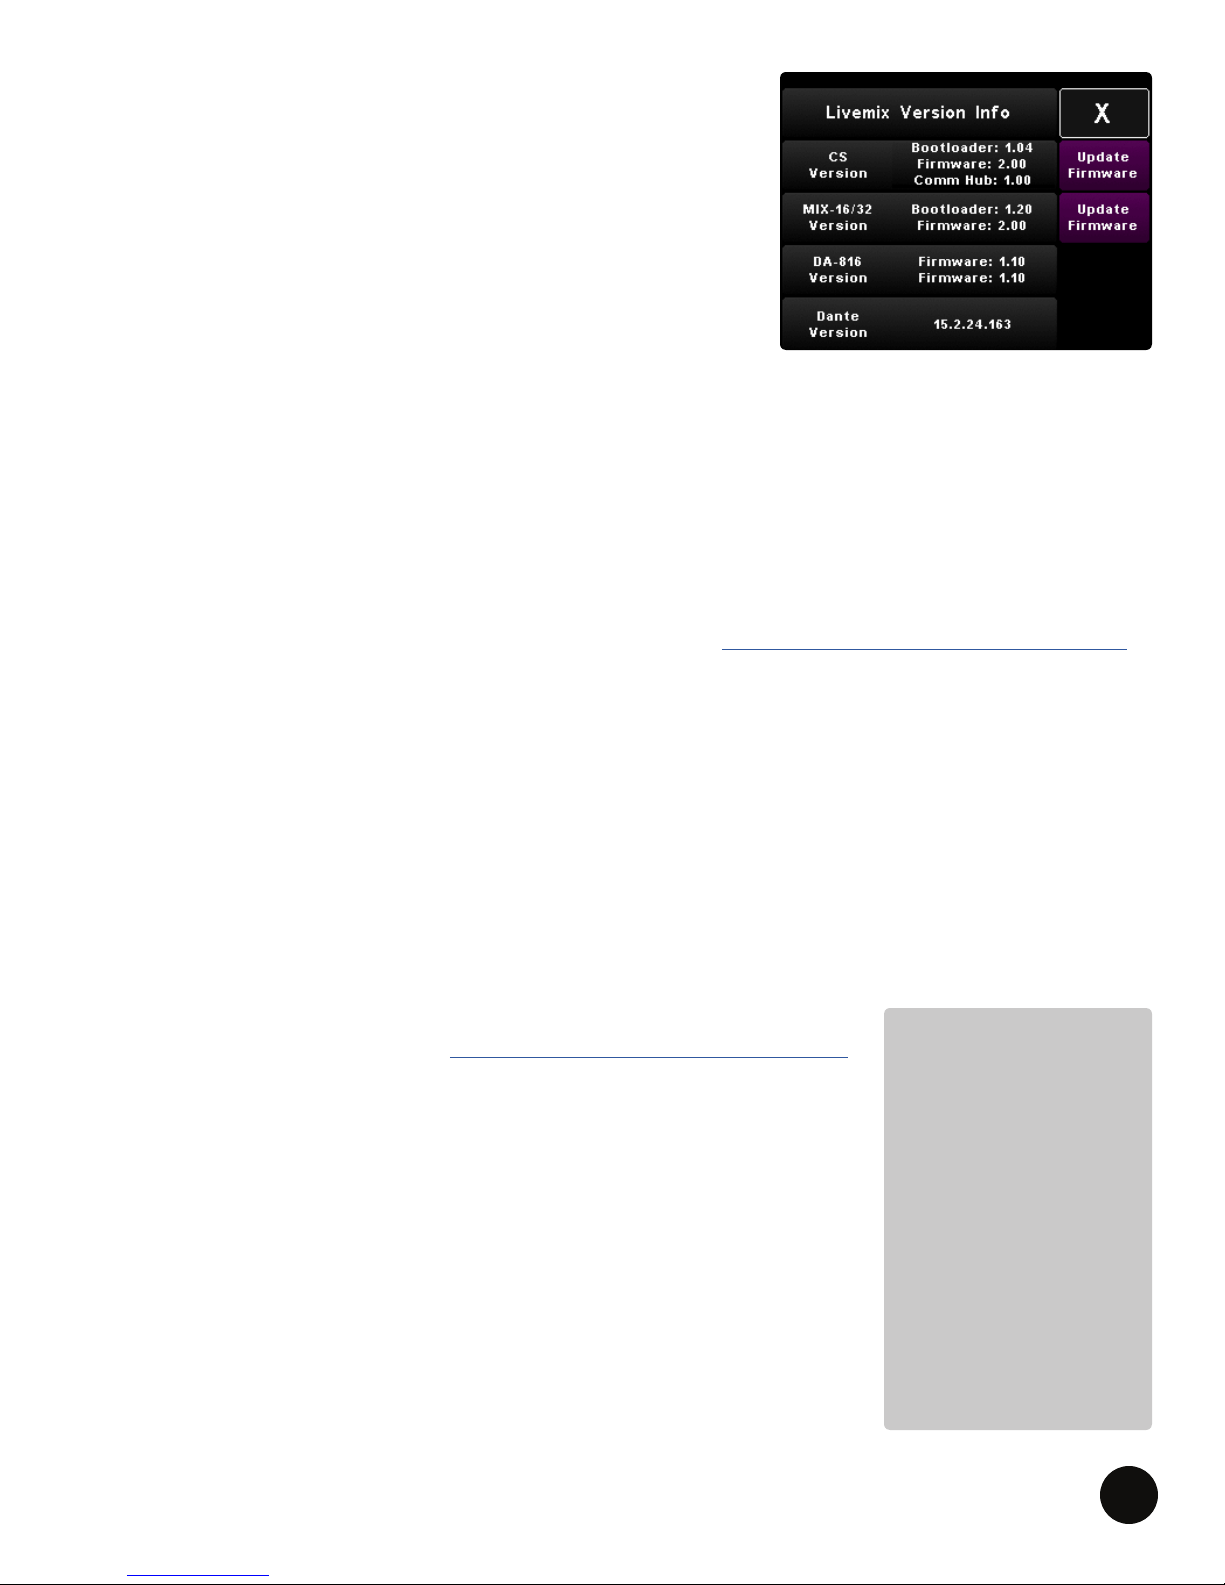
MIX-16/MIX-32 FIRMWARE UPDATE INSTRUCTIONS
The MIX-16/MIX-32 can be updated with a CS-SOLO/CS-DUO
or a PC application.
You can update with a CS-SOLO if:
• The MIX-16/MIX-32 serial number is greater than
12-02-01030
• The MIX-16/MIX-32 rmware is 1.01 or above
• The CS-SOLO/CS-DUO rmware is 1.31 or above
If your MIX-16/MIX-32 does not meet the criteria above, update with a Windows PC application.
In most cases, this will bring your MIX-16/MIX-32 up to date and subsequent updates can be
performed with the CS-SOLO/CS-DUO. For reference, both methods are listed below.
UPDATE FIRMWARE OF MIX-16/MIX-32 WITH THE PC APPLICATION:
1. Update all CS-SOLOs and CS-DUOs to the latest version per the instructions above.
2. Download the MIX-16/MIX-32 Update Application from http://www.digitalaudio.com/support.
3. Connect the USB port on the MIX-16/MIX-32 to a Windows computer.
4. Wait for MIX-16/MIX-32 drivers to fully install.
5. Run MIX-16/MIX-32 Update Application. A second set of drivers will be installed at the start
of this process and may take a few minutes. Once the updater has started, a progress bar will
appear. Do not turn off the power until the update is complete or you may damage the unit.
6. PRESS Finish.
7. Disconnect the MIX-16/MIX-32 from the PC and verify the update was successful by checking
the rmware version with the CS-SOLO/CS-DUO.
UPDATE MIX-16/MIX-32 FIRMWARE WITH A CS-SOLO OR CS-DUO:
1. Download the latest rmware: http://www.digitalaudio.com/support.
2. Unzip the rmware zip le and copy the LMUPDATE folder to the root
directory of a USB ash drive. Please verify the LMUPDATE folder is
not in another folder.
3. Go to Livemix Version Info by pressing Mix Tools, Global
Conguration and then Livemix Version Info.
4. PRESS Update MIX-16/MIX-32 Firmware.
5. PRESS Yes to update, or No to cancel.
6. Insert USB ash drive containing the update, when prompted. PRESS
Continue or Exit to cancel. Once the update has begun, do not turn
NOTE:
If updating with the CSSOLO or CS-DUO does
not work, please use
the PC Application.
Some updates take a
while to complete. If
updating the MIX-16/
MIX-32 from the CSSOLO/CS-DUO, it
works best to have only
one personal mixer
connected.
off the power to the MIX-16/MIX-32 or you may damage the unit.
LIVEMIX CS-SOLO
50
Page 53
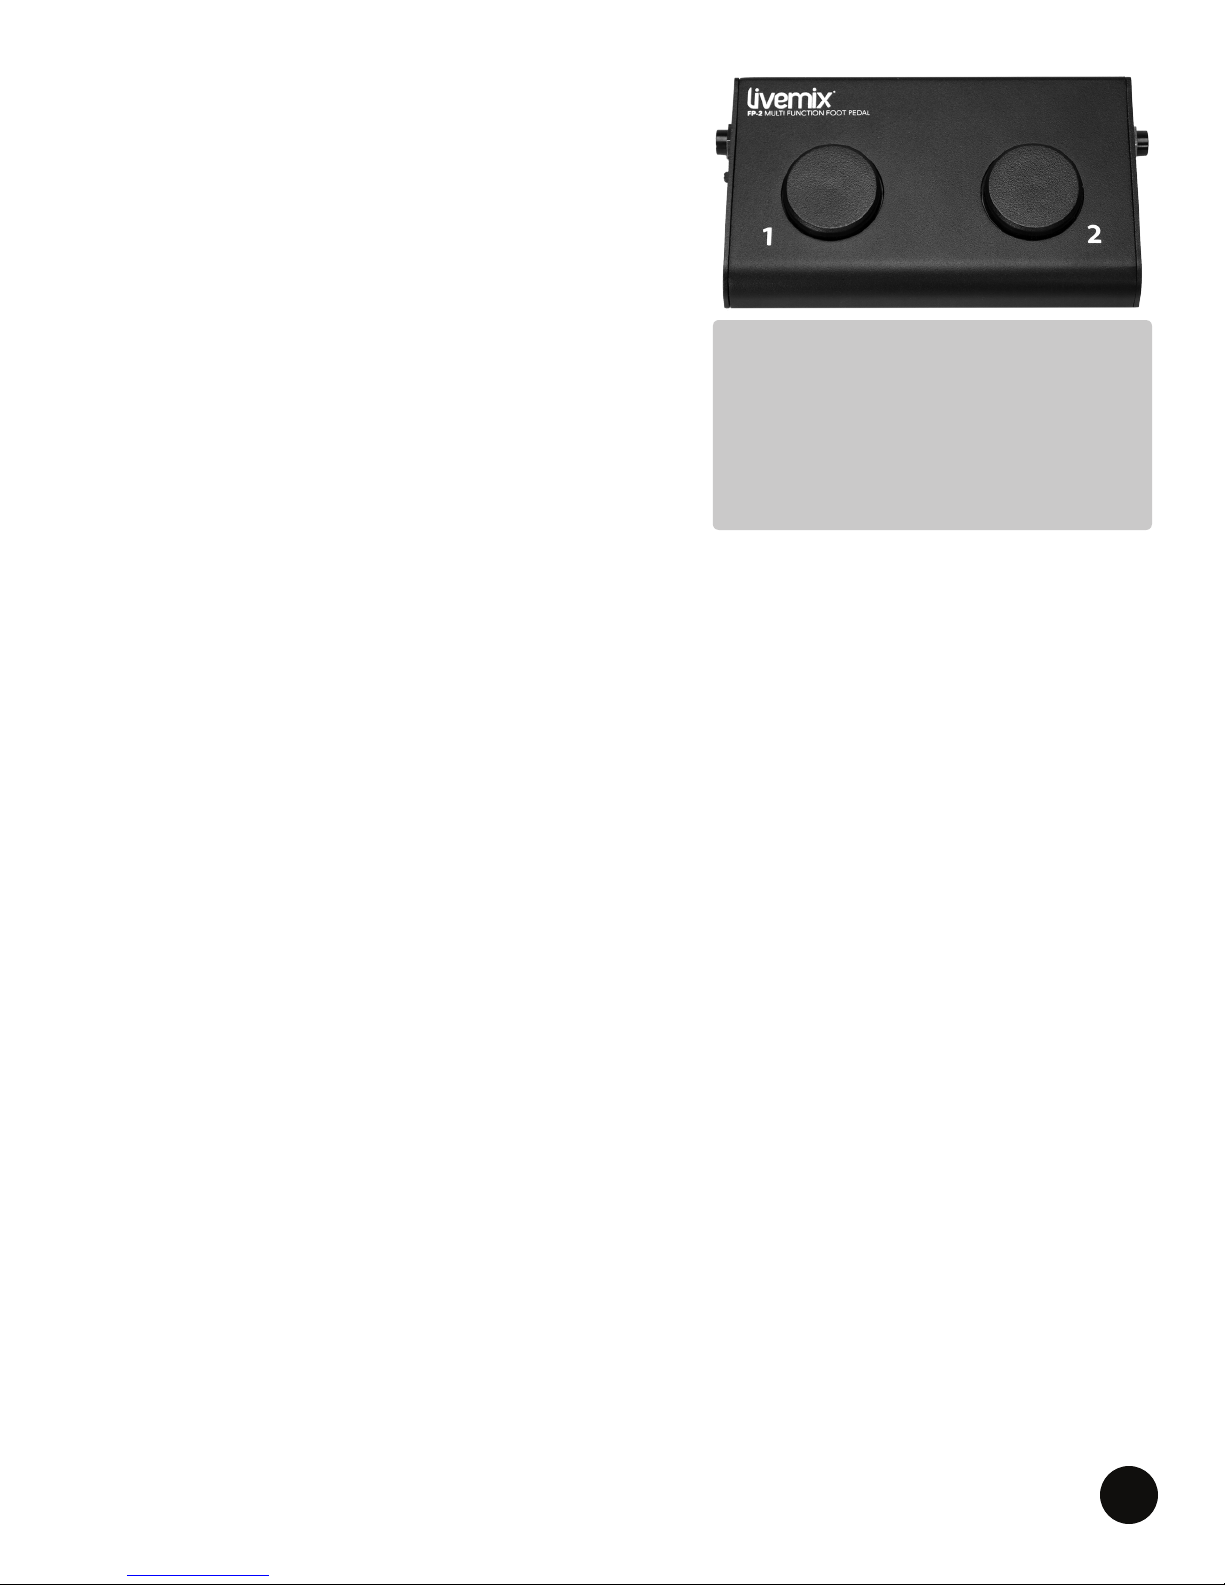
ACCESSORY: FP-2 FOOT PEDAL
The ¼” TRS connector on the Livemix personal mixer rear
panel allows connection to the optional FP-2 Foot Pedal
accessory. The foot pedal allows you to adjust mix settings
or activate the intercom on your mixer, while keeping your
hands on your instrument or microphone.
SETTING UP THE FP-2 FOOT PEDAL
1. IN: Connect a ¼” TRS cable to the Footswitch
connector to the personal mixer. Make sure the cable
is a TRS and has Tip, Ring, and Sleeve. A standard TS
or guitar cable will not work with the FP-2.
2. A/B Switch (CS-DUO ONLY): Depending on if you
are using the A or B side for mixing on the CS-DUO,
NOTE:
The only foot pedal that will function
with the CS-SOLO or CS-DUO is the
Livemix FP-2. Third party footswitches
will not work. The FP-2 is available from
an authorized Digital Audio Labs dealer.
set this switch to MIX A or MIX B. This switch is
inactive on the CS-SOLO.
3. THRU (CS-DUO ONLY): The FP-2 THRU connector allows you to connect two foot pedals to
one CS-DUO; one for MIX A and one for MIX B. Use a TRS cable to connect the rst pedal to
the second pedal and assign the MIX A or MIX B switches accordingly.
USING THE FP-2 FOOT PEDAL
The FP-2 foot pedal is controlled by either a TAP or a HOLD on one of the buttons. A TAP is a short
press, less than 1 sec in duration. A HOLD is a long press lasting more than a second.
1. TAP BUTTON 1: A short tap on button 1 will select the next channel on the Livemix personal
mixer. When you reach channel 24 it will select the Accessory Channels then cycle back to
channel 1.
2. HOLD BUTTON 1: A long press on button 1 will return you to the ME Group. A second long
press will select channel 1. If a ME Group is not set up, holding button 1 will return you to
channel 1.
3. TAP BUTTON 2: A short tap on button 2 will turn up the volume of the selected channel.
4. HOLD BUTTON 2: A long press on button 2 will reduce the volume of the selected channel.
The volume of the selected channel will continue to reduce as long as button 2 is held.
5. HOLD BUTTON 1 & BUTTON 2: A long press on both buttons simultaneously will activate
the intercom. You will need to hold both buttons down for a full second before the intercom
activates. The intercom will remain active until the buttons are released.
LIVEMIX CS-SOLO
51
Page 54
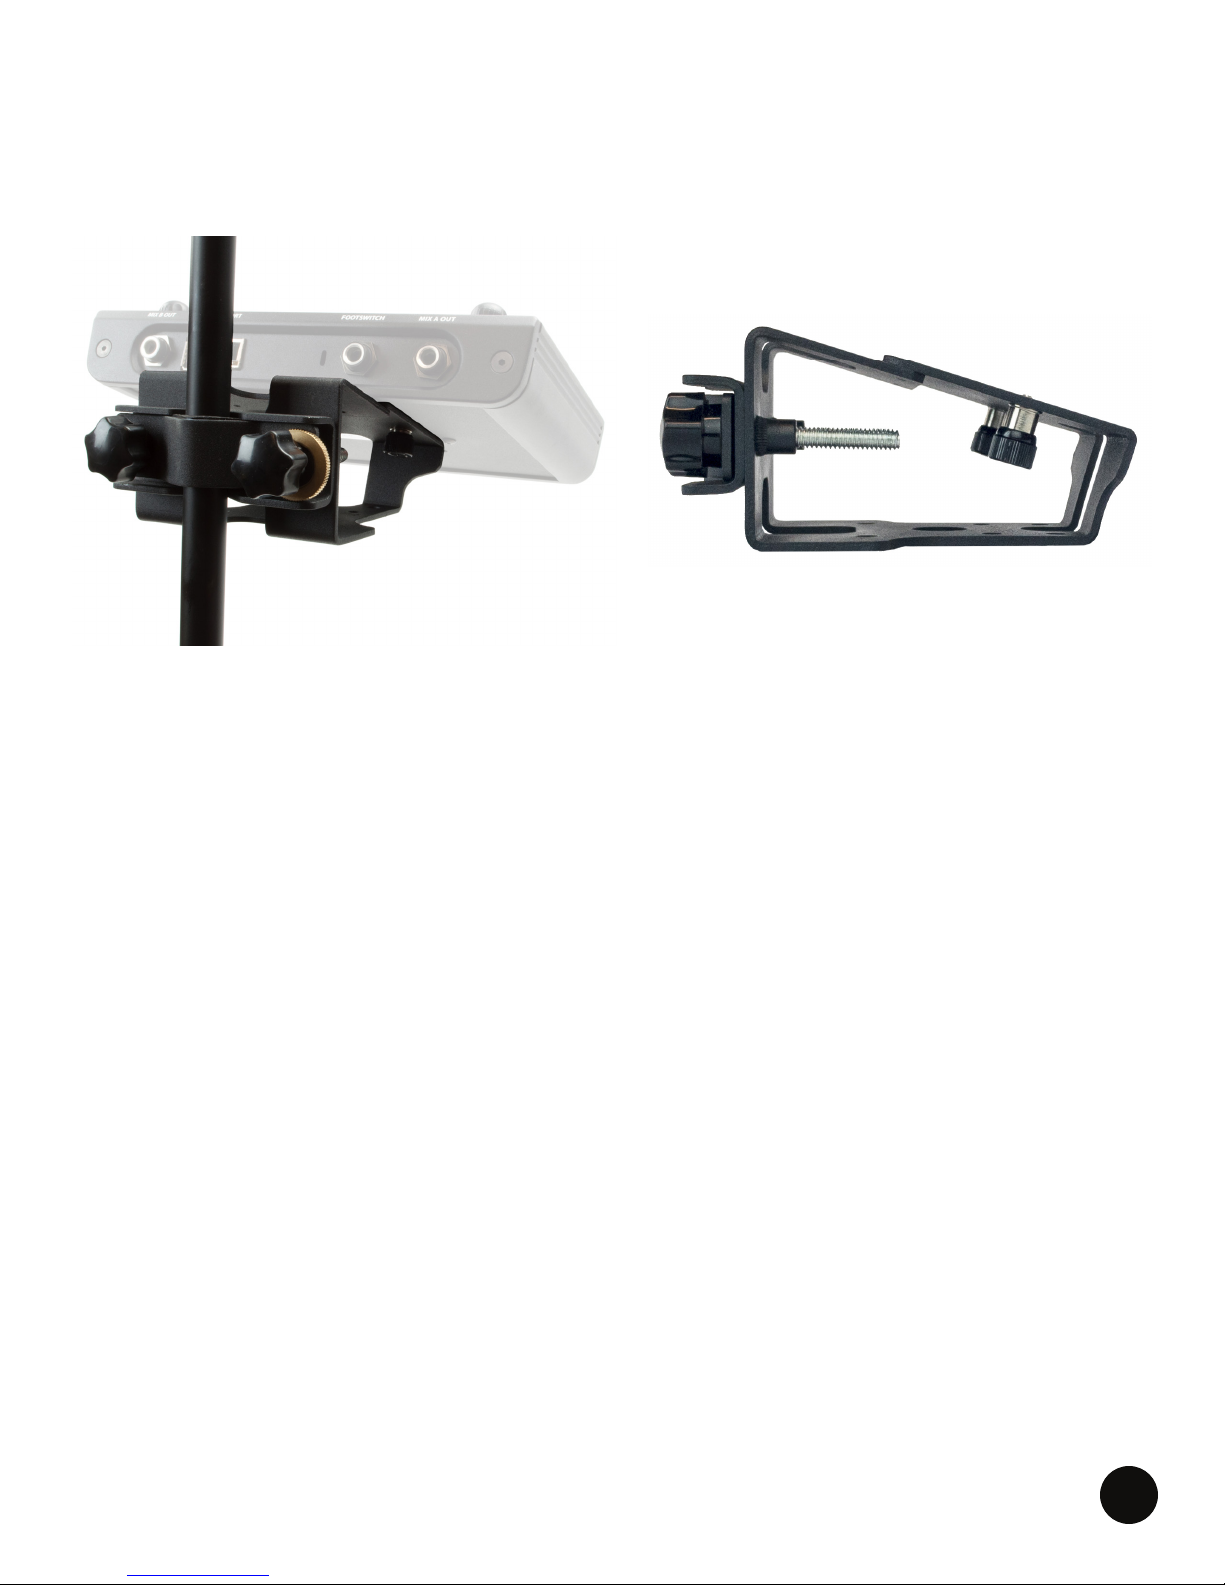
ACCESSORY: MT-1 MOUNT
The MT-1 mic-stand mount is dual position and attaches to the bottom of your CS-SOLO. It can be
attached to the top of any standard microphone stand or to the vertical post. The MT-1 dual position
microphone stand mount is available from your Livemix dealer.
LIVEMIX CS-SOLO
52
Page 55

LIVEMIX SYSTEM EXAMPLES
A Livemix system requires either an analog (AD-24) or digital input (option card), the MIX-16 or MIX-
32 central mixer and at least one Livemix personal mixer. The CS-SOLO is a single mix personal
mixer and the CS-DUO is a dual mix personal mixer. A system with CS-DUOs provides the best
value. We recommend using CS-DUOs, with CS-SOLOs for use at front of house, for drummers,
keyboard players or for larger venues.
ANALOG INPUT SYSTEM WITH CS-SOLOS
1 x AD-24 Analog Input Rack Unit
1 x MIX-16 Central Mixer
3 x CS-DUO Personal Mixers
2 x CS-SOLO Personal Mixers
5 x MT-1 Dual Position Mounts
1 x CBL-CAT6-100 Shielded CAT6 Cable 100’ **
5 x CBL-CAT6-50 Shielded CAT6 Cable 50’
ANALOG INPUT SYSTEM WITH CS-DUOS
1 x AD-24 Analog Input Rack Unit
1 x MIX-16 Central Mixer
4 x CS-DUO Dual Mix Personal Mixers
4 x MT-1 Dual Position Mounts
1 x CBL-CAT6-100 Shielded CAT6 Cable 100’ **
4 x CBL-CAT6-50 Shielded CAT6 Cable 50’
**Shielded cable between AD-24 and MIX-16/MIX-32 (and also the DA-816 if applicable) is required.
CAT6 is not required, CAT5e is acceptable.
DIGITAL INPUT SYSTEM WITH CS-SOLOS
1 x MIX-16 Central Mixer
1 x LM-DANTE-EXP Dante option card
3 x CS-DUO Personal Mixers
2 x CS-SOLO Personal Mixers
5 x MT-1 Dual Position Mounts
1 x CBL-CAT6-100 Shielded CAT6 Cable 100’ **
5 x CBL-CAT6-50 Shielded CAT6 Cable 50’
DIGITAL INPUT SYSTEM CS-DUOS
1 x MIX-16 Central Mixer
1 x LM-DANTE-EXP Dante option card
4 x CS-DUO Dual Mix Personal Mixers
4 x MT-1 Dual Position Mounts
1 x CBL-CAT6-100 Shielded CAT6 Cable 100’ **
4 x CBL-CAT6-50 Shielded CAT6 Cable 50’
Below are some examples of what a basic system may look like.
ANALOG OR DIGITAL?
Users receiving audio from an analog source will use the AD-24. Using the TRS or DB-25 inputs,
audio from the source is made available to the Livemix system.
Users receiving audio from a digital source will use the Option Card (LM-DANTE-EXP). This is an
option card that is installed in the MIX-16/MIX-32 and allows the Livemix system to receive audio
from a digital device or network.
PERSONAL MIXER / CONTROL SURFACE
Livemix needs at least one connected personal mixer to make a mix. Each Livemix personal mixer
connects via CAT5e/CAT6 cable to one of the Control Surface Ports on the MIX-16 or MIX-32. Using
various controls on the unit, users can each create their own custom mix, which is then output to
headphones, in-ear monitors or stage monitors, directly from the personal mixer or Livemix DA-816
analog output unit.
LIVEMIX CS-SOLO
53
Page 56

TROUBLESHOOTING
Verify that the standard network cable is connected
from a MIX-16/MIX-32 port to the CS PORT IN on the
CS-SOLO. The green light on the CS PORT will light up
green when power is connected and the yellow light will
light when there is a problem receiving information from
the MIX-16/MIX-32.
My CS-SOLO is not powering on.
I do not hear any sound coming out of
my headphones or stage monitor.
I do not hear any sound from a specic
channel in my mix.
If two CS-SOLOs are connected, verify that a standard
network cable is connected to the CS PORT IN on the
second CS-SOLO. NOTE: Only two CS-SOLOs can be
connected per Control Surface Port on the MIX-16 or
MIX-32.
Verify that your MIX-16/MIX-32 is powered on.
Verify that the master volume knob is turned up and that
the Mute Master Output is not selected in the Master
Output Settings. Also ensure the volume levels on each
channel are appropriate.
Verify that the channel is not muted. If it is muted, you
will see a red mute label next to the channel name on
the Channel Overview and a red indicator will be visible
on the Status Bar.
Verify that the channel is connected properly to the AD24 or mapped properly if using the Dante Option Card.
If your mixing console supports direct output muting,
verify these that these are on.
I do not hear any sound from my media
player connected to the Aux Input.
I am adjusting the panning but
everything still sounds mono.
My personal mix sounds dry and clinical.
I don’t feel any connection with the other
musicians or the audience.
LIVEMIX CS-SOLO
Go to the Accessory Channels, make sure the volume
for the Aux Input source is turned up. In Single Channel
View, verify Monitor All Aux is selected.
Go to the Master Output Settings and verify that your
personal mixer is set to Headphones Stereo and not
Balanced Mono.
In the Accessory Channels, select the Ambient Mic
channel and ROTATE the ADJUST knob to add some
ambient sound to your mix.
You might also try adding some reverb by pressing the
Master Volume knob and selecting Master Reverb.
54
Page 57

I can’t hear the Ambient Mic or Intercom.
There is a clicking, popping or audio
dropouts.
Verify the CS-SOLO is not set to Balanced Mono
mode. In Balanced Mono mode, the ambient mics and
intercom are turned off to reduce feedback. It also
keeps the intercom out of the oor wedges.
Audible clicking and popping is usually an issue with
the clock source. If you are using Livemix with a Dante
network, verify that your console or Dante device is set
to be the Master and Livemix is set to be the Slave.
This can be done through the Dante controller on a
Windows PC or Apple computer. NOTE: If you desire to
have your console’s internal (or local) clock be the clock
source, select this conguration setting on your console.
Then in Dante Controller, set your console’s Dante
option card to be the Master Dante device on the Dante
network and select “Sync to External” for this.
If audio is dropping out for a few seconds on a Dante
input version, and you are using a switch, verify that it
is a gigabit switch and that it is not an EEE or “green”
ethernet switch.
I don’t hear any channels.
Verify you have the correct input device selected. In the
Global Conguration menu, select “Input Select and
Digital Conguration” then “Input Source Select” and
verify that the correct input option is selected.
Verify that there are not any cable couplers, hubs,
switches or splitters between the personal mixers and
MIX-16/MIX-32.
Check the network cable connecting the personal mixer
to the MIX-16/MIX-32. If it was poorly constructed or
there is a break in the cable, you may not be getting the
proper data to the personal mixer.
LIVEMIX CS-SOLO
55
Page 58

APPENDIX
PRESET EFFECTS LIST
1 DRUMS: ROCK KICK
2 DRUMS: JAZZ KICK
3 DRUMS: ROCK SNARE
4 DRUMS: JAZZ SNARE
5 DRUMS: TOM LOW
6 DRUMS: TOM MID
7 DRUMS: TOM HIGH
8 DRUMS: OVERHEAD ROCK
9 DRUMS: OVERHEAD JAZZ
10 DRUMS: HIGH HAT
11 BASS: ELECTRIC FINGER
12 BASS: ELECTRIC PICK
13 BASS: ELECTRIC SLAP
14 BASS: UPRIGHT
15 GUITAR: ELECTRIC LEAD
16 GUITAR: ELECTRIC RHYTHM
17 GUITAR: ACOUSTIC
18 KEYS: ACOUSTIC PIANO
19 KEYS: ELECTRIC PIANO
20 KEYS: SYNTH
21 HORNS: TRUMPET
22 HORNS: TROMBONE
23 HORNS: SAX
24 STRINGS: VIOLIN
25 STRINGS: CELLO
26 PERCUSSION: BONGO/CONGA
27 VOX: MALE LEAD
28 VOX: MALE BACKGROUND
29 VOX: FEMALE LEAD
30 VOX: FEMALE BACKGROUND
31 VOX: MALE SPEECH
32 VOX: FEMALE SPEECH
LIVEMIX CS-SOLO
56
Page 59
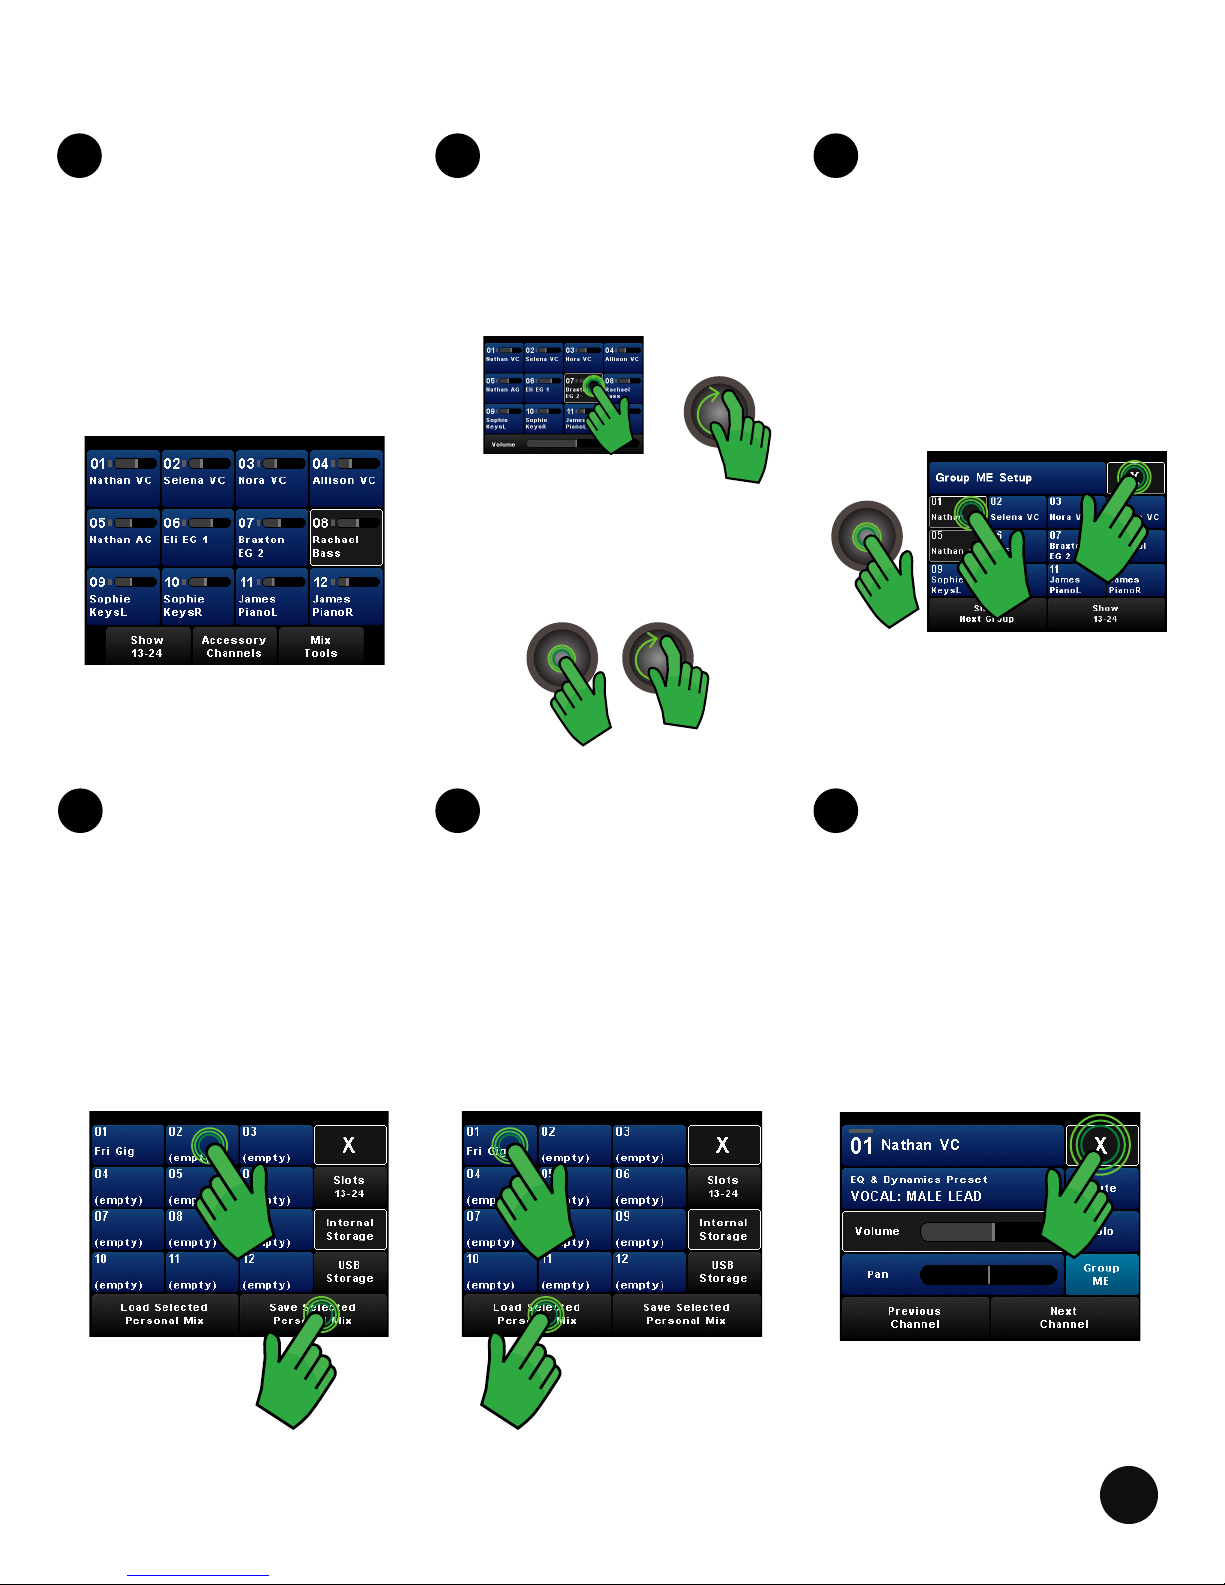
CREATING A PERSONAL MONITOR MIX
|
INTERCOM
ME
PUSH FOR GROUP SETUP
CS-SOLO
|
INTERCOM
ME
PUSH FOR GROUP SETUP
CS-SOLO
|
INTERCOM
ME
PUSH FOR GROUP SETUP
CS-SOLO
|
INTERCOM
CS-SOLO
1 CHANNEL OVERVIEW
Most of your mixing occurs on the
Channel Overview, allowing you to see
the names and levels of 12 channels at
a time. On the CS-DUO, press the A
or B control button to select the A mix
(blue) or the B mix (red).
2 VOLUME & PAN
The ADJUST VOL & PAN Knob is for
adjusting the volume or pan.
1. SELECT a channel to adjust.
2. ROTATE the Adjust Knob to
increase or decrease volume.
ADJUST
VOL & PAN
1
2
3. PRESS the Adjust Knob for pan.
4. ROTATE the Adjust Knob to pan
left or right. The mixer returns to
volume mode after 5 seconds.
ADJUST
VOL & PAN
3
ADJUST
VOL & PAN
4
3 ME KNOB
The ME Knob allows you to quickly
adjust the volume of your own
“group”. If you are singing and playing
guitar, you may want to assign these
channels to the ME Knob.
1. PRESS the ME Knob to access
Group Setup.
2. SELECT your channel(s).
3. PRESS X to exit.
ME
PUSH FOR GROUP SETUP
3
1
2
4 SAVE YOUR MIX 5 LOAD YOUR MIX
Saving a mix makes for an easy starting
point for your next performance.
1. PRESS Mix Tools from the Channel
Overview.
2. PRESS Load/Save Personal Mix.
3. SELECT an available save slot.
4. PRESS Save Selected Personal Mix.
5. PRESS Yes and enter Mix Name.
6. PRESS Done.
3
Loading a mix follows the same pattern
as Saving a mix.
1. PRESS Mix Tools from the Channel
Overview.
2. PRESS Load/Save Personal Mix.
3. SELECT a mix to load.
4. PRESS Load Selected Personal Mix.
3
4 4
6 PRESS THE X
The Livemix system has many
advanced features. If you nd
yourself somewhere you don’t want
to be, PRESS X to return the Channel
Overview.
LIVEMIX CS-SOLO
57
Page 60

MIXING TIPS
• START AT ZERO Load mix slot 23 (Zero Mix) as a starting point and set your master volume to
50-80%.
• ADD TIMING REFERENCE Mix the channels that keep time, usually percussion instruments.
Start with the Kick in the center and add snare and hi-hats panned off center.
• ADD PITCH REFERENCE Mix the channels you need to ensure you are on pitch. Limit this to
1-2 channels, like piano or acoustic guitar. Pan them off center to create space.
• ADD THE LEADER Mix the lead vocal to hear where the song is going.
• ADD YOU Increase your channel volume so you can hear yourself, but don’t overpower the mix.
• ADD THE REST SPARINGLY You don’t need to hear everything on stage. Some instruments are
not essential to your performance and can be reduced to make space for important channels.
• REVERB OR AMBIENT MICS After mixing, choose either Reverb or Ambient Mics to “open
up” the mix. For Reverb, press the Master Volume knob, select Master Reverb, select a room
type and adjust. For Ambient Mics, adjust level on the Accessory Channel screen. Add slowly to
the mix.
You don’t need to hear everything! Some instruments are not essential to your performance and can
be reduced in the mix making space for the important channels.
LIVEMIX CS-SOLO
58
Page 61

LIVEMIX SUPPORT
Phone Support: 952-401-7700
Toll Free: 844-DAL-INFO
Email Support: [email protected]
Website: www.digitalaudio.com/support
DIGITAL AUDIO LABS
1266 Park Rd
Chanhassen, MN 55317
TECHNICAL SPECIFICATIONS
CS-SOLO SPECIFICATIONS
@22Ω
@32Ω
Output Power & THD+N
@64Ω
@300Ω
Frequency Response 20 Hz - 22 kHz ± 3 dB
S/N Ratio 103 dB
Input Impedance (Aux In) 7.5kΩ
Crosstalk (Left to Right) -103 dB
Max Cable Length from MIX-16/MIX-32 100m CAT5e (shielded recommended)
High Pass and Low Pass .707
Filter Q
Peak/Dip 1.5
200mW @ 1% THD+N
100mW @ .03% THD +N
250mW @ 1% THD+N
100mW @ .014% THD +N
250mW @ 1% THD+N
100mW @ .005% THD +N
130mW @ 1% THD+N
100mW @ .003% THD +N
Filter Cut/Boost Amount ± 6 dB
Ambient Mic Gain 25 dB
Dimensions
Weight 1.5 lbs (0.68kg)
LIVEMIX CS-SOLO
6.5” (165mm) W
6” (152mm) D
1.94” (49mm) H
59
Page 62

LIVEMIX SYSTEM SPECIFICATIONS
.03% (100mW, 22Ω)
THD+N
(18 dBu 1kHz input)
.014% (100mW, into 32Ω)
.005% (100mW into 64Ω)
.003% (100mW into 300Ω)
S/N Ratio 103 dB
Frequency Response 20Hz-22kHz ± 3 dB
Crosstalk (Left to Right) -103 dB
Latency 1.5 mS
LIVEMIX CS-SOLO
60
Page 63

® 2014, 2015 Digital Audio Labs. ™ & © 2017 Digital Audio Labs.
Audinate®, the Audinate logo and Dante are trademarks of Audinate Pty Ltd.
Livemix is a registered trademark of Digital Audio Labs.
Patents pending.
 Loading...