

Digital Arts & Sciences IMAGEAXS 4.1 FOR WINDOWS User Manual
ImageAXS
for Windows
User’s Guide
™

Caere Corporation
100 Cooper Court
Los Gatos, California
95032-7603 USA
www.caere.com
Caere GmbH
Innere Wiener Strasse 5
81667 München, Germany
Caere UK Information Centre
3 Catherine Place
Westminster, London SWIE 6DX
Caere France
72, rue Baratte-Cholet
94100 Saint-Maur, France
Please Note
In order to use this application, you should know how to work in the Microsoft
Windows environment. Please refer to Windows documentation if you have
questions about how to use menu commands, dialog boxes, scroll bars, edit
boxes, and so on.
ImageAXS and ImageAXS Professional for Windows
Ver s i o n 4 . 1
Copyright© 1999 by Caere Corporation. All rights reserved.
The Caere logo and Caere are registered trademarks of Caere Corporation.
ImageAXS and e-ZCard are trademarks of Digital Arts & Sciences.
All other trademarks are the property of their respective companies.
ii
800-1329-030A

Table of Contents
Welcome
About ImageAXS and ImageAXS Professional....... 1
About This User’s Guide....... 1
Chapter 1 Installation and Startup
Installing ImageAXS....... 3
Starting ImageAXS....... 4
Opening the sample collection....... 4
Chapter 2 ImageAXS Basics
Collections....... 7
Records....... 8
Views....... 8
Toolbars....... 9
Status Bar....... 14
Thumbnail icons....... 15
File information....... 15
Chapter 3 Collections
Overview....... 17
Creating a new collection....... 18
Defining fields for a custom collection (Professional version
only)....... 20
Opening an existing collection....... 22
Selecting preferences for your collection....... 23
Creating records....... 28
Viewing and editing collection information....... 31
Closing a collection....... 32
iii

Chapter 4 Portfolios
Overview....... 33
Creating a new portfolio....... 35
Opening an existing portfolio....... 36
Adding records to a portfolio....... 37
Removing records from a portfolio....... 38
Sorting records in a portfolio....... 38
Closing a portfolio....... 38
Deleting a portfolio....... 39
Chapter 5 Views
Overview....... 41
Thumbnails View....... 42
Text List View....... 43
Info Sheet View....... 45
Keywords View....... 47
Source File View....... 48
Source File View toolbar options....... 51
Slide Shows....... 53
Chapter 6 Managing Records and Source Files
iv
Selecting records ....... 56
Creating blank records....... 57
Copying and pasting records....... 57
Dragging and dropping records between collections
(Professional version only)....... 59
Copying source files....... 60
Moving source files....... 61
Deleting source files....... 62
Deleting records from a collection....... 62
Orienting thumbnails and image source files....... 63

Updating records....... 64
Renaming a source file....... 66
Source file information....... 67
Editing a source file....... 68
Navigating to a specific record....... 68
Counting words in a record or selection of records....... 69
Copying images to the Clipboard....... 69
Converting source files (Professional version only)....... 70
Chapter 7 Working with Keywords
Overview....... 71
Modifying the Master Keywords list....... 72
Attaching keywords to individual records....... 73
Attaching keywords to multiple records....... 74
Importing and exporting keywords....... 75
Chapter 8 Searching and Sorting Records
Searching records....... 77
Using the and/or search operators....... 81
Saving and loading searches (Professional version only)....... 82
Searching subsets of records....... 83
Keyword searching....... 85
Sorting Records....... 88
Chapter 9 Importing and Exporting Records
Sharing records between Macintosh and Windows ....... 90
Importing CSV text formatted data....... 92
Exporting CSV text formatted data ....... 93
Importing ImageAXS 2.x formatted data....... 94
Mapping fields for ImageAXS 2.x collections (Professional
version only)....... 95
v

Chapter 10 Creating Web Pages (
Professional version only
Overview....... 99
Before You Begin....... 99
Exporting Web Pages....... 100
Creating Web Page Templates....... 112
)
Chapter 11 Exporting e-ZCards
(
Professional version only
Overview....... 117
Exporting e-ZCards from ImageAXS....... 118
e-ZCard options....... 119
)
Chapter 12 Printing Records and Reports
Printing records....... 129
Selecting page setup options....... 132
Printing Text List Reports....... 134
Customizing Text List Reports....... 136
Index
vi

Welcome to ImageAXS, and thank you for using this
software!
About ImageAXS and ImageAXS Professional
ImageAXS is an easy-to-use visual database that creates
thumbnail snapshots of your images (and other media) and
keeps track of where the media are stored.
ImageAXS Professional has all the features of ImageAXS,
plus more powerful, professional-level capabilities, such as
being able to publish HTML pages and distribute electronic
catalogs.
About This User’s Guide
This User’s Guide is designed to be used with both
ImageAXS and ImageAXS Professional. All references to
ImageAXS apply to both products unless otherwise noted.
For example, certain features are only available with
ImageAXS Professional. These features, and other
differences, are noted by the phrase Professional version only.
Welcome
Note For best results when viewing and printing this User’s
Guide, it is strongly recommended that you use Adobe
Acrobat Reader 4.0 or later.
1

About This User’s Guide
2 Welcome

Chapter 1
Installation and Startup
Chapter Topics
Installing ImageAXS
Installing ImageAXS
Starting ImageAXS
Opening the sample collection
To install ImageAXS:
1. Insert the ImageAXS CD-ROM into your CD-ROM drive.
2. Locate your CD-ROM drive in Windows Explorer.
3. Double-click the setup.exe file at the top-level of the
CD-ROM.
4. Select the language you want to install when you are
prompted.
5. Follow the instructions that appear on the screen.
By default, ImageAXS is installed in this folder
location:
C:\Program Files\ImageAXS 4
3

Starting ImageAXS
Starting ImageAXS
There are four ways to start ImageAXS:
• Double-click the ImageAXS (or ImageAXS Pro) program
icon in Windows Explorer.
• Click Start in the Windows taskbar and choose
Programs
Pro).
• Double-click an ImageAXS collection file.
• Drag an ImageAXS collection file onto the ImageAXS (or
ImageAXS Pro) program icon.
Opening the sample collection
When you open ImageAXS, you can click the Sample
Collection button in the program’s welcome screen to
display the sample collection. You can also open the sample
collection using the Open command.
Caere Applications!ImageAXS (or ImageAXS
!
4 Chapter 1
Opening the sample collection
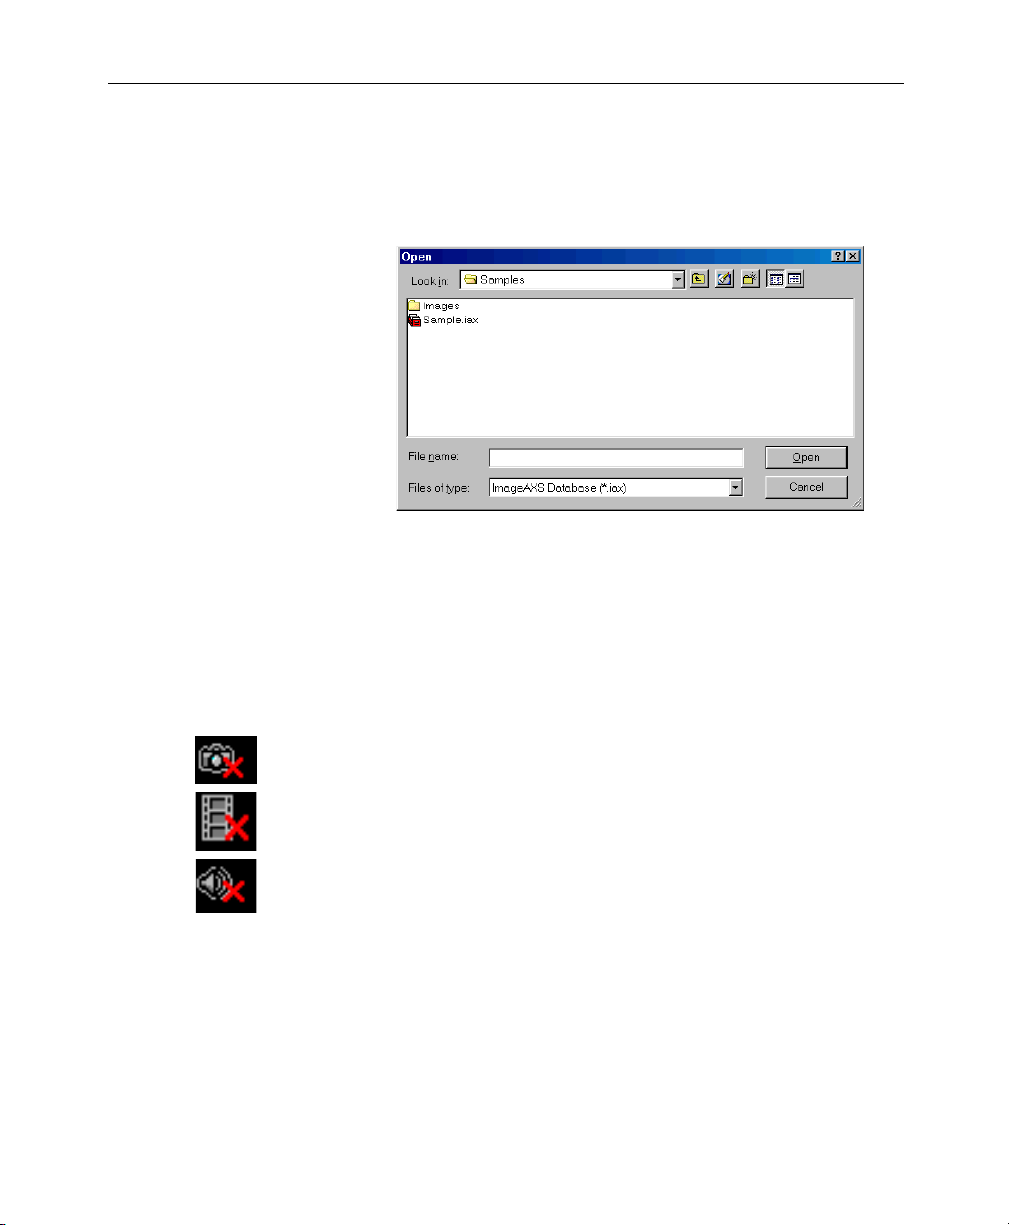
To open the sample collection:
1. Choose Open from the File menu (
CTRL
+ O).
2. Locate the sample collection (Sample.iax) in the Samples
folder within the folder where you installed ImageAXS.
3. Select Sample.iax and click Open.
The sample collection opens.
Note If you did not install ImageAXS in the default folder
location, an “X” appears over each thumbnail icon. This
indicates that the sample source files cannot be found. If
this occurs, you will need to update the records in the
sample collection using the Update Path command in the
Source File menu.
Examples of thumbnail
icons when source files
cannot be found.
Installation and Startup 5

Opening the sample collection
6 Chapter 1

Chapter 2
ImageAXS Basics
Chapter Topics
Collections
Note When you start ImageAXS, it will automatically display any
Collections
Records
View s
To o l b a r s
Status Bar
Thumbnail icons
File information
Collections are the data files created and read by ImageAXS.
Each is composed of individual records and pointers to the
source files associated with them. You can create and open
as many collections as you like.
collections and portfolios that were open when you closed
the previous session.
7

Records
Records
Views
Each collection or portfolio you create is made up of
individual records. A record contains information about a
source file. When creating a record, you will usually select a
source file and acquire it for the record.
Each record contains a thumbnail, file information, fields
with descriptive data, and keywords.
ImageAXS provides a number of different ways to look at
the records in your collections and portfolios. These are
called views.
There are five different views in ImageAXS:
Thumbnails View
Info Sheet View
Text List View
Keywords View
Source File View
You can open each of the views by clicking a button or
choosing a menu command. The Thumbnails View and Text
List View display multiple records at a time and the Info
Sh eet View, Keyw ords View, a nd Source File View d isplay
one record at a time.
8 Chapter 2
Toolbars
Toolbars
As a default, the Toolbars appear across the top of the
application window, below the Menu bar. The Toolbars
provide quick mouse access to common commands used in
ImageAXS, as well as buttons for opening the Portfolios
dialog box and for acquiring source files.
To hide or show the Toolbars, select the Toolbar submenu
from the View menu. A check mark appears next to each
toolbar that is visible; select a particular toolbar to turn it on
or off.
Each toolbar can be resized or moved from its default
position by clicking and dragging it with your mouse.
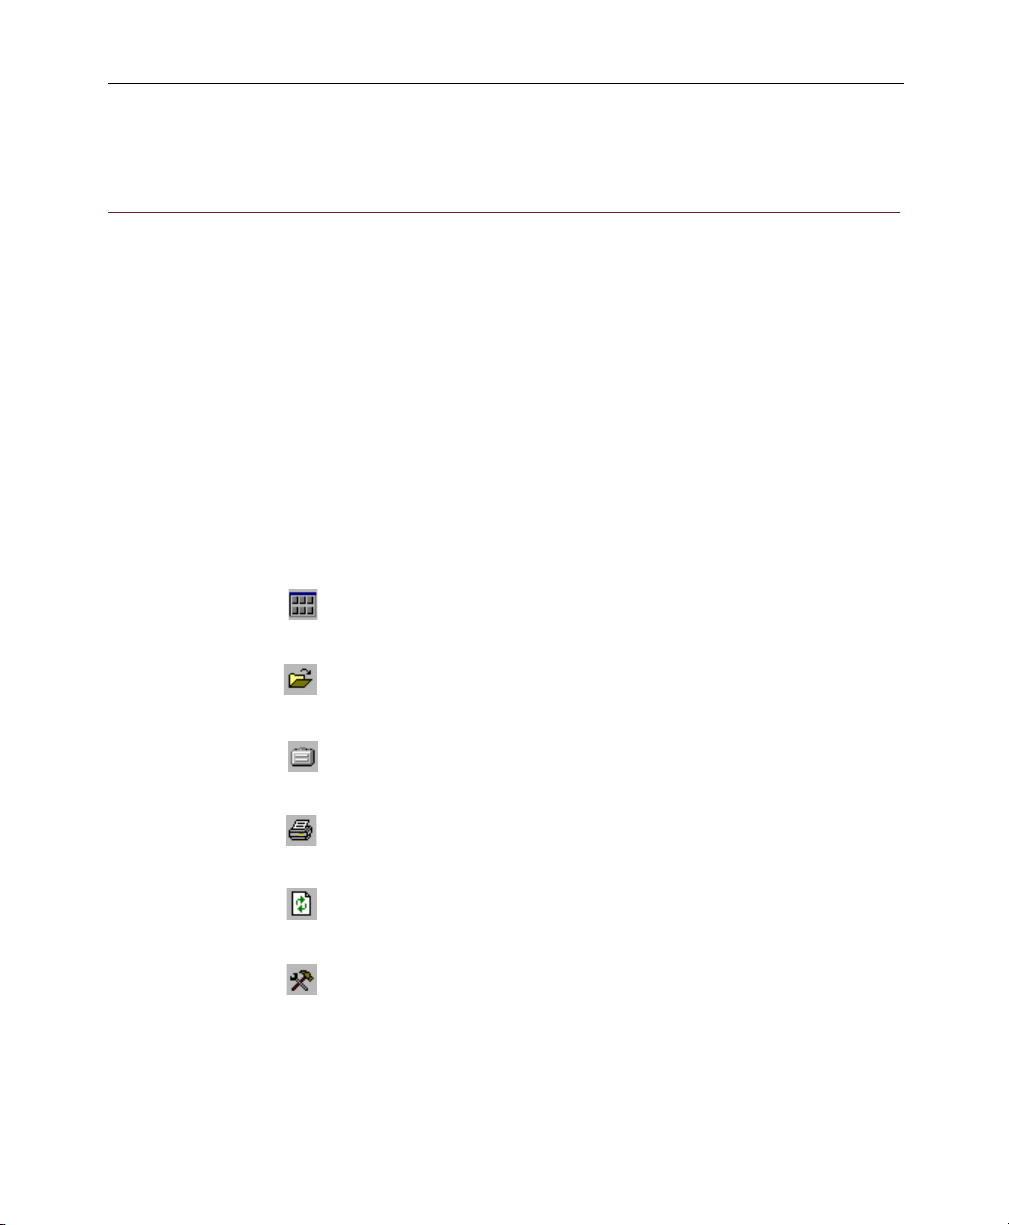
Standard toolbar
New Collection
Displays the Create Collection dialog box.
Open Collection
Displays the Open dialog box.
Portfolios
Opens the Portfolios dialog box.
Print
Displays the Print dialog box.
Refresh Volumes
Activates the Refresh Volumes command.
System Settings
Opens the System Settings dialog box.
ImageAXS Basics 9
Toolbars
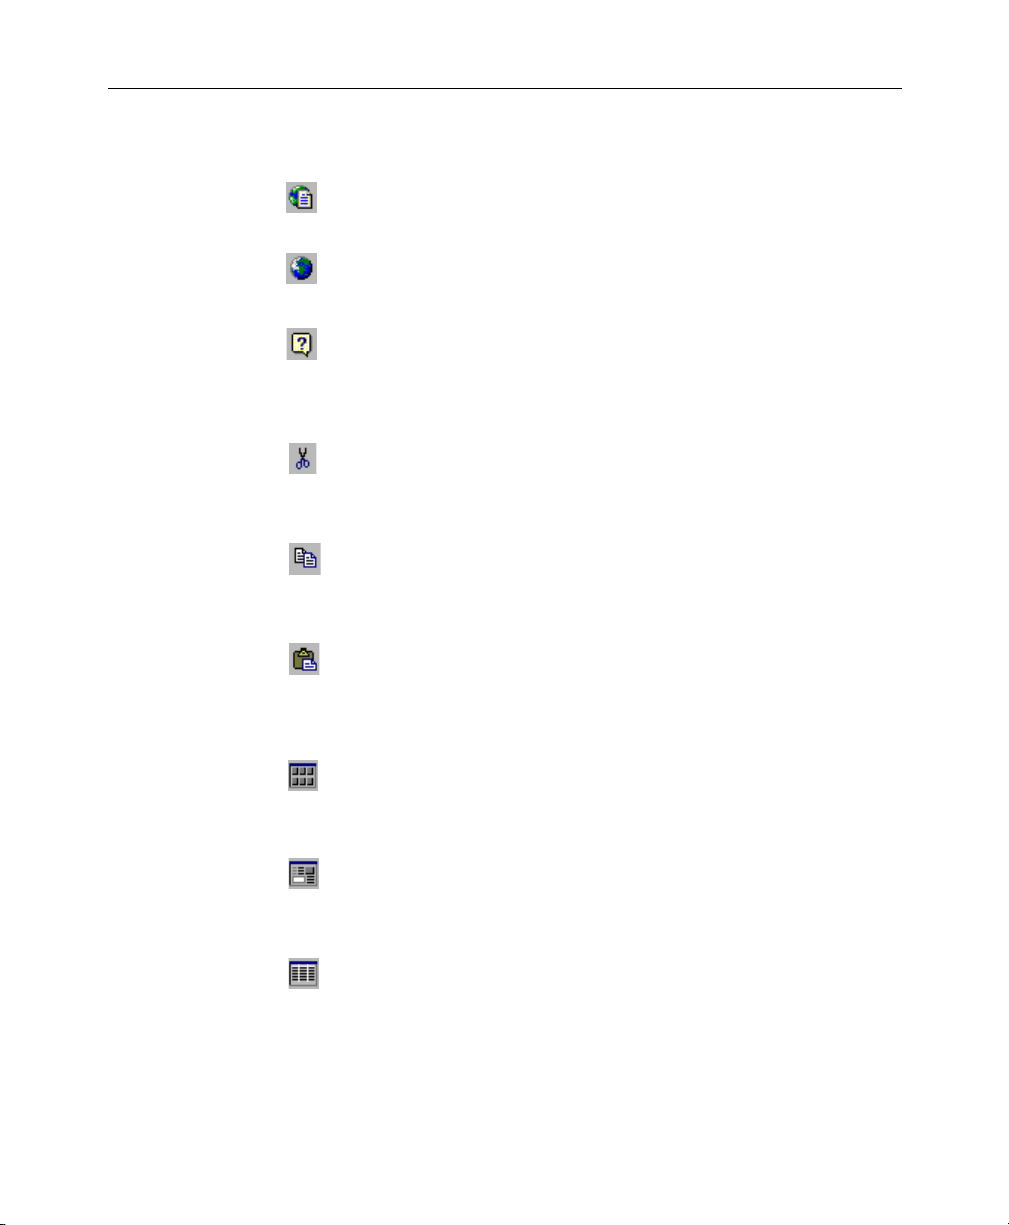
Go to Caere Web Site
Opens your Web browser and goes to www.caere.com.
Language
Displays the Language dialog box.
Help
Opens the ImageAXS Help file.
Edit toolbar
Cut
Cuts selected text from the Info Sheet View to the
Clipboard.
Copy
Copies selected text from the Info Sheet View to the
Clipboard.
Paste
Pastes cut or copied text from the Clipboard.
View toolbar
Thumbnails View
Displays the records in the active window in the
Thumbnails View.
Info Sheet View
Displays the records in the active window in the Info Sheet
View.
Text List View
Displays the records in the active window in the Text List
View.
10 Chapter 2
Toolbars
Keywords View
Displays the records in the active window in the Keywords
View.
Source File View
Displays the records in the active window in the Source File
View.
Record toolbar
Acquire Source Files
Opens the Acquire Files dialog box.
Save Fields
Saves changes you have made to the current record (Info
Sheet View only).
New Record
Creates a blank record (i.e., a record without a source file).
Delete Record
Removes records from a collection.
First
Navigates to the first record or window of records in the
active view.
Previous
Navigates to the previous record or window of records in
the active view.
Next
Navigates to the next record or window of records in the
active view.
ImageAXS Basics 11
Toolbars
Last
Navigates to the last record or window of records in the
active view.
Copy Source File
Copies selected source files to another location on your hard
drive or network.
Move Source File
Moves source files from one place to another on your hard
drive or network.
Delete Source File
Removes source files from your hard drive or network.
Search toolbar
Keyword Search
Opens the Keyword Search dialog box.
Search
Opens the Search dialog box.
Sort
Opens the Sort dialog box.
All
Initiates the Show All command (available only when a
subset of records appears in the active window).
Zoom toolbar
Zoom In
Activates the Zoom In tool.
12 Chapter 2
Toolbars
Zoom Out
Activates the Zoom Out tool.
Scroll
Activates the Scroll tool.
Best Fit
Activates the Best Fit tool.
Crop rectangle
Activates the Crop tool so you can select the area you want
to crop.
0 Degrees
Rotates an image back to its original orientation.
90 Degrees
Rotates an image clockwise 90 degrees.
180 Degrees
Rotates an image clockwise 180 degrees.
270 Degrees
Rotates an image clockwise 270 degrees.
Image toolbar (
More Contrast
Increases the contrast level in the image being viewed.
Less Contrast
Decreases the contrast level in the image being viewed.
More Brightness
Increases the brightness level in the image being viewed.
ImageAXS Basics 13
Professional version only
)
Status Bar
Status Bar
Less Brightness
Decreases the brightness level in the image being viewed.
More Gamma
Increases the gamma level in the image being viewed.
Less Gamma
Decreases the gamma level in the image being viewed.
Invert Image Colors
Inverts the intensity of the red, green, and blue components
of each color, producing a negative of the original image.
The Status Bar appears at the bottom of the application
window. The Status Bar displays messages to help you and
the following information:
•If you have
•If you have
CAPS LOCK
NUM LOCK
on.
on.
• Record number information
The number of records in the current data set and
which (if any) record you last selected.
To hide or show the Status Bar, choose Status Bar from the
View menu. A check mark appears next to the Status Bar
command when the Status Bar is visible.
14 Chapter 2
Thumbnail icons
Image Thumbnail icon
Movie Thumbnail icon
Audio Thumbnail icon
Thumbnail icons
In the Thumbnails View, an icon appears under the
thumbnail of each record. The Thumbnail icon indicates the
type of the source file and whether or not the source file for
that record is online. The terms online and offline refer to
whether ImageAXS is able to locate the source file for a
record.
In the Thumbnails View, if a Thumbnail icon has an “X”
through it, the source file for that record is offline. You
cannot open the Source File View for records that are offline;
in addition, you cannot copy, move, rename, or delete the
source files for these records.
Refreshing volumes
The Refresh Volumes command allows you to check that the
online/offline information on your screen is up to date.
Each time you change disks or mount or dismount a
volume like a CD-ROM or network volume, you should use
the Refresh Volumes command to update your information.
To do this, choose Refresh Volumes from the Tools menu (
5).
F
File information
File information is non-modifiable information about the
source file automatically entered when the file is acquired.
To display file information, select the record and choose File
Info from the Source File menu (
ALT+ENTER
is available only if a single record is selected. In the
Thumbnails view, file information for a record can also be
displayed by double-clicking its Thumbnail icon.
ImageAXS Basics 15
). The command

File information
The File Information dialog box provides the following
information about the source file:
Name
File name.
Ty p e
File type.
Size
File size on disk (in bytes).
Width
Image or movie file width in pixels.
Height
Image or movie file height in pixels.
Modified
Last modification date.
Vol um e
The name of the file’s storage volume.
Location
The file’s path name.
16 Chapter 2

Chapter 3
Collections
Chapter Topics
Overview
Note The standard version of ImageAXS can have only one
Overview
Creating a new collection
Defining fields for a custom collection (Professional version
only)
Opening an existing collection
Selecting preferences for your collection
Creating records
Viewing and editing collection information
Closing a collection
Collections are the data files created and read by ImageAXS.
Each is composed of individual records and pointers to the
source files associated with them. You can create and open
as many collections as you like.
collection open at a time. ImageAXS Professional can have
many collections open at once.
17
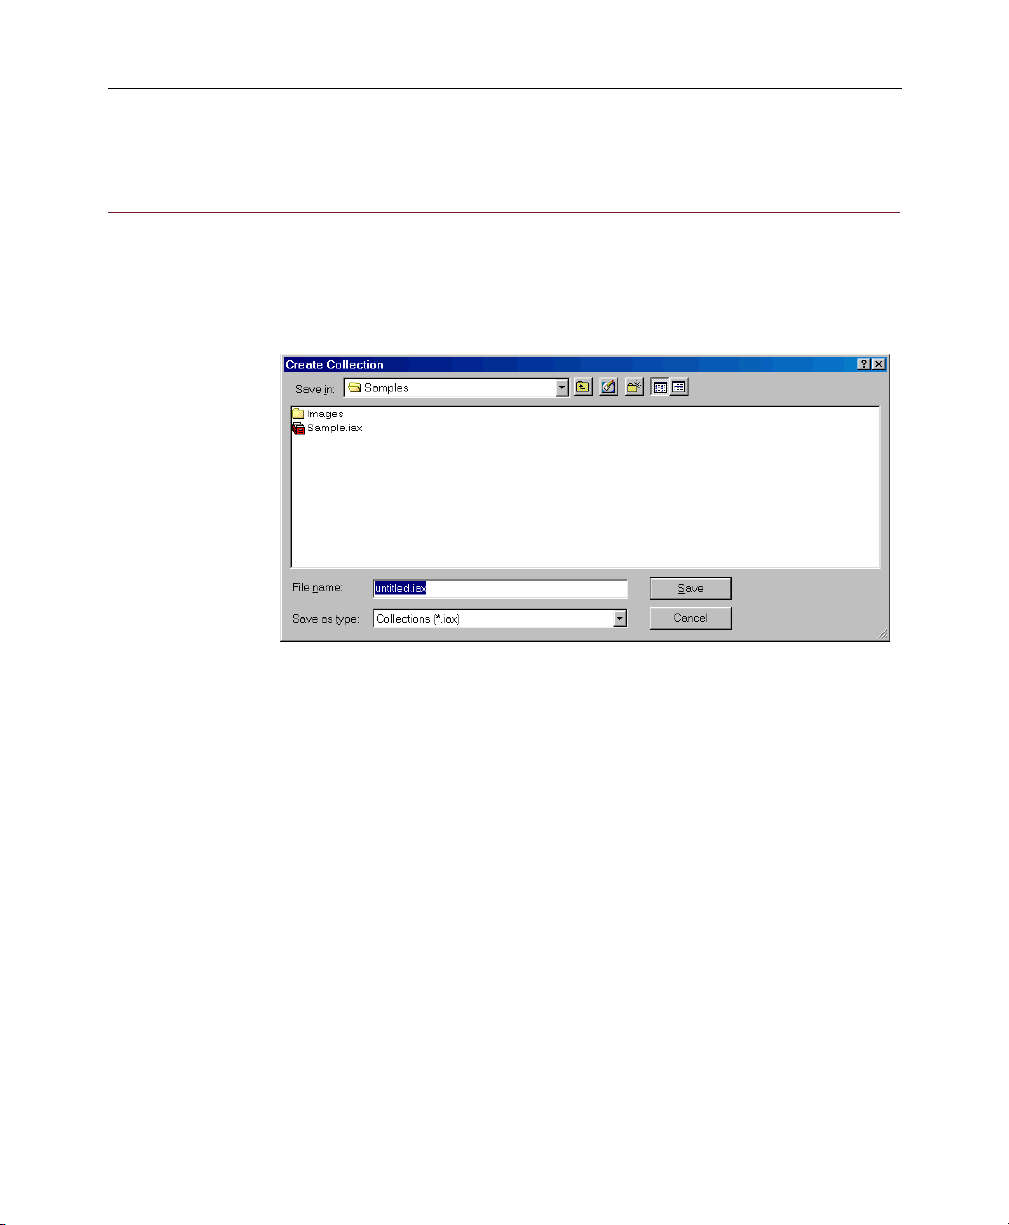
Creating a new collection
Creating a new collection
To create a new collection:
1. Choose New Collection from the File menu.
The Create Collection dialog box appears.
2. Enter a name and location for the new collection to be
saved.
3. Click Save.
If you have the regular version of ImageAXS, a
blank collection opens in ImageAXS 2.x format.
Each record contains 7 text fields with up to 80
characters per field.
If you have ImageAXS Professional, you will be
prompted to select a format for your collection.
Note The next two steps are for the Professional version only.
4. Choose a format for your collection:
18 Chapter 3

Creating a new collection
•Compact
Each record contains eight text fields (of up to
128 characters each), two number fields, and
two date fields.
•Professional
Each record contains sixteen text fields (up to
256 characters each), four number fields, and
four date fields.
•Custom
Custom collections let you create and name
more than 100 fields for your records. Select this
button and click OK to open the Custom
Collection Definition dialog box. See the next
section for more information on this dialog box.
• ImageAXS 2.x
Records will be configured exactly the same as
those created by earlier versions of ImageAXS
(7 text fields, up to 80 characters each).
5. Click OK.
A blank collection window appears.
Collections 19
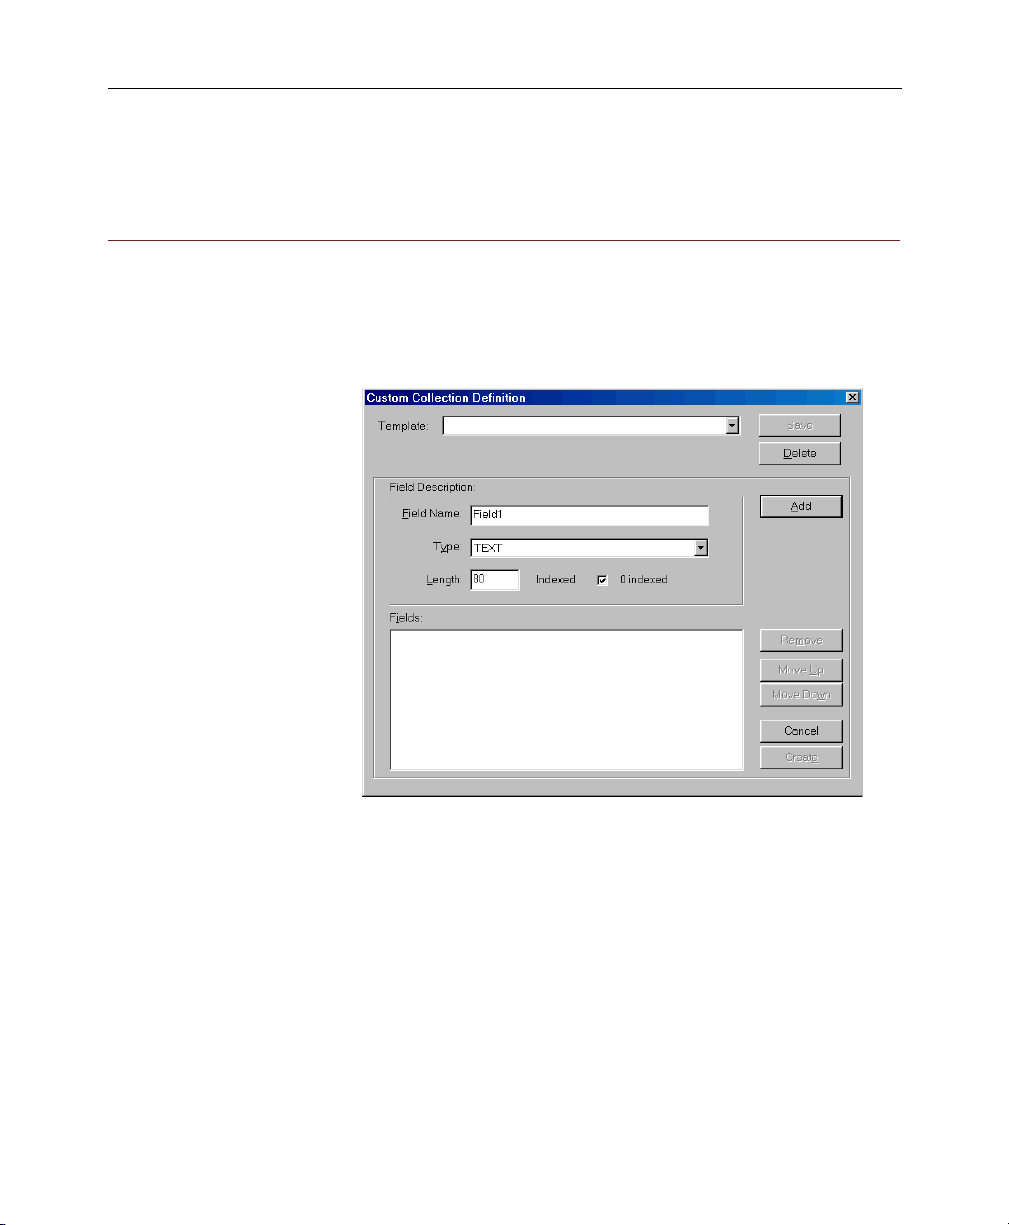
Defining fields for a custom collection (Professional version only)
Defining fields for a custom collection (Professional version
only)
When you create a custom collection, the Custom Collection
Definition dialog box appears. This allows you to define
more than 100 fields for the records in your custom
collection.
To define fields in the Custom Collection Definition
dialog box:
1. Enter a name for a field (up to 32 characters, with no
spaces or punctuation) in the Field Name box.
2. Choose a type for the field from the Type drop-down
list:
20 Chapter 3

Defining fields for a custom collection (Professional version only)
•Text
Holds up to 255 characters (enter a number in
the Length text box).
•Numeric
Useful for assigning numbers to each record for
organization and sorting purposes, or other
numeric information.
•Date/Time
Will be filled automatically using the date and
time information from your system.
• Boolean
Holds binary (such as true/false or yes/no)
data.
3. Select the Indexed check box if you want ImageAXS to
automatically presort this field for faster searching.
Up to 10 fields in a record can be indexed. Indexing
does not affect the display of fields in the record.
4. Click Add to add the field.
5. Repeat these steps for each field you want to include.
You can remove a field, or move it up or down, by
selecting the field and using the buttons in the
dialog box.
6. Click Create when you have finished adding fields.
Collections 21
Opening an existing collection
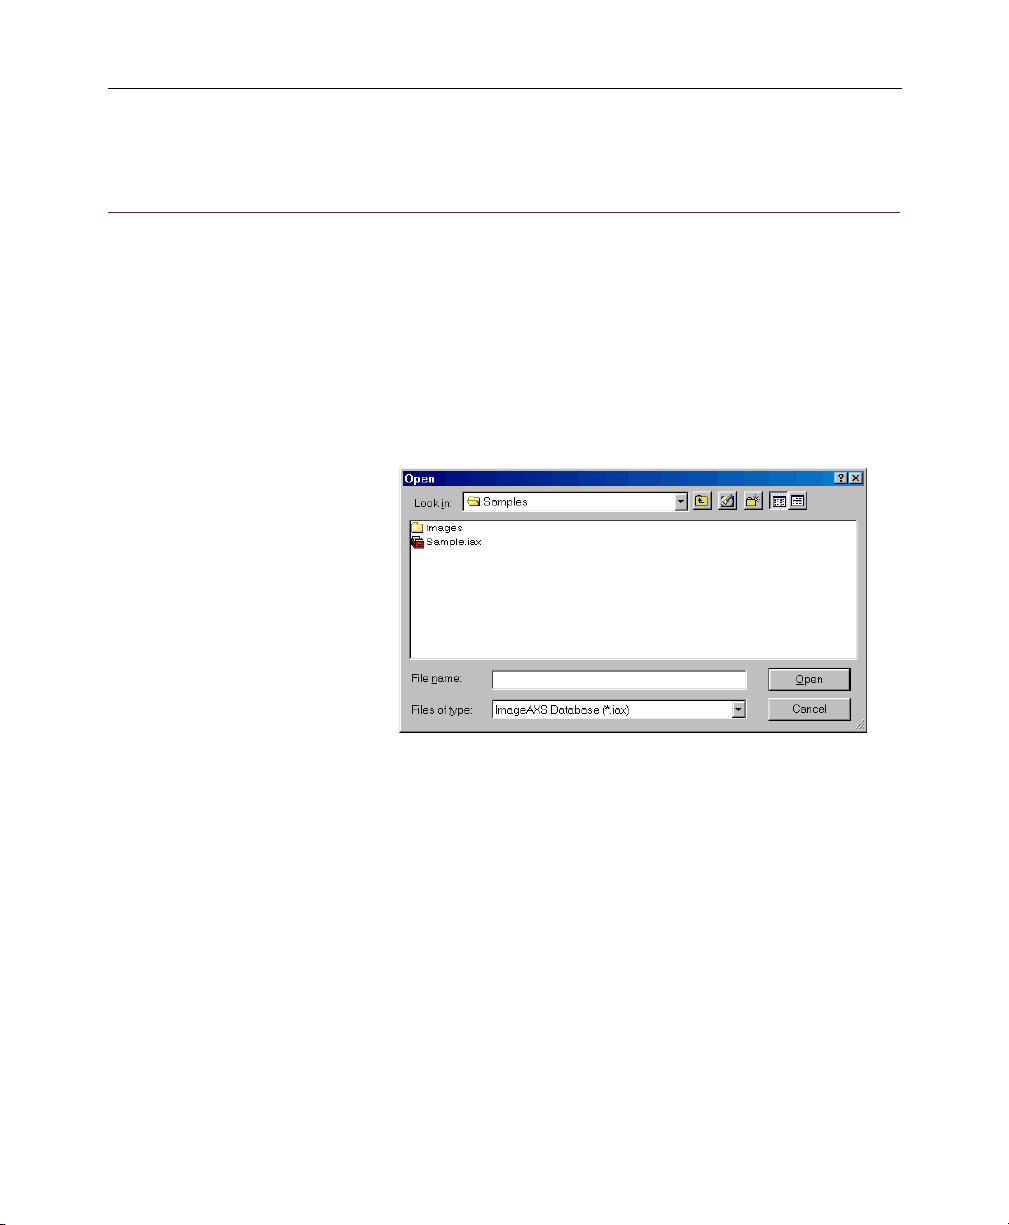
Opening an existing collection
The standard version of ImageAXS can have one collection
open at a time. If you open another collection, the current
collection closes automatically.
ImageAXS Professional can have many collections open at
once.
To open an existing collection:
1. Choose Open Collection (Ctrl +
) from the File menu.
O
2. Locate and select the collection you want to open.
3. Click Open.
22 Chapter 3
Selecting preferences for your collection
Selecting preferences for your collection
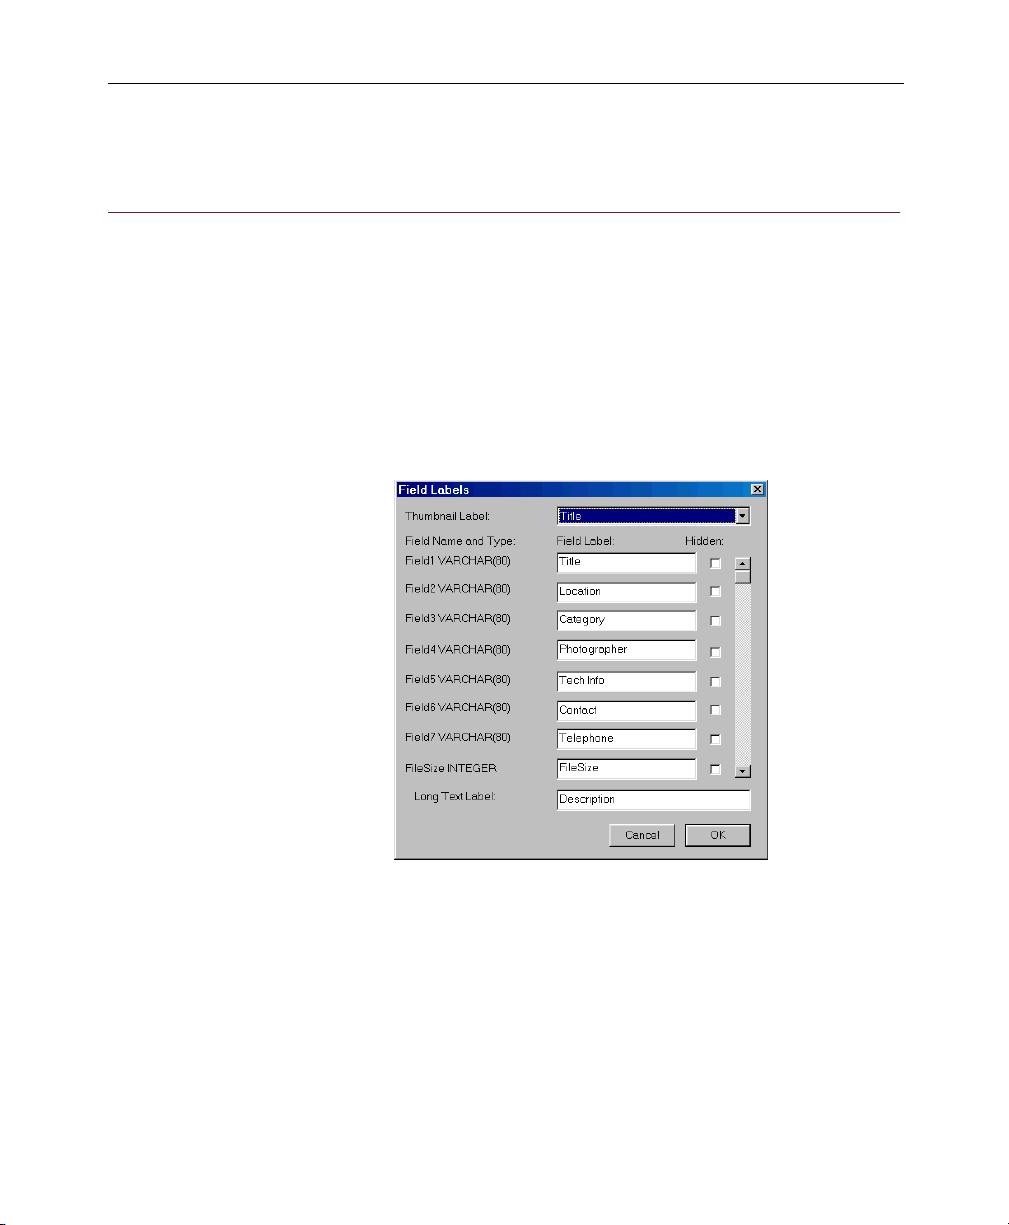
Assigning field labels
You can assign labels to fields to make them easily
identifiable. Field labels can be modified any time after a
collection has been created.
To assign field labels:
1. Open a collection.
2. Choose Field Labels from the Tools menu.
3. Select the field label you want to change and type in a
new one.
4. In the Thumbnail Label drop-down list, choose the field
information that you want displayed underneath each
thumbnail.
Note Only the first 15 characters of the field you select appear if
Collections 23

Selecting preferences for your collection
you are viewing large thumbnails. Fewer characters appear
if you are viewing medium or small thumbnails.
5. In the Long Text Label box, type your long text field label.
6. (Professional version only)
Select the Hidden check box for fields you do not
want to appear in the Text List View, Info Sheet
View, printed reports, or search/sort dialogs.
7. Click OK to save the changes you have made.
System Settings
The preferences you select in the System Settings dialog box
are applied to all collections that you open. To open the
System Settings dialog box, choose System Settings from the
To o ls m en u .
Data Source
The
Professional version of ImageAXS
tab appears only in the
Appearance
These system settings allow you to configure the
appearance of the ImageAXS windows.
24 Chapter 3
 Loading...