

Page 1
30
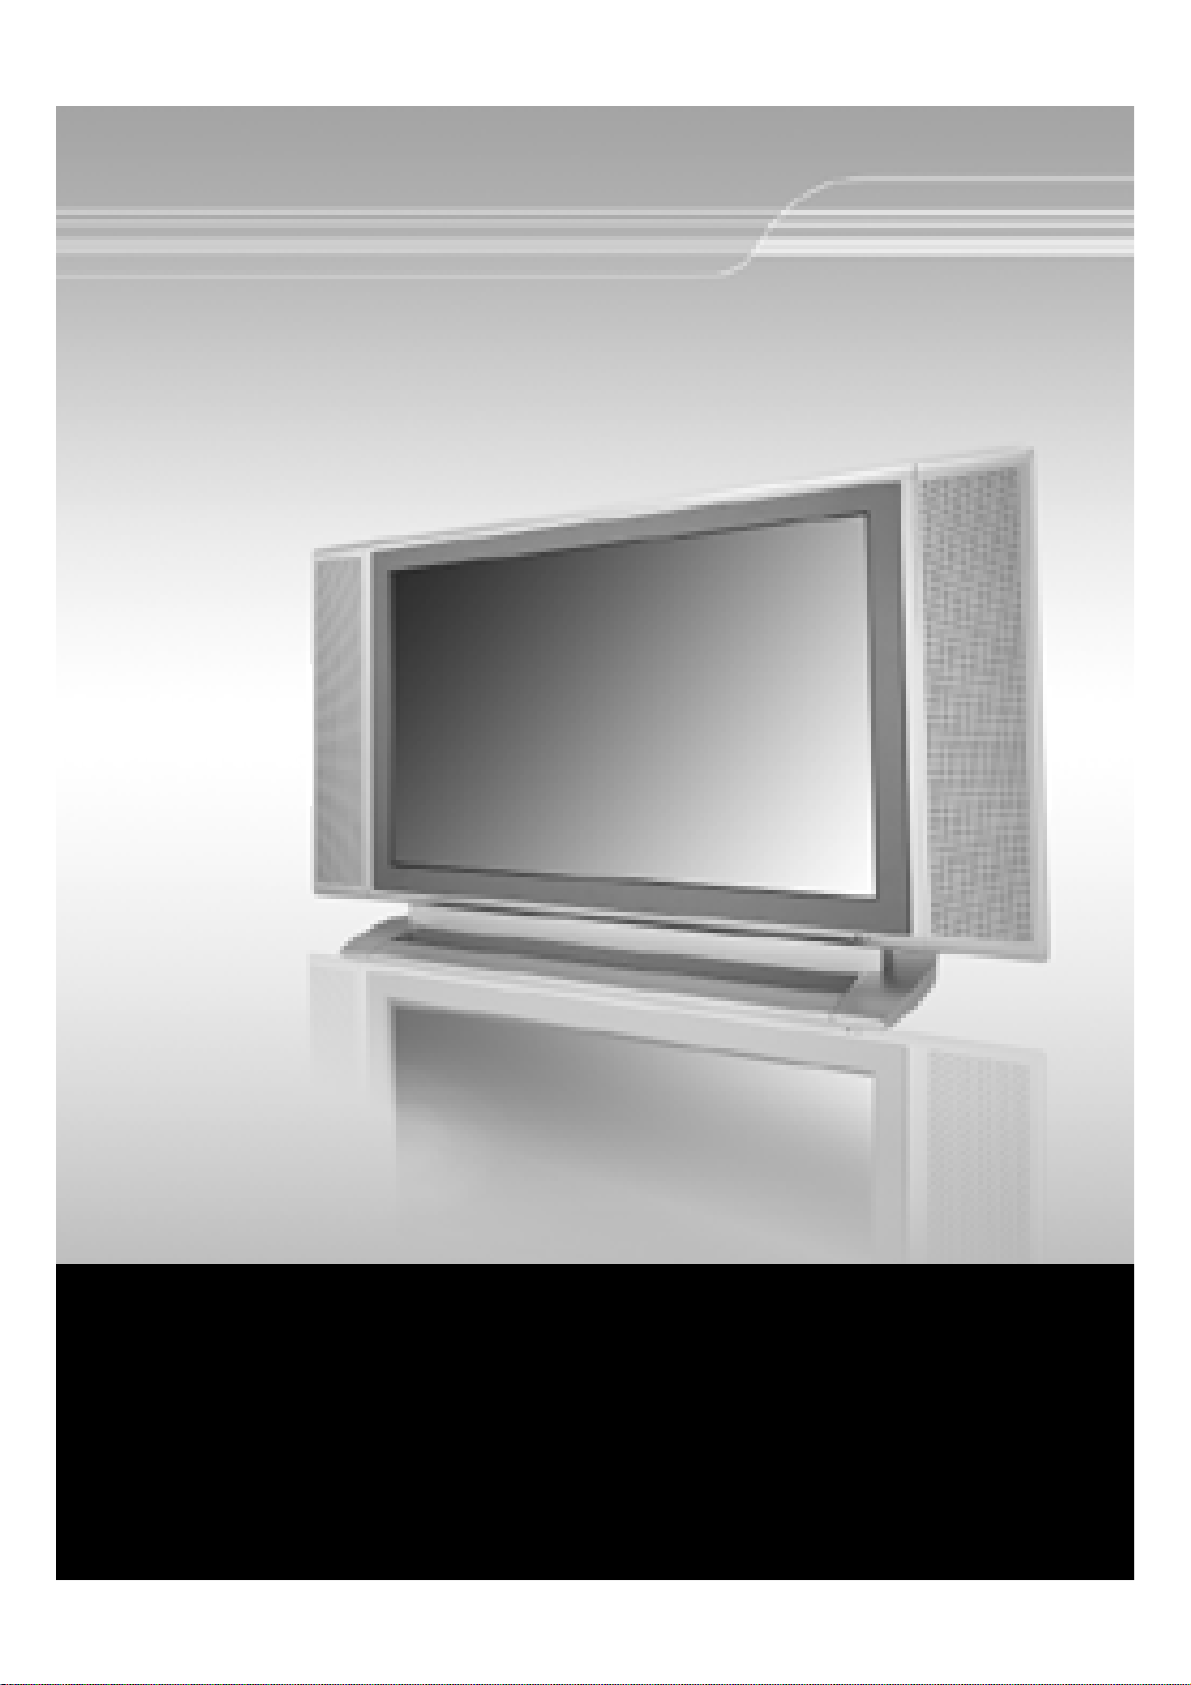
˝ LCD TV User's Guide
● Please observe all safety precautions
when using this product.
● Please read this manual carefully before
using this product.
Page 2
CONTENTS
● Quick and Easy Installation
● Versatility and Expandability
● That doesn’t make you feel fatigue on your Eyes.
● Flat-Panel Digital Display easy on the Eyes.
Safety Precautions
ㅤPower Supply
ㅤInstallation
ㅤUse and Maintenance
ㅤWhat is LCD TV?
⋯⋯⋯⋯⋯⋯⋯⋯⋯⋯⋯⋯⋯⋯⋯⋯⋯⋯⋯⋯⋯⋯⋯⋯⋯⋯⋯⋯⋯⋯⋯⋯⋯⋯⋯⋯⋯⋯⋯⋯⋯
⋯
⋯⋯⋯⋯⋯⋯⋯⋯⋯⋯⋯⋯⋯⋯⋯⋯⋯⋯⋯⋯⋯⋯⋯⋯⋯⋯⋯⋯⋯⋯⋯⋯⋯⋯⋯⋯⋯⋯⋯⋯⋯⋯⋯
⋯⋯⋯⋯⋯⋯⋯⋯⋯⋯⋯⋯⋯⋯⋯⋯⋯⋯⋯⋯⋯⋯⋯⋯⋯⋯⋯⋯⋯⋯⋯⋯⋯⋯⋯⋯⋯⋯
⋯⋯⋯⋯⋯⋯⋯⋯⋯⋯⋯⋯⋯⋯⋯⋯⋯⋯⋯⋯⋯⋯⋯⋯⋯⋯⋯⋯⋯⋯⋯⋯⋯⋯⋯⋯⋯⋯⋯⋯⋯
User Guidance Information
ㅤName of each part
ㅤControls and Functions
ㅤMounting on a wall
ㅤInstallation Precautions
ㅤInstalling an Antenna
ㅤRemote controller
ㅤPrecautions
⋯⋯⋯⋯⋯⋯⋯⋯⋯⋯⋯⋯⋯⋯⋯⋯⋯⋯⋯⋯⋯⋯⋯⋯⋯⋯⋯⋯⋯⋯⋯⋯⋯⋯⋯⋯⋯⋯⋯⋯
⋯⋯⋯⋯⋯⋯⋯⋯⋯⋯⋯⋯⋯⋯⋯⋯⋯⋯⋯⋯⋯⋯⋯⋯⋯⋯⋯⋯⋯⋯⋯⋯⋯⋯⋯⋯⋯⋯
⋯⋯⋯⋯⋯⋯⋯⋯⋯⋯⋯⋯⋯⋯⋯⋯⋯⋯⋯⋯⋯⋯⋯⋯⋯⋯⋯⋯⋯⋯⋯⋯⋯⋯⋯⋯⋯⋯
⋯⋯⋯⋯⋯⋯⋯⋯⋯⋯⋯⋯⋯⋯⋯⋯⋯⋯⋯⋯⋯⋯⋯⋯⋯⋯⋯⋯⋯⋯⋯⋯⋯⋯⋯⋯
⋯⋯⋯⋯⋯⋯⋯⋯⋯⋯⋯⋯⋯⋯⋯⋯⋯⋯⋯⋯⋯⋯⋯⋯⋯⋯⋯⋯⋯⋯⋯⋯⋯⋯⋯⋯⋯⋯
⋯⋯⋯⋯⋯⋯⋯⋯⋯⋯⋯⋯⋯⋯⋯⋯⋯⋯⋯⋯⋯⋯⋯⋯⋯⋯⋯⋯⋯⋯⋯⋯⋯⋯⋯⋯⋯⋯⋯⋯
⋯⋯⋯⋯⋯⋯⋯⋯⋯⋯⋯⋯⋯⋯⋯⋯⋯⋯⋯⋯⋯⋯⋯⋯⋯⋯⋯⋯⋯⋯⋯⋯⋯⋯⋯⋯⋯⋯⋯⋯⋯⋯⋯
Connection
ㅤVCR Connections
ㅤCable TV Connections
ㅤCamcorder/ Game Console Connections
ㅤDVD Connections
ㅤDTV Connections
ㅤPC Connections
⋯⋯⋯⋯⋯⋯⋯⋯⋯⋯⋯⋯⋯⋯⋯⋯⋯⋯⋯⋯⋯⋯⋯⋯⋯⋯⋯⋯⋯⋯⋯⋯⋯⋯⋯⋯⋯⋯⋯⋯
⋯⋯⋯⋯⋯⋯⋯⋯⋯⋯⋯⋯⋯⋯⋯⋯⋯⋯⋯⋯⋯⋯⋯⋯⋯⋯⋯⋯⋯⋯⋯⋯⋯⋯⋯⋯
⋯⋯⋯⋯⋯⋯⋯⋯⋯⋯⋯⋯⋯⋯⋯⋯⋯⋯⋯⋯⋯⋯⋯⋯⋯⋯⋯⋯
⋯⋯⋯⋯⋯⋯⋯⋯⋯⋯⋯⋯⋯⋯⋯⋯⋯⋯⋯⋯⋯⋯⋯⋯⋯⋯⋯⋯⋯⋯⋯⋯⋯⋯⋯⋯⋯⋯⋯⋯
⋯⋯⋯⋯⋯⋯⋯⋯⋯⋯⋯⋯⋯⋯⋯⋯⋯⋯⋯⋯⋯⋯⋯⋯⋯⋯⋯⋯⋯⋯⋯⋯⋯⋯⋯⋯⋯⋯⋯⋯
⋯⋯⋯⋯⋯⋯⋯⋯⋯⋯⋯⋯⋯⋯⋯⋯⋯⋯⋯⋯⋯⋯⋯⋯⋯⋯⋯⋯⋯⋯⋯⋯⋯⋯⋯⋯⋯⋯⋯⋯⋯
Basic Use
⋯
⋯
⋯
⋯
⋯
4
5
6
7
8
9
1 0
1 0
1 1
1 2
1 3
1 4
1 5
1 5
1 6
1 8
1 9
ㅤPowering the LCD TV
ㅤInitial Settings
ㅤWatching TV
ㅤSelecting Input Source
ㅤUsing the Menu
ㅤTo Set Location
ㅤSetting Programs
ㅤTo set or erase a Program
ㅤChanging Picture Settings
ㅤChanging Sound Settings
ㅤSelecting the Menu Language
ㅤSetting OSD Tone Menu Background
ㅤSetting Blue Background
2
⋯⋯⋯⋯⋯⋯⋯⋯⋯⋯⋯⋯⋯⋯⋯⋯⋯⋯⋯⋯⋯⋯⋯⋯⋯⋯⋯⋯⋯⋯⋯⋯⋯⋯⋯⋯⋯⋯⋯⋯⋯⋯
⋯⋯⋯⋯⋯⋯⋯⋯⋯⋯⋯⋯⋯⋯⋯⋯⋯⋯⋯⋯⋯⋯⋯⋯⋯⋯⋯⋯⋯⋯⋯⋯⋯⋯⋯⋯⋯⋯⋯⋯⋯
⋯⋯⋯⋯⋯⋯⋯⋯⋯⋯⋯⋯⋯⋯⋯⋯⋯⋯⋯⋯⋯⋯⋯⋯⋯⋯⋯⋯⋯⋯⋯⋯⋯⋯⋯⋯⋯⋯
⋯⋯⋯⋯⋯⋯⋯⋯⋯⋯⋯⋯⋯⋯⋯⋯⋯⋯⋯⋯⋯⋯⋯⋯⋯⋯⋯⋯⋯⋯⋯⋯⋯⋯⋯⋯⋯
⋯⋯⋯⋯⋯⋯⋯⋯⋯⋯⋯⋯⋯⋯⋯⋯⋯⋯⋯⋯⋯⋯⋯⋯⋯⋯⋯⋯⋯⋯⋯⋯⋯⋯⋯⋯⋯⋯⋯⋯
⋯⋯⋯⋯⋯⋯⋯⋯⋯⋯⋯⋯⋯⋯⋯⋯⋯⋯⋯⋯⋯⋯⋯⋯⋯⋯⋯⋯⋯⋯⋯⋯⋯⋯⋯⋯⋯⋯⋯⋯⋯
⋯⋯⋯⋯⋯⋯⋯⋯⋯⋯⋯⋯⋯⋯⋯⋯⋯⋯⋯⋯⋯⋯⋯⋯⋯⋯⋯⋯⋯⋯⋯⋯⋯⋯⋯⋯⋯⋯⋯⋯
⋯
⋯
⋯⋯⋯⋯⋯⋯⋯⋯⋯⋯⋯⋯⋯⋯⋯⋯⋯⋯⋯⋯⋯⋯⋯⋯⋯⋯⋯⋯⋯⋯⋯⋯⋯⋯⋯
⋯
⋯⋯⋯⋯⋯⋯⋯⋯⋯⋯⋯⋯⋯⋯⋯⋯⋯⋯⋯⋯⋯⋯⋯⋯⋯⋯⋯⋯⋯⋯⋯⋯⋯⋯⋯
⋯⋯⋯⋯⋯⋯⋯⋯⋯⋯⋯⋯⋯⋯⋯⋯⋯⋯⋯⋯⋯⋯⋯⋯⋯⋯⋯⋯⋯⋯⋯⋯⋯⋯⋯⋯
⋯⋯⋯⋯⋯⋯⋯⋯⋯⋯⋯⋯⋯⋯⋯⋯⋯⋯⋯⋯⋯⋯⋯⋯⋯⋯⋯⋯⋯⋯⋯⋯⋯⋯
⋯⋯⋯⋯⋯⋯⋯⋯⋯⋯⋯⋯⋯⋯⋯⋯⋯⋯⋯⋯⋯⋯⋯⋯⋯⋯⋯⋯⋯⋯
⋯⋯⋯⋯⋯⋯⋯⋯⋯⋯⋯⋯⋯⋯⋯⋯⋯⋯⋯⋯⋯⋯⋯⋯⋯⋯⋯⋯⋯⋯⋯⋯⋯⋯⋯⋯
⋯
2 0
2 0
2 1
2 2
2 2
2 3
2 4
2 4
2 5
2 6
2 7
2 7
2 8
Page 3
CONTENTS
Application
ㅤChanging Screen Size
ㅤChanging the Screen Size for WSS Signal Input
ㅤChanging the Program
ㅤSorting Program
ㅤEditing Program Name
ㅤAdjusting Unclear Screen
ㅤTo view the still picture
ㅤViewing Picture in Picture
ㅤAuto Volume Level
ㅤStereo Settings
ㅤResetting LCD TV Setting
ㅤSetting Time
ㅤAutomatic Power On/ Off
ㅤTeletext
ㅤUsing TV as a Monitor
ㅤAdjusting PC Screen
ㅤAdjusting Colour Temp
⋯⋯⋯⋯⋯⋯⋯⋯⋯⋯⋯⋯⋯⋯⋯⋯⋯⋯⋯⋯⋯⋯⋯⋯⋯⋯⋯⋯⋯⋯⋯⋯⋯⋯⋯⋯⋯⋯⋯⋯⋯⋯
⋯⋯⋯⋯⋯⋯⋯⋯⋯⋯⋯⋯⋯⋯⋯⋯⋯⋯⋯⋯⋯⋯⋯⋯⋯⋯⋯⋯⋯⋯⋯⋯⋯⋯⋯⋯⋯⋯⋯⋯⋯⋯⋯
⋯⋯⋯⋯⋯⋯⋯⋯⋯⋯⋯⋯⋯⋯⋯⋯⋯⋯⋯⋯⋯⋯⋯⋯⋯⋯⋯⋯⋯⋯⋯⋯⋯⋯⋯⋯⋯⋯⋯⋯⋯⋯⋯⋯⋯
⋯⋯⋯⋯⋯⋯⋯⋯⋯⋯⋯⋯⋯⋯⋯⋯⋯⋯⋯⋯⋯⋯⋯⋯⋯⋯⋯⋯⋯⋯⋯⋯⋯⋯⋯⋯⋯⋯
⋯⋯⋯⋯⋯⋯⋯⋯⋯⋯⋯⋯⋯⋯⋯⋯⋯⋯⋯⋯⋯⋯⋯⋯⋯⋯⋯⋯⋯⋯⋯⋯⋯⋯⋯⋯⋯
⋯⋯⋯⋯⋯⋯⋯⋯⋯⋯⋯⋯⋯⋯⋯⋯⋯⋯⋯⋯⋯⋯⋯⋯⋯⋯⋯⋯⋯⋯⋯⋯⋯⋯⋯⋯⋯⋯⋯⋯⋯
⋯⋯⋯⋯⋯⋯⋯⋯⋯⋯⋯⋯⋯⋯⋯⋯⋯⋯⋯⋯⋯⋯⋯⋯⋯⋯⋯⋯⋯⋯⋯⋯⋯⋯⋯⋯⋯
⋯⋯⋯⋯⋯⋯⋯⋯⋯⋯⋯⋯⋯⋯⋯⋯⋯⋯⋯⋯⋯⋯⋯⋯⋯⋯⋯⋯⋯⋯⋯⋯⋯⋯⋯⋯⋯
⋯⋯⋯⋯⋯⋯⋯⋯⋯⋯⋯⋯⋯⋯⋯⋯⋯⋯⋯⋯⋯⋯⋯⋯⋯⋯⋯⋯⋯⋯⋯⋯⋯⋯⋯⋯⋯⋯
⋯⋯⋯⋯⋯⋯⋯⋯⋯⋯⋯⋯⋯⋯⋯⋯⋯⋯⋯⋯⋯⋯⋯⋯⋯⋯⋯⋯⋯⋯⋯⋯⋯⋯⋯
⋯⋯⋯⋯⋯⋯⋯⋯⋯⋯⋯⋯⋯⋯⋯⋯⋯⋯⋯⋯⋯⋯⋯⋯⋯⋯⋯⋯⋯⋯⋯⋯⋯⋯⋯⋯⋯⋯⋯⋯
⋯⋯⋯⋯⋯⋯⋯⋯⋯⋯⋯⋯⋯⋯⋯⋯⋯⋯⋯⋯⋯⋯⋯⋯⋯⋯⋯⋯⋯⋯⋯⋯⋯⋯⋯⋯⋯
⋯
⋯⋯⋯⋯⋯⋯⋯⋯⋯⋯⋯⋯⋯⋯⋯⋯⋯⋯⋯⋯⋯⋯⋯⋯⋯⋯⋯⋯⋯⋯⋯⋯⋯⋯⋯⋯
⋯⋯⋯⋯⋯⋯⋯⋯⋯⋯⋯⋯⋯⋯⋯⋯⋯⋯⋯⋯⋯⋯⋯⋯⋯⋯⋯⋯⋯⋯⋯⋯⋯⋯⋯⋯⋯
⋯⋯⋯⋯⋯⋯⋯⋯⋯⋯⋯⋯⋯⋯⋯⋯⋯⋯⋯⋯⋯⋯⋯⋯⋯⋯⋯⋯⋯⋯⋯⋯⋯⋯⋯⋯⋯⋯
⋯⋯⋯⋯⋯⋯⋯⋯⋯⋯⋯⋯⋯⋯⋯⋯⋯⋯⋯⋯⋯⋯⋯⋯⋯⋯⋯⋯⋯⋯⋯⋯⋯⋯⋯⋯⋯⋯
⋯⋯⋯⋯⋯⋯⋯⋯⋯⋯⋯⋯⋯⋯⋯⋯⋯⋯⋯⋯⋯⋯⋯⋯⋯⋯
⋯
⋯
3 4 ~ 3 5
Monitor
⋯
⋯
2 9
3 0
3 0
3 1
3 2
3 3
3 3
3 6
3 6
3 7
3 8
3 9
4 0
4 1
4 1
4 2
ㅤExternal adjustment
ㅤSet ID
ㅤSpecial features
ㅤRS-232C Communication Protocol
ㅤTrouble shooting Tips
ㅤSupported Display Modes
⋯
⋯⋯⋯⋯⋯⋯⋯⋯⋯⋯⋯⋯⋯⋯⋯⋯⋯⋯⋯⋯⋯⋯⋯⋯⋯⋯⋯⋯⋯⋯⋯⋯⋯⋯⋯⋯⋯⋯⋯⋯⋯⋯⋯⋯⋯
⋯
⋯⋯⋯⋯⋯⋯⋯⋯⋯⋯⋯⋯⋯⋯⋯⋯⋯⋯⋯⋯⋯⋯⋯⋯⋯⋯⋯⋯⋯⋯⋯⋯⋯⋯⋯⋯⋯⋯
⋯⋯⋯⋯⋯⋯⋯⋯⋯⋯⋯⋯⋯⋯⋯⋯⋯⋯⋯⋯⋯⋯⋯⋯⋯⋯⋯⋯⋯⋯⋯⋯⋯⋯⋯⋯⋯⋯⋯⋯
⋯⋯⋯⋯⋯⋯⋯⋯⋯⋯⋯⋯⋯⋯⋯⋯⋯⋯⋯⋯⋯⋯⋯⋯⋯⋯⋯⋯⋯⋯⋯⋯⋯⋯⋯⋯⋯⋯
⋯⋯⋯⋯⋯⋯⋯⋯⋯⋯⋯⋯⋯⋯⋯⋯⋯⋯⋯⋯⋯⋯⋯⋯⋯⋯⋯⋯⋯⋯⋯⋯⋯⋯⋯⋯
External adjustment
⋯⋯⋯⋯⋯⋯⋯⋯⋯⋯⋯⋯⋯⋯⋯⋯⋯⋯⋯⋯⋯⋯⋯⋯⋯⋯⋯⋯⋯⋯
Maintenance and Service
⋯
4 5 ~ 4 9
5 0 ~ 5 1
⋯
4 3
4 3
4 4
5 2
3
Page 4
Power Supply
Warnings
Safety Precautions
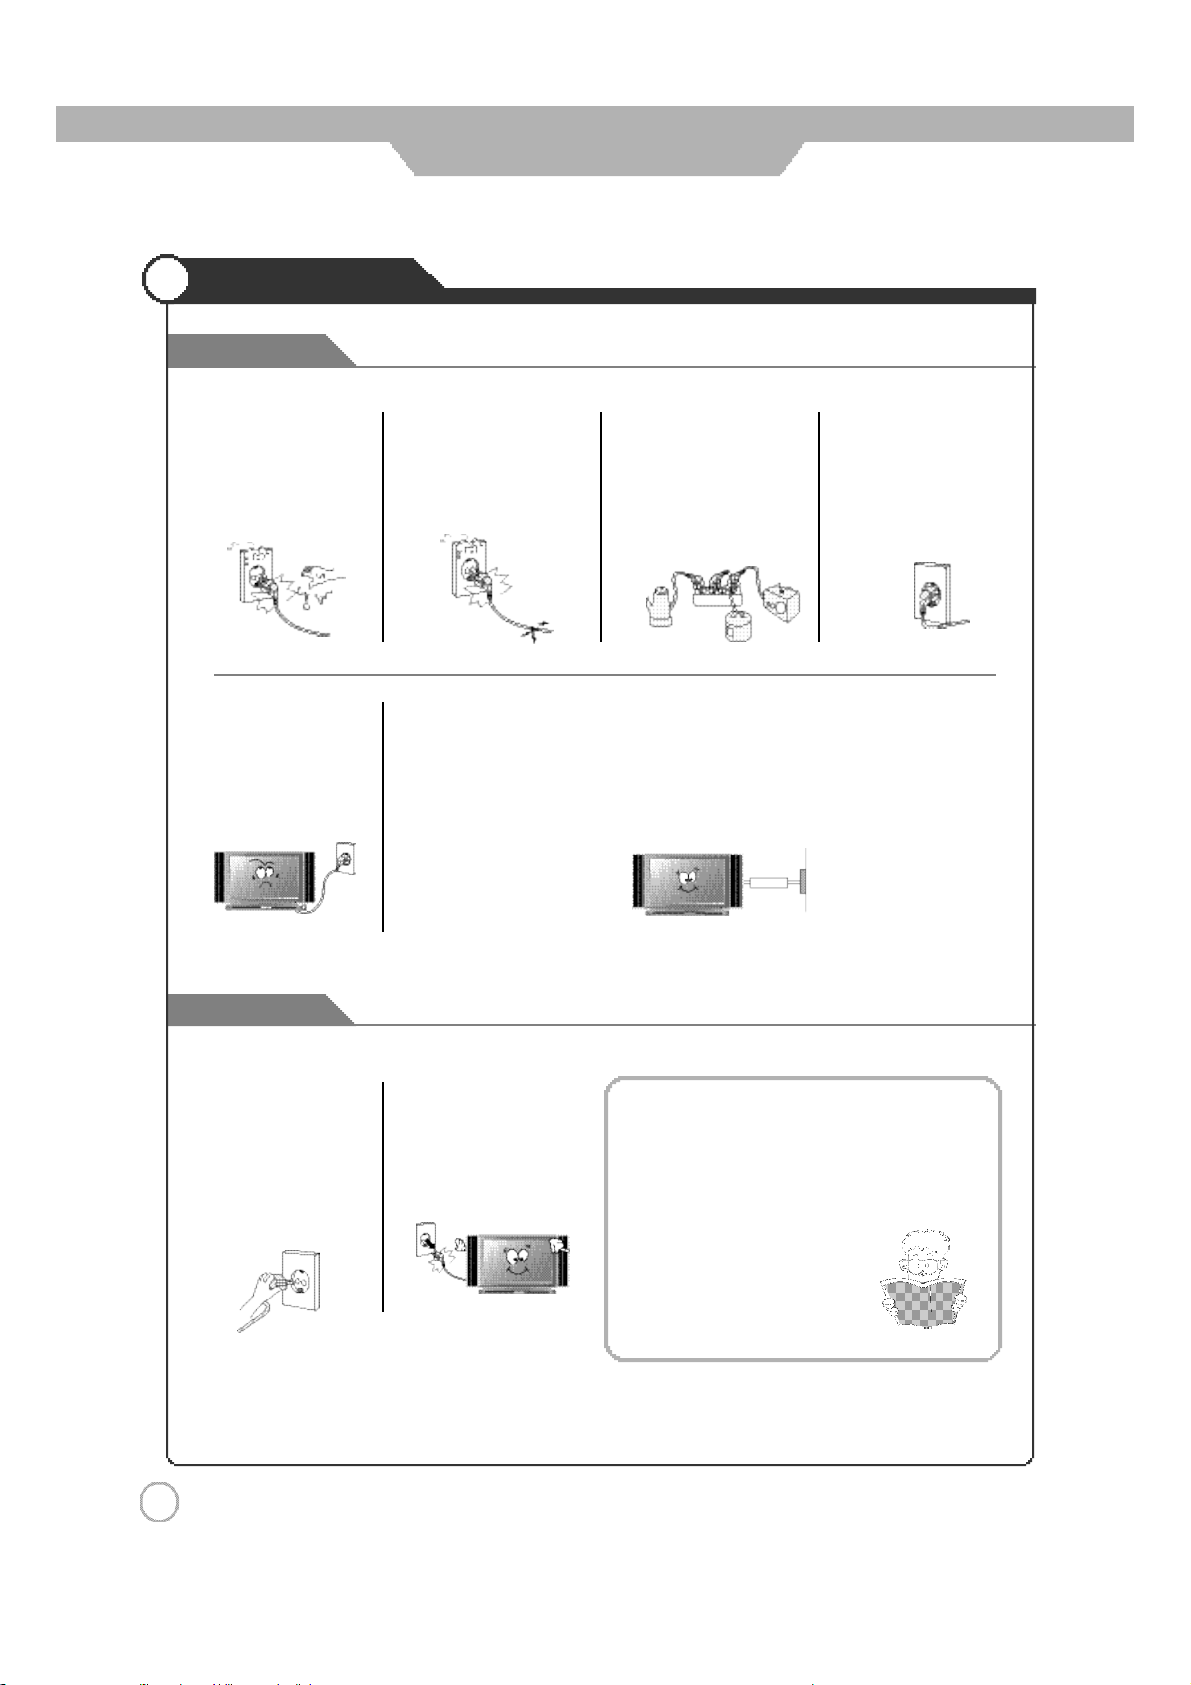
Do not touch the power
plug with wet hands.
ㅤDoingsomayresultin
electric shock.
Do not bend the power
cord excessively or place
heavy objects on it.
ㅤDoing so may r esult in
fire or electric shock.
Do not use a damaged
power cord or plug or a
loose outlet.
ㅤDoingsomayresultin
fire or electric shock.
Be sure to ground the unit.
ㅤFailing to do so may lead to electric shock when a short circuit or overload occurs.
If necessary, install a ground fault circuit breaker. Never ground to a telephone line,
lightning rod, or metal gas pipe. (Doing so may result in fire, electric shock, or other
hazards.)
Do not plug several
devices i nt o the s ame
outlet.
ㅤDoingsomaycause
the outlet to overheat
and start a fire.
Insert the power plug fully
into the outlet.
ㅤA loose or improperly
inserted power plug
may result in fire.
Cautions
When disconnecting the
power cord from an AC
outlet,alwaysgraspitby
the plug.
ㅤPulling on the cord can
damage the in t er nal wi re
and may result in fire.
4
Always unplug the unit
before cleaning.
ㅤNot doing so may result
in fire or electric shock.
The purpose of these precautions is to
ensure user safety and prevent property
damage.
Be sure to read and observe all safety
precautions.
Page 5
Safety Precautions
Installation
Warnings
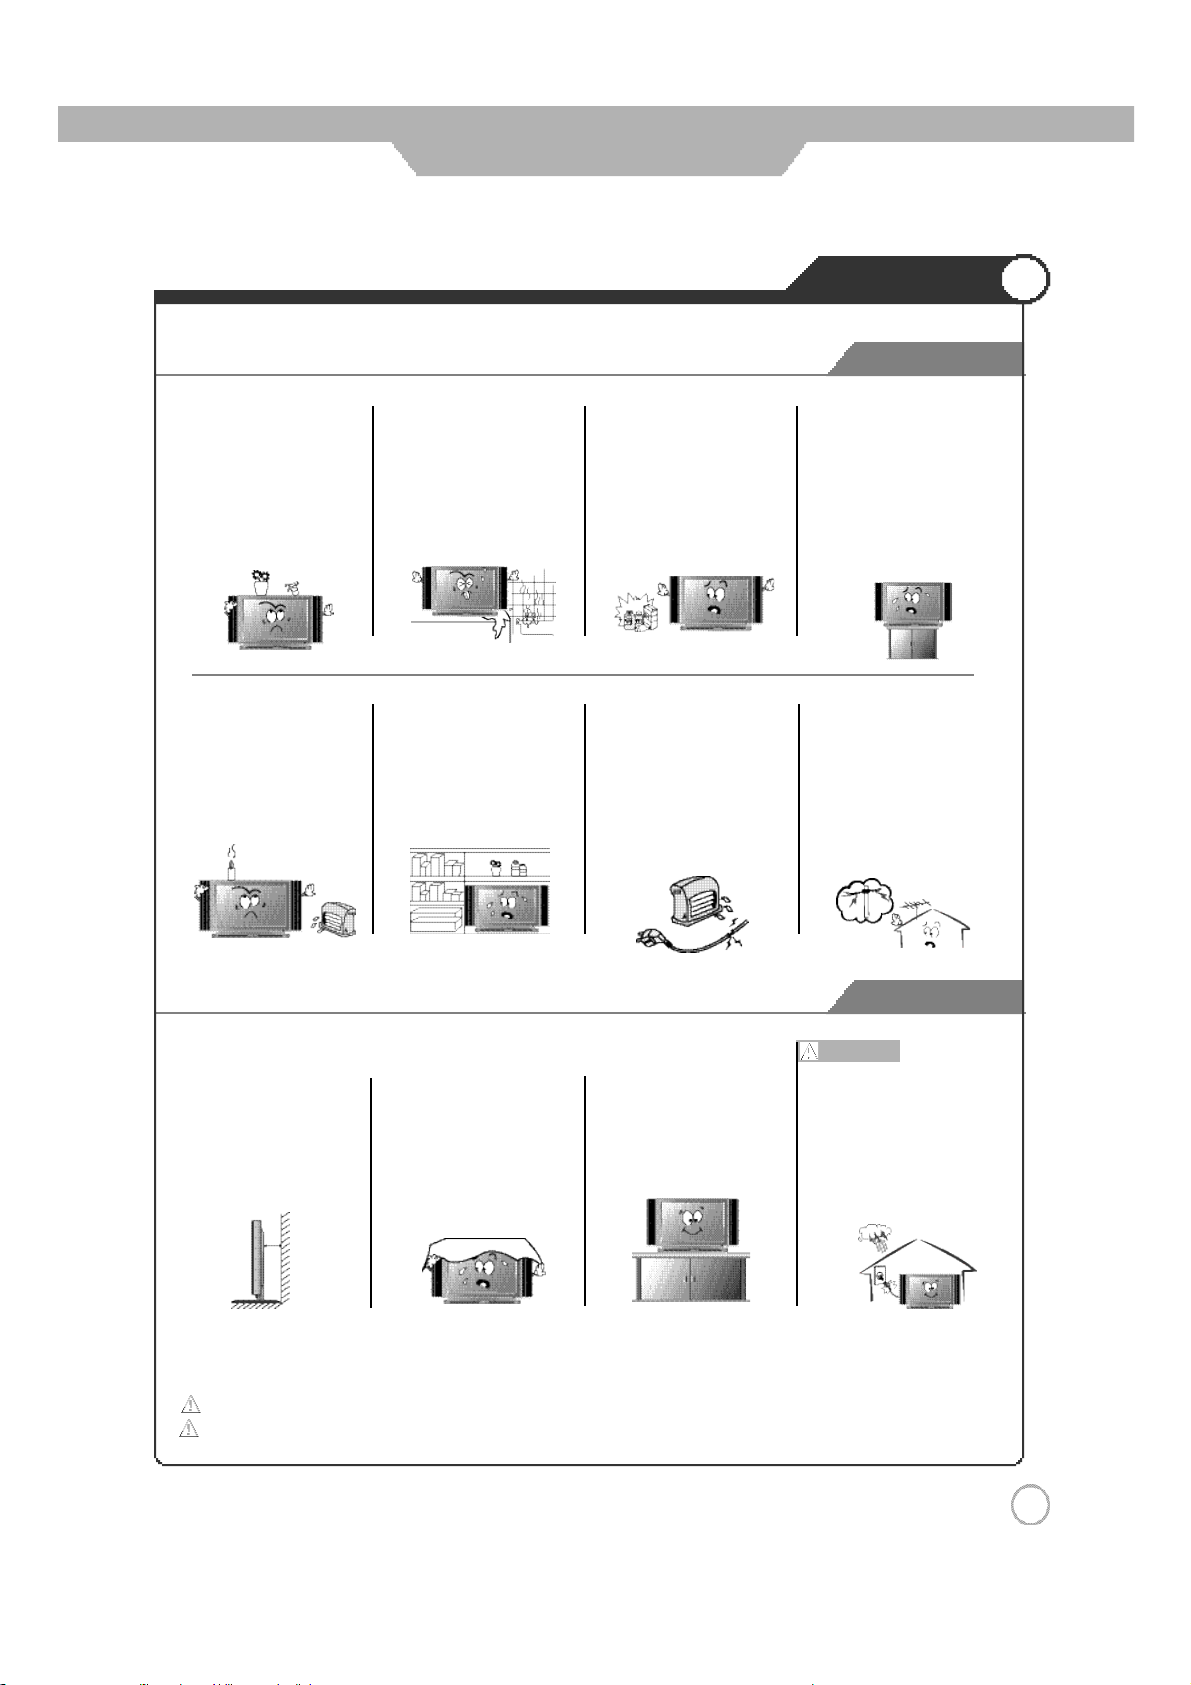
Do not pla ce co ntai ners wi th
liquids such as flower vases,
soft drink cans,or medicine
bottles or small metallic
objectson topofthe unit.
ㅤ
If l iquid enters the unit or
any metal object falls into
the unit, i t may result in
short-circu it, fire,or electric
s h o c k .
Do not pla ce a burning ca ndl e,
burn ing anti-m osquito incen se,
or l ight ed ci garette on top of the
unit. Do not place the unit near
any heats ource s uch as a
fireplace or space hea ter.
ㅤDoing so posesa s er ious
riskof fire.
Donot plac e the unit whereit
is exposedto rain, excessive
moistureor grease.
ㅤ
Do ing so may result in fire,
electric shock, malfunction,
ordeformation.
Do not place the unit in a
poorly ventilated enclosure,
such as acabi net.
ㅤ
Doing so poses a serious
riskoffire.
Do not use or store flamm
ableor combustible materials
near theuni t.
ㅤDoingsomayresultinfire
or explosion.
Do not runpowercords near
heat-producing appliances
suc h as radiators, stoves , or
i r o n s .
ㅤThe excessive heat could
melt the i nsulation and
expose liv e wires, res ultin g
in fireor electric shock.
Do not place the unit on an
unstable s urface, suc h as a
wobbly stand or sloped table, or
r
on an y su
smaller than the bo ttom area of
theunit.
ㅤIf a child climbs on the uni t, i t
facewhoseareais
cou ld topple and fall o nto the
c hild , resulting in serious i njury
to the child o r d amage to the
unit. P la ce th e unit on a flat
s table surface.
Install the a ntenna away from
high-voltage power lines and
com munication cables and
make sure it is installed
s e c u r e l y .
ㅤIf the antenna touc hes a
power line, contact with the
antenna could result in fire,
electric shock, serious inju
or deat h.
r
y,
Install the unit atan adequate
dis tanc e from the wall to
en sure sufficient ve ntilation.
ㅤ
If the temperature inside
the uni t ris es, it may resul tin
f i r e .
Do not c over the unit with a
tabl e cloth, curtain, or other
m a t e r i a l .
ㅤ
If the temper ature inside
theunitrises,itmayresult
in fire.
Besuretoplace theunit on a
level surface.
● The following precautions are divided into “Warnings” and “Cautions”.
Warning : Ignoring this precaution may result in death or serious injury.
Caution : Ignoring this precaution may result in injury or property damage.
Cautions
Warnings
Form a drip loop where the
coaxial antenna c able enters
your building to p
rainwater f
the cabl e and coming in contact
with theantenna input terminal.
ㅤIf rainwater finds itsway i nside
r
om traveling a lo ng
the unit, it ma y result in fire or
r
icshock.
elect
r
event
5
Page 6
Safety Precautions
Use and Maintenance
Warnings
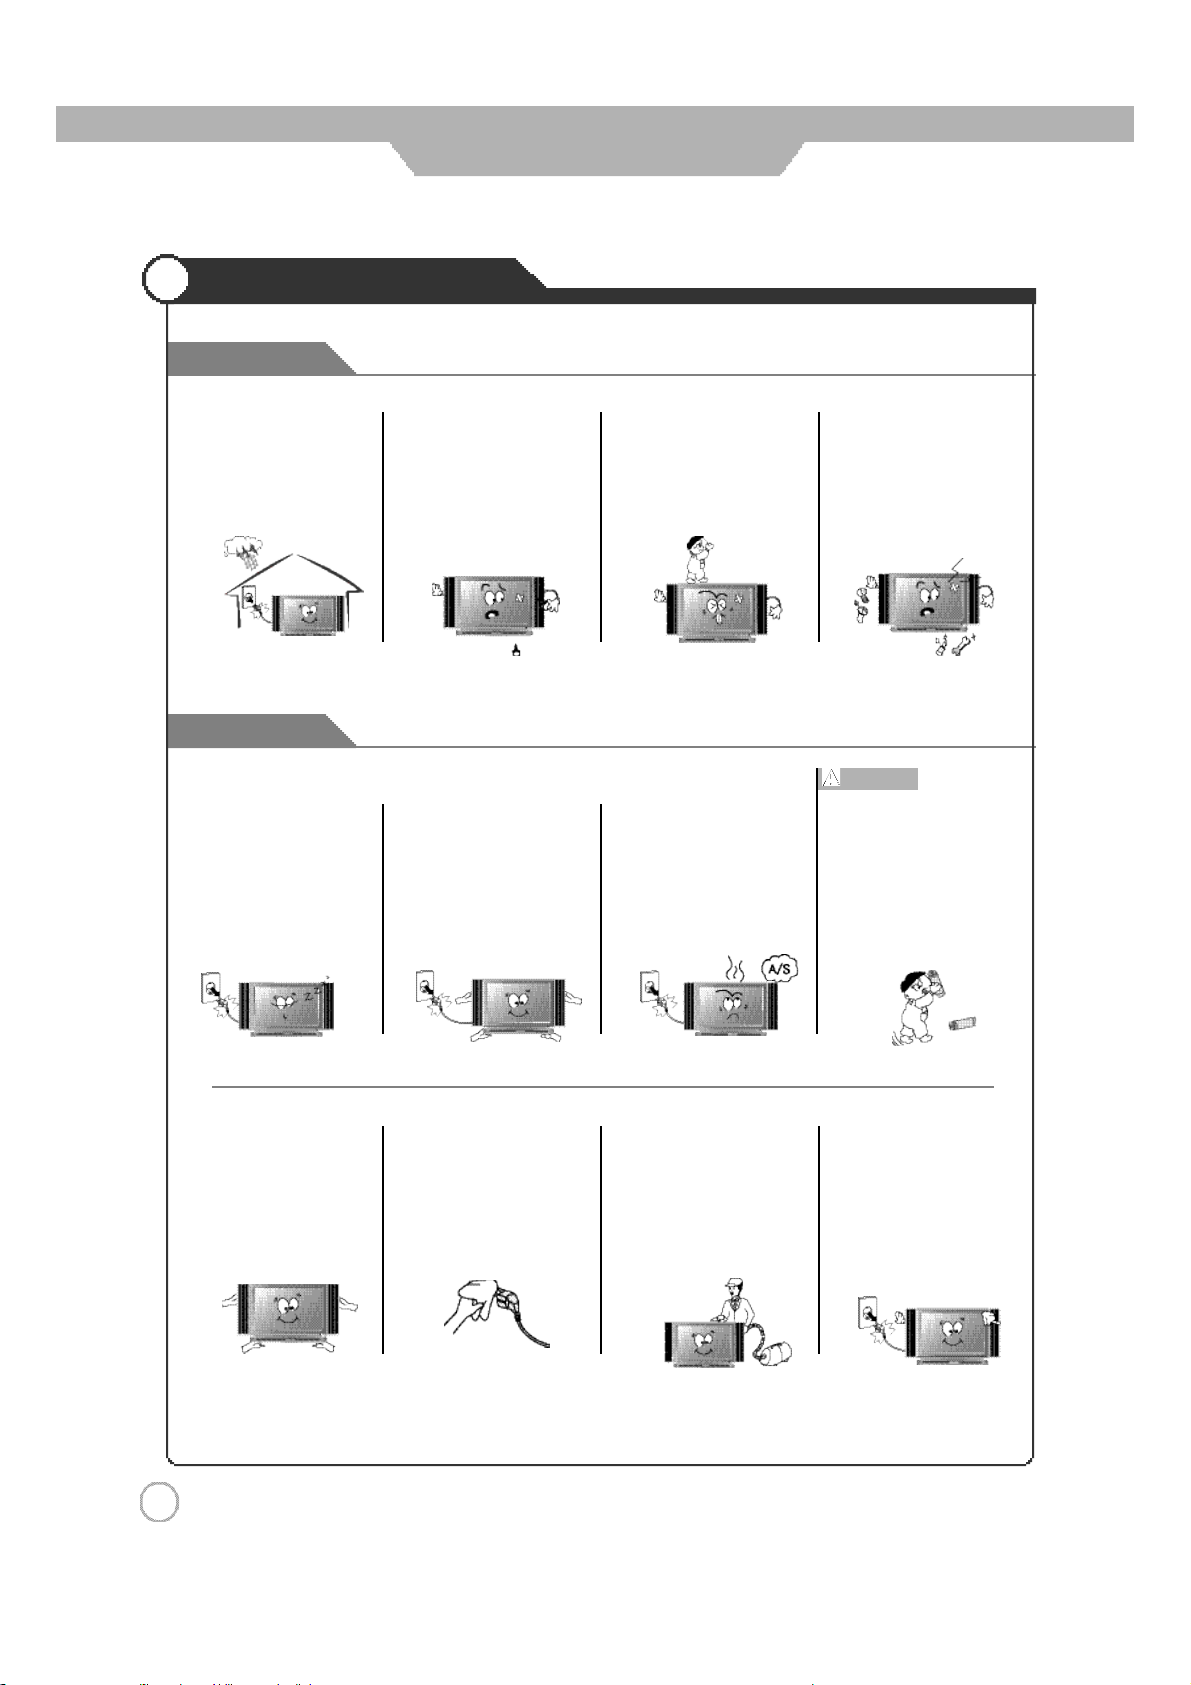
Disconnect the power c ord
from the wall out let durin g an
electricalstorm.
ㅤ
Not doings o may resultin
fire or electric shock.
Cautions
When not using the unit for
long p eriods oftime, d i s c o n n e c t
the power c ord from the wall
o u t l e t .
ㅤDust could accumulate ove r
time on the un it a nd c ause it
to generate h ea t an d ignite,
or deteriorate ins ulation,
whichinturnmayresultinan
electrical fire.
Do not inse rt any metal
objects, such as a screwdr i v e r,
paper clip,or bentwir eintothe
ventilation openings or A/V
t e r m i n a l s .
ㅤ
Doing so poses a serious
risk offireor electricshock.
When moving the unit, be sure
to turn off the unit and unp lug
the power cor d from the wall
o u t l e t .
ㅤMoving the unit with the
power cord connec ted to the
outlet may cause damage to
r
d, resulting in fire or
the co
electric shock.
Do n ot allow children to climb
or hangon theunit.
ㅤ
The unit could topple over
onto a child and result in
serious injury.
If you notice any unus ual
odors or smoke around the
unit, immediately disconnect
the unit from the outletand
contact theservicecenter.
ㅤFailuretodosomayresult
infireorelectricshock.
Never disassemble or modify
the unit in any way. Do not
attempt to service the uni t
y o u r s e l f .
ㅤ
Doingsomayresultinfire
or electric shock. If theunit
re qu ires repair, contac t the
servicecen ter.
Warnings
When removing the batteries
from the remo te control, m ake
sure childre n do no t swallow
them. Keep the batteri es out
of the reach of infants and
c h i l d r e n .
ㅤ
If a child has swallowed a
battery, s eek medical atten-
tion immediately.
Always use two or mo re
people to lift or move the u nit.
ㅤ
If the unit is dropped, it
coul d be damaged or
otherwise cau se i nj ury.
6
Wipe off any moisture, dirt, or
dust on the power plug pins
with a clean dry cloth.
ㅤ
Failure to do so may res ult
infireorelectric shock.
It i s advisable to clean the
interior of the unitat leastonce
a year . Contact the store of
purchase or service ce nter for
i n f o r m a t i o n .
ㅤContinuing to use the unit
without cleaning off the dust
build-up insid e it may result
r
eor electricshock.
in fi
Always turn off the unit and
unplug the power cord when
cle ani ng the unit. U se a soft dry
clothto cleanthe unit.
ㅤNever clean with industrial
streng th polish, wax,benzene,
paint thinner, ai
lubricant, de tergent, or other
suchchemicals.Also, do not
cl ean with a damp cloth.
r
freshener,
Page 7
Safety Precautions
What is LCD TV?
What is LCD TV?
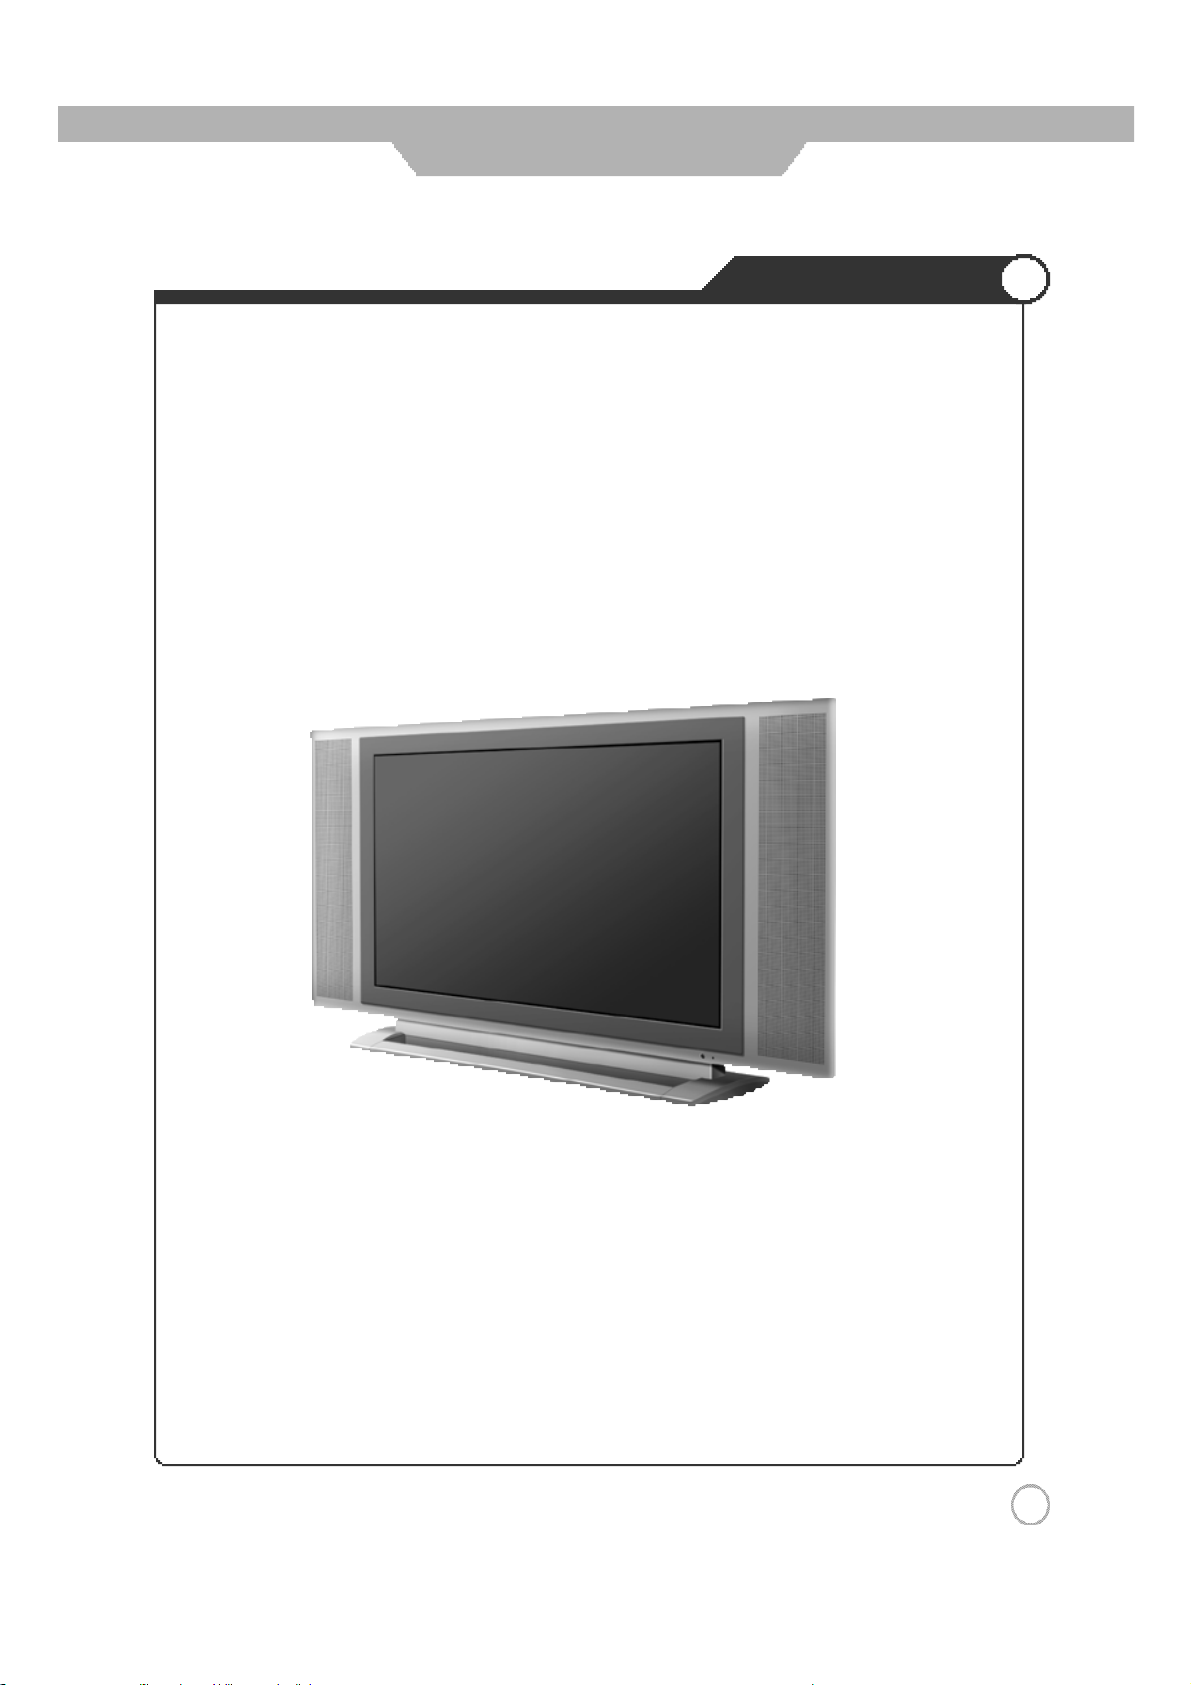
LCD (Liquid Crystal Display) is a next generation flat-panel display module. Liquid crystal material is
contained between sheets of glass and electricity causes the liquid crystal material to reflect or block
the light emitted from a light source inside the display chassis.
By incorporating this LCD display module, LCD TVs enable you to enjoy out standing picture quality
wit hout the w orries of space limitation and harmful radiation y ou may have experienc ed with
conventional CRT TVs.
Features
- Picture-in-Picture : Enables you to simultaneously display two different image sources.
- PC Compatible Monitor : Enables you to connect PC (D-Sub) input for displaying high-resolution SXGA (1280x1024, 60Hz)
PC images.
- HDTV-Ready Display : Enables you to view high-definition digital pictures using a DVD player or HDTV set-top receiver.
- Various Picture/Sound Controls : Enables you to set the picture an d sound settings for a number of different types of
programs and viewing and listening conditions.
- Auto Power On/Off Timer : Enables you to set the TV to automatically turn ON or OFF at a preset time.
- ATM : Enables you to set the TV to search for all a vailable standard broadcast and cable TV channels and store them
automatically.
7
Page 8
User Guidance Information
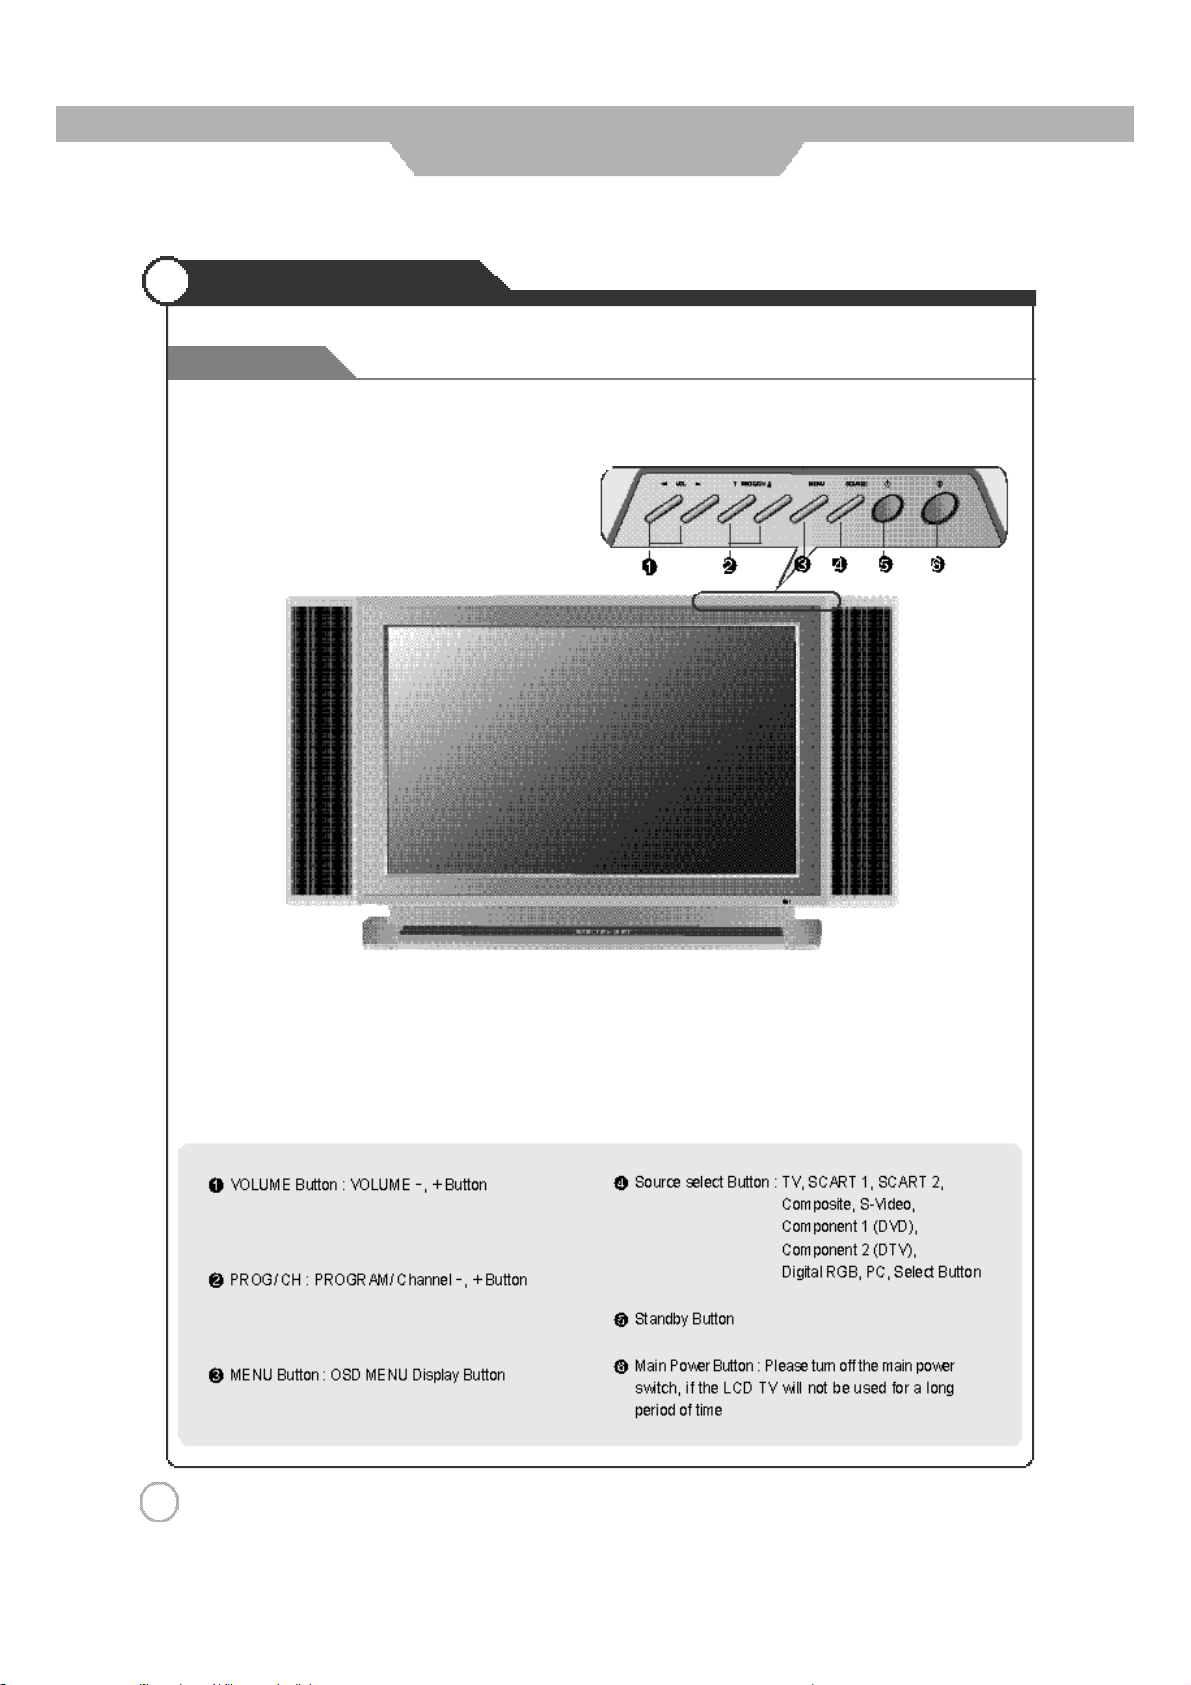
Names of each part
Front View
8
Page 9
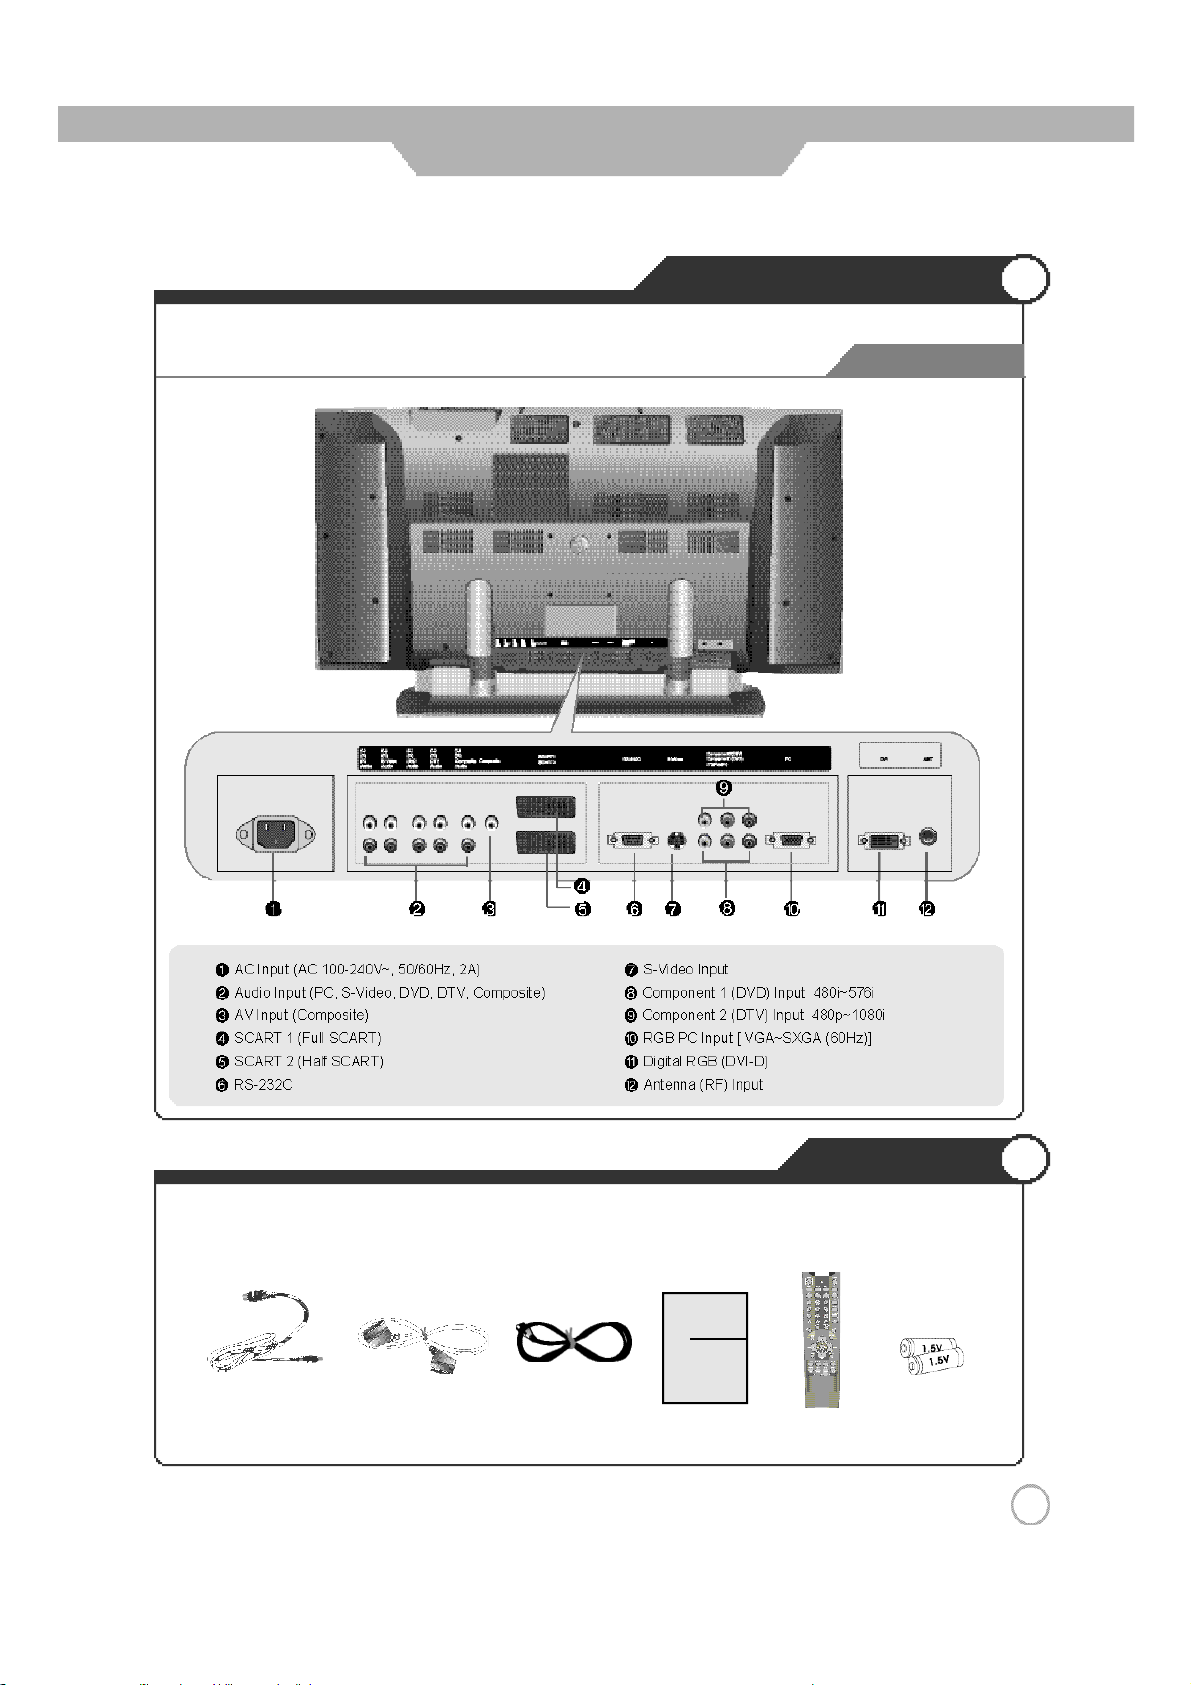
User Guidance Information
Controls and Functions
Back View
● The configuration of the components may look differe ntf romthe following illustrat ion.
User's Guide
Antenna Cable Remote
SCART Cable
Power Cord
User's Guide
Accessories
Battery (2)
Control
(AAA, 1.5V)
9
Page 10
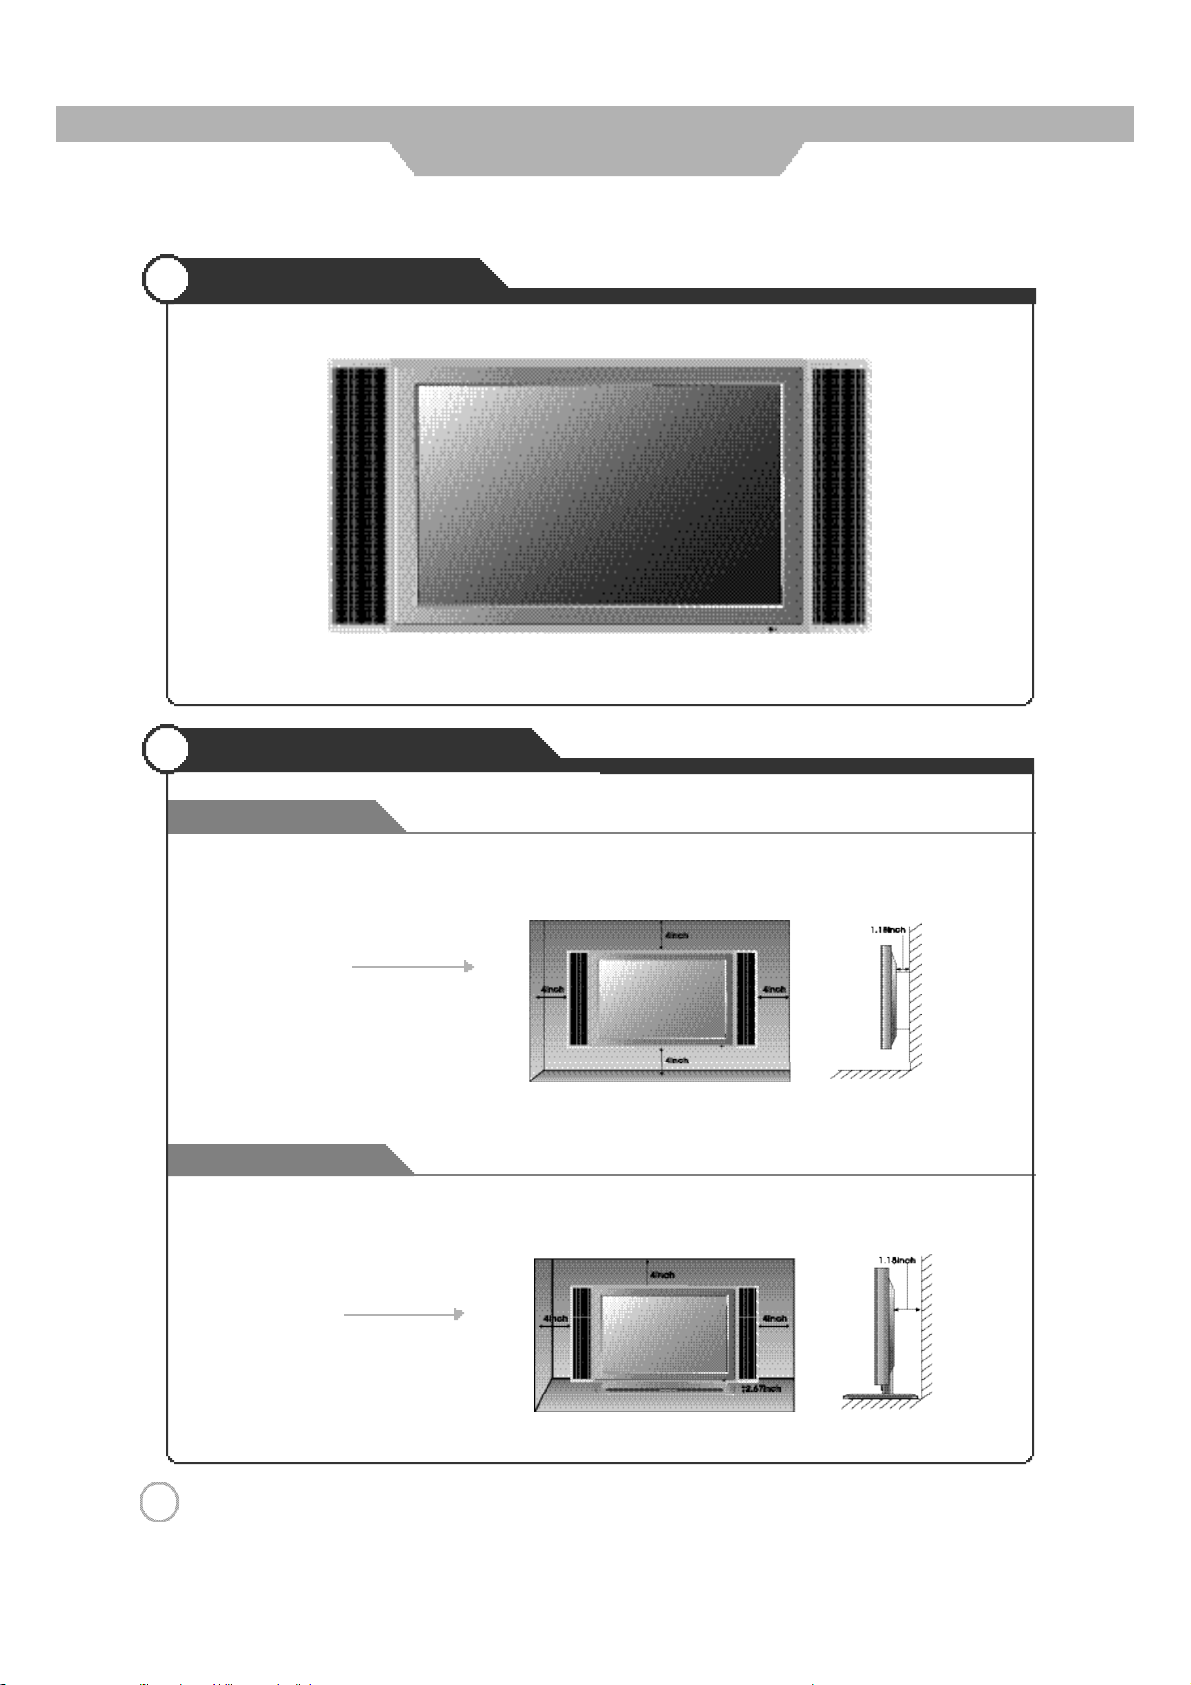
User Guidance Information
Mounting on a Wall
▶
Your LCD TV can be mounted on a wall as shown in the figure above.
Installation Precautions
Wall Mounting
●
Please secure enough space for safe use. (Please refer to A and B.)
●
Installation of the LCD TV in an improperly ventilated location can cause a fire or damage to the LCD TV
due to increased temperature
A
(Mounting on a wall)
※
Contact your dealer to purchase the "Adjustable-angle wall mount" required for wall-mounted installation.
Using the Stand
●
Do not install on an unstable location with support area smaller than the LCD TV.
B
(Using the Stand)
.
1 0
Page 11
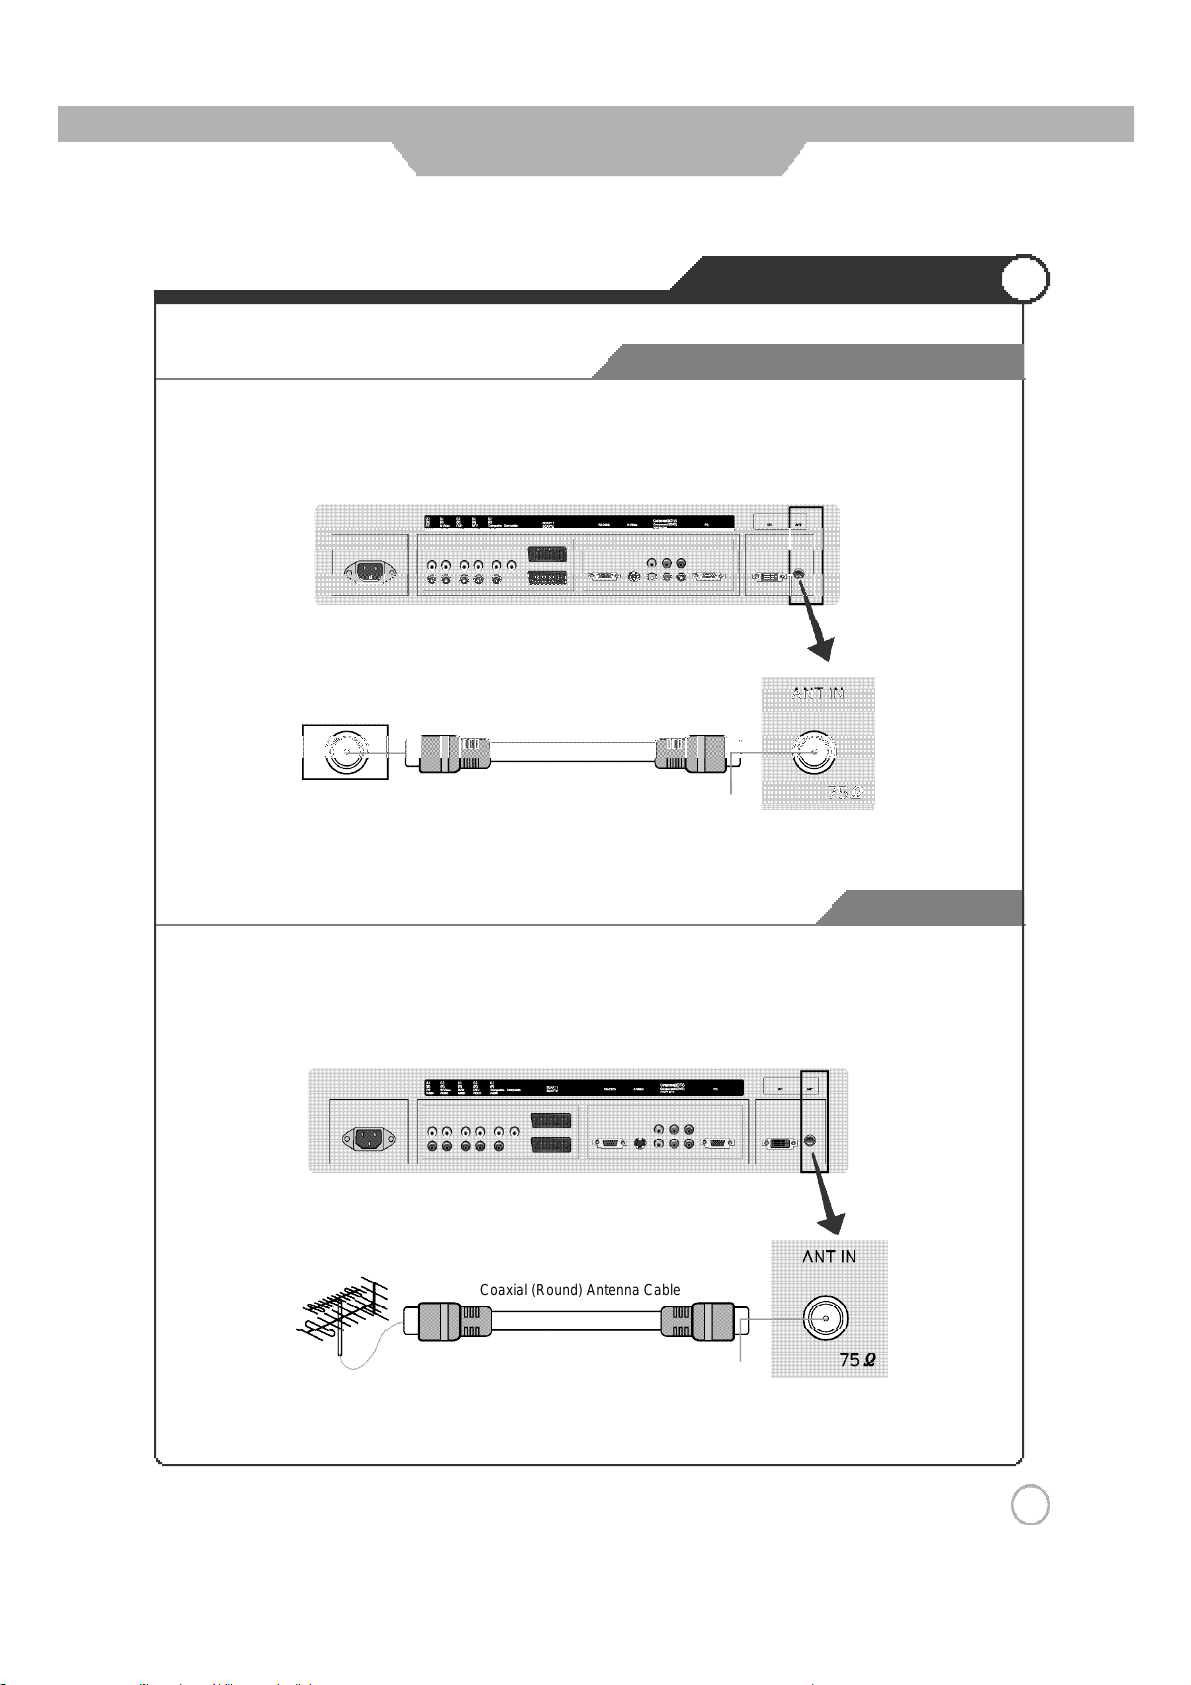
User Guidance Information
Installing an Antenna
For an Apartment or Condo Complex
●
Using an Indoor Antenna
Locate a wall jack with an F-connector, and then connect the coaxial antenna cable to the wall jack.
Wall Jack with
F-Connector
Coaxial (Round) Antenna Cable
Copper
Wire
●
Using an Outdoor Antenna
To install or use an outdoor antenna, if possible, consult a qualified technician for help.
Coaxial (Round) Antenna Cable
Copper
Wire
For a House
1 1
Page 12
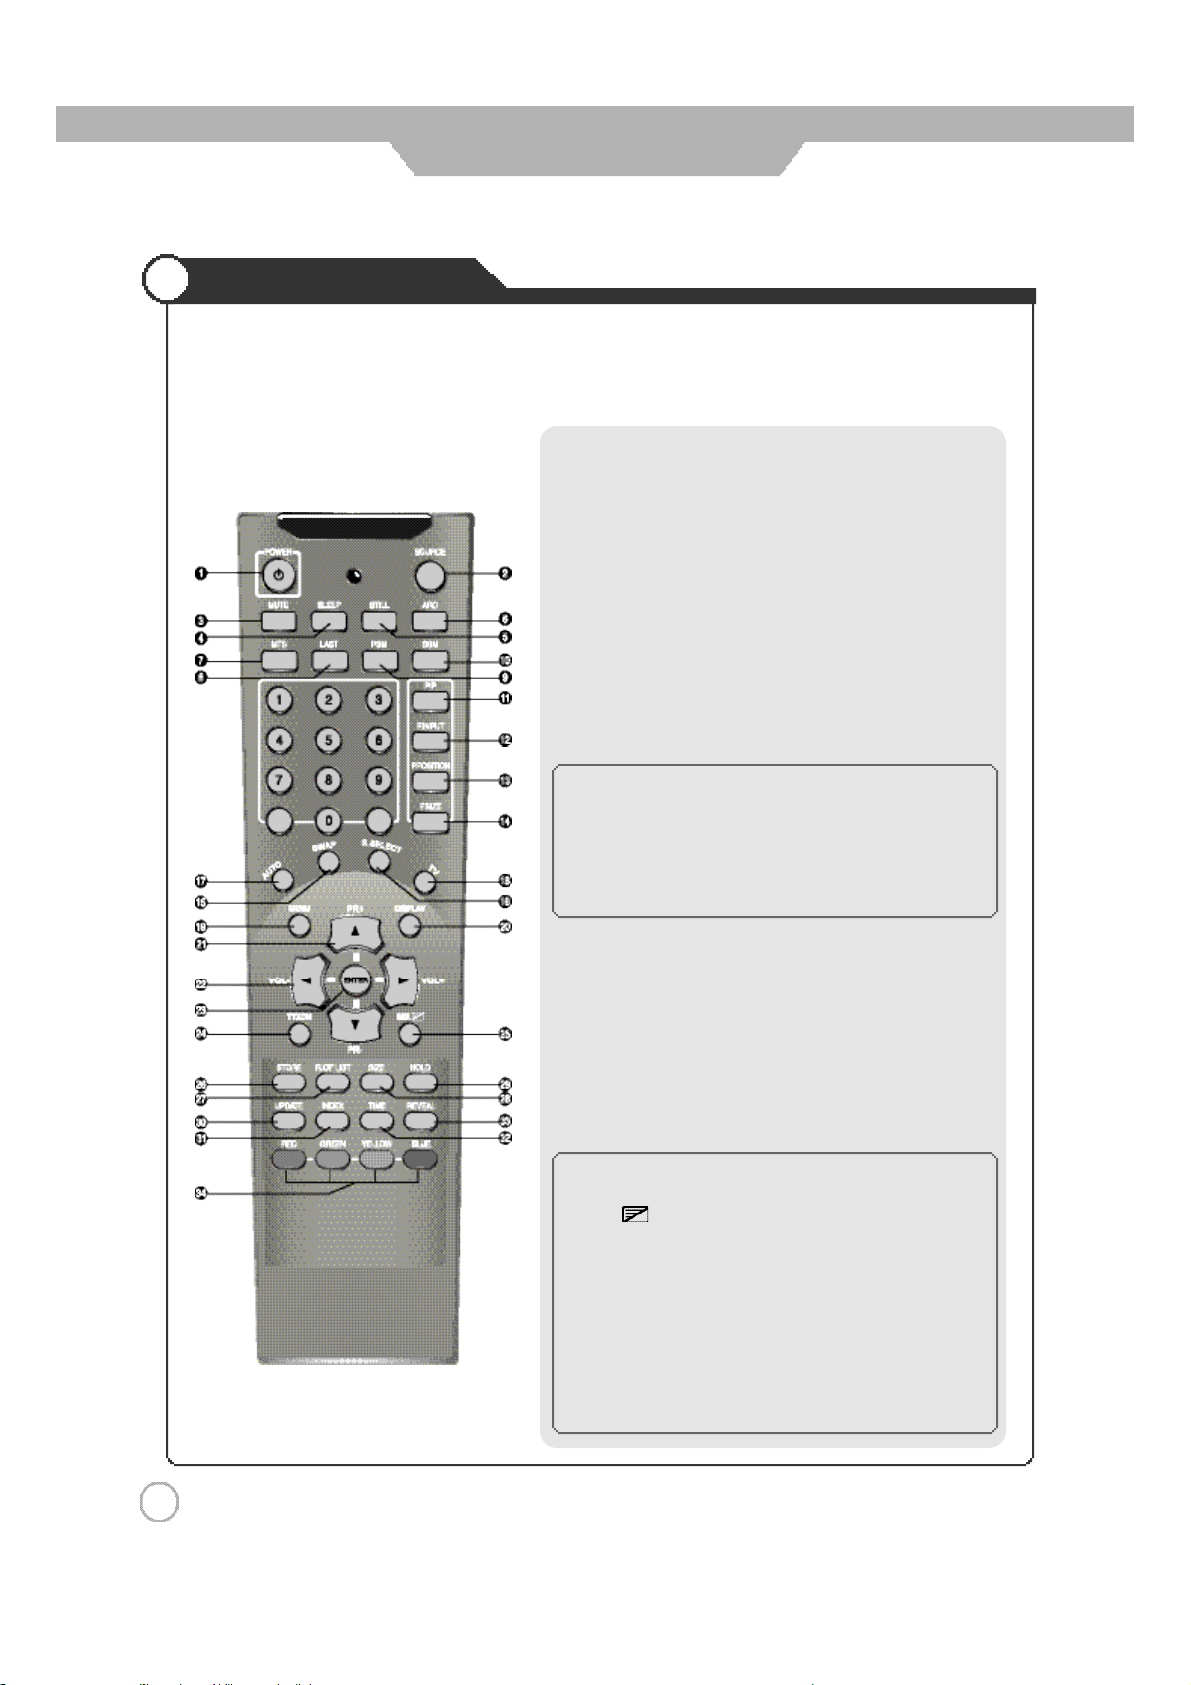
User Guidance Information
Remote Controller
●Functions of remote control buttons
The remote control is using Infra-Red (IR). Point it towards the front of the LCD TV. The remote control may not
work correctly if it is operated out of range or out of angle.
1. POWER : TURNS THE TV ON AND OFF(page.20)
2. SOURCE : USE TO SELECT AN INPUT SOURCE (page.22)
3. MUTE : PRESS TO TEMPORARILY CUT OFF THE SOUND (page.21)
4. SLEEP : PRESS TO SELECT A TIME FOR THE TV TO TURN OFF
5. STILL : PRESS TO STOP THE ACTION DURING A PARTICULAR
6. ARC (Aspect Ratio Control) : PRESS TO CHANGE THE
7. MTS (Multi-Television Sound) : PRESS TO SELECT MONO
8. LAST : TUNES TO THE PREVIOUS PROGRAM (page.21)
9. PSM : PICTURE STATUS MEMORY KEY (page.25)
10. SSM : SOUND STATUS MEMORY KEY (page.26)
◈
PIP CONTROL KEY
11. PIP : PIP ON/OFF
12.
13.
14.
15.
16.
AUTOMATICALLY (page.39)
SCENE (page.33)
SCREEN SIZE (page.29)
OR STEREO MODE (page.36)
(CUSTOM, DYNAMIC, STANDARD, MOVIE, MILD)
(CUSTOM, STANDARD, MUSIC, MOVIE, SPEECH)
(page 34, 35)
P.INPUT :PIP INPUT SELECT KEY
P.POSITION :PIP POSITION CONTROL KEY
P.SIZE : PIP AND PBP MODE CHANGE
SWAP : PIP SOURCE SWAP
S.SELECT : SOUND SWAP KEY
1 2
17. AUTO(
AUTO IN PROGRESS) : PRESS TO CONTROL THE
MONITOR SCREEN AUTOMATICALLY
18. TV : TV INPUT SOURCE SELECT KEY
19. MENU : DISPLAYS THE MAIN ON-SCREEN MENU
20. DISPLAY : PRESS TO DISPLAY THE CURRENT PROGRAM
AND AUDIO/ VIDEO SETTINGS (page.21)
21. ▲,▼ (PR+, PR-) : PROGRAM, MENU CONTROL OR PAGE UP
AND DOWN KEY, STAND BY ON
22. ◀,▶ (VOL-, VOL+) : PRESS TO INCREASE OR DECREASE
THE VOLUME OR MENU CONTROL KEY
23. ENTER :
◈
TELETEXT CONTROL KEY
SAVE THE VALUE
(page 40)
24. TTXON :TEXT ON KEY
25. MIX : MIX WITH TV SCREEN
26. STORE : STORE THE USER DEFINED FAVORITE PAGE
27. FLOF LIST : EXCHANGE FLOF/LIST MODE
28. SIZE : TELE TEXT SCREEN SIZE KEY
29. HOLD : HOLD FUNCTION DURING TELETEXT DISPLAY
30. UPDATE : DISPLAY CANCEL OR TEXT UPDATE KEY
31. INDEX : TEXT INDEX KEY
32. TIME: SUBPAGE DISPLAY MODE KEY
33. REVEAL :
SELECT HIDDEN CONTENT DURING TELETEXT DISPLAY
34. RED, GREEN, YELLOW, BLUE : DIRECT ACCESS TELETEXT
LINKED PAGE KEY
Page 13

User Guidance Information
Avoiding Remote Control Problems
Precautions
1. Check the polarity (
2. Check that the batteries have power.
3. Check that the LCD TV is powered and that it is properly plugged in.
4.Check if any three-wavelength lamp, special fluorescent or neon sign is turned on near the LCD TV.
+
,-) of the batteries in the remote controller.
Instering Batteries in the Remote Controller
1. Open the cover out completely.
2.Insert the two supplied batteries (AAA, 1.5V). Ensure
+
that the polarities (
correctly.
3. Replay the cover.
and-) of the batteries are aligned
CAUTION : Risk of explosion if battery is replaced by an incorrect type.
Dispose of used batteries according to the national code (Recycling program).
How to use remote controller
·
The remote control should be operated within 23feet
on the front of the LCD TV.
·
Used batteries should be disposed properly.
(7m) and 3
0˚to the left and the right of the IR receiver
1 3
Page 14
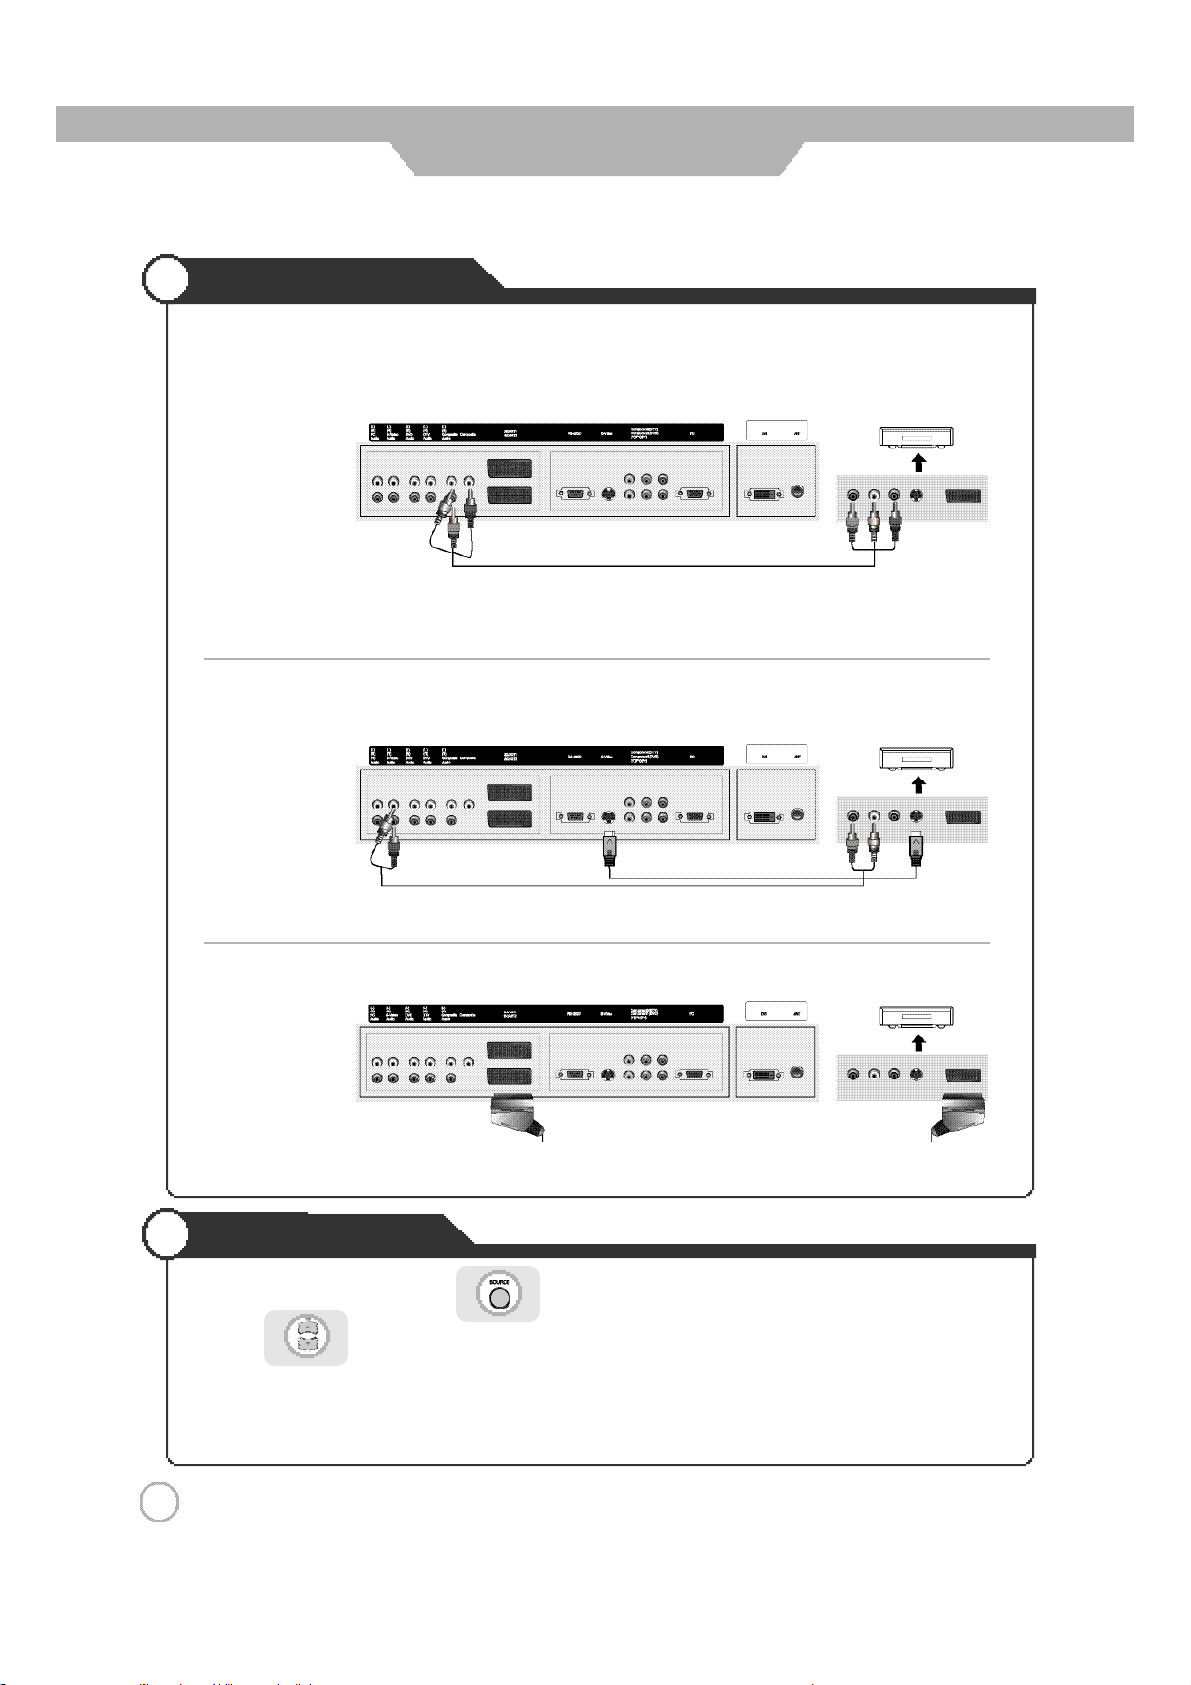
Connection
VCR Connections
● Connecting to the composite terminal
※ Connection terminals of other appliances differ by manufacturer and model.
< VIDEO >
( R )( L )
< LCD TV Back view>
Composite Cable
·Connect the LCD TV's Composite In terminal to the VCR's Composite Out terminal using the Composite cable.
(Make sure the color of the terminals and the color of the cable are the same)
● Connecting to the S-Video terminal
< LCD TV Back view>
S-VideoCable
※ Use the S-Video cable for higher picture quality.
● Connecting to the SCART terminal
< LCD TV Back view>
·Connect the SCART terminal of the LCD TV and the VCR with the SCART cable.
Playing the VCR
1. Turn on the LCD TV and press on the remote controller.
< VIDEO >
( R )( L )
< VIDEO >
( R )( L )
2. Use to move to "composite".
·If S-Video has been connected, select S-Video.
·If SCART terminal has been connected, select SCART1 or SCART2.
3. Turn on the VCR, insert the t ape and press play button.
1 4
Page 15

Connection
Cable TV Connections
● Connecting to the composite terminal
※ In order to watch CableTV, Subscribe to your local CableTV company and install aseparateconverter(Set-Top-Box)
※ Connection terminalsof other appliances differ by manufacturer and model.
< Cable broadcasting receiver >
( R )( L )
< LCD TV Back view>
Composite Cable
·
Connect the LCD TV's Composite In terminal to the cable broadcasting receiver Composite Out terminal using the
Composite cable. (Make sure the color of the terminals and the color of cable are the same)
● Connecting to S-Video terminal
< Cable broadcasting receiver >
< LCD TV Back view>
S-Video Cab l e
※ Use the S-Video cable for higher picture quality.
● Connecting to the SCART terminal
< LCD TV Back view>
·Connect theSCART terminal of the LCDTVand the cablebroadcastingreceiver with theSCART cable
Viewing Cable TV
1. Turn on the LCD TV and press on the remote controller.
2. Use to move to "composite".
( R )( L )
< Cable broadcasting receiver >
( R )( L )
·
If S-Video has been connected, select S-Video.
·If SCART terminal has been connected, select SCART1 or SCART2.
3. Turn on the cable broadcasting receive and select the channel you wish to view.
1 5
Page 16
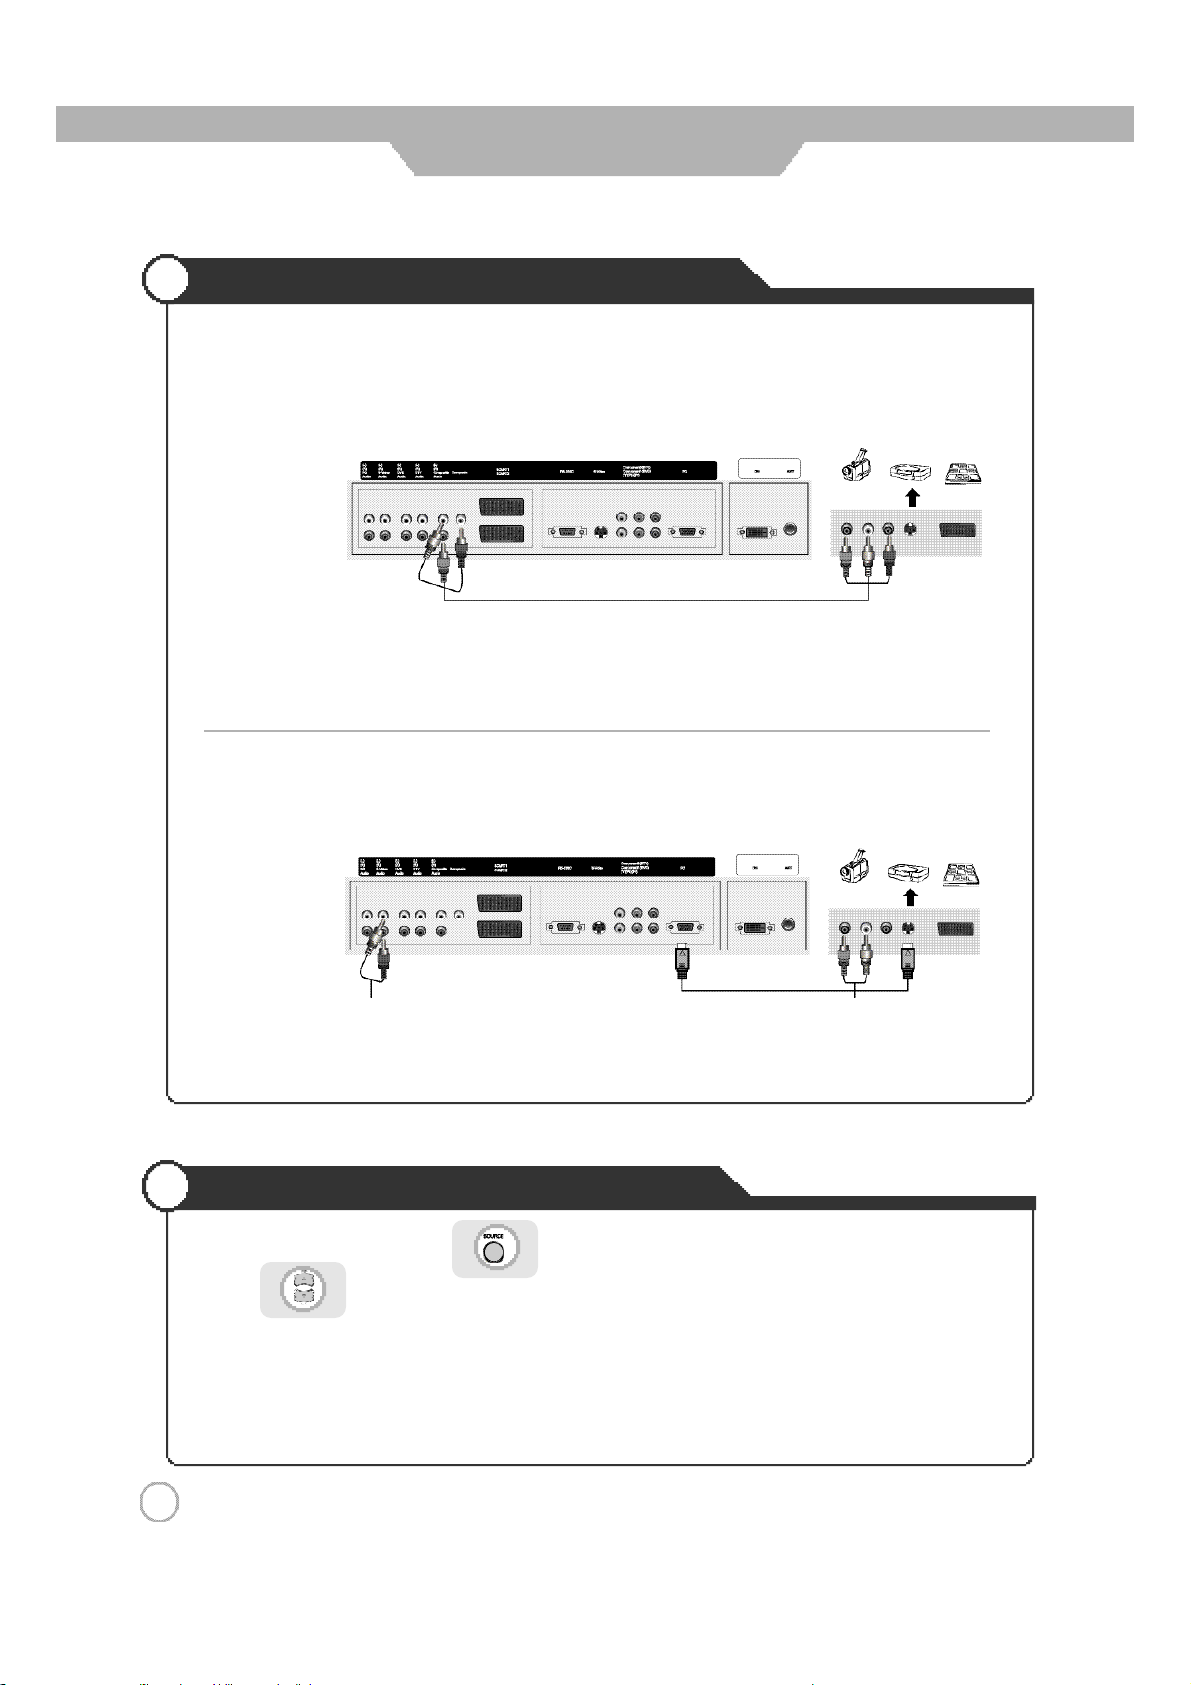
Connection
Camcorder/Game Console Connections
● Connecting to the composite terminal
※
Connection terminals of other appliances differ by manufacturer and model.
< Camcorder/ Game machine >
( R )( L )
< LCD TVBackview >
Composite Cable
·Connect the LCD TV's Composite In terminal to the camcorder/game console's Composite Out terminal with the
Composite cable. (Make sure the color of the terminals and the color of cable are the same)
● Connecting to S-Video terminal
< LCD TVBackview >
S-VideoCable
※ S-Video cable can be used if there isanS-Videoterminal.
Using Camcorder/Game Console
1. Turn on the LCD TV and press on the remote controller.
2. Use to move to "composite".
· If S-Video has been connected, select S-Video.
3. Turn on the Camcorder or video game and Set to Video mode.
(Please refer to the User's manual of Camcorder/ Video game for more information)
4. Insert tape into Camcorder and press play button or insert disc into the Video game console.
< Camcorder/ Game machine >
( R )( L )
1 6
Page 17
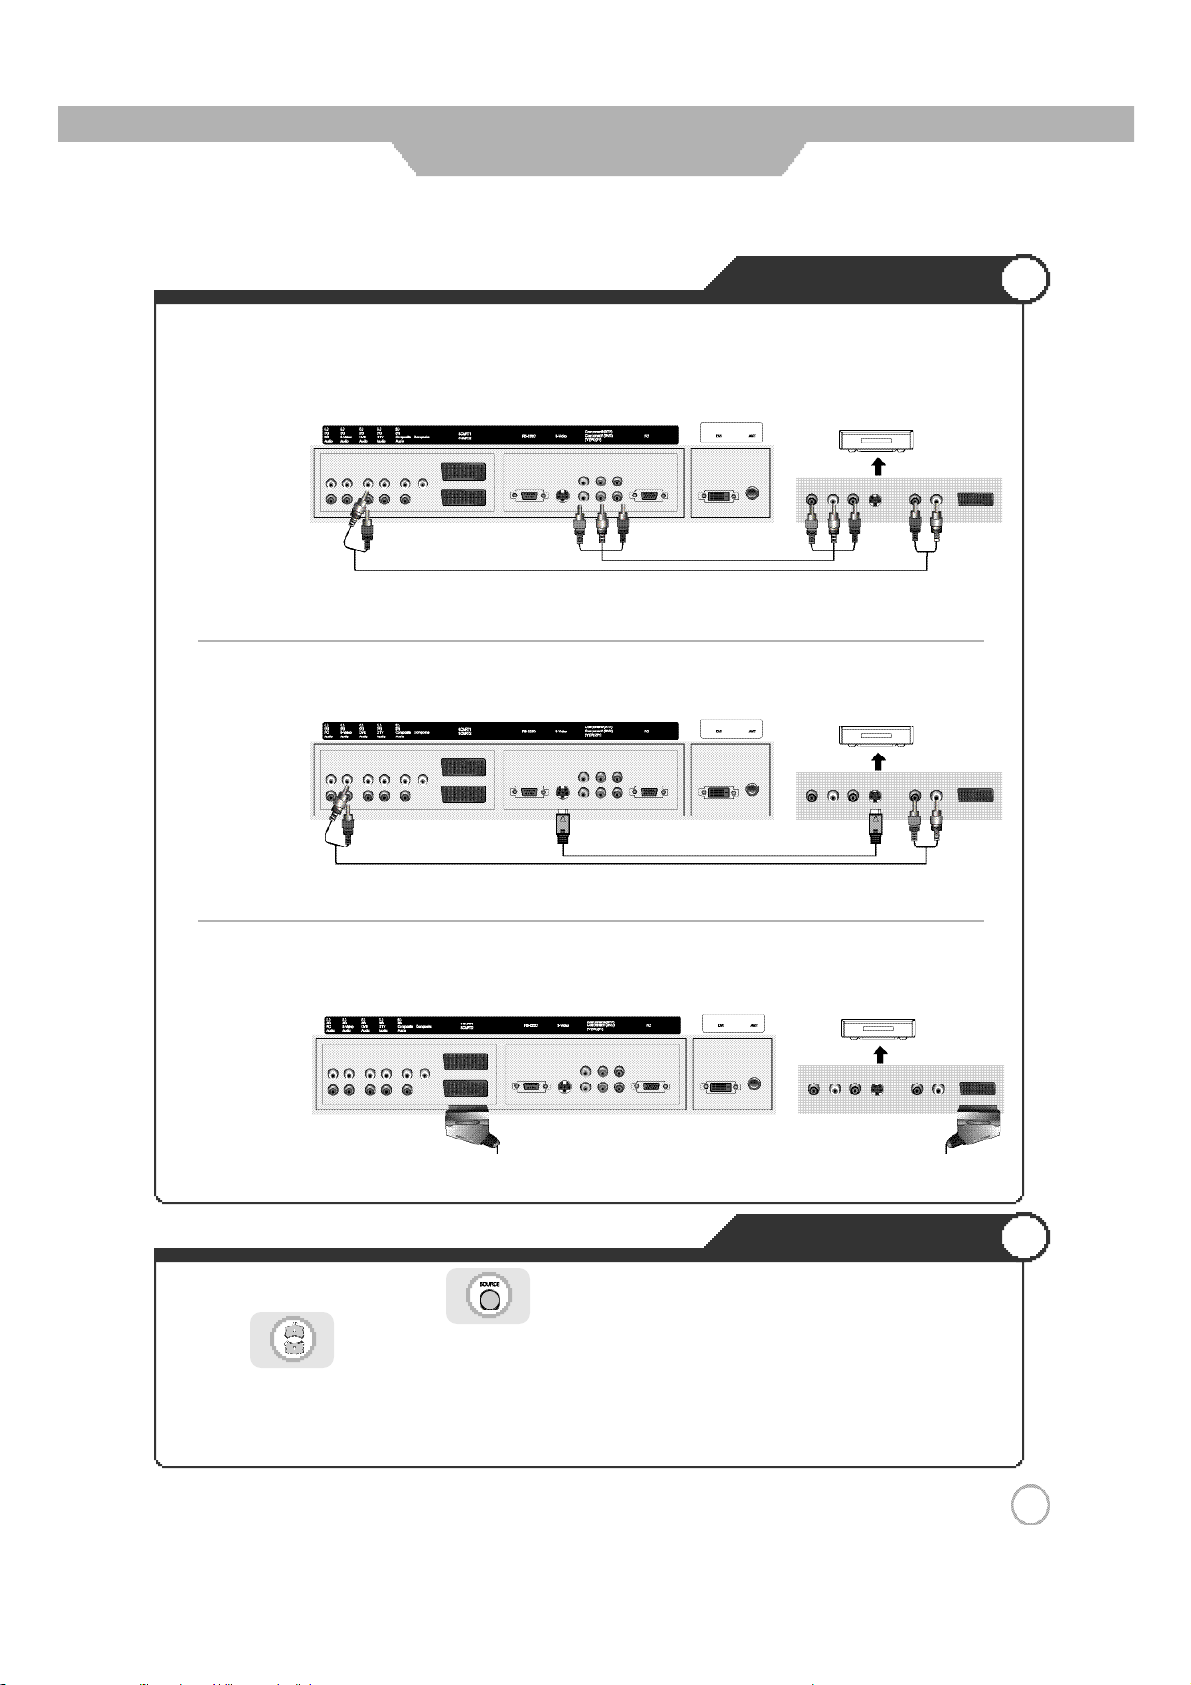
Connection
● Connecting to the component terminal
※ Connection terminals of other appliances differ by manufacturer and model.
DVD Connections
< DVD >
( R )( L )
< LCD TV Back view>
Co mpo nent A ud io cable
PRPBY
Com pon ent connection cable
1. Connect LCD TV's Y, PB,PR terminal in component 1 to DVD's Video Out terminal using the external cable.
2. Connect LCD TV's Audio terminals (left & right) in component 1 to DVD's Audio Out terminal using the Audio cable.
● Connecting to the S-Video terminal
< DVD >
( R )
< LCD TV Back view>
S-Vi deo Cable
RPBY
P
( L )
※ S-Video cable can be used if there is an S-Video terminal.
● Connecting to the SCART
< DVD >
< LCD TV Back view>
·Connect the SCART terminal of the LCD TV and the DVD with the SCART cable.
1. Turn on the LCD TV and press on the remote controller.
2. Use to move to "component1".
·If S-Video has been connected, select S-Video
·If SCART terminal has been connected, select SCART1 or SCART2.
3. Turn on the DVD, insert the DVD and press Play button.
RPBY
P
( R )( L )
Playing the DVD
1 7
Page 18
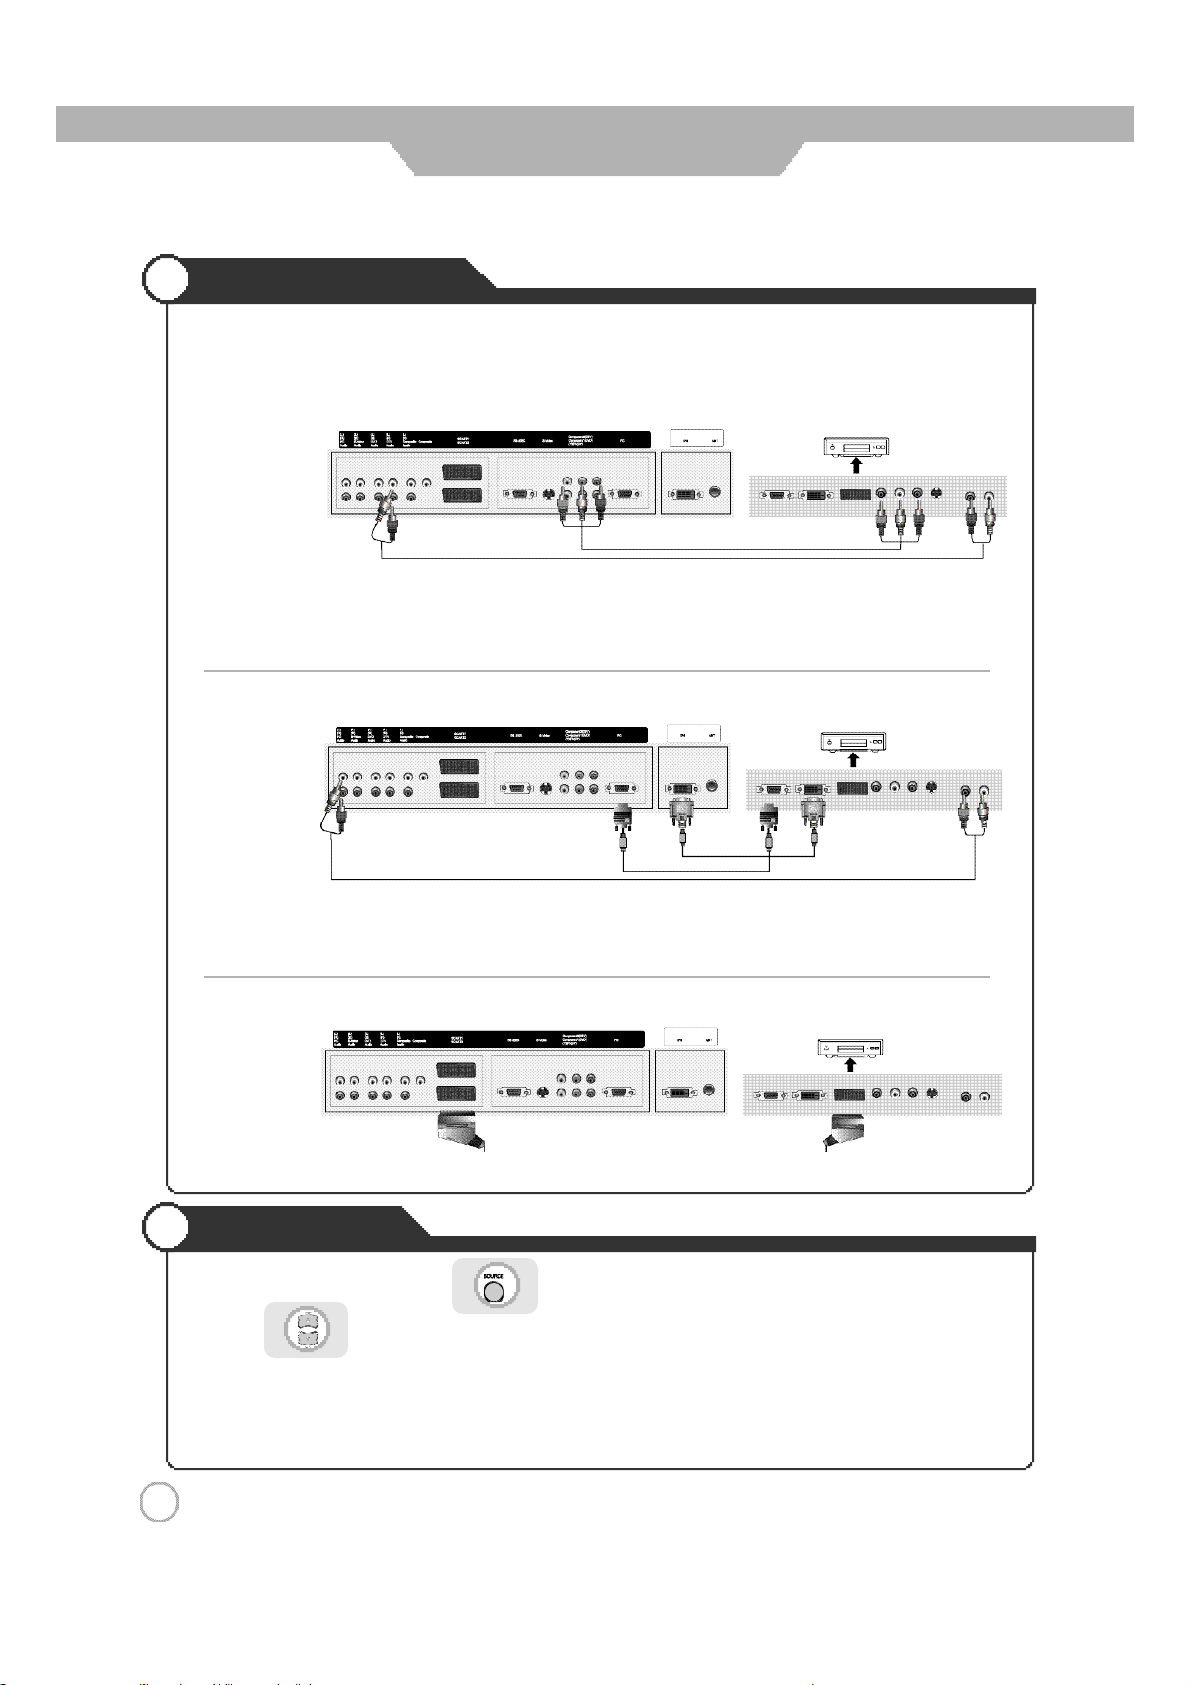
Connection
DTV Connections
● Connecting to the component terminal
※ Connection terminals of other appliances differ by manufacturer and model.
< DTV receiver>
RPBY
P
<LCD TVBackview>
Component Audio Cable
1. Connect LCD TV's Y, PB,PR terminal in component 2 to DTV receiver's Video Out terminal using the external cable
2. Connect LCD TV's Sound terminals (left & right) in component 2 to DTV receiver's Audio Out terminal using
the Audio cable
※ DTV receiver's output terminal can be marked Y, PB,PR or Y, CB, CR according to products.
ComponentConnection Cable
( R )( L )
● Connecting to the PC terminal
< DTV receiver>
RPBY
P
<LCD TVBackview>
DVI-D Cable
·Some of DTV receiver(Set-Top-Box) have an PC Connector (D-Sub 15pin) instead of Component output .
·Connect Audio Cable from the Audio output terminal of receiver to the PC Audio input terminal of the LCD TV.
※ Use the DVI-D with HDCP connection for higher picture quality if there is DVI-D terminal.
● Connecting to the SCART terminal
< DTV receiver>
<LCD TVBackview>
RPBY
·Connect the SCART terminal of the LCD TV and the DTV receiver with the SCART cable.
Viewing DTV
( R )( L )
( R )( L )P
1. Turn on the LCD TV and press on the remote controller.
2. Use to move to "component2".
·If D-Sub 15 Pin terminal has been connected, select PC.
·If DVI-D has been connected, select DVI.
·If SCART terminal has been connected, select SCART1 or SCART2 .
3. Turn on the DT V receiver and select the channel that youwant.
1 8
Page 19
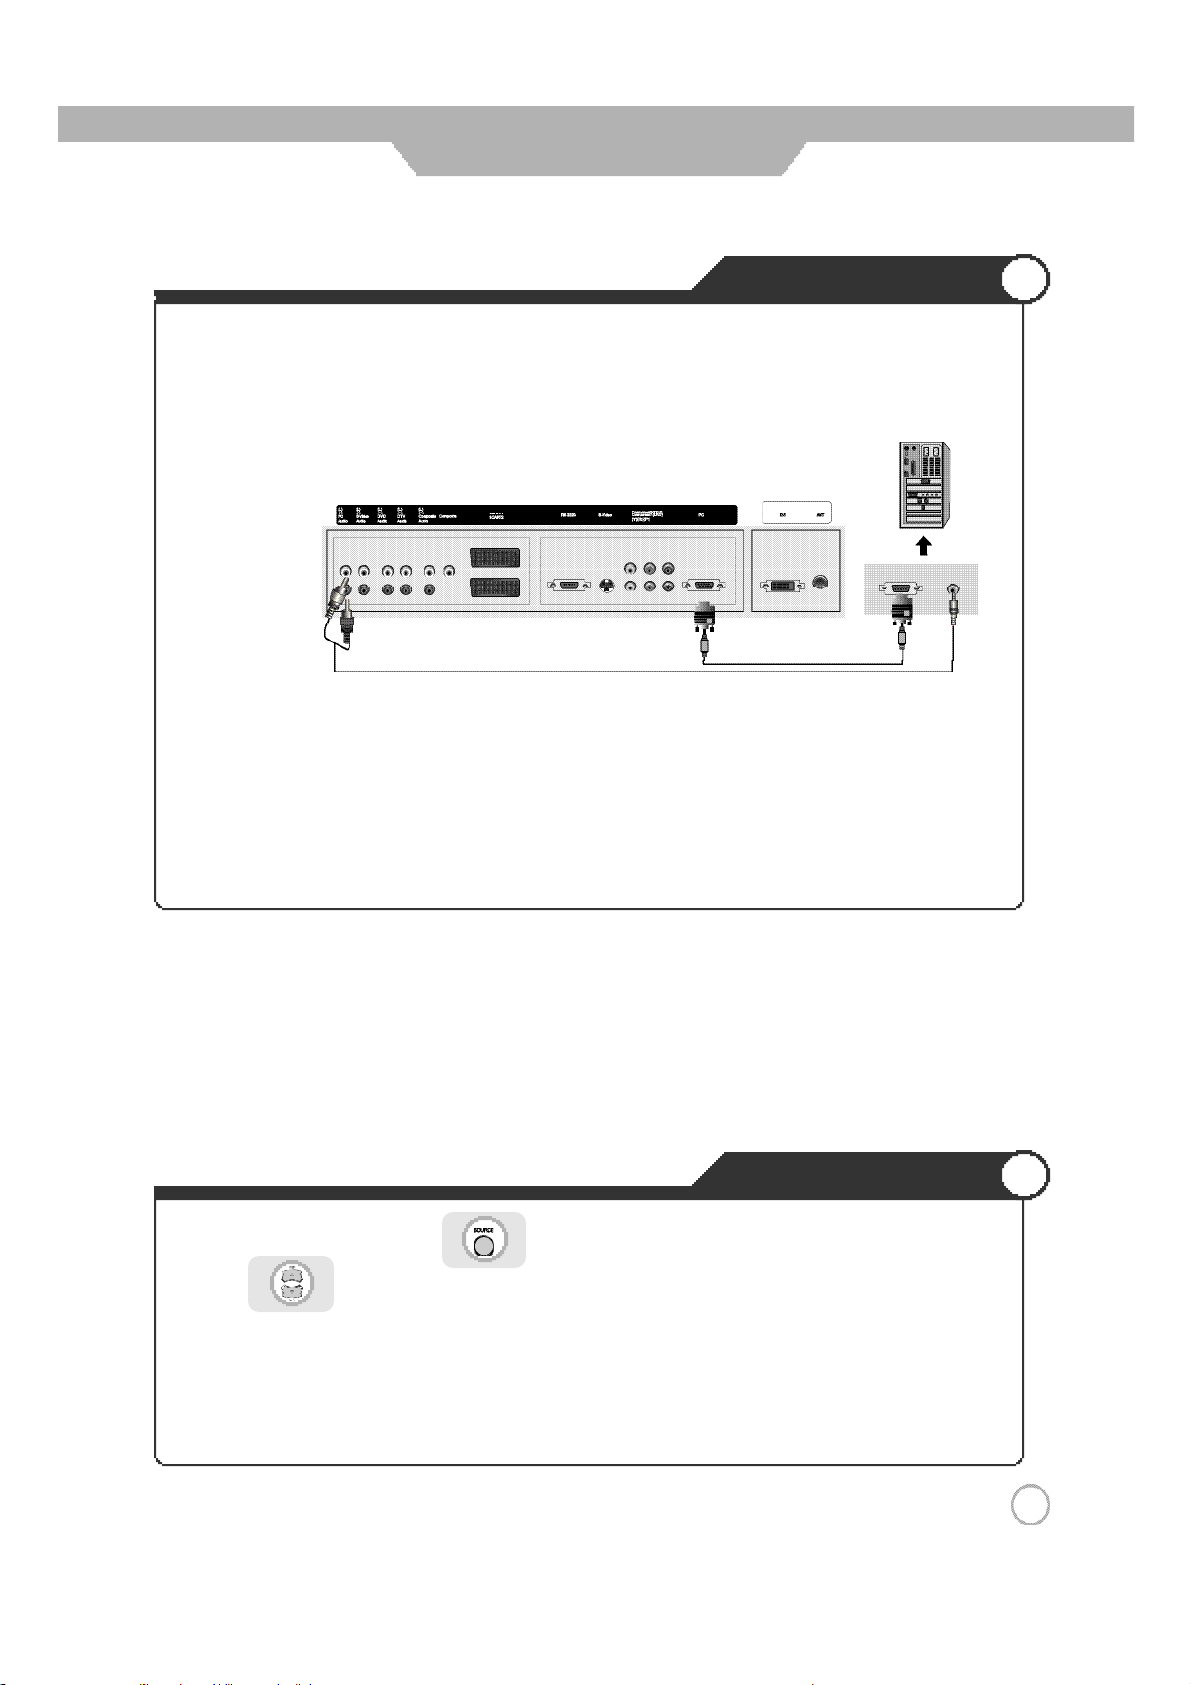
Connection
※ Connection terminals of other appliances differ by manufacturer and model.
< LCD TV Back view>
PC Connections
PC Connections
< PC >
·Connect LCD TV's RGB terminal to PC's RGB terminal using the D-Sub cable.
·Connect LCD TV's PC Audio terminal to PC's Audio terminal using the Audio cable.
(Only possible for PC's with Audio terminal)
·If there is a DVI-D terminal in your PC, use the DVI-D cable connection.
How to Use as PC
1. Turn on the LCD TV and press on the remote controller.
2. Use to move to "PC".
·
If DVI-D has been connected, select “DVI"
3.Set the PC video output mode to VGA (640×480)/ SVGA (800× 600)/ XGA (1024× 768), SXGA
( 1 2 8 0×1024,60Hz). Inthe mode higherthanSXGA (1280×1024, 75Hz) "Out of Range" message appears.
Be sure to change your PC video format to less than SXGA mode.
1 9
Page 20
Basic Use
Powering the LCD TV
● Power on/ off
·To turn the LCD TV on :
Press the "Main Power" button of LCD TV and then press the "Standby" button.
·To turn the LCD TV off :
Press "Standby" button on the LCD TV and then press the "Main Power" button.
Turning the main power switch off will save energy. It is the same as unplugging the power cord.
If ON Time setting is set, the main power should be ON.
·To turn on/off by remote controller :
Press the Power button of remote controller (If the LCD TV is not turned on, check that the "Main Power"
button on the LCD TV main body is turned on. The main power indicator will light up red if turned on).
CAUTION - After turning off the main Power, please wait at least more than 3 seconds to turn the main power back on.
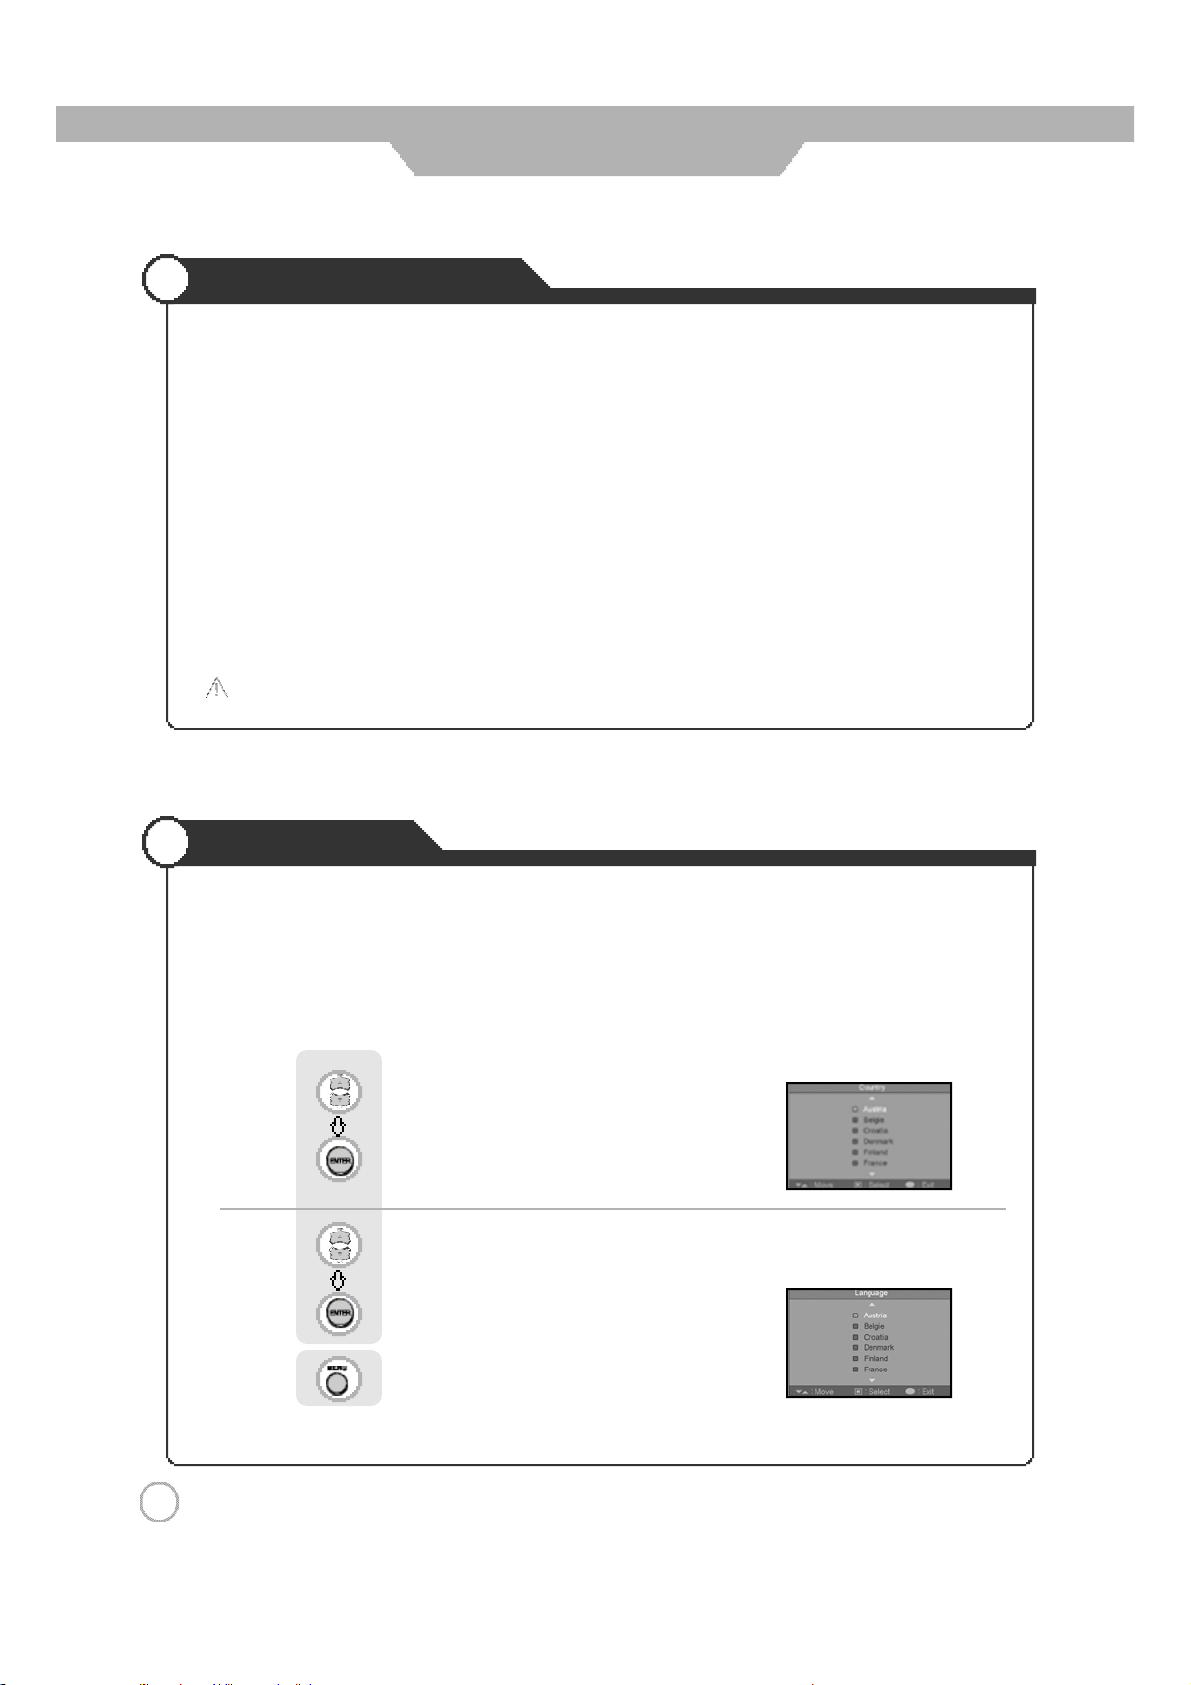
Initial Settings
·When the brand new telev isionset it turned on forthe first time,following settings can be set usi ng the plug and
play function of theTV.
·Press the "Main Power" button of LCD TV and then press the "Standby" button. You will see the Country
mode selection menu.
Us e to move to the desired "Country ".
Press to select.
ㅤ Automatically"ATM"beginning.
ㅤ After "ATM" ends,select thedesired Language.
Us e to move to the desired "Language".
Press to select.
Press to go back to the previous menu.
2 0
Page 21
Basic Use
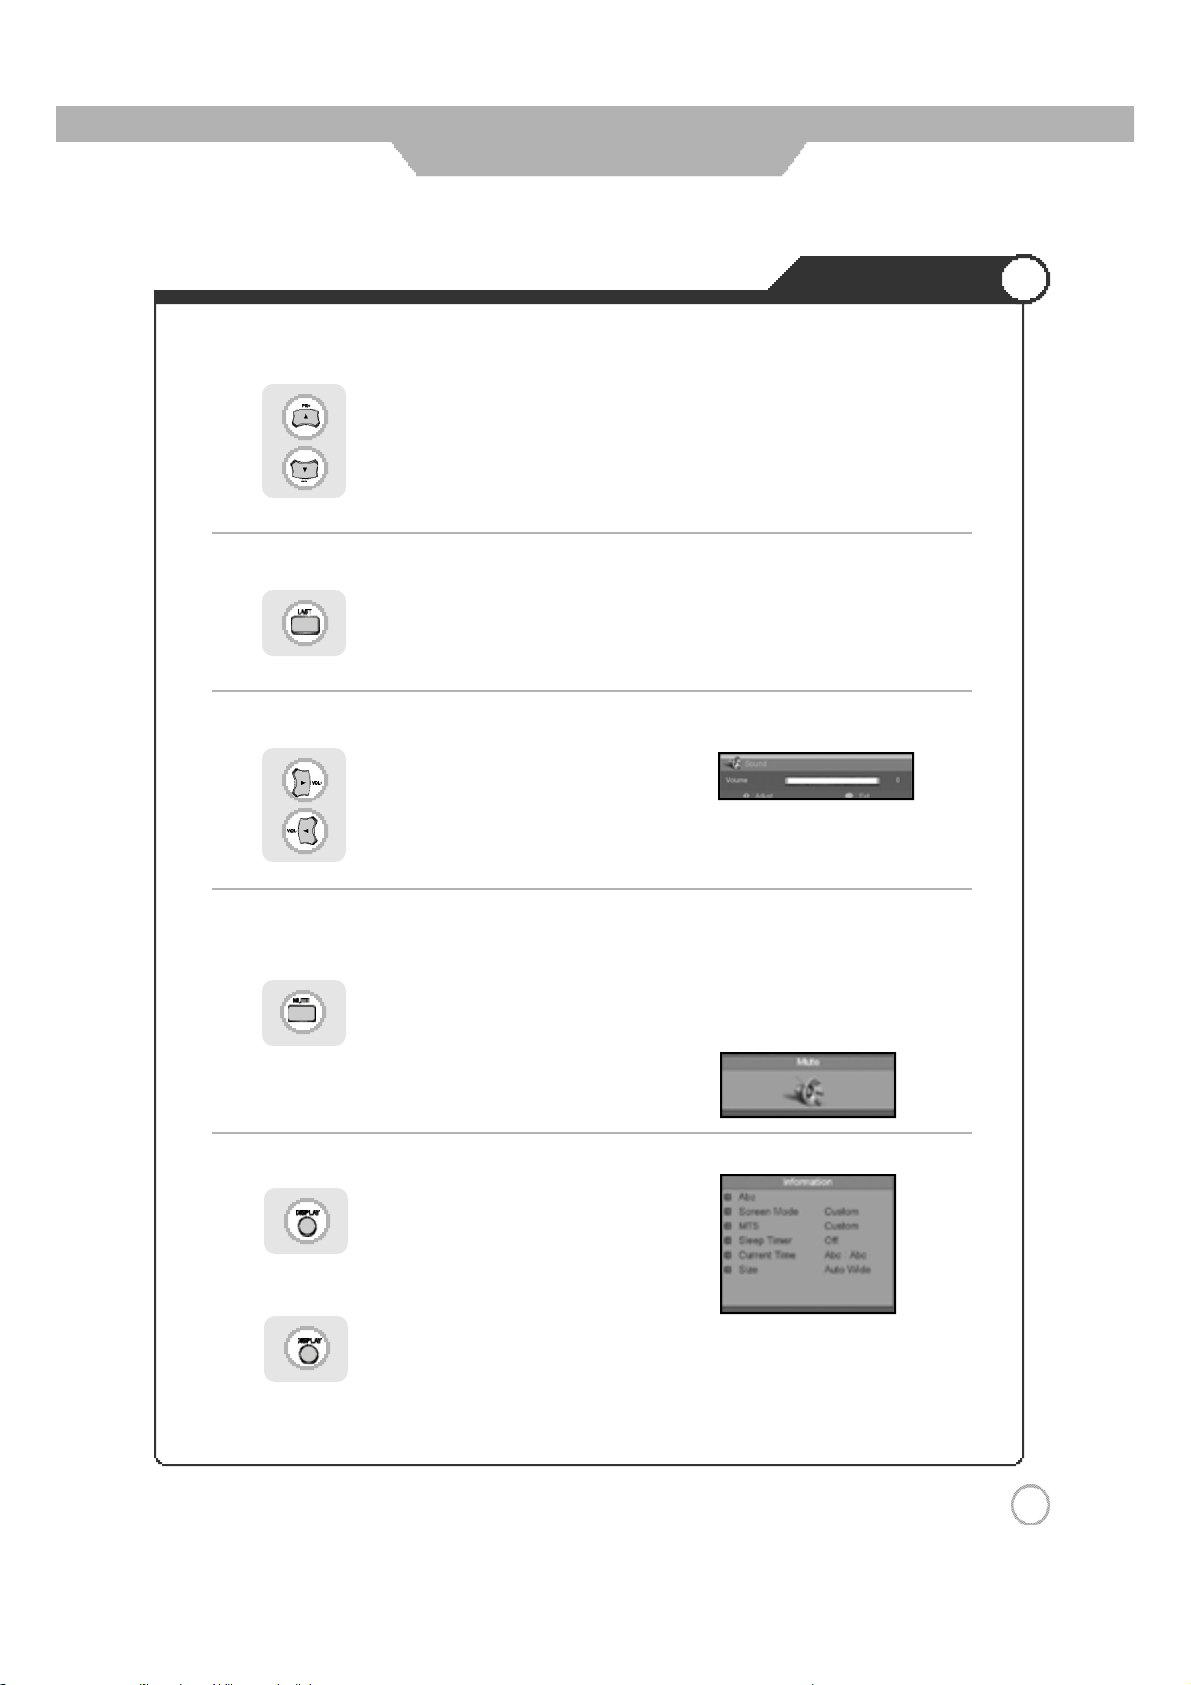
● Program Selection
increases thepro gram.
decreases the program.
● To go back to the previous program
Press to go back to the programyou were previously v iewing.
● Volume Control
Watching TV
increas esthe volume.
decreases the volume.
● To turn off only sound
ㅤ
Use the m ute function to turn off the LCD TV sound for a while, when a phone or a bell rings.
Press button again to hear the sound again.
● INFO - To check the current state
Press button on the remote control.
ㅤ
Display showsuser's setting andselections.
Press button or wait 10 seconds for the displayto disappear.
2 1
Page 22
Basic Use
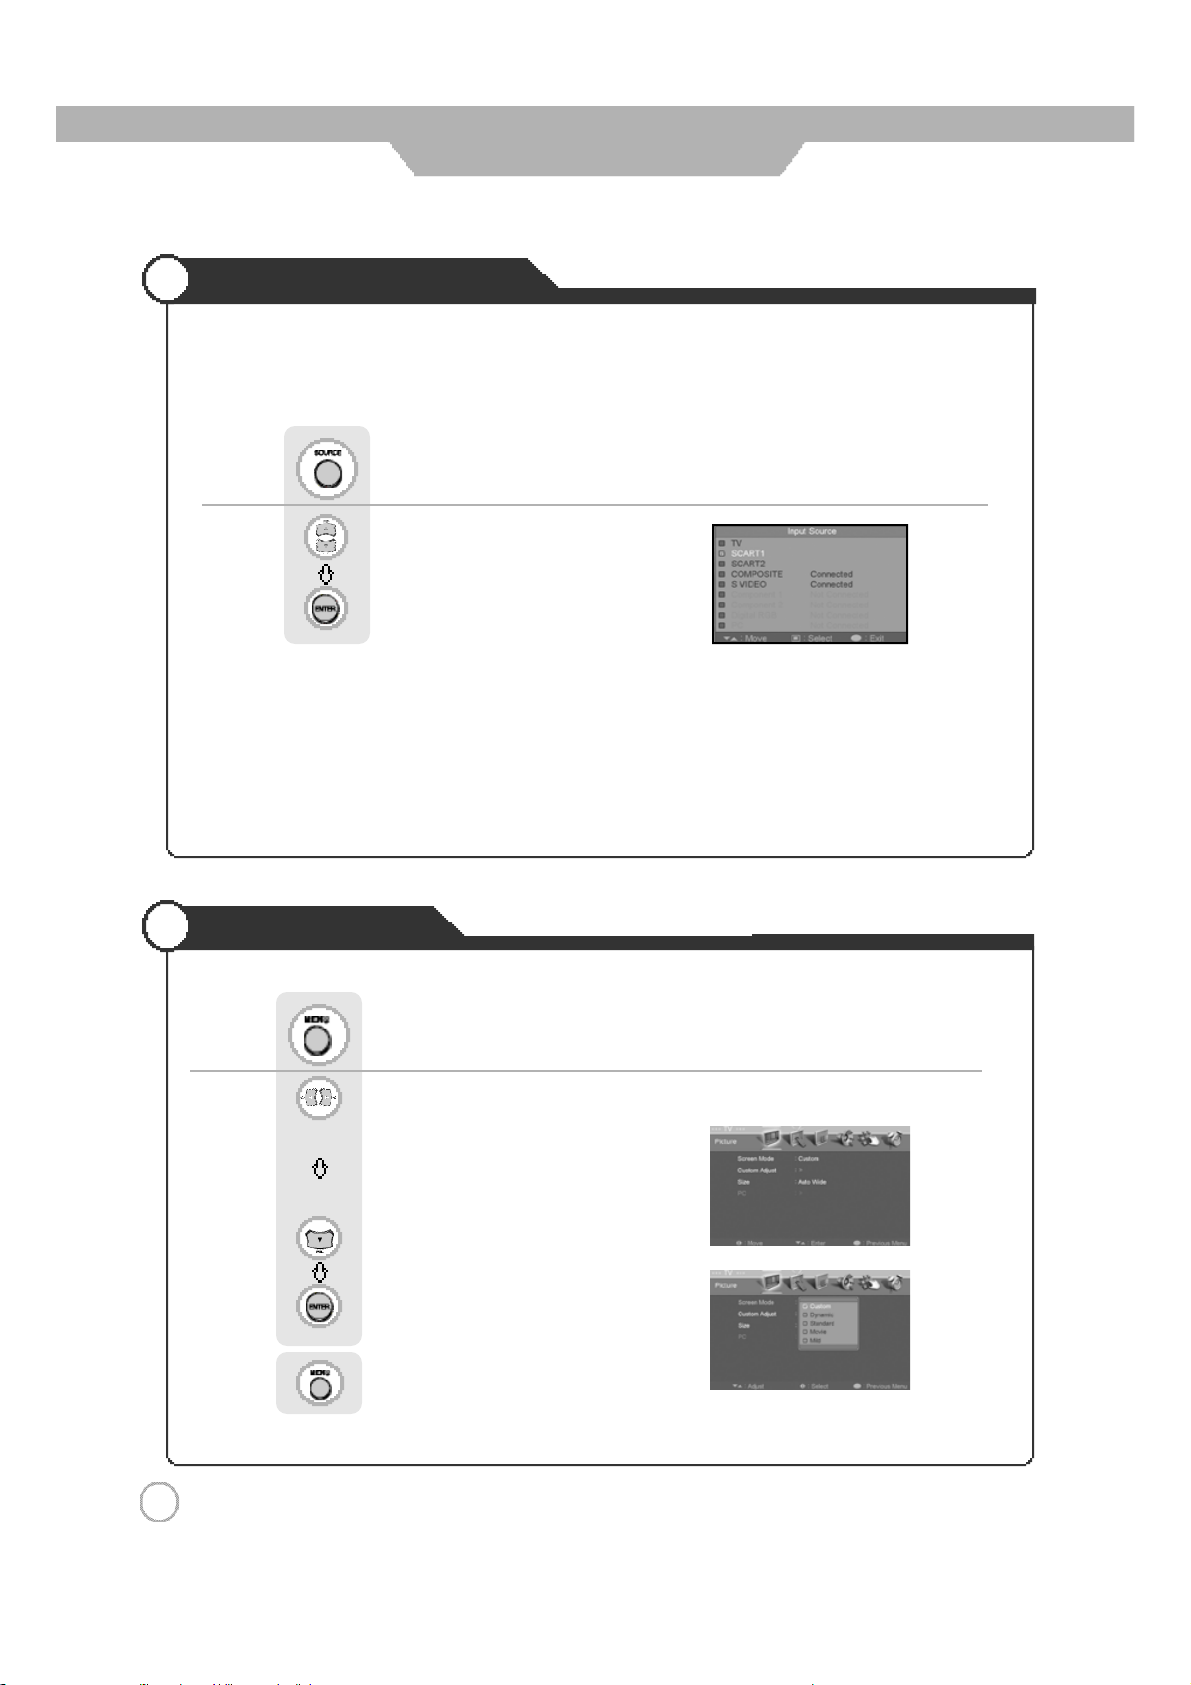
Selecting Input Source
ㅤ
You can between the TV signal and the input signal of other appliances connected to the TV.
ㅤ
Use this function to switch tothe input source you wish to view.
P r e s sPress button on the remote control.
Use tomovetothedesireditem.
Press to select.
※ Aside from the watching TV, you can connect SCART1, SCART 2, Composite, S-Video,
Component 1, Component 2, Digital RGB and PC to the TV set and enjoy these functions.
※ All input sources will be automatically detected and displayed on screen, but you may select an
activated source when the input cable is connected only.
Using the Menu
Press .ㅤThe menu screen will appear.
Us e (left, right arrows) to move the cursorto the desired function.
Press to get intothe s ub menu.
Press to select.
2 2
Press to go back to the previous menu.
Page 23
Basic Use
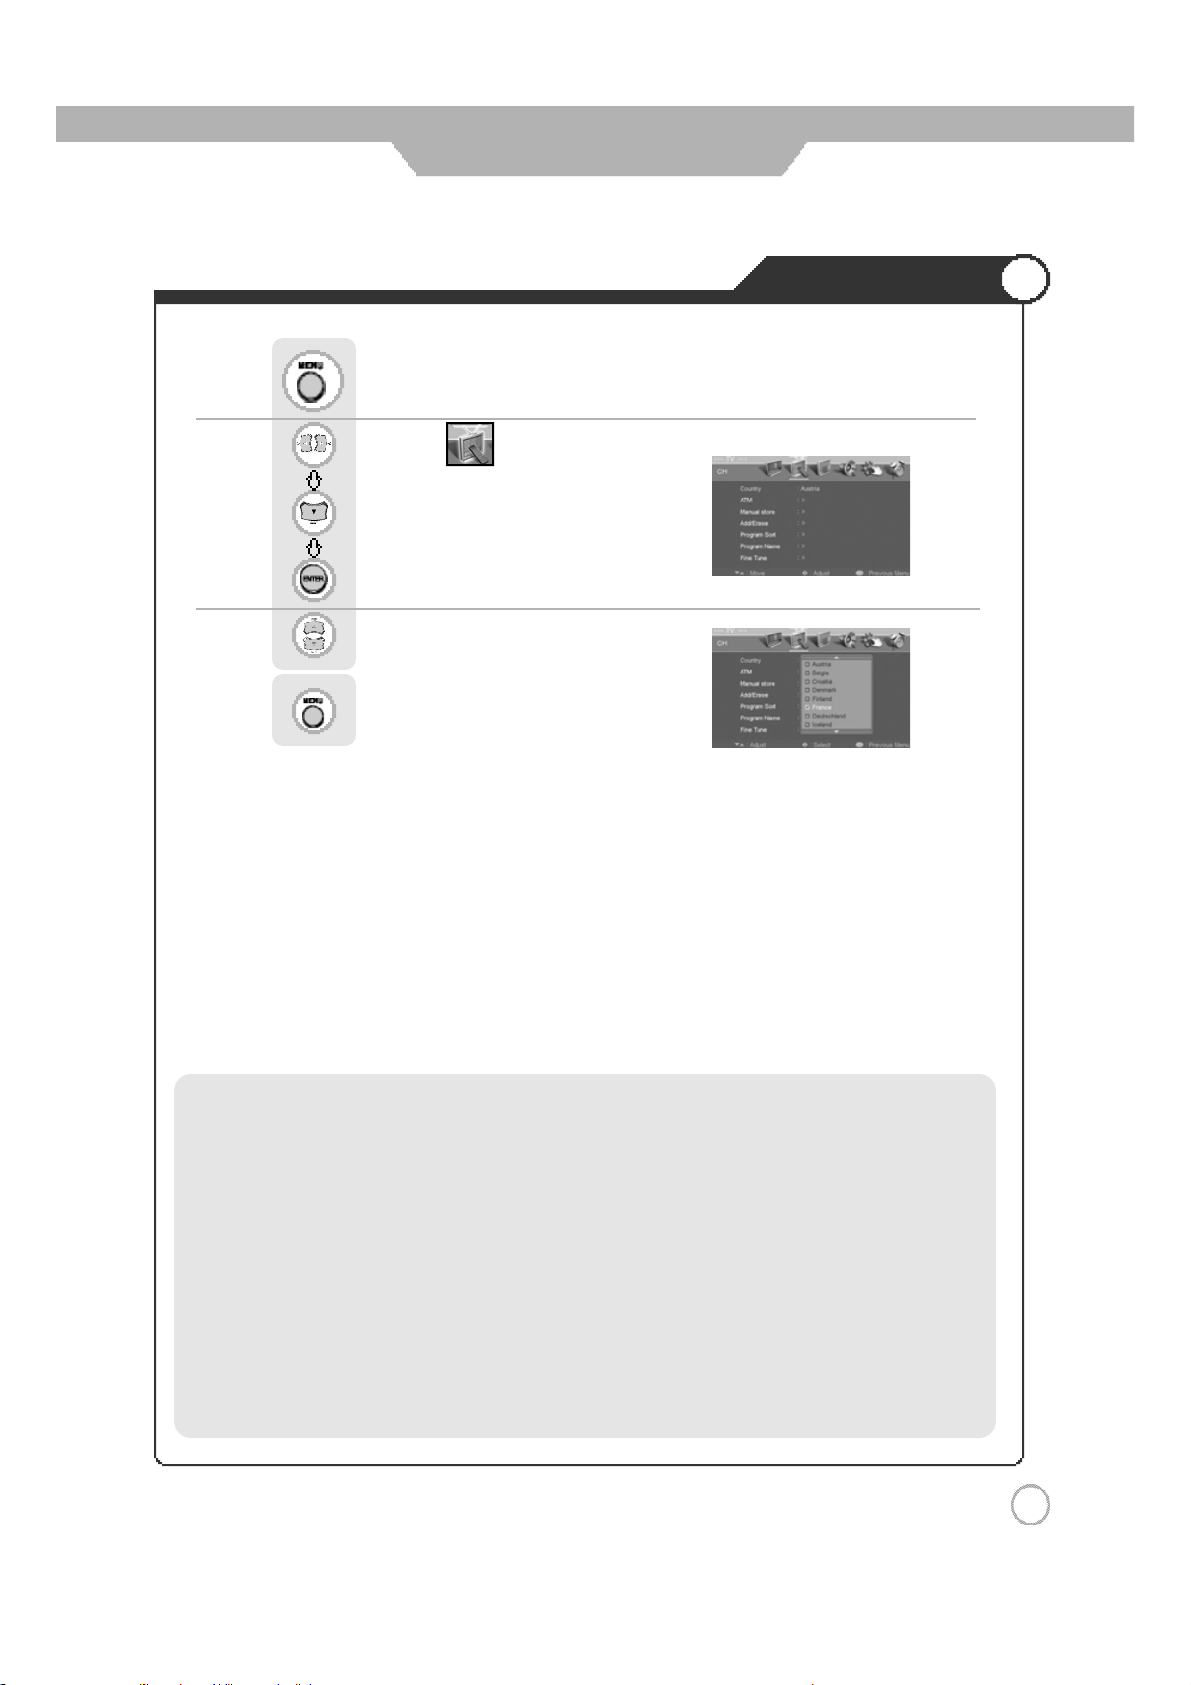
To Set Location
Press .
Use tomoveto .
Press to move to "Country".
Press to select.
Use toselect the desi red country.
Press to go back to the previous menu.
To Set Location
·TV System Standard
P A L(Phase Alternative Line)
SECAM(Séquential Couleúr Amémoire)
L/SECAM : France
D.K/SECAM : Russia, Poland, Czechoslovakia, Hungary
I/PAL : United Kingdom, Hongkong
B.G/PAL : Germany ,Netherland, Switzerland, Italy, Austria, Yugoslavia
B/PAL : Australia, New Zealand, Singapore, Norway, India, Thailand, Indonesia, Malaysia
B/SECAM : Egypt, Iran, Iraq
D/PAL : China, north Korea
B.H/PAL : Belgium
2 3
Page 24
Basic Use
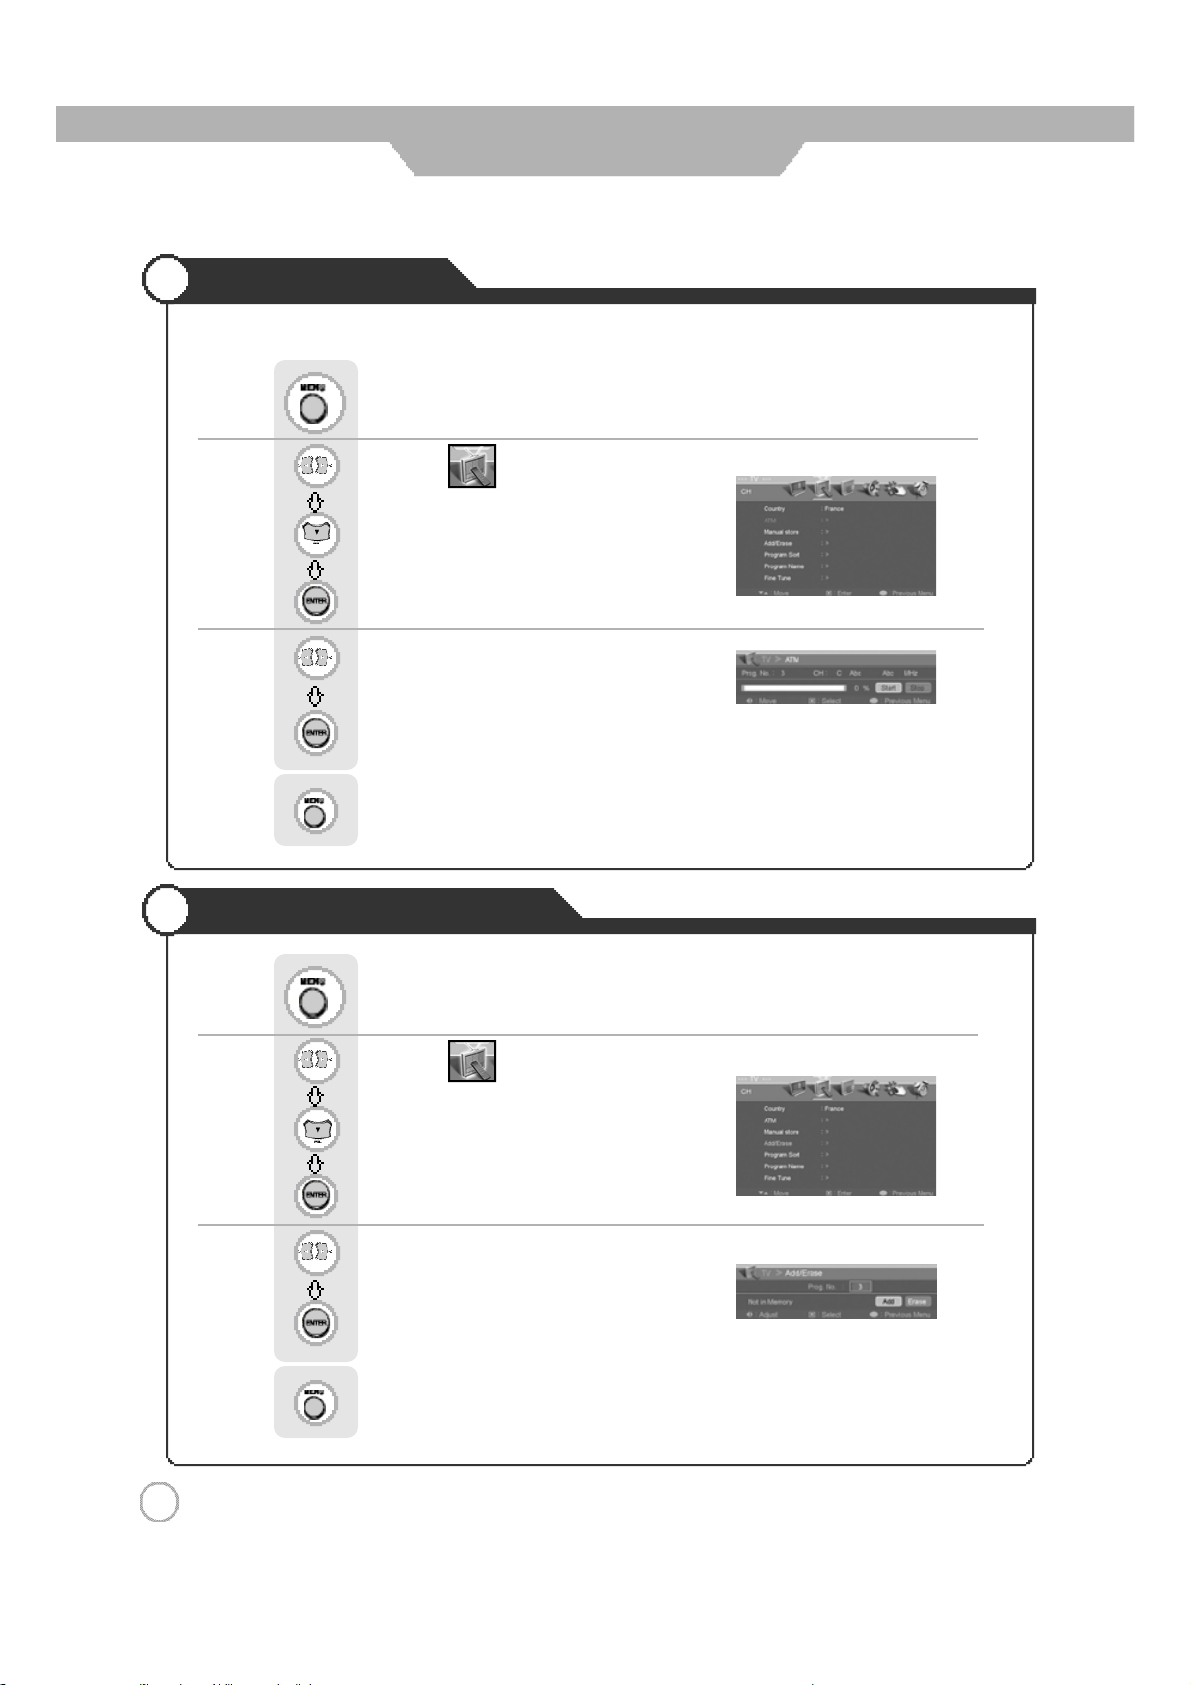
Setting Programs
ㅤ
Us e the Auto Search function to preset al l pr ograms that are being broadcast
Press .
Use tomoveto .
Press tomoveto"ATM".
Pres s toselect.
Use tomoveto"Start".
Pres s toselect.
ㅤ
Press "Start" to start the automatic program search/s et function
Allbroadcasting programs willbe set.
Pres s togo back to the previous menu.
To set or erase a Program
Press .
Use tomoveto .
Pres s tomove to "Add/ Erase"
Pres s toselect.
Use tomoveto "Add"or"Erase".
Pres s toselect.
Pres s togo back to the previous menu.
2 4
Page 25
Basic Use
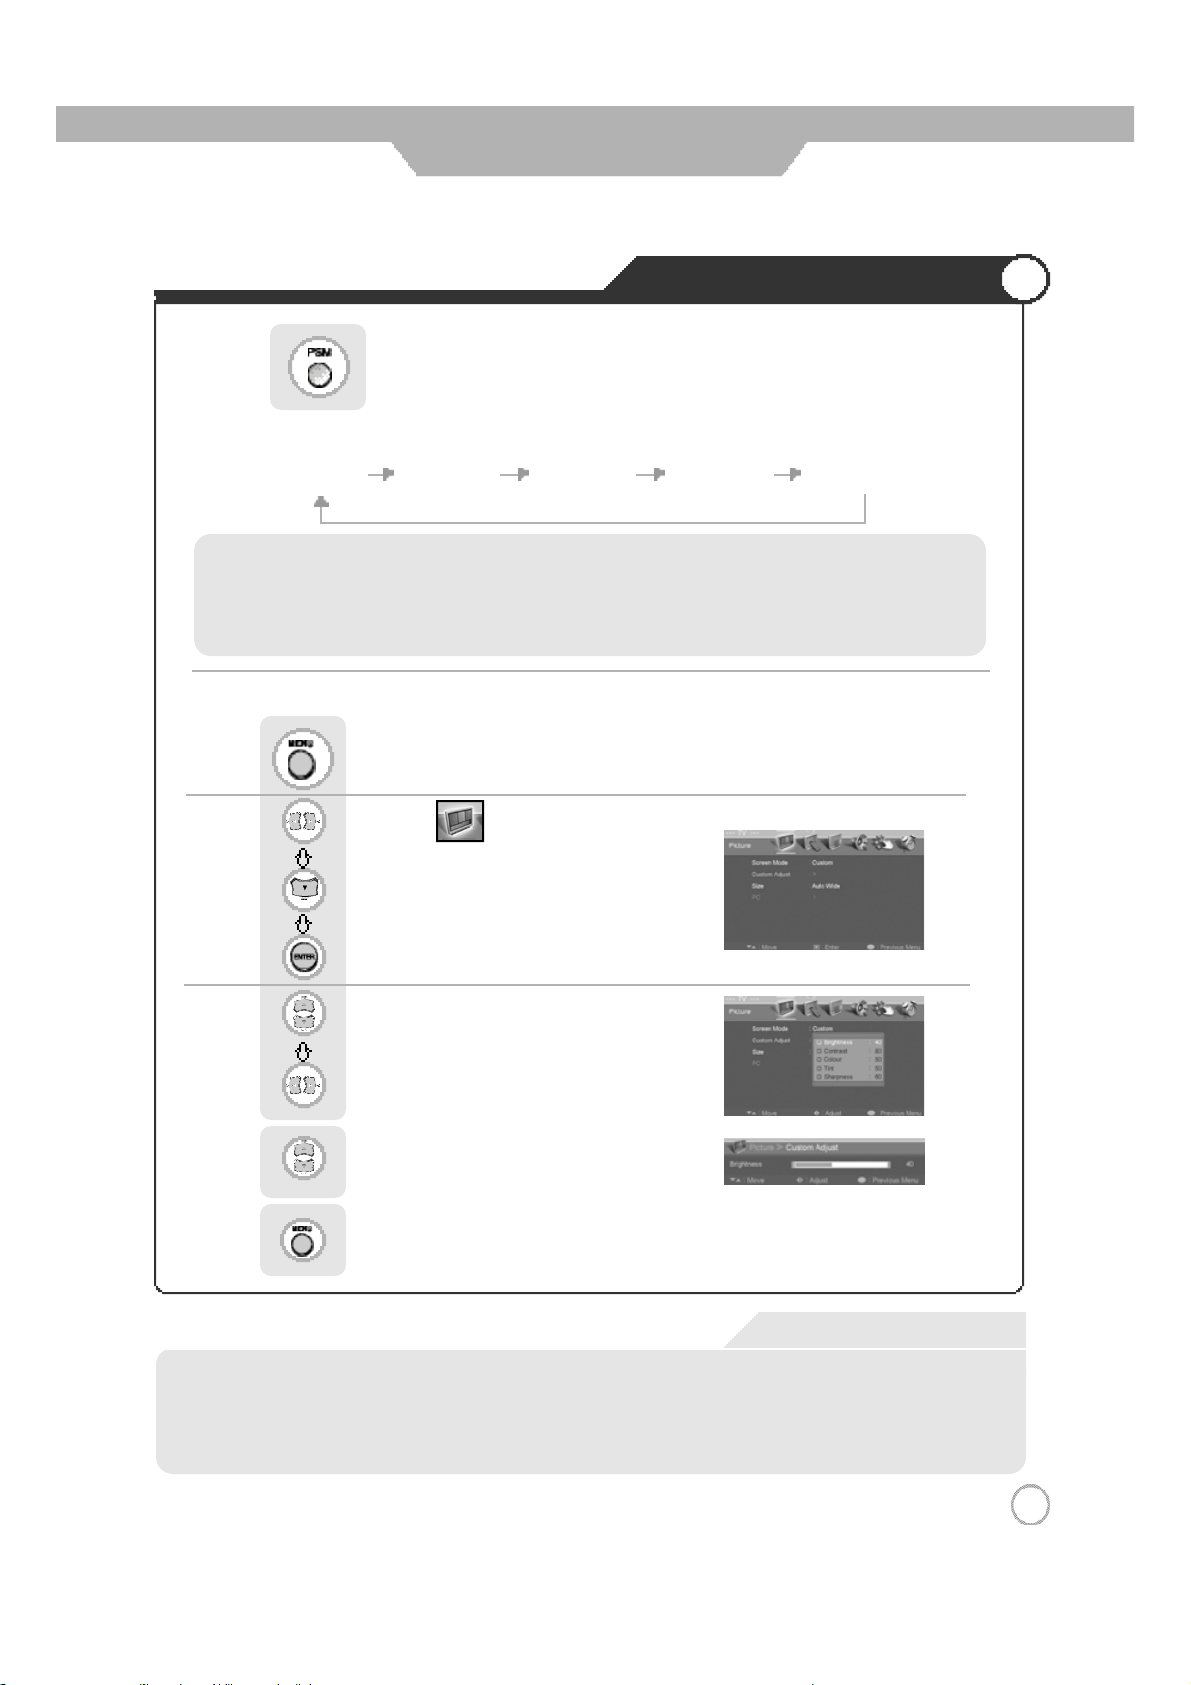
Changing Picture Settings
Press buttonon the remotecontrol .
ㅤ
Press the mode buttons on the shown on the screen repeatedly to adjust the settings.
Custom Dynamic Standard Movie Mild
·Custom : Select to set user's preferences.
·Dynamic : Select when using the LCD TV in a brightly lit environment.
·Standard : It is the best screen setting (factory setting).
·Movie : Select when watching a movie.
·Mild : Select when using the LCD TV in a dimly lit environment.
● Custom Picture Adjustment
Press .
Use tomoveto .
Press to move to "Custom Adjust".
Press to select.
Use to move to the desired category .
Use to adjust the setting.
Use select betw een Brightness/ Contrast/
Colour/Tint/ Sharpness.
Press to go back to the previous menu.
ㅤ
Custom Mode
·Brightness : It adjusts the brightness of the image.
·Contrast : It adjusts the contrast of image.
·Colour : It adjusts the intensity of the colour.
·Tint : It adjusts the natural tint of the image.
·Sharpness : It adjusts the clarity of the image.
2 5
Page 26
Basic Use
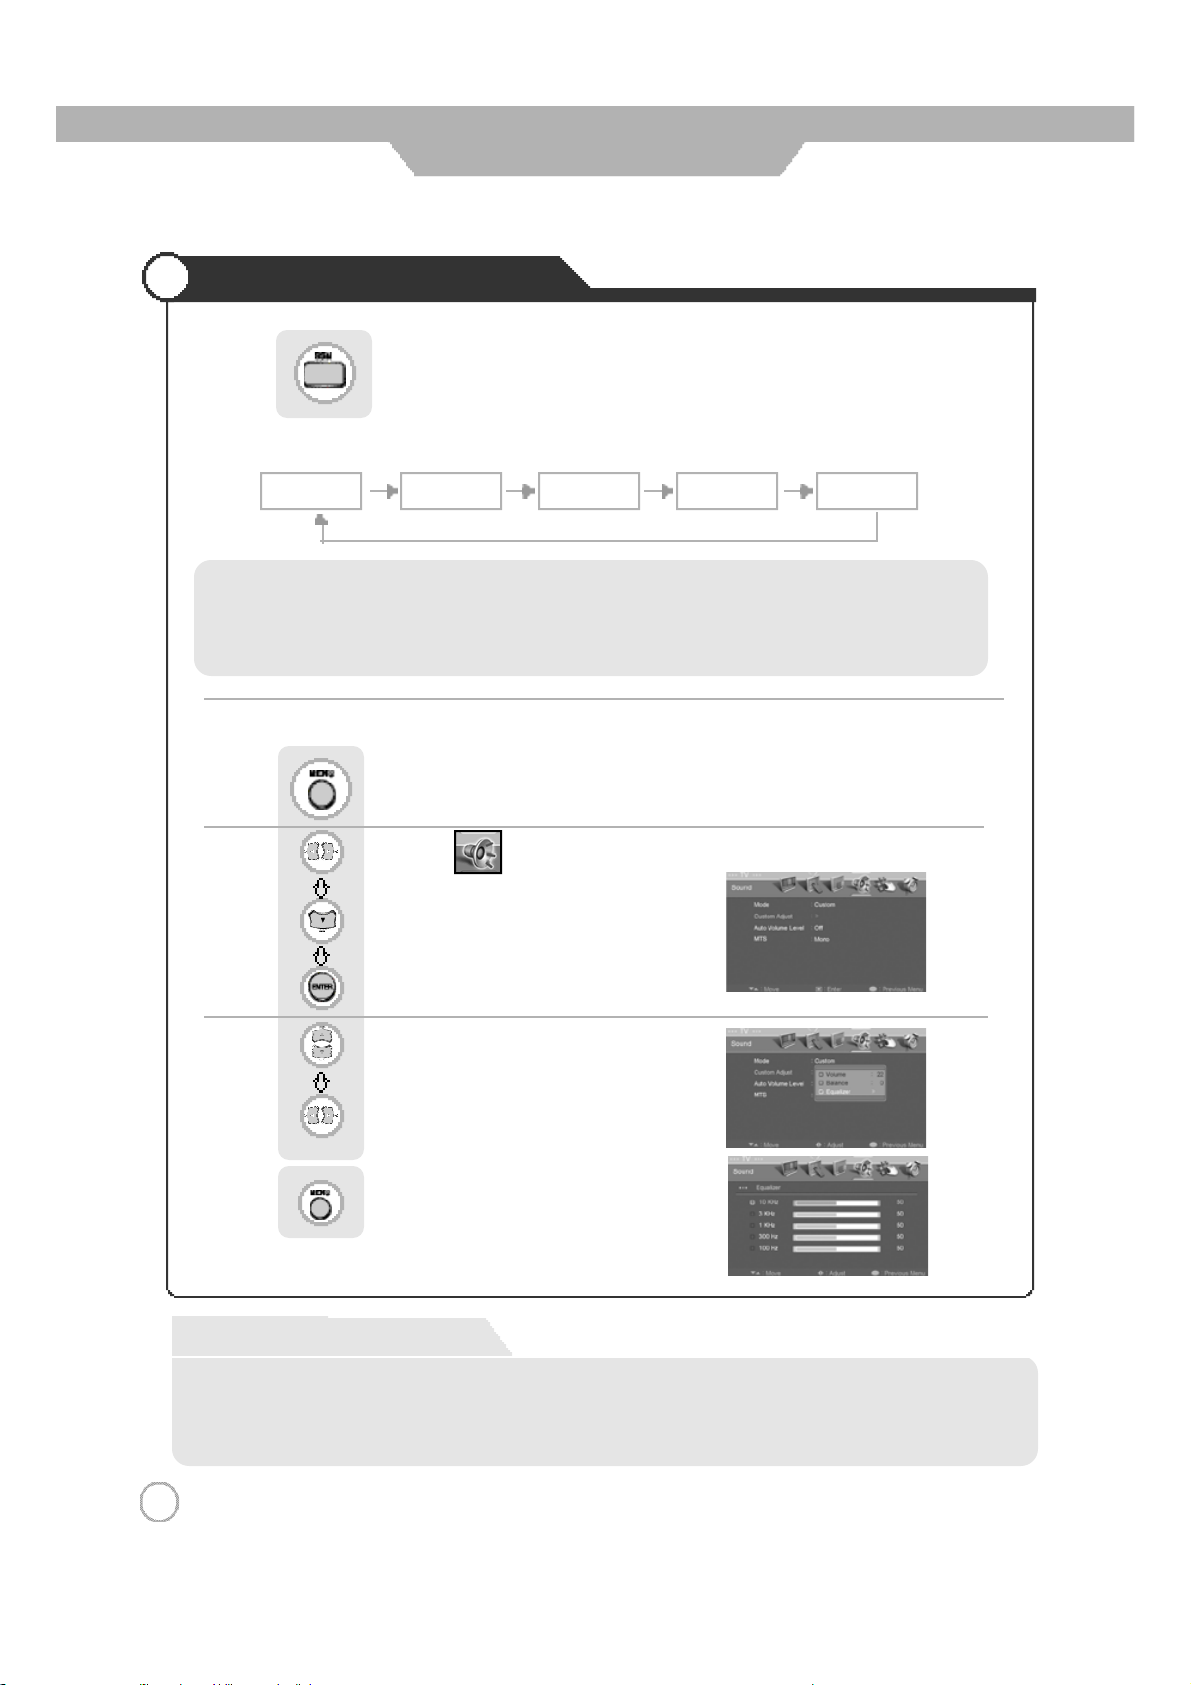
Changing Sound Settings
Press button ontheremote control.
ㅤ
Press the mode buttons on the s how n on the screen repeatedly to adjust thesettings.
Custom Standard Music Movie Speech
·Custom : Select when listening to the sound to user's preference.
·Standard : It is the flat sound setting with no equalizer effect at all.
·Music : It is preset for music listening.
·Movie : It is preset sound for watching a movie.
·Speech : It is preset for hearing vocal audio clearly.
● Custom Sound Adjustment
Press .
Use tomove to .
Press to move to "Custom Adjust".
Press toselect.
Use t o move to the desired category.
Use to adjust the setting.
Pres s togo back to the previous menu.
ㅤ
Custom Mode
·Volume : It adjusts the sound volume.
·Balance : It adjusts the volume of speakers on the left and the right.
·Equalizer : It adjusts the volume byfrequency bands and the usercan selec tthe desir ed sound quali ty.
2 6
Page 27
Basic Use
ㅤ
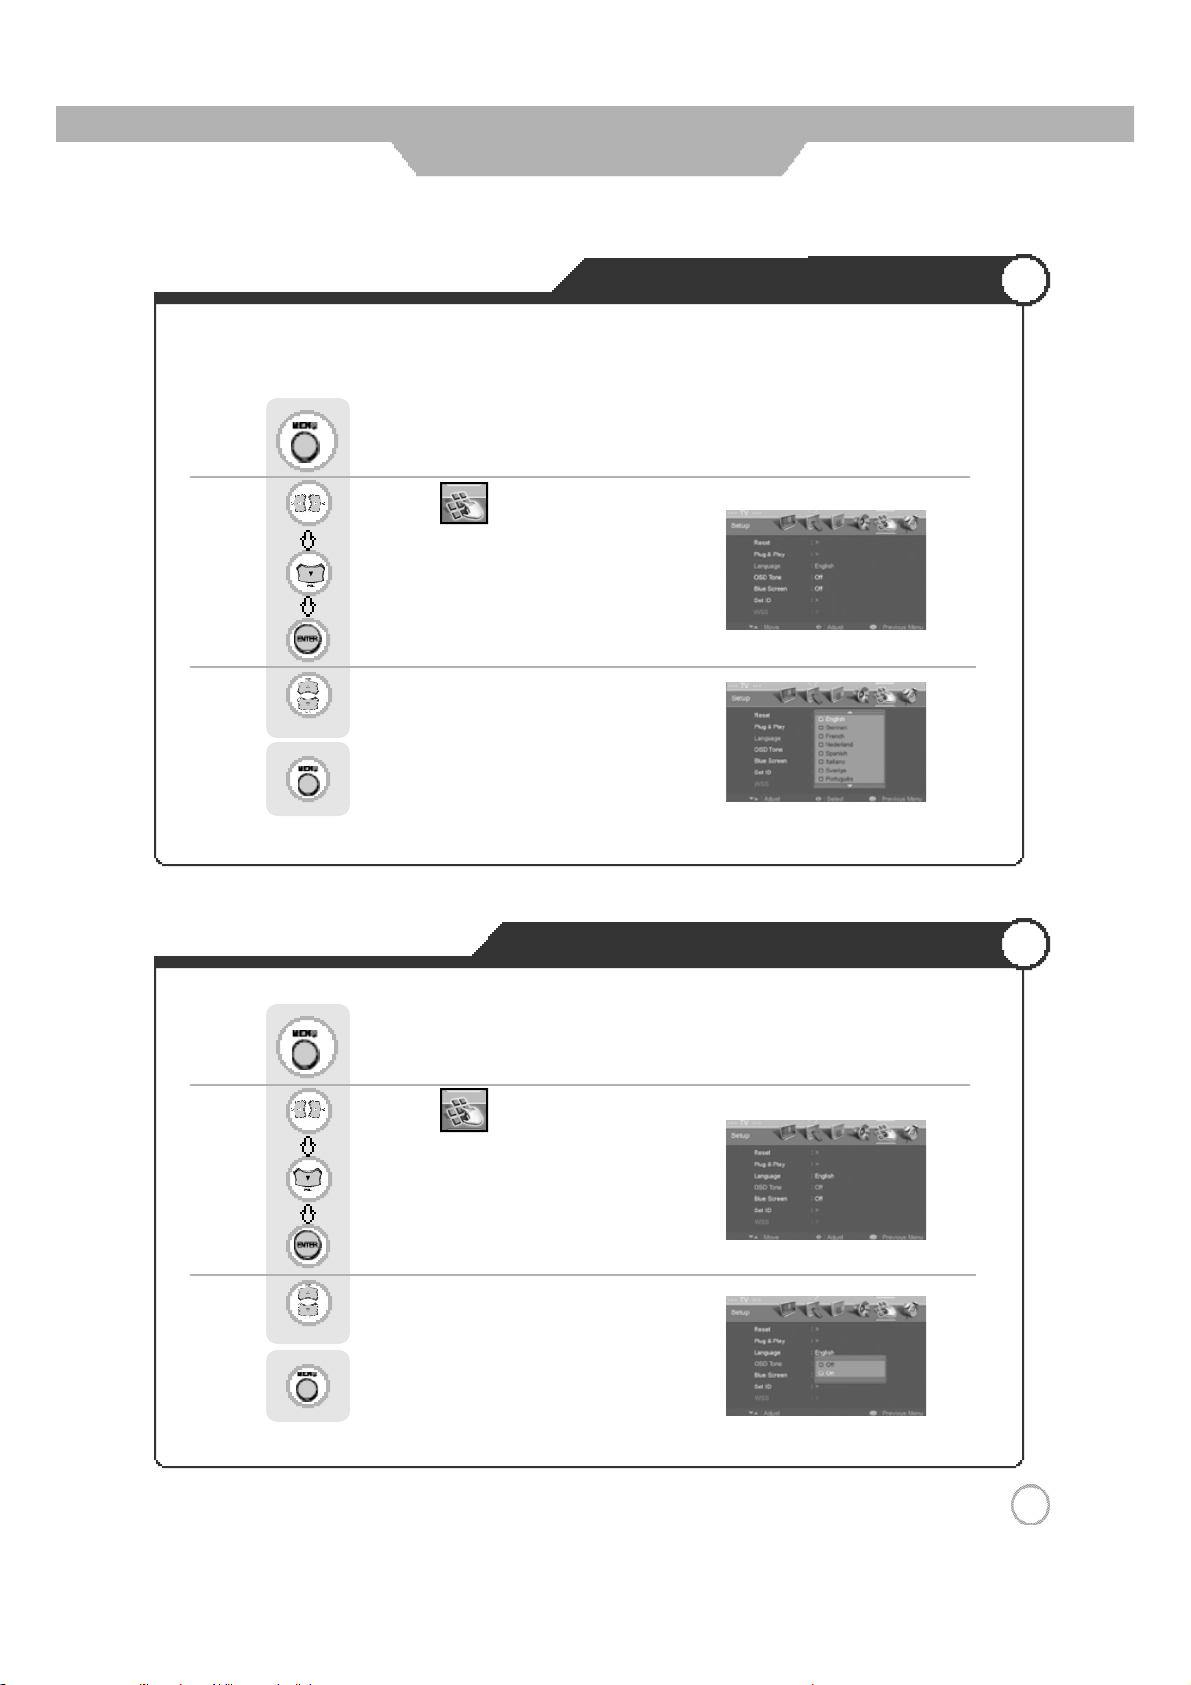
Menu screen can be viewed in the language preferred bythe user.
Press .
Use tomoveto .
Pres s tomove to "Language".
Pres s toselect.
Use to select the desired language.
Selecting the Menu Language
Pres s togo back to the previous menu.
Setting OSD Tone Menu Background
Press .
Use tomoveto .
Press tomoveto"OSD Tone".
Pres s toselect.
Use to select the "On".
Pres s togo back to the previous menu.
2 7
Page 28
Basic Use
Setting Blue Background
ㅤ
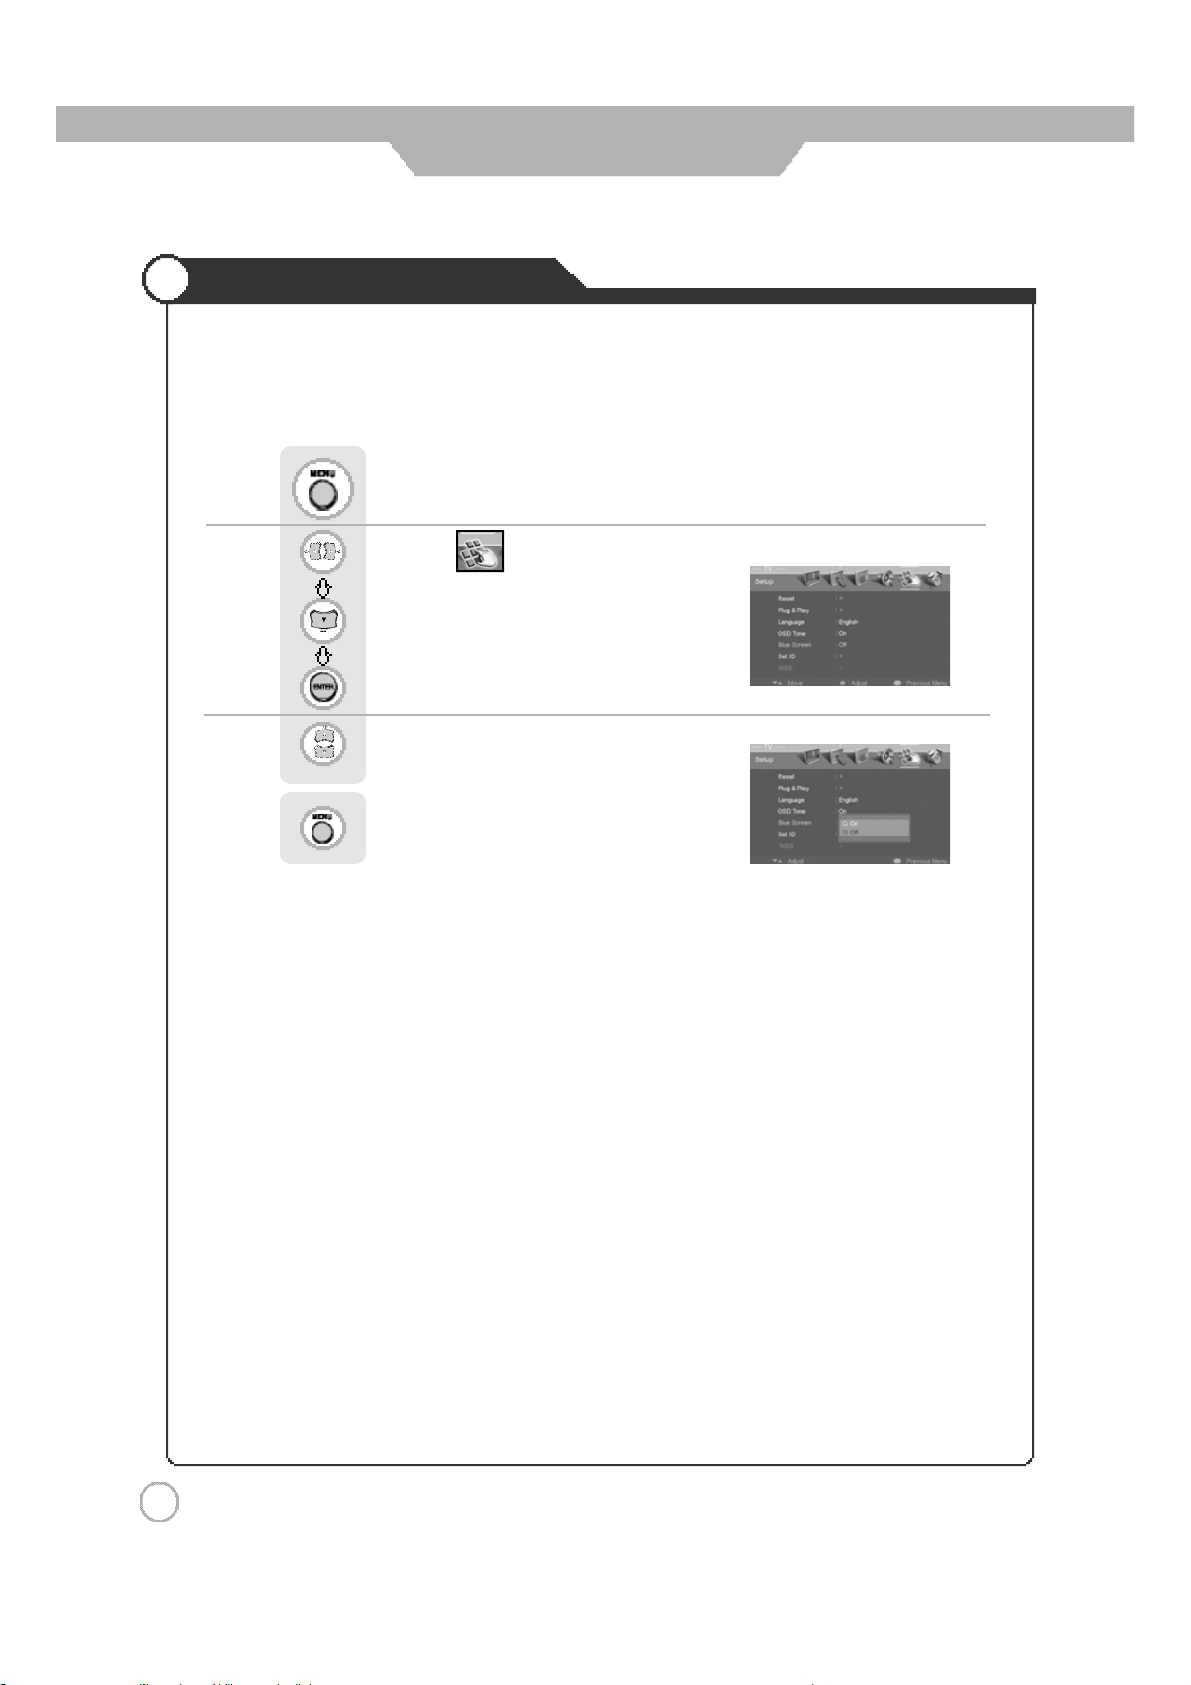
TheLCD TV canbe set to display bluescreen when no TV signalor signal fromother c onnected
appli ances arebeing received. If there is an incoming signal, the blue screen will be replaced by the
normal picture screen.
Press .
Use tomoveto .
Press to move to "Blue Screen".
Press to select.
Use to selectthe "On".
Press to go back to the previous menu.
2 8
Page 29
Application
Changing Screen Size
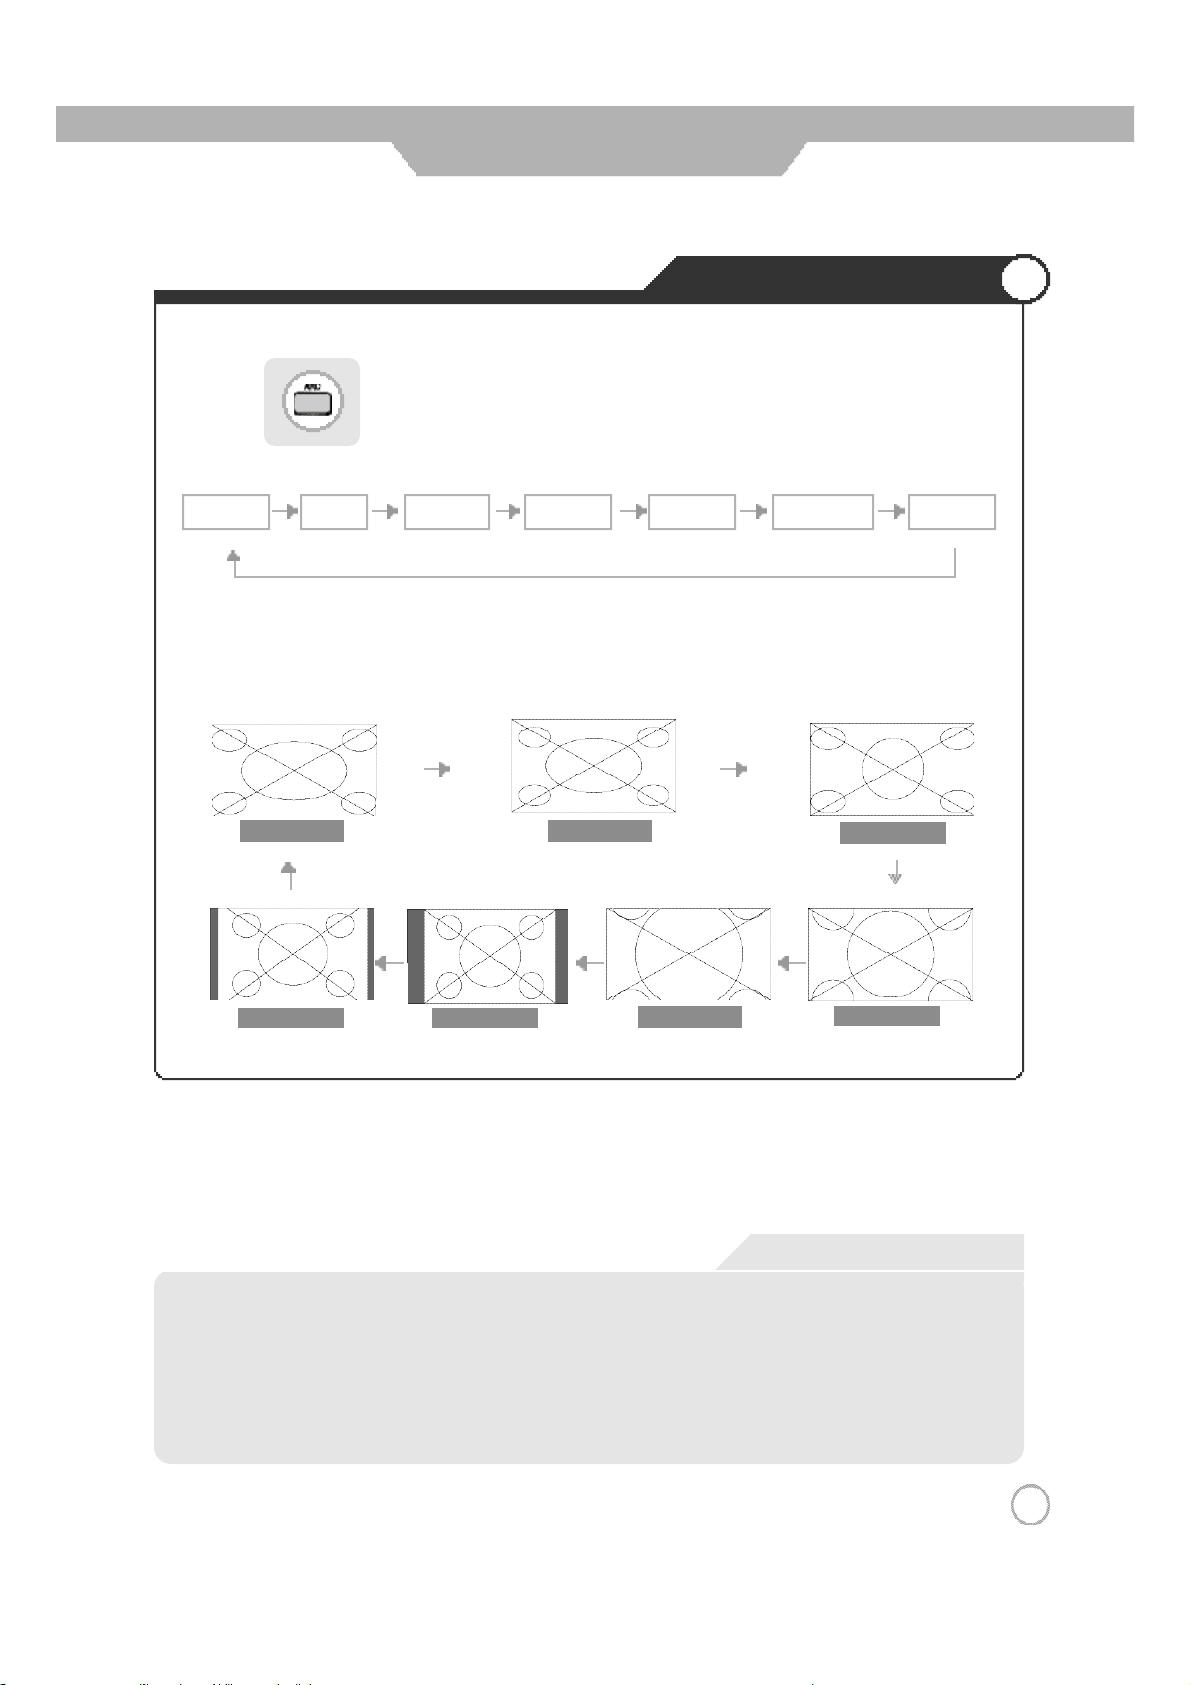
Press button onthe remotecontrol(aspect ratio controller).
Auto wide wide Panorama Zoom1 Zoom2
ㅤ
In PC input mode, you can only select either the wide or the normal (4 : 3) mode.
ㅤ
In Component 2 input mode, you can't Select, Auto wide and 14 : 9.
Auto wide wide
14 : 9
4 : 3
4 : 3 (normal)
Panorama
Zoom 1Zoom 2
14 : 9
·Auto wide - It automatically displays for the screen format of input signal.
·wide - It makes 15 : 9 format for input signal.
·Panorama - It makes 4 : 3 format fit into 15 : 9 format with minimal loss in content.
·Zoom 1 - It enlarges the natural screen factor by approx. 5 %
·Zoom 2 - It enlarges the natural screen factor by approx. 10 %
·4 : 3 - It is the standard format of broadcasting.
·14 : 9 - It makes 14 : 9 format for input signal.
ㅤ
Screen Size
2 9
Page 30
Application
Changing the Screen Size for WSS Signal Input
ㅤ
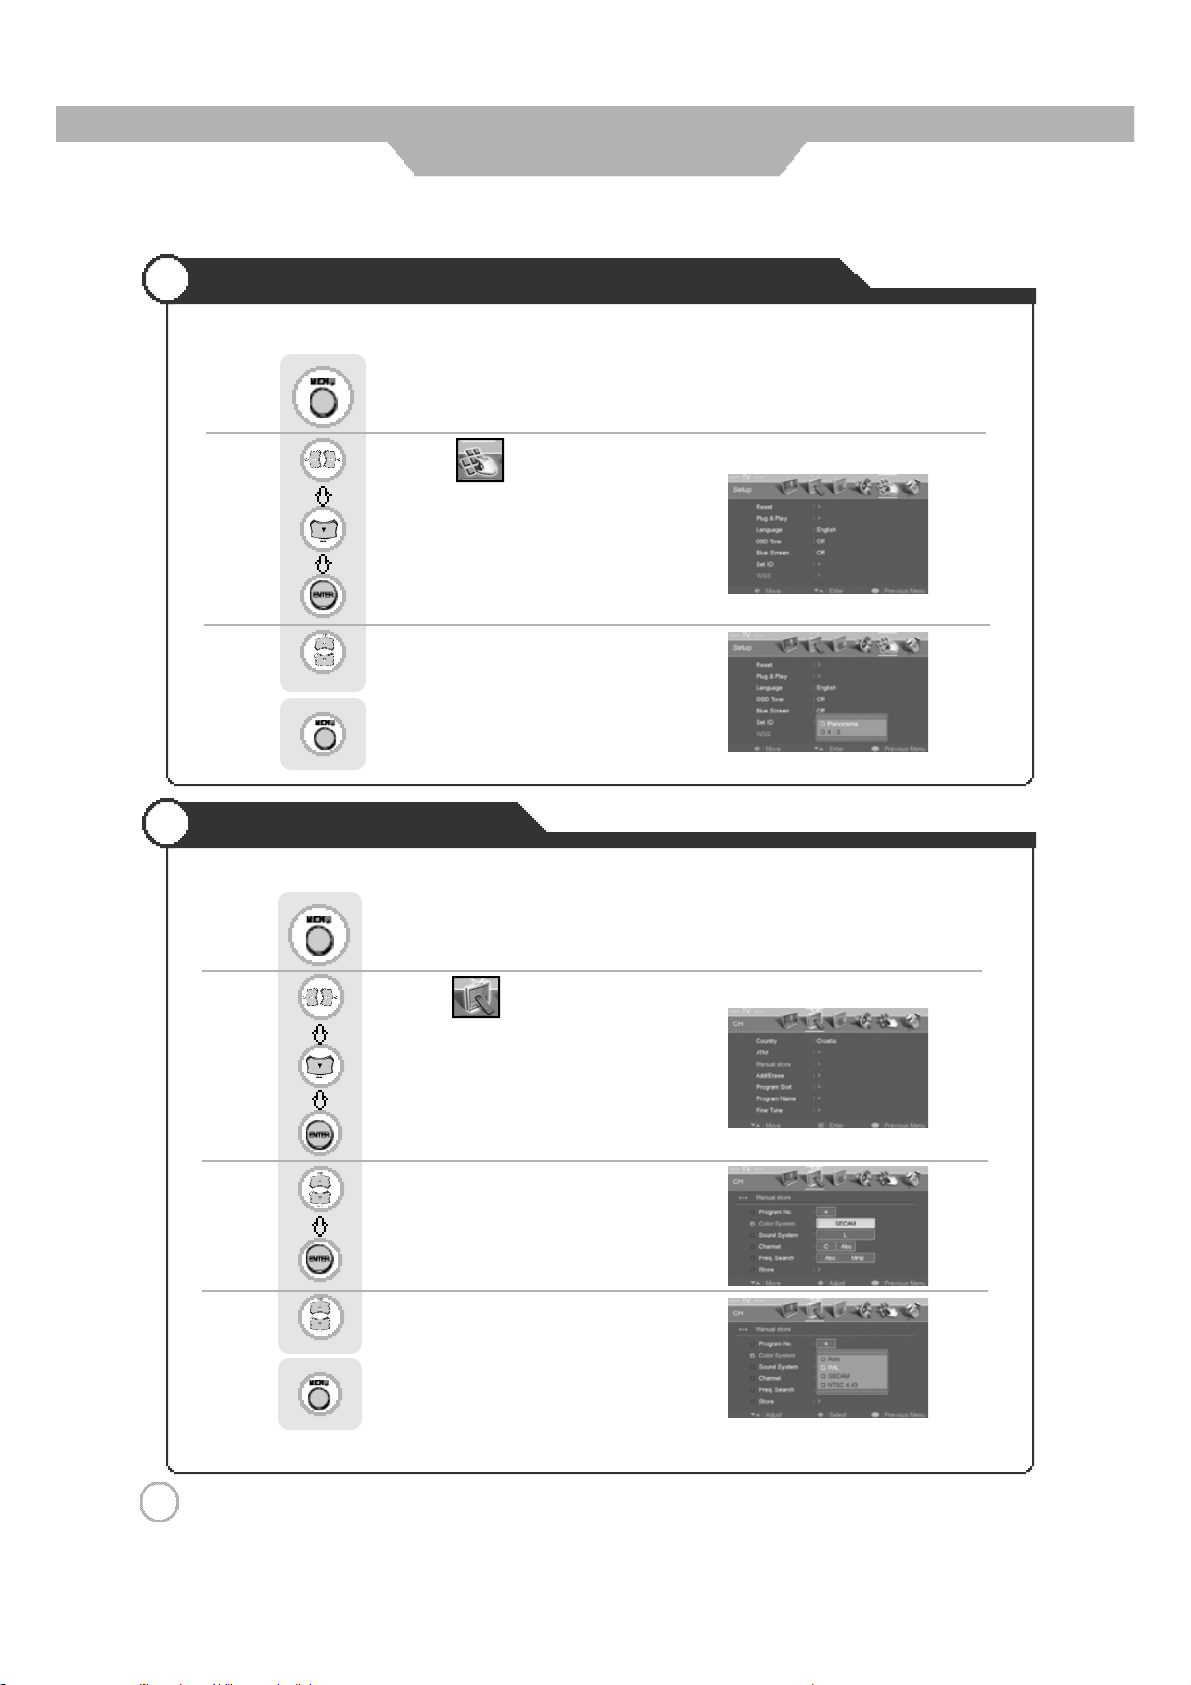
When WSS s ignal i s incoming from a connected external appliance, screen size can be changed to panorama or 4 : 3.
Press .
Use tomoveto .
Press to move to "WSS ".
Press to select.
Use to selectthe Panorama or 4 : 3.
Press to go back to the previous menu.
Changing the Program
ㅤ
Colorsystem andsoundsystem canbesetup for eachprogram.
Press .
Use tomoveto .
Pres s tomove to "Manual Store".
Pres s toselect.
Use tomovetothedesiredcategory.
Pres s toselect.
Use to adjust the setting.
Pres s togo back to the previous menu.
3 0
ㅤ
Select "Yes" in Manual Store to save the Program settings.
Page 31
Application
ㅤ
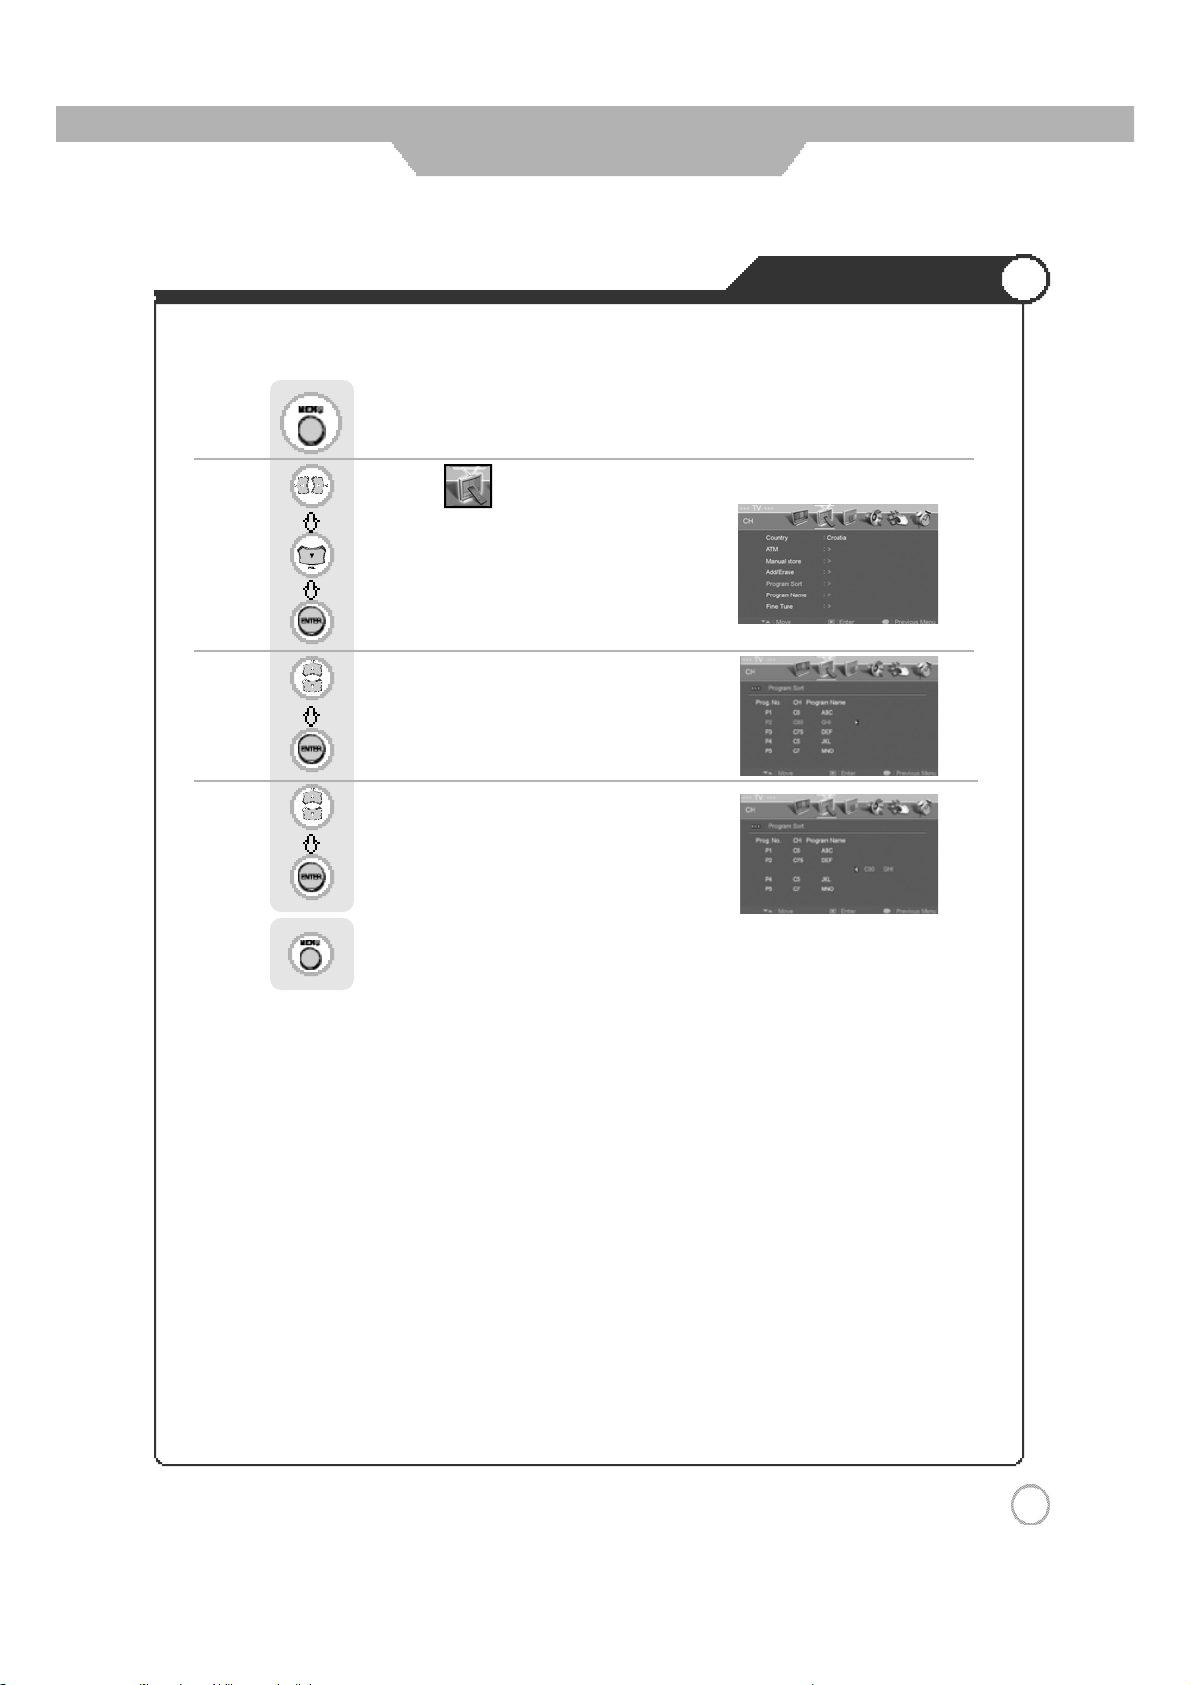
In thi s mode, you can arrange programs in numericalorder.
Press .
Use tomoveto .
Press to move to "Program Sort".
Press to select.
Use to move to the desired Program Number.
Sorting Program
Press to move to the next category.
Use to move to the Preferred Program Number.
Press to sort.
Press to go backto the previous menu.
3 1
Page 32
Application
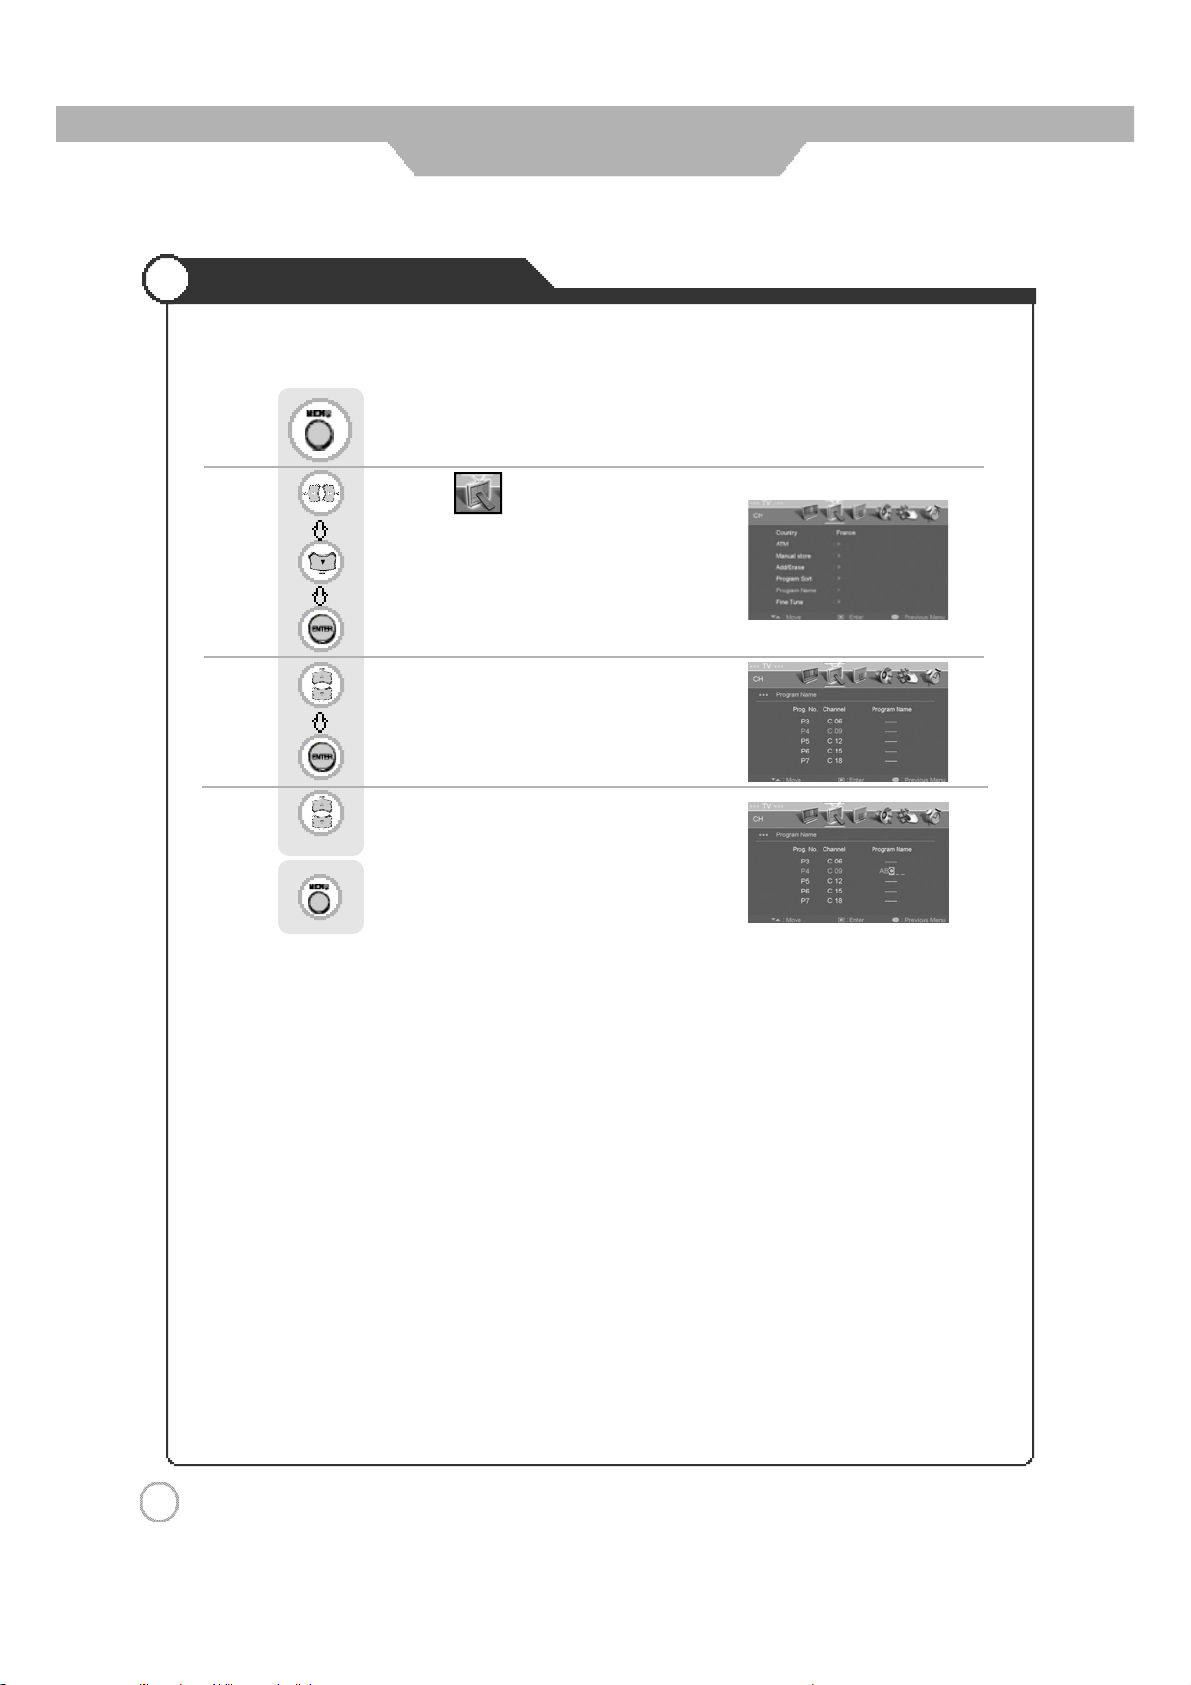
Editing Program Name
ㅤ
Favoriteprogramscan bestored to make it easi er to find.
Press .
Use tomoveto .
Press to move to "Program Name".
Press to select.
Use to move tothe des ired Program Number.
Press to move to program name.
Use to register program name.
Press to go back to the previous menu.
3 2
Page 33
Application
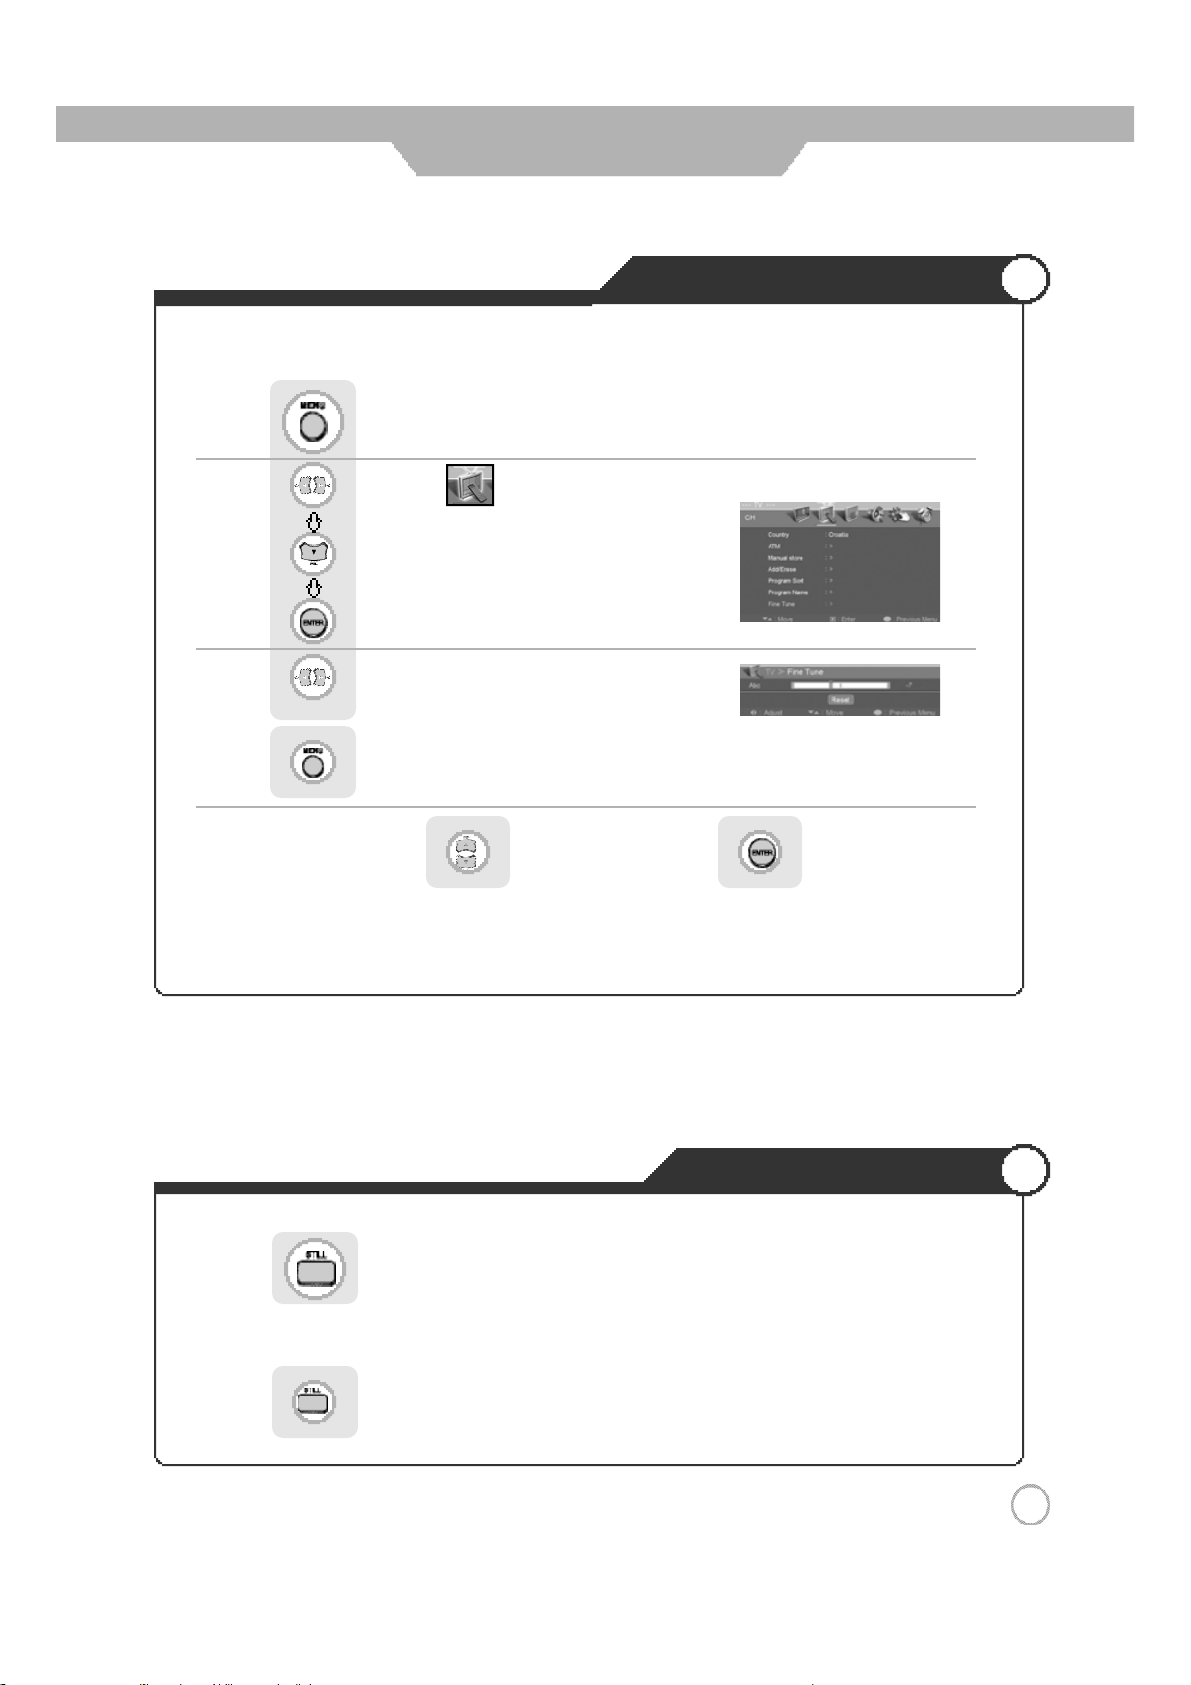
Adjusting Unclear Screen
ㅤ
Us e s creen fine-tune controlsto adjust the screen when picture qualityis unclear orlines appear.
Press .
Use tomoveto .
Press to move to "Fine Tune".
Press to select.
Use to tune.
Press to go back to the previous menu.
To retu rn to initial setting,us e to select"R eset"an dpre ss .
To view the still picture
Press button on the remote control.
ㅤ
Picture will freeze, but sound will continue to be heard.
Press again to cancel.
3 3
Page 34
Application
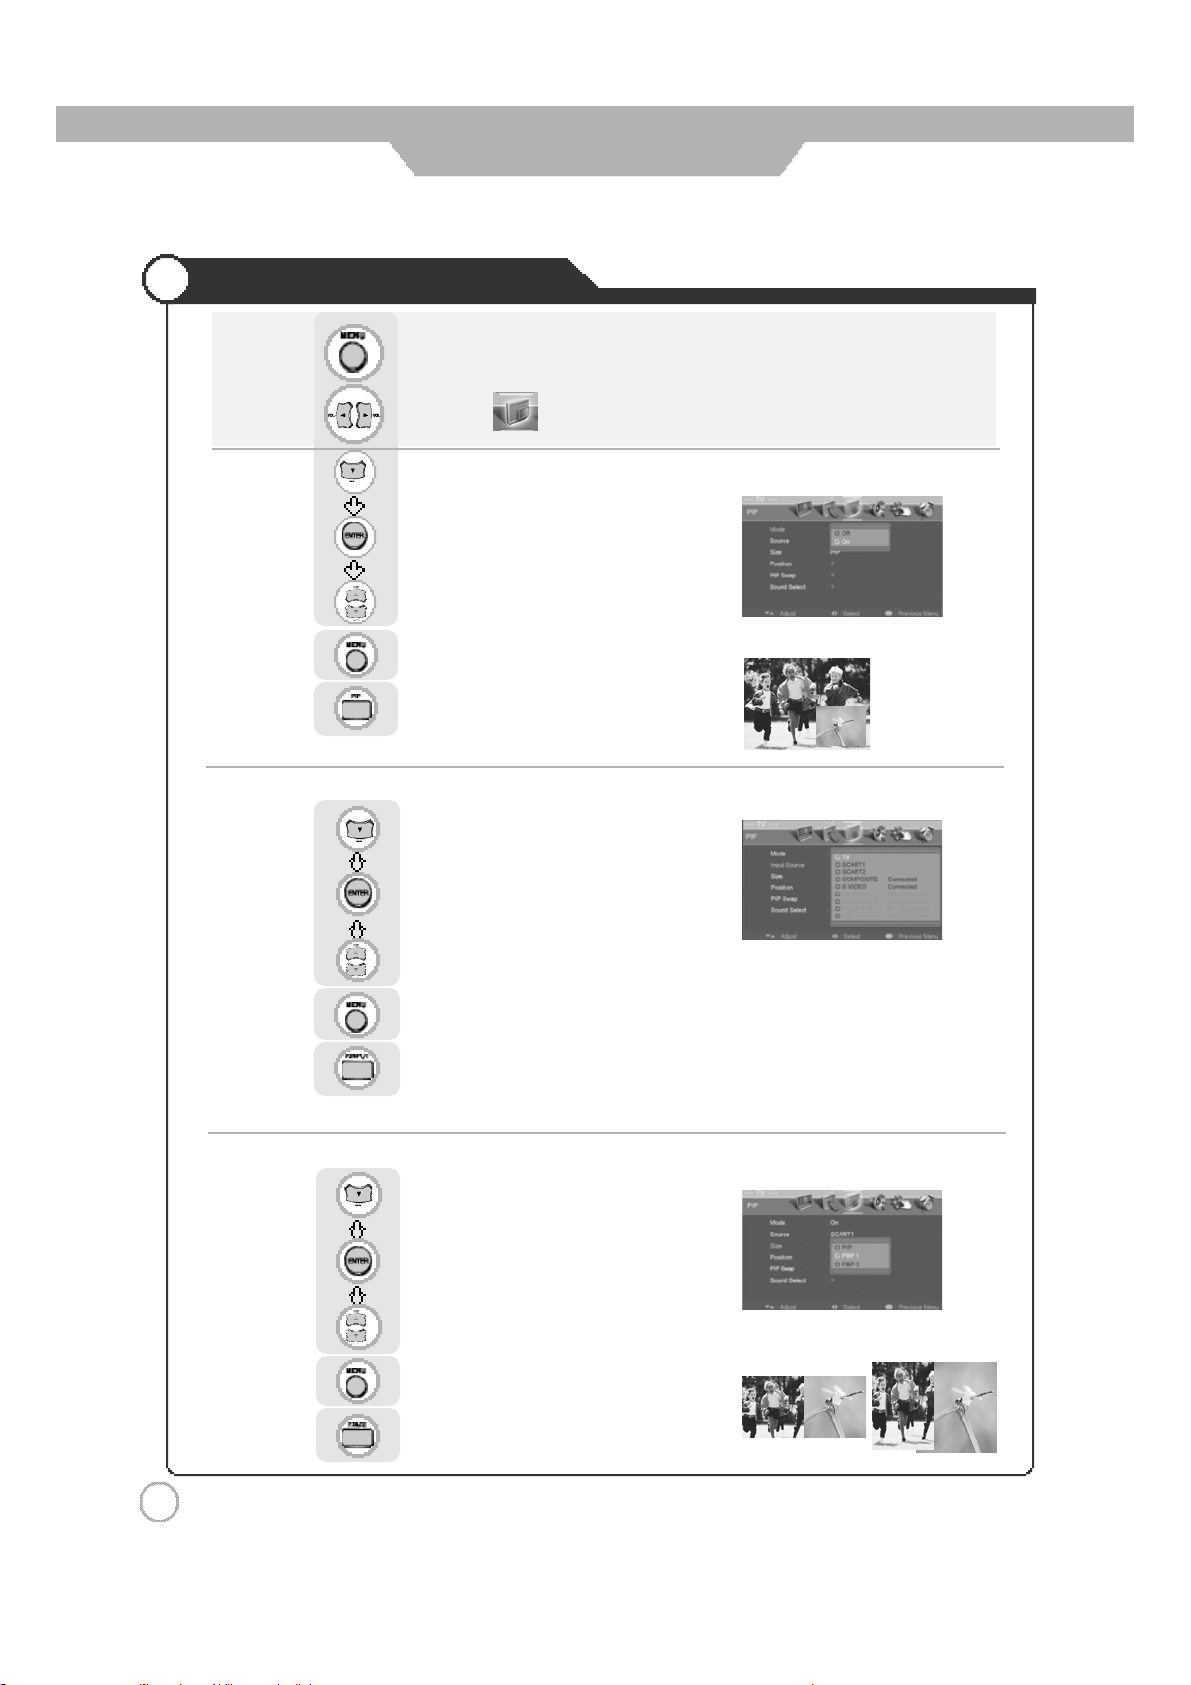
Viewing Picture in Picture
Press .
Use tomoveto .
Press to move to "Mode".
Press to select.
Us e to select the " On".
Press to go back to the previous menu.
ㅤ Or press button on the remote control.
ㅤ Sound from only one of the screens may beheard.
● TV/External Input
Press to move to "Source"
Press toselect.
Use to s elect the desired input source.
Press to go backto the previous menu.
ㅤ
Or press
ㅤ
The sub-screen can be changedto display picture from the desired input source
● Changing the Screen Size
Press tomove to"Size".
Press to select.
Use to select the desi redsiz e.
butto n on the r e motecontrol.
.
3 4
Press to go back to the previous menu.
ㅤ
Orpress
butto n on theremo te control.
Page 35
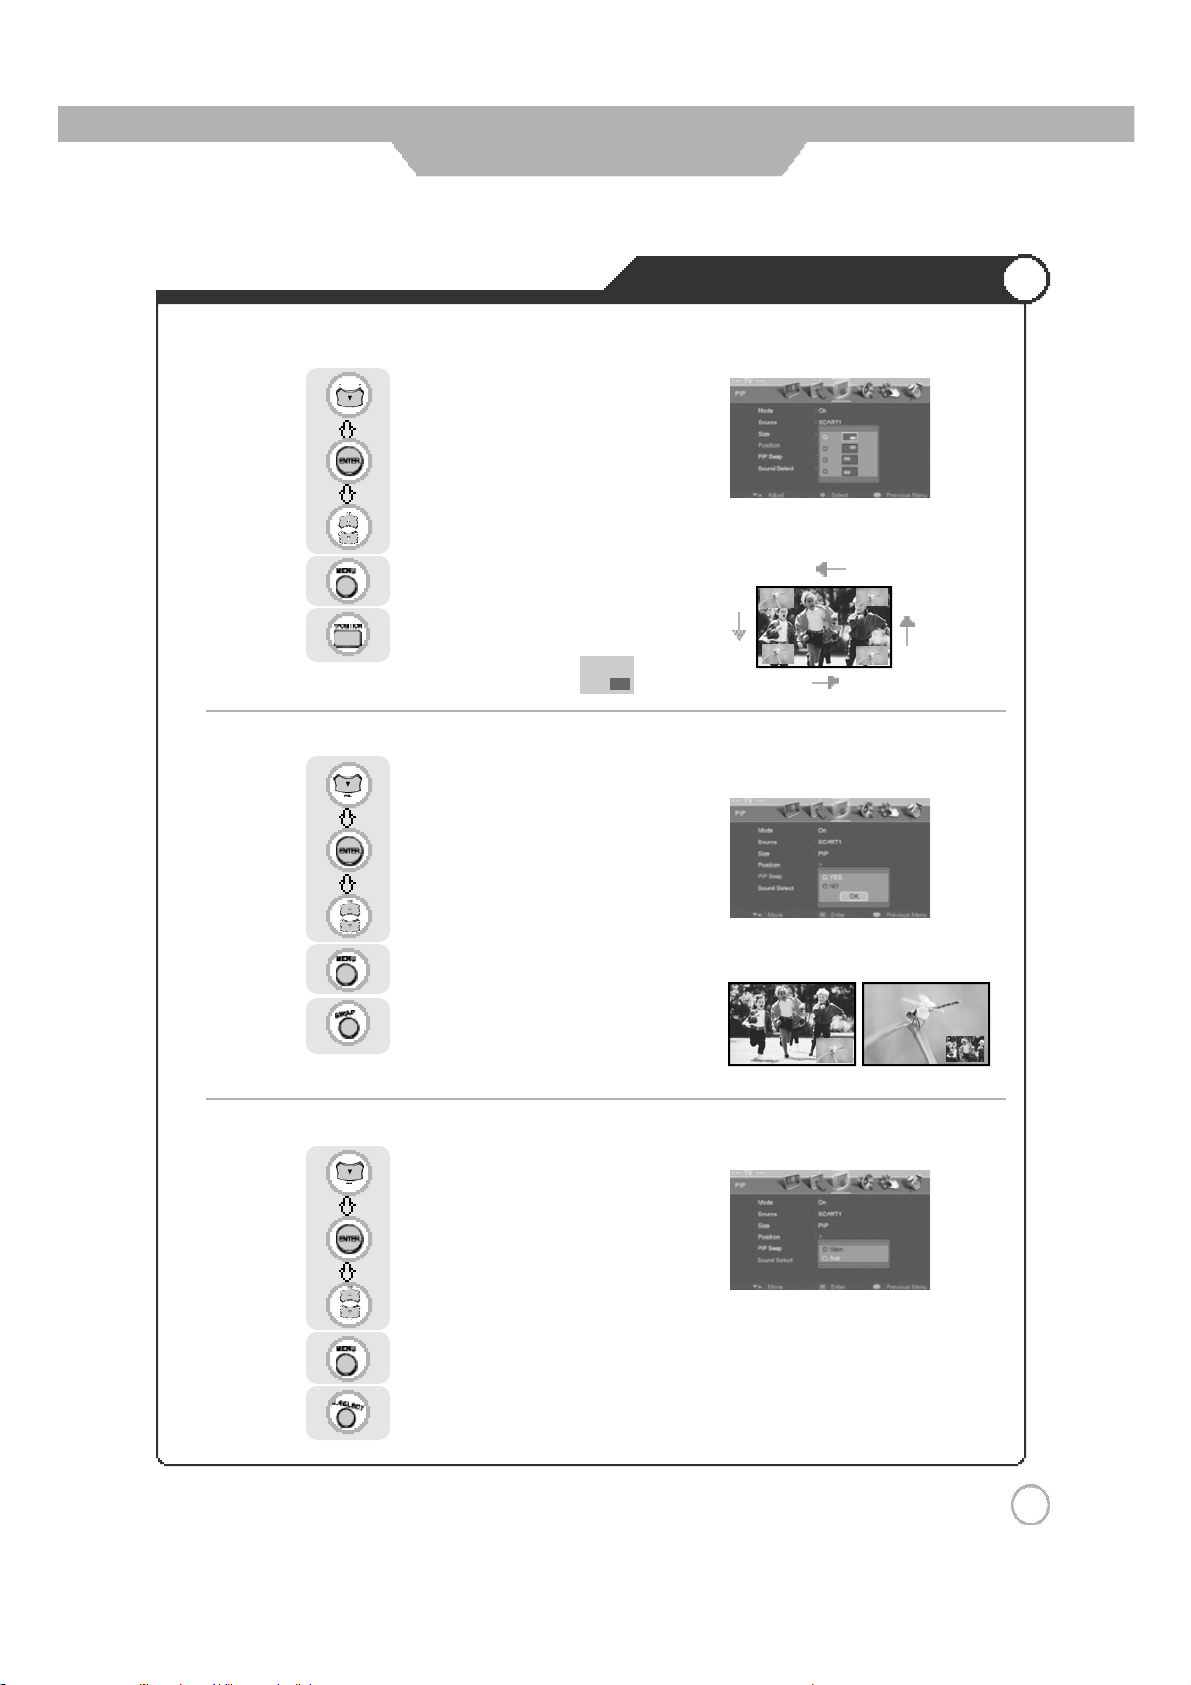
Application
● Selecting Position
Press tomoveto"Position".
Pres s toselect.
Use to select the desi redposition.
Pres s togo back to the previous menu.
ㅤ
Or pres s
ㅤ
Sub-screen position can be selected onlyfrom the .
●
Main Screen/Sub Screen Swap
button on therem ote control.
Viewing Picture in Picture
Press tomoveto"PIPSwap".
Pres s toselect.
Use to select the "YES".
Pres s togo back to the previous menu.
ㅤ
Or pres s
ㅤ
The main screen and the sub screen will swap.
● Selecting Sub Screen Sound
Press tomoveto"SoundSelect".
Pres s toselect.
Use to select the "Main" or "Sub".
Pres s togo back to the previous menu.
button on therem ote control.
ㅤ
Or pres s
button on therem ote control.
3 5
Page 36
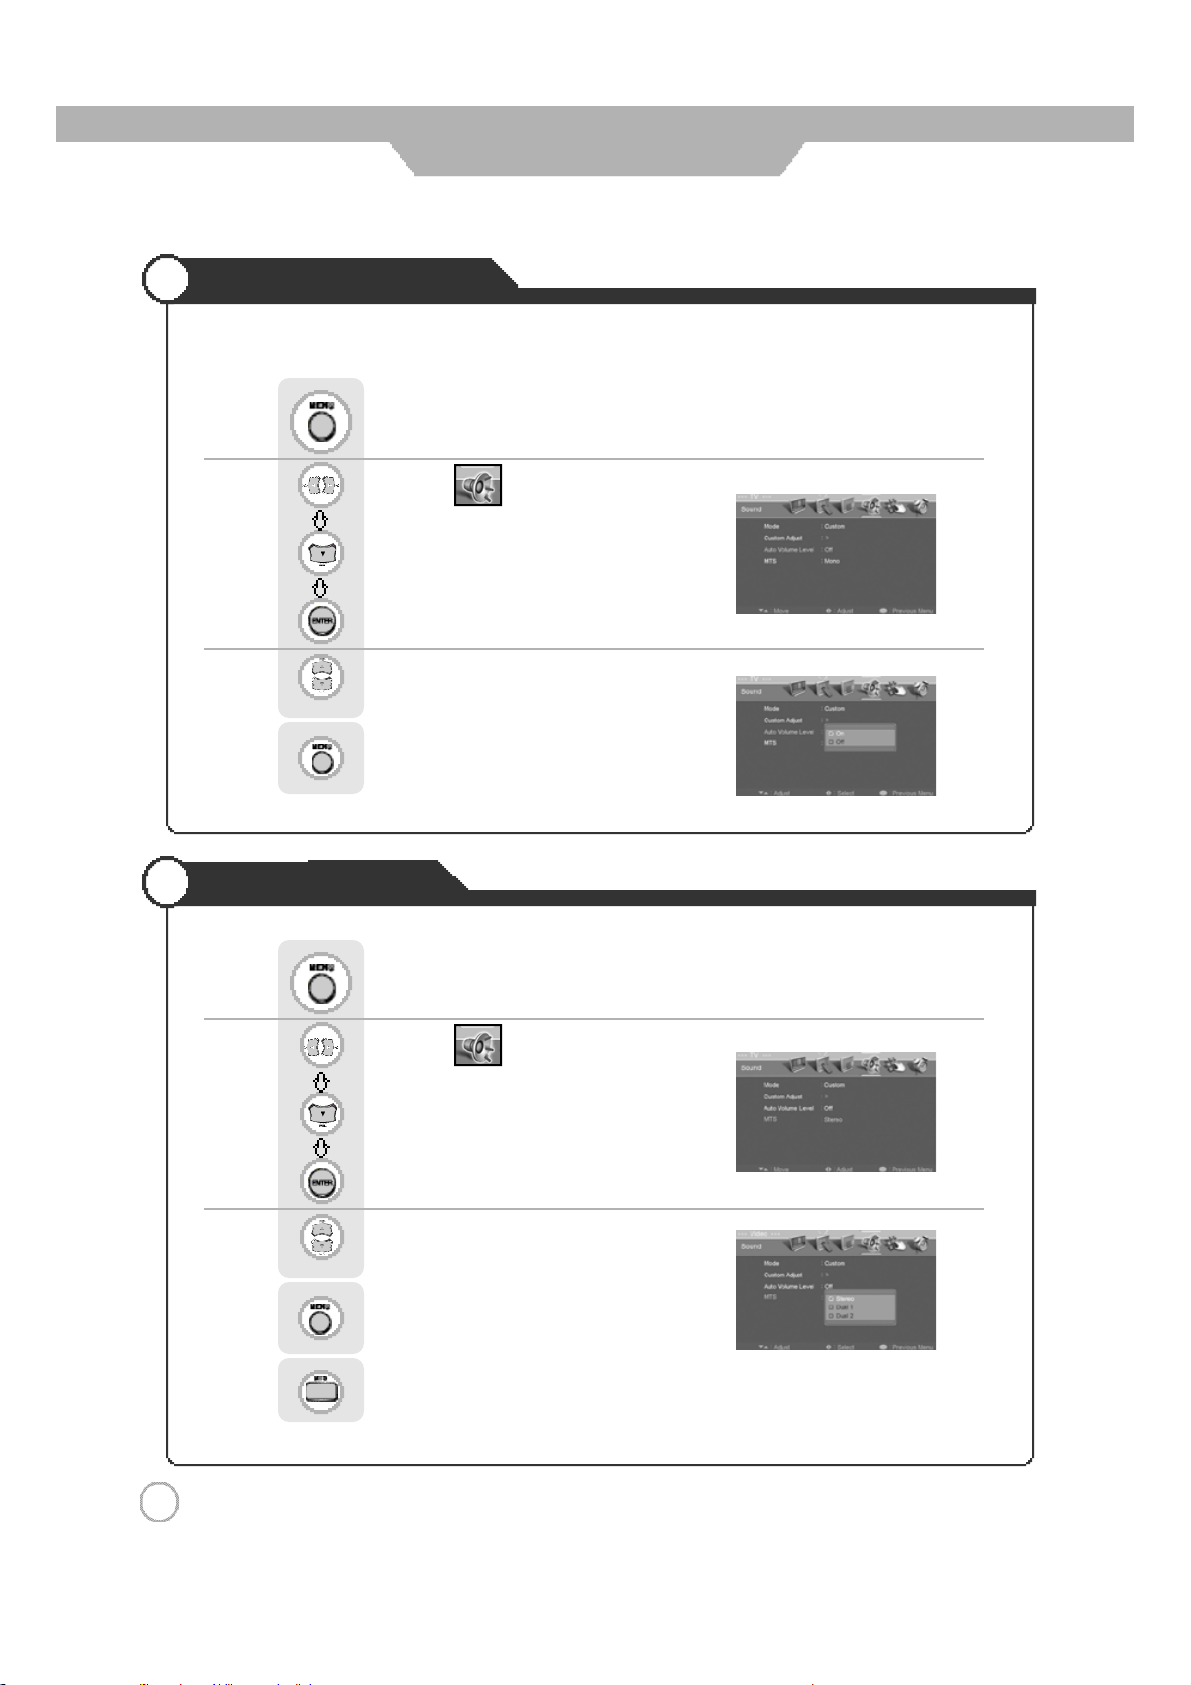
Application
Auto Volume Level
ㅤ
This feature maintains an equal Volume l ev elevenif you change programs.
Press .
Use to moveto .
Press to move to "Auto Volume Level".
Press to select.
Use to select the "On".
Press to go back to the previous menu.
Stereo Settings
Press .
Use tomoveto .
Press to move to "MTS".
Press toselect.
Use to s elect the desired category.
Press to go backto the previous menu.
ㅤ
Or press button on the remote control (MultiTelevis ion Sound).
3 6
3 6
Page 37
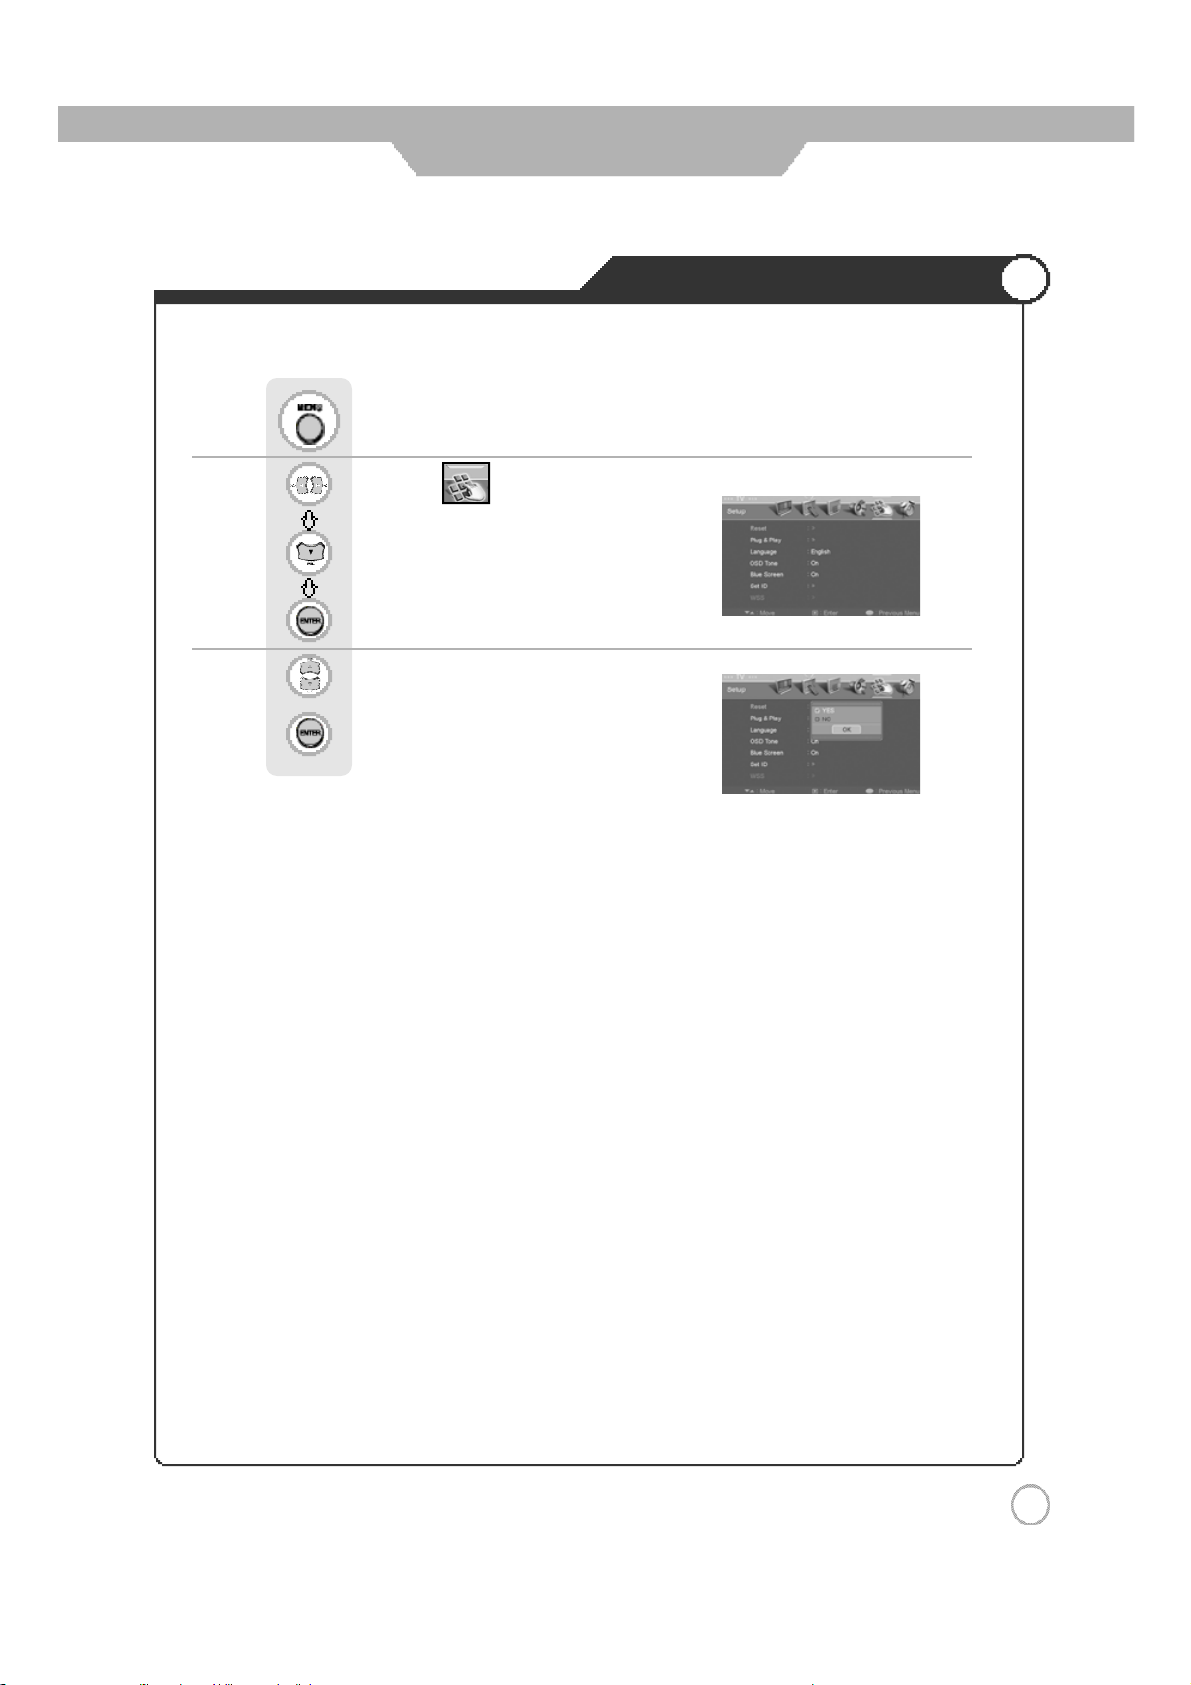
ㅤ
It resetsall of the par ameters to thefactory default.
Press .
Use tomoveto .
Press to move to "Reset".
Press to select.
Use to select the "YES".
Press to select
Application
Resetting LCD TV Setting
※
The LCD TV willturnoff. The parameters will be set to factory defaul t.
3 7
3 7
Page 38
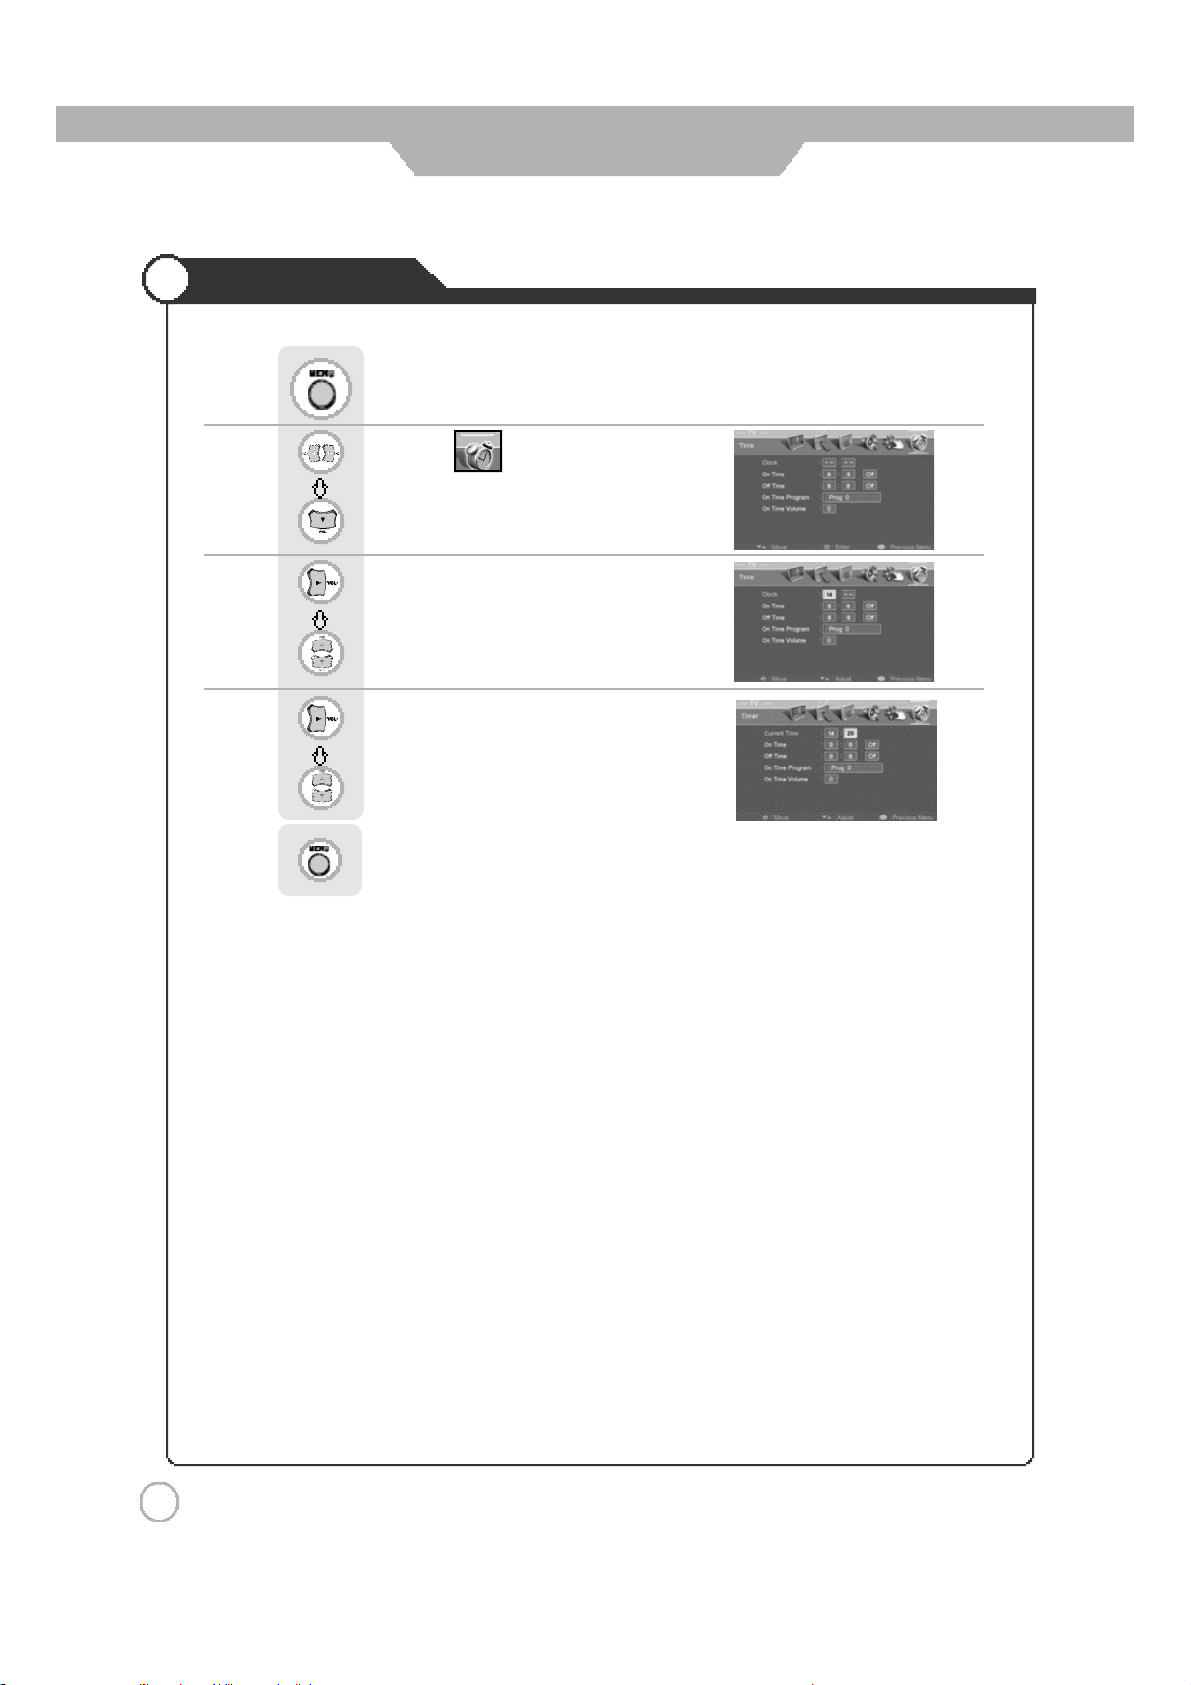
Setting Time
Press .
Use tomoveto .
Press tomoveto"Clock".
Press to move onestep.
Us e to adjust the desired hour.
Press to move onestep.
Application
Use to adjust thedesiredminute.
Press to go back to the previous menu.
3 8
Page 39
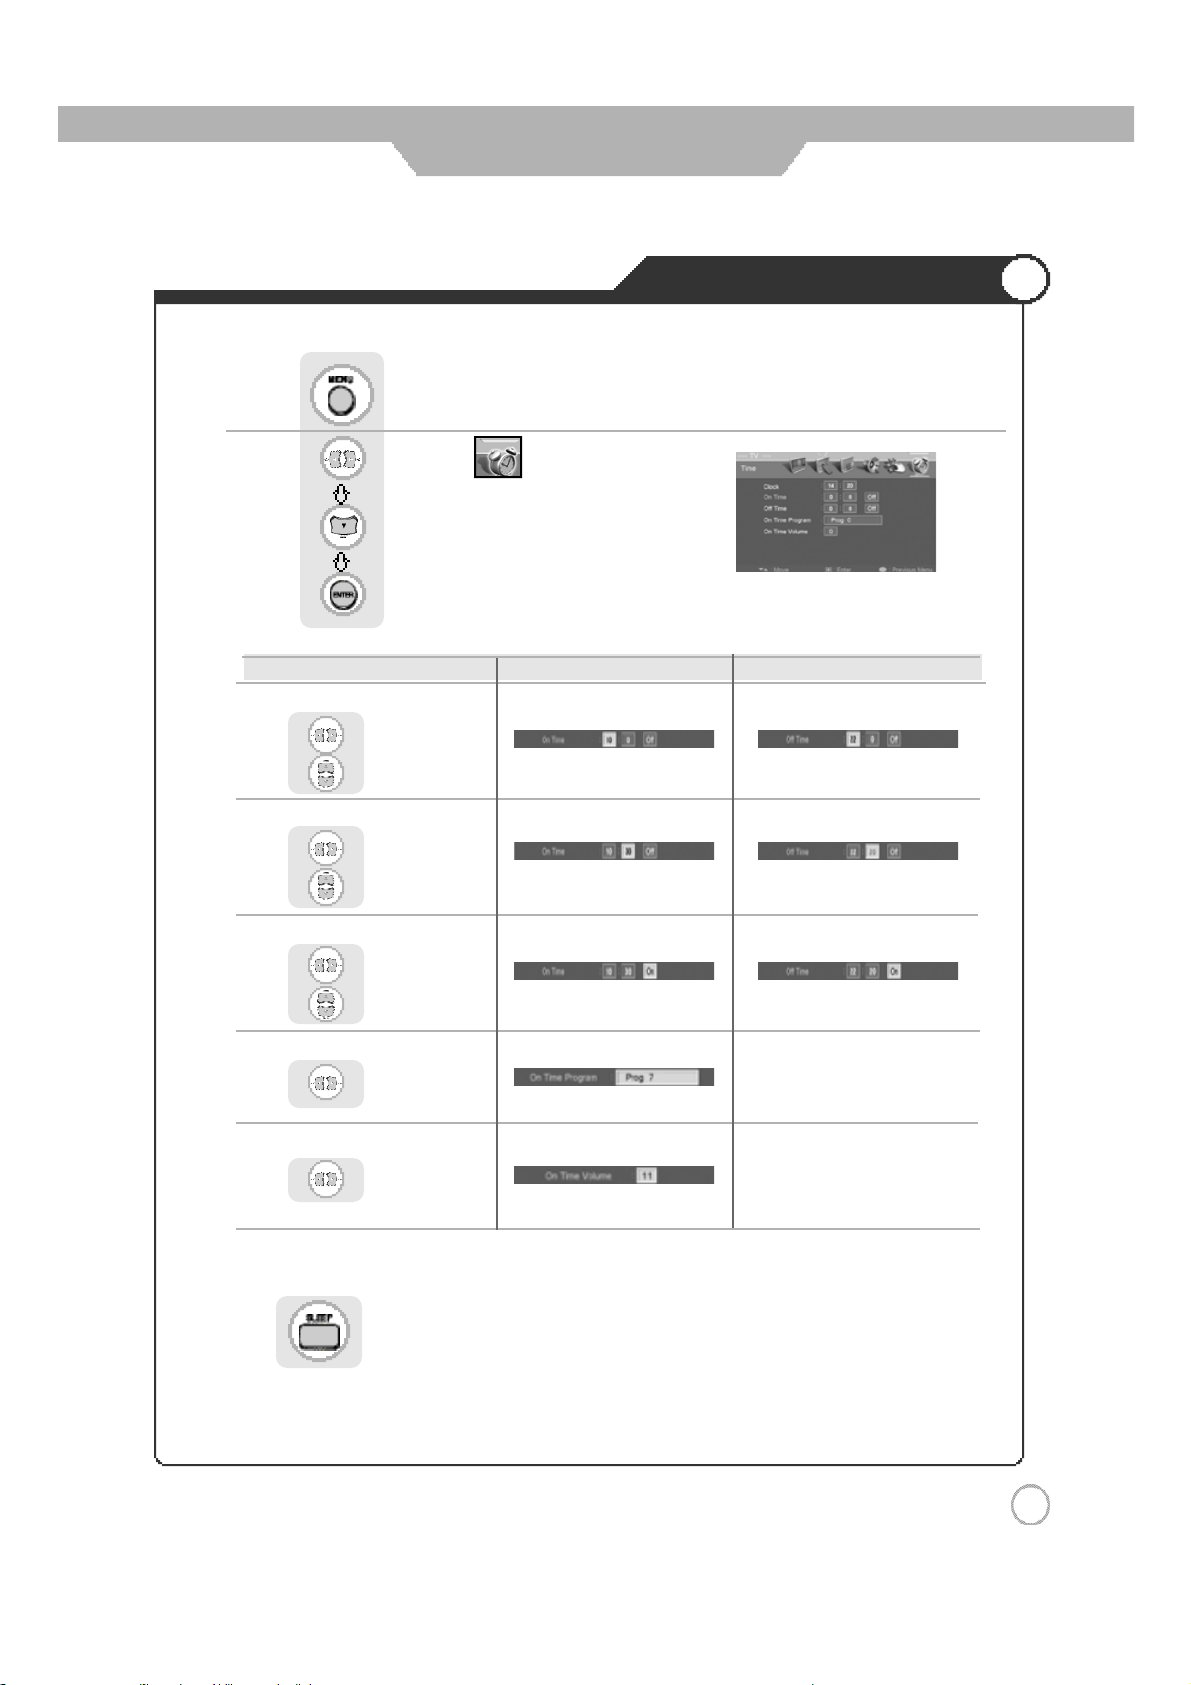
● Clock time must be set
Press .
Use tomoveto .
Pres s tomove to desired category.
Pres s toselect.
Setting Hour
Use toselect,
Application
Automatic Power On/Off
SettingTime forPower On SettingTime for Po wer Off
to set
SettingMinute
Use toselect,
to set
S e t / C a n c e l
Use toselect,
to select the
"On"or "Off"
Channel Select
Use to setprogr am.
VolumeControl
Use toset volume.
● To have the TV turn off after you fall a sleep
press button onthe remote control.
ㅤ
It automati ca lly tur n soff the TV aftera designated p e riod of tim e
ㅤ
Depending on the numberof times the "Sleep"button is pressed, the TV will be turned off after 30, 60, 90, 120, 150
or 180 minutes.
3 9
Page 40
Application
Teletext
Basic Function
■TEXT On/Off
1. Press "TTXON" once , then displays the Teletext pages.
2. If you press "TTXON" once more, Text mode is off.
■TOP TEXT
The user guide displays four fields-red, green, yellow and blue at the bottom of the screen. The yellow field
denotes the next group and the blue field indicates the next block.
- Group/Block/Page selection
1. WIth the blue button you can progress block to block.
2. Use the Yellow button to proceed to the next group with automatic overflow to the next block.
3. With the Green button you can proceed to the next existing page with automatic overflow to the next group.
4. The RED button permits to return to previous selection.
■FLOF TEXT
The teletext pages are colour coded along the bottom of the screen and are selected by pressing the
corresponding coloured button.
- Page selection
1. Press the Index button to select the index page.
2. You can select the pages, which are colour coded along the bottom line with the same coloured buttons.
Special Teletext Function key
■MIX : In the mix mode display, the underlying video and the teletext page display are both simultaneously
visible on the screen. This command turns the display to mix mode and is enabled only in the text
mode.
■STORE : This command stores the user defined favorite pages. This command is enabled only if the list
mode is active.
■FLOF LIST : This command toggles between list mode and current. Text mode(FLOF, TOP or normal)
■
SIZE : Toggle the display page size between double-size top, double-size bottom and normal.
■HOLD : The update of the current display page is halted so that the content will not be changed.
■UPDATE : Press this button to view the updated teletext page or display cancel.
■INDEX : Return to the index page.
■TIME : In TV mode this command makes clock display at right-top corner.
In TEXT mode if this command is given the sub page mode is activated.
■REVEAL : Press this button to display the concealed information. Such as solutions of riddles or puzzles.
RED, GREEN, YELLOW, BLUE-In the TOP/FLOF automatic navigation mode, these keys select
and display the linked page.
4 0
Page 41
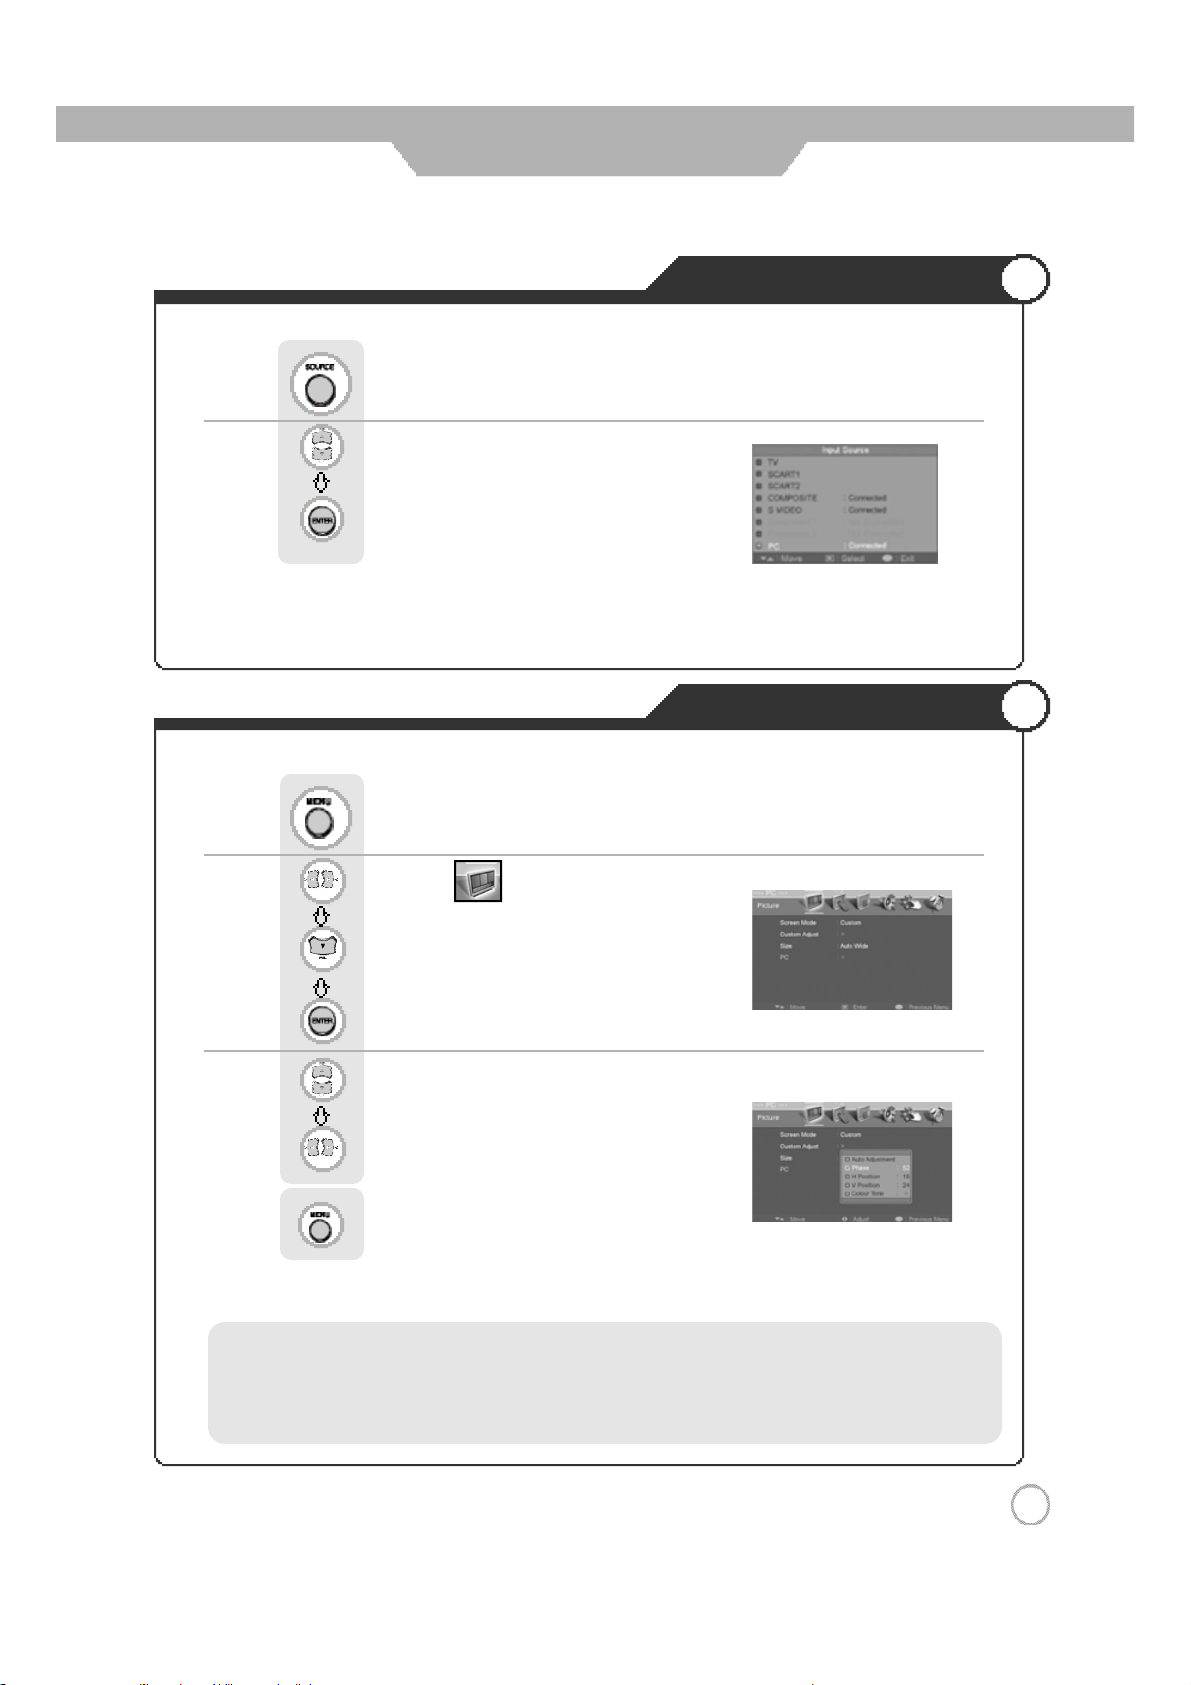
Monitor
Using TV as a Monitor
Press button on the remote control.
Use tomoveto"PC".
Press to select.
ㅤ
PC Mode must be on i n order foryou to use the TV as amonitor.
ㅤ
If thes e is a DVI-Dtermi nalin your PC, use the DVI-D cable connec tion.
Press .
Use tomoveto .
Press tomoveto"PC".
Using TV as a Monitor
Adjusting PC Screen
Pres s toselect.
Use tomovetodesiredcategory.
Use to adjust the setting.
Pres s togo back to the previous menu.
ㅤ
In DVI Input mode, you c an only select the "Color Tone".
·Auto Adjustment
·Phase : It adjusts the phase shift of the image. Use when image appears blurry or out of focus.
·H-Position : It moves the image on the screen horizontally.
·V-Position : It moves the image on the screen vertically.
4 1
Page 42
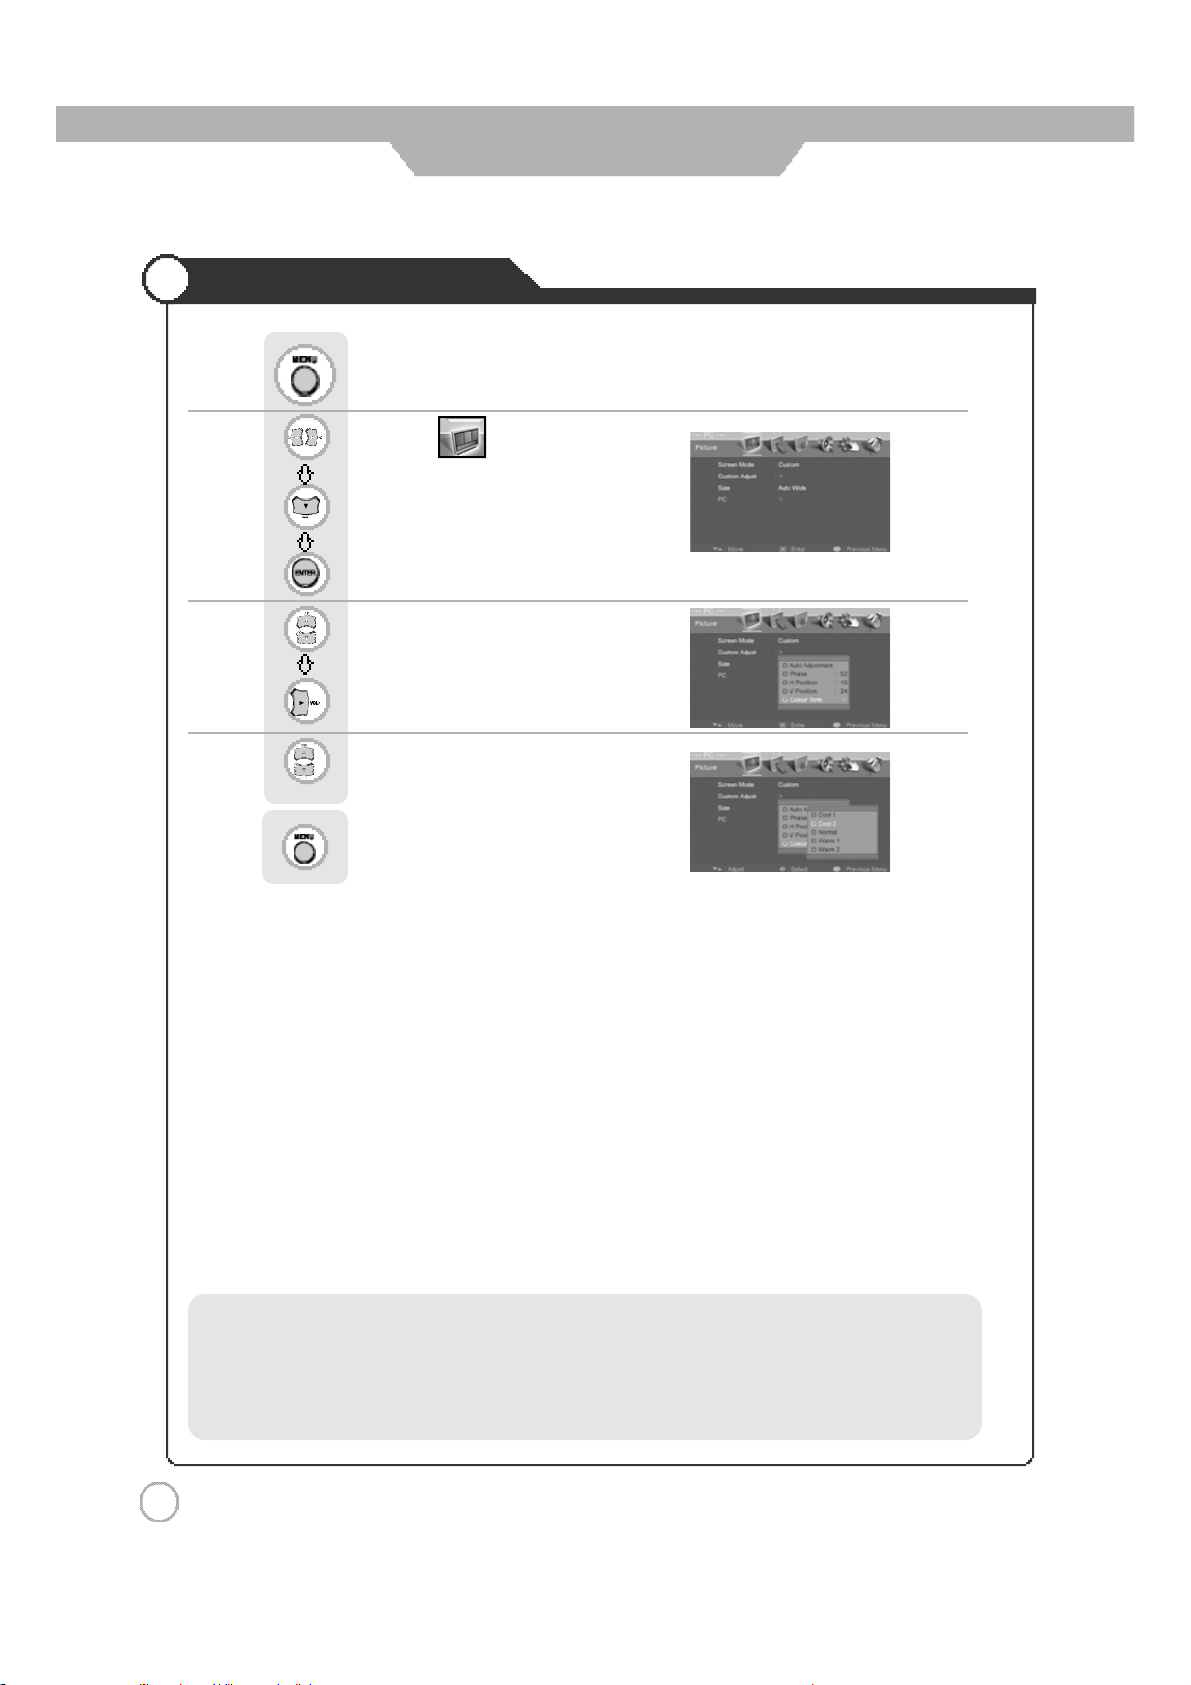
Adjusting Colour Temp
Press .
Use tomoveto .
Press tomove to"PC".
Press to select.
Use tomove to"ColourTemp"
Press to select.
Monitor
Use to select the desi redcategory.
Press to go back to the previous menu.
·Cool 1: This results in a blueish tone.
·Cool 2: This results in a more blueish tone.
·Normal : This is standard colour setting.
·Warm1 : This results in a reddish tone.
·Warm2 : This results in a more reddish tone.
4 2
Page 43
External adjustment
External adjustment
·
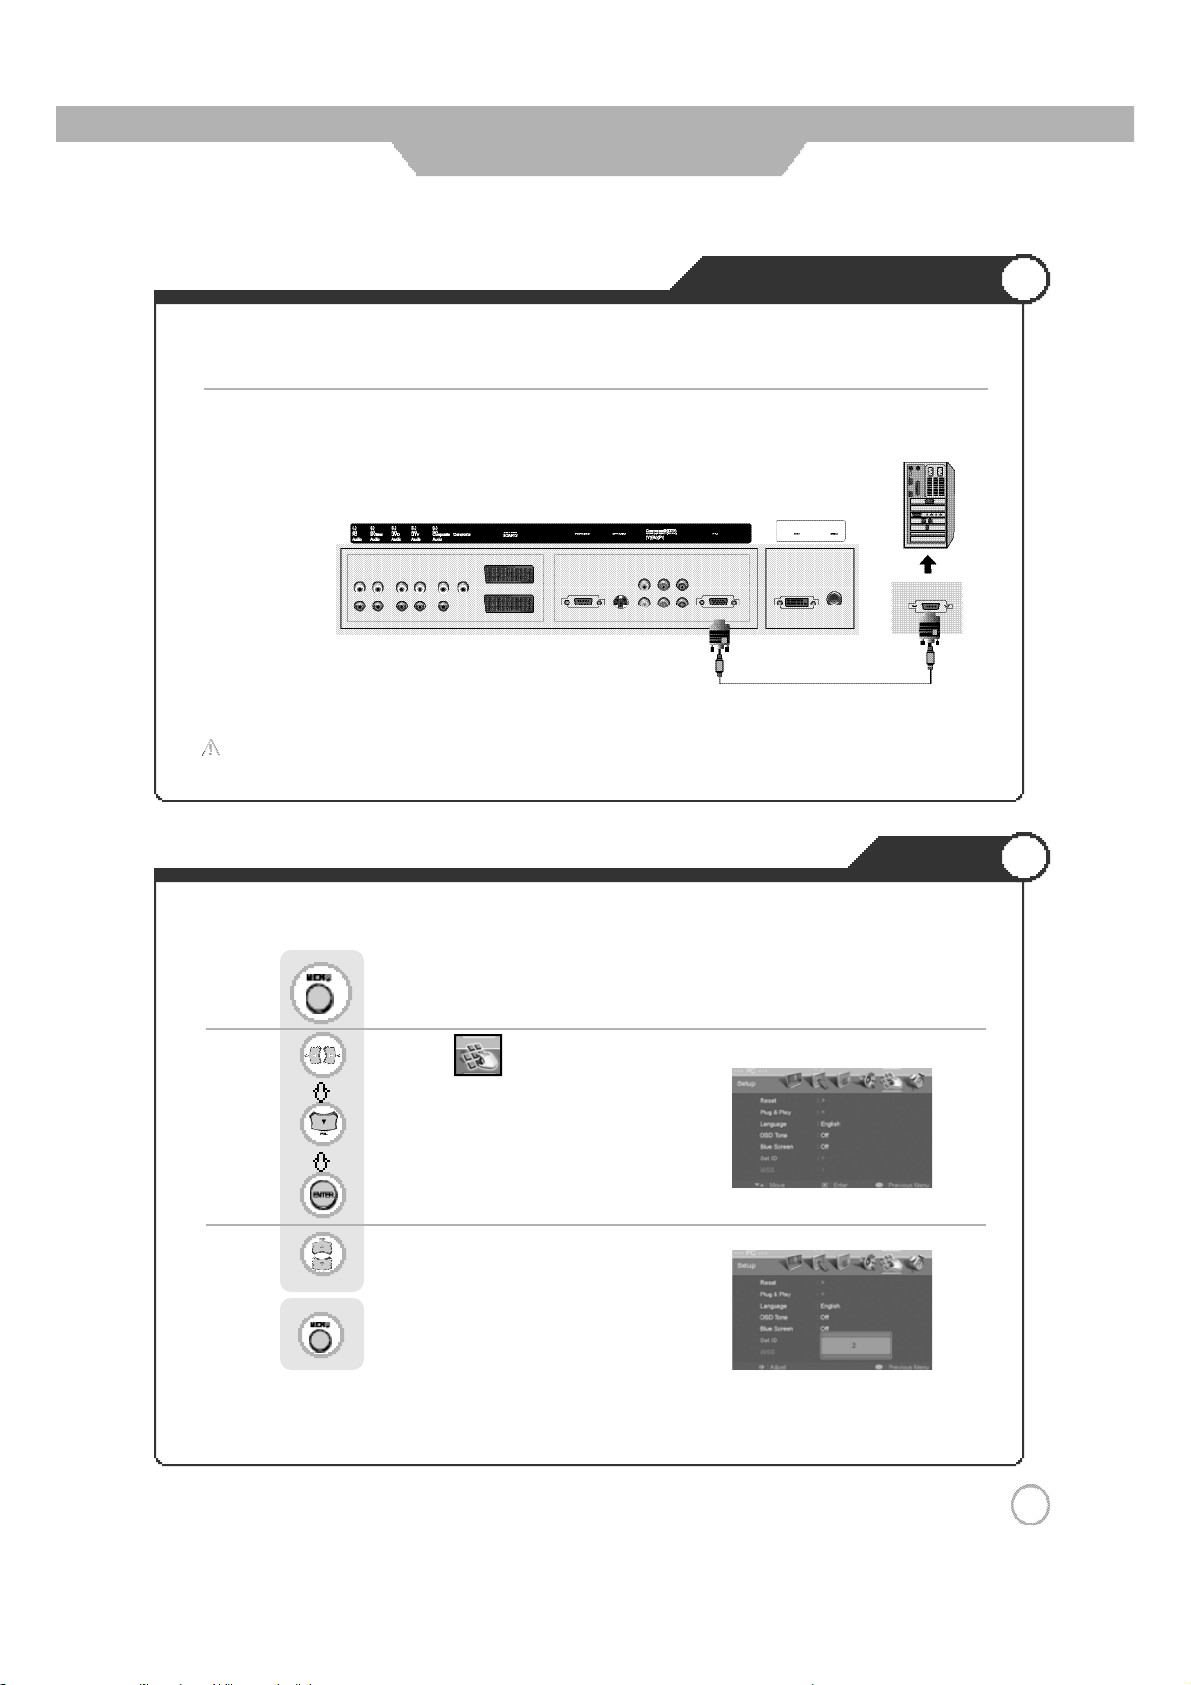
Use the RS-232C jack to control monitor's functions externally by external equipment.
● How connect a external equipment
<BackviewoftheLCD TV>
C a u t i o n : Regular customer does not allow using the external adjustment that is used for service
purpose only.
Set ID
ㅤ
Use this function tochoose monitor ID number.
Press .
Use tomoveto .
Press tomoveto"SetID".
Pres s toselect.
Use to select the desi redID number.
Pres s togo back to the previous menu.
ㅤ
The adjustment range of Set ID is 0~254.
4 3
Page 44
External adjustment
Special features
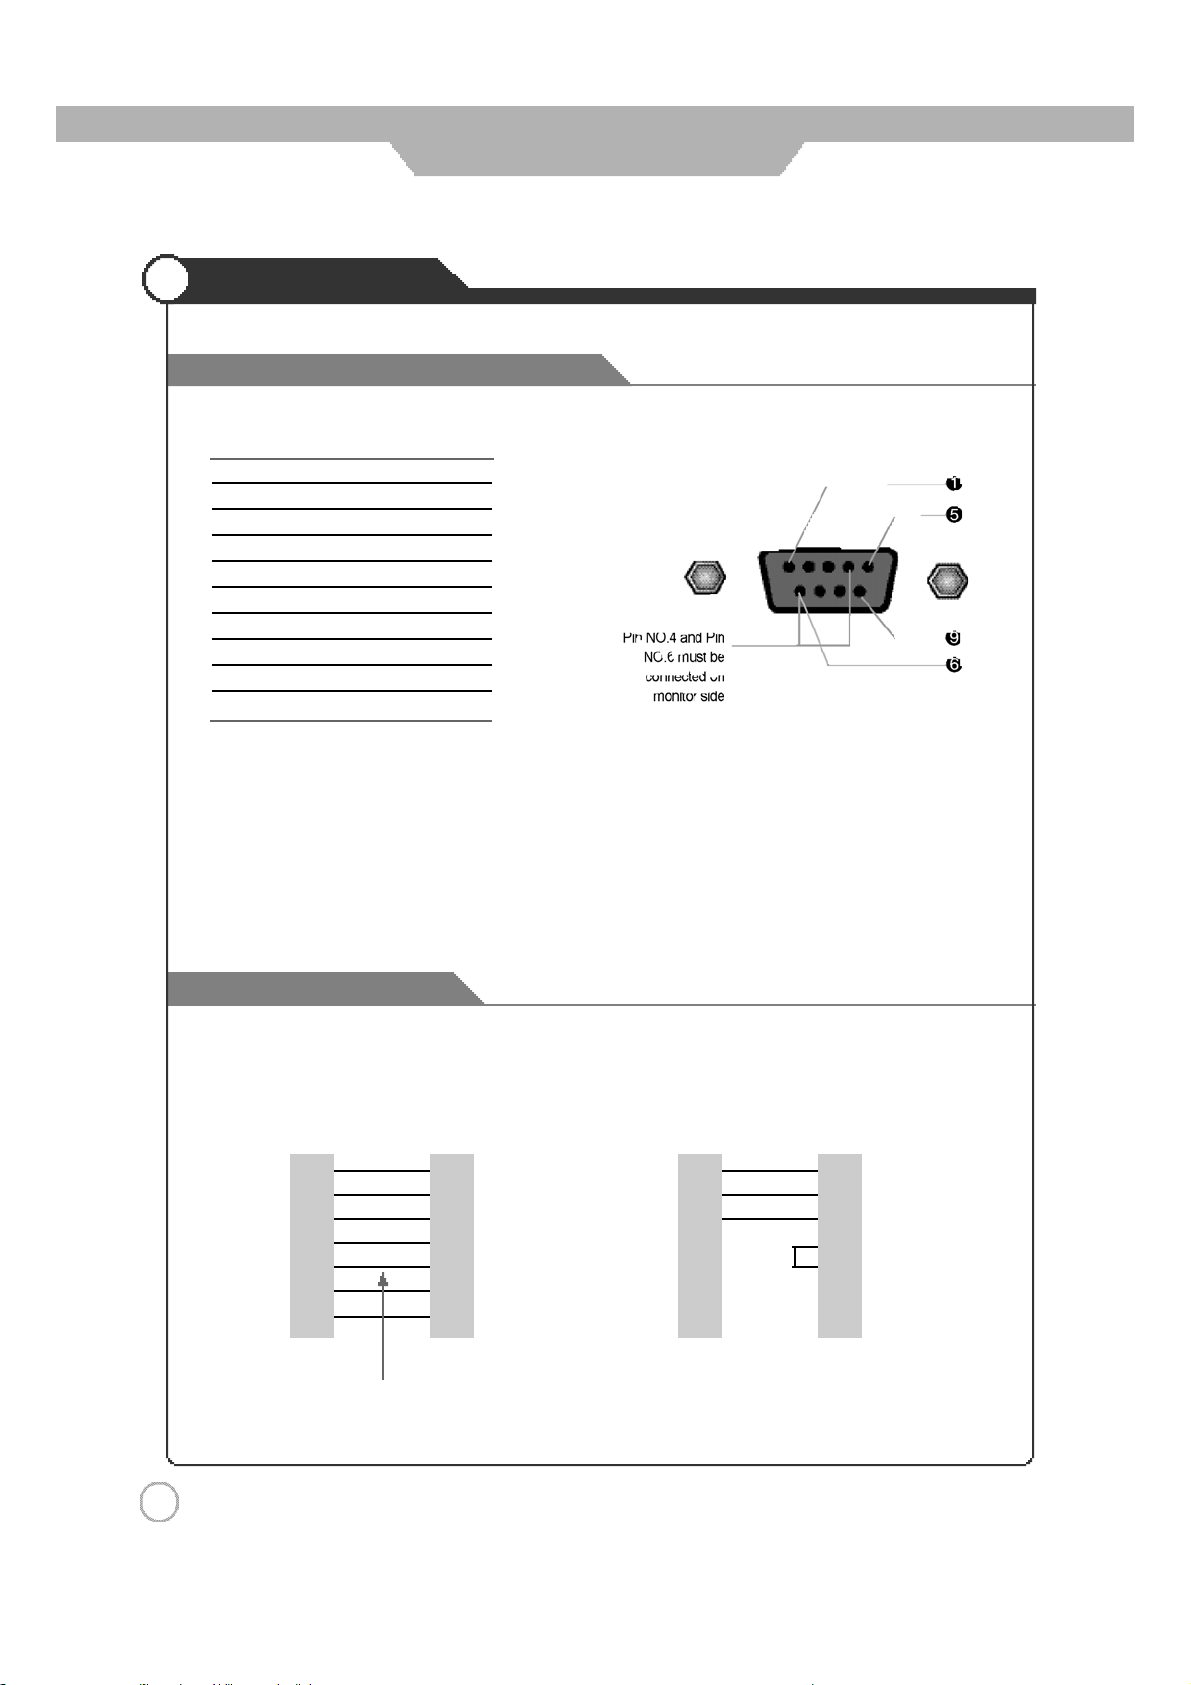
Type of connector : D-Sub 9-pin male
No. Pin name
1 No c onnection
2 RXD (Receive data)
3 TXD(Transmit data)
4 DTR (DTE side ready)
5G N D
6 DSR (Dce sideready)
7 RTS (Ready to send)
8 CTS (Clear to send)
9 No Connection
·Use a crossed (reverse) cable.
Wire the cable so that each pair of data lines cross between the two devices. These data line pairs are RXD
(Receive to send) and TXD (Transmit data), DTR (DTE side ready) and DSR (DCE side ready), and RTS
(Ready to send) and CTS (Clear to send).
RS-232C configurations
·7-wire configuration
PC LCD
RXD 2 3 TXD
TXD 3 2
GND 5 5 GND
DTR 4 6 DSR
DSR 6 4 DTR
RTS 7 8 CTS
CTS 8 7 RTS
DB 9 DB 9
Control line
RXD
RXD 2 3 TXD
TXD 3 2 RXD
GND 5 5 GND
DTR 4 4 DSR
DSR 6 6 DTR
RTS 7 7 CTS
CTS 8 8 RTS
·3-wire configuration
PC LCD
DB 9 DB 9
4 4
Page 45
ㅤ
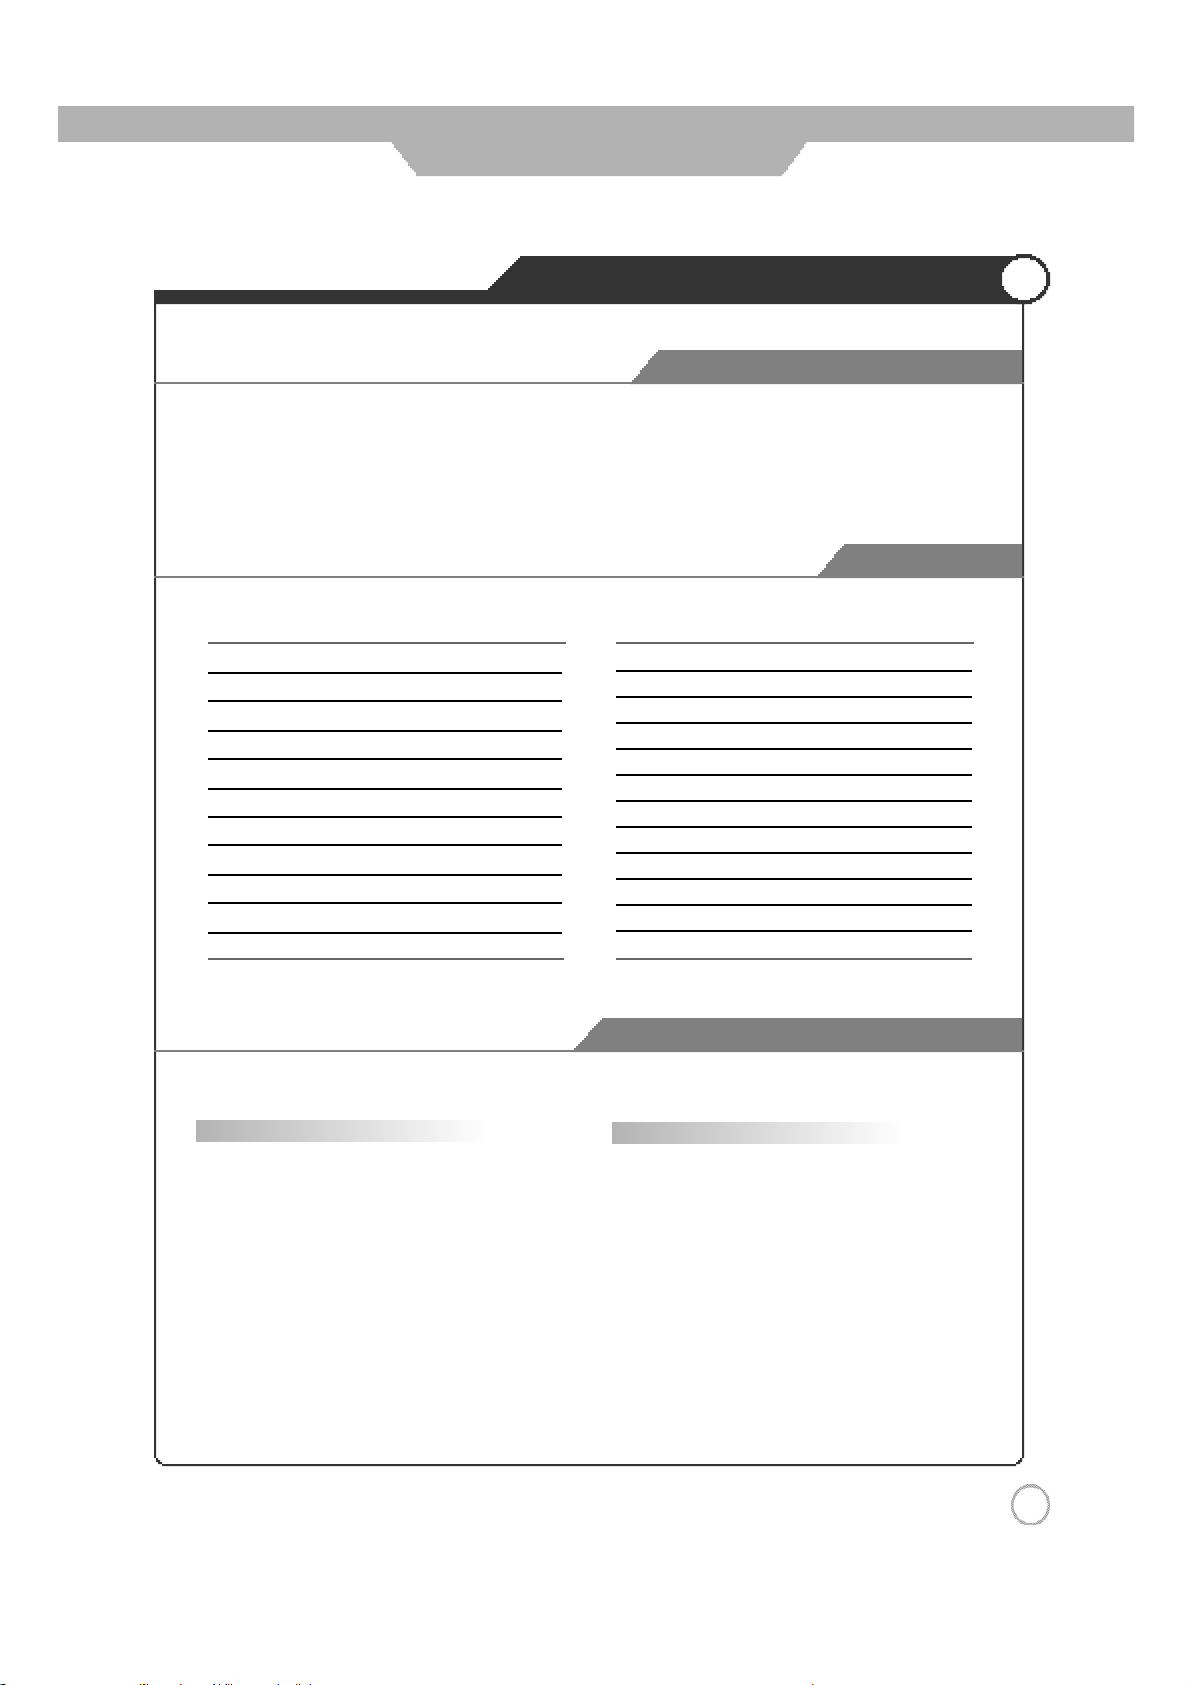
BAUD RATE : 9600 bps
ㅤ
Data Length : 8bits
ㅤ
Parity : None
ㅤ
Stop bit : 1bit
External adjustment
RS-232C Communication Protocol
COMMUICATION PARAMETERS
Command List
I t e m ASCII Code D a t a ( h e x )
1.Power p 0 0 h ~ 0 1 h
2. Input Source i 0 0 h ~ 0 7 h
3. Aspect Ratio r 0 0 h ~ 0 8 h
4.Volume Mute w 0 0 h ~ 0 1 h
5.Volume Control v 0 0 h ~ 6 4 h
6.Screen Mode s 0 0 h ~ 0 4 h
7.Brightness b 0 0 h ~ 6 4 h
8.Contrast k 0 0 h ~ 6 4 h
9.Colour c 0 0 h ~ 6 4 h
10.Tint t 0 0 h ~ 6 4 h
* Transmission
{Command}{ }{SET ID}{ }{Data}{Cr}
ㅤ {Commad} To ControlCodeLCDTV
ㅤ { } "Space , ASCII Code = 0x20"
ㅤ {SET ID} You Can Adjust SET ID Setup
Menu of LCD TV
ㅤ {Data} Data Command
Transmit 'FF' data to data
read mode
ㅤ {Cr} Carriage Return
ASCII Code 0x0d
I t e m ASCII Code D a t a ( h e x )
11. Sharpness h 0 0 h ~ 6 4 h
12. Information f 0 0 h ~ 0 1 h
13. Pip On o 0 0 h ~ 0 1 h
14. Pip Source u 0 0 h ~ 0 7 h
15. Pip Location n 0 0 h ~ 0 3 h
16. Pip Sound set e 0 0 h ~ 0 1 h
17. Pip Mode d 0 0 h ~ 0 2 h
18. Remote Control On j 0 0 h ~ 0 1 h
19. Prog -,+ a 0 0 h ~ 0 1 h
20. Abnormal State q 0 0 h ~ 0 1 h
21. Sound Mode y 0 0 h ~ 0 4 h
Tramsmission / Receiving Protocol List
* Ok Acknowledge
{SET ID}{:}{OK}{x}{Data}{x}
ㅤThe LCD TV set transmits ASCII based on this
format When receiving normal data. At this time, If
the data is data read mode, it indicates present
status data if the data is data write mode, it returns
the data of PC.
* In case set ID is 0, Ack data doesn’t feed back, and
you can adjust all LCD set.
4 5
Page 46
External adjustment
Erae Rs232c Communication Protoco
RS-232C Communication Protocol
Commands
1.
Power : p
▶ To Control Power On/Off of the LCD TV
* Transmission
{p}{ }{SET ID}{ }{Data}{Cr}
Data 0 : Off
Data 1 : On
* Ack
{SET ID}{:}{OK}{x}{Data}{x}
Data 0 : Off
Data 1 : On
▶ Read Power On Source Status
* Transmission
{p}{ }{SET ID}{ }{FF}{Cr}
* Ack
{SET ID}{:}{OK}{x}{Data}{x}
Data 0 : Power Off
Data 1 : Power On TV
Data 2 : Power On Scart1
Data 3 : Power On Scart2
Data 4 : Power On Composite
Data 5 : Power On S-Video
Data 6 : Power On Component1
Data 7 : Power On Component2
Data 8 : Power On PC(RGB)
※ If Other Functions Tr ansmit 0xFF data based on this
format, Ack data feeds back present status about
each function.
2. Input Source : i
▶ To Input Source Select
* Transmission
{i}{ }{SET ID}{ }{Data}{Cr}
Data 0 : TV
Data 1 : Scart1
Data 2 : Scart2
Data 3 : Composite
Data 4 : S-Video
Data 5 : Component1
Data 6 : Component2
Data 7 : PC(RGB)
* Ack
{SET ID}{:}{OK}{x}{Data}{x}
Data 0 : TV
Data 1 : Scart1
Data 2 : Scart2
Data 3 : Composite
Data 4 : S-Video
Data 5 : Component1
Data 6 : Component2
Data 7 : PC(RGB)
3. Aspect Ratio : r
▶ To adjust screen format
* Transmission
{r}{ }{SET ID}{ }{Data}{Cr}
Data 0 : Auto Wide
Data 1 : Wide
Data 2 : Panorama
Data 3 : Zoom1
Data 4 : Zoom2
Data 5 : 4:3
Data 6 : 14:9
Data 7: 4:3(In PC Mode)
Data 8: Wide(In PC Mode)
* Ack
{SET ID}{:}{OK}{x}{Data}{x}
Data 0 : Auto Wide
Data 1 : Wide
Data 2 : Panorama
Data 3 : Zoom1
Data 4 : Zoom2
Data 5 : 4:3
Data 6 : 14:9
Data 7: 4:3(In PC Mode)
Data 8: Wide(In PC Mode
4 6
Page 47
External adjustment
RS-232C Communication Protocol
4. Volume Mute : w
▶To Select volume mute on/off
* Transmission
{w}{ }{SET ID}{ }{Data}{Cr}
Data 0 : On
Data 1 : Off
* Ack
{SET ID}{:}{OK}{x}{Data}{x}
Data 0 : On
Data 1 : Off
5. Volume Control : v
▶ To adjust volume
* Transmission
{v}{ }{SET ID}{ }{Data}{Cr}
Data : Min : 00h~Max : 64h
* Ack
{SET ID}{:}{OK}{x}{Data}{x}
Data : Min : 00h~Max : 64h
6. Screen Mode : s
▶ To Select Screen Mode
* Transmission
{s}{ }{SET ID}{ }{Data}{Cr}
Data 0 : Custom
Data 1 : Dynamic (In PC Mode : High)
Data 2 : Standard (In PC Mode : Middle)
Data 3 : Movie (In PC Mode : Low)
Data 4 : Mild
* Ack
{SET ID}{:}{OK}{x}{Data}{x}
Data 0 : Custom
Data 1 : Dynamic (In PC Mode : High)
Data 2 : Standard (In PC Mode : Middle)
Data 3 : Movie (In PC Mode : Low)
Data 4 : Mild
7. Brightness : b
▶ To adjust Brightness
* Transmission
{b}{ }{SET ID}{ }{Data}{Cr}
Data : Min : 00h~Max : 64h
* Ack
{SET ID}{:}{OK}{x}{Data}{x}
Data : Min : 00h~Max : 64h
8. Contrast : k
▶ To adjust Contrast
* Transmission
{k}{ }{SET ID}{ }{Data}{Cr}
Data : Min : 00h~Max : 64h
* Ack
{SET ID}{:}{OK}{x}{Data}{x}
Data : Min : 00h~Max : 64h
9. Colour : c
▶ T oadjustColour(Not availablein PC Mode)
* Transmission
{c}{ }{SET ID}{ }{Data}{Cr}
Data : Min : 00h~Max : 64h
* Ack
{SET ID}{:}{OK}{x}{Data}{x}
Data : Min : 00h~Max : 64h
10. Tint : t
▶ To adjust Tint (Not available in PC Mode)
* Transmission
{t}{ }{SET ID}{ }{Data}{Cr}
Data : Min : 00h~Max : 64h
* Ack
{SET ID}{:}{OK}{x}{Data}{x}
Data : Min : 00h~Max : 64h
4 7
Page 48
External adjustment
RS-232C Communication Protocol
Commands
11. Sharpness : h
▶ To adjust Sharpness
* Transmission
{h}{ }{SET ID}{ }{Data}{Cr}
Data : Min : 00h~Max : 64h
* Ack
{SET ID}{:}{OK}{x}{Data}{x}
Data : Min : 00h~Max : 64h
12. Information : f
▶ Information on/off
* Transmission
{f}{ }{SET ID}{ }{Data}{Cr}
Data 0 : On
Data 1 : Off
* Ack
{SET ID}{:}{OK}{x}{Data}{x}
Data 0 : On
Data 1 : Off
14. Pip Source: u
▶ To Select Pip Source [Not available]
(only adjustable when pip mode is activated.)
* Transmission
{u}{ }{SET ID}{ }{Data}{Cr}
Data 0 : TV
Data 1 : Scart1
Data 2 : Scart2
Data 3 : Composite
Data 4 : S-Video
Data 5 : Component1
Data 6 : Component2
Data 7 : PC(RGB)
* Ack
{SET ID}{:}{OK}{x}{Data}{x}
Data 0 : TV
Data 1 : Scart1
Data 2 : Scart2
Data 3 : Composite
Data 4 : S-Video
Data 5 : Component1
Data 6 : Component2
Data 7 : PC(RGB)
4 8
13. Pip On : o
▶ Pip on/off
* Transmission
{o}{ }{SET ID}{ }{Data}{Cr}
Data 0 : On
Data 1 : Off
* Ack
{SET ID}{:}{OK}{x}{Data}{x}
Data 0 : On
Data 1 : Off
15. Pip Location : n
▶ To Select Pip Position
(only adjustable when pip mode is activated.)
* Transmission
{n}{ }{SET ID}{ }{Data}{Cr}
Data 0 : Right Bottom
Data 1 : Right Top
Data 2 : Left Top
Data 3 : Left Bottom
* Ack
{SET ID}{:}{OK}{x}{Data}{x}
Data 0 : Right Bottom
Data 1 : Right Top
Data 2 : Left Top
Data 3 : Left Bottom
Page 49
External adjustment
RS-232C Communication Protocol
16. Pip Sound Set : e
▶To Select Pip Sound
(only adjustable when pip mode is activated.)
* Transmission
{e}{ }{SET ID}{ }{Data}{Cr}
Data 0 : Main
Data 1 : Sub
* Ack
{SET ID}{:}{OK}{x}{Data}{x}
Data 0 : Main
Data 1 : Sub
17. Pip Mode : d
▶ To Select Pip Mode
(only adjustable when pip mode is activated.)
* Transmission
{d}{ }{SET ID}{ }{Data}{Cr}
Data 0 : PIP
Data 1 : PBP1
Data 2 : PBP2
* Ack
{SET ID}{:}{OK}{x}{Data}{x}
Data 0 : PIP
Data 1 : PBP1
Data 2 : PBP2
18. Remote Control On : j
▶ To Select Remote Control on/off
* Transmission
{j}{ }{SET ID}{ }{Data}{Cr}
Data 0 : Pc Control
Data 1 : Remote Conroller On
* Ack
{SET ID}{:}{OK}{x}{Data}{x}
Data 0 : Pc Control
Data 1 : Remote Conroller On
19. Prog -, + : a
▶ To Adjust Program Number
* Transmission
{a}{ }{SET ID}{ }{Data}{Cr}
Data 0 : Decrement Program Number
Data 1 : Increment Program Number
* Ack
{SET ID}{:}{OK}{x}{Data}{x}
Data 0 : Decrement Program Number
Data 1 : Increment Program Number
20. Abnormal Status : q
▶ You Can Read LCD TV Status
* Read Only Mode
* Transmission
{q}{ }{SET ID}{ }{FF}{Cr}
* Ack
{SET ID}{:}{OK}{x}{Data}{x}
Data 0 : OK
Data 1 : Stanby
Data 2 : AC Downr
21. Sound Mode : y
▶ To Select Sound Mode
* Transmission
{s}{ }{SET ID}{ }{Data}{Cr}
Data 0 : Custom
Data 1 : Standard
Data 2 : Music
Data 3 : Movie
Data 4 : Speech
* Ack
{SET ID}{:}{OK}{x}{Data}{x}
Data 0 : Custom
Data 1 : Standard
Data 2 : Music
Data 3 : Movie
Data 4 : Speech
4 9
Page 50
Maintenance and Service
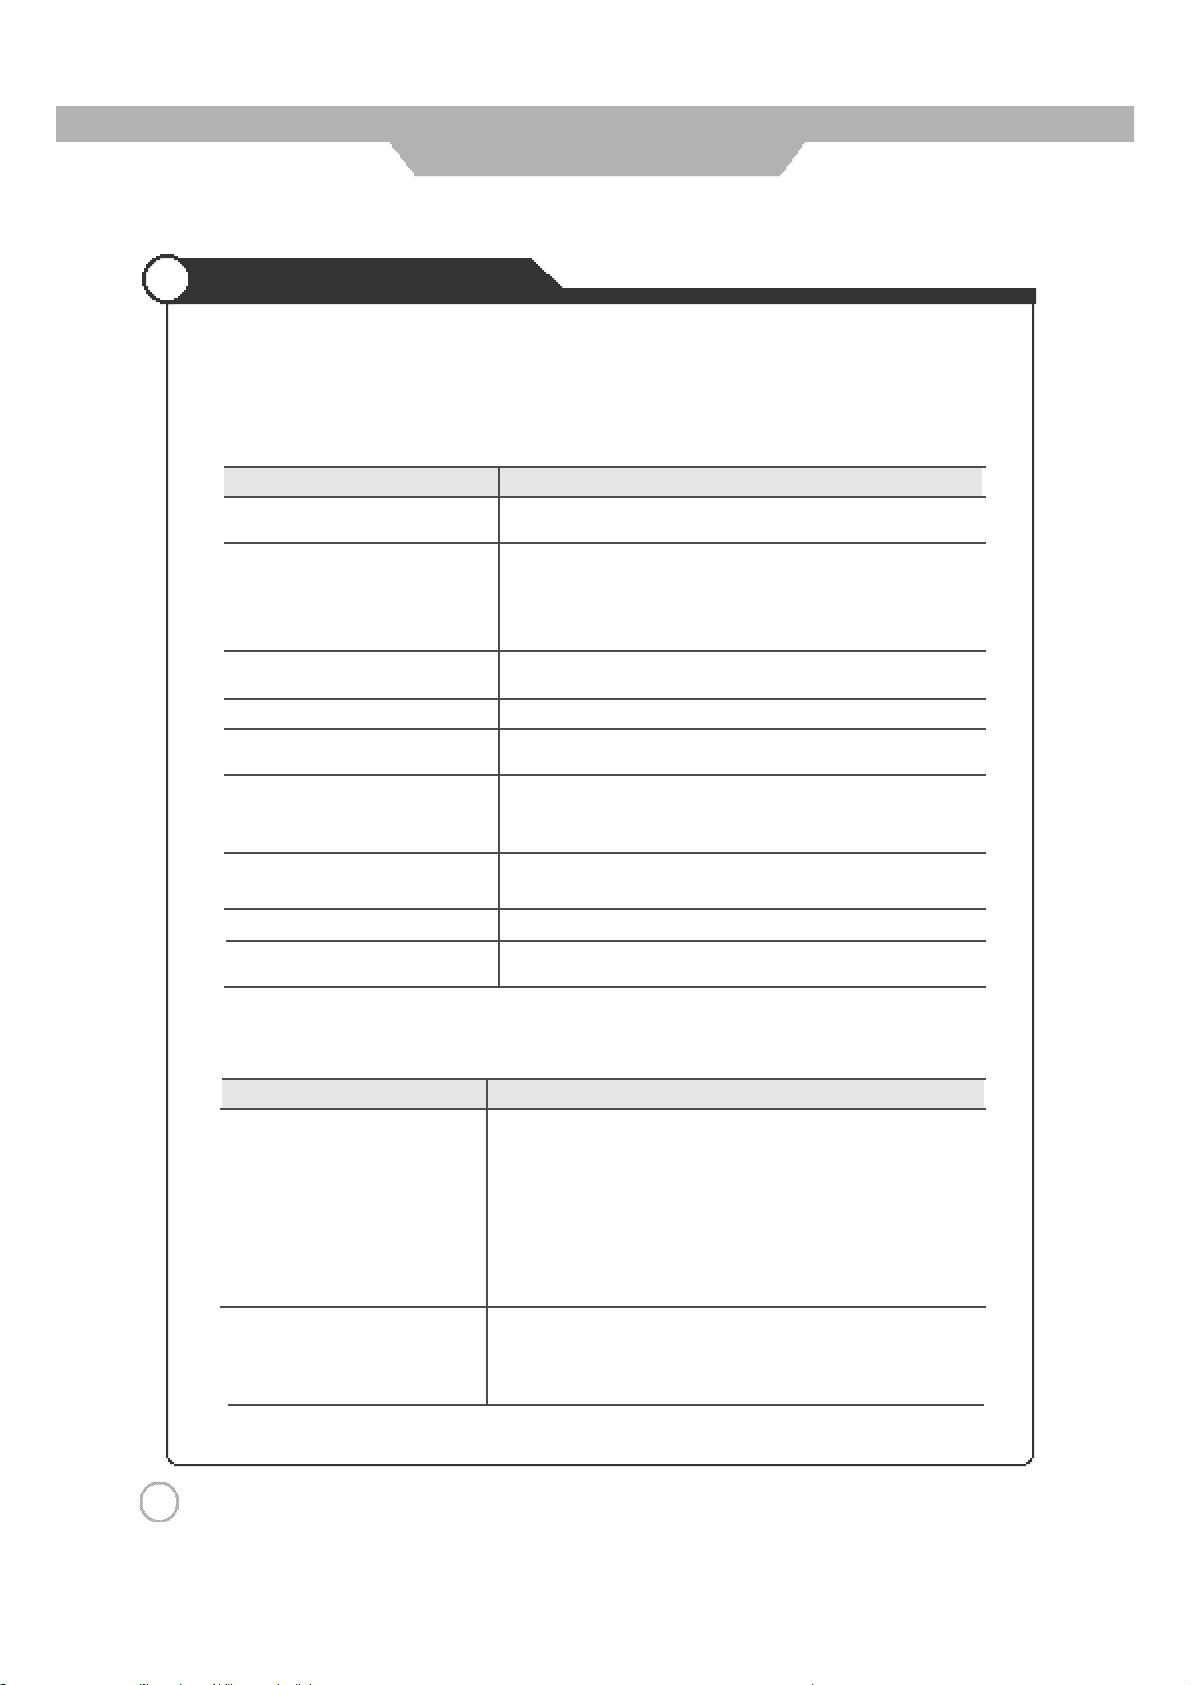
Trouble shooting Tips
※
Do not use other functions that are mentioned on this user's manual. It will be main reason of a faulty
and motion error.
ㅤ
In case a problem occurs with your LCD TV, please take the following steps first.
ㅤ
If you still have the problem, turn the power off and contact your dealer or an authorized service center.
● Screen related Matters
P r o b l e mA c t i o n
Thesc reen does not appear.
Thesc reen appearstoo
slowly afterthe pow eristurned on.
Scr eenistoo bright or too dark. Perform brightness adjustment orContras t adj ustment. (Please refer
Scr eenistoo large or too small. Adjust the screen si ze. (Please refer to page 29)
St ripes appear on the screen
and it shakes.
S imul taneous Screen
doesnot appear .
Thesc reen does not move. Press the "STILL"button. ( Please refer topage 33) Check if the
ComputerInput Screen is abnormal. Perform manual fine adjust ment(Please refer to page 41).
Aut omaticTurn On doesnot work.
Is the power plug pull ed out? Ins ert the power plug. Turn the mai n
power button on and press t hepower button of the remote control ler.
This pr oblem occursfor abrief timein the process of
image elimination processing in order to hide temporaryscreennoise
that occurs when the power is turned on. But if the screen does not
come after 1 minute has passed, contact your dealer or an
authorized service center.
to page 25)
Stop using w irel esstelephones,hairdriers and electric drills.
Check that LCDTV and externalequipment are c o n n e c t e d .
Checktheinputsof simultaneous screen by pressing sub- screen
s e l e c t i o n .
Pausebutton is pres sed on external equipment.
Automatic Turn O nfunctionwork s only when turningthe LCD TV off
with theremote control ler or Standbybutton.
5 0
● Sound related Matters
Problem Action
Screen appears, Voice is not heard 1. Press the "Mute"button. (page 21)
2. Increase the sound by pressing volume adjustment button.
3. Check if voice terminal of external input is connected properly.
4. Check if audio cables are connected properly.
5. If it is on PIP mode, convert audio of main screen and subscreen by pressing S.SELECT.
6. Select and check the other input.
If the sound still does not work and the other channels are the
same afteryou have done as the above, contact your dealer or
an authorized service center.
Lots of noise (static) occurs. When connecting a Set-Top-Box, check that it is on stereo
broadcasting. If it is, the TV program may not be available or t h e
reception may be bad. Check the audio source with another player. If
that source is good, contact your dealer or an Authorized servi ce center.
Page 51
Maintenance and Service
Trouble shooting Tips
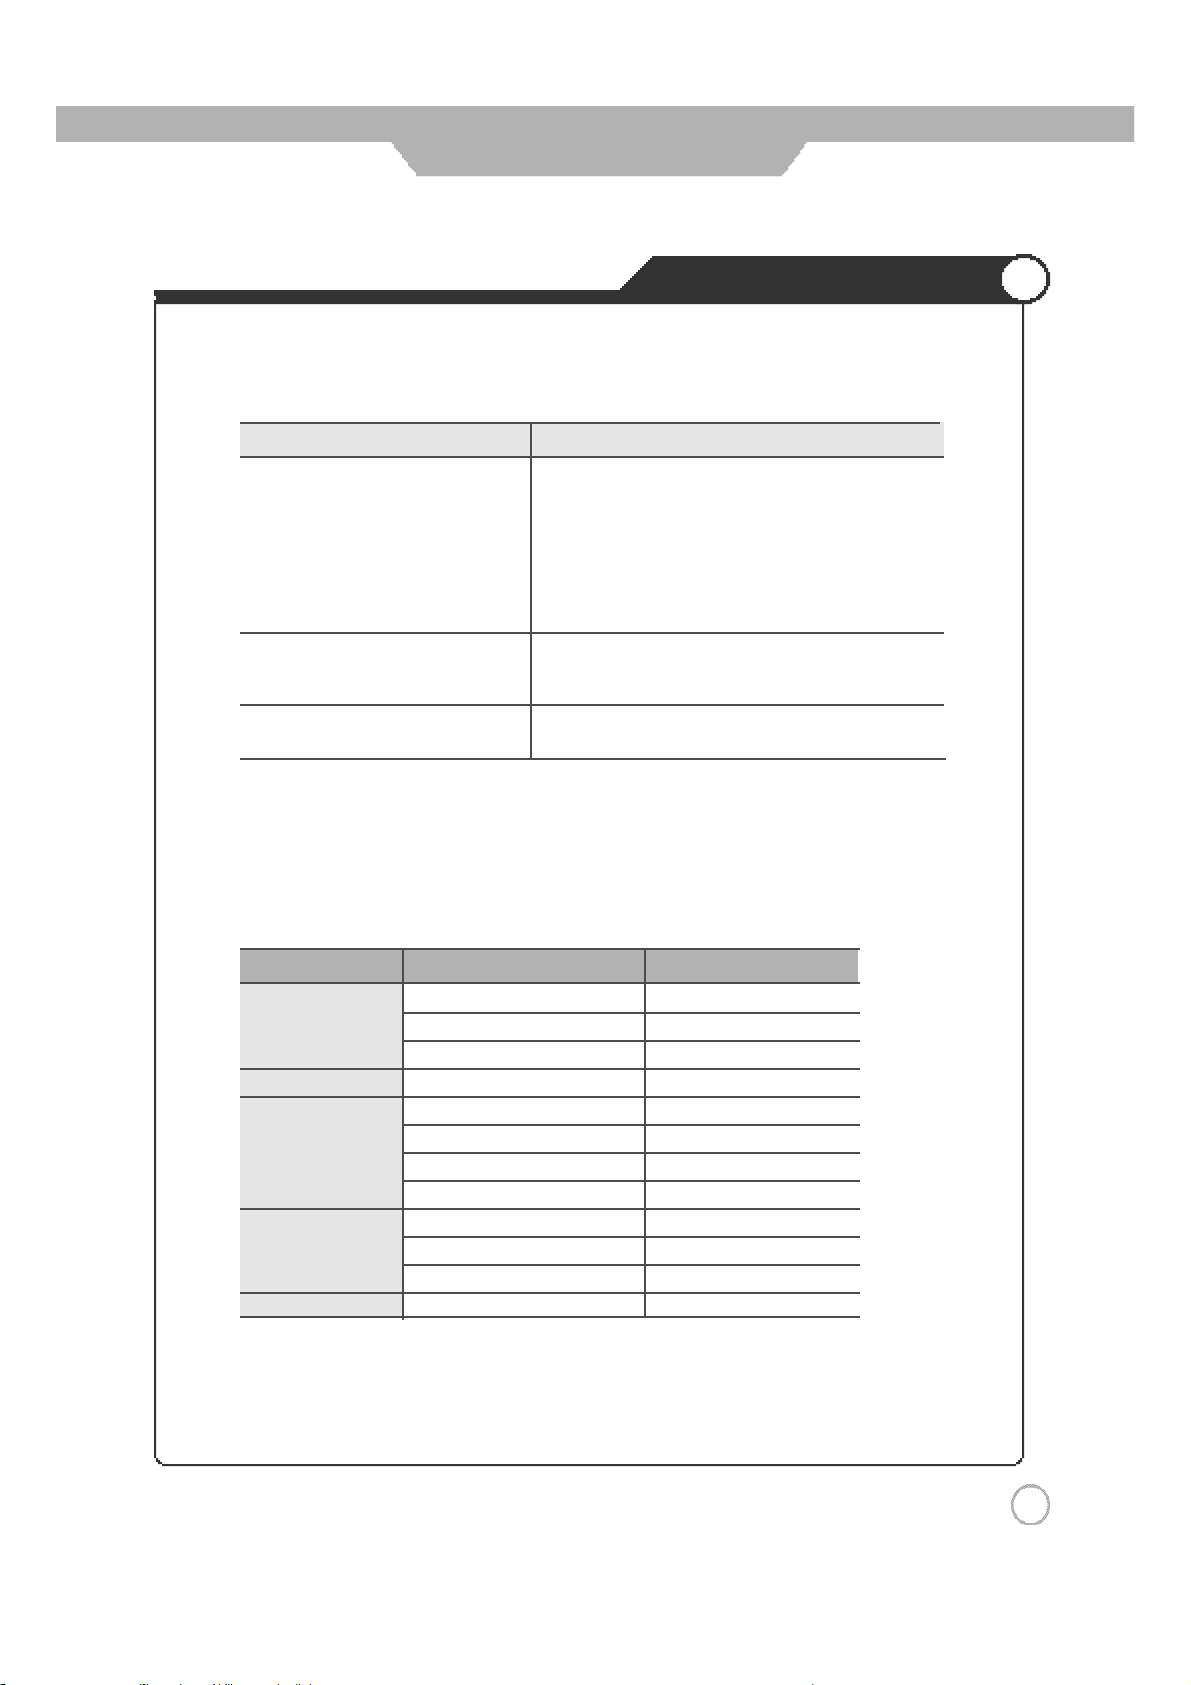
● Others
Problem Action
Remote controller does not work. 1. Check if main power is On.
2. Check that the batteries of the remote controller were
loaded properly.
3. Check to see if any obstacle exists between the LCD
TV and the remote controller and remove it, if any.
4. If the batteries have no power, replace them with two
new batteries.
LCD TV makes strange noise. It is the noise when the mechanism expands or contracts
from to changes to the environment due to factors such
as humidity, temperature, etc. It is not a failure.
LCD TV indication lamp is On. The red means the Stand-by power is ON. It will take a
few seconds to turn off as the main power is off.
ㅤ
This LCD TV is for household use and registered as suitable on electromagnetic waves.
ㅤ
Therefore, you can use it in every location as well as residential areas.
Supporting display mode
●
Resolution Horizontal Frequency (KHz) Vertical Frequency (Hz)
31.47 60
640×480
720×400
800×600
1024×768
1280×1024
37.86 72
37.50 75
31.47 70
35.15 56
37.88 60
48.88 72
46.88 75
48.36 60
56.48 70
60.02 75
64.0 60
● Considerations inInstallation
ㅤ If anysignal of unsupported resolutionisinput, the "Out of Range" message appears.
5 1
Page 52
Maintenance and Service
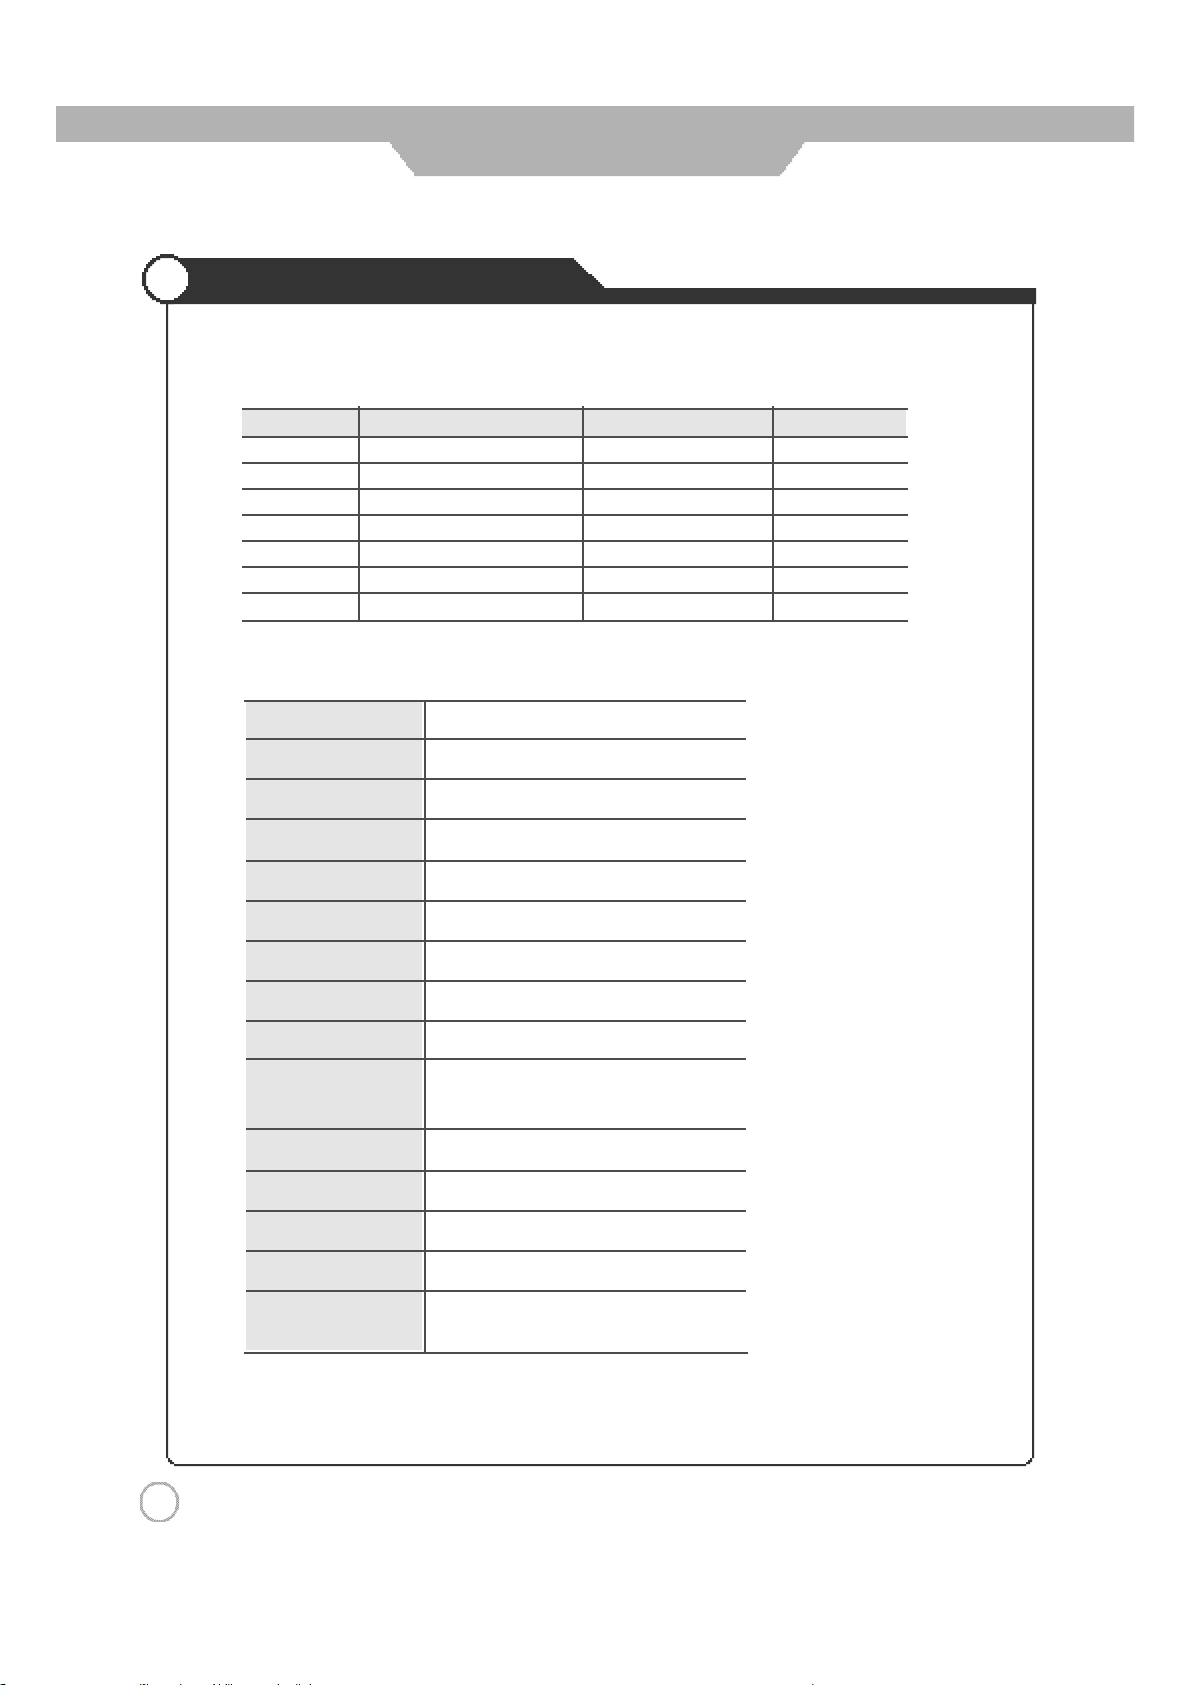
Supported Display Modes
●
Component Mode
Resolution Horizontal Frequency (KHz) Vertical Frequency (Hz)
7 2 0×4 8 0 15.73 6 0 . 0 0 SDTV,DVD 480i
7 2 0×5 7 61 5 . 6 35 0 . 0 0 SDTV,DVD 57 6i
7 2 0×4 8 0 31.47 5 9 . 9 4 SDTV,480p
1 2 8 0×7 2 0 45.00 6 0 . 0 0 HDTV, 720p
1 2 8 0×7 2 0 44.96 5 9 . 9 4 HDTV, 720p
1 9 2 0×1 0 8 0 33.75 6 0 . 0 0 HDTV, 1080i
1 9 2 0×1 0 8 0 33.72 5 9 . 9 4 HDTV, 1080i
● Specifications
Aspect Ratio 15 : 9
[
Y,C
B (PB), CR ( PR)
]
Screen Size (H×V) 643.2mm×385.92mm
Resolution 1280×768(Wide XGA)
Pixel pitch 0.1675mm×RGB×0.5025mm
Displayable Colors 16.7M
Brightness 550cd/㎡(Typical)
Contrast 600:1
Color Temperature 9500 。K
Viewing Angle 85。/ 85。/ 85。/ 85。
Input signal
Tuner PAL, SECAM
RGB Input D-Sub (15pin)
AC Input AC100-240V~, 50/60Hz, 2A
Power Consumption 150W
Dimensions/ Weight TV Only - 933×479×104/ 15.3Kg
(H×V×W) (Kg) with stand- 933×526×215/ 18.4Kg
PAL, SECAM, SD, HD
VGA~SXGA
5 2
ㅤ The outside design and specification can be modified without any previous notice for
improving the performance.
Page 53
Maintenance and Service
Memo
Page 54
Memo
Maintenance and Service
Page 55
Maintenance and Service
Memo
Page 56

D
I
G
I
T
A
L
A
R
T
 Loading...