

Page 1
Operation Guide
Professional, Wearable Digital Video Recording System
860-00177-00 Rev D
Copyright © 2013 Digital Ally, Inc. All Rights Reserved. This publicati on may not be reproduced, stored in a retrieval system,
or transmitted in whole or part in any form or by any means electronic, mechanical, recordin g, photocopying, or in an y other
manner without the prior written approval of Digital Ally, Inc.
Page 2

FirstVu™ HD Operation Guide 860-00177-00 REV D
T a b l e o f C o n t e n t s
SECTION - 1 INTRODUCTION ............................................................................................................................1-1
FIRSTVU™ HD FEATURES ...................................................................................................................................1-1
FIRSTVU™ HD CONTROLS ..................................................................................................................................1-1
PARTS AND ACCESSORIES LIST .............................................................................................................................1-2
SECTION - 2 GETTING STARTED ......................................................................................................................2-1
SOFTWARE UPDATES ............................................................................................................................................2-1
BATTERY CHARGING INFORMATION .....................................................................................................................2-1
Charging From a Computer .........................................................................................................................2-1
Charging In a Vehicle ...................................................................................................................................2-1
Charging Using an AC Power Outlet ...........................................................................................................2-1
Charging Using the Battery Charger ...........................................................................................................2-1
FirstVu HD Charging and Battery Indicators ..............................................................................................2-1
CONNECTING THE CAMERA ..................................................................................................................................2-2
SETTING THE DATE AND TIME ..............................................................................................................................2-2
Automatically setting the date and time .......................................................................................................2-2
Manually setting the date and time ..............................................................................................................2-2
SECTION - 3 DEVICE CONFIGURATION - VUVAULT ...................................................................................3-1
DEFAULT CONFIGURATION ...................................................................................................................................3-1
USING VUVAULT TO CONFIGURE YOUR FIRSTVU HD ..........................................................................................3-1
Location ........................................................................................................................................................3-2
Settings .........................................................................................................................................................3-3
Data Transfer ...............................................................................................................................................3-4
ACTIVA TING YOUR FIRSTVU HD WITHIN VUVAULT .............................................................................................3-4
SECTION - 4 DEVICE CONFIGURATION – MINI CONFIGURATION
MANAGER ...............................................................................................................................................................4-1
DEFAULT CONFIGURATION ...................................................................................................................................4-1
MINI CONFIGURATION MANAGER PC SOFTWARE .................................................................................................4-1
Load Configuration File ...............................................................................................................................4-1
Location ........................................................................................................................................................4-2
Settings .........................................................................................................................................................4-3
Save Configuration File ...............................................................................................................................4-4
SECTION - 5 OPERATION ....................................................................................................................................5-1
POWERING ON/OFF ..............................................................................................................................................5-1
VIDEO RECORDING...............................................................................................................................................5-1
Start Recording .............................................................................................................................................5-1
Stop Recording .............................................................................................................................................5-1
MARKING EVENTS ...............................................................................................................................................5-1
AUDIO RECORDING ..............................................................................................................................................5-1
UPLOADING FILES TO A COMPUTER ......................................................................................................................5-2
UPLOADING FILES USING VUVAULT.....................................................................................................................5-2
Non-Secure USB Port method ......................................................................................................................5-2
Secure USB Port Method ..............................................................................................................................5-4
VIDEO PLAYBACK AND MANAGEMENT ................................................................................................................5-7
Using VuV ault ...............................................................................................................................................5-7
Using the Digital Ally Viewer .......................................................................................................................5-7
Toolbar Controls...........................................................................................................................................5-8
Playback Controls ........................................................................................................................................5-8
Playback Slider bar ......................................................................................................................................5-8
View Selection and Options ..........................................................................................................................5-9
© 2013 Digital Ally, Inc.
Page 3

FirstVu™ HD Operation Guide 860-00177-00 REV D
EMORY & BATTERY ALERTS ..............................................................................................................................5-9
M
Memory Alerts: .............................................................................................................................................5-9
Battery Alerts: ..............................................................................................................................................5-9
Battery Replacement: ...................................................................................................................................5-9
SECTION - 6 STATUS INDICATORS ...................................................................................................................6-1
SECTION - 7 SPECIFICATIONS ..........................................................................................................................7-1
SECTION - 8 WARRANTY INFORMATION ......................................................................................................8-1
SECTION - 9 CONTACT INFORMATION ..........................................................................................................9-1
SECTION - 10 REGULATORY ............................................................................................................................ 10-1
© 2013 Digital Ally, Inc.
Page 4
FirstVu™ HD Operation Guide 860-00177-00 REV D
Section - 1 Introduction
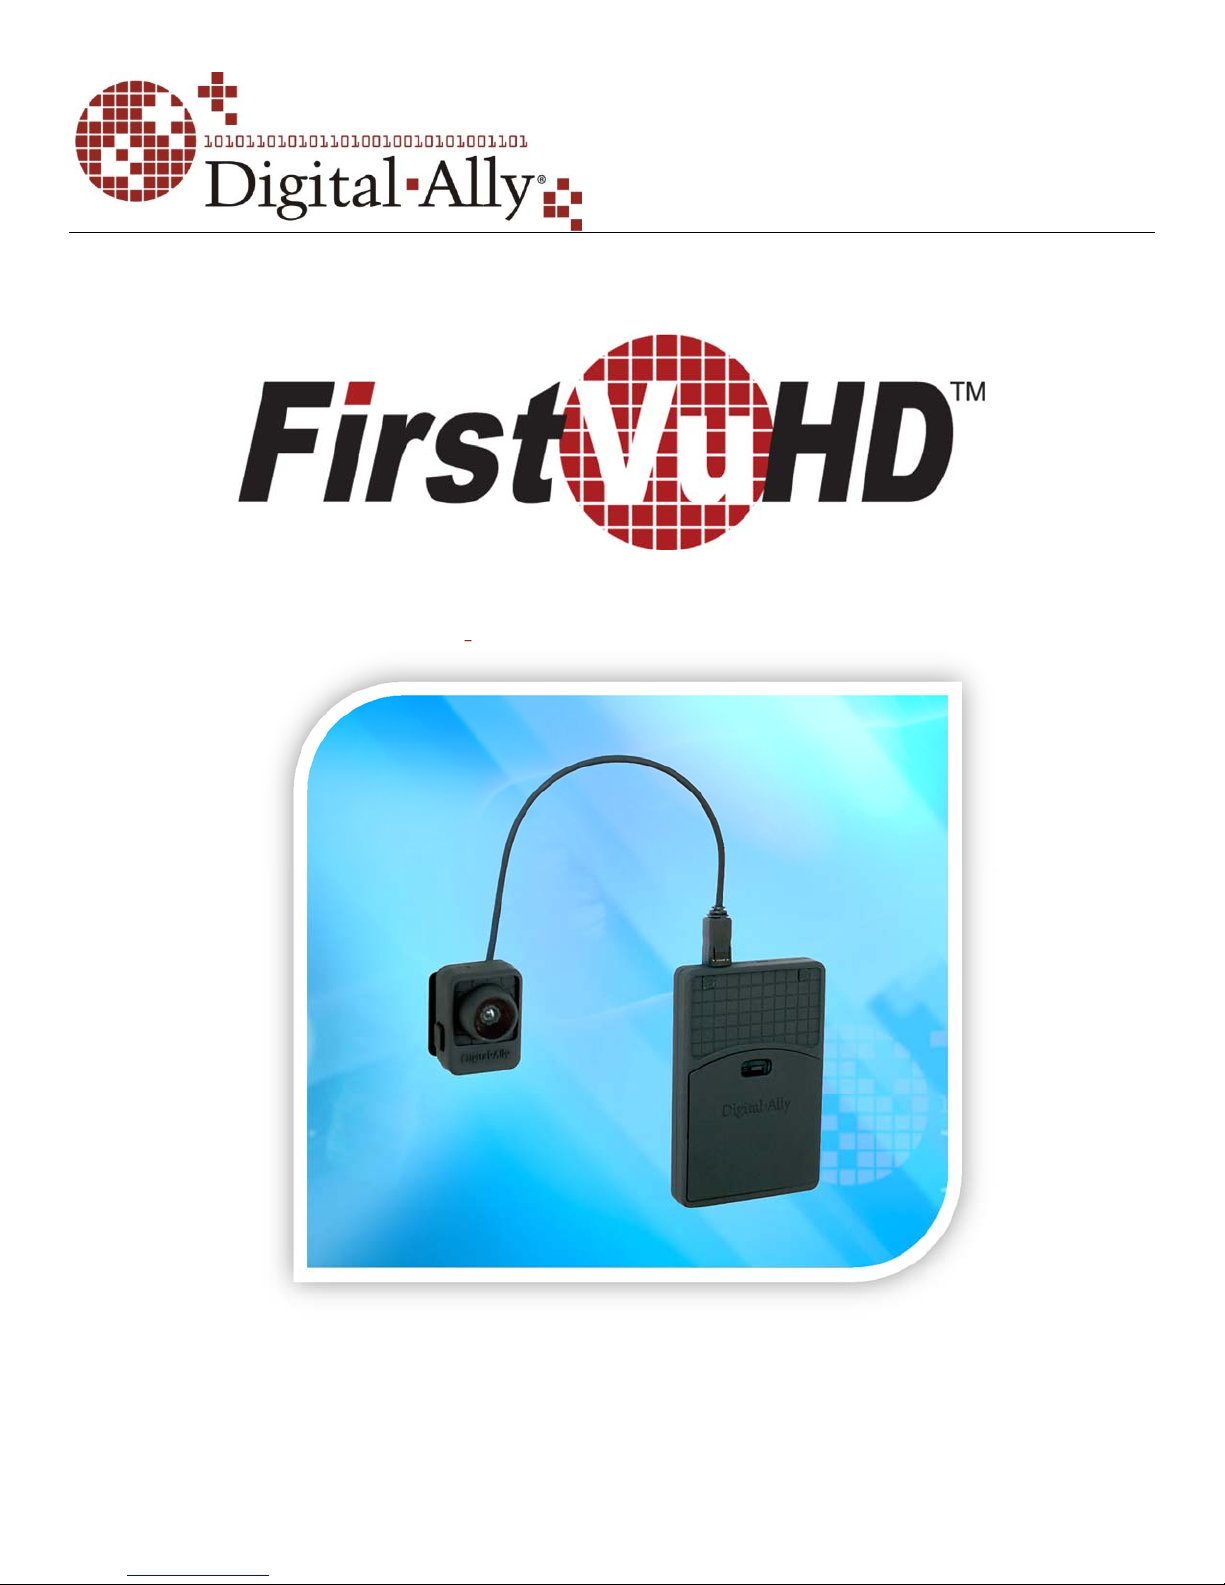
The FirstVu™ HD is a Professional, Evidentiary, Wearable, Mountable, and WeatherResistant Digital Video System.
Record video and audio, evidence wherever the job requires, day or night while also
collecting useful information such as a date/time stamp, and marks (video bookmarks).
This Operation Guide is designed to get you up and running quickly with its basic features.
For integration within the VuVault™ back office software, please refer to Section 3.
FirstVu™ HD Features
Easy to Operate – One button start/stop record
Small and Lightweight
Easily and securely mounts almost anywhere
High Quality 720p Video – H.264 codec – 1280 x 720 resolution, 30 frames per
second (configurable for lower settings)
Wide Field of View
Encoded AVI videos may easily be viewed on standard PC video player software.
Saves Metadata along with Video
Up to 60 Seconds Pre-Event Record (when configured) – Capture the action
before activating a recorded event
Low light sensitivity for night time operation
Instant Record ON while in Stand-by Mode
User can insert a ‘Mark’ during a recording which records to Metadata
Covert Mode – Vibratory notifications
Secure 32GB of internal event record memory with easy download thru USB port
Software Upgradeable via USB
Up to 4.5 hours of continuous recording on a single charge
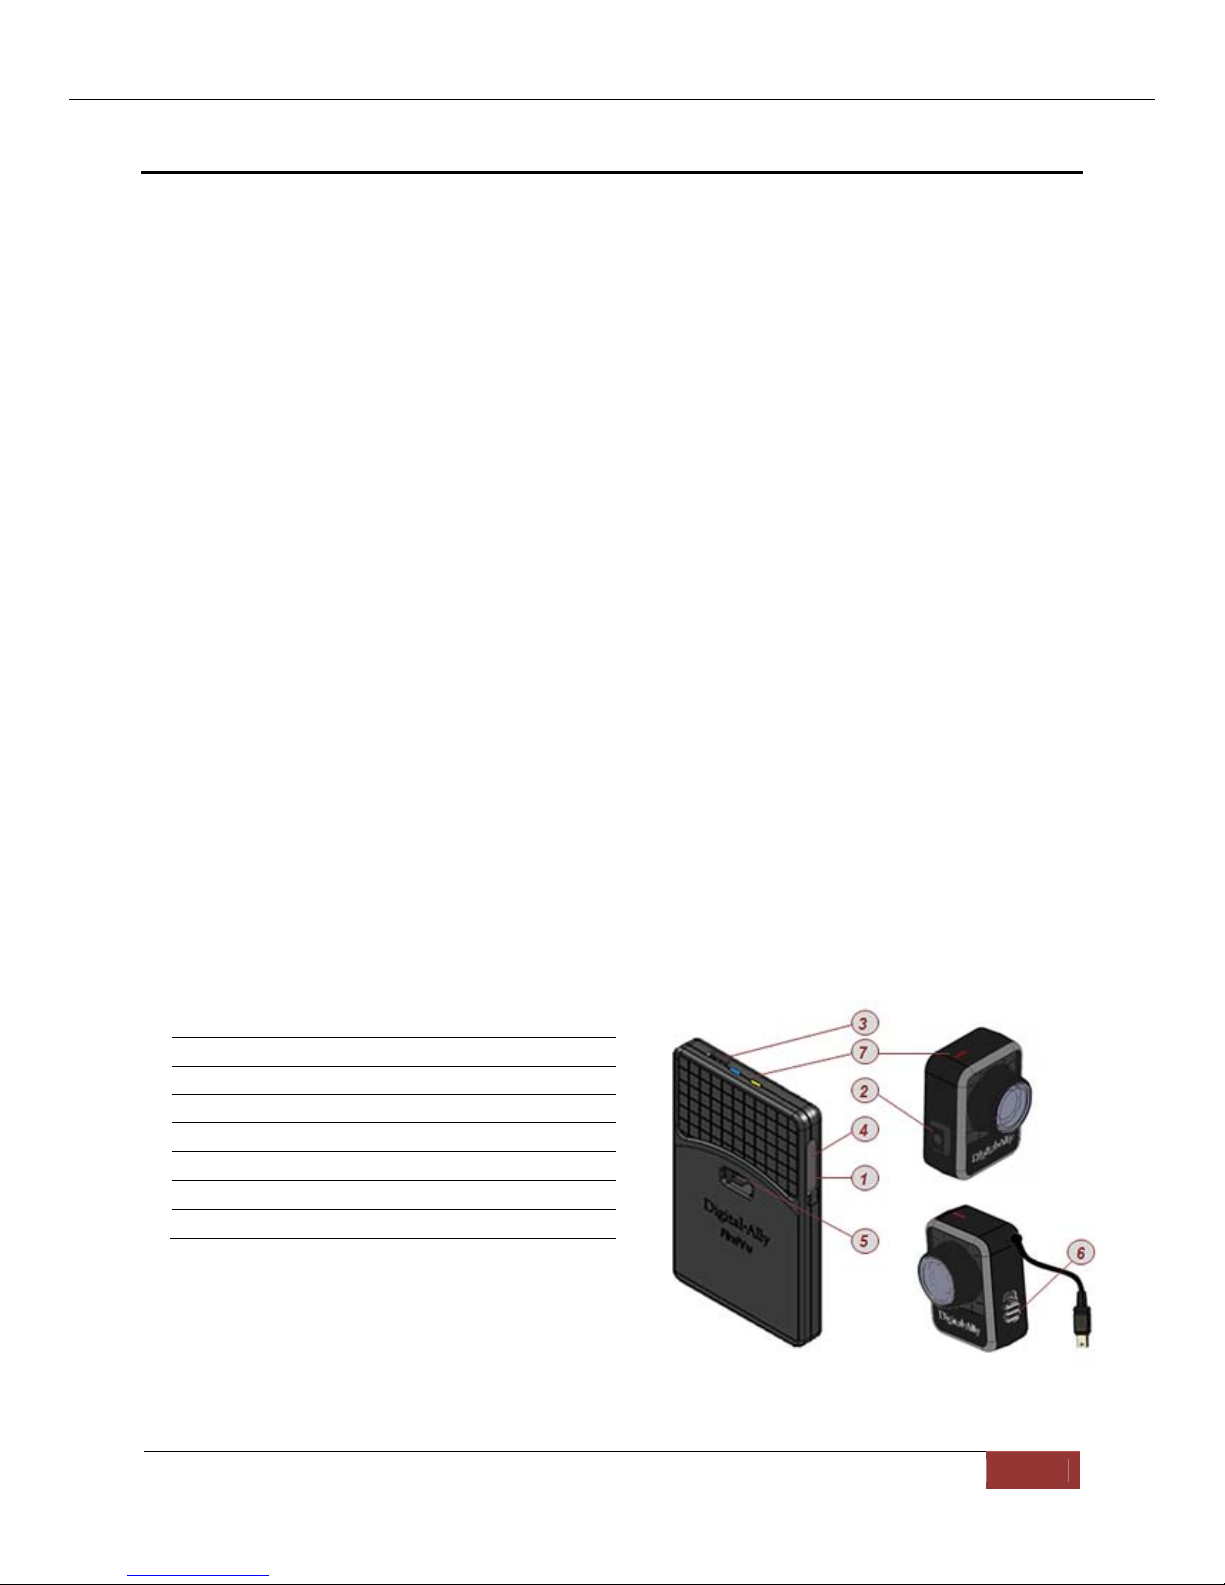
FirstVu™ HD Controls
1 PowerOn‐Off
2 RecordStart/Mark/RecordStop
3 CameraPort
4 USBPort
5 BatteryCover
6 MicrophoneON/OFF
7 StatusLED’s
Digital Ally, Inc. | Introduction 1-1
Page 5
FirstVu™ HD Operation Guide 860-00177-00 REV D
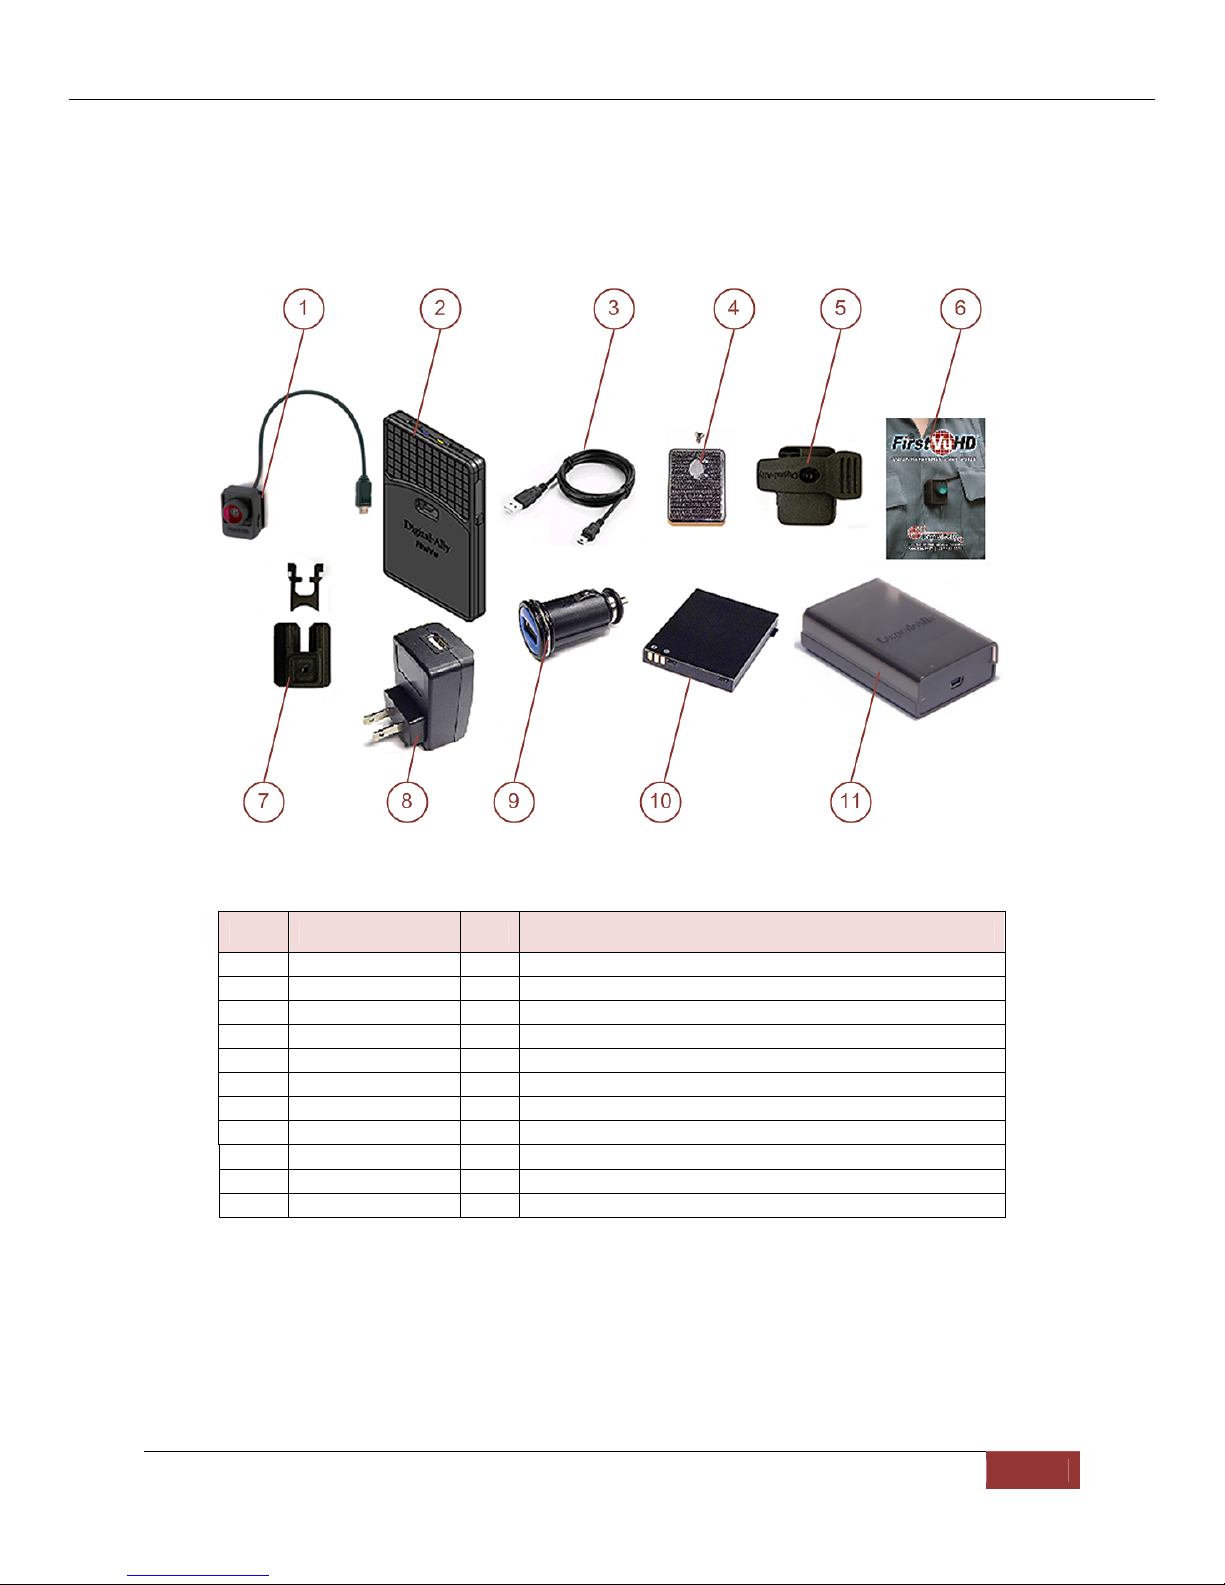
Parts and Accessories List
Kit Part Number 001-00203-00
Item Part Number Qty Description
1 050-10110-00 1 Assembly, FirstVu HD Camera
2 050-10091-00 1 Assembly, FirstVu HD DVR
3 008-0100 2 Cable, USB 2.0 Type A to Mini-B, 3.3 ft.
4 050-10101-00 1 Kit, Velcro Mount
5 050-10090-00 1 Assembly, Fabric Clip
6 860-00182-00 1 FirstVu HD Quick Referenc e Guide
7 050-10096-00 1 Assembly, Button Mount
8 009-00004-00 1 Charger, 110Vac wall to USB Type A
009-00005-00
9
10 135-00398-00 2 Battery, 3.7V 2200mAh Li-Po
11 009-00008-00 1 Charger, Battery
Charger, 12Vdc Auto Plug to USB Type A
1
Digital Ally, Inc. | Introduction 1-2
Page 6

FirstVu™ HD Operation Guide 860-00177-00
Section - 2 Getting Started
Software Updates
Log on to www.digitalallyinc.com/tech-support.php and register for an account to be an
authorized user. By registering you will be able to download all the latest
firmware/software updates and will be notified of future upgrades.
Battery Charging Information
The FirstVu HD should be fully charged before initial use using the AC power outlet or DC
auto adapter. With the unit powered off, charge the unit initially for 12~16 hours.
Subsequent charges should take approximately 4 hours.
Charging From a Computer
Plug the USB cable into the computer’s USB port. Insert the other end of the cable into the
FirstVu USB port and the unit will begin charging.
Charging In a Vehicle
Plug the DC auto adapter into the vehicle’s 12Vdc receptacle and the
other end into the FirstVu HD USB port or charging cradle USB port; the
unit will begin charging.
Charge time is minimized when the FirstVu HD is powere d off but note
the status indicators will not operate.
In some vehicles, the 12Vdc receptacle may be controlled by the
position of the ignition switch. In such cases, the FirstVu™ HD will
only charge when the ignition switch is in the “On” position.
REV D
Charging Using an AC Power Outlet
Plug the AC power adapter into an appropriate power outlet and the USB
connector into the FirstVu USB port. The unit will begin charging.
Charging Using the Battery Charger
Remove your battery from the FirstVu HD and insert into the
supplied battery charger shown to the right (009-00008-00).
Then plug your battery charger into an available USB port on
your computer or one of the chargers pictured to the right
using the supplied USB cable. A status LED indicates the
charging mode of the battery. When the LED is green, your
battery is charged and ready for use.
FirstVu HD Charging and Battery Indicators
Charging with unit powered ’ON’
Charging in progress is shown with a solid blue status indicator.
When charging is complete the blue status indicator is not illuminated.
For more information consult Section 6.
Charging with unit powered ’OFF’
The unit may be charged via USB cable with the power switch in the OFF
position. However, no LED indicators will be present while it is charging.
Digital Ally, Inc. | Getting Started 2-1
Page 7

FirstVu™ HD Operation Guide 860-00177-00 REV D
Connecting the Camera
Connect your camera to the camera port on top of the DVR as
shown to the right. The camera port can only be used with an
approved Digital Ally camera. Never plug any other device or cable
into the camera port. Doing so may cause permanent internal
damage to your FirstVu HD.
Setting the Date and Time
Automatically setting the date and time
The date and time is set by the factory prior to shipment. However, you must also enter the
correct UTC offset when configuring the device so that the time zone can be set properly.
For example, USA Central Standard Time =UTC -6. For more information, consult the
Device Configuration sections of this manual. USA time zones are listed below for
reference.
PST = Pacific Standard Time (UTC - 8 hours)
MST = Mountain Standard Time (UTC - 7 hours)
CST = Central Standard Time (UTC - 6 hours)
EST = Eastern Standard Time (UTC - 5 hours)
AST = Atlantic Standard Time (UTC - 4 hours)
ALST = Alaskan Standard Time (UTC - 9 hours)
HST = Hawaiian Standard Time (UTC - 10 hours)
Camera Port
Manually setting the date and time
The date and time is set by the factory prior to shipment and should not need manual
adjustment. However, date and time can still be set manually if needed. Follow the
procedure below to manually set the date and time.
1. Open Notepad from your computer.
2. Inside Notepad, type in the year, month, day, hour, and seconds you wish to
program into the FirstVu. Use the following format (YYYYMMDDHHMMSS) using 24
hour UTC time. You must also apply your time zone offset.
For example, If you live in the CST zone and the current date & time is 5/23/2013
10:47:50pm, you would enter 20130524044750. Since CST is UTC-6, you have to add
6 hours to the current time to reflect the UTC time.
3. Go to File>Save As and name the file “DATE.txt”
4. Connect your FirstVu HD via the supplied USB cable and transfer the DATE.txt file to
the root drive.
5. Cycle the power on your FirstVu HD. The unit will apply the system date/time during
boot up. When completed, the FirstVuHD will erase the .txt file.
Digital Ally, Inc. | Getting Started 2-2
Page 8
FirstVu™ HD Operation Guide 860-00177-00
Section - 3 Device Configuration - VuVault
The FirstVU HD contains a default configuration and can be used immediately. It may
be reconfigured by activating the device either using the Mini Configuration Manager
application supplied on the FirstVu HD product DVD or by using Digital Ally’s optional
VuVault™ back-office software. If you have purchased VuVault™, follow the
instructions in this section to configure and activate your FirstVu HD. If you have NOT
purchased VuVault, skip to Section 4 to configure your device.
Default Configuration
If the unit has never been activated, the unit will use the following default settings:
Central Standard Time (UTC-6)
Daylight Saving enabled
Date format: Month/Day/Year
Time format: 12-hour
Pre-Event disabled
1280x720p record size/high record quality
Pre-Event Audio disabled
30 frames per second
Record LED enabled
Secure USB port disabled
REV D
Using VuVault to Configure your FirstVu HD
You must upgrade VuVault to version 4.2 (minimum) to configure and
activate a FirstVu HD device. VideoManagerII and previous versions
of VuVault will not work with the FirstVu HD.
VuVault is used to manage FirstVu HD settings as well as activate your device for use
within the system.
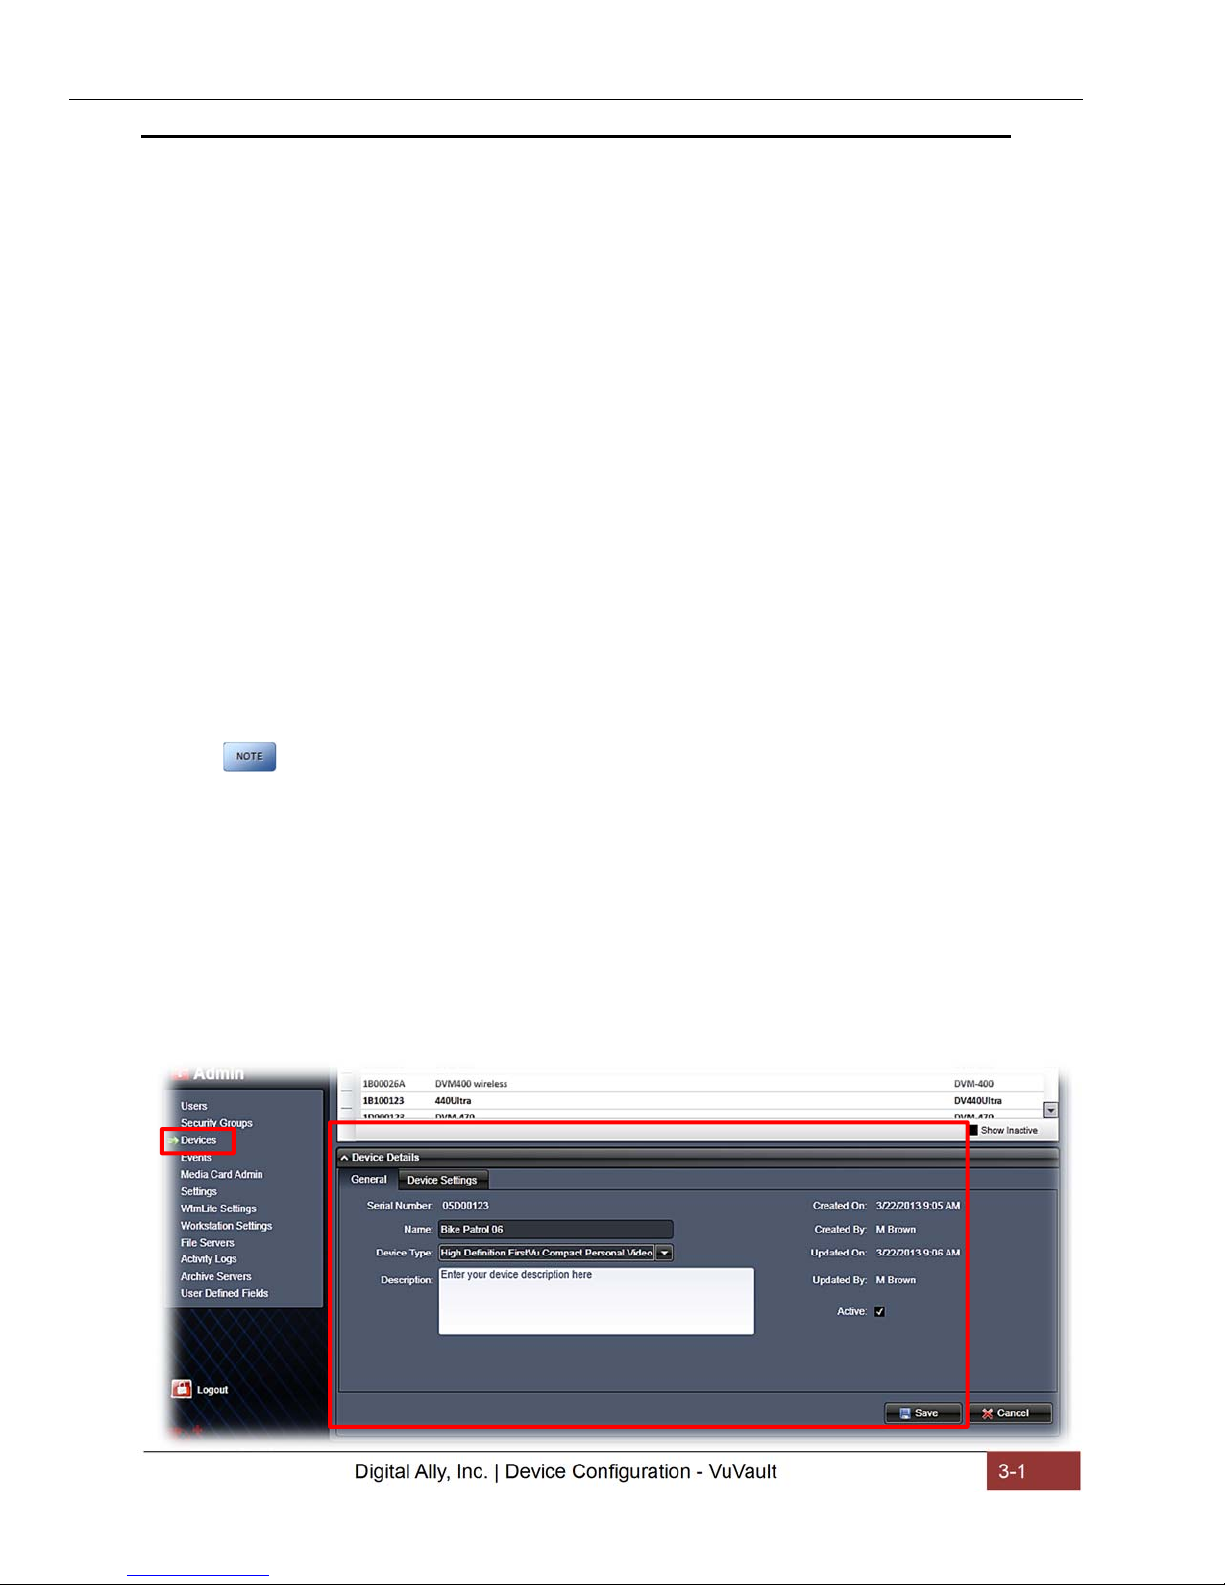
Before you can configure your device for use within VuVault, the serial number must be
added into the system. Select Admin>Devices>Add Device to add your device into
VuVault. Type in your device serial number and assign it a name within the system.
When done, press Save (for more information consult the VuVault User’s Guide
“Adding Devices” section).
Digital Ally, Inc. | Device Configuration - VuVault 3-1
Page 9
FirstVu™ HD Operation Guide 860-00177-00
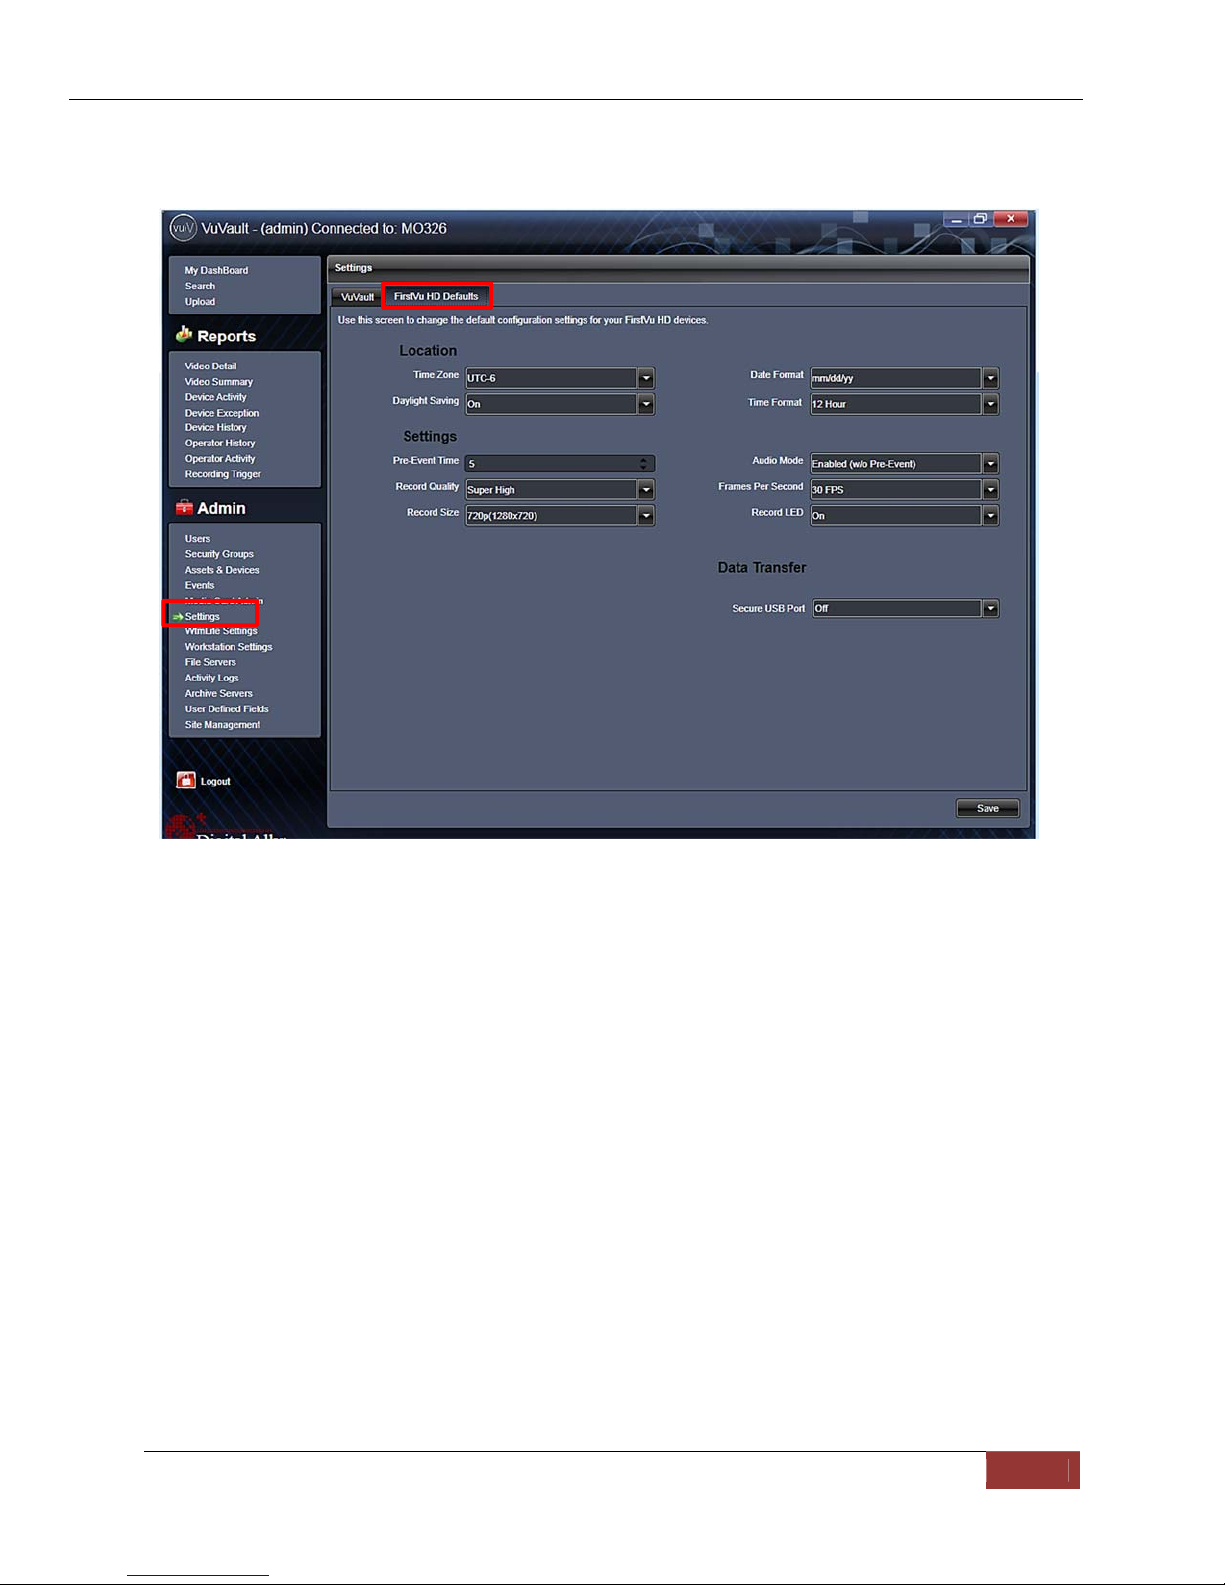
A configuration field will be available in the Admin>Settings tab within VuVault once a
valid FirstVu HD serial number has been added into the system. These global settings
will define how all users will interface with the FirstVu.
REV D
Location
TimeZone
The local time zone is used to adjust the device when synchronizing to the
Greenwich Mean Time. During device configuration, the local time from the
PC real time clock will be used and Central Standard Time is set by default.
Settings: UTC,UTC-6(CST)[default]
DaylightSaving
When set to On, Daylight Saving setting time will be automatically adjusted
for the configured Local Time Zone. If this is disabled, time will not be
adjusted for Daylight Saving.
Settings: Off, On[default]
DateFormat
The date format displayed on the event recordings is selected through this
setting.
Settings:mm/dd/yy[default];yy/mm/dd;dd/mm/yy
TimeFormat
This time format allows the device to be configured in a 12-hour format or a
24-hour format.
Digital Ally, Inc. | Device Configuration - VuVault 3-2
Page 10

FirstVu™ HD Operation Guide 860-00177-00 REV D
Settings
Pre‐EventTime
The Pre-Event Time option allows you to set the amount of time for the preevent buffer. The FirstVu HD will buffer the last 0-60 seconds of audio and
video so it can be recorded during a record event. If set for 0 seconds, preevent function will be disabled.
Settings:0-60seconds[default=0seconds]
RecordQuality
The Record Quality parameter allows the video compression bit rate to be
adjusted. Digital video is compressed by taking out data that remains
constant from each frame, and only storing data that actually changes. This
allows videos with still backgrounds to be much smaller than they would be
if the background had to be present in every single frame.
The bit rate is the amount of bits that can be used in one second of video.
The higher the record quality, the higher the bit rate and the size of the
event files. The default setting is “high” for excellent video quality, and can
be lowered or raised to adjust the bit rate and storage space. (VuVault 4.2
Update 2 or newer is required for the super high setting).
Settings: Standard(2Mbps),Medium(4Mbps),High(6Mbps)[default],SuperHigh(12Mbps)
RecordSize
The Record Size parameter allows the video image size to be adjusted from
VGA (standard definition) to 720p (high definition). VGA has a picture size
of 640x480 pixels, whereas 720p has a picture size of 1280x720 pixels.
720p will provide a larger & more defined video picture, but because of its
larger size, will require about 3 times as much storage space as VGA. Also,
the shape of the final video frame will be slightly different, with 720p being a
longer and thinner frame (higher width ratio to height).
Settings: VGA(640x480),and720p(1280x720)[default
AudioMode
The audio mode determines how audio will be recorded to your device. If
enabled, audio information is recorded during the recorded event and
during the configured pre-event time.
If enabled (w/o Pre-event), audio will be recorded during the event but not
recorded during pre-event. If this option is disabled, no audio will be
recorded.
If the Pre-Event Time is set for 0, there cannot be pre-event audio.
Settings: Enabled,Disabled,Enabled(w/oPre-Event)[default]
FramesPerSecond
This parameter sets the number of frames per second the FirstVu HD will
record. The higher the setting, the better the video quality, and the larger
the size of the event files.
Settings:5,10,15,30fps[default=30fps]
Digital Ally, Inc. | Device Configuration - VuVault 3-3
Page 11

FirstVu™ HD Operation Guide 860-00177-00
RecordLED(covertmode)
The Red Record LED behavior on the camera can be configured to
accommodate your desired operation. If disabled, the LED will not
illuminate during a recorded event and will operate in covert mode.
Settings:Off,On[default]
Data Transfer
SecureUSBPort
This parameter determines if the USB port for secure data connections to a
PC is enabled or disabled. This feature provides greater security to your
recorded evidentiary data.
When enabled, video and metadata files can only be accessed when using
the upload function within your VuVault stand-alone or networked
environment. The only user-accessible information when the device is
connected to a PC USB port is the dvminfo.log file. The dvminfo.log file
contains basic information about your device such as serial number and
firmware version.
When this option is disabled, video and data files will be accessible to any
user when the device is plugged into a PC USB port. Event data can then
be copied, erased, or uploaded with or without the use of VuVault.
Settings:On,Off[default]
Once the desired settings have been entered, click and proceed
below to activate your device.
REV D
Activating your FirstVu HD within VuVault
The Media Card Administration function is used to erase, format, and activate the
FirstVu HD internal memory to be ready for use with VuVault.
Digital Ally, Inc. | Device Configuration - VuVault 3-4
Page 12

FirstVu™ HD Operation Guide 860-00177-00
The FirstVu HD must be connected to the VuVault workstation via USB port. Make sure
your device is powered on and in the Standby mode.
1. Select Media Card Admin from the Admin navigation bar.
2. Select the correct Device Type from the available options. You must select
“High Definition FirstVu Compact Personal Video”.
3. Click the button to detect the FirstVu HD from the available removable
drives.
4. Select the drive letter assigned to the FirstVu HD.
5. Note the Card Volume Name field. If there is a current volume name, it will
show up automatically. If not, it will default to DA_DEVICE. This can be
changed according to customer preference to whatever is deemed most
appropriate.
6. Choose from one of two options to activate the device:
Activate Device (Leave Data Intact) – this option simply activates the
FirstVu by writing the “deviceconfig” file to internal memory. No existing
video events located on the internal memory are altered.
Clear Data and Activate Device – this option erases any data on the
internal memory and activates it.
CAUTION: Always ensure that all relevant data has been previously
uploaded to the system before deleting it from the FirstVu HD.
7. Click the Activate button. The Status pane will indicate when the process has
completed.
VuVault will create a file named “deviceconfig” and place into the root folder of
the FirstVu HD. This and all other media files are accessible to the user if
Secure USB Port is disabled in the VuVault Admin>Settings>FirstVu HD
Defaults Menu.
If Secure USB Port is enabled, the only accessible information is the
dvminfo.log file. The dvminfo.log file contains basic information about your
device such as serial number and firmware version. Video uploads and device
configuration MUST be done through VuVault when this option is enabled.
8. Reboot your FirstVu HD by turning the power switch OFF, then ON.
The FirstVu HD is now activated and ready for use. For more information consult the
VuVault User’s Guide Media Card Administration section.
REV D
Digital Ally, Inc. | Device Configuration - VuVault 3-5
Page 13

FirstVu™ HD Operation Guide 860-00177-00 REV D
Digital Ally, Inc. | Device Configuration - VuVault 3-6
Page 14

FirstVu™ HD Operation Guide 860-00177-00 REV D
Section - 4 Device Configuration – Mini Configuration Manager
The FirstVu™ HD contains a default configuration and can be used immediately.
Advanced configuration for FirstVu HD is determined by the configuration files that are
downloaded to the device from the Mini Configuration Manager supplied on the
FirstVu™ HD DVD, or by using Digital Ally’s optional VuVault™ back-office software. If
you have NOT purchased VuVault ™, follow the instructions in this section to configure
and activate your device using the stand-alone Mini Configuration Manager software.
Default Configuration
If the unit has never been activated, the unit will use the following default settings:
Central Standard Time (UTC-6)
Daylight Saving enabled
Date format: Month/Day/Year
Time format: 12-hour
Pre-Event disabled
1280x720p record size/high record quality
Pre-Event Audio disabled
30 frames per second
Record LED enabled
Mini Configuration Manager PC Software
The Mini Configuration Manager software is used to manage FirstVu HD settings as
well as activate a FirstVU HD device or an external memory card for use in a FirstVu
HD (non-VuVault installations). Various configurable items can be adjusted to meet
your specific setting requirements. For VuVault integration, use the configuration
options within the VuVault software program instead to configure your FirstVu HD
(consult Section 3 for more information).
The Mini Configuration Manager Installation software is located on your product DVD.
Once installed, go to Start Menu>Programs>Digital Ally>Mini Configuration Manager to
open the application.
Load Configuration File
To import settings from your FirstVU HD device or data
storage location you can press the Load button inside the
“File” tab near the center of the software screen. This will
bring up the Windows dialog box to navigate to the location
of the file. The file is named “deviceconfig”.
Digital Ally, Inc. | Device Configuration – Mini Configuration Manager 4-1
Page 15

FirstVu™ HD Operation Guide 860-00177-00
Device Configuration
Press the button to create or edit a device configuration.
REV D
The default device configuration screen will then be available for editing. Use the drop
down arrows to make your selections.
Location
TimeZone
The local time zone is used to adjust the device when synchronizing to the
Greenwich Mean Time. During device configuration, the local time from the
PC real time clock will be used and Central Standard Time is set by default.
Settings: UTC,UTC-6(CST)[default]
Digital Ally, Inc. | Device Configuration – Mini Configuration Manager 4-2
Page 16

FirstVu™ HD Operation Guide 860-00177-00 REV D
DaylightSaving
When set to On, Daylight Saving setting time will be automatically adjusted
for the configured Local Time Zone. If this is disabled, time will not be
adjusted for Daylight Saving.
Settings: On,Off[default]
DateFormat
The date format displayed on the event recordings is selected through this
setting.
Settings:mm/dd/yy[default];yy/mm/dd;dd/mm/yy
TimeFormat
This time format allows the device to be configured in a 12-hour format or a
24-hour format.
Settings
Pre‐EventTime
The Pre-Event Time option allows you to set the amount of time for the preevent buffer. The FirstVu HD will buffer the last 0-60 seconds of audio and
video so it can be recorded during a record event. If set for 0 seconds, preevent function will be disabled. Enabling pre-event will reduce battery life to
about 4.5 hours of standby time.
Settings:0-60seconds[default=0seconds]
RecordQuality
The Record Quality parameter allows the video compression bit rate to be
adjusted. Digital video is compressed by taking out data that remains
constant from each frame, and only storing data that actually changes. This
allows videos with still backgrounds to be much smaller than they would be
if the background had to be present in every single frame. The bit rate is the
amount of bits that can be used in one second of video. The higher the
record quality, the higher the bit rate and the size of the event files. The
default setting is “high” for excellent video quality, and can be lowered or
raised to adjust the bit rate and storage space. (Viewer 4.2 Update 2 or
newer is required for the super high setting).
Settings: Standard(2Mbps),Medium(4Mbps),High(6Mbps)[default],SuperHigh(12Mbps)
RecordSize
The Record Size parameter allows the video image size to be adjusted from
VGA (standard definition) to 720p (high definition). VGA has a picture size
of 640x480 pixels, whereas 720p has a picture size of 1280x720 pixels.
720p will provide a larger & more defined video picture, but because of its
larger size, will require about 3 times as much storage space as VGA. Also,
the shape of the final video frame will be slightly different, with 720p being a
longer and thinner frame (higher width ratio to height).
Settings: VGA(640x480),and720p(1280x720)[default]
Digital Ally, Inc. | Device Configuration – Mini Configuration Manager 4-3
Page 17

FirstVu™ HD Operation Guide 860-00177-00 REV D
AudioMode
The audio mode determines how audio will be recorded to your device. If
enabled, audio information is recorded during the recorded event and
during the configured pre-event time. If enabled (w/o Pre-event), audio will
be recorded during the event but not recorded during pre-event. If this
option is disabled, no audio will be recorded.
If the Pre-Event Time is set for 0, there cannot be pre-event audio.
FramesPerSecond
This parameter sets the number of video frames per second the FirstVu HD
will record. The higher the setting, the better the video quality, and the
larger the size of the event files.
Settings:5,10,15,30fps[default=30fps]
RecordLED
The Red Record LED behavior on the camera can be configured to
accommodate your desired operation. If enabled, the red LED will
illuminate while the FirstVu HD is recording. If disabled, the LED will not
illuminate during a recorded event and will operate in covert mode.
Settings:Disabled,Enabled[default]
When done, go to the tab and save your configuration file to a location on your
computer.
Save Configuration File
To save the configured settings to your FirstVu HD or a data
storage location, you can press the Save button near the center
of the Mini Device Configuration software screen. This will bring
up the Browse for Folder dialog box to select the location to
save the file. After the configuration file has been transferred to
your FirstVu HD, reboot the device by turning the power OFF
then ON.
After the configuration file is copied, reboot your FirstVu HD. It is now configured &
ready for use.
Digital Ally, Inc. | Device Configuration – Mini Configuration Manager 4-4
Page 18

FirstVu HD User’s Guide 860-00177-00
Section - 5 Operation
Powering On/Off
To power on, connect the camera to the camera port on top of the unit.
Then slide the power switch to the ‘ON’ position to power the unit on.
The blue and yellow LED’s will flash alternatively and the device will
vibrate once to indicate that it is powering on.
Once powered on, the unit is ready to start a recording.
To power the unit off, first stop any active recording or playback session
and slide the power switch to the ‘OFF’ position.
WARNING: The camera port can only be used with an approved Digital Ally
camera module. Never plug any other device or cable into the camera port.
Doing so may cause permanent internal damage to your FirstVu HD.
Video Recording
Start Recording
Once the FirstVu HD is powered on, press and release the Record Button at
any time. The DVR unit will emit a vibration pulse, and the red LED status
indicator on top of the camera will be lit continuously (if configured) during the
recording. If pre-event has been enabled through the device configuration,
the unit will automatically include up to 30 seconds of video and audio
prior to the event record trigger.
REV D
Camera Port
Power
Switch
Stop Recording
Press and hold the Record Button for approximately 3 seconds to stop an active recording.
The DVR will emit a vibration pulse and the unit will be ready to record the next event.
Marking Events
Once a recording has been initiated, markers can be placed in the recording to indicate when
important events take place. This is done by momentarily pressing the Record button.
Additional marks can be placed at any time during the recording.
Audio Recording
The FirstVu™ HD contains a microphone built into the face of the camera
module. The position of the switch indicates whether the audio is enabled
or muted.
Audio can be muted or activated by changing the position of the mute
switch (pictured right).
position.
Audio is muted when the switch is in the DOWN position.
Additionally, the audio mode must also be enabled within the device configuration.
Depending yon your purchased camera option, the audio switch may not be
present. In this case, the user will not have the capability to mute the audio.
Audio is active when the switch is in the up (green)
Digital Ally, Inc. | Operation 5-1
Page 19

FirstVu HD User’s Guide 860-00177-00
Uploading Files to a Computer
Using the supplied USB cable, connect your FirstVu HD to
the computer using the USB port next to the power switch.
Power the unit on and the FirstVu HD will appear on the
computer as a removable storage drive. Double click on the
drive and the video file folders will be listed. You may then
drag and drop the files to your PC or open a selected folder
to playback the .avi file using Windows Media Player.
To playback your videos and metadata using VuVault or the
Digital Ally Viewer, refer to page 5-7.
The FirstVu HD is capable of advanced security features which may restrict a user’s access to
recorded event files. These restrictions can be implemented by a system administrator only if
using the VuVault back office software. If the Secure USB port feature has been enabled in the
VuVault Admin>Settings>FirstVu HD Defaults tab (see page 3-4), video and metadata files will
not be accessible through the USB port and can only be uploaded using VuVault. Additionally,
each user must have Upload New Videos permissions within VuVault to transfer files from the
FirstVu HD.
USB Port
REV D
Uploading Files using VuVault
Non-Secure USB Port method
To upload video files from the FirstVu HD when the Secure USB Port is not enabled, plug
the supplied USB cable into the computer USB port and insert the other end of the cable into
the FirstVu™ HD PC USB port. Make sure your device is powered on.
1. Select Upload from the Main navigation bar. If the secure USB port feature has not been
enabled, select From Disk.
Digital Ally, Inc. | Operation 5-2
Page 20

FirstVu HD User’s Guide 860-00177-00 REV D
2. Click the Source button. ‘A dialogue box will appear allowing you to select the appropriate
location of your FirstVu HD.
The system will verify the files to be uploaded. If event
files are being uploaded from a device that is not recognized by the system, the user will
be prompted to add them with the built-in Add Device Wizard by clicking on Define
Device in the lower right-hand corner of the Device Event Details pane. Please refer to
the VuVault User’s Guide Add Device Wizard section for further details.
3. Once the files have been verified, the system will automatically list and select all of the
files for upload. If you don’t wish to upload all available records, uncheck the Select All
checkbox and then check the box next to each record you want to upload. The default File
Server and Share Location are displayed. If additional file servers have been defined,
select the desired destination using the dropdown menu. Click the Upload Files button to
begin uploading data to the system.
If desired, the selected files can also be backed up to a DVD during the upload
process. VuVault supports disc spanning, so if the total size of the files in the source
location exceeds the space available on a single disc, the user will be prompted to insert
additional discs until all of the files have been copied.
Digital Ally, Inc. | Operation 5-3
Page 21

FirstVu HD User’s Guide 860-00177-00
4. A progress bar will move from left to right, and details of the upload process will be
displayed in the window.
REV D
5. After the upload process finishes, the uploaded files will be available for viewing in the My
Dashboard, and Search screens. For more information, consult the VuVault User’s Guide.
FirstVu™ HD cannot record while it is uploading or downloading files.
Secure USB Port Method
To manually upload video files from the FirstVu HD when the Secure USB Port is enabled,
plug the supplied USB cable into the computer USB port and insert the other end of the cable
into the FirstVu™ HD PC USB port. Make sure your device is powered on.
1. Select Upload from the Main navigation bar. When the secure USB port feature has been
enabled, select FirstVu HD.
Digital Ally, Inc. | Operation 5-4
Page 22

FirstVu HD User’s Guide 860-00177-00 REV D
2. Use the arrow key to highlight and choose your device serial number. Then press refresh.
VuVault will load the available recordings from your device and verify the files to be
uploaded. If event files are being uploaded from a device that is not recognized by the
system, the user will be prompted to add them with the built-in Add Device Wizard by
clicking on Define Device in the lower right-hand corner of the Device Event Details pane.
Please refer to the Add Device Wizard section for further details.
3. Once the files have been verified, the system will automatically list and select all of the files
for upload. Check the box next to each record you want to upload. Click the Upload button
to begin uploading data to the system.
Digital Ally, Inc. | Operation 5-5
Page 23

FirstVu HD User’s Guide 860-00177-00
4. A progress bar will move from left to right on the bottom of the screen, and details of the
upload process will be displayed in the window.
REV D
5. After the upload process finishes, the uploaded files will be available for viewing in the My
Dashboard, and Search screens. For more information, consult the VuVault User’s Guide.
FirstVu HD™ cannot record while it is uploading or downloading files.
Digital Ally, Inc. | Operation 5-6
Page 24

FirstVu HD User’s Guide 860-00177-00
Video Playback and Management
Using VuVault
VuVault is Digital Ally’ s robust back-of fice video management solution. The VuV ault media
player can be opened by double-clicking on a video entry in My Dashboard or Search
screens, or by selecting Play from the right-click menu. For more information about using
the VuVault player, please consult the VuVault User’s Guide.
Playback Controls
Media Details
REV D
Using the Digital Ally Viewer
The Digital Ally Viewer is a user-friendly software package to allow playback of video, audio,
and metadata files, as well as many advanced features. The Digital Ally Viewer installer is
located on your product DVD. Once installed, open the program by double clicking on the
Digital Ally Viewer icon, or by selecting the program from the Start Menu>Programs>Digital
Ally>Digital Ally Viewer. Once opened, the program will prompt you to navigate to your video
storage location and select a video.
T oolbar Con trols
Media Details
Playback Controls
Digital Ally, Inc. | Operation 5-7
Page 25

FirstVu HD User’s Guide 860-00177-00 REV D
Toolbar Controls
Browse Media: Browse and select event files (.mtd) to playback.
Save Media: Save changes or segment a video event. Segmenting the video allows
you to create a new video without altering the original video.
Media Details: Displays the details of the media file and allows adding additional
information.
Edit Marks: Add/Edit Marks or Notes to the video event.
Image Capture: Save a snapshot of a frame of video.
Burn to CD/DVD: Create a data disc or movie DVD of the video event using this
wizard. Simply follow the on-screen prompts to back up your recorded event.
Help: Displays help information and software version.
Playback Controls
Previous Mark: Click to skip to the Previous Mark.
Rewind: Click and hold to rewind.
Play/ Pause: Click to begin playback or pause video.
Fast Forward: Click and hold to Fast Forward.
Next Mark: Click to skip to Next Mark.
Start Over / Repeat: Click to Restart video from the beginning or Repeat playback.
Playback Speed Control: Adjust the Playback Speed (4x, 2x, 1x, 1/2x, 1/4x).
Playback Slider bar
The Playback Slider bar allows you to move forward or backward in the video event very
quickly by dragging the slider.
Beginning of Video Flag: The Green Flag indicates the Beginning of the video
event.
Start of Recording Flag: The Black Flag indicates the Start of video recording and
any added Marks.
End of Video Flag: The Red Flag indicates the End of the video event.
Digital Ally, Inc. | Operation 5-8
Page 26

FirstVu HD User’s Guide 860-00177-00 REV D
View Selection and Options
The View Selection drop down box allows you to
select the information that is displayed in each
window such as Video 1, Marks, and Media
Details. Point the mouse to the top of each
window to display the following drop down bar.
Then point on the window heading to display the
View Selection drop down box.
Full Screen View: Click on the Full Screen icon or Double Click in the window to
display full screen.
Auto Hide Window: Click this icon box to display or hide the view selection options.
Video Zoom Window: The video display window can be resized by using the slider bar.
Window Size Adjustment: You may increase or decrease the size of each field by
hovering your mouse on the vertical divider between the two display windows.
Select Screen Layout: Select this button located on the bottom of the screen next to the
playback controls to customize your view from a list of preset layouts.
Memory & Battery Alerts
Memory Alerts:
A fast flash of the Yellow status indicator indicates 30 minutes or less of recording
time is left based on memory.
In Record Mode: If the Yellow status indicator is a constant on and 2 vibratory pulses
are emitted every 15 seconds; this indicates the memory is nearly full and has 15
minutes or less remaining.
In Standby Mode: If the Yellow status indicator is a constant on and 2 vibratory
pulses are emitted every 5 seconds; this indicates the memory is nearly full and has
15 minutes or less remaining.
Battery Alerts:
In Record Mode: A fast flash of the Blue status indicator and 2 vibratory pulses every
10 seconds indicates the user should take immediate action as there is
approximately 15 minutes of recording time remaining based on battery power level.
In Standby Mode: A fast flash of the Blue status indicator and 2 vibratory pulses
every 5 seconds indicates the user should take immediate action as there is
approximately 15 minutes of recording time remaining based on battery power level.
Battery Replacement:
Always power off the FirstVu HD prior to removing the battery. Replacement batteries
may be obtained by contacting Digital Ally (PN# 135-00398-00)
Digital Ally, Inc. | Operation 5-9
Page 27

FirstVu HD User’s Guide 860-00177-00 REV D
Section - 6 Status Indicators
Status indicators and vibration pulses are used to indicate
the operational status of the FirstVu HD. The status
indicators are located on the top of the camera module
and main module.
Red
Cam module
Blue
main module
Yellow
main module
Vibrate
main module
Powering ‘ON’
Event Recording
Stand-by or Stand-by Pre-Event
Memory Alert
30 Minutes or less remaining - - fast flash -
15 Minutes or less remaining - - On
Battery Alerts
15% or less of Battery Charge
Remaining
Battery Charging In Progress - On - -
Battery Charging Complete - Off - -
alternating flash 1 pulse
On - - 1 pulse/15sec
Off - - -
2 pulses/15sec
during Record
2 pulses/5 sec
In Standby
2 pulses/15sec
during Record
- fast flash 2 pulses/5sec
In Standby
ERROR - fast flash in unison 1 pulse/5sec.
Digital Ally, Inc. | Status Indicators 6-1
Page 28

FirstVu HD User’s Guide 860-00177-00 REV D
Section - 7 Specifications
OPERATING
TEMPERATURE
-20° to +70° C
STORAGE
TEMPERATURE
DIMENSIONS
WEIGHT
HUMIDITY
INTERNAL BATTERY
RECORD TIME
STANDBY TIME
MICROPHONE
VIDEO RESOLUTION
AUDIO
CAMERA
-40° to +80° C
2 5/8”(w) x 4”(h) x 5/8”(d) (Main Recorder)
1 1/8”(w) x 1 1/2”(h) x 1.0”(d) (Camera Module)
3.1 oz. (Main Recorder)
0.8 oz. (Camera)
10 -90% RH, non-condensing. IPX5 water resistant camera
head
3.7vDC 2,200mAh, Rechargeable Lithium Ion Polymer Battery
Field replaceable, 2 batteries and chargers included
Up to 4.5 hours continuous record or with pre-event enabled
Up 12 hours with pre-event disabled
Internal (max. input SPL 110dB, sensitivity -42dBV)
720p (1280x720) or VGA (640x480)
H.264 codec with configurable quality settings
Mono, may be muted by user
Multiple configuration options
0.08 Lux. Fixed focus lens
FIELD OF VIEW
MEMORY CAPACITY
SECURE MEDIA ACCESS
PRE-EVENT BUFFER
COVERT MODE
H=95°, V=80°, D=130°
32GB secure internal memory
25-54 hours record time depending on quality setting
May be configured so only designated computers can access
recordings
Up to 60 seconds, adjustable in 1 second increments
Deactivates LEDs on the camera (vibrating confirmations and
DVR LEDs remain on)
Digital Ally, Inc. | Specifications 7-1
Page 29

FirstVu HD User’s Guide 860-00177-00 REV D
Section - 8 Warranty Information
STANDARD LIMITED WARRANTY FIRSTVU HIGH DEFINITION COMPACT PERSONAL
VIDEO RECORDER.
We warranty that our personal video recorder, Model FirstVu HD, will be free from defects in
workmanship and material for a period of 12 months from the date of purchase by the original
purchaser. If any defect is discovered through normal and proper use of the unit during this
period, the defect will be repaired or the unit will be replaced at our factory or at one of our
authorized service centers at no cost to the purchaser. The purchaser must return the defective
unit to the factory or one of our authorized service centers, freight prepaid. We will pay for
shipping charges for the return of the unit.
This warranty applies only to defects in a unit’s internal electronic components and circuitry,
and is void as to units that have been opened without prior authorization, have experienced
unauthorized repairs, or have had unauthorized modifications. This warranty does not cover the
following:
Normal wear and tear on the unit such as batteries, frayed cables or wires, broken
connectors, or scratched or broken cases.
Damage caused by operator abuse or neglect.
Damage caused by incorrect use of the unit, carelessness, unauthorized alterations
to the unit, improper storage of the unit or unauthorized service, installation or repairs
made to the unit.
Damage caused by fire, flood, lightning, vandalism, collision, acts of God, or
other events beyond the reasonable control of Digital Ally, Inc. or the purchaser.
Damage to external parts of the unit such as buttons, wires, and cables, etc.
Damage from use of the unit in hostile operating environments.
We reserve the right to charge for repairs to a unit during the warranty period made necessary
because of any of the foregoing causes at our standard rates for repair of units not under
warranty.
The purchaser assumes all risk of use from its purchase and use of the unit. Harmful personal
contact with a unit might occur in the event of violent maneuvers, collisions, or similar
circumstances, even if the unit was properly installed and used. We are not responsible for, and
we specifically disclaim any liability for injury caused by a unit in such circumstances.
THIS WARRANTY IS GIVEN IN LIEU OF ALL OTHER WARRANTIES. THERE ARE NO
WARRANTIES THAT EXTEND BEYOND THIS STATEMENT. ALL IMPLIED WARRANTIES ARE
DISCLAIMED, INCLUDING, WITHOUT LIMITATION, WARRANTIES OF MERCHANTABILITY, NONINFRINGEMENT, FITNESS FOR A PARTICULAR PURPOSE, AND WARRANTIES IMPLIED FROM A
COURSE OF DEALING, COURSE OF PERFORMANCE OR USAGE OF TRADE. THE PURCHASER’S
SOLE AND EXCLUSIVE REMEDY FOR A WARRANTY CLAIM WILL BE THE REPAIR OR
REPLACEMENT OF A UNIT.
Digital Ally, Inc. | Warranty Information 8-1
Page 30

FirstVu HD User’s Guide 860-00177-00
Section - 9 Contact Information
9705 Loiret Blvd
Lenexa, KS 66219
REV D
Website:
Support E-Mail:
Sales E-Mail:
Phone:
Fax:
Sales / Support Toll Free:
www.digitalallyinc.com
support@digitalallyinc.com
sales@digitalallyinc.com
913-814-7774
913-814-7775
1-800-440-4947
Digital Ally, Inc. | Contact Information 9-1
Page 31

FirstVu HD User’s Guide 860-00177-00 REV D
Section - 10 Regulatory
This device complies with Part 15 of the FCC Rules. Operation is subject to the following two
conditions: (1) This device may not cause harmful interference, and (2) This device must accept
any interference received, including interference that may cause undesired operation.
This equipment has been tested and found to comply with the limits for a Class B digital device,
pursuant to part 15 of the FCC Rules. These limits are designed to provide reasonable
protection against harmful interference in a residential installation. This equipment generates
uses and can radiate radio frequency energy and, if not installed and used in accordance with
the instructions, may cause harmful interference to radio communications. However, there is
no guarantee that interference will not occur in a particular installation. If this equipment does
cause harmful interference to radio or television reception, which can be determined by turning
the equipment off and on, the user is encouraged to try to correct the interference by one or
more of the following measures:
Reorient or relocate the receiving antenna.
Increase the separation between the user equipment and FirstVu HD.
Connect the user equipment into an outlet on a circuit different from that to which the
FirstVu HD is connected.
Contact Digital Ally technical support.
Changes or modifications not expressly approved by Digital Ally, Inc. could void the user’s
authority to operate the equipment.
This device complies with Industry Canada licence-exempt RSS standard(s). Operation is
subject to the following two conditions: (1) this device may not cause interference, and (2) this
device must accept any interference, including interference that may cause undesired operation
of the device.
Le présent appareil est conforme aux CNR d'Industrie Canada applicables aux appareils radio
exempts de licence. L'exploitation est autorisée aux deux conditions suivantes : (1) l'appareil ne
doit pas produire de brouillage, et (2) l'utilisateur de l'appareil doit accepter tout brouillage
radioélectrique subi, même si le brouillage est susceptible d'en compromettre le
fonctionnement.
The CE Mark is a European marking of conformity indicating that a product complies with the
essential requirements of the applicable European laws or Directives with respect to safety,
health, environment, and consumer protection.
Digital Ally, Inc. | Regulatory 10-1
Page 32

FirstVu HD User’s Guide 860-00177-00 REV D
 Loading...