

Page 1
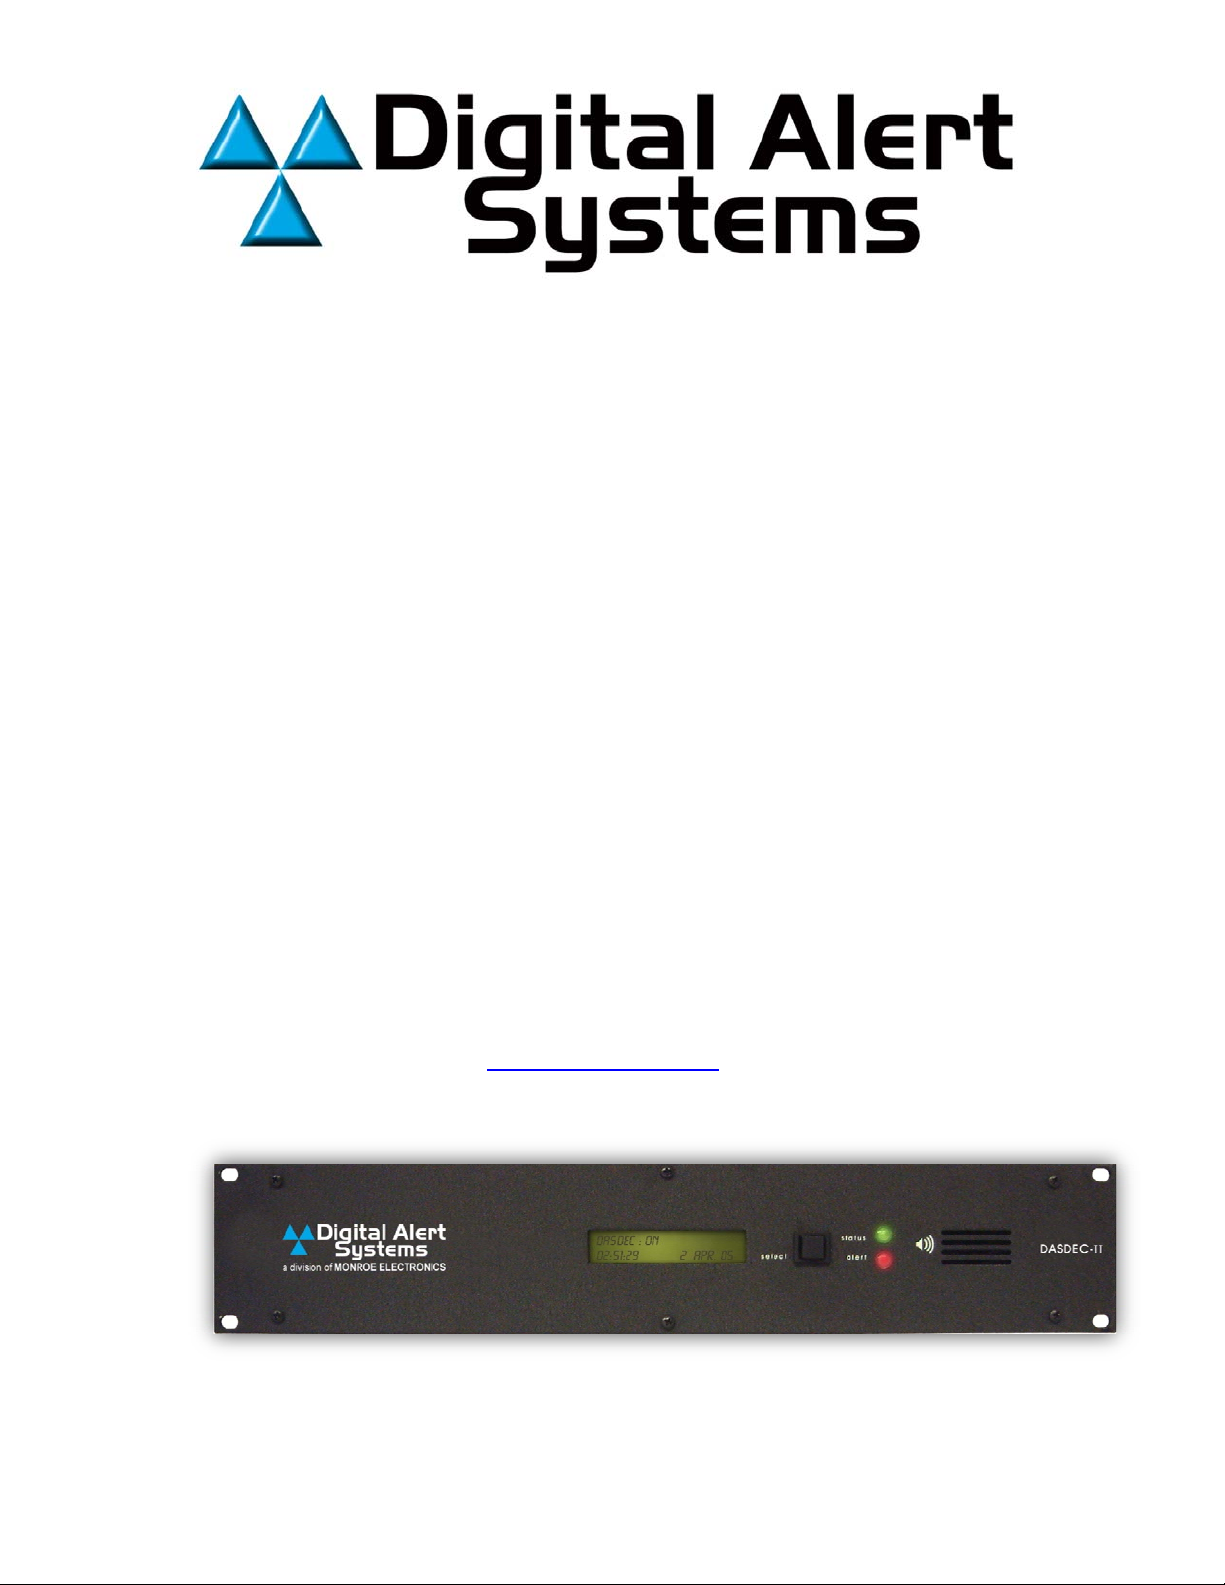
DASDEC II
Digital/Analog Emergency Alert
System
Encoder/Decoder
Quick Start Guide
Model DASDEC-1EN
Version 2.6-0
Digital Alert Systems
A division of Monroe Electronics
585-765-1155 | fax 585-765-9330
100 Housel Ave. | Lyndonville | NY | 14098
www.digitalalertsystems.com
March 27, 2015
Digital Alert Systems
A Division of Monroe Electronics Inc.
100 Housel Ave
Lyndonville, NY 14098
www.digitalalertsystems.com
Copyright © 2015 Digital Alert Systems, a division of Monroe Electronics Inc. Information
herein is considered accurate at the time of publication. We constantly strive to improve our
products and services therefore some specifications are subject to change without notice.
DASDEC, MultiStation, and EAS-Net are trademarks of Digital Alert Systems and Monroe
Electronics.
Revision: 1.0 Publication: APNDAS-32715
Page 2
Table of Contents
Step 1 – Setting the IP Address ............................................................................................................. 4
Step 2 – Connecting the Audio Wiring ................................................................................................ 8
MPEG Encoder ........................................................................................................................................................................ 13
Step 3 – Assigning Radio Tuners ....................................................................................................... 13
Step 4 – Setting the Time ...................................................................................................................... 18
Step 5 – Changing the Default Admin Password ........................................................................... 20
Step 6 – Alert Decoding, Filtering & Forwarding ............................................................................ 22
Step 7 – Alert Encoding and Originating .......................................................................................... 27
Step 8 – Set-up Station Interface and Required Tests .................................................................. 30
Step 9 – GPIO Configuration ................................................................................................................ 35
Step 10 – E-Mail Setup ........................................................................................................................... 38
Quick Start Guide for Your DASDEC II Page 2 of 40
Page 3
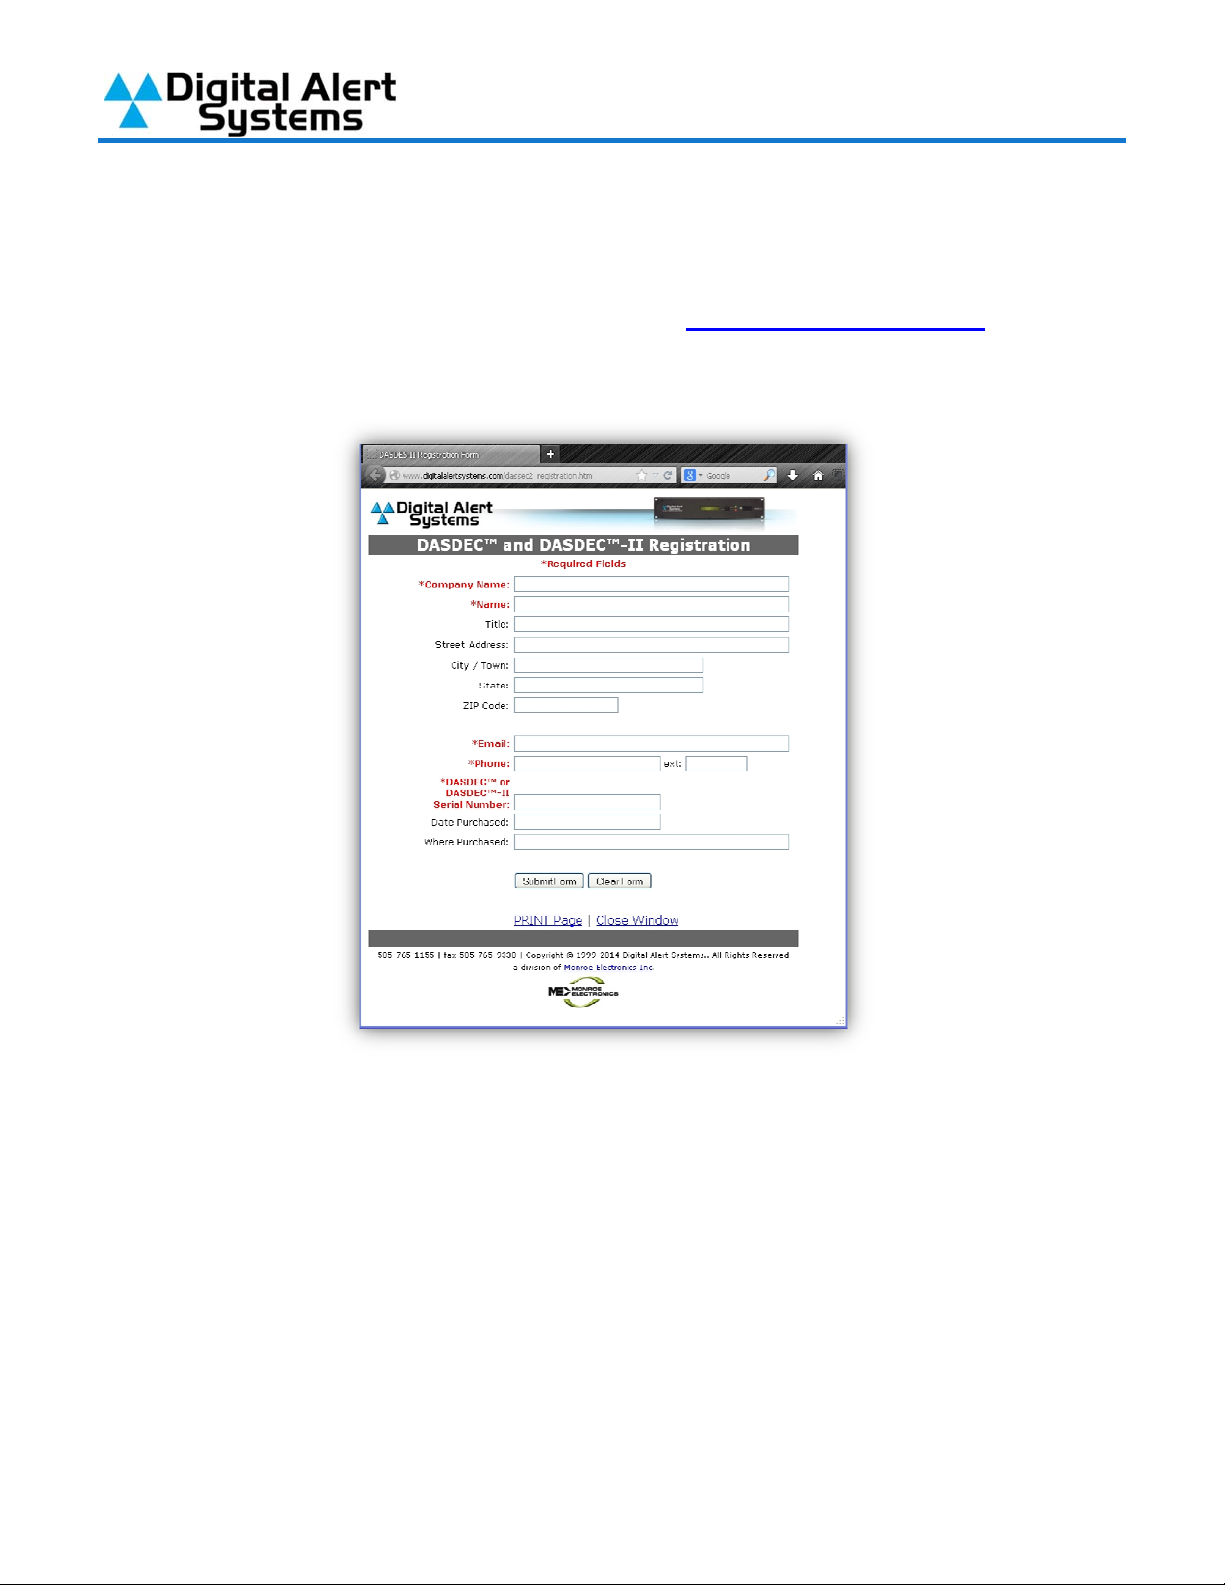
Please Register Your DASDEC II
To verify that you have the latest version of software in your DASDEC II it’s important to register
your device with Digital Alert Systems. To register go to www.digitalalertsystems.com
left side menu click Product Registration and Software Updates. Click on the DASDEC
Registration link and submit your information. You will be notified by Email of the latest updates
and enhancements that can be downloaded from our website.
and on the
What comes with your DASDEC II
A CD that has the full version of the Manual, Application notes, and a Product Data Sheet.
Getting Started
You will need the following before starting the setup.
County name for the location where the equipment will be installed. And county names for the area you are
broadcasting to. These county names will be converted to FIPS Code(s) in the DASDEC II.
Radio frequencies for your LP1 and LP2. These are the approved radio stations for your area and can be obtained through
your EAS chairman for your state. If a NOAA station will be monitored that must also be obtained.
IP address for the DASDEC II. This must be obtained from your system administrator to make sure there are no other
devices on your network with this address.
Quick Start Guide for Your DASDEC II Page 3 of 40
Page 4
Quick Start Guide for Your DASDEC-II
The official Digital Alert Systems manual for your EAS system can be found here:
http://www.digitalalertsystems.com/pdf/DASDEC_II_manual.pdf
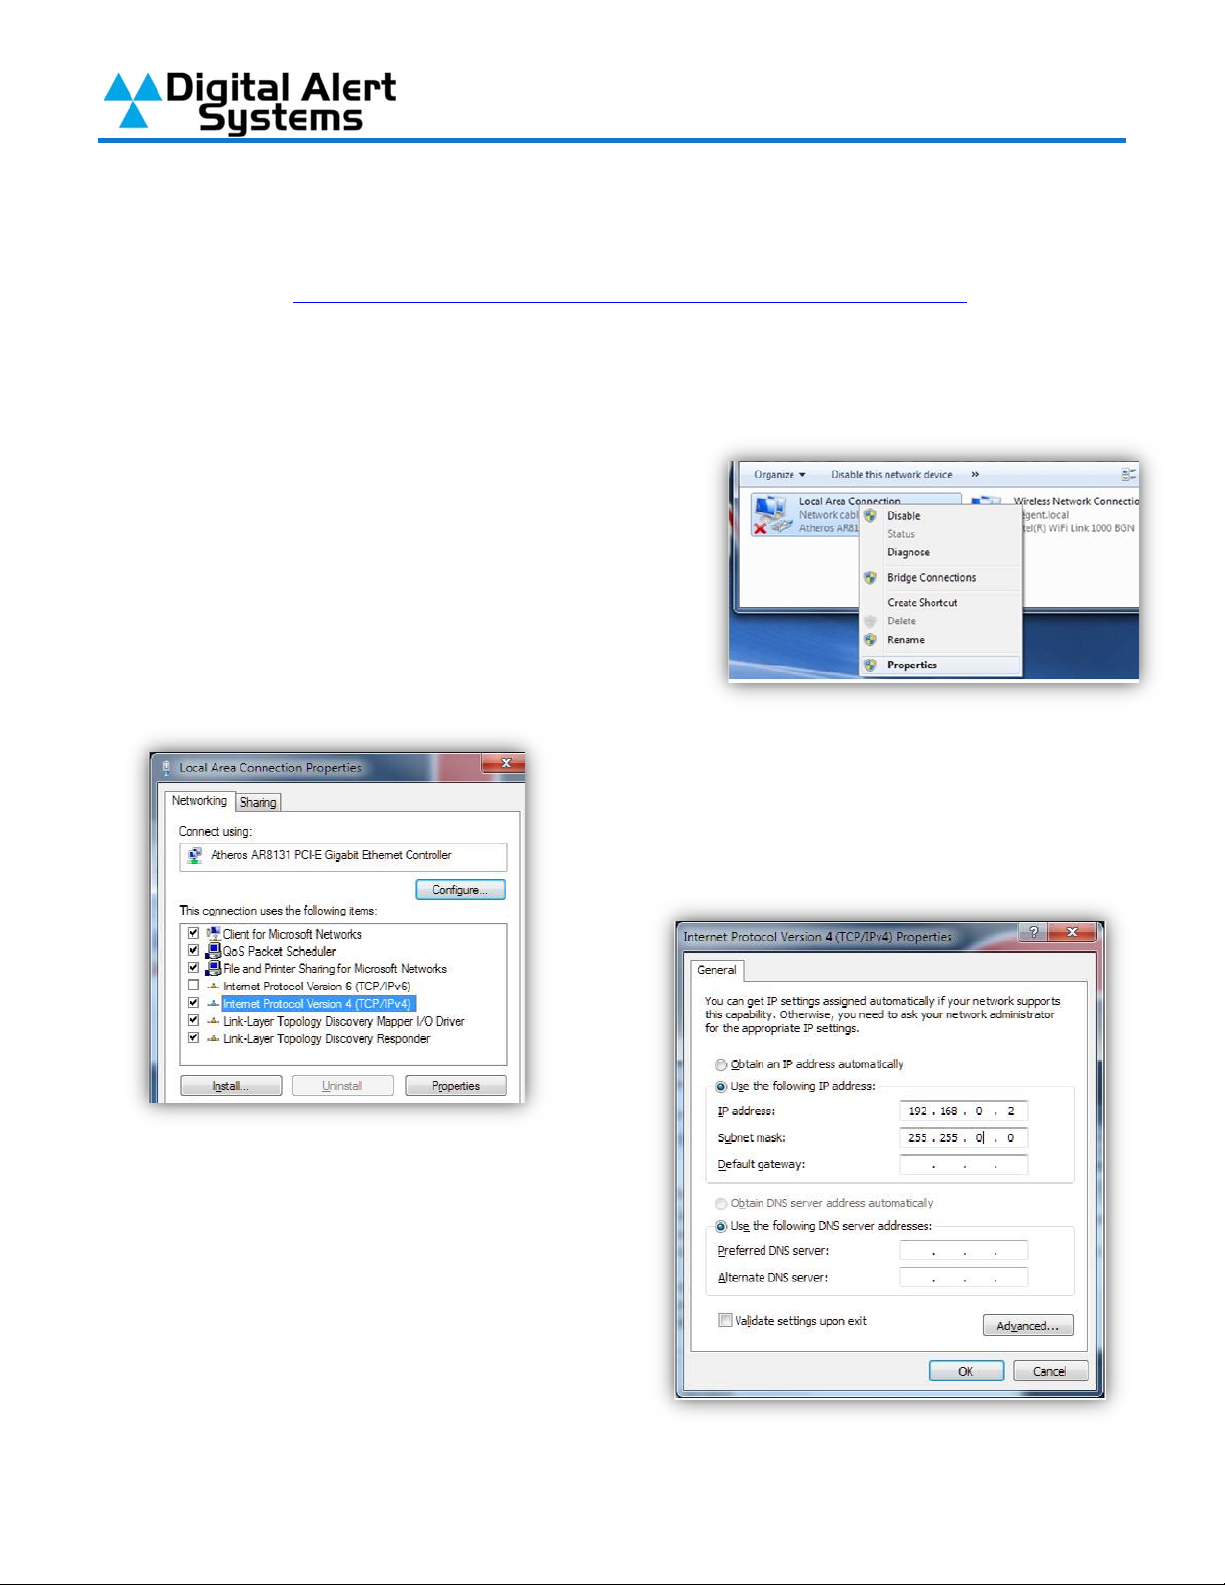
Step 1 – Setting the IP Address
When the DASDEC-II is shipped from the factory its IP Address is set to 192.168.0.200 by
default, in most cases this IP address will need to
be changed. To change the IP address, a
computer whose IP setting can be changed will be
required.
1) On the computer (Windows 7 for this example)
open “Control Panel”, and then open “Network and
Sharing Center”. On the left, click on Change
adapter settings. Right click on the network
connection you will be using to complete the setup
and select properties.
2) From the Network Connection Properties
screen click on “Internet Protocol Version 4
(TCP/IP), then click on the “Properties” button.
3) Make a note of the current settings in the
“Internet Protocol Version 4 (TCP/IP)”
properties page that opens so you can reset
the computer to these settings after setting
the IP Address of the DASDEC-II. Next, click
the Radio Button for “Use the Following IP
Address”. In “IP Address” field enter
192.168.0.2. In the “Subnet Mask Field” enter
255.255.0.0. Leave the “Default Gateway”,
“Preferred DNS Server” and “Alternate DNS
Server” fields blank. Click OK and close the network connection properties page.
Quick Start Guide for Your DASDEC II Page 4 of 40
Page 5
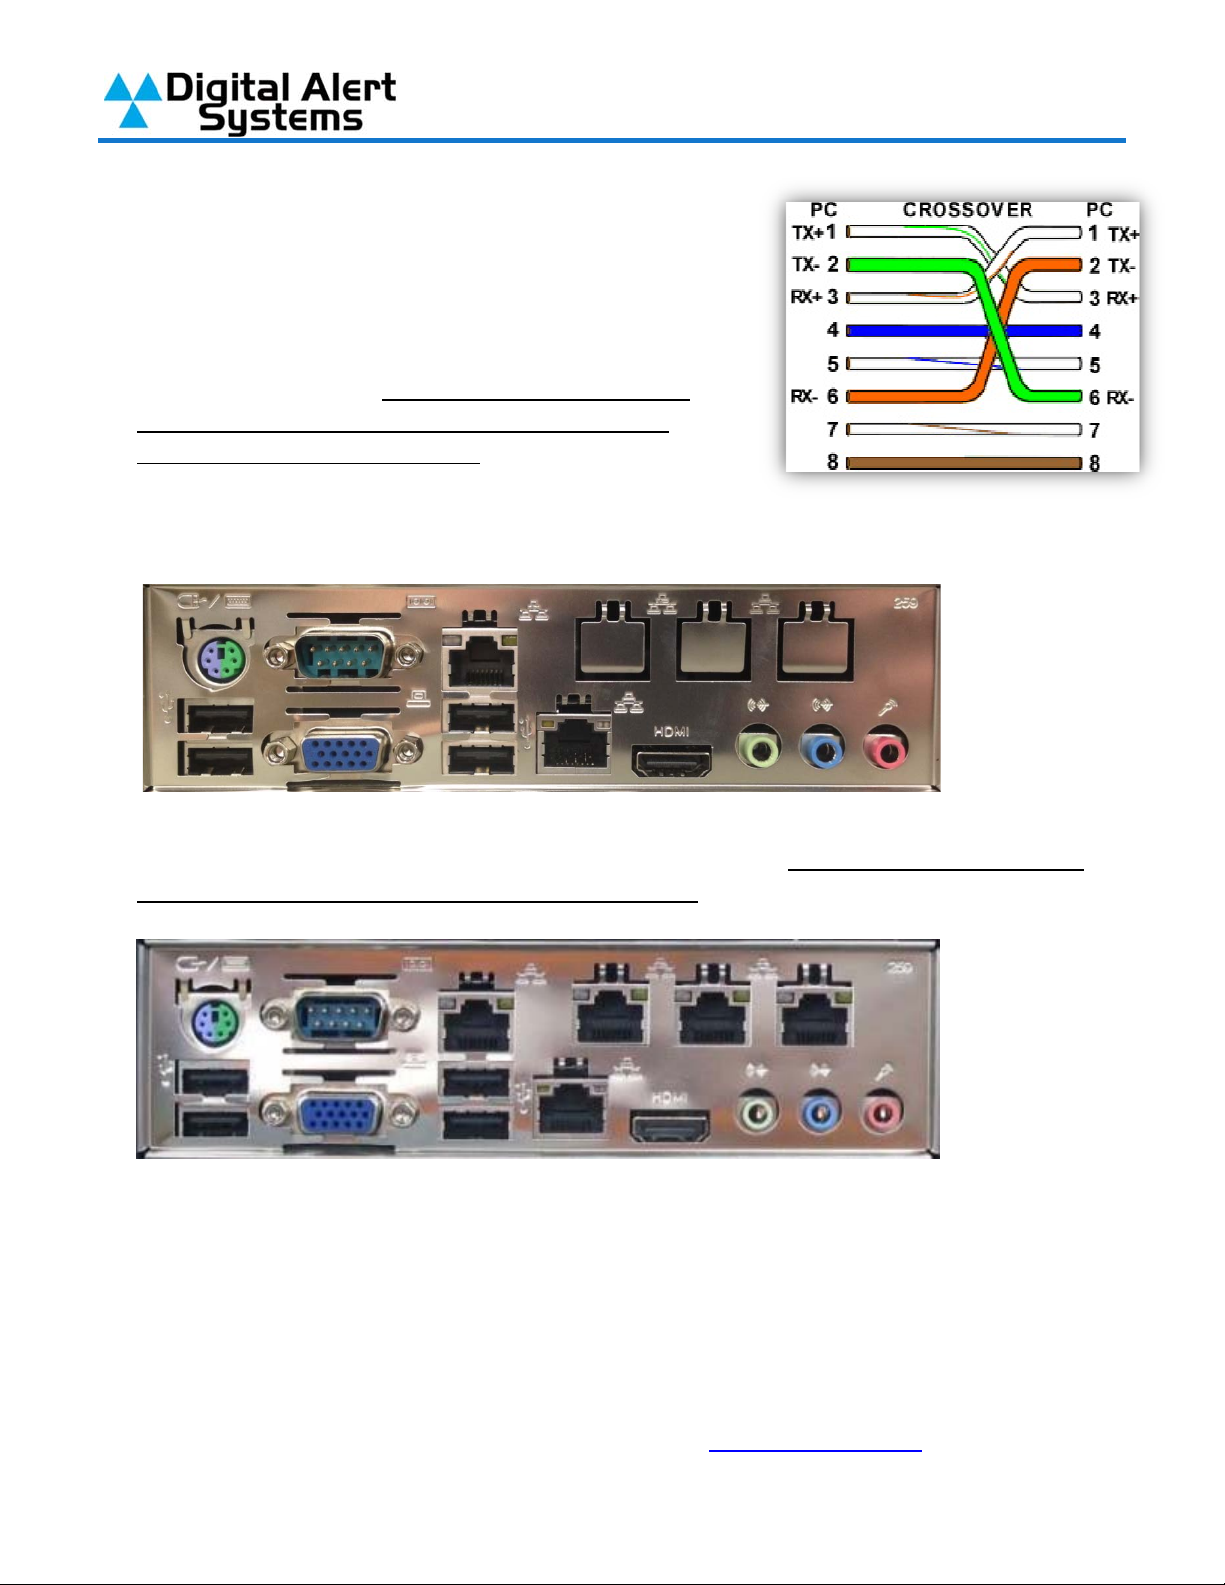
Your DASDEC-II shipped with a CAT-5 network
Crossover cable; this cable allows you to connect
directly between the network card setup in the previous
steps and the network port on the DASDEC-II. Before
directly connecting the computer and your DASDEC-II
verify you are using a crossover cable by referencing
the picture to the right. If you do not use a crossover
cable the connection will not work and one or both
network ports may be damaged.
4) Plug one end of the network crossover cable that your DASDEC-II was shipped with into the
computer. Plug the other end into Network Port 1 on the back of the DASDEC-II.
2
1
If the optional EXP-3NICGIG Gigabit Ethernet Expansion is installed, there is a third and
fourth network interface available (as shown in figure below). Note: Although a fifth port is
available the DASDEC-ll software does not support it.
3 4
5) Turn on the DASDEC-II and wait for it to finish booting. When the DASDEC-II has finished
booting the display will show “DASDEC: ON” along with its current IP address and the
system date and time (the date and time may not yet be accurate).
6) On the computer launch an Internet Browser such as Firefox or Internet Explorer (the
browser may indicate it cannot find your home page, this is normal). In the address bar of
your browser enter the IP Address of the DASDEC-II: http://192.168.0.200, this will bring you
X
Quick Start Guide for Your DASDEC II Page 5 of 40
Page 6
to the DASDEC-II’s login page. Enter the default user name “Admin” and default password
“dasdec”, and then click “Login”.
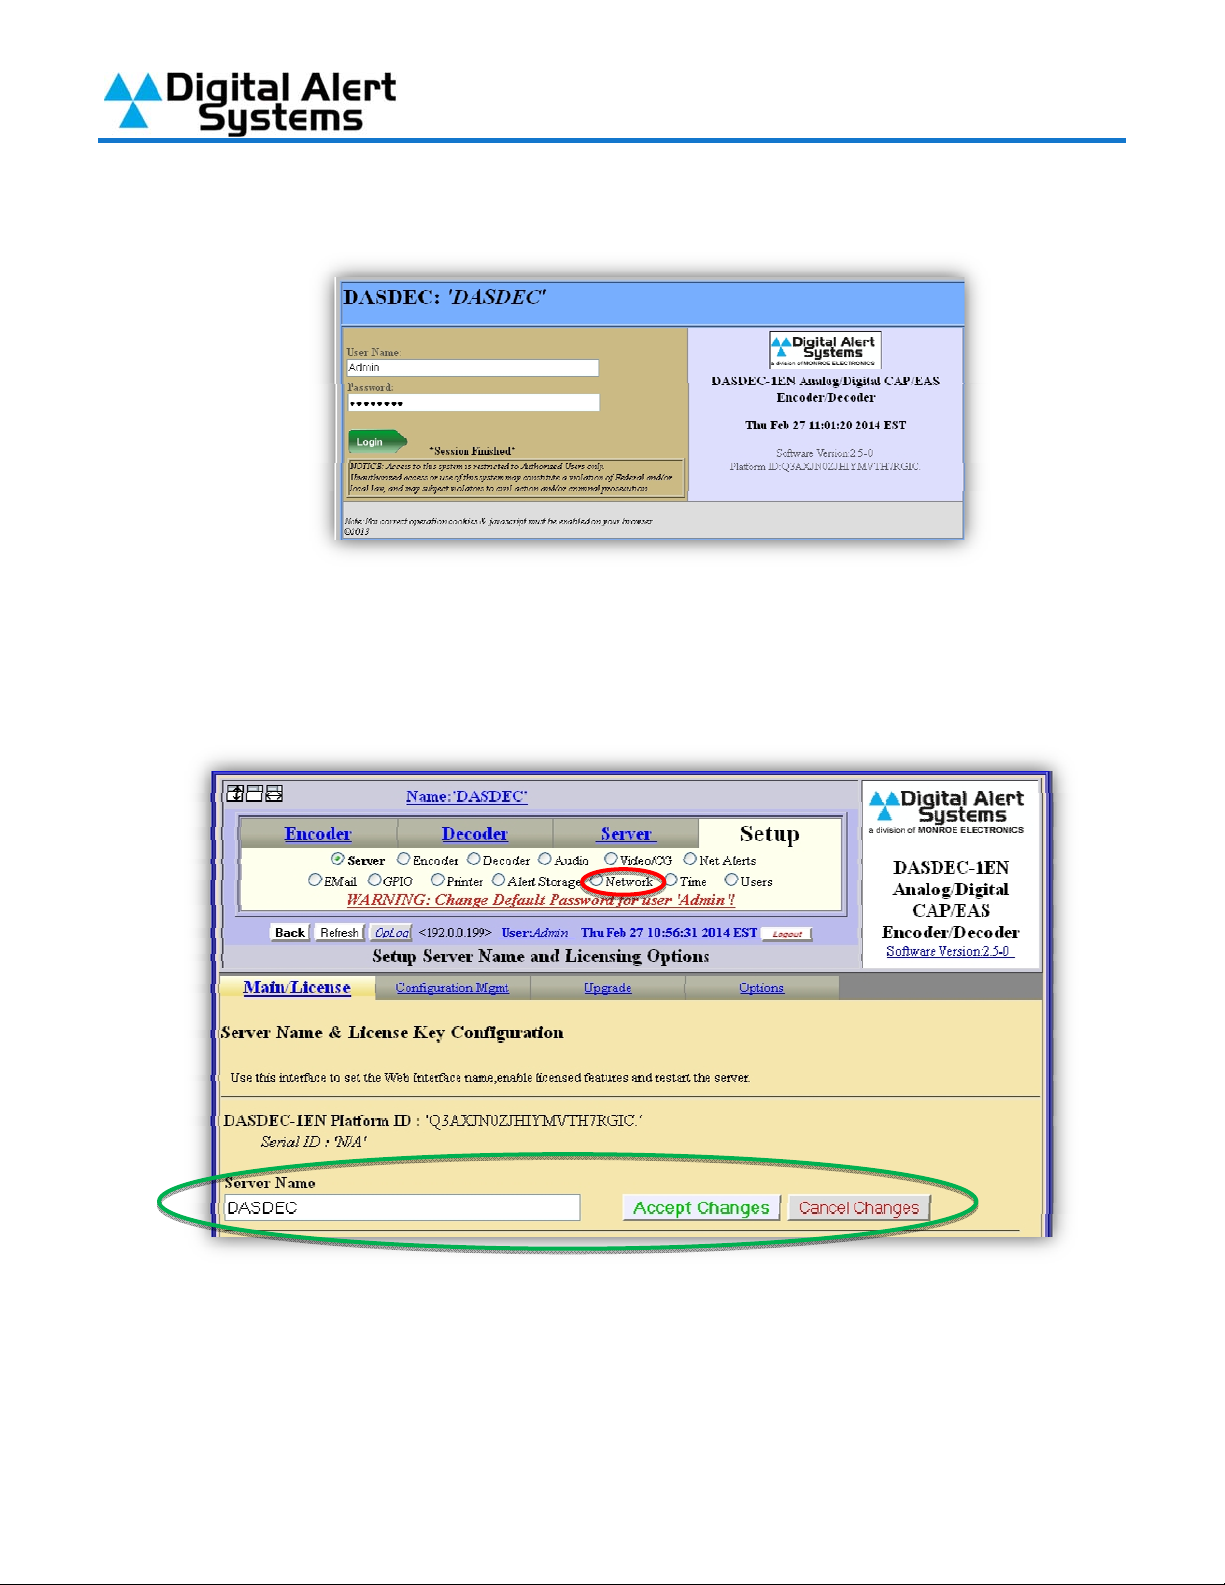
7) The first time you log into the DASDEC-II it will bring you to the “Setup > Server” page. On
this page you can change the display name (circled in green) of your DASDEC-II; this unit is
named “DASDEC”. After changing the name and clicking “Accept Changes”, click on the
“Network” radio button (circled in red).
8) On the “Setup > Network” page enter a network hostname for the DASDEC-II (circled in red).
Next, set the “Network Type” to “Static” (circled in blue), the “Network Speed” (above the
Network Type) is recommended to be set to “Automatic”, enter the IP Address you want the
DASDEC-II to use in the “IP Address” field (circled in black) and your networks Subnet mask
(likely to be 255.255.255.0). (The following screenshot shows a unit using one network
interface, with a static IP address) Then enter the IP Address of your networks Internet
Quick Start Guide for Your DASDEC II Page 6 of 40
Page 7

Gateway in the field provided (Circled in green). Finally click “Accept Changes/Restart
Network” (note – after clicking this button your computer won’t be able to reload the page,
this is normal).
9) Verify that the display on the front of the DASDEC-II now shows the IP Address you entered;
you can now connect the DASDEC-II to an open port on one of your buildings Ethernet
switches using a regular network cable.
10) On the computer, restore the network connection settings that were changed in step 3 to
their previous settings.
11) With the DASDEC-II powered up and connected to the network launch a web browser on a
computer which is connected to the same network. In the address field enter the IP Address
you have given your DASDEC-II. You will then be brought to the login screen.
Quick Start Guide for Your DASDEC II Page 7 of 40
Page 8
12) The IP Address is now set. All further programming will be accessed through the DASDECII’s embedded website by typing its assigned IP Address into an Internet browser on a
computer on the same network.
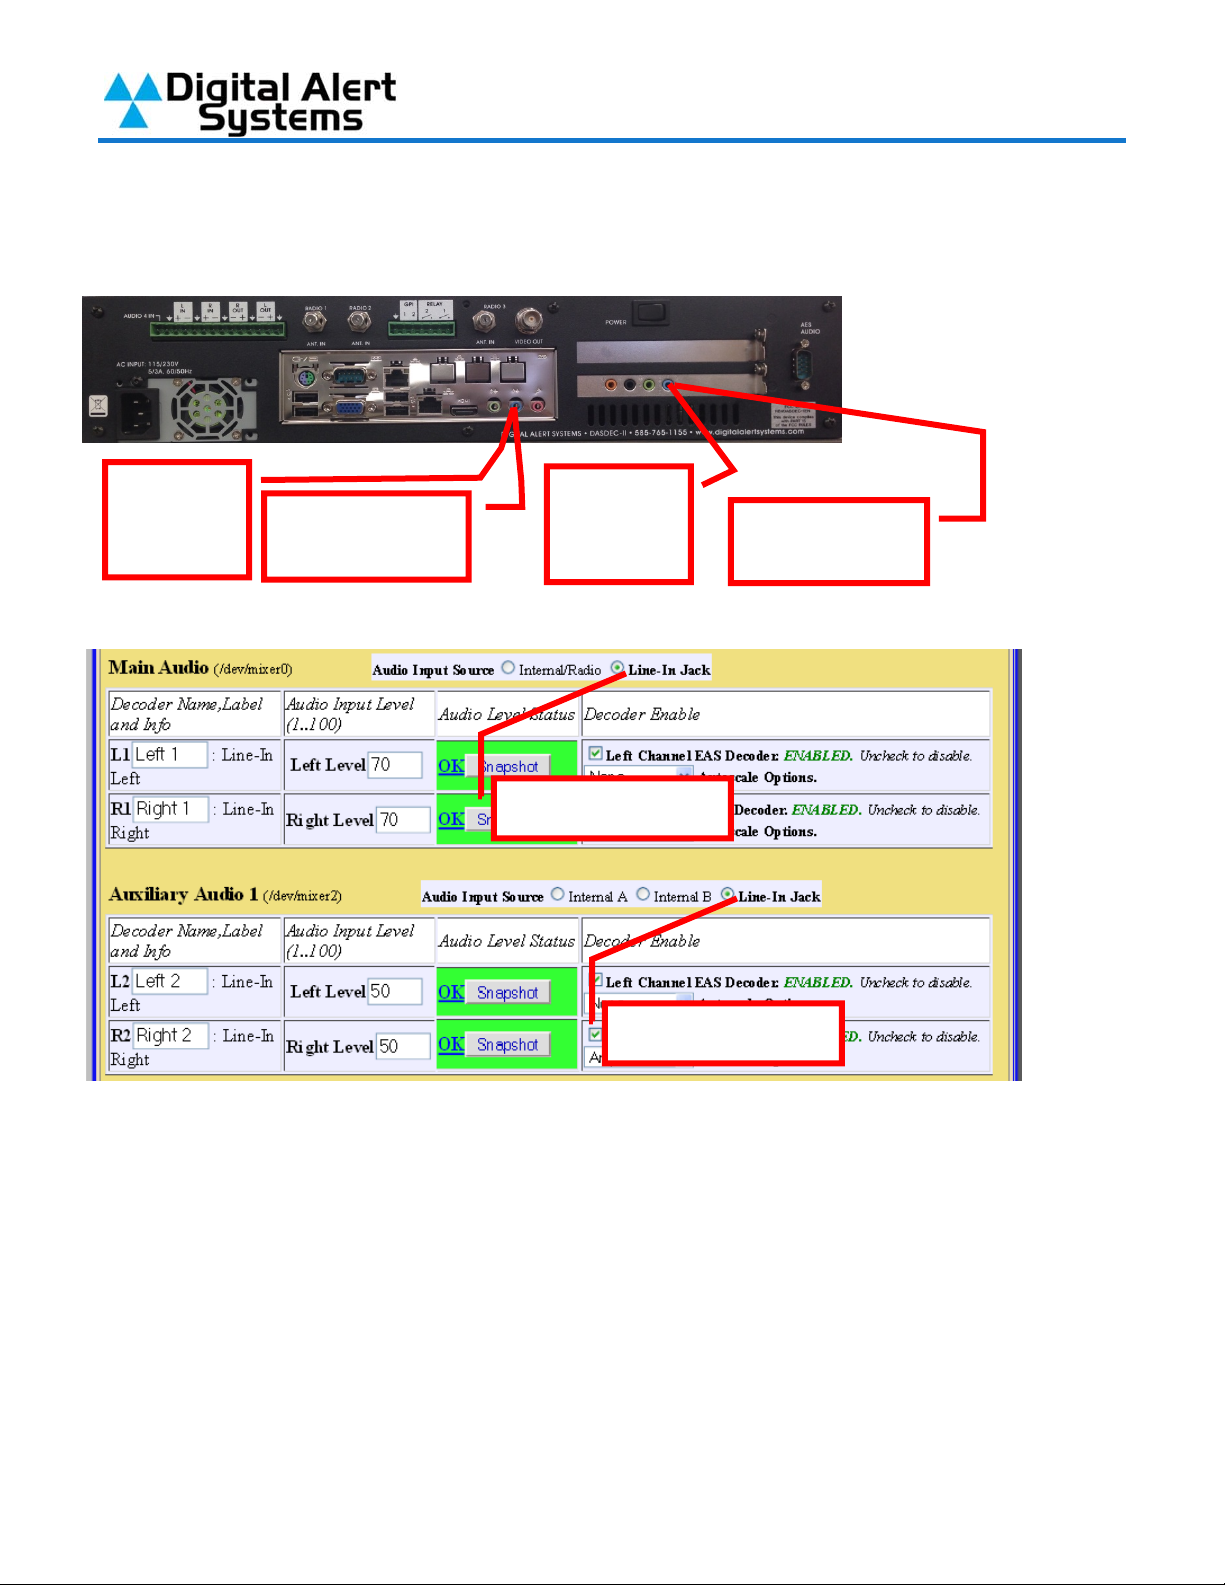
Step 2 – Connecting the Audio Wiring
DASDEC™ EAS Monitoring Inputs
Quick Wiring / Configuration Guide
Overview
1. ALL units have the F-connectors, but NOT all units have the internal radios.
Externally - If the unit shipped with caps over the antenna inputs then it does not contain radios.
Internally - under Setup > Audio units with internal radios will have a “Radio Tuners” tab available
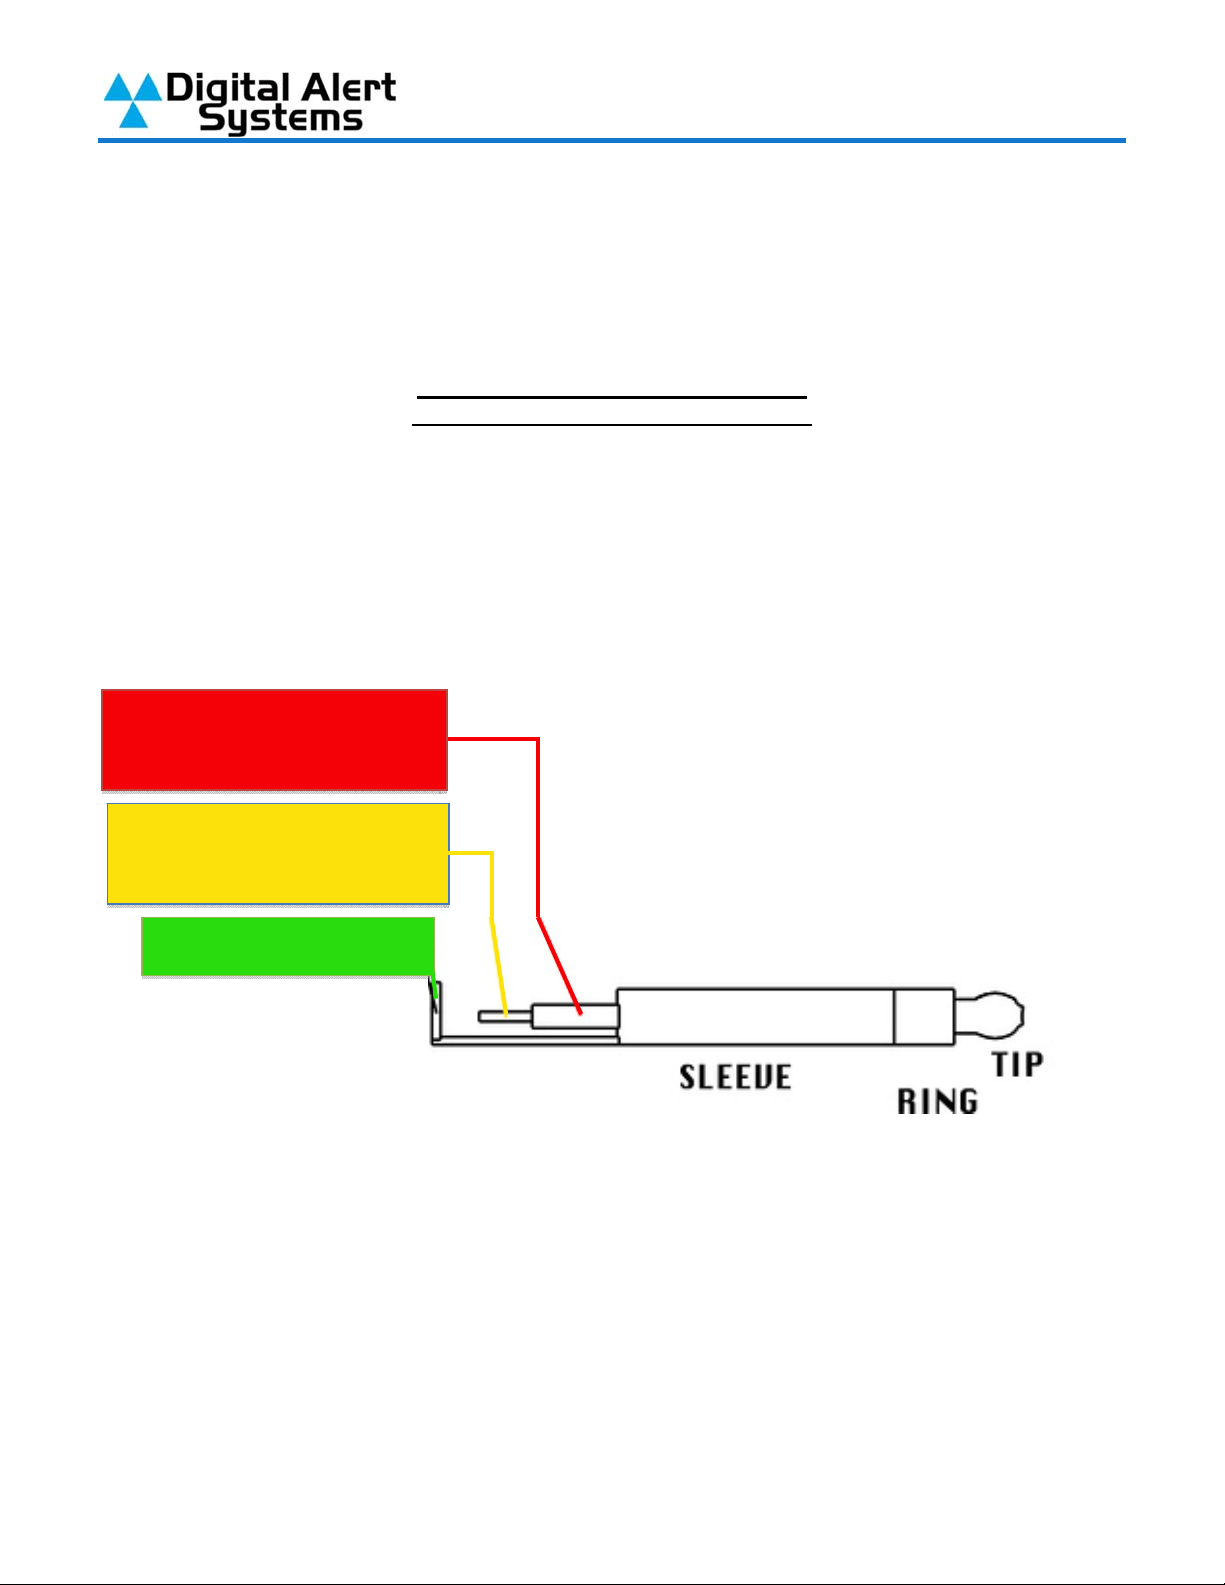
2. Wiring of the 1/8” mini stereo input audio connectors is shown in Figure 1.
Tip is Left input
Ring is Right input
Sleeve is common ground
MainAudio–R1
AuxiliaryAudio–R2
MainAudio–L1
AuxiliaryAudio–L2
CommonGround
Figure 1: Wiring diagram for 1/8 mini stereo plugs
3. All monitoring inputs are mono only
4. Inputs use “blue” 1/8 mini plug inputs on the rear panel
5. Units with the EXP-EAS expanded audio inputs have an additional Auxiliary 2 input board for two (2)
additional inputs and expanded selections under the Setup > Audio > Decoder Audio tab. Following
similar settings for Auxiliary 1 noting this provides line in only connections.
6. DASLC and DASLCR models do not have Auxiliary Inputs
Section continues on next page
Quick Start Guide for Your DASDEC II Page 8 of 40
Page 9
Using 2 Internal radios and 2 External inputs
1. Use the following connections:
Radio 1 Radio 2
Then from the Setup > Audio > Decoder Audio tab select the following:
Internal/radio
Aux. 1
Input 3
(L2)
Aux. 1
Input 4
(R2)
Line-In Jack
Quick Start Guide for Your DASDEC II Page 9 of 40
Page 10
p
(L2)
(L1)
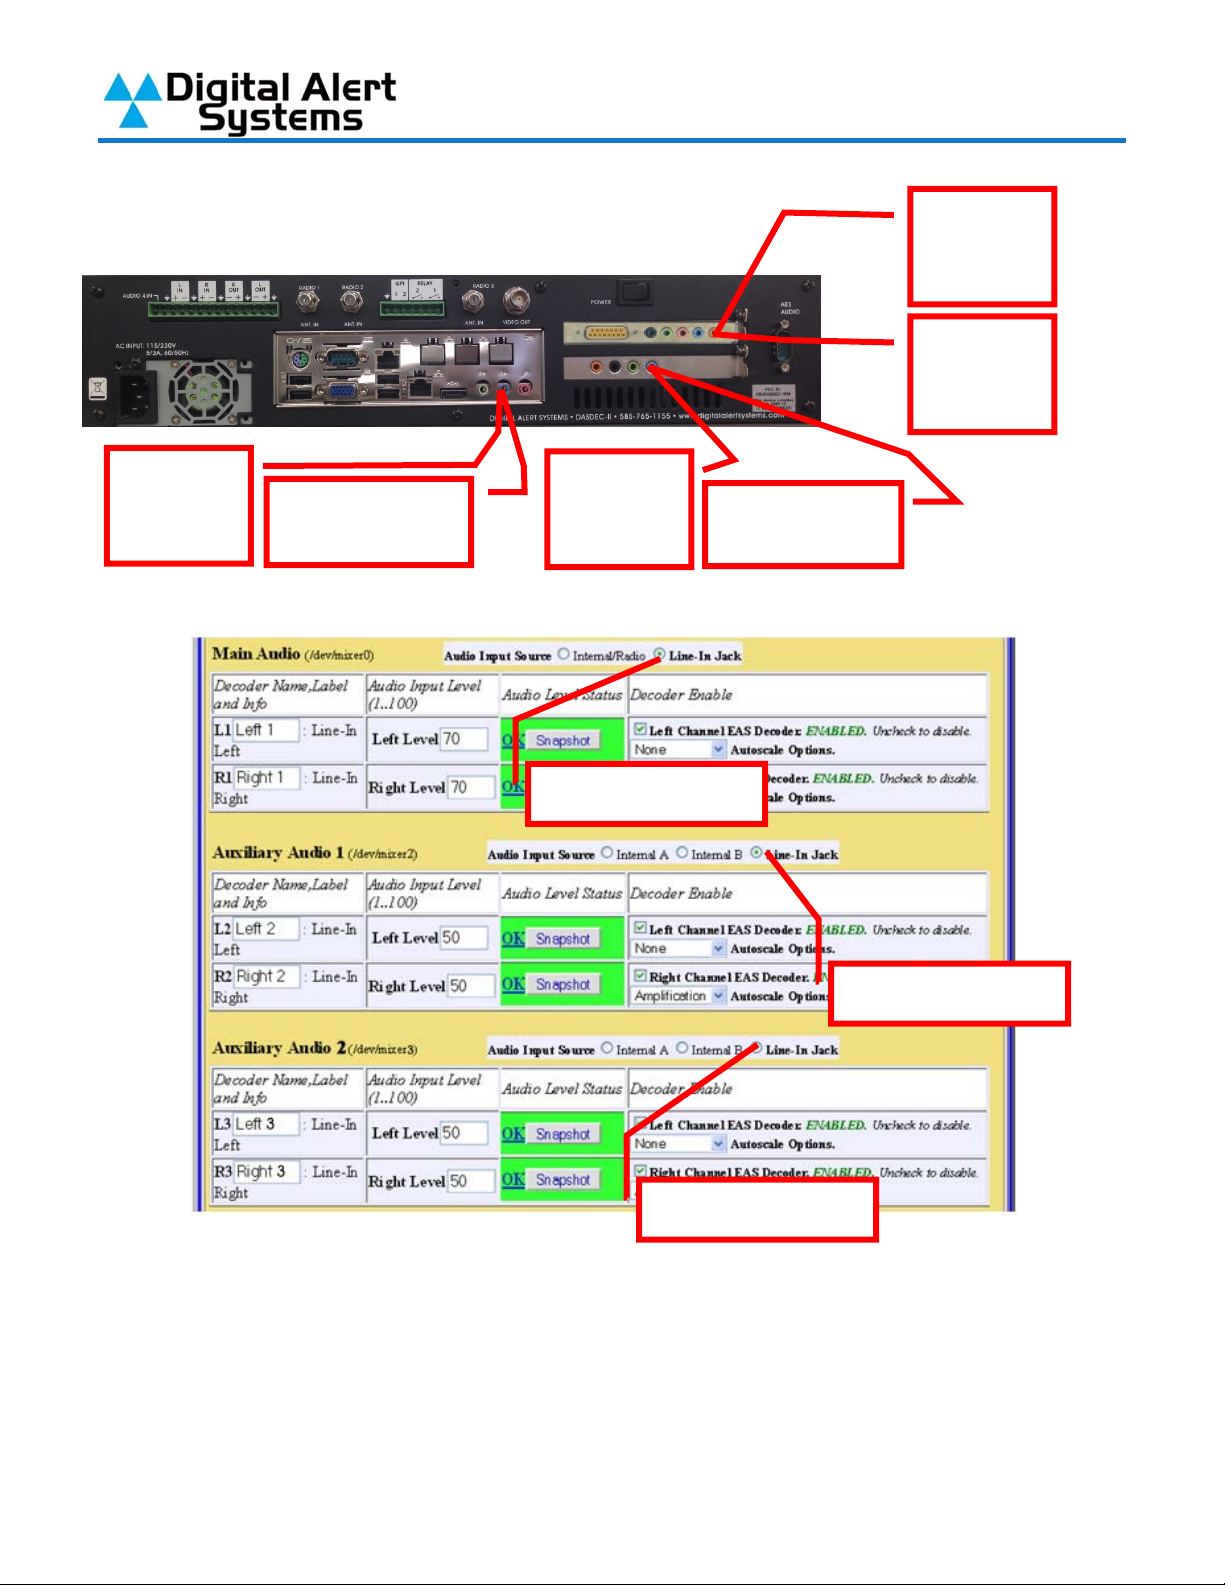
Using 4 External Inputs
1. Use the following connections:
Main
Input 1
Then from the Setup > Audio > Decoder Audio tab select the following:
Main
Input 2 (R1)
Aux. 1
Input 3
Line-In Jack
Aux. 1
In
ut 4 (R2)
Line-In Jack
Quick Start Guide for Your DASDEC II Page 10 of 40
Page 11

Using 3 Internal radios and a 4th External input
1. Use the following connections:
Then from the Setup > Audio > Decoder Audio tab select the following:
Input 4 is the last
two pins on the
terminal strip.
(The L+/- & R+/are for program
audio)
Radio 1
Radio 2
Here you can see the rear connection. It is on the green terminal
strip pins labeled “AUDIO IN.
Internal/radio
Radio 3
Internal A
Quick Start Guide for Your DASDEC II Page 11 of 40
Page 12
p
(L2)
(L1)
(L3)
(R3)
Using EAS Monitoring Expansion (Auxiliary 2) Inputs
1. Use the following connections:
Main
Input 1
Then from the Setup > Audio > Decoder Audio tab select the following:
Main
Input 2 (R1)
Aux. 1
Input 3
Aux. 1
In
ut 4 (R2)
Aux. 2
Input 5
Aux. 2
Input 6
Line-In Jack
Line-In Jack
Line-In Jack
Quick Start Guide for Your DASDEC II Page 12 of 40
Page 13

MPEG Encoder
If you have purchased the DVS-168 or DVS-644 options see section 4.10.1 and 4.10.4 of the Manual
for details.
If you’ve purchased the MPEG2 option you can also refer to section 2.6 and 4.10.4 of the Manual
for details. The supplied cables must also be installed as shown below.
Optional MPEG2 PCI Encoder Card Audio/Video connections
Step 3 – Assigning Radio Tuners
Depending upon how your DASDEC-II was configured when it left the factory it likely shipped
with three internal radio tuners. Any of the three can serve as an AM, FM or NOAA tuner.
Route and connect the necessary antenna lines to the DASDEC-II before proceeding.
1) Log into your DASDEC-II by launching an Internet browser and typing the IP Address of your
DASDEC-II into the browsers address bar. Enter the User Name “Admin” and then enter the
password for the Admin account. Then click the “Login” button.
Quick Start Guide for Your DASDEC II Page 13 of 40
Page 14

2) After logging in Click on the “Setup” tab (circled in red), then click on the “Audio” radio button
(circled in green) and then click on the tab “Radio Tuners” (circled in blue).
Quick Start Guide for Your DASDEC II Page 14 of 40
Page 15

3) With the antenna lines connected to the DASDEC-II adjust the internal tuners for your
assigned monitors. Use the radio buttons (circled in red) to set the band to FM, AM or
NOAA. When FM or AM band is selected enter the desired frequency in the field circled in
green, then click “Accept Typed Frequency Change”. When “NOAA Weather Radio” is
selected (as in the lower half of the picture below) click on the desired NOAA frequency.
4) After setting the tuning on the radios verify they are receiving audio. Each tuner can be
listened to, one at a time, from any of the options you see on the screen by the “Listen On:”
heading.
5) After verifying audio reception you must now set the DASDEC-II’s Decoder. Click on the
“Setup” tab (circled in red), then click on the “Audio” radio button (circled in green) and finally
the “Decoder Audio” tab (circled in blue).
Quick Start Guide for Your DASDEC II Page 15 of 40
Page 16

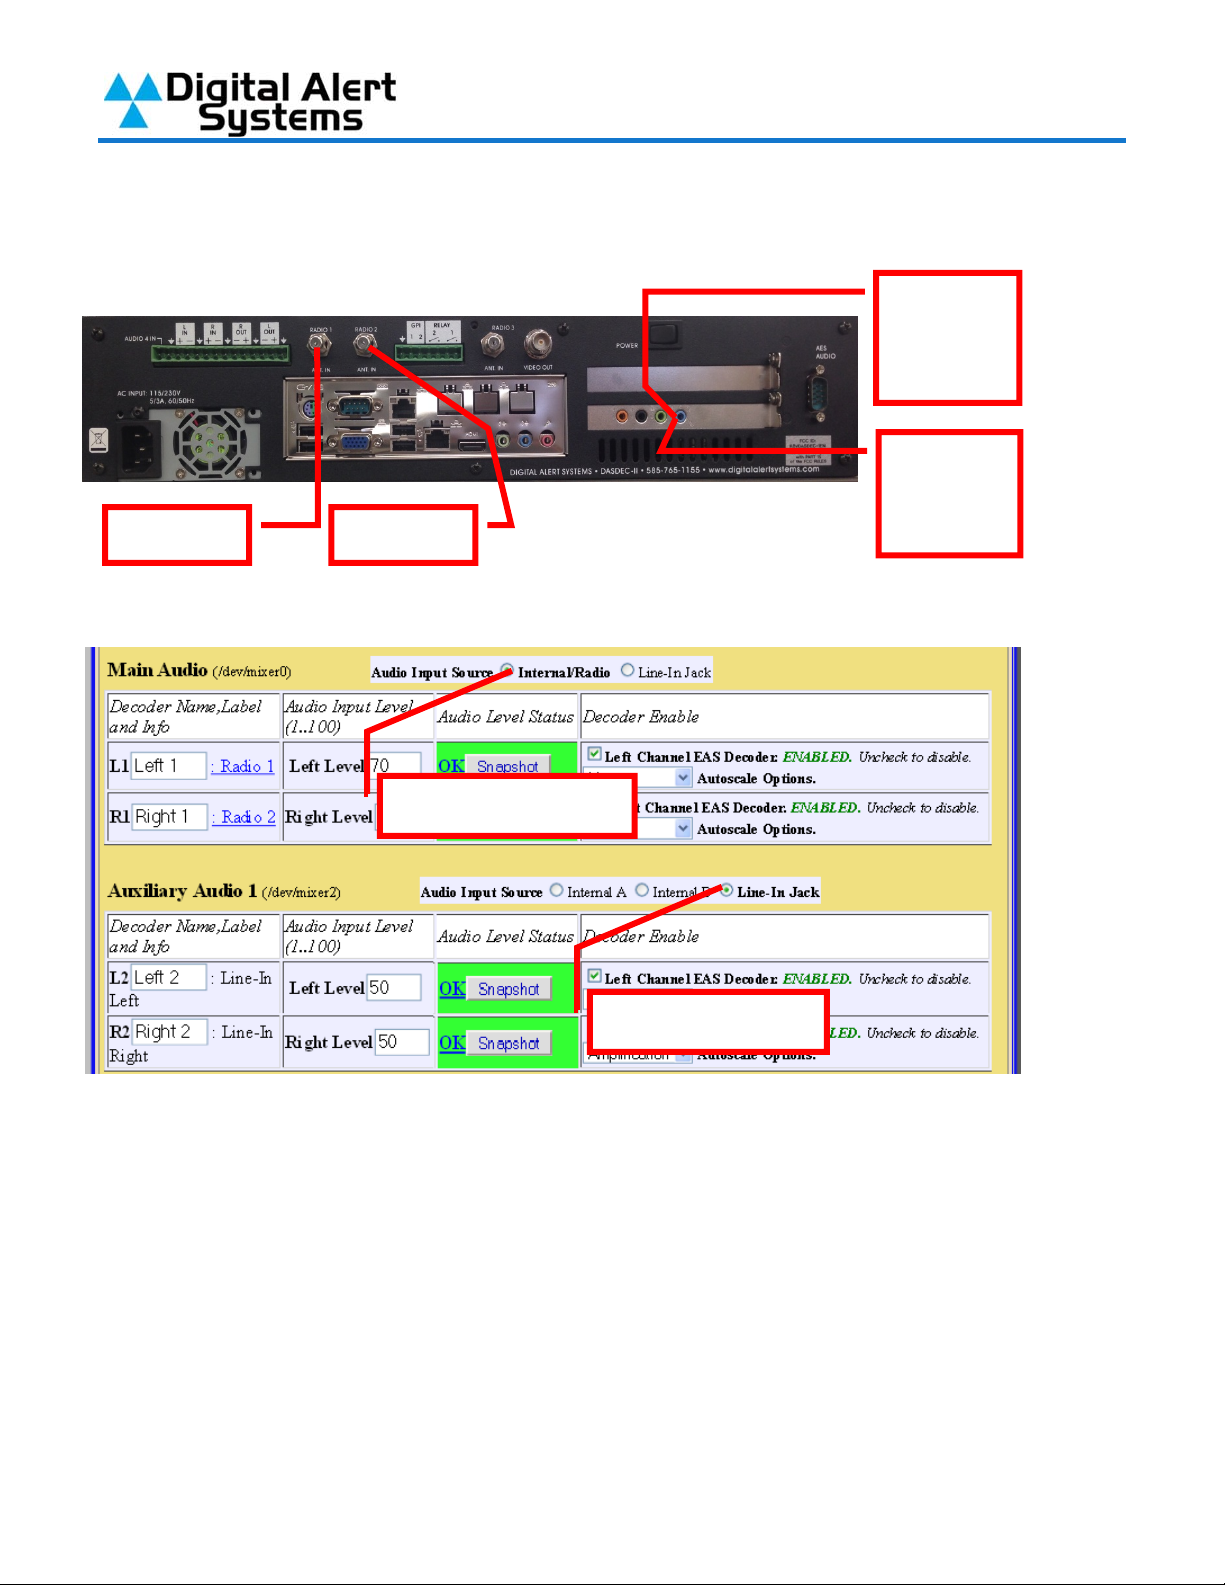
On the Alert Decoding Audio Configuration page, scroll down to the Main Audio heading.
Select the “Internal/Radio” radio button (circled in blue). Enter the call letters of the station
programmed on Radio 1 into field “L1” (circled in red). Then enter the call letters of the
station programmed on Radio 2 into field “R1” (circled in black). The call letters entered in
these fields will appear on the alert log. After entering the call letters ensure that the check
boxes (circled in orange) have a check mark in them to enable the decoder on that channel.
6) The field under the table heading Audio Level Status will change to give a visual indication
of the level going into the decoder on that channel. If that box turns yellow or red and show
the words “Elevated” or “High” reduce the gain of that channel by reducing the number in the
field circled in green; if the level status is shown as “Low” then increase the number in the
field circled in green. The gain of each channel can be adjusted independently of the others.
7) Radio 3 and the auxiliary audio input on the main audio terminal block can be set under the
heading “Auxiliary Audio 1” on the “Alert Decoding Audio Configuration” page. In the
example picture Radio 3 is tuned to a NOAA station so I used call letters “NWS”. Notice that
I have the fourth audio input disabled in the picture below. The fourth audio input is on the
Audio Terminal Block on the rear of the DASDEC-II and will accept any unbalanced line-level
signal.
Quick Start Guide for Your DASDEC II Page 16 of 40
Page 17

8) The DASDEC-II will now monitor your assigned and enabled decoders for encoded EAS
messages.
Quick Start Guide for Your DASDEC II Page 17 of 40
Page 18

Step 4 – Setting the Time
**NOTE**: The following steps are written for a DASDEC that has the Plus Package Option
license key configuration, not the Multistation option. If you have the Multistation option,
please refer to the website,
http://www.digitalalertsystems.com/resources_application_notes.htm and find the
Multistation 2 and 5 app-note that aids in setting up the Multistation encoding and decoding
of alerts.
The DASDEC-II has two options for setting the time: The time can be entered and updated
manually – or – the time can be set via an NTP server. Using an NTP server is
recommended.
1) Log into your DASDEC-II by launching an Internet browser and typing the IP Address of your
DASDEC-II into the browsers address bar. Enter your User Name (the default User Name is
“Admin”) and Password (the default Password is “dasdec”) and click “Login”.
2) After logging in click on the “Setup” tab (circled in red) and then the “Time” radio button
(circled in green).
Quick Start Guide for Your DASDEC II Page 18 of 40
Page 19

3) On the “Setup > Time” page set your time zone (circled in red) and then click the “Submit
Date/Time/Time zone Changes” button (circled in blue). Under the heading Network Time
Protocol on this page is where you can set an internal or public NTP Server address.
NIST.gov keeps a list of public NTP servers which you can find by following this link:
http://tf.nist.gov/tf-cgi/servers.cgi (note: you will need to enter the IP Address of the server
you wish to use in the field provided unless you have enabled DNS in the DASDEC-II
network setup). After entering the IP Address of the NTP server you wish to use in the field
provided (circled in green) click on the Check Box (circled in yellow) to enable NTP (note –
you may need to check, clear and check the box again to properly turn on this service and
set the time).
4) Your DASDEC-II should now display the correct date and time on the front panel display. As
long as the NTP server you have selected remains active and reachable by the DASDEC-II
you should not need to adjust the clock for drift or Daylight Savings Time.
Quick Start Guide for Your DASDEC II Page 19 of 40
Page 20

Step 5 – Changing the Default Admin Password
After setting the IP Address of the DASDEC-II it is strongly encouraged that you change the
default password.
1) Log into your DASDEC-II by launching an Internet browser and typing the IP Address of your
DASDEC-II into the browsers address bar. Enter the default User Name “Admin” and the
default Password “dasdec”, and then click the “Login” button.
2) Click on the “Setup” tab at the top and then the “Users” radio Button.
3) Under the heading Edit Server User Account Profile select “Admin” from the drop-down
menu (circled in red).
Quick Start Guide for Your DASDEC II Page 20 of 40
Page 21

4) Towards the bottom of the left hand column are the fields used to change the password. I
suggest changing the “Session Idle Timeout” (circled in red) from the default of 15 mins to 2
hours to prevent the DASDEC-II from logging you out while setting up and testing your
stations. In the fields circled in blue enter the current Admin password “dasdec”, then enter
your new Admin password. Finally click “Submit Changes”.
5) The next time you log into the DASDEC-II use the default user name “Admin” and the
password you have set.
Quick Start Guide for Your DASDEC II Page 21 of 40
Page 22

Step 6 – Alert Decoding, Filtering & Forwarding
By default the DASDEC-II monitors for all alerts sent to all areas and will make all of those
alerts available for forwarding. Changing the alert filters for will affect the alerts that are
available for forwarding to your individual station interfaces, which will be setup later.
Determine which counties this DASDEC-II will serve and which EAS Event codes your
stations will forward.
1) Log into your DASDEC-II by launching an Internet browser and typing the IP Address of your
DASDEC-II into the browsers address bar. Enter the User Name “Admin” and then enter the
password for the Admin account. Then click the “Login” button.
2) After logging in Click on the “Setup” tab (circled in red), then click on the “Decoder” radio
button (circled in blue) and then click on the tab “Forwarding” (circled in green).
3) In the Forwarding EAS Station ID box, type the name of your station in the ID form that you
want.
Quick Start Guide for Your DASDEC II Page 22 of 40
Page 23

4) The drop-down box is used to set how long non-national alerts, such as Required Monthly
Tests and weather alerts, will be held before being forwarded. “As soon as possible” is the
default meaning as soon as an alert has finished being decoded it will be sent.
5) Below that, there are several check boxes that will affect how the DASDEC-II handles
decoded alerts. For more in-depth explanation of each option refer to the manual. All of
these options can be used to configure your DASDEC exactly how you want it to decode
alerts. It is recommended you analyze each option and only use the options that you know
will give you the exact outcome you want.
6) Under the heading Configure Auto or Manual Forwarding Operation are the global
controls for enabling Auto-Forward Mode. If you will have any stations that you will want to
auto-forward alerts then the check box turning on “Auto-Forward Mode” must be checked.
Quick Start Guide for Your DASDEC II Page 23 of 40
Page 24

7) With “Auto-Forward Mode” your station can be operated in auto or manual mode. The
selection made from the drop-down list will control alert filtering when a station interface is in
“Manual Mode”. If “Off” is selected any alert received will be made available to be manually
forwarded. In Mode 1 or 2 only alerts that meet your filtering requirements will be made
available for Manual Forwarding.
8) The DASDEC-II can play an audio message from the front panel speaker whenever specific
types of decoded alerts have been received and are being held by manual forwarding. Use
the drop-down for each type of alert to enable its audio announcement.
Quick Start Guide for Your DASDEC II Page 24 of 40
Page 25

9) The settings under the heading Configure Duplicate Alert Handling for Decoder AutoForwarding controls how alerts with matching event and FIPS codes are handled. For
example: the DASDEC-II decodes an SVR for County A on Input1 and forwards the alert.
The DASDEC-II decodes an SVR for County A from Input2. If you have selected “Do not
auto-forward duplicate alerts” next to the Duplicate Alert Auto-Forward Options, the alert
from Input2 will be logged but not forwarded. However, if you have selected “Auto-forward
duplicate alerts” both the alert from Input1 and Input2 will be forwarded. The recommended
setting is “Do not auto-forward duplicate alerts”.
10) The Configure Update Policy for Active EAS Alerts option, allows you to expire an active
alert when a new alert is decoded and updates the previous alert. When enabled, you can
choose what requirements the new alert must have to expire the previous active alert.
11) The section under heading Configure EAS code filters for decoder Auto-Forwarding &
Manual Forward Blocking allows you to specify which decoded alerts will be available to be
forwarded. By default “Allow All EAS Codes” is selected, clearing that check-box will allow
you to select the event codes the DASDEC-II will forward. Click on the event code in the left
list and then click “Add” to add them to the list on the right. Any alert with an event code
other than those you have added to the right column will be ignored. (You should add more
than what is in the screen shot, or leave it as Allow all EAS Codes)
Quick Start Guide for Your DASDEC II Page 25 of 40
Page 26

12) The final part of configuring alert forwarding is to set your areas FIPS codes. By default the
DASDEC-II is set to “Allow All FIPS Codes”, this is not recommended. When you clear the
check box in this section the FIPS code listing will appear. Use the drop-down lists on the left
to find the counties in your broadcast area, click on them to highlight them and then click
“Add” to move them into the list on the right.
13) Alert Decoding, Filtering & Forwarding is now configured.
Quick Start Guide for Your DASDEC II Page 26 of 40
Page 27

Step 7 – Alert Encoding and Originating
Before the DASDEC-II can be used to originate alerts such as weekly and monthly tests the
Encoder must first be configured.
1) Log into your DASDEC-II by launching an Internet browser and typing the IP Address of your
DASDEC-II into the browsers address bar. Enter the User Name “Admin” and then enter the
password for the Admin account. Then click the “Login” button.
2) After logging in Click on the “Setup” tab (circled in red), then click on the “Encoder” radio
button (circled in blue) and then click on the tab “General” (circled in green).
Under the heading EAS Origination select “EAS-Broadcast Station/Cable System”.
Quick Start Guide for Your DASDEC II Page 27 of 40
Page 28

3) Use the drop-down menu under the heading Non-national alert play scheduling to control
when originated and forwarded alerts will be sent. The default is “As Soon as Possible”.
4) This setting controls how long the Attention Tone will be played during forwarded alerts. You
can also control whether or not audio other than the header and EOM tones will be included
in your generated weekly test.
5) The section Configure Available EAS Types for Encoder Alert Origination is where you
set what EAS events your DASDEC-II will be allowed to originate, this list is not the same as
the events the DASDEC-II will be allowed to forward. Commonly stations are only permitted
to originate Weekly Tests, check with your state EAS plan to see which EAS events your
station may be allowed or asked to originate.
Quick Start Guide for Your DASDEC II Page 28 of 40
Page 29

6) Finally, the section Configure Available FIPS for Encoder Alert Origination is where you
assign which counties your DASDEC-II will originate alerts for; refer to your state’s EAS plan
to determine which counties you may need to add to this list. Note – Any county for any
individual station which will use this DASDEC-II needs to be added to the Available
Encoder FIPS Locations on the right, counties can be removed from individual station
interfaces later.
7) Your DASDEC-II’s Encoder is now configured.
Quick Start Guide for Your DASDEC II Page 29 of 40
Page 30

Step 8 – Set-up Station Interface and Required Tests
After the DASDEC-II’s Base Station configuration has been completed you can begin to
configure a “Station Interface” for each station. Station Interface Configuration allows you to
set which audio output and GPIO your station will use as well as controlling which EAS
events will be forwarded.
1) Log into your DASDEC-II by launching an Internet browser and typing the IP Address of your
DASDEC-II into the browsers address bar. Enter the User Name “Admin” and then enter the
password for the Admin account. Then click the “Login” button.
2) After logging in Click on the “Setup” tab (circled in red), then click on the “Encoder” radio
button (circled in blue) and then click on the tab “General” (circled in green).
3) Under the Main Encoder Configuration section, make sure that the EAS Station ID is the
same as the Forwarding station ID which is located at Setup > Decoder > Forwarding. If
they are not the same, a red box will show up (as shown in the next screen shot) and it will
tell you to edit one so it is the same as the other. This should be the ID of your station. If the
station names are the same, skip to part 7 of this step.
Quick Start Guide for Your DASDEC II Page 30 of 40
Page 31

4) Next the “Forwarding Station ID” must be changed, click on the link in the red box that
appeared on this page.
5) Clicking the link will take you to Setup (circled in red) > Decoder (circled in blue) >
Forwarding tab (circled in green).
6) Edit the Forwarding Station ID to match the Encoder Station ID.
Quick Start Guide for Your DASDEC II Page 31 of 40
Page 32

7) By default, new Station Configurations will have the station operate in Manual Forward
mode. You have the option to have the individual station operate in Auto mode. If you want
the system to operate manually except during certain hours (such as during unattended
overnights) use one of the “Forward Mode Timers” if you want the station to operate in Auto
mode all the time, check the box in red.
8) If you use the Forward Mode Timer, enter the times that you want the system to operate in
Auto mode. In the below example, Timer 1 will set the DASDEC-II to operate in Manual
Mode from 6AM to 6PM and in Auto Mode from 6PM to 6AM Monday through Friday. Timer
2 will set the DASDEC-II to operate in Auto Mode from 6AM to 6PM on weekends.
Quick Start Guide for Your DASDEC II Page 32 of 40
Page 33

9) Next, program the FIPS codes the DASDEC-II will send on that stations interface for weekly
tests. To set that click on the “Setup” tab (circled in red), then click on the “Encoder” radio
button (circled in blue) and finally the “Required Tests” tab (circled in green).
10) From the Encoder pool FIPS codes click on to select which counties this station interface will
issue its weekly tests for (refer to your State EAS plan) and then click “Add Selected FIPS”.
11) The next step in setting up a Station Interface is to enable the audio output. Click on the
“Setup” tab (circled in red), then click on the “Audio” radio button (circled in blue) and finally
the “Encoder Audio” tab (circled in green).
Quick Start Guide for Your DASDEC II Page 33 of 40
Page 34

12) On the Alert Encoding Audio Configuration page you must click on the check box (circled
in red) for each audio output you’ll be using. “Main Audio Output” is on the terminal block on
the back of the DASDEC-II, depending upon your hardware configuration “Aux 1 Audio” and
“Aux 2 Audio” are on the 1/8th inch audio jacks on the back.
13) If you are using the “Main Audio” input as an EAS Audio Loop through the final step in the
Station Interface configuration is to enable this feature. Click on the “Audio Output” tab
(circled in red).
14) Scroll down the page to the Main Audio heading and check the box for “Main Audio
Passthrough”
Quick Start Guide for Your DASDEC II Page 34 of 40
Page 35

Step 9 – GPIO Configuration
The DASDEC-II ships with two General Purpose Inputs and two general purpose outputs,
depending upon your hardware configuration your DASDEC-II may have additional GPIO
inputs and outputs.
The GPIO inputs are used to trigger the DASDEC-II to perform certain tasks, such as
sending a weekly test or forwarding a received EAS message. The GPIO outputs allow the
DASDEC-II to signal or control external hardware, such as an external switcher for additional
station interfaces.
1) Log into your DASDEC-II by launching an Internet browser and typing the IP Address of your
DASDEC-II into the browsers address bar. Enter the User Name “Admin” and then enter the
password for the Admin account. Then click the “Login” button.
2) After logging in Click on the “Setup” tab (circled in red), then click on the “GPIO” radio button
(circled in blue).
Quick Start Guide for Your DASDEC II Page 35 of 40
Page 36

3) The GPIO Setup screen has a table at the top which will show what the current programming
for each GPIO and its current state.
4) Pictured to the right is programming I have for the station using the Aux1 audio output for
EAS messages. That station’s program audio loops through an external switcher which is
controlled the DASDEC-II’s GPIO output 1. That output is programmed to be closed while an
EAS message is being played out of the DASDEC-II for the station assigned to that output.
`
Quick Start Guide for Your DASDEC II Page 36 of 40
Page 37

5) For further information on how the other GPIO in and out setting operate refer to the
DASDEC-II manual.
Quick Start Guide for Your DASDEC II Page 37 of 40
Page 38

Step 10 – E-Mail Setup
The DASDEC-II has the ability to send e-mails when Alerts are sent or received or on a
weekly or monthly basis for logging. Before e-mail can be used you will need to know the
Outgoing E-Mail SMTP server and have an e-mail address you want the DASDEC-II to use
as its sent from address.
1) Log into your DASDEC-II by launching an Internet browser and typing the IP Address of your
DASDEC-II into the browsers address bar. Enter the User Name “Admin” and then enter the
password for the Admin account. Then click the “Login” button.
2) After logging in click on the “Setup” tab (circled in red), then click on the “Email” radio button
(circled in blue) and then on the “Email Server” tab (circled in green).
Quick Start Guide for Your DASDEC II Page 38 of 40
Page 39

3) In the field next to Outgoing Email Server Name (circled in red) enter the IP address of
the SMTP server (note – you can not use the server name, such as
“outgoing.mailserver.com” unless you have enabled DNS in the DASDEC-II network setup).
In the field by From Name (circled in blue) enter the e-mail address you want messages
from the DASDEC-II to be from.
4) Next click on the button “Set & Test Mail Server & From Names”. If your settings are correct
you’ll see a graphic reading “OK: Contacted Mail Server”.
5) If your server IP address is incorrect or you are trying to use a name without DNS you’ll see:
6) After setting the E-Mail Server click on the tab for “Event Email” (circled in red).
Quick Start Guide for Your DASDEC II Page 39 of 40
Page 40

7) The DASDEC-II will send EAS Event Reports to whatever e-mail address you enter into the
“To” field, you can enter more than one e-mail address by separating them with a comma.
Click the check boxes for whichever report you want, I suggest the “Weekly” reports.
These are the basics for getting a DASDEC-II on-air and passing EAS Alerts. For further
information on any of these or other setting refer to the DASDEC-II manual.
Quick Start Guide for Your DASDEC II Page 40 of 40
 Loading...