

Page 1
IP Intercom/Paging
Getting Started Guide
IP7-SE8
SE8 GETTING STARTED
Page 2

Page 3

Introduction
The IP7-SE8 IP Intercom/Paging endpoint provides high
quality 2-way audio from TalkMaster™ software over an IP
network. The internal audio amplifier can drive a maximum of
8 watts to one or more speakers. It supports a Talk switch
and includes a Relay, a Door Sensor and an integrated
2-port switch. Powers options include Power Over Ethernet
(PoE - 802.3af compatible) and external 12-15VDC
This Getting Started booklet covers basic hardware
installation and software configuration of the IP7-SE8.
Table of Contents
IP7-SE8 Installation..................................................2
TalkMaster-LE Software........................................... 7
1
Page 4
IP7-SE8
Installation
Please refer to the IP7-SE8 Reference Manual
available on the TALKMASTER SOFTWARE CD
i
for additional information on installation and setup
Important Installation Guidelines
• Choose 18-22 AWG wire for speaker connections. Select
wire gauge suited to minimize power loss for specific
distribution method and wire run distances
• Do not install near power distribution equipment or noise
generating equipment such as stepper motors
• Conform to industry standard practices for grounding
• Use shielded, twisted pair wire for microphone signals.
Avoid sharing AC power and audio signals in conduit runs
2
Page 5
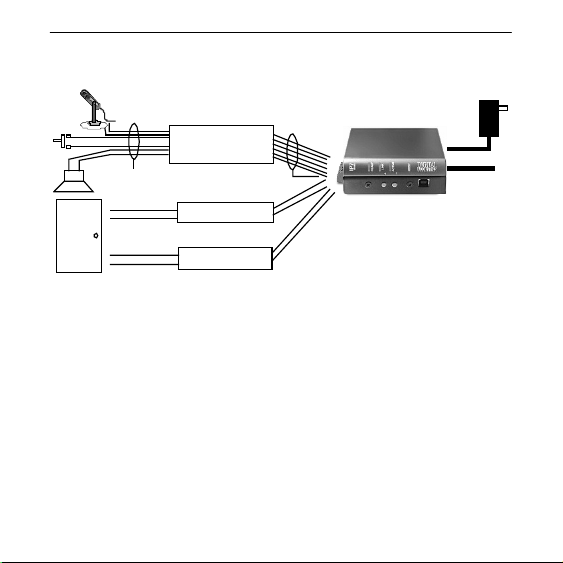
IP7-SE8 Installation (2-way Intercom/Paging mode)
Optional
6 Conduct or Wire
18-22 AWG
(No Connection)
Twisted Shielded
Relay Output (Optional)
2 Conduct or Wire
Sensor Input (Optional)
2 Conduct or Wire
• Connect SPKR 8Ω+ (J2-6) and SPKR 8Ω- (J2-7) to the
terminals of an 8 ohm speaker (polarity independent)
• Connect MIC + (J2-1) and MIC - (J2-2) to an Electret
Microphone, or Connect MIC + (J2-1) and MIC - (J2-2)
and GND (J2-4) to a Dynamic Microphone
• Connect TALK (J2-5) and GND (J2-4) to a switch
pushbutton
• Connect GND (J2-4) to the shield of the shielded wire
(leave open at door station)
12VDC - 15VD C
Cat-5 C able to
Cat-5 Cable to
PoE Hub/Switc h
PoE Hub/Switch
3
Page 6
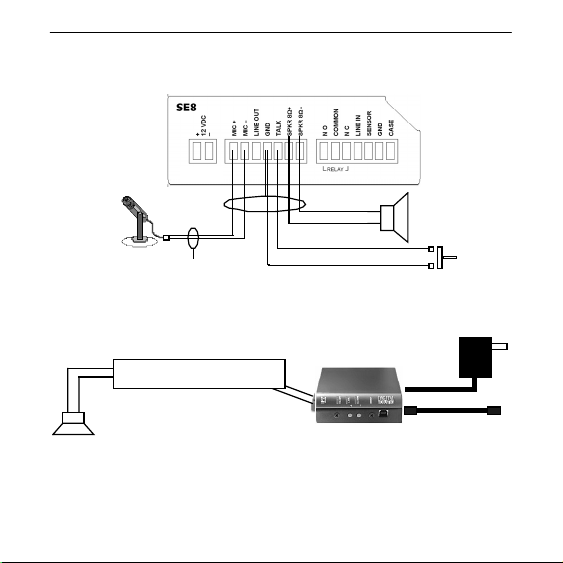
IP7-SE8 Wiring (2-way Intercom/Paging mode)
J2 J3
J1
Microphone
Speaker
No
Connect ion
Talk Button
IP7-SE8 Installation (Paging Mode Only, 8 Ohm Speaker)
Optional
2 Conduct or Wire 18-22 AWG
12VDC - 15VD C*
Cat-5 Cable to
Cat-5 C able to PoE
PoE Hub/Switch
Hub/Switc h
• Connect SPKR 8Ω+ and SPKR 8Ω- (J2-6 and J2-7) to the
terminals of an 8 ohm speaker (polarity independent)
4
Page 7

Relay Options
• An integrated Relay uses J3-2, with J3-1 (Normally Open)
or J3-3 (Normally Closed). Use TalkMaster™ to configure
the options
Sensor Options
• The integrated Sensor can be used to monitor the status
of a door by connecting J3-5 and J3-6 to a contact closure
sense switch. Use TalkMaster™ to configure the options
Power Options
Use one of the following methods for powering the IP7
device:
• Power over Ethernet (PoE - 802.3af compliant) - requires
15.4 Watts from Power Source Equipment (PSE)
• 12VDC - 15VDC at 15 watts via J1-1 and J1-2 connectors
(polarity independent)
• 12VDC -15VDC at 15 watts via the Aux Power 2.1mm
barrel connector
An external power supply, if detected, overrides PoE power
5
Page 8

Network Installation
• Connect an RJ-45 cable between the Ethernet 10/100
connector and a network switch or directly to a PC for
configuration
• After the Ethernet 10/100 is connected, another IP device
can be connected to Port 2 10/100
Mounting Instructions
The IP7 series is design to be mounted on standard 35mm
DIN rail or surface mounted using the optional surface
mounting plate.
• DIN Rail Clip – Tilt top of unit (J1, J2 connectors facing up
with Volume buttons facing forward) back towards the DIN
Rail until the IP7-SE8 DIN clip catches the top of the rail.
Press in at the bottom of the IP7-SE8 to snap into place.
• Surface Mount Plate – Snap the optional surface mount
plate in half and secure it to the back of the frame using
the provided screws so that the mounting holes extend
past the edges of the case
6
Page 9
r
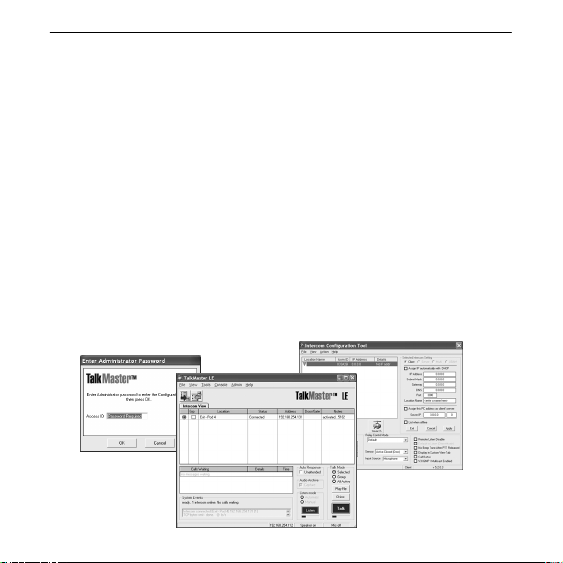
TalkMaster™ LE Software is a Windows® application used
to configure and manage Digital Acoustics IP7™ and ii3™
Intercoms and Paging endpoints. Primary functions include
user controls for inbound/outbound calls and paging. An
integrated configuration utility is also included to set Options
and IP Addresses for individual endpoints.
TalkMaste
™
LE
7
Page 10
Please refer to the TalkMaster Reference Manual
i
Prepare for Intercom Configuration
on the TALKMASTER SOFTWARE CD for
additional information on installation and software
• Refer to the previous section to power up and connect the
IP7 series device to the network.
• Record the unique ID# from the bottom of the Intercom (or
Paging) endpoint(s) and note the location where it will be
installed
• Install the TalkMaster Software using the Digital Acoustics’
Software CD, or online at www.digitalacoustics.com
8
Page 11
Configure the devices
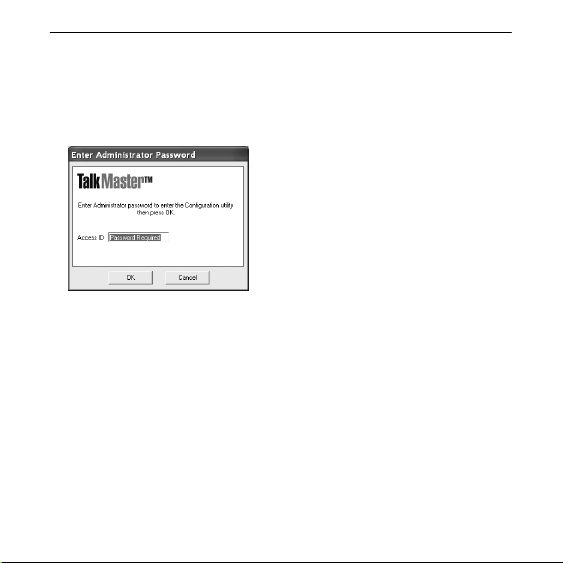
• Start TalkMaster and click menu option
Admin Æ Enable Admin
• Enter the default password
• To verify the latest version is
being used optional click
Admin Æ Check for new
versions online
• Click menu option Admin Æ Configure Intercoms
A new screen is displayed while TalkMaster searches
the network for about 15 seconds. TalkMaster will
display a list of all ii3 and IP7 devices on the current
network segment
• Click on the Intercom to be configured (the “Icom ID”
column will match to the Intercom’s ID# previously
recorded)
admin
9
Page 12
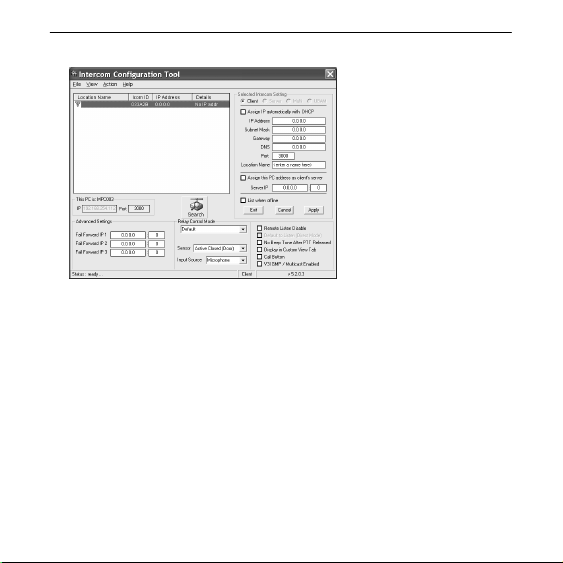
• Check the Assign
IP automatically
with DHCP box, or
uncheck it to
assign the device a
static IP Address,
Subnet Mask and
Gateway
• Enter a descriptive name for the Intercom into the
Location Name field. This name should be unique to
help easily identify the Intercom or Paging endpoint
• Enter the IP Address of the PC running TalkMaster that
the Intercom will connect to by checking the Assign
this PC address as client’s server box or uncheck it to
enter a different PC’s IP address in Server IP, and Click
Apply. Repeat for each Intercom
• To review all changes, press Search again
10
Page 13

Additional IP7 Configuration options
Input Source (IP7 series only)
• Microphone – Assigns a Microphone as audio source
• Line In -Assigns Line In connector as audio source
Remote Listen Disable - Used for Paging endpoints to
disable Taskmaster’s™ Listen button operation
Call Button - Changes the default action of the Intercom’s
Talk switch. Pressing Talk sends a Call Announcement
signal to TalkMaster, instead of the Intercom user’s voice
Relay Options
• Door Open - adds a software button to TalkMaster™ to
activate the Relay to operate an electronic door strike
• PTT - Activates the Relay during station ‘Talk’
• Activate on Speaker and/or Mic - activates the Relay
while the audio channel is active in TalkMaster™
Sensor Options
• Active Closed when J3-5 is closed to ground
• Active Open when J3-5 is open to ground
11
Page 14
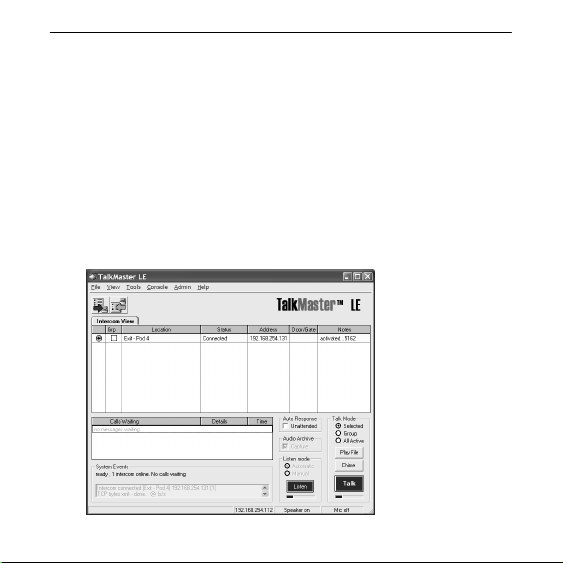
Using TalkMaster LE
• Intercom (and paging) endpoints will automatically
appear in the main display listing of TalkMaster (active
on the computer specified in Server IP)
• The PC microphone is used to send audio to an
intercom. The audio from an intercom can be heard on
the PC’s speakers
12
• To call an
Intercom,
select it by
clicking in
the display
listing
Page 15
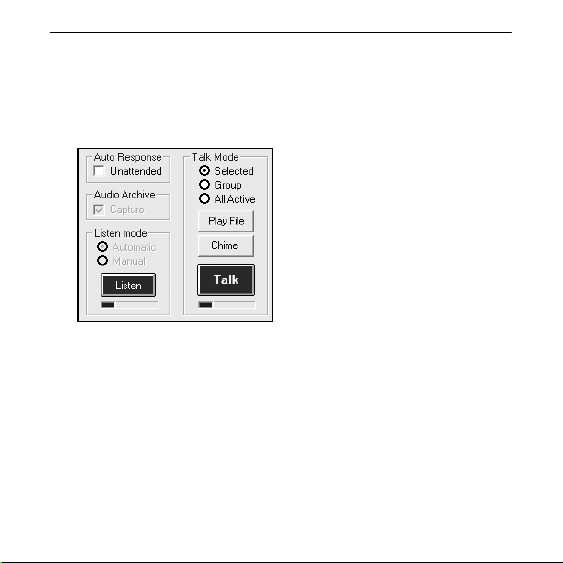
• Click and hold the Talk button, or press and hold the
Space Bar to speak to the Intercom
• Release the Talk button or Space Bar to listen
• Click the Listen button,
or press the Escape key
to end the call
• Pressing the Intercom’s
Talk button will sound
an audible alarm in
TalkMaster to announce
incoming calls
• All incoming calls will be listed in the Calls Waiting list.
A call is “in session” until removed from the Calls
Waiting list by clicking the Listen button, or pressing the
Escape key
• For additional information on using TalkMaster™ LE,
select menu option Help Æ Help on using TalkMaster
13
Page 16

IP7-SE8™
Getting Started Guide
Refer to the Digital Acoustics TalkMaster CD
for detailed information wiring, setup, configuring
IP addresses and additional software settings.
Included on the CD:
• IP7-SE8 Reference Manual
• TalkMaster™ Software Users Guide
Digital Acoustics Technical Support
www.digitalacoustics.com
U.S.A. +1 (847) 604-9256
SE8-GSG0806-6621.docu TalkMaster, IP7 and Digital Acoustics® are
trademarks of Digital Acoustics LLC. Other tradem arks are the property
of their respective owners. All Rights Reserved ©2008 p/n 6621
 Loading...