

Page 1

V1.0
2013-02-04
RANGER SERIES
DG-BR4000N/E
Setup Guide :
(This Guide applies to all Hardware Versions of DG-BG4011N)
SETUP GUIDE
Wireless Repeater Mode
Page 2

SETUP GUIDE
Wireless Repeater Mode
COPYRIGHT
Copyright 2013 by Smartlink Network Systems Ltd. All rights reserved. No part of this publication
may be reproduced, transmitted, transcribed, stored in a retrieval system, or translated into any
language or computer language, in any form or by any means, electronic, mechanical, magnetic,
optical, chemical, manual or otherwise, without the prior written permission of this company This
company makes no representations or warranties, either expressed or implied, with respect to the
contents hereof and specifically disclaims any warranties, merchantability or fitness for any
particular purpose. Any software described in this manual is sold or licensed "as is". Should the
programs prove defective following their purchase, the buyer (and not this company, its distributor,
or its dealer) assumes the entire cost of all necessary servicing, repair, and any incidental or
consequential damages resulting from any defect in the software. Further, this company reserves
the right to revise this publication and to make changes from time to time in the contents thereof
without obligation to notify any person of such revision or changes.
Trademarks
DIGISOL™ is a trademark of Smartlink Network Systems Ltd. All other trademarks are the property
of the respective manufacturers.
Page 3
SETUP GUIDE
Wireless Repeater Mode
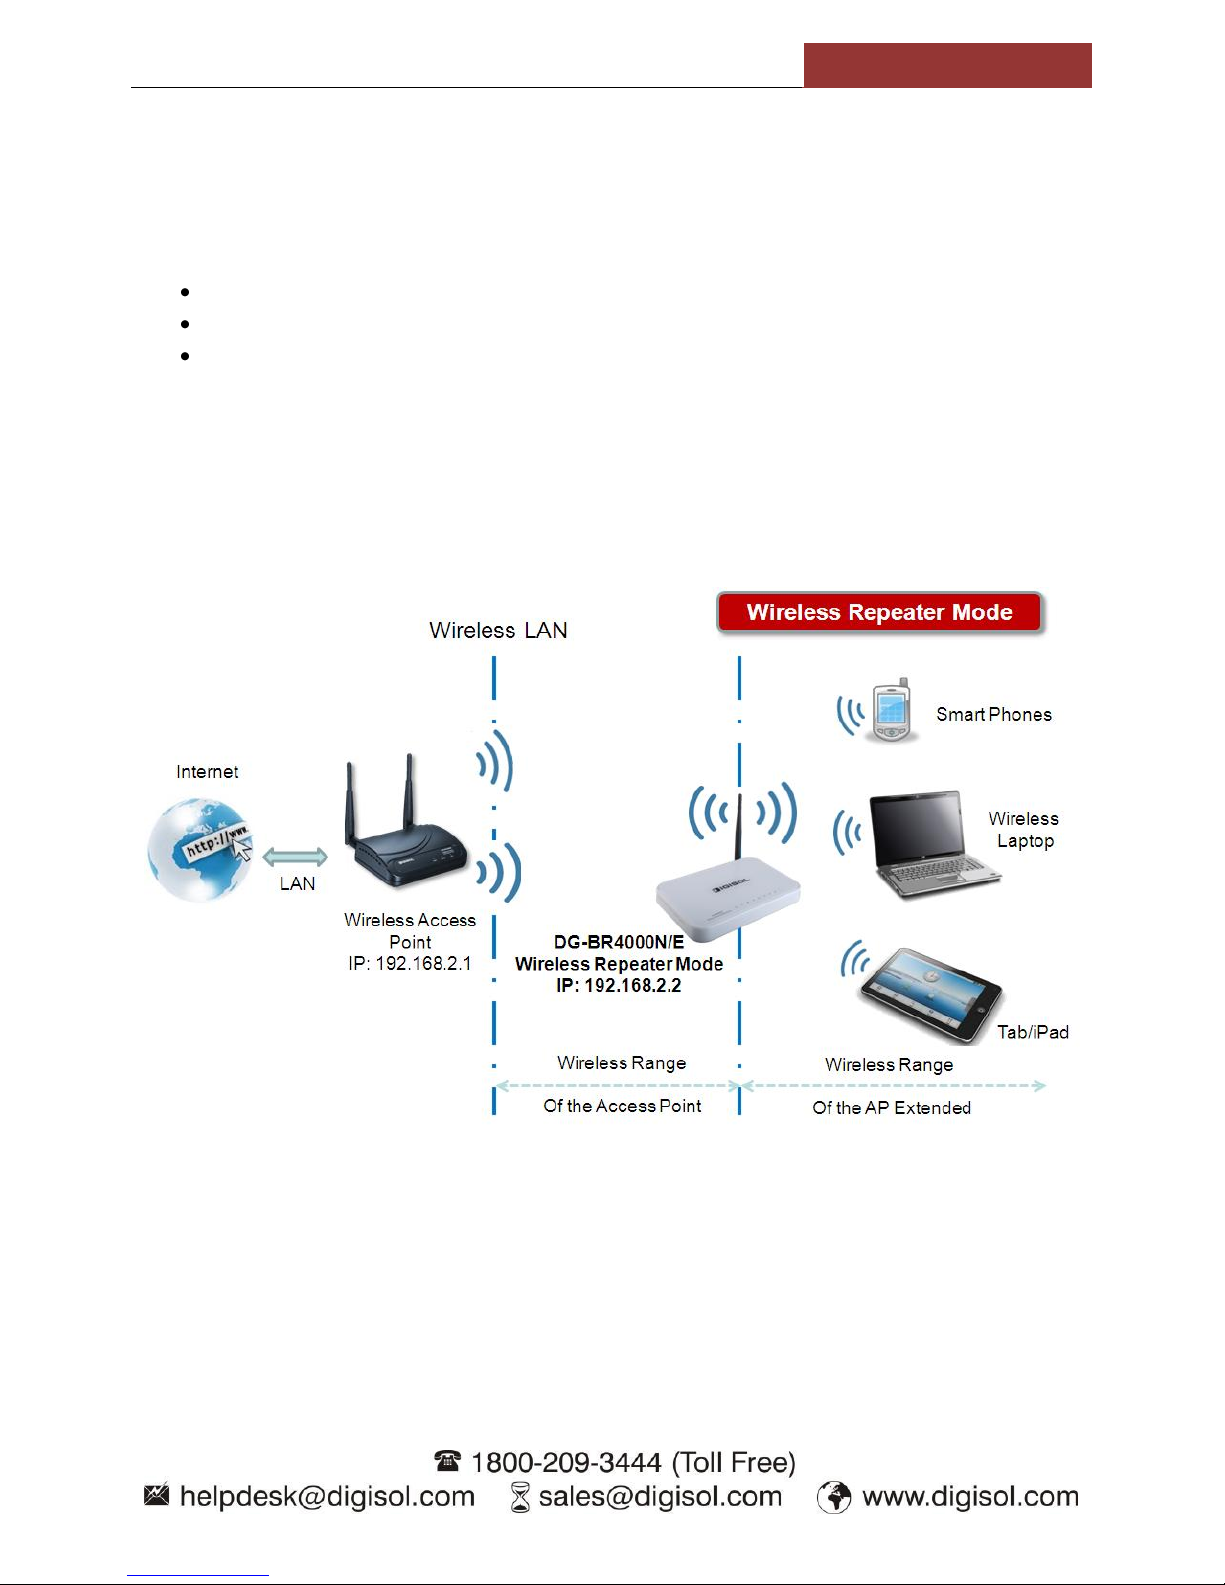
DG-BR4000N/E can be configured in Repeater mode with Access Point when the AP is configured in WDS
with AP mode.
Network devices used in this setup:
DG-BR4000N/E
DG-WA1000N or DG-WA3000N or DG-WA3000NP or DG-WA3002NP
Wireless Laptop
Network Setup:
In the Following setup, DG-WA3000N (AP) is connected in the existing LAN and we are connecting DGBR4000N/E (Router) to extend the wireless range of the AP. The AP should be configured in the “AP
Bridge-WDS” so that the wireless clients (Laptop) and the Repeater i.e. DG-BR4000N/E can connect to it
simultaneously.
Page 4

SETUP GUIDE
Wireless Repeater Mode
Step 1 : Configure the AP
Access the web GUI of the AP. The default IP of the AP is 192.168.2.1 and the user name is “admin” and
password is “1234”.
Click on “Basic Settings” on the left hand side and select the mode to “AP Bridge-WDS”. In the “MAC
address 1:” field enter the wireless MAC address of DG-BR4000N/E i.e. of the Wireless Repeater.
Click “Apply” to save the settings.
NOTE: Ensure that the channel number is set to some fixed value.
Page 5

SETUP GUIDE
Wireless Repeater Mode
Step 2 : Configure the routers LAN IP address
Access the web GUI of the router, default IP is 192.168.2.1 and the username is “admin” and the
password is “1234”.
If the router IP is default then we need to change it to some other IP other than the AP IP address. In the
following screen, we will assign an IP 192.168.2.2 to the router. Click “Apply” to save the settings.
Now, login to the router using the new IP address. In this setup it is 192.168.2.2.
Page 6

SETUP GUIDE
Wireless Repeater Mode
Step 3 : Configure the Wireless Settings on router
Step 4 : Configure the Wireless Repeater settings
To configure the wireless settings on the router, click on “Wireless Settings > Wireless Basic Settings”.
Configure the desired SSID and then set the “Channel” to one which is configured on the Access Point. In
this setup the channel on AP was set to 11, hence we will set the same channel on router. Click “Apply”
to save the setting.
Click on the “Wireless Settings > Wireless Repeater”. Select the check box for “Enable Wireless
repeater” and then select the Radio Button for “Wireless Repeater”.
Page 7

SETUP GUIDE
Wireless Repeater Mode
Wireless Client Connect to
Wireless Client can ping to
wirelessly i.e. 192.168.2.2
Wireless Client can ping to
192.168.2.1
The “Repeater IP Address” should be set to its own IP address i.e. DG-BR4000N/E LAN IP Address. In this
set up the router IP is 192.168.2.2, hence the same is entered here. The “Base Station MAC Address”
should be the Wireless MAC Address of the AP i.e. of DG-WA3000N.
Click “Apply” to save the settings.
The Router and AP configuration is now complete. You can now connect a wireless client to the router
then then ping to the AP
Verification:
On the wireless client seach for the wireless network and select and connect to “DIGISOL” SSID. Once
connected then ping to the LAN IP of DG-BR4000N/E i.e 192.168.2.2. If you get reply then ping to
192.168.2.1 i.e. the IP address of the Access Point.
the Router’s LAN IP
the AP’s IP wirelessly i.e.
Page 8

SETUP GUIDE
Wireless Repeater Mode
 Loading...