

Page 1

TM
DG-SC3610W
Wireless IP Surveillance Pan/Tilt Camera
Quick In stallation Guide
V1.1
2011-05-09
Page 2

Copyright © 2011. All rights reserved.
Company has an on-going policy of upgrading its products and it may be possible that
information in this document is not up-to-date.
Please check with your local distributors for the latest information.
No part of this document can be copied or reproduced in any form without written consent
from the company.
2
Trademarks:
TM
DIGISOL is a trademark of Smartlink Network Systems Ltd. All other trademarks are the
property of the respective manufacturers.
Package Contents
The following items should be present in your package:
DG-SC3610W Wireless IP Surveillance Pan/Tilt Camera
Switching power adapter (12V DC, 1A)
Antenna
Camera mounting kit
Installation software CD (includes User Manual and Utility )
Patch cord (1 No.)
Make sure that the package contains above items. If any of the listed items is damaged or
missing, please contact your retailer immediately.
Page 3

3
Thank you for purchasing DIGISOL DG-SC3610W Wireless IP Surveillance Pan/Tilt
Camera. DG-SC3610W is a Megapixel IP Camera with H.264 compression, IR LED and
microphone. The Pan/Tilt function allows the camera to monitor a much larger and wider
area. Day/Night function with the IR LEDs allows the camera to operate effectively in low
light environment. The wireless function makes DG-SC3610W very versatile for
installations. This camera is an ideal solution for monitoring wide area on a 24X7 basis.
Product Overview
System Requirements
The following system requirements are recommended
CPU: 2.0Ghz or above (2.4GHz plus processor with 1GB memory and a 256MB video
card is required for multiple camera viewing and recording in IP Surveillance)
Memory Size: 512MB and VGA card resolution: 1024 x 768 or above
Notebook or desktop PC with network adapter (wired)
Windows 2000/XP with SP2/Vista/7 Operating System
A web browser
AC power socket (100 – 240V, 50/60Hz)
Page 4
4
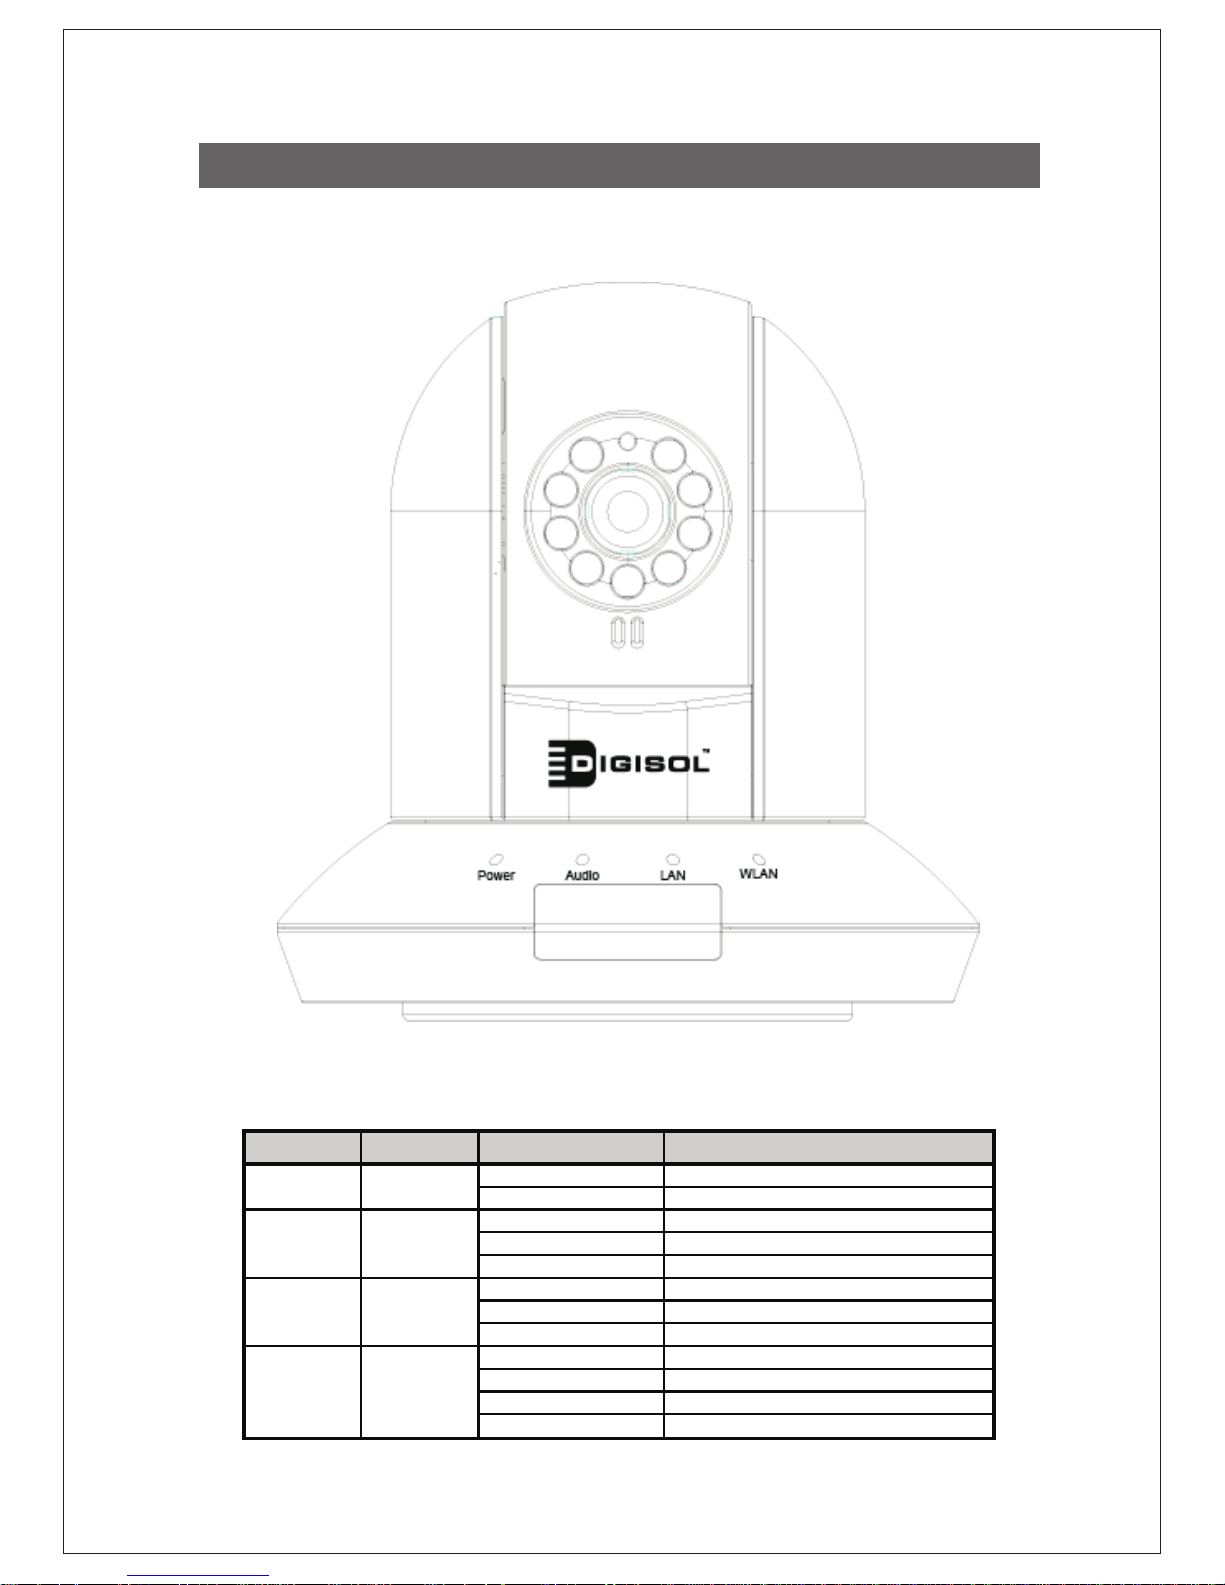
Product Overview
After installing the IP surveillance camera, you can verify its status from
the LED indicators on the front panel as shown below.
Front View
DG-SC3610W has one 10/100Mbps RJ-45 port which can be connected to LAN or PC for
viewing the camera.
LED Name LED Color Light Status Description
OFF Camera is not powered
ON Camera is powered ON
OFF Audio function is disabled
ON Audio function is enabled
Flash Two way audio
OFF LAN port not in use
ON LAN port in use
Flash Transferring data
OFF Wireless LAN not in use
ON Wireless LAN in use
Flash at low speed Waiting for WPS connection from AP
Flash Transferring data
Power
Audio
LAN
WLAN Green
Green
Green
Green
Page 5
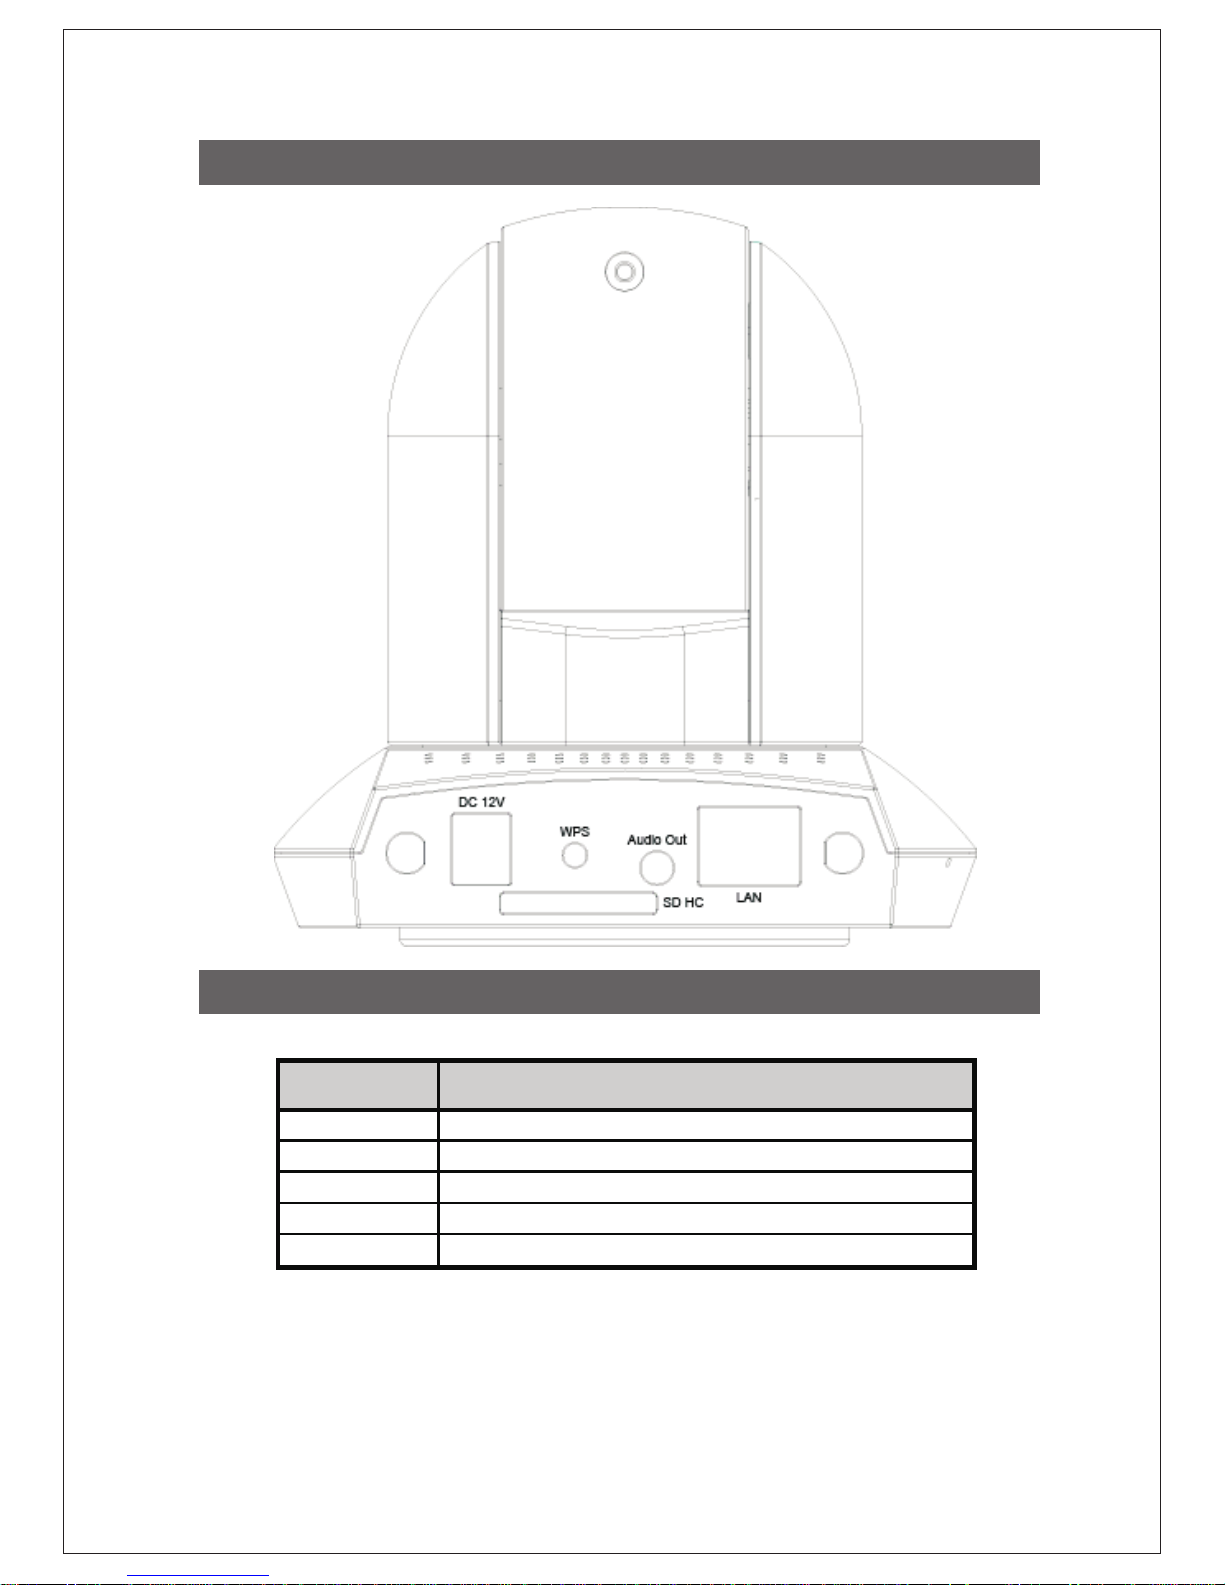
Interface Description
5
Rear View
Interface Description
Power Connects to power source
WPS Setup secure Wireless using WPS
SD HC SD High Capacity card holder
Audio Out Connects to external speakers
LAN Connects to local network
Page 6
6
Rear View
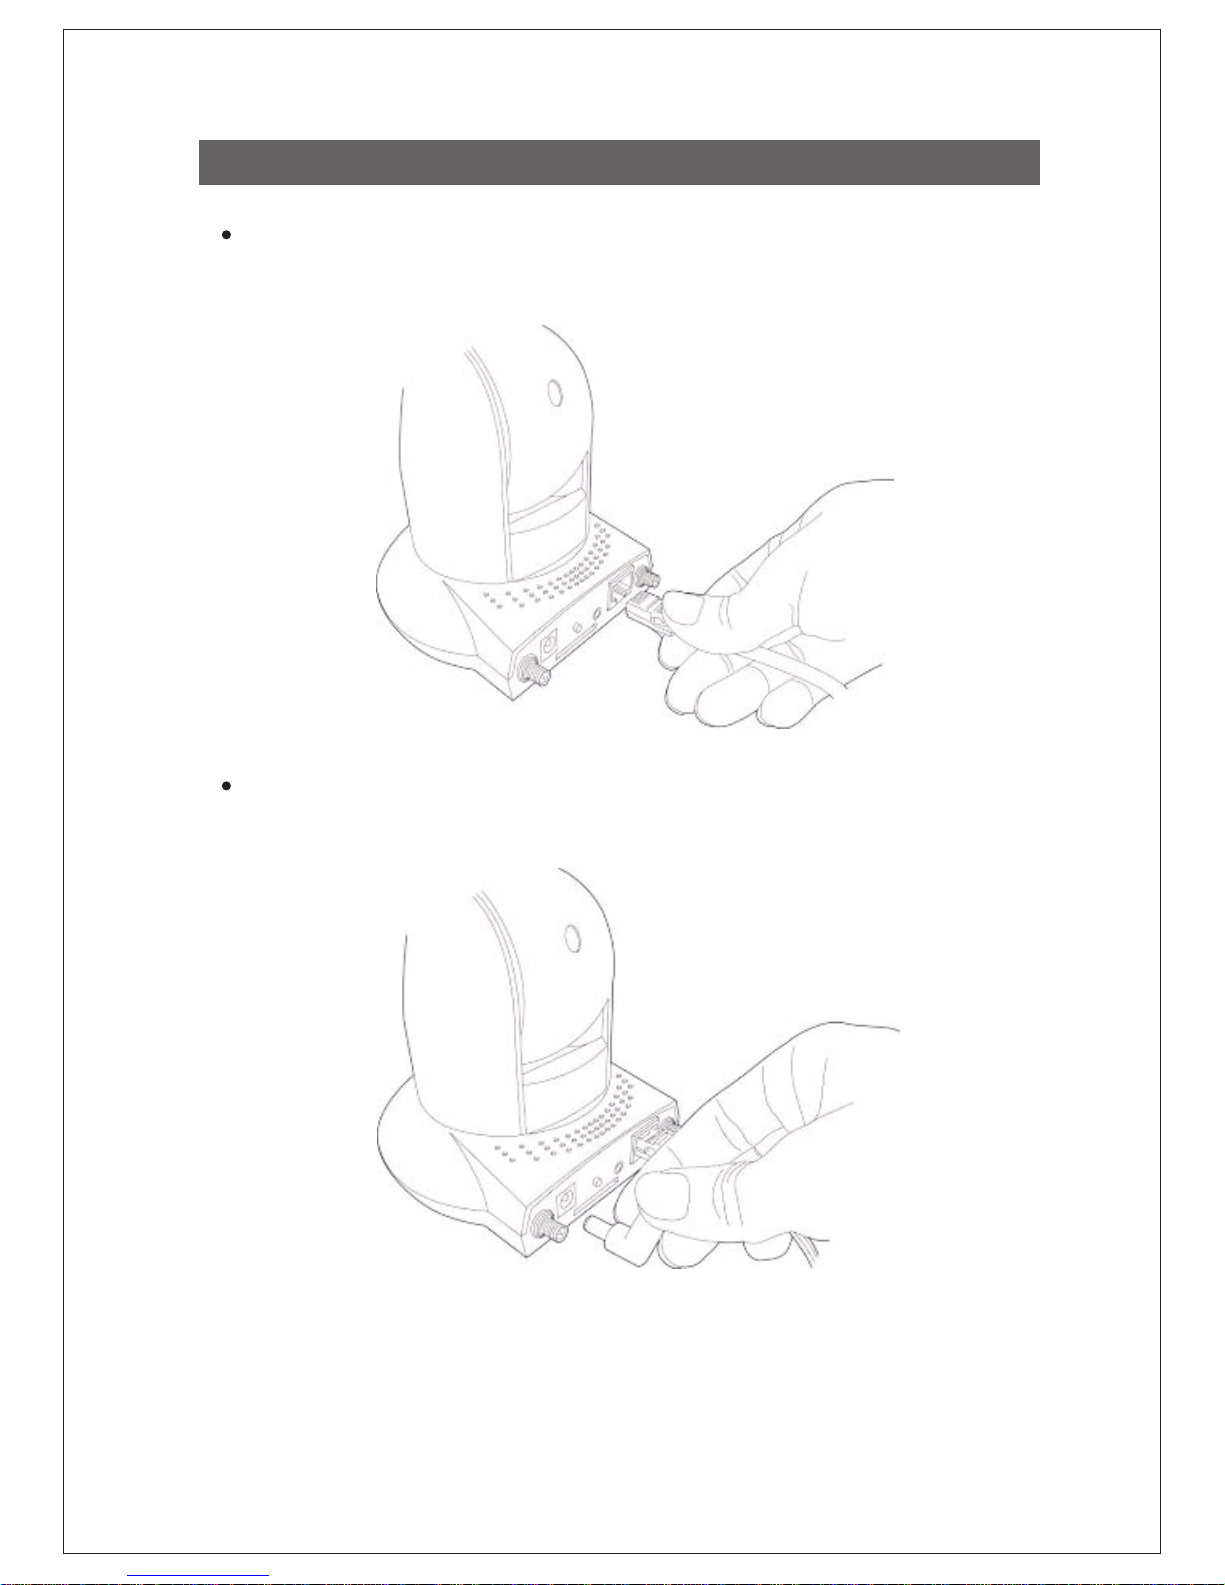
Camera installation - Hardware
Connect the Ethernet cable to your local area network, and the other end to the LAN
port of DG-SC3610W.
Plug the power adapter to power outlet, and connect the power connector to the
to the power jack located at the back Panel of the IP camera.
Note: It is highly recommended to use the power adapter shipped with the Camera,
do NOT use any other power adapter from any sources.
Page 7

7
Rear View
Place the IP camera at a secure place, and point the camera to the place you
wish to monitor. If you wish to mount the camera on the ceiling or wall, please
use the tripod connector (located at the bottom of the camera, as shown below) to
mount the camera.
Connect the antennas to the antenna base (located at the back panel of the
camera)
Page 8

8
The “Autorun.exe” program should be executed automatically. If not, run “Autorun.exe” manually from
“Autorun” folder in the CD.
The Installation Wizard show’s four selection, select the program you want to install or click “Exit” to
install the program later. Select “Install Administrator Utility” for detecting and configuring the IP
Camera.
Camera installation - Software
Insert the Setup CD into your CD-ROM drive of notebook/desktop computer.
Page 9

When clicked on ''Install Administrator Utility'' the following window appears, click 'Next' to
continue with the installation.
9
You can specify the destination folder of software installation else you can just use the
default folder option which appears, click 'Next' to continue with installation..
Page 10

10
If you need installation program to create a desktop icon or a quick launch icon then
select the check box for “Create a desktop icon” and “Create a Quick Launch icon”
then click 'Next' to continue with the installation.
Following screen lists the summary of all options chosen up till now, if everything is
correct then click 'Install' to start the installation process, or click 'Back' to go back to
previous step to modify installation settings.
Page 11

11
The installation process will take some time, please be patient.
When you see the following screen, it means the software installation process is
complete. Please click 'Finish' to finish the procedure (SKYROS Camera Admin
software will start after you click 'Finish' button, if you wish to start it later, uncheck
'Launch SKYROS Camera Admin Software' box).
Page 12

The following screen appears when the “SKYROS Camera Admin Software” is
launched. Click on the search button located at the left bottom corner of the screen.
12
When the search is complete, the cameras found in the network are listed. Choose
the one you wish to configure and click “Setup Wizard” button i.e
icon to proceed.
Page 13

Please enter the default password “1234” and click “OK” to login to the IP setup page
of the camera.
13
IP Camera works through the network using TCP/IP Protocol. The IP address setting
must be correct for accessing the camera. The wizard program will detect the IP
address status of your network automatically and suggest a free IP address for the
Camera. You can accept the suggested value or enter the value manually. If you
enter the value manually, please be aware that the “Subnet Mask” must be the same
for both the camera and the PC. Click “OK” to apply the configuration.
Page 14

14
Or select ''DHCP'' to obtain an auto IP setting from DHCP server and click ''OK'' to
apply the configuration. Now the setting will be saved.
Congratulations! Your Camera configuration is now complete.
Web Management of the Camera
To access the web configuration of the camera, assign a static IP address to your
notebook/desktop computer in the subnet 192.168.2.X with the subnet mask
255.255.255.0 and gateway as 192.168.2.1. For example, assign the IP address
192.168.2.10.
Open a web browser and enter “http://192.168.2.3” (default IP address is
192.168.2.3) in the address bar, press ‘Enter’. A login screen will appear, assign
username as “admin” and password as “1234”. Press ‘OK’ to Log in.
Page 15

After login, you should see the following messages appear at the top
of Internet Explorer (highlighted using RED color).
15
Right-click on the message, and click 'Install ActiveX Control' as shown in the
following screen shot.
When you see the following message, click 'Install' to install required ActiveX control.
Page 16

You should be able to see the images captured by the camera now.
16
Congratulations! Now you can start advanced configuration.
Page 17

FAQ
Following are the solutions to problems that may occur during the installation and operation of
the DIGISOL DG-SC3610W Wireless IP Camera.
1. Cannot access the IP Camera.
2. Image refreshes very slowly.
Try a higher frame rate setting, if it's not 30fps.
Try a lower resolution.
If you're connecting this camera from Internet, it could be caused by a slow Internet
connection, and it's not a problem caused by camera. However, when the network
connection is slow, you should use lower frame rate / resolution.
Contact DIGISOL helpdesk, if above solutions do not work.
Please make sure IP camera is correctly powered (the 'Power' LED should be ON).
Please confirm the IP address setting of the computer you're using. If the IP Camera
and the laptop are not in the same subnet, they will not be able to communicate with
each other.
Please modify the IP address of the laptop to match the subnet of the IP camera.
In case, the IP address of the IP camera is not known, reset it to factory default value
(which is 192.168.2.3) by pressing 'reset' button on the IP camera. Press and hold
reset button for 10 seconds, the IP Camera will reboot with default settings.
If you're trying to connect to the IP camera from Internet, please make sure the port
that IP camera uses is not blocked by firewall or other software / hardware.
Contact DIGISOL helpdesk, if above solutions do not work.
17
This product comes with One Year Warranty for further details about warranty policy
and Product Registration, please visit support section of www.digisol.com
Page 18

1800-209-3444 (Toll Free)
helpdesk@digisol.com sales@digisol.com www.digisol.com
 Loading...