

Page 1
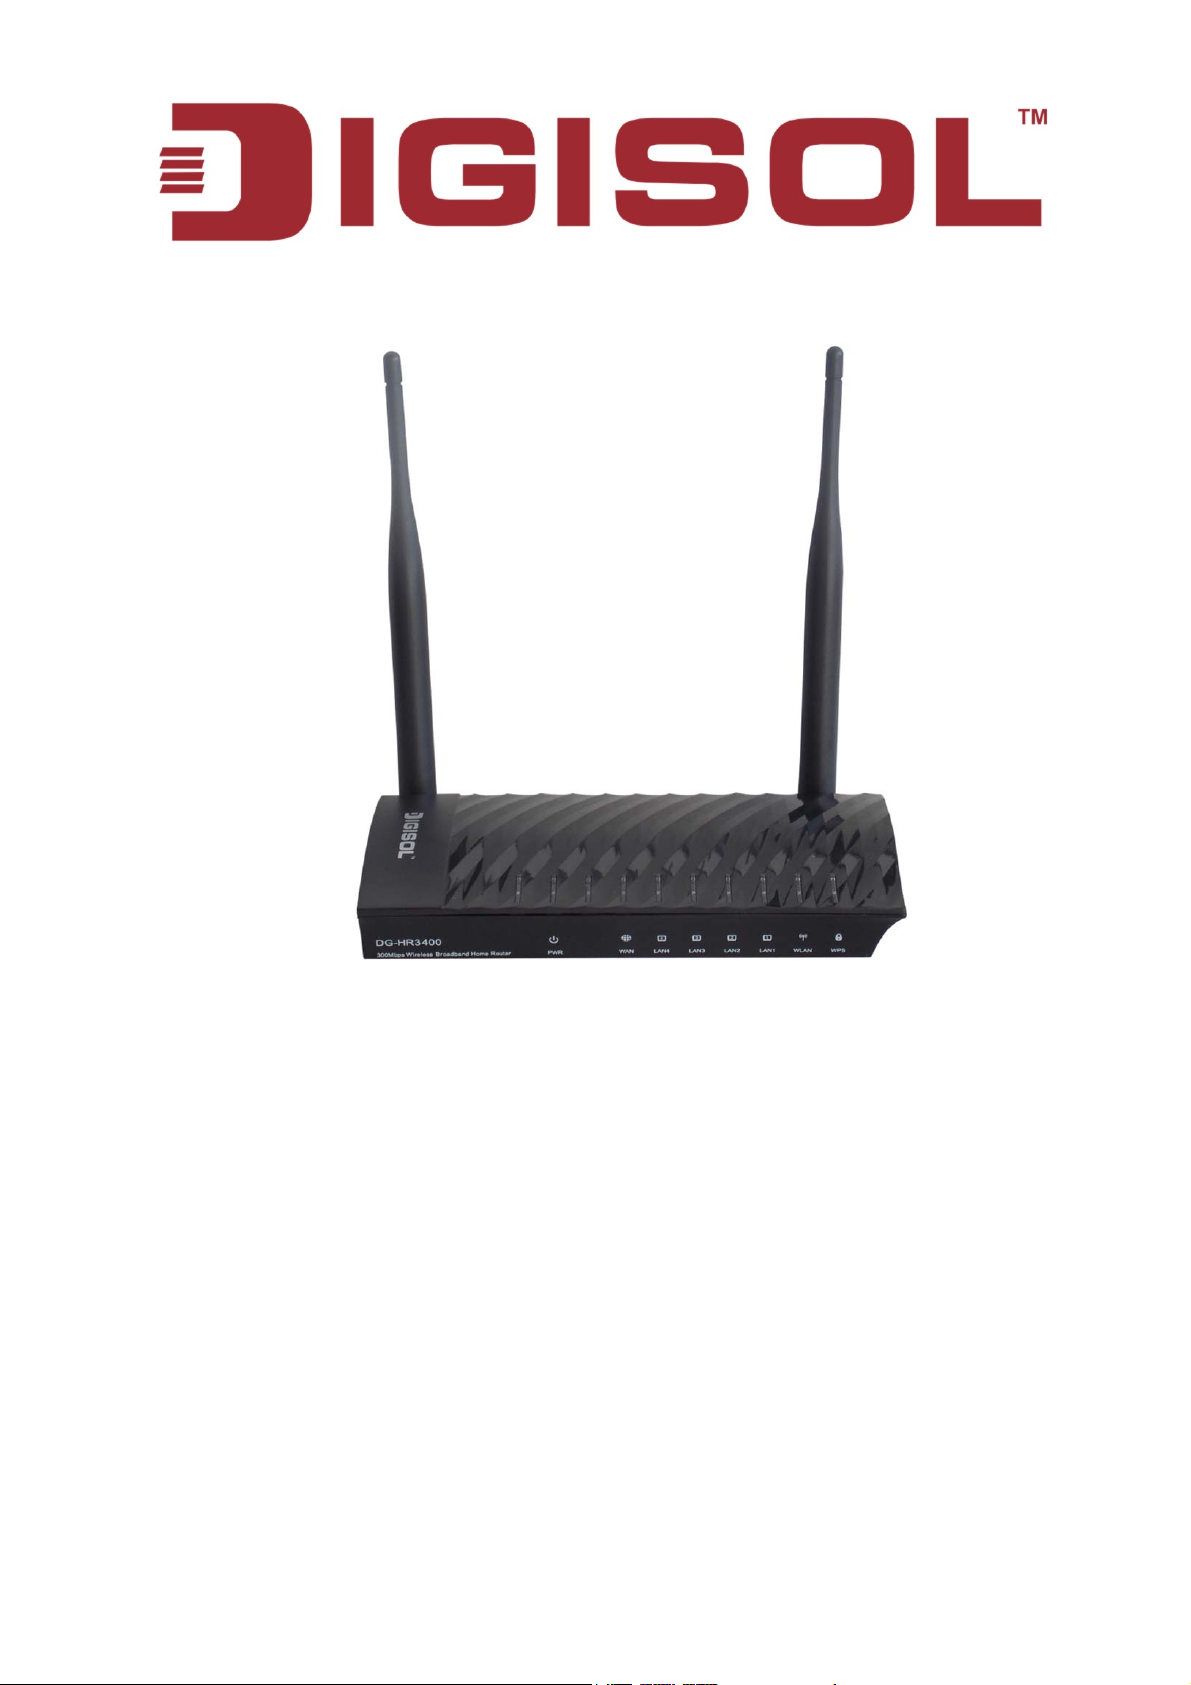
DG-HR3400
300Mbps Wireless Broadband Home Router
User Manual
2013-09-13
As our products undergo continuous development the specifications are subject to change without prior notice
V1.0
Page 2

DG-HR3400 User Manual
COPYRIGHT
Copyright 2013 by Smartlink Network Systems Ltd. All rights reserved. No part of this
publication may be reproduced, transmitted, transcribed, stored in a retrieval system, or translated
into any language or computer language, in any form or by any means, electronic, mechanical,
magnetic, optical, chemical, manual or otherwise, without the prior written permission of this
company.
This company makes no representations or warranties, either expressed or implied, with respect
to the contents hereof and specifically disclaims any warranties, merchantability or fitness for any
particular purpose. Any software described in this manual is sold or licensed "as is". Should the
programs prove defective following their purchase, the buyer (and not this company, its
distributor, or its dealer) assumes the entire cost of all necessary servicing, repair, and any
incidental or consequential damages resulting from any defect in the software. Further, this
company reserves the right to revise this publication and to make changes from time to time in
the contents thereof without obligation to notify any person of such revision or changes.
Trademarks:
DIGISOL™ is a trademark of Smartlink Network Systems Ltd. All other trademarks are the
property of the respective manufacturers.
Safety
This equipment is designed with the utmost care for the safety of those who install and use it.
However, special attention must be paid to the dangers of electric shock and static electricity
when working with electrical equipment. All guidelines of this and of the computer manufacturer
must therefore be allowed at all times to ensure the safe use of the equipment.
2
Page 3

DG-HR3400 User Manual
INDEX
1. Product Introduction .................................................................................................5
1-1 Introduction and Safety Information ..............................................................5
1-2 Safety Information ..........................................................................................6
1-3 System Requirements......................................................................................7
1-4 Package Contents...........................................................................................7
2. Hardware Installation................................................................................................ 8
2-1 Get Familiar with your new wireless broadband router................................8
2-1-1 Front Panel.........................................................................................8
2-1-2 Back Panel........................................................................................10
2-2 Typical install................................................................................................ 11
2-3 Software Installation.....................................................................................13
3. Quick Install Guide................................................................................................. 26
3-1 Connecting to wireless broadband router by web browser..........................26
3-2 Getting Started..............................................................................................29
3-3 Using Quick Setup........................................................................................31
4. Configuring the Router ...........................................................................................37
4-1 Setup ............................................................................................................. 37
4-1-1 Wizard ..............................................................................................37
4-1-2 Local Network .................................................................................38
4-1-3 Internet Setup ..................................................................................41
4-1-4 Mode Settings...................................................................................44
4-2 Wireless.........................................................................................................45
4-2-1 Wireless Basics.................................................................................45
4-2-2 MBSSID............................................................................................50
4-2-3 WPS ..................................................................................................52
4-2-4 Wireless Advanced...........................................................................53
ACL Set up................................................................................................. 54
4-2-5 Wireless Repeater............................................................................55
4-2-6 WDS..................................................................................................56
4-3 Advanced ......................................................................................................57
4-3-1 Access Control List..........................................................................58
4-3-2 Port Triggering ................................................................................59
4-3-3 DMZ..................................................................................................60
4-3-4 URL Block ........................................................................................61
4-3-5 IP/Port Filter....................................................................................62
4-3-6 MAC Filter.......................................................................................63
4-3-7 DOS Settings ....................................................................................64
3
Page 4

DG-HR3400 User Manual
4-3-8 Dynamic DNS...................................................................................65
4-3-9 Qos Setup .........................................................................................66
4-3-10 UPnP...............................................................................................67
4-3-11 Routing ...........................................................................................68
4-3-12 Virtual Server ................................................................................70
4-4 Maintenance ................................................................................................. 71
4-4-1 Reboot...............................................................................................71
4-4-2 Firmware Upgrade..........................................................................72
4-4-3 Backup/Restore................................................................................73
4-4-4 Password ..........................................................................................74
4-4-5 Time and Date..................................................................................75
4-4-6 System Log....................................................................................... 76
4-4-7 Diagnostics-Ping ..............................................................................77
4-4-8 Diagnostics-Traceroute ...................................................................78
4-5 Status.............................................................................................................79
4-5-1 Device Info .......................................................................................79
4-5-2 Active Client Table .......................................................................... 80
4-5-3 Statistics............................................................................................80
5. Appendix................................................................................................................. 81
6. Glossary .................................................................................................................. 83
4
Page 5

DG-HR3400 User Manual
1. Product Introduction
1-1 Introduction and Safety Information
Thank you for purchasing DG-HR3400 300Mbps 802.11n Wireless Broadband Home
Router! DG-HR3400 is the best choice for Small office / Home office users, all
computers and network devices can share a single xDSL / cable modem internet
connection at high speed. Easy install procedures allow computer users to setup a
network environment in very short time - within minutes, even inexperienced users.
When the number of your computers and network-enabled devices grow, you can
also expand the number of network slots by simply connecting a hub or switch, to
extend the scope of your network.
All computers and IEEE 802.11b/g/n wireless-enabled network devices (including
PDA, cellular phone, game console and more) can connect to this wireless router
without additional cabling. With a compatible wireless card installed in your PC, you
can transfer files up to 300Mbps (transfer data rate).
Other features of this router include:
High Internet Access throughput.
Wireless speed up to 300Mbps.
Allows multiple users to share a single Internet line.
Shares a single Cable or xDSL internet connection.
Access private LAN servers from the internet.
Four wired LAN ports (10/100M) and one WAN port (10/100M).
Works with IEEE 802.11b/g/n wireless LAN devices.
Supports DHCP (Server/Client) for easy IP-address setup.
Supports multiple wireless modes like: AP, Client, Wireless Bridge and
Universal Repeater.
Advanced network and security features like: Special Applications, QoS, DMZ,
Virtual Servers, Access Control, Firewall.
Allows you to monitor the router’s status like: DHCP Client Log, System Log,
Security Log and Device/Connection Status.
Easy to use Web-based GUI for network configuration and management
purposes.
Remote management function allows configuration and upgrades from a remote
computer (over the Internet).
Provides Auto MDI / MDI-X function for all wired Ethernet ports.
5
Page 6

DG-HR3400 User Manual
1-2 Safety Information
In order to keep the safety of users and your properties, please follow the safety
instructions as mentioned below:
1. This router is designed for indoor use only; DO NOT place this router outdoor.
2. DO NOT place this router close to a hot or humid area, like kitchen or bathroom.
Also, do not leave this router in the car during summer.
3.
DO NOT pull any connected cable with force; disconnect it from the router first.
If you want to place this Router at a height or mount on the wall, please make sure
4.
it is firmly secured. Falling from a height would damage the router and its
accessories and warranty will be void.
Accessories of this router, like antenna and power supply, are dangerous to small
5.
children. KEEP THIS ROUTER OUT OF REACH OF CHILDREN.
The Router will get heated up when used for long time (This is normal and is not a
6.
malfunction). DO NOT put this Access Point on paper, cloth, or other flammable
materials.
There’s no user-serviceable part inside the router. If you find that the router is not
7.
working properly, please contact your dealer of purchase and ask for help. DO
NOT disassemble the router, warranty will be void.
8. If the router falls into water when it’s powered, DO NOT use your hands to pick it
up. Switch the electrical power off before you do anything, or contact an
experienced electrical technician for help.
9. If you smell something strange, or even see some smoke coming out from the
router or power supply, remove the power supply or switch the electrical power off
immediately, and call the dealer of purchase for help.
6
Page 7

DG-HR3400 User Manual
1-3 System Requirements
Notebook or desktop computer with network adapter (wired/wireless)
Internet connection, provided by xDSL or cable modem with a RJ-45 Ethernet
port.
Windows 98/ME/2000/XP/Vista
Web browser (Microsoft Internet Explorer 4.0 or above, Netscape Navigator 4.7
or above, Opera web browser, or Safari web browser).
An available AC power socket (100 – 240V, 50/60Hz)
1-4 Package Contents
Before you start using this router, please check if there’s anything missing in the
package, and contact your dealer of purchase to claim for missing items:
DG-HR3400 Wireless Broadband Home Router
Power adapter (5V DC, 1A)
Rubber feet (4 Nos.)
Quick Installation Guide
Installation Guide CD (includes User Manual, QIG &Utility)
Patch Cord (1 No.)
7
Page 8
DG-HR3400 User Manual
2. Hardware Installation
2-1 Get Familiar with your new wireless broadband router
2-1-1 Front Panel
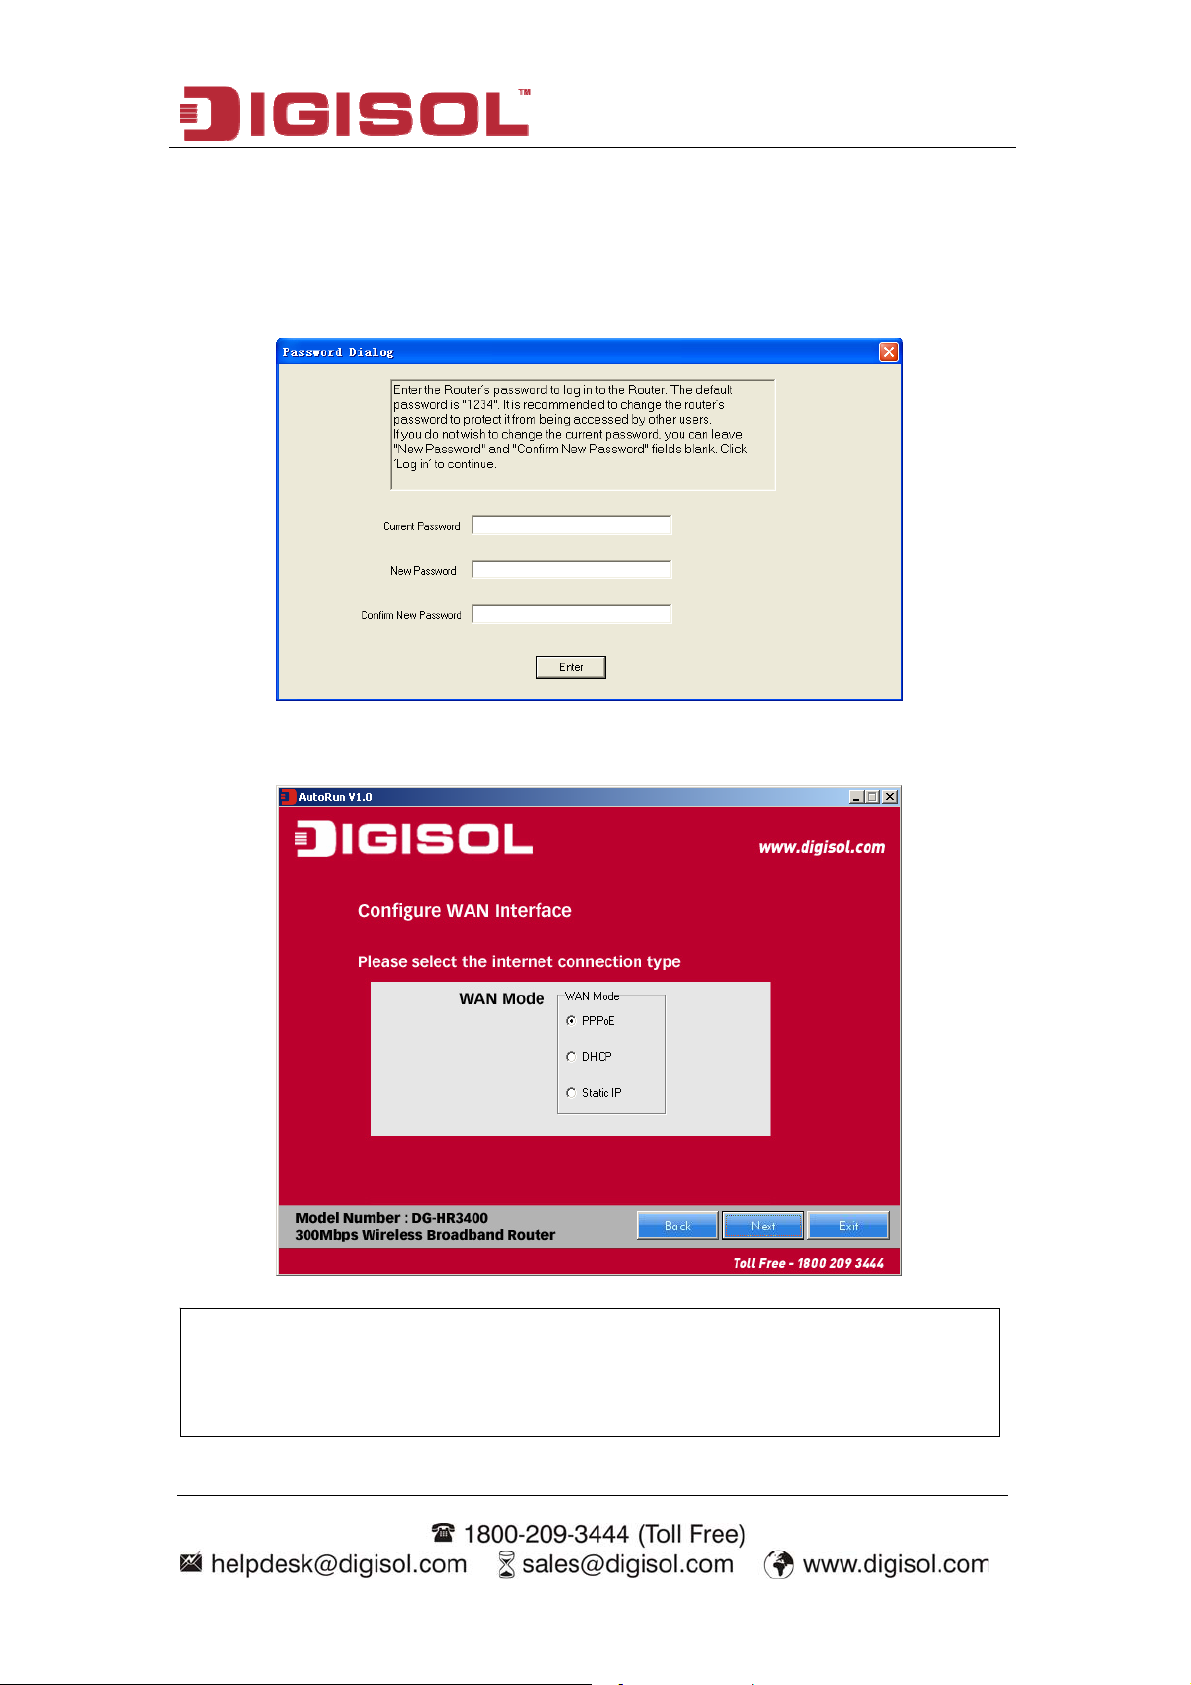
LED Name LED Status Indication
Power (PWR)
WAN
LAN(1-4)
On Router is switched on and correctly powered.
On WAN port is connected.
Off WAN port is not connected.
Blinking WAN activity (transferring or receiving data).
On LAN port is connected.
Off LAN port is not connected.
8
Page 9
DG-HR3400 User Manual
Blinking LAN activity (transferring or receiving data).
On Wireless network is switched on.
WLAN
Off Wireless network is switched off.
Blinking Wireless LAN activity (transferring or receiving data).
A wireless device has been successfully added to the
On
WPS
network by WPS function.
Off WPS process is not initiated.
A wireless device is connecting to the network by
Blinking
WPS function.
9
Page 10
DG-HR3400 User Manual
2-1-2 Back Panel
Interfaces Description
Antennas
Power on/off
These antennas are 5dBi dipole antennas.
Press this button to power on/off the router.
button
Power
LAN (1 – 4)
The Power socket is where you will connect the power adapter.
Please use the power adapter provided with this Wireless Router.
Local Area Network (LAN) ports 1 to 4.
The WPS/WIFI button has two functions.
WPS/WIFI
WPS: Press this button for more than 5 seconds to initiate WPS.
WIFI: Press this button for less than 5 seconds to enable WLAN.
Reset the router to factory default settings (clear all settings).
Reset
Press this button and hold for 5 seconds to restore all settings to
factory defaults.
WAN
Wide Area Network (WAN / Internet) port.
10
Page 11
DG-HR3400 User Manual
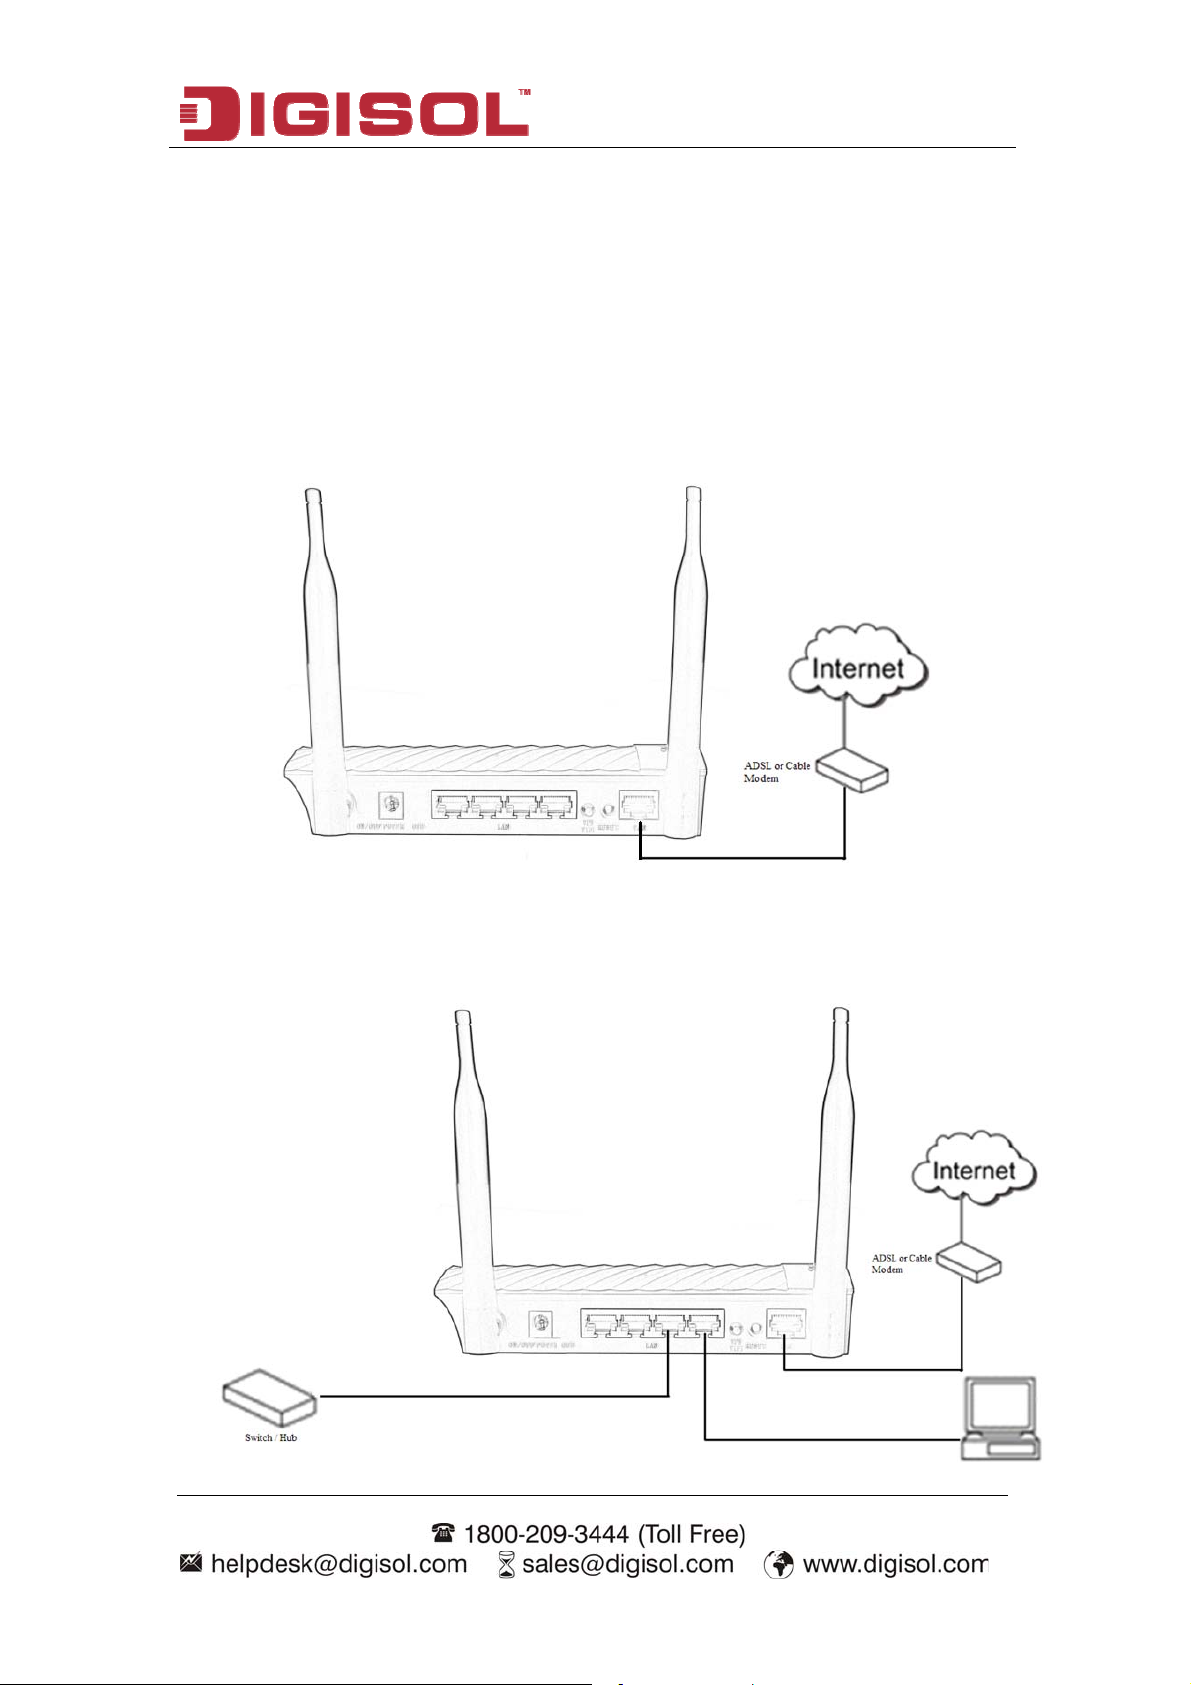
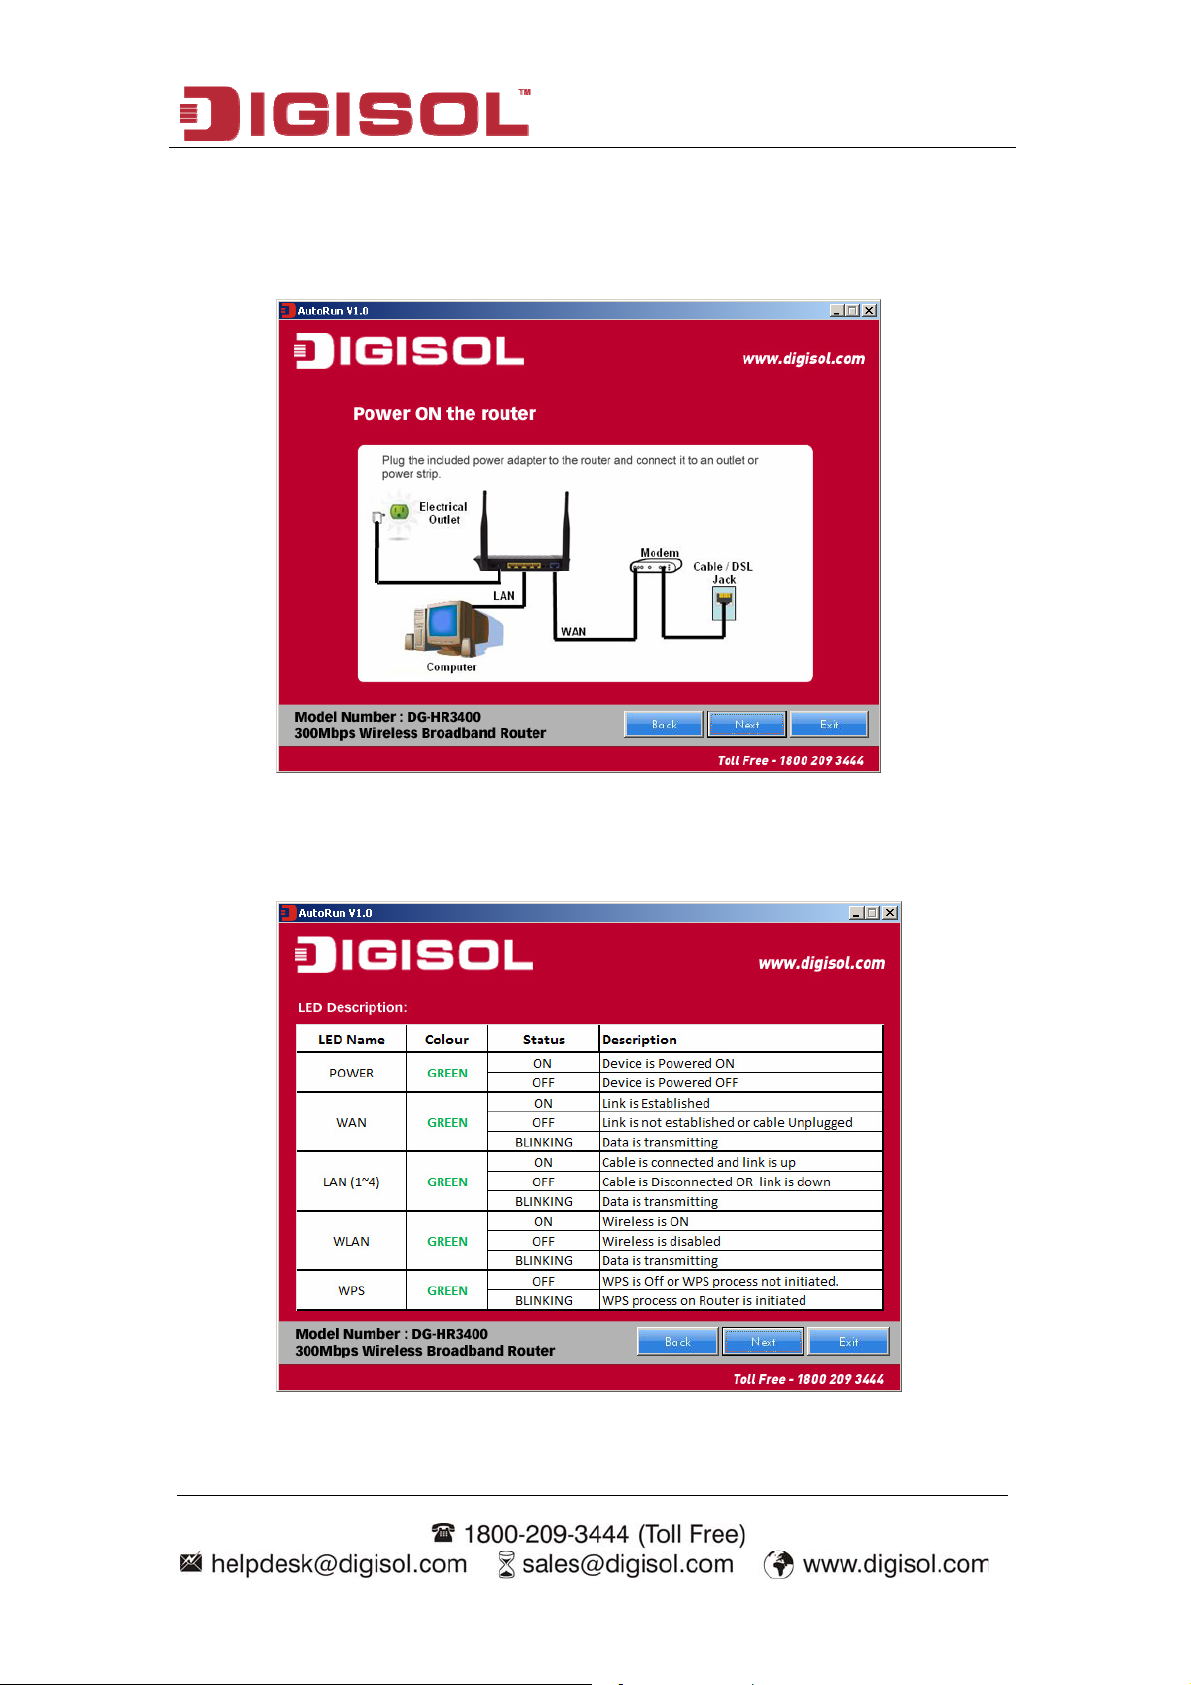
2-2 Typical install
Hardware Installation:
Please follow the below mentioned instructions to build the network connection
between your new WIRELESS router and your computers, network devices:
1. Connect your xDSL / cable modem to the WAN port of the router by an Ethernet
cable.
2. Connect all your computers, network devices (switch / hub) to the LAN port of
the router.
11
Page 12
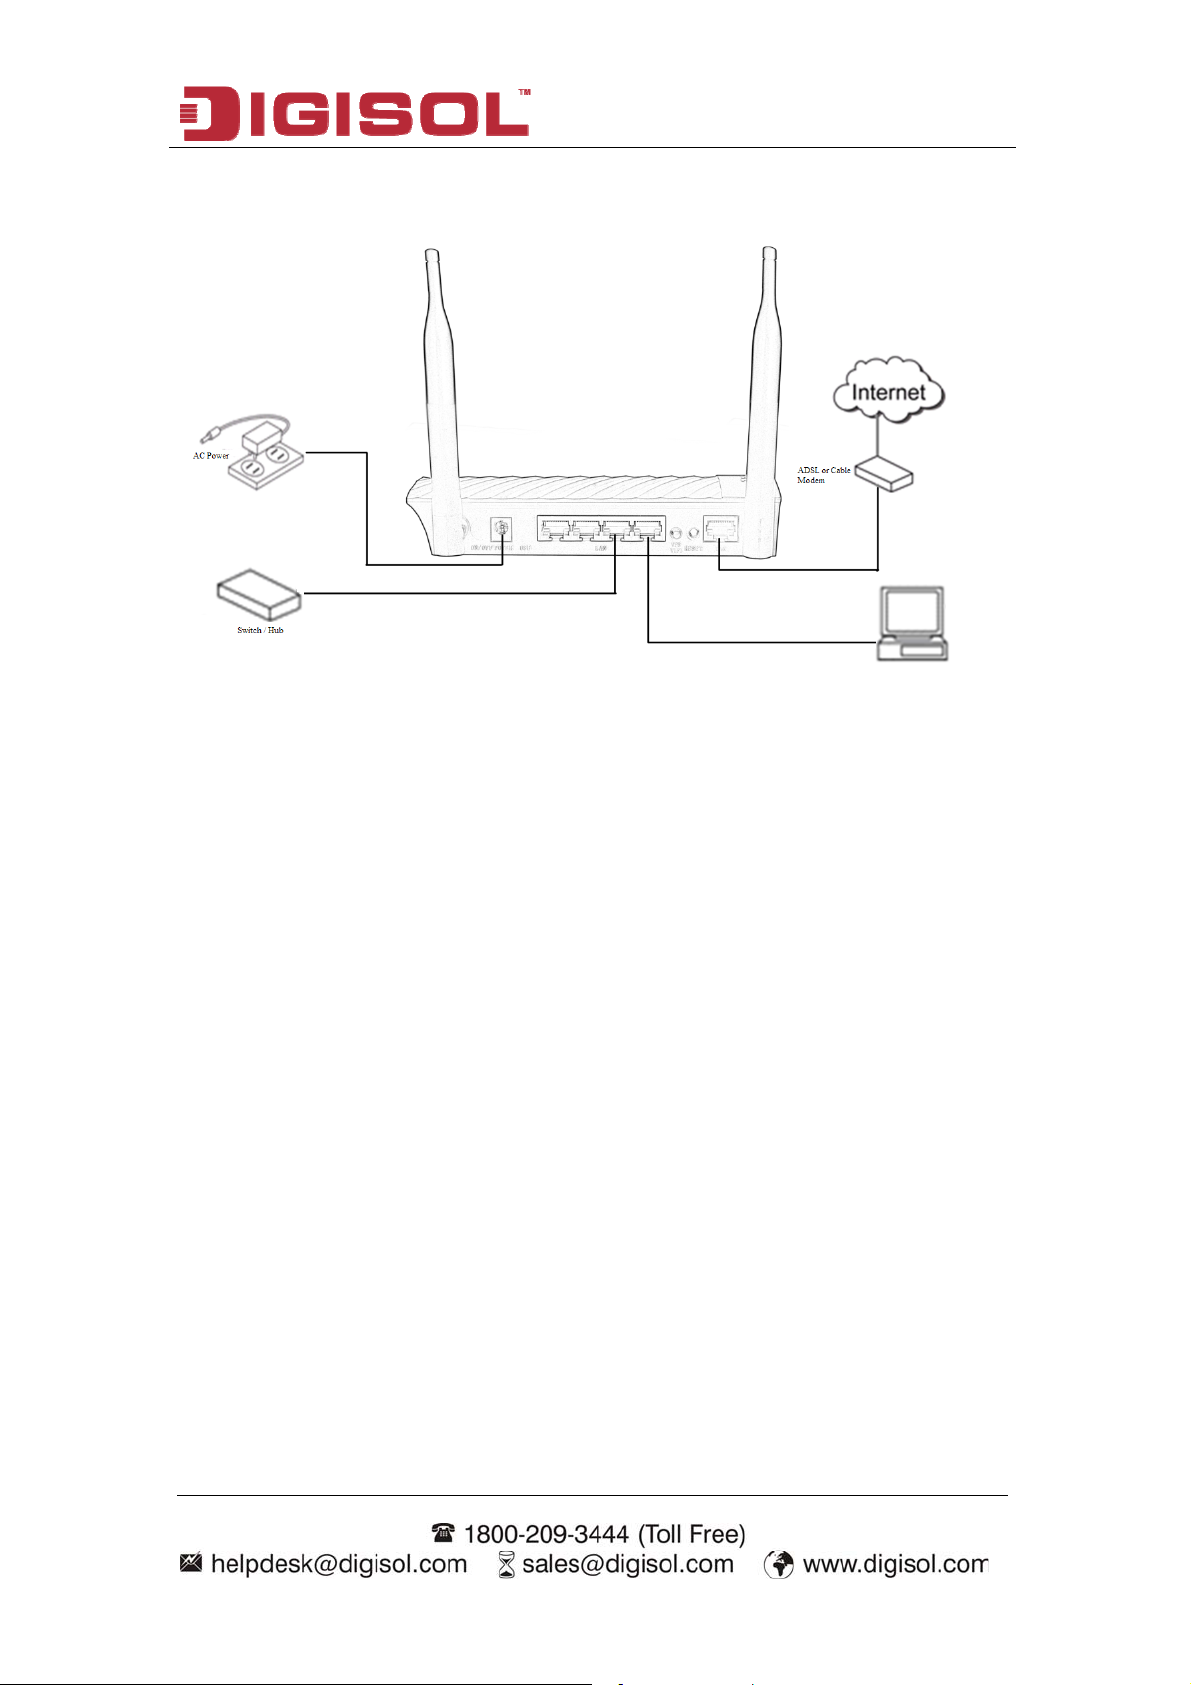
DG-HR3400 User Manual
3. Connect the power adapter (5V DC / 1A) to the wall socket, and then connect it
to the ‘Power’ socket of the router.
4. Please check all LEDs on the front panel. Power LED ‘PWR’ should be steadily
ON, WAN and LAN LEDs should be ON. Check if the computer/network device
connected to the respective port of the router is powered ON and correctly
connected. If power LED ‘PWR’ is not ON, or any LED you expected is not ON,
please recheck the cabling.
12
Page 13
DG-HR3400 User Manual
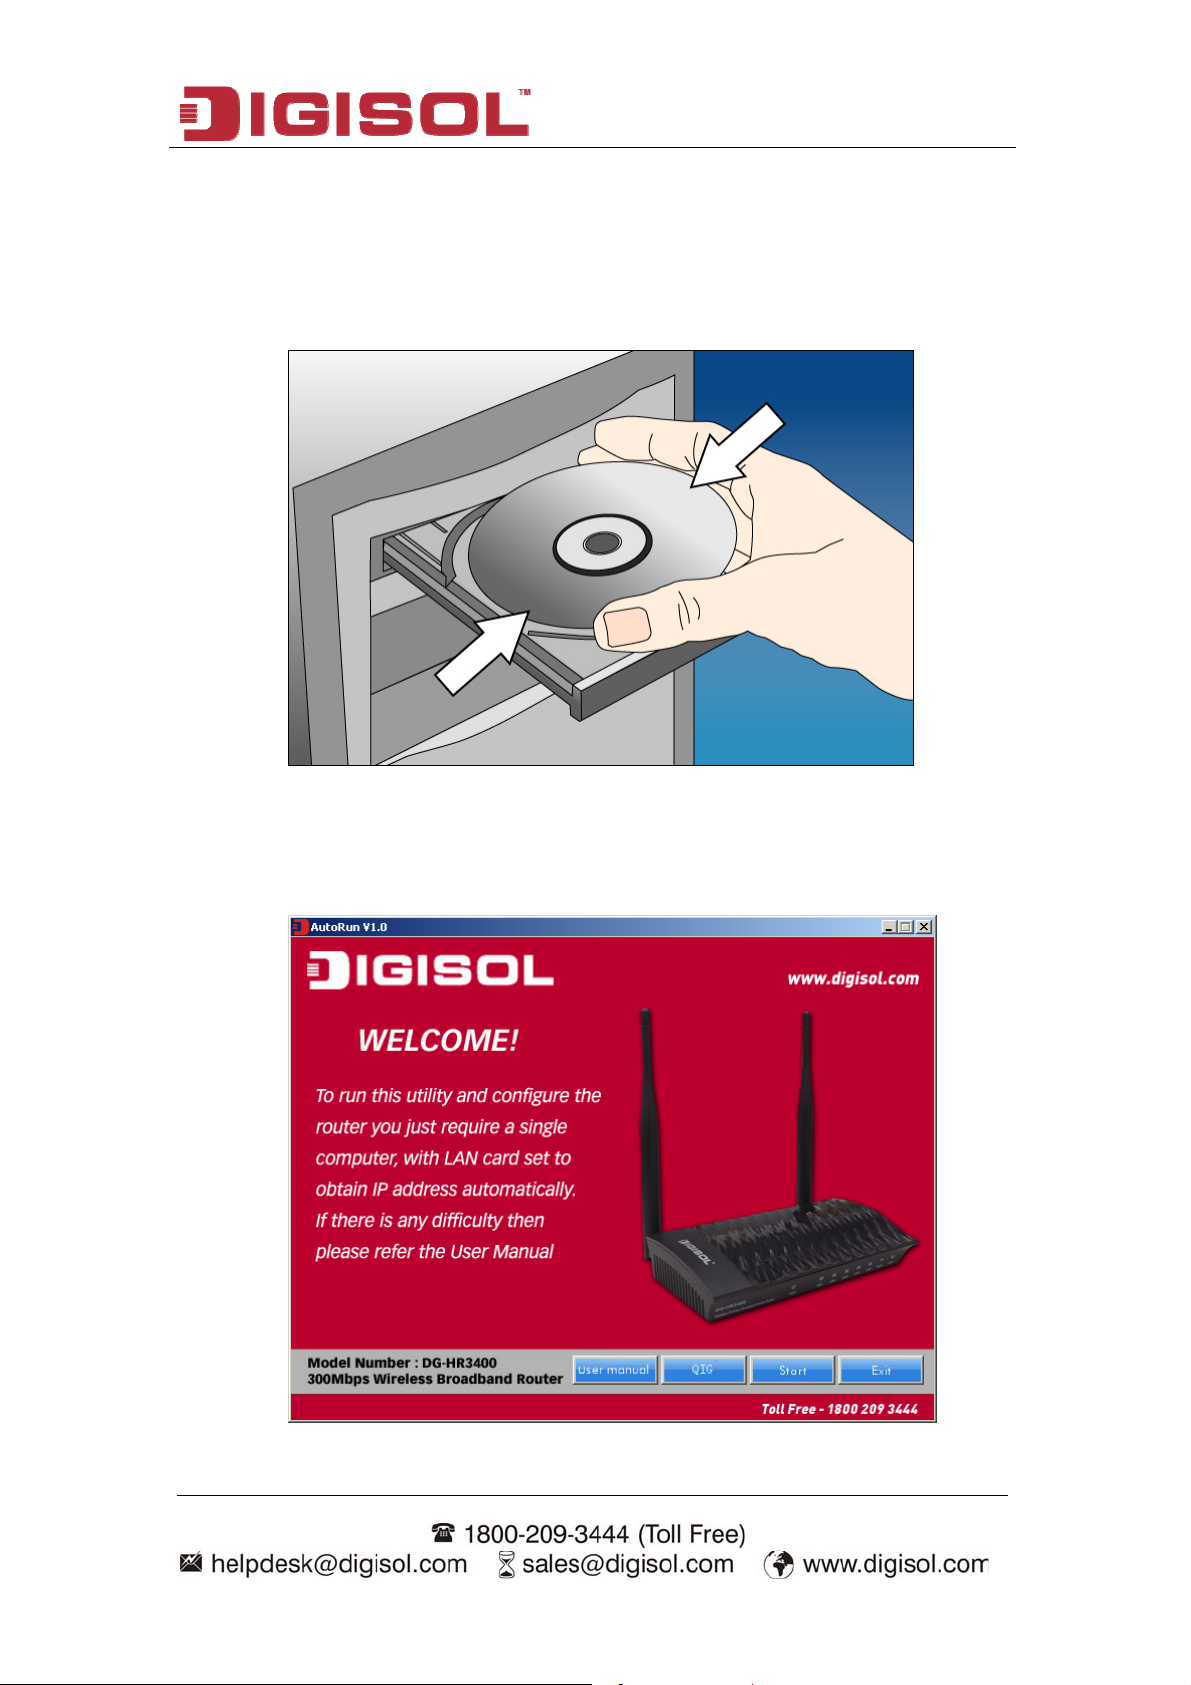
2-3 Software Installation
Insert the Setup CD into your CD-ROM drive of notebook/desktop computer.
Explore the CD and execute the “AutoRun.exe” file. Below given screen will
appear. Click 'Start' to Continue.
13
Page 14
DG-HR3400 User Manual
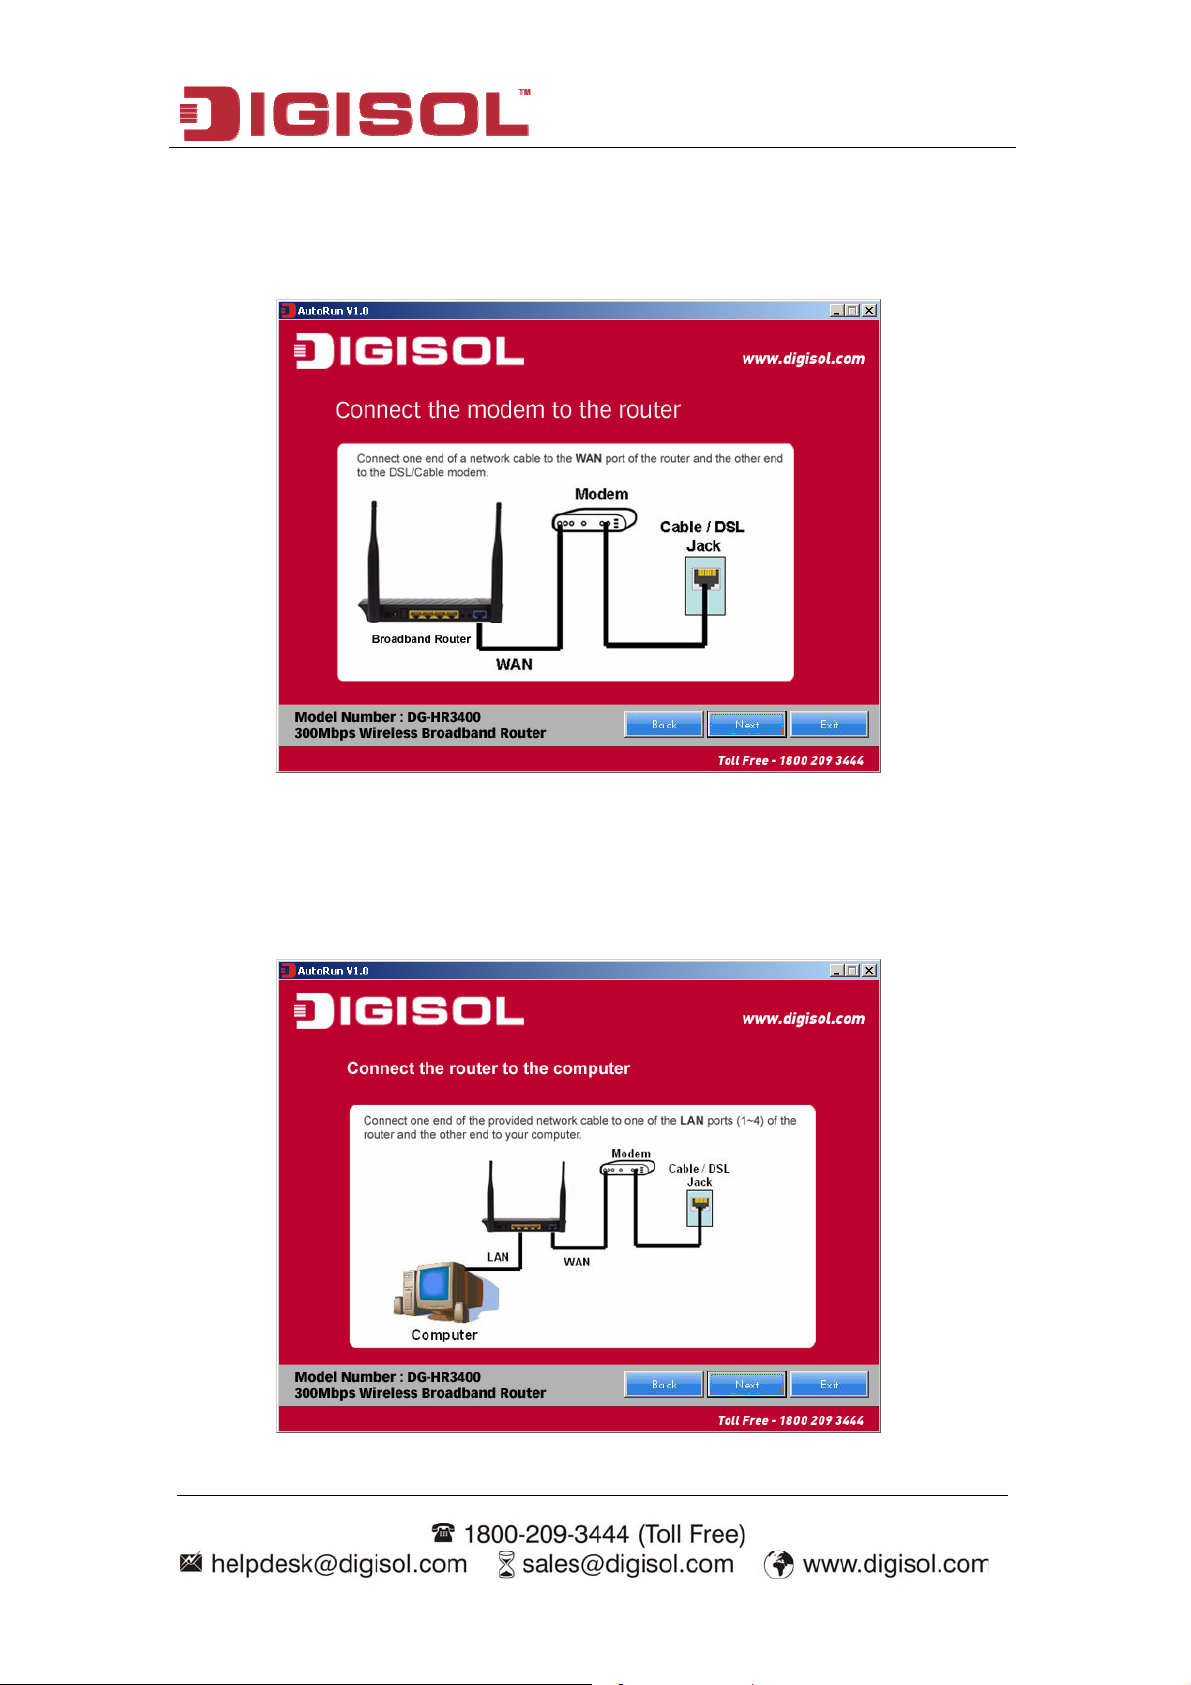
Connect one end of a network cable to the WAN port of the router and the
other end to the DSL/Cable modem. Click ‘Next’ to continue.
Connect one end of the provided network cable to one of the LAN ports (1~4)
of the router and the other end to your computer. Click ‘Next’ to continue
with the installation.
14
Page 15
DG-HR3400 User Manual
Power on the Router. It will take approximately 30 seconds for the router to
boot up completely. Click ‘Next’ to continue with the installation.
Ensure the normal indication of all LED’s on the router. If not, try the above
steps again else click ‘Next’ to continue.
15
Page 16
DG-HR3400 User Manual
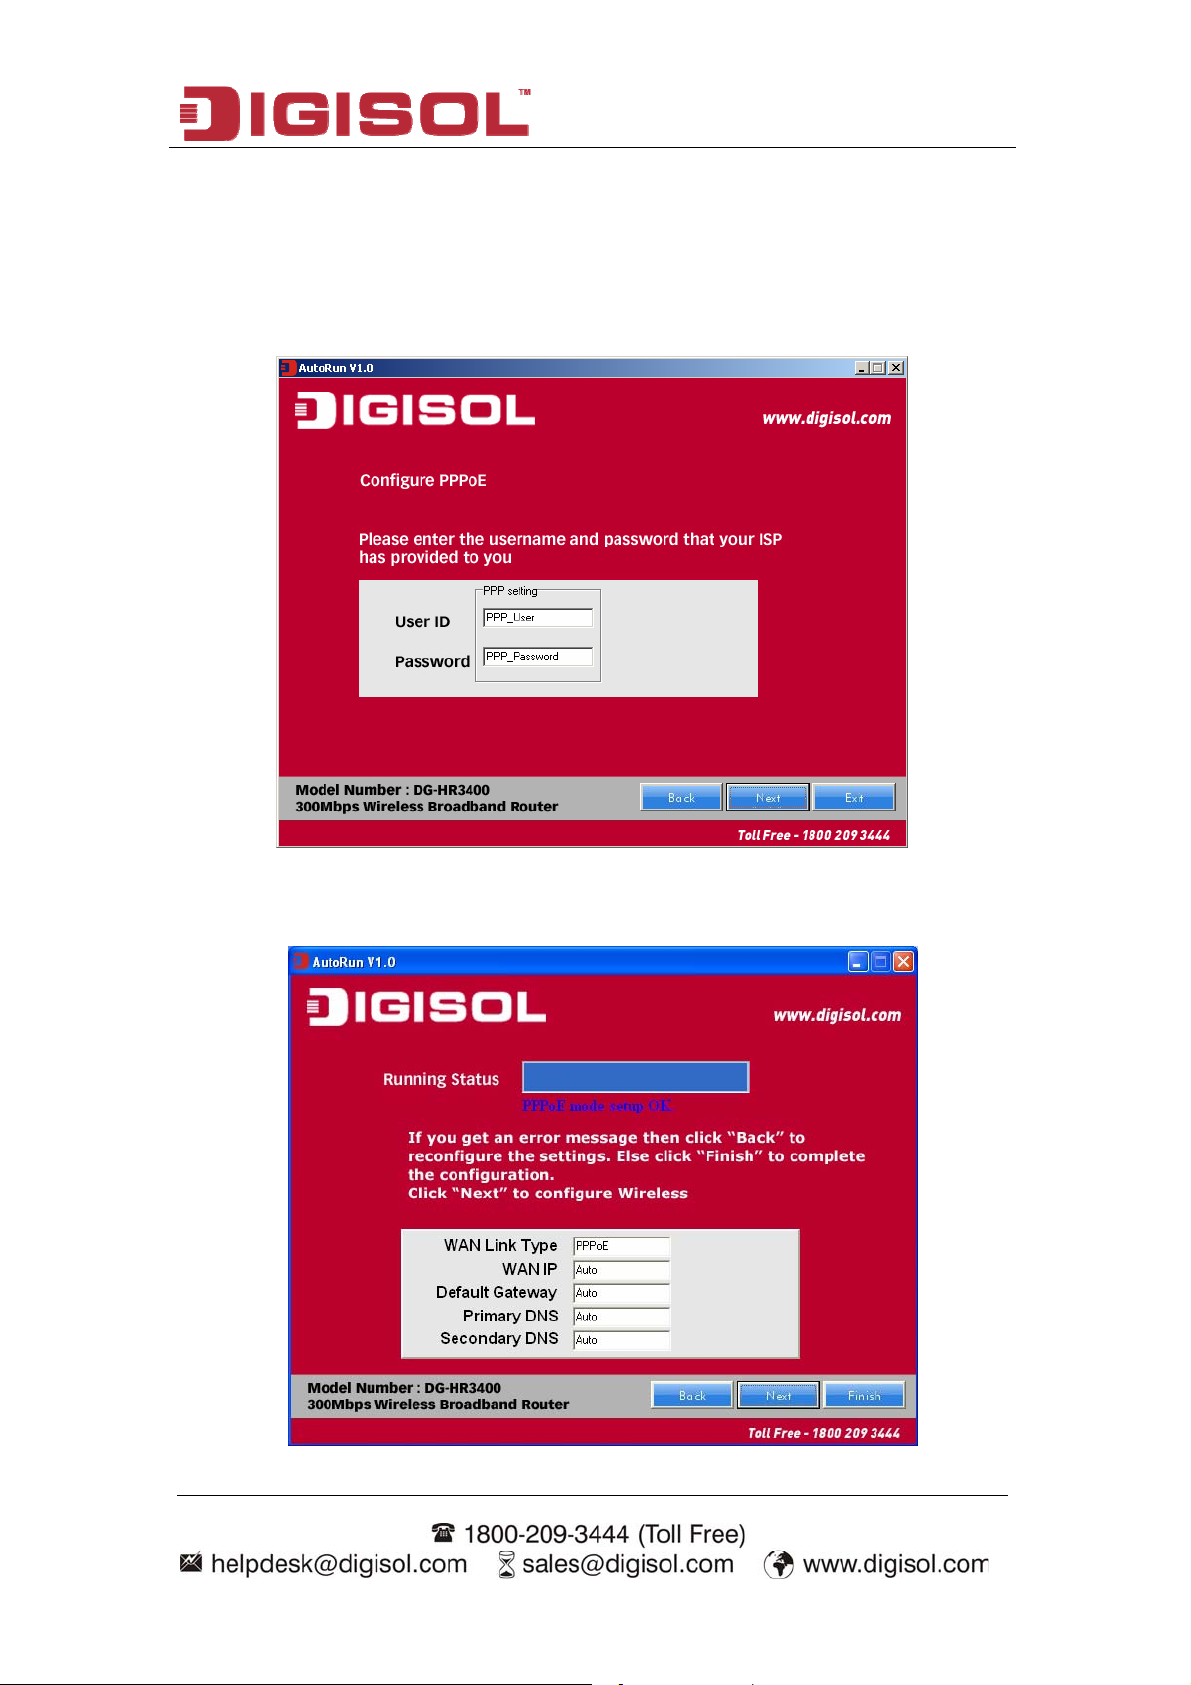
Enter the Router’s password to log in to the Router. The default password is
“1234”. It is recommended to change the router’s password to protect it from
being accessed by other users. If you do not wish to change the current
password, you can leave “New Password” and “Confirm New Password”
fields blank. Click ‘Enter’ to continue.
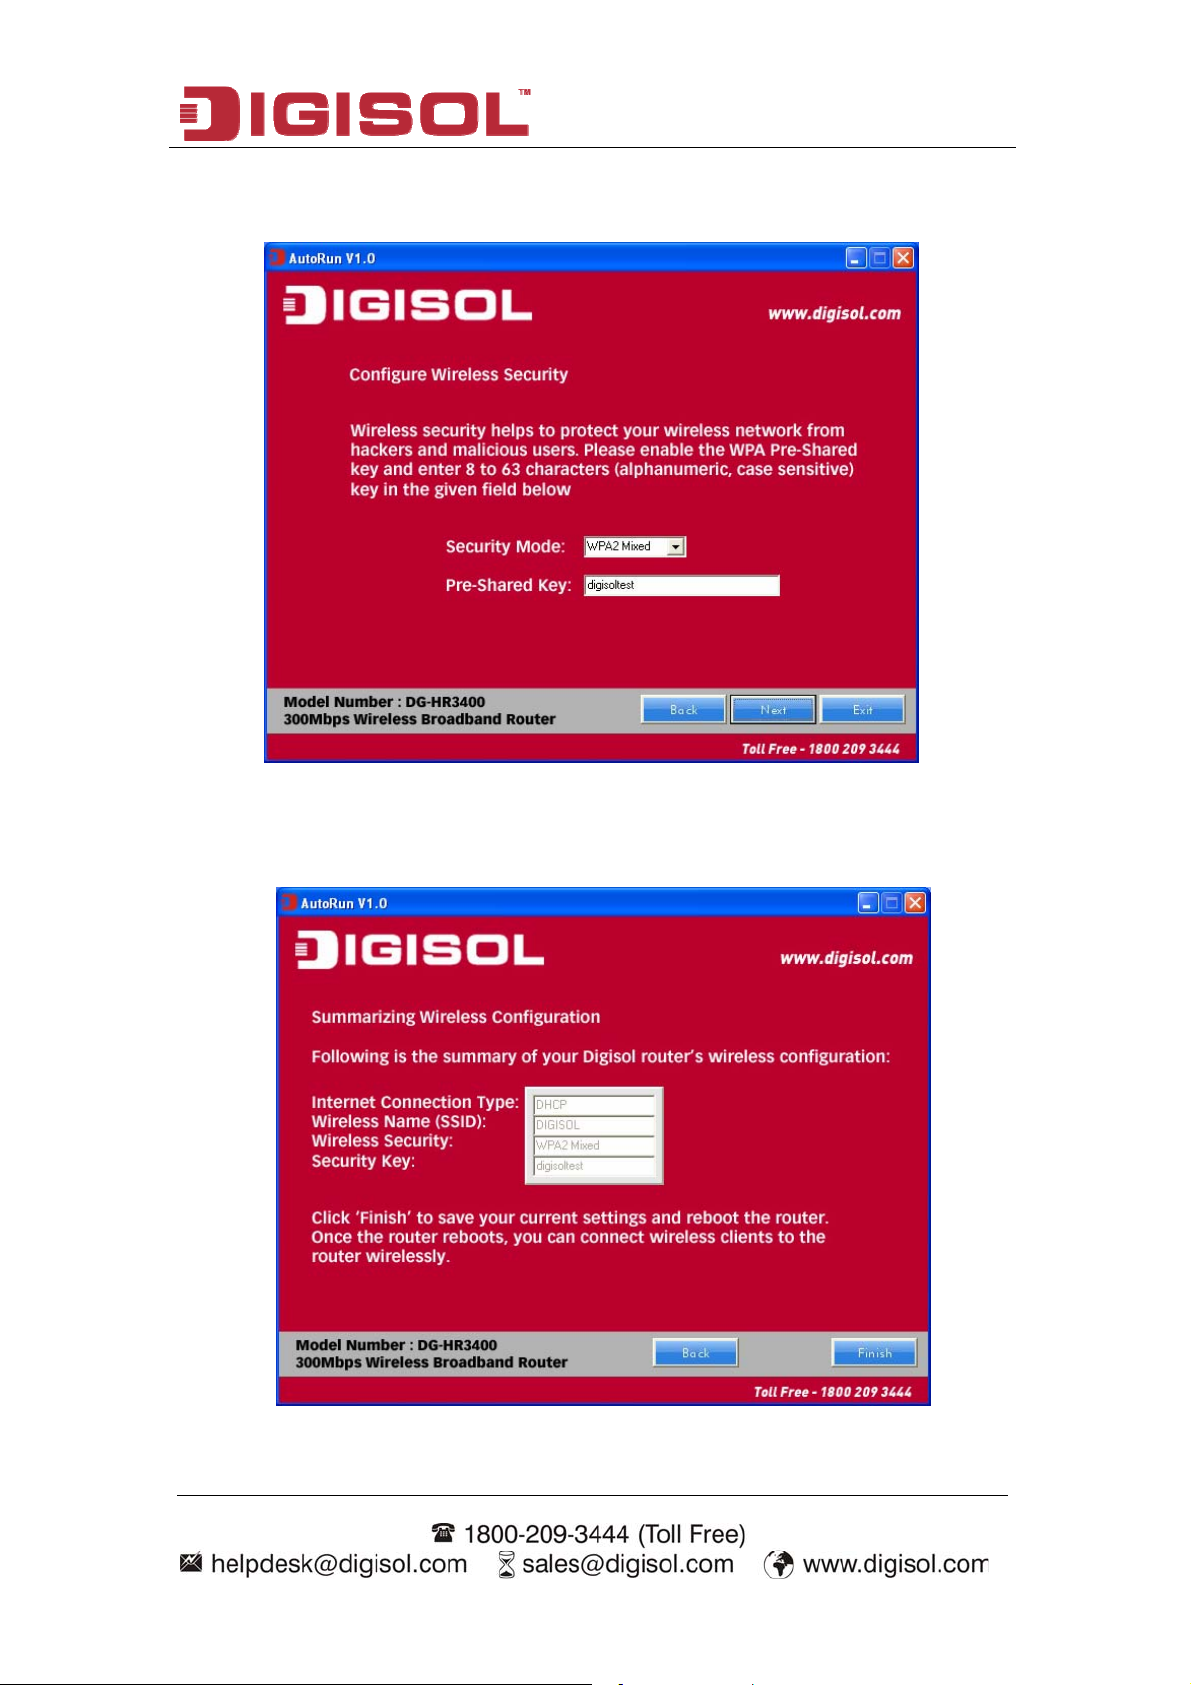
Please select the internet connection type. Click ‘Next’ to continue.
NOTE: The steps mentioned till here are the common steps to be
followed for all the three modes. Following steps below
describe how to configure the respective modes.
16
Page 17
DG-HR3400 User Manual
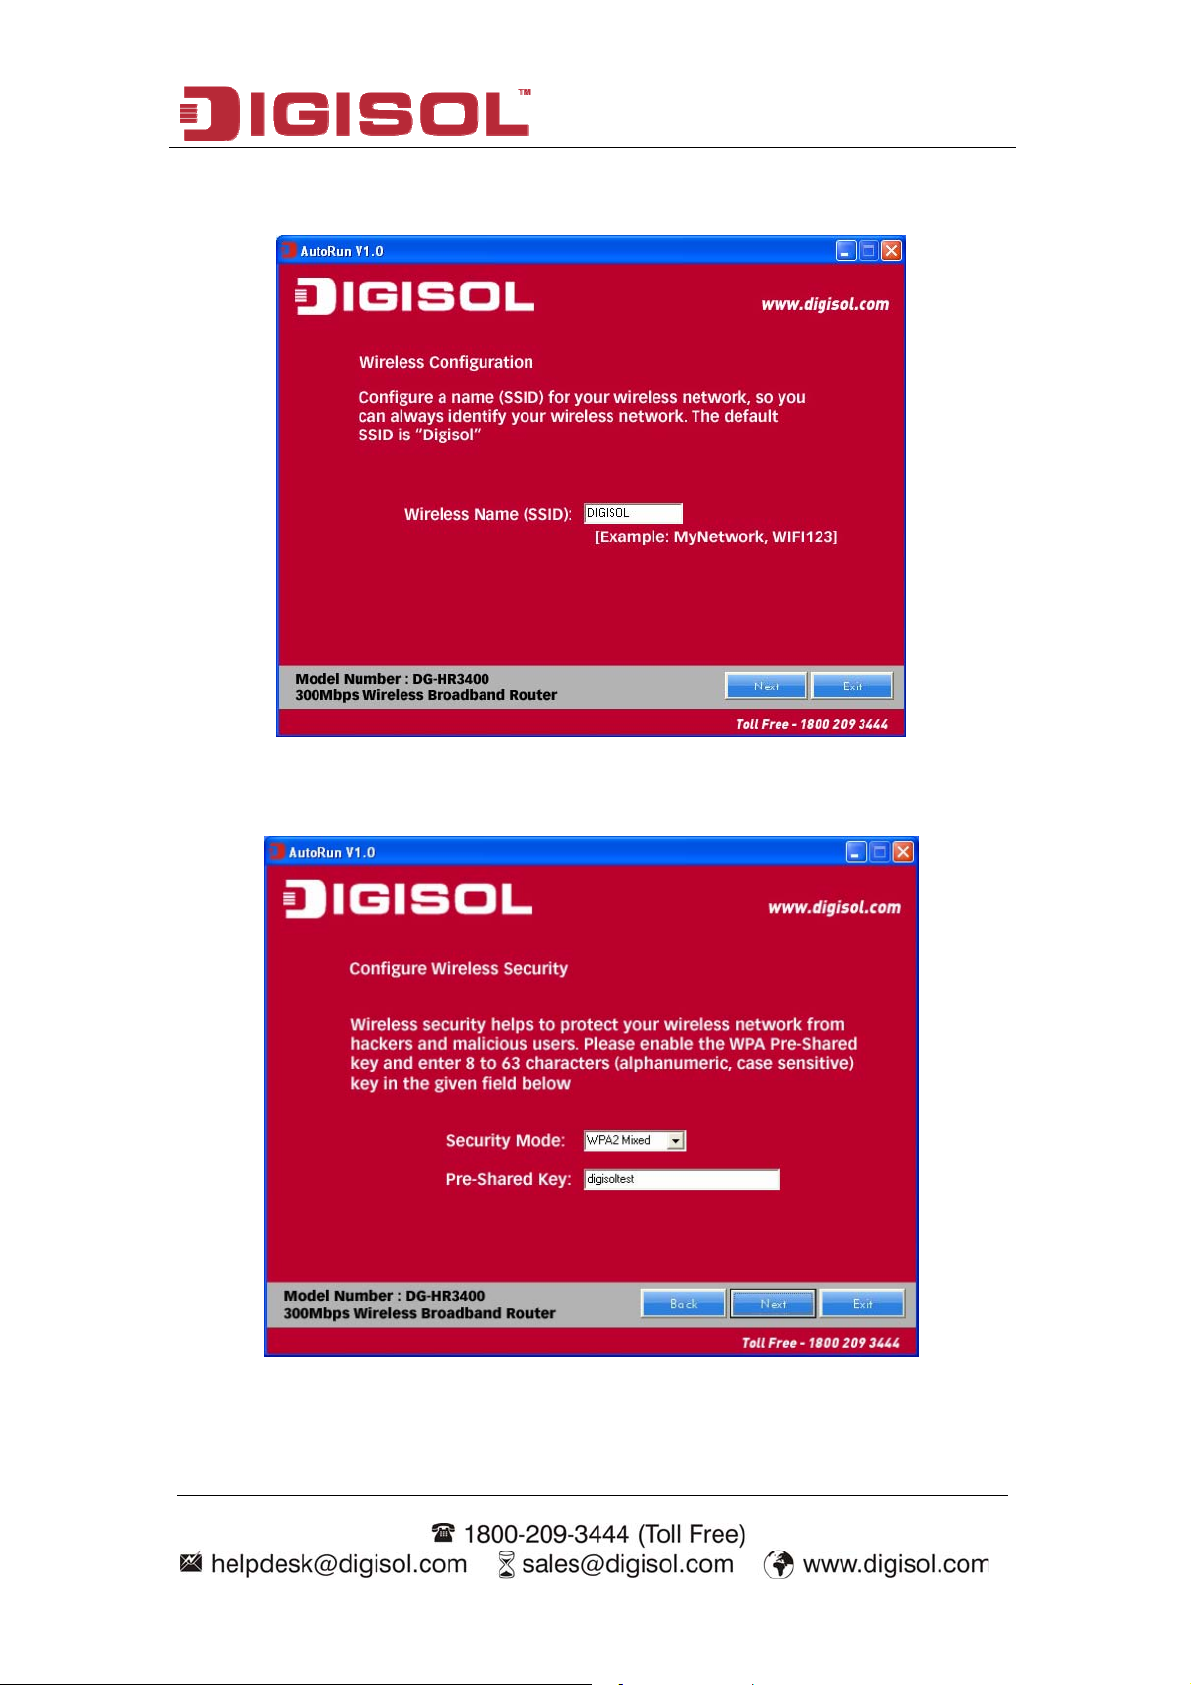
PPPoE (DSL users)
Choose PPPoE. (Point to Point Protocol over Ethernet) If your ISP uses a
PPPoE connection you will be provided with a username and password. This
option is typically used for DSL services.
Once the user name and password is entered click on ‘Next’, the screen
shown below will appear. Click on ‘Next’.
17
Page 18
DG-HR3400 User Manual
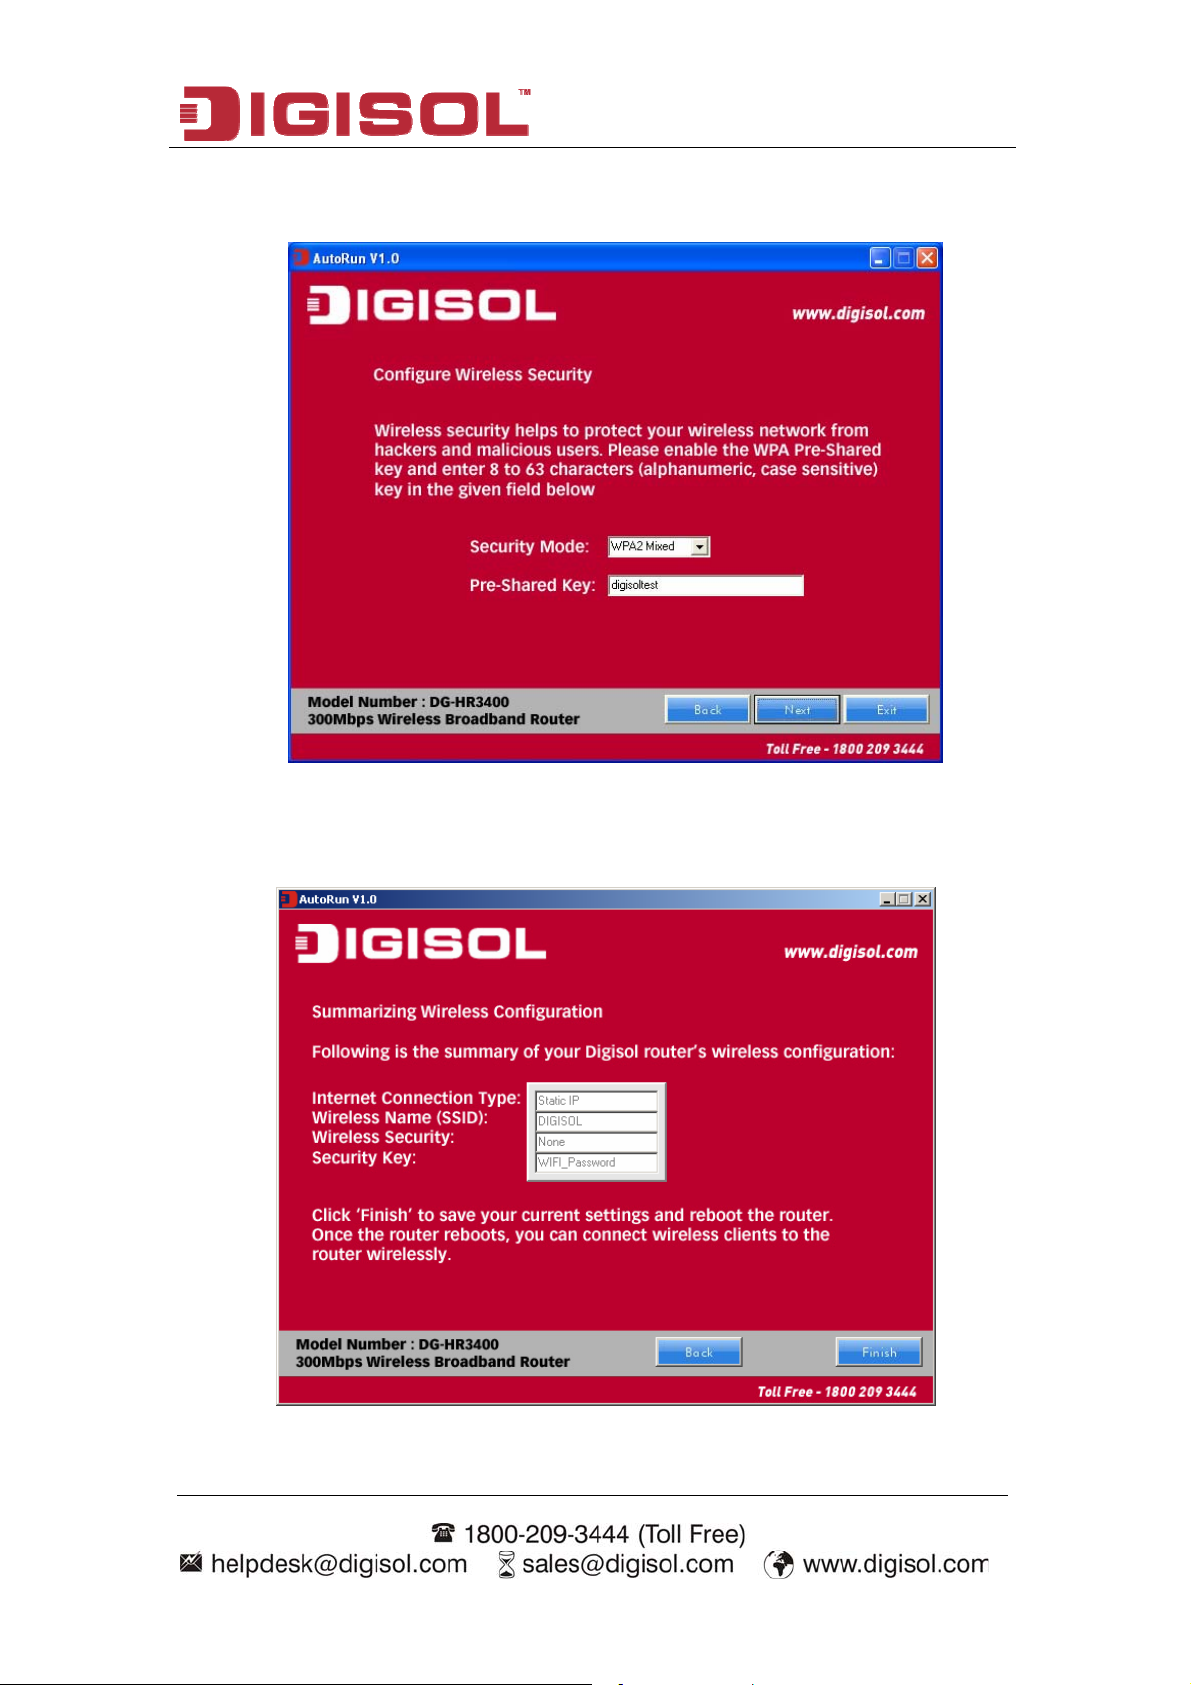
Enter the ‘SSID’ and click on ‘Next’.
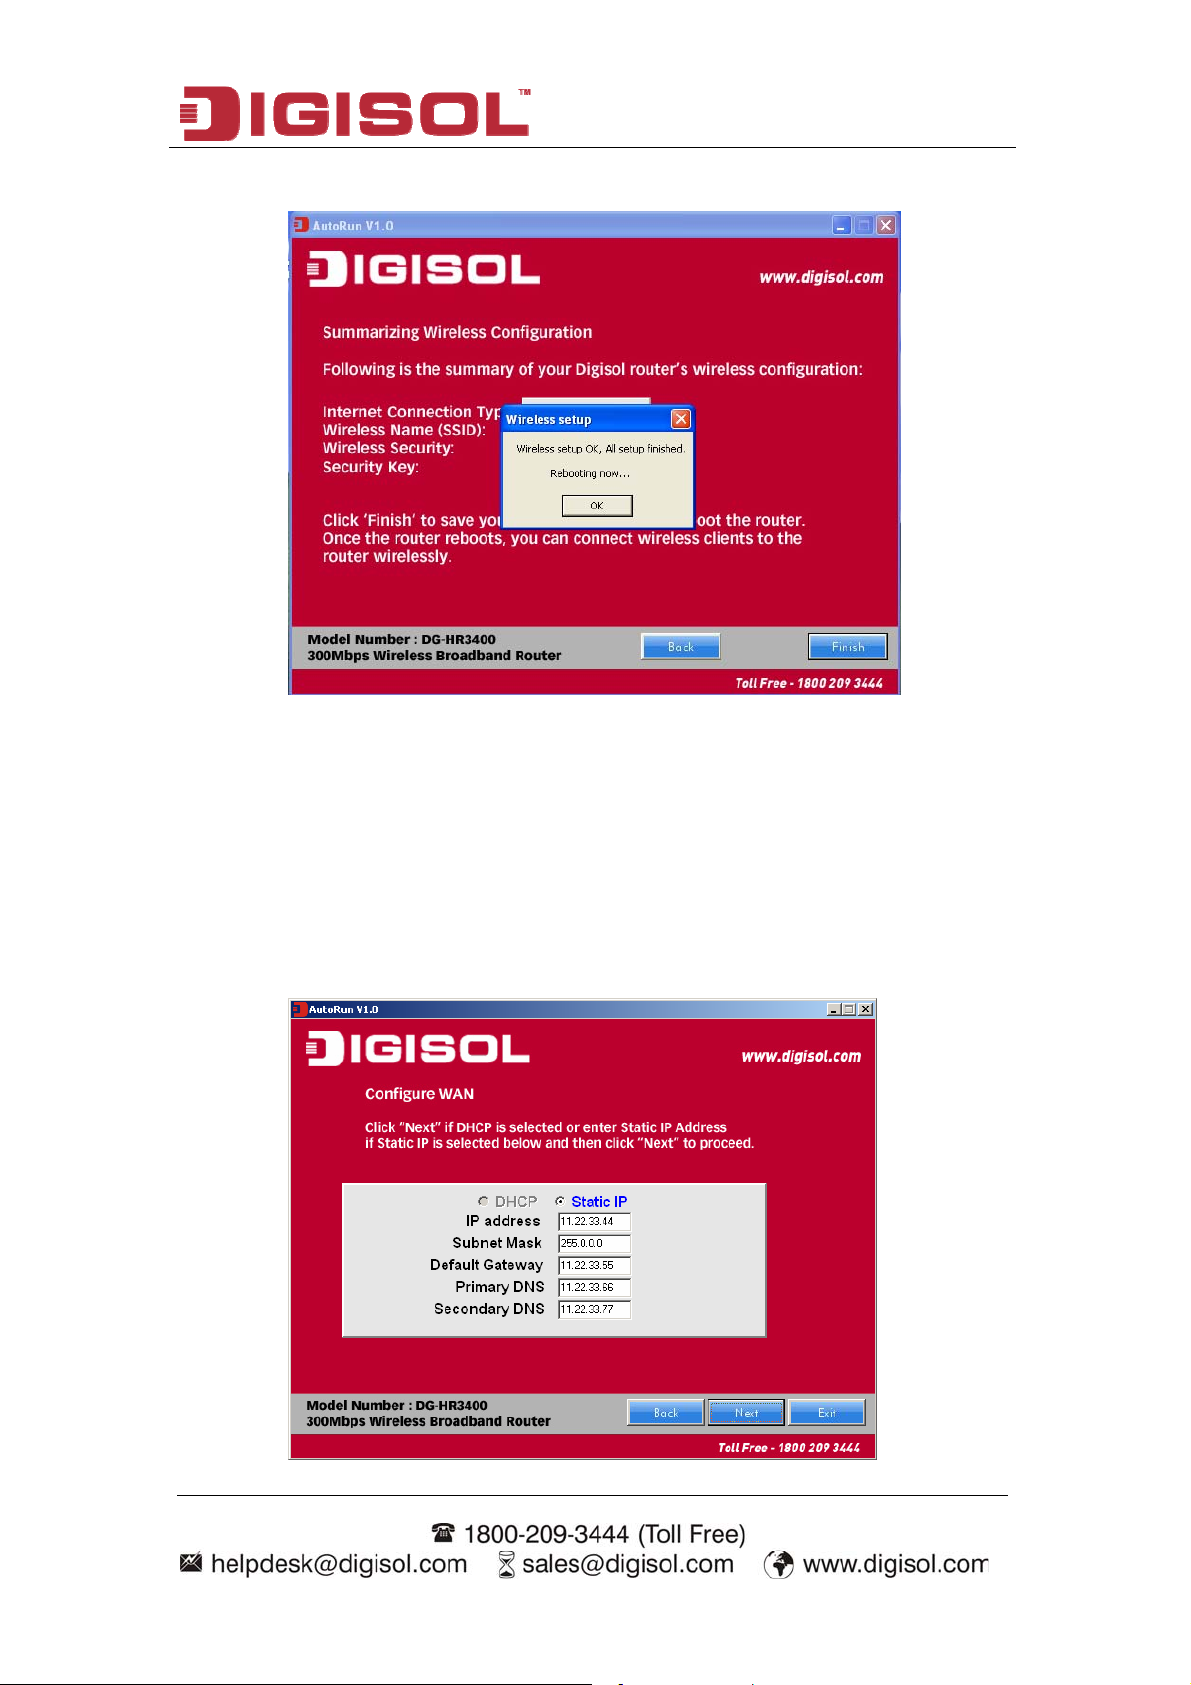
Configure the wireless security. Enter the security mode i.e. either ‘None’ or
‘WPA2 Mixed’ and click on ‘Next’.
18
Page 19
DG-HR3400 User Manual
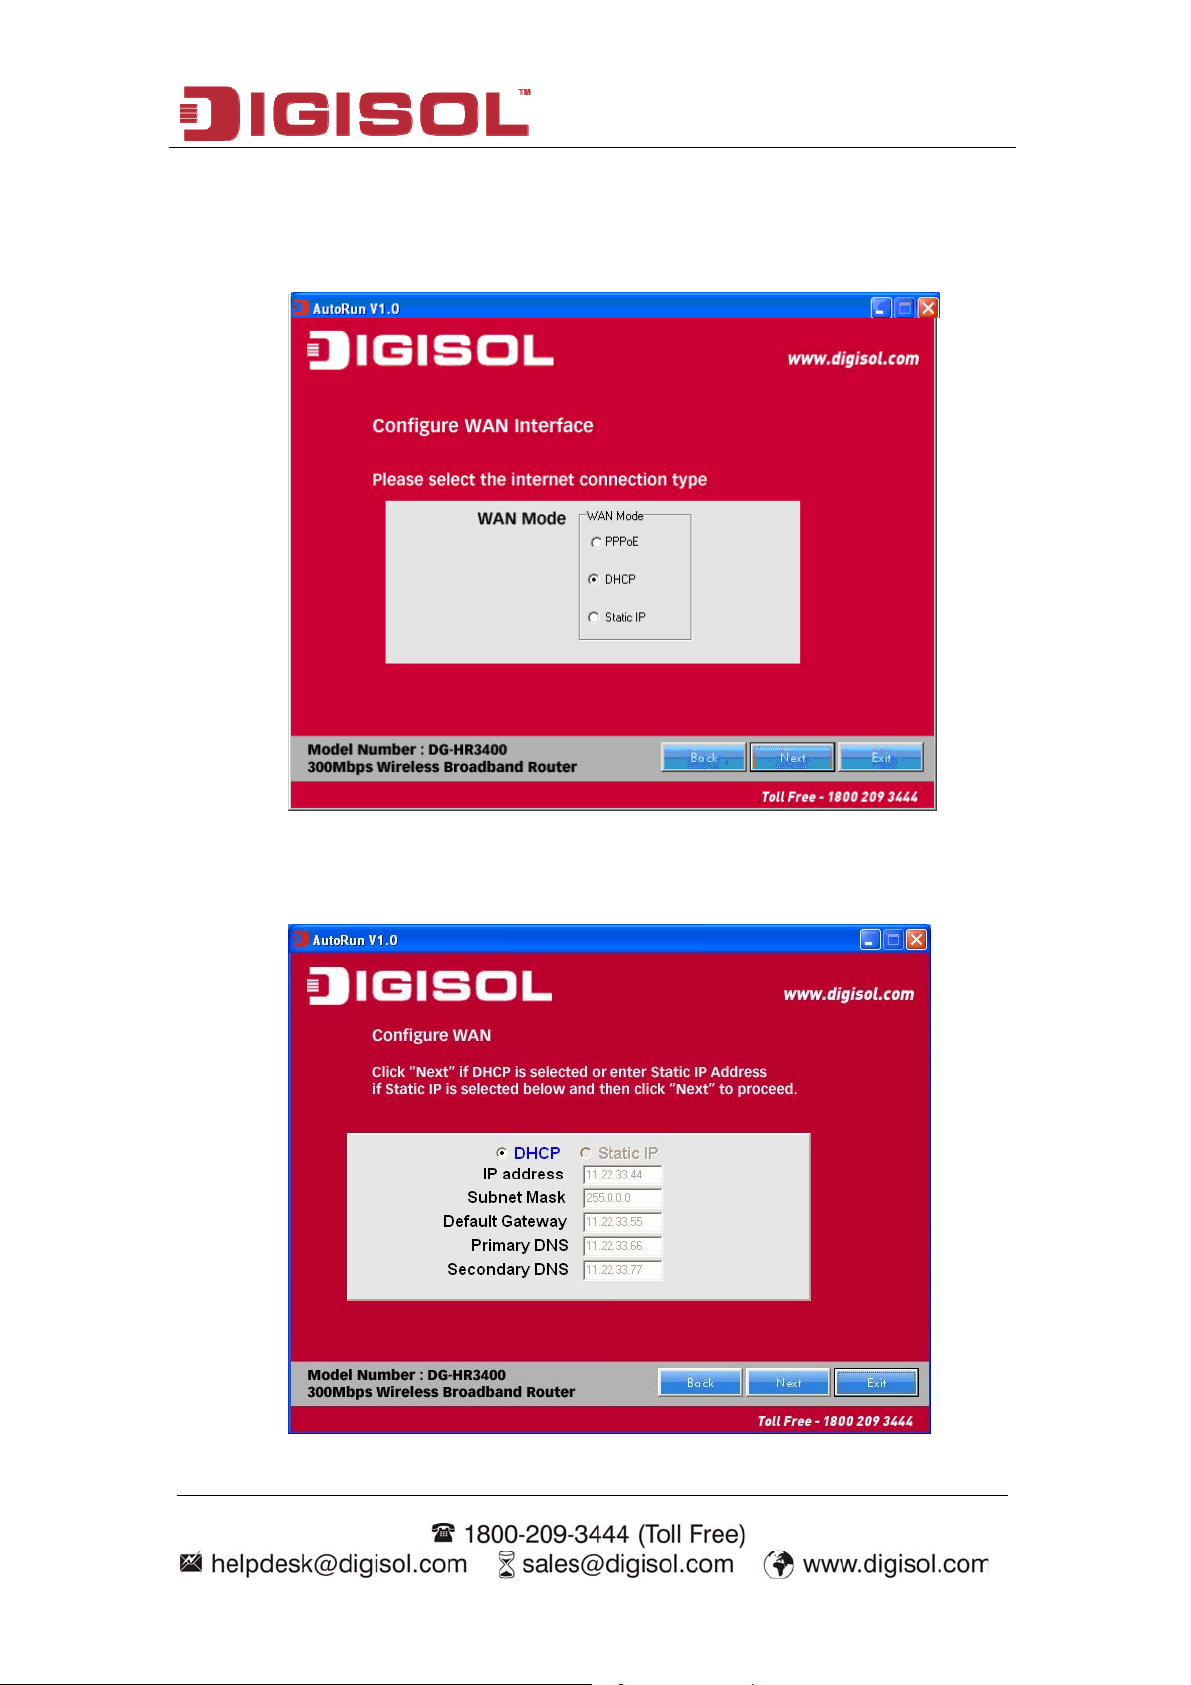
The screen as shown below will appear. Click on ‘Finish’.
Lastly, the router will reboot as shown below.
19
Page 20
DG-HR3400 User Manual
DHCP (Cable Modem users)
Select DHCP Client to obtain IP Address information automatically from your
ISP. Click on ‘Next’.
The screen shown below will appear. Click on ‘Next’.
20
Page 21

DG-HR3400 User Manual
Below mentioned screen will appear. Click on ‘Next’.
Enter the ‘SSID’ and click on ‘Next’.
21
Page 22
DG-HR3400 User Manual
Configure the wireless security. Enter the security mode i.e. either ‘None’ or
‘WPA2 Mixed’ and click on ‘Next’.
Following screen will appear. Click on ‘Finish’.
22
Page 23
DG-HR3400 User Manual
Lastly, the router will reboot as shown below.
Static IP (Cable Modem users)
Select Static IP Address if all the Internet port’s IP information is provided to
you by your ISP. You will need to enter in the IP address, subnet mask,
gateway address and DNS address provided to you by your ISP. Each IP
address entered in the fields must be in the appropriate IP form, which are
four octets separated by a dot (x.x.x.x). The Router will not accept the IP
address if it is not in this format. Click on ‘Next’.
23
Page 24

DG-HR3400 User Manual
The screen shown below will appear. Click on ‘Next’.
Enter the ‘SSID’ and click on ‘Next’.
24
Page 25
DG-HR3400 User Manual
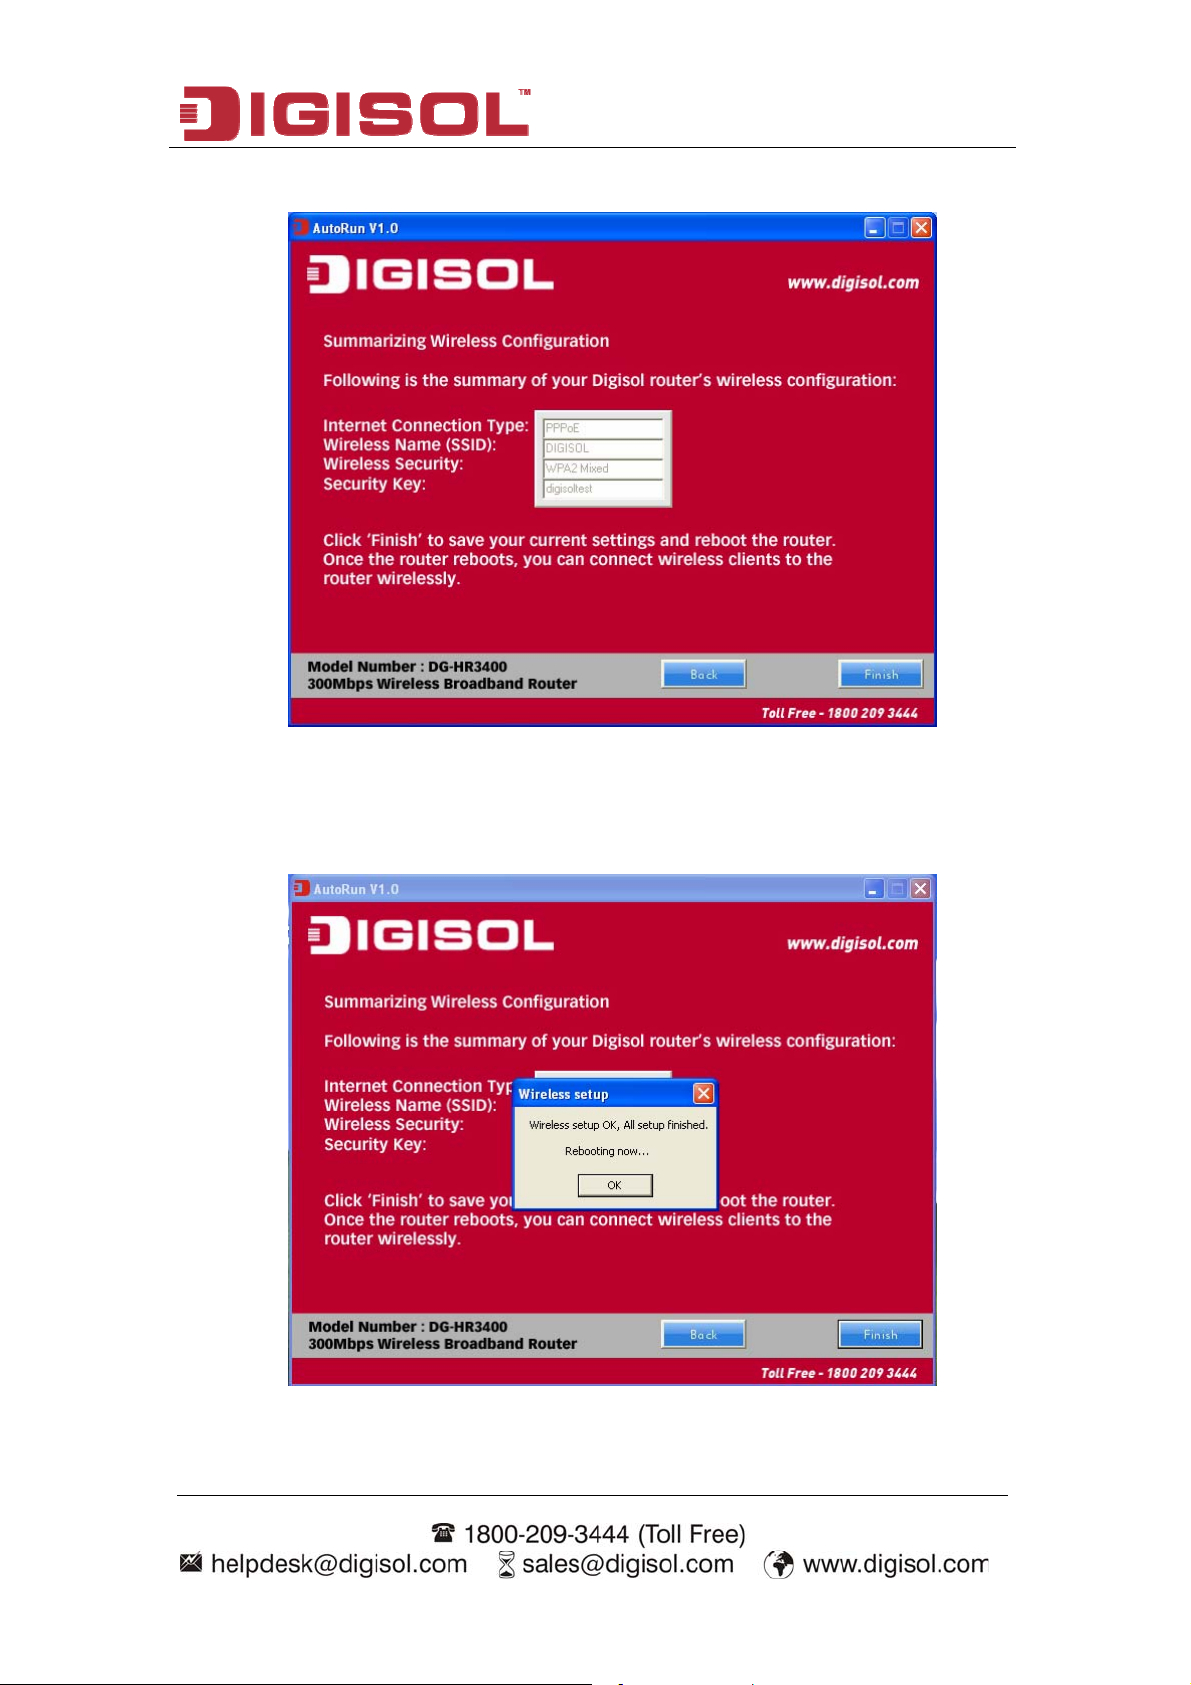
Configure the wireless security. Enter the security mode i.e. either ‘None’ or
‘WPA2 Mixed’ and click on ‘Next’.
You can view the information about the wireless configuration in the next
screen. Click ‘Finish’ to save your cu
rrent settings and reboot the router.
25
Page 26
DG-HR3400 User Manual
3. Quick Install Guide
3-1 Connecting to wireless broadband router by web browser
After the network connection is setup, next step is to setup the router with proper
network parameters, so it can work properly in your network environment.
Please use the web browser to configure the router. A computer with wired Ethernet
connection to the router is required for this first-time configuration.
Before you start to configure the router (default IP 192.168.2.1), please configure the
IP address of the computer in the same network class as that of the router.
Set the Network Configurations:
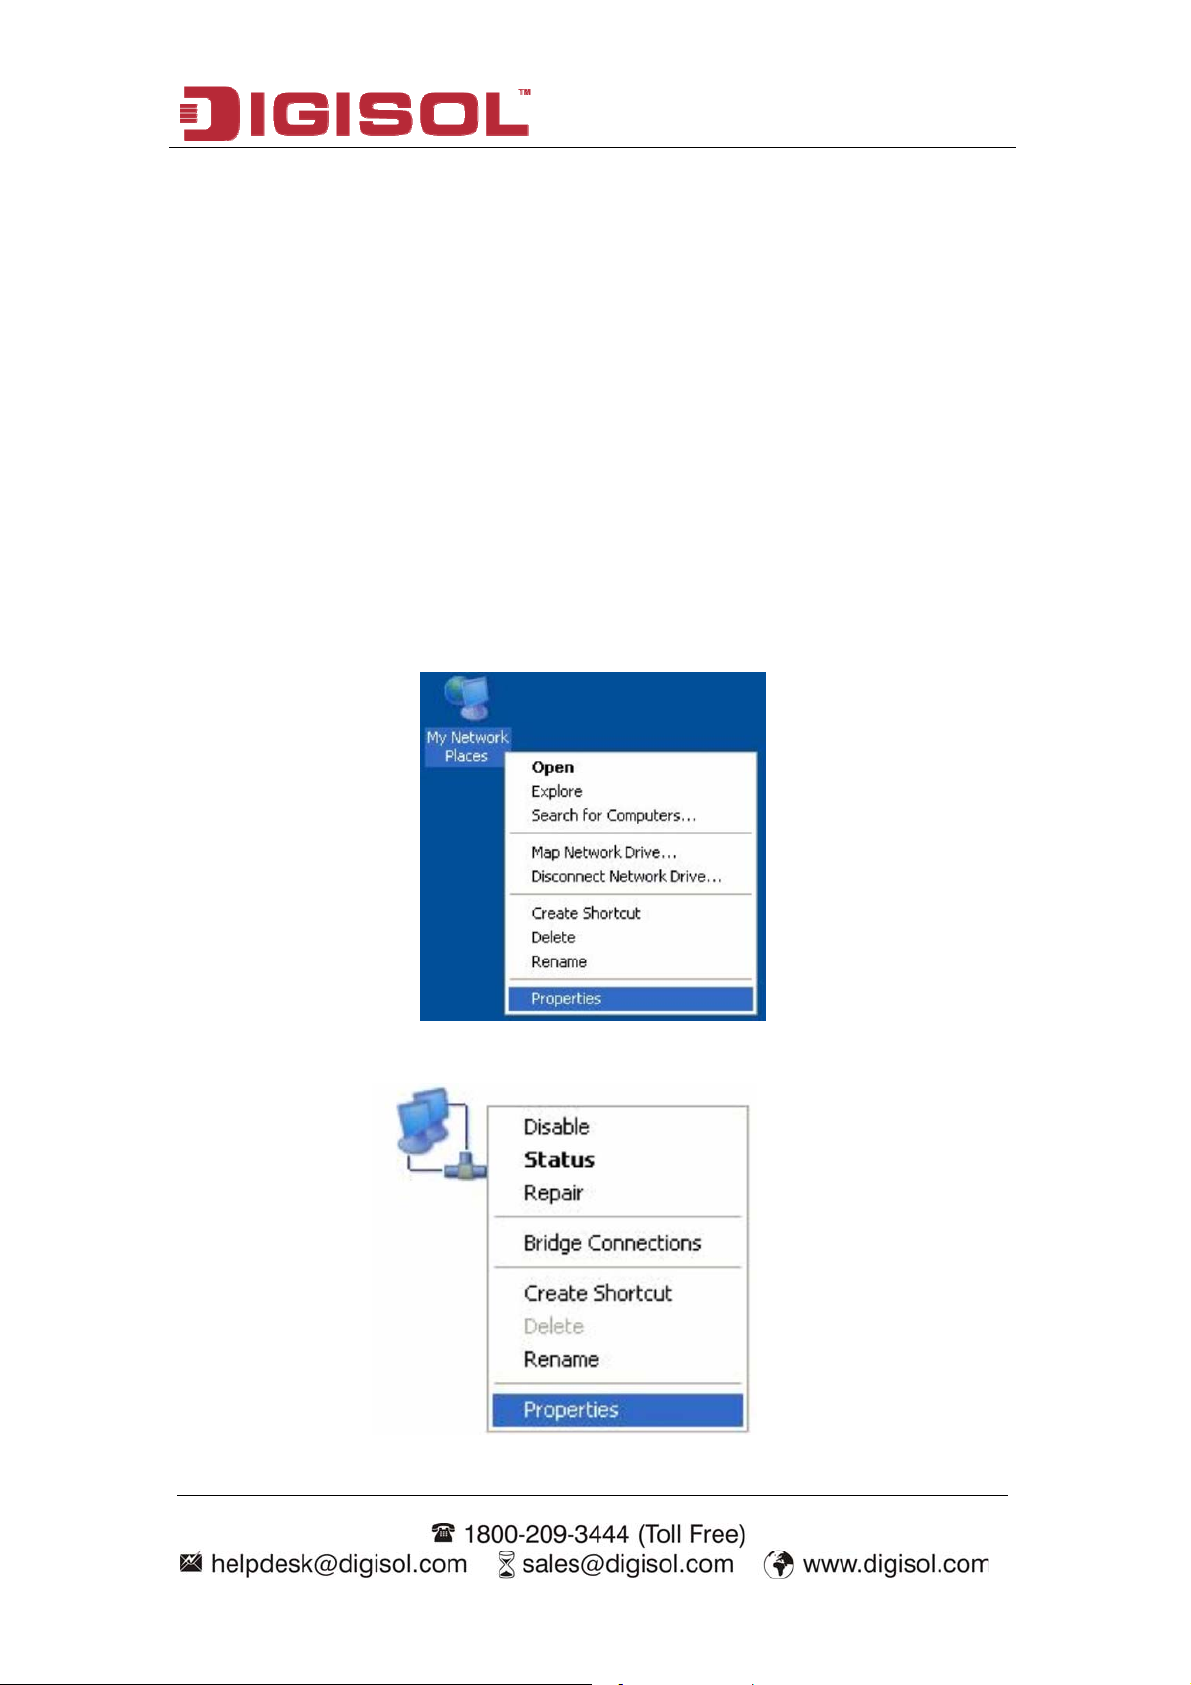
1. On your computer desktop right click "My Network Places" and select
"Properties".
2. Right click "local Area Network Connection" and select "Properties".
26
Page 27

DG-HR3400 User Manual
3. Select "Internet Protocol (TCP/IP)" and click "Properties".
4. Select "Obtain an IP address automatically" or select "Use the following IP
address(S)".
A. Select "Obtain an IP address automatically" and "Obtain DNS server address
automatically". Click "OK".
27
Page 28

DG-HR3400 User Manual
B. “Use the following IP address (S)"
IP Address: 192.168.2.XXX (XXX is a number from 2~254)
Subnet Mask: 255.255.255.0
Gateway: 192.168.2.1
DNS Server: You need to input the DNS server address provided by you ISP.
Otherwise, you can use the Router's default gateway as the DNS proxy
server. Click "OK" to save the configurations.
Click "OK" to save the configurations.
28
Page 29

DG-HR3400 User Manual
3-
2 Getting Started
Co ent interface by web browser:
nnecting the router’s managem
Af dress to the computer, open the web browser, and type the
ter you assign an IP ad
IP
address of the router in the address bar as ‘http://192.168.2.1’.
The foll
owing message should be shown:
lease input user name and password in the field respectively, default user name is
P
admin’, and default password is ‘1234’, then press ‘Login’ button, and you can see
‘
the web management interface of this router:
29
Page 30

DG-HR3400 User Manual DG-HR3400 User Manual
NOTE: If you can’t see the web management interface, and you’re
being prompted to input user name and password again, it
means you didn’t input username and password correctly.
TIP: This page shows the current status and some basic settings of
Please retype user name and password again.
30
30
Page 31

DG-HR3400 User Manual
3-3 Using Quick Setup
This router provides a ‘Quick Setup’ procedure, which will help you to complete all
required settings you need to access the Internet in very short time. Please follow the
instructions mentioned below to complete the ‘Quick Setup’:
Please go to Quick Setup menu by clicking ‘Setup’ button.
And the following message will be displayed:
Click the “Next” button to continue.
Please follow the steps and complete the router configuration.
31
Page 32

DG-HR3400 User Manual
Step 1 Setup WAN Connection
Type:
Below given ‘WAN Connection Type’ screen will appear.
Please choose the broadband (Internet connection) type you’re using in this page
There are three types of Internet connection, PP
PoE, Dynamic IP and Static IP.
If you’re not sure, please contact your Internet service provider. A wrong Internet
connection type will cause connection problem, and you will not be able to connect
to the internet.
If you want to go back to previous step, please press ‘Back’ button.
NOTE: Some service providers use ‘DHCP’ (Dynamic Host
Configuration Protocol
this case, you can choose ‘Dynamic IP’ as In
) to assign IP address to your router. In
ternet connection
type.
.
32
Page 33

DG-HR3400 User Manual
Setup procedure for ‘PPPoE’:
Choose PPPoE. (Point to Point Protocol over Ethernet)
onnection it will provide you with a username and password. This option is typically
c
If your ISP uses a PPPoE
used for DSL services. Below given screen will be displayed.
Here is the description of every setup item:
Parameter Description
User Name Please input user name assigned by your Internet service
provider here.
Password Please input the password assigned by your Internet service
provider here.
Confirm Re-enter the password in this field for confirm
ation.
Password
When you s
enu, clic
finish with all settings, press ‘Next’; if you want to go back to previou
k ‘Back’. m
etup procedure for ‘Dynamic IP’:
S
elect Dynamic IP to obtain IP Address information automatically from your ISP.
S
sually Cable Modem and the router will automatically obtain an IP address from the
U
DHCP
server.
33
Page 34

DG-HR3400 User Manual
Setup procedure for ‘Static IP’:
Select Static IP Address if IP information is provided to you by your ISP. You will
need to enter in the IP address, subnet mask, gateway address and DNS address
provided to you by your ISP. Each IP address entered in the
ppropriate IP form, which are four octets separated by a dot (x.x.x.x). The Router
a
fields must be in the
will not accept the IP address if it is not in this format. Below given screen will be
displayed.
Here is the description item:
of every setup
Parameter Description
I Please input IP . P address address assigned by your service provider
Subnet Mask Please input subnet mask assigned by your service provider
Default Gateway Please input the default gateway assigned by your service
provider.
Primary DNS Please input the DNS IP address in dotted-decimal notation
provided by your ISP.
Secondary DNS Please input another DNS
provided by your
ISP.
IP address in dotted-decimal notation
NOTE: You must use the addresses provided by your Internet service
provider, wrong setting value will cause connection problem.
hen you finish with all settings, press ‘Next’; if you want to go back to previous
W
menu, click ‘Back’.
34
Page 35

DG-HR3400 User Manual
Step 2 Setup Wireless:
Below given ‘Wireless’ screen will appear.
H riptio
ere is the desc n of every setup item:
Parameter Description
Disable the wirel
radio
ess
The wireless rad
io of this Router can be enabled or
disabled to allow wireless stations access.
SSID This is the name of wireless network. Input the SSID
name that your wireless ISP has provided you with.
Channel This is the radio frequency used to transmit and receive
the wireless signal. The wireless devices in the same
network should follow the same setting. Select the
channel designated by your wireless ISP.
Mode Select the desired mode. The default setting is 2.4GHz
(B+G+N).
Channel Width Select any channel width from the pull-down list. The
35
Page 36

DG-HR3400 User Manual
default setting is Auto 20/40M, which can adjust the
channel width for your clients automatically.
Wireless Security If the access point enables wireless security, you have to
follow the same settings in order to access the access
point.
When you finish with all settings, press ‘Next’; if you want to go back to previous
menu, click ‘Back’.
Step 3 Finish the Quick Setup:
Below given ‘Finish’ screen will appear.
You can click the “Finish” button to finish the Quick Setup; if you want to go back to
previous menu, click ‘Back’.
36
Page 37

DG-HR3400 User Manual
4. Configuring
This chapter will show eac page’s key functions and the configuration way.
After your successful login, you will see the five main menus on the top of the
Web-based utility.
instructions.
On the right, there are corresponding explanations and
the Router
h Web
4-1 Setup
lick ‘Setup’ menu on the top of the web management interface, and the following
C
message will be displayed on your web browser:
e are four submenus under the Setup menu: Wizard, Local Network, In
Ther ternet
etup, Mode Settings. Click any of them, and you will be able to configure the
S
corresponding function.
4-1-1 W
If you are new to networking and have never configured a router before, click on
Wizard and the router will guide you through a few simple steps to get your network
up and running.
hoose menu “Setup→Wizard”, below given screen will be displayed.
C
izard
For details please refer to 3.3 Using Quick Setup on above.
37
Page 38

DG-HR3400 User Manual
4-1-2 Local Network
These are the settings of the LAN (Local Area Network) interface for the router.
Choose menu “Setup→Local Network”, below given screen will be displayed.
This page is used to configure the LAN interface of your Wireless Router. Here you
may change the setting for IP address, subnet mask, etc.
This page can be used to configure the DHCP mode: None or DHCP Server.
(1) Enable the DHCP Server if you are using this device as a DHCP server. This page
lists the IP address pools available to hosts on your LAN. The device distributes
numbers in the pool to hosts on your network as they request
38
Internet access.
Page 39

DG-HR3400 User Manual
If you choose "None",
then the router will do nothing when the hosts request an IP
address.
(2) This page lists the fixed IP/MAC address on your LAN. The device distrib
utes
the number configured to hosts on your network as they request Internet access.
LAN Interface Setup:
Here is the description of every setup item:
Parameter Description
IP address Please input the IP address of this router.
Subnet Mask Please input subnet mask for this network.
DHCP Server Settings:
These settings are only available when ‘DHCP Server’ in ‘LAN IP’ section is
‘Enabled’, and here is the description of every setup item.
Parameter Description
DHCP Mode
IP Pool Range These two IP values (from and to) define a range of IP
Enable or Disable the DHCP Server.
addresses that the DHCP Server uses when assigning ad
dresses
to computers and devices on your Local Area Network. Any
address that does not fall in this range are not managed by the
DHCP Server; these could, therefore, be used for ma
nually
configured devices or devices that cannot use DHCP to obtain
39
Page 40

DG-HR3400 User Manual
network address details automatically.
Max Lease Time The amount of time that a computer may have an IP address
before it is required to renew the lease. The lease functions, just
as a lease on an apartment would. The initial lease designates
the amount of time before the lease expires. If the tenant wis
tain the address when the lease is expired then a new lease
to re
tablished. If the lease expires and the address is no longer
is es
hes
needed then another tenant may use the address.
Domain Name
Domain name for the dhcp server scope.
DNS Server DNS Server address for the dhcp server scope.
DHCP Static IP Configuration:
If you need to assign static ip for your computer or device on the local area network,
configure static ip with the mac address.
Here is the description of every setup item:
Parameter Description
IP address
The IP address to be configured for your computer
or device on the local area network. For example,
192.168.2.2.
Mac Address After you enter MAC address and IP address pair,
click this button to add the pair to static DHCP
leases table.
After you clicked ‘Add’, the MAC address and IP address mapping will be added
to ‘DHCP Static IP Table’ section.
40
Page 41

DG-HR3400 User Manual
4-1-3 Internet Setu
p
This page is used to
the WAN port of yo
IP, DHCP client or P
configure the parameters for Internet network which connects to
ur Access Point. Here you may change the access method to static
PPoE by clicking the item value of WAN Access type.
Choose menu “Setu
p→Internet Setup”, below given screen will be displayed.
Setup pr e for ‘Static IPocedur ’:
41
Page 42

DG-HR3400 User Manual
of every setup item: Here is the description
Parameter Description
IP Address Please input the IP address assigned by your service provider.
Subnet Mask Please input the subnet mask assigned by your service
provider
Default Gateway Please input the IP address of the gateway provided by your
service provider.
MTU Size Please input the MTU value of your network connection here.
If you don’t know, you can use default value.
DNS Servers
1/2/3
Please input the IP address of DNS servers provided by your
service provider.
Setup procedure for ‘DHCP Client’:
Here is the description of every setup item:
Parameter Description
Host Name Please input the host name of your computer. This is
optional, and is only required if your service provider
asks you to do so.
MTU Size Please input the MTU value of your network
connection here. If you don’t know, you can use default
value.
Attain DNS If your ISP specifies a DNS server IP address for you,
Automatically click the checkbox.
Set DNS Manually Enter the DNS IP address manually provided by your
ISP.
42
Page 43

DG-HR3400 User Manual
Setup procedure for ‘PPPoE’:
Here is the description of every setup item:
Parameter Description
User Name Please input user name assigned by your Internet service
provider here.
Password Please input the password assigned by your Internet service
provider here.
Service Name Please give a name to this Internet service, this is optional.
MTU Size Please input the MTU value of your network connection here.
If you don’t know, you can use default value.
Connection Type Please select the connection type of Internet connection you
wish to use.
Contin
connec
automa
Conne
the In Idle Time Out” is set to stop the connection
when
idle tim
Manu fter you have selected this option, you will see the
uous – The connection will be kept always On. If the
tion is interrupted, the router will re-connect
tically.
ct On-Demand – Only connect when you want to surf
ternet. “
the network traffic is not sending or receiving after an
e.
al – A
“Connect” button and “Disconnect” button, click “’Connect”
and the router will connect to the ISP. If you want to stop the
connection, please click “Disconnect” button.
Attain DNS If your ISP specifies a DNS server IP address for you, click
43
Page 44

DG-HR3400 User Manual
Automatically the checkbox.
Set DNS Enter the DNS IP address manually provided by your ISP.
Manually
MAC Clone:
You can configure the MAC address of the WAN.
4-1-4 Mode Settings
This page is used to configure mode.
Choose menu →Mode Sett
“Setup ings”, below given screen will be displayed.
Here is the descriptio n of every setup item:
Parameter Description
Bridge Mode The device works as a bridge. All ethernet wired ports
and wireless ports are bridged together.
Router Mode The device works as a router. It can access to the Internet
by Static IP/DHCP Client/PPPoE.
NOTE: The device would reboot if you change the mode.
44
Page 45

DG-HR3400 User Manual
-2 Wirel
4 ess
Click ‘Wireles
s’ menu on the top of web management interface, and the following
message will be displayed on your web browser:
There are six submenu
Wireless Advanced, Wireless Repeater
s under the Wireless menu: Wireless Basics, MBSSID, WPS,
, WDS. Click any of them, and you will be
able to configure the corresponding function.
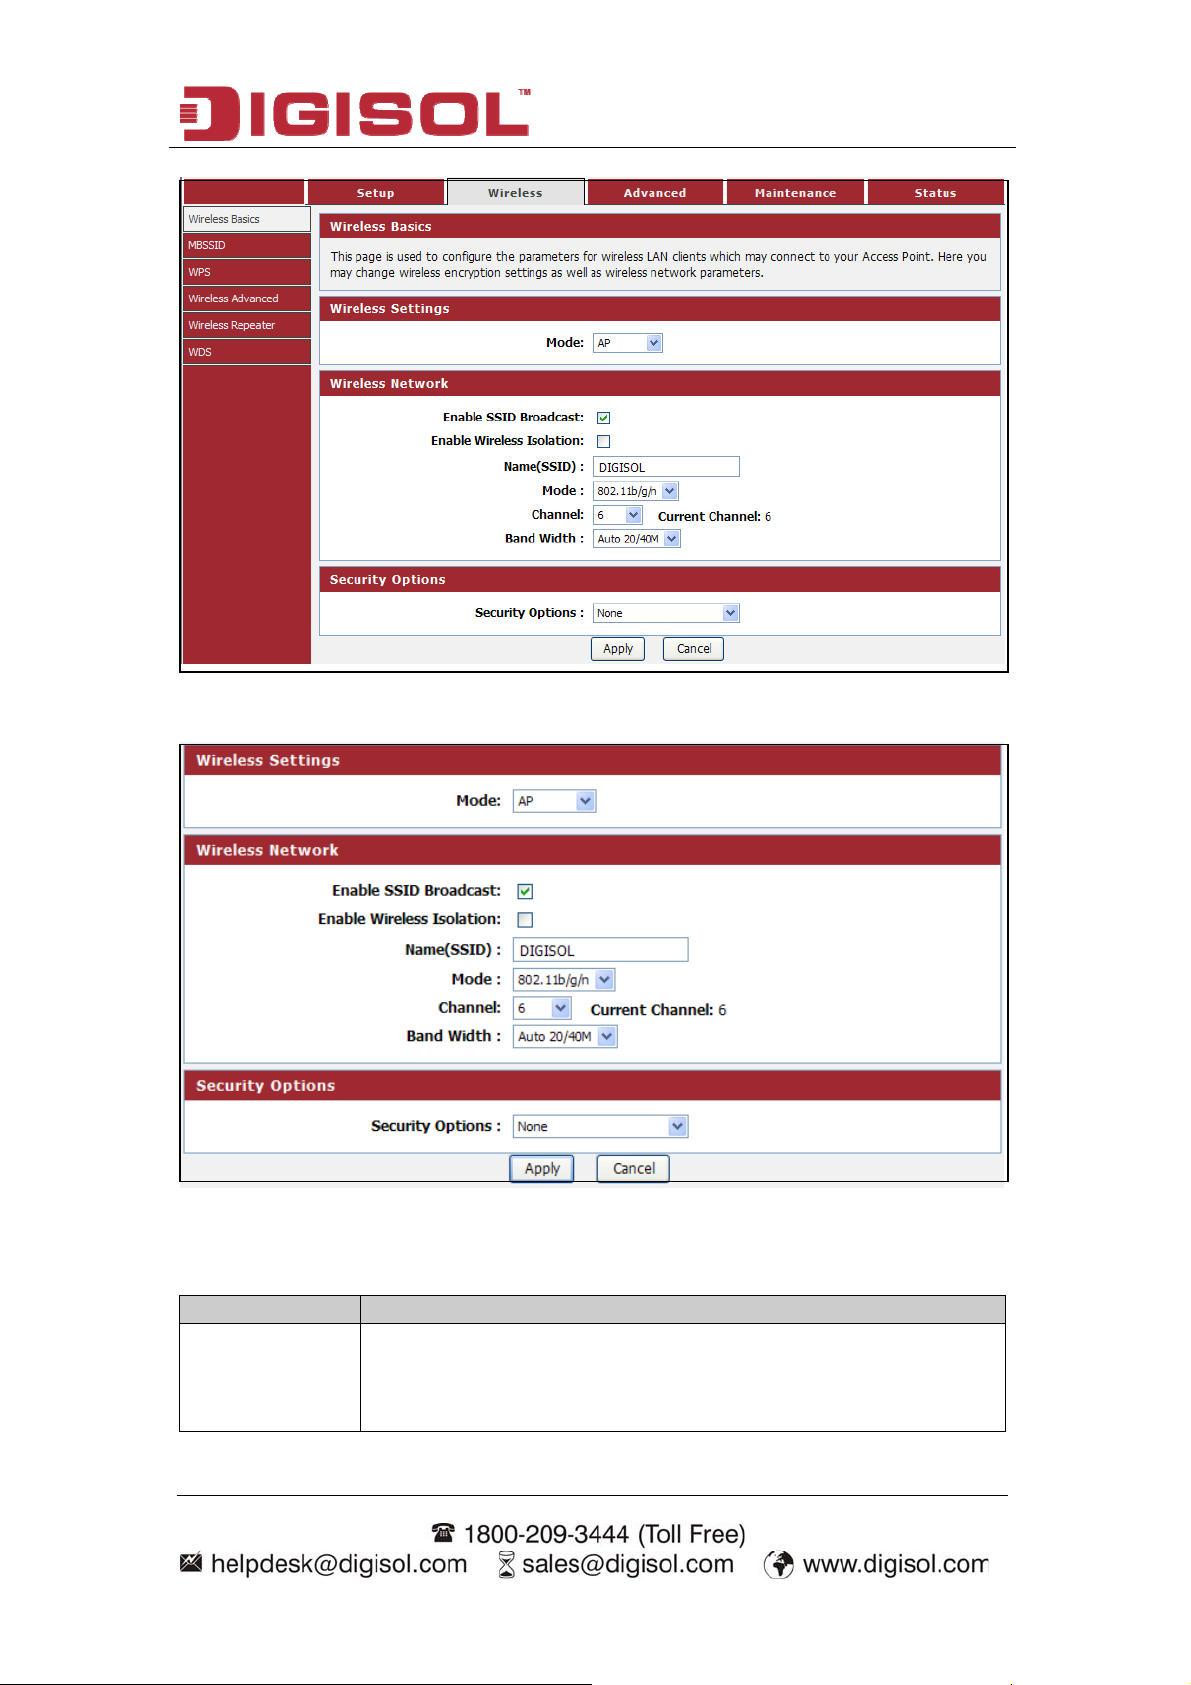
4-2-1 Wireless Basics
This page is used to configure the parameters for wireless LAN clients which may
connect to your Access Point. Here you may change wireless encryption settings as
well as wireless network parameters.
Choose menu “Wireless→Wireless Basics”, below given screen will be displayed.
45
Page 46
DG-HR3400 User Manual
Setup procedure for AP:
Here is the description of every setup item:
Parameter Description
Enable SSID
Broadcast
If Enabled, the Wireless Access Point will broadcast its name
(SSID) to all Wireless Stations. Stations which have no SSID (or
a null value) can then adopt the correct SSID for connections to
46
Page 47

DG-HR3400 User Manual
this Access Point.
Enable Wireless
Isolation
If checked, the wireless client under this SSID can only access
internet and it can`t access other wireless clients even under the
same SSID, Ethernet clients or this device. Other clients can`t
access the wireless client, either.
Name(SSID)
Enter a value of up to 32 alphanumeric characters. The same
name (SSID) must be assigned to all wireless devices in your
network. The default SSID is "DIGISOL”, but we strongly
recommend that you change your network`s name (SSID) to a
different value. This value is case-sensitive. For example, SSID
is not the same as SsiD.
Mode Select the wireless mode you want to use. The options are:
802.11b mode. With a maximum speed of up to 11 Mbps.
802.11g mode. With a maximum speed of up to 54 Mbps.
802.11n mode. The band width is 20M, with a maximum
speed of up to 130 Mbps(short preamble, with a maximum
speed of up to 150 Mbps); The band width is 40M, with a
maximum speed of up to 270 Mbps(short preamble, with a
maximum speed of up to 300 Mbps).
802.11b/g mode. With a maximum speed of up to 54 Mbps.
802.11n/g mode. The band width is 20M, with a maximum
speed of up to 130 Mbps(short preamble, with a maximum
speed of up to 150 Mbps); The band width is 40M, with a
maximum speed of up to 270 Mbps(short preamble, with a
maximum speed of up to 300 Mbps).
802.11b/g/n mode. The band width is 20M, with a maximum
speed of up to 130 Mbps(short preamble, with a maximum
speed of up to 150 Mbps); The band width is 40M, with a
maximum speed of up to 270 Mbps(short preamble, with a
maximum speed of up to 300 Mbps).
Channel
This field determines which operating frequency will be used. It
should not be necessary to change the wireless channel unless
you notice interference problems with another nearby access
point.
47
Page 48

DG-HR3400 User Manual
Band Width
Select any channel width from the pull-down list. The default
setting is Auto 20/40M, which can adjust the channel width for
your clients automatically.
Security There are six wireless security modes supported by the Router:
Options
WEP, WPA-PSK [TKIP], WPA-PSK [AES], WPA2-PSK [AES],
WPA2-PSK [TKIP], WPA-PSK/WPA2-PSK AES.
S re fo
etup procedu r Client:
In this mode, you
player, HDD & DV
a wireless network
can connect the router to Ethernet devices such us TV, Game
D to enable the Ethernet device to be a wireless station and join to
through an access point or AP router.
Here is the de scription of every setup item:
Parameter Description
SSID of AP This is the name of wireless network. Input the SSID name that
your wireless ISP has provided you with.
48
Page 49

DG-HR3400 User Manual
Site Survey Click ‘Site Survey’ button, then a “Wireless Site Survey Table”
will pop up. It will list all available access points nearby. Select
the access point designated by your wireless ISP in the table and
the router will join wireless network through this access point.
Security I ve to follow f the access point enables wireless security, you ha
Options the same settings in order to access the access point.
Setup procedure for WDS or WDS+AP:
In this mode, you can expand the scope of network by combining up to four other
access points together.
Here is the description of every setup item:
Parameter Description
Enable SSID If Enabled, the Wireless Access Point will broadcast its
Broadcast name (SSID) to all Wireless Stations. Stations which have
no SSID (or a null value) can then adopt the correct SSID
for connections to this Access Point.
Enable Wireless If checked, the wireless client under this SSID can only
Isolation access internet and it can`t access other wireless clients
even under the same SSID, Ethernet clients or this device.
Other clients can`t access the wireless client, either.
49
Page 50

DG-HR3400 User Manual
Name(SSID)
Input the SSID of your wireless router, the setting should
be the same with other wireless routers for the
convenience of roaming.
Mode Select the mode you want to use; all the wireless routers
must use the same setting.
Channel Select the channel you want to use; all the wireless
routers must use the same setting.
Band Width Select any channel width from the pull-down list. The
default setting is Auto 20/40M, which can adjust the
channel width for your clients automatically.
Security Options If the wireless bridge point enables wireless security, you
have to follow the same settings in order to access the
access point.
4-2-2 MBSSID
Here we provide several guest networks for your guests to use your router to surf the
Internet temporary. You can configure your SSID, security options and so on. Guests
can only access your router if you enable your guest network.
Choose menu “Wireless→MBSSID”, below given screen will be displayed.
50
Page 51

DG-HR3400 User Manual
Here is the description of every setup item:
Parameter Description
Network Profiles Yo u can click radio button of each profile to check detail info
or change settings of each profile. The table is a brief
summary of how many profiles you can create, it provides
pro e, Security type of this file number, SSID of this profil
profile, this guest wireless network is Enabled or Not, and the
SSID will be displayed or not.
Enable Guest
Network
If this feature is checked, then this guest network is enabled.
You and your visitors can connect to your network via the
SSID of this profile.
Enable SSID
Broadcast
If Enabled, the Wireless Access Point will broadcast its name
(SSID) to all Wireless Stations. Stations which have no SSID
(or a null value) can then adopt the correct SSID for
connections to this Access Point.
Allow Guest to
access My Local
Network
If Unchecked, any user that connects to this SSID can only
access internet, but can not access gateway management UI,
such as Web Server, Telnet, etc. .All clients in this SSID are
not allowed to access clients of other SSIDs and Ethernet
network.
If Checked, any user who connects to this SSID can access not
only internet but also local networks of this wireless router
like users in primary SSID.
Enable Wireless
Isolation
If checked, the wireless clients under this SSID can’t access
other wireless clients under the same SSID.
If unchecked, the wireless client under this SSID can access
other wireless clients under the same SSID.
Guest Wireless
Network Name
(SSID)
Enter a value of up to 32 alphanumeric characters. The same
Name (SSID) must be assigned to all wireless devices in your
network. The default SSID is SSID_N, N is profile number,
but we strongly recommend that you change your network`s
Name (SSID) to a different value. This value is also
case-sensitive. For example, SSID is not the same as SsiD.
Security Options
None - no data encryption
WEP - Wired Equivalent Privacy, use WEP 64- or 128-bit
data encryption
Note: Wi-Fi Protected Setup function is disabled when the
security setting is WEP with Shared-Key authentication
WPA-PSK [TKIP] - Wi-Fi Protected Access with
Pre-Shared Key, use WPA-PSK standard encryption with
TKIP encryption type
WPA2-PSK [AES] - Wi-Fi Protected Access version 2 with
Pre-Shared Key, use WPA2-PSK standard encryption with
the AES encryption type
51
Page 52

DG-HR3400 User Manual
WPA-PSK [AES] + WPA2-PSK [AES] - Allow clients
using either WPA-PSK [AES] or WPA2-PSK [AES]
To achieve the best performance with 11N wireless adapters
under robust security network, we recommends that you
change your network`s security option to WPA2-PSK.
4-2-3 WPS
Through this process,
pecific c
Choose me
nu “Wirele
you can easily add wireless clients to the network without the
onfiguration, such as SSID, secuneed for any s
rity mode or password.
ss→WPS”, below given screen will be displayed.
etup) is easy way to connectWPS (WiFi Protected S to a wireless router.
To use the wizar
must supp
ort WPS.
Check the user manual hether it supports
d to a
dd a wireless client to WPS-enabled wireless router, the client
or the box of the wireless client to confirm w
the WPS.
If the wireless c es not support WPS, you must configure it manually.
lient do
Click the “Next” butto
n to continue.
You can add wireless client by PIN mode. If you use PIN mode, you should input
client PIN code. WPS process. You can find client Meanwhile you should start client
52
Page 53

DG-HR3400 User Manual
PIN code on client m
anager.
Here is the description
of every setup item:
Parameter Description
Entry PIN of wireless The length of PIN is limited to four or eight numeric
NIC digits. If the AP and Station input the same PIN and click
“Start PIN” button in two minutes, they will establish
connection and setup their security key.
4-2-4 Wireless Advanced
This page helps you to setup advanced wireless features, include Fragment Threshold
etc.
Choose menu “Wireless→Wireless Advanced”, below given screen will be
displayed.
53
Page 54

DG-HR3400 User Manual
Here is the description of ever
y setup item:
arameter Description P
Enable Wireless Check this box to enable the Router’s wireless features; uncheck
to disable it.
Fragment Used to fragment packets which help improve performance in the
presence of radio frequency (RF) interference. Threshold
RTS Threshold Determ e ines the packet size of a transmission through the use of th
router to help control traffic flow.
Preamble Type This is the length of the CRC (Cyclic Redundancy Check) block
for communication between the router and wireless clients. High
network traffic areas should select Short preamble type.
Radio Power
(percent)
You can choose the transmission power of the radio signal. The
default one is 100%. It is recommended to choose the default
value 100%.
HT20/40 Enable this option to reduce interference from other wireless
Coexistence networks in your area. If the channel width is operating at 40MHz
and there is another wireless network's channel over-lapping and
causing interference, the router will automatically change to
20MHz.
ACL Set up
You can specify what kind of service should be enabled in WAN on this page.
Packets available in the list or from IP specified can enter the AP router.
54
Page 55

DG-HR3400 User Manual
4-2-5 Wireless Repeater
This page i configure the
Choose menu ireless→Wireless Repeater”, below given screen will be
s used to parameters for wireless repeater.
“W
displayed.
DHCP se
will be ena
address and DNS ad
IP address of the co
address from the up .
rver will a
bled if
utomatically shut down if relay mode is enabled (DHCP server
relay mode is disabled). We recommend that the computer's IP
dress is set to automatically obtain. You need to manually set the
mputer if you want to access the device, while your PC got IP
stream AP
In order to co
Click “Site Survey”. Sites surveyed will be displayed in the list below. Select
mplete these settings, please follow the steps below:
one item, and click “Next”.
Setup the wireless security. Turn on WEP or WPA by using Encryption Keys
which could prevent any unauthorized access to your wireless network.
Click “Finish” to save the configuration.
55
Page 56

DG-HR3400 User Manual
4-2-6 WDS
Wireless Distribution System uses wireless media to communicate
with other APs,
like the Ethernet does. To do this, you must set these APs in the same channel and set
MAC address of other APs which you want to communicate with in the table and
then enable
hen enabled, you must make sure each WDS device has adopted the same
W
the WDS. This page also allows you setup the wireless security for WDS.
encryption algorithm and Key.
Choose menu “Wireless→WDS”, below given screen will be displayed.
Here is the description of every setup item:
Parameter Description
MAC Address
Input the MAC address of other wireless routers.
Comment You can add some comment for this item.
WDS Security Setup All base stations in a wireless distribution system must
be configured to use the same radio channel, method of
encryption (none, WEP, TKIP or AES) and the same
encryption keys.
56
Page 57

DG-HR3400 User Manual
4-3 Advan
ced
Click ‘Advanced’ menu on the top of web management interface, and the following message will be displayed on your web browser:
There are twelve submenus under the Advanced menu: Access Control List, Port
Triggering, DMZ, URL Block, IP/Port Filter, MAC Filter, DOS Settings,
Dynamic DNS, QoS Setup, UPnP, Routing, Virtual Server. Click any of them, and
you will be able to configure the corresponding function.
57
Page 58

DG-HR3400 User Manual
4-3-1 Access Contr
ou can specify what kind of service should be enabled in WAN on this page.
Y
ol List
Packets available in the ACL list or from IP specified can enter the AP Router.
hoose menu “Advanced→Access Control List”, below given screen will be
C
displayed.
Here is the description of every setup item:
Parameter Description
WAN Setting Select WAN or a specific IP address range.
Services Allowed Specify what kind of service should be enabled in WAN.
58
Page 59

DG-HR3400 User Manual
4-3-2 Port Triggering
Entries in this table are used to restrict certain types of data packets from your local
network to Internet through the Gateway. Use of such filters can be help
ful in
securing or restricting your local network.
Choose menu “
Advanced→Port Triggering”, below given screen will be displayed.
Here is the description of every setup item:
Parameter Description
Nat Port Trigger If you want to enable Nat Port Trigger function, please
select ‘Enable’; otherwise please select ‘Disable’.
59
Page 60

DG-HR3400 User Manual
e You can choose the type for the Usual Application Usual Application Nam
Name on the pull-down list.
User-defined Application
Enter an application name for the rule.
Name
Start Match Port - End The port range for outgoing traffic. An outgoing
Match Port connection using this port will “Match” this rule.
Trigger Protocol The protocol used for Trigger Ports, either TCP, UDP,
or TCP/UDP.
Start Relate Port - End
Relate Port
The port range used by the remote system when it
responds to the outgoing request. A response using one
of these ports will be forwarded to the PC that
triggered this rule.
Open Protocol The protocol used for Incoming Ports Range, either
TCP or UDP, or TCP/UDP.
Nat Type Incoming mode will allow inbound traffic to specific
incoming port. Outgoing mode will allow outbound
traffic to specific outgoing port.
4-3-3 DMZ
A Demilitarized Zone is used to provide Internet services without sacrificing
unauthorized access to its local private network. Typically, the DMZ host contains
devices accessible to Internet traffic, such as Web (HTTP) servers, FTP servers,
SMTP (e-mail) servers and DNS servers.
Choose menu “Advanced→DMZ”, below given screen will be displayed.
60
Page 61

DG-HR3400 User Manual
Here is the description of :
every setup item
Parameter Description
Enable DMZ Check this box to enable DMZ function, uncheck this box to
disable DMZ function.
DMZ Host IP
Address
Enter s of
the PC
comm
DMZ host IP Address. Specify the LAN IP addres
on which you want to have unrestricted Internet
unication.
4-3-4 URL Block
This page is used to configur
e the filtered keyword. Here you can add/delete filtered
keyword.
Choose menu “ Block”, below given screen will be displayed.
Advanced→URL
Here is the description of every setup item:
Parameter Description
URL Blocking Capability
If you want to enable URL Blocking Capability
function, please select ‘Enable’; otherwise please
select ‘Disable’.
Keyword Enter the keyword that you want to block.
61
Page 62

DG-HR3400 User Manual
4-3-5 IP/Port Filter
ntries in this table are used to restrict certain types of data packets from your local
E
network to Internet th . Use of such filters can be helpful in
rough the Gateway
securing or restricting your local network.
C dvanc
hoose menu “A ed→IP/Port Block”, below given screen will be displayed.
Here is the description of every setup item:
Parameter Description
Default Action
Select Deny or Permit.
Status
Protocol The protocol used to filter, either IP, ICMP, TCP, or UDP.
Rule Action Select y. Permit or Den
Direction You c
pull-d
Source IP Address Specif ddress that will be affected by this
an choose the type for the IP/Port Filter on the
own list.
y the source IP a
rule.
Dest IP Address Specif fected by
y the destination IP address that will be af
this rule.
62
Page 63

DG-HR3400 User Manual
SPort
Specify the source port range that will be affected by this
rule.
DPort Specify the destination port range that will be affected by
this rule.
Enable Check this box to to enable the IP/Port Filter features;
uncheck to disable it.
4-3-6 MAC Filter
Entries in this table are used to restrict certain types of data packets from your local
network to Internet through the Gateway. Use of such filters can be helpful in
securing or restricting your local network.
Choose menu “Advanced→MAC Filter”, below given screen will be displayed.
63
Page 64

DG-HR3400 User Manual
H he description
ere is t of every setup item:
Parameter Description
D olicy efault P
Select Deny or Permit.
Direction You can ch for the MAC Filter on the pull-down
oose the type
list.
Action Select Deny or Permit.
Source MAC Specify a source MAC address.
Destination MAC Specify a destination MAC address.
4-3-7 DOS Settings
A "denial-of-service" (DoS) attack is characterized by an explicit attempt by hackers
to prevent legitimate users of a service from using that service.
Choose m
enu “Advanced→DOS Settings”, below given screen will be displayed.
64
Page 65

DG-HR3400 User Manual
Here is the description of every setup item:
Parameter Description
Enable Dos
Prevention
Enable source IP
blocking
Check this box to enable the Dos Prevention features;
uncheck to disable it.
The Router will block the IP Address of source which sends
the DoS attack for specified time.
4-3-8 Dynamic DNS
This page is used to configure the Dynamic DNS address from Oray, No-IP,
DynDNS.org and TZO. Here you can Add/Remove to configure
Choose menu “Advanced→Dynamic DNS”, below given screen will be displayed
Dynamic DNS.
.
Here is the description of every setup item:
Parameter Description
Enable Check this box to enable the DDNS features; uncheck to
disable it.
65
Page 66

DG-HR3400 User Manual
ovider from the drop down menu. DDNS Provider Choose your DDNS Pr
Host Name Enter the Host Name that you have registered with your
DDNS service provider.
Username Enter the Username for your DDNS account.
Password Enter the Password for your DDNS account.
4-3-9 Qos Setup
This page is used to configure QoS bandwidth and rules.
→Qos Setup”, below given screen will be displayed. Choose menu “Advanced
Here is the description of every setup item:
Parameter Description
Up Stream
The upload speed through the WAN port.
Down Stream speed through the WAN port. The download
Auto Traffic
Shaping uncheck to disable it.
Check this box to to enable the Auto Traffic Shaping features;
66
Page 67

DG-HR3400 User Manual
4-3-10 UPnP
This page is used to configure UPnP
U
PnP.
Choose m Advanced
enu “ →UPnP”, below given screen will be displayed.
. The system acts as a daemon when you enable
Here is the description of every setup item:
Parameter Description
UPnP Select Enable or Disable to enable or disable UPnP function.
67
Page 68

DG-HR3400 User Manual
4-3-11 Routin
g
This page is used to configure the routing information. Here you can add/delete IP
routes.
Choose menu “Advanced→Routing”, below given screen will be displayed
Here is the description of every setup item:
.
Parameter Description
Enable
Check this box to enable the Routing features; uncheck to
disable it.
Destination Enter the remote destination LAN IP.
Subnet Mask Enter the remote LAN subnet mask.
Next Hop Enter the next hop IP.
Metric Determines the priority of the route. If multiple routes to the
same destination exist, the route with the lowest metric is
chosen.
68
Page 69

DG-HR3400 User Manual
Static route tabl
e
Parameter Description
State
Shows if Routing rule is Disabled or Enabled.
Destination Shows the remote destination LAN IP.
Subnet Mask Shows the remote LAN subnet mask.
Next Hop Shows the next hop IP.
Metric Shows metric in numeric form.
69
Page 70

DG-HR3400 User Manual
4-3-12 Virtual Ser
he page allows you to configure virtual server, so others can access the server
T
ver
through the Gateway.
Choose menu “Advanced→Virtual Server”, below given screen will be displayed.
Here is the description of every setup item:
Parameter Description
Usual Service Name
You can choose the type for the Usual Application Name
on the pull-down list.
User-defined Service
Enter a name for the rule.
Name
Protocol The protocol used for this application, either TCP, UDP.
WAN Port Enter the port that you want to open next to WAN port.
LAN Open Port Enter the port that you want to open next to LAN port.
LAN IP Address Enter the IP address of the computer on your local network
that you want to allow the incoming service to.
70
Page 71

DG-HR3400 User Manual
4-4 Maintenance
Click ‘Maintenance’ m
enu on the top of web management interface, and the
following message will be displayed on your web browser:
There are eight submenus under the Maintenance menu: Reboot, Firmware
Upgrade, Backup/Restore, Password, Time and Date, System Log,
Diagnostics-Ping, Diagnostics-Traceroute. Click any of them, and you will be able
to configure the corresponding function.
4-4-1 Reboot
This page is used to reboot your system with current setting or reset configuration to
default setting.
hoose menu “Maintenance→Reboot”, below given screen will be displayed.
C
Here is the description of every setup item:
Parameter Description
Reboot
Restarts the router for the settings to take effect.
Reset Restarts the router with factory default setting.
71
Page 72

DG-HR3400 User Manual
4-4-2 Firmware Upgra
he Firmware Upgrade section can be used to upgrade to the latest firmware code to
T
de
improve functionality and performance.
Choose menu “Maintenance→Firmware Upgrade”, below given screen will be
displayed.
The Firmware Upgrade section can be used to upgrade to the latest firmware code to
improve functionality and performance.
To update the firmware, follow these steps:
Click the Browse button to locate the upgrade file on your computer.
Once you have found the file to be used, click the Upload button below to start
the firmware update process. This can take a minute or more.
Wait for the router to reboot. This can take another minute or more.
NOTE: Some firmware updates reset the configuration options to the
factory defaults. Before performing any update, be sure to
save the current configuration.
72
Page 73

DG-HR3400 User Manual
4-4-3 Backup/Restore
Save your configurations in a file on your computer so that it may be accessed again
later if your current settings are change
d. Be sure to save the configuration before
performing a firmware update.
Choose me
nu “Maintenance→Backup/Restore”, below given screen will be
displayed.
Here is the description of every setup item:
Par meter a Description
Save Settings to Press ‘Save’ button, and you’ll be prompted to download the
File configuration as a file, default filename is ‘config.img’, you can
save it as another filename for different versions, and keep it in a
safe place.
Load Setti
From
ngs Press ‘Browse…’ to pick a previously-saved configuratio
from your computer, and
then click ‘Upload’ to transfer the
configuration file to the router. After the configuration is
uploaded, the router’s configuration will be replaced by the file
you just uploaded.
73
n file
Page 74

DG-HR3400 User Manual
4-4-4 Password
This page is used to add user account to access the web server of Wireless Router.
Empty user name or password is not allowed.
Choose menu “Maintenance→
Password”, below given screen will be displayed.
Here is the descript ion of every setup item:
Parameter Description
User Name Please input new User Name here.
Privilege Please select the privilege of account you wish to use.
Old Password Please input current password here.
New Password Please input new password here.
Confirm
Please input new password here again.
Password
74
Page 75

DG-HR3400 User Manual
4-4-5 Time and Date
This page is used to configure the system time and Network Time Protocol (NTP)
server.
Choose menu “Maintenance→Time and Date”, below given screen will
displayed.
be
H scription p item:
ere is the de of every setu
Parameter Description
System Time D er. If the time is incorrect, isplays the current time of the rout
please fill in the correct time.
Daylight Saving OCheck this option if your location observes daylight saving time.
ffset D rn hemisphere between aylight saving time begins in the southe
September–November and ends between March–April. Standard
time begins in the southern hemisphere between March–April
and ends between September–November. Many countries in the
southern hemisphere may observe DST.
75
Page 76

DG-HR3400 User Manual
o options here: Enable or Disable. The default value State There are tw
is disable.
Server You can fill the address used for clock synchronization of
network time server.
Time Zone You can select your time zone drop-down box.
Start NTP You can click Get GMT Time from network time server.
4-4-6 System Log
This page is used to display the system event log table. By checking Error or Notice
(or both) will set the log flag.
Choose menu “Maintenance→System Log”, below given screen will be displayed.
76
Page 77

DG-HR3400 User Manual
Here is the description of every setup item:
Parameter Description
Setting By selecting the log type, only logs of this type will be shown.
Save Log to Save current event log to a text file.
File
Clean Log Table Delete all event logs displayed here.
4-4-7 Diagnostics-Ping
This page is used to ping. Diagnostic Ping can check network reachable or not.
Choose menu “Maintenance→
Diagnostics Ping”, below given screen will be
displayed.
Here is the description of every setup item:
Parameter Description
Host Type the destination IP address.
77
Page 78

DG-HR3400 User Manual
4-4-8 Diagnostics-Traceroute
This page is used to traceroute diagnostic. Diagnostic traceroute can check network
reachab te path between user and the host under check.
le or not, and find the rou
Choose menu “Mainten
ance→Diagnostics Traceroute”, below given screen will be
displayed.
Here is the description of every setup item:
Parameter Description
Host Type the destination IP address.
Numberoftries Type the number of tries.
Timeout Set the waiting time for the reply of each packet. If there is no
r nection is overtime. eply in the specified time, the con
Datasize The size of packet.
DSCP Configure the DSCP parameters.
MaxHopCount The max number of hops for a traceroute connection.
Interface By selecting the Interface type.
78
Page 79

DG-HR3400 User Manual
4-5 Status
Click ‘Status’ menu on the top of web management interface and the following
message will be displayed on your web browser:
There are three submenus under the Status menu: Device Info, Active Client Table
and Statistics. Click any of them, and you will be able to view the corresponding
status.
4-5-1 Device Info
This page shows the current status and some basic settings of the device.
Choose menu “Maintenance→Device Info”, below given screen will be displayed.
79
Page 80

DG-HR3400 User Manual
lient Table 4-5-2 Active C
This table shows IP address, MAC address for each client.
Choose menu “Status→Active Client Table”, below given screen will be displayed.
4-5-3 Statistics
This page shows the packet statistics for transmission and reception regarding to
network interface.
Choose menu “Status→Statistics”, below given screen will be displayed.
80
Page 81

DG-HR3400 User Manual
5. Appendix
Hardware Specifications
- Flash: 2MB
- SDRAM: 16MB
- Antenna: Two fixed 5 dBi antenna
- WPS Push Button
- Factory reset button
Network Ports
- 1 * 10/100Mbps UTP WAN Port
- 4 * 10/100Mbps UTP LAN Ports
Status LED
- Power, WAN, LAN (1-4), WLAN, WPS
Standards Compliance
- IEEE802.3 10 Base-T Ethernet
- IEEE802.3u 100 Base-TX Ethernet
- IEEE802.3 11b, IEEE802.11g, IEEE802.11n
Frequency Band
- 2.4000 ~ 2.4835 GHz
WLAN Data Transfer Rates
- IEEE802.3 11b up to 11Mbps
- IEEE802.11g up to 54Mbps
- IEEE802.11n up to 300Mbps
Wireless Output Power
- IEEE802.3 11b: 23 +/- 1 dBm
- IEEE802.11g: 19 +/- 1 dBm
- IEEE802.11n: 18 +/- 1 dBm
81
Page 82

DG-HR3400 User Manual
Environmenta
- Operating
l Specifications
temperature: 0 to 40°C
- Storage Temperature: -40 to 70°C
- Operating Humidity: 10
- Storage Hum
idity: 5% to 95%
% to 90 %
Power Supply
- 5V DC, 1A Switchi
ng Power Adapter
82
Page 83

DG-HR3400 User Manual
6. Glo ss ary
De evice needs to configure a default
fault Gateway (Router): Every non-router IP d
gateway IP IP packet, if the destination is not
on the sam e packet to its default gateway, which
will then send it to the destination.
address. When the device sends out an
e network, the device has to send th
DHCP:
e
D
In
o
In
d
b
th
a
D
e
E
sp
se
Dynamic Host Configuration Protocol. Thi
very computer on your home network an IP address.
NS Server IP Address:
DNS stands for Domain Name System, which allows
ternet servers to have a domain name (such as www.Broadbandrouter.com) and one
r more IP addresses (such as 192.34.45.8). A DNS server keeps a database of
ternet servers and their respective domain names and IP addresses, so that when a
omain name is requested (as in typing "Broadbandrouter.com" into your Internet
rowser), the user is sent to the proper IP address. The DNS server IP address used by
e computers on your home network is the location of the DNS server your ISP has
ssigned to you.
SL Modem:
DSL stands for Digital Subscriber Line. A DSL modem uses your
xisting phone lines to transmit data at high speeds.
thernet:
A standard for computer networks. Ethernet networks are connected by
ecial cables and hubs, and move data around at up to 10/100 million bits per
cond (Mbps).
s protocol automatically gives
le Timeout:
Id
r a pre-configured amount of time, the connection will automatically get
fo
isconnected.
d
Address and Network (Subnet) Mask:
IP
onsists of a series of four numbers separated by periods, which identifies a single,
c
nique Internet computer host in an IP network. Example: 192.168.2.1. It consists of
u
portions: the IP network address, and the host identifier.
2
he IP address is a 32-bit binary pattern, which can be represented as four cascaded
T
ecimal numbers separated by “.”: aaa.aaa.aaa.aaa, where each “aaa” can be anything
d
om 000 to 255, or as four cascaded binary numbers separated by “.”:
fr
bbbbbbb.bbbbbbbb.bbbbbbbb.bbbbbbbb, where each “b” can be either 0 or 1.
b
Idle Timeout is designed so that after there is no traffic on the Internet
IP stands for Internet Protocol. An IP address
83
Page 84

DG-HR3400 User Manual
A network mask is also a
1’s followed by consecu
32-bit binary pattern, and consists of consecutive leading
tive trailing 0’s, such as
11111111.11111111.11111111.00000000. Therefore sometimes a network mask can
also be described simply as “x” number of leading 1’s.
When both are represented side by side in their binary forms, all bits in the IP address
that correspond to 1’s in the netwo
rk mask become part of the IP network address,
and the remaining bits correspond to the host ID.
For example, if the IP address for a device is, in its bin
ary form,
11011001.10110000.10010000.00000111, and if its network mask is,
11111111.11111111.11110000.00000000
It means the device’s network address is
11011001.10110000.10010000.00000000, and its host ID is,
00000000.00000000.00000000.00000111. This is a convenient and efficient method
for routers to route IP packets to their destination.
ISP Gateway Address: (see ISP for definition). The ISP Gateway Address is an IP
address for the Int
ernet router located at the ISP's office.
ISP:
Internet Service Provider. An ISP is a business that provides connectivity to the
Internet for individuals and other businesses or organi
LAN:
Local Area Network. A LAN is a group of computers and devices connected
zations.
together in a relatively small area (such as home or office). Your home network is
considered a LAN
MAC Addr
ess:
.
MAC stands for Media Access Control. A MAC address is the
hardware address of a device connected to a network. MAC address is a unique
identifier for a
device with an Ethernet interface. It is comprised of two parts: 3 bytes
of data that correspond to the Manufacturer ID (unique for each manufacturer), plus 3
bytes that are often used as the product’s serial number.
NAT:
home network to use one IP address. Using the broadban
y
Network Address Translation. This process allows all the computers on your
d router
’s NAT capability,
ou can access Internet from any computer on your home network without having to
purchase more IP addresses from your ISP.
Port:
application/protocol over another. Below is a list of common applications
p
Network Clients (LAN PC) uses port numbers to distinguish one network
and
rotocol/port numbers:
84
Page 85

DG-HR3400 User Manual
Application Protocol
Telnet TCP 23
FTP TCP 21
SMTP TCP 25
POP3 TCP 110
H.323 TCP 1720
SNMP UDP 161
SNMP Trap UDP 162
HTTP TCP 80
PPTP TCP 1723
PC Anywhere TCP 5631
PC Anywhere UDP 5632
PPPoE
: (Point-to-Point Protocol over Ethernet.) Point-to-Point Protocol is a secure
Port
Number
data transmission method originally created for dial-up connections; PPPoE is for
Ethernet connections. PPPoE relies on two widely accepted sta
ndards, Ethernet and
the Point-to-Point Protocol. It is a communications protocol for transmitting
information over Ethernet between different manufacturers.
Protocol:
A protocol
is a set of rules for interaction agreed upon between multiple
parties so that when they interface with each other based on such a protocol, the
interpretation of their behavior is well defined and can be made objectively, without
confusion or misunderstanding.
Router:
A router is an intelligent network device that
forwards packets between
different networks based on network layer address information such as IP addresses.
Subnet Mask:
A subnet mask, which may be a part of the TCP/IP information
provided by your ISP, is a set of four numbers (e.g. 255.255.255.0) configured like an
IP address. It is used to create IP address
numbers used only within a particular
network (as opposed to valid IP address numbers recognized by the Internet, which
must be assigned by InterNIC).
85
Page 86

DG-HR3400 User Manual
TCP/IP, UDP: Transm Control Protocol/Internet Protocol (TCP/IP) and
Da UDP). TCP/IP is the standard protocol for data
transm
perform rro tec
other not re le.
networ rotoc
W
ission over the Internet. Both TCP and UDP are transport layer protocols. TCP
s proper e r de tion and error recovery, and thus is reliable. UDP on the
hand is liab They both run on top of the IP (Internet Protocol), a
k layer p ol.
Wide Area Network. A network that connects computers located in
AN:
geographically separate areas (e.g. dif
is a wid etwor
W
graphi interfa that is
e area n k.
sed ma ent aphical User Interface (GUI):
eb-ba nagem Gr
cal user ce based on the web browser. This means the user can use
ission
rotocol (Unreliable tagram P
ferent buildings, cities, countries). The Internet
Many devices support a
the familiar Netscape or Microsoft Internet Explorer to Control/configure or monitor
the device bei g man d.
n age
86
 Loading...