

Page 1
DG-HR1070MS User Manual
1
DG-HR1070MS
DIGISOL 150MBPS WI-FI PORTABLE 4G/3G
MI-FI BROADBAND ROUTER
User Manual
V1.0
2015-10-07
As our products undergo continuous development the specifications are subject to change without prior notice
Page 2

DG-HR1070MS User Manual
2
COPYRIGHT
Copyright 2015 by Smartlink Network Systems Ltd. All rights reserved. No part of
this publication may be reproduced, transmitted, transcribed, stored in a retrieval
system, or translated into any language or computer language, in any form or by any
means, electronic, mechanical, magnetic, optical, chemical, manual or otherwise,
without the prior written permission of this company.
This company makes no representations or warranties, either expressed or implied,
with respect to the contents hereof and specifically disclaims any warranties,
merchantability or fitness for any particular purpose. Any software described in this
manual is sold or licensed "as is". Should the programs prove defective following
their purchase, the buyer (and not this company, its distributor, or its dealer) assumes
the entire cost of all necessary servicing, repair, and any incidental or consequential
damages resulting from any defect in the software. Further, this company reserves the
right to revise this publication and to make changes from time to time in the contents
thereof without obligation to notify any person of such revision or changes.
Trademarks
DIGISOL™ is a trademark of S martlink Network Systems Ltd. All other trademarks
are the property of the respective manufacturers.
Safety
This equipment is designed with the utmost care for the safety of those who install
and use it. However, special attention must be paid to the dangers of electric shock
and static electricity when working with electrical equipment. All guidelines of this
and of the computer manufacturer must therefore be allowed at all times to ensure the
safe use of the equipment.
Page 3

DG-HR1070MS User Manual
3
Index
1. Product Introduction .................................................................................................... 4
1-1 Introduction ........................................................................................................ 4
1-2 Safety Instructions .............................................................................................. 4
1-3 Package Contents .............................................................................................. 5
1-4 System Requirements ........................................................................................ 5
2. Get Familiar with your new wireless 4G Mi Fi broadband router................................... 6
2-1 Hardware Overview ............................................................................................ 6
2-2 OLED Display Status .......................................................................................... 7
2-3 Power Management ........................................................................................... 8
3. Using the Device ......................................................................................................... 9
3-1 Connect to Your Network .................................................................................... 9
3-2 Configuring the Router Settings........................................................................ 11
3-3 Getting Started ................................................................................................. 12
3-4 Wizard.............................................................................................................. 16
3-5 WAN................................................................................................................. 18
3-6 LAN .................................................................................................................. 22
3-7 SMS ................................................................................................................. 24
3-8 Wi Fi................................................................................................................. 25
3-9 Security ............................................................................................................ 30
3-10 System ........................................................................................................... 32
Page 4

DG-HR1070MS User Manual
4
1. Product Introduction
1-1 Introduction
The DIGISOL™ DG-HR1070MS HSPA+ Mobile Router lets you share a fast mobile
Internet connection with multiple PCs and mobile devices wherever you go. It offers
4G/3G LTE/ HSPA+ compatibility for fast downlink and uplink data rates, so you get
the high-speed upload and download speeds even when you‟re o n the go. Set up a
personal mobile network anywhere, anytime allowing you and those around you to
access the Internet, and share files.
Other features of this router include:
• High-Speed Mobile Internet with 4G Connectivity
The DG-HR1070MS LTE Mobile Router gives you high-speed access to the Internet
wherever you are and lets you share it on the go. The built-in 4G antenna provides a
reliable connection to your 4G service provider, and a separate Wi-Fi antenna gives
extended coverage to the computers and mobile devices connected to the
DG-HR1070MS.
1-2 Safety Instructions
Like any electronic device, the DG-HR1070MS must be handled with care to ensure
reliable operation.
DIGISOL MiFi Wireless Router recommends the following guidelines:
• Protect the device from liquids, dust and excessive temperatures.
• DO NOT apply adhesive labels to the device; they might cause the device to
potentially overheat or alter the performance of the antenna.
• Use only batteries, chargers and accessories that your device has been provided
with. The failure to use approved batteries, chargers and accessories may
increase the risk that your device will overheat, catch fire, or explode, resulting
in serious injury or property damage, and may void the product warranty.
• Store the device in a safe place when not in use.
Page 5

DG-HR1070MS User Manual
5
1-3 Package Contents
The MiFi Router DG-HR1070MS package includes:
• DG-HR1070MS MiFi Router
• Li-ion 2800mAh rechargeable battery
• Power Adapter (5V, 1A)
• Micro USB Cable
• Quick Installation Guide
• Installation Guide CD (includes User Manual & QIG)
1-4 System Requirements
• A compatible (U) SIM card with mobile data service.
• A computer with Windows®, Macintosh®, or Linux-based operating systems.
• Internet Explorer 8, Firefox 12.0, Chrome 20.0, or Safari 4.0.
Page 6
DG-HR1070MS User Manual
6
2. Get Familiar with your new wireless 4G Mi Fi
broadband router
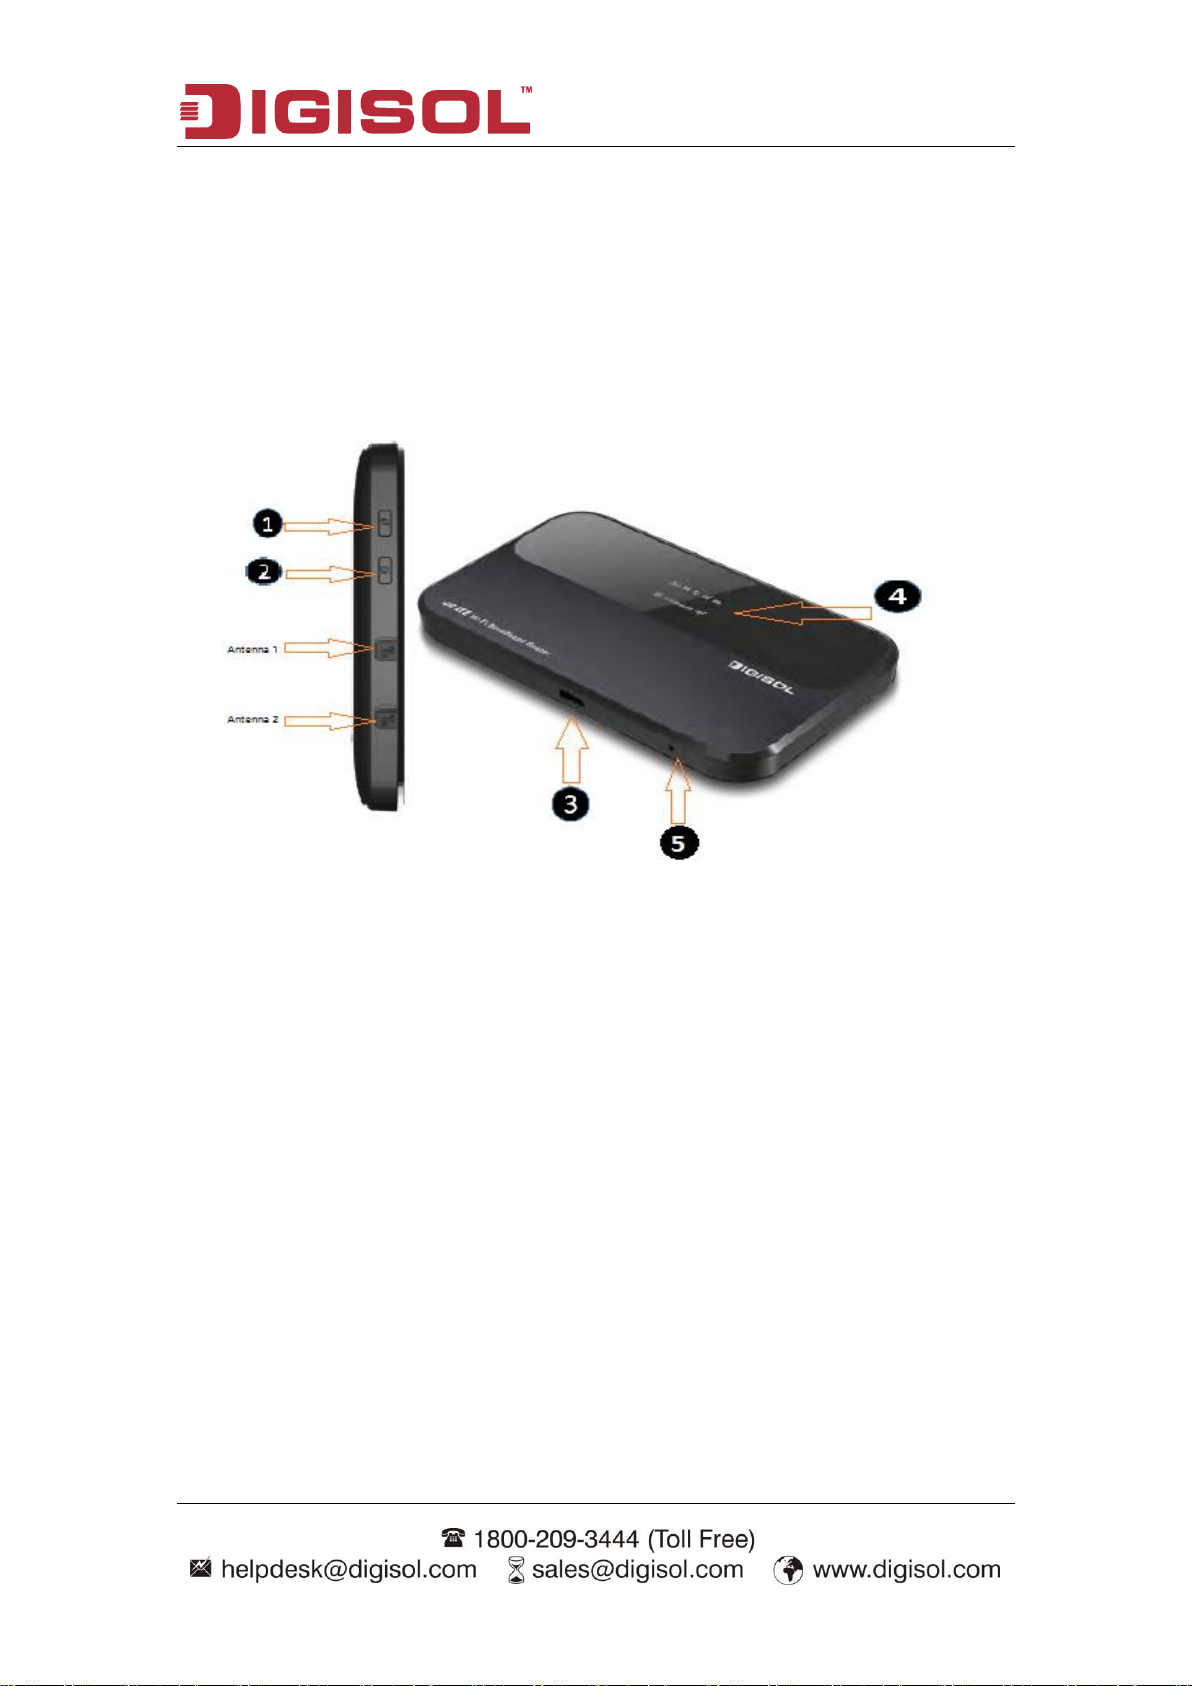
2-1 Hardware Overview
❶ WPS Button—Press this button to add new wireless devices quickly and easily
using Wi-Fi Protected Setup (WPS).
Press and hold for more than 5 seconds to turn the wireless function ON/OFF.
❷ Power Button —Press and hold this button for 6 seconds to power on/off the
device.
❸ Micro USB Connector — Connect either to the USB cable or power adapter for
charging.
❹ Status Display—Provides connection and battery status, network signal strength,
roaming status and number of wireless clients connected.
❺ Reset Button
1. If you forget the changes done, you can restore factory default settings and
reconfigure the settings.
2. If you forget Administrator password or Wireless network key, you can press
the Reset key to restore factory default settings. Press and hold for 10 seconds
Page 7
DG-HR1070MS User Manual
7
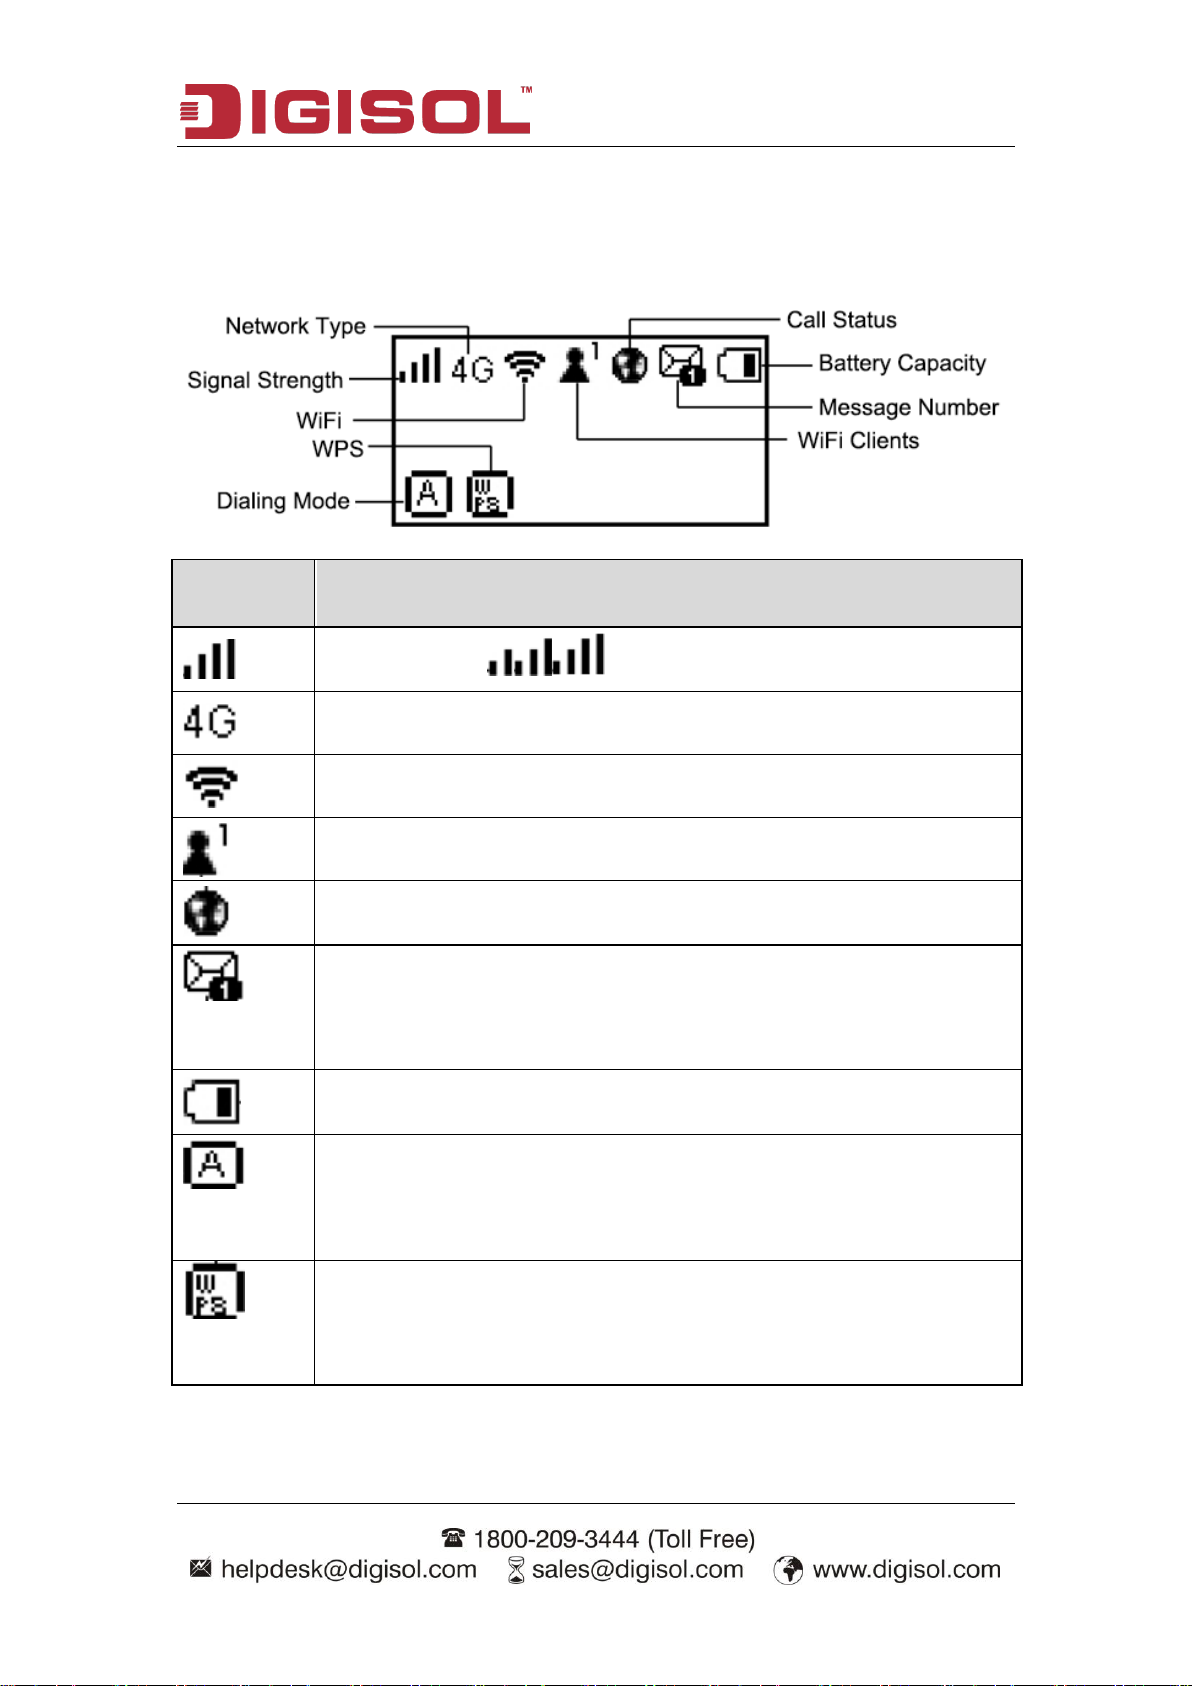
Symbol
Function
Signal Strength, :Signal Strength from weak to strong.
Network Type, Connecting the 4G/3G/2G Network.
Wi-Fi, The Wireless network is open.
Wi-Fi Clients, The Wireless client number.
Call Status, Dial up successfully, and you can access the Internet.
Message Number, Resembles the text message number. Indicates the
number of unread messages.
Battery Capacity, The more the grid number, the more full the battery is..
Dialing Mode, Connecting to the network automatically. When the icon
shows “M”, you need to connect to the network manually.
WPS, As long as the Wireless devices match successfully, it can be
automatically connected successfully without passwords.
2-2 OLED Display Status
Page 8

DG-HR1070MS User Manual
8
2-3 Power Management
Your device will work from its battery or when plugged into a power source.
• Battery— Charge the battery by plugging in the wall charger. While the battery is
charging the battery icon on the Status Displays cycles from one to four bars.
When the battery is fully charged, the battery icon is solid.
• Wall charger— You can use the device when the charger is plugged into a wall
socket. The battery charges while it is plugged in. Before using DG-HR1070MS,
read the battery safety information in the "Safety Hazards" section of this
guide.
Page 9
DG-HR1070MS User Manual
9
3. Using the Device
3-1 Connect to Your Network
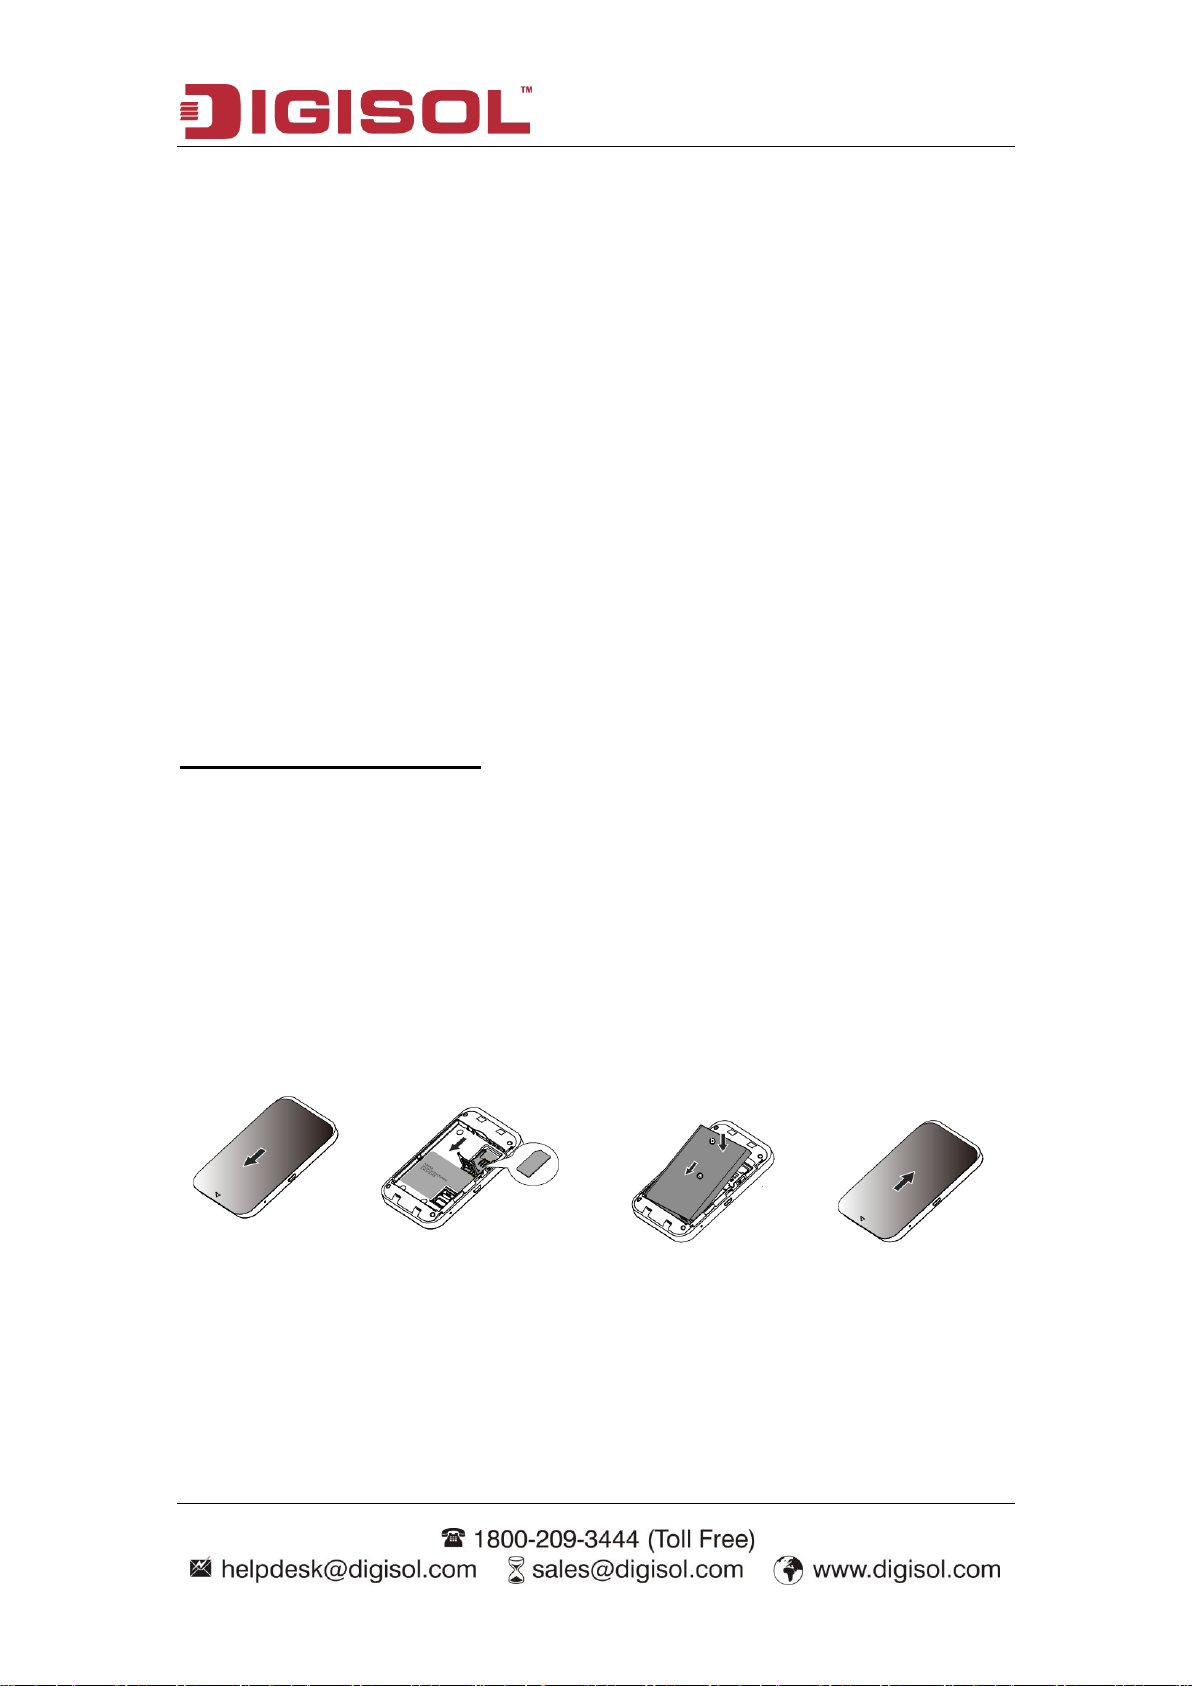
1. Ensure that your DG-HR1070MS LTE Mobile Router is powered OFF.
2. Remove the back cover and take out the battery. Slide your (U) SIM card into the
slot provided, ensuring that the alignment is the same as indicated by the logo next
to the slot. The gold contacts on the card should be facing downwards.
Caution: Always unplug and turn off the router before installing or removing the
SIM card. Never insert or remove the SIM card while the router is in use.
3. Press and hold the power button at the side of the router.
a. “DIGISOL”, “welcome” will be displayed on the screen as the router performs
its initialization processes.
b. After a few moments, the OLED display will show the current status of the
router‟s various functions. For more details on the OLED display, please refer to
“OLED Display Status” as explained above.
Insert SIM Card and Battery
Tips: Always switch the device OFF and disconnect the charger before removing
the battery.
1. Remove the back cover and the battery.
2. Insert the SIM card. Ensure that the contact area on the card is facing down and that
the beveled corner on the card is facing the beveled corner on the holder.
3. Align the battery contacts with the battery compartment connectors, and insert the
battery. Lastly replace the back cover.
Page 10
DG-HR1070MS User Manual
10
Charge the battery
Your battery has been partially charged at the factory. If the device indicates a low
charge, do the following:
1. Connect the charger to a wall outlet.
2. Connect the USB charger plug to your device‟s USB port.
3. When the device indicates a full charge, disconnect the charger from the device,
then from the wall outlet.
Tips: Don’t plug USB cable or charger during powering on the device; otherwise
it may cause the device to work abnormally. If it occurs at your end, please
restart your device.
Wireless Installation Considerations
The DG-HR1070MS can be accessed using a wireless connection from anywhere
within the operating range of its wireless network. Keep in mind that the quantity,
thickness and location of walls, ceilings, or other objects that the wireless signals
must pass through may adversely affect wireless signals. Ranges vary depending on
the type of material and background RF (radio frequency) noise in your home or
office. The key to maximizing the wireless range is to follow these basic guidelines:
1. Minimize the number of walls and ceilings between the router and other network
devices. Each wall or ceiling can reduce your adapter‟s range from 3 to 90 feet (1 to
30 meters).
2. Be aware of the direct line between network devices. A wall that is 1.5 feet thick
(0.5 meters) appears to be almost 3 feet (1 meter) thick at a 45-degree angle. At a
2-degree angle it appears over 42 feet (14 meters) thick. Position devices so that the
signal will travel straight through a wall or ceiling (instead of at an angle) for better
reception.
3. Try to position access points, wireless routers and computers so that the signal
passes through open doorways and drywall. Material such as glass, metal, brick,
insulation, concrete and water can affect wireless performance. Large objects such as
fish tanks, mirrors, file cabinets, metal doors and aluminum studs may also have a
negative effect on range.
Page 11
DG-HR1070MS User Manual
11
4. If you are using a 2.4 GHz cordless phone, make sure that the 2.4 GHz phone base
is as far away from your wireless device as possible. The base transmits a signal even
if the phone is not in use. In some cases, cordless phones, X-10 wireless devices and
electronic equipments such as ceiling fans, fluorescent lights and home security
systems may dramatically degrade wireless connectivity.
3-2 Configuring the Router Settings
Initial Connection to the Router
When configuring the router for the first time, you will need to establish a direct
connection with the router in order to access the web-based configuration utility. This
can be done using the included USB cable, or by connecting wirelessly to the
DG-HR1070MS. Once you have configured your router, you will be able to connect
using the Wi-Fi settings that you have specified in the configuration process. Ensure
that the router is powered ON and has sufficient battery power before commencing
the setup process.
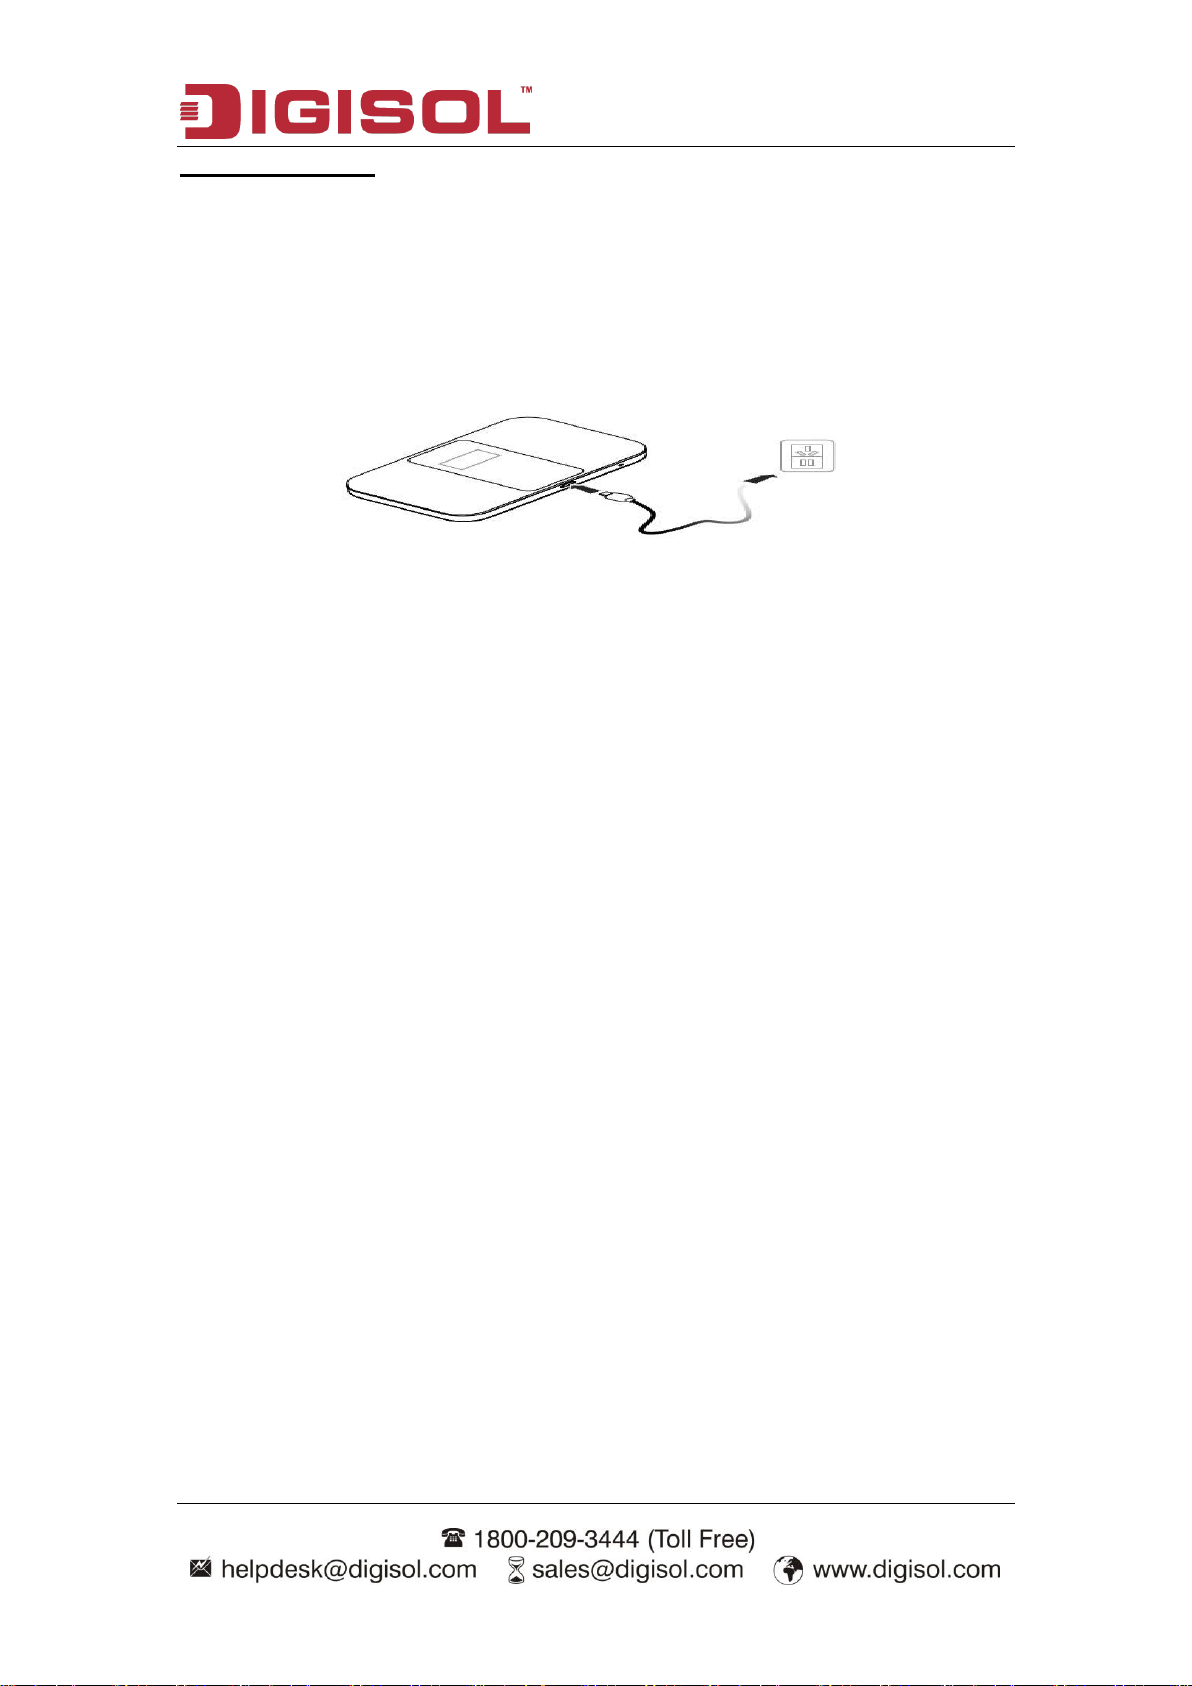
Connect via USB
To connect the router via USB, plug the provided micro USB cable into the micro
USB port at the bottom of the router, and plug the other end into an available USB
port on your computer. Your router is now ready for configuration.
Connect via Wi-Fi
Note: The following example uses Windows 7’s built-in wireless connection
utility. If you are using a different operating system, or a third party connection
utility, the process may be different. Please refer to the documentation that came
with your operating system or wireless client for further information on how to
connect to a wireless network.
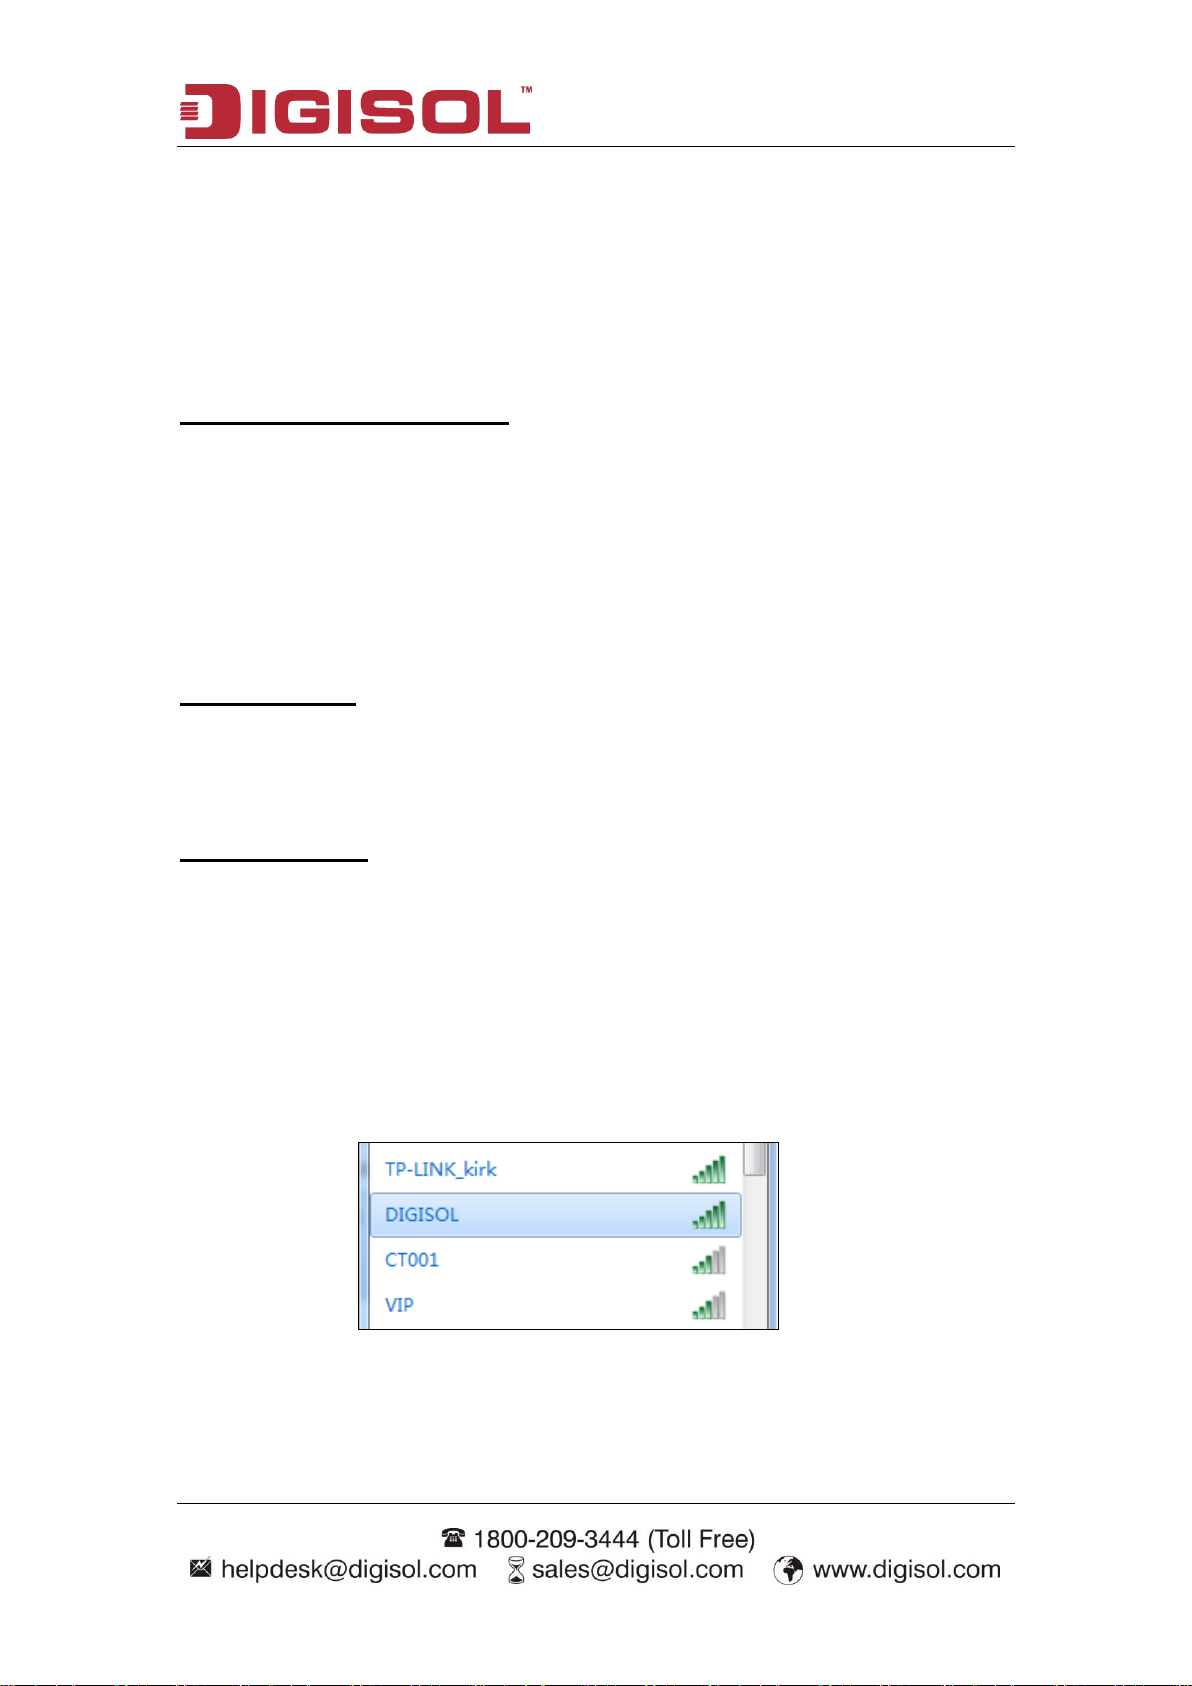
To connect to the router using Wi-Fi, open your operating system‟s wireless
networking utility and scan for available networks. By default, the network name
(SSID) of the DG-HR1070MS will be “DIGISOL”
You will then be prompted to enter the network security key for your router. The
unique security key for your router will be displayed on a sticker in the router‟s
battery bay. By default the security key is “12345678”. Enter the security key in the
Page 12

DG-HR1070MS User Manual
12
box provided and click OK. Your wireless connection utility should confirm that the
connection is successful, and you can move to the next step to continue with
configuration process.
3-3 Getting Started
Web-based Configuration
To access the configuration, open a web browser (such as Internet Explorer) and enter
the IP address of the router, which is 192.168.2.1 by default or you can enter
http://digisol.mifi.
Router Configuration
Once you have reached the configuration utility through your web browser, you will
need to log in. Enter admin as the username, and then enter the password. By default,
the password is 1234.
Page 13

13
Click Login to continue.
The screen shown below will appear.
DG-HR1070MS User Manual
Page 14

DG-HR1070MS User Manual
14
Throughout the interface you will find a menu bar at the top of the page which
includes tabs for easy navigation, and a summary bar in the upper right corner with a
quick view of essential information.
Home: The Home tab will bring you back to the home page, where a summary of the
system information is shown.
Wizard: Click on this tab to start the setup wizard, which will guide you through the
basic setup process.
WAN: This tab gives you Internet setup and settings options.
Network: The Network tab allows you to configure the network settings for your
Local Area Network (LAN).
SMS: From the SMS you can view and send SMS messages via your mobile network.
Wi-Fi: The Wi-Fi allows you to configure your Wi-Fi network, as well as add new
devices using WPS.
Security: The Security allows you to configure firewall and security settings to
protect your network from WAN-side intrusions.
System: From this tab, you can manage the administrative configuration of your
router, such as time and date, firmware upgrade, language and system logs.
Page 15

DG-HR1070MS User Manual
15
Device Status
A summary of the device‟s current status will be displayed on the information panel at
the top of the right-hand side of the navigation bar. The following is a description of
the indications, from left to right.
SIM: This icon shows whether or not a compatible SIM card has been inserted into
the device.
SMS: The number to the right of this icon indicates the number of unread messages in
the SMS inbox.
Signal Strength: Indicates the current strength of the mobile network signal being
received.
Operator Name: The name of the mobile network operator to which the device is
currently connected.
Internet: Indicates that there is an Internet connection present.
Wi-Fi Network: Indicates that the router‟s Wi-Fi network is currently active. The
number to the right of this icon indicates the number of wireless clients currently
connected to the router‟s Wi-Fi network.
Logout: Click this button to log out of the configuration interface.
Page 16

DG-HR1070MS User Manual
16
Parameter
Description
IP Address
If you wish to change the router‟s IP address, enter the new
address here. If you change the IP address from the default, you
will need to enter the new address in your Internet browser‟s
address bar in order to access the web-based configuration
utility.
IP Subnet Mask
If you wish to change the router‟s subnet mask, enter it here.
3-4 Wizard
The Wizard page will guide you through the steps required to configure the basic
settings of your router such as the IP address, network name (SSID) and password.
Click on the Wizard button on the navigation bar to commence the wizard.
Please go to Wizard menu by clicking on „Wizard‟ button.
Please follow the steps and complete the router configuration.
Step 1: LAN Connection Setting:
Here is the description of every setup item:
After the settings are done click on “Next”.
Page 17

DG-HR1070MS User Manual
17
Parameter
Description
SSID
If you wish to change your wireless network name (SSID),
enter a new name in the field provided. If you change the SSID,
you may need to re-connect to the router using the new SSID
before you can access your network or the configuration utility.
Password Setting
(Pre-shared key)
Choose a password for your wireless security. Clients will need
this password in order to access your network wirelessly. If you
are currently connected to the router using Wi-Fi, you will need
to reconnect to the router using your new password once the
wizard has been completed.
Step 2: 2G/3G/4G Configuration:
If you wish to change the 2G/3G or 4G service provider or connection type, click on a
profile in the list to highlight it, and click “Set” to set that profile as the default.
Click “Next” to continue, or “Back” to return to the previous step.
Step 3: Wi-Fi Configuration
Here is the description of every setup item:
Click “Done” to complete the wizard, or click Back to return to the previous page.
After you have clicked Done, a confirmation window will appear. Click “OK” to save
the configuration.
Page 18

DG-HR1070MS User Manual
18
Parameter
Description
Dialing Mode
Select your preferred cellular network connection mode:
Auto Mode - The router will automatically connect to your preferred
mobile network and remain connected while the device is powered on.
Manual Mode - You must manually connect to the preferred mobile
network.
Data Roaming
Select whether you would like to Enable or Disable mobile network
roaming from the drop-down menu.
Caution: Roaming on networks other than your own may incur
additional usage charges.
Connection
Shows the type and status of the current mobile connection.
3-5 WAN
This page allows you to configure the Internet settings for your mobile network
connection. Use the tabs in the left-hand column to navigate through the different
settings categories.
1) Connection Operation
Here is the description of every setup item:
Page 19

DG-HR1070MS User Manual
19
Parameter
Description
List
Shows list of operators.
ID
Enter the configuration ID. Eg. “PID-1”
Name
Displays the Operator Name.
APN
APN(Access Point Name) provided by your ISP.
User
Enter the user Name provided by your ISP. These fields are
case-sensitive.
Password
Enter the password provided by your ISP. These fields are
case-sensitive.
PDF type
Select Packet Data Protocol type.
Auth type
Some ISP‟s specifically need authentication type, please
confirm it with your ISP or keep it PAP/CHAP.
2) APN Setting
Here is the description of every setup item:
3) 4G/3G/2G Modem
This section displays information about your 4G/3G or 2G modem connection.
Settings: Select your preferred modem type from the drop-down menu:
Page 20

DG-HR1070MS User Manual
20
Parameter
Description
Network Type
Auto - The modem will automatically select the modem type
depending on the network it is connected to.
LTE only- Only 4G Network connection.
WCDMA only- Only 3G network connection.
GSM only-Only 2G network connection.
Here is the description of every setup item:
4) PIN
This section allows you to turn SIM lock on or off for the SIM card which is currently
inserted into the router.
PIN Code: Enter the PIN code for the SIM card. Click Enable to turn on SIM lock, or
click Disable to turn off SIM lock.
5) PLMN
This page allows you to view available Public Land Mobile Networks (PLMN). This
page can also be used to select a preferred network when you are roaming outside
your home network.
Mode: Select Automatic to allow the router to automatically connect to the first
available network when roaming. Select Manual to choose your preferred roaming
network from the list below.
If you have selected Manual mode, click on the preferred network to select it, and
then click the Update button to select that network as the preferred network.
Page 21

DG-HR1070MS User Manual
21
Click Query to refresh the list of available networks.
Note: You will need to manually disconnect the current mobile data service
before selecting a network using PLMN.
Page 22

DG-HR1070MS User Manual
22
Parameter
Description
DHCP Mode
Select the desired DHCP mode from the drop down menu:
None - Turns off DHCP functionality.
Server - The router will act as a DHCP server and assign IP
addresses to the connected devices.
Start IP
Enter the starting address for the DHCP pool.
End IP
Enter the ending address for the DHCP pool.
Lease Time
(minutes)
Enter the lease time (in minutes) for assigned IP addresses.
3-6 LAN
This page allows you to check the current status of your Local Area Network (LAN)
and make changes to LAN Settings.
1) LAN
IP Address: Enter the IPv4 address for your Wi-Fi network. If you change this
address, you will need to enter the new address in your web browser‟s address bar in
order to access the web-based configuration utility.
IP Subnet Mask: Enter the IPv4 subnet mask for your Wi-Fi network.
2) DHCP
DHCP Server
Here is the description of every setup item:
Page 23

DG-HR1070MS User Manual
23
Leased hosts
This table shows the details of clients currently receiving a DHCP address from the
DHCP server. C lick “Refresh” to update the table.
3) IPv6
Stateless
Receipt of Router Advertisement message with one or more Prefix Information
options.By default current option is selected.
Stateful
Use of stateful address configuration protocol such as DHCPv6.
MTU
Maximum Transmission Unit (MTU) is the maximum packet size (bytes) of a
communication protocol that can be passed by a layer of communication protocol.
Page 24

DG-HR1070MS User Manual
24
3-7 SMS
DG-HR1070MS can send or receive SMS text messages through the mobile
network‟s SMS function. In this section you can check the SIM card‟s inbox and
outbox, as well as send new messages.
New Message
Local
Inbox: This tab shows a summary of SMS messages in the inbox.
Outbox: This tab shows a summary of messages in the outbox which are yet to be
sent.
SIM
Page 25

DG-HR1070MS User Manual
25
Parameter
Description
Enable
Check the box to enable Wi-Fi function.
Mode
Select the desired 802.11 wireless mode from the drop down
menu. You should make your selection based on the standards
supported by the wireless clients which will be connecting to
your network.
Channel
To have the router automatically select the optimal wireless
channel, select Auto from the drop-down menu. If you wish to
select a particular channel, select it from the drop-down menu.
SSID
Enter the SSID (network name) to identify your wireless
network.
Hide SSID
Check the box to hide the SSID of your network. If the SSID is
hidden, wireless clients must manually enter it in order to
connect to your network.
WLAN Auto
Close
Enable: The Wi-Fi function will be closed when no terminals
attempt to connect the device or connect the device in 5
minutes & you can press the power key to awake Wi-Fi
3-8 Wi Fi
The Wi-Fi pages allow you to check the current status of your Wi-Fi network and
make changes to Wi-Fi settings.
1) Basic
This section allows you to configure your Wi-Fi network and specify the wireless
security method to be used to secure your network.
Here is the description of every setup item:
Page 26

DG-HR1070MS User Manual
26
function.
Disable: The Wi-Fi function will be always on .
WLAN auto
close Time
(minutes)
You can assign the time limit for WLAN. WLAN will
automatically Stop when no terminals attempt to connect the
device in between time which you fixed.
Max Clients
A maximum of three clients only can be connected to your
wireless network.
Encryption Type
Select the wireless encryption method that you wish to use
from the drop-down menu. If you do not wish to enable
wireless security, select None from the drop-down menu. Click
Apply to save the current settings.
WPA Mode
You can select WPA encryption type here.
Cipher type
AES is safer than TKIP, but not every wireless client supports
it. Please refer to the specification of your wireless client to
decide which encryption type you should use.
Pre-shared key
Please input pre-shared key according to the key format you
selected here. For security reasons, don‟t use simple words.
Wireless security
It is recommended that you enable wireless security on your router in order to protect
your wireless network from unauthorized access. You should select a wireless security
protocol that is compatible with the wireless clients which will access your network.
WEP
Wired Equivalent Privacy (WEP) is an older wireless security standard, which
although providing more protection than no security at all, has some weaknesses
Page 27

DG-HR1070MS User Manual
27
Parameter
Description
Encryption Type
Select WEP from the drop-down menu.
Authentication
Method
Select the desired authentication method from the drop down
menu:
Auto - The router will automatically determine the
authentication method based on the client that is connecting to
it.
Open System - Clients do not require authentication in order to
associate with the router. The encryption key will be used to
encrypt data packets sent over the network.
Shared - The encryption key is used for authentication as well
as to encrypt data packets.
WEP Encryption
Length
Select the length of the encryption key to be used.
64-bit - A 64-bit key comprises a string of 10 hexadecimal
characters, or 5 ASCII characters.
128-bit - A 128-bit key comprises a string of 26 hexadecimal
characters, or 13 ASCII characters.
Key 1-4
You can predetermine up to 4 WEP keys. Select the WEP key
you wish to use by clicking on the radio buttons next to the
keys. Select whether you wish to use HEX or ASCII characters
in your key using the drop-down menu. Enter the desired key in
the field provided. Click Apply to save the current settings.
which could make it vulnerable to intrusion. It is recommended that you only use
WEP if your wireless clients do not support Wi-Fi Protected Access (WPA). WEP is
not supported by the 802.11n standard, and therefore you will not be able to achieve
802.11n speeds if you are using WEP.
Here is the description of every setup item:
Page 28

DG-HR1070MS User Manual
28
Parameter
Description
Encryption Type
Select WPA Personal from the drop-down menu.
WPA Mode: Select the desired authentication method from the
drop-down menu:
Auto (WPA or WPA2) - The router will automatically
determine the version of WPA to be used based on the client
that is connecting to it.
WPA - Clients will only be able to associate with the router
using the WPA standard.
WPA2 - Clients will only be able to associate with the router
using the WPA2 standard. Clients that do not support WPA2
will not be able to associate with the router.
Cipher Type
Select the desired cipher type from the drop-down menu:
TKIP - This cipher is used by the WPA standard.
AES - A newer cipher used by the WPA2 standard. Use of this
cipher type is required in order to achieve 802.11 speeds.
Pre-Shared Key
The pre-shared key is the password which clients will require in
order to connect to your network. Enter a password between 8
and 63 characters in length.
Wi-Fi Protected Access (WPA)
Wi-Fi Protected Access (WPA) is a newer and more secure encryption protocol which
makes significant improvements over WEP. There are two versions of WPA; the
original WPA, and the newer WPA2.
Here is the description of every setup item:
Click “Apply” to save the current settings
Page 29

DG-HR1070MS User Manual
29
Parameter
Description
Enable
Check the box to enable the Wi-Fi Protected Setup feature.
Configure State
Shows the current status of the WPS function.
Configure
Method
Select the WPS method that you wish to use. If your device
supports Push Button Connection (PBC), simply select this
option and click Apply to start the connection process. You will
then have 120 seconds to press the WPS button on your
wireless device in order to initiate the connection. If your
device does not support PBC, you can select the PIN method
and continue to the next step.
2) WPS
Wi-Fi Protected Setup (WPS) enables you to quickly and securely add compatible
devices to your wireless network.
Here is the description of every setup item:
Click “Apply” to commence the connection process.
3) Station List
The Station List tab shows a list of all wireless clients currently connected to your
wireless network.
Page 30

DG-HR1070MS User Manual
30
Parameter
Description
Source MAC
Enter the MAC address of the machine or device which you
wish to filter packets coming from.
Source IP
Enter the IP address of the machine or device which you wish
to filter packets coming from.
Source form port
Enter the starting port on the source IP.
Source to port
Enter the ending port on the source IP.
Destination IP
Enter the destination IP address to be filtered.
Destination from
IP
Enter the starting port of the destination IP.
Destination to Port
Enter the ending port of the destination IP.
Delete
Click the icon to delete this MAC filtering rule. To edit the
rule click on the rule itself.
3-9 Security
The Security tab allows you to configure your router‟s firewall settings and enable
features to protect your network from outside intrusions and malicious attacks.
1) MAC/IP/Port Filter
Configure
The MAC filter enables you to allow or deny access to your wireless network based
on a client‟s MAC address.
Click “Add” to add the current rule to the rules list as shown below.
Here is the description of every setup item:
Page 31

DG-HR1070MS User Manual
31
Parameter
Description
DMZ Host
Enter the IP address of the machine that you wish to place in
the DMZ. If this machine receives an IP address from the
DHCP server, you should make a DHCP reservation to ensure
that the machine always receives the same IP address.
2) NAT
This section allows you to configure functions related to Network Address Translation
(NAT) such as port forwarding, port triggering and the Demilitarized Zone (DMZ)
3) DMZ
If a machine on your network is having trouble running an application from behind
the router‟s firewall, you can choose to enable the DMZ, which will expose the
selected machine completely to the Internet. It is recommended that this is only used
as a last resort, and that you understand the security implications before enabling the
DMZ.
Here is the description of every setup item:
Click “Apply” to save the settings and return to the Network page.
Page 32

DG-HR1070MS User Manual
32
3-10 System
This tab allows you to configure the router‟s administrative functions, such as time &
date, remote access, firmware upgrade, access the system log etc.
1) About
This tab shows the router‟s basic information.
2) Configuration
Here you can click on “Reset” to reset the unit to default settings.
Reset to Default
3) Firmware Upgrade
You can upgrade the firmware of the router here. Make sure the firmware file you
want to use is on the local hard drive of the computer.
Page 33

DG-HR1070MS User Manual
33
Parameter
Description
Old Password
Enter the existing password for this account.
New Password
Enter the new password for this account.
Retype New
Password
Type the new password again to confirm.
Click “Choose file” to locate a previously downloaded firmware file on your
computer. Once the file has been located, click Upgrade to carry out the firmware
upgrade process.
Warning: All current settings will be restored to their factory defaults following a
firmware upgrade.
4) Password
This page lets you change the configuration interface passwords for the Administrator
(Admin) and User accounts.
Here is the description of every setup item:
5) Date and Time
This page lets you set the time and date for your router, and also configures automatic
time synchronization and daylight savings time.
Page 34

DG-HR1070MS User Manual
34
Parameter
Description
Current System
Time
Displays the current time and date according to the router‟s
system clock.
Time Zone
Select the time zone.to synchronize the device time with time
zone.
NTP server
Set the NTP server manually.
NTP
Synchronization
Time when the NTP client will synchronize with NTP server.
Here is the description of every setup item:
Click “Apply” to save the current settings.
6) Schedule Reboot
You can manually set the schedule time so as to reboot the device at a particular time,
day of the week or day of the month.
7) Language
Language: Select your preferred language from the drop-down menu.
Click “Apply” to save the current configuration.
Page 35

DG-HR1070MS User Manual
35
8) System Log
Refresh: Click to update the log display.
Clear Log: Click to clear all log entries.
9) Reboot
Page 36

DG-HR1070MS User Manual
36
Proper Battery Use and Disposal
IMPORTANT
IN EVENT OF A BATTERY LEAK:
• Do not allow the liquid to come in contact with your skin or eyes. If contact has
been made, wash the affected area with large amounts of water and seek medical
advice.
• SEEK MEDICAL ADVICE IMMEDIATELY IF A BATTERY HAS BEEN SWALLOWED.
• Communicate the appropriate steps to be taken if a hazard occurs. Due to the
transmission and reception properties of wireless communication, data
occasionally can be lost or delayed.
Please review the following guidelines for safe and responsible battery use:
1. DO NOT disassemble or open, crush, bend or deform, puncture, or shred.
2. DO NOT modify or remanufacture, attempt to insert a foreign object into the
battery, immerse or expose to water or other liquids, or expose to fire, explosion,
or other hazards.
3. Only use the battery for the system for which it was specified.
4. Only use the battery with a charging system that has been qualified with the
system as per this standard. Use of an unqualified battery or charger may present a
risk of fire, explosion, leakage, or other hazards.
5. Do not short circuit a battery or allow a metallic or conductive object to come in
contact with the battery terminals.
6. Replace the battery only with another battery that has been qualified with the
system as per this standard. Use of an unqualified battery may present a risk of
fire, explosion, leakage, or other hazards.
7. Promptly dispose off used batteries in accordance with local regulations.
8. Battery usage by children should be supervised.
9. Avoid dropping the device or battery. If the device or the battery is dropped,
especially on a hard surface, and the user suspects damage, take it to the
authorized service center for inspection.
10. Improper battery use may result in a fire, explosion, or other hazard.
This product comes with one year warranty. For further details about warranty policy
and Product Registration, please visit support section of www.digisol.com
 Loading...