

Page 1
DG-BR4015N
150Mbps Wireless 3G Broadband Router
User Manual
V1.1
2011-11-30
As our products undergo continuous development the specifications are subject to change without prior notice
Page 2

DG-BR4015N User Manual
COPYRIGHT
Copyright © 2011 by this company. All rights reserved. No part of this publication may
be reproduced, transmitted, transcribed, stored in a retrieval system, or translated into any
language or computer language, in any form or by any means, electronic, mechanical,
magnetic, optical, chemical, manual or otherwise, without the prior written permission of
this company
This company makes no representations or warranties, either expressed or implied, with
respect to the contents hereof and specifically disclaims any warranties, merchantability
or fitness for any particular purpose. Any software described in this manual is sold or
licensed "as is". Should the programs prove defective following their purchase, the buyer
(and not this company, its distributor, or its dealer) assumes the entire cost of all
necessary servicing, repair, and any incidental or consequential damages resulting from
any defect in the software. Further, this company reserves the right to revise this
publication and to make changes from time to time in the contents thereof without
obligation to notify any person of such revision or changes.
Trademarks:
DIGISOL™ is a trademark of Smartlink Network Systems Ltd. All other trademarks are
the property of the respective manufacturers.
Safety
This equipment is designed with the utmost care for the safety of those who install and
use it. However, special attention must be paid to the dangers of electric shock and static
electricity when working with electrical equipment. All guidelines of this and of the
computer manufacturer must therefore be allowed at all times to ensure the safe use of
the equipment.
2
Page 3

DG-BR4015N User Manual
INDEX
1. PRODUCT INFORMATION.................................................................................................................. 5
1-1 I
NTRODUCTION
1-2 S
AFETY INFORMATION
1-3 S
YSTEM REQUIREMENTS
1-4 P
ACKAGE CONTENTS
1-5 G
ET FAMILIAR WITH YOUR NEW WIRELESS BROADBAND ROUTER
2. SYSTEM AND NETWORK SETUP.................................................................................................... 10
2-1 S
OFTWARE INSTALLATION
2-2 C
ONNECTING TO 3G ROUTER BY WEB BROWSER
..................................................................................................................................... 5
.......................................................................................................................... 6
...................................................................................................................... 7
............................................................................................................................ 7
......................................................... 8
.................................................................................................................. 10
................................................................................. 20
2-2-1 Windows 95/98 IP address setup .................................................................... 20
2-2-2 Windows 2000 IP address setup...................................................................... 22
2-2-3 Windows XP IP address setup......................................................................... 24
2-2-4 Windows Vista IP address setup...................................................................... 26
2-3 A
CCESSING ROUTER’S WEB
2-4 U
SING ROUTER SETUP WIZARD
2-5 I
NTERNET MODE SETUP
GUI......................................................................................................... 28
.......................................................................................................... 30
(3G) ............................................................................................................. 36
2-5-1 3G mode.......................................................................................................... 36
2-5-2 Static (Fixed IP) mode..................................................................................... 37
2-5-3 DHCP Mode.................................................................................................... 38
2-5-4 PPPoE Mode ................................................................................................... 38
2-6 O
PERATION MODE
.............................................................................................................................. 39
2-6-1 IP Address (UPnP)........................................................................................... 41
2-6-2 Statistics .......................................................................................................... 43
2-6-3 DHCP Client List ............................................................................................ 44
2-7 WIRELESS........................................................................................................................................ 44
2-7-1 Basic Wireless Setting..................................................................................... 45
2-7-2 Advance........................................................................................................... 47
2-7-3 Wireless Security............................................................................................. 49
2-7-4 WPS (Wi-Fi Protected Setup) ......................................................................... 57
2-6-5 WDS (Wireless Distribution System) ............................................................. 58
2-7-6 AP Clients List................................................................................................. 59
2-7-7 Statistics .......................................................................................................... 60
2-8 F
IREWALL
........................................................................................................................................... 61
2-8-1 QoS (Quality of Service)................................................................................. 62
2-8-2 TCP/IP Filter ................................................................................................... 62
2-8-3 URL Filter....................................................................................................... 64
2-8-4 System Security............................................................................................... 66
2-9 A
DVANCE
........................................................................................................................................... 67
2-9-1 DDNS Domain................................................................................................ 67
2-9-2 Routing............................................................................................................ 68
2-9-3 DMZ................................................................................................................ 69
2-9-4 Port Forwarding............................................................................................... 71
3
Page 4

DG-BR4015N User Manual
2-9-5 System Command ........................................................................................... 73
2-10 M
ANAGEMENT
................................................................................................................................. 74
2-10-1 System Management ..................................................................................... 74
2-10-2 Settings File (Factory)................................................................................... 76
2-10-3 Upload Firmware........................................................................................... 77
2-11 S
TATUS
............................................................................................................................................. 78
2-11-1 Syslog............................................................................................................ 78
2-11-2 Reboot ........................................................................................................... 79
4
Page 5

DG-BR4015N User Manual
1. Product Information
1-1 Introduction
Thank you for purchasing DG-BR4015N 150Mbps Wireless 3G Broadband Router! DGBR4015N is the best choice for Small office / Home office users, all computers and
network devices can share a single 3G / Cable modem internet connection at high speed.
Easy installation procedures allow computer users to setup a network environment in
very short time - within minutes. When the number of your computers and networkenabled devices grow, you can also expand the number of network slots by simply
connecting a hub or switch, to extend the scope of your network.
All computers and IEEE 802.11b/g/n wireless-enabled network devices (including PDA,
cellular phone, game console, and more) can connect to this wireless router without
additional cabling. With a compatible wireless card installed in your PC, you can transfer
files up to 150Mbps (transfer data rate).
Other features of this router include:
• Wireless speed up to 150Mbps.
• Allows multiple users to share a single Internet line.
• Share a single 3G, Cable or xDSL internet connection.
• Access private LAN servers from the internet.
• Four wired LAN ports (10/100M) and one WAN port (10/100M)
• USB port to connect 3G USB dongle.
• Failover between primary and secondary links.
• Works with IEEE 802.11b/g/n wireless LAN devices.
• Supports DHCP (Server/Client) for easy IP-address setup.
• Advanced network and security features like: Special Applications, QoS,
DMZ, Virtual Servers, Firewall.
• Allows you to monitor the router’s status like: DHCP Client Log, System
Log and Device/Connection Status.
• Easy to use Web-based GUI for network configuration and management
Purposes.
• Remote management function allows configuration and upgrades from a
remote computer (over the Internet)
• Provides Auto MDI / MDI-X function for all wired Ethernet ports.
5
Page 6

DG-BR4015N User Manual
1-2 Safety Information
In order to keep the safety of users and your properties, please follow the safety
instructions as mentioned below:
1. This router is designed for indoor use only; DO NOT place this router outdoor.
2. DO NOT place this router close to a hot or humid area, like kitchen or
bathroom. Also, do not leave this router in the car during summer.
3. DO NOT pull any connected cable with force; disconnect it from the router first.
4. If you want to place this Router at a height or mount on the wall, please make
sure it is firmly secured. Falling from a height would damage the router and its
accessories and warranty will be void.
5. Accessories of this router, like antenna and power supply, are dangerous to
small children. KEEP THIS ROUTER OUT OF THE REACH OF CHILDREN.
6. The Router will get heated up when used for long time (This is normal and is
not a malfunction). DO NOT put this Access Point on paper, cloth, or other
flammable materials.
7. There’s no user-serviceable part inside the router. If you find that the router is
not working properly, please contact your dealer of purchase and ask for help.
DO NOT disassemble the router, warranty will be void.
8. If the router falls into water when it’s powered, DO NOT use your hands to pick
it up. Switch the electrical power off before you do anything, or contact an
experienced electrical technician for help.
9. If you smell something strange, or even see some smoke coming out from the
router or power supply, remove the power supply or switch the electrical power
off immediately, and call the dealer of purchase for help.
6
Page 7

DG-BR4015N User Manual
1-3 System Requirements
• Notebook or desktop computer with network adapter (wired/wireless)
• Internet connection, provided by USB (3G) or Cable modem with a RJ-45
Ethernet port.
• Web browser (Microsoft Internet Explorer 4.0 or above, Netscape
Navigator 4.7 or above, Opera web browser, or Safari web browser).
• An available AC power socket (100 – 240V, 50/60Hz)
1-4 Package Contents
Before you start using this router, please check if there’s anything missing in the package,
and contact your dealer of purchase to claim for missing items:
• DG-BR4015N 3G Wireless Broadband Router
• Switching power adapter (9V DC, 1A)
• Quick Installation Guide
• Installation Guide CD (includes User Manual, Utility)
• Patch chord (1 No.)
7
Page 8
DG-BR4015N User Manual
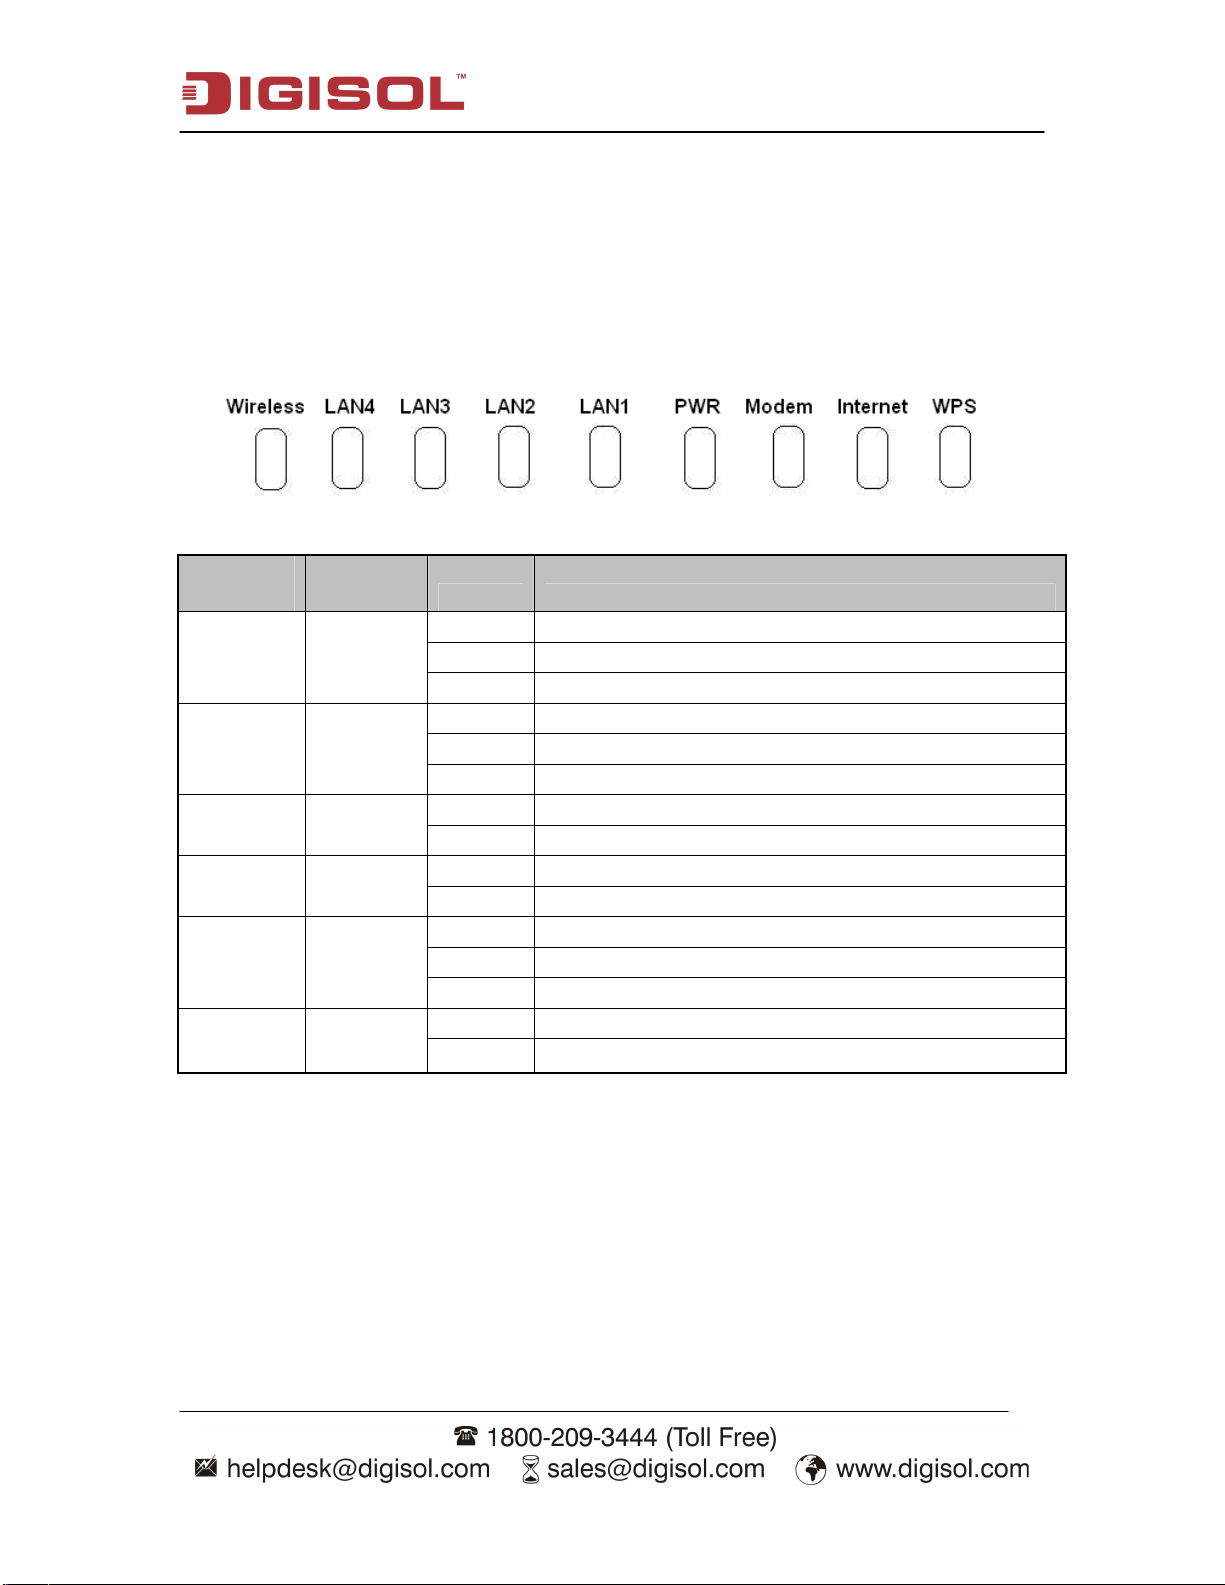
1-5 Get Familiar with your new wireless broadband router
Front Panel
LED
Name
Wireless Green
LAN
(1~4)
PWR Red
Modem Green
Internet Green
WPS Green
LED
Color Status Description
ON Wireless radio is ON.
Blinking Data is being transmitted or received.
OFF Wireless is not enabled.
ON LAN link is UP.
Green
Blinking Data is being transmitted or received.
OFF LAN port not in use.
OFF Power is OFF.
ON Power is ON.
Blinking 3G Modem is initializing or initialization is failed.
ON 3G connections are established.
ON WAN link is UP
Blinking Data is being transmitted or received.
OFF WAN link is down
Blinking WPS negotiation is enabled, waiting for the clients
OFF WPS negotiation is not enabled on the device.
8
Page 9
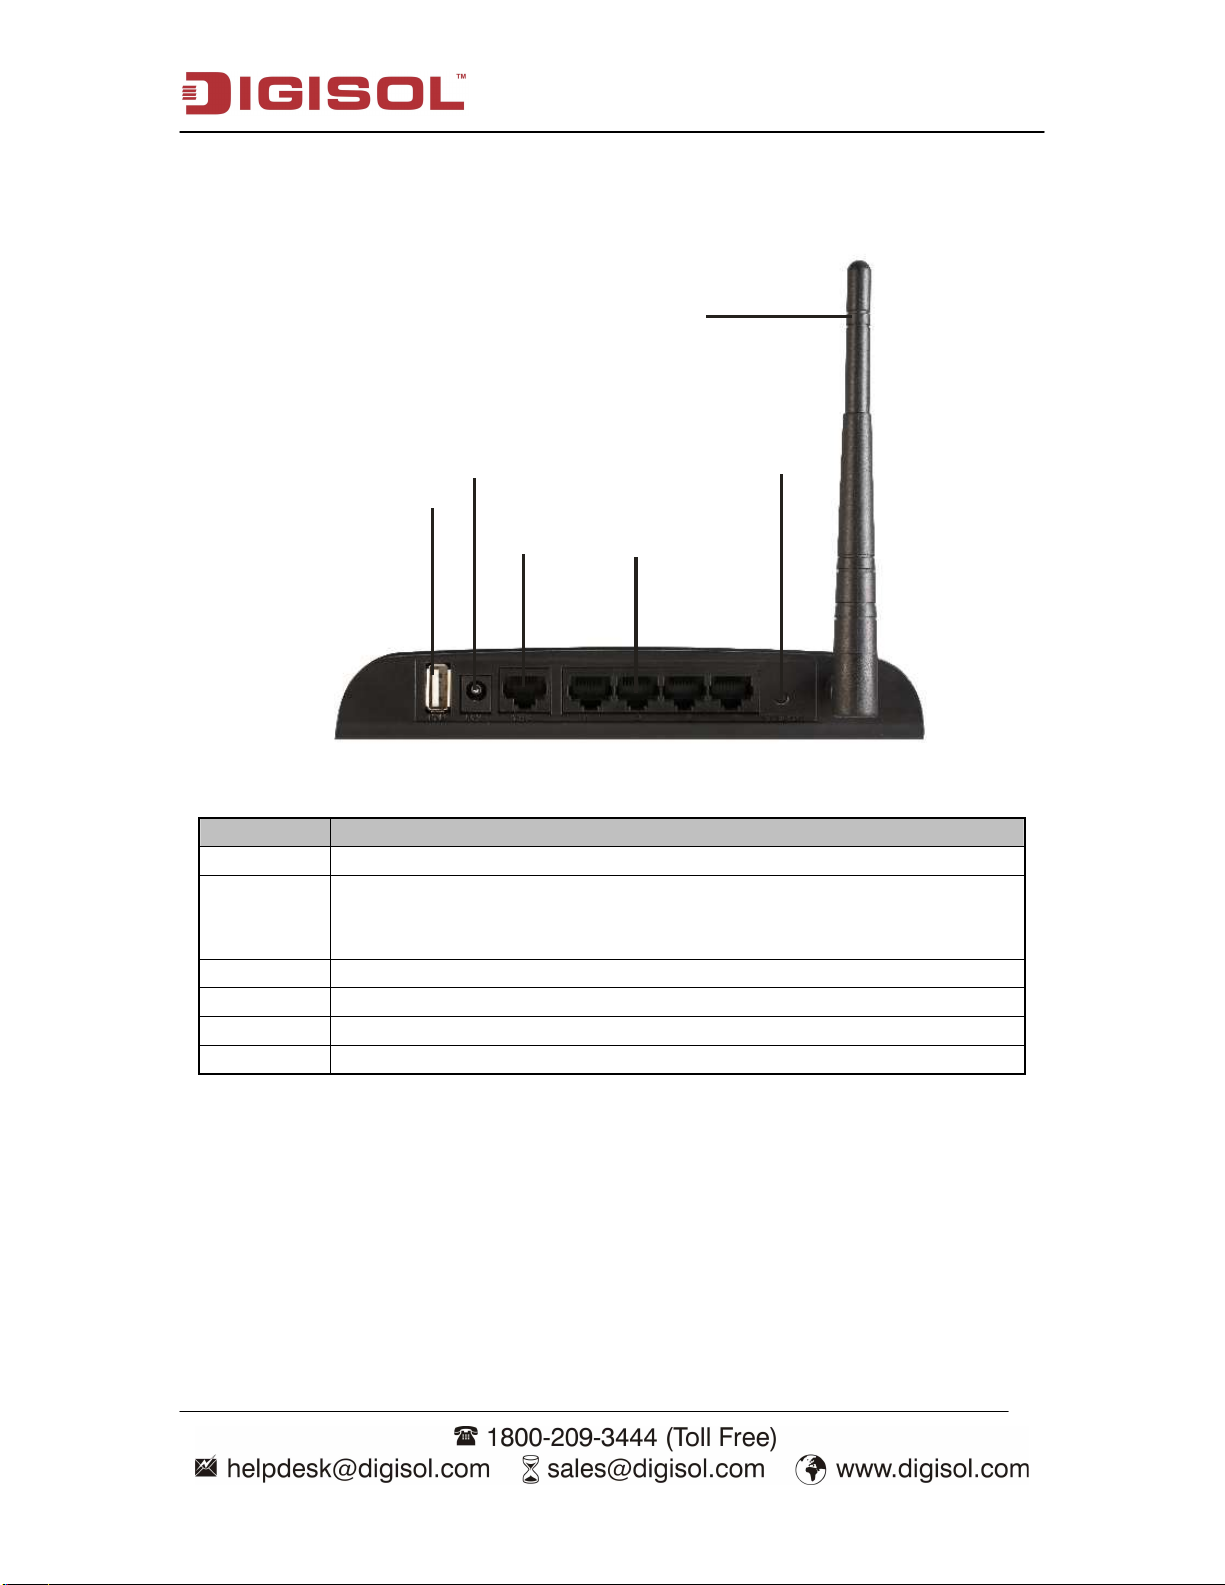
Back Panel
DG-BR4015N User Manual
Antenn a
WPS/
Reset
USB
Power
Connector
Port
WAN LAN
Interface Description
Antenna It is a 3dBi dipole antenna.
Press this button and hold for 10 seconds to restore all settings to
WPS/Reset
LAN (1~4) Local Area Network (LAN) ports 1 to 4.
WAN Wide Area Network (WAN / Internet) port.
Power Power connector, connects to A/C power adapter.
USB USB port for 3G connection.
factory defaults, and press this button for less than 5 seconds to start
WPS function.
9
Page 10
DG-BR4015N User Manual
2. System and Network Setup
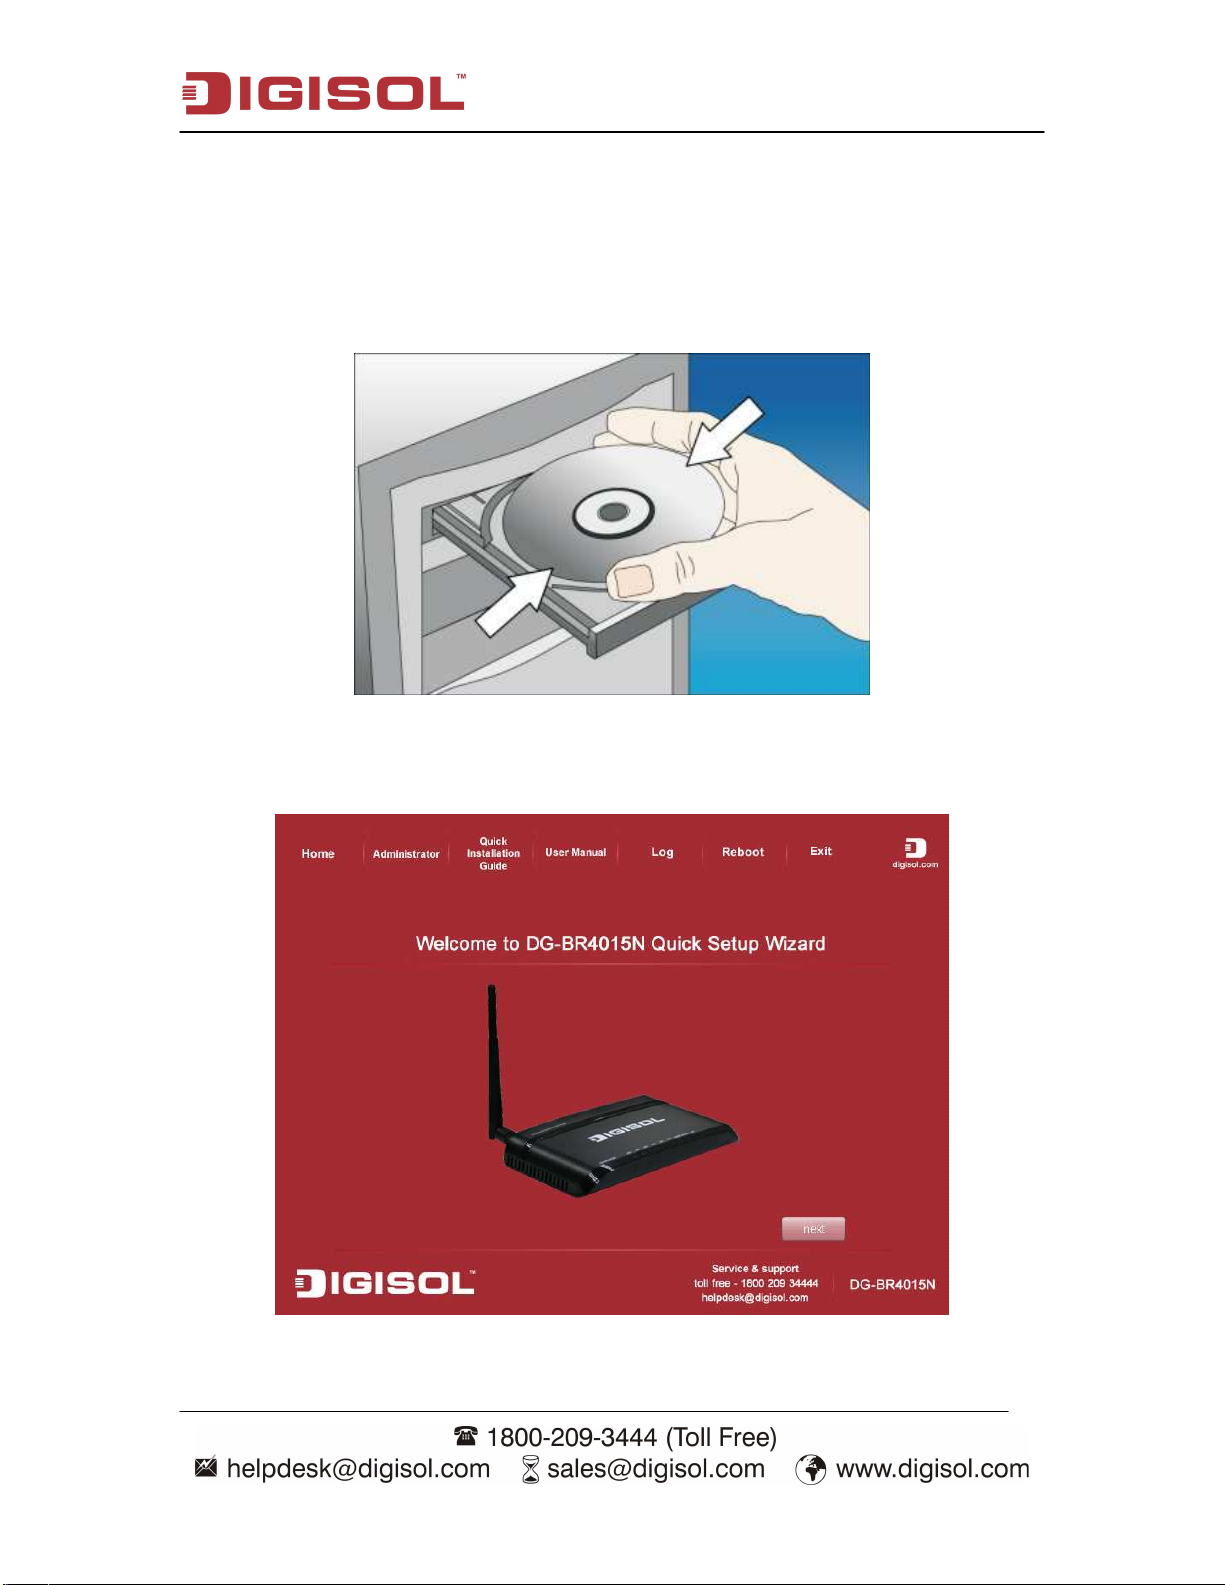
2-1 Software Installation
1. Insert the Setup CD into your CD-ROM drive of notebook/desktop computer.
2. Explore the CD and execute the “Autorun.exe” file. Below given screen will
appear. Click ‘next’ to continue with the installation.
10
Page 11
DG-BR4015N User Manual
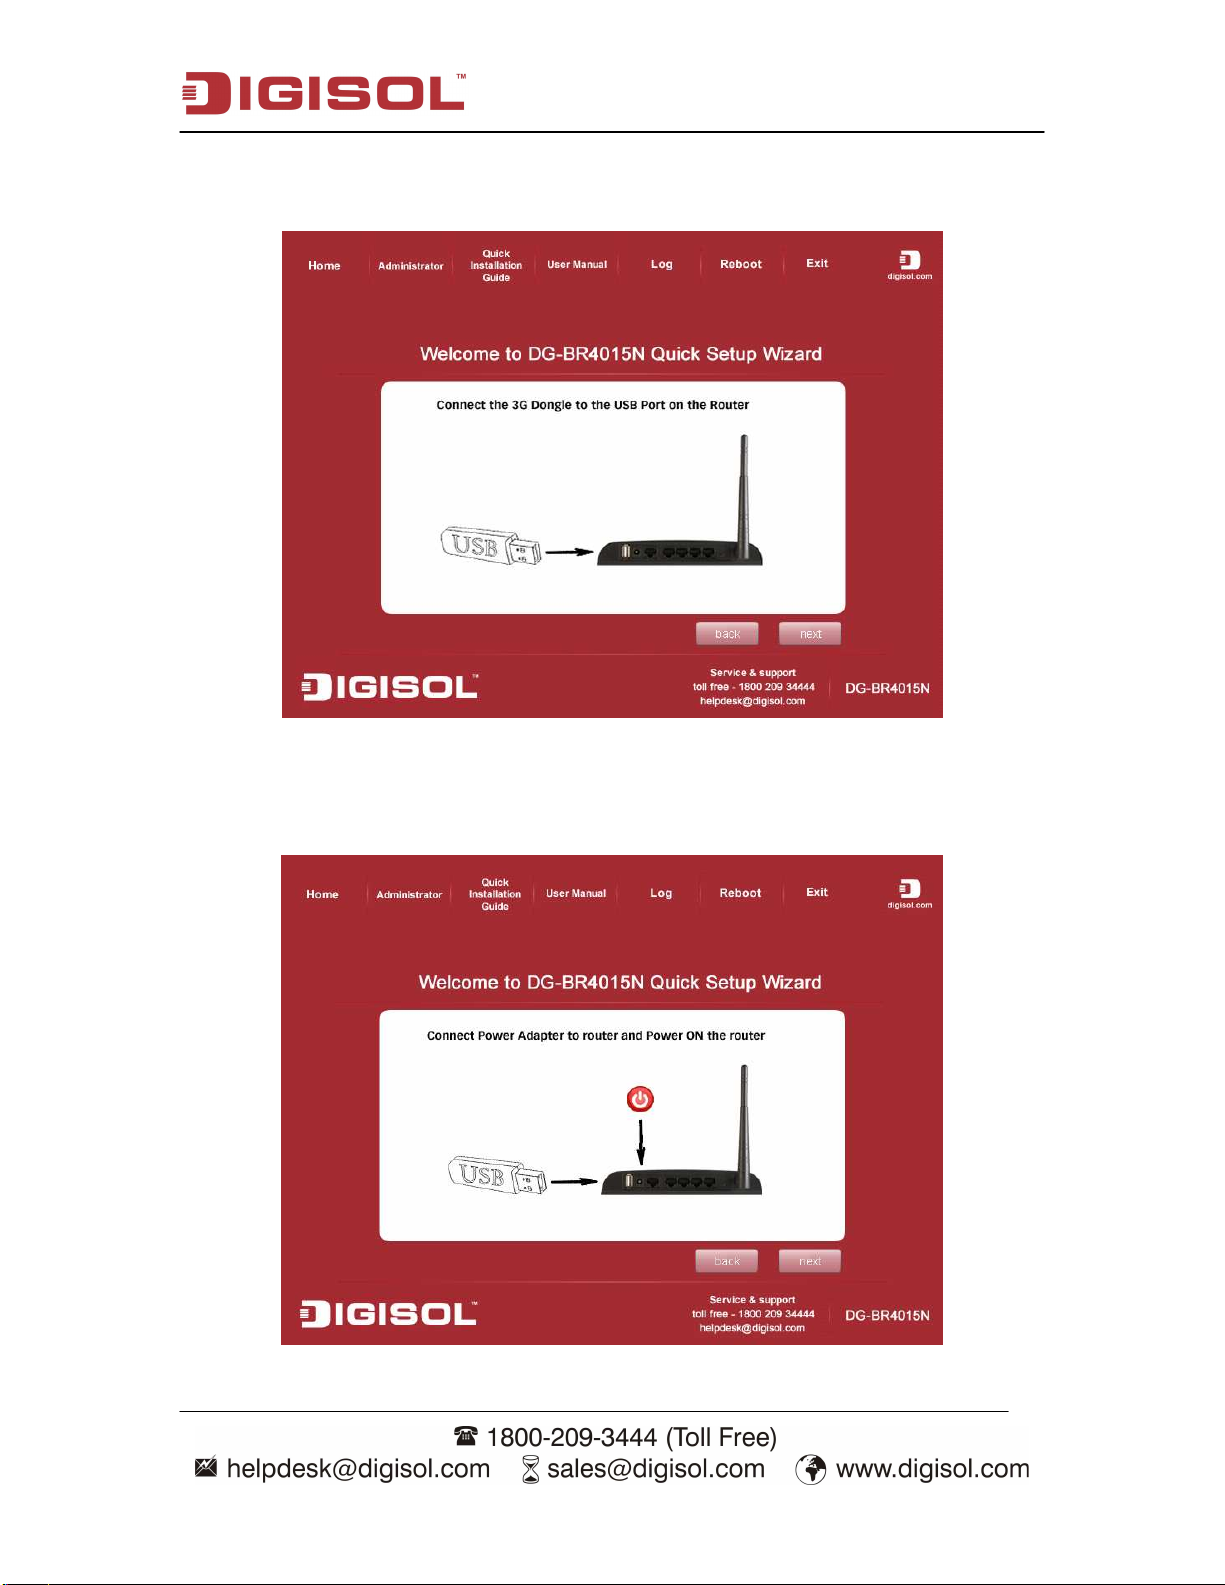
3. Connect 3G USB dongle to the USB port on the Router. Click ‘next’ to continue
with the installation.
4. Power ON the router. It will take approximately 30 seconds for router to boot
up completely. Ensure that all the LED’s on the router are ON. If not, try the
above steps again else click ‘next’ to continue with the installation.
11
Page 12
DG-BR4015N User Manual
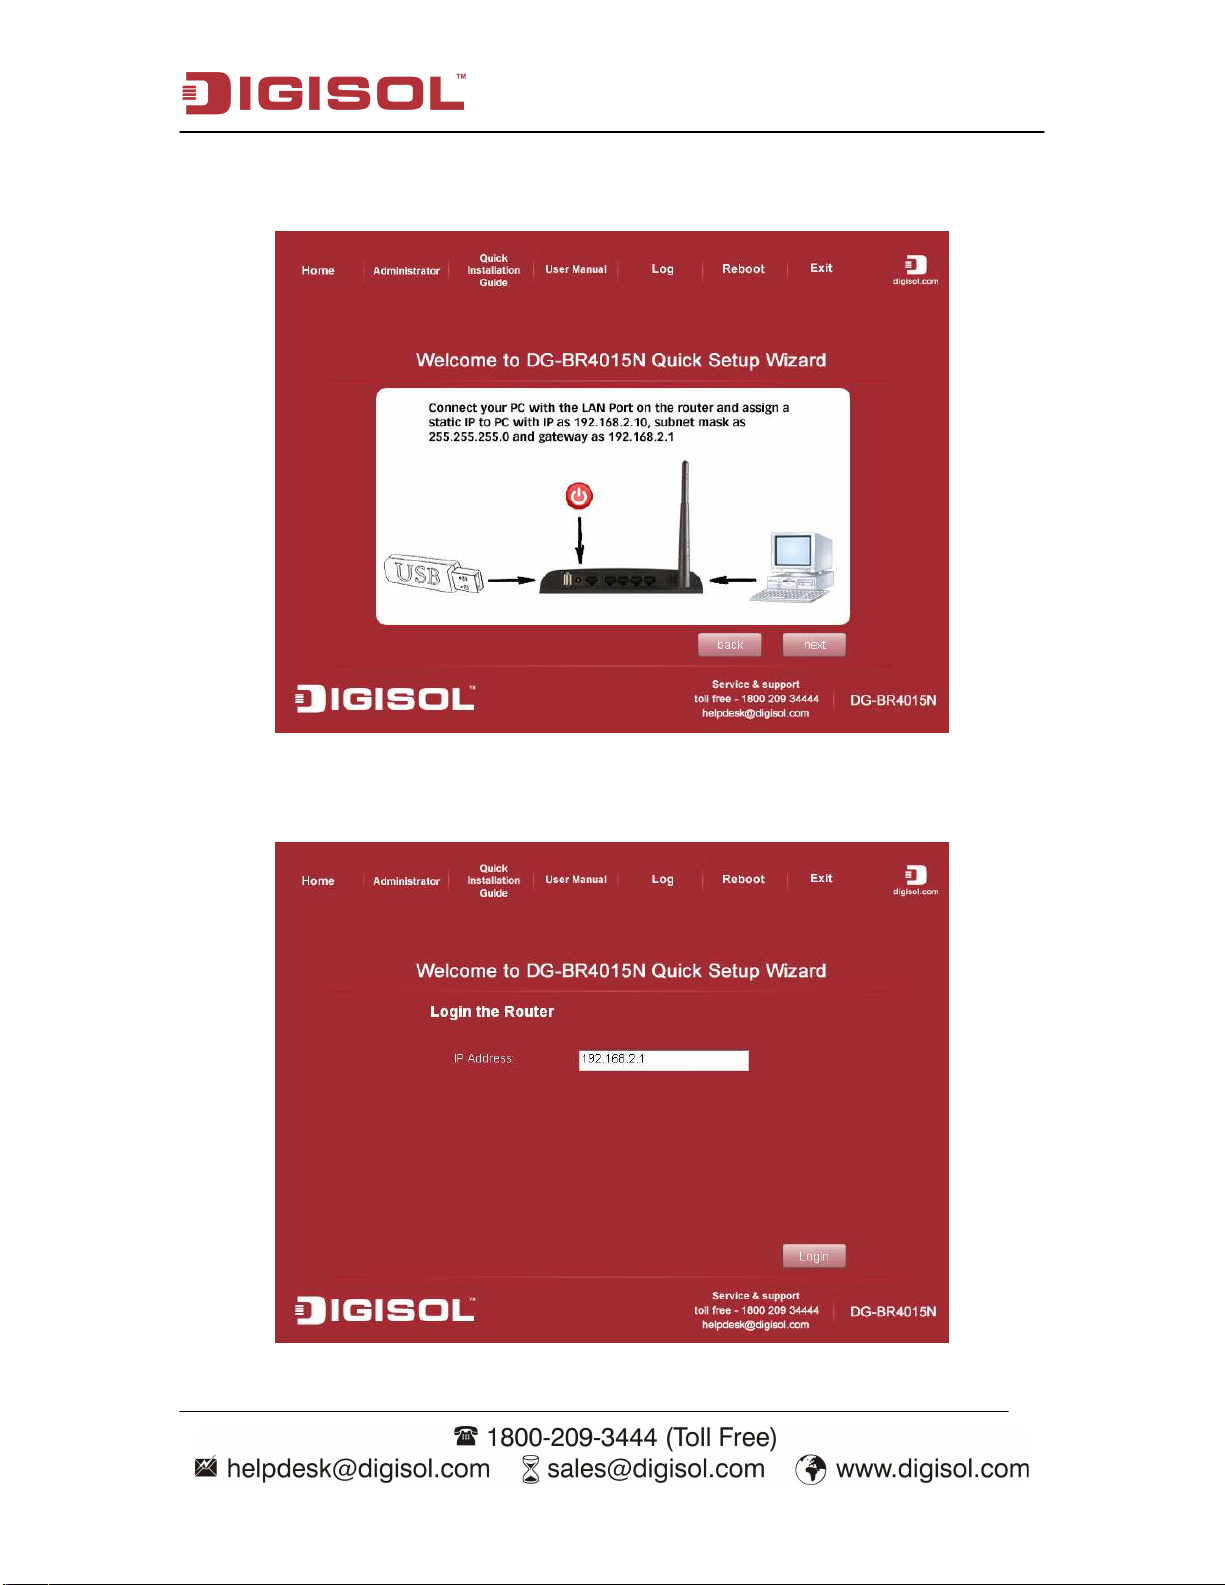
5. Connect your desktop/notebook to one of the LAN ports (1~4) of the router.
Click ‘next’ to continue with the installation.
6. Enter the IP address of the router (default IP 192.168.2.1 will automatically
appear). Click ‘Login’ to continue with the installation.
12
Page 13
DG-BR4015N User Manual
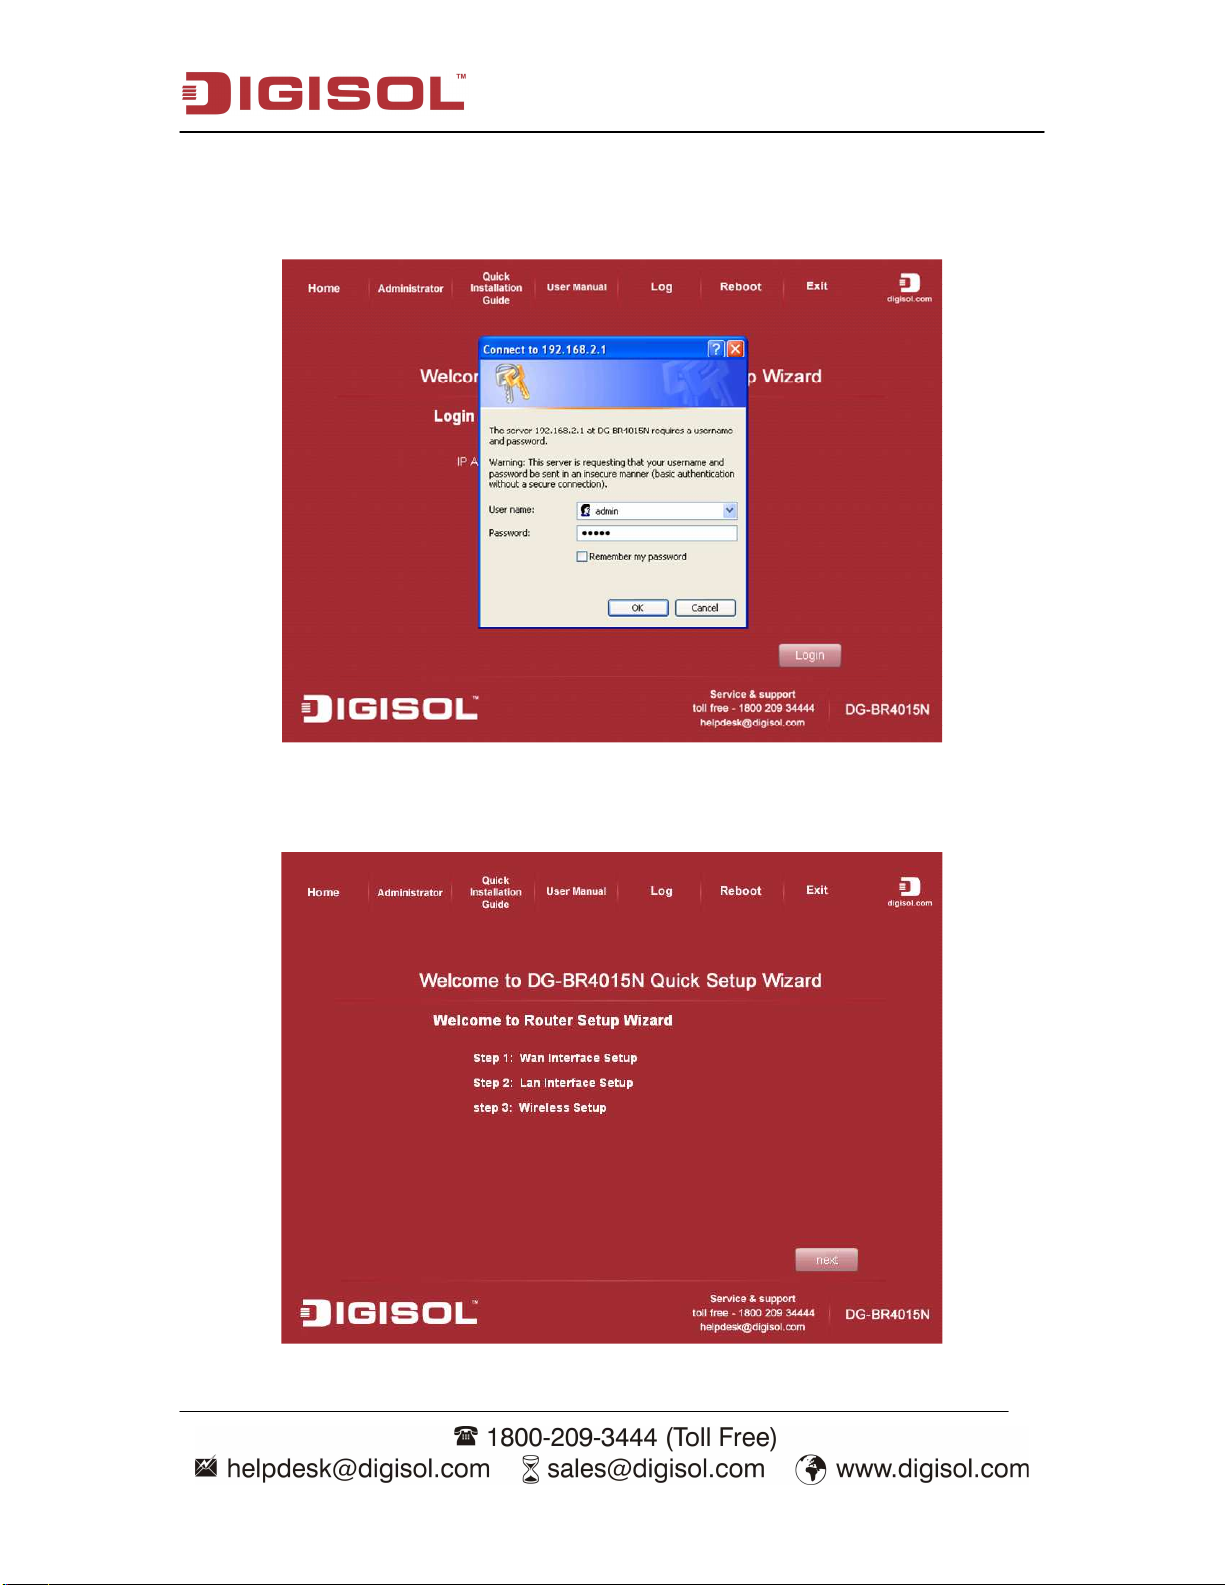
7. Default Username is admin and Password is admin. Click ‘OK’ to continue
with the installation.
8. Below screen will display the Router Setup Wizard steps. Click ‘next’ to
continue with the installation.
13
Page 14
DG-BR4015N User Manual
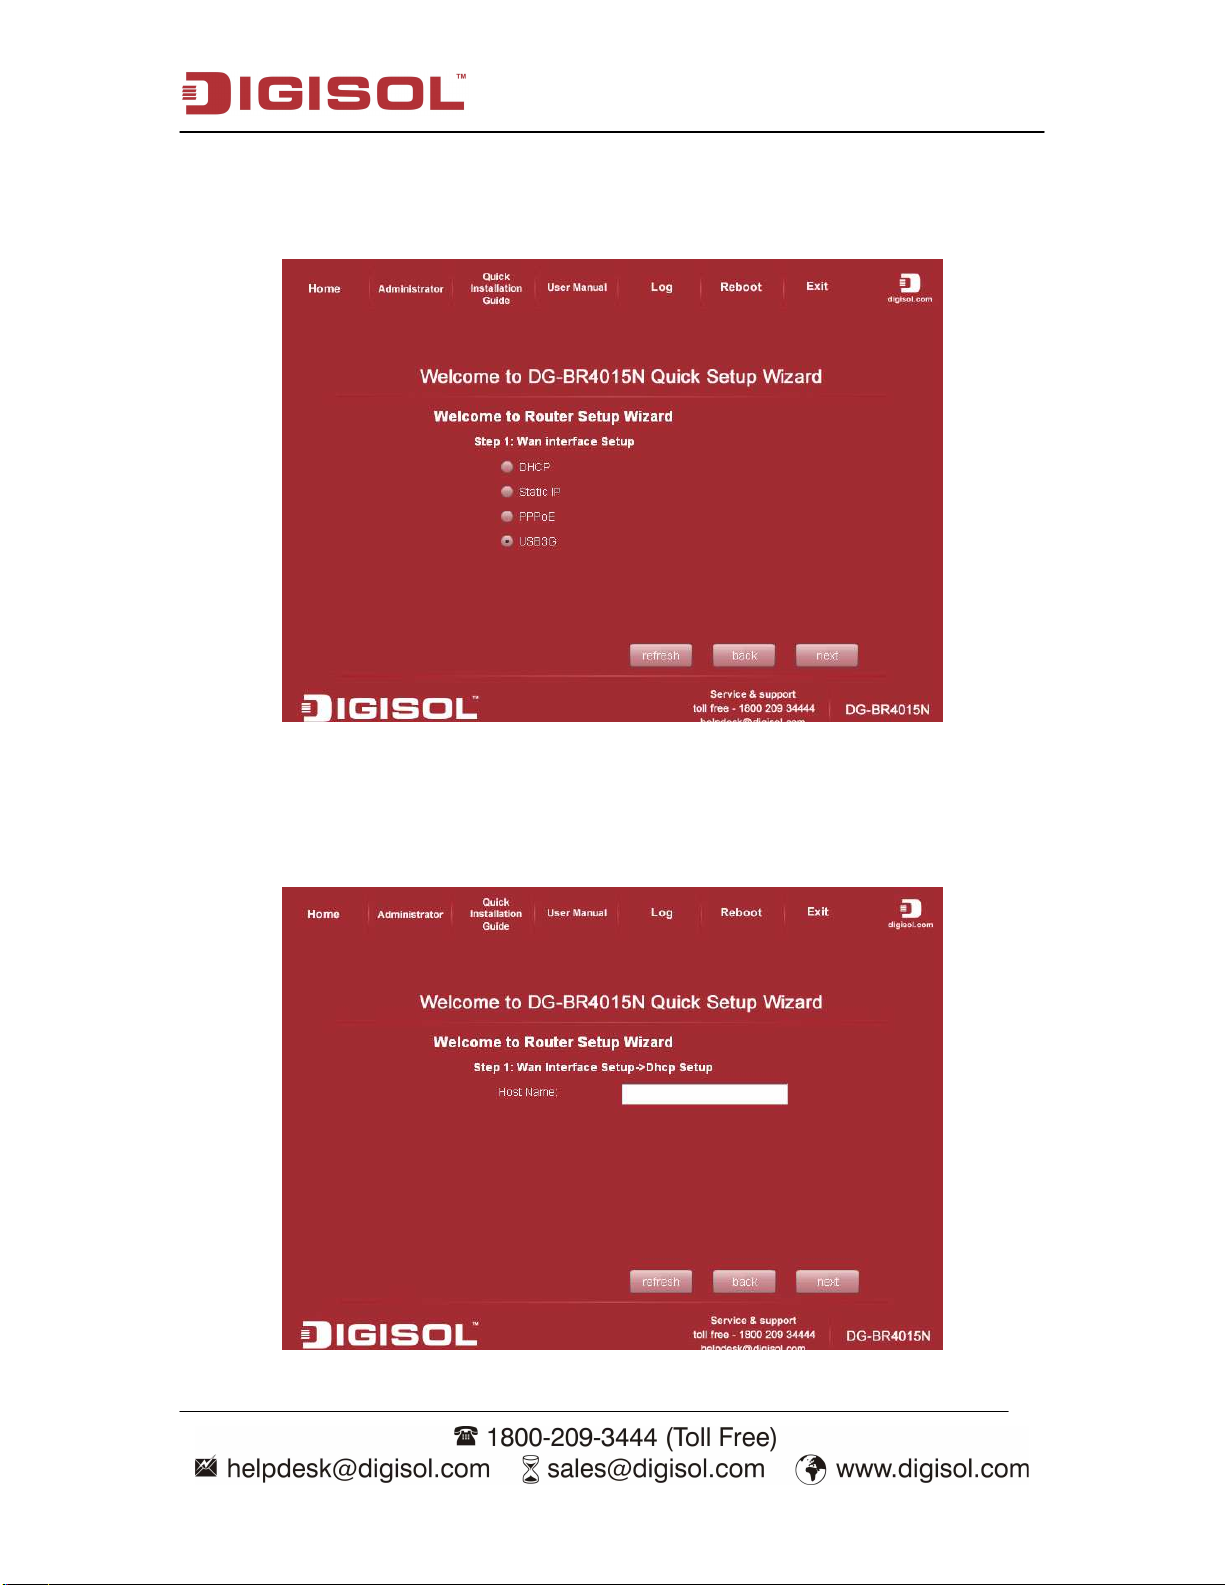
9. Select the type of Internet connection you wish to set. Click ‘next’ to continue
with the installation.
i) If “Wan Interface Setup” is set to DHCP then the following screen will appear.
Enter any Hostname, this field is optional. Click ‘next’ to continue with the
installation.
14
Page 15
DG-BR4015N User Manual
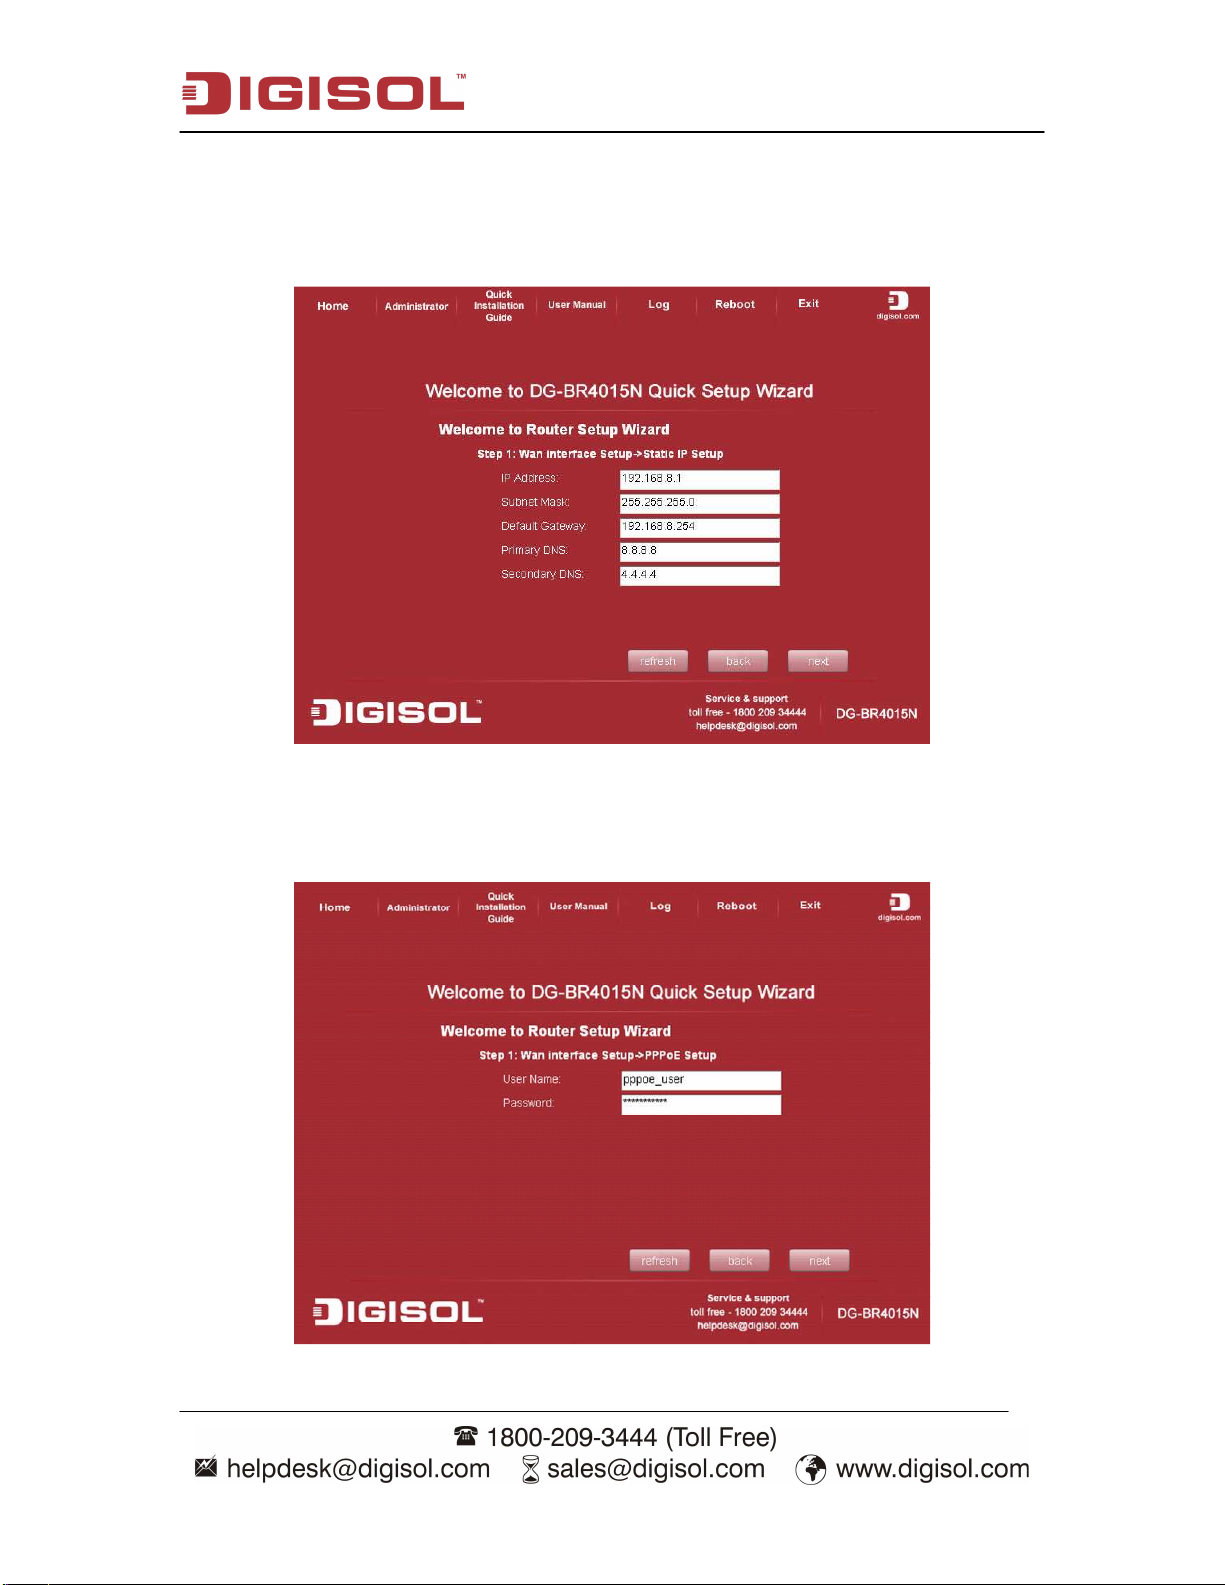
ii) If “Wan Interface Setup” type is set to Static IP then following screen will appear.
Enter the IP address, Subnet Mask, Default Gateway and DNS address provided by
ISP in the screen shown below and click ‘next’ to continue with the installation.
iii) If “Wan Interface Setup” type is set to PPPoE then following page will appear.
Enter the PPPoE Username and Password as provided by ISP and click ‘next’ to
continue with the installation.
15
Page 16
DG-BR4015N User Manual
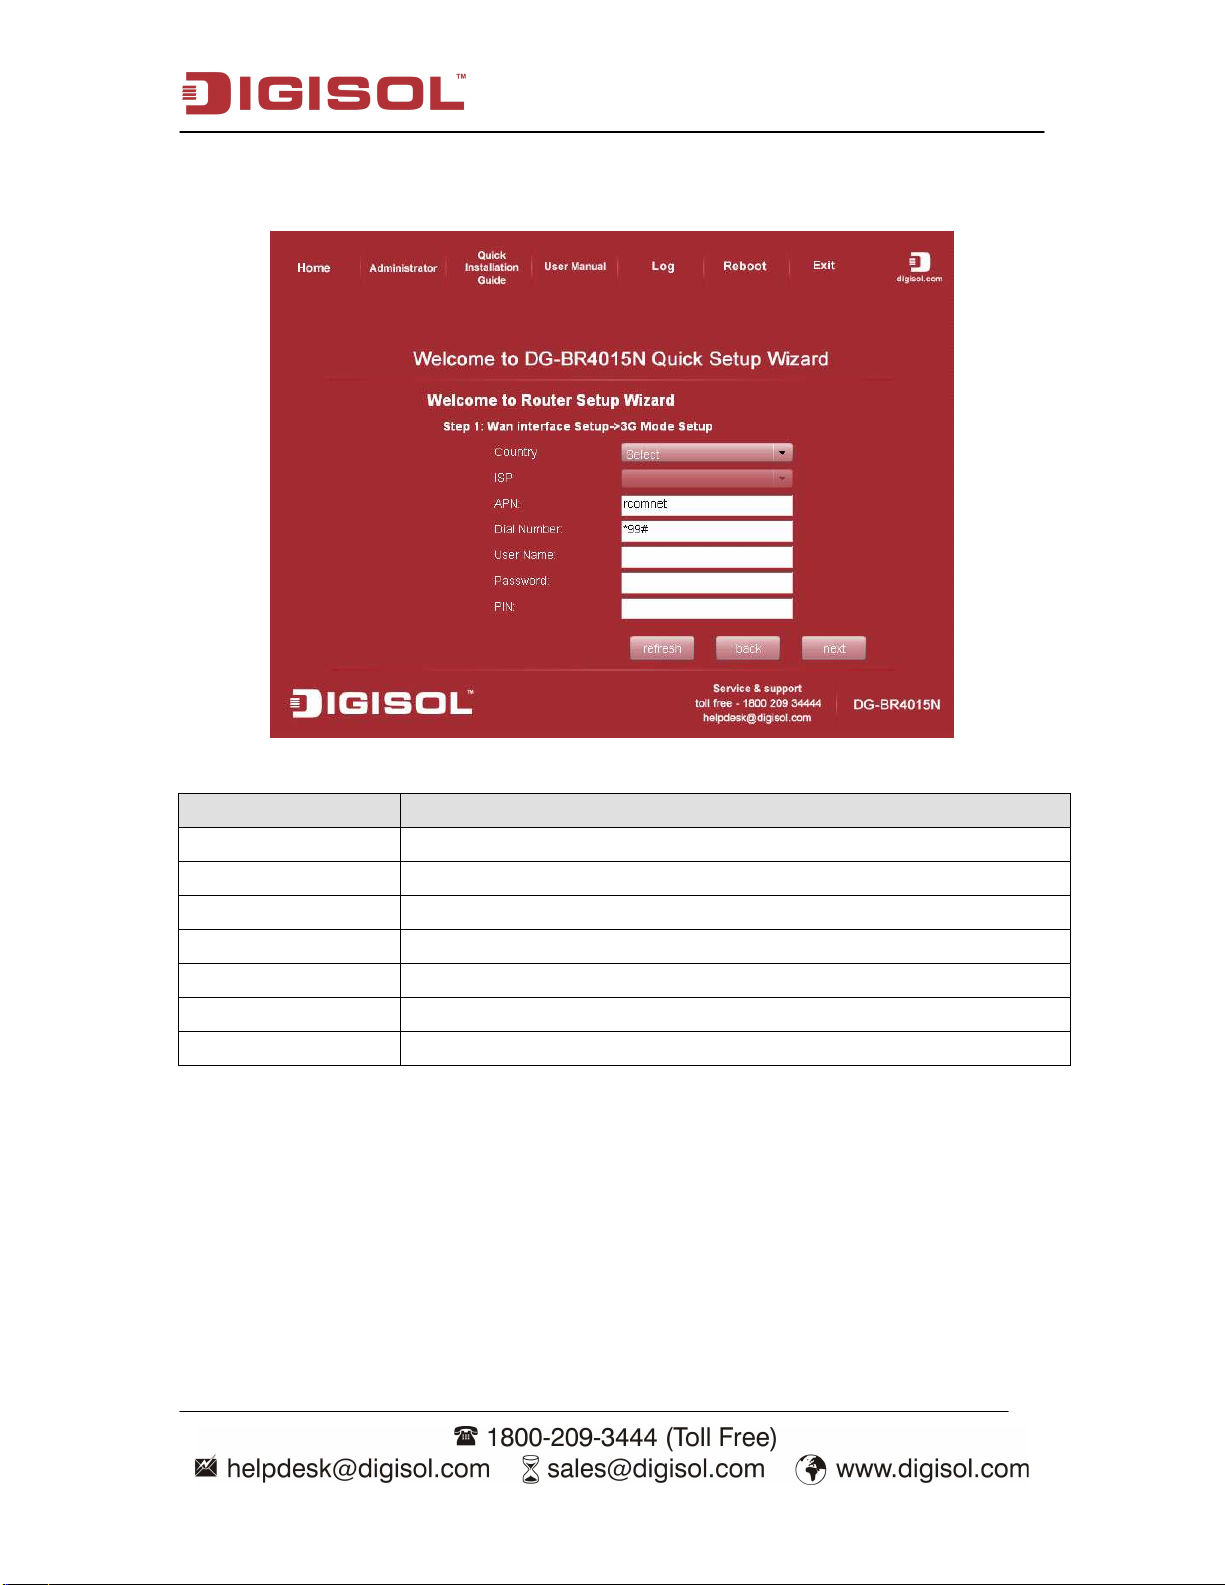
10. Configure the 3G connection parameters as shown in the following screen.
Click ‘next’ to continue with the installation.
Parameter Description
Country Select the Country from drop-down list. If not listed select Manual.
ISP Select ISP from drop-down list.
APN Enter the APN (Access Point Name) provided by ISP
Dial Number Enter the dial number provided by your ISP
Username Enter Username if provided by your ISP. This field is optional
Password Enter Password if provided by your ISP. This field is optional
PIN Enter PIN if provided by your ISP. This field is optional
16
Page 17
DG-BR4015N User Manual
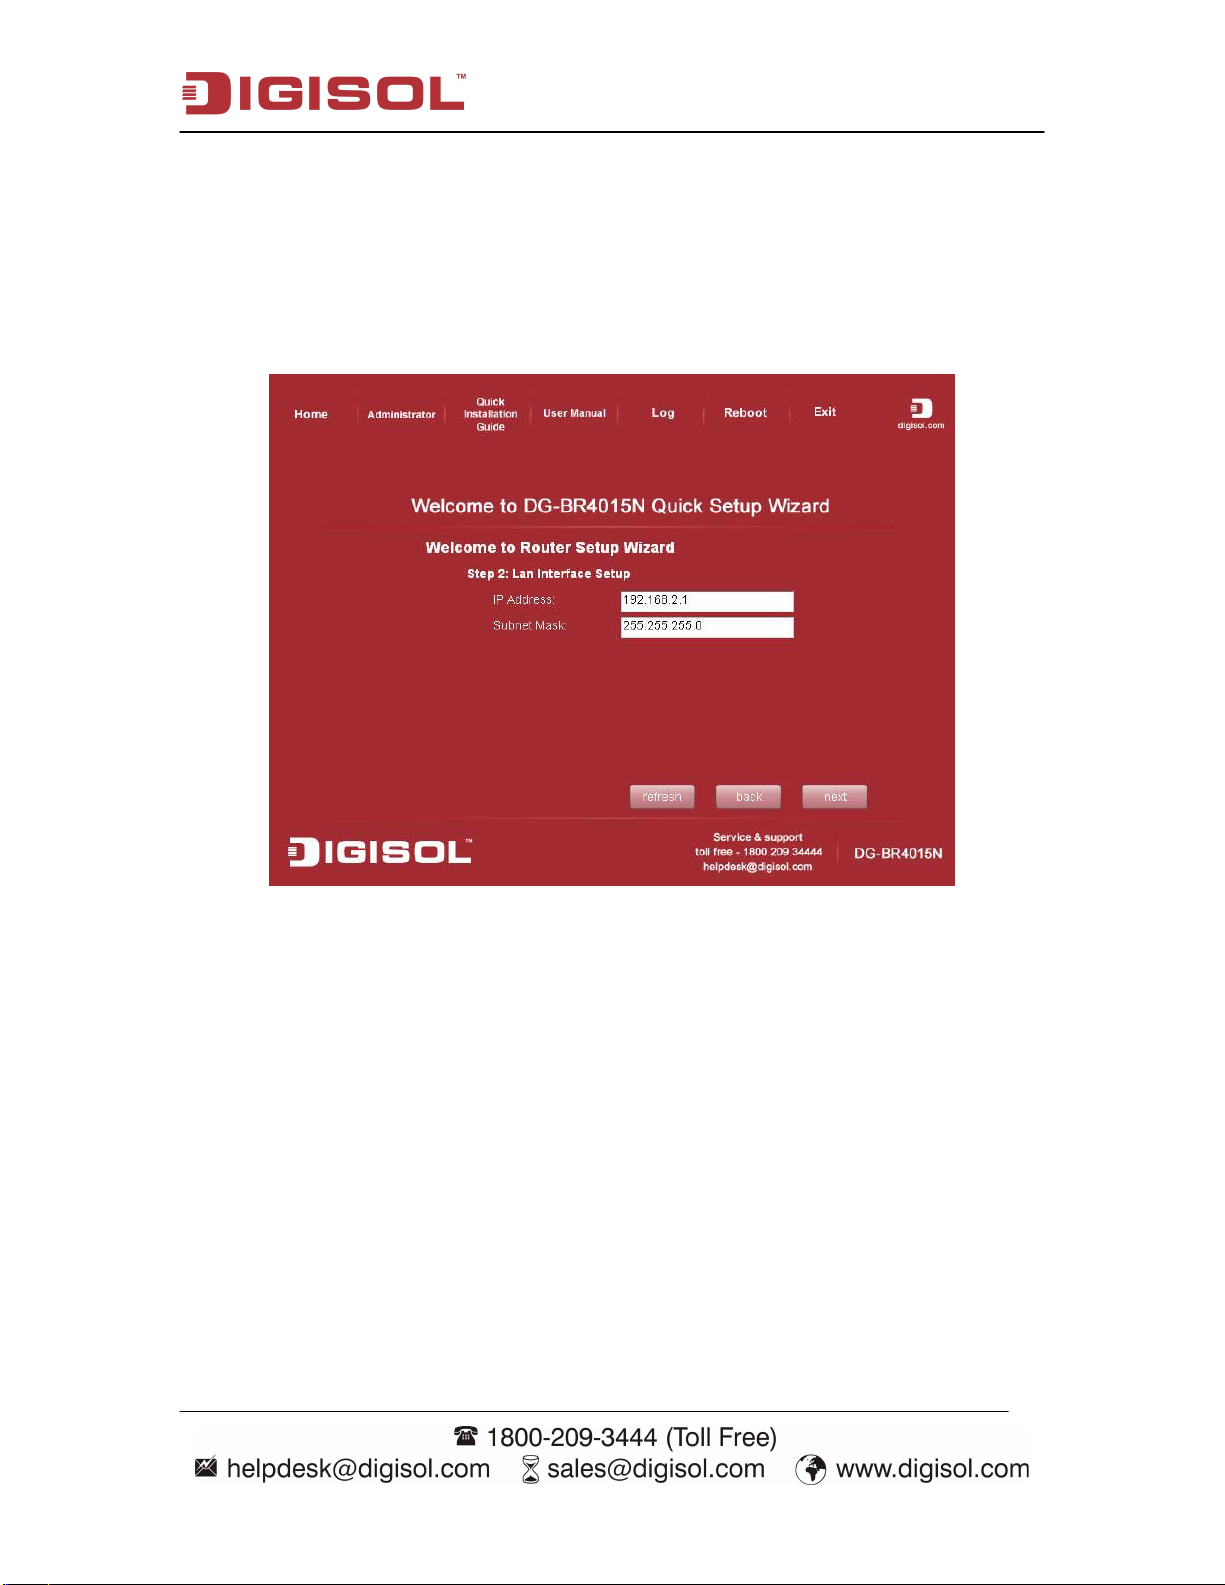
11. On the following screen the Default IP address (192.168.2.1) of router is
displayed. If you wish to modify the LAN IP address of the router then enter a
new valid IP here. Click ‘next’ to continue with the installation.
Note: If your notebook/desktop computer is set to DHCP then please change it to
static IP address in the same subnet as that of router IP.
17
Page 18
DG-BR4015N User Manual
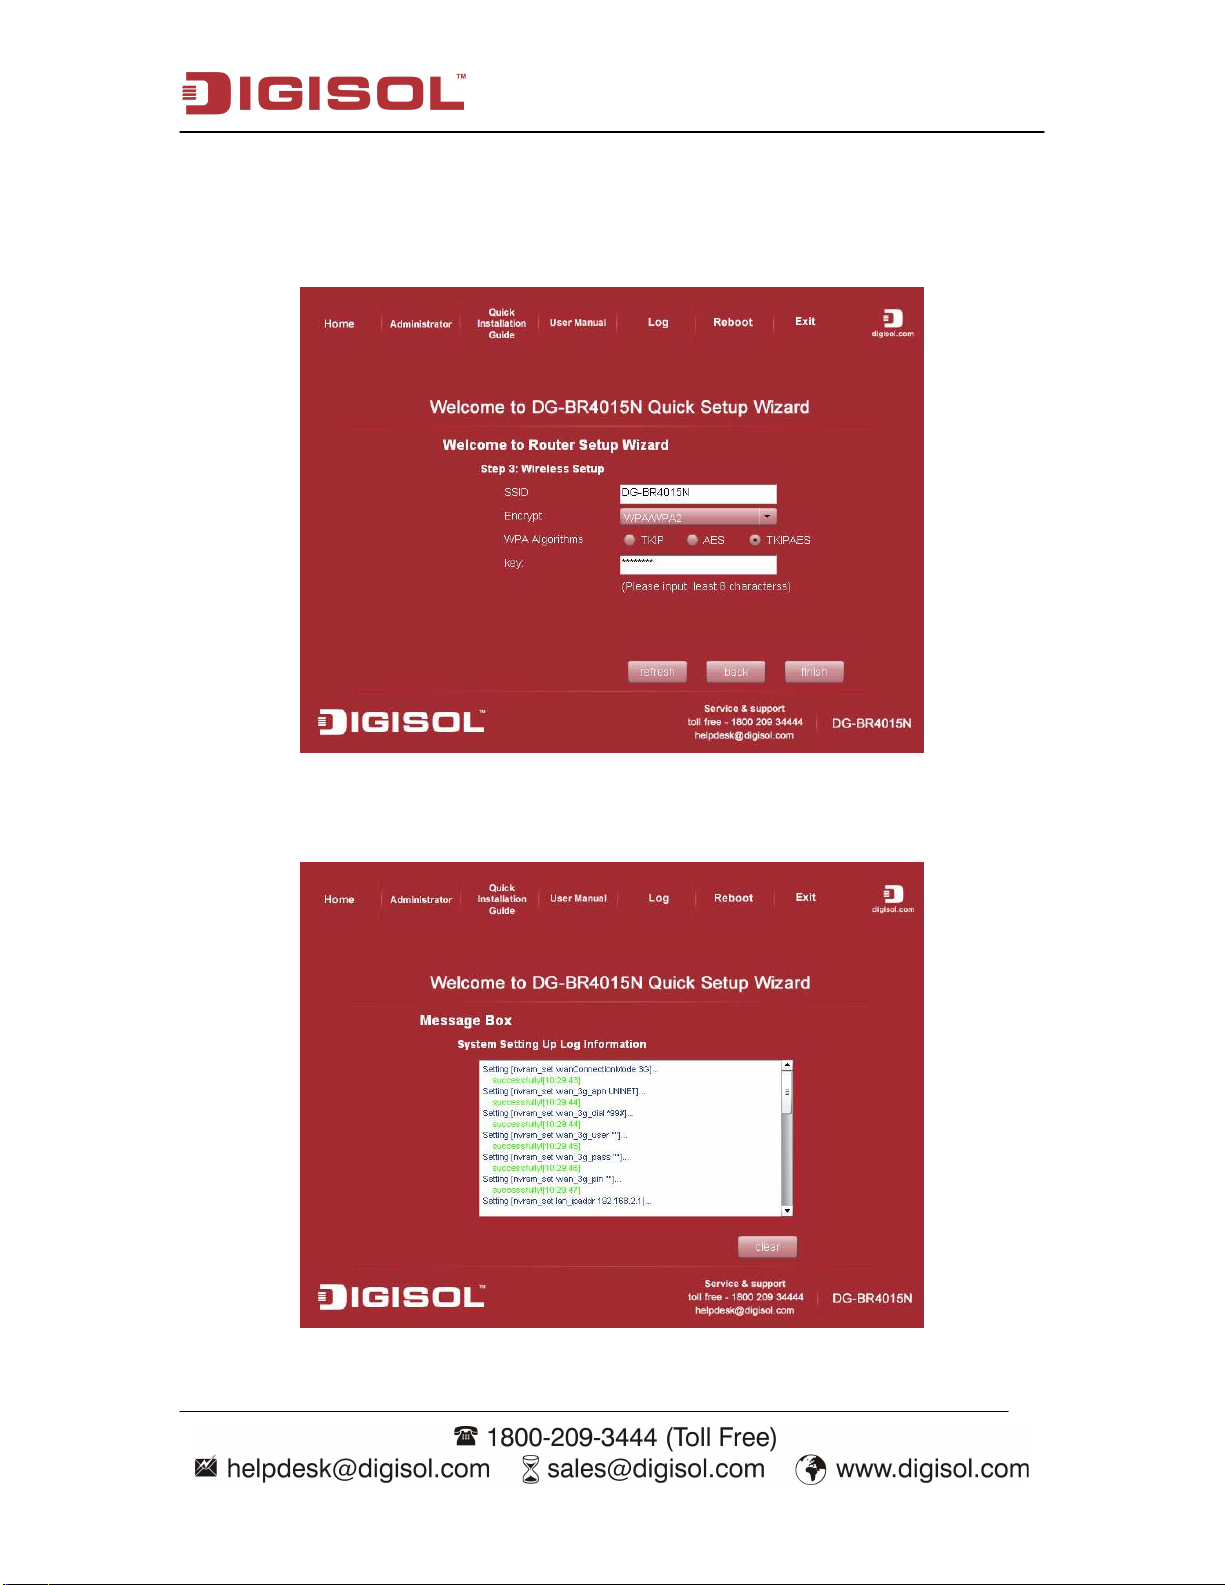
12. In the following screen, assign a SSID to your wireless network. Default
SSID is DG-BR4015N. Secure your wireless network by selecting an
encryption as WPA/WPA2. Enter 8~63 characters as encryption key. Click
‘finish’ to complete the installation.
13. In this screen you can see log information. Router will update the settings.
This indicates that the settings are saved to the router.
18
Page 19
DG-BR4015N User Manual
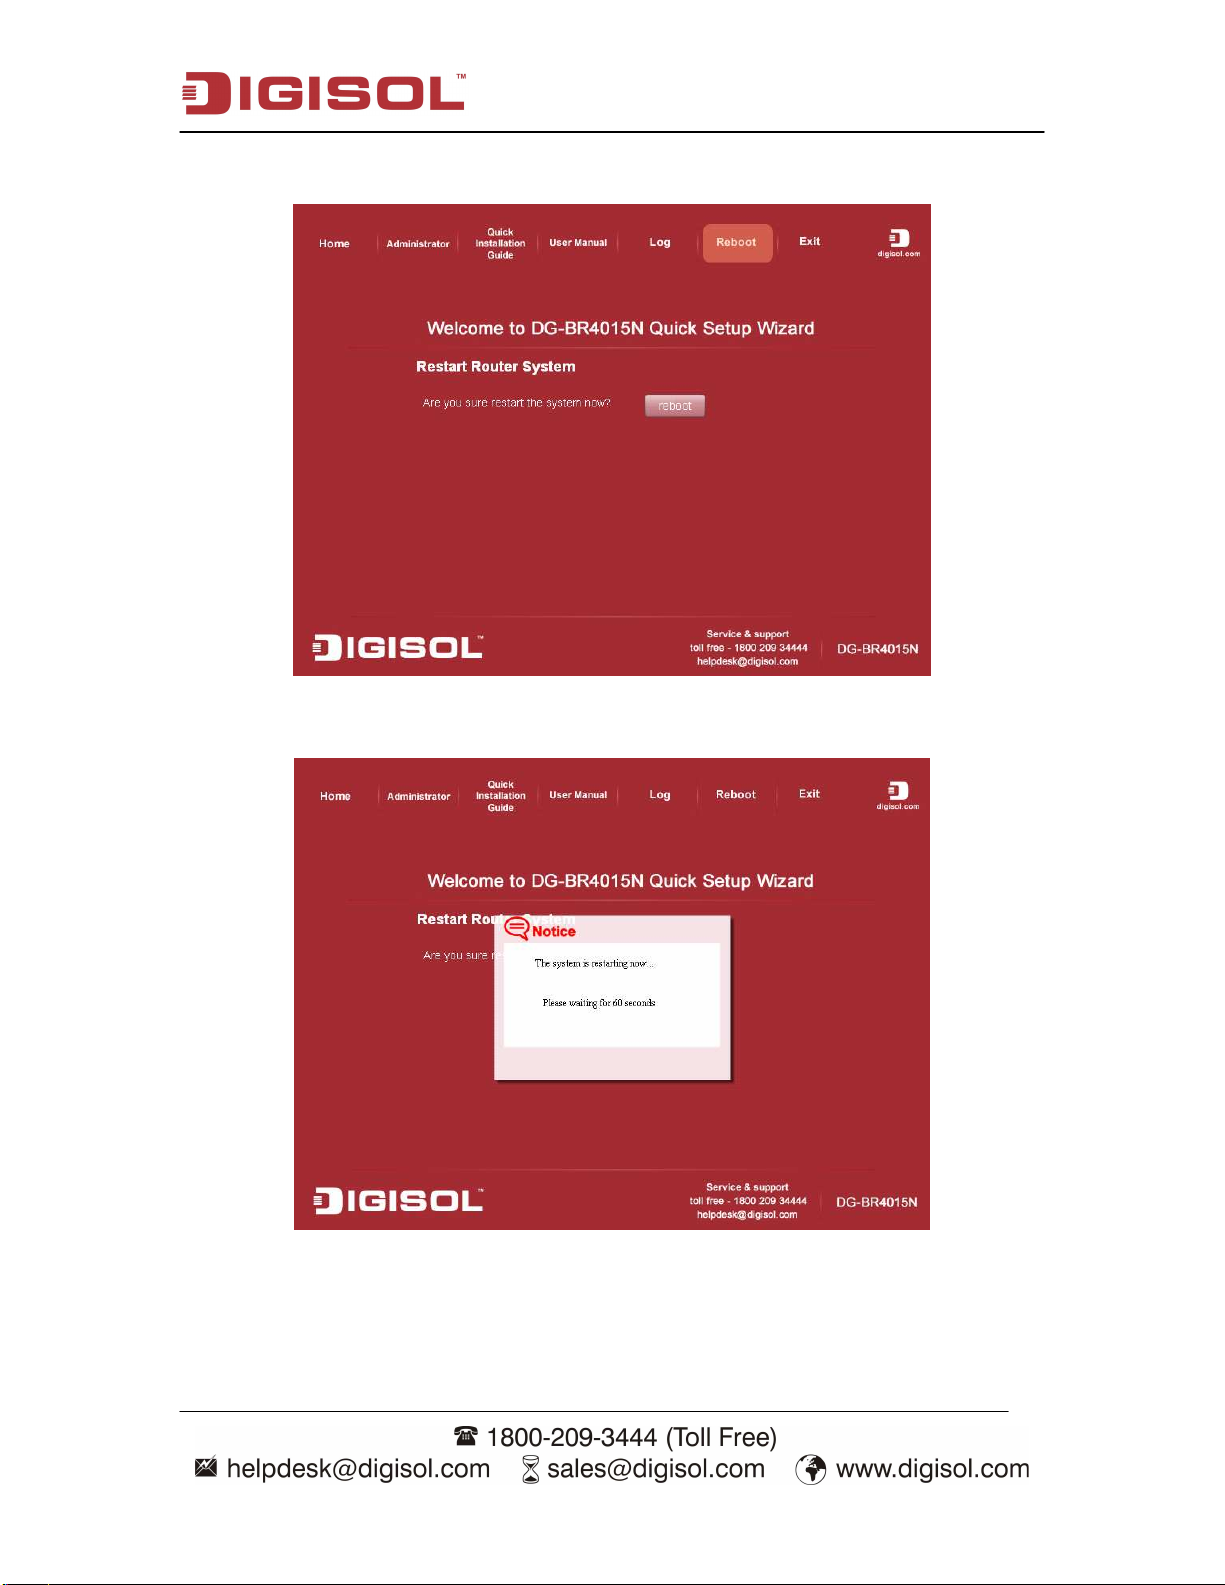
14. Click “Reboot” button to reboot the router.
Please wait for 60 seconds till the router reboots.
Congratulations! Your router configuration is now finished.
19
Page 20

DG-BR4015N User Manual
2-2 Connecting to 3G router by web browser
After the network connection is setup, next step is to setup the router with proper network
parameters, so it can work properly in your network environment.
Please use the web browser to configure the router. A computer with wired Ethernet
connection to the router is required for this first-time configuration.
Before you start to configure the router (default IP 192.168.2.1), please configure the IP
address of the computer in the same network Class as that of the router.
2-2-1 Windows 95/98 IP address setup
1. Click ‘Start’ button (it should be located at lower-left corner of your computer), then
click control panel. Double-click ‘Network’ icon, and Network window will appear.
Select ‘TCP/IP’, then click ‘Properties’.
20
Page 21
DG-BR4015N User Manual
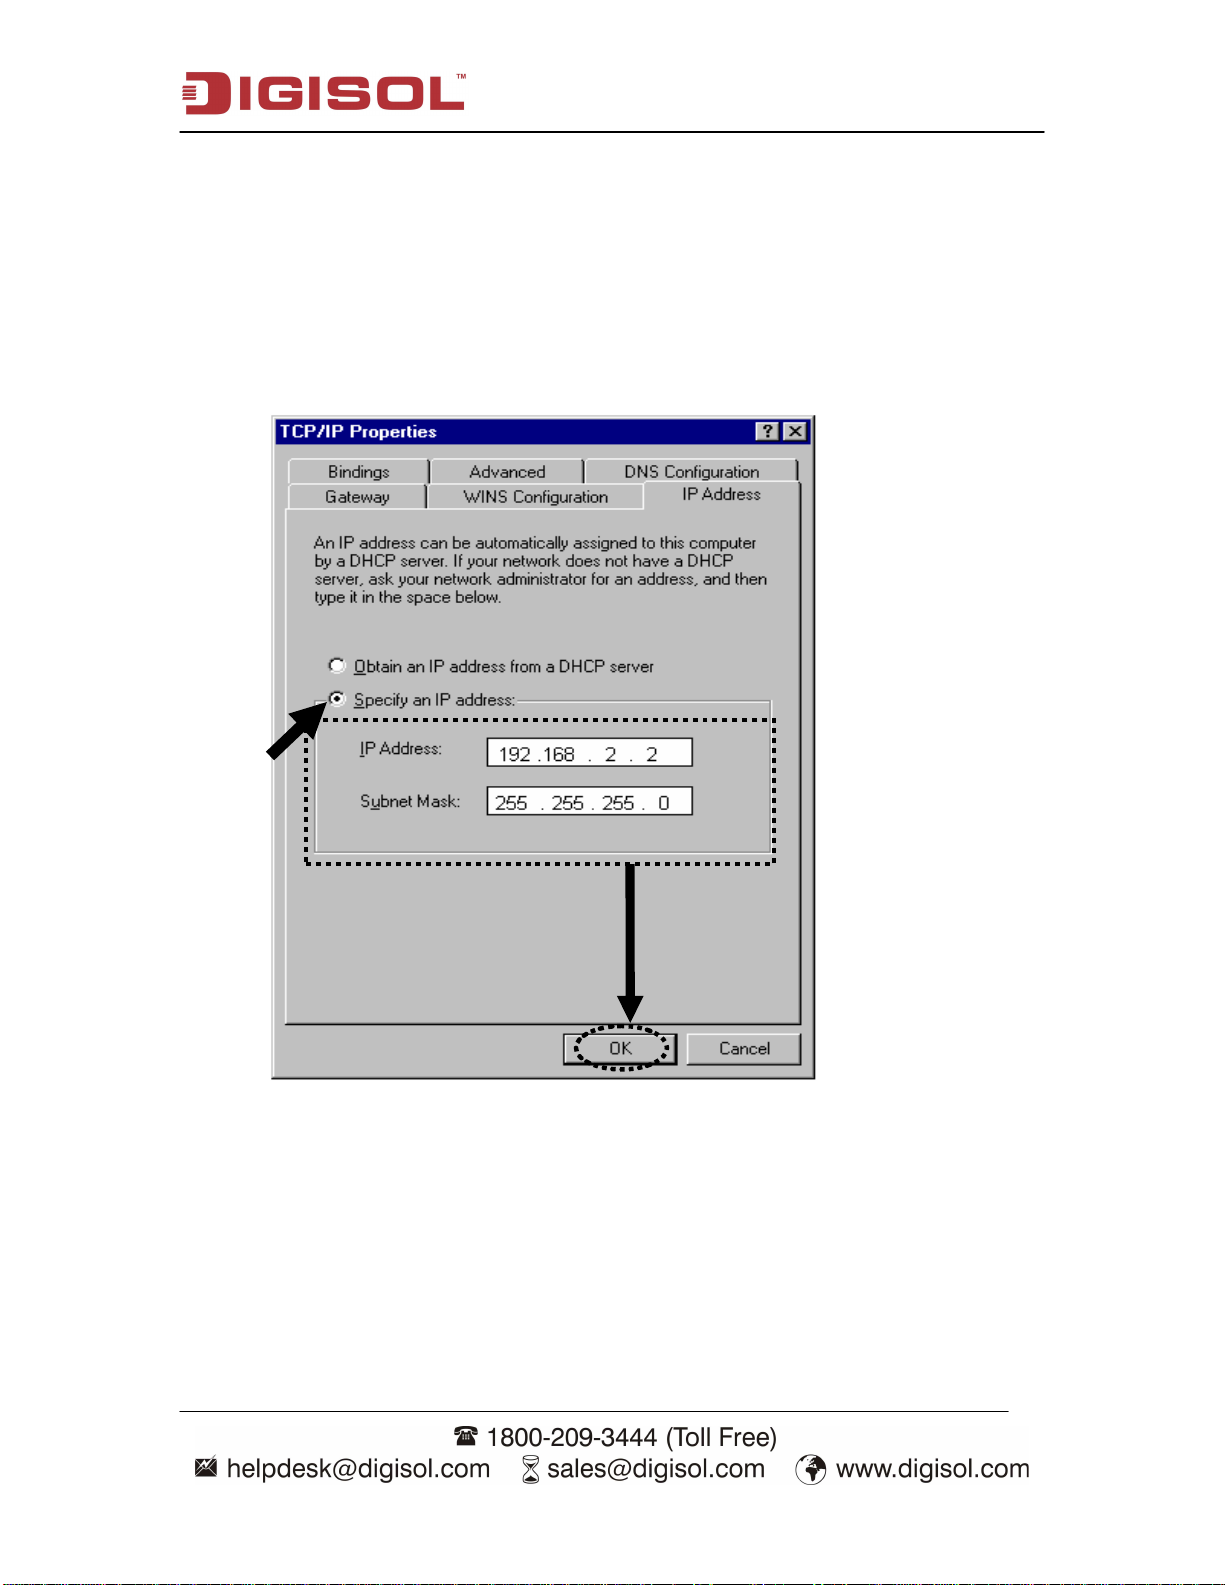
2. Select ‘Specify an IP address’, then input the following settings
in respective field:
IP address: 192.168.2.2
Subnet Mask: 255.255.255.0
Gateway: 192.168.2.1
Click ‘OK’ when finish.
21
Page 22

DG-BR4015N User Manual
2-2-2 Windows 2000 IP address setup
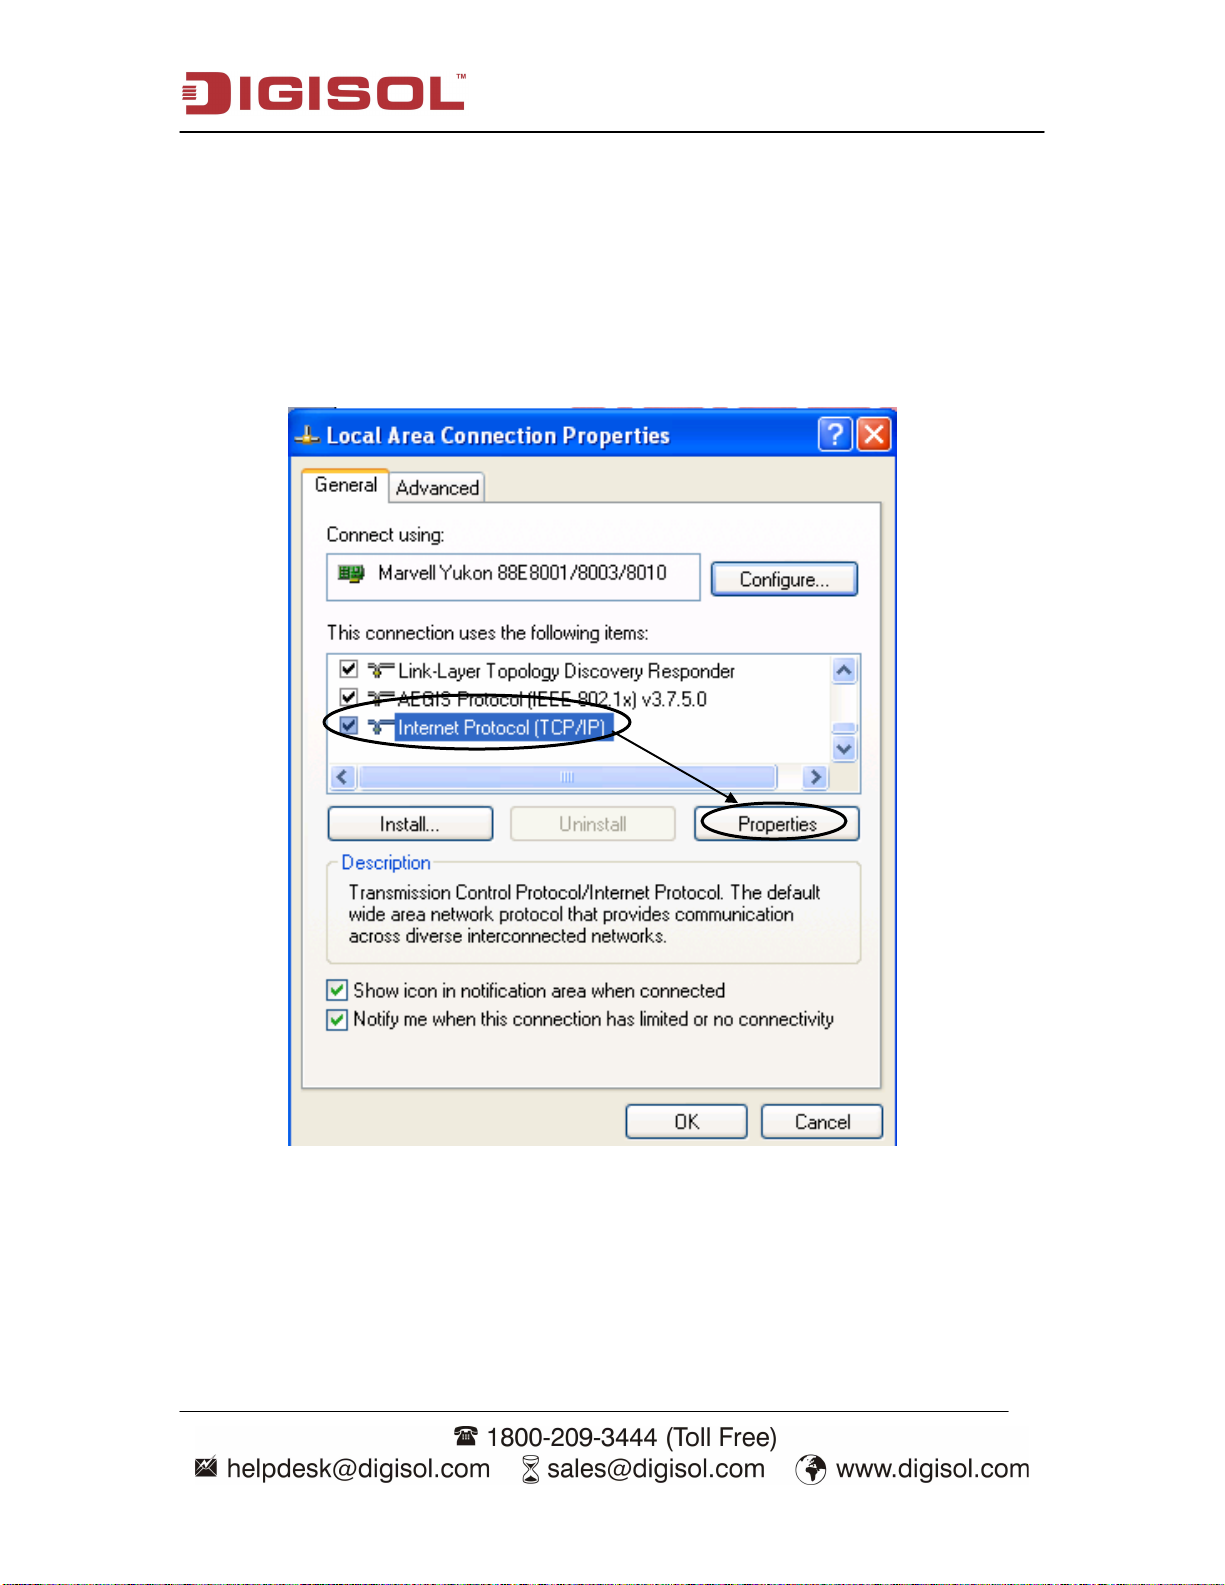
1. Click ‘Start’ button (it should be located at lower-left corner of your
computer), then click control panel. Double-click ‘Network and Dial-up
Connections’ icon, Right click on ‘Local Area Connection’ and select
‘Properties’, Local Area Connection Properties window will appear.
Select ‘Internet Protocol (TCP/IP)’, then click ‘Properties’
22
Page 23
DG-BR4015N User Manual
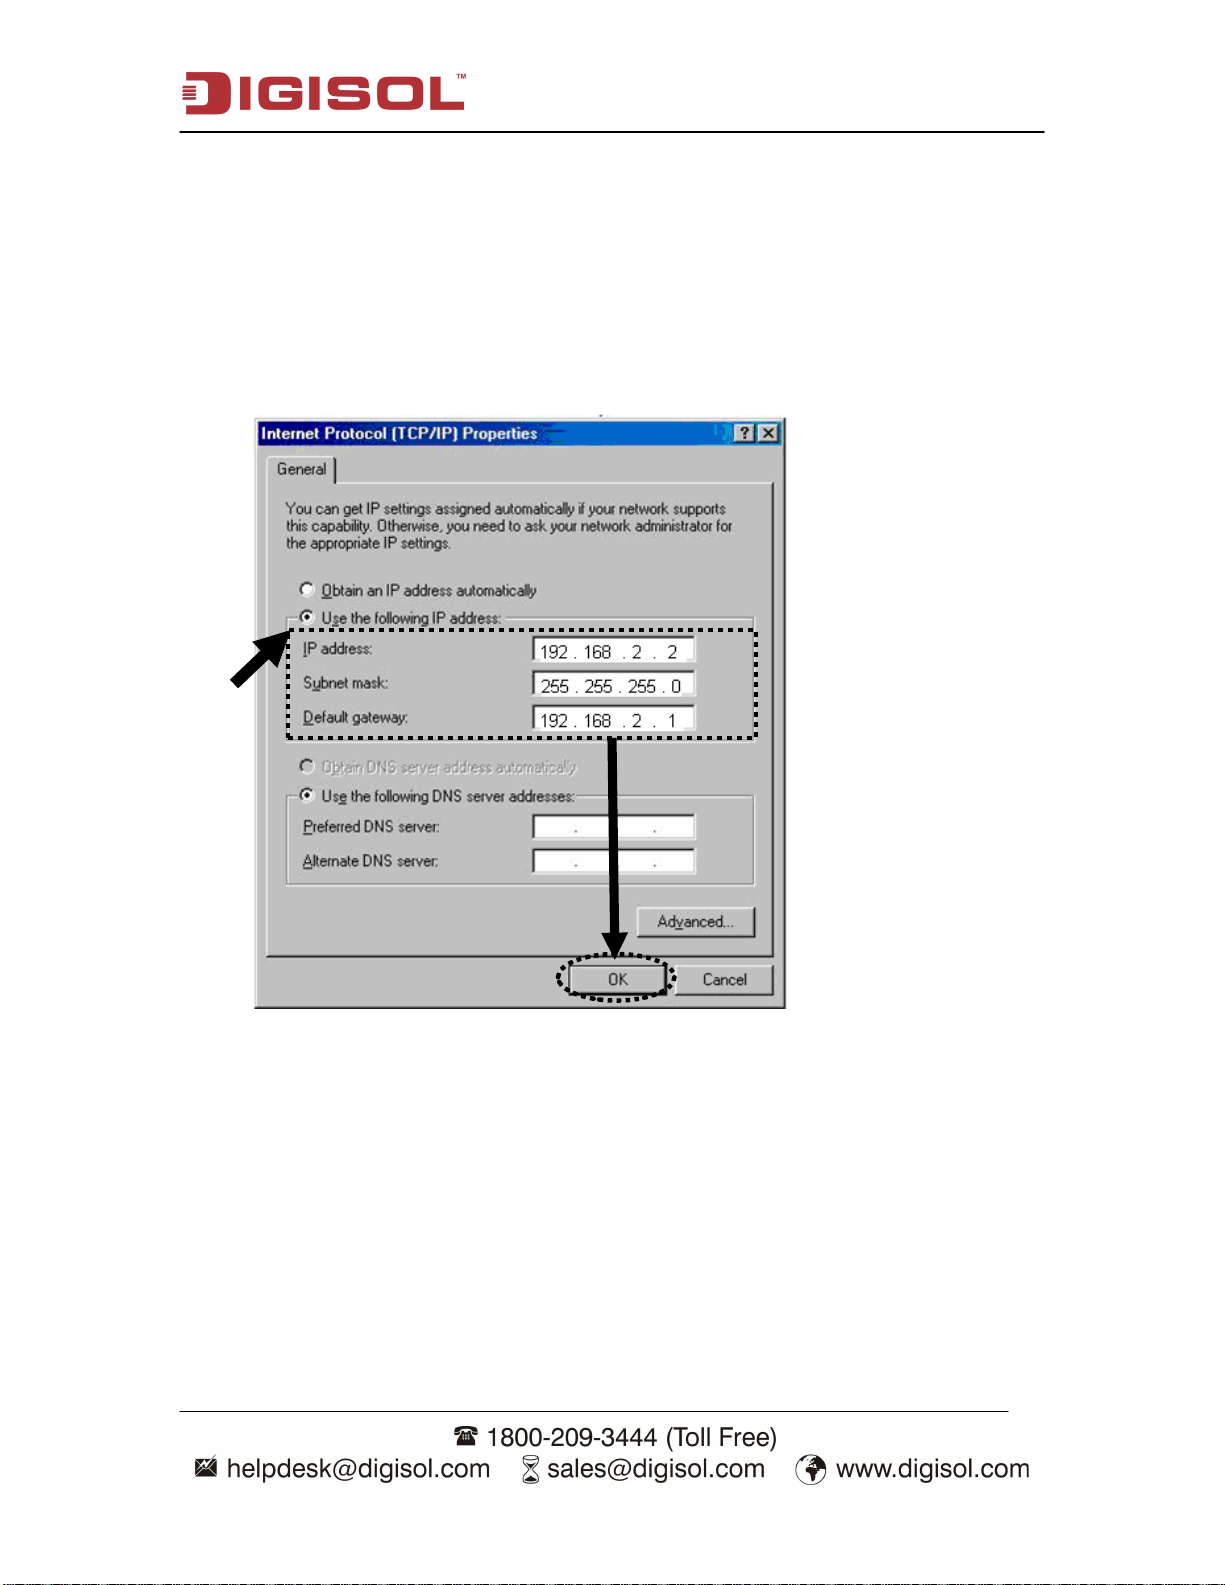
2. Select ‘Use the following IP address’, then input the following
settings in respective field:
IP address: 192.168.2.2
Subnet Mask: 255.255.255.0
Default gateway: 192.168.2.1
Click ‘OK’ when finish.
23
Page 24
DG-BR4015N User Manual
2-2-3 Windows XP IP address setup
1. Click ‘Start’ button (it should be located at lower-left corner of your
computer), then click control panel. Click ‘Network Connections’, Right click on
‘Local Area Connection’ and select Properties, Local Area Connection
Properties window will appear. Select ‘Internet Protocol (TCP/IP)’,
and then click ‘Properties’.
24
Page 25

DG-BR4015N User Manual
2. Select ‘Use the following IP address’, then input the following
settings in respective field:
IP address: 192.168.2.2
Subnet Mask: 255.255.255.0
Default gateway: 192.168.2.1
Click ‘OK’ when finish.
25
Page 26

DG-BR4015N User Manual
2-2-4 Windows Vista IP address setup
1. Click ‘Start’ button (it should be located at lower-left corner of your
computer), then click control panel. Click on ‘View Network Status and
Tasks’ and then click on ‘Manage Network Connections’. Right-click
‘Local Area Connection’, then select ‘Properties’. Local Area
Connection Properties window will appear, select ‘Internet Protocol
Version 4 (TCP / IPv4), and then click ‘Properties’
26
Page 27

DG-BR4015N User Manual
2. Select ‘Use the following IP address’, then input the following
settings in respective field:
IP address: 192.168.2.2
Subnet Mask: 255.255.255.0
Default gateway: 192.168.2.1
Click ‘OK’ when finish.
27
Page 28
DG-BR4015N User Manual
2-3 Accessing router’s web GUI
After you assign an IP address to the computer, open the web browser (Internet Explorer
5.x or above, Firefox, or Netscape) and type the IP address of router in the address bar as
‘http://192.168.2.1’ and hit ‘Enter’ to establish connection.
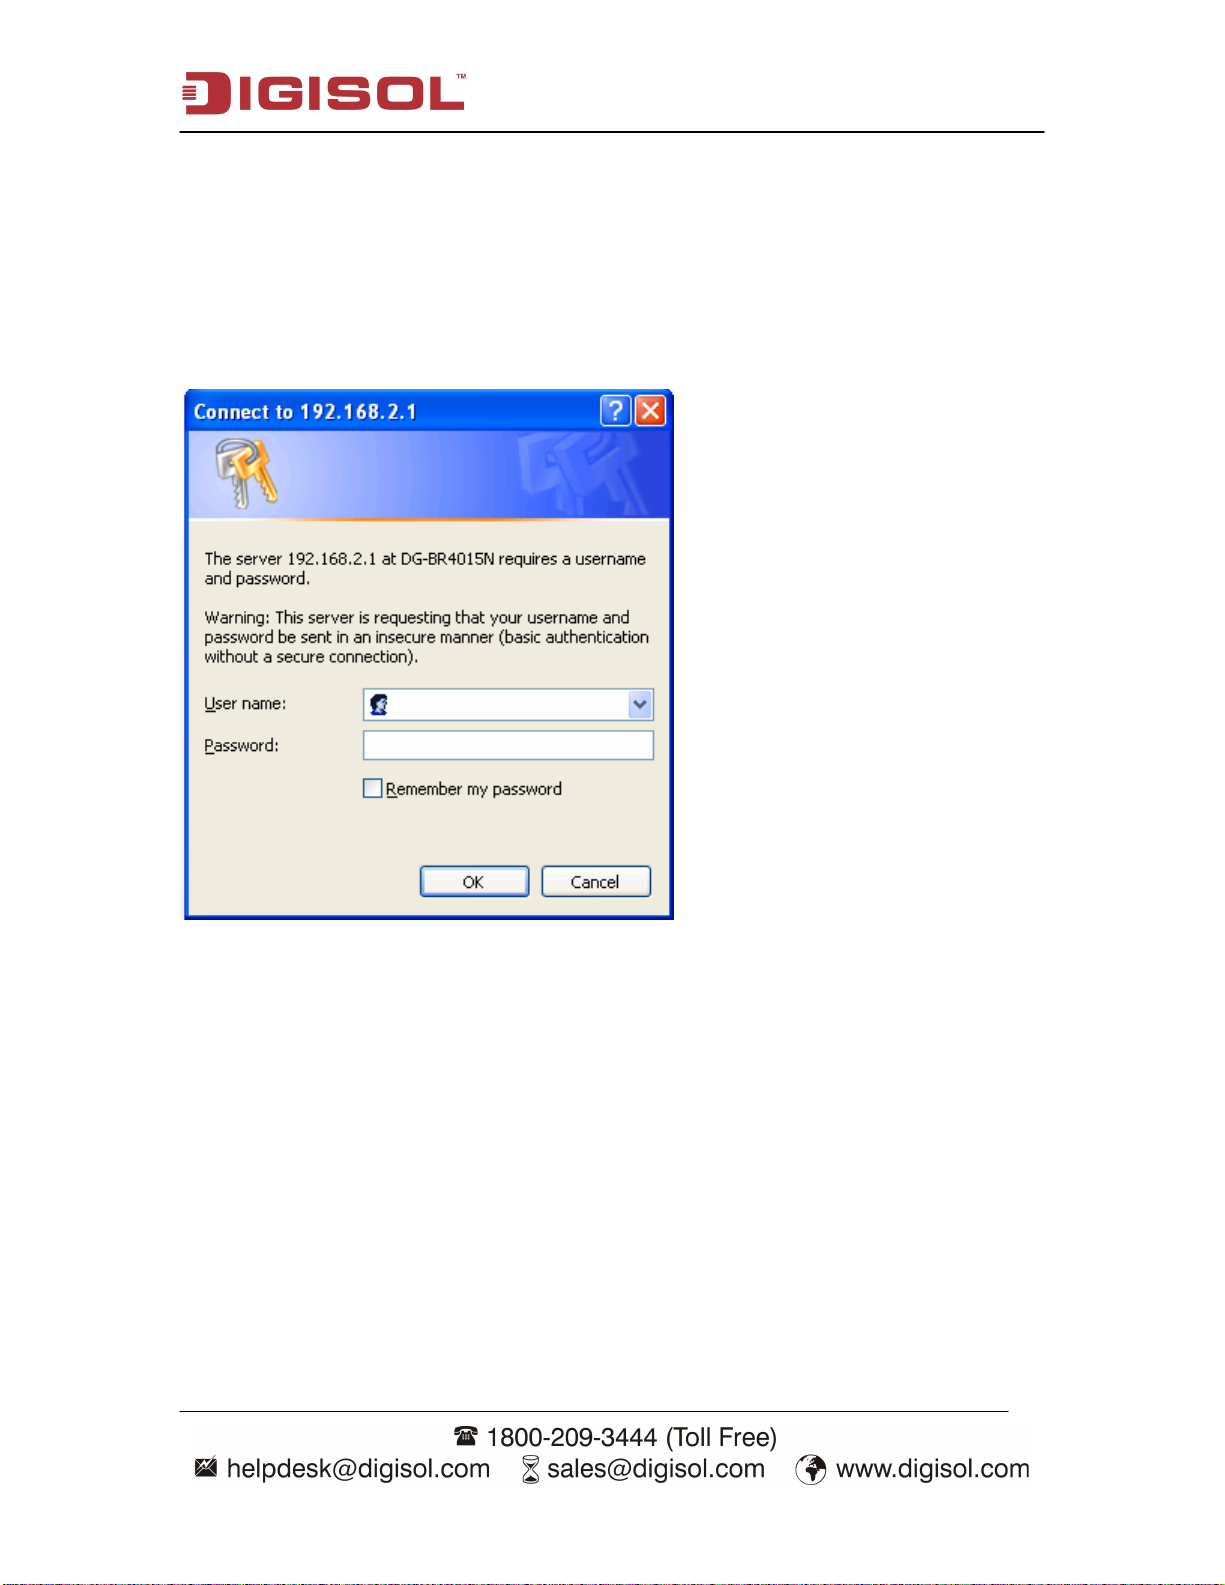
You should see the following authentication window:
Please input user name and password in the field respectively, default user name is
‘admin’, and default password is ‘admin’, then press ‘OK’ button to enter into web
management interface of this router:
28
Page 29

DG-BR4015N User Manual
Following is the Web GUI interface of the router.
TIP: This page shows the eight major setting categories: Wizard,
Internet Mode (3G), Network, Wireless, Firewall, Advance,
Management, Status. You can jump to another category directly
by clicking the link.
NOTE: If you can’t see the web management interface, and you’re
being prompted to input user name and password again, it means
you didn’t input username and password correctly. Please retype
user name and password again. If you’re certain about the user
name and password you typed please go to Troubleshooting
section to perform a factory reset to set the password back to
29
Page 30

DG-BR4015N User Manual
2-4 Using Router Setup Wizard
This router provides a ‘Quick Setup Wizard’ procedure, which will help you to complete
all required settings you need to access the Internet quickly. Please follow the instructions
mentioned below to complete the ‘Quick Setup’:
Please go to Quick Setup menu by clicking ‘Wizard’ button. And the following window
will be displayed:
30
Page 31

DG-BR4015N User Manual
Here, you can configure the router using wizard in 2 simple steps.
Step 1 : Configure Internet Connection
Step 2 : Configure Wireless Settings
Click ‘Next’ to continue with the Router Setup Wizard and the following window will
appear to configure Internet connection.
Step1: Please choose the Internet connection type you’re using in this page. There are 4
types of Internet connection, they are:
A. DHCP
B. Static Mode
C. PPPoE (xDSL)
D. 3G
If you’re not sure, please contact your Internet service provider. A wrong Internet
connection type will cause connection problem, and you will not be able to connect to
internet.
If you want to go back to previous step, please press ‘Back’ button at the bottom of this
page. Press ‘Cancel’ to restart the Wizard.
31
Page 32

DG-BR4015N User Manual
A. Setup procedure for DHCP
Click on ‘DHCP’ in Internet connection as shown in the below screen.
Click ‘Next’ to continue with the router setup wizard.
B. Setup procedure for Static mode
Click on ‘Static Mode’ in Internet connection and below screen will appear.
32
Page 33

DG-BR4015N User Manual
Here are descriptions of every setup item:
Parameter Description
IP address Please input IP address assigned by your service provider.
Subnet Mask Please input subnet mask assigned by your service provider
Default Gateway Please input the default gateway assigned by your service provider.
Primary DNS Server
Secondary DNS
Server
your service provider.
Please input the IP address of secondary DNS server provided by
your service provider.
Please input the IP address of primary DNS server provided by
NOTE: You must use the addresses provided by your Internet service
provider, wrong setting value will cause connection problem.
NOTE: You can choose this Internet connection method if your
service provider assigns a fixed IP address (also know as static
address) to you, and not using DHCP or PPPoE protocol. Please
contact your service provider for further information.
When you finish with all settings, press ‘Next’; if you want to go back to previous menu,
click ‘Back’.
C. Setup procedure for PPPoE mode
Click on ‘PPPoE xDSL’ in Internet connection and below given screen will be displayed.
33
Page 34
DG-BR4015N User Manual
Here are descriptions of every setup item:
Parameter Description
Username Enter the username provided by ISP
Password Enter the password provided by ISP
Verify Password Re-enter password to verify
There are 3 types of Operation Modes:
• Keep Alive - Internet connection is always alive.
• On Demand - Only connects to Internet when there’s a connect attempt.
• Manual - Only connects to Internet when ‘Connect’ button is pressed, and
disconnects when ‘Disconnect’ button is pressed.
Idle Time Out: Specify the time to shutdown internet connection after no internet
activity is detected by specified minutes. This option is only
available when connection type is ‘Connect on Demand’.
D. Setup Procedure for 3G
Please select your STATE, local ISP, and then input the local ISP's APN, PIN, Dial
Number; username, password; click ‘Next’ to continue.
34
Page 35

DG-BR4015N User Manual
Step2: Configure Wireless Settings.
Here is the description of every setup item.
Parameter Description
Network
Allows you to change the SSID. Default SSID is DG-BR4015N.
Name (SSID)
Security Please secure the wireless network using WEP or WPA/WPA2
security. Default is Disable.
When you finish with all settings, press ‘Apply’; if you want to go back to previous
menu, click ‘Back’.
You will get message “Settings successful” after applying the settings.
35
Page 36

DG-BR4015N User Manual
2-5 Internet Mode Setup (3G).
Configure Internet mode setup manually.
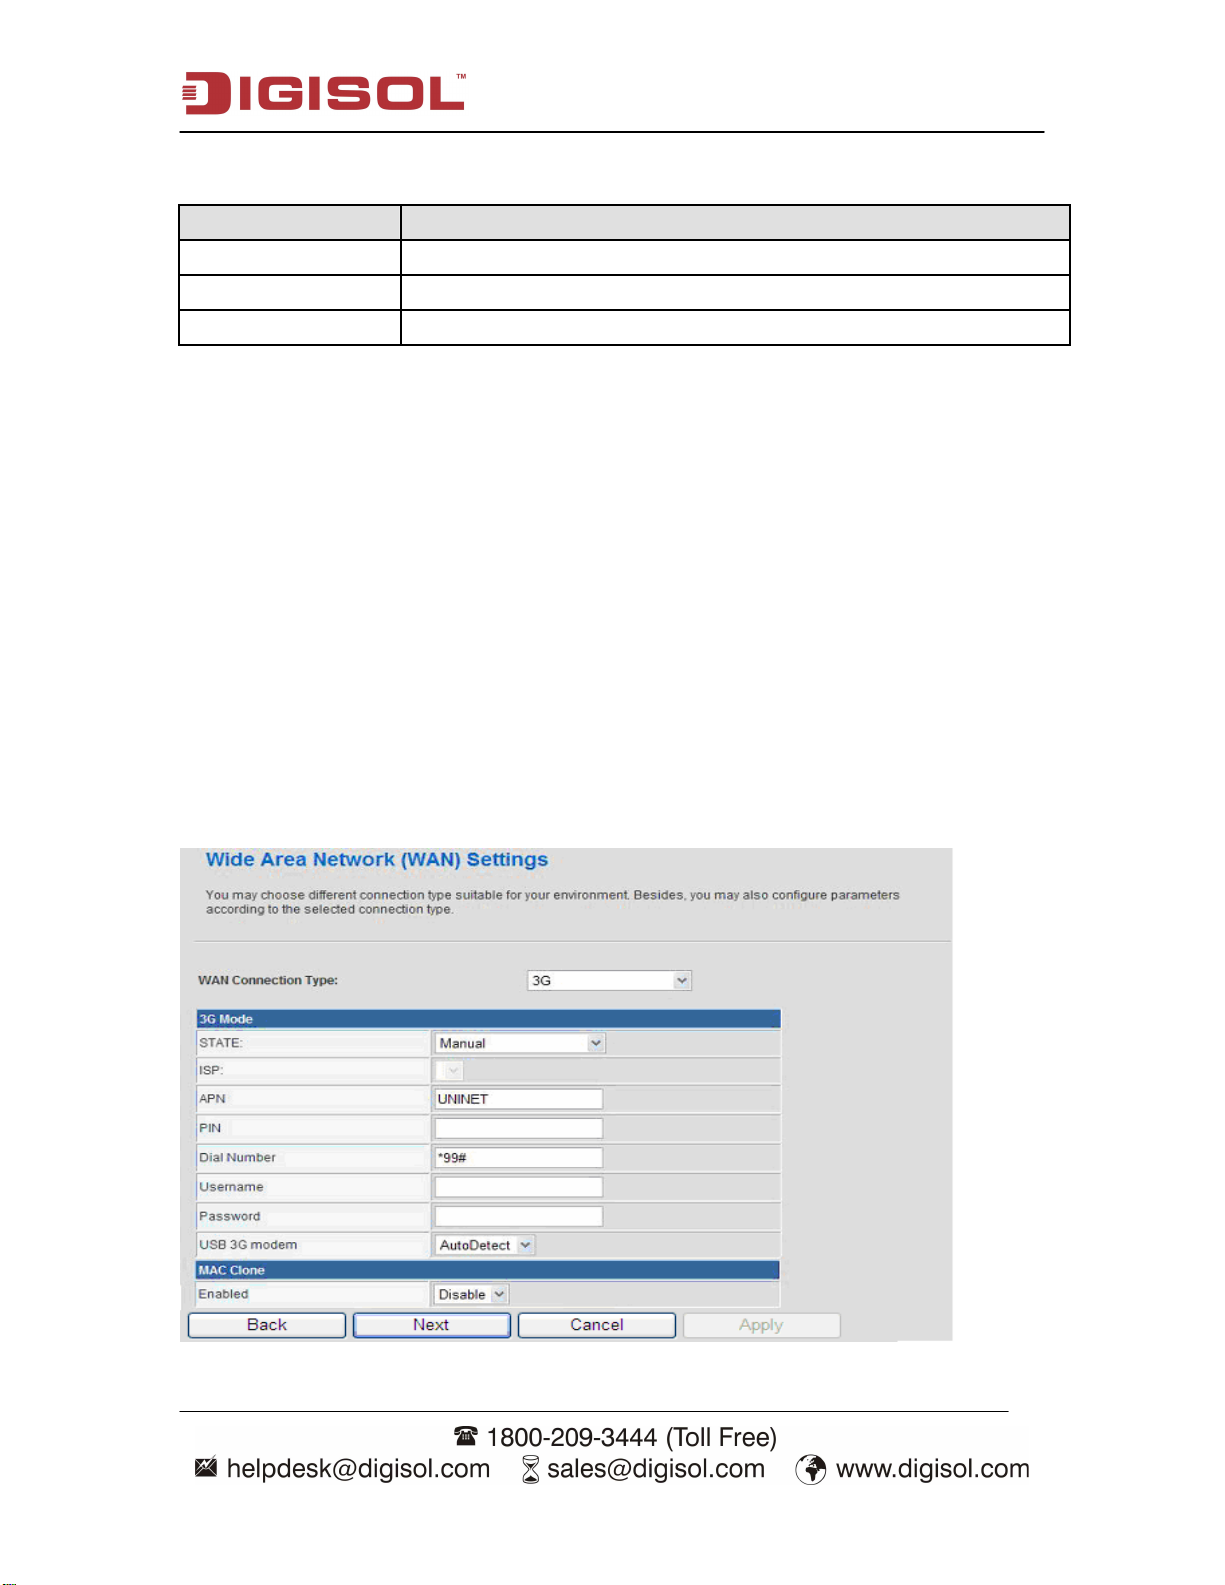
2-5-1 3G mode
If your ISP Internet mode is 3G, then configure the following parameters.
Parameter Description
State Enter state from pull-down menu. If not listed select Manual.
APN Enter the APN (Access Point Name) provided by ISP.
Dial Number Enter the dial number provided by your ISP.
Username Enter Username if provided by your ISP. This field is optional.
Password Enter Password if provided by your ISP. This field is optional.
PIN Enter PIN if provided by your ISP. This field is optional.
Click Apply to continue with the installation.
36
Page 37

DG-BR4015N User Manual
2-5-2 Static (Fixed IP) mode
If your connection mode is static IP, then configure the following parameters.
Parameter Description
IP address Please input IP address assigned by your service provider.
Subnet Mask Please input subnet mask assigned by your service provider
Default Gateway Please input the default gateway assigned by your service provider.
Please input the IP address of primary DNS server provided by
Primary DNS Server
Secondary DNS
Server
your service provider.
Please input the IP address of secondary DNS server provided by
your service provider.
MAC Address Some ISPs require end-user's MAC address to access their
network. Click “Fill my MAC”, register your PC's MAC address.
You can also manually input the MAC address.
Click Apply to continue with the installation.
37
Page 38

DG-BR4015N User Manual
2-5-3 DHCP Mode
This router to automatically obtain IP address from your ISP, in DHCP mode. If your ISP
does not provide any IP network parameters, select the connection and Input Hostname.
Click Apply to continue with the installation.
2-5-4 PPPoE Mode
If your ISP provides PPPoE connection, select the PPPoE option. And enter
the following parameters.
38
Page 39
DG-BR4015N User Manual
Parameter Description
Username Enter the username provided by ISP
Password Enter the password provided by ISP
Verify Password Re-enter password to verify
Operation Mode Connect Keep Alive: Connect automatically to the Internet
after rebooting the system or connection failure.
Connect on Demand: In this mode, the Internet connection
can be terminated.
Connect Manual: Connect to the Internet by users
manually.
Click “Apply” to continue with the installation.
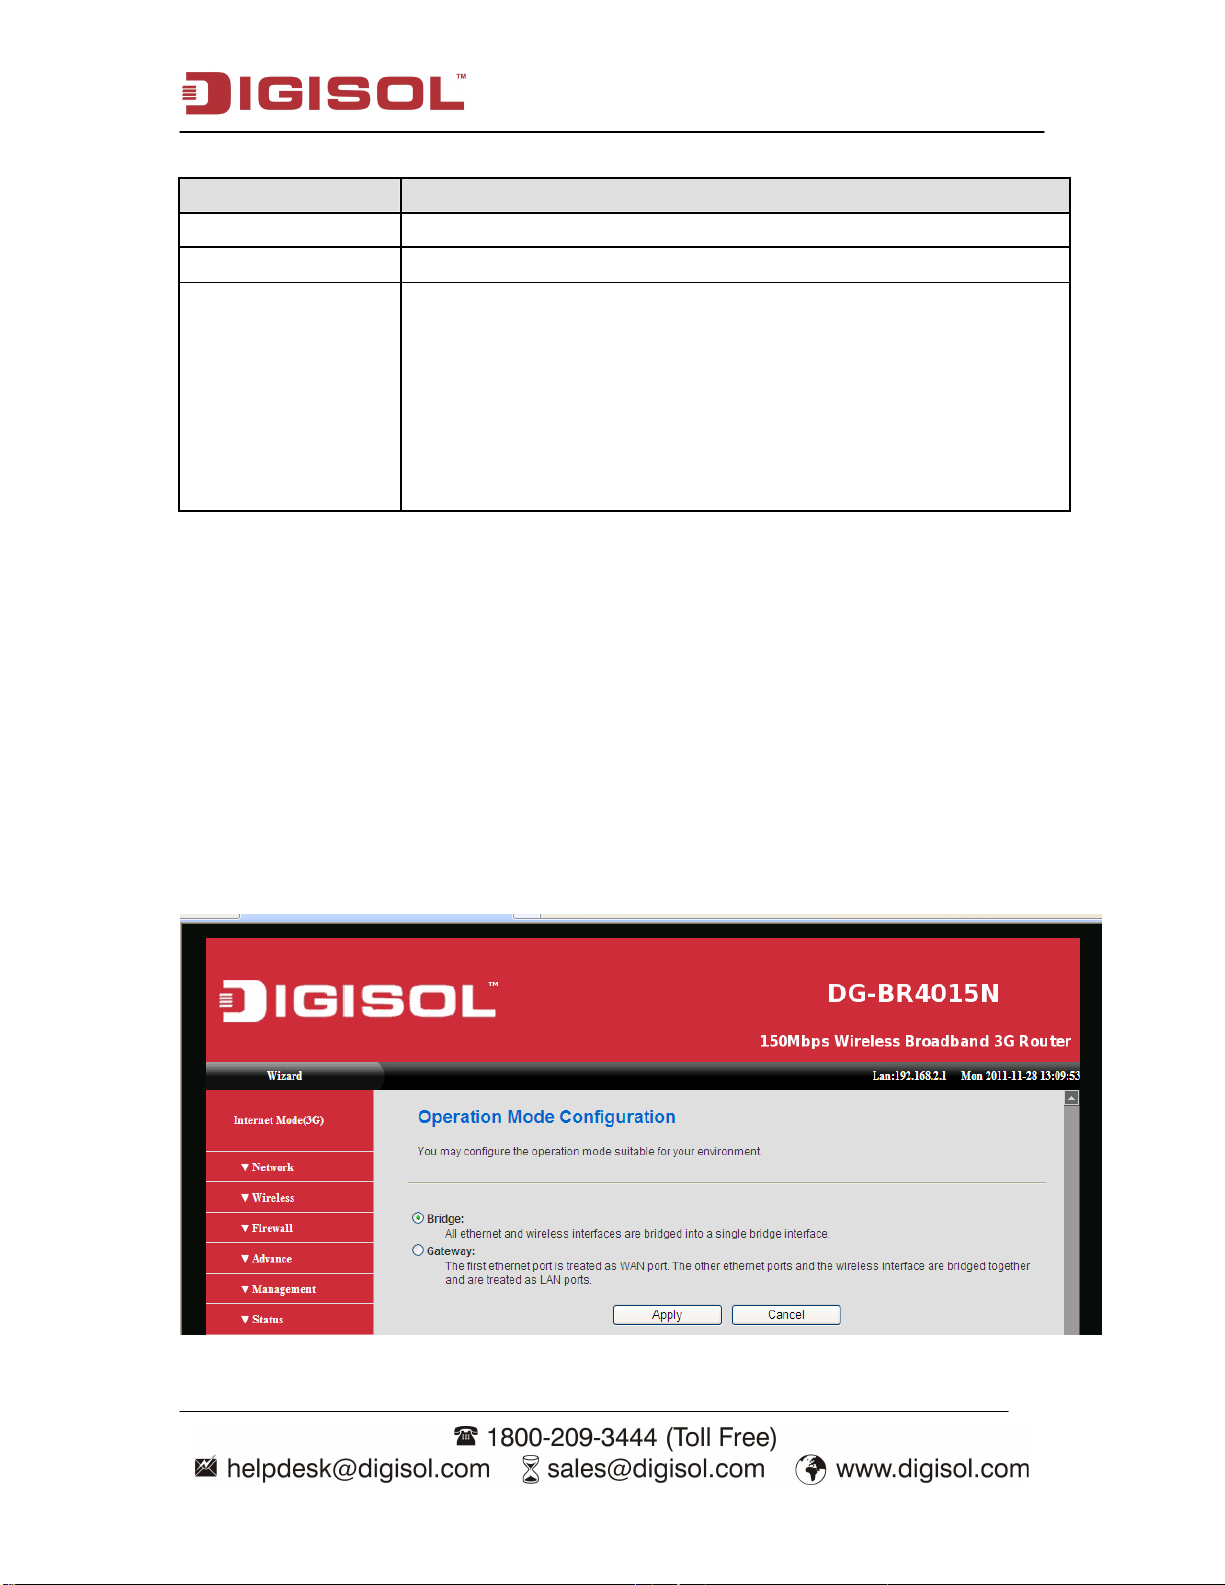
2-6 Operation Mode
Please click ‘Network menu on the left of web management interface, and the following
screen will be displayed on your web browser.
Here you can configure the operation mode which is suitable for your environment. The
default setting is Gateway. Router supports 2 operation modes.
Bridge: All Ethernet and wireless interfaces are bridged into a single bridge
interface. When Bridge mode is applied, NAT gets disabled.
39
Page 40

DG-BR4015N User Manual
Gateway: The first Ethernet port is treated as WAN port. The other Ethernet
ports and the wireless interface are bridged together and are treated as LAN ports.
Parameter Description
NAT NAT can be enabled or disabled as suitable for user environment.
TCP Timeout The TCP timeout controls how long transmitted data may remain
unacknowledged before a connection is forcefully closed.
Increasing the user timeouts allows established TCP connections to
survive extended periods of disconnection.
UDP Timeout The UDP timeout controls how long UDP data may remain
unacknowledged before a connection is forcefully closed.
Increasing the user timeouts allows established UDP connections
to survive extended periods of disconnection.
When you finish with all settings, please click ‘Apply’ button to continue with other
setup procedures.
40
Page 41

DG-BR4015N User Manual
2-6-1 IP Address (UPnP)
In this section you can configure LAN parameters.
Please click ‘IP Address (UPnP)’ menu on the left of web management interface, under
the ‘Network’ tab and the following screen will be displayed on your web browser.
Here are descriptions of every setup item:
Parameter Description
IP address Please input the IP address of this router.
Subnet Mask Please input subnet mask for this network.
Default Gateway
Primary DNS
Secondary DNS
Please input default gateway for this network.
Please input the primary DNS address for this network.
Please input the secondary DNS address for this network.
MAC Address Shows the Router LAN MAC address.
41
Page 42

DG-BR4015N User Manual
DHCP Server: Enabled
DHCP Type
Start IP Address
End IP Address
Subnet Mask
Primary DNS
Secondary DNS
Default Gateway
Assign IP address dynamically to the DHCP clients. Default is
Enabled.
Please input the Start IP address for this network.
Please input the End IP address for this network.
Please input subnet mask for this network.
Please input the primary DNS address for this network.
Please input the secondary DNS address for this network.
Please input default gateway for this network.
Lease Time Enter the lease time for DHCP clients.
Spanning Tree Enable 802.1d to start spanning tree function. Default is Disabled.
LLTD is used by to display a graphical representation of the local area
LLTD
network (LAN) or wireless LAN (WLAN), to which the computer is
connected. Default is Disabled.
UPnP UPnP enabled clients are discovered dynamically. Default is Disabled.
Enable the DNS Proxy that will relay users’/clients’ DNS requests to a
DNS Proxy
real DNS server IP address. Users no need to specify real DNS server
IP address. Default is Enabled.
Recommended Value if you don’t know what to fill:
IP Address: 192.168.2.1
Subnet Mask: 255.255.255.0
802.1d Spanning Tree: Disabled
When you finish with all settings, please click ‘Apply’ button to continue with other
setup procedures.
42
Page 43

DG-BR4015N User Manual
2-6-2 Statistics
Here you can view the statistics of 3G router such as memory statistics, WAN/LAN Tx
and Rx and all interface statistics.
Please click ‘Statistic’ menu on the left of web management interface, under the
‘Network’ tab and the following screen will be displayed on your web browser.
43
Page 44
DG-BR4015N User Manual
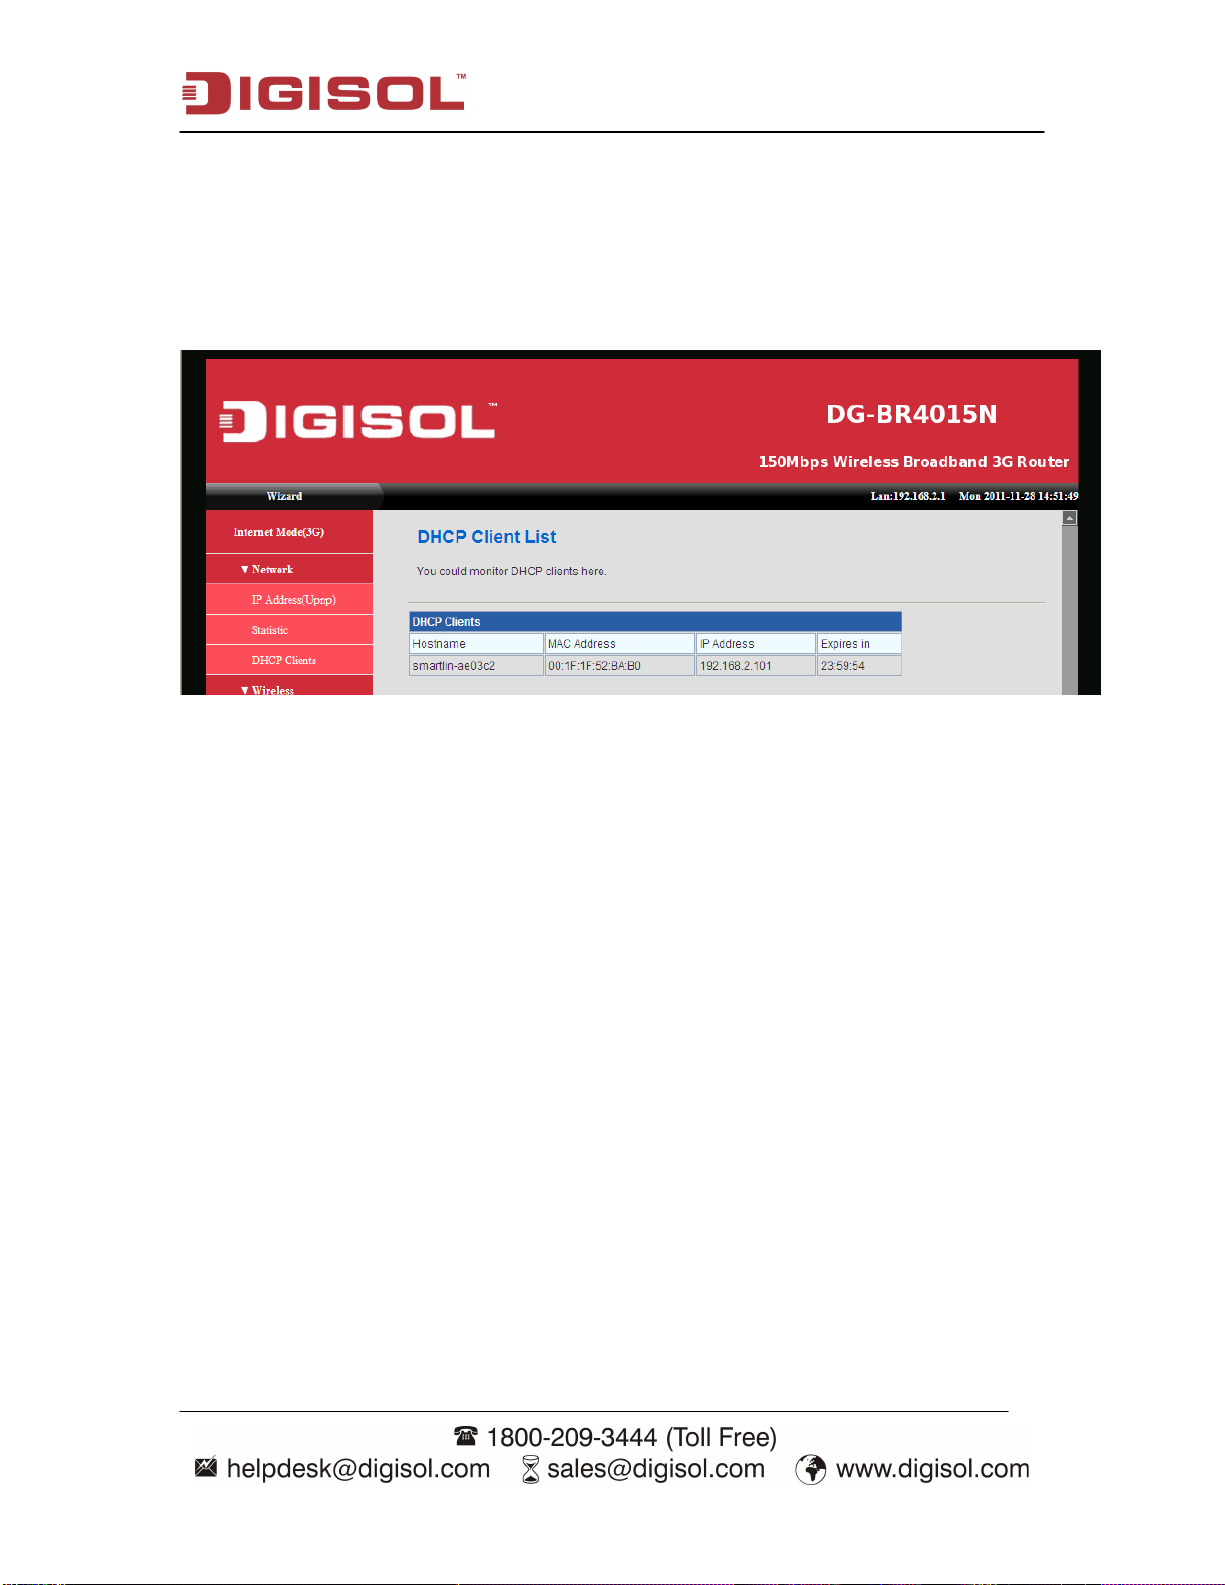
2-6-3 DHCP Client List
Here you can view the DHCP clients connected to the router.
Please click ‘DHCP Clients’ menu on the left of web management interface, under the
‘Network’ tab and the following screen will be displayed on your web browser.
2-7 WIRELESS
The wireless settings can be quickly configured as a wireless access point for roaming
client by setting the access identifier (Network name) and channel number. It also
supports data encryption and client filtering. The Wireless Settings contains the following
sections:
Basic
Advanced
Wireless Security
WPS
WDS
AP Clients List
Statistics
44
Page 45
DG-BR4015N User Manual
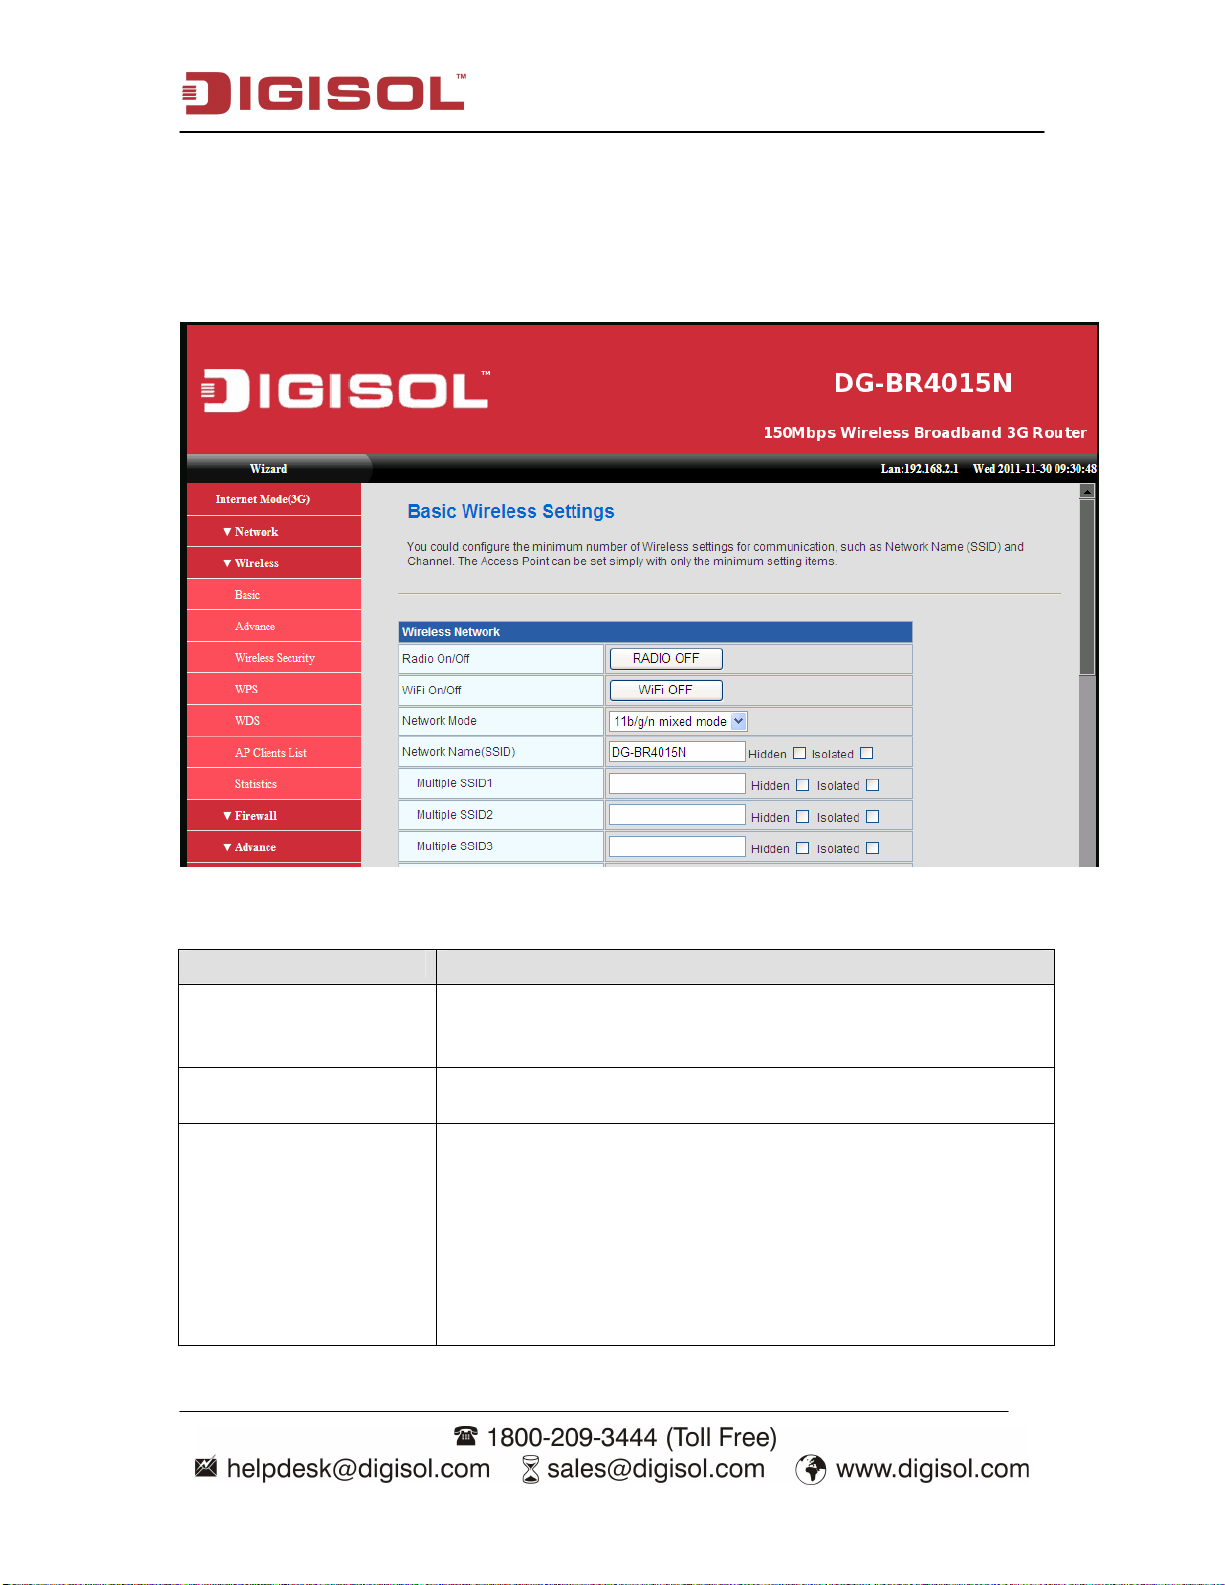
2-7-1 Basic Wireless Setting
This function allows you to define SSID, and Channel for the wireless connection. These
parameters are used for the wireless stations to connect to the Access Point. Click ‘Basic’
under Wireless, below screen will prompt for Basic Setting.
Here are the descriptions of every setup item:
Parameter Description
RADIO ON / OFF RADIO indicates the wireless operating status. The wireless
can be turned ON or OFF. When the radio is ON, the
following parameters are in effect.
WIFI ON / OFF Similar to RADIO ON / OFF. Wireless can be turned ON or
OFF.
Network Mode If all of the wireless devices you want to connect with this
router can connect in the same transmission mode, you can
improve performance slightly by choosing the appropriate
wireless mode. If you have some devices that use a different
transmission mode, choose the appropriate wireless mode.
There are many different configuration options available to
choose from. Use the drop down list to select the wireless
mode.
45
Page 46

DG-BR4015N User Manual
Network Name (SSID) When you are browsing for available wireless networks, this
is the name that will appear in the list (unless Visibility Status
is set to Hidden, see below). This name is also referred to as
the SSID.
Multiple SSID (1~7)
To add additional wireless Network Names simply add the
name to the Multiple SSID field and click on apply at the
bottom of the page.
Broadcast Network
Name (SSID) SSID broadcast can be disabled.
AP Isolation If enabled, will isolate communication between the clients
connected to router wirelessly.
MBSSID Isolation If enabled, will isolate communication between the clients
from different SSID.
BSSID MAC Address of AP
Frequency (Channel) Radio Channel that wireless AP/Router uses to communicate
with wireless clients.
HT Physical Mode description
Operating Mode Mixed mode: Provides backward compatibility with
IEEE 802.11n/g/b devices.
Green Field: Used for pure network of 802.11n access
point and clients, taking full advantage of highthroughput capabilities of MIMO architecture.
Channel Bandwidth 20 MHz: Allows only single channel operation (20MHz).
20/40 MHz: Allows both single channel operations.
Guard Interval The guard interval is the period in nanoseconds that the
Gateway listens between packets.
MCS(Modulation
Coding Scheme):
The Modulation and Coding Scheme(MCS) is a value that
determines the modulation, coding and number of spatial
channels. ( Options: value [range] = 0~7 (1 Tx Stream), 8~15
(2 Tx Stream), 32 and auto (33). Default is auto.
Reverse Direction Grant When enabled Reverse Direction Grant, the wireless
AP/Router can reduce the transmitted data packet collision by
using the reverse direction protocol. The RDG improves
transmission performance and scalability in a wireless.
Aggregation MSDU This option enables MAC Service Data Unit (MSDU)
aggregation. Default is disable.
Auto Block ACK Select to block ACK (Acknowledge Number) or not during
data transferring.
Decline BA Request Select to reject peer BA-Request or not
46
Page 47

DG-BR4015N User Manual
Other
HT TxStream HT means High Throughput. The number of HT TxStream
means how many antennas will transmit data
simultaneously.
HT RxStream The number of HT RxStream means how many antennas
will receive data simultaneously.
When you finish with all settings, please click ‘Apply’ button to continue with other
setup procedures.
2-7-2 Advance
You can configure wireless using advance feature to fine tune the wireless network.
Please click ‘Advance’ menu on the left of web management interface, under the
‘Wireless’ tab and the following screen will be displayed on your web browser.
Here are the descriptions of every setup item.
47
Page 48

DG-BR4015N User Manual
Parameter Description
BG Protection
Mode
Auto BG protection mode goes ON or OFF automatically as needed.
Beacons
DTIM A DTIM is a countdown informing clients of the next window for listening to
Fragment
Threshold
RTS Threshold When an excessive number of wireless packet collisions are occurring, wireless
Tx Power
Short Preamble
Short Slot Sets the basic unit of time the wireless AP/Router uses for calculating waiting
Tx Burst Allows the wireless Router to deliver better throughput in the same period and
Pkt_Aggregate
WMM
This mode is a protection mechanism that prevents collisions among 802.11b/g
modes. Below are the choices.
ON: BG protection mode is always ON.
OFF: BG protection mode is always OFF.
Beacons are packets sent by a wireless router to synchronize wireless devices.
Specify a Beacon Period value between 20 and 1000. The default value is set to
100 milliseconds
broadcast and multicast messages. When the wireless router has buffered
broadcast or multicast messages for associated clients, it sends the next DTIM
with a DTIM Interval value. Wireless clients detect the beacons and awaken to
receive the broadcast and multicast messages. The default value is 1. Valid
settings are between 1 and 255.
Wireless frames can be divided into smaller units (fragments) to improve
performance in the presence of RF interference and at the limits of RF coverage.
Fragmentation will occur when frame size in bytes is greater than the
Fragmentation Threshold. This setting should remain at its default value of 2346
bytes. Setting the Fragmentation value too low may result in poor performance.
performance can be improved by using the RTS/CTS (Request to Send/Clear to
Send) handshake protocol. The wireless transmitter will begin to send RTS
frames (and wait for CTS) when data frame size in bytes is greater than the RTS
Threshold. This setting should remain at its default value of 2346 bytes.
Adjusts the power of radio signals transmitted from the AP. The higher the
transmission power, the farther the transmission range. You also have to ensure
that high-power signals do not interfere with the operation of other radio devices
in the service area.
Enables the length of the signal preamble that is used at the start of a
transmission.
times before data is transmitted. Enabling a short time slot can increase data
throughput on the wireless AP/Router, but requires that all clients can support a
short time slot.
environment in order to increase speed.
Increase efficiency by aggregating multiple packets of application data into a
single transmission frame. In this way, 802.11n networks can send multiple data
packets with the fixed overhead cost of just a single frame.
Here you can configure WMM parameters.
When you finish with all settings, please click ‘Apply’ button to continue with other
setup procedures.
48
Page 49

DG-BR4015N User Manual
2-7-3 Wireless Security
It’s very important to set wireless security settings properly. If you don’t, hackers and
malicious users can reach your network and valuable data without your consent and this
will cause serious security problem.
To set wireless security settings, Please click ‘Wireless Security’ menu on the left of
web management interface, under the ‘Wireless’ tab and then follow the instructions
mentioned below to set wireless security settings:
Wireless Security if selected Disable
When you select this mode, data encryption is disabled, and every wireless device in
proximity will be able to connect to your wireless router if no other security measure is
enabled (like Access Control or disable SSID broadcast).
Only use this option when you really want to allow everyone to use your wireless
router, and you don’t care if there’s someone reading the data you transfer over
network without your consent.
A. WEP
When you select this mode, the wireless router will use WEP encryption, and the
following setup menu will be shown on your web browser.
49
Page 50

DG-BR4015N User Manual
Here are descriptions of every setup item:
Parameter Description
Default Tx Key When ‘WEP’ Encryption is enabled then ‘Key 1’ will appear in
this field.
Key Format There are two types of key format: ASCII and Hex. When you
select a key format, the number of characters of key will be
displayed.
Encryption Key 1 Input WEP key characters here, the number of characters must
be the same as the number displayed at ‘Key Format’ field.
You can use any alphanumerical characters (0-9, a-z, and A-Z)
if you select ‘ASCII’ key format, and if you select ‘Hex’ as key
format, you can use characters 0-9, a-f, and A-F. You must
enter at least one encryption key here, and if you have entered
multiple WEP keys, they should not be the same.
Policy If Enabled, as per the policy defined clients will be either
allowed or rejected to connect wireless network.
MAC Enter the MAC address of client.
When you finish with all settings, please click ‘Apply’ button to continue with other
setup procedures.
50
Page 51
DG-BR4015N User Manual
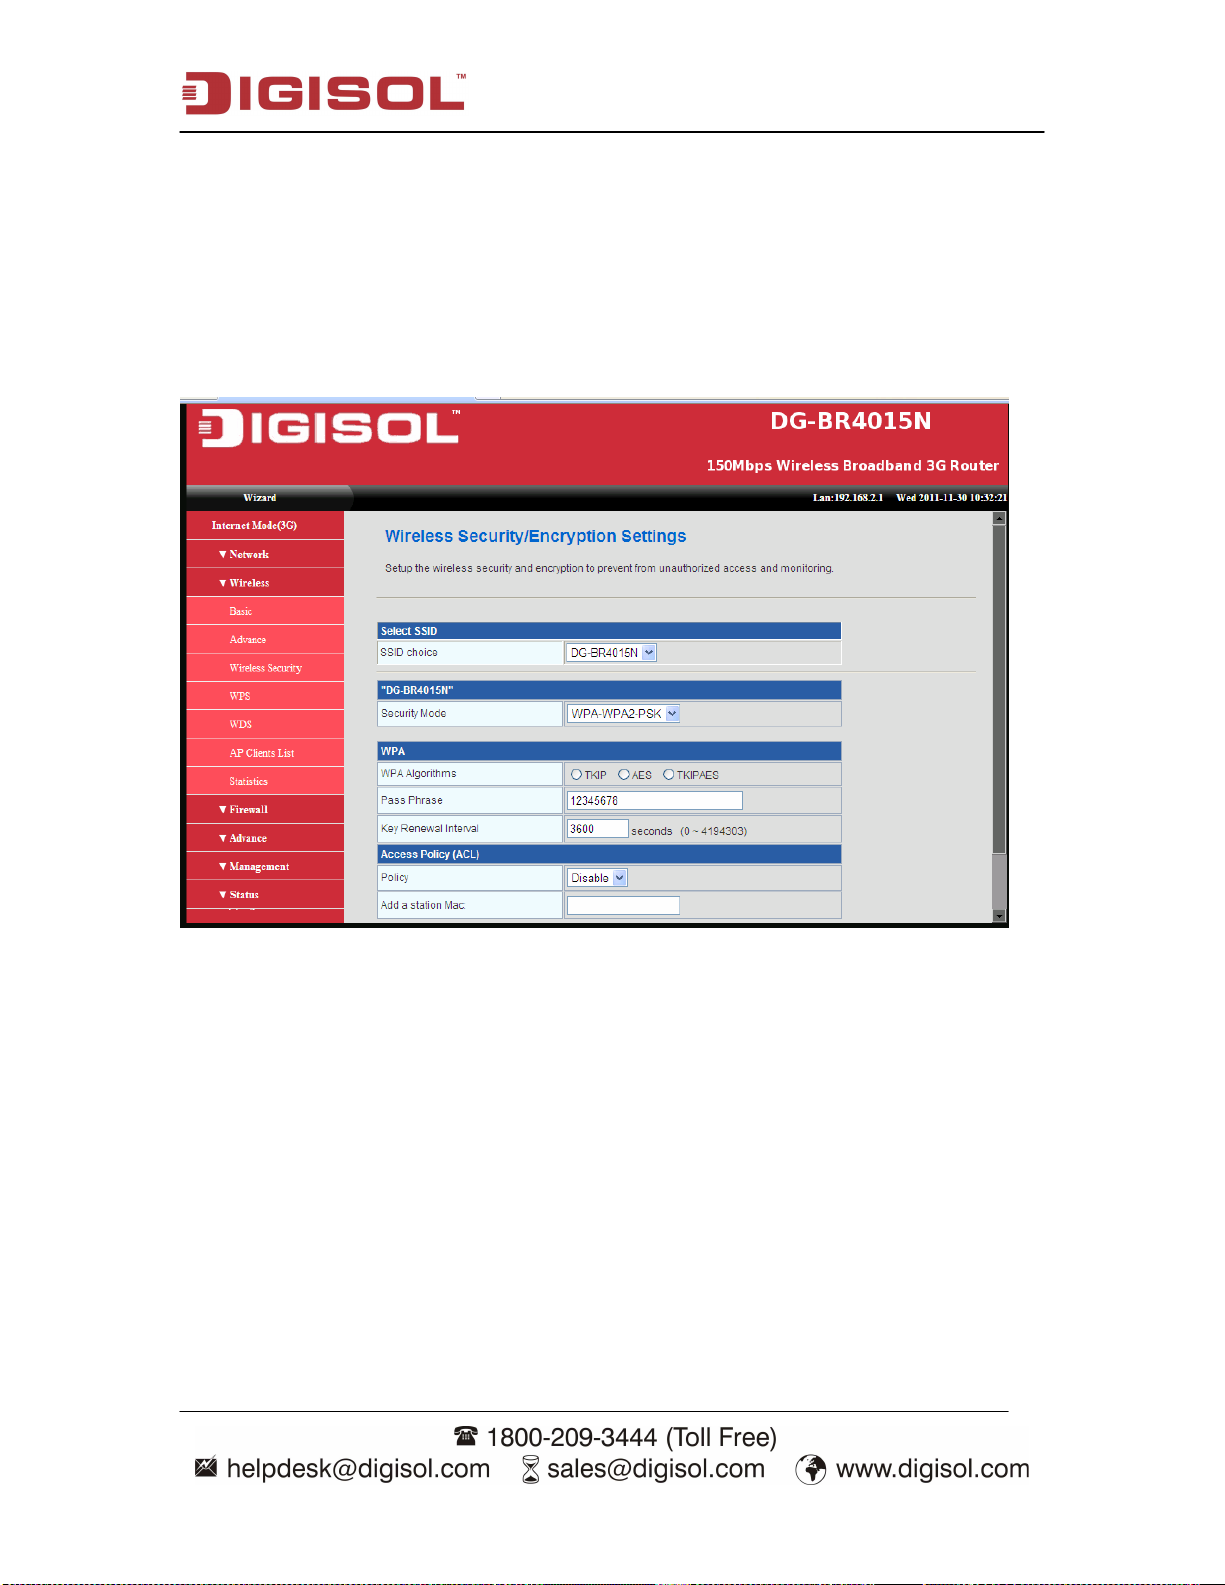
B. WPA-PSK/WPA2-PSK
The WPA or WPA2 mode uses a common password phrase, called a Pre-Shared Key,
that must be manually distributed to all clients that want to connect to the network.
Specify a key as an easy-to-remember form of letters and numbers. The WPA/WPA2
Preshared Key can be input as ASCII string (8-63 characters).
Following screen appears if you select WPA-WPA2-PSK.
51
Page 52

DG-BR4015N User Manual
Here are the descriptions of every setup item.
Parameter Description
TKIP will change the encryption key frequently to enhance the
TKIP
wireless LAN security.
AES uses CCMP protocol to change encryption key frequently.
AES can provide high level encryption to enhance the wireless
AES
LAN security.
TKIP or AES based on the other communication peer
TKIP/AES
automatically.
The Pass phrase key is used to authenticate and encrypt data
transmitted over the wireless network. Enter at least 8 character
Pass Phrase
pass phrase as the pre-shared keys.
Router generates key that is actually used for the encryption
Key renewal Interval
between the host and router at interval defined.
Policy You can also secure wireless by defining policy.
Enter the station MAC Address that will be either allowed or
Add a station MAC
rejected as per the policy defined.
When you finish with all settings, please click ‘Apply’ button to continue with other
setup procedures.
52
Page 53
DG-BR4015N User Manual
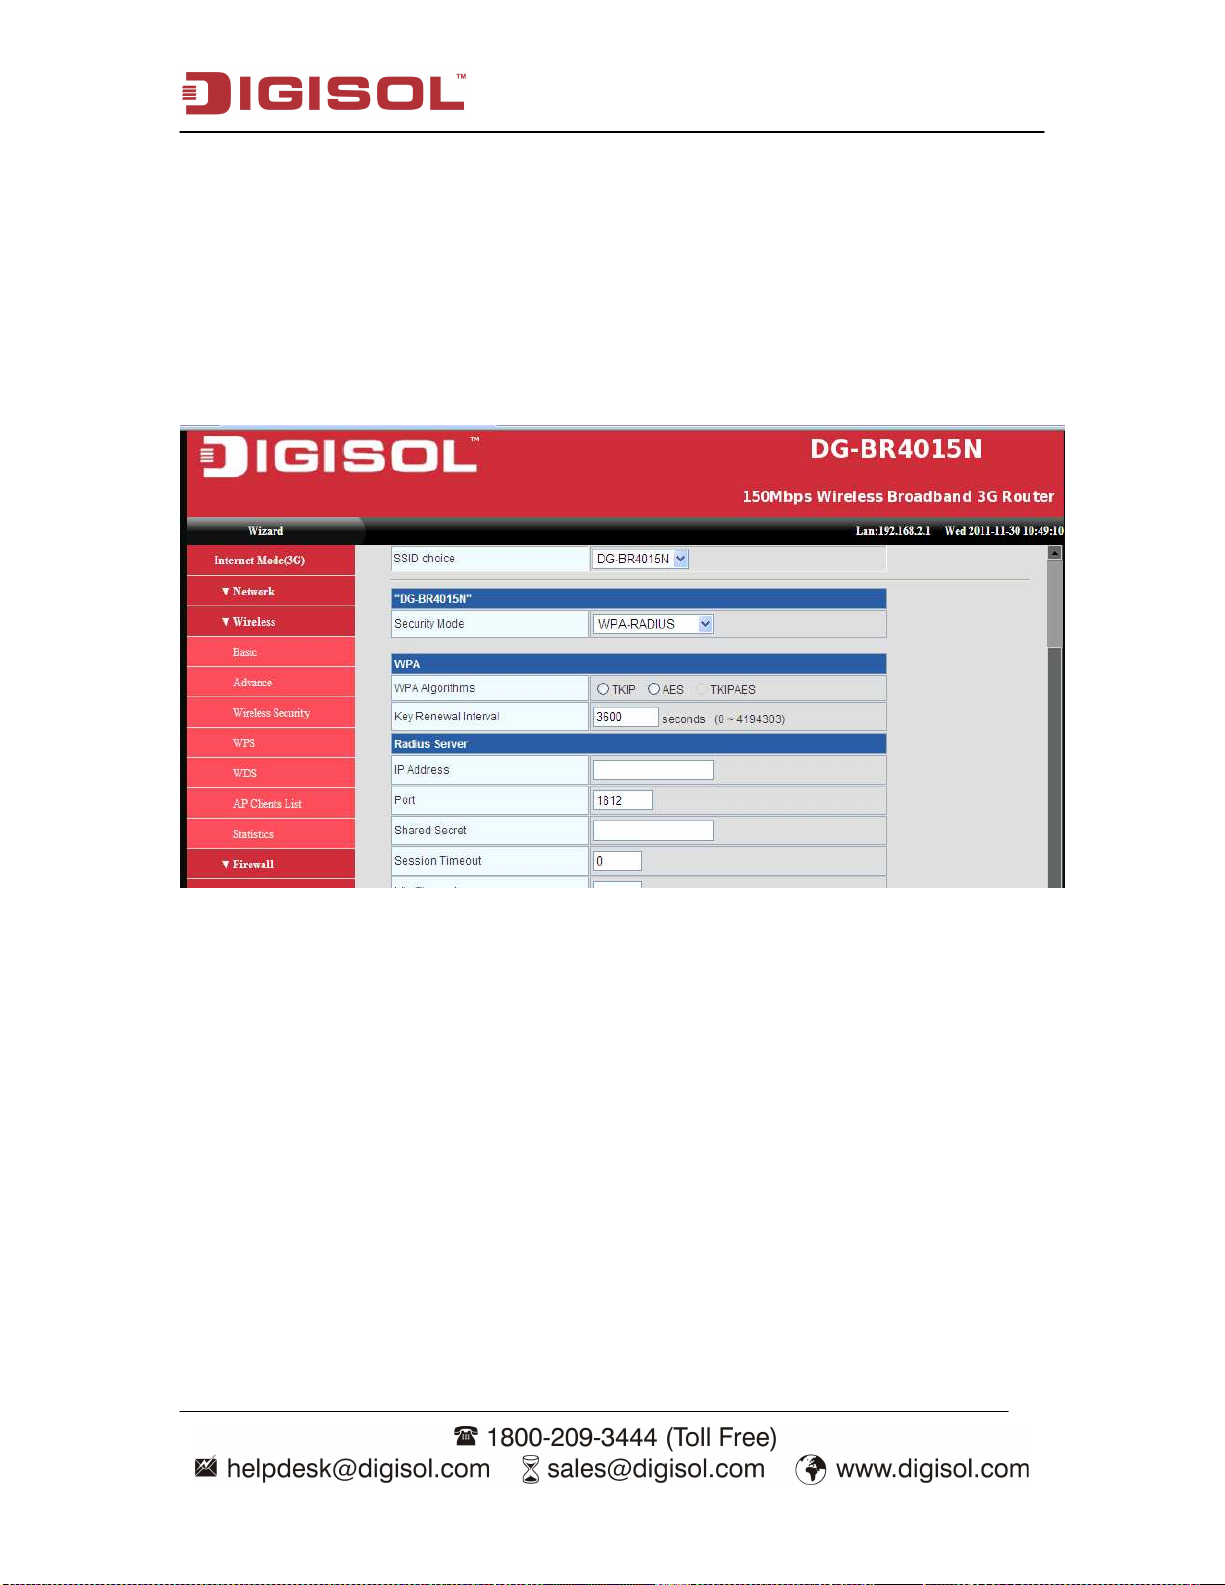
C. WPA-RADIUS
Wi-Fi Protected Access (WPA) is an advanced security standard. You can use
an external RADIUS server to authenticate wireless stations and provide the
session key to encrypt data during communication. It uses TKIP or AES to change the
encryption key frequently, and this will improve security.
Following screen appears if you select ‘WPA-RADIUS’.
53
Page 54

DG-BR4015N User Manual
Here are the descriptions of every setup items.
Parameter Description
TKIP will change the encryption key frequently to enhance the
TKIP
wireless LAN security.
AES uses CCMP protocol to change encryption key frequently.
AES can provide high level encryption to enhance the wireless
AES
LAN security.
TKIP or AES based on the other communication peer
TKIP/AES
automatically.
Router generates key that is actually used for the encryption
Key renewal Interval
IP Address
Port
Shared Secret
between the host and router at interval defined.
The IP address of external RADIUS server.
The service port of the external RADIUS server.
The password used by external RADIUS server.
RADIUS server sets timeout session for the clients as pe the credit
Session Timeout
Idle Timeout
Policy
available.
Clients will be timeout if it remains idle for time specified.
You can also secure wireless by defining policy.
Enter the station MAC Address that will be either allowed or
Add a station MAC
rejected as per the policy defined.
When you finish with all settings, please click ‘Apply’ button to continue with other
setup procedures.
54
Page 55

DG-BR4015N User Manual
D. WPA2-RADIUS
WPA2 is advanced and upgraded form of WPA. WPA2 provides better and secure
wireless network as compared to WPA.
Following screen appears if you select ‘WPA2-RADIUS’
55
Page 56

DG-BR4015N User Manual
Here are the descriptions of every setup items:
Parameter Description
TKIP
TKIP will change the encryption key frequently to enhance the
wireless LAN security.
AES
AES uses CCMP protocol to change encryption key frequently.
AES can provide high level encryption to enhance the wireless
LAN security.
TKIP/AES
TKIP or AES based on the other communication peer
automatically.
Key renewal Interval
Router generates key that is actually used for the encryption
between the host and router at interval defined.
PMK Cache Period
WPA2 wireless clients and wireless AP cache the results of 802.1X
authentications. Therefore, access is much faster when a wireless
client roams back to a wireless access point to which the client
already authenticated.
Preauthentication
WPA2 wireless client can perform an 802.1X authentication with
other wireless access points in its range when it is still connected to
its current wireless access point.
IP Address
Port
Shared Secret
Session Timeout
The IP address of external RADIUS server.
The service port of the external RADIUS server.
The password used by external RADIUS server.
RADIUS server sets timeout session for the clients as pe the credit
available.
Idle Timeout
Policy
Add a station MAC
Clients will be timeout if it remains idle for time specified.
You can also secure wireless by defining policy.
Enter the station MAC Address that will be either allowed or
rejected as per the policy defined.
When you finish with all settings, please click ‘Apply’ button to continue with other
setup procedures.
56
Page 57

DG-BR4015N User Manual
2-7-4 WPS (Wi-Fi Protected Setup)
Wi-Fi Protected Setup (WPS) is the simplest way to build connection between wireless
network clients and this wireless router. You don’t have to select encryption mode and
input a long encryption passphrase every time when you need to setup a wireless client,
you only have to press a button on wireless client and this wireless router, and the WPS
will do the rest for you.
This wireless router supports two types of WPS: Push-Button Configuration (PBC), and
PIN code. If you want to use PBC, you have to push a specific button on the wireless
client to start WPS mode, and switch this wireless router to WPS mode too. You can push
Reset/WPS button of this wireless router, or click ‘Start PBC’ button in the web
configuration interface to do this; if you want to use PIN code, you have to know the PIN
code of wireless client and switch it to WPS mode, then provide the PIN code of the
wireless client you wish to connect to this wireless router.
Please click ‘WPS’ menu on the left of web management interface, under the ‘Wireless’
tab, and the following screen will be displayed on your web browser.
57
Page 58

DG-BR4015N User Manual
Here are the descriptions of every setup item.
Parameter Description
WPS mode Select Enable from drop down list to start WPS function.
PBC Select PBC if you wish to connect using push button. Also, enable
PBC on clients so they can connect with WPS security.
PIN Enter the PIN obtained from client into the router so as to connect
using WPS security.
You can view the WPS current status under summary.
2-6-5 WDS (Wireless Distribution System)
WDS mode is used to extend the wireless network coverage. The AP/Router can be
linked to other AP using WDS. To set up links between access point units, you must
configure the Wireless Distribution System (WDS) forwarding table by specifying the
wireless MAC address of all units to which you want to forward traffic.
This uses the MAC addresses of the station and that of the AP connected to it on the
transmitting LAN, and the MAC addresses of the AP functioning as a wireless
repeater/bridge and that of the station connected to it on a neighboring LAN in the 802.11
frame header.
Note: The wireless AP/Router does not support the spanning tree algorithm. WDS
links should be configured appropriately to avoid causing loops on the network.
To set WDS settings, Please click ‘WDS’ menu on the left of web management interface,
under the ‘Wireless’ tab.
Here are the descriptions of every setup item.
58
Page 59

DG-BR4015N User Manual
Parameter Description
WDS Mode
WDS mode is disabled by default. You can set WDS in 3 different
modes.
Lazy Mode
Operates in an automatic mode that detects and learns WDS peer
addresses without the need to configure a WDS list entry This feature
allows the wireless AP/Router to associate with other AP/Router in the
network and use their WDS MAC list.
Bridge Mode
Operates as a standard bridge that forwards traffic between WDS links
(links that connect to other AP/wireless bridges). Here you need to
configure WDS MAC list.
Repeater Mode
Operates as a wireless repeater, extending the range for remote
wireless clients and connecting them to an AP using repeater mode.
If you are finish with the settings, please click ‘Apply’ button to continue with setup
procedure.
2-7-6 AP Clients List
Displays the Clients lists that are associated to AP/Router.
59
Page 60
DG-BR4015N User Manual
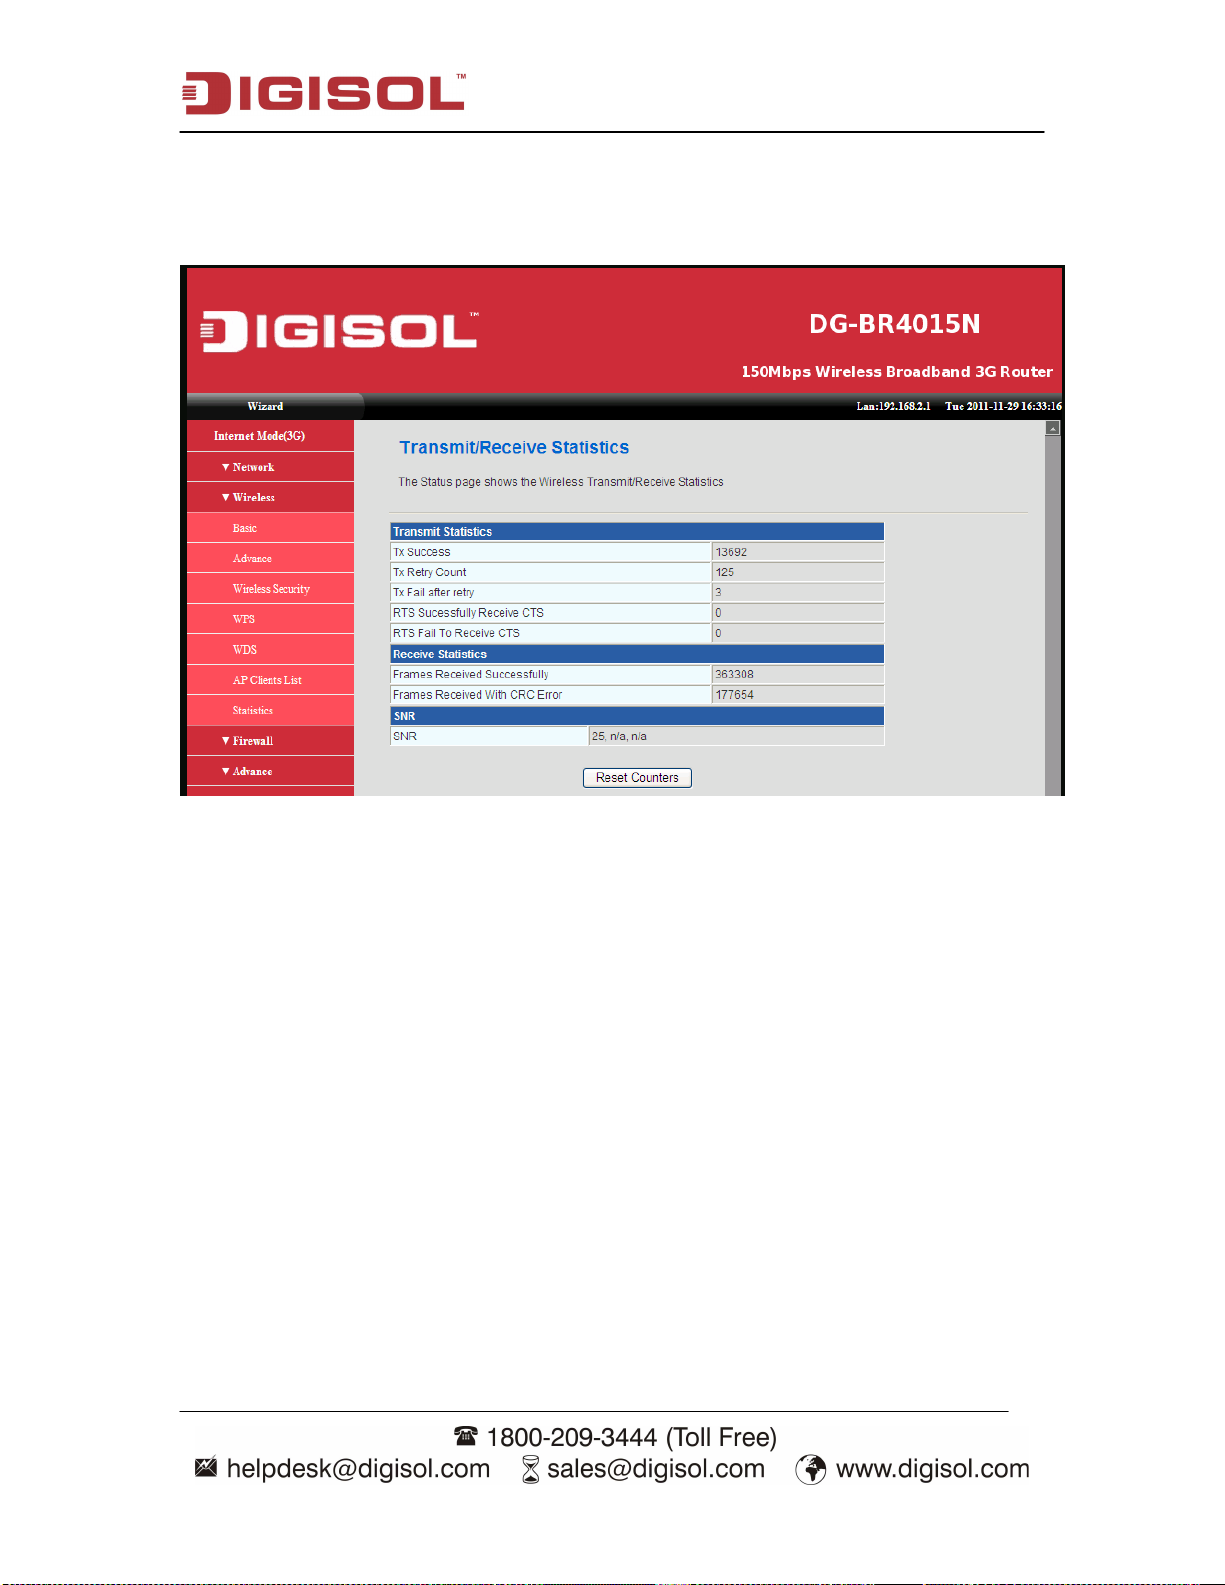
2-7-7 Statistics
Displays the Wireless Tx/Rx statistics.
60
Page 61

DG-BR4015N User Manual
2-8 Firewall
A firewall is designed to permit or deny network transmissions based upon a set of rules
and is frequently used to protect networks from unauthorized access while permitting
legitimate communications to pass. The firewall can also block users from accessing the
specific URL.
Please click ‘Firewall’ menu on the left of web management interface, and the following
screen will be displayed on your web browser.
61
Page 62

DG-BR4015N User Manual
2-8-1 QoS (Quality of Service)
You may setup rules to provide Quality of Service guarantees for specific applications.
To set QoS settings, Please click ‘QoS BwLimit’ menu on the left of web management
interface, under the ‘Firewall’ tab and following screen will be displayed.
If you are finish with the settings, please click ‘Submit’ button to continue with setup
procedure.
2-8-2 TCP/IP Filter
In this section you can setup firewall rules using MAC/IP/Port Filtering to restrict certain
types of data packets from your local network to Internet through the router.
62
Page 63
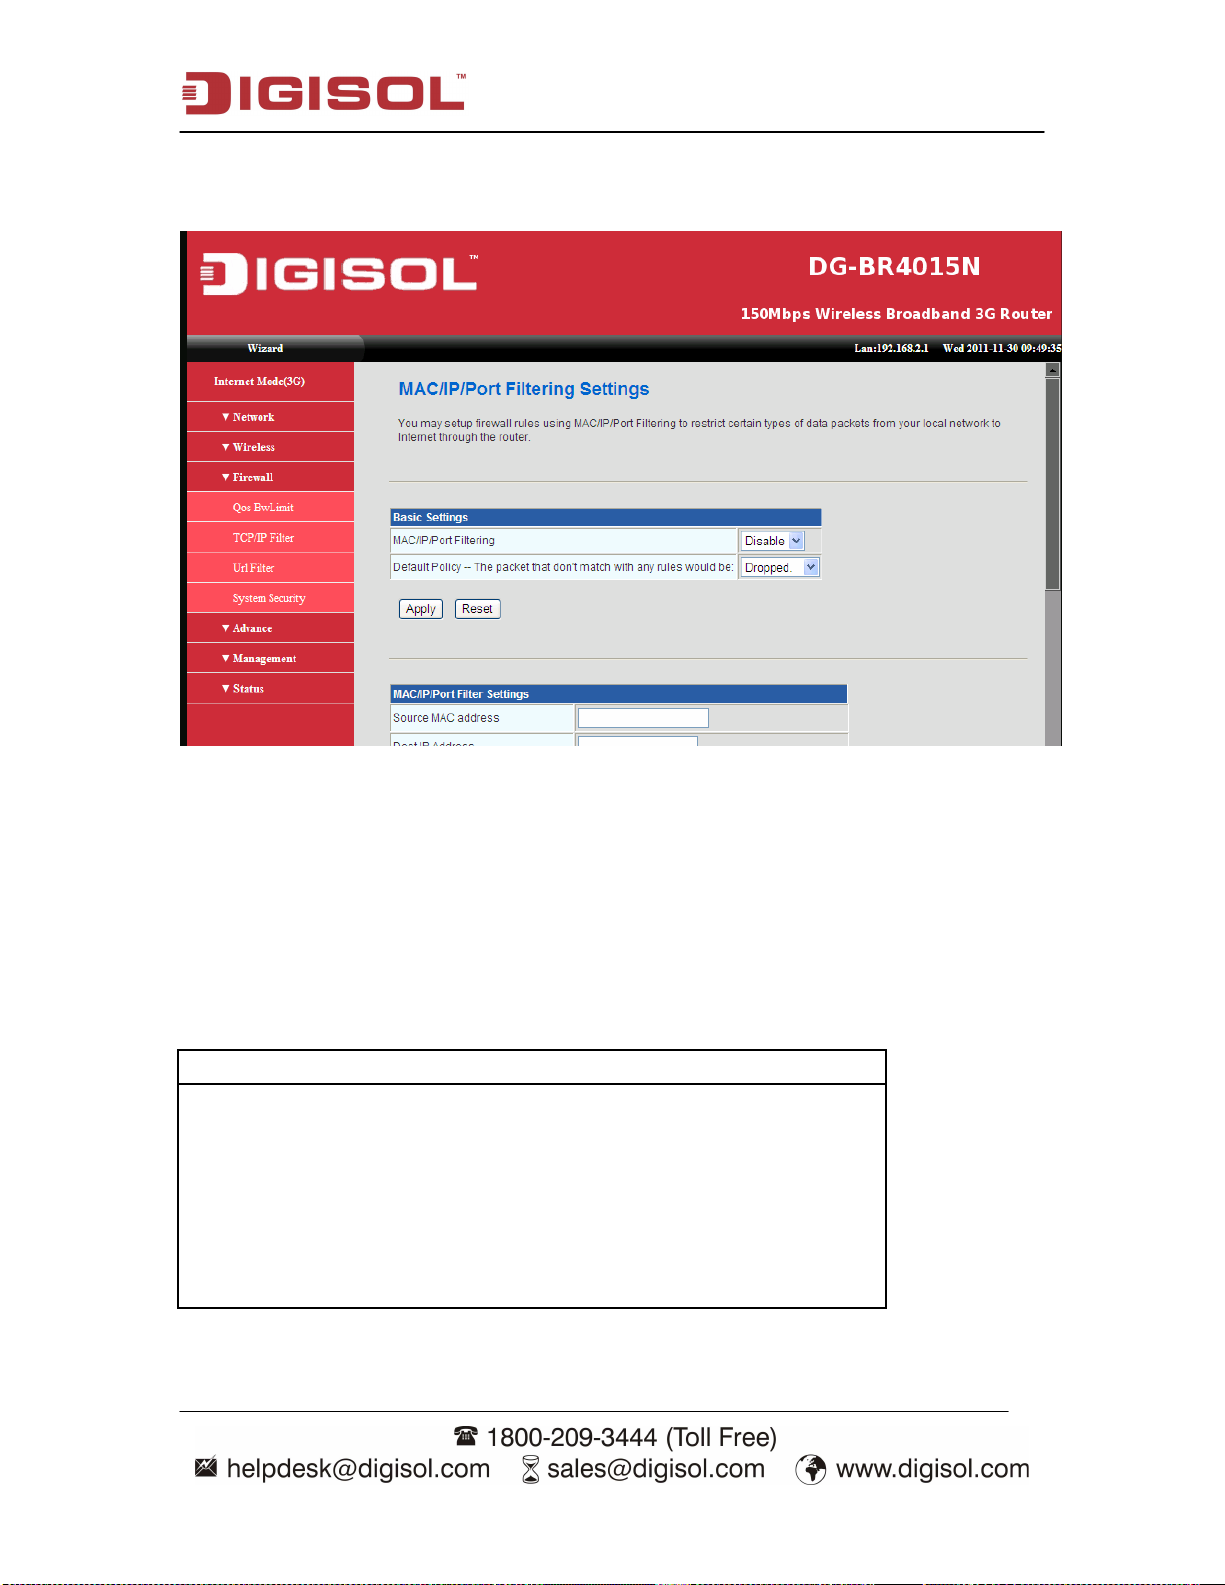
DG-BR4015N User Manual
Please click ‘TCP/IP Filter menu on the left of web management interface, under the
‘Firewall’ tab and the following screen will be displayed on your web browser.
By default, the MAC/IP/Port Filtering feature is disabled.
Note : When Access Control is disabled, every device on the LAN has unrestricted
access to the Internet. However, if you enable Filtering, Internet access is restricted /
allowed for those devices that have an Access Control Policy configured for them.
All other devices will match with default policy and will be dropped or allowed as
per the default policy configured.
Here are the descriptions of every setup item.
Parameter Description
Source MAC Address
Dest IP Address
Source IP Address
Protocol
Dest Port Range
Source Port Range
Action
Enter the Source MAC Addres.
Enter the Dest IP Address.
Enter the Soure IP Address.
Enter the Protocol TCP/UDP/ICMP.
Enter Destination port range.
Enter Source port range.
Enter the Action either Accept or Reject.
63
Page 64
DG-BR4015N User Manual
When you finish with all settings, please click ‘Apply’ button to continue with other
setup procedures. If you want to reset the setting click on ‘Reset’.
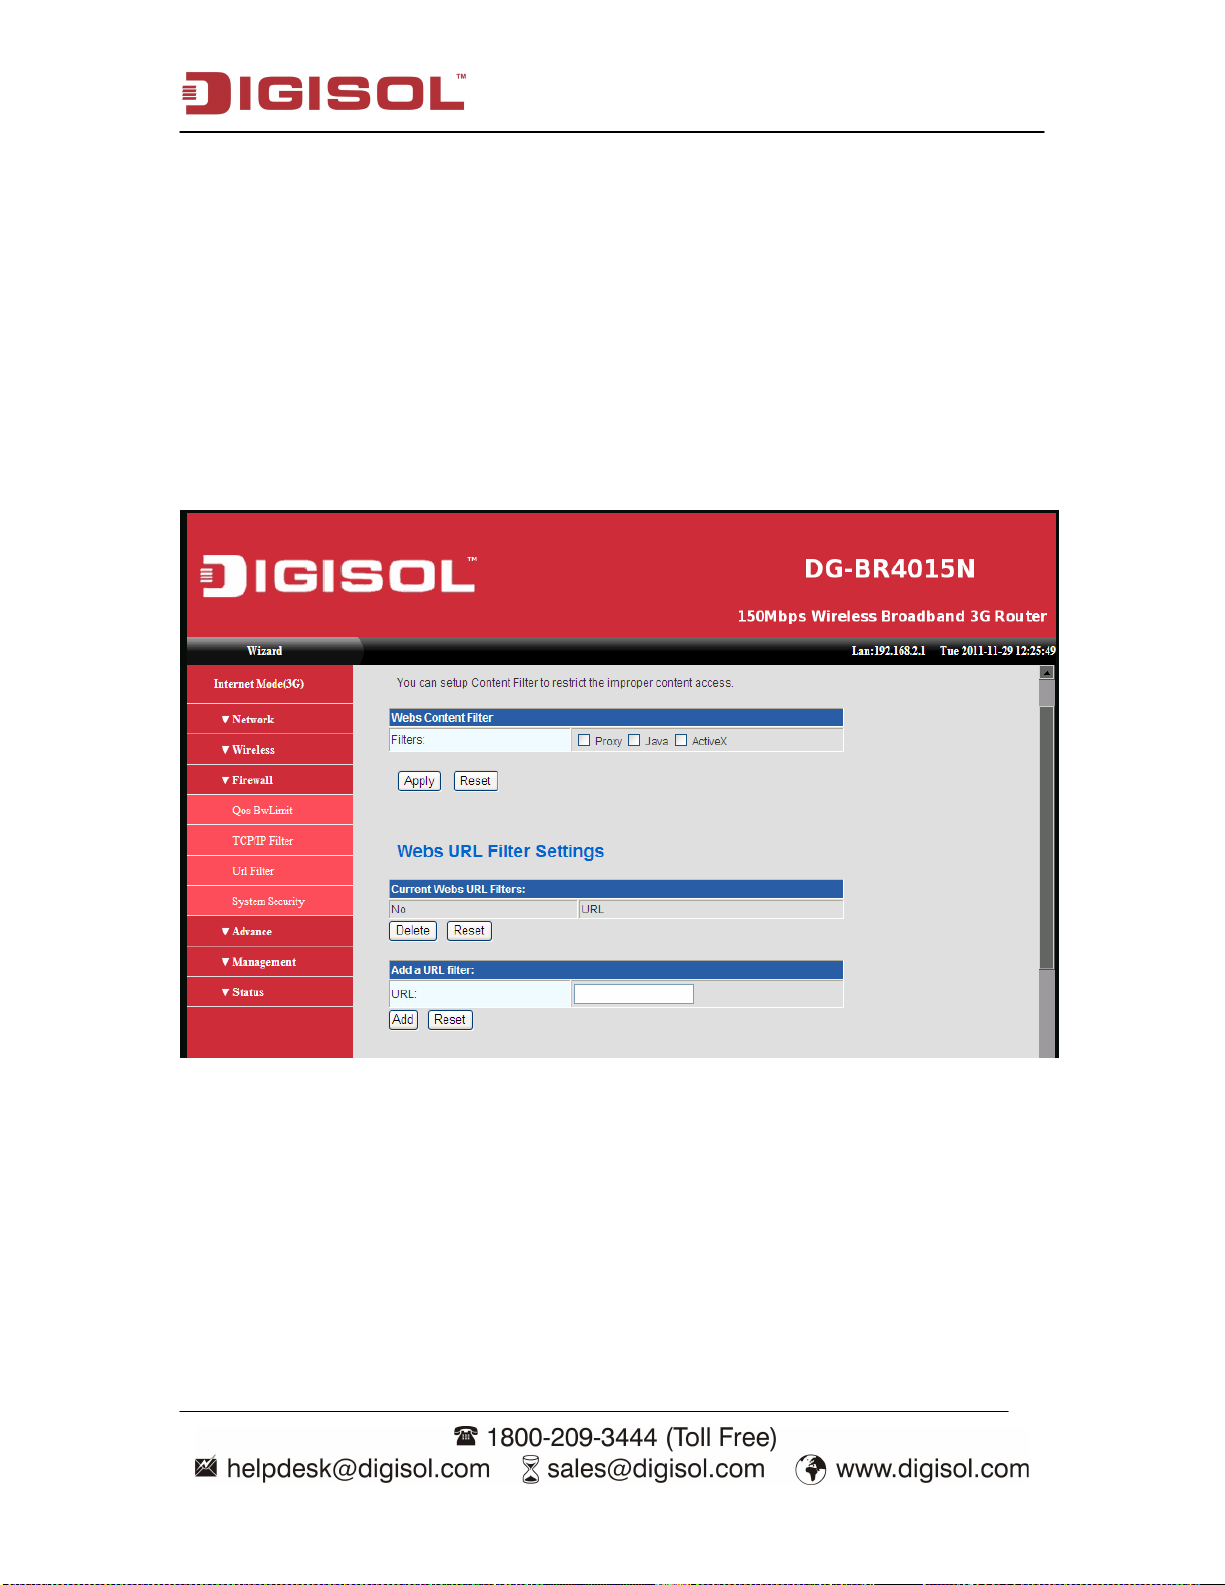
2-8-3 URL Filter
URL Filter is a web solution that blocks web-sites access according the URL Filter
String.
Please click ‘URL Filter’ menu on the left of web management interface, under the
‘Firewall’ tab and the following screen will be displayed on your web browser.
64
Page 65

DG-BR4015N User Manual
Here is the description of every setup items:
Parameter Description
There are 3 options. When this options are checked
Web Content Filter
it will filter objects supporting proxy, java and
active X.
Web URL Filter
URL Filter blocks web-sites access according to
the URL Filter String.
Web Host Filter
URL Filter blocks web-sites access according to
the Keyword String.
Click on ‘Add’ to add the URL strings for filtering. If you want to delete any of the URL
string click ‘Delete’ button.
When you finish with all settings, please click ‘Apply’ button to continue with other
setup procedures. If you want to reset the setting click on ‘Reset’.
65
Page 66

DG-BR4015N User Manual
2-8-4 System Security
You can configure system firewall to protect AP/Router from attacks.
Please click ‘System Security’ menu on the left of web management interface, under the
‘Firewall’ tab and the following screen will be displayed on your web browser.
66
Page 67

DG-BR4015N User Manual
Here are the descriptions of every setup item.
Parameter Description
Remote Management
Ping from WAN Filter
Allows you to access router remotely.
If Enabled, will block all ICMP packets on the WAN
port.
Block Port Scan
Block SYN Flood
SPI
To block the suspected port scan flood.
To block the suspected SYN flood.
Stateful Packet Inspection keeps track of the state of
network connections (such as TCP streams, UDP
communication) traveling across it.
When you finish with all settings, please click ‘Apply’ button to continue with other
setup procedures. If you want to reset the setting click on ‘Reset’.
2-9 Advance
In this section you can configure advance setting like DDNS, Routing, DMZ, Port
Forwarding and run System command as a root.
2-9-1 DDNS Domain
Use DDNS only if you have purchased your own domain name and registered with a
dynamic DNS service provider. The following screen is displayed when you click on
‘DDNS’ menu on the left of web management interface, under the ‘Advance’ tab.
67
Page 68
DG-BR4015N User Manual
Here are the descriptions of every setup item.
Parameter Description
Dynamic DNS
Provider
Account
Password
DDNS
Select a dynamic DNS service provider from the drop-down
list.
Enter the account provided by your service provider.
Enter the password provided by your service provider.
Enter your host name, for example: myhost.mydomain.net.
When you finish with all settings, please click ‘Apply’ button to continue with other
setup procedures.
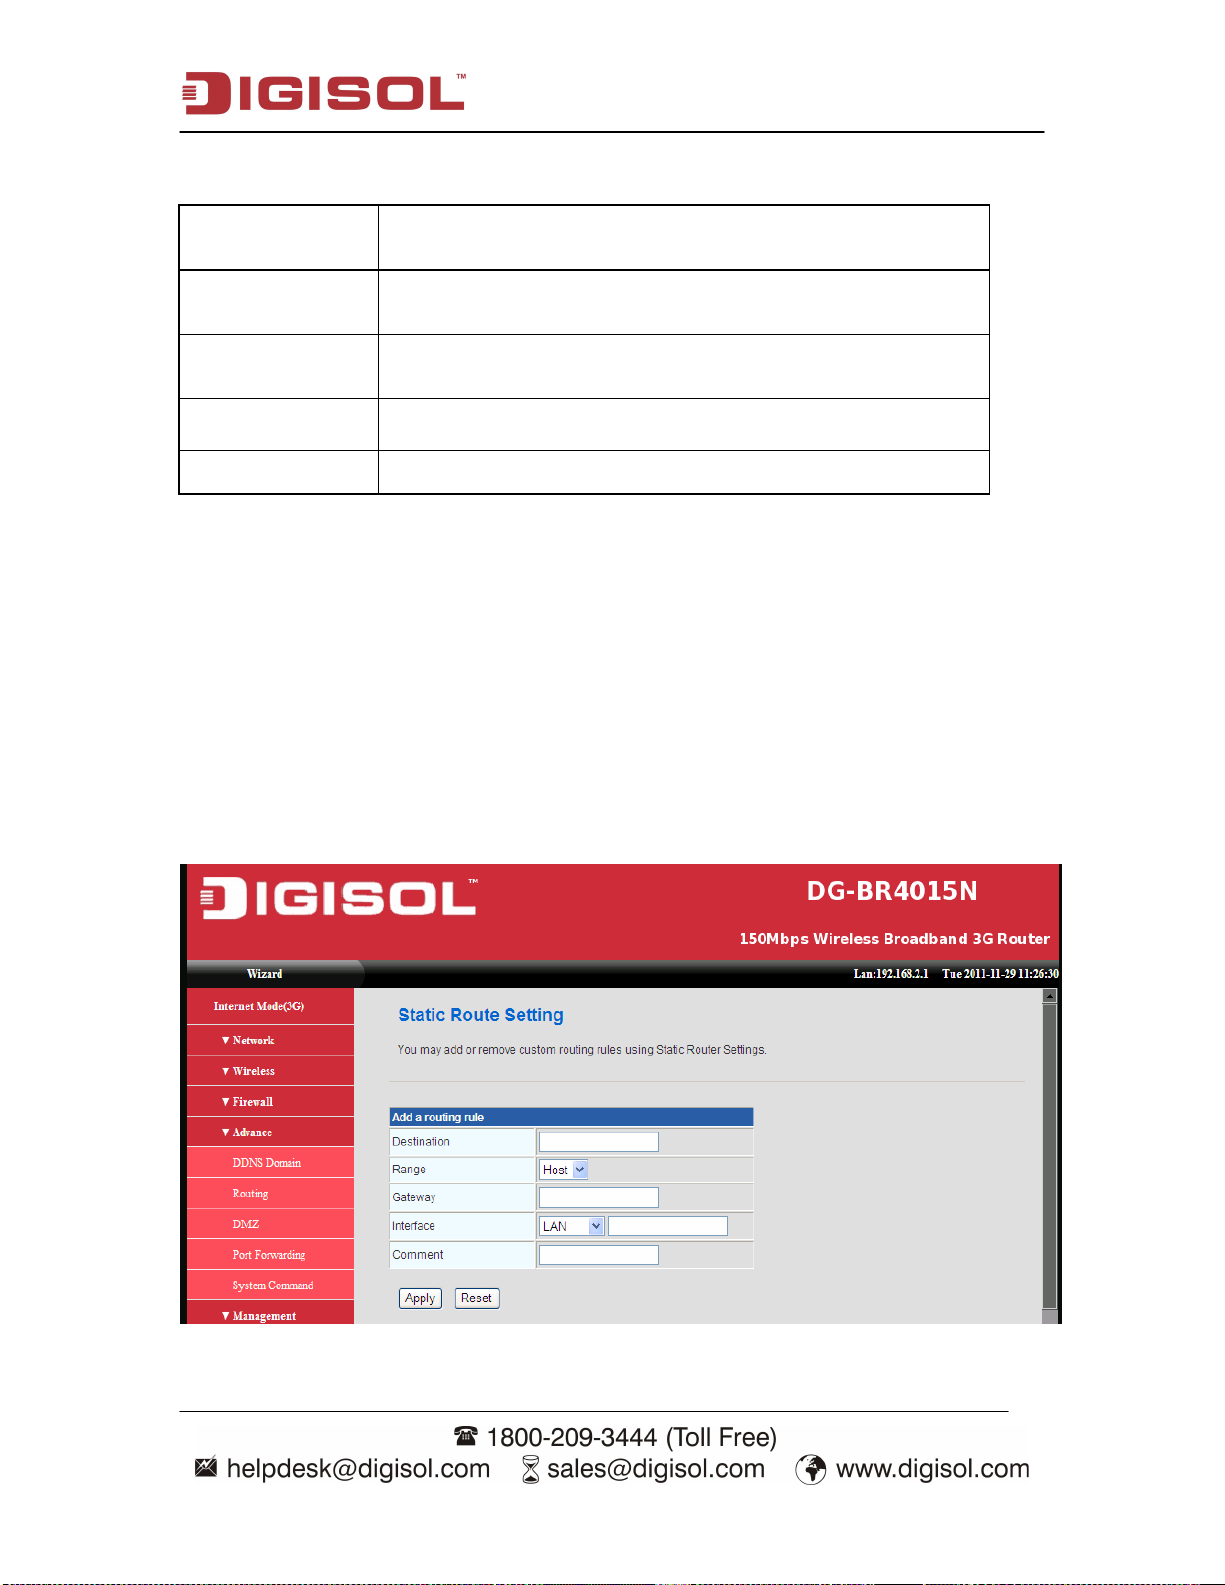
2-9-2 Routing
With static routing, the router can forward packets according to your routing rules.
In this section you can manually create and remove static route.
The following screen is displayed when you click on ‘Routing’ menu on the left of web
management interface, under the ‘Advance’ tab.
68
Page 69

DG-BR4015N User Manual
Here is the description of every setup items.
Parameter
Destination
Range
Description
Destination IP address of packets that will take this route
Select either range of IP address or Single host
Specifies the next hop to be taken if this route is used. A
Gateway
gateway of 0.0.0.0 implies there is no next hop, and the IP
address matched is directly connected to the router on the
interface specified LAN or WAN.
Specifies the interface : LAN or WAN that the IP packet
Interface
must use to transit out of the router, when this route is
used.
When you finish with all settings, please click ‘Apply’ button to continue with other
setup procedures. If you want to reset the setting click on ‘Reset’.
2-9-3 DMZ
DMZ means "Demilitarized Zone." If an application has trouble working from behind the
router, you can expose one computer to the Internet and run the application on that
computer.
The following screen is displayed when you click on ‘DMZ’ menu on the left of web
management interface, under the ‘Advance’ tab.
69
Page 70

DG-BR4015N User Manual
Here is the description of every setup items:
Parameter
Description
Putting a computer in the DMZ may expose that
DMZ Settings
computer to a variety of security risks. Use of this option
is only recommended as a last resort.
DMZ IP
Address
Specify the LAN IP address of the LAN computer that
you want to have unrestricted Internet communication.
Except TCP
port 80
If you wish to block port 80 enable this option.
When you finish with all settings, please click ‘Apply’ button to continue with other
setup procedures. If you want to reset the setting click on ‘Reset’.
70
Page 71
DG-BR4015N User Manual
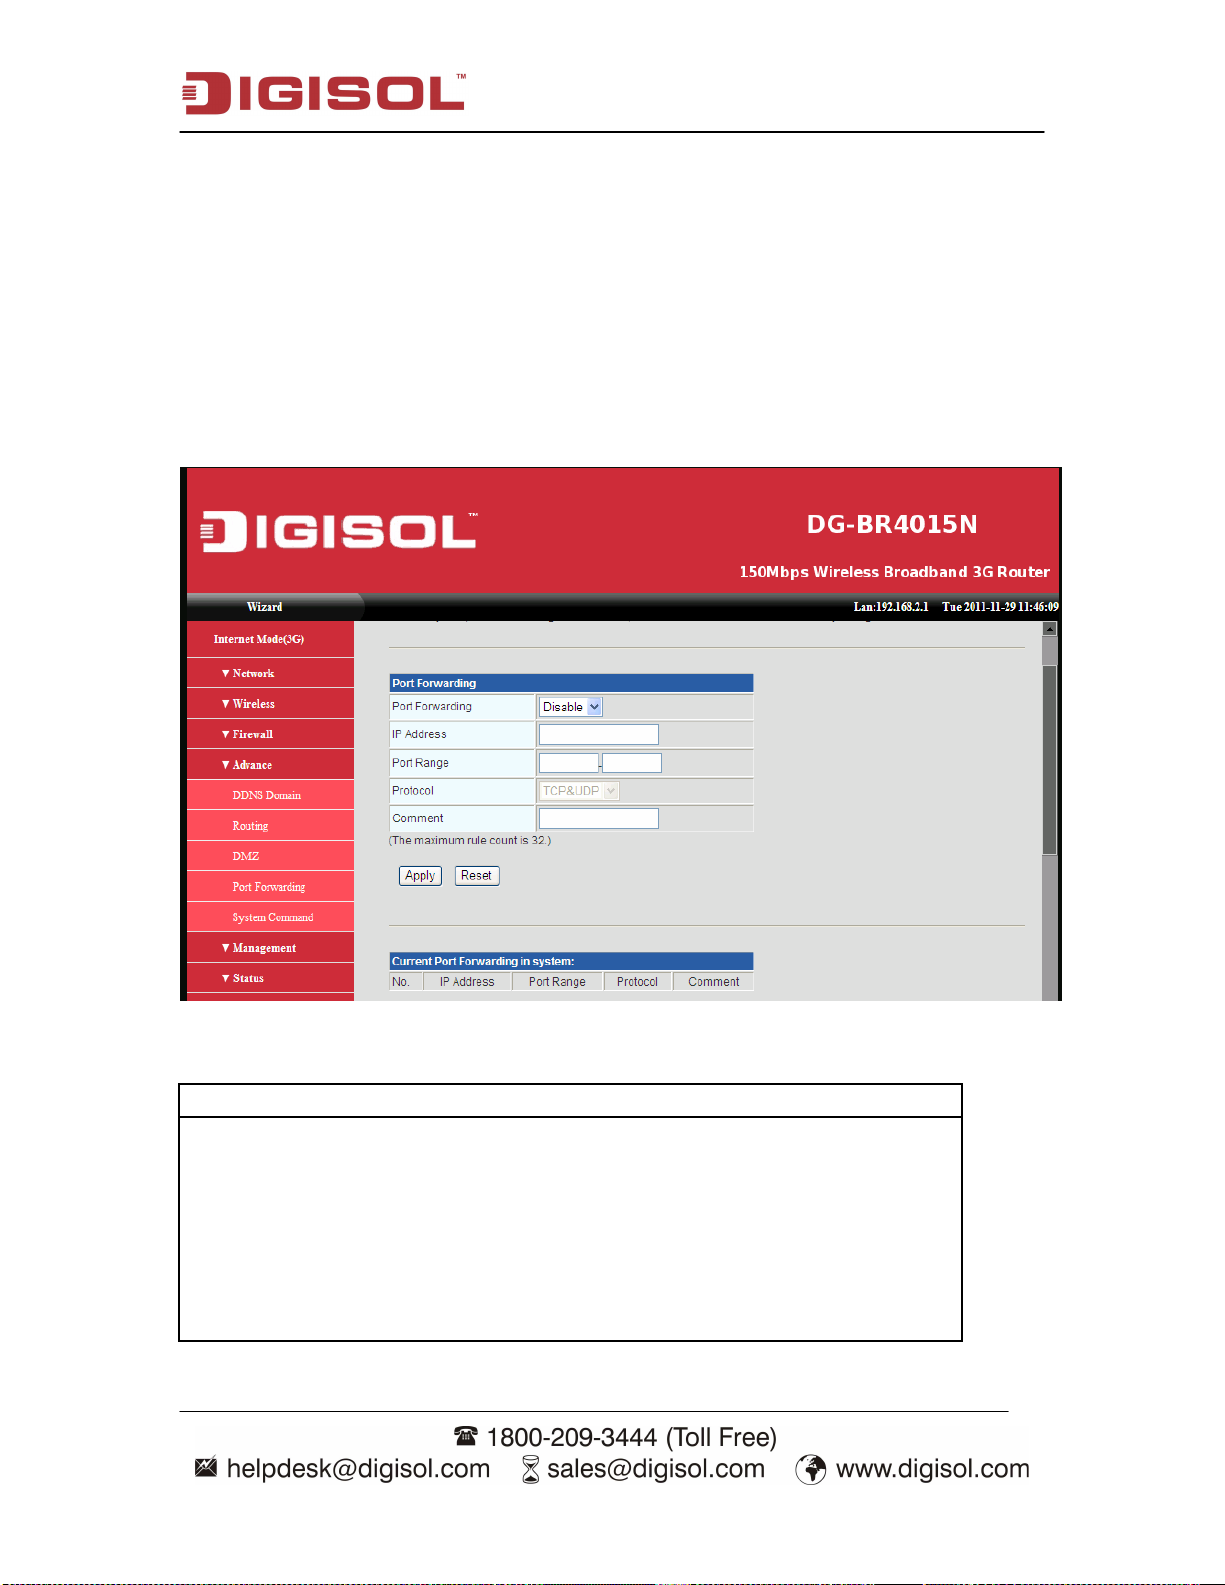
2-9-4 Port Forwarding
This function allows you to redirect a single port or consecutive ports of Internet IP
address to the same port of the IP address on a local network. The port number(s) of
Internet IP address and private IP address (the IP address on local network) must be the
same. If the port number of Internet IP address and private IP address is different, please
use ‘Virtual Server’ function, described in next section.
Please click ‘Port Forwarding’ menu on the left of web management interface, under
the ‘Advance’ tab and the following screen will be displayed on your web browser.
Here is the description of every setup items:
Parameter
Port Forwarding
IP Address
Port Range
Protocol
Description
Specifies whether the entry will be active or inactive.
The IP address of the system on your internal network that
will provide the virtual service, for example 192.168.2.20
Enter the range of TCP or UDP ports to be opened.
Select the protocol used by the service. The common choices
UDP, TCP, and both UDP and TCP can be selected from the
drop-down menu.
71
Page 72

DG-BR4015N User Manual
When you finish with all settings, please click ‘Apply’ button to continue with other
setup procedures. If you want to reset the setting click on ‘Reset’.
Virtual Server
This function allows you to redirect a port on Internet IP address (on WAN port) to a
specified port of an IP address on local network, so you can setup an Internet service on
the computer on local network, without exposing it on Internet directly. You can also
build many sets of port redirection, to provide many different Internet services on
different local computers via a single Internet IP address.
Please click ‘Virtual Server’ menu on the left of web management interface, under the
‘Advance’ tab and the following screen will be displayed on your web browser.
Here is the description of every setup items:
Parameter
Virtual Server
IP Address
Public Port
Private Port
Protocol
Description
Specifies whether the entry will be active or inactive.
The IP address of the system on your internal network that
will provide the virtual service, for example 192.168.2.20
The port that will be accessed from the Internet.
The port that will be used on your internal network.
Select the protocol used by the service. The common choices
UDP, TCP, and both UDP and TCP can be selected from the
drop-down menu.
72
Page 73

DG-BR4015N User Manual
When you finish with all settings, please click ‘Apply’ button to continue with other
setup procedures. If you want to reset the setting click on ‘Reset’.
2-9-5 System Command
In this section, you can run a system command as root.
When you finish with all settings, please click ‘Apply’ button to continue with other
setup procedures.
73
Page 74

DG-BR4015N User Manual
2-10 Management
In this section you can configure the admin password, NTP setting, Factory setting and
Upload firmware.
2-10-1 System Management
Please click ‘Management’ tab and the following screen will be displayed on your web
browser.
74
Page 75

DG-BR4015N User Manual
Here is description of every setup items.
Parameter
Language
Settings
Administrator
Setting
Description
Select English or Simple Chinese as per the user need.
Recommended is English.
Enter a password for the user "admin", who will have
full access to the Web-based management interface.
NTP Settings
Displays the time currently maintained by the router. If
Current Time
this is not correct, use the following options to configure
the time correctly.
Time Zone
Select your local time zone from drop down menu
Select a Network Time Server for synchronization. You
NTP Server
can type in the address of a time server. If you have
trouble using one server, enter another.
Sync with Host
Select this option if you want to sync router time with
your desktop.
When you finish with all settings, please click ‘Apply’ button to continue with other
setup procedures.
75
Page 76
DG-BR4015N User Manual
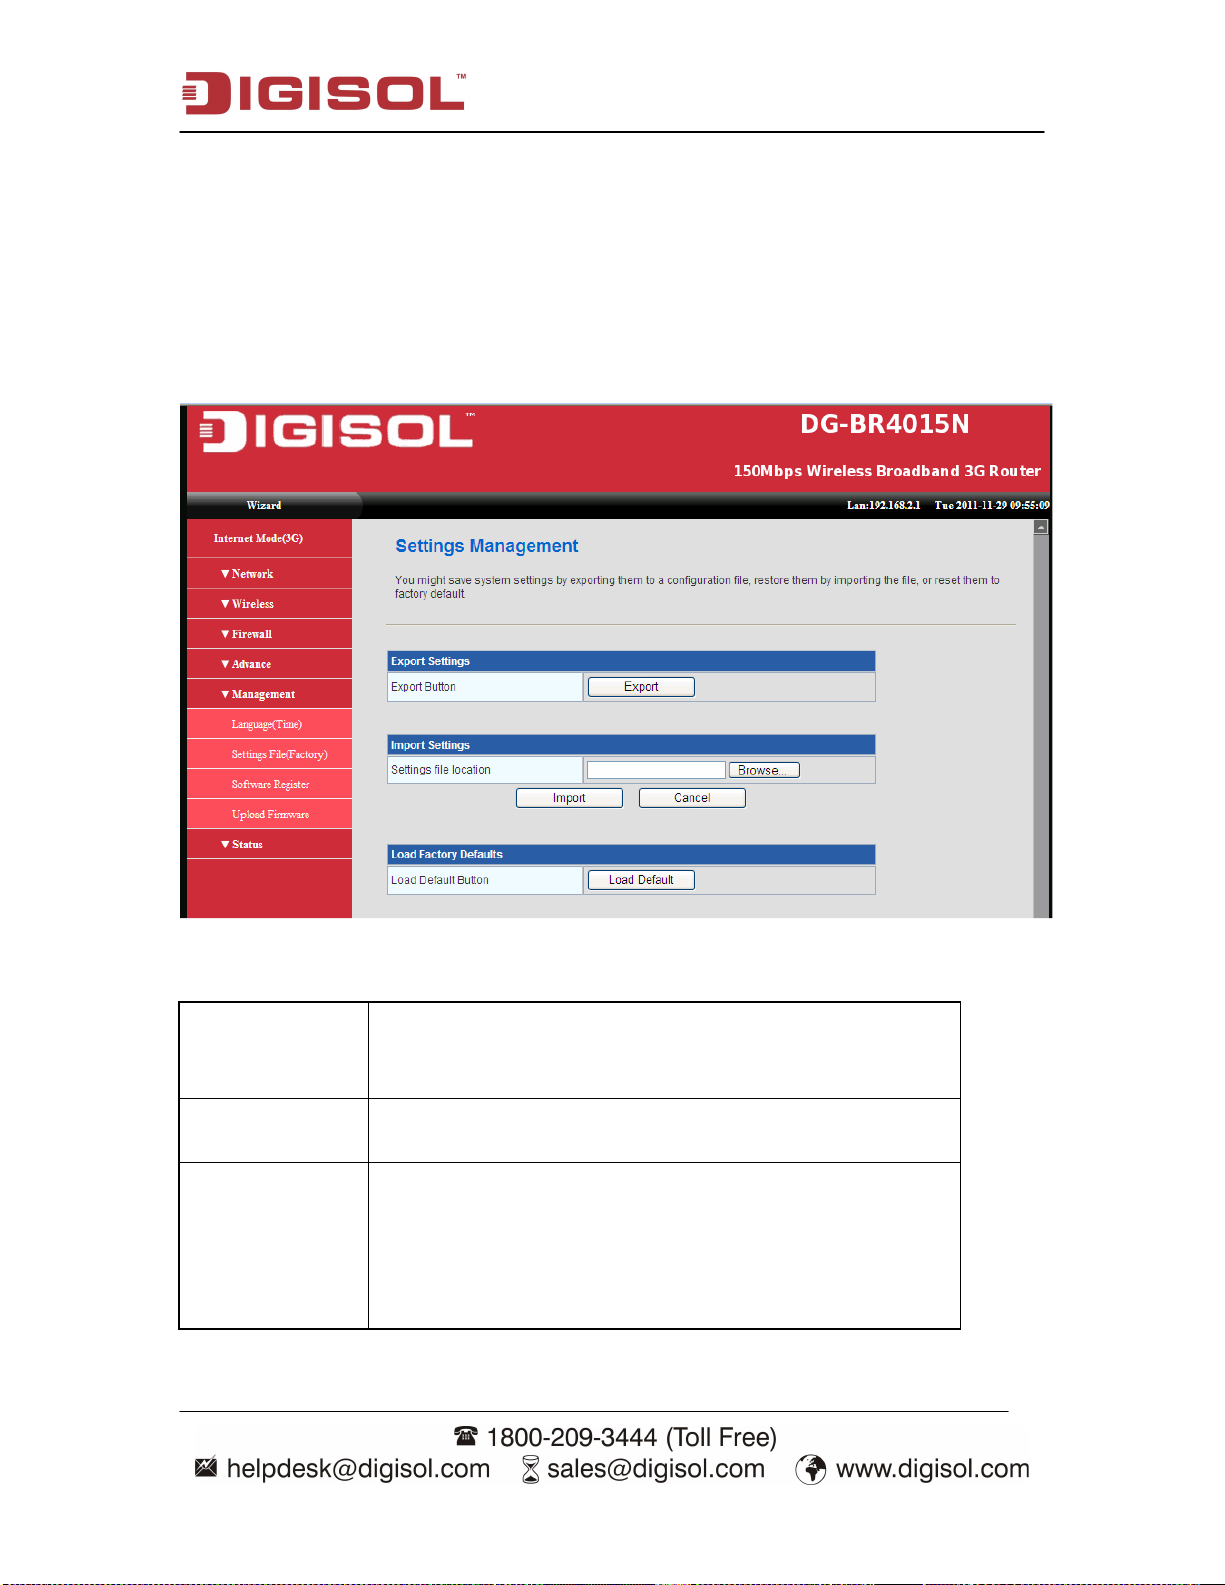
2-10-2 Settings File (Factory)
In this section you can save system settings, by exporting the configuration file, restoring
by importing the file or reset router to factory default setting.
Please click ‘Settings File (Factory)’ menu on the left of web management interface,
under the ‘Management’ tab and the following screen will be displayed on your web
browser.
Here is the description of every setup items.
This option allows you to export and then save the router's
Export Settings.
configuration to a file on your computer. Be sure to save
the configuration before performing a firmware upgrade
Import Settings
Use this option to restore previously saved router
configuration settings.
This option restores all configuration settings back to the
settings that were in effect at the time the router was
Load Factory
Default
shipped from the factory. Any settings that have not been
saved will be lost. If you want to save your router
configuration settings, use the Export Settings option
above.
76
Page 77

DG-BR4015N User Manual
2-10-3 Upload Firmware
Once you have a firmware update on your computer, use this option to browse for the file
and then upload the information into the router.
Please click ‘Upload Firmware’ menu on the left of web management interface, under
the ‘Management’ tab and the following screen will be displayed on your web browser.
77
Page 78

DG-BR4015N User Manual
2-11 Status
In this section, you can look at the status of 3G wireless Router, such as System Info,
Internet Configurations, and Local Network.
2-11-1 Syslog
In this section you can view the log generated. Click ‘Refresh’ to get new log message
and click ‘Clear’ to clear the syslog table.
78
Page 79

DG-BR4015N User Manual
2-11-2 Reboot
It is useful for restarting when you are not near the device.
79
 Loading...