

Page 1
RANGER SERIES
150Mbps Wireless
Green Broadband Router
DG-BR4000NG
150 Mbps
N
V1.2
2011-12-15
Page 2

FCC warning:
This equipment has been tested and found to comply with the limits for
a class B digital device, pursuant to Part 15 of the FCC Rules. These
limitations are designed to provide reasonable protection against
harmful interference in a residential installation. This equipment
generates, uses and can radiate radio frequency energy and, if not
installed and used in accordance with the instructions, may cause
harmful interference to radio communications. However, there is no
guarantee that interference will not occur in a particular installation. If
this equipment does cause harmful interference to radio or television
reception, which can be determined by turning the equipment off and
on, the user is encouraged to try to correct the interference by one or
more of the following measures:
• Reorient or relocate the receiving antenna.
•
Increase the separation between the equipment and receiver.
•
Connect the equipment into a different outlet from that to which the
receiver is connected.
•
Consult your local distributors or an experienced radio/TV technician
for help.
•
Shielded interface cables must be used in order to comply with
emission limits.
Changes or modifications to the equipment, which are not approved by
the party responsible for compliance could affect the user's authority to
operate the equipment.
Copyright © 2011. All rights reserved.
Company has an on-going policy of upgrading its products and it may
be possible that information in this document is not up-to-date.
Please check with your local distributors for the latest information.
No part of this document can be copied or reproduced in any form
without written consent from the company.
Trademarks:
TM
DIGISOL is a trademark of Smartlink Network Systems Ltd. All other
trademarks are the property of the respective manufacturers.
Page 3

Package Contents
The following items should be present in your package:
DG-BR4000NG Wireless Broadband Router
Switching power adapter (5V DC, 1A)
Rubber feet (4 Nos.)
Quick Installation Guide
Installation Guide CD (includes User Manual, Utility & Firmware)
Patch chord (1 No.)
Make sure that the package contains above items. If any of the listed
items is damaged or missing, please contact your retailer immediately.
Product Overview
Thank you for purchasing DG-BR4000NG 150Mbps 802.11n Wireless
Green Broadband Router! DG-BR4000NG is an energy-efficient router
which helps to save more power by using an embedded power
amplifier. DG-BR4000NG is a power efficient router which saves host
power by off-loading CPU when WLAN is idle. The Smart Tx Power
Control mechanism in DG-BR4000NG transmits optimum power
depending upon the distance of wireless clients from the router. DGBR4000NG is the best choice for Small office / Home office users, all
computers and network devices can share a single xDSL / cable
modem internet connection at high speed. Easy install procedures
allow computer users to setup a network environment in very short
time - within minutes, even inexperienced users. When the number of
your computers and network-enabled devices grow, you can also
expand the number of network slots by simply connecting a hub or
switch, to extend the scope of your network.
Page 4

Product Features
High Internet Access throughput
Allows multiple users to share a single Internet line
Share a single Cable or xDSL internet connection
Access private LAN servers from the internet
Four wired LAN ports (10/100M) and one WAN port (10/100M)
Works with IEEE 802.11b/g/n wireless LAN devices
Supports DHCP (Server/Client) for easy IP-address setup
Supports multiple wireless modes like: AP, Station-Infrastructure,
Wireless Bridge and Universal Repeater.
Supports WISP mode for accessing Internet through wireless network
Advanced network and security features like: Special Applications, QoS,
DMZ, Virtual Servers, Access Control, Firewall.
Allows you to monitor the router’s status like: DHCP Client Log, System
Log, Security Log and Device/Connection Status
Easy to use Web-based GUI for network configuration and management
purposes
Remote management function allows configuration and upgrades from
a remote computer (over the Internet)
Provides Auto MDI / MDI-X function for all wired Ethernet ports.
Supports Green WLAN for smart Tx power saving, Implicit Rx power
saving and CPU offload.
System Requirements
The following system requirements are recommended
Notebook or desktop computer with network adapter
(wired/wireless)
Internet connection, provided by xDSL or cable modem with a RJ-45
Ethernet port.
Web browser (Microsoft Internet Explorer 4.0 or above, Netscape
Navigator 4.7 or above, Opera web browser, or Safari web browser).
An available AC power socket (100 – 240V, 50/60Hz)
Page 5

Front View
Below shown is the product front view.
Users can verify router status from the LED indicators on the front
panel. Below given is the LED description.
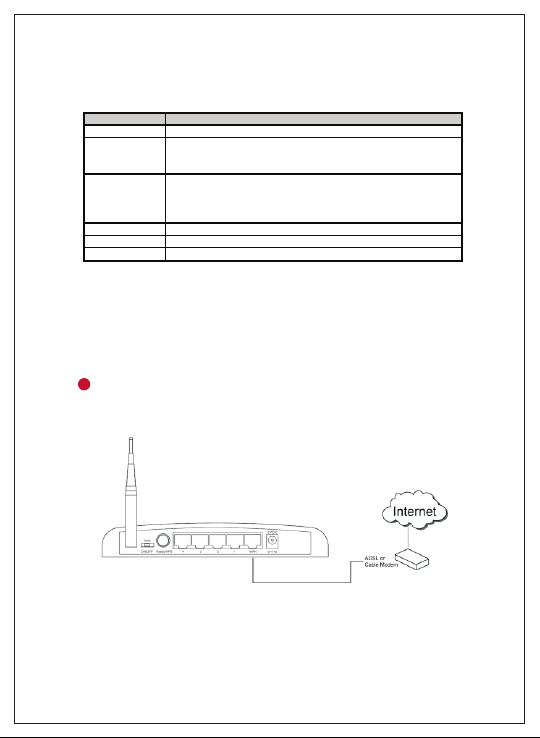
LED Name LED Color Light Status Description
P (Power) Green
WLAN Amber
WAN Green
LAN (1~4) Green
Rear View
Below shown is the product Rear View.
On Router is switched on and correctly powered.
On Wireless WPS function is enabled.
Off Wireless network is switched off.
Flashing Wireless LAN activity (transferring or receiving data).
On WAN port is connected.
Off WAN port is not connected.
Flashing WAN activity (transferring or receiving data).
On LAN port is connected.
Off LAN port is not connected.
Flashing LAN activity (transferring or receiving data).
Page 6
Below given is the router interface description.
Interfaces
Antenna
Radio ON/OFF
Reset / WPS
LAN (1 – 4)
WAN
Power
Description
It is a 3dBi dipole antenna.
Switch the button to activate or deactivate the wireless functions.
After switching the button, the router will be reset automatically for
enabling the new setting.
Reset the router to factory default settings (clear all settings) or
start WPS function. Press this button and hold for 10 seconds to
restore all settings to factory defaults, and press this button for less
than 5 seconds to start WPS function.
Local Area Network (LAN) ports 1 to 4.
Wide Area Network (WAN / Internet) port.
Power connector, connects to A/C power adapter.
Hardware Installation
Please follow the below mentioned instructions to build the network
connection between your new WIRELESS router and your computers,
network devices:
1
Connect your xDSL / cable modem to the WAN port of the router by
an Ethernet cable.
Page 7

2
2
Connect all your computers, network devices (switch / hub) to the
LAN port of the router.
3
Connect the power adapter (5V DC / 1A) to the wall socket, and then
connect it to the 'Power' socket of the router.
4
Please check all LEDs on the front panel. Power LED 'P' should be
steadily ON, WAN and LAN LEDs should be ON. Check if the
computer / network device connected to the respective port of the
router is powered ON and correctly connected.
Page 8

Software Installation
Insert the Setup CD into your CD-ROM drive of notebook/desktop
1
computer.
2
Explore the CD and execute the “EZWizard.exe” file. Below given
screen will appear. Click 'Next' to Continue.
Page 9

Connect one end of a network cable to the WAN port of the router
3
and the other end to the DSL/Cable modem. Click 'Next' to continue.
4
Connect one end of the provided network cable to one of the LAN
ports (1~4) of the router and the other end to your computer. Click
'Next' to continue with the installation.
Page 10

Power on the Router. It will take approximately 30 seconds for router
5
to boot up completely. Ensure that all the LED's on the router are ON.
If not, try the above steps again else click 'Next' to continue.
6
Enter the Router's password to log in to the Router. The default
password is “1234”. It is recommended to change the router's
password to protect it from being accessed by other users. If you do
not wish to change the current password, you can leave “New
Password” and “Confirm New Password” fields blank. Click 'Log in'
to continue.
Page 11

Verify the Internet Connection Type the wizard has detected. If it is
7
not correct, please configure it manually. Click 'Next' to continue.
Note: If you are not sure which Internet Connection Type you use,
please contact your Internet Service Provider for this information.
8
Enter the settings for your Internet Connection Type.
Dynamic IP (Cable Modem users): Click on 'Clone' to clone the MAC
address of your PC with the WAN port of the router, then click 'Next'
to continue.
Page 12

PPPoE (DSL users): Enter the user name and password provided by
your ISP then click 'Next'.
9
Please wait while the Wizard tries to connect to the Internet. If you
see the window “Internet Connection Succeed”, your router has
been successfully connected to the Internet. Please click 'Next' to
configure the wireless settings.
Page 13

10
Configure a name for your wireless network. Click 'Next' to continue.
11
Configure the security key for your wireless network. Check 'Enable
WPA Pre-Shared Key'. Enter 8 to 63 characters into WPA-Pre-Shared
Key. Click 'Next' to continue.
Page 14

12
Verify the settings you just configured for the Router. Click 'Finish' to
restart the Router. This will take about 60 seconds.
Congratulations! Your router
configuration is now finished.
Connect to the router wirelessly
Users must configure their wireless notebook/desktop computer in
order to establish a wireless connection to the router. The following
instructions help in establishing a wireless connection between a
Windows XP computer and the router.
Right click the wireless icon in the system tray and click on “View
Available Wireless Networks”.
Page 15

A window displaying available wireless networks will open. Select
the wireless network you wish to connect and then click on
‘Connect’.
Enter the network security key if the wireless network you wish to
connect has wireless encryption enabled. Click ‘Connect’. The
connection should now get established.
Page 16

Web Management of the router
To access the web configuration of the router, assign a static IP
address to your notebook/desktop computer in the subnet
192.168.2.X with the subnet mask 255.255.255.0 and gateway as
192.168.2.1. For example, assign the IP address 192.168.2.10.
Open a web browser and enter “http://192.168.2.1” in the address
bar, press ‘Enter’. A login screen will appear, assign username as
“admin” and password as “1234”. Press ‘OK’ to Log in.
Following screen will appear on successful Login. You can now
configure the router through this web management page.
Page 17

FAQ
Following are the solutions to problems that may occur during the
installation and operation of the DIGISOL DG-BR4000NG Wireless LAN
Broadband Router.
1. Router cannot get connected to Internet.
Access the router’s web configuration and go to ‘Status’ -> ‘Internet
Connection’ menu and verify Internet connection status.
If you were previously able to connect a computer to Internet
directly, try to do that again, and verify whether you can access
Internet with your computer directly attached to the device
provided by your Internet service provider.
Check PPPoE user ID and password again.
Call your Internet Service Provider and verify whether there is some
issue with their service.
Try to reboot the router and verify whether it connects to Internet or
not.
Try to use IP address instead of hostname. If you can use IP address
to communicate with a remote server, but can’t use hostname,
please check DNS setting.
2. Wireless client cannot locate the router.
Verify whether ‘Broadcast ESSID’ is set to off in router’s web
configuration.
Verify whether the antenna is properly connected and in correct
direction.
Is your wireless client far away from your router? Try to get closer to
the router.
Ensure that you input ESSID on your wireless client manually, if
ESSID broadcast is disabled.
Page 18

 Loading...