

Page 1
DG-BG4300NU User Manual
DG-BG4300NU
300Mbps W ireless ADSL2/2+
Broadband Router with USB port
User Manual
V1.0
As our products undergo continuous development the specifications are subject to change without prior notice
1
2013-11-12
Page 2

DG-BG4300NU User Manual
COPYRIGHT
Copyright 2013 by Smartlink Network Systems Ltd. All rights reserved. No part of this publication may
be reproduced, transmitted, transcribed, stored in a retrieval system, or translated into any language or
computer language, in any form or by any means, electronic, mechanical, magnetic, optical, chemical,
manual or otherwise, without the prior written permission of this company.
This company makes no representations or warranties, either expressed or implied, with respect to the
contents hereof and specifically disclaims any warranties, merchantability or fitness for any particular
purpose. Any software described in this manual is sold or licensed "as is". Should the programs prove
defective following their purchase, the buyer (and not this company, its distributor, or its dealer) assumes
the entire cost of all necessary servicing, repair, and any incidental or consequential damages resulting
from any defect in the software. Further, this company reserves the right to revise this publication and to
make changes from time to time in the contents thereof without obligation to notify any person of such
revision or changes.
Trademarks:
DIGISOL™ is a trademark of Smartlink Network Systems Ltd. All other trademarks are the property of
the respective manufacturers.
Safety
This equipment is designed with the utmost care for the safety of those who install and use it. However,
special attention must be paid to the dangers of electric shock and static electricity when working with
electrical equipment. All guidelines of this and of the computer manufacturer must therefore be allowed at
all times to ensure the safe use of the equipment.
2
Page 3

DG-BG4300NU User Manual
INDEX
1. Product Information.........................................................................................................5
1-1 Introduction and Safety Information............................................................................5
1-2 Safety Information.....................................................................................................6
1-3 System Requirements ................................................................................................7
1-4 Package Contents......................................................................................................7
1-5 Get Familiar with your new ADSL2+ Wireless broadband router.....................................8
2. System and Network Setup............................................................................................10
2-1 Hardware Installation...............................................................................................10
3. Web Browser Configuration...........................................................................................12
4. Setup...........................................................................................................................27
4-1 WAN Configuration ..................................................................................................27
4-2 Statistics.................................................................................................................27
4-2-1 LAN..................................................................................................................28
4-2-2 WAN Service.....................................................................................................28
4-3 Route .....................................................................................................................29
4-3-1 Device Info Route..............................................................................................29
4-3-2 Device Info ARP................................................................................................29
4-3-3 Device Info DHCP..............................................................................................29
4-4 Advanced Setup.......................................................................................................30
4-4-1 WAN Service.....................................................................................................31
4-4-2 LAN..................................................................................................................33
4-4-2-1 IPv6 Auto Config.........................................................................................35
4-4-3 NAT..................................................................................................................36
4-4-3-1 Virtual Servers ............................................................................................37
4-4-3-2 Port Triggering............................................................................................38
4-4-3-3 DMZ Host...................................................................................................39
4-4-3-4 IP Address Map...........................................................................................39
4-4-3-5 ALG............................................................................................................40
4-4-4 Security............................................................................................................40
4-4-4-1 IP Filtering..................................................................................................41
4-4-4-2 MAC Filtering..............................................................................................43
4-4-4-3 DoS ...........................................................................................................43
4-4-5 Parental Control ................................................................................................44
4-4-5-1 Ti
4-4-5-2 URL Filter ...................................................................................................45
4-4-6 3G....................................................................................................................46
4-4-6-1 3G Failover .................................................................................................48
4-4-7 Quality Of Service..............................................................................................49
4-4-7-1 QOS Queue ................................................................................................50
4-4-7-2 QOS Classification.......................................................................................51
4-4-8 Routing ............................................................................................................53
4-4-8-1 Default Gateway .........................................................................................53
4-4-8-2 Static route.................................................................................................54
4-4-8-3 Policy Routing.............................................................................................55
me Restriction..........................................................................................44
3
Page 4

DG-BG4300NU User Manual
4-4-8-4 RIP ............................................................................................................56
4-4-9 DNS .................................................................................................................56
4-4-9-1 DNS Server.................................................................................................56
4-4-9-2 Dynamic DNS..............................................................................................57
4-4-10 DSL................................................................................................................58
4-4-11 UPnP..............................................................................................................59
4-4-12 DNS Proxy.......................................................................................................60
4-4-13 Storage Service ...............................................................................................60
4-4-14 Interface Grouping...........................................................................................61
4-4-15 IP Tunnel........................................................................................................62
4-4-15-1 IPv6inIPv4................................................................................................62
4-4-15-2 IPv4inIPv6................................................................................................63
4-4-16 IPSec..............................................................................................................63
4-4-17 Certificate.......................................................................................................66
4-4-17-1 Local........................................................................................................66
4-4-17-2 Trusted CA................................................................................................68
4-4-18 Power Management.........................................................................................69
4-4-19 Multicast.........................................................................................................69
4-5 Wireless..................................................................................................................71
4-5-1 Basic................................................................................................................71
4-5-2 Security............................................................................................................72
4-5-3 MAC Filter.........................................................................................................73
4-5-4 Wireless Bridge .................................................................................................74
4-5-5 Advanced..........................................................................................................74
4-5-6 Station Info.......................................................................................................75
4-6 Diagnostics .............................................................................................................75
5 Management.................................................................................................................76
5-1 Settings ..................................................................................................................76
5-1-1 Backup.............................................................................................................76
5-1-2 Update .............................................................................................................77
5-1-3 Restore Default.................................................................................................77
5-2 System Log.............................................................................................................77
5-3 Security Log............................................................................................................79
5-4 TR-069 Client..........................................................................................................80
5-5 Internet time...........................................................................................................81
5-6 Access Control.........................................................................................................82
5-6-1 Passwords.........................................................................................................82
5-6-2 Services............................................................................................................82
5-6-3 IP Addresses.....................................................................................................83
5-7 Update Software......................................................................................................83
5-8 Reboot....................................................................................................................84
6. Appendix......................................................................................................................85
6-1 Hardware Specifications...........................................................................................85
7. Troubleshooting ............................................................................................................86
8. Glossary.......................................................................................................................88
4
Page 5

DG-BG4300NU User Manual
1. Product Information
1-1 Introduction and Safety Information
Thank you for purchasing DG-BG4300NU 300Mbps Wireless ADSL2/2+ Broadband Router with USB
port! This router is the best choice for Small office / Home office users, all computers and network
devices can share a single Internet connection at high speed. Easy Installation wizard provided with this
router is designed to setup an Internet connection in a very short time by accessing the web configuration
of the router. With its wireless speed up to 300Mbps users can experience uninterrupted Internet and
multimedia access.
Other features of this Router include:
High Internet Access throughput. Downstream up to 24 Mbps and Upstream up to 1 Mbps.
Wireless speed up to 300Mbps.
Robust WLAN Security .
Supports URL blocking & Firewall.
Dedicated WPS and WLAN push button.
Dynamic DNS and VPN Pass through support.
USB2.0 Port for 3G Dongle & Mass Storage.
Allows multiple users to share a single ADSL internet connection.
Access private LAN servers from the Internet.
Four wired LAN ports (10/100M) and one WAN port (RJ-11).
Works with IEEE 802.11b/g/n wireless LAN devices.
Supports IPv6.
Supports DHCP (Server/Client) for easy IP-address setup.
5
Page 6

DG-BG4300NU User Manual
1-2 Safety Information
In order to keep the safety of users and your properties, please follow the safety instructions as mentioned
below:
1. This router is designed for indoor use only; DO NOT place this router outdoor.
2. DO NOT place this router close to a hot or humid area, like kitchen or bathroom. Also, DO NOT
leave this router in the car during summer.
3. DO NOT pull any connected cable with force; disconnect it from the router first.
4. If you want to place this Router at a height or mount on the wall, please make sure it is firmly secured.
Falling from a height would damage the router and its accessories and warranty will be void.
5. Accessories of this router, like antenna and power supply, are dangerous to small children. KEEP
THIS ROUTER OUT OF REACH OF CHILDREN.
6. The Router will get heated up when used for a long time (This is normal and is not a malfunction). DO
NOT put this Router on paper, cloth, or other flammable materials.
7. There’s no user-serviceable part inside the router. If you find that the router is not working properly,
please contact your dealer of purchase and ask for help. DO NOT disassemble the router, warranty will
be void.
8. If the router falls into water when it’s powered, DO NOT use your hands to pick it up. Switch the
electrical power off before you do anything, or contact an experienced electrical technician for help.
9. If you smell something strange, or even see some smoke coming out from the router or power supply,
remove the power supply or switch the electrical power off immediately, and call the dealer of purchase
for help.
6
Page 7

DG-BG4300NU User Manual
1-3 System Requirements
Notebook or desktop PC with network adapter (wired/WLAN)
Windows 98/Me/2000/XP/Vista
Web browser
AC power socket (100 – 240V, 50/60Hz)
1-4 Package Contents
Before you start using this router, please check if there’s anything missing in the package, and contact
your dealer of purchase to claim for missing items:
DG-BG4300NU ADSL 2/2+ Broadband Router With 3G
POTS splitter
AC power adapter
Quick Installation Guide
Installation Guide CD (includes user manual & QIG)
Patch cord (1 No.)
RJ-11 cables (2 Nos.)
7
Page 8
DG-BG4300NU User Manual
1-5 Get Familiar with your new ADSL2+ Wireless broadband router
Top Panel
LED Name
Power
LED
Color
Red ON Device is initializing or initialization has failed.
Green
Light
Status
OFF Power is OFF.
ON Power is ON.
Description
LAN (1~4) Green
WPS Green
WLAN Green
USB Green
DSL Green
Internet Green
ON PC is connected on LAN Port.
OFF PC is Unplugged / Not Connected.
Blinking WPS negotiation is enabled, waiting for the clients.
OFF WPS negotiation is not enabled on the device.
ON Wireless is enabled.
Blinking Data is being transmitted or received.
OFF Wireless is not enabled.
ON USB device is plugged.
OFF USB device is not plugged.
ON Physical link is UP.
Blinking
ON Internet connection is established.
Blinking Data is being transmitted or received.
OFF Device is not connected to Internet.
ADSL handshaking process is ON or ADSL Line is
unplugged.
8
Page 9
Rear Panel
DG-BG4300NU User Manual
Note: Kindly note that the Reset button for resetting the device to factory default settings is
provided on the back panel/bottom side of the device.
Interfaces Description
Antennas
Power Power connector, connects to A/C power adapter.
Switch Press this button to power on/off the router.
WPS Press this button for less than 3 seconds to start WPS function.
WLAN Press this button up to 3 seconds to ON/OFF WLAN.
USB
LAN (1~4) Local Area Network (LAN) ports 1 to 4.
DSL Connect ISP line to the Line port.
They are 5dBi fixed antennas.
USB port is provided for 3G dongle connection or USB disk
mass storage.
9
Page 10
DG-BG4300NU User Manual
2. System and Network Setup
2-1 Hardware Installation
Step 1 Connect the Line interface of the device and the Modem interface of the splitter with a
telephone cable. Connect the phone set to the Phone interface of the splitter through a
telephone cable. Connect the input cable to the Line interface of the splitter.
Step 2 Connect all your computers, network devices (switch / hub) to the LAN port of the
router.
10
Page 11
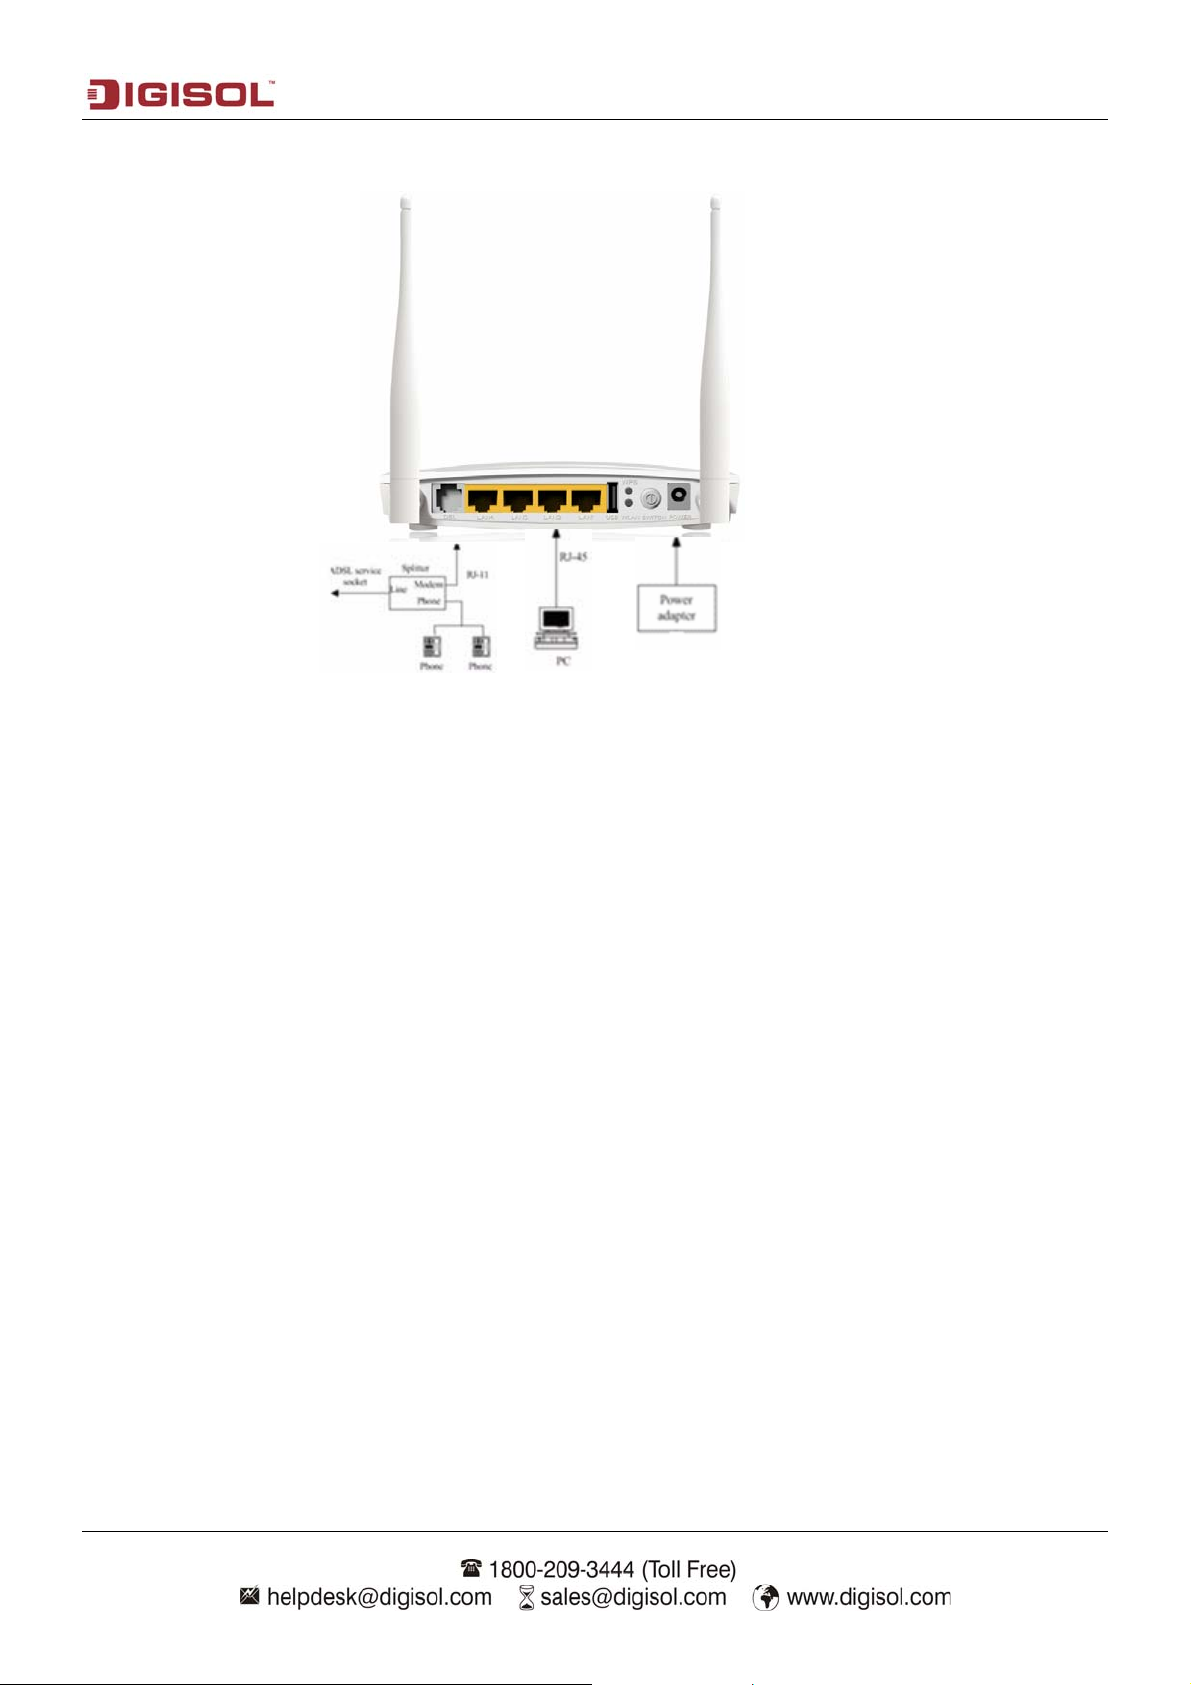
DG-BG4300NU User Manual
Step 3 Connect the power adapter (12V DC / 1A) to the wall socket, and then connect it to the
‘Power’ socket of the router.
Step 4 Please check all LEDs on the front panel. ‘Power LED’ should be steadily ON, ADSL and
LAN should be ON. Check if the computer / network device connected to the respective
port of the router is powered ON and correctly connected. If power LED is not ON, or any
LED you expected is not ON, please recheck the cabling.
11
Page 12
DG-BG4300NU User Manual
3. Web Browser Configuration
The DSL device is an ADSL2+ wireless router.
LAN IP address: 192.168.1.1, Netmask: 255.255.255.0
Default VPI/VCI for ATM (maximum 8 sets): 0/32, 1/32, 0/35
ADSL Line mode: Auto-detect.
User can change settings via WEB browser. The following sections describe the set up procedures.
Please set your PC’s Ethernet port as follows:
IP address: 192.168.1.XXX (e.g. 192.168.1.10)
Netmask: 255.255.255.0
Default Gateway: 192.168.1.1
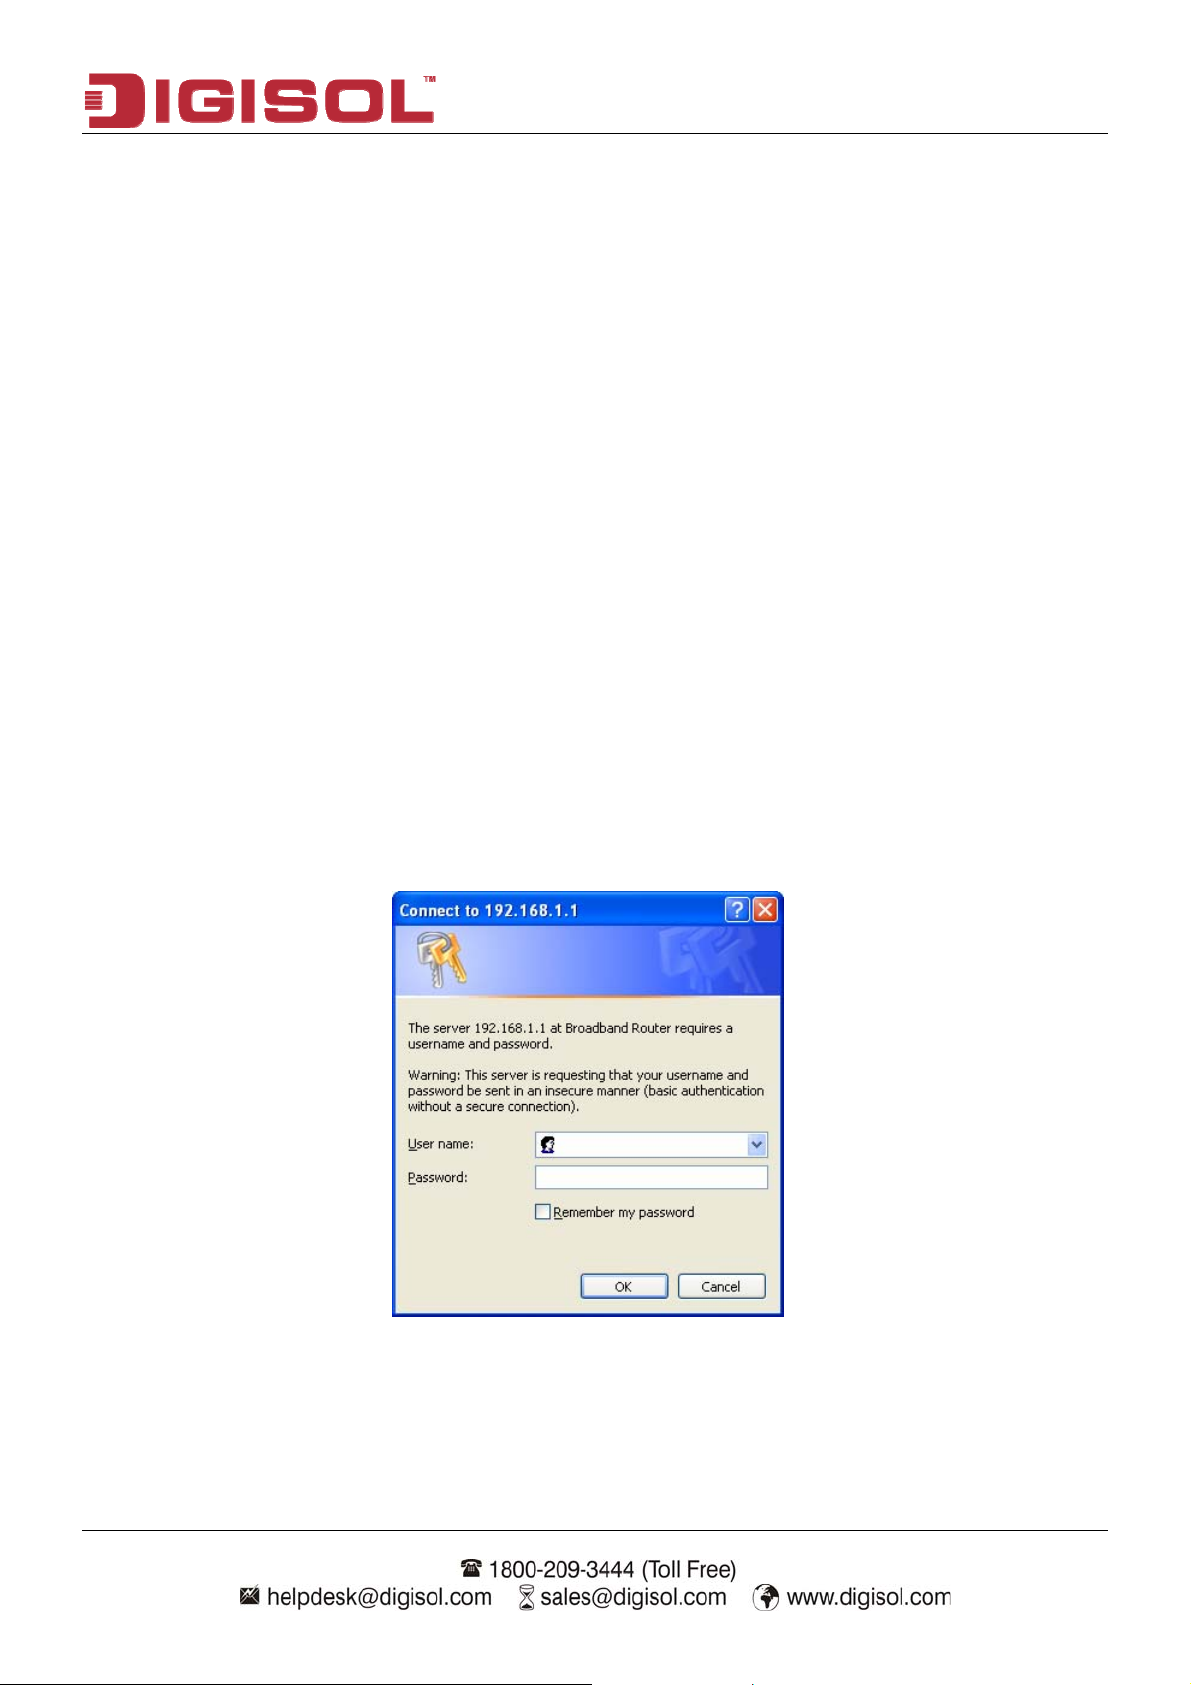
Access the Web Console:
Start your web browser.
Type the Ethernet IP address of the modem/router on the address bar of the browser. Default IP
address is 192.168.1.1.
Enter Password in the dialog box when it appears. Default Username: admin Password: admin
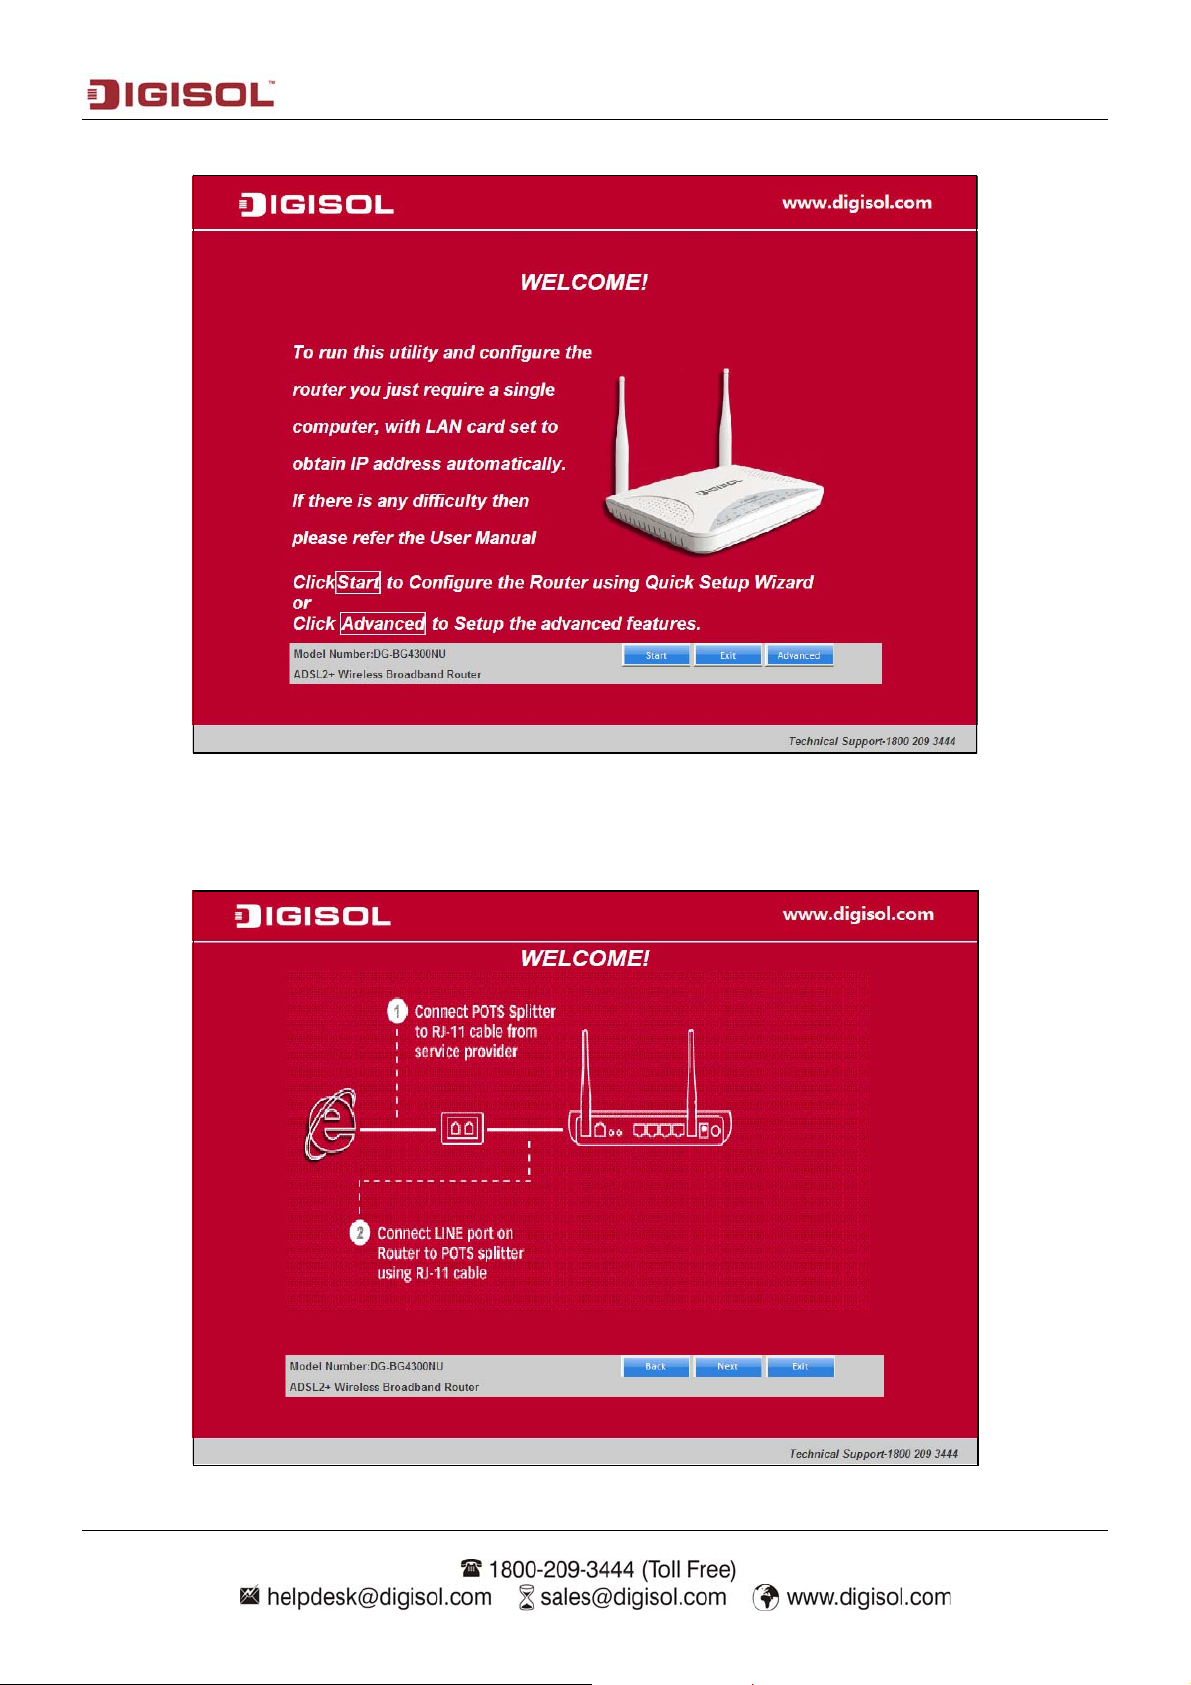
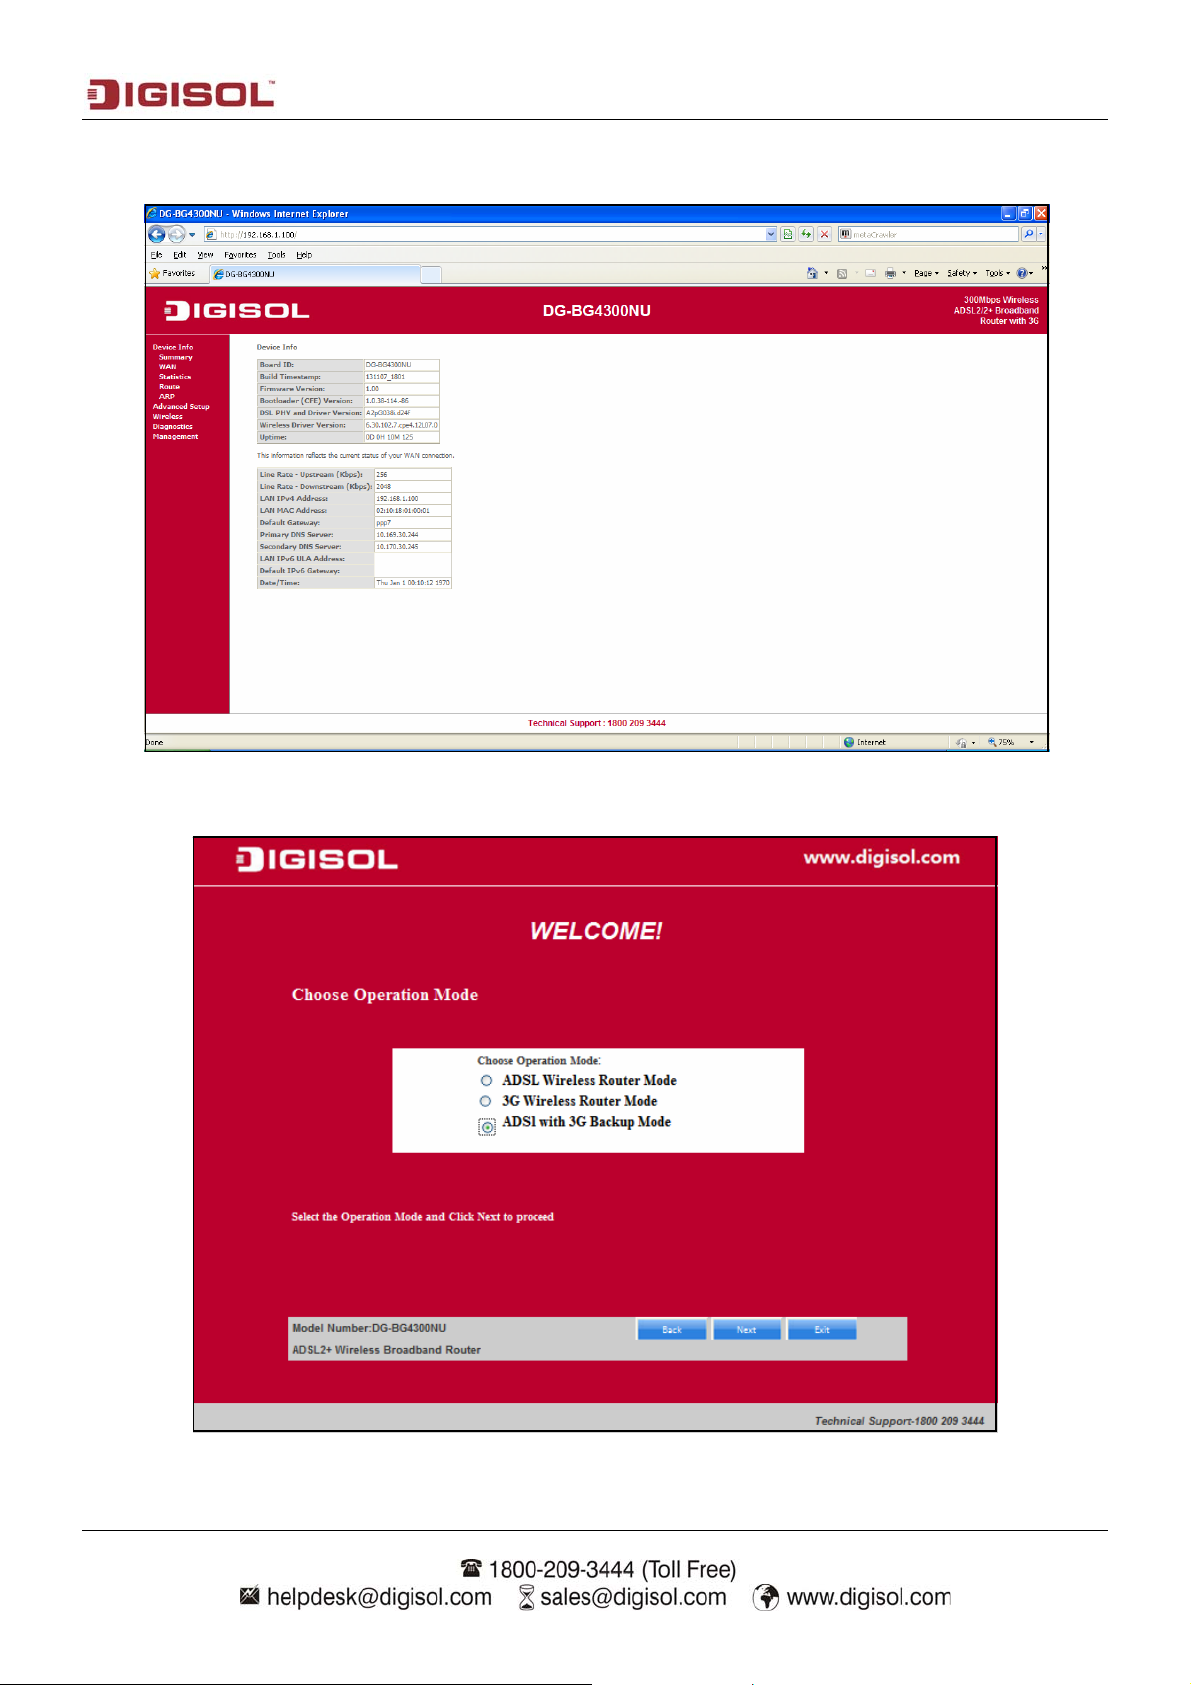
Please note that the below welcome screen will appear when the router configuration is factory defaults.
Click “Start” to use the Quick setup wizard for basic settings or click “Advanced” to setup advanced
features and skip the Wizard.
12
Page 13
DG-BG4300NU User Manual
Once you login the following screen will appear.
Click on “Start”, the following screen will appear. Connect one end of the RJ-11 telephone
cable into the ADSL port provided on the splitter from the service provider and connect the
other telephone cable from the splitter to the LINE port on the router. Click ‘Next’ to continue.
13
Page 14
DG-BG4300NU User Manual
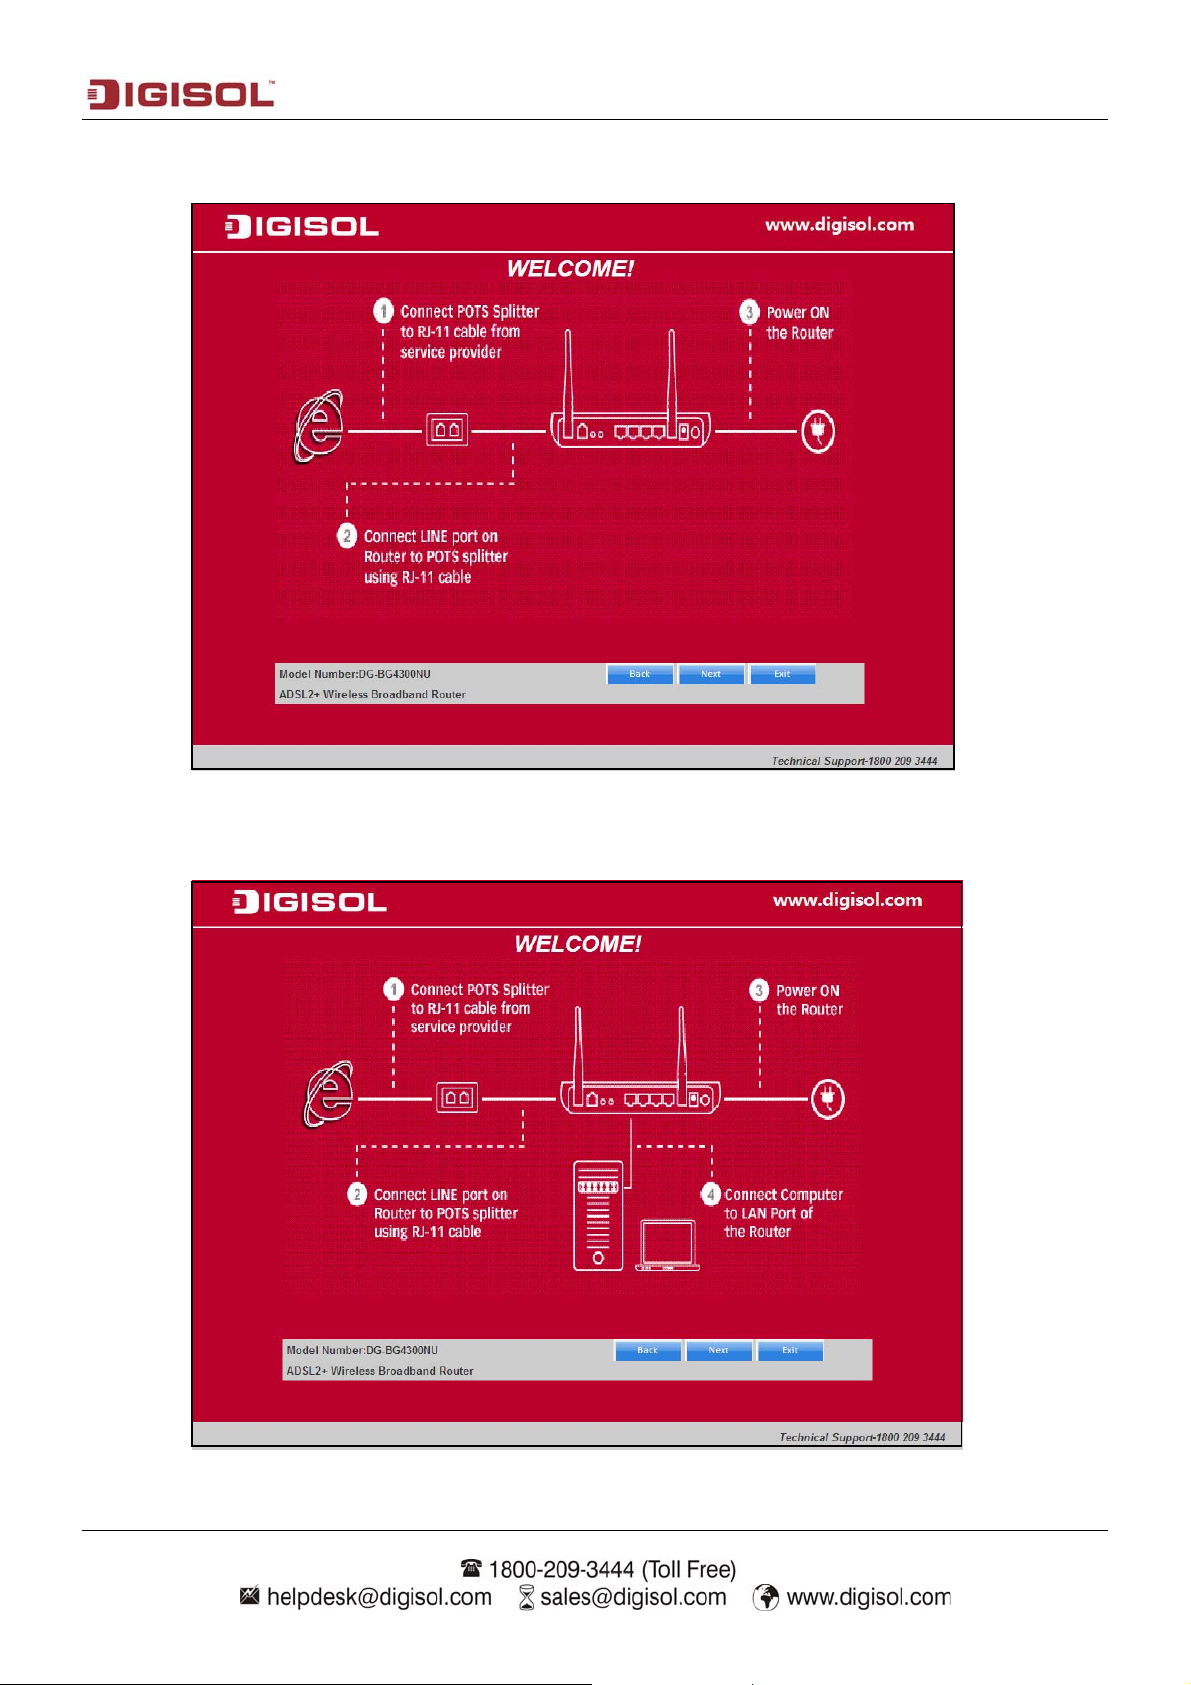
Power ON the router. Ensure that all the LED’s on the router are ON. If not, try the above
steps again else click ‘Next’ to continue.
Connect one end of the network cable to one of the LAN ports (1~4) of the router and
the other end to your computer. Click ‘Next’ to continue with the installation.
14
Page 15

DG-BG4300NU User Manual
Click on “Next”. The LED description table will appear.
Click on “Next”. The screen shown below will appear.
Note: The steps mentioned till here are common for all the modes.
15
Page 16
DG-BG4300NU User Manual
The Options/Modes configurations have been explained below.
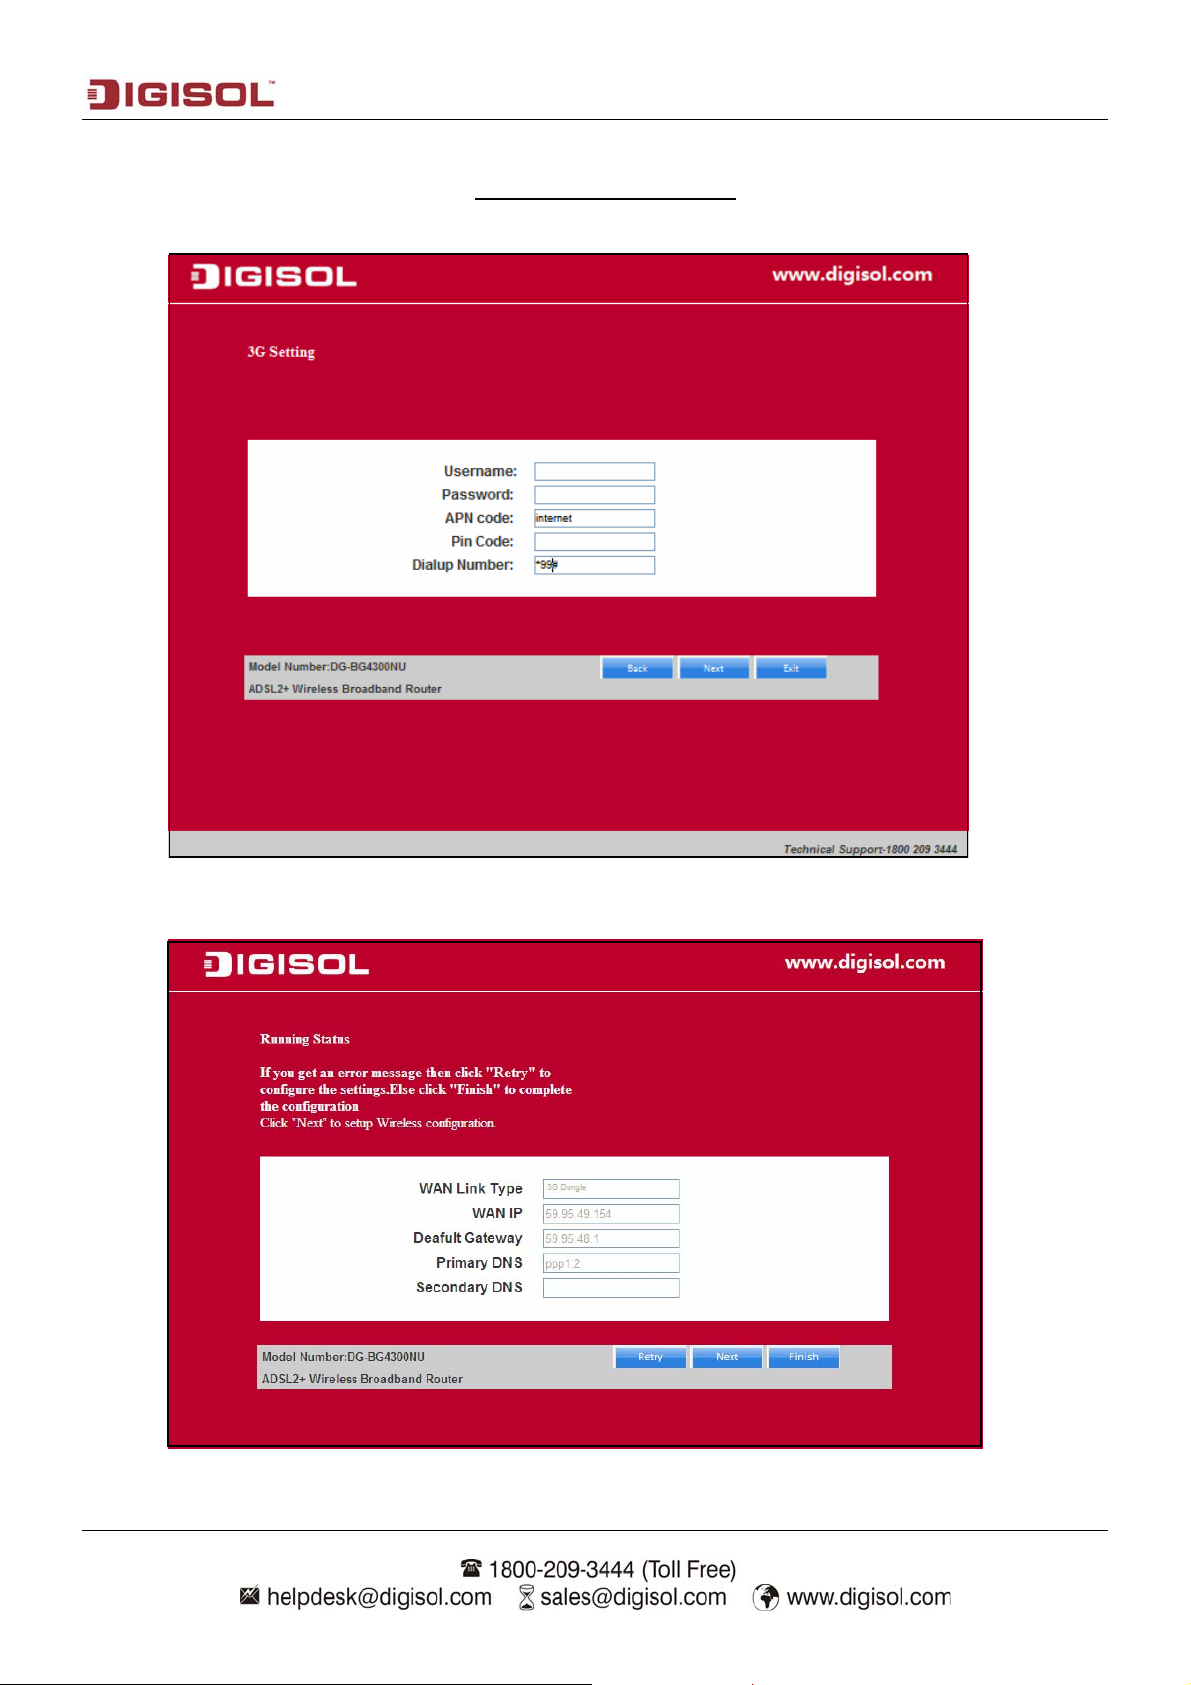
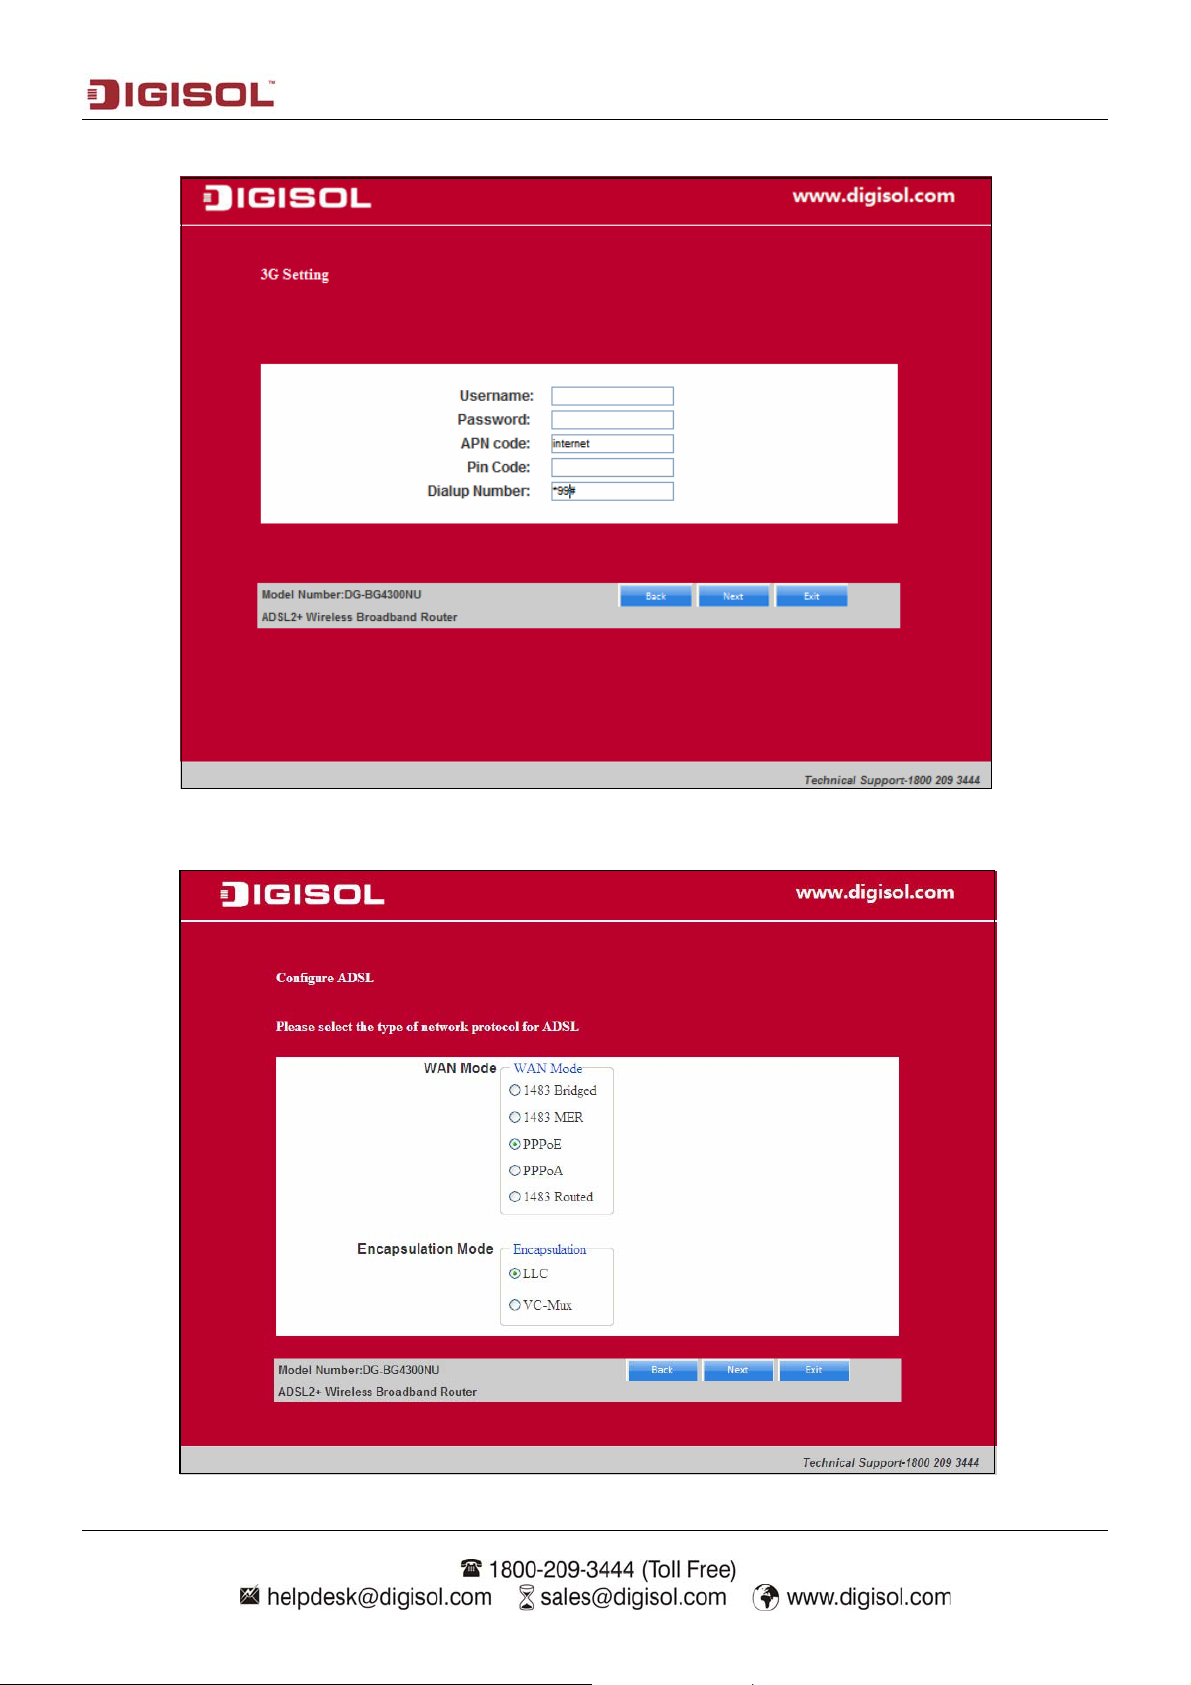
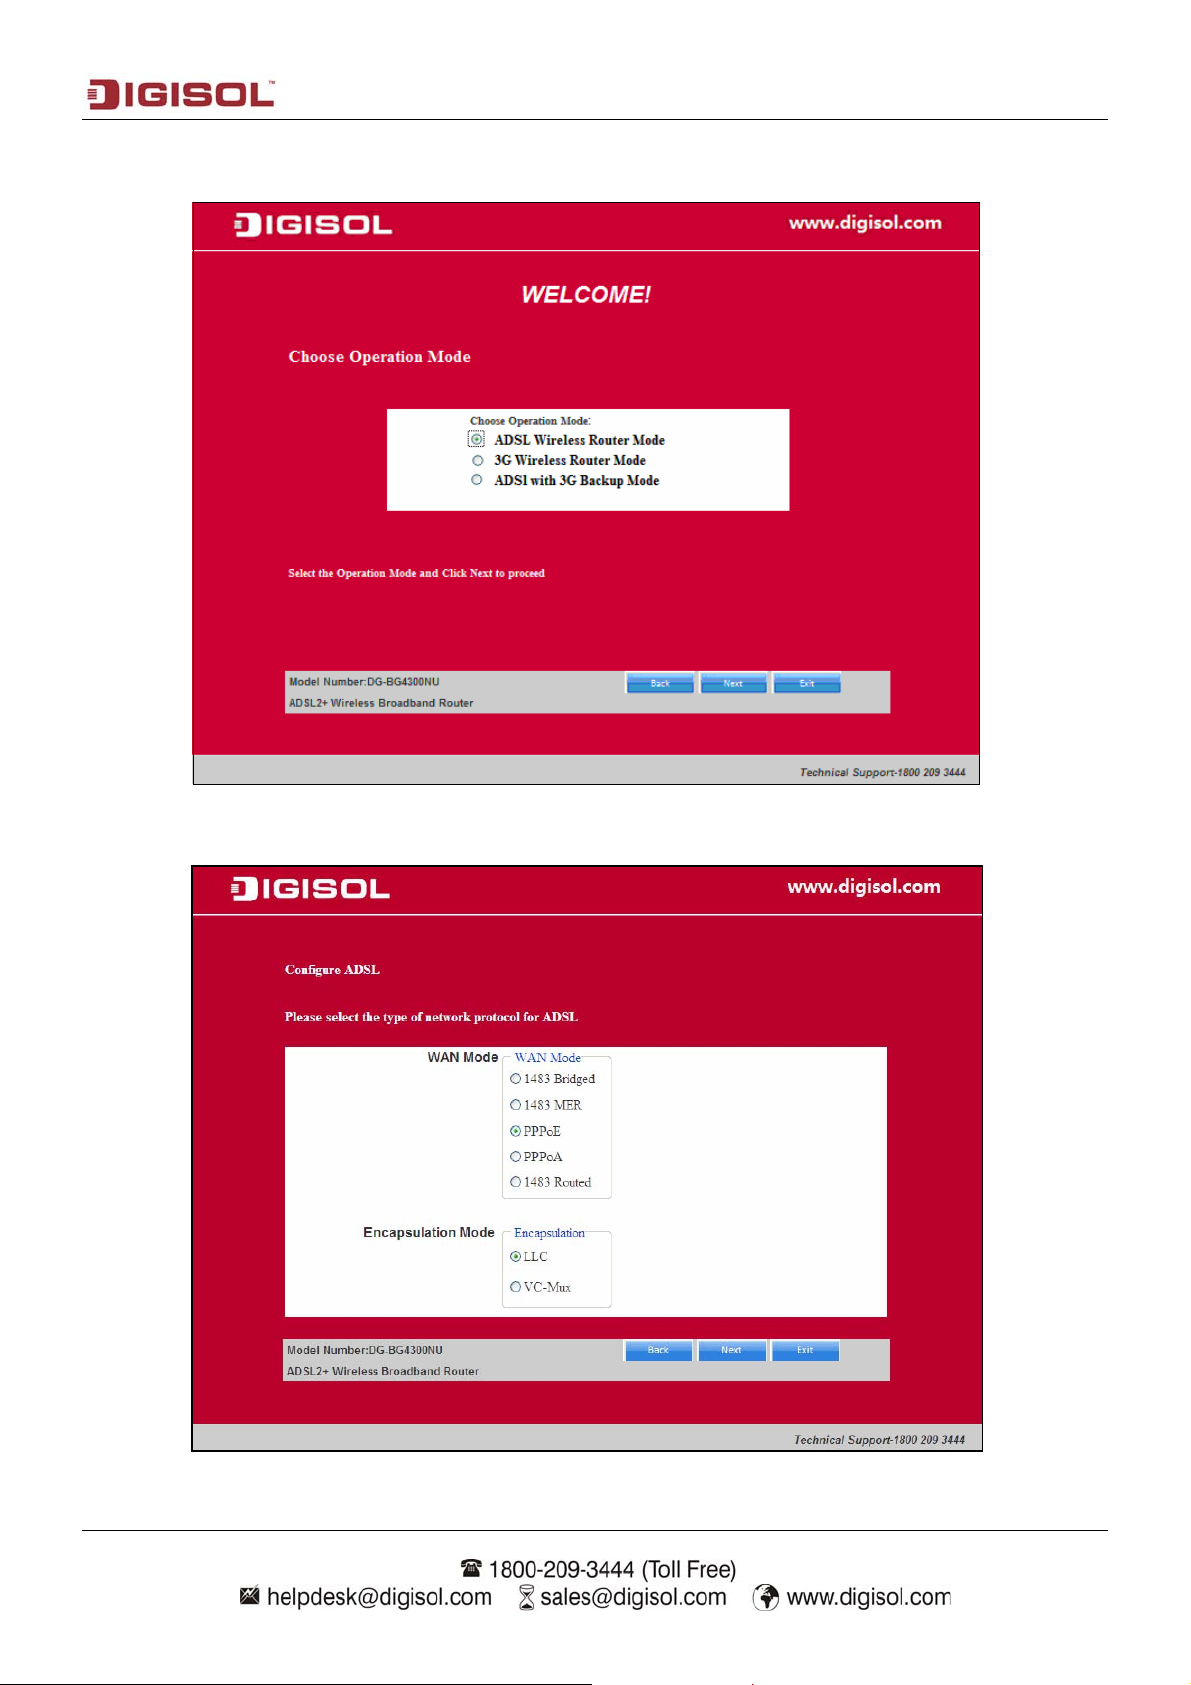
I) Select the operation mode “3G wireless Router Mode”. Click on “Next”. The screen shown
below will appear. Enter the “APN code” and “Dialup Number” as shown below.
Click on “Next”. The screen shown below will appear.
16
Page 17
DG-BG4300NU User Manual
Click on “Next”. The WAN connection summary will appear. Click on “Finish” or “Next” to
configure wireless settings.
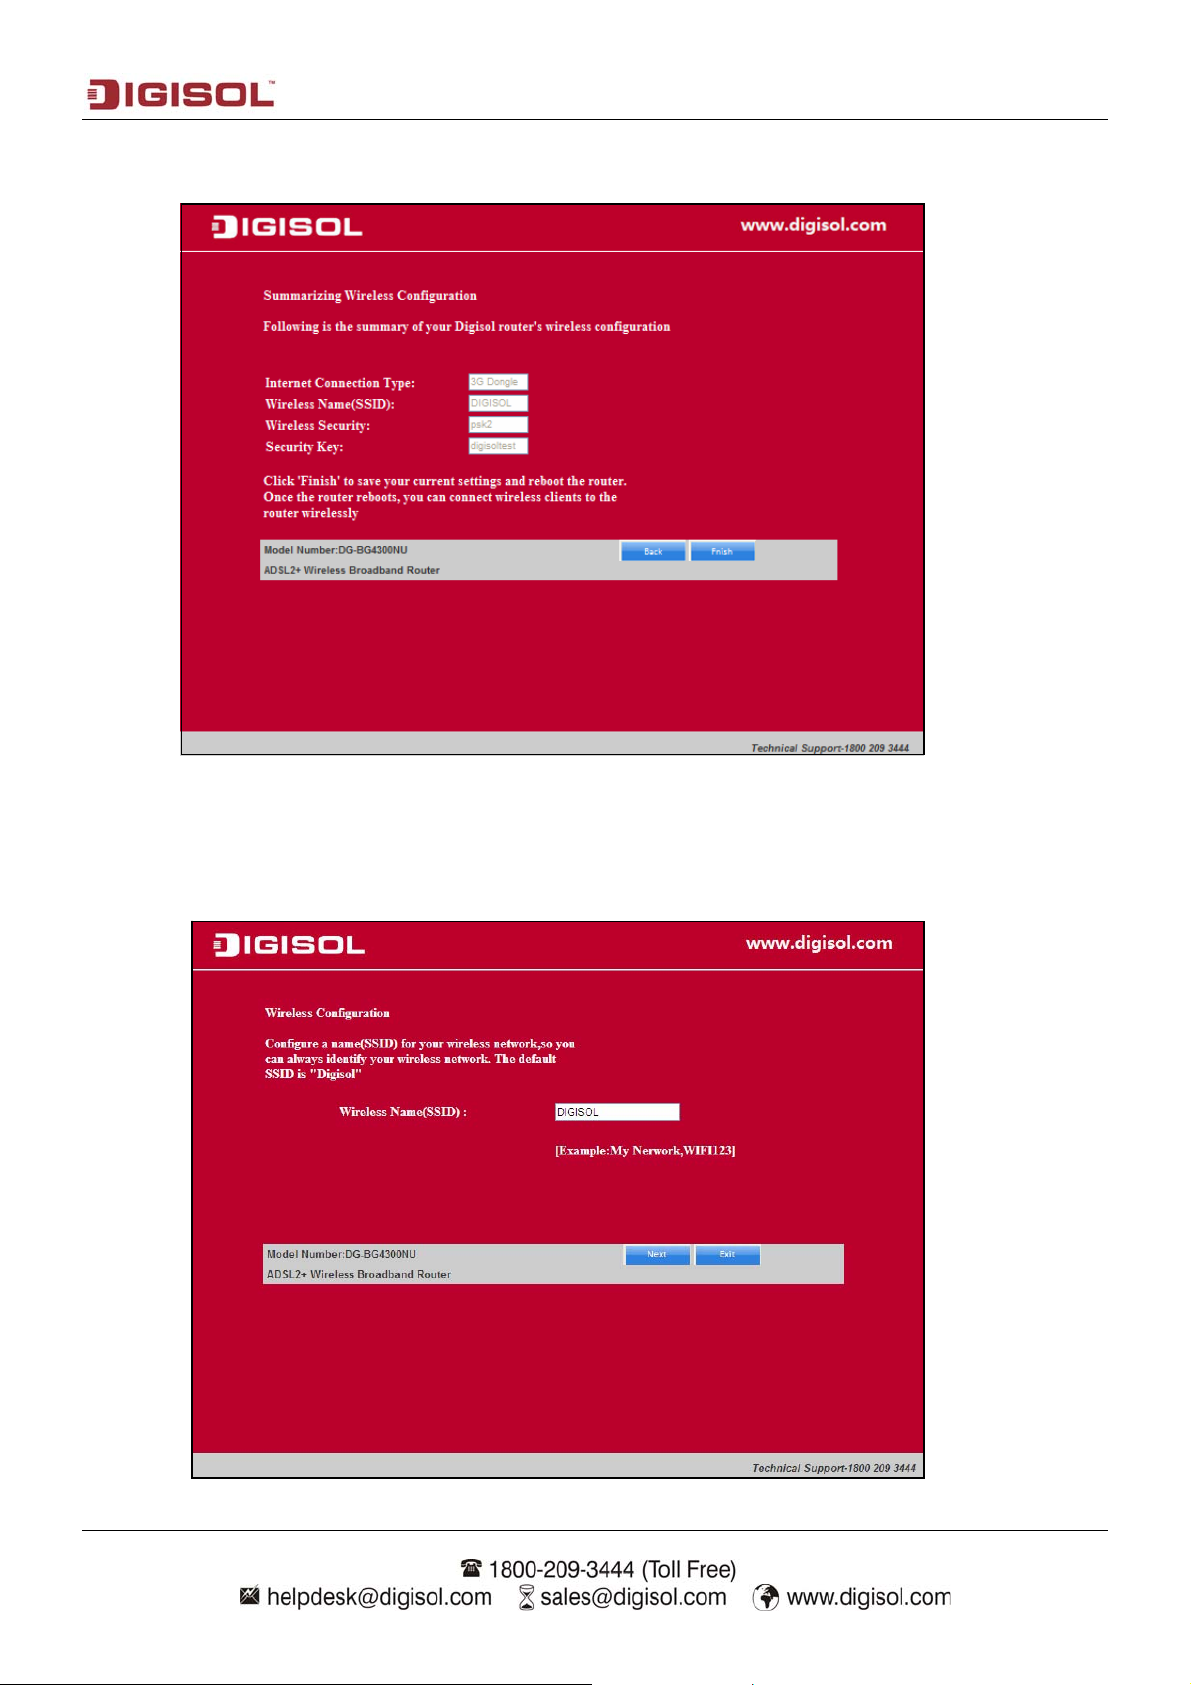
Note: The Wireless configuration steps mentioned below are common for all the modes.
Click “Next” to configure the wireless settings. In this page, you can set the SSID for wireless
network.
17
Page 18
DG-BG4300NU User Manual
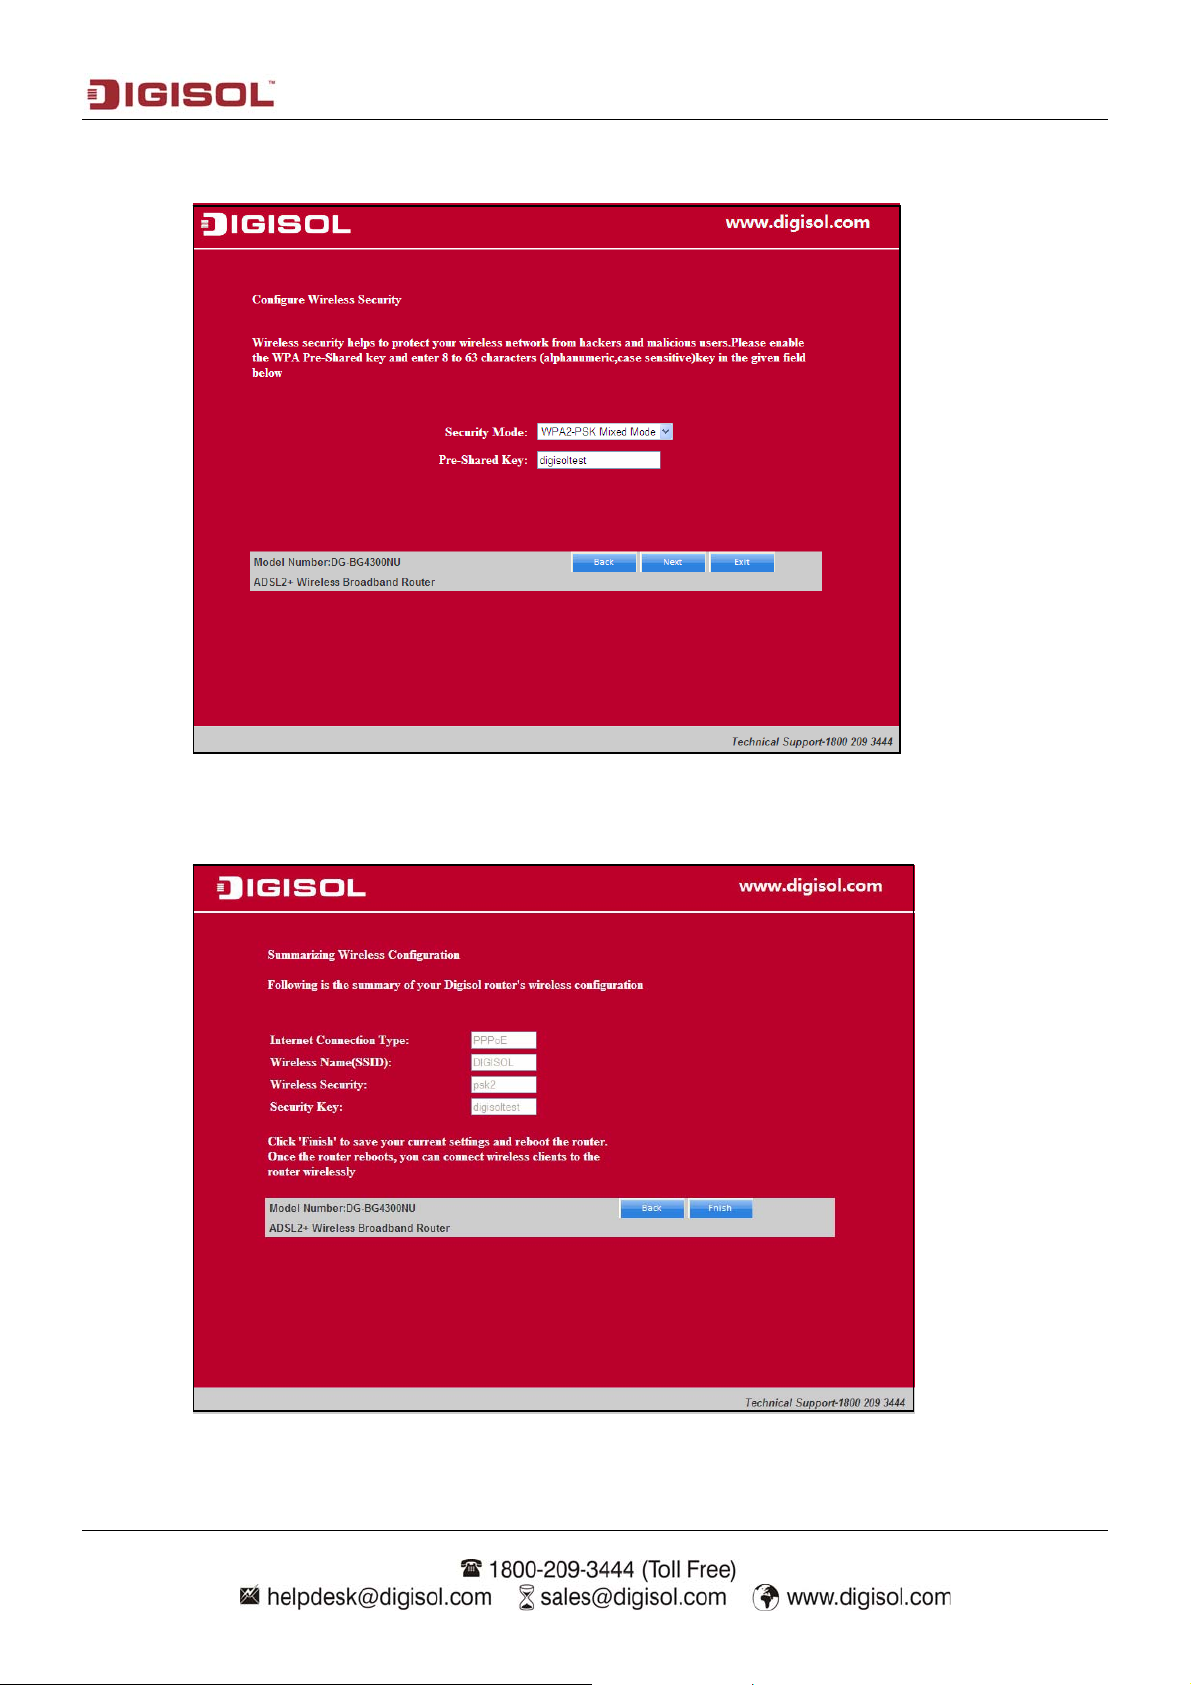
Click ‘Next’ and the following page appears. In this page, you can select WPA2-PSK as the
security mode.
Click ‘Next’ and the following page appears. In this page, you can view the configuration
summary.
18
Page 19
DG-BG4300NU User Manual
Click ‘Finish’ to save your settings and reboot the router. Once the settings are applied the
following screen will appear.
II) Select the operation mode “ADSL with 3G Backup Mode”. Click on “Next”. The screen
shown below will appear.
19
Page 20
DG-BG4300NU User Manual
Enter the “APN code” and “Dialup Number” as shown below. Click on “Next”.
Select the type of network protocol and click ‘Next’ to continue with the installation.
20
Page 21
DG-BG4300NU User Manual
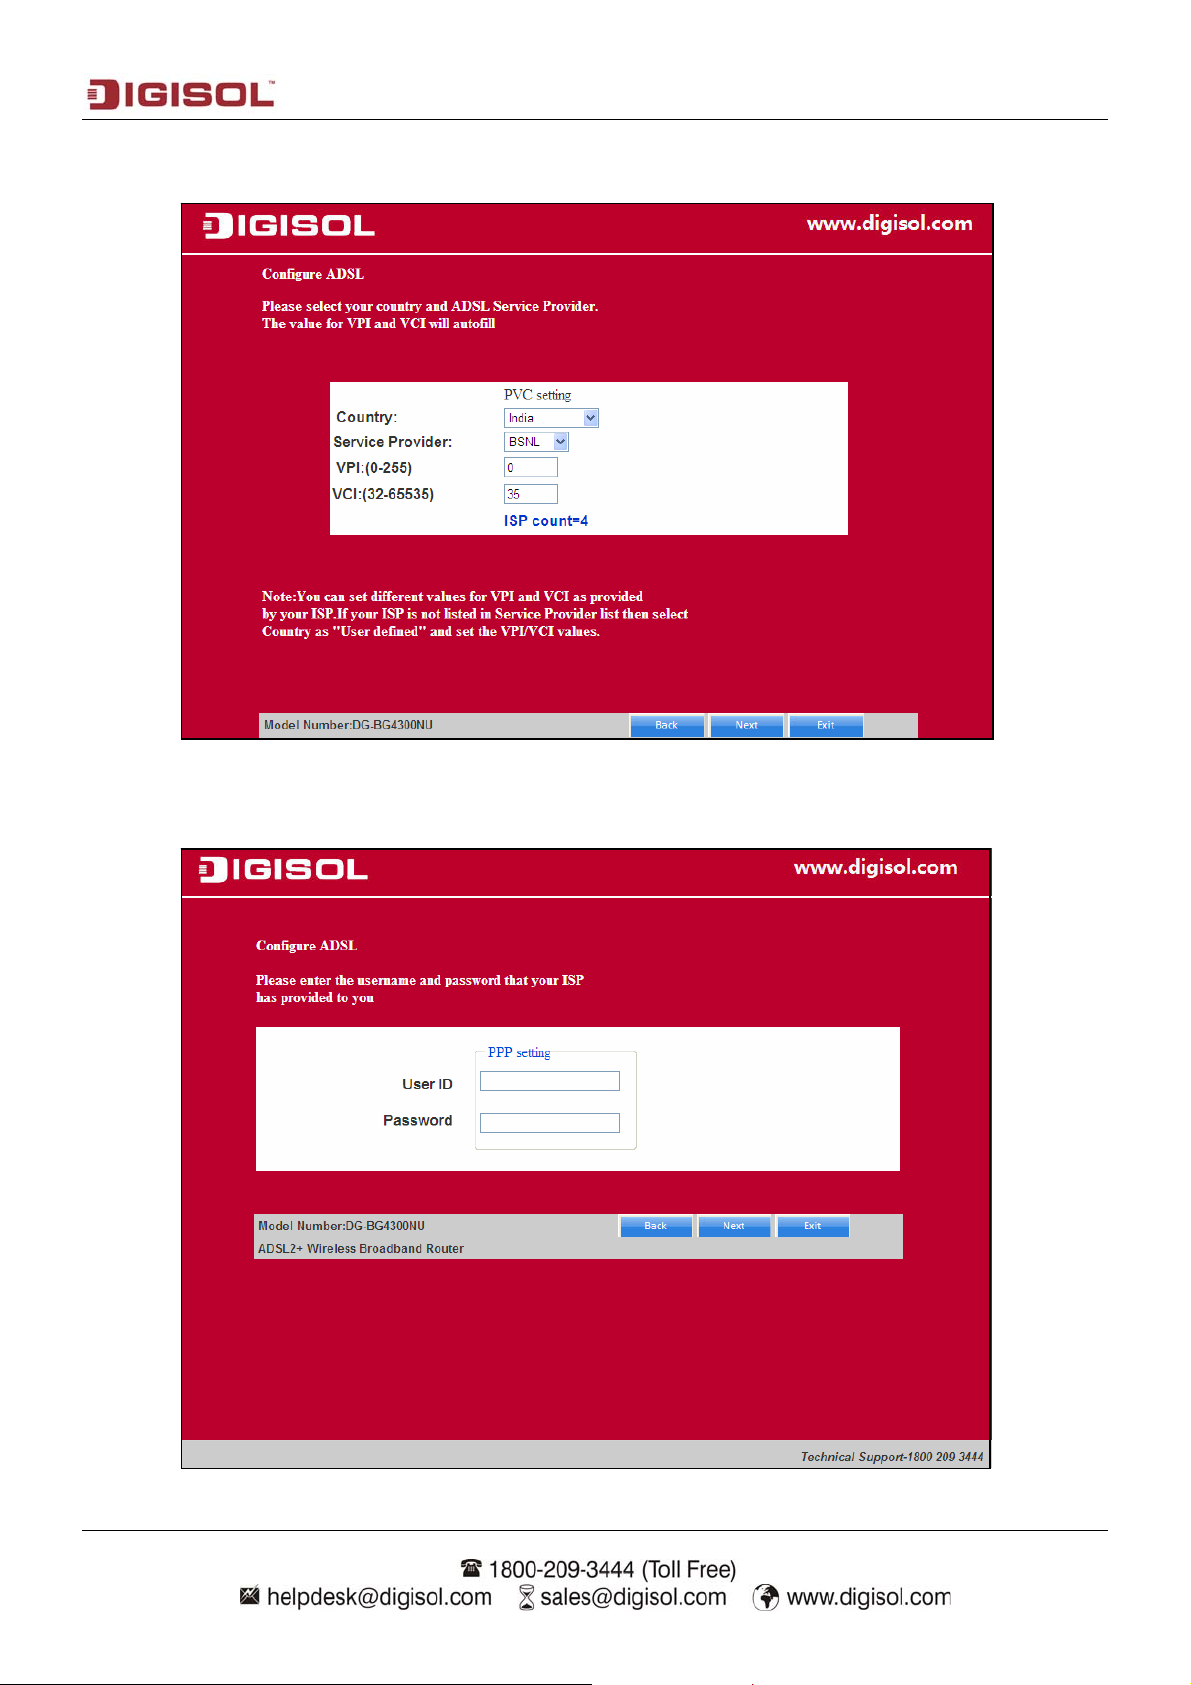
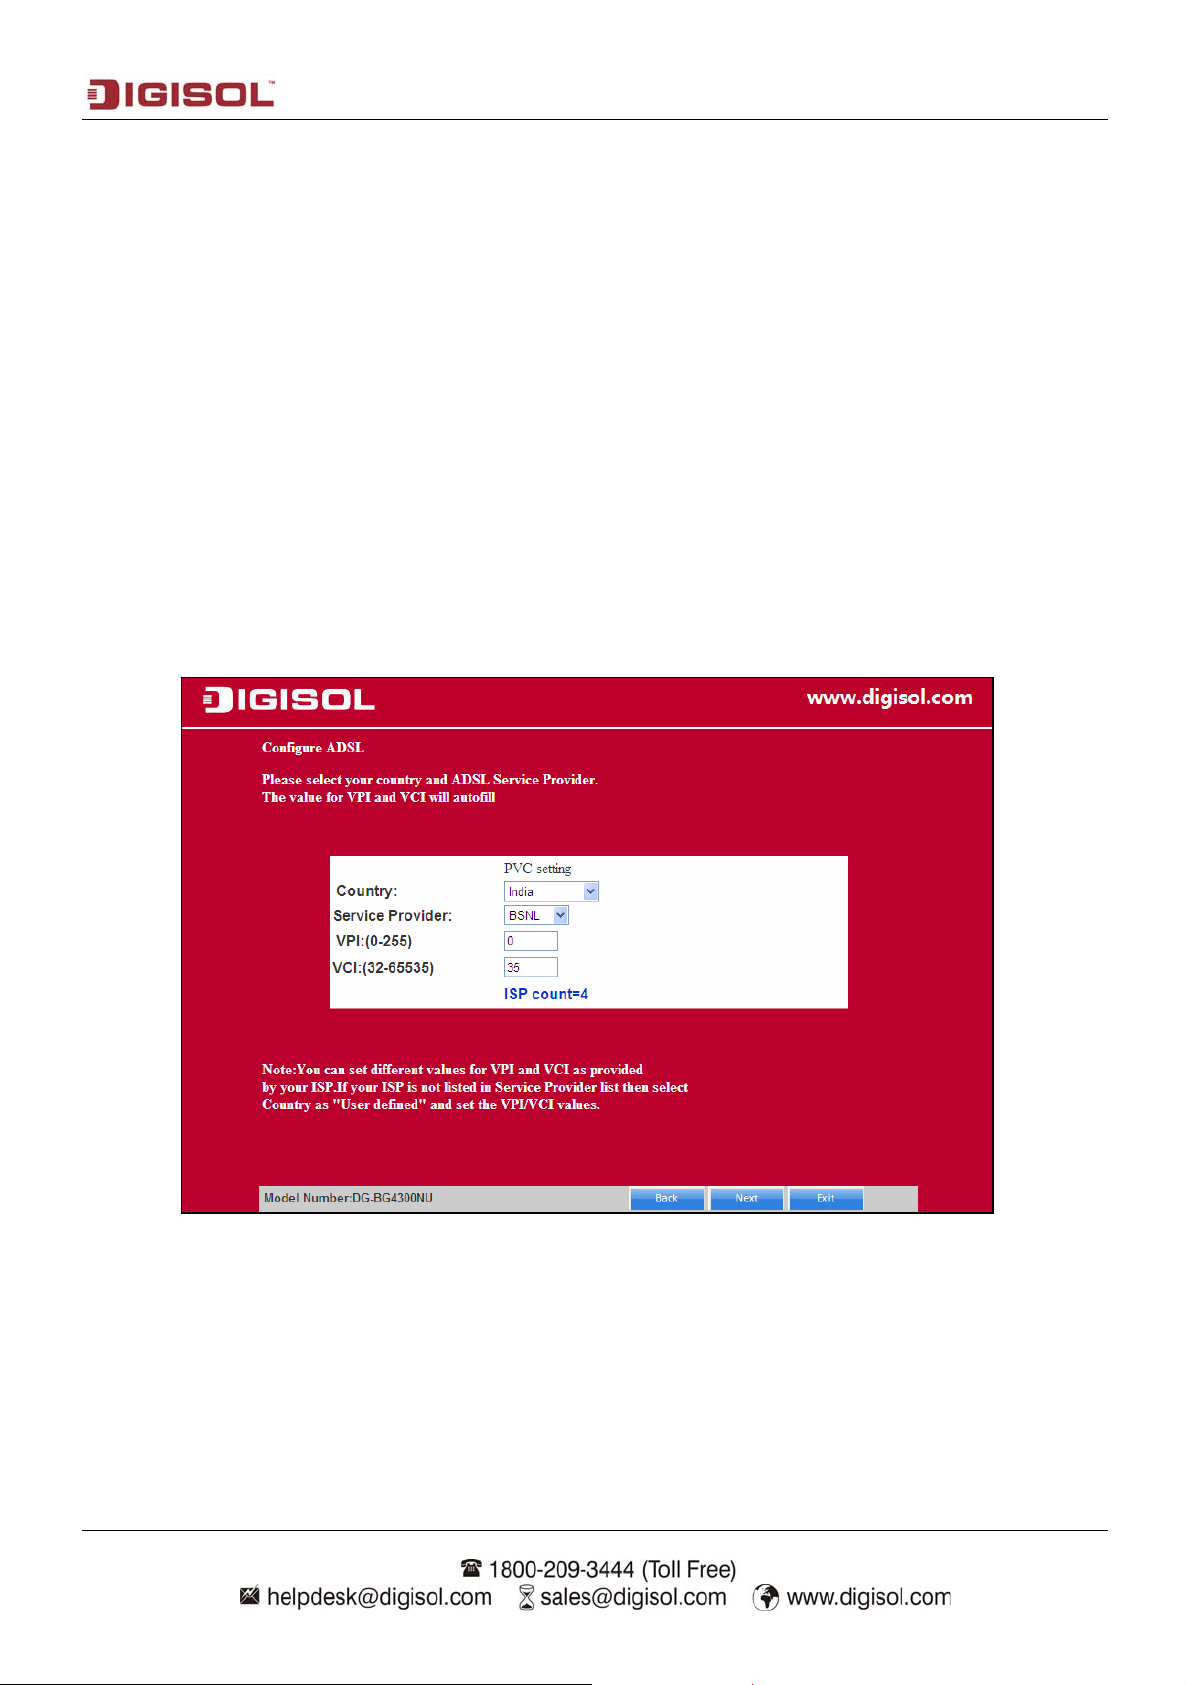
Select the Country: India and then select the service provider from the drop-down list. You can
change the VPI/VCI values as instructed by your ISP.
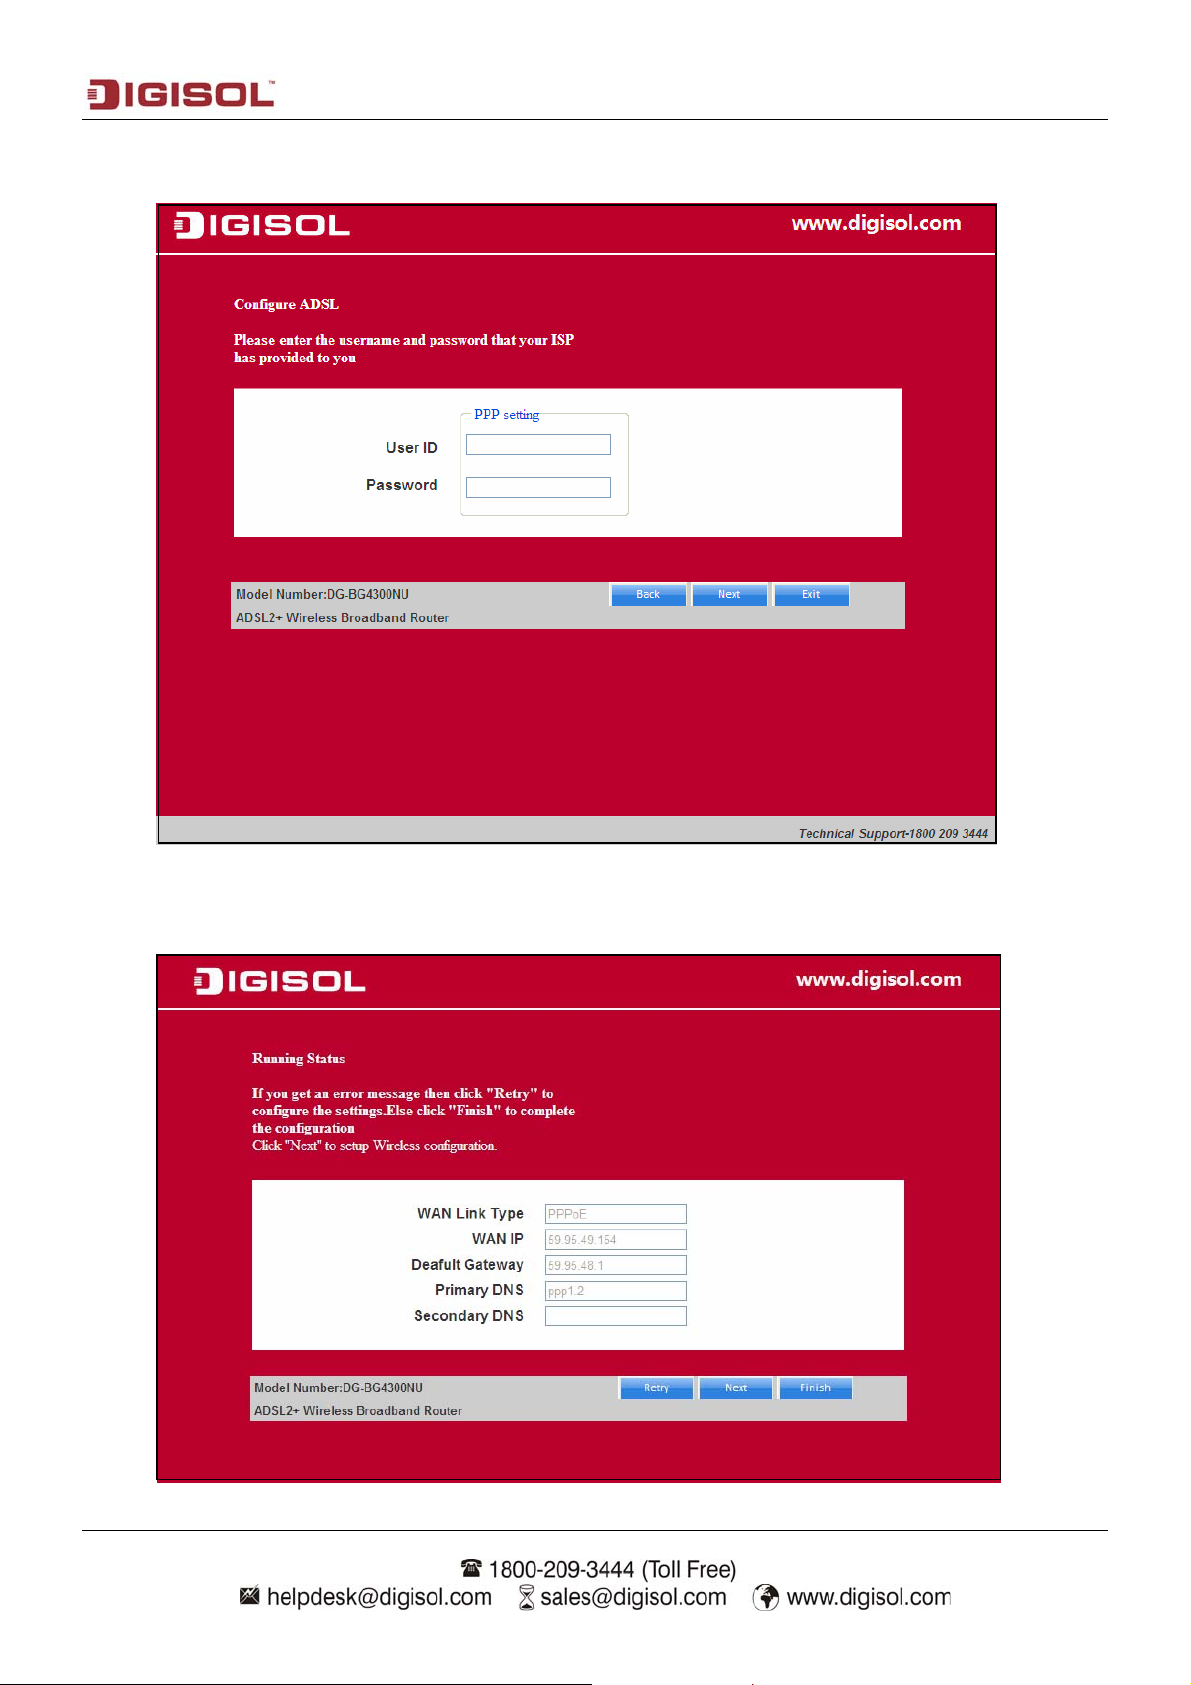
Click on “Next” and enter the correct user ID and password for PPPoE mode that is provided by
your ISP. After the settings are done, click ‘Next’ to continue with the installation.
21
Page 22
DG-BG4300NU User Manual
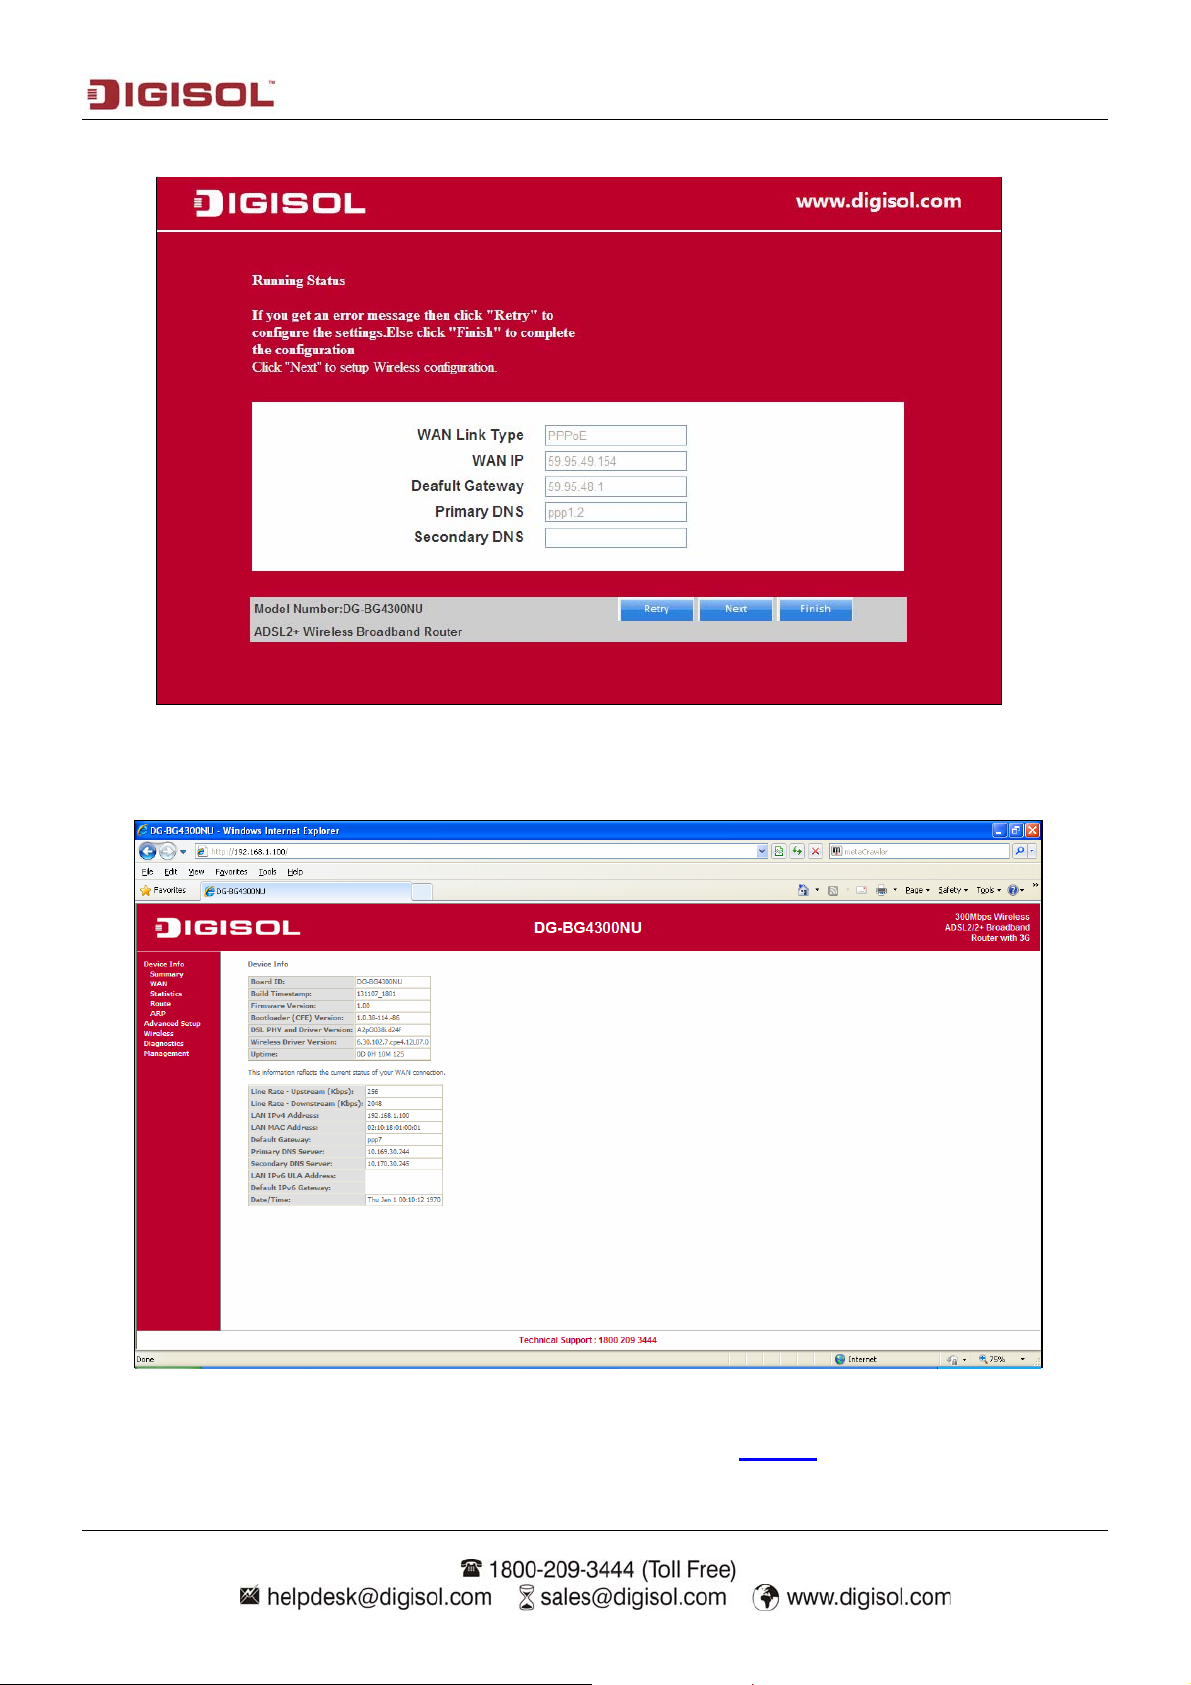
Following page appears showing the WAN status.
Once the settings are applied the following screen will appear.
For wireless configuration settings refer to steps mentioned on page 17
22
.
Page 23
DG-BG4300NU User Manual
III) Select the operation mode “ADSL Wireless Router Mode”. Click on “Next”. The screen
shown below will appear.
Select the type of network protocol and click ‘Next’ to continue with the installation.
23
Page 24
DG-BG4300NU User Manual
You can select LLC or VC-Mux as the encapsulation mode according to the uplink equipment or use the
default setting.
1483 Bridged: If you select 1483 Bridged as the WAN protocol, you must use the third party
Dial-up software or Windows New Connection Wizard to configure the Internet dial-up access.
1483 MER: If you select 1483 MER as the WAN protocol, the router obtains an IP address
automatically.
PPPoE /PPPoA: If you select PPPoE or PPPoA as the WAN protocol, click Next, and the
following page appears.
1483 Routed: If you select 1483 Routed as the WAN protocol, you cannot use the DHCP
service. You need to enter the IP address, subnet mask, default gateway and DNS that is provided
by your ISP.
Select the Country: India and then select the service provider from the drop-down list. You can
change the VPI/VCI values as instructed by your ISP.
24
Page 25
DG-BG4300NU User Manual
PPPoE Mode: In this page, enter the correct user ID and password that is provided by your ISP.
After the settings are done, click ‘Next’ to continue with the installation.
Following page appears showing the WAN status.
25
Page 26
DG-BG4300NU User Manual
For wireless configuration settings refer to steps mentioned on page 17.
Click ‘Finish’ to save your settings and reboot the router. Once the settings are applied the
following screen will appear.
26
Page 27
DG-BG4300NU User Manual
4. Setup
4-1 WAN Configuration
4-2 Statistics
Click on statistics the following options will appear.
27
Page 28

DG-BG4300NU User Manual
4-2-1 LAN
The table below displays the statistics of ports through which the data is transferred and received.
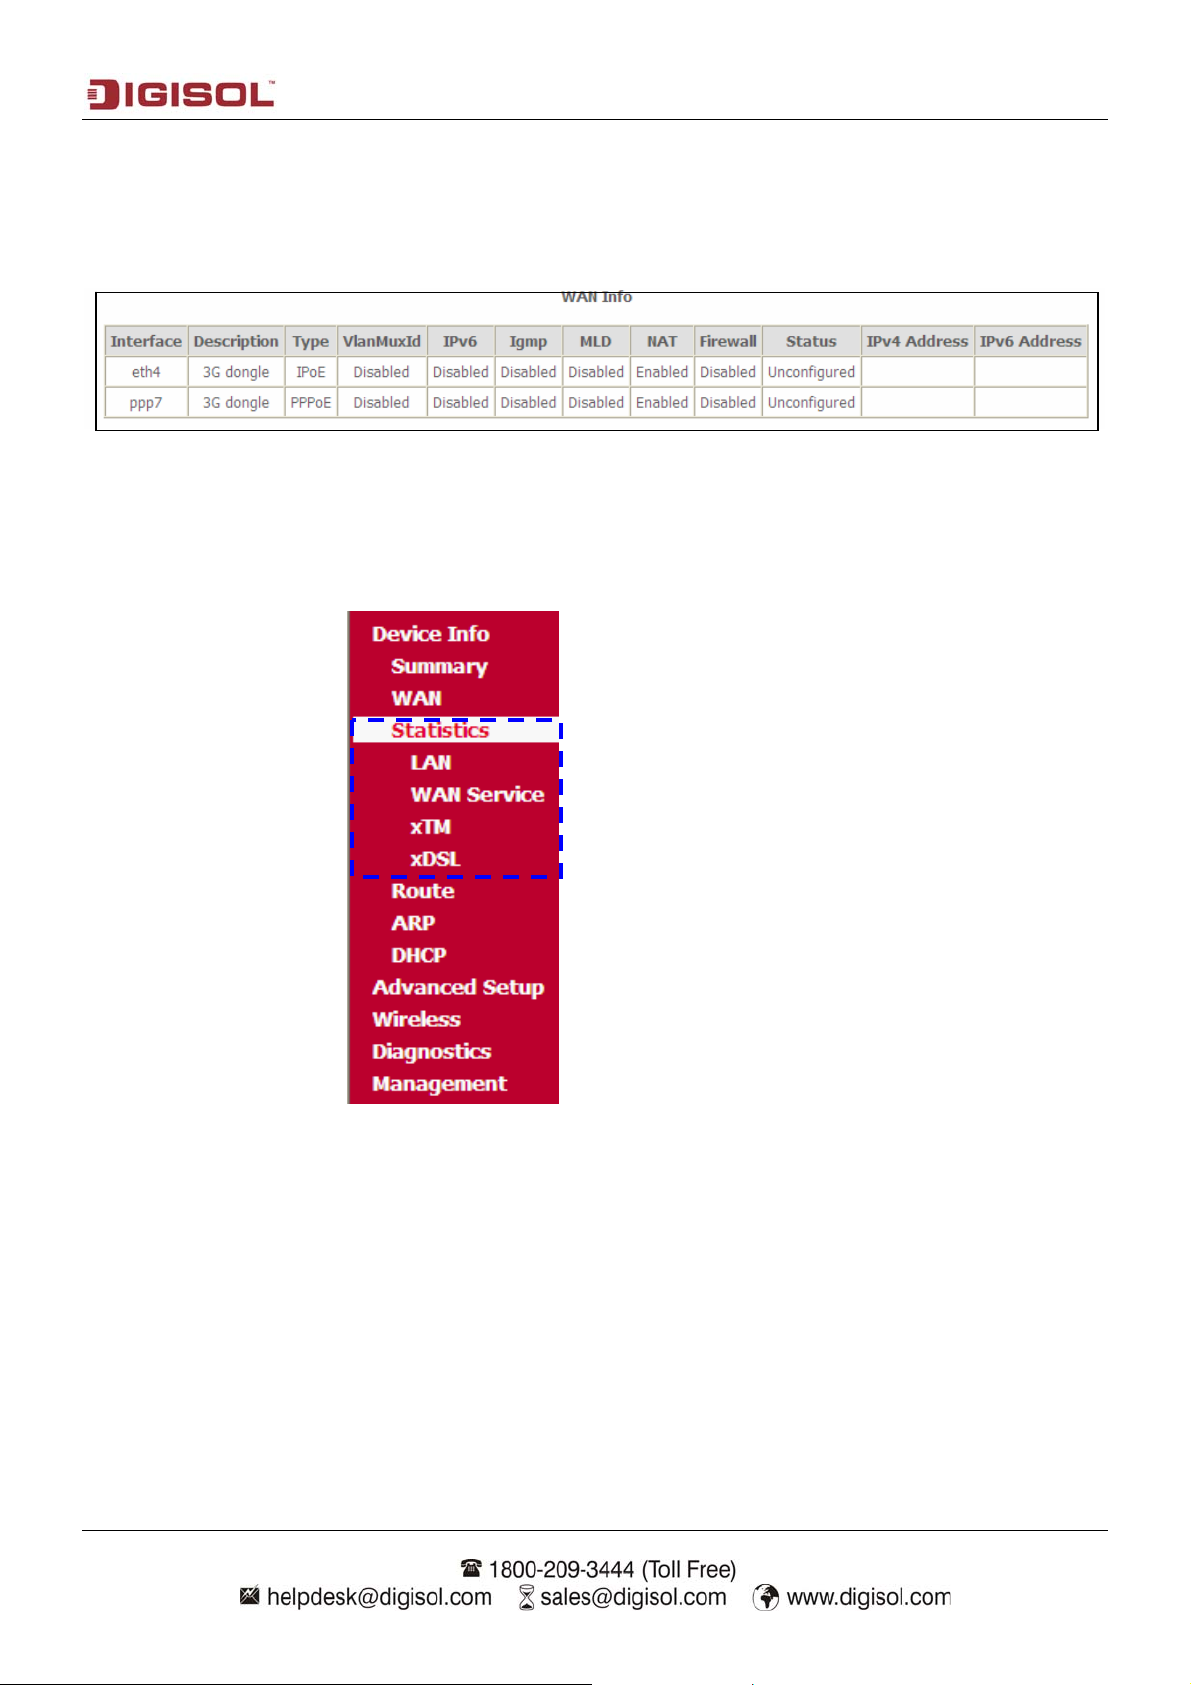
4-2-2 WAN Service
Parameter Description
Interface Lists the WAN interfaces.
Description Displays WAN type info.
Received Displays the counters for received pkts /bytes.
Transmitted Displays the counters for transmitted pkts /bytes.
28
Page 29

DG-BG4300NU User Manual
4-3 Route
4-3-1 Device Info Route
The below table shows the dynamic route entry/entries.
4-3-2 Device Info ARP
The below table displays the ARP entries of devices connected to the router.
4-3-3 Device Info DHCP
29
Page 30

DG-BG4300NU User Manual
Parameter Description
Hostname Displays PC / client name.
MAC Address Displays MAC address of Host / PC.
IP Address Displays IP address of Host /PC.
Expires In Displays the DHCP Lease time remaining.
4-4 Advanced Setup
Click on the link and the following options will appear under “Advanced Settings”.
30
Page 31

DG-BG4300NU User Manual
4-4-1 WAN Service
I) 1483 Bridged Mode
If you select 1483 Bridged as the WAN protocol, you can use the third party Dial-up software or
Windows New Connection Wizard to configure the Internet dial-up access.
II) PPPoE Mode
The PPPoE mode will require the PPPoE Username and Password which is provided from the ISP.
31
Page 32

DG-BG4300NU User Manual
III) 1483 Routed Mode
If you select 1483 Routed as the WAN protocol, you cannot use the DHCP service. You need to enter the
IP address, subnet mask, default gateway and DNS that is provided by your ISP.
IV) 1483 MER
If you select 1483 MER as the WAN protocol, the router obtains an IP address automatically.
32
Page 33

DG-BG4300NU User Manual
4-4-2 LAN
Configure the broadband router IP address and subnet mask for LAN interface.
33
Page 34

DG-BG4300NU User Manual
Click on MAC address “Add Entries” button. The screen shown below will appear. Enter the MAC
address and static IP address and click on “Apply/Save” button.
Option 43 Vendor Specific Provided by the vendor.
Parameter Description
Leased Time (hour) Set the DHCP lease time.
Static IP lease list Will list th e Reserved IP for specified MAC
address.
Option 6 DNS address DNS IP provided by DHCP server.
Option 42 NTP server Network TIME server address.
Option 60 Vendor ID Provided by the vendor.
34
Page 35

DG-BG4300NU User Manual
4-4-2-1 IPv6 Auto Config
This page allows the user to configure the IPv6 LAN parameters of the router such as DHCPv6 server,
IPv6 LAN IP, Router Advertisement daemon (RADVD), IPv6 Multicast snooping (MLD).
35
Page 36

DG-BG4300NU User Manual
4-4-3 NAT
Below screenshot shows the options available under NAT.
36
Page 37

DG-BG4300NU User Manual
4-4-3-1 Virtual Servers
Virtual server allows you to direct incoming traffic from the WAN side to the internal server with private
IP address on the LAN side. The internal port is required if the external port needs to be converted to a
different port number used by the server on the LAN side. A maximum 32 entries can be configured.
When you click on “Add” the following screen will appear.
Parameter Description
User Interface Select the WAN interface on which the Port forwarding is
required.
Service Name Name of Port forwarding service.
External Port Start &
External Port End
Port number accessible on public.
Protocol Select TCP or UDP or both.
Internal Port Start &
Internal Port End
Type the port number of the server for port forwarding.
37
Page 38

DG-BG4300NU User Manual
4-4-3-2 Port Triggering
Port triggering is a way to automate port forwarding in which outbound traffic on predetermined ports
(‘triggering ports’) causes inbound traffic to specific incoming ports to be dynamically forwarded to the
initiating host, while the outbound ports are in use. This allows computers behind a NAT-enabled router
on a local network to provide services that would normally require the computer to have a fixed address
on the local network. Port triggering triggers can open an incoming port when a client on the local
network makes an outgoing connection on a predetermined port or range of ports.
When you click on “Add” the following screen will appear.
38
Page 39

DG-BG4300NU User Manual
4-4-3-3 DMZ Host
A DMZ (Demilitarized Zone) allows a single computer on your LAN to expose ALL of its ports to the
Internet. Enter the IP address of computer as a DMZ (Demilitarized Zone) host with unrestricted Internet
access. When doing this, the DMZ host is no longer behind the firewall.
Enter the DMZ Host IP address which is the IP address of the local host. This feature sets a local host to
be exposed to the Internet.
4-4-3-4 IP Address Map
Advanced users can use this feature for outgoing traffic, creating “NAT IP MAPPING” rules that divert
all traffic that is destined for a certain IP address to a different IP address. Entries in this table allow you
to configure one Global IP Pool for specified Local IP address from LAN.
When you click on “Add” the following screen will appear.
39
Page 40

DG-BG4300NU User Manual
4-4-3-5 ALG
An application-level gateway (also known as ALG or application layer gateway) consists of a security
component that augments a firewall or NAT employed in a computer network.
4-4-4 Security
40
Page 41

DG-BG4300NU User Manual
4-4-4-1 IP Filtering
I) Outgoing IP filtering
By default all outgoing IP traffic from LAN is allowed, but some IP traffic can be blocked by setting up
filters.
Click on “Add”. The following screen will appear.
Parameter Description
Filter Name Any name for rule.
IP version Select the IPV4 /IPV6.
Protocol Select the protocol for which the rule is applied.
Source IP address/prefix
Enter the source IP address.
length
Source Port Enter the source port.
Destination IP
Enter the Destination IP address.
address/prefix length
Destination Port Enter the Destination port.
41
Page 42

DG-BG4300NU User Manual
II) Incoming IP filtering
When the firewall is enabled on a WAN or LAN interface, all incoming traffic is blocked. However, some
IP traffic can be accepted by setting up filters.
Click on “Add”. The following screen will appear.
42
Page 43

DG-BG4300NU User Manual
4-4-4-2 MAC Filtering 4-4-4-3 DoS
A denial-of-service attack (DoS attack) is an attempt to make a computer resource unavailable to its
intended users.
Enable DoS Prevention to detect and prevent denial of service attacks through automatic rate filtering or
rules to protect legitimate users during the DoS attacks.
TCP SYNcookies Will block the TCP Sync cookies when enabled.
SYN Flood Will block the SYN flood when enabled.
Ping of Death/Ping Flood Will block ping from source IP when enabled.
Port Scanning Will block Port scanning from source when enabled.
Parameter Description
43
Page 44

DG-BG4300NU User Manual
4-4-5 Parental Control
If you want to allow access to Internet in the specific time, click on Parental Control and the following
page appears. It is used to configure the filtered URL and domain. You can also add/delete the excluded
IP, from which packets free from these URL filtering rules.
4-4-5-1 Time Restriction
This feature adds time of restriction to a special LAN device to the router. The browser ’s MAC address
automatically displays the MAC address of the LAN device when the browser is running.
To restrict other LAN devices, click “other MAC Address” button and enter the MAC address of the
other LAN device. To find out the MAC address of a Windows based PC, go to command window and
type “ipconfig/all”.
44
Page 45

DG-BG4300NU User Manual
Click on “Add”. The below given screen will appear.
Parameter Description
Browser’s MAC address Enter the MAC address of PC to be restricted.
Other MAC address Enter the MAC address of PC to be restricted.
Days of the week Select the days for restricted access.
Start Blocking time Select the time for restriction.
End Blocking time Select the time for restriction.
4-4-5-2 URL Filter
The URL Blocking is the web filtering solution. The firewall has the ability to block access to specific
web URLs based on string matches. This can allow large number of URLs to be blocked by specifying
only a FQDN (such as tw.yahoo.com). The URL Blocking enforces a Web usage policy to control content
downloaded from, and uploaded to the Web.
Please select the list type first then configure the list entries. Maximum 100 entries can be configured.
Click on “Add”. The below given screen will appear. Enter the URL address and port number to add the
entry to the URL filter.
45
Page 46

DG-BG4300NU User Manual
4-4-6 3G
This page allows the user to set the 2G and 3G parameters of the USB Datacard with an active SIM
plugged to the USB port of the router. These Parameters are provided by the 2G/3G internet service
provider. Also check the 3G dongle compatibility list on the website or call Digisol technical support.
Basically username, password, dial Number and APN code is required. Some ISP’s do not require
username and password. The below parameters may need to be confirmed with ISP.
NOTE: Switch off the router to plug/unplug USB 2G/3G Dongle.
46
Page 47

DG-BG4300NU User Manual
Parameter Description
Username Type Username, provided by 3G ISP.
Password Type Password, provided by 3G ISP.
APN Code Type APN code, provided by 3G ISP.
Pin Code Pin code is provided by ISP.
Dialup Number Type Dialup number provided by ISP (e.g.: *99# or #777 etc.)
Baud Rate Baud rate do not change.
MTU Maximum Transfer unit – Set by ISP.
MRU MRU. Do not change the default.
LCP Echo Interval LCP Interval – Do not change the default.
LCP Echo failure LCP Failure – Do not change the default.
Network Preference Can Set 3G / 2G / Automatic mode.
Click on “driver add”. Below given screen will appear to add a new 3G dongle drive.
Parameter
Description
Driver List Lists the Driver added manually by user.
Device Name Enter the name of Driver to be added.
Default Vendor Here type the Vendor ID of the USB Dongle for Mass Storage.
Default Product Here type the Product ID of the USB Dongle for Mass Storage.
T ar get Vendor Here type the Vendor ID of the USB Dongle for USB Modem.
Target Product Here type the Product ID of the USB Dongle for USB Modem.
Message Endpoint Endpoint of Mass Storage device.
Dev Name Type the Device name (E.g./dev/ttyUSB2), use USB sniffer tool.
Huawei Mode Select only if card is Huawei make.
Message Content0 Type 62bit Hexadecimal No. (Use Bushound tool)
Message Content1 Type 62bit Hexadecimal No. (Use Bushound tool)
47
Page 48

DG-BG4300NU User Manual
4-4-6-1 3G Failover
On this page, the user or administrator can set WAN type as Primary or Backup Uplink.
Parameter Description
Primary Uplink Set the preferred WAN type
Backup Uplink Set the backup/secondary WAN type
Backup mechanism The failover settings can be edited.
Note: It is not recommended to change the Backup mechanism settings
48
Page 49
DG-BG4300NU User Manual
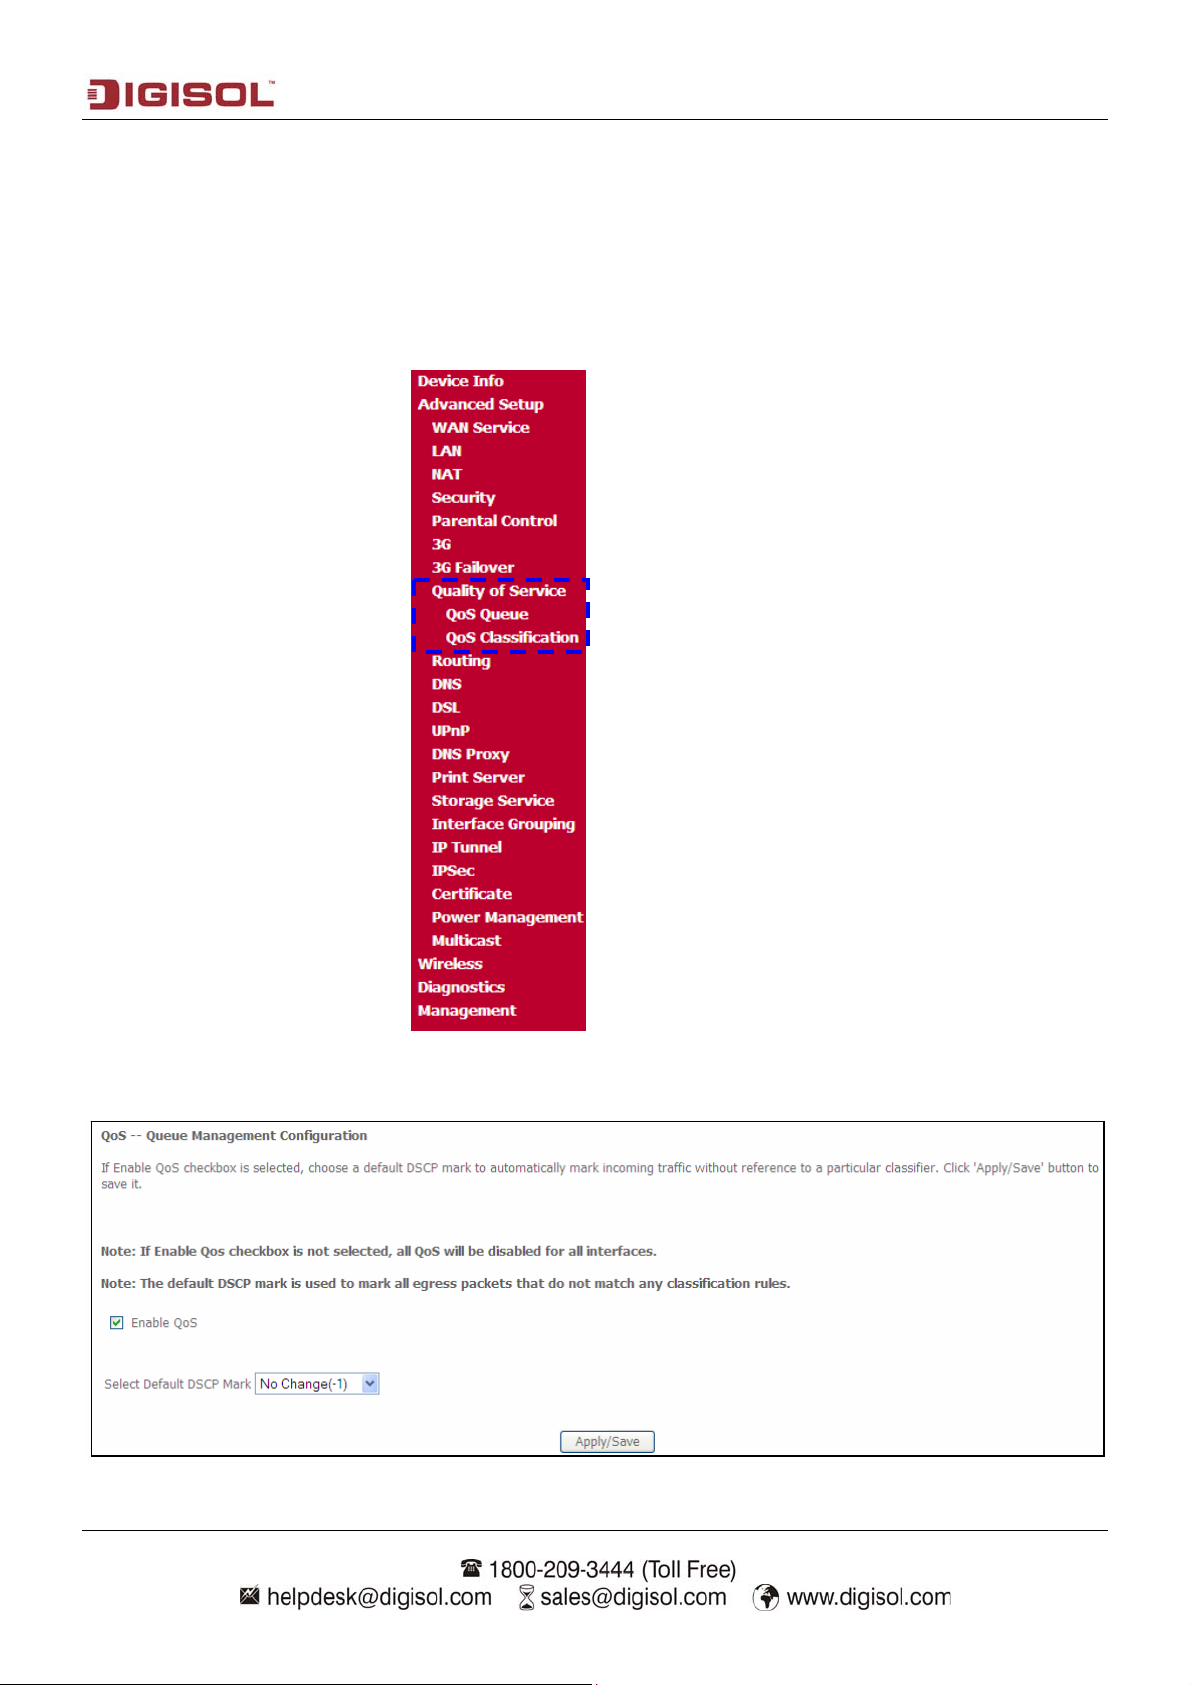
4-4-7 Quality Of Service
The QoS is enforced by the QoS rules in the QoS table. A QoS rule contains two configuration blocks:
Traffic Classification and Action. The Traffic Classification enables you to classify packets on the basis of
various fields in the packet and perhaps the physical ingress port. The Action enables you to assign the
strict priority level and mark some fields in the packet that matches the Traffic Classification rule. You
can configure any or all fields as needed in these two QoS blocks for a QoS rule.
Check the “Enable QoS” checkbox as shown below. Then choose a default DSCP mark to automatically
mark incoming traffic without reference to a particular classifier. Click on “Apply/Save” button to save it.
49
Page 50

DG-BG4300NU User Manual
4-4-7-1 QOS Queue
For each Ethernet interface, maximum 4 queues can be configured. For each Ethernet WAN interface
maximum 4 queues can be configured.
The “Enable” button will scan through every queue in the table.
Parameter Description
Name Name of the QoS Rule.
Key Enter the key.
Interface Select Interface on which the QoS rule is to be applied.
Qid Enter the QID.
Prec/Alg/Wght Mention the prec/alg/wght.
DSL Latency Display the WAN Path.
PTM priority Define the PTM priority.
Shaping Rate (bps) Type the shaping rate.
Burst Size (bytes) Type the Burst size
Enable Displays the Enabled Status if enabled.
Remove Select the checkbox to remove the entry.
Note: If the WMM function is disabled in the wireless page, queues related to wireless will not take
effect.
50
Page 51

DG-BG4300NU User Manual
Click on “Add”. The below given screen will appear. This screen allows you to create a QOS queue and
add it to a selected layer2 interface. Enter the name and interface of the QoS queue as shown below.
4-4-7-2 QOS Classification
Note: If the QOS function has been disabled, then the classification rules would not take effect.
51
Page 52

DG-BG4300NU User Manual
Click on “Add” button to add a rule. The below given screen will appear. By entering the settings in this
page, you can create traffic class rule to classify the ingress traffic into the priority queue and optionally
mark the DSCP or Ethernet priority of the packet. Click “Apply/Save” button to save and activate the
rule.
Parameter Description
Traffic Class Name Name of the Traffic Class.
Rule Order Select the Rule Order.
Rule Status Enable or Disable the Rule Status.
Class Interface Select the Traffic Class Interface on which rule is to be applied.
Ether T ype Select the Ether Type as required.
Source MAC Address Enter the Source MAC Address.
Destination MAC address Enter the Destination MAC address.
Destination MAC Mask Enter the Destination MAC Mask.
Specify Class Queue Enter the Class Queue.
Mark DSCP Select the DSCP from the List.
Mark 802.1p priority Select the Priority from 0-7.
Set Rate Limit Set the Rate limit here.
52
Page 53

4-4-8 Routing
DG-BG4300NU User Manual
4-4-8-1 Default Gateway
Default gateway interface can have WAN interfaces served as system default gateways but only one will
be used according to the priority with the first being the highest and the last one of the lowest priority if
the WAN interface is connected. Priority order can be changed by removing all and adding them back
again.
53
Page 54

DG-BG4300NU User Manual
4-4-8-2 Static route
Click on “Add”. The below given screen will appear. Here enter the destination network address, subnet
mask, gateway AND/OR available WAN interface then click on “Apply/Save” to add the entry to the
routing table.
Parameter Description
IP Version Select the Internet Protocol version IPV4/IPV6.
Destination IP
Enter Destination IP or/and Prefix length. (IPV6)
address/prefix length
Interface Select the WAN/LAN interface.
Gateway IP address Enter the IP address.
Metric Enter the numerical value (= or > 0).
54
Page 55

DG-BG4300NU User Manual
4-4-8-3 Policy Routing
Click on “Add”. The below given screen will appear.
Here enter the policy name, policies and WAN interface. Then click “Apply/Save” button to add the entry
to the policy routing table.
Parameter Description
Policy Name Enter the name of Policy.
Physical LAN port Select the LAN port.
Source IP Enter the Source IP address.
Use Interface Select the Interface.
Default Gateway IP Type the IP of the default gateway.
55
Page 56

DG-BG4300NU User Manual
4-4-8-4 RIP
To activate RIP for the WAN interface, select the desired RIP version and operation and check the
“Enabled” checkbox. To stop RIP on the WAN interface, uncheck the “Enabled” checkbox. Click the
“Apply/Save” button to start/stop RIP and save the configuration.
Note: RIP cannot be configured on the WAN interface which has NAT enabled (such as PPPoE).
4-4-9 DNS
4-4-9-1 DNS Server
56
Page 57

DG-BG4300NU User Manual
4-4-9-2 Dynamic DNS
The Dynamic DNS feature allows you to register your device with a DNS server and access your device
each time using the same host name. The Dynamic DNS page allows you to add/remove the Dynamic
DNS feature.
Click on “Add”. The below given screen will appear.
Parameter Description
D-DNS provider Select your DDNS Service Provider.
Hostname Enter the hostname configured in your DDNS Service Provider
Interface Select the WAN Interface T ype.
User Name Enter the User Name of your DDNS account.
Password Enter the Password of your DDNS account.
Account.
57
Page 58

DG-BG4300NU User Manual
4-4-10 DSL
This page allows you to set the ADSL modulation. It is recommended, not to change anything unless
required/suggested by the ADSL service provider. CAUTION: Wrong selection of modulation may
make the router ADSL link unstable.
Click on “Advanced Settings”. The below given screen will appear.
58
Page 59

DG-BG4300NU User Manual
Click on “Tone Selection”. The screen shown below will appear.
Note: If you do not have much knowledge of ADSL tone settings, it is advised not to change these
settings.
4-4-11 UPnP
Check mark “Enable UPnP” to enable UPnP service.
59
Page 60

DG-BG4300NU User Manual
4-4-12 DNS Proxy
Check mark “Enable DNS Proxy” to enable DNS Proxy. Enter the Host name of the Router and the
domain name of the LAN network.
4-4-13 Storage Service
This page will list the USB Mass storage when connected (tested up to 16 GB).
The storage service allows you to use storage devices with the modem to be more easily accessed.
60
Page 61

DG-BG4300NU User Manual
4-4-14 Interface Grouping
Interface grouping supports multiple ports and bridging groups. Each group will perform as an
independent network. To support this feature, you must create mapping groups with appropriate LAN and
WAN interfaces using the Add button. The remove button will remove the grouping and add the
ungrouped interfaces to the default group. Only the default group has IP interface.
Click on “Add”. The following screen will appear.
61
Page 62

DG-BG4300NU User Manual
4-4-15 IP Tunnel
4-4-15-1 IPv6inIPv4
Click on “Add”. The following screen will appear.
Parameter Description
Tunnel Name Enter a name for the tunnel.
Mechanism The default mechanism is 6RD.
Associated WAN
Select the WAN Interface for tunneling.
interface
Associated LAN
Default LAN interface is selected.
interface
IPv4 Mask Length Enter the IPv4 Mask Length.
6rd Prefix with prefix
Enter the prefix length.
length
Border Relay IPv4
Enter the border relay IPv4 address.
address
62
Page 63

DG-BG4300NU User Manual
4-4-15-2 IPv4inIPv6
Click on “Add”. The following screen will appear.
4-4-16 IPSec
63
Page 64

DG-BG4300NU User Manual
Click on “AddNewConnection”. The screen shown below will appear.
64
Page 65

DG-BG4300NU User Manual
Parameter Description
IPSec Connection Name Enter a name for IPSec Tunnel.
IP version Select the IP Version.
Tunnel Mode Select the IPSec Tunnel mode.
Local Gateway Interface Select the local gateway interface.
Remote IPSec Gateway
Enter the remote IPSec Gateway IP Address.
Address
Tunnel Access from local
Select Subnet or Single IP Address.
IP address
IP address for VPN Enter the IP Address.
Mask or prefix length Enter the Subnet Mask.
Tunnel access form
Select Subnet or Single IP Address for the remote network.
remote IP address
Key exchange method Select the key exchange mode.
Authentication Method Select the authentication mode.
Pre-Shared key Enter a new VPN Key for the IPSec tunnel.
Perfect forward secrecy Select Enable or Disable.
Advanced IKE settings Click to show advanced setting.
Click on “Show Advanced Settings”. The screen shown below will appear.
65
Page 66

DG-BG4300NU User Manual
Parameter Description
Mode Select the mode, either Main or Aggressive.
Encryption Algorithm Select the encryption algorithm.
Integrity Algorithm Select the Integrity Algorithm.
Select Diffie-Hellman
Select the bit option.
Group for key exchange
Key life time Enter the time in seconds.
4-4-17 Certificate
4-4-17-1 Local
Local certificates are used by peers to verify your identity. Maximum 4 certificates can be stored.
Click on “Create Certificate request”. The screen shown below will appear.
66
Page 67

DG-BG4300NU User Manual
Click on “Import Certificate”, the following screen will appear.
67
Page 68

DG-BG4300NU User Manual
4-4-17-2 Trusted CA
CA certificates are used by you to verify peers certificates. Maximum 4 certificates can be stored.
Click on “Import Certificate”. The following screen will appear.
68
Page 69
DG-BG4300NU User Manual
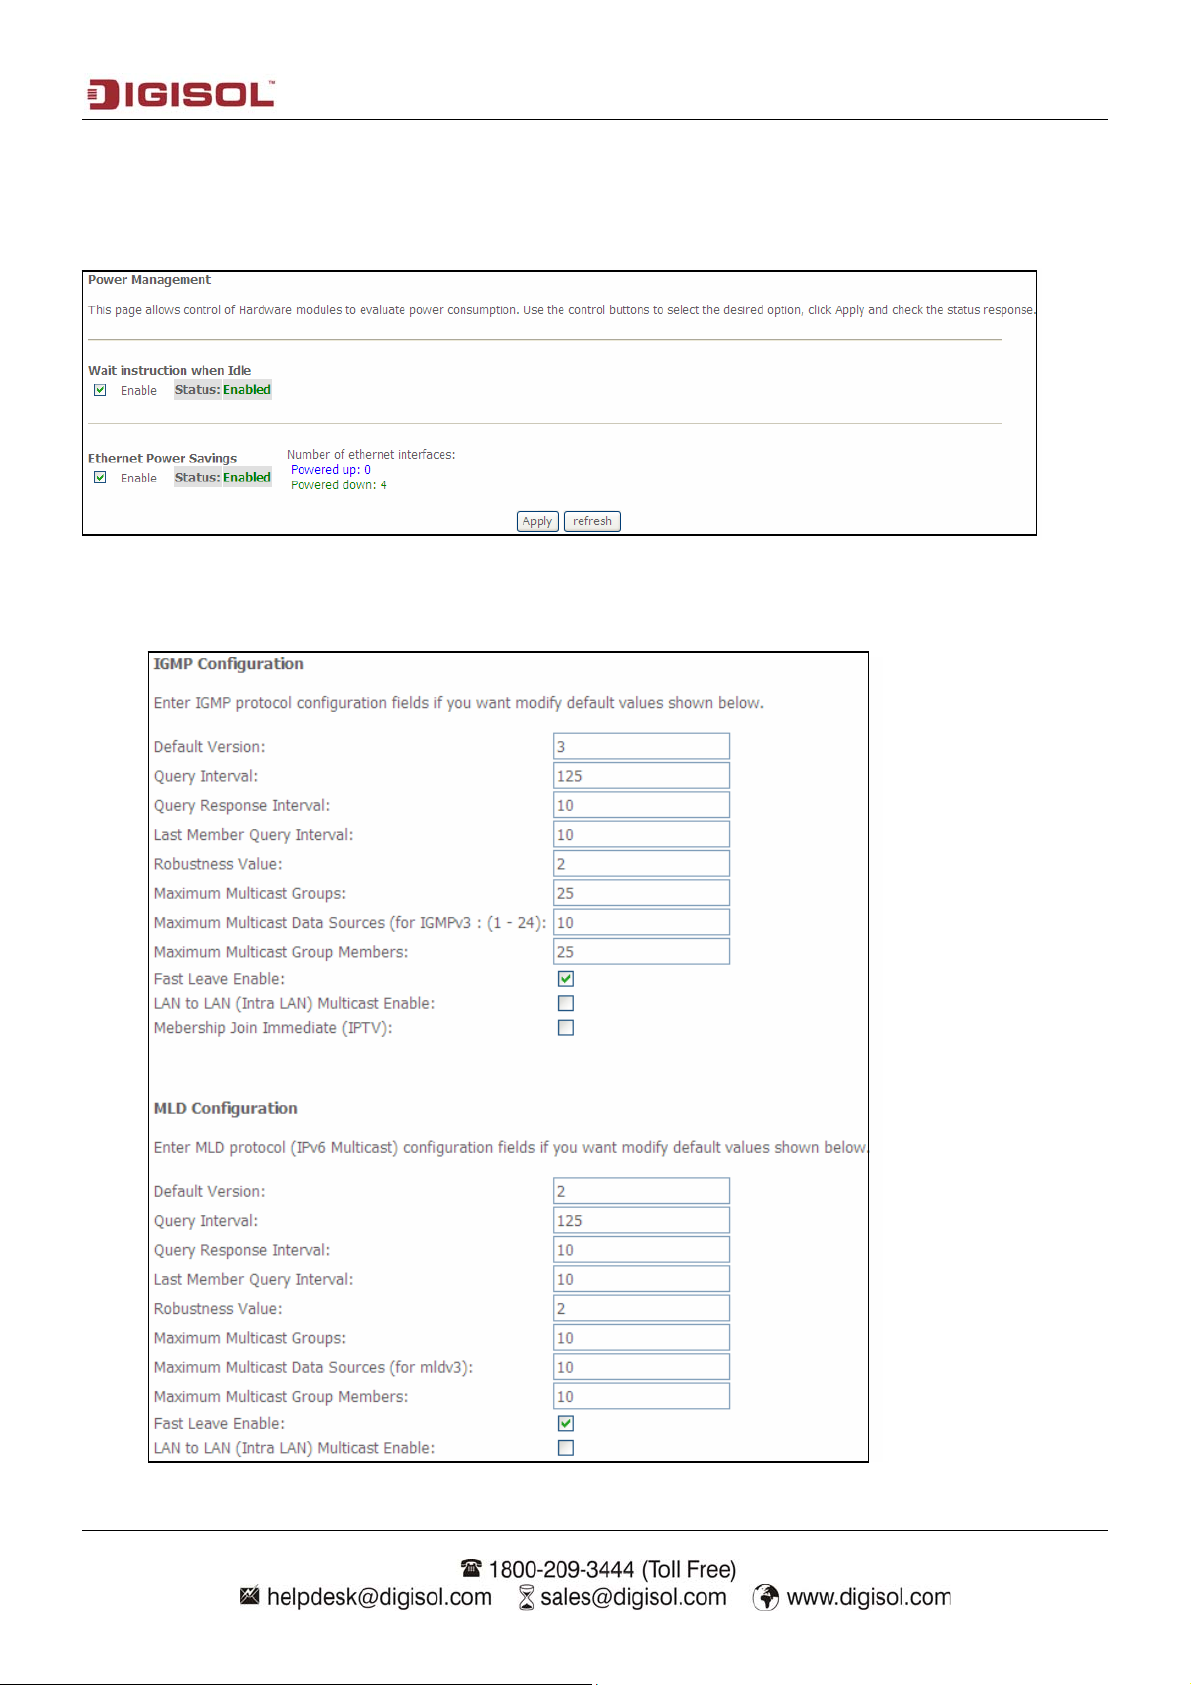
4-4-18 Power Management
This module allows control of hardware modules to evaluate power consumption. Use the control buttons
to select the desired option. Click “Apply” and check the status response.
4-4-19 Multicast
69
Page 70

DG-BG4300NU User Manual
Parameter Description
Default Version Enter the Default Version V alue.
Query Interval This parameter indicates the query interval. It is the interval in
seconds (s) between general queries sent by the querier. Default is 60
sec.
Query Response Interval This parameter indicates the query response interval. It is the
maximum response time in seconds for an IGMP host in reply to
general queries. By default, the value is set to 100.
Last Member query
Enter the last member query interval.
interval
Robustness value The IGMP robustness variable provides fine-tuning to allows for
expected packet loss on a subnet.
Maximum multicast
Define the Maximum multicast group/groups.
groups
Maximum multicast data
Define the Maximum multicast data sources.
sources
Fast leave enable When you enable IGMP fast-leave processing, the router
immediately removes a port when it detects an IGMP version 2 leave
message on that port.
LAN to LAN multicast
Enable or disable as required.
enable
Membership join
Enable or Disable membership join immediate.
Immediate
70
Page 71
DG-BG4300NU User Manual
4-5 Wireless
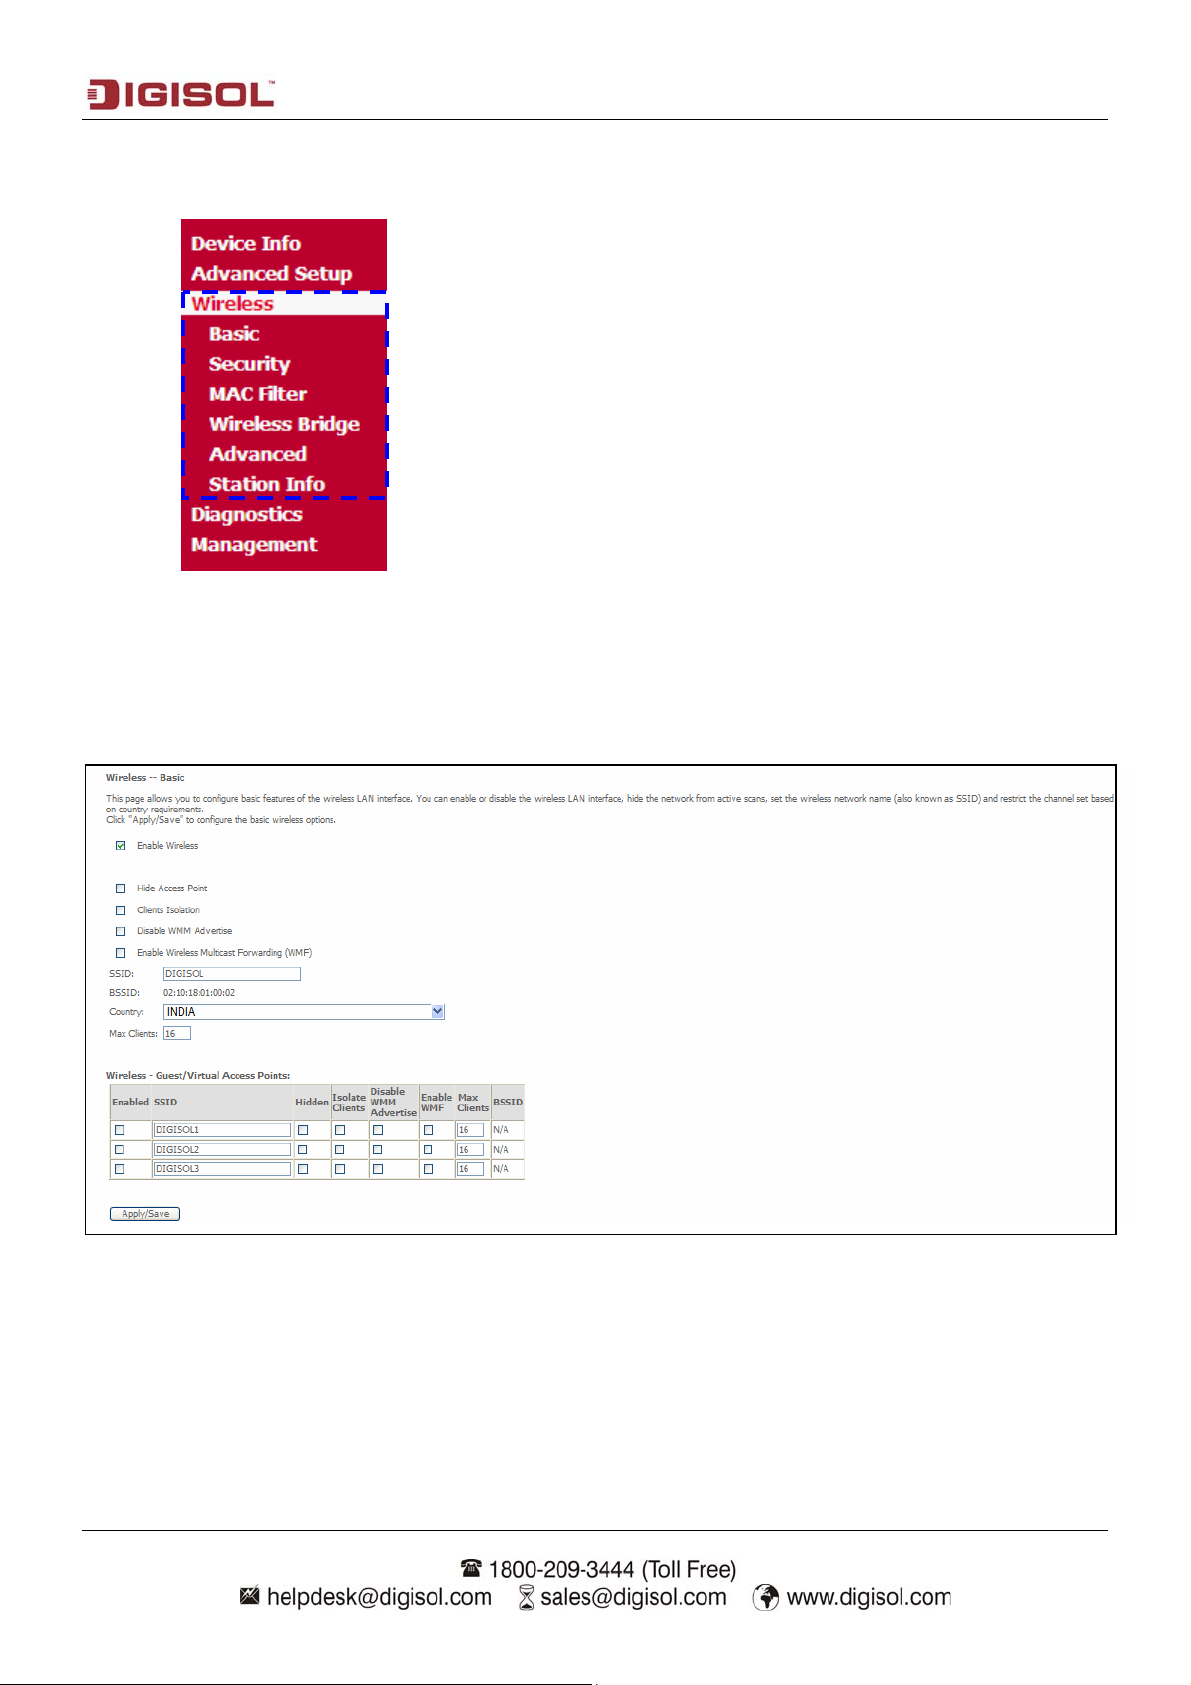
4-5-1 Basic
This page allows you to configure basic features of the wireless LAN interface. You can enable or disable
the wireless LAN interface, hide the network from active scans, set the wireless network name and
restrict the channel set based on country requirements.
71
Page 72

DG-BG4300NU User Manual
Parameter Description
Enable wireless Use this option to turn ON/OFF Wi-Fi of the router.
Hide access point Disable SSID Broadcast.
Clients Isolation Select this option to Enable Wireless client isolation.
Disable WMM Advertise Enable/Disable WMM Advance feature.
Enable wireless multicast
Enable/Disable WMF feature.
forwarding (WMF)
SSID Enter a name to your Wi-Fi network.
BSSID Displays the MAC ID.
Country Select the country.
Max Clients Enter the Max Wi-Fi clients.
4-5-2 Security
This page allows you to configure the security features of the wireless LAN interface.
72
Page 73

DG-BG4300NU User Manual
Parameter Description
Enable WPS Select to enable WPS.
Add Client Input Station Pin from Client.
Set Authorized station
Input Authorized Station MAC: xx:xx:xx:xx:xx:xx
MAC
Set WPS AP mode Set the AP Mode.
Device PIN Device Pin is generated by AP.
Select SSID Select the wireless network.
Network Authentication Select authentication method.
WEP Encryption Enter the WEP Key if WEP Encryption is selected.
4-5-3 MAC Filter
The MAC filtering feature allows you to define rules to allow or deny frames through the device based on
source MAC address, destination MAC address and traffic direction.
Click on “Add”. Enter the MAC address below that you wish to add to the wireless MAC address filters.
73
Page 74

DG-BG4300NU User Manual
4-5-4 Wireless Bridge
This page allows you to configure wireless bridge features of the wireless LAN interface. You can select
wireless bridge to disable access point functionality.
4-5-5 Advanced
This page allows you to configure advanced features of the wireless LAN interface. You can select a
particular channel on which to operate, force the transmission rate to a particular speed, set the
fragmentation threshold, set the RTS threshold, set the wakeup interval for clients in power-save mode,
set the beacon interval for the access point.
74
Page 75

DG-BG4300NU User Manual
4-5-6 St ation Info
This page shows authenticated wireless stations and their status.
Parameter Description
MAC List the MAC address of wireless device associated.
Associated This will appear Yes, if associated or otherwise it will be blank.
Authorized Will show if authorized or not.
SSID Wireless network name.
Interface Wireless interface number.
4-6 Diagnostics
The router is capable of testing the DSL connection. The individual tests are listed below.
75
Page 76
DG-BG4300NU User Manual
5 Management
5-1 Settings
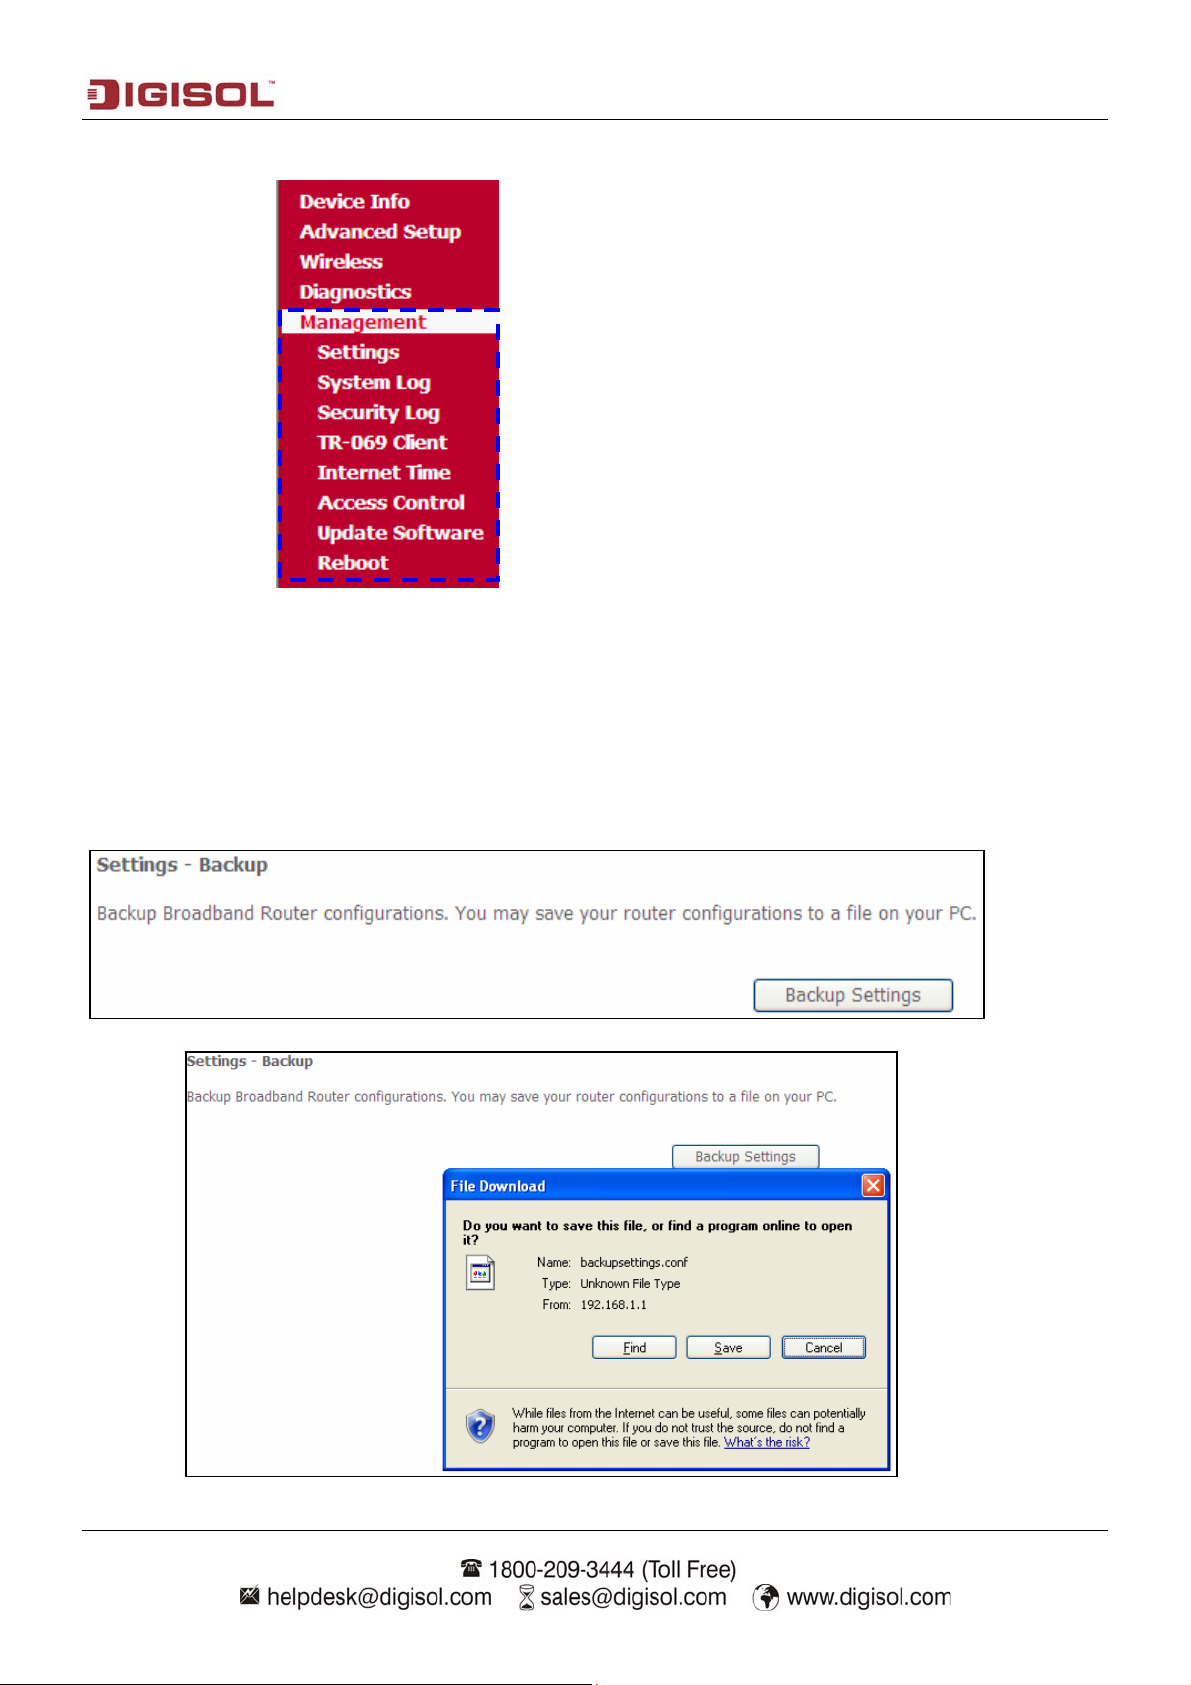
5-1-1 Backup
Click on “Backup settings” button and the following screen will appear. Click on the save button to save
the config file on your PC.
76
Page 77

DG-BG4300NU User Manual
5-1-2 Update
Click on “Browse” to upload a new config file on the router. Then click on “Update Settings”.
5-1-3 Restore Default
Click on the “Restore Default Settings” button to restore the unit to its default settings.
5-2 System Log
The system log dialog allows you to view the system log and configure the system log options.
Click on “View system log”. The screen shown below will appear.
77
Page 78

DG-BG4300NU User Manual
Click on “Configure System Log”. The screen shown below will appear.
Parameter Description
Log level Select the Log Level.
Display level Select the Display Level.
Mode Select mode as Local or Remote.
78
Page 79

DG-BG4300NU User Manual
5-3 Security Log
The security log dialog allows you to view the security log and configure the security log options.
Click on “View”. The screen shown below will appear.
79
Page 80

DG-BG4300NU User Manual
5-4 TR-069 Client
TR-069 is a protocol for communication between a CPE and Auto-Configuration Server (ACS). The CPE
TR-069 configuration should be well defined to be able to communicate with the remote ACS.
Parameter Description
Inform interval Enter the “Inform Interval”, default value is 300.
ACS URL Enter ACS server IP.
ACS user name Enter the username.
ACS password Enter the password.
WAN interface used by
Select the WAN Interface.
TR-069 client
Display SOAP messages
Enable or disable as required (check with ISP).
on serial console
Connection Request
Select or deselect as required.
Authentication
Connection Request User
Type the username.
name
Connection Request
Type the password.
Password
Connection request URL Type the URL of server.
80
Page 81

DG-BG4300NU User Manual
5-5 Internet time
This page allows you to synchronize the internet time with the router.
The below parameters will help you to configure the NTP server details on the router which will enable
the router time to sync with the global internet time. This will help to enable the time stamp in system
logs.
81
Page 82

DG-BG4300NU User Manual
5-6 Access Control
5-6-1 Passwords
Access to your broadband router is controlled through three user accounts: admin, support and user.
The user name “admin” has unrestricted access to change and view configuration of your broadband
router.
The user name “support” is used to allow an ISP technician to access you broadband router for
maintenance and run diagnostics.
The user name “user” can access the broadband router, view configuration settings and statistics, as well
as update the router’s software.
Below you can enter up to 16 characters and click “Apply/Save” button to change or create passwords.
5-6-2 Services
You can enable or disable the following list of services available in the access control list as shown below.
82
Page 83

DG-BG4300NU User Manual
5-6-3 IP Addresses
The IP address Access control mode, if enabled, permits access to local management from IP addresses
contained in the access control list. If the access control mode is disabled, the system will not validate IP
addresses for incoming packets.
Click on “Add”. The following screen will appear. Enter the IP address.
5-7 Update Software
Click on the “Update Software” button to upgrade the firmware.
83
Page 84

DG-BG4300NU User Manual
5-8 Reboot
Click on “Reboot” button to restart the device.
84
Page 85

DG-BG4300NU User Manual
6. Appendix
6-1 Hardware Specifications
Antennas: 5 dBi fixed antennas
Power Supply: AC power adaptor: 100VAC-240VAC
DC voltage: 12V DC, 1A
Hardware Interfaces: One RJ-11 port (for ADSL Line), Four 10/100Mbps RJ-45 Ports, One Power
switch, One Reset button, Two Wireless antenna, WLAN button, WPS button and One USB 2.0(Host)
Port
ADSL Standards: ANSI T1.413 issue2, ITU-T G992.1 with Annex A (G.dmt)
ITU-T G.992.2 Annex A (G.lite), ITU-T G.992.3 Annex A, L, M (ADSL2)
ITU-T G.992.5 Annex A, M (ADSL2+), ITU-T G 994.1
ITU-T G.997.1, ETSI ETR-328
Protocol & Features Supported: RFC 2684 IP Bridging, RFC 2684 IP Routing, RFC 2516, PPPoE,
RFC 2364 PPPoA, NAT & PAT (RFC 1631), DMZ support
Software features: IP filtering, Stateful packet inspection, (IPSec, L2TP, PPTP) pass through, Support
TR069
Quality of Service: Port based QoS
Wireless Standard and feature: IEEE 802.11b/g/n, 64/128 bit WEP, Multiple SSIDs Support, Support
for WPA, WPA2-PSK, WPA-PSK, TKIP, AES.
Dimensions:
Net Dimensions: 149 x 130.08 x 28.8 mm
Gross Dimensions: 213 x 158 x 82 mm
Weight:
Net weight: 500 gms
Gross weight: 600 gms
Environmental Specifications:
Operating temperature: 0º C to 50º C
Non-operating temperature: -20º C to 70º C
85
Page 86

DG-BG4300NU User Manual
7. Troubleshooting
If you find that the router is not working properly or stops responding don’t panic! Before you contact
your dealer of purchase for help, please read this troubleshooting first.
Scenario Solution
Unable to access the
router through web page
a. Please check the power cord connection and network cable of this
router. All cords and cables should be correctly and firmly inserted into
the router.
b. If all LED’s on the router are off, please check the status of A/C power
adapter, and make sure it’s correctly powered.
c. You must use the same IP address subnet as the router uses.
d. Are you using MAC or IP address filter? Try to connect the router by
another computer and see if it works; if not, please restore your router
to factory default settings (pressing ‘reset’ button for over 10 seconds).
e. Set your computer to obtain an IP address automatically (DHCP), and
see if your computer can get an IP address.
f. If you did a firmware upgrade and this happens, contact your dealer of
purchase for help.
g. If all above solutions don’t work, contact the dealer of purchase for
help.
Can’t get connected to
Internet
h. Clear your Internet browser history and cache memory.
a. Please be patient, sometimes Internet is just that slow.
b. Bypass the router and verify whether you can get connected to internet
as before.
c. Check PPPoE user ID and password again.
d. Call your Internet service provider and check if there’s something
wrong with their service.
e. If you just can’t connect to one or more websites, but you can still use
other internet services, please check URL/Keyword filter.
f. Try to reset the router and try again.
86
Page 87

DG-BG4300NU User Manual
g. Verify the line with device provided by your Internet service provider
too.
h. Try to use IP address instead of hostname. If you can use IP address to
communicate with a remote server, but can’t use hostname, please
check DNS settings.
I can’t locate my router by
my wireless client
File download is very
slow or breaks frequently
I can’t log onto web
a. ‘Broadcast ESSID’ set to off?
b. Both the antennas are secure.
c. Are you too far from your router? Try to get closer.
d. Please remember that you have to input ESSID on your wireless
client manually, if ESSID broadcast is disabled.
a. Are you using QoS function? Try to disable it and try again. Internet is
slow sometimes, be patient.
b. Try to reset the router and see if the download speed improves.
c. Try to know what other clients do on your local network. If some clients
are transferring files of big size, other clients will get an impression that
Internet is slow.
d. If this has never happened before, call your Internet service provider to
know if there is something wrong with their network.
a. Make sure you’re connecting to the correct IP address of the
management interface:
password is wrong
router (Default IP: 192.168.1.1).
b. Password is case-sensitive. Make sure ‘Caps lock’ is not on.
c. If you have forgotten the password, do a hard reset.
Router gets heated up a. This is not a malfunction as long as you are able to touch the router’s
case.
b. If you smell something wrong or see smoke coming out from the router
or A/C power adapter, please disconnect the router and A/C power
adapter from the utility power (make sure it’s safe before you’re doing
this), and call your dealer of purchase for help.
The date and time of all
a. Adjust the time zone in ‘System > Time Zone’ settings of the router.
event logs are wrong
87
Page 88

DG-BG4300NU User Manual
8. Glossary
Default Gateway (Router): Every non-router IP device needs to configure a default gateway IP address.
When the device sends out an IP packet, if the destination is not on the same network, the device has to
send the packet to its default gateway, which will then send it to the destination.
DHCP: Dynamic Host Configuration Protocol. This protocol automatically gives every computer on your
home network an IP address.
DNS Server IP Address: DNS stands for Domain Name System, which allows Internet servers to have a
domain name (such as www.Broadbandrouter.com) and one or more IP addresses (such as 192.34.45.8). A
DNS server keeps a database of Internet servers and their respective domain names and IP addresses, so
that when a domain name is requested (as in typing "Broadbandrouter.com" into your Internet browser),
the user is sent to the proper IP address. The DNS server IP address used by the computers on your home
network is the location of the DNS server your ISP has assigned to you.
DSL Modem: DSL stands for Digital Subscriber Line. A DSL modem uses your existing phone lines to
transmit data at high speeds.
DMZ: DMZ is a physical or logical subnetwork that contains and exposes an organization's external
services to a larger untrusted network, usually the Internet. The purpose of a DMZ is to add an additional
layer of security to an organization's local area network (LAN); an external attacker only has access to
equipment in the DMZ, rather than any other part of the network.
Ethernet: A standard for computer networks. Ethernet networks are connected by special cables and
hubs, and move data around at up to 10/100 million bits per second (Mbps).
Idle Timeout: Idle Timeout is designed so that after there is no traffic on the Internet for a pre-configured
amount of time, the connection will automatically get disconnected.
IP Address and Network (Subnet) Mask: IP stands for Internet Protocol. An IP address consists of a
series of four numbers separated by periods, which identifies a single, unique Internet computer host in an
IP network. Example: 192.168.2.1. It consists of 2 portions: the IP network address, and the host
identifier.
The IP address is a 32-bit binary pattern, which can be represented as four cascaded decimal numbers
separated by “.”: aaa.aaa.aaa.aaa, where each “aaa” can be anything from 000 to 255, or as four cascaded
binary numbers separated by “.”: bbbbbbbb.bbbbbbbb.bbbbbbbb.bbbbbbbb, where each “b” can be either
0 or 1.
A network mask is also a 32-bit binary pattern, and consists of consecutive leading
1’s followed by consecutive trailing 0’s, such as 11111111.11111111.11111111.00000000. Therefore
sometimes a network mask can also be described simply as “x” number of leading 1’s.
When both are represented side by side in their binary forms, all bits in the IP address that correspond to
1’s in the network mask become part of the IP network address, and the remaining bits correspond to the
host ID.
88
Page 89

DG-BG4300NU User Manual
For example, if the IP address for a device is, in its binary form,
11011001.10110000.10010000.00000111, and if its network mask is,
11111111.11111111.11110000.00000000
It means the device’s network address is
11011001.10110000.10010000.00000000, and its host ID is,
00000000.00000000.00000000.00000111. This is a convenient and efficient method for routers to route
IP packets to their destination.
ISP Gateway Address: (see ISP for definition). The ISP Gateway Address is an IP address for the
Internet router located at the ISP's office.
ISP: Internet Service Provider. An ISP is a business that provides connectivity to the Internet for
individuals and other businesses or organizations.
LAN: Local Area Network. A LAN is a group of computers and devices connected together in a relati vely
small area (such as home or office). Your home network is considered a LAN.
MAC Address: MAC stands for Media Access Control. A MAC address is the hardware address of a
device connected to a network. MAC address is a unique identifier for a device with an Ethernet interface.
It is comprised of two parts: 3 bytes of data that correspond to the Manufacturer ID (unique for each
manufacturer), plus 3 bytes that are often used as the product’s serial number.
NAT: Network Address Translation. This process allows all the computers on your home network to use
one IP address. Using the broadband router’s NAT capability, you can access Internet from any computer
on your home network without having to purchase more IP addresses from your ISP.
Port: Network Clients (LAN PC) uses port numbers to distinguish one network application/protocol over
another. Below is a list of common applications and protocol/port numbers:
Application Protocol
Telnet TCP 23
FTP TCP 21
SMTP TCP 25
POP3 TCP 110
H.323 TCP 1720
Port
Number
SNMP UDP 161
SNMP T rap UDP 162
HTTP TCP 80
PPTP TCP 1723
PC Anywhere TCP 5631
PC Anywhere UDP 5632
Port triggering: Port triggering is a configuration option on a NAT-enabled router that allows a host
machine to dynamically and automatically forward a specific port back to itself. Port triggering opens an
incoming port when your computer is using a specified outgoing port for specific traffic.
89
Page 90

DG-BG4300NU User Manual
PPPoE: (Point-to-Point Protocol over Ethernet.) Point-to-Point Protocol is a secure data transmission
method originally created for dial-up connections; PPPoE is for Ethernet connections. PPPoE relies on
two widely accepted standards, Ethernet and the Point-to-Point Protocol. It is a communication protocol
for transmitting information over Ethernet between different manufacturers.
Protocol: A protocol is a set of rules for interaction agreed upon between multiple parties so that when
they interface with each other based on such a protocol, the interpretation of their behavior is well defined
and can be made objectively, without confusion or misunderstanding.
Router: A router is an intelligent network device that forwards packets between different networks based
on network layer address information such as IP addresses.
Subnet Mask: A subnet mask, which may be a part of the TCP/IP information provided by your ISP, is a
set of four numbers (e.g. 255.255.255.0) configured like an IP address. It is used to create IP address
numbers used only within a particular network (as opposed to valid IP address numbers recognized by the
Internet, which must be assigned by InterNIC).
TCP/IP, UDP: Transmission Control Protocol/Internet Protocol (TCP/IP) and Unreliable Datagram
Protocol (UDP). TCP/IP is the standard protocol for data transmission over the Internet. Both TCP and
UDP are transport layer protocols. TCP performs proper error detection and error recovery, and thus is
reliable. UDP on the other hand is not reliable. They both run on top of the IP (Internet Protocol), a
network layer protocol.
WAN: Wide Area Network. A network that connects computers located in geographically separate areas
(e.g. different buildings, cities, countries). The Internet is a wide area network.
Web-based management Graphical User Interface (GUI): Many devices support a graphical user
interface that is based on the web browser. This means the user can use the familiar Netscape or Microsoft
Internet Explorer to Control/configure or monitor the device being managed.
3G telecommunication networks: Supports services that provide an information transfer rate of at least
200 kbit/s. However, many services advertised as 3G provide higher speed than the m
inimum technical
requirements for a 3G service. Later 3G releases, often denoted 3.5G and 3.75G, also provide mobile
broadband access of several Mbit/s to smartphones and mobile modems in laptop computers.
90
 Loading...