

RANGER SERIES
150 MBPS WIRELESS ADSL2+
BROADBAND ROUTER
DG-BG4100N
V1.0
2012-11-06
1
The following items should be present in your package
DG-BG4100N 150MBPS WIRELESS ADSL2+ BROADBAND ROUTER
Switching Power Adapter
POTS Splitter
Two RJ-11 cables
One RJ-45 patch cord
Quick Installation Guide
Installation Guide CD
Make sure that the package contains above items. If any of the listed
items is damaged or missing, please contact your retailer immediately.
The ADSL access device supports multiple line modes. It provides four
10/100Base-T Ethernet interfaces at the user end. Utilizing the high-speed
ADSL connection, the device provides users with broadband connectivity to
the Internet or the Intranet for high-end users like net bars and office users. It
provides a downlink speed up to 24 Mbit/s and an uplink speed up to 1 Mbit/s.
The device supports WLAN access, as WLAN AP or WLAN router, to internet.
It is compliant with IEEE 802.11,802.11b/g/n specifications and complies with
WEP, WPA and WPA2 security specifications.
Supports various line modes.
Supports external PPPoE dial-up access.
Supports internal PPPoE/PPPoA dial-up access.
Supports leased line mode.
Supports 1483B/1483R/MER access.
Supports multiple PVCs (eight at most) and these PVCs can be isolated
from each other.
Supports single PVC with multiple sessions.
Supports multiple PVCs with multiple sessions.
Supports the binding of the ports and the PVCs.
Supports the 802.1Q and 802.1P protocol.
Supports DHCP server.
Supports NAT / NAPT.
Supports static route.
Supports firmware upgrade: WEB/tftp/ftp.
Supports reset to factory default: reset, WEB.
Supports DNS relay.
Supports Virtual server.
Supports DMZ functions.
Supports two-level passwords and usernames.
Supports WEB interface.
Supports telnet CLI.
Supports System status display.
Supports PPP session PAP / CHAP.
Supports IP filter function.
Supports IP QoS function.
Supports remote access control.
Supports line connection status test.
Supports remote management (Telnet; HTTP).
Supports configuration file backup and restoration function.
Ethernet supported such as Crossover Detection, Auto-Correction and
polarity correction.
The following system requirements are recommended
A 10BaseT/100BaseT Ethernet card installed on your PC.
A hub or switch is available for connecting one Ethernet interface on the
device and several PCs.
Operating system: Windows Vista, Windows 7, Windows 98SE,
Windows 2000, Windows ME or Windows XP.
Internet Explorer V7.0 or higher, or Netscape V4.0 or higher, or firefox
1.5 or higher.
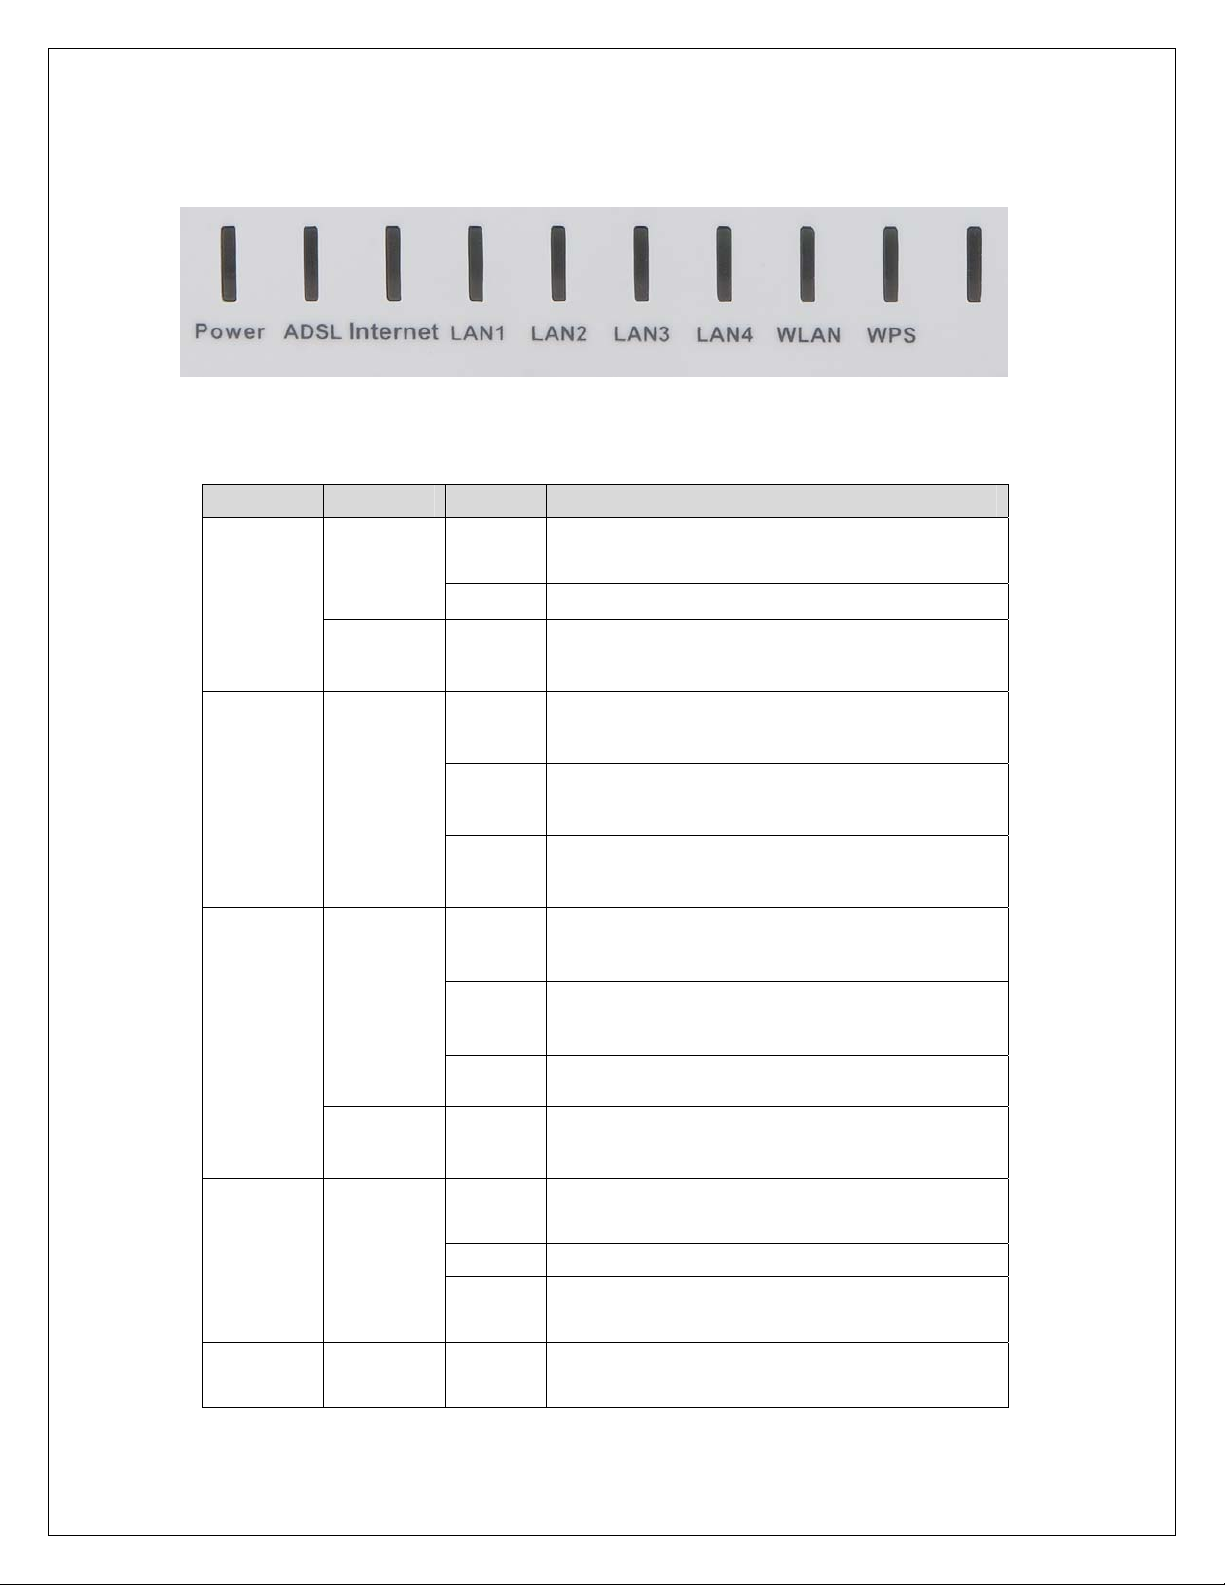
Top View
The following table describes the LEDs of the device.
LEDs Color Status Description
The initialization of the Router is
successful.
Power
Green
On
Off The Router is powered off.
Amber On
ADSL Green
Green
Internet
Red On
LAN
1/2/3/4
Green
WLAN Green
The Router is booting, or software
upgrade is under progress.
ADSL Signal between the Router
On
Slow
Blink
Fast
Blink
and Exchange is established.
No signal from Exchange is being
detected.
The Router is synchronizing with
the Exchange.
Internet data is being transmitted
Blink
or received (Routing mode)
Internet Connection is established
On
(Routing Mode)
Off
The Router is in bridged mode.
The Internet connection
failed/password error.
The LAN connection is established
On
and activated.
Blink LAN data is being transmitted.
The LAN interface/cable is
Off
disconnected.
Wireless connection has been
On
activated.

WPS Green
Blink Wireless data is being transmitted.
The Wireless connection is not
Off
activated.
WPS process on the Router is
Blink
initiated.
WPS is disabled OR WPS process
Off
not initiated.

Rear View
The following table describes the interfaces of the device.
Item Description
Press the button and hold it for 1 second to enable
WLAN /
WPS
ADSL
LAN4/3/2/1
Power Power interface, for connecting to the power adapter.
ON / OFF Power switch, power on or power off the device.
Reset
WLAN.
Press the button and hold it for at least 3 seconds, to
initialize WPS negotiation.
RJ-11 interface, for connecting to the ADSL interface or
a splitter through a telephone cable.
RJ-45 interface, for connecting to the Ethernet interface
of a computer or the Ethernet devices through an
Ethernet cable.
Reset to the factory default configuration. Keep the
device powered on, and insert a pin into the reset hole
for 3 seconds, then release it. The device is reset to the
factory default configuration.

Hardware Installation
Step 1 Connect the ADSL interface of the device and the router interface
of the splitter through a telephone cable. Connect the phone to the
Phone interface of the splitter through a telephone cable. Connect
the incoming line to the Line interface of the splitter.
The splitter has three interfaces:
Line: Connect to a wall phone jack (RJ-11 jack).
Router: Connect to the ADSL jack of the device.
Phone: Connect to a telephone set.
Step 2 Connect the LAN interface of the device to the network card of the
PC through an Ethernet cable (MDI/MDIX).
Note:
Use twisted-pair cables to connect to the hub or switch.
Step 3 Plug one end of the power adapter to the wall outlet and connect
the other end to the Power interface of the device.
The following figure shows the application diagram for the connection of the
router, PC, splitter and the telephone sets.

Software Installation
Insert the Setup CD into your CD-ROM drive of notebook/desktop
computer.
Explore the CD and execute the “India_autorun.exe” file. Screen given
below will be displayed. Click ‘Start’ to continue.

Connect the ADSL line and the phone line to the router. Click ‘Next’.
Connect the power adapter to the AC Mains and the other end to the
power interface on the router. Push the power button on the router to
power up the device. Click ‘Next’.

Connect the Ethernet interface on the router to the LAN card on the
computer using the Ethernet cable. Click ‘Next’.
After powering up the router, verify the status of the LED indicators on
the front panel of the router. Click ‘Next’.

Please select your ‘Country’ and ADSL service provider. VPI and VCI
values will auto fill.
Select the network protocol for WAN interface. Click ‘Next’.

All the utility installation steps till here are the common steps to be followed
for the modes.
Following are the steps for configuring PPPoE connection:
Enter the username and password provided by your ISP. Click ‘Next’.
Configure a wireless name (SSID) for your router. Click ‘Next’.

Configure the wireless security. Click ‘Next’.
The next screen is a summary of the wireless settings of the router.

Click on ‘Next’, the following screen will appear.
Once the connection is established, the router connection status will
appear.

Bridging Mode:
To configure the router in bridge mode select “Bridging” option. Click
‘Next’.
Configure a wireless name (SSID) for your router. Click ‘Next’.

Configure the wireless security.
Click on ‘Next’ the following screen will appear.

Click on ‘Finish’ to finish the router configuration in Bridge mode.
CONGRATULATIONS! THE WIRELESS ROUTER
CONFIGURATION IS COMPLETE.

Web Management of the Router
The following is the detailed description of accessing the router for the first
time.
Step 1 Open the Internet Explorer (IE) browser and enter
http://192.168.1.1.
Step 2 In the Login page that is displayed, enter the username and
password.
The username and password of the super user are admin and admin.
The username and password of the common user are user and user.
If you log in as a super user, the page shown in the following figure appears.
You can check, configure and modify all the settings.
If you log in as a common user, you can check the status of the router, but
can not configure most of the settings.

Following are the solutions to problems that may occur during the installation and
operation of the DIGISOL DG-BG4100N Wireless Broadband Router.
1. Cannot login to the router.
Verify whether username and password you entered is correct.
If you have forgotten the password, then reset the router using reset
button available on the rear side of the router.
Please keep reset button pressed till the router reboots to reset to
factory default settings. Now, you can try login into the router using
default user name and password.
Ensure that you take backup of the router configuration so you can
restore the router back after resetting it.
2. Router cannot get connected to Internet.
Access the router’s web configuration and verify internet connection
status.
If you were previously able to connect a computer to internet directly, try
to do that again, and verify whether you can access internet with your
computer directly attached to the device provided by your internet
service provider.
Check PPPoE user ID and password again.
Call your internet service provider and verify whether it connects to
internet or not.
Try to reboot the router and verify whether it connects to internet or not.
Try to use IP address instead of hostname. If you can use IP address to
communicate with a remote server but cannot use hostname. Please
check DNS settings.

r
f
3. Wireless cannot locate the Router.
Verify whether ‘SSID broadcast’ is set to off in router’s web
configuration.
Verify whether antenna is properly connected and in correct direction.
Is your wireless client far away from your router? Try to get closer to the
router.
Ensure that you input ESSID on your wireless client manually, if SSID
broadcast is disabled.
This product comes with Life time warranty. Fo
further details about warranty policy and Product
Registration, please visit support section o
www.digisol.com

22
 Loading...