

Page 1
V1.1
2012-09-17
RANGER SERIES
7.2Mbps
3G Broadband Adapter
DG-BA3370
3G
7.2 Mbps
Page 2
Copyright © 2012. All rights reserved.
Company has an on-going policy of upgrading its products and it may
be possible that information in this document is not up-to-date.
Please check with your local distributors for the latest information.
No part of this document can be copied or reproduced in any form
without written consent from the company.
Trademarks:
TM
DIGISOL is a trademark of Smartlink Network Systems Ltd. All other
trademarks are the property of the respective manufacturers.
Package Contents:
The following items should be present in your package:
DG-BA3370 7.2Mbps 3G Broadband Adapter
Quick Installation Guide
Make sure that the package contains above items. If any of the listed
items is damaged or missing, please contact your retailer immediately.
Copyright:
Page 3

Product Features
Supports HSPA / UMTS (2100MHz), GSM / GPRS / EDGE
(850/900/1800/1900MHz)
Support HSDPA (7.2 Mbps), HSUPA (5.76 Mbps), UMTS (384 Kbps), EDGE
(237 Kbps), GPRS (85.6 Kbps).
Support SMS, phone book, Volume Statistics via Software.
USB 2.0 High speed interface.
Micro SD slot for Mass Storage, maximum capacity up to 32GB.
No-CDROM required, auto installs the software.
Plug-and-Play installation.
Voice Call and USSD support.
Notebook or desktop PC with a free USB port
Windows 2003, Windows XP, Win Vista & Win 7
MAC OSX 10.5,10.6 &10.7
Linux Ubuntu 9.10,10.04,10.10 & 11.04
At least 100MB free disk space & 256MB RAM
System Requirements
The following system requirements are recommended
Thank you for choosing DIGISOL DG-BA3370 7.2Mbps 3G Broadband
Adapter! With this 3G broadband adapter you can get connected to
Internet using the high speed 3G network. When this adapter is connected
to a system then the utility/driver installation wizard is initiated
automatically without the need of a CD-ROM for installation. Through the
utility users can make/receive a voice call and also track the data usage
for their connection.
This adapter also has a Micro SD slot for Mass Storage. User can send or
receive a SMS and maintain a phone book with the help of the software
which is installed with this adapter.
Product Overview
Page 4
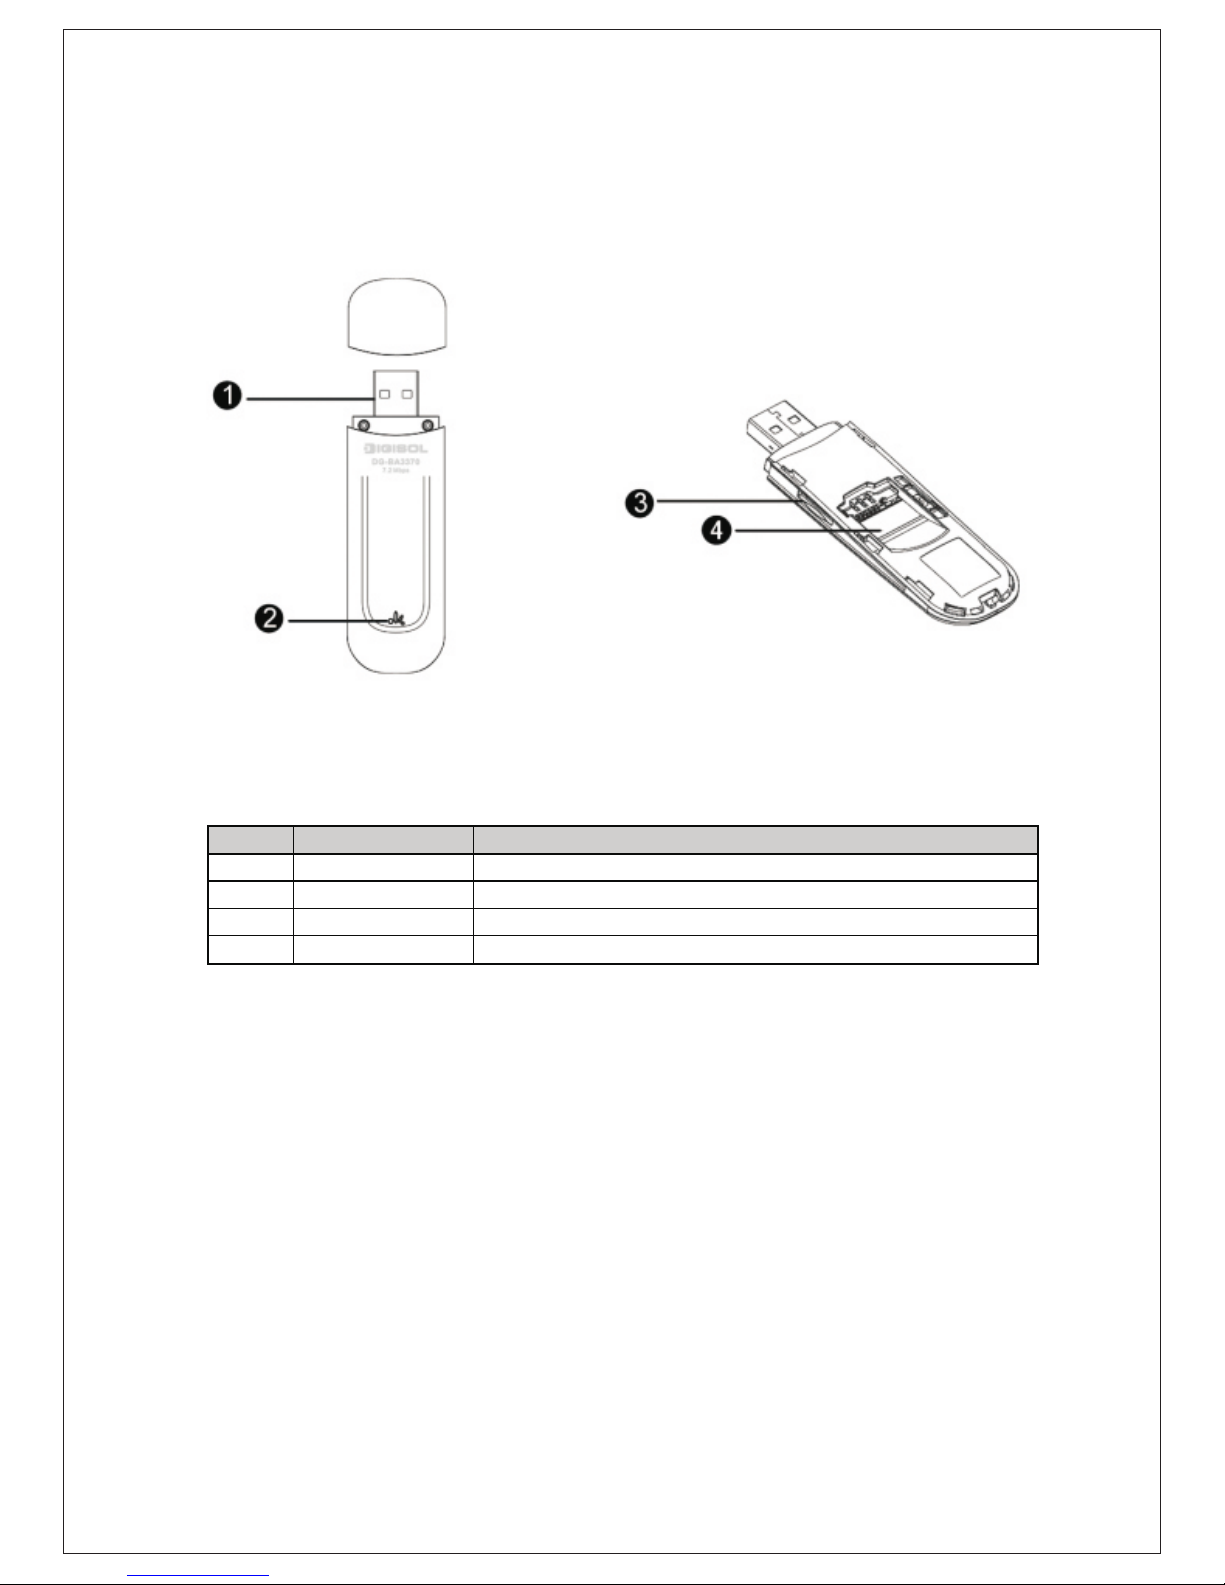
Product View
Below shown is the front and rear view of the 3G USB adapter
The above figure shows the appearance of the 3G USB adapter. It is
provided only for reference and the actual product image may vary.
Sr. No.
Interface
Description
1 USB Connector It connects to the USB port of the notebook/desktop computer
2 LED Indicator It indicates the status of the 3G USB adapter
3 Micro SD Card Slot It holds a Micro SD card
4 SIM Card Slot It holds a SIM card
Page 5

Hardware Installation
Following are the steps for inserting the SIM and a Micro SD card in the
3G USB adapter.
Slide the back cover to remove it from the 3G USB adapter.
1
2
3
Insert the SIM card into its corresponding slot, as shown in the
following figure.
Insert the Micro SD card into its corresponding slot, as shown in the
following figure.
Ensure that the beveled edge of the SIM card is properly aligned with
that of the SIM card slot.
Ensure that the Micro SD card is inserted according to the direction
as labeled on the Micro SD card slot.
Note: The Micro SD card is an optional accessory. It is not included in
the package.
Page 6

Plug the 3G USB adapter into the USB port of your PC.
1
2
Software Installation
Replace the back cover and slide it into place
4
Note: Do not remove the Micro SD or SIM card when the card is in
use. Otherwise, the card as well as your 3G USB adapter may get
damaged and the data stored on the card may get corrupted.
The software installation procedure depends on the operating system
(OS) installed on your PC. This section takes Windows XP as an example.
For MAC and Linux, please refer the User Manual in the ‘Help’ section of
the Software.
Page 7

The OS automatically detects and recognizes the new hardware and
starts the installation wizard. Click ‘Next’ button to continue with
the installation.
Note: If installation does not start automatically then go to my
computer and click on the CD ROM ICON “3G - Connect”
2
Select the drive and folder for installing the software, and then click
the 'Next' button to continue with the installation.
3
Page 8

Select start menu folder and additional tasks, and then click the
‘Next’ button to continue with the installation.
4
If you wish to create the icon on the desktop then select the
checkbox else unselect it. Click the ‘Next’ button to continue with
the installation.
5
Page 9

Click the ‘Install’ button to install the application.
6
Click the ‘Finish’ button to finish the software installation.
7
Page 10

The application runs automatically after finishing the installation.
8
Congratulations! Your 3G USB adapter
installation is now finished.
Connect the 3G USB adapter to Internet
Click 'Connect' to connect the 3G USB adapter to Internet.
Page 11

Select the Service Provider from the ‘Profile Name’ and then click
‘Connect’ for connecting to Internet.
Note: If the Service Provider you are using is not listed in the ‘Profile
Name’ then create a new profile in the ‘Profile Management’ option in
the ‘Settings’ tab. Please refer the ‘Help’ tab for more details.
Frequently Asked Questions
Following are the solutions to problems that may occur during the
installation and operation of the DIGISOL DG-BA3370 7.2Mbps 3G
Broadband Adapter.
1. Cannot get connected to Internet.
Verify whether the 3G USB adapter is firmly inserted and the LED is
ON.
Verify whether the driver/software for the adapter is installed
correctly.
Ensure that the correct profile is used to connect to Internet. Also
verify that the 3G signal strength is appropriate.
If still the issue persists then please contact DIGISOL TAC.
Page 12

 Loading...