

Page 1
Platinum RTD Thermometer
MODEL NO. 93410-00
Cole-Parmer Instrument Co.
625 East Bunker Court
Vernon Hills, Illinois U.S.A. 60061-1844
(847) 549-7600
(847) 247-2929 (Fax)
800-323-4340
www.coleparmer.com
e-mail: techinfo@coleparmer.com
A-1299-0864
Edition 01
Page 2

CERTIFICA TE OF
CONFORMANCE
This thermometer was calibrated using
equipment traceable to the National Institute of Standards and Technology (NIST).
This instrument conforms to
DIN IEC 751 revised to ITS-90.
The accuracy of the thermometer at the
time of calibration was within specifications
stated in the operating manual.
Model No.:__________________________
Serial Number:______________________
Date placed in service:________________
To purchase an NIST certificate of trace-
ability with test data and test date for meter
and probe please contact:
Cole-Parmer Instrument Company
625 East Bunker Court
Vernon Hills, Illinois USA 60061-1844
Toll-free: 800-323-4340
Page 3

INTRODUCTION
This versatile hand-held instrument provides highly
accurate temperature measurements. The instrument is designed for easy operation and includes
the following features:
• Operator selection of Celsius or Fahrenheit scale
• Resolution of 0.1° (auto ranging)
• Four-digit LCD
• Hold feature for temporarily retaining a reading
• Field calibration capability
• Low battery warning
• Built-in tilt stand for easy hands-free operation
• 3-pin circular connector input
• Operates with a wide selection of probes
1
Page 4

SAFETY PRECAUTIONS
DANGER
PRESENT AT THE BATTERY TERMINALS. ALWA YS DISCONNECT THE R TD WHEN CHANGING BA TTERIES.
WARNING
LOW LEVEL SIGNALS SUPPLIED BY STANDARD 100 OHM PLATINUM RTDS. UNDER NO
CIRCUMSTANCES SHOULD THE INPUT VOLTAGE EXCEED THE SPECIFIED 10 V RMS.
CAUTION
MICROWAVE OVENS OR ANY ABNORMALLY
HOT OR COLD AREAS.
CAUTION
STRUMENT . DEAD BATTERIES CAN LEAK AND
CAUSE DAMA GE T O UNIT.
VOLTAGES PRESENT AT
THE RTD MAY ALSO BE
THIS INSTRUMENT IS
DESIGNED TO ACCEPT
DO NOT USE OR STORE
THIS INSTRUMENT IN
WEAK BA TTERIES SHOULD
NOT BE LEFT IN THE IN-
2
Page 5

SPECIFICATIONS
PLA TINUM RTD PROBES
100 ohm platinum: alpha = 0.003850
–200 °C to 850 °C (–392 °F to 1562 °F)
Out of range display: “Ur” , “Or” , “oPEn”
Accuracy and Resolution:
Range Accuracy Resolution
–200 to –100 °C
(–392 to –148 °F) ±2 °C (±4 °F) 1°
–100 to 200 °C
(–148 to 392 °F) ±0.2 °C (±0.4 °F) 0.1°
200 to 850 °C
(392 to 1562 °F) ±2 °C (±4 °F) 1°
Display: 4-digit LCD with 0.4 inch (10 mm) high
numerals.
Display update rate: 0.5 sec per update.
Input: One probe with 3-pin circular connector
(Switchcraft T A3F).
Input Protection: 10V rms
Battery: Two AA, 1.5V alkaline ANSI-L40, IEC-
LR6.
Battery Life: 200 hours continuous, typical.
Low battery indication: Battery symbol on when
8 to 10 hours of battery life remains.
Auto Shutoff: 17 minutes after last key press.
3
Page 6

Operating:
Stated accuracy: 18°C to 28°C (64°F to 82°F)
Useful range: 0°C to 40°C (32°F to 104°F)
Storage: –40°C to 65°C
Humidity: 10% to 90%
Dimensions
3 cm D x 8.4 cm W x 15.8 cm H
(1.2 in x 3.3 in x 6.2 in)
Weight with batteries: 227 g rams (8 ounces)
Ingress protection: Meets IEC-529 IP-54 for dust-
and water-resistant enclosures.
Compliance (For CE Mark): EN61326-1/A1: 1998
(EU EMC Directive)
(–40°F to 149°F)
(non-condensing)
4
Page 7

BATTERY INSTALLATION AND
REPLACEMENT
DANGER
PRESENT AT THE BA TTER Y TERMINALS . ALWA YS DISCONNECT THE R TD WHEN CHANGING BA TTERIES.
CAUTION
INSTRUMENT. DEAD BATTERIES CAN LEAK
AND CAUSE D AMAGE TO UNIT .
VOLTAGES PRESENT AT
THE RTD MAY ALSO BE
WEAK BA TTERIES SHOULD
NOT BE LEFT IN THE
5
Page 8
If battery indicator turns on, battery life is approximately 8 to 10 hours.
See SPECIFICATIONS for battery type.
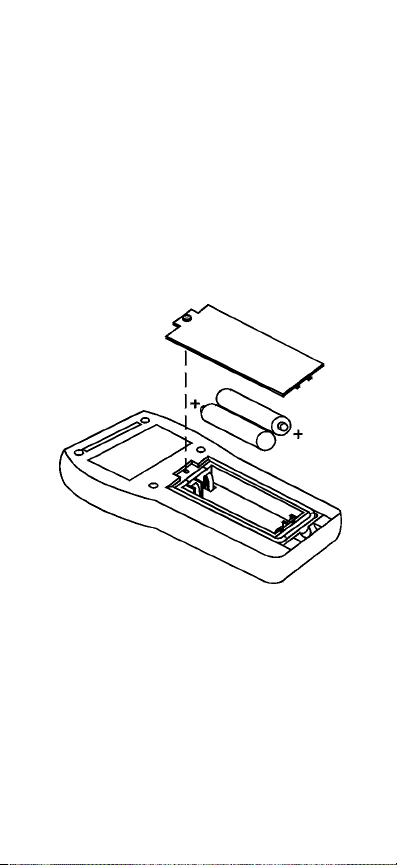
1. Before changing battery , turn instrument off and
disconnect probe.
2. Loosen screw and lift battery cover off back of
case.
3. Remove the two AA batteries.
4. Insert two new batteries, observing polarity.
5. Install cover and tighten screw.
6
Page 9

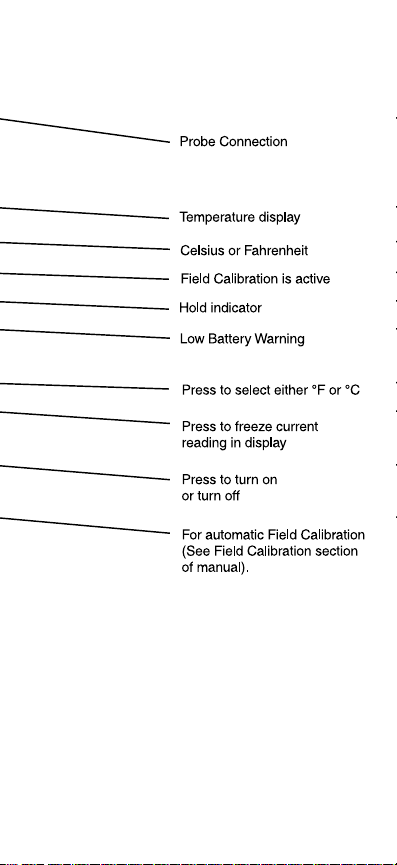
CONNECTING AN RTD
Use the correct 100 ohm RTD (alpha = 0.003850)
for your instrument. Using an incorrect probe type
will result in erroneous readings. Insert the 3-pin
plug into the mating connector on the top of the
instrument.
7
Page 10

8910
Page 11
Page 12

OPERATION
1. Press the ON/OFF key. The thermometer performs a self-test and all display digits and indicators, as shown below, should remain on for
approximately two seconds.
2. If a probe is not connected or if the probe is defective, the displa y will indicate “oPEn”.
3. Select °C or °F by pressing the °C/°F key. Temperature scale can be switched at any time. The
thermometer retains the last selected scale the
next time you turn the power on.
4. For optimum instrument accuracy, allow one
minute for ambient temperature stabilization. If
the unit has been stored at an extreme ambient
condition, more time will be needed.
When taking temperature measurements, allow
time for the reading to stabilize. Multiplying the time
constant of the probe by 5 will give you the approximate time required.
If desired, press the HOLD key to retain the reading on the display . Press HOLD key again for normal operation.
The display will show “Ur” (under range) or “Or”
(over range) if the temperature reading is out of
range of the instrument.
Page 13

FIELD CALIBRATION
The thermometer is factory calibrated and does not
require calibration before use. The CAL function allows single point calibration of the thermometer at
0°C (32°F) to compensate for probe offset error. It
is not necessary to perform a field calibration to
obtain specified meter accuracy . Use the field calibration feature to improve thermometer/probe
accuracy.
1. Follow steps 1 through 4 in FIELD CALIBRA-
TION CLEAR/UNLOCK section.
2. Pack sensing end of probe in a container tightly
packed with crushed ice and filled with distilled
water. Allow temperature to stabilize.
3. Press and release the CAL key to enter the calibration mode.
4. The display will momentarily show “CA” and then
the temperature reading starts blinking.
5. If the measured temperature is from –5°C to 5°C
(23 to 41°F) when the temperature reading is
stable, press the HOLD key to confirm
calibration.
The display will momentarily show “CO” and the
reading will be set to 0°C (32°F). The CAL indicator will turn on, indicating a field calibration is
active.
The field calibration is automatically
locked as well.
If “Err” is display ed, either the display ed reading is
outside the above limits or the batteries are weak.
11
Page 14

FIELD CALIBRA TION CLEAR/UNLOCK
The calibration clear/unlock feature will cancel an y
previous field calibration (the thermometer reverts
to the default factory calibration) and also enables
the field calibration operation.
1. Turn the thermometer off.
2. Hold the CAL key down while pressing the ON/
OFF key .
3. Unit will first display 8888 then the firmware version number
4. When the CAL key is released, the unit will return to measurement mode.
FIELD CALIBRA TION LOCKOUT
The calibration lockout feature prevents any field
calibration changes. The lockout remains in eff ect
until a clear/enable has been performed. Use the
following procedures to lockout the field calibration
operation.
Lockout Procedure
1. Turn the thermometer off.
2. Hold the HOLD key down while pressing the ON/
OFF key .
3. Unit will first display 8888 then the firmware version number
4. When the HOLD key is released, the unit will
display 8888 and then turn off. (If field calibration is already locked, the unit will return to measurement mode.)
.
.
12
Page 15

MAINTENANCE
Properly used, the thermometer should maintain
calibration indefinitely and not require service other
than occasional cleaning of the housing and changing of the batteries.
Do not clean with abrasives or solvents. Use mild
detergents; nev er immerse nor use excessive fluid.
BATTERIES
If there is no display when the thermometer is
turned on, check condition of the two AA batteries.
Also check that the battery terminals are clean and
batteries are properly installed. If replacement is
necessary, ref er to the BA TTER Y INST ALLA TION
AND REPLACEMENT section for replacement
procedure.
SERVICE
There are no internal adjustments or userreplaceable parts.
Note: Serial number label is located inside
battery compartment.
Rev. A 010201
Printed in Singapore
68X309904 12/02 Rev. 0
13
A-1925-36
Page 16

EU Declaration of Conformity
Name of Apparatus:
Thermometer
Model Number: 93410-00
Description of Apparatus: Electronic thermometer
Barnant Company declares that the above model is
in conformity to the following harmonized standards
and directives:
Applicable Applicable Manufacturer’s
Directives Specifications Report Number
89/336/EEC EN61326-1/A1: 1998 TR0180
92/31/EEC
93/68/EEC
Manufacturer:
Cole-Parmer Instrument Company
28W092 Commercial Avenue
Barrington, IL 60010-2392
USA
T el.: 847-381-7050
Manufacturer’s Signature:
James W . Doll Date
Vice President, Engineering
DIGI-SENSE
using a platinum RTD probe
®
Platinum RTD
20 August, 2001
Page 17

ACCESSOR Y RTD
PROBES
Cole-Parmer offers a wide variety of RTD
probes, connectors, extension cables, accessories and calibration services.
The popular probes listed below have a nylon
handle, a 5-ft coiled cord and a 316 SS sheath.
General-purpose probe, 10 in long x 0.188 in
dia. 10 second time constant.
08117-70
PTFE-coated general-purpose probe, 10 in
long x 0.145 in dia. 15 second time constant.
08117-87
Penetration probe, 4 in long x 0.188 in dia sharp
tip. 10 second time constant.
08117-85
Surface probe, 8 in long with 0.25 in dia alumi-
num and ceramic tip. 24 second time constant.
08117-75
Air/gas probe, 10 in long sheath with 0.25 in dia
radiant heat shield. 4 second time constant.
08117-90
37000-98 Carrying case. Hard plastic case with
foam insert holds one meter and up to five probes.
Measures 21 in W x 12 in H x 3 in D.
91100-90 Soft carrying case.
Page 18

WARRANTY
The Manufacturer warrants this product to be
free from significant deviations from published
specifications. If repair or adjustment is necessary within the warranty period, the problem will
be corrected at no charge if it is not due to misuse or abuse on your part as determined by the
Manufacturer. Repair costs outside the warranty
period, or those resulting from product misuse
or abuse, may be invoiced to you.
The warranty period for this product is noted
on the Warranty Card.
PRODUCT RETURN
To limit charges and delays, contact the seller or
Manufacturer for authorization and shipping instructions before returning the product, either
within or outside of the warranty period. When
returning the product, please state the reason
for the return. For your protection, pack the product carefully and insure it against possible damage or loss. Any damages resulting from improper packaging are your responsibility.
TECHNICAL ASSISTANCE
If you have any questions about the use of this
product, contact the Manufacturer or authorized
seller.
Trademarks bearing the ® symbol in this publication are
registered in the U.S. and in other countries.
A-3477-69
Rev. A 010201
Printed in Singapore
68X309904 12/02 Rev. 0
 Loading...