

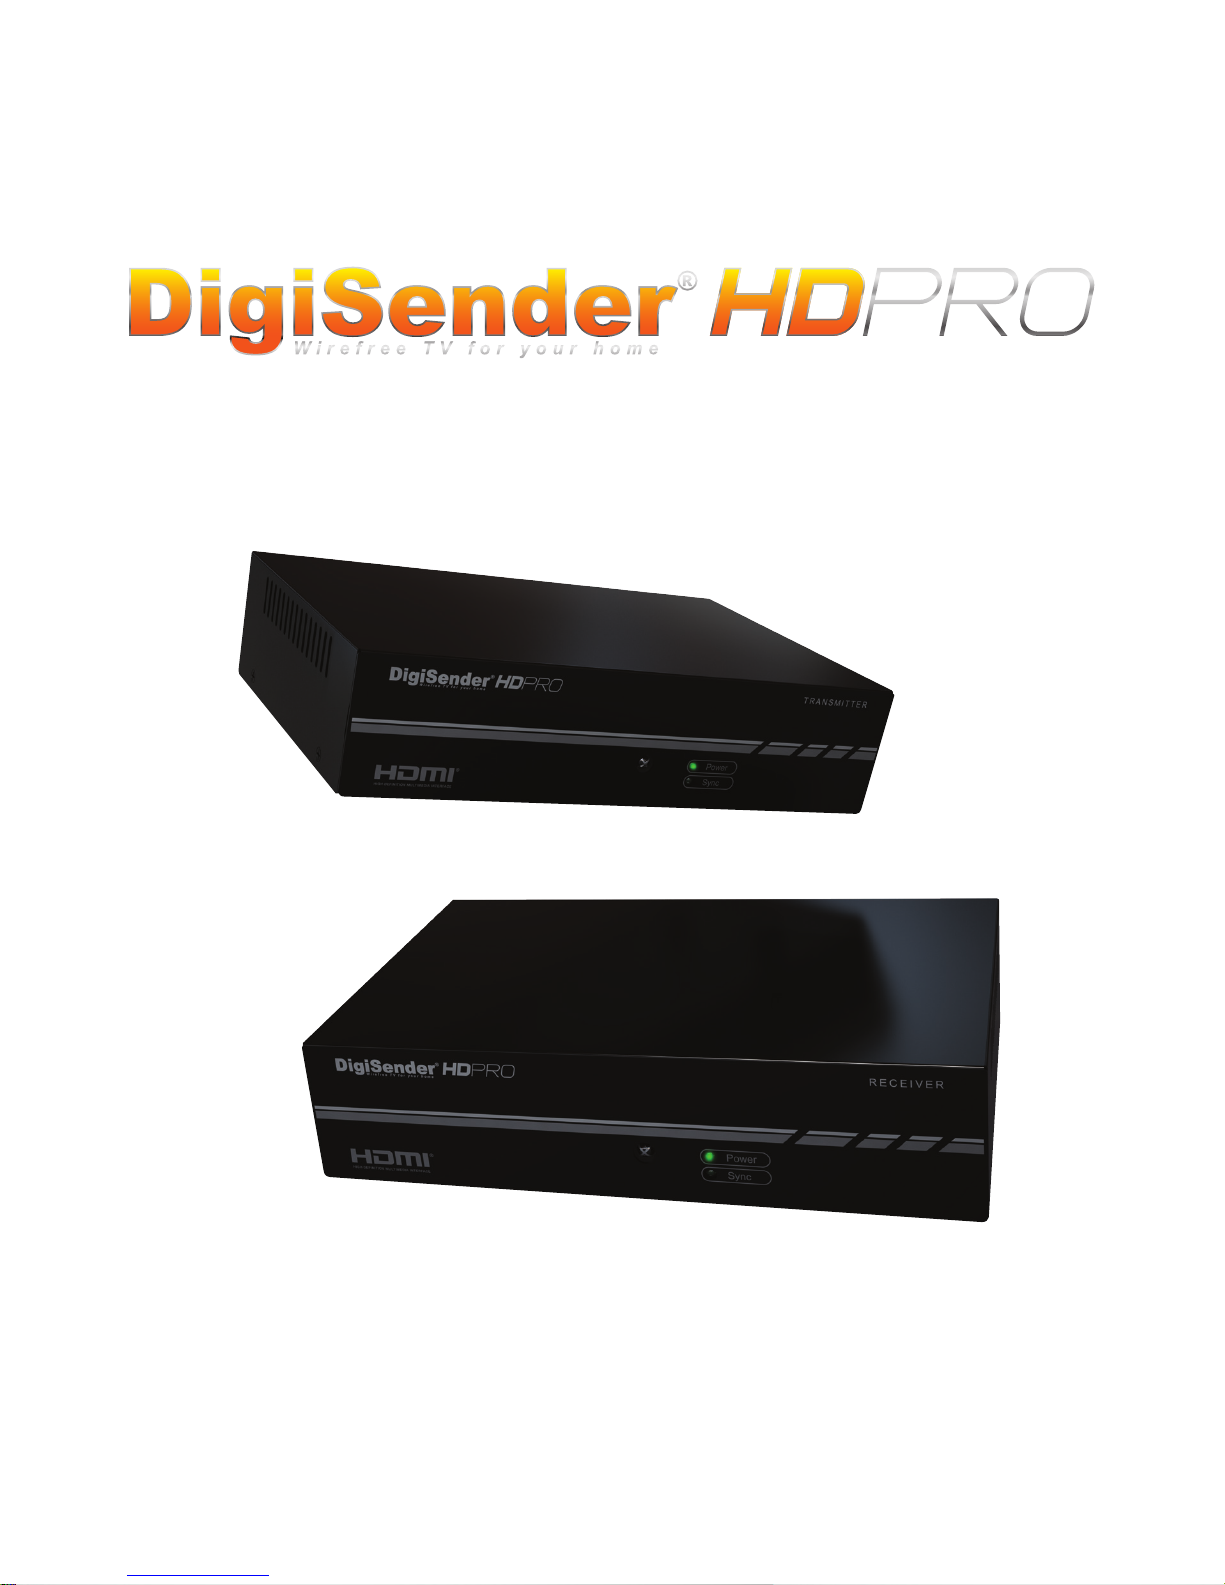
Model: DGHDP1
1080p Powerline AV Sender System
Please keep this instruction manual for future reference

Page 02 Please read the instructions carefully prior to installation
DGHDP1 - DigiSender® HD Pro - 1080p Powerline AV Sender System
Contents
Introduction
Installing the DigiSender® HD Pro
Step 1 - Unpack your DigiSender®
Step 2 - Install the Transmitter
Step 3 - Install the IR Emitter
Step 4 - Install the Receiver
Basic Operation
The DigiSender® HD Pro Remote Control
The On-Screen Menu
Advanced Operation
Installing Additional Receivers
Running Multiple Transmitters with Multiple Receivers
Transmitter & Receiver Syncing
PLC Grouping
Resetting the System Settings to Factory Defaults
Resetting the PLC Settings to Factory Defaults
Troubleshooting
Frequently Asked Questions
Syncing and Resetting Procedure
Remote Relay Problems
Technical Support & Accessories
Information & Safety
Important Product Information
Abnormal Operation
Safety Precautions
Power Cable Precautions
HDMI Cable Precautions
Notes
Specifications
03
04 - 09
04
05 - 06
07
08 - 09
10 - 14
10 - 12
13 - 14
15 - 20
15
15 - 16
17
18
19
20
21 - 26
21 - 22
23 - 24
25
26
27 - 29
27
27
28
29
29
30 - 31
32
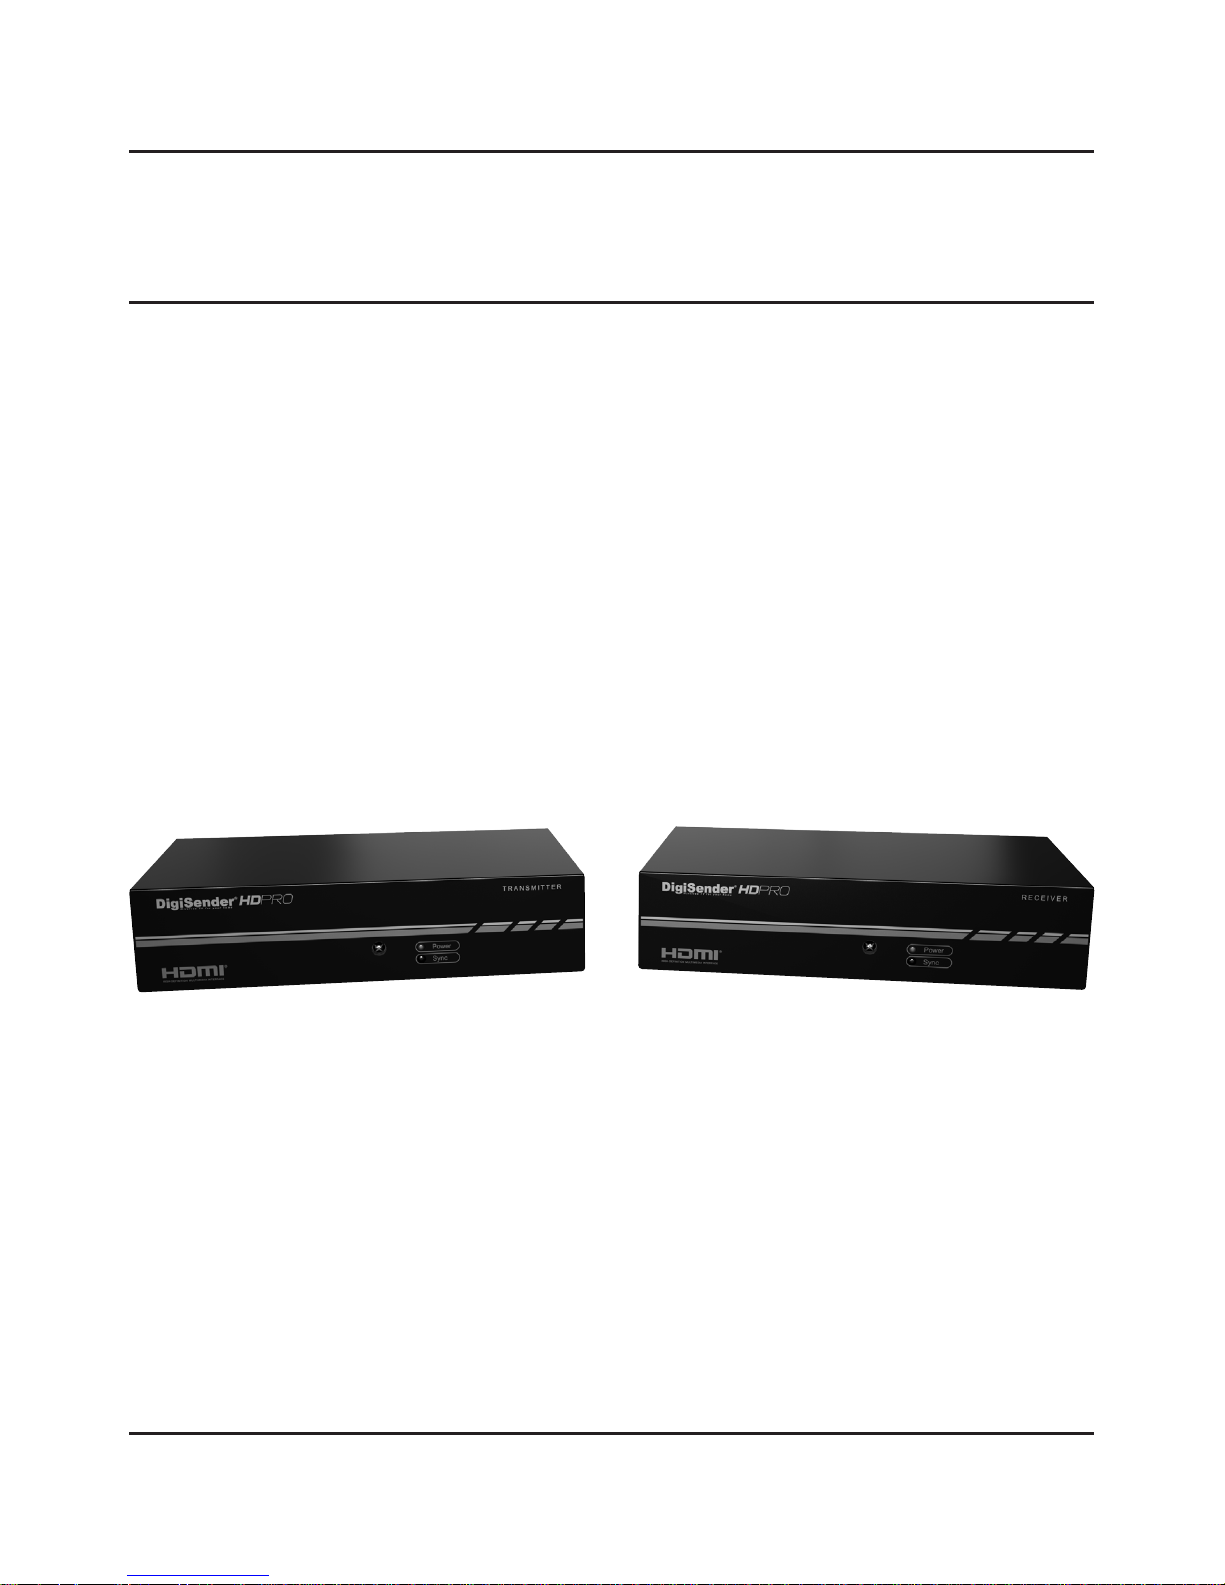
Page 03Please read the instructions carefully prior to installation
DGHDP1 - DigiSender® HD Pro - 1080p Powerline AV Sender System
Introduction
The DigiSender® HD Pro is the latest state-of-the-art AV sender system from AEI Security & Communications Ltd.
Making use of the most recent advancements in high definition media distribution technology the DigiSender®
HD Pro will allow you to transmit 1080p High Definition video around your home using your existing mains power
lines. This avoids the complexities of re-wiring your house or buying new AV equipment for each viewing room.
This system consists of a Transmitter and a Receiver that delivers H.264 High Definition video and high quality
audio from HD Satellite receivers, HD Set-Top boxes , Blu-Ray™ players and HD Games Consoles (etc.) to compatible HDTV displays located near mains power sockets in your home.
Setup is quick and easy. The source device (e.g. HD Satellite receiver in lounge) is connected to the transmitter
and the receiver is connected to the second HDTV (e.g. Bedroom TV), both via HDMI™.
The system also features Remote Relay, allowing you to use the source remote (e.g. HD Satellite remote control)
from the receiving location.
It is recommended that you read the Information & Safety section on page 27 - 29 before installing this product.
Page 04 Please read the instructions carefully prior to installation
DGHDP1 - DigiSender® HD Pro - 1080p Powerline AV Sender System
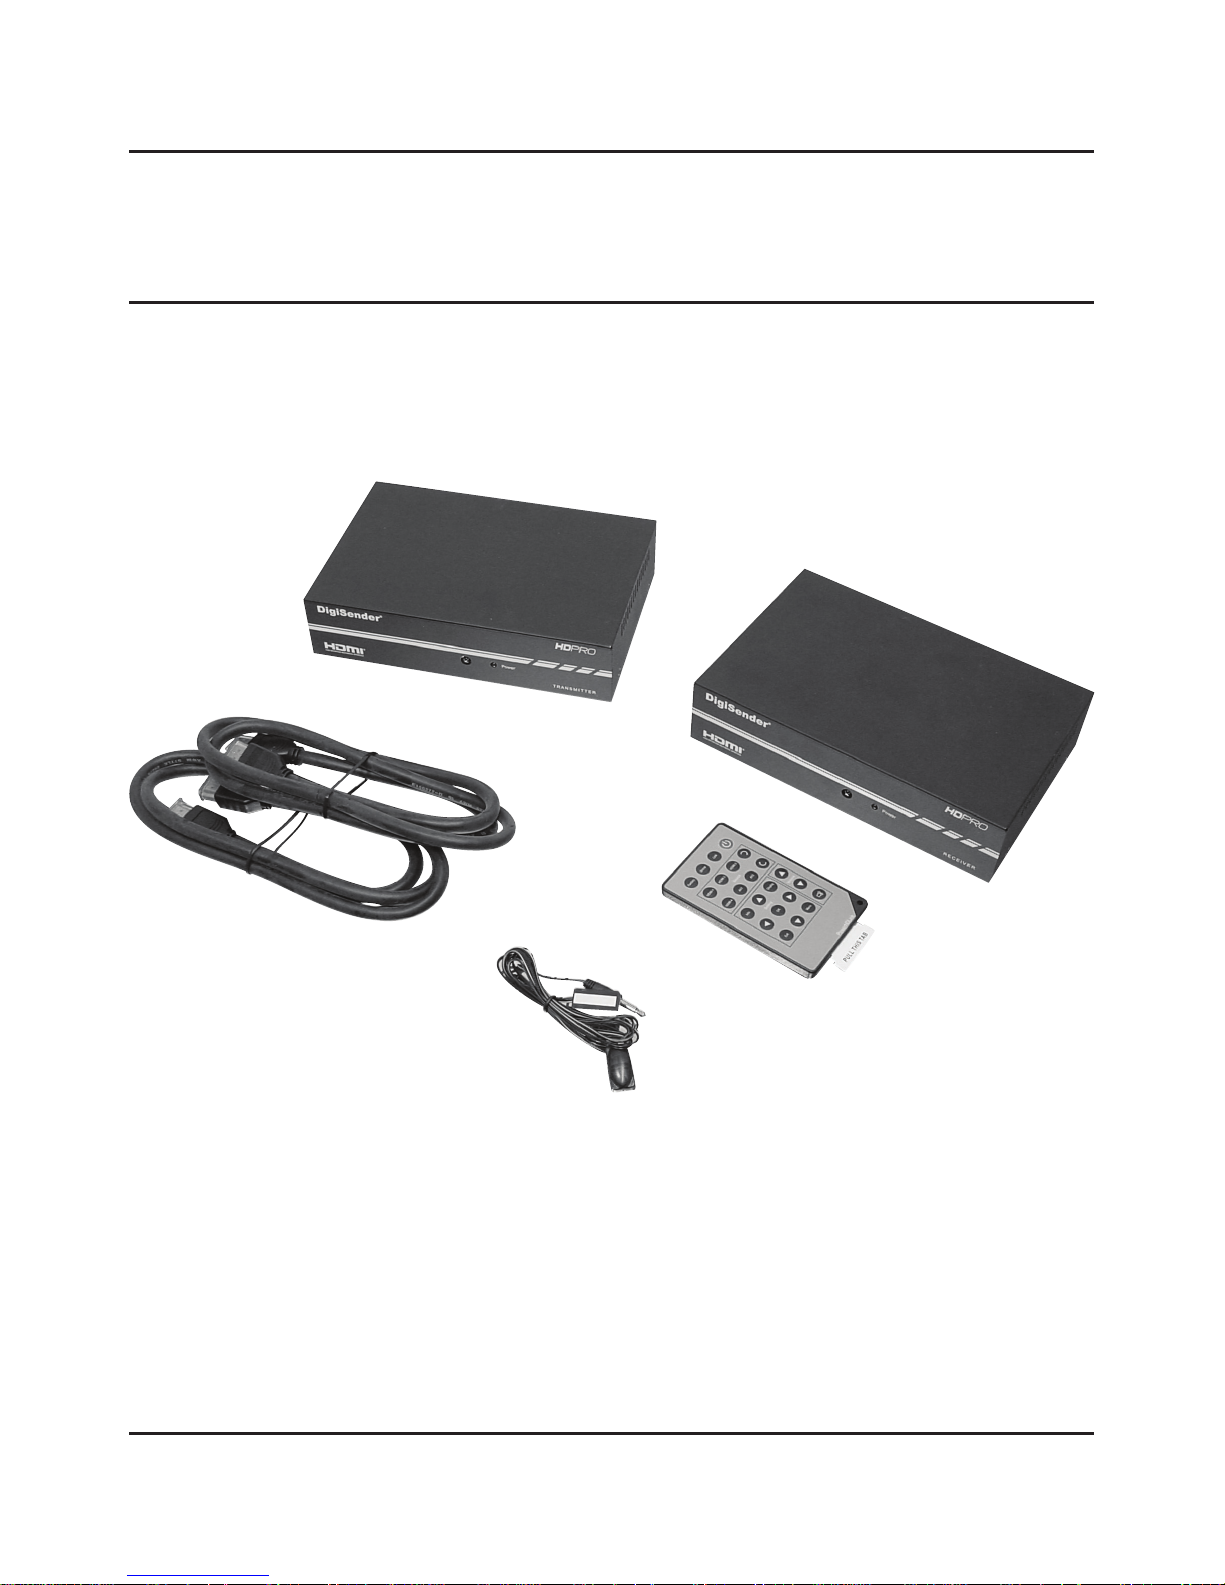
Installing your DigiSender®
Step 1 - Unpack your DigiSender®
All DigiSender® orders are computer weight checked when packed, however, it is a good idea to check all kit
contents are present before proceeding with the installation.
1.
2.
3.
4.
5.
1. 1x HD Pro Transmitter
2. 1x Receiver
3. 2x HDMI Cables
4. 1x IR Emitter
5. 1x Remote Control
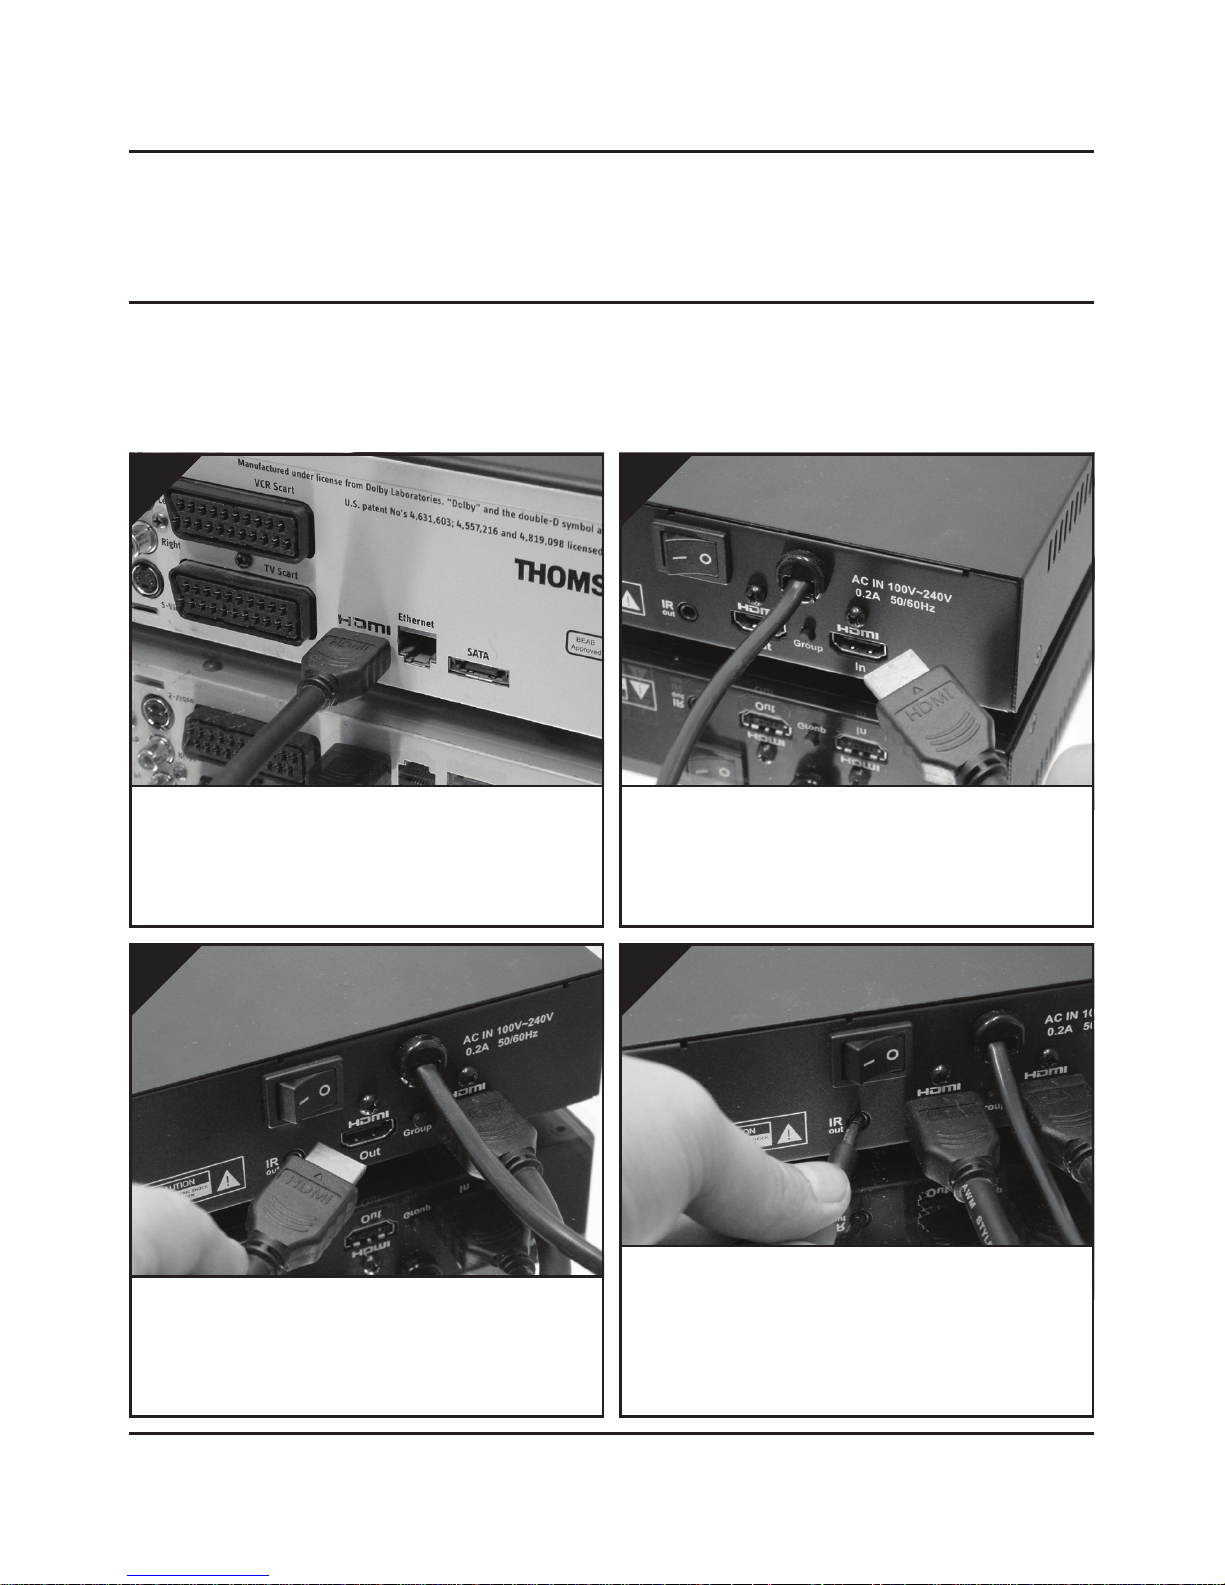
Page 05Please read the instructions carefully prior to installation
DGHDP1 - DigiSender® HD Pro - 1080p Powerline AV Sender System
Use one of the included HDMI cables and connect
it to the socket labelled ‘HDMI Out’ on the back of
the DigiSender® Transmitter and the HDMI Input on
your main TV.
3.
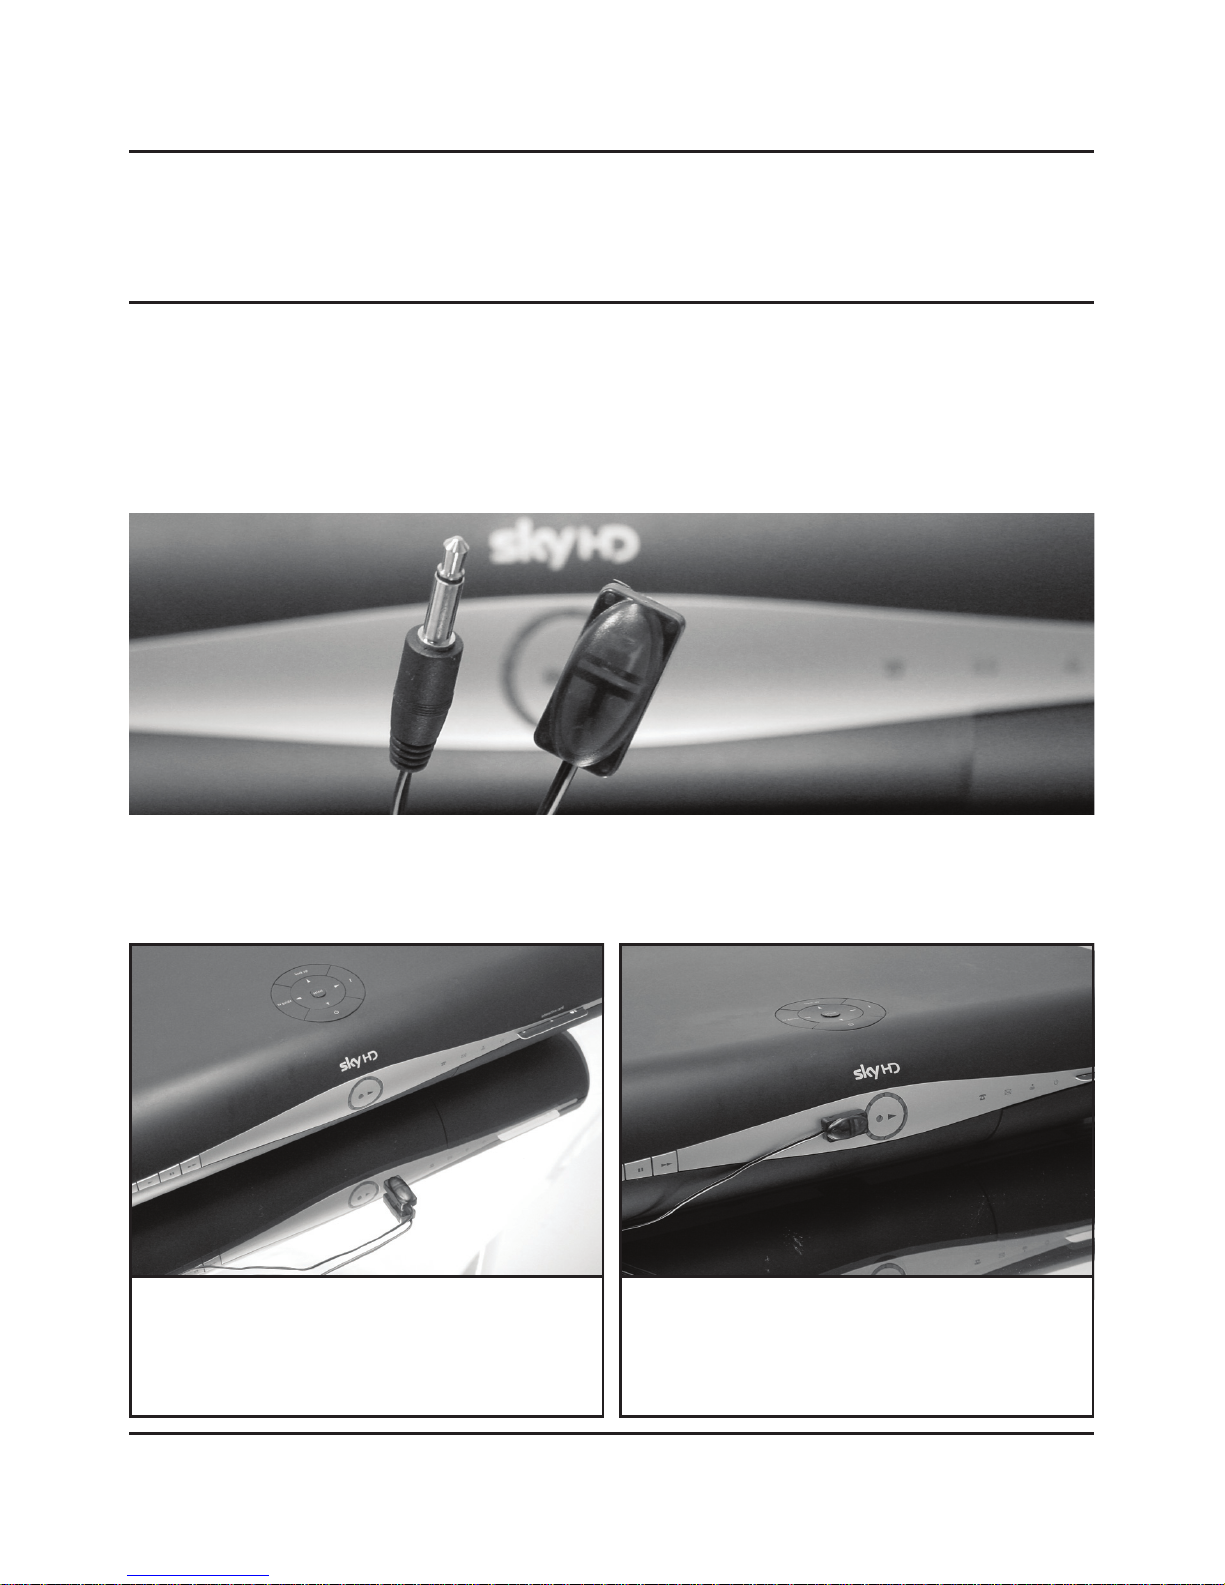
Connect the IR Emitter to the socket labelled ‘IR’ on
the back of the DigiSender® Transmitter and place
the IR Emitter facing the remote control sensor on
the front of your source device (e.g. HD Satellite
receiver) .
4.
Identify the HDMI cable connecting your source
device (e.g. HD Satellite receiver) to your main TV.
1.
Disconnect this cable from the TV and connect it
to the socket labelled ‘HDMI In’ on the back of the
DigiSender® Transmitter.
2.
Installing your DigiSender®
Step 2 - Install the Transmitter
This chapter describes how to correctly install your DigiSender® HD Pro. After installation is complete you will be
able to view the connected source device (e.g. HD Satellite receiver) on another TV anywhere in your home or
office.
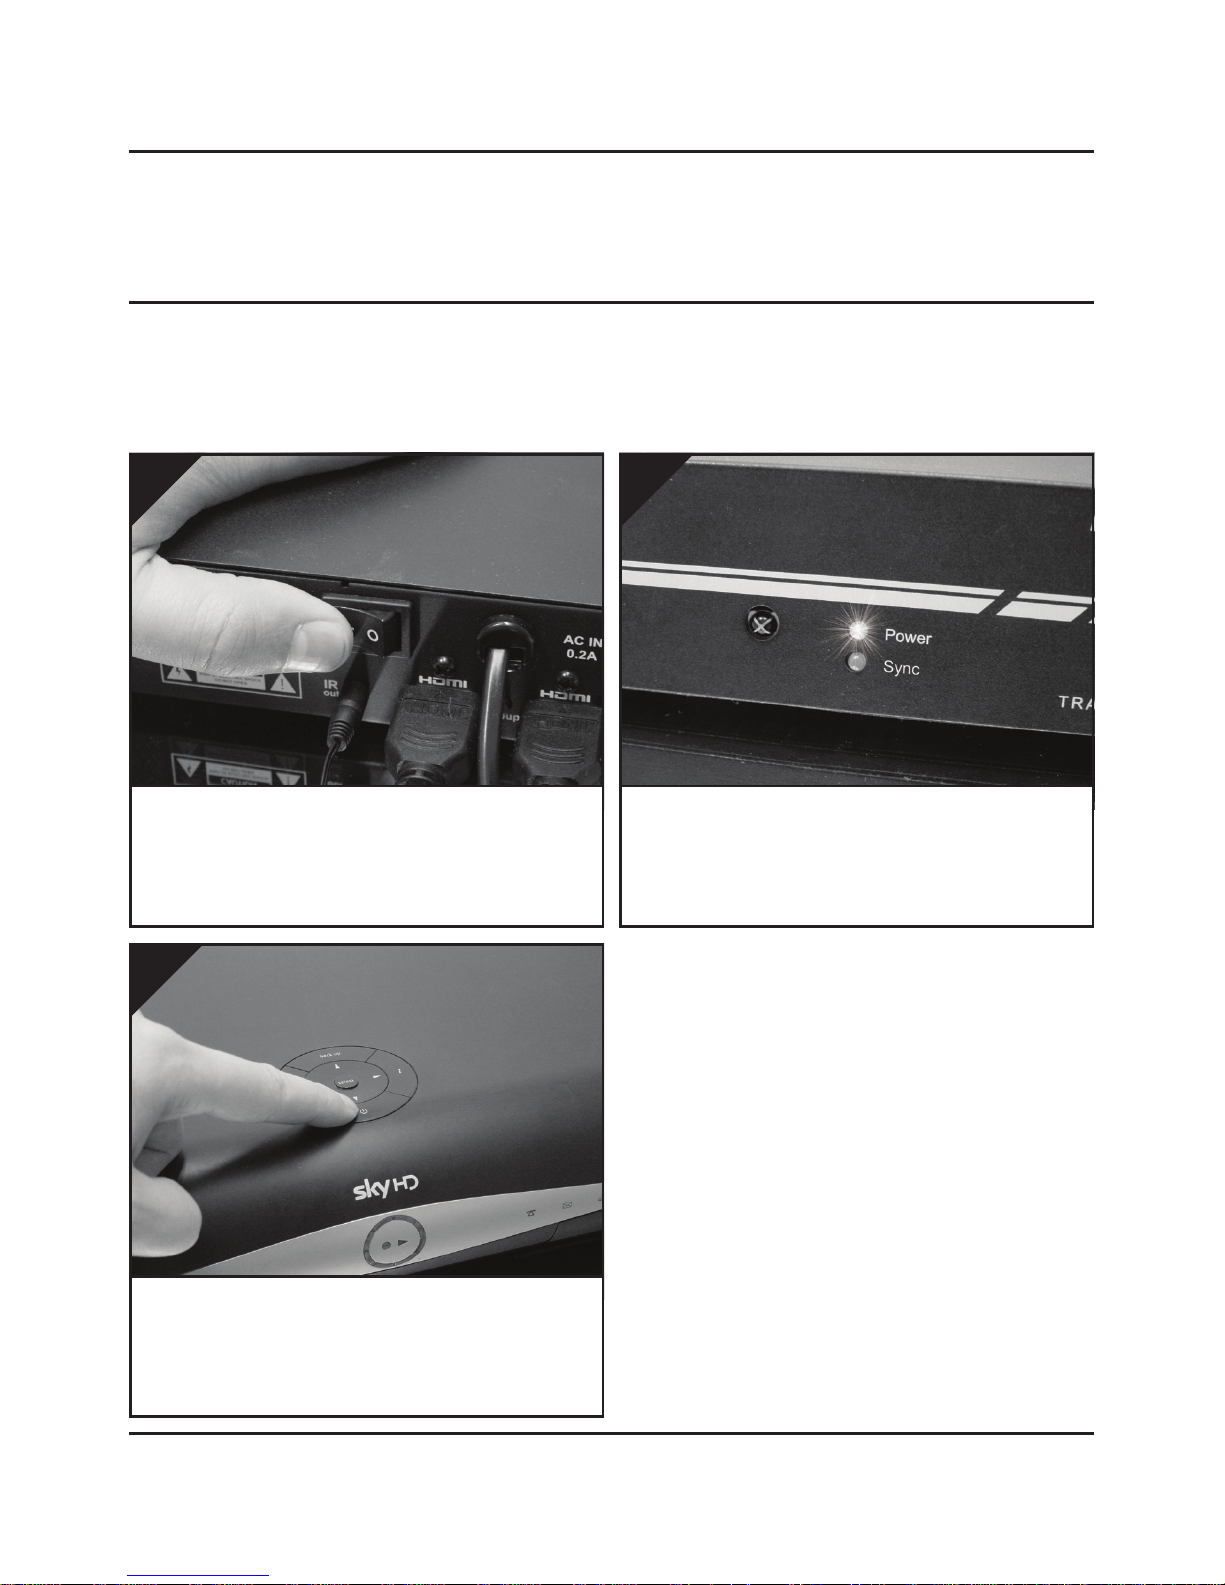
Connect the DigiSender® Transmitter power cable
to an available mains power socket and switch on
at the back.
5.
The Power LED on the front of the DigiSender®
Transmitter will illuminate green to indicate that
the Transmitter is powered up.
6
Page 06 Please read the instructions carefully prior to installation
DGHDP1 - DigiSender® HD Pro - 1080p Powerline AV Sender System
Installing your DigiSender®
Step 2 - Install the Transmitter
Turn on your source device (e.g. HD Satellite receiver).
7.
Page 07Please read the instructions carefully prior to installation
DGHDP1 - DigiSender® HD Pro - 1080p Powerline AV Sender System
Installing your DigiSender®
Step 3 - Install the IR Emitter
The DigiSender® HD Pro features a remote relay system that allows you to control your source device (e.g. HD
Satellite receiver, from the second TV. The DigiSender® Receiver is fitted with an IR Sensor that will pick up the
IR signal from your source remote control (e.g. HD Satellite remote control). This IR signal is sent over your mains
power line to the DigiSender® Transmitter, where it is then sent to the source device (e.g. HD Satellite receiver)
via the IR Emitter.
Position 1: Place the IR Emitter facing the remote
control sensor on the front of your source device
(e.g. HD Satellite receiver) .
Position 2: Use the included sticky pad to stick the
IR emitter to the front of your source device, near
to, and facing, the remote control sensor.
The IR Emitter can be mounted in one of two different positions and it is best to try both positions to ensure
optimal performance.
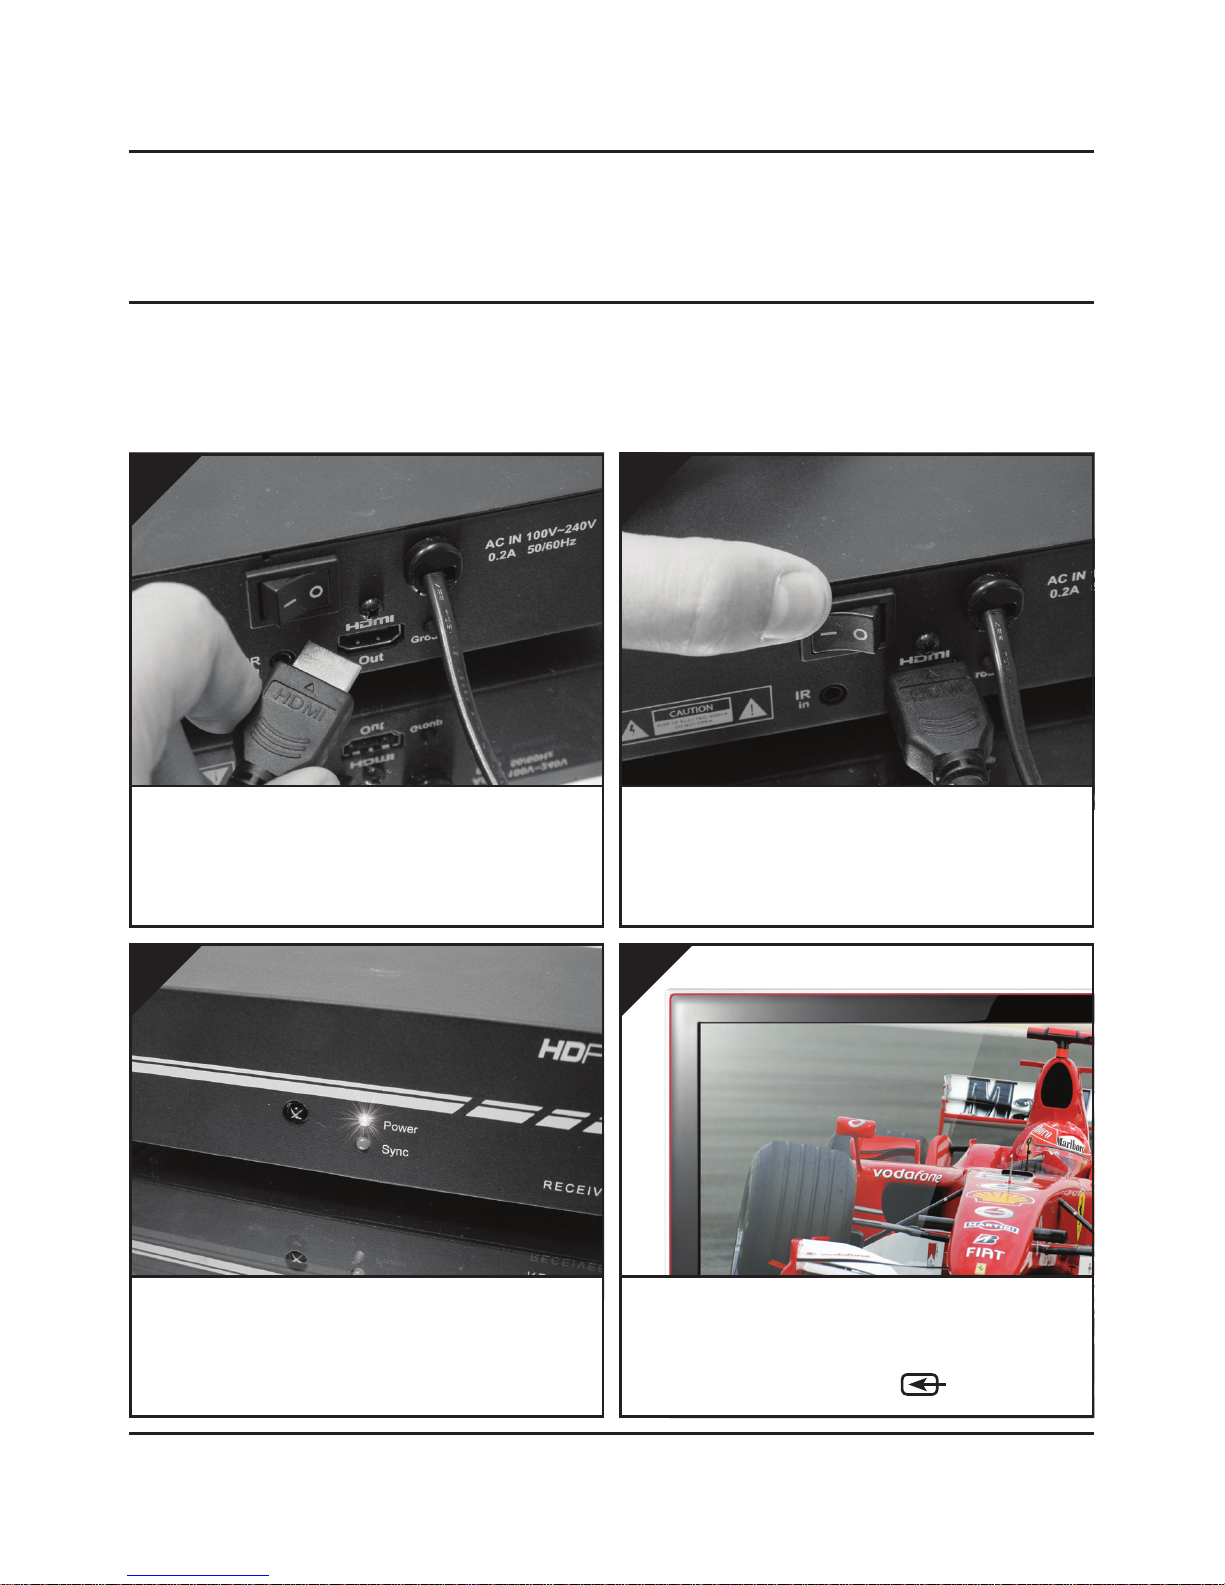
A green LED on the front of the DigiSender® Receiver will illuminate to indicate that the Receiver
is powered up.
3.
Turn on the receiving TV and select the channel assigned to the HDMI input that you connected the
DigiSender® Receiver into. This may be labelled as
HDMI, SOURCE, INPUT, AV or .
4.
Use the remaining HDMI cable and connect it to
the socket labelled ‘HDMI Out’ on the back of the
DigiSender® Receiver and the HDMI Input on your
receiving TV.
1.
Page 08 Please read the instructions carefully prior to installation
DGHDP1 - DigiSender® HD Pro - 1080p Powerline AV Sender System
Installing your DigiSender®
Step 4 - Install the Receiver
The Receiver will pick up the signals being sent by your Transmitter and output them to a connected TV.
Connect the DigiSender® Receiver power cable to
an available mains power socket and switch on at
the back.
2.
HDMI1
Page 09Please read the instructions carefully prior to installation
DGHDP1 - DigiSender® HD Pro - 1080p Powerline AV Sender System
Installing your DigiSender®
Step 4 - Install the Receiver
Depending on how quickly the previous steps have been completed, you may see two messages displayed on the
receiving TV screen.
Establishing Sync Sync Successful
Approximately 40 seconds after turning on all of your equipment (the source device e.g. HD Satellite receiver, DigiSender® Transmitter, DigiSender® Receiver and the receiving TV) the video will be displayed on the receiving TV.
CONGRATULATIONS!
Installation is complete and you can now receive 1080p HD video in another room in your home.
DigiSender® HD Pro
Establishing Sync with Transmitter
Please wait...
Sync Successful
Waiting for Video signal...

Page 10 Please read the instructions carefully prior to installation
DGHDP1 - DigiSender® HD Pro - 1080p Powerline AV Sender System
Basic Operation
The DigiSender® HD Pro Remote Control
The DigiSender® HD Pro comes included with a remote control that will allow you to access various settings via
the on-screen Menu as well as perform various procedures should you run into any problems.
Refer to the tables on the next two pages for descriptions of what each button is used for.
Top Row
Source Area
Volume Area
Settings Area

Page 11Please read the instructions carefully prior to installation
DGHDP1 - DigiSender® HD Pro - 1080p Powerline AV Sender System
Basic Operation
The DigiSender® HD Pro Remote Control
Remote Control Button Descriptions
Fig. Button Area Button Name Button Description
Top Row Power/Standby
Toggles the Transmitter and Receiver between On and
Standby mode.
Top Row Link
Re-establishes a PLC between the Transmitter and
Receiver. Only to be used when installing an additional
receiver or during Troubleshooting.
Top Row Group
Syncs the Transmitter and Receiver. Only to be used
when installing an additional receiver or during Troubleshooting.
Top Row Factory
Used to set the PLC Settings back to the factory defaults.
Only to be used during Troubleshooting.
Source HDMI 1 Input Not used for this model.
Source HDMI 2 Input Not used for this model.
Source HDMI 3 Input Not used for this model.
Source HDMI 4 Input Not used for this model.
Source AV 1 Input Not used for this model.
Source AV 2 Input Not used for this model.
Source Next Input Not used for this model.
Source Last Input Not used for this model.

Page 12 Please read the instructions carefully prior to installation
DGHDP1 - DigiSender® HD Pro - 1080p Powerline AV Sender System
Basic Operation
The DigiSender® HD Pro Remote Control
Remote Control Button Descriptions
Fig. Button Area Button Name Button Description
Setting Display Toggles the TV System
Setting Menu Enter Menu
Setting Info Displays Menu Information
Setting Up In Menu: Scroll Up
Setting Down In Menu: Scroll Down
Setting Left In Menu: Scroll Left
Setting Right In Menu: Scroll Right
Setting OK Select / Enter / Confirm
Setting Exit Exit Menu
Volume Volume Up Increase Volume
Volume Volume Down Decrease Volume
Volume Mute Mute Audio

Page 13Please read the instructions carefully prior to installation
DGHDP1 - DigiSender® HD Pro - 1080p Powerline AV Sender System
Basic Operation
The On-Screen Menu
The On-Screen Menu is used to configure various options and can be accessed by pressing Menu Button on the
remote control. This will bring up the On-Screen Menu on the television attached to the Receiver.
On-Screen Menu Items
• Language
• Network Bandwidth
• Resolution Control
• Sleep Time
• Lip Sync
• Select TX Station
• Information
Using the On-Screen Menu
You can navigate the On-Screen Menu by using the following buttons on the remote control:
• Use the Scroll Up and Scroll Down buttons to select a menu item.
• Press the OK button to select a menu item and display the available options.
• Use the Scroll Up and Scroll Down buttons to select an option.
• Press the OK button to set an option.
• Press the Exit button to exit the On-Screen Menu.
SETUP
Language
Network Bandwidth
Resolution Control
Sleep
LIP SYNC
Select TX Station
Information

Page 14 Please read the instructions carefully prior to installation
DGHDP1 - DigiSender® HD Pro - 1080p Powerline AV Sender System
Basic Operation
The On-Screen Menu
On-Screen Menu Descriptions
Menu Item Description Options
Language
Selects the language which is used for this OnScreen Menu
• English (default)
• German (optional)
• Spanish (optional)
• Japanese (optional)
• Italian (optional)
• Traditional Chinese (optional)
• Simplified Chinese (optional)
• French (optional)
Network Bandwidth
Adjusts the quality of the video stream depending on which setting is chosen. If you do not
know how good your Network Bandwidth is,
select Auto Detect.
• Auto Detect (default)
• Low
• Fair
• Good
• Excellent
Resolution Control
Selects the output resolution for the television
you are connected to.
• By Source (default)
• By TV
Sleep Time
Sets the amount of time either the Transmitter or
Receiver are idle for before going into Standby
mode. The Transmitter is considered ‘idle’ when
there is no video input from the source device
e.g. HD Satellite receiver. The Receiver is considered idle when it not receiving a video signal
from the Transmitter.
• Off (default)
• 10 minutes
• 30 minutes
• 60 minutes
• 120 minutes
Lip Sync
The selections in this option are only used as a
reference value for the system to adjust timing
(only used for 60 Hz, does not apply to 50 Hz or
PAL systems).
• 60 Hz
• 59.94 Hz (default)
Select TX Station
Each Receiver can be synced with a maximum
of 4 Transmitters. Select which Transmitter you
wish to receiver the video stream from here.
• See the section Running
Multiple Transmitters with
Multiple Receivers on pages
15 and 16.
Information Firmware version.

Page 15Please read the instructions carefully prior to installation
DGHDP1 - DigiSender® HD Pro - 1080p Powerline AV Sender System
Each Transmitter can be connected to a maximum of four Receivers. When installing an additional receiver, please
perform the below procedures in order:
• Connect and Install the Receiver as on pages 08 and 09.
• Reset the Receiver PLC Settings to Factory Defaults as on page 20.
• Perform the PLC Grouping procedure on page 18.
• Perform the Transmitter & Receiver Syncing procedure on page 17.
Advanced Procedures
Installing Additional Receivers
Each Receiver can be connected to a maximum of four Transmitters. This would allow you to choose from multiple
source devices such as your HD Satellite receiver, Blu-Ray™ player, DVD recorder or even CCTV.
Advanced Procedures
Running Multiple Transmitters with Multiple Receivers
Selecting a Transmitter
• At the Receiver, press the Menu button on the DigiSender® Remote Control to bring up the On-screen Menu. Use the Scroll Up
and Scroll Down buttons to go to the Select TX Station option.
• Press the OK button to enter the Select TX Station option.
• On the Select TX Station page, a list of all Transmitters that
are currently synced with the Receiver will be displayed. Use
the Scroll Up and Scroll Down buttons to select the desired
Transmitter.
• Press the OK button to confirm your selection.
• If the selected Transmitter is currently transmitting video, this
will be displayed. The Remote Relay will automatically be
transferred to the selected Transmitter so that you can control
the source device it is connected to.
SETUP
Language
Network Bandwidth
Resolution Control
Sleep
LIP SYNC
Select TX Station
Information
SETUP
Select TX Station
TX Station 1
TX Station 2

Page 16 Please read the instructions carefully prior to installation
Changing the Name of a Transmitter
• At the Receiver, press the Menu button on the DigiSender® Remote Control to bring up the On-screen
Menu. Use the Scroll Up and Scroll Down buttons to go to the Select TX Station option.
• Press the OK button to enter the Select TX Station option.
• On the Select TX Station page, a list of all Transmitters that are currently synced with the Receiver will
be displayed. Use the Scroll Up and Scroll Down buttons to select the desired Transmitter.
Press the Menu button again to edit the name of the selected Transmitter.
The underline below the Transmitter name shows the current cursor
position.
Use the Scroll Up and Scroll Down buttons to scroll through the available
characters (letters, numbers, etc.)
Use the Scroll Right button to confirm the selected character and move to the next space.
Use the Scroll Left button to move back one space, deleting one character.
Press the OK button to confirm the Transmitter name and finish editing.
Resetting the Name of a Transmitter back to Factory Default
Perform the Reset the Transmitter System Settings to Factory Defaults procedure on page 22.
DGHDP1 - DigiSender® HD Pro - 1080p Powerline AV Sender System
Advanced Procedures
Running Multiple Transmitters with Multiple Receivers
SETUP
Rename Transmitter
TX Station 1

Page 17Please read the instructions carefully prior to installation
DGHDP1 - DigiSender® HD Pro - 1080p Powerline AV Sender System
Advanced Procedures
Transmitter & Receiver Syncing
The Transmitter & Receiver Syncing procedure should only be used when installing an Additional Receiver or
during Troubleshooting.
There are two ways in which the Transmitter and Receiver can be ‘Synchronised’ or ‘Synced’:
• ‘Sync’ using the buttons on the Transmitter and Receiver:
1. Press and hold the Group Button on the rear of the Receiver until the message “SYNCING” is
displayed on the receiving TV.
2. Press and hold the Group Button on the rear of the Transmitter for 2 seconds until the Sync and
Power LEDs blink sequentially.
If the Sync is successful, the message on the receiving TV will change from “SYNCING” to “SYNCED”,
followed by the video (providing that the source device is currently on and media is playing).
• ‘Sync’ using the remote control:
Press the Group Button on the DigiSender® remote control to sync the Transmitter and Receiver.
Note: It is highly recommended that you perform the above procedure with both the DigiSender® Transmitter and
Receiver in the same vicinity, preferably attached to the same dual-socket mains power outlet.

Page 18 Please read the instructions carefully prior to installation
DGHDP1 - DigiSender® HD Pro - 1080p Powerline AV Sender System
Advanced Procedures
PLC Grouping
The PLC Grouping procedure should only to be used when installing an additional receiver or during Trouble-
shooting when the Transmitter & Receiver Syncing procedure fails to resolve a problem.
1. Press the Link Button on the DigiSender® remote control at the Transmitter and Receiver
locations.
“Attempting PLC Grouping” will be displayed on the receiving TV.
The Sync LED on the Transmitter will continuously flash ON and OFF and the Power LED will be
OFF.
If the PLC Grouping is successful, the system will automatically start Syncing the Transmitter
and Receiver. After this has finished the video will be displayed (providing that the source device is
currently on and media is playing).
Note: It is highly recommended that you perform the above procedure with both the DigiSender® Transmitter and
Receiver in the same vicinity, preferably attached to the same dual-socket mains power outlet.

Page 19Please read the instructions carefully prior to installation
DGHDP1 - DigiSender® HD Pro - 1080p Powerline AV Sender System
Advanced Procedures
Resetting the System Settings to Factory Defaults
The following procedure will revert the DigiSender® HD Pro system settings back to factory default and should
only be used during troubleshooting.
1. Reset the Transmitter System Settings to Factory Defaults:
At the Transmitter, press the Group Button on the DigiSender® remote control CONTINUOUSLY (in
rapid succession) until both the Power LED goes OFF and the Sync LED comes ON and then press
the OK Button on the DigiSender® remote control.
The Power and Sync LEDs will flash OFF-ON-OFF-ON and then the Transmitter will reboot itself.
The Transmitter system settings have now been set back to the factory defaults.
2. Reset the Receiver System Settings to Factory Defaults:
At the Receiver, press the Group Button on the DigiSender® remote control AT LEAST 5 TIMES (in
rapid succession) until the receiving TV displays the message “Confirm - Reset System Settings to
Factory Defaults?”. Then press and hold the Group Button on the back of the Receiver for
approximately 6 seconds.
The receiving TV will display the message “System Settings Reset to Factory Defaults” and then
the screen will go blank and the TV will display the message “Not Synced - Please perform Syncing
Operation”.
The Receiver system settings have now been set back to the factory defaults.
Note: After completing the Resetting the System Settings to Factory Defaults procedure you will need to complete the Transmitter & Receiver Syncing procedure on page 17.

Page 20 Please read the instructions carefully prior to installation
DGHDP1 - DigiSender® HD Pro - 1080p Powerline AV Sender System
Advanced Procedures
Resetting the PLC Settings to Factory Defaults
The following procedure will revert the DigiSender® HD Pro PLC settings back to factory default and should only
be used during troubleshooting.
1. Reset the Transmitter PLC Settings to Factory Defaults:
At the Transmitter, press the Factory Button on the DigiSender® remote control CONTINUOUSLY (in
rapid succession) until the Power LED and the Sync LED goes OFF, and then press the
OK Button on the DigiSender® remote control.
The Power and Sync LEDs will flash OFF-ON-OFF-ON and then the Transmitter will reboot itself.
The Transmitter PLC settings have now been set back to the factory defaults.
2. Reset the Receiver PLC Settings to Factory Defaults:
At the Receiver, press the Factory Button on the DigiSender® remote control, in rapid succession,
until the receiving TV displays the message “Confirm - Reset PLC Settings to Factory Defaults?”
and then press the OK Button on the DigiSender® remote control (you can press any other button on
the DigiSender® remote control to cancel the operation.
The Receiver PLC settings have now been set back to the factory defaults.
Note: After completing the Resetting the PLC Settings to Factory Defaults procedure you will need to complete
the PLC Grouping procedure on page 18.

Page 21Please read the instructions carefully prior to installation
DGHDP1 - DigiSender® HD Pro - 1080p Powerline AV Sender System
Troubleshooting
Frequently Asked Questions
Troubleshooting
Scenario Possible Reason Resolution
Receiving TV (TV attached to the Receiver)
displays no video.
• Power is switched off at the
mains.
• Make sure the power switches on the back
of both the Transmitter and Receiver are
turned On.
• Cable connections are not
secure.
• Make sure the power cables and HDMI
cables are connected securely.
• Source device (e.g. HD Satellite
receiver) is not working correctly.
• Verify that the source device is working
properly by connecting it directly to a TV.
• Source device is sending a video
format that is not supported by
the DigiSender® HD Pro.
• If the source device works fine when directly connected to a TV, this could indicate
a problem with the audio/video format it
is outputting. Check the Specifications on
the back page to make sure that the format
being delivered by the source device is
compatible with the DigiSender® HD Pro
system.
• Source device is sending a video
resolution that is not supported
by the receiving TV.
• Enter the DigiSender® HD Pro On-screen
Menu and set Resolution Control to Select
by TV. See pages 13 and 14 for more info.
• Interference from an EMI or
electrical surge protection.
• If there are electrical surge protection or
EMI protection circuits inside the mains
power socket you are currently connected
to, try connecting the DigiSender® HD Pro
to a different mains power socket.
Power LED is not illuminated.
• Transmitter and/or Receiver not
turned ‘On’.
• Make sure the power switches on the back
of both the Transmitter and Receiver are
turned On.
• Mains power socket is not
turned ‘On’.
• Make sure that the power switch on the
mains power socket is turned On.
• Device is not booting up
properly.
• If there is no response to the remote
control, try turning the units Off and back
On again using the power switches on the
back of the units.
• Power supply fault.
• If the above suggestions do not remedy
the problem, the unit may have developed
a power supply fault. Disconnect the unit
from the mains immediately and contact
our support hotline on 0207 193 1413.

Page 22 Please read the instructions carefully prior to installation
DGHDP1 - DigiSender® HD Pro - 1080p Powerline AV Sender System
Troubleshooting
Frequently Asked Questions
Troubleshooting
Scenario Possible Reason Resolution
Receiving TV displays
“Not Synced - Please
perform Syncing Operation”.
• The Transmitter and Receiver
are not synced correctly.
• Try the ‘Transmitter & Receiver Syncing’
procedure on page 17, to re-establish connections.
• If the above has not resolved the issue, try
the ‘PLC Grouping’ procedure on page 18
first and then ‘Transmitter & Receiver Syncing’ procedure on page 17.
Power LED on the front
of Transmitter is constantly flashing.
• Source device (e.g. HD Satellite
receiver) is not turned On or is
in standby mode.
• Ensure that the source device is turned on.
• Check to see if the source device is sending
a video signal (you may have to press the
play button on your remote control).
• Source device is sending a video
format that is not supported by
the DigiSender® HD Pro.
• Check the Specifications on back page to
make sure that the format being delivered
by the source device is compatible with the
DigiSender® HD Pro system.
During video playback,
receiving TV (attached
to the Receiver) displays
“Sync Successful - Waiting for Video signal”.
• PLC (Power Line Communication) network cannot support
sufficient bandwidth or the network quality is not high enough.
This results in the suspension of
the video picture.
• This problem will usually resolve itself
within a minute or two.
• If this problem persists then it may be due
to a faulty mains power socket. Try connecting the DigiSender® HD Pro to another
mains power socket instead.
• The Receiver is continuously
rebooting.
• If the power LED keeps flashing on and
off then the Receiver may have developed
a power supply fault. Disconnect the unit
from the mains immediately and contact
our support hotline on 0207 193 1413.
Receiving TV displays
message “Unsupported
Video Format”.
• The output resolution of the
source device is not supported.
The DigiSender® HD Pro only
supports resolutions up to
1920 x 1080@24P or 1920 x
1080@60i.
• Your source device will usually ‘auto
detect’ the format used by the DigiSender®
HD Pro and so normally there will be no
problems. However, if the source device
has been manually configured to output a
certain format that is not supported by the
DigiSender® HD Pro, you will need to reference your source devices user manual to
reset the format to one that is supported by
the DigiSender® HD Pro. See Specifications
on the back page of this manual.

Page 23Please read the instructions carefully prior to installation
DGHDP1 - DigiSender® HD Pro - 1080p Powerline AV Sender System
In the unlikely event that you still can’t get the system working, please proceed with the steps below.
Step 1: Check connections, Power & Equipment
• Make sure that all power cable connections are secure and that all equipment is turned on.
• Inspect the HDMI cables and connections between the source device (e.g. HD Satellite receiver) and
DigiSender® Transmitter and the DigiSender® Receiver and receiving TV. Ensure that all HDMI connectors
are fully inserted into the correct sockets and that none of the HDMI cables are damaged in any way.
• Make sure that the source device (e.g. HD Satellite receiver) is working correctly and is outputting video via the HDMI socket you are using to connect it to the DigiSender® Transmitter. It is recommended that you connect the source device directly to a TV to confirm correct operation.
• Make sure that the receiving TV is working correctly and that it is set to the correct HDMI channel.
If the video is still not being displayed on the receiving TV, then please proceed to step 2 below.
Step 2: Syncing and Resetting Procedure
The Syncing and Resetting procedure is the last step in troubleshooting your product and should only be attempted when all other measures have failed to resolve your problem.
The flowchart on page 24 will instruct you on how to proceed with this procedure.
Note: It is assumed that the source device (e.g. HD Satellite receiver), DigiSender® Transmitter, DigiSender® Receiver
and the receiving TV are all connected properly and turned on.
Note: It is highly recommended that you perform this procedure with both the DigiSender® Transmitter and Receiver
in the same vicinity, preferably attached to the same dual-socket mains power outlet.
Troubleshooting
Syncing and Resetting Procedure

Page 24 Please read the instructions carefully prior to installation
DGHDP1 - DigiSender® HD Pro - 1080p Powerline AV Sender System
Troubleshooting
Syncing and Resetting Procedure
Perform the Transmitter & Receiver Syncing procedure on page 20
Perform the PLC Grouping procedure on page 21
Is it working?
Is it working?
Perform the Resetting the PLC Settings to Factory Defaults procedure on page 23
Perform the PLC Grouping procedure on page 21
Perform the Transmitter & Receiver Syncing procedure on page 20
Is it working?
Is it working?
Perform the Resetting the System Settings to Factory Defaults procedure on page 22
Perform the Transmitter & Receiver Syncing procedure on page 20
Is it working?
Please contact our Customer Support hotline on 0207 193 1413
Success!
Yes
Yes
Yes
Yes
Yes
No
No
No
No
No

Page 25Please read the instructions carefully prior to installation
DGHDP1 - DigiSender® HD Pro - 1080p Powerline AV Sender System
Troubleshooting
Remote Relay Problems
If you have any difficulty operating your source equipment remote control in your second room please follow the
advice below:
• Ensure the IR Emitter is connected to the socket labelled ‘IR’ on the Transmitter.
• Ensure you are using the correct remote control in the second room. For instance, if you are trying to
control your Satellite box you will need to use the Satellite remote control.
• Ensure the IR Emitter is facing the IR sensor on your source equipment.
• Ensure that cable connecting the IR Emitter to the Transmitter is not running directly over or under your
source equipment. This is because most modern set top boxes have a hard drive built into them which
can put out a bit of Electromagnetic Interference, disrupting the IR signal as it travels along the cable.
• Move the IR Emitter further away from the source equipment.
• Move the Transmitter AND Receiver further away from other electrical devices.
• Try operating your source remote control closer to the Receiver.
• Replace the batteries in your source remote control.
Often, the easiest way to get your Remote Relay system working perfectly is to get someone to help you.
• Have the person helping you go to the Receiver and try to change the Satellite channel or pause the
Blu-Ray™ whilst pointing the source devices remote control at the front of the DigiSender® Receiver.
• While the person helping you is doing the above, you should be adjusting the position of the IR Emitter.
Try moving the IR Emitter slowly, from one side of the source device to the other, making sure to keep
the face of the IR Emitter pointed towards the front of your source device at all times.
• When you find the right spot for the IR Emitter the channel will change or the disc will pause and the
person helping you can let you know that you have the exact right spot for the IR Emitter.

Page 26 Please read the instructions carefully prior to installation
DGHDP1 - DigiSender® HD Pro - 1080p Powerline AV Sender System
Troubleshooting
Technical Support & Accessories
Technical Support
AEI Security & Communications Ltd is dedicated to providing our customers with first class customer care and
technical support.
1. Website
Free technical advice is available online 24/7 at our dedicated support web site: www.aei.eu
2. Online Videos
Watch online Installation and Troubleshooting Video Guides. Search www.youtube.com for DigiSender
HD Pro.
3. Live Chat
Chat to one of our technical advisors live. See website for details.
4. Telephone
We have a dedicated helpline, open Monday to Friday, 8.30am - 4pm. Call 02071 931 413.
DGHDP1RX - DigiSender® HD Pro Additional Receiver
• Get your HD channels on additional TV’s in your
home!
• Connect up to 4 Receivers at once.
Accessories
If you wish to transmit your source to more than 1 room, this can be
achieved by using the additional receiver below.
To purchase accessories visit us online at: www.easylife.com
or call us on: 02071 931 413.

Page 27Please read the instructions carefully prior to installation
DGHDP1 - DigiSender® HD Pro - 1080p Powerline AV Sender System
Information & Safety
Important Product Information & Abnormal Operation
Important Product Information
Power Line Communication or Power Line Carrier (PLC), are systems for carrying data on a conductor also
used for electrical power transmission.
The Transmitter and Receiver units must be operating on the same AC power circuit for guaranteed performance.
This product may not perform efficiently if plugged into Power Strips (especially those with Surge Protection and
EMI / RFI Filtration) or Extension Cords. For best results it is recommended that you connect the units directly
to a mains power socket. In homes with multiple mains circuits installed, it is recommended that both units are
installed on the same circuit so that they can communicate effectively with each other.
Power sockets and electrical wiring must all be part of the same electrical system. Certain electrical conditions in
your home, such as wiring conditions and configuration, may affect the performance of this product.
Note: Interference from devices that emit electrical noise, such as vacuum cleaners, refrigerators, hair dryers, old
electric motors and poor quality mobile phone chargers for example, may adversely affect the performance of this
product. This product may have the possibility to interfere with devices such as lighting systems that have a dimmer switch, short wave radios, or other power line devices that do not follow the correct wiring standard.
Abnormal Operation
• It will take 30 to 40 seconds to establish a connection between the transmitter and receiver. If
there is no signal coming through to the receiver after this time, please try the Syncing the Trans-
mitter & Receiver procedure on page 17 and refer to the troubleshooting section of this manual. If
you are unable to resolve your problem, please contact our support helpline on 0207 193 1413.
• If a unit is accidentally exposed to water or the case is damaged in any way, you should immediately turn the unit off at the mains and disconnect the plug. The unit should be replaced at
the next available opportunity, failure to do so could result in an electrical short or fire. If you are
uncertain of your situation, please call our support hotline on 0207 193 1413.
• If any smoke or odors emanate from the units, you should immediately turn the unit off at the
mains and disconnect the plug. Continuing to use this product in these conditions could cause a
fire or damage the product irreparably. Please call our support hotline on 0207 193 1413.

Page 28 Please read the instructions carefully prior to installation
DGHDP1 - DigiSender® HD Pro - 1080p Powerline AV Sender System
Information & Safety
Safety Precautions
Safety Precautions
These safety precautions are provided to ensure the best and safest user experience with the least amount of
inconvenience. Please read this Instruction Manual thoroughly before installation and operation. It is advised that
you keep the original packaging, protective materials and any documentation included with this product, as well
as your invoice or receipt of purchase.
• Do not use this product outside or in any environments where the units can be exposed to water or
moisture (bathrooms, water tanks, damp basements, swimming pools, etc.).
• Do not, in any circumstance, open the case of either of these units.
• Do not place containers holding liquid (vases, drinks, etc.) or wet materials on top of or in the
vicinity of these units.
• Only use a dry cloth to wipe down or clean the case. Do not use liquid cleaners or spray cleaners.
• Only operate this product in well ventilated areas. Do not place in closets, cupboards, covered
boxes, etc.
• Do not block the air vents on the units. Always leave at least 2cm of clear space around the units
during operation to ensure heat is properly dissipated; this will maintain and prolong the life of the
product.
• Do not place the units on soft surfaces (sofas, carpets, rugs, etc.) where the units might sink into
the surface or where the surrounding material can affect ventilation and heat dissipation.
• Do not place the units on any surface that generates heat (radiators, electric heaters, fire places,
etc.).

Page 29Please read the instructions carefully prior to installation
Information & Safety
Power & HDMI Cable Precautions
Power Cable Precautions
If you do not expect to use this product for an extended period of time, unplug the units from the mains power
socket. This is a precautionary measure because this product will, as long as it is connected to a mains power
socket, maintain an electrical current even though the units may be turned off.
• Do not wedge or clamp the power cable between the case and surrounding items (walls, furniture,
closets, etc.)
• Do not place anything on the power cable or drag objects over it.
• When unplugging the units from the mains power sockets, ensure you do so by pulling on the plug
and not the power cable.
• If the power cable is damaged in any way, you should immediately turn the unit off at the mains
and disconnect the plug. The unit should be replaced at the next available opportunity, failure to
do so could result in an electrical short or fire. If you are uncertain of your situation, please call our
support hotline on 0207 193 1413.
HDMI Cable Precautions
Improper use of the HDMI cable and socket can cause damage to both this product and the HDMI cable.
• Before connecting a HDMI cable to the HDMI socket on the back of either unit, carefully check
the orientation of the connector and the socket to make sure you are not inserting the connector
upside.
• Plug the HDMI cable in carefully, making sure the head of the connector fits straight into the
socket, without any tilt.
• Hold the HDMI cable in line whenever you connect or disconnect the cable. Do not twist or force
the connector into the socket.
• Remove the HDMI cables whenever you move or transport these units.
DGHDP1 - DigiSender® HD Pro - 1080p Powerline AV Sender System

Page 30 Please read the instructions carefully prior to installation
DGHDP1 - DigiSender® HD Pro - 1080p Powerline AV Sender System
Notes

Page 31Please read the instructions carefully prior to installation
Notes
DGHDP1 - DigiSender® HD Pro - 1080p Powerline AV Sender System

Supported Video Resolutions
Audio Format
Audio Sample Rate
Audio Resolution
Audio Channel
Connector
Transmitter Inputs
Transmitter Outputs
Receiver Outputs
Power Input
Power Consumption
Operating Temperature
Operating Humidity
Storage Temperature
Storage Humidity
1920 x 1080p / 24
1920 x 1080i / 50
1920 x 1080i / 60
1280 x 720p / 60
1280 x 720p / 50
720 x 576p / 50
720 x 480p / 60
720 x 576i / 50
720 x 480i / 60
PCM
44.1 / 48 kHz
16 bits
Dual-Channel Digital (Stereo)
HDMI
1x HDMI
1x HDMI Through pass
1x HDMI
100 - 240 V AC / 50, 60 Hz / 0.15A max.
12 W (TX), 9 W (RX)
10 ~ 50 °C
30 ~ 80 %RH
-20 ~ 80 °C
20 ~ 90 %RH
SPECIFICATIONS
CW240212-1
© 2012 AEI Security & Communications Ltd. All rights reserved.
Registered in England: 02831823
AEI Security & Communications Ltd
Weslake Industrial Park
Rye Harbour Road, Rye
East Sussex
TN31 7TE
United Kingdom
IR Systeme Technik and DigiConnector are trademarks of AEI Security & Communications Ltd.
DigiSender is a registered trademark of AEI Security & Communications Ltd.
Use of any other trademarks or logos are for illustrative purposes only and are the property of the their respective owners.
 Loading...