

DigiSender DGXDSDV111 Installation And Troubleshooting Manual
Model: DGXDSDV111
100% Digital Single Input Wireless AV Sender System
WATCH A VIDEO
INSTALLATION
& TROUBLESHOOTING GUIDE
Available online at: www.aei.eu/video
WATCH A VIDEO
INSTALLATION
& TROUBLESHOOTING GUIDE
Available online at: www.aei.eu/video
ENGLISH (EN)
DEUTSCH (DE)
FRANCAIS (FR)
NEDERLANDS (NL)
Page 02 Please read the instructions carefully prior to installation
DGXDSDV111 - DigiSender® XD - Single Input Digital Wireless AV Sender System
(EN) ENGLISH
Contents
English
Introduction 03
Installing Your Digisender® XD 04 - 10
Step 1 - Unpack Your Digisender® XD 04
Step 2 - Install The Transmitter 05
Step 3 - Install The IR Systeme Technik™ 06
Step 4 - Install The Receiver 07
Step 5 - Test Your Setup Using The
Diagnostics Mode 08-10
Using Your Digisender® XD 11 - 12
Standard Operation 11
Re-Syncing The Transmitter And Receiver 12
Troubleshooting 13 - 14
Frequently Asked Questions 13
Technical Support 14
Deutsch
Einleitung 15
Installation Ihres Digisender XD 16 - 22
Schritt 1 - Packen Sie Ihren Digisender XD Aus 16
Schritt 2 - Installieren Sie Den Sender 17
Schritt 3 - Installieren Sie Das IR Systeme Technik™ 18
Schritt 4 - Installieren Sie Den Empfänger 19
Schritt 5 - Testen Sie Ihre Anlage Mit Dem
Diagnosticprogramm 20-22
Gebrauch Ihres Digisender XD 23 - 24
Standartanwendung 23
Re-Synchronisierung Des Senders Und Empfängers 24
Fehlerbehebung 25 - 26
Häufig Gestellte Fragen 25
Technischer Support 26
Francais
Présentation 27
Installation Du Digisender® 28 - 34
Étape 1 - Déballage Du Digisender® XD 28
Étape 2 - Installation De L’émetteur 29
Étape 3 - Installation De IR Systeme Technik™ 30
Étape 4 - Installation Du Récepteur 31
Étape 5 - Vérification De La Configuration À L’aide
Du Mode Diagnostic 32-34
Utilisation Du Digisender® XD 35 - 36
Opération Normale 35
Synchronisation De L’émetteur Et Du Récepteur 36
Dépannage 37 - 38
Foire Aux Questions 37
Assistance Technique 38
Nederlands
Inleiding 39
Uw Digisender® Installeren 40 - 46
Stap 1 - Pak Uw Digisender® XD Uit 40
Stap 2 - Installeer De Zender 41
Stap 3 - Installeer De IR Systeme Technik™ 42
Stap 4 - Installeer De Ontvanger 43
Stap 5 - Test Uw Installatie Met De Diagnosemodus 44-46
De Digisender® XD Gebruiken 47 - 48
Standaardbediening 47
De Zender En Ontvanger Opnieuw Synchroniseren 48
Problemen Oplossen 49 - 50
Veelgestelde Vragen 49
Technische Ondersteuning 50
Warning! Do Not Open. Risk Of Electric Shock
Achtung! Nicht Öffnen – Elektrischer Schlag Möglich
Attention! Ne Pas Ouvrir. Risque D’électrocution
Waarschuwing! Niet Openen. Kans Op Elektrische Schokken
Warning! For Indoor Use Only
Achtung! Gebrauch Nur Für Den Innenbereich
Attention! Usage Intérieur Uniquement
Waarschuwing! Alleen Voor Gebruik Binnenshuis

Page 03Please read the instructions carefully prior to installation
DGXDSDV111 - DigiSender® XD - Single Input Digital Wireless AV Sender System
ENGLISH (EN)
Introduction
Congratulations on purchasing the new DigiSender® XD from AEI Security & Communications Ltd. This
product represents the absolute pinnacle of state-of-the-art wireless audio video distribution technology, at exceptional value for money.
You can now enjoy DVD quality video and Hi-Fi stereo sound from your satellite, cable, DTV, DVD, DVR
or VCR in another room in your home, without the worry of interference from other wireless products.
Its use of spread spectrum digital technology means that signals will not only pass through walls and
ceilings effortlessly, but that the signal will not degrade or be affected by interference from similar
wireless devices. In fact, this technology coexists so seamlessly with other wireless technologies, that
it can be set up and run right next to a wireless router or microwave, something that has never before
been possible.
With innovative features like the DigiConnector, IR Systeme Technik™ Remote Relay Kit and a Diagnostics Mode you can rest assured that you have purchased one of the most advanced video sender
systems available on the market today.

Page 04 Please read the instructions carefully prior to installation
DGXDSDV111 - DigiSender® XD - Single Input Digital Wireless AV Sender System
(EN) ENGLISH
Installing your DigiSender® XD
Step 1 - Unpack your DigiSender® XD
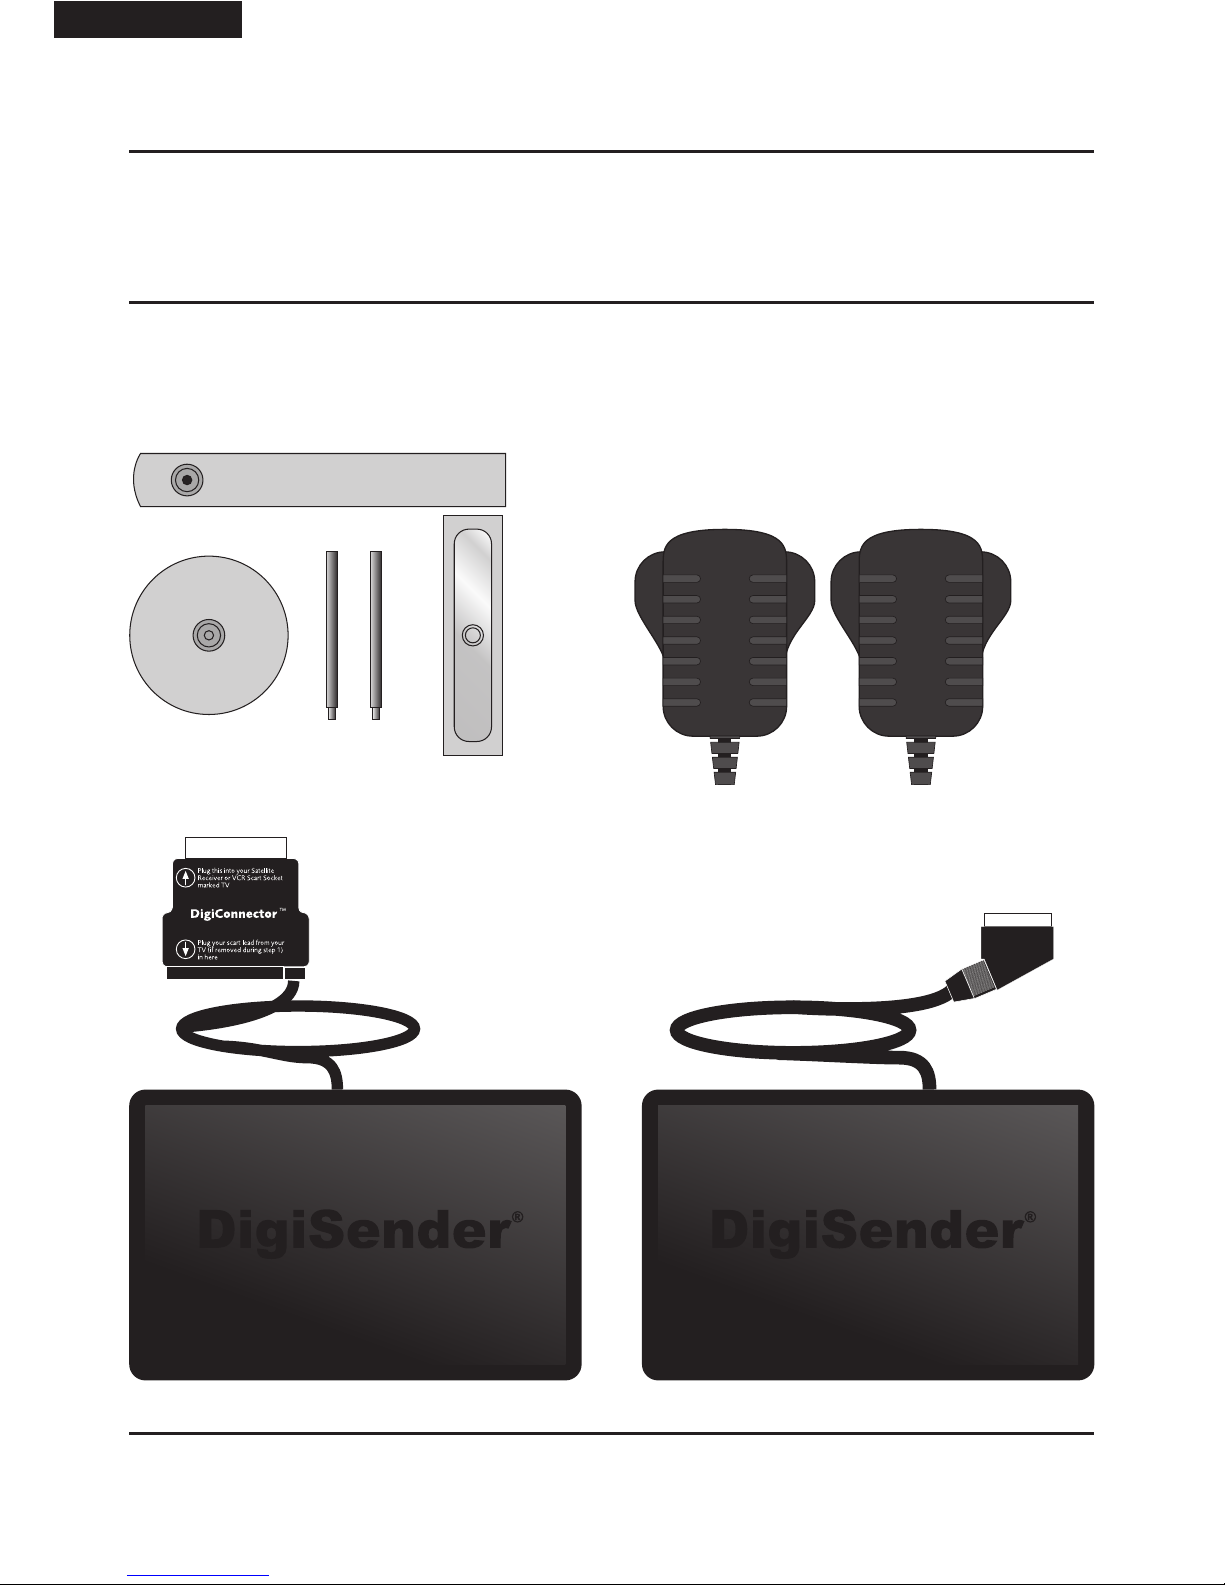
All DigiSender® orders are computer weight checked when packed. However, it is a good idea to check
all kit contents are present before proceeding with the installation.
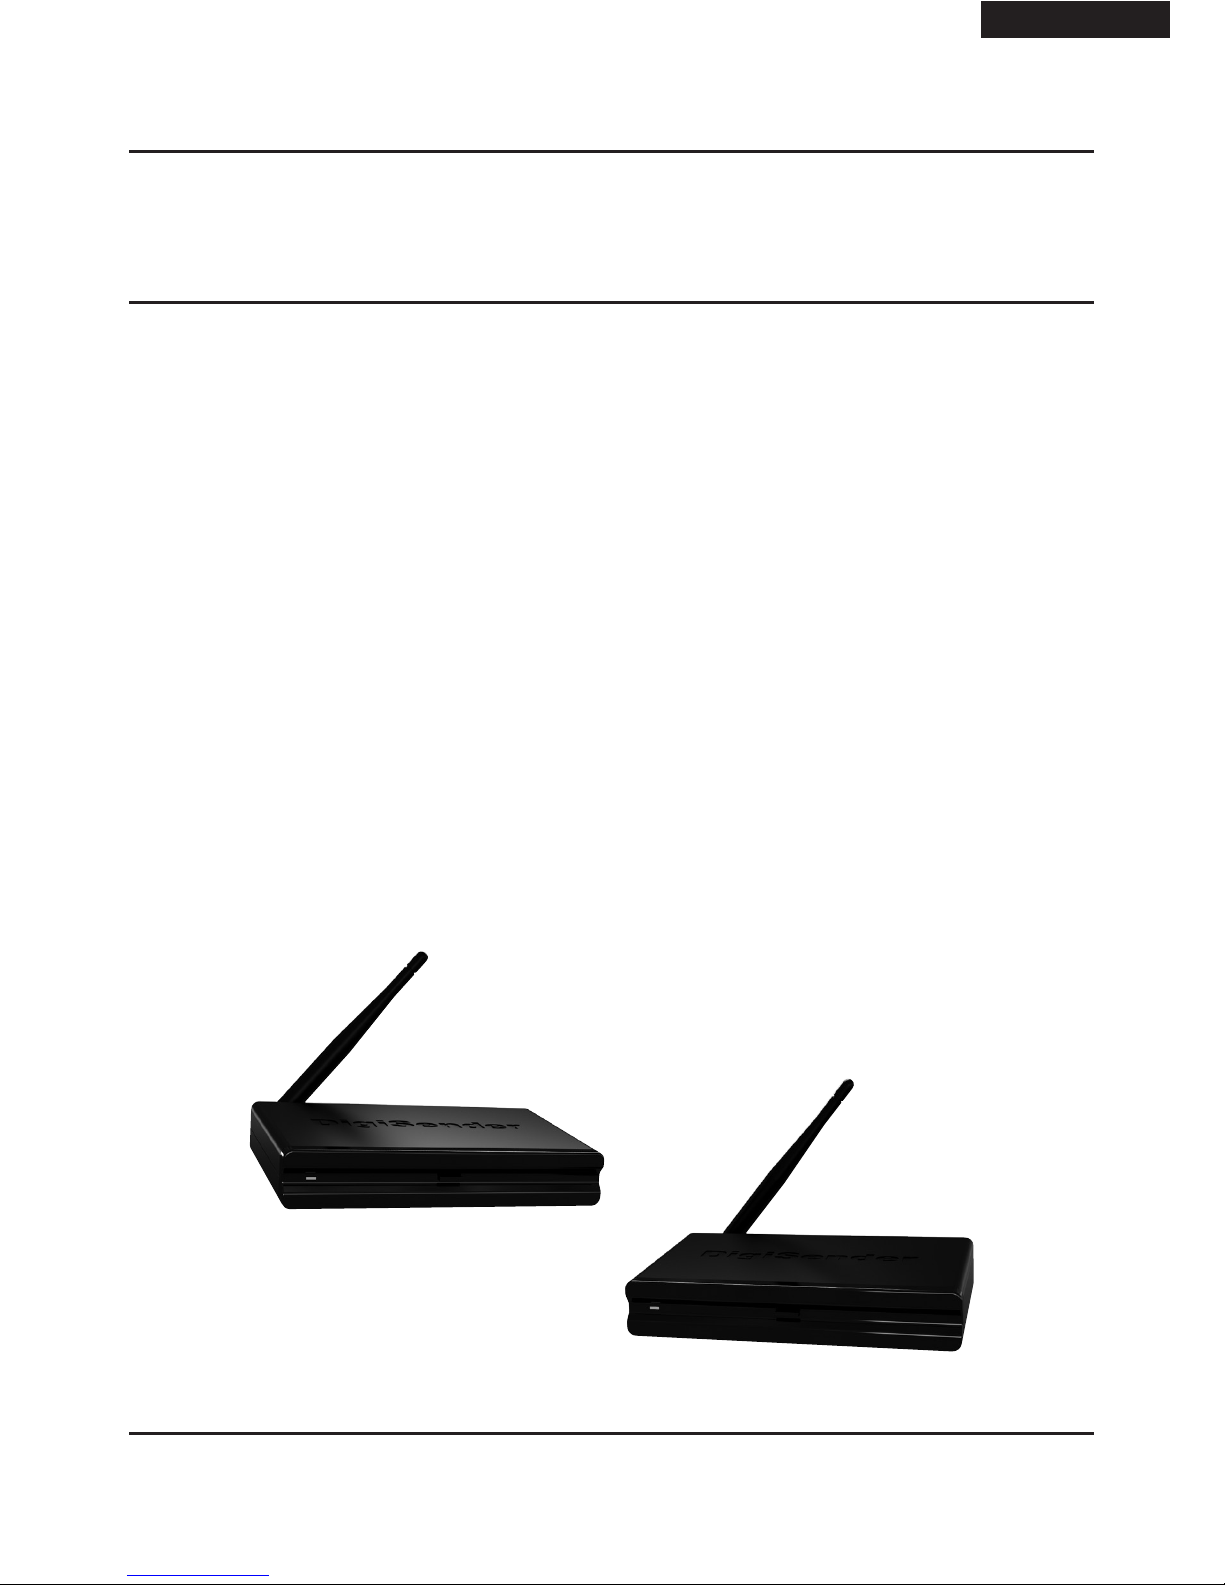
POWER
Transmitter
POWER
Receiver
IR Systeme Technik™ Kit
2x Power Supply Units
Page 05Please read the instructions carefully prior to installation
DGXDSDV111 - DigiSender® XD - Single Input Digital Wireless AV Sender System
ENGLISH (EN)
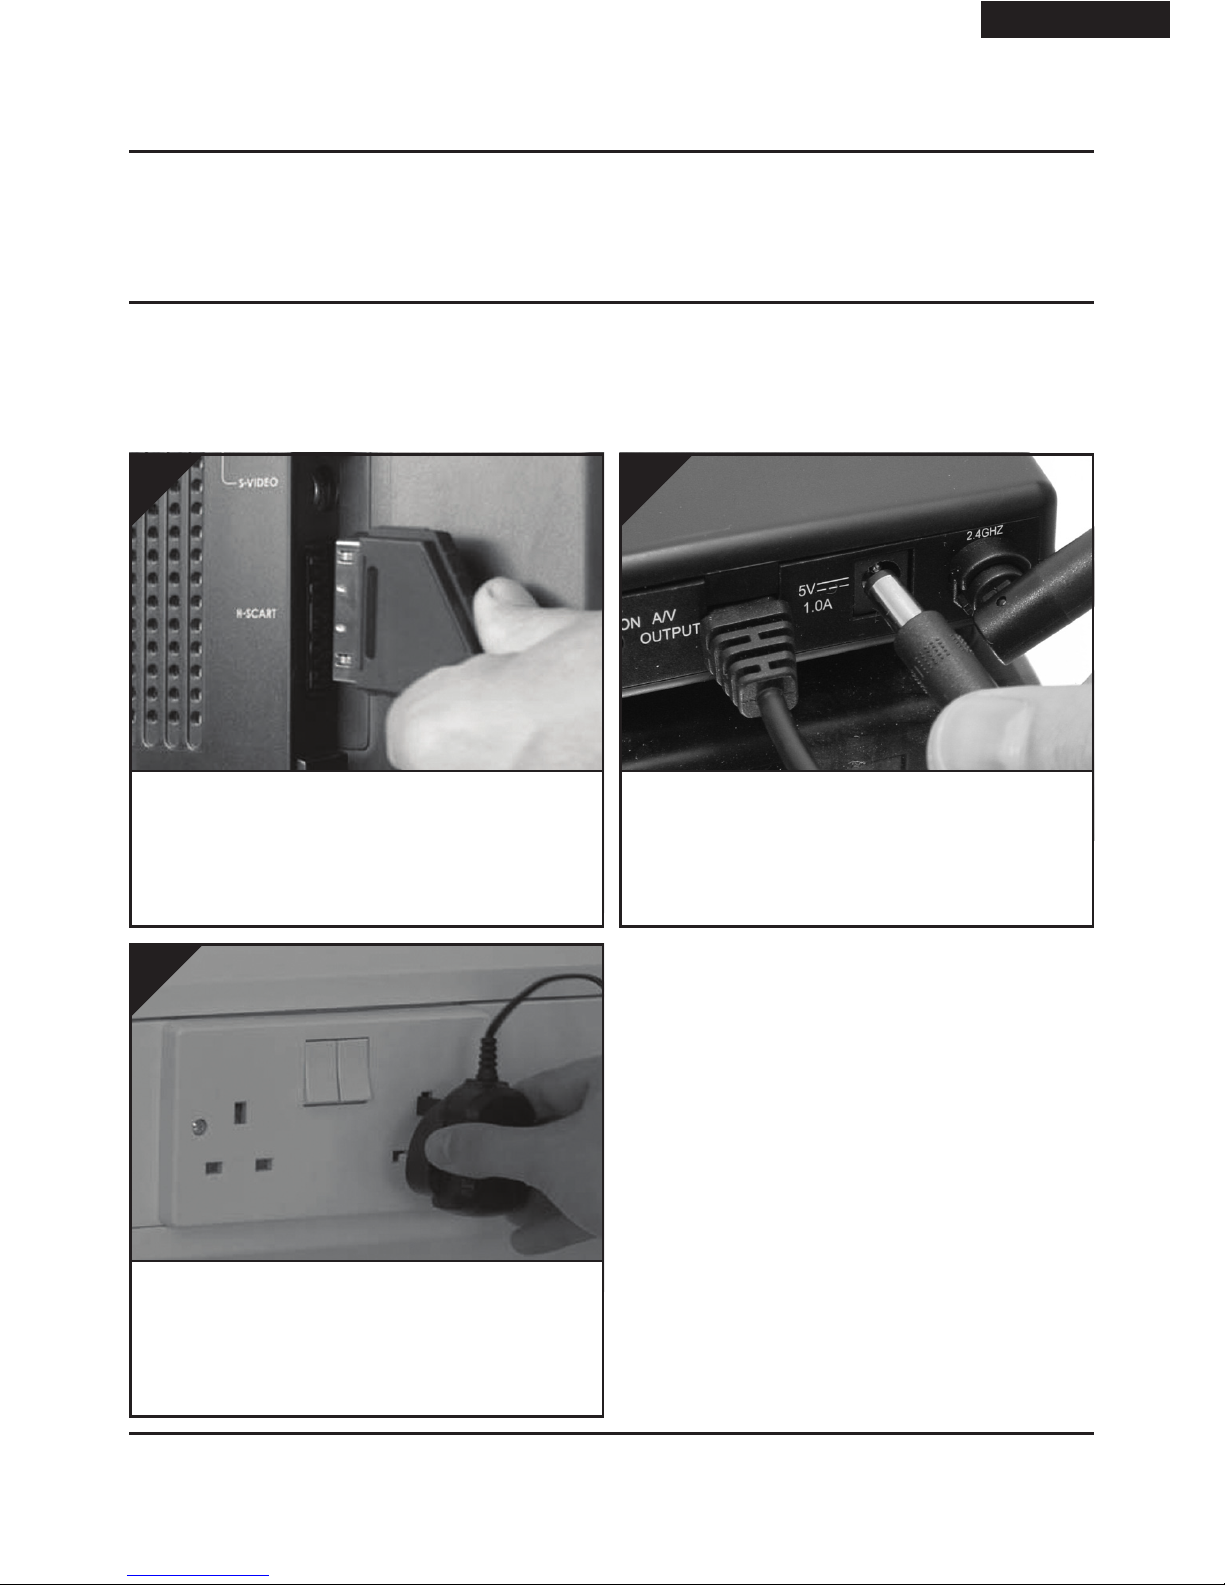
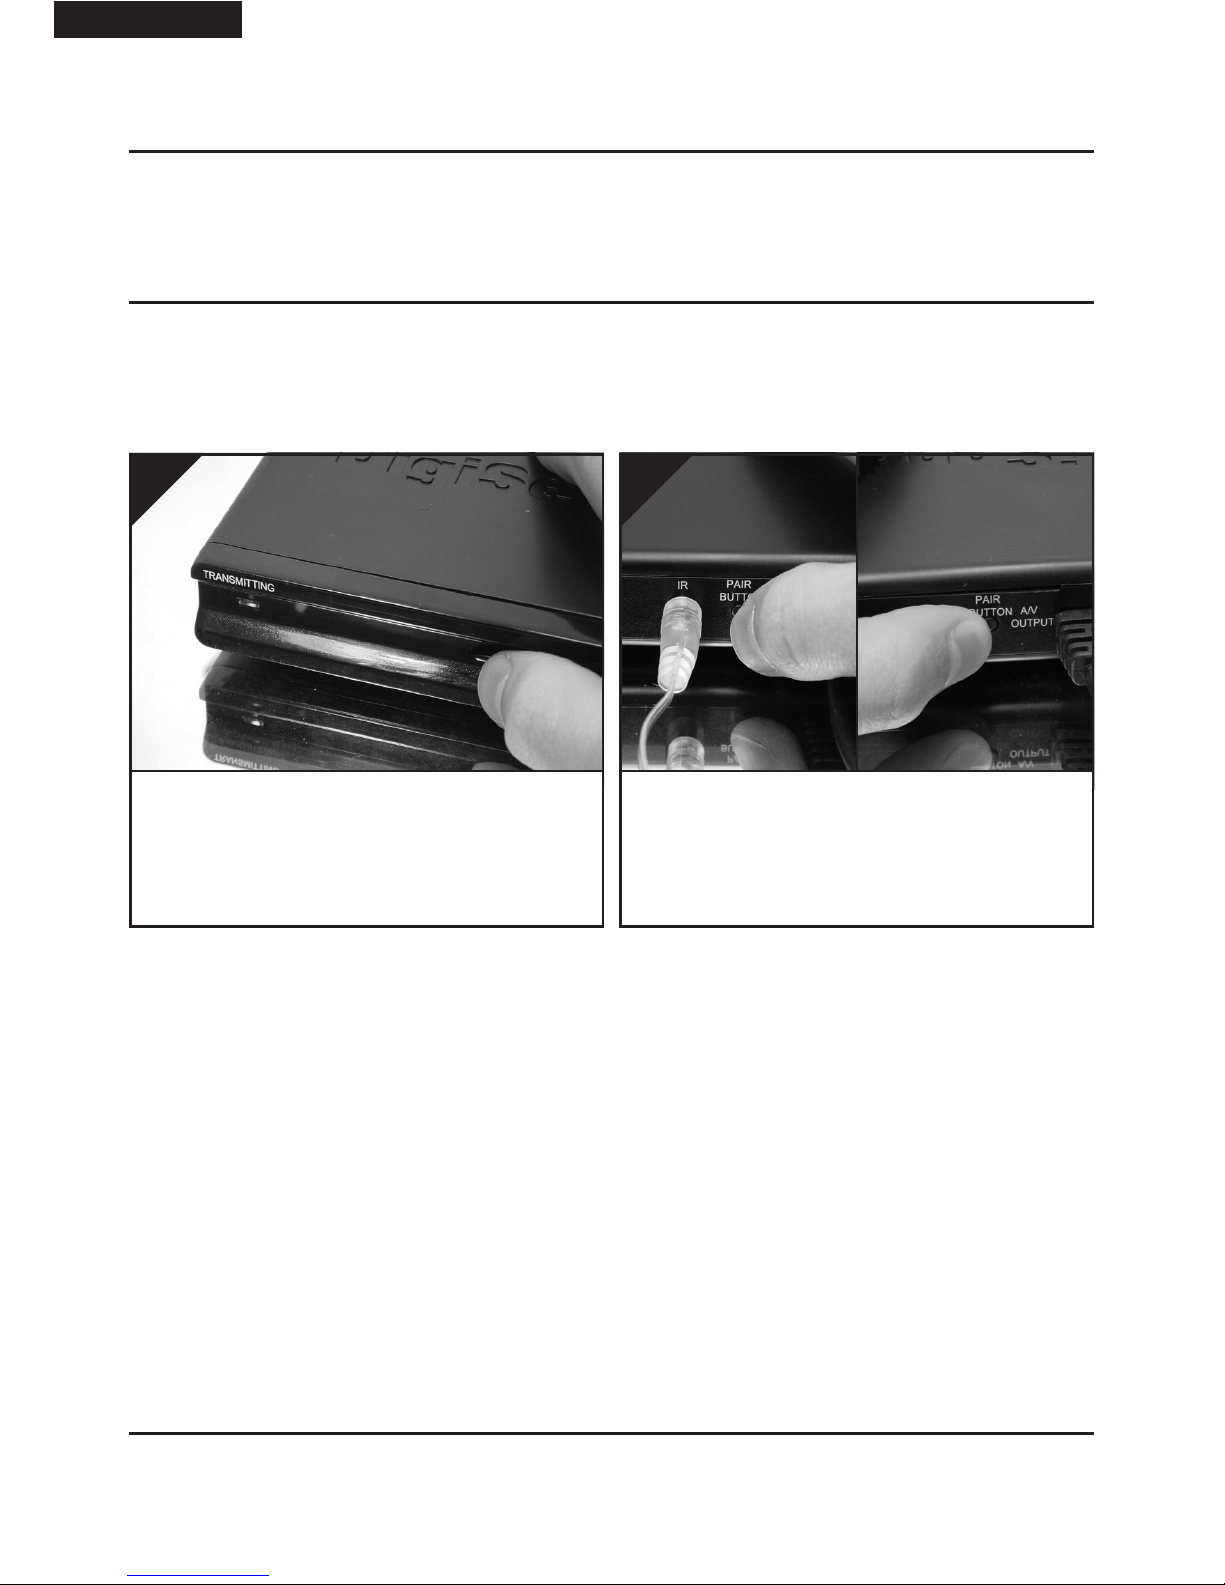
Connect the IR Emitter to the socket labelled ‘IR’ on
the back of the Transmitter. See Page 06 for more
information on installing the IR Systeme Technik™.
2.
Connect the DigiConnector™ to your Satellite, Cable or Freeview box. Use the SCART socket labelled
‘TV’ or ‘OUT’. Connect any existing SCART lead into
the rear of the DigiConnector™.
1.
Installing your DigiSender® XD
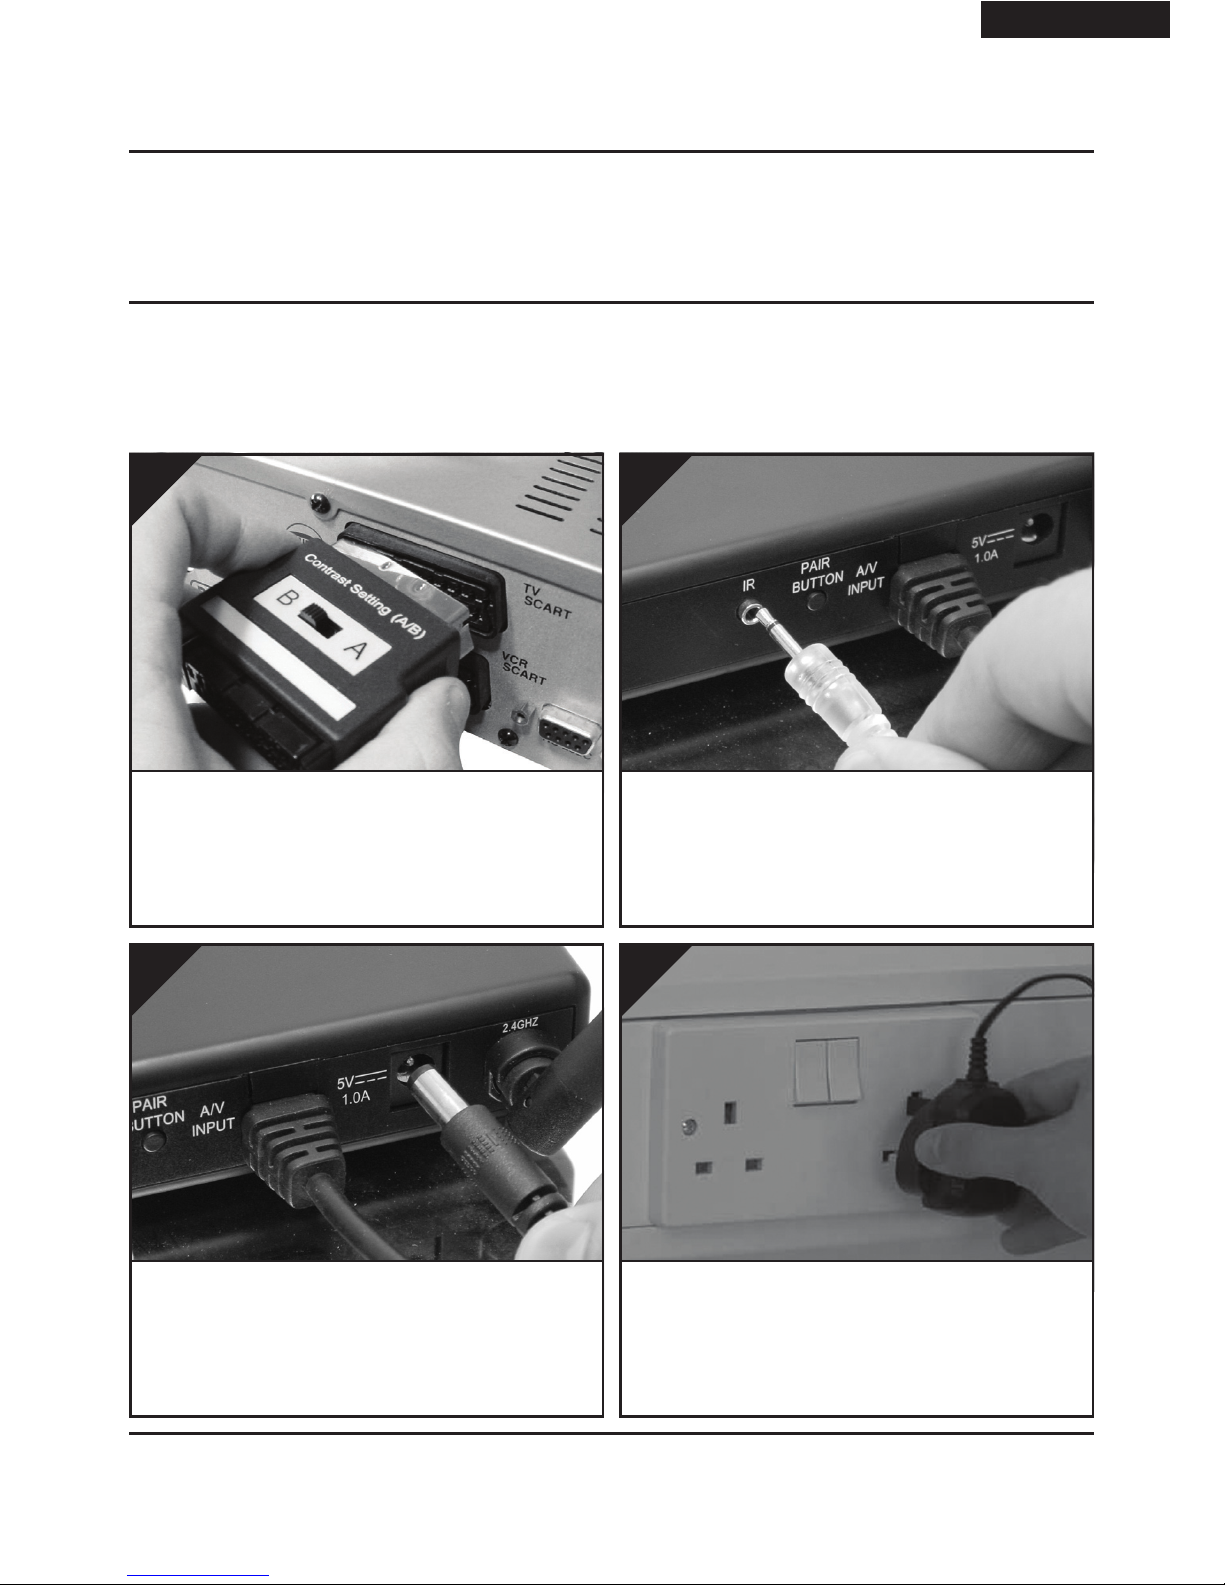
Step 2 - Install the Transmitter
The Transmitter will send the audio and video from a connected source (your Satellite Receiver for
example) to the Receiver, located in another room in your home.
Connect the Power Supply Unit (PSU) to the socket
labelled ‘5V ~1.0A’ on the rear of the Transmitter.
3.
Connect the PSU to an available mains socket. The
Power Indicator will light up Red to indicate that the
unit is in Standby Mode.
4.
Page 06 Please read the instructions carefully prior to installation
DGXDSDV111 - DigiSender® XD - Single Input Digital Wireless AV Sender System
(EN) ENGLISH
Installing your DigiSender® XD
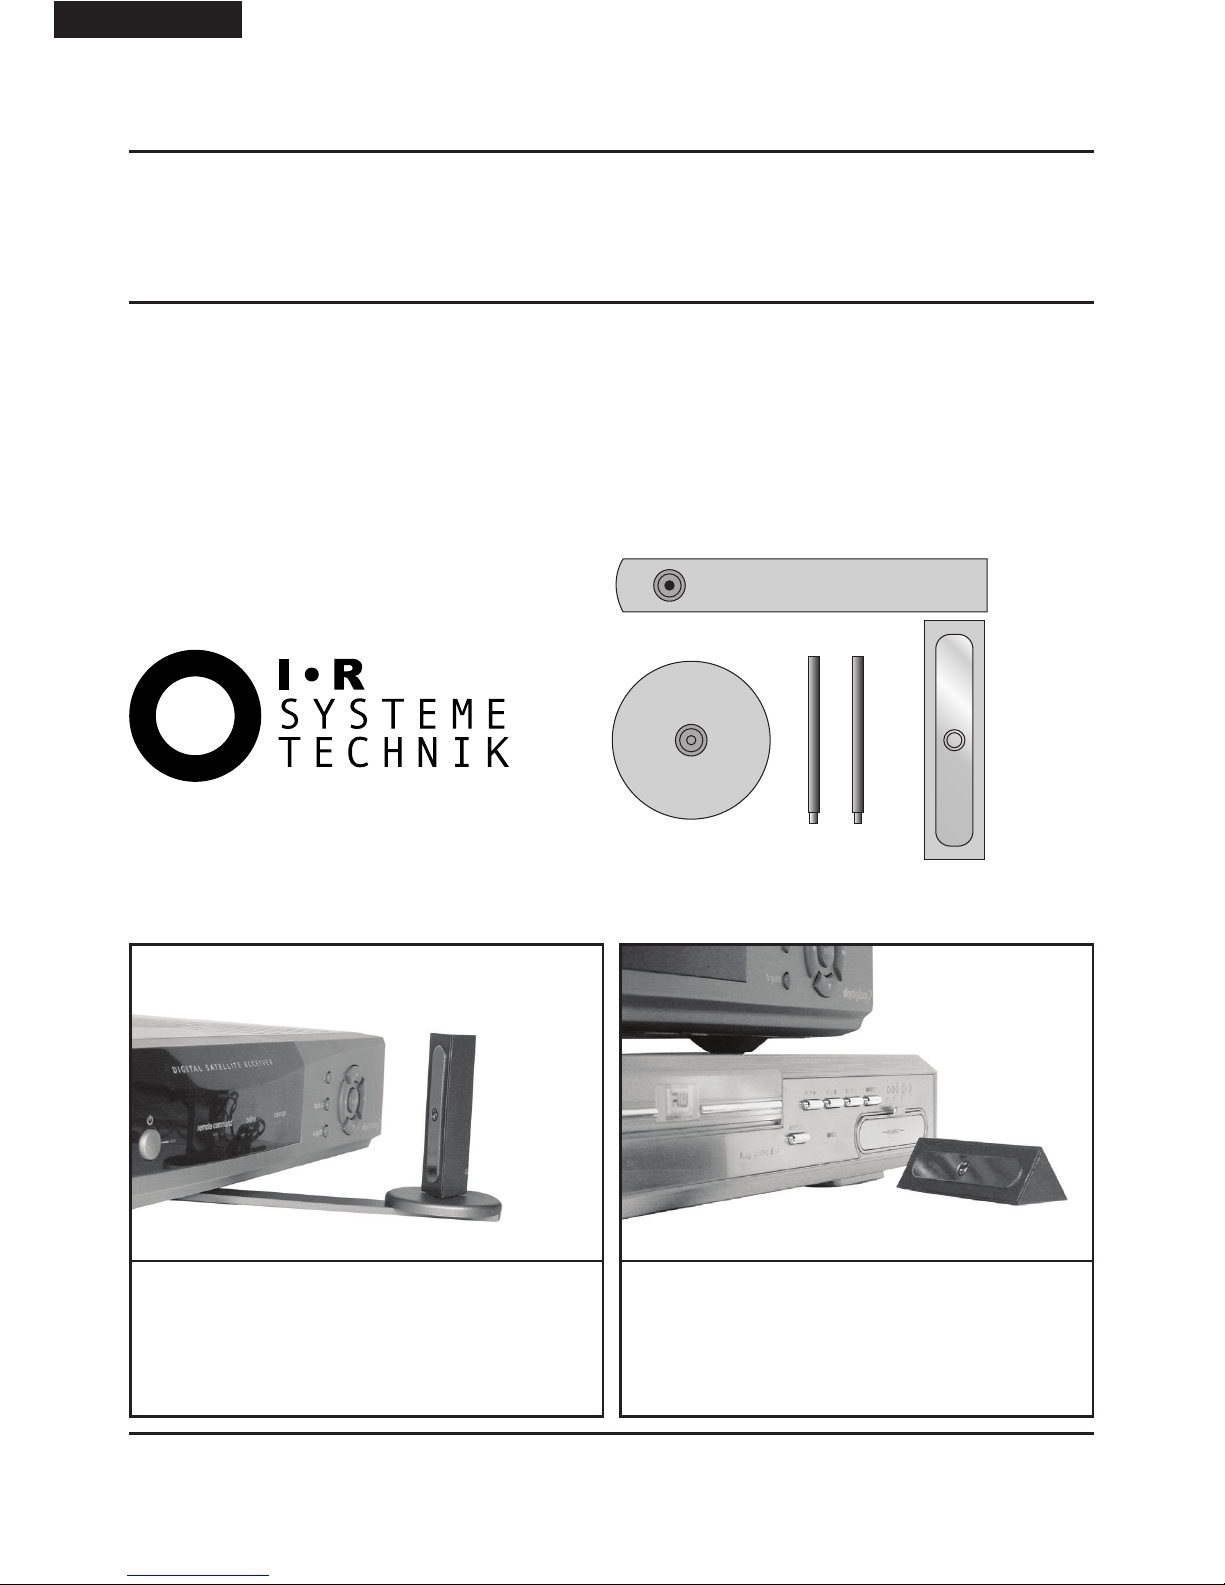
Step 3 - Install the IR Systeme Technik Remote Relay Kit™
The IR Systeme Technik™ Remote Relay Kit includes various accessories that will help you in setting it
up the Remote Relay system correctly.
Once set up, this Remote Relay system will enable you to control your source equipment (your satellite
receiver for example), with its remote control, from the receiving location.
Example 1: Mount the IR Emitter vertically using
accessories 1 and 2. Ensure the LED is facing the IR
sensor on your source equipment.
Example 2: Mount the IR Emitter horizontally using
the supplied sticky pad. Ensure the LED is facing the
IR sensor on your source equipment.
Extension Pieces
Accessory #1
Accessory #2
IR Emitter
Page 07Please read the instructions carefully prior to installation
DGXDSDV111 - DigiSender® XD - Single Input Digital Wireless AV Sender System
ENGLISH (EN)
Connect the PSU to the socket labelled ‘5V ~ 1.0A’
on the Receiver.
2.
Connect the PSU to an available mains socket. The
Power Indicator will light up Red to indicate that the
unit is in Standby Mode.
3.
Locate a vacant SCART socket on the back of your
receiving TV and insert the DigiSender® XD SCART
cable.
1.
Installing your DigiSender® XD
Step 4 - Install the Receiver
The Receiver will pick up the signals being sent by your Transmitter and output them to a connected
TV.
Page 08 Please read the instructions carefully prior to installation
DGXDSDV111 - DigiSender® XD - Single Input Digital Wireless AV Sender System
(EN) ENGLISH
Installing your DigiSender® XD
Step 5 - Test your Setup Using the Diagnostics Mode
Your DigiSender® XD is set to Diagnostics Mode by default and will aid you in getting the best possible
picture and help identify any problems that may arise during installation.
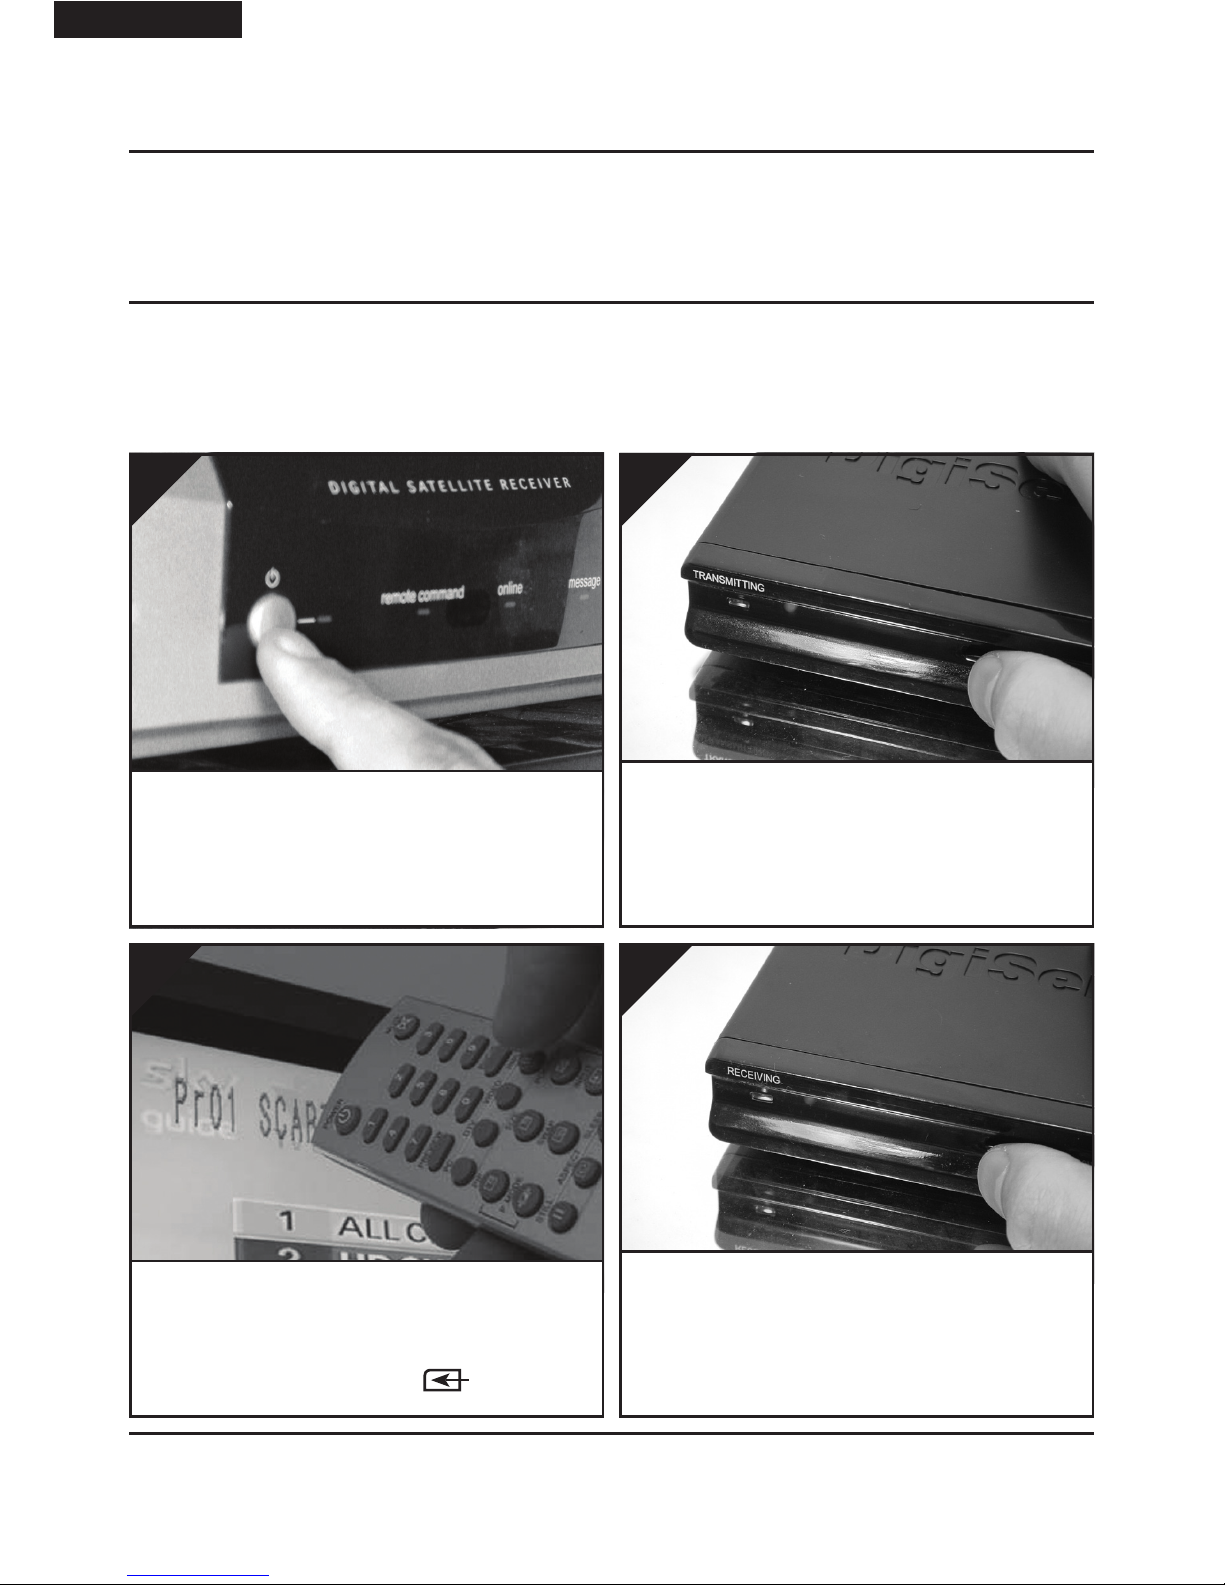
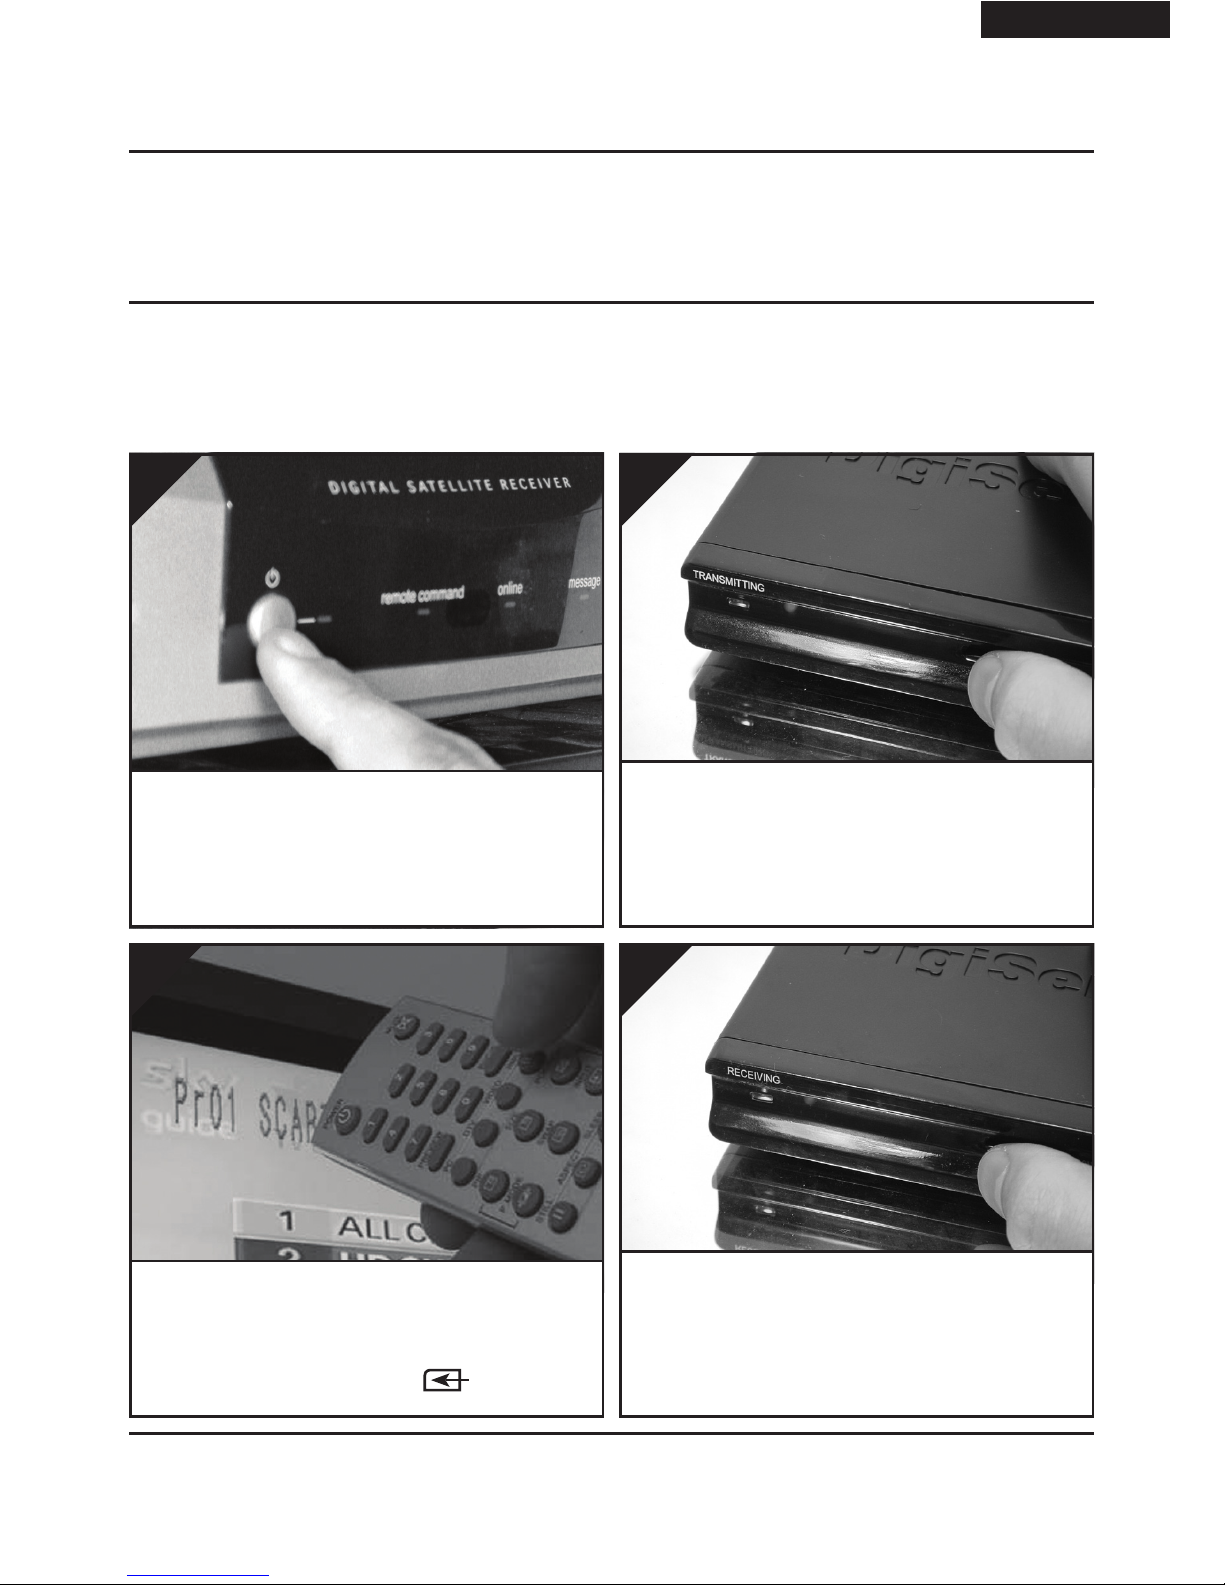
Turn on the receiving TV, and select the SCART
channel assigned to the SCART socket that you
plugged the Receiver in to. This may be labelled as
SCART, AUX, AV, VIDEO, VCR or .
3.
Switch on the source equipment (Satellite, Freeview, DVD, VCR, etc.).
1.
Turn on the Transmitter by pushing the Power button on the front of the unit. The Power Indicator will
change from Red to Green to indicate that the unit
is switched on.
2.
Turn on the Receiver by pushing the Power button
on the front of the unit. The Power Indicator will
change from Red to Green to indicate that the unit
is switched on
4.
Page 09Please read the instructions carefully prior to installation
DGXDSDV111 - DigiSender® XD - Single Input Digital Wireless AV Sender System
ENGLISH (EN)
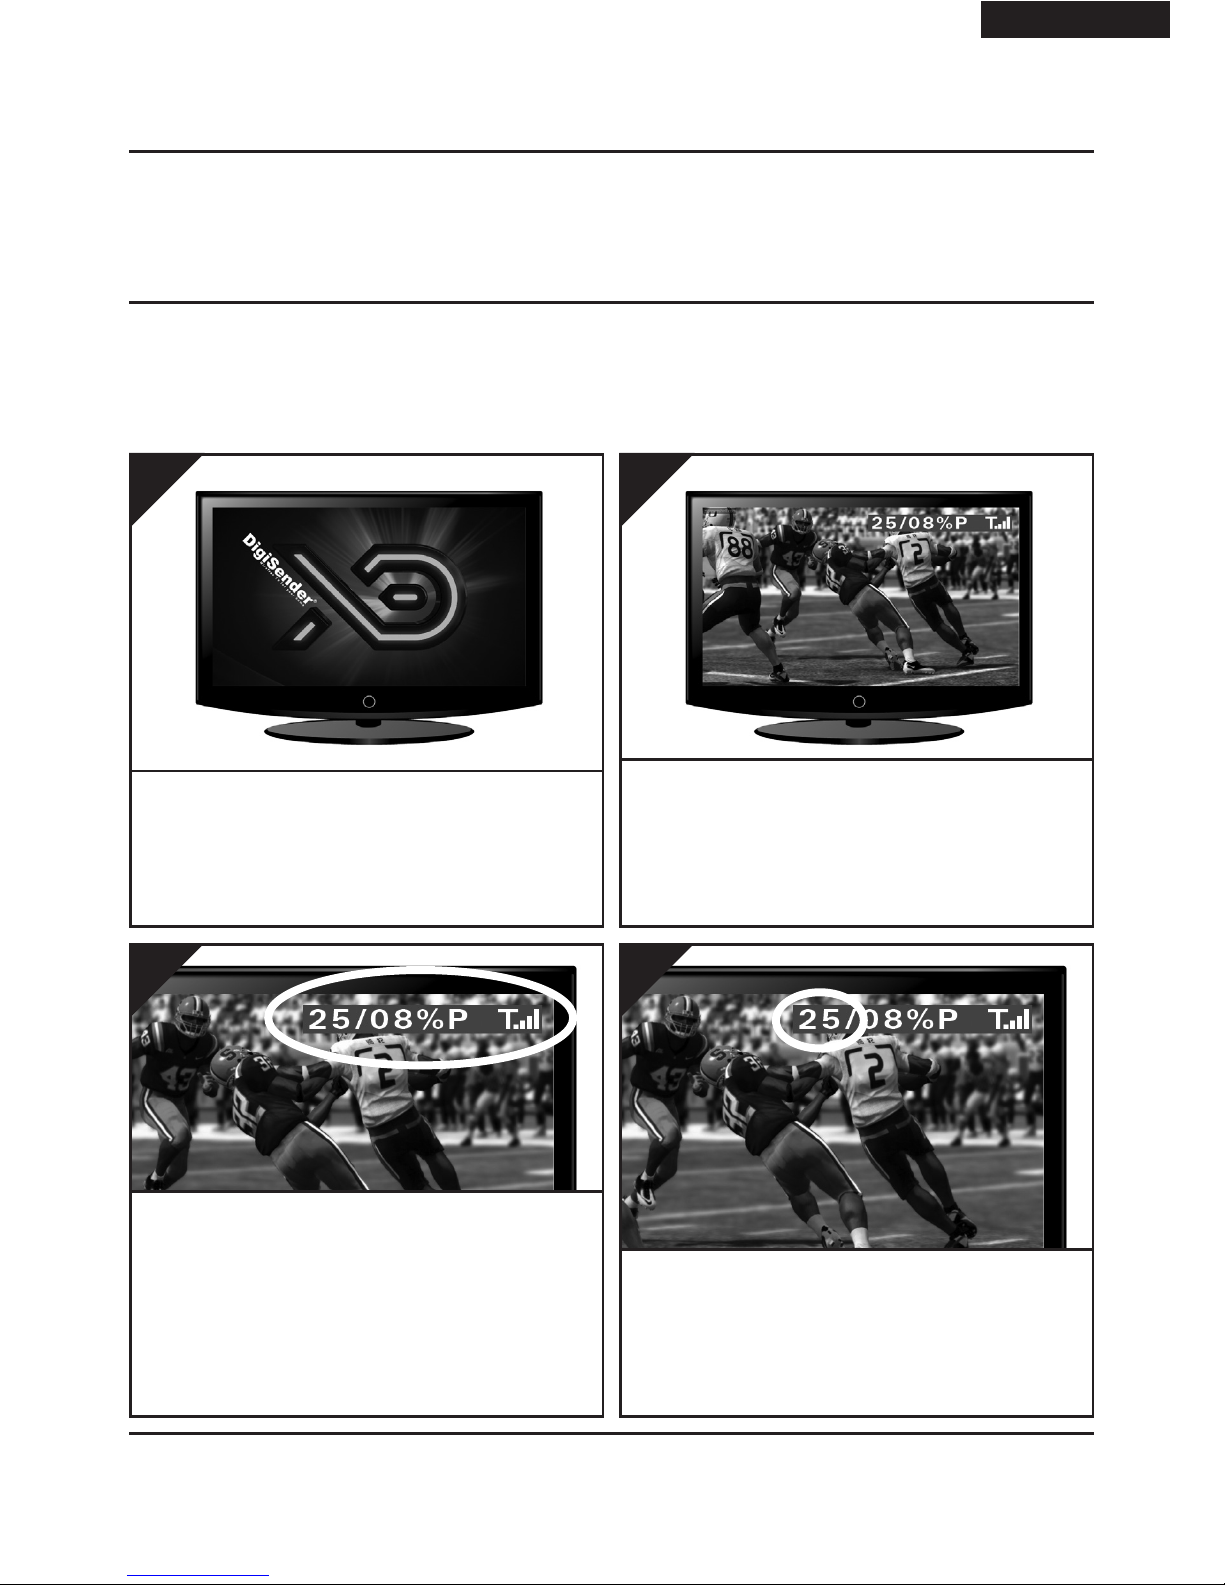
continued...
You will notice that at the top right corner of the
screen is a blue Diagnostics Bar with some information on it. If the Diagnostics Bar is not present,
then your Receiver may not be in Diagnostics Mode.
Flick the Mode Switch on the back from Normal to
Diagnostics and turn the receiver off and then back
on again.
7.
The DigiSender® XD Boot Screen will be displayed
whilst the Receiver locks on to the Transmitters
signal.
5.
After approximately 5 seconds the picture will
change to whatever you are transmitting. If the pic-
ture does not change, or changes to the DigiSender®
Test Card, you may need to re-sync the Transmitter
and Receiver. See page 12 for more details.
6.
The first number indicates the Frame Rate that the
Receiver is picking up from the Transmitter and outputting to your TV.
8.
Page 10 Please read the instructions carefully prior to installation
DGXDSDV111 - DigiSender® XD - Single Input Digital Wireless AV Sender System
(EN) ENGLISH
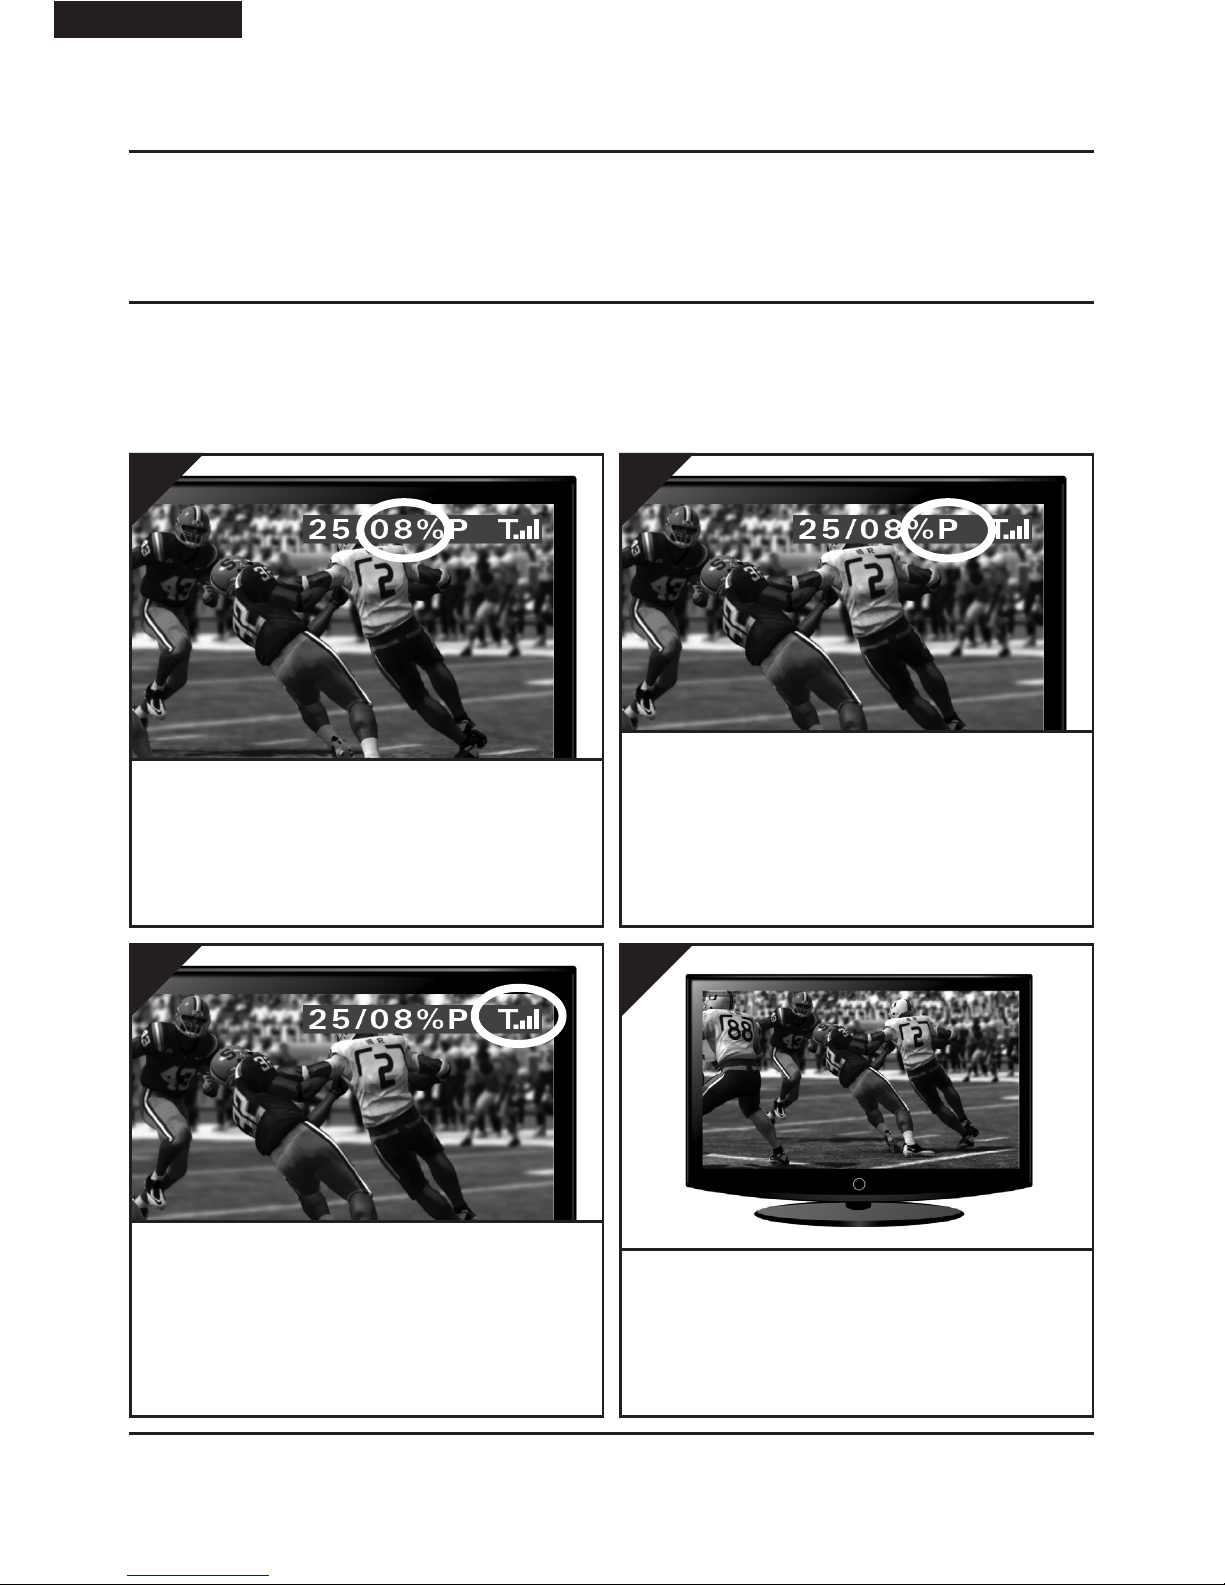
continued...
Note: When switching from Diagnostics Mode to Normal mode, or vice versa, it will be necessary to turn
the unit off and then back on again.
Having made any necessary adjustments, flick the
Mode Switch from Diagnostics to Normal and turn
the unit off. Installation is now complete and you
can enjoy your satellite channels on another TV in
your home!
12.
The second number indicates the Packet Rate. This
is the percentage of data packets sent from the
Transmitter that are having to be reconstructed by
the Receiver.
9.
‘P’ means that no noticeable losses should be visible in the picture quality and the frame rate should
remain steady at around 25. ‘F’ means that you may
notice subtle losses in the picture quality. As the
Packet Rate increases, the Frame Rate will also reduce.
10.
The last icon indicates Signal Level. This is key to
a good Frame Rate and Packet Rate. Endeavour to
keep this as high as possible. If you are getting a
low Frame Rate, Packet Rate or Signal Level, you
may need to adjust the positioning of the units and/
or aerials.
11.
Page 11Please read the instructions carefully prior to installation
DGXDSDV111 - DigiSender® XD - Single Input Digital Wireless AV Sender System
ENGLISH (EN)
Using your DigiSender® XD
Standard Operation
Turn on the receiving TV, and select the SCART
channel assigned to the SCART socket that you
plugged the Receiver in to. This may be labelled as
SCART, AUX, AV, VIDEO, VCR or .
3.
Switch on the source equipment (Satellite, Freeview, DVD, VCR, etc.).
1.
Turn on the Transmitter by pushing the Power button on the front of the unit. The Power Indicator will
change from Red to Green to indicate that the unit
is switched on.
2.
Turn on the Receiver by pushing the Power button
on the front of the unit. The Power Indicator will
change from Red to Green to indicate that the unit
is switched on
4.
Page 12 Please read the instructions carefully prior to installation
DGXDSDV111 - DigiSender® XD - Single Input Digital Wireless AV Sender System
(EN) ENGLISH
Turn on both the Transmitter and the Receiver.
1.
Press and hold the Pair Button on the back of the
Transmitter and Receiver, simultaneously, for 5 seconds and then release.
2.
Should you need to re-sync the Transmitter and Receiver at any point, this can be achieved by following the instructions below.
Using your DigiSender® XD
Re-syncing the Transmitter and Receiver
Please note that because you need to hold the Pair Button on both the Transmitter and Receiver simultaneously, you will need to have the Transmitter and Receiver in the same room as each other and within
reach. Alternatively, if you have someone that can help, they can hold the Transmitters Pair Button in the
lounge while you hold the Receivers Pair Button in the bedroom.

Page 13Please read the instructions carefully prior to installation
DGXDSDV111 - DigiSender® XD - Single Input Digital Wireless AV Sender System
ENGLISH (EN)
Troubleshooting
Frequently Asked Questions
Q. My picture is jerky, how can I solve this?
A. A jerky picture is an indication of poor Frame Rate. Put the system into Dignostics Mode (see page
08 - 10) and check the Signal Level. Try adjusting the position of the antenna on both the Transmitter
and Receiver whilst another person monitors the Signal Level.
Q. How can I improve the Frame rate?
A. A poor Frame Rate is the result of a significant loss of data packets (a poor Packet Rate) from the
Transmitter. The Receiver is able to reconstruct the lost data packets but it has to make an intelligent
guess as to their value. Try adjusting the position of the antenna on both the Transmitter and Receiver
until the problem is resolved.
Q. I can never acheive a good Packet Rate, can I just leave it as is?
A. Sure. The Receiver has been designed to work with significant packet data loss without any serious
degradation to picture quality and never a loss of sound quality.

Page 14 Please read the instructions carefully prior to installation
DGXDSDV111 - DigiSender® XD - Single Input Digital Wireless AV Sender System
(EN) ENGLISH
Troubleshooting
Technical Support
AEI Security & Communications Ltd is dedicated to providing our customers with first class customer
care and technical support.
1. Website
Free technical advice is available online 24/7 at our dedicated support web site: www.aei.eu
2. Online Videos
Watch online Installation and Troubleshooting Video Guides at: www.aei.eu/video
3. Email
Email our technical department directly at: support@aei.eu
4. Live Chat
Chat to one of our technical advisors live. See website for details.
5. Telephone
We have a dedicated helpline, open Monday to Friday, 8.30am - 4pm. Call 02071 931 413
WATCH A VIDEO
INSTALLATION
& TROUBLESHOOTING GUIDE
Available online at: www.aei.eu/video
WATCH A VIDEO
INSTALLATION
& TROUBLESHOOTING GUIDE
Available online at: www.aei.eu/video
Page 15Lesen Sie diese Instruktionen bitte sorgfältig durch, bevor Sie die Installation beginnen
DEUTSCH (DE)
DGXDSDV111 - DigiSender® XD - digitales kabelloses AV Sendesystem mit einem Eingang
Einleitung
Wir gratulieren zum Kauf des neuen DigiSender XD von AEI Security & Communications Ltd.
Dies ist ein absolutes Spitzenprodukt der kabellosen Audio- und Video- Technologie, das Sie für diesen
Preis haben können.
Sie können hiermit DVD Qualität und Hi-Fi stereo – Klang von Ihrem Satellitenfernsehen, Kabel - TV,
DTV, DVD, DVR oder VCR in einem anderen Raum in Ihrer Wohnung empfangen, ohne irgendwelche
Interferenzen und Störungen von anderen drahtlosen Geräten fürchten zu müssen.
Der Gebrauch des aufgeteilten Spektrums der digitalen Technologie ermöglicht ein müheloses Durchdringen des Signals durch Wände und Decken, wobei das Signal nicht durch andere ebenfalls drahtlose Geräte gestört wird. Tatsächlich kann diese Technologie so nahtlos mit anderen dieser Techniken
betrieben werden, dass ein Aufstellen direkt neben einem Funkrouter oder sogar einer Mikrowelle
möglich ist. Das war früher überhaupt nicht möglich!
Mit den innovativen Ausstattungen wie dem DigiConnector, der IR Systeme Technik™ Remote Relay
Kit (Infrarot – Fernbedienung) und dem Diagnostikmodus können Sie sich sicher sein, das wohl am
weitesten entwickelte System zu haben, das es auf dem Markt gibt.
Page 16 Lesen Sie diese Instruktionen bitte sorgfältig durch, bevor Sie die Installation beginnen
(DE) DEUTSCH
DGXDSDV111 - DigiSender® XD - digitales kabelloses AV Sendesystem mit einem Eingang
Installation Ihres DigiSender® XD
Schritt 1 - Packen Sie Ihren DigiSender XD Aus
Alle DigiSender wurden mit einem Computer auf das Gewicht hin überprüft. Trotzdem ist es gut, alle
Teile auf Vollständigkeit zu prüfen, bevor Sie mit der Installation beginnen.
POWER
Sender
POWER
Empfänger
IR Systeme Technik™ Kit
2x Stromversorgung
 Loading...