

ENGLISH (EN)
DEUTSCH (DE)
FRANCAIS (FR)
Model: DGHDP1
NEDERLANDS (NL)
1080p Powerline AV Sender System
Please keep this instruction manual for future reference

(EN) ENGLISH
DGHDP1 - DigiSender® HD Pro - Single Input Powerline AV Sender System
Contents
ENGLISH DEUTSCH
Introduction
04
Installing the DigiSender® HD Pro
05 - 10
Step 1 - Unpack your DigiSender®
05
Step 2 - Install the Transmitter
06 - 07
Step 3 - Install the IR Emitter
08
Step 4 - Install the Receiver
09 - 10
Basic Operation
11 - 15
The DigiSender® HD Pro Remote Control
11 - 13
The On-Screen Menu
14 - 15
Advanced Operation
16 - 21
Installing Additional Receivers
16
Running Multiple Transmitters and Receivers
16 - 17
Transmitter & Receiver Syncing
18
PLC Grouping
19
Resetting the System Settings to Factory Defaults
20
Resetting the PLC Settings to Factory Defaults
21
Troubleshooting
22 - 27
Frequently Asked Questions
22 - 23
Syncing and Resetting Procedure
24 - 25
Remote Relay Problems
26
Technical Support & Accessories
27
Information & Safety
28 - 30
Important Product Information
28
Abnormal Operation
28
Safety Precautions
29
Power Cable Precautions
30
HDMI Cable Precautions
30
Einleitung
31
Installation Ihres DigiSender®
32 - 37
Schritt 1 - Packen Sie Ihren DigiSender® Aus
32
Schritt 2 - Installieren Sie Den Sender
33 - 34
Schritt 3 - Installieren Sie den Infrarotimpulsgeber
35
(Fernbedienung).
Schritt 4 - Installieren Sie Den Empfänger
36 - 37
Basisfunktionen
38 - 42
Die DigiSender HD Pro Fernbedienung
38 - 40
Menüanzeige auf dem Bildschirm
41 - 42
Erweiterte Handlungsweisen
43 - 48
Die Installation zusätzlicher Empfänger
43
Betreiben mehrerer Sender und Empfänger
43 - 44
Sender- und Empfängersynchronisierung
45
PLC Gruppierung
46
Zurücksetzen des Systems auf die Werkseinstel-
47
lungen
Zurücksetzung der PLC- Einstellungen auf die
48
Werkseinstellung
Problemlösung
49 - 54
Häufig gestellte Fragen
49 - 50
Synchronisierung und Rücksetzungsvorgehen.
51 - 52
Fernbedienungserweiterung
53
Technischer Support und Zusatzgeräte
54
Informationen und Sicherheitshinweise
55 - 57
Wichtige Produktinformationen
55
Ungewöhnliche Reaktionen
55
Sicherheitsvorkehrungen
56
Schutzmaßnahmen für Stromleitungen
57
Schutzmaßnahmen für HDMI - Kabel
57
Page 02 Please read the instructions carefully prior to installation

DGHDP1 - DigiSender® HD Pro - Single Input Powerline AV Sender System
FRANCAIS NEDERLANDS
Présentation
58
Installation Du DigiSender®
59 - 64
Étape 1 - Déballage du DigiSender®
59
Étape 2 - Installation de l’émetteur
60 - 61
Étape 3 - Installer l’Emetteur Infrarouge
62
Étape 4 - Installation du récepteur
63 - 64
Opérations de base
65 - 69
La télécommande DigiSender ® HD Pro
65 - 67
Eléments du menu à l’écran
68 - 69
Procédures avancées
70 - 75
Installation de récepteurs supplémentaires
70
Mise en marche de plusieurs émetteurs avec
70 - 71
plusieurs récepteurs
Synchronisation d’emetteur & de récepteur
72
Groupement de PLC
73
Configuration les paramètres du système par
74
défaut
Réinitialisation des paramètres PLC aux
75
paramètres par défaut
Dépannage
76 - 81
Foire aux questions
76 - 77
La procédure de synchronisation et de réinitialisa-
78 - 79
tion
Problèmes de commande de l’équipement source
80
Assistance technique et Accessoires
81
Informations de sécurité
82 - 84
Informations importantes sur le produit
82
Fonctionnement anormal
82
Consignes de sécurité
83
Précautions pour le câble électriques
84
Les Précautions de Câble HDMI
84
97 - 102
103 - 108
103 - 104
105 - 106
109 - 111
Inleiding
85
Uw DigiSender® Installeren
86 - 91
Stap 1 - Pak Uw DigiSender® Uit
86
Stap 2 - Installeer De Overdrager
87 - 88
Stap 3 - Installeer de IR Zender (IR-Emitter)
89
Stap 4 - Installeer De Ontvanger
90 - 91
Basis Handelingen
92 - 96
The DigiSender® HD Pro Afstandsbediening
92 - 94
Het On-Screen-Menu ( Menu op het scherm)
95 - 96
Gevorderde Procedures
Installeren Meerdere Ontvangers
97
Meerdere Overdragers met Meerdere Ontvangers
97 - 98
gebruiken
Overdrager & Ontvanger Op elkaar Afstellen
99
PLC Groepering
100
Herstellen van de Systeem-instellingen naar
101
Fabrieksstandaardwaarden
Herstellen van de PLC Instellingen naar Fab-
102
rieksstandaardwaarden
Problemen Oplossen
Veelgestelde Vragen
Op elkaar Afstellen en Herstellen- Procedure
Problemen bij het bedienen van de bronappa-
107
ratuur
Technische ondersteuning en accessoires
108
Informatie & Veiligheid
Belangrijke Productinformatie
109
Abnormaal Gebruik
109
Veiligheidsmaatregelen
110
Voorzorgsmaaatregelen Electrische Kabels en
111
Snoeren
HDMI Kabel Voorzorgsmaatregelen
111
ENGLISH (EN)
Page 03Please read the instructions carefully prior to installation

(EN) ENGLISH
DGHDP1 - DigiSender® HD Pro - Single Input Powerline AV Sender System
Introduction
The DigiSender® HD Pro is the latest state-of-the-art AV sender system from AEI Security & Communications Ltd.
Making use of the most recent advancements in high definition media distribution technology the DigiSender®
HD Pro will allow you to transmit 1080p High Definition video around your home using your existing mains power
lines. This avoids the complexities of re-wiring your house or buying new AV equipment for each viewing room.
This system consists of a Transmitter and a Receiver that delivers H.264 High Definition video and high quality
audio from HD Satellite receivers, HD Set-Top boxes , Blu-Ray™ players and HD Games Consoles (etc.) to compatible HDTV displays located near mains power sockets in your home.
Setup is quick and easy. The source device (e.g. HD Satellite receiver in lounge) is connected to the transmitter
and the receiver is connected to the second HDTV (e.g. Bedroom TV), both via HDMI™.
The system also features Remote Relay, allowing you to use the source remote (e.g. HD Satellite remote control)
from the receiving location.
It is recommended that you read the Information & Safety section on page 28 - 30 before installing this product.
Page 04 Please read the instructions carefully prior to installation

ENGLISH (EN)
DGHDP1 - DigiSender® HD Pro - Single Input Powerline AV Sender System
Installing your DigiSender®
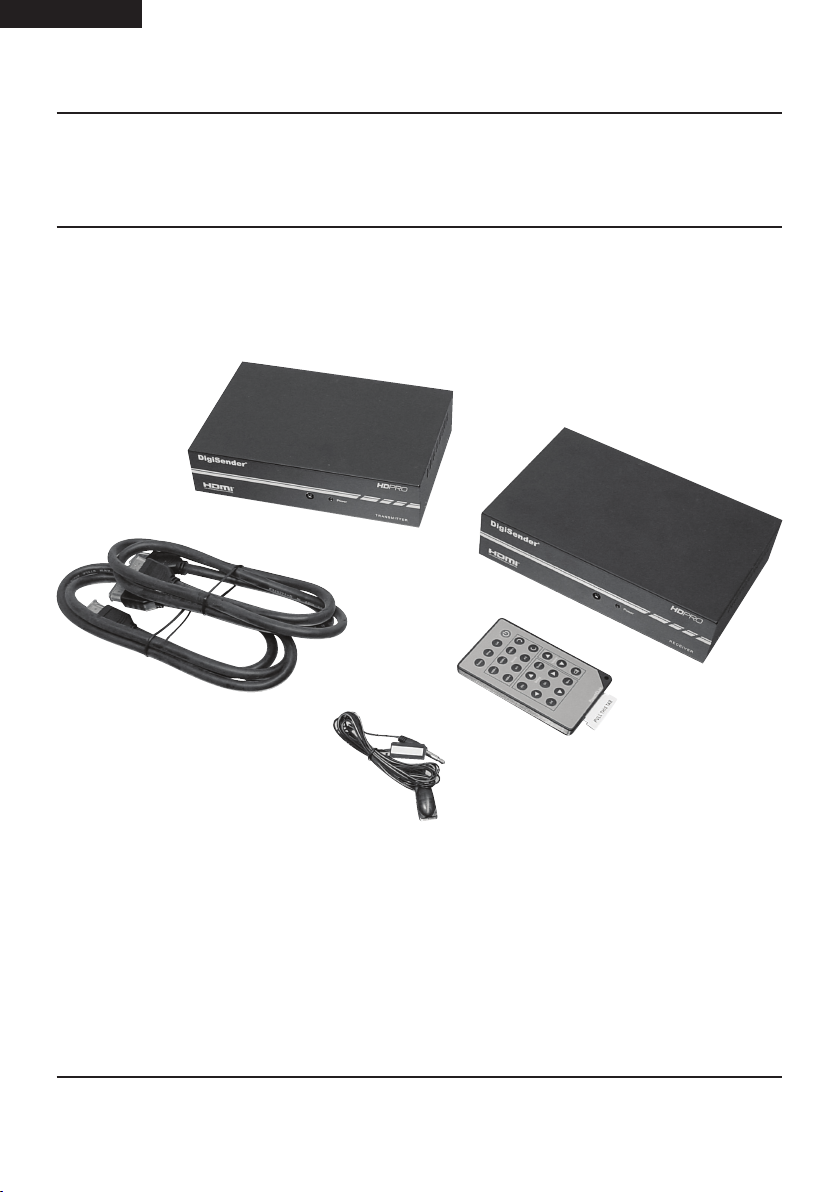
Step 1 - Unpack your DigiSender®
All DigiSender® orders are computer weight checked when packed, however, it is a good idea to check all kit
contents are present before proceeding with the installation.
1.
2.
3.
1. 1x DigiSender® HD Pro Transmitter
2. 1x DigiSender® HD Pro Receiver
3. 2x HDMI Cables
4. 1x IR Emitter
5. 1x Remote Control
5.
4.
Page 05Please read the instructions carefully prior to installation
(EN) ENGLISH
DGHDP1 - DigiSender® HD Pro - Single Input Powerline AV Sender System
Installing your DigiSender®
Step 2 - Install the Transmitter
This chapter describes how to correctly install your DigiSender® HD Pro. After installation is complete you will be
able to view the connected source device (e.g. HD Satellite receiver) on another TV anywhere in your home or
office.
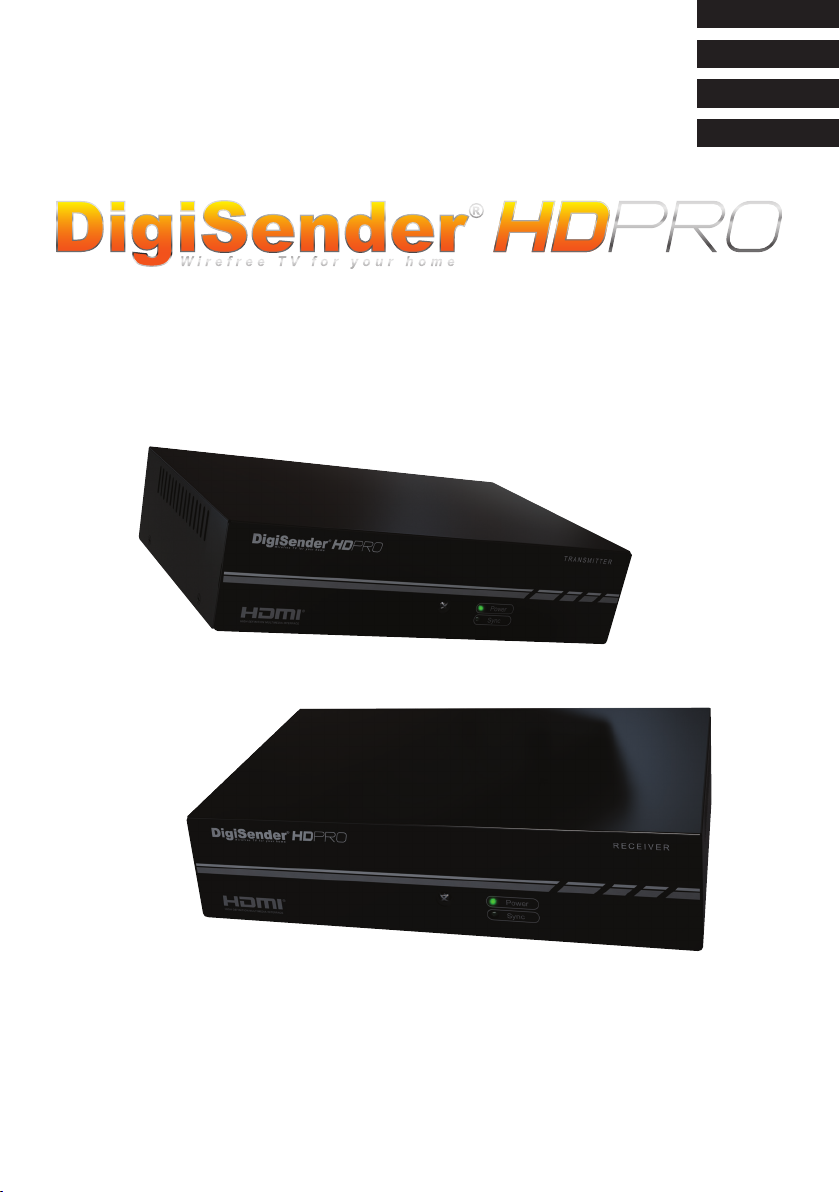
1.
Identify the HDMI cable connecting your source
device (e.g. HD Satellite receiver) to your main TV.
3.
2.
Disconnect this cable from the TV and connect it
to the socket labelled ‘HDMI In’ on the back of the
DigiSender® Transmitter.
4.
Connect the IR Emitter to the socket labelled ‘IR’ on
Use one of the included HDMI cables and connect
it to the socket labelled ‘HDMI Out’ on the back of
the DigiSender® Transmitter and the HDMI Input on
your main TV.
Page 06 Please read the instructions carefully prior to installation
the back of the DigiSender® Transmitter and place
the IR Emitter facing the remote control sensor on
the front of your source device (e.g. HD Satellite
receiver) .
DGHDP1 - DigiSender® HD Pro - Single Input Powerline AV Sender System
Installing your DigiSender®
Step 2 - Install the Transmitter
ENGLISH (EN)
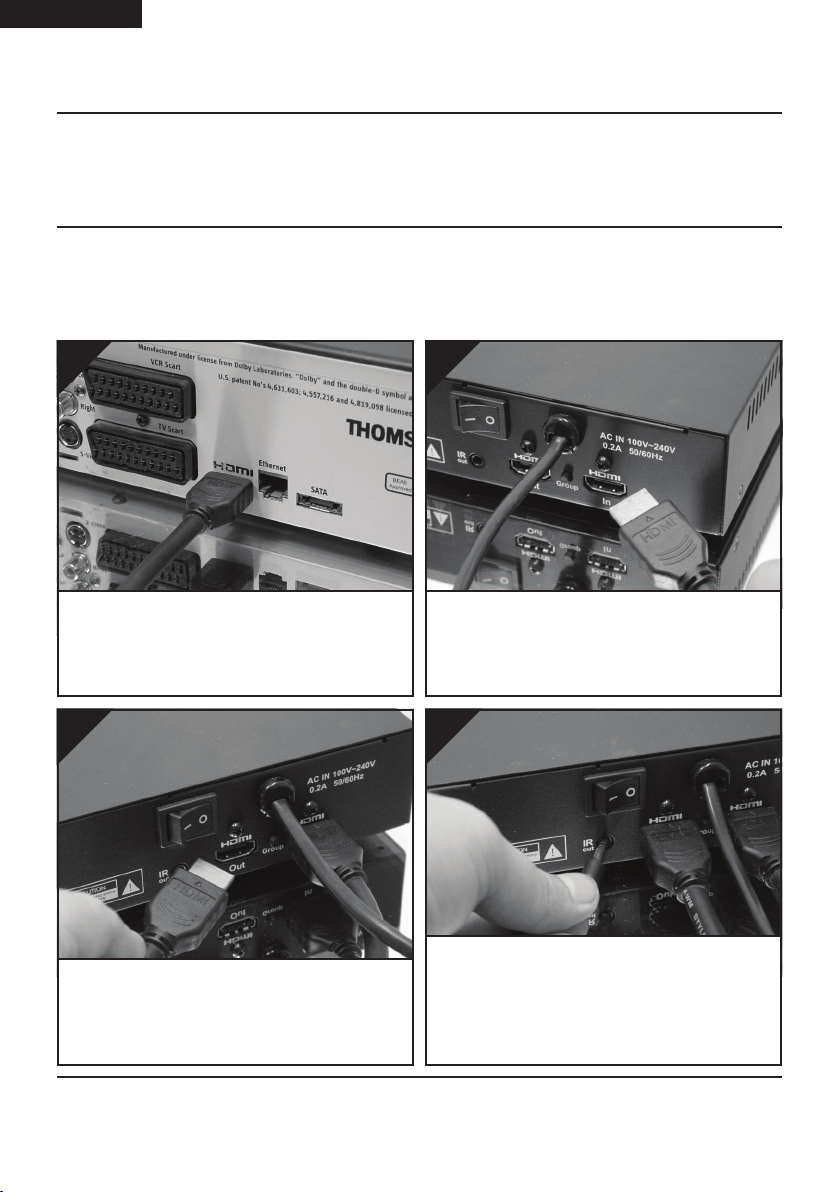
5.
Connect the DigiSender® Transmitter power cable
to an available mains power socket and switch on
at the back.
7.
6
The Power LED on the front of the DigiSender®
Transmitter will illuminate green to indicate that
the Transmitter is powered up.
Turn on your source device (e.g. HD Satellite receiver).
Page 07Please read the instructions carefully prior to installation

(EN) ENGLISH
DGHDP1 - DigiSender® HD Pro - Single Input Powerline AV Sender System
Installing your DigiSender®
Step 3 - Install the IR Emitter
The DigiSender® HD Pro features a remote relay system that allows you to control your source device (e.g. HD
Satellite receiver, from the second TV. The DigiSender® Receiver is fitted with an IR Sensor that will pick up the
IR signal from your source remote control (e.g. HD Satellite remote control). This IR signal is sent over your mains
power line to the DigiSender® Transmitter, where it is then sent to the source device (e.g. HD Satellite receiver)
via the IR Emitter.
The IR Emitter can be mounted in one of two different positions and it is best to try both positions to ensure
optimal performance.
Position 1: Place the IR Emitter facing the remote
control sensor on the front of your source device
(e.g. HD Satellite receiver) .
Page 08 Please read the instructions carefully prior to installation
Position 2: Use the included sticky pad to stick the
IR emitter to the front of your source device, near
to, and facing, the remote control sensor.
DGHDP1 - DigiSender® HD Pro - Single Input Powerline AV Sender System
Installing your DigiSender®
Step 4 - Install the Receiver
The Receiver will pick up the signals being sent by your Transmitter and output them to a connected TV.
ENGLISH (EN)
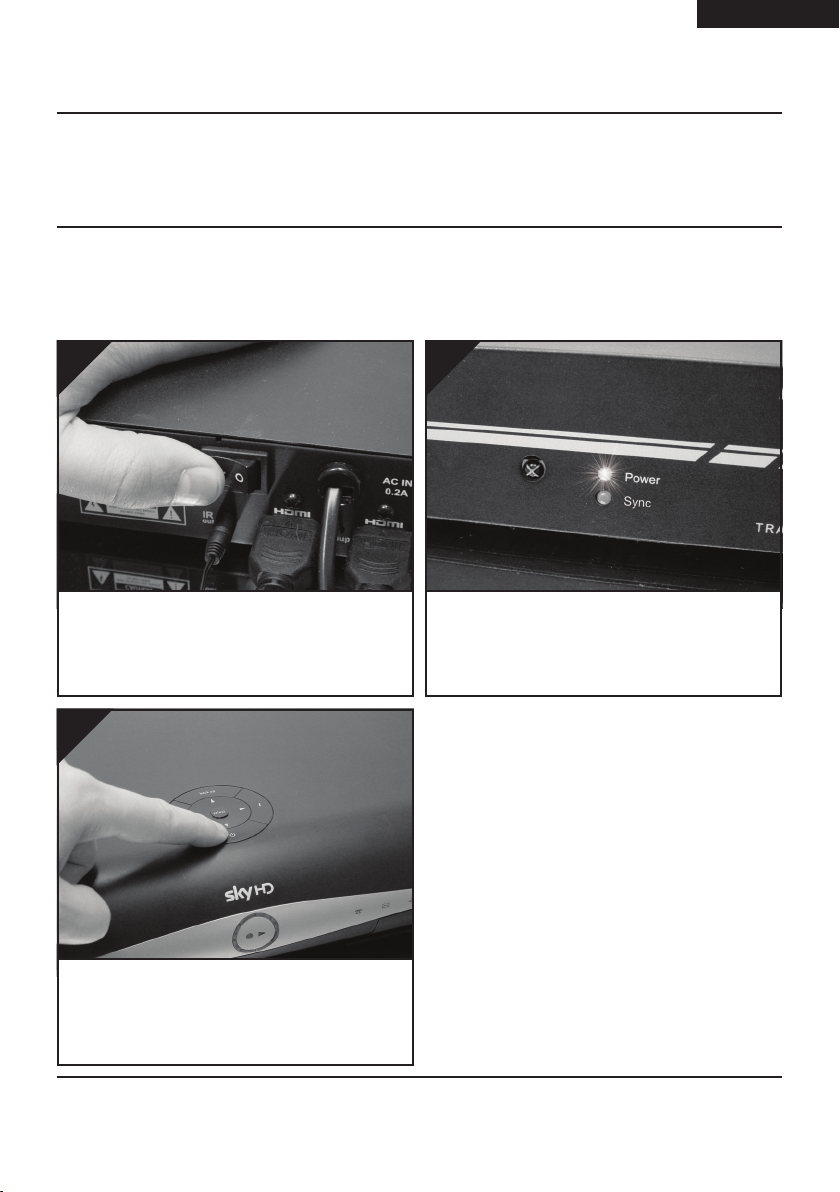
1.
Use the remaining HDMI cable and connect it to
the socket labelled ‘HDMI Out’ on the back of the
DigiSender® Receiver and the HDMI Input on your
receiving TV.
3.
2.
Connect the DigiSender® Receiver power cable to
an available mains power socket and switch on at
the back.
4.
HDMI1
A green LED on the front of the DigiSender® Receiver will illuminate to indicate that the Receiver
is powered up.
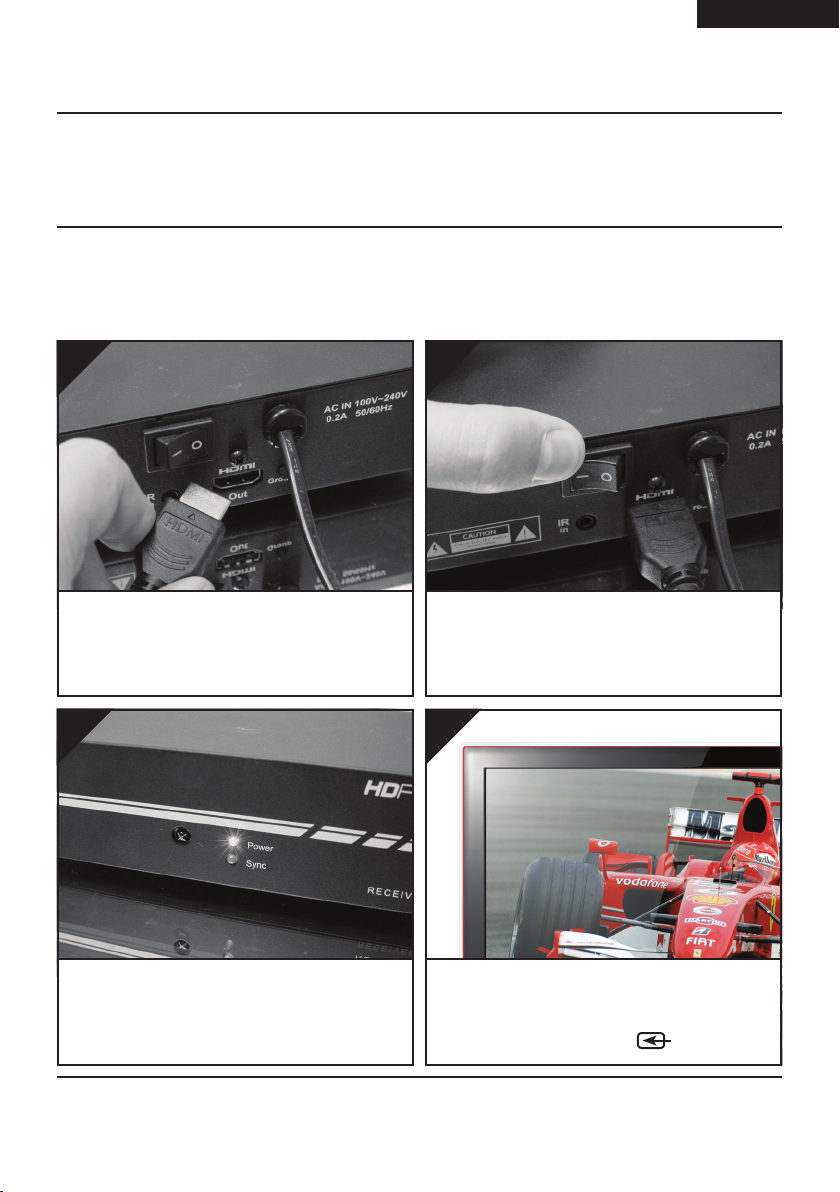
Turn on the receiving TV and select the channel as-
signed to the HDMI input that you connected the
DigiSender® Receiver into. This may be labelled as
HDMI, SOURCE, INPUT, AV or .
Page 09Please read the instructions carefully prior to installation
(EN) ENGLISH
DGHDP1 - DigiSender® HD Pro - Single Input Powerline AV Sender System
Installing your DigiSender®
Step 4 - Install the Receiver
Depending on how quickly the previous steps have been completed, you may see two messages displayed on the
receiving TV screen.
DigiSender® HD Pro
Establishing Sync with Transmitter
Please wait...
Establishing Sync Sync Successful
Approximately 40 seconds after turning on all of your equipment (the source device e.g. HD Satellite receiver, DigiSender® Transmitter, DigiSender® Receiver and the receiving TV) the video will be displayed on the receiving TV.
Sync Successful
Waiting for Video signal...
CONGRATULATIONS!
Installation is complete and you can now receive 1080p HD video in another room in your home.
Page 10 Please read the instructions carefully prior to installation

ENGLISH (EN)
DGHDP1 - DigiSender® HD Pro - Single Input Powerline AV Sender System
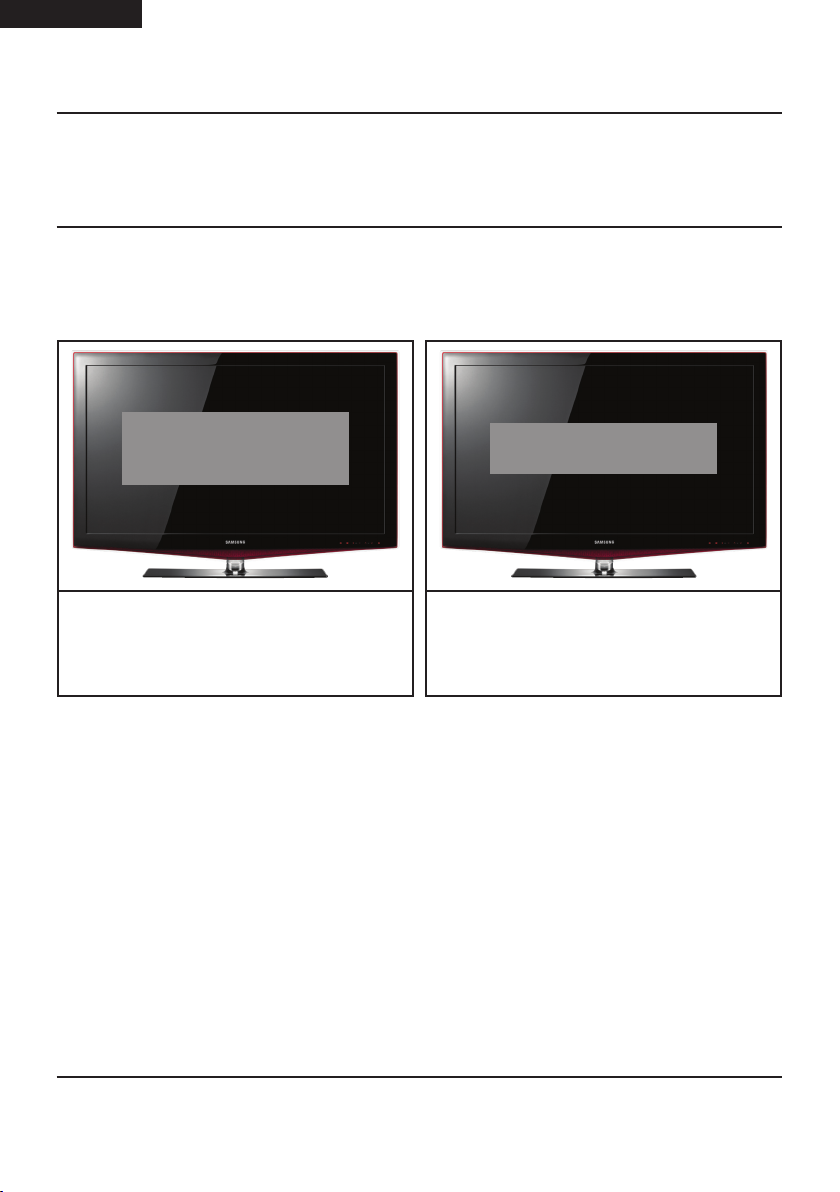
Basic Operation
The DigiSender® HD Pro Remote Control
The DigiSender® HD Pro comes included with a remote control that will allow you to access various settings via
the on-screen Menu as well as perform various procedures should you run into any problems.
Refer to the tables on the next two pages for descriptions of what each button is used for.
Top Row
Source Area
Volume Area
Settings Area
Page 11Please read the instructions carefully prior to installation

(EN) ENGLISH
DGHDP1 - DigiSender® HD Pro - Single Input Powerline AV Sender System
Basic Operation
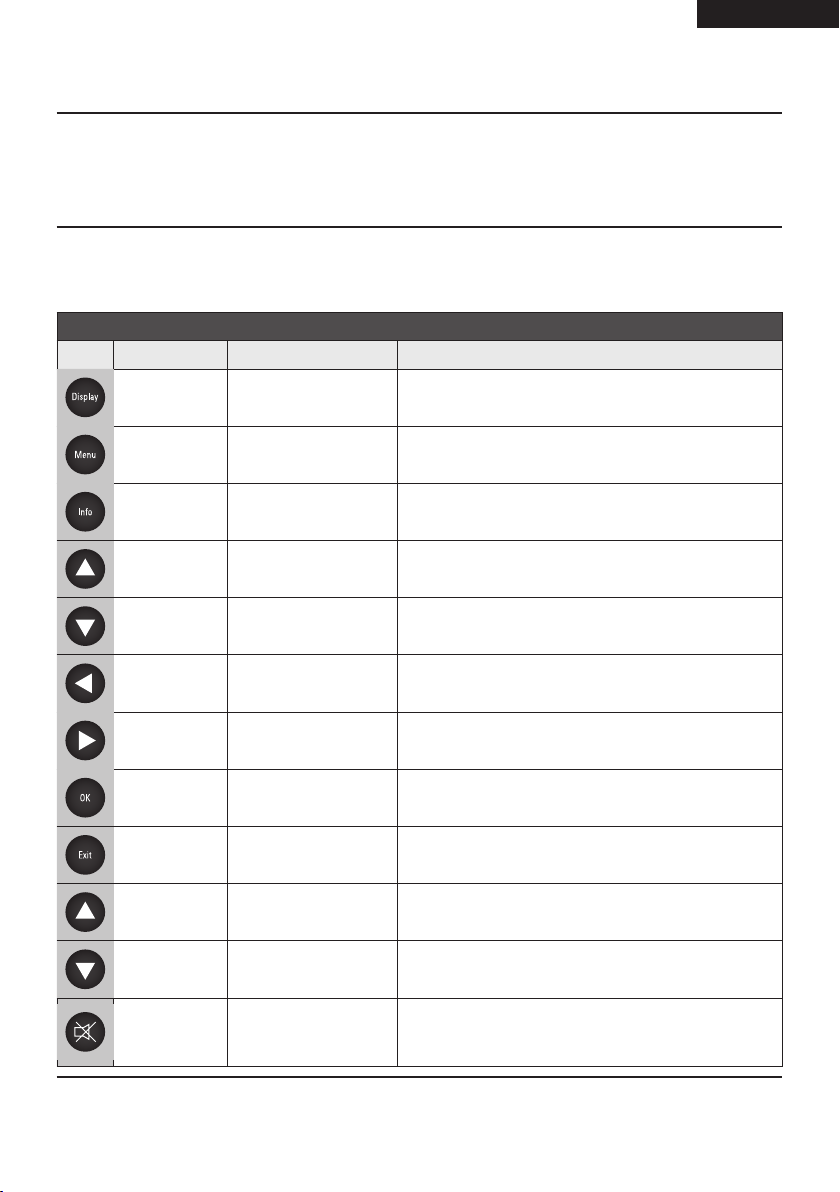
The DigiSender® HD Pro Remote Control
Remote Control Button Descriptions
Fig. Button Area Button Name Button Description
Top Row Power/Standby
Top Row Link
Top Row Group
Top Row Factory
Toggles the Transmitter and Receiver between On and
Standby mode.
Re-establishes a PLC between the Transmitter and
Receiver. Only to be used when installing an additional
receiver or during Troubleshooting.
Syncs the Transmitter and Receiver. Only to be used
when installing an additional receiver or during Troubleshooting.
Used to set the PLC Settings back to the factory defaults.
Only to be used during Troubleshooting.
Source HDMI 1 Input Not used for this model.
Source HDMI 2 Input Not used for this model.
Source HDMI 3 Input Not used for this model.
Source HDMI 4 Input Not used for this model.
Source AV 1 Input Not used for this model.
Source AV 2 Input Not used for this model.
Source Next Input Not used for this model.
Source Last Input Not used for this model.
Page 12 Please read the instructions carefully prior to installation
DGHDP1 - DigiSender® HD Pro - Single Input Powerline AV Sender System
Basic Operation
The DigiSender® HD Pro Remote Control
Remote Control Button Descriptions
Fig. Button Area Button Name Button Description
Setting Display Toggles the TV System
Setting Menu Enter Menu
Setting Info Displays Menu Information
Setting Up In Menu: Scroll Up
ENGLISH (EN)
Setting Down In Menu: Scroll Down
Setting Left In Menu: Scroll Left
Setting Right In Menu: Scroll Right
Setting OK Select / Enter / Confirm
Setting Exit Exit Menu
Volume Volume Up Increase Volume
Volume Volume Down Decrease Volume
Volume Mute Mute Audio
Page 13Please read the instructions carefully prior to installation

(EN) ENGLISH
DGHDP1 - DigiSender® HD Pro - Single Input Powerline AV Sender System
Basic Operation
The On-Screen Menu
The On-Screen Menu is used to configure various options and can be accessed by pressing Menu Button on the
remote control. This will bring up the On-Screen Menu on the television attached to the Receiver.
On-Screen Menu Items
• Language
• Network Bandwidth
• Resolution Control
• Sleep Time
• Lip Sync
• Select TX Station
• Information
Network Bandwidth
SETUP
Language
Resolution Control
Sleep
LIP SYNC
Select TX Station
Using the On-Screen Menu
You can navigate the On-Screen Menu by using the following buttons on the remote control:
• Use the Scroll Up and Scroll Down buttons to select a menu item.
• Press the OK button to select a menu item and display the available options.
• Use the Scroll Up and Scroll Down buttons to select an option.
• Press the OK button to set an option.
• Press the Exit button to exit the On-Screen Menu.
Information
Page 14 Please read the instructions carefully prior to installation
DGHDP1 - DigiSender® HD Pro - Single Input Powerline AV Sender System
Basic Operation
The On-Screen Menu
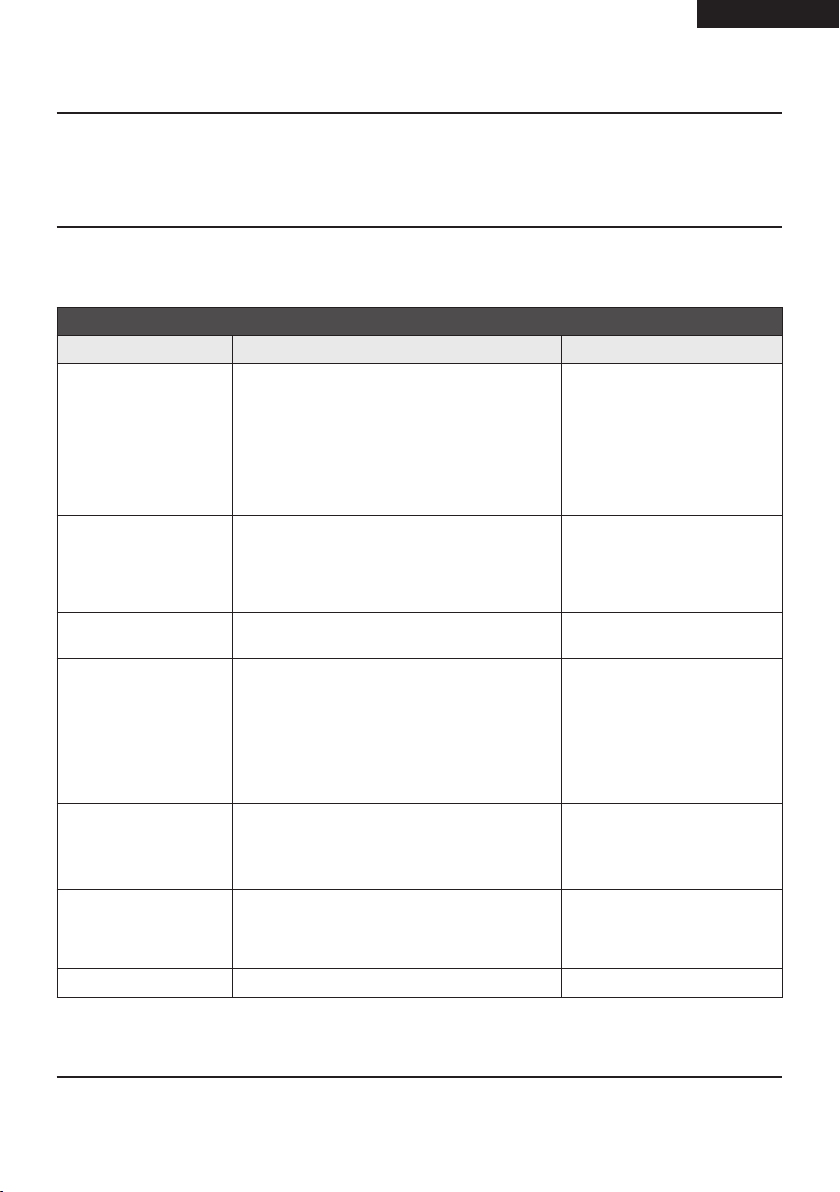
On-Screen Menu Descriptions
Menu Item Description Options
• English (default)
• German (optional)
Language
Network Bandwidth
Resolution Control
Sleep Time
Lip Sync
Select TX Station
Information Firmware version.
Selects the language which is used for this OnScreen Menu
Adjusts the quality of the video stream depending on which setting is chosen. If you do not
know how good your Network Bandwidth is,
select Auto Detect.
Selects the output resolution for the television
you are connected to.
Sets the amount of time either the Transmitter or
Receiver are idle for before going into Standby
mode. The Transmitter is considered ‘idle’ when
there is no video input from the source device
e.g. HD Satellite receiver. The Receiver is considered idle when it not receiving a video signal
from the Transmitter.
The selections in this option are only used as a
reference value for the system to adjust timing
(only used for 60 Hz, does not apply to 50 Hz or
PAL systems).
Each Receiver can be synced with a maximum
of 4 Transmitters. Select which Transmitter you
wish to receiver the video stream from here.
• Spanish (optional)
• Japanese (optional)
• Italian (optional)
• Traditional Chinese (optional)
• Simplified Chinese (optional)
• French (optional)
• Auto Detect (default)
• Low
• Fair
• Good
• Excellent
• By Source (default)
• By TV
• Off (default)
• 10 minutes
• 30 minutes
• 60 minutes
• 120 minutes
• 60 Hz
• 59.94 Hz (default)
• See the section Running
Multiple Transmitters with
Multiple Receivers on pages
16 and 17.
ENGLISH (EN)
Page 15Please read the instructions carefully prior to installation

(EN) ENGLISH
DGHDP1 - DigiSender® HD Pro - Single Input Powerline AV Sender System
Advanced Procedures
Installing Additional Receivers
Each Transmitter can be connected to a maximum of four Receivers. When installing an additional receiver, please
perform the below procedures in order:
• Connect and Install the Receiver as on pages 09 and 10.
• Reset the Receiver PLC Settings to Factory Defaults as on page 21.
• Perform the PLC Grouping procedure on page 19.
• Perform the Transmitter & Receiver Syncing procedure on page 18.
Advanced Procedures
Running Multiple Transmitters with Multiple Receivers
Each Receiver can be connected to a maximum of four Transmitters. This would allow you to choose from multiple
source devices such as your HD Satellite receiver, Blu-Ray™ player, DVD recorder or even CCTV.
Selecting a Transmitter
• At the Receiver, press the Menu button on the DigiSender® Remote Control to bring up the On-screen Menu. Use the Scroll Up
and Scroll Down buttons to go to the Select TX Station option.
SETUP
Language
Network Bandwidth
Resolution Control
• Press the OK button to enter the Select TX Station option.
• On the Select TX Station page, a list of all Transmitters that
are currently synced with the Receiver will be displayed. Use
the Scroll Up and Scroll Down buttons to select the desired
Transmitter.
• Press the OK button to confirm your selection.
• If the selected Transmitter is currently transmitting video, this
will be displayed. The Remote Relay will automatically be
transferred to the selected Transmitter so that you can control
the source device it is connected to.
Page 16 Please read the instructions carefully prior to installation
Sleep
LIP SYNC
Select TX Station
Information
SETUP
Select TX Station
TX Station 1
TX Station 2

DGHDP1 - DigiSender® HD Pro - Single Input Powerline AV Sender System
Advanced Procedures
Running Multiple Transmitters with Multiple Receivers
Changing the Name of a Transmitter
• At the Receiver, press the Menu button on the DigiSender® Remote Control to bring up the On-screen
Menu. Use the Scroll Up and Scroll Down buttons to go to the Select TX Station option.
• Press the OK button to enter the Select TX Station option.
• On the Select TX Station page, a list of all Transmitters that are currently synced with the Receiver will
be displayed. Use the Scroll Up and Scroll Down buttons to select the desired Transmitter.
Press the Menu button again to edit the name of the selected Transmitter.
The underline below the Transmitter name shows the current cursor
position.
Use the Scroll Up and Scroll Down buttons to scroll through the available
characters (letters, numbers, etc.)
Use the Scroll Right button to confirm the selected character and move to the next space.
Use the Scroll Left button to move back one space, deleting one character.
Press the OK button to confirm the Transmitter name and finish editing.
Resetting the Name of a Transmitter back to Factory Default
SETUP
Rename Transmitter
TX Station 1
ENGLISH (EN)
Perform the Reset the Transmitter System Settings to Factory Defaults procedure on page 20.
Page 17Please read the instructions carefully prior to installation

(EN) ENGLISH
DGHDP1 - DigiSender® HD Pro - Single Input Powerline AV Sender System
Advanced Procedures
Transmitter & Receiver Syncing
The Transmitter & Receiver Syncing procedure should only be used when installing an Additional Receiver or
during Troubleshooting.
There are two ways in which the Transmitter and Receiver can be ‘Synchronised’ or ‘Synced’:
• ‘Sync’ using the buttons on the Transmitter and Receiver:
1. Press and hold the Group Button on the rear of the Receiver until the message “SYNCING” is
displayed on the receiving TV.
2. Press and hold the Group Button on the rear of the Transmitter for 2 seconds until the Sync and
Power LEDs blink sequentially.
If the Sync is successful, the message on the receiving TV will change from “SYNCING” to “SYNCED”,
followed by the video (providing that the source device is currently on and media is playing).
• ‘Sync’ using the remote control:
Press the Group Button on the DigiSender® remote control to sync the Transmitter and Receiver.
Note: It is highly recommended that you perform the above procedure with both the DigiSender® Transmitter and
Receiver in the same vicinity, preferably attached to the same dual-socket mains power outlet.
Page 18 Please read the instructions carefully prior to installation

ENGLISH (EN)
DGHDP1 - DigiSender® HD Pro - Single Input Powerline AV Sender System
Advanced Procedures
PLC Grouping
The PLC Grouping procedure should only to be used when installing an additional receiver or during Troubleshooting when the Transmitter & Receiver Syncing procedure fails to resolve a problem.
1. Press the Link Button on the DigiSender® remote control at the Transmitter and Receiver
locations.
“Attempting PLC Grouping” will be displayed on the receiving TV.
The Sync LED on the Transmitter will continuously flash ON and OFF and the Power LED will be
OFF.
If the PLC Grouping is successful, the system will automatically start Syncing the Transmitter
and Receiver. After this has finished the video will be displayed (providing that the source device is
currently on and media is playing).
Note: It is highly recommended that you perform the above procedure with both the DigiSender® Transmitter and
Receiver in the same vicinity, preferably attached to the same dual-socket mains power outlet.
Page 19Please read the instructions carefully prior to installation

(EN) ENGLISH
DGHDP1 - DigiSender® HD Pro - Single Input Powerline AV Sender System
Advanced Procedures
Resetting the System Settings to Factory Defaults
The following procedure will revert the DigiSender® HD Pro system settings back to factory default and should
only be used during troubleshooting.
1. Reset the Transmitter System Settings to Factory Defaults:
At the Transmitter, press the Group Button on the DigiSender® remote control CONTINUOUSLY (in
rapid succession) until both the Power LED goes OFF and the Sync LED comes ON and then press
the OK Button on the DigiSender® remote control.
The Power and Sync LEDs will flash OFF-ON-OFF-ON and then the Transmitter will reboot itself.
The Transmitter system settings have now been set back to the factory defaults.
2. Reset the Receiver System Settings to Factory Defaults:
At the Receiver, press the Group Button on the DigiSender® remote control AT LEAST 5 TIMES (in
rapid succession) until the receiving TV displays the message “Confirm - Reset System Settings to
Factory Defaults?”. Then press and hold the Group Button on the back of the Receiver for
approximately 6 seconds.
The receiving TV will display the message “System Settings Reset to Factory Defaults” and then
the screen will go blank and the TV will display the message “Not Synced - Please perform Syncing
Operation”.
The Receiver system settings have now been set back to the factory defaults.
Note: After completing the Resetting the System Settings to Factory Defaults procedure you will need to complete the Transmitter & Receiver Syncing procedure on page 18.
Page 20 Please read the instructions carefully prior to installation

ENGLISH (EN)
DGHDP1 - DigiSender® HD Pro - Single Input Powerline AV Sender System
Advanced Procedures
Resetting the PLC Settings to Factory Defaults
The following procedure will revert the DigiSender® HD Pro PLC settings back to factory default and should only
be used during troubleshooting.
1. Reset the Transmitter PLC Settings to Factory Defaults:
At the Transmitter, press the Factory Button on the DigiSender® remote control CONTINUOUSLY (in
rapid succession) until the Power LED and the Sync LED goes OFF, and then press the
OK Button on the DigiSender® remote control.
The Power and Sync LEDs will flash OFF-ON-OFF-ON and then the Transmitter will reboot itself.
The Transmitter PLC settings have now been set back to the factory defaults.
2. Reset the Receiver PLC Settings to Factory Defaults:
At the Receiver, press the Factory Button on the DigiSender® remote control, in rapid succession,
until the receiving TV displays the message “Confirm - Reset PLC Settings to Factory Defaults?”
and then press the OK Button on the DigiSender® remote control (you can press any other button on
the DigiSender® remote control to cancel the operation.
The Receiver PLC settings have now been set back to the factory defaults.
Note: After completing the Resetting the PLC Settings to Factory Defaults procedure you will need to complete
the PLC Grouping procedure on page 19.
Page 21Please read the instructions carefully prior to installation
(EN) ENGLISH
DGHDP1 - DigiSender® HD Pro - Single Input Powerline AV Sender System
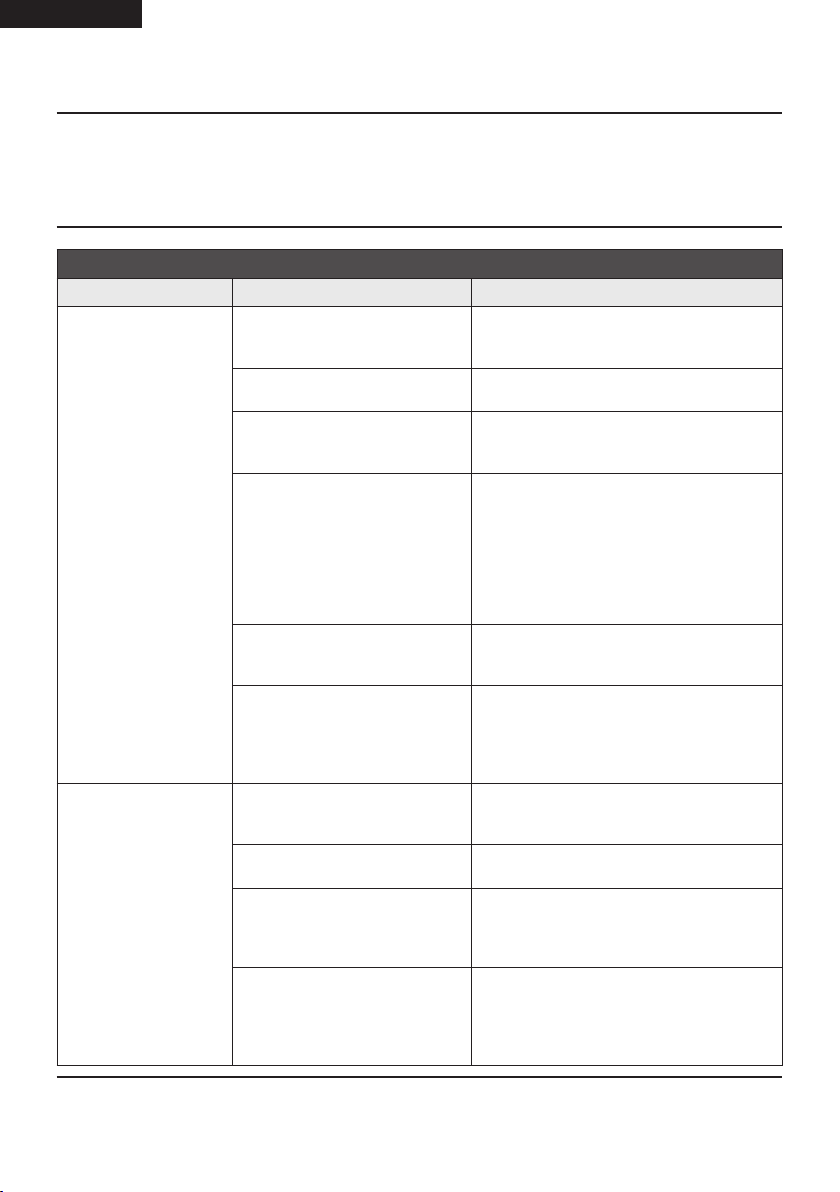
Troubleshooting
Frequently Asked Questions
Troubleshooting
Scenario Possible Reason Resolution
• Power is switched off at the
mains.
• Cable connections are not
secure.
• Source device (e.g. HD Satellite
receiver) is not working correctly.
Receiving TV (TV attached to the Receiver)
displays no video.
Power LED is not illuminated.
• Source device is sending a video
format that is not supported by
the DigiSender® HD Pro.
• Source device is sending a video
resolution that is not supported
by the receiving TV.
• Interference from an EMI or
electrical surge protection.
• Transmitter and/or Receiver not
turned ‘On’.
• Mains power socket is not
turned ‘On’.
• Device is not booting up
properly.
• Power supply fault.
• Make sure the power switches on the back
of both the Transmitter and Receiver are
turned On.
• Make sure the power cables and HDMI
cables are connected securely.
• Verify that the source device is working
properly by connecting it directly to a TV.
• If the source device works fine when directly connected to a TV, this could indicate
a problem with the audio/video format it
is outputting. Check the Specifications on
the back page to make sure that the format
being delivered by the source device is
compatible with the DigiSender® HD Pro
system.
• Enter the DigiSender® HD Pro On-screen
Menu and set Resolution Control to Select
by TV. See pages 14 and 15 for more info.
• If there are electrical surge protection or
EMI protection circuits inside the mains
power socket you are currently connected
to, try connecting the DigiSender® HD Pro
to a different mains power socket.
• Make sure the power switches on the back
of both the Transmitter and Receiver are
turned On.
• Make sure that the power switch on the
mains power socket is turned On.
• If there is no response to the remote
control, try turning the units Off and back
On again using the power switches on the
back of the units.
• If the above suggestions do not remedy
the problem, the unit may have developed
a power supply fault. Disconnect the unit
from the mains immediately and contact
our support hotline on 0207 193 1413.
Page 22 Please read the instructions carefully prior to installation

DGHDP1 - DigiSender® HD Pro - Single Input Powerline AV Sender System
Troubleshooting
Frequently Asked Questions
Troubleshooting
Scenario Possible Reason Resolution
• Try the ‘Transmitter & Receiver Syncing’
Receiving TV displays
“Not Synced - Please
perform Syncing Operation”.
Power LED on the front
of Transmitter is constantly flashing.
During video playback,
receiving TV (attached
to the Receiver) displays
“Sync Successful - Waiting for Video signal”.
Receiving TV displays
message “Unsupported
Video Format”.
• The Transmitter and Receiver
are not synced correctly.
• Source device (e.g. HD Satellite
receiver) is not turned On or is
in standby mode.
• Source device is sending a video
format that is not supported by
the DigiSender® HD Pro.
• PLC (Power Line Communication) network cannot support
sufficient bandwidth or the network quality is not high enough.
This results in the suspension of
the video picture.
• The Receiver is continuously
rebooting.
• The output resolution of the
source device is not supported.
The DigiSender® HD Pro only
supports resolutions up to
1920 x 1080@24P or 1920 x
1080@60i.
procedure on page 18, to re-establish connections.
• If the above has not resolved the issue, try
the ‘PLC Grouping’ procedure on page 19
first and then ‘Transmitter & Receiver Syncing’ procedure on page 18.
• Ensure that the source device is turned on.
• Check to see if the source device is sending
a video signal (you may have to press the
play button on your remote control).
• Check the Specifications on back page to
make sure that the format being delivered
by the source device is compatible with the
DigiSender® HD Pro system.
• This problem will usually resolve itself
within a minute or two.
• If this problem persists then it may be due
to a faulty mains power socket. Try connecting the DigiSender® HD Pro to another
mains power socket instead.
• If the power LED keeps flashing on and
off then the Receiver may have developed
a power supply fault. Disconnect the unit
from the mains immediately and contact
our support hotline on 0207 193 1413.
• Your source device will usually ‘auto
detect’ the format used by the DigiSender®
HD Pro and so normally there will be no
problems. However, if the source device
has been manually configured to output a
certain format that is not supported by the
DigiSender® HD Pro, you will need to reference your source devices user manual to
reset the format to one that is supported by
the DigiSender® HD Pro. See Specifications
on the back page of this manual.
ENGLISH (EN)
Page 23Please read the instructions carefully prior to installation

(EN) ENGLISH
DGHDP1 - DigiSender® HD Pro - Single Input Powerline AV Sender System
Troubleshooting
Syncing and Resetting Procedure
In the unlikely event that you still can’t get the system working, please proceed with the steps below.
Step 1: Check connections, Power & Equipment
• Make sure that all power cable connections are secure and that all equipment is turned on.
• Inspect the HDMI cables and connections between the source device (e.g. HD Satellite receiver) and
DigiSender® Transmitter and the DigiSender® Receiver and receiving TV. Ensure that all HDMI connectors
are fully inserted into the correct sockets and that none of the HDMI cables are damaged in any way.
• Make sure that the source device (e.g. HD Satellite receiver) is working correctly and is outputting video via the HDMI socket you are using to connect it to the DigiSender® Transmitter. It is recommended that you connect the source device directly to a TV to confirm correct operation.
• Make sure that the receiving TV is working correctly and that it is set to the correct HDMI channel.
If the video is still not being displayed on the receiving TV, then please proceed to step 2 below.
Step 2: Syncing and Resetting Procedure
The Syncing and Resetting procedure is the last step in troubleshooting your product and should only be attempted when all other measures have failed to resolve your problem.
The flowchart on page 25 will instruct you on how to proceed with this procedure.
Note: It is assumed that the source device (e.g. HD Satellite receiver), DigiSender® Transmitter, DigiSender® Receiver
and the receiving TV are all connected properly and turned on.
Note: It is highly recommended that you perform this procedure with both the DigiSender® Transmitter and Receiver
in the same vicinity, preferably attached to the same dual-socket mains power outlet.
Page 24 Please read the instructions carefully prior to installation

DGHDP1 - DigiSender® HD Pro - Single Input Powerline AV Sender System
Troubleshooting
Syncing and Resetting Procedure
Perform the Transmitter & Receiver Syncing procedure on page 18
ENGLISH (EN)
Is it working?
No
Perform the PLC Grouping procedure on page 19
Is it working?
No
Perform the Resetting the PLC Settings to Factory Defaults procedure on page 21
Perform the PLC Grouping procedure on page 19
Is it working?
No
Perform the Transmitter & Receiver Syncing procedure on page 18
Is it working?
No
Perform the Resetting the System Settings to Factory Defaults procedure on page 20
Perform the Transmitter & Receiver Syncing procedure on page 18
Yes
Yes
Yes
Yes
Success!
Is it working?
No
Please contact our Customer Support hotline on 0207 193 1413
Yes
Page 25Please read the instructions carefully prior to installation

(EN) ENGLISH
DGHDP1 - DigiSender® HD Pro - Single Input Powerline AV Sender System
Troubleshooting
Remote Relay Problems
If you have any difficulty operating your source equipment remote control in your second room please follow the
advice below:
• Ensure the IR Emitter is connected to the socket labelled ‘IR’ on the Transmitter.
• Ensure you are using the correct remote control in the second room. For instance, if you are trying to
control your Satellite box you will need to use the Satellite remote control.
• Ensure the IR Emitter is facing the IR sensor on your source equipment.
• Ensure that cable connecting the IR Emitter to the Transmitter is not running directly over or under your
source equipment. This is because most modern set top boxes have a hard drive built into them which
can put out a bit of Electromagnetic Interference, disrupting the IR signal as it travels along the cable.
• Move the IR Emitter further away from the source equipment.
• Move the Transmitter AND Receiver further away from other electrical devices.
• Try operating your source remote control closer to the Receiver.
• Replace the batteries in your source remote control.
Often, the easiest way to get your Remote Relay system working perfectly is to get someone to help you.
• Have the person helping you go to the Receiver and try to change the Satellite channel or pause the
Blu-Ray™ whilst pointing the source devices remote control at the front of the DigiSender® Receiver.
• While the person helping you is doing the above, you should be adjusting the position of the IR Emitter.
Try moving the IR Emitter slowly, from one side of the source device to the other, making sure to keep
the face of the IR Emitter pointed towards the front of your source device at all times.
• When you find the right spot for the IR Emitter the channel will change or the disc will pause and the
person helping you can let you know that you have the exact right spot for the IR Emitter.
Page 26 Please read the instructions carefully prior to installation

ENGLISH (EN)
DGHDP1 - DigiSender® HD Pro - Single Input Powerline AV Sender System
Troubleshooting
Technical Support & Accessories
Technical Support
AEI Security & Communications Ltd is dedicated to providing our customers with first class customer care and
technical support.
1. Website
Free technical advice is available online 24/7 at our dedicated support web site: www.aei.eu
2. Online Videos
Watch online Installation and Troubleshooting Video Guides. Search www.youtube.com for DigiSender
HD Pro.
3. Live Chat
Chat to one of our technical advisors live. See website for details.
4. Telephone
We have a dedicated helpline, open Monday to Friday, 8.30am - 4pm. Call 02071 931 413.
Accessories
If you wish to transmit your source to more than 1 room, this can be
achieved by using the additional receiver below.
To purchase accessories visit us online at: www.easylife.com
or call us on: 02071 931 413.
DGHDP1RX - DigiSender® HD Pro Additional Receiver
• Get your HD channels on additional TV’s in your
home!
• Connect up to 4 Receivers at once.
Page 27Please read the instructions carefully prior to installation

(EN) ENGLISH
DGHDP1 - DigiSender® HD Pro - Single Input Powerline AV Sender System
Information & Safety
Important Product Information & Abnormal Operation
Important Product Information
Power Line Communication or Power Line Carrier (PLC), are systems for carrying data on a conductor also
used for electrical power transmission.
The Transmitter and Receiver units must be operating on the same AC power circuit for guaranteed performance.
This product may not perform efficiently if plugged into Power Strips (especially those with Surge Protection and
EMI / RFI Filtration) or Extension Cords. For best results it is recommended that you connect the units directly
to a mains power socket. In homes with multiple mains circuits installed, it is recommended that both units are
installed on the same circuit so that they can communicate effectively with each other.
Power sockets and electrical wiring must all be part of the same electrical system. Certain electrical conditions in
your home, such as wiring conditions and configuration, may affect the performance of this product.
Note: Interference from devices that emit electrical noise, such as vacuum cleaners, refrigerators, hair dryers, old
electric motors and poor quality mobile phone chargers for example, may adversely affect the performance of this
product. This product may have the possibility to interfere with devices such as lighting systems that have a dimmer switch, short wave radios, or other power line devices that do not follow the correct wiring standard.
Abnormal Operation
• It will take 30 to 40 seconds to establish a connection between the transmitter and receiver. If
there is no signal coming through to the receiver after this time, please try the Syncing the Trans-
mitter & Receiver procedure on page 18 and refer to the troubleshooting section of this manual. If
you are unable to resolve your problem, please contact our support helpline on 0207 193 1413.
• If a unit is accidentally exposed to water or the case is damaged in any way, you should immediately turn the unit off at the mains and disconnect the plug. The unit should be replaced at
the next available opportunity, failure to do so could result in an electrical short or fire. If you are
uncertain of your situation, please call our support hotline on 0207 193 1413.
• If any smoke or odors emanate from the units, you should immediately turn the unit off at the
mains and disconnect the plug. Continuing to use this product in these conditions could cause a
fire or damage the product irreparably. Please call our support hotline on 0207 193 1413.
Page 28 Please read the instructions carefully prior to installation

ENGLISH (EN)
DGHDP1 - DigiSender® HD Pro - Single Input Powerline AV Sender System
Information & Safety
Safety Precautions
Safety Precautions
These safety precautions are provided to ensure the best and safest user experience with the least amount of
inconvenience. Please read this Instruction Manual thoroughly before installation and operation. It is advised that
you keep the original packaging, protective materials and any documentation included with this product, as well
as your invoice or receipt of purchase.
• Do not use this product outside or in any environments where the units can be exposed to water or
moisture (bathrooms, water tanks, damp basements, swimming pools, etc.).
• Do not, in any circumstance, open the case of either of these units.
• Do not place containers holding liquid (vases, drinks, etc.) or wet materials on top of or in the
vicinity of these units.
• Only use a dry cloth to wipe down or clean the case. Do not use liquid cleaners or spray cleaners.
• Only operate this product in well ventilated areas. Do not place in closets, cupboards, covered
boxes, etc.
• Do not block the air vents on the units. Always leave at least 2cm of clear space around the units
during operation to ensure heat is properly dissipated; this will maintain and prolong the life of the
product.
• Do not place the units on soft surfaces (sofas, carpets, rugs, etc.) where the units might sink into
the surface or where the surrounding material can affect ventilation and heat dissipation.
• Do not place the units on any surface that generates heat (radiators, electric heaters, fire places,
etc.).
Page 29Please read the instructions carefully prior to installation

(EN) ENGLISH
DGHDP1 - DigiSender® HD Pro - Single Input Powerline AV Sender System
Information & Safety
Power & HDMI Cable Precautions
Power Cable Precautions
If you do not expect to use this product for an extended period of time, unplug the units from the mains power
socket. This is a precautionary measure because this product will, as long as it is connected to a mains power
socket, maintain an electrical current even though the units may be turned off.
• Do not wedge or clamp the power cable between the case and surrounding items (walls, furniture,
closets, etc.)
• Do not place anything on the power cable or drag objects over it.
• When unplugging the units from the mains power sockets, ensure you do so by pulling on the plug
and not the power cable.
• If the power cable is damaged in any way, you should immediately turn the unit off at the mains
and disconnect the plug. The unit should be replaced at the next available opportunity, failure to
do so could result in an electrical short or fire. If you are uncertain of your situation, please call our
support hotline on 0207 193 1413.
HDMI Cable Precautions
Improper use of the HDMI cable and socket can cause damage to both this product and the HDMI cable.
• Before connecting a HDMI cable to the HDMI socket on the back of either unit, carefully check
the orientation of the connector and the socket to make sure you are not inserting the connector
upside.
• Plug the HDMI cable in carefully, making sure the head of the connector fits straight into the
socket, without any tilt.
• Hold the HDMI cable in line whenever you connect or disconnect the cable. Do not twist or force
the connector into the socket.
• Remove the HDMI cables whenever you move or transport these units.
Page 30 Please read the instructions carefully prior to installation

DEUTSCH (DE)
DGHDP1 - DigiSender® HD Pro - Powerline AV Sendersystem mit einem Eingang
Einleitung
Der DigiSender HD pro ist der modernste AV-Sender von AEI Security …. mit der Ausstattung der besten Weiterentwicklung der Technologie für hoch auflösende Medien und ermöglicht Ihnen eine Übertragung eines 1080p
Videos überall in Ihrer Wohnung, wo eine Stromquelle zu finden ist. Das vermeidet, dass Sie Ihre Wohnung
verkabeln oder dass Sie neues Equipment kaufen müssen.
Das System besteht aus einem Sender und einem Empfänger , die ausgelegt sind H 264 hoch auflösende Videos und Audiosignale mit hoher Qualität von HD-Satellitenempfängern, HD-Set-Top-Boxen, Blu-Ray Wiedergabegeräten und HD-Spielekonsolen (usw.) zu kompatiblen HDTV – Bildschirmen zu übertragen, wo immer Sie eine
Steckdose in der Nähe haben.
Die Installation ist schnell und einfach. Das Gerät von dem das Signal ausgeht (zum Beispiel der Satellitenempfänger in Ihrem Wohnzimmer) wird mit dem Sender verbunden und der Empfänger am zweiten Fernsehgerät
angeschlossen (zum Beispiel in Ihrem Schlafzimmer)), beides mit HDMI.
Das System bietet natürlich auch eine Fernbedienungsfunktion die es erlaubt, mit Ihrer Fernbedienung (zum
Beispiel die des Satellitenempfängers) von dem Raum zu schalten, in dem Sie das Programm schauen.
Es ist erforderlich, dass Sie die Sicherheitsinformationen der Seiten 55 - 57 lesen, bevor Sie das Gerät in Betrieb nehmen.
Page 31Lesen Sie diese Instruktionen bitte sorgfältig durch, bevor Sie die Installation beginnen
(DE) DEUTSCH
DGHDP1 - DigiSender® HD Pro - Powerline AV Sendersystem mit einem Eingang
Installation Ihres DigiSender®
Schritt 1 - Packen Sie Ihren DigiSender® Aus
Alle DigiSender® wurden mit einem Computer auf das Gewicht hin überprüft. Trotzdem ist es gut, alle Teile auf
Vollständigkeit zu prüfen, bevor Sie mit der Installation beginnen.
1.
2.
3.
5.
1. 1x DigiSender® HD Pro Sender
2. 1x DigiSender® HD Pro Empfänger
3. 2x HDMI Kabel
4. 1x Infrarot Impulsgeber
5. 1x Fernbedienung
Page 32 Lesen Sie diese Instruktionen bitte sorgfältig durch, bevor Sie die Installation beginnen
4.

DEUTSCH (DE)
DGHDP1 - DigiSender® HD Pro - Powerline AV Sendersystem mit einem Eingang
Installation Ihres DigiSender®
Schritt 2 - Installieren Sie Den Sender
Dieses Kapitel beschreibt, wie Sie den DigiSender HD Pro richtig installieren. Nach der Installation werden Sie
in der Lage sein die angeschlossene Quelle (z. B. Ihren Satellitenempfänger) an jedem Ort mit einem TV-Gerät
empfangen zu können.
1.
Nehmen Sie das HDMI – Kabel, das Ihre Sendequelle (z. B. der Satellitenempfänger) mit dem
Fernsehgerät verbindet.
3.
2.
Trennen Sie das Kabel vom Fernseher und verbinden Sie es mit dem Eingang, der mit „HDMI in“
bezeichnet ist an der Rückseite des DigiSender
Senders.
4.
Benutzen Sie eines der beiliegenden HDMI – Kabel und verbinden Sie es mit dem Stecker, der
mit “HDMI out” auf der Rückseite des DigiSender
Senders bezeichnet ist mit dem Stecker Ihres Fernsehgerätes.
Verbinden Sie den Infrarot Impulsgeber mit dem
Stecker, der mit “IR” bezeichnet ist an der Rückseite
des Senders und platzieren Sie den Impulsgeber
so, dass er auf den Fernbedienungssensor an der
Vorderseite Ihrer Sendequelle (z. B. Ihr Satellitenempfänger) ausgerichtet ist.
Page 33Lesen Sie diese Instruktionen bitte sorgfältig durch, bevor Sie die Installation beginnen

(DE) DEUTSCH
DGHDP1 - DigiSender® HD Pro - Powerline AV Sendersystem mit einem Eingang
Installation Ihres DigiSender®
Schritt 2 - Installieren Sie Den Sender
5.
Verbinden Sie den Stecker Ihres DigiSender Senders mit einer Steckdose und schalten Sie das Gerät
auf der Rückseite ein.
7.
6
Die LED an der Vorderseite Ihres Gerätes leuchtet
grün auf und zeigt an, dass der Sender eingeschaltet ist.
Schalten Sie Ihr sendendes Gerät ein (z. B. Ihren
Satellitenempfänger).
Page 34 Lesen Sie diese Instruktionen bitte sorgfältig durch, bevor Sie die Installation beginnen

DEUTSCH (DE)
DGHDP1 - DigiSender® HD Pro - Powerline AV Sendersystem mit einem Eingang
Installation Ihres DigiSender®
Schritt 3 - Installieren Sie den Infrarotimpulsgeber (Fernbedienung).
Der DigiSender HD Pro bietet ein Fernbedienungssystem, das Ihnen erlaubt, Ihre Sendequelle (z. B. den HD
Satellitenempfänger) vom zweiten Fernsehgerät zu bedienen. Der DigiSender Empfänger ist mit einem IR-Sensor ausgerüstet, um den Impuls der Fernbedienung (z.B. die Fernbedienung des HD – Satellitenempfängers) zu
empfangen. Dieses IR Signal wird über die Stromleitung zu dem Empfänger übertragen, wenn es über den IRImpulsgeber zu der Sendequelle gesendet wird.
Der IR – Impulsgeber kann in zwei Positionen aufgestellt werden, am besten probieren Sie aus, in welcher Position das beste Resultat erzeugt wird.
Position 1 : Plazieren Sie der IR – Impulsgeber so,
dass er zu dem Fernbedienungssensor auf der
Vorderseite Ihrer Sendequelle ausgerichtet ist (z. B.
des Satellitenempfängers).
Position 2 : Verwenden Sie das kleine Klebepad um
den IR – Impulsgeber auf der Vorderseite der Sendequelle zu befestigen, nahe bei und ausgerichtet
auf den Fernbedienungssensor.
Page 35Lesen Sie diese Instruktionen bitte sorgfältig durch, bevor Sie die Installation beginnen

(DE) DEUTSCH
DGHDP1 - DigiSender® HD Pro - Powerline AV Sendersystem mit einem Eingang
Installation Ihres DigiSender®
Schritt 4 - Installieren Sie Den Empfänger
Der Empfänger nimmt das Signal auf, das von Ihrem Sender ausgeht und gibt es an das verbundene TV - Gerät
weiter.
1.
Nehmen Sie das übrige HDMI – Kabel und verbinden Sie es mit dem Stecker, der mit “HDMI OUT”
gekennzeichnet ist auf der Rückseite des DigiSender Empfängers und dem HDMI – Eingang Ihres
empfangenden Fernsehgerätes.
3.
2.
Verbinden Sie den Stecker Ihres DigiSender Empfängers mit einer Steckdose und schalten Sie das
Gerät auf der Rückseite ein.
4.
HDMI1
Schalten Sie das empfangende Fernsehgerät ein,
Die LED an der Vorderseite Ihres Gerätes leuchtet
grün auf und zeigt an, dass der Empfänger eingeschaltet ist.
Page 36 Lesen Sie diese Instruktionen bitte sorgfältig durch, bevor Sie die Installation beginnen
wählen Sie den HDMIkanal, der dem HDMIanschluß zugewiesen ist, in den Sie den Empfänger
eingesteckt haben. Dies kann als SOURCE, INPUT,
AUX, AV, VIDEO, VCR oder ausgewiesen sein.

DEUTSCH (DE)
DGHDP1 - DigiSender® HD Pro - Powerline AV Sendersystem mit einem Eingang
Installation Ihres DigiSender®
Schritt 4 - Installieren Sie Den Empfänger
Je nachdem wie schnell die vorigen Schritte ausgeführt wurden, werden zwei Nachrichten auf Ihrem Bildschirm
angezeigt.
DigiSender® HD Pro
Establishing Sync with Transmitter
Please wait...
Herstellung der Synchronisation Synchronisation erfolgreich
Ungefähr 40 Sekunden nachdem Sie alle Geräte eingeschaltet haben (die Sendequelle – z. B. den Satellitenempfänger - , DigiSender Sender, DigiSender Empfänger und das empfangende Fernsehgerät) wird das Video auf
Ihrem empfangenden Fernseher angezeigt.
Sync Successful
Waiting for Video signal...
Herzlichen Glückwunsch!
Die Installation ist abgeschlossen und Sie können jetzt 1080p HD – Videos
in anderen Räumen Ihrer Wohnung empfangen.
Page 37Lesen Sie diese Instruktionen bitte sorgfältig durch, bevor Sie die Installation beginnen

(DE) DEUTSCH
DGHDP1 - DigiSender® HD Pro - Powerline AV Sendersystem mit einem Eingang
Basisfunktionen
Die DigiSender HD Pro Fernbedienung
Der DigiSender HD Pro wird mit einer Fernbedienung geliefert, die Ihnen ermöglicht, Zugang zu verschiedenen
Einstellungen des auf dem Bildschirm angezeigten Menüs zu bekommen sowie verschiedene Vorgänge zu starten,
falls Probleme auftreten.
Beachten Sie die Tabellen auf den nächsten zwei Seiten die aufzeigen, wie die Schaltknöpfe gebraucht werden.
Oberste Reihe
Feld der Quelle
Feld für Lautstärke
Feld für Einstellungen
Page 38 Lesen Sie diese Instruktionen bitte sorgfältig durch, bevor Sie die Installation beginnen

DGHDP1 - DigiSender® HD Pro - Powerline AV Sendersystem mit einem Eingang
Basisfunktionen
Die DigiSender HD Pro Fernbedienung
Beschreibung der Bedienknöpfe der Fernbedienung
Bereich der
Fig.
Bedientaste
Oberste Reihe Power/Standby
Oberste Reihe Link
Oberste Reihe Group
Oberste Reihe Factory
Name der Bedien-
taste
DEUTSCH (DE)
Beschreibung der Bedientasten
Schaltet den Sender und Empfänger zwischen “On” und
“Standby” – Status um.
Stellt PLC zwischen dem Sender und dem Empfänger wieder her. Nur benutzen für die Installation eines zusätzlichen Empfängers oder während einer Problembehebung.
Synchronisiert den Sender und Empfänger. Nur benutzen
für die Installation eines zusätzlichen Empfängers oder
während einer Problembehebung.
Wird gebraucht um die PLC – Einstellungen zurückzusetzen zu den vorgegebenen Werkseinstellungen. Nur
benutzen während einer Problembehebung.
Feld der Quelle HDMI 1 Input Nicht für dieses Modell.
Feld der Quelle HDMI 2 Input Nicht für dieses Modell.
Feld der Quelle HDMI 3 Input Nicht für dieses Modell.
Feld der Quelle HDMI 4 Input Nicht für dieses Modell.
Feld der Quelle AV 1 Input Nicht für dieses Modell.
Feld der Quelle AV 2 Input Nicht für dieses Modell.
Feld der Quelle Next Input Nicht für dieses Modell.
Feld der Quelle Last Input Nicht für dieses Modell.
Page 39Lesen Sie diese Instruktionen bitte sorgfältig durch, bevor Sie die Installation beginnen

(DE) DEUTSCH
DGHDP1 - DigiSender® HD Pro - Powerline AV Sendersystem mit einem Eingang
Basisfunktionen
Die DigiSender HD Pro Fernbedienung
Beschreibung der Bedienknöpfe der Fernbedienung
Fig.
Bereich der
Bedientaste
Feld für Einstel-
lungen
Name der Bedien-
taste
Display Schaltet das TV – System
Beschreibung der Bedientasten
Feld für Einstel-
lungen
Feld für Einstel-
lungen
Feld für Einstel-
lungen
Feld für Einstel-
lungen
Feld für Einstel-
lungen
Feld für Einstel-
lungen
Feld für Einstel-
lungen
Feld für Einstel-
lungen
Feld für Laut-
stärke
Feld für Laut-
stärke
Feld für Laut-
stärke
Menu Beginn des Menüs
Info Menüinformationen auf dem Display
Up Im Menü: Rollen Sie den Text nach oben
Down Im Menü: Rollen Sie den Text nach unten
Left Im Menü: Rollen Sie den Text nach links
Right Im Menü: Rollen Sie den Text nach rechts
OK Auswählen / Beginnen / Bestätigen
Exit Menü beenden
Volume Up Lautstärke erhöhen
Volume Down Lautstärke verringern
Mute Ton ausblenden
Page 40 Lesen Sie diese Instruktionen bitte sorgfältig durch, bevor Sie die Installation beginnen

DEUTSCH (DE)
DGHDP1 - DigiSender® HD Pro - Powerline AV Sendersystem mit einem Eingang
Basisfunktionen
Menüanzeige auf dem Bildschirm
Die Menüanzeige auf dem Bildschirm wird benutzt, um verschiedene Optionen zu konfigurieren und können aufgerufen werden, indem Sie den Menüknopf der Fernbedienung drücken. Dies ruft das Menü auf dem Bildschirm
des Fernsehers auf, der an den Empfänger angeschlossen ist.
SETUP
Abschnitte des Bildschirmmenüs
• Sprache
• Bandbreite des Netzwerkes
• Kontrolle der Auflösung
• Zeit des Schlafmodus
• Lip - Synchronisation
• Auswahl der TX Station
• Information
Gebrauch des Bildschirmmenüs
Language
Network Bandwidth
Resolution Control
Sleep
LIP SYNC
Select TX Station
Information
Sie können das Bildschirmmenü navigieren, in dem Sie die folgenden Tasten der Fernbedienung benutzen:
• Benutzen Sie die Auf- und Abwärtstasten um einen Menübereich zu wählen
• Drücken Sie die OK Taste um einen Menüpunkt auszuwählen und die verfügbaren Möglichkeiten
anzuzeigen.
• Benutzen Sie die Auf- und Abwärtstasten um eine Möglichkeit auszuwählen.
• Drücken Sie die Ok – Taste, um die Option zu bestätigen.
• Drücken Sie die “EXIT” – Taste, um das Bildschirmmenü zu verlassen.
Page 41Lesen Sie diese Instruktionen bitte sorgfältig durch, bevor Sie die Installation beginnen

(DE) DEUTSCH
DGHDP1 - DigiSender® HD Pro - Powerline AV Sendersystem mit einem Eingang
Basisfunktionen
Menüanzeige auf dem Bildschirm
Beschreibung des Bildschirmmenüs
Abschnitte des Bild-
schirmmenüs
Sprache Wählt die Sprache für das Bildschirmmenü aus.
Justiert die Qualität des Videostreams abhängig
Bandbreite des Netzwerkes
Kontrolle der Auflösung
Zeit des Schlafmodus
Lip - Synchronisation
Auswahl der TX Station
Information Firmawareversion
davon, welche Einstellung gewählt wurde. Wenn
Sie nicht wissen, wie gut Ihre Bandbreite des
Netzwerkes ist, wählen Sie „Auto detect“.
Wählt die Ausgangsauflösung für den angeschlossenen Fernseher.
Setzt die Dauer der Zeit fest, nach der Sender
oder Empfänger in den Leerlauf und dann in
den Standby – Modus geht.. Der Sender geht
in den Leerlauf, wenn keine Videoquelle einen
Impuls liefert. Z. B. der Satellitenempfänger. Der
Empfänger geht in den Leerlauf, wenn kein Videosignal vom Sender kommt.
Die Auswahl in dieser Option ist lediglich als
Referenzwert für dieses System gedacht, um das
Timing anzupassen (nur für 60Hz, geht nicht für
50Hz oder PAL – System).
Jeder Empfänger kann mit maximal 4 Sendern
synchronisiert werden. Wählen Sie aus, von
welchem Sender aus Sie Ihr Videosignal empfangen möchten.
Beschreibung Möglichkeiten
• Englisch (Werkseinstellung)
• Deutsch (optional)
• Spanisch (optional)
• Japanisch (optional)
• Italienisch (optional)
• Traditionelles Chinesisch
(optional)
• Vereinfachtes Chinesisch
(optional)
• Französisch (optional)
• Automatische Erfassung
(Werkseinstellung)
• Niedrig
• Ausreichend
• Gut
• Excellent
• Von der Quelle (Werkseinstellung)
• Vom Fernsehgerät
• Aus (Werkseinstellung)
• 10 minuten
• 30 minuten
• 60 minuten
• 120 minuten
• 60 Hz
• 59.94 Hz (Werkseinstellung)
• Lesen Sie die Abschnitte,
wie man mehrere Sender
und mehrere Empfänger in
Betrieb nimmt auf den Seiten
43 - 44
Page 42 Lesen Sie diese Instruktionen bitte sorgfältig durch, bevor Sie die Installation beginnen

DEUTSCH (DE)
DGHDP1 - DigiSender® HD Pro - Powerline AV Sendersystem mit einem Eingang
Erweiterte Handlungsweisen
Die Installation zusätzlicher Empfänger
Jeder Sender kann mit max. 4 Empfängern verbunden werden. Wenn Sie zusätzliche Empfänger installieren,
gehen Sie bitte schrittweise wie unten beschrieben vor:
• Verbinden und installieren Sie die Empfänger wie auf den Seiten 36 - 37 beschrieben.
• Setzen Sie den Empfänger auf die PLC - Werkseinstellung zurück, wie auf Seite 48 beschrieben.
• Führen Sie die PLC – Gruppen – Prozedur aus, wie auf Seite 46 beschrieben.
• Führen Sie die Sender und Empfänger Synchronisation aus, wie auf Seite 45 beschrieben.
Erweiterte Handlungsweisen
Betreiben mehrerer Sender und Empfänger
Jeder Empfänger kann mit max. 4 Sendern verbunden werden. Das ermöglicht Ihnen den Betrieb von mehreren
Sendequellen wie z. B. Ihr Satellitenempfänger, Blu-Ray Wiedergabegerät, DVD-Rekorder oder einfach CCTV.
Auswählen eines Senders
• Drücken Sie die Menütaste der DigiSender Fernbedienung Ihres
Empfängers, um das Menü auf dem Bildschirm anzuzeigen.
Wählen Sie mit der Taste „nach unten“ oder „nach oben“ die
Option der Auswahl der TX Station.
• Drücken Sie die “OK” Taste, um die Auswahl zu bestätigen.
• Auf der angezeigten Seite (Auswahl der TX Station) erscheint
eine Auflistung aller mit dem Empfänger synchronisierten
Sender. Wählen Sie mit den Tasten zum Scrollen aus, welchen
Sender Sie auswählen möchten.
• Drücken Sie die “OK” Taste, um die Auswahl zu bestätigen.
• Wenn der ausgewählte Sender gerade ein Video sendet, wird
dies angezeigt. Die Fernbedienung wird automatisch zu diesem
Sender schalten und Sie können kontrollieren, ob die Quelle
angeschlossen ist.
SETUP
Language
Network Bandwidth
Resolution Control
Sleep
LIP SYNC
Select TX Station
Information
SETUP
Select TX Station
TX Station 1
TX Station 2
Page 43Lesen Sie diese Instruktionen bitte sorgfältig durch, bevor Sie die Installation beginnen

(DE) DEUTSCH
DGHDP1 - DigiSender® HD Pro - Powerline AV Sendersystem mit einem Eingang
Erweiterte Handlungsweisen
Betreiben mehrerer Sender und Empfänger
Änderung des Namens des Senders.
• Drücken Sie die Menütaste der DigiSender Fernbedienung Ihres Empfängers, um das Menü auf dem
Bildschirm anzuzeigen. Wählen Sie mit der Taste „nach unten“ oder „nach oben“ die Option der
Auswahl der TX Station.
• Drücken Sie die “OK” Taste, um die Auswahl zu bestätigen.
• Auf der angezeigten Seite (Auswahl der TX Station) erscheint eine Auflistung aller mit dem Sender synchronisierten Empfänger. Wählen Sie mit den Tasten zum Scrollen aus, welchen Sender Sie auswählen
möchten.
Drücken Sie die Menütaste erneut, um den Namen des ausgewählten
Senders zu editieren.
Der Unterstrich unter dem Sendernamen zeigt die aktuelle Position des
Cursors an.
Benutzen Sie die Auf- und Abwärtstasten um zu den verfügbaren Zeichen zu gehen (Nummern, Buchstaben).
Benutzen Sie die Rechtstaste um das ausgewählte Zeichen zu bestätigen und gehen Sie zum nächsten freien
Platz.
Benutzen Sie die Linkstaste um zum nächsten Platz zurück zu gehen, um das Zeichen zu löschen.
Drücken Sie die OK – Taste um den Namen des Senders zu bestätigen und die Editierung zu beenden.
SETUP
Rename Transmitter
TX Station 1
Zurücksetzen des Sendernamens auf die Werkseinstellung.
Führen Sie die Rückstellung des Sendersystems zu den Werkseinstallungen durch, wie auf Seite 47 beschrieben.
Page 44 Lesen Sie diese Instruktionen bitte sorgfältig durch, bevor Sie die Installation beginnen

DEUTSCH (DE)
DGHDP1 - DigiSender® HD Pro - Powerline AV Sendersystem mit einem Eingang
Erweiterte Handlungsweisen
Sender- und Empfänger Synchronisierung
Die Synchronisation des Senders und Empfängers sollte NUR dann durchgeführt werden, wenn ein zusätzlicher
Empfänger zugefügt wird oder bei einer Problembehebung.
Es gibt zwei Wege, auf denen Sender und Empfänger synchronisiert werden können (Sync):
• “Sync” indem die Taste des Senders oder Empfängers verwendet wird:
1. Drücken und halten Sie die (Group-) Taste auf der Rückseite des Empfängers, bis die Nachricht
“Syncing” auf dem Bildschirm angezeigt wird.
2. Drücken und halten Sie die (Group-) Taste auf der Rückseite des Senders für 2 Sekunden bis die
Sync und Power LED regelmäßig blinken.
Wenn die Synchronisation erfolgreich war, wird die Nachricht auf dem empfangenden Bildschirm von
“Syncing” zu “synced” geändert, gefolgt vom Video (falls die Sendequelle eingeschaltet ist und ein Film
läuft).
• “Sync” wenn die Fernbedienung benutzt wird:
Drücken Sie die (Group-) Taste der Fernbedienung um Sender und Empfänger zu synchronisieren.
Beachten Sie : Es ist unbedingt erforderlich, dass die oben genannte Prozedur durchgeführt wird, indem DigiSender
und Empfänger in unmittelbarer Nähe platziert und mit einem Doppelstecker der selben Stromleitung angeschlossen sind.
Page 45Lesen Sie diese Instruktionen bitte sorgfältig durch, bevor Sie die Installation beginnen

(DE) DEUTSCH
DGHDP1 - DigiSender® HD Pro - Powerline AV Sendersystem mit einem Eingang
Erweiterte Handlungsweisen
PLC Gruppierung
Die PLC Gruppierung sollte nur dann ausgeführt werden, wenn ein zusätzlicher Empfänger installiert wird oder
bei einer Problembehebung, wenn die Synchronisation von Sender und Empfänger fehlgeschlagen ist und ein
Problem nicht behoben wurde.
1. Drücken Sie die Linktaste auf der DigiSender Fernbedienung in der Nähe des Senders und
Empfängers.
“Durchführung PLC Gruppierung” wird auf dem Bildschirm des empfangenden Fernsehers angezeigt.
Die Sync – LED auf dem Sender blinkt regelmäßig und die Power – LED ist aus.
Wenn die PLC Gruppierung erfolgreich war, wird das System automatisch Sender und Empfänger
synchronisieren. Dann wird das Video sichtbar (falls die Sendequelle eingeschaltet ist und ein Film
läuft).
Beachten Sie : Es ist unbedingt erforderlich, das die oben genannte Prozedur durchgeführt wird, indem DigiSender
und Empfänger in unmittelbarer Nähe platziert und mit einem Doppelstecker der selben Stromleitung angeschlossen sind.
Page 46 Lesen Sie diese Instruktionen bitte sorgfältig durch, bevor Sie die Installation beginnen

DEUTSCH (DE)
DGHDP1 - DigiSender® HD Pro - Powerline AV Sendersystem mit einem Eingang
Erweiterte Handlungsweisen
Zurücksetzen des Systems auf die Werkseinstellungen
Das folgende Vorgehen setzt das DidiSender HD Pro System auf die Werkseinstellungen zurück und sollte nur bei
einer Problembehebung ausgeführt werden.
1. Zurücksetzen des Senders auf die Werkseinstellungen
Beim Sender drücken Sie bitte den Groupknopf auf der DigiSender Fernbedienung ständig ( in schneller
Abfolge) bis die Power – LED ausgeht und die Sync – LED angeht, dann drücken Sie die OK – Taste der
DigiSender Fernbedienung.
Power- und Sync – LED gehen an und aus und der Sender wird selbständig neu starten.
Sie Sendereinstellungen sind nun auf die Werkseinstellung zurück gesetzt.
2. Zurücksetzung des Empfängersystems auf die Werkseinstellungen:
Beim Empfänger drücken Sie bitte den Groupknopf auf der DigiSender Fernbedienung bitte 5 Mal in
schneller Reihenfolge bis der Bildschirm des Empfänger-TVs die Nachricht „Bestätigen Sie bitte die
Rücksetzung des Systems auf die Werkseinstellung“ anzeigt. Dann drücken Sie bitte die Grouptaste an
der Rückseite des Empfängers für ungefähr 6 Sekunden.
Der Bildschirm wird dann die Nachricht “ Systemeinstellungen sind auf die Werkseinstellung zurück
gesetzt” anzeigen, der Bildschirm zeigt danach nichts mehr an und die Nachricht “Nicht synchronisiert
– Führen Sie bitte die Synchronisation aus” erscheint.
Die Empfängereinstellungen sind nun auf die Werkseinstellung zurück gesetzt.
BEACHTEN SIE BITTE: Nachdem Sie das System auf die Werkseinstellungen zurück gesetzt haben, müssen Sie die
Synchronisation der Sender und Empfänger erneut durchführen, wie auf Seite 45 beschrieben.
Page 47Lesen Sie diese Instruktionen bitte sorgfältig durch, bevor Sie die Installation beginnen

(DE) DEUTSCH
DGHDP1 - DigiSender® HD Pro - Powerline AV Sendersystem mit einem Eingang
Erweiterte Handlungsweisen
Zurücksetzung der PLC- Einstellungen auf die Werkseinstellung
Der im Folgenden beschriebene Vorgang wird die DigiSender HD Pro PLC – Einstellungen zu den Werkseinstellungen zurück setzen und sollte nur zur Problembehebung durchgeführt werden.
1. Zurücksetzung der PLC – Einstellungen des Sendersystems auf die Werkseinstellungen:
Beim Sender drücken Sie bitte den „Factoryknopf“ auf der DigiSender Fernbedienung ständig (in
schneller Abfolge) bis die Power – LED und die Sync – LED ausgehen, dann drücken Sie die OK – Taste
der DigiSender Fernbedienung.
Power- und Sync – LED gehen an und aus und der Sender wird selbständig neu starten.
Die Sender PLC – Einstellungen sind nun auf die Werkseinstellungen zurück gesetzt.
2. Zurücksetzung der PLC – Einstellungen des Empfängersystems auf die Werkseinstellungen:
Beim Empfänger drücken Sie bitte den Groupknopf auf der DigiSender Fernbedienung ständig (in
schneller Abfolge) bis der Bildschirm des empfangenden Fernsehers die Nachricht „ Bestätigen Sie
bitte, die PLC – Einstellungen auf die Werkseinstellungen zurück zu setzen“, dann drücken Sie die OK
– Taste der DigiSender Fernbedienung (Sie können jede andere Taste der DigiSender Fernbedienung
drücken, um den Vorgang abzubrechen).
Die Empfänger PLC – Einstellungen sind nun auf die Werkseinstellungen zurück gesetzt.
BEACHTEN SIE BITTE: Nachdem Sie das System auf die Werkseinstellungen zurück gesetzt haben, müssen Sie die
PLC - Gruppierung erneut durchführen, wie auf Seite 46 beschrieben.
Page 48 Lesen Sie diese Instruktionen bitte sorgfältig durch, bevor Sie die Installation beginnen

DGHDP1 - DigiSender® HD Pro - Powerline AV Sendersystem mit einem Eingang
Problemlösung
Häufig gestellte Fragen
Problemlösung
Mögliche Umstände Mögliche Ursachen Auflösung
• Stellen Sie sicher, dass die Einschaltknöpfe
auf der Rückseite des Senders und Empfängers eingeschaltet sind.
• Stellen Sie sicher, dass die Strom- und
HDMI – Kabel richtig verbunden sind.
• Überprüfen Sie, ob die Sendequelle richtig
arbeitet, indem Sie diese direkt an das
Fernsehgerät anschließen.
• Wenn die Sendequelle an dem TV direkt
angeschlossen ist und gut arbeitet, kann
dies ein Hinweis sein, dass das Audio / Videoformat ein Problem bereitet. Überprüfen
Sie die Spezifikationen auf der Rückseite
der Anleitung um sicher zu gehen, dass das
Ausgabeformat mit dem DigiSender HD Pro
System kompatibel ist.
• ufen Sie das DigiSender HD Pro Bildschirmmenü auf und lassen Sie die Auflösung
durch das Fernsehgerät auswählen. Lesen
Sie die Seiten 41 und 42 für mehr Information.
• Wenn im angeschlossenen Stromsystem
Überspannungsschutz oder EMI – Schutz
gegeben ist, versuchen Sie bitte den
Anschluss an eine andere Steckdose.
• Stellen Sie sicher, dass die Einschaltknöpfe
auf der Rückseite des Senders und Empfängers eingeschaltet sind.
• Stellen Sie sicher, dass die angeschlossene
Leitung Strom führt.
• Wenn die Fernbedienung keine Rückmeldung gibt, schalten Sie die Geräte auf der
Rückseite an und aus.
• Wenn die oben genannten Maßnahmen
das Problem nicht beheben, kann es
sein, dass das Gerät einen Fehler in der
Stromzufuhr hat. Trennen Sie die Geräte
unverzüglich von der Stromzufuhr und
kontaktieren Sie die Hotline.
Das empfangende TV Gerät (am Empfänger
angeschlossen) zeigt
kein Video.
Die Power – LED leuchtet
nicht.
• Die Stromzuführung ist abgeschaltet.
• Die Kabelverbindungen sind
locker.
• Die Sendequelle (z. B. der Satellitenempfänger) arbeitet nicht
richtig.
• Die Sendequelle sendet
kein Videoformat, dass vom
DigiSender HD Pro unterstützt
wird.
• Die Sendequelle sendet
keine Videoauflösung, die vom
empfangenden Fernsehgerät
unterstützt wird.
• Interferenzen durch EMI oder
durch einen Überspannungschutz der elektrischen Leitung.
• Sender und / oder Empfänger
sind nicht eingeschaltet.
• Die Stromzuführung ist ausgeschaltet.
• Das Gerät fährt nicht richtig
hoch.
• Defekt des Netzteiles.
DEUTSCH (DE)
Page 49Lesen Sie diese Instruktionen bitte sorgfältig durch, bevor Sie die Installation beginnen

(DE) DEUTSCH
DGHDP1 - DigiSender® HD Pro - Powerline AV Sendersystem mit einem Eingang
Problemlösung
Häufig gestellte Fragen
Problemlösung
Mögliche Umstände Mögliche Ursachen Auflösung
Wenn der Fernseher die
Meldung anzeigt “Nicht
synchronisiert – führen
Sie bitte die Synchronisation aus”.
Die Power – LED auf der
Vorderseite des Senders
blinkt regelmäßig.
Während der Videosendung zeigt das an den
Empfänger angeschlossene Gerät die Meldung
“Synchronisation
erfolgreich, Warten auf
das Videosignal”.
Das empfangende
Fernsehgerät zeigt die
Meldung “Unerwartetes
Videoformat”.
• Sender und Empfänger sind
nicht richtig synchronisiert.
• Die Sendequelle (z. B. der
Satellitenempfänger) ist nicht
eingeschaltet oder im „Stand –
By“ – Modus.
• Die Sendequelle sendet nicht in
einem vom DigiSender HD Pro
unterstütztem Format.
• Das PLC (Power Line Communication) Netzwerk kann
nicht eine unzureichende
Bandbreite unterstützen oder
die Netzwerkqualität ist nicht
ausreichend. Dies führt zu einer
Stilllegung des Videobildes.
• Der Empfänger startet immer
wieder neu.
• Die Ausgangsauflösung der
Sendequelle wird nicht unterstützt. Der DigiSender HD Pro
unterstützt nur eine Auflösung
bis zu 1020 x 1080@24P oder
1920 x 1080@60i.
• Führen Sie die Sender und Empfänger
Synchronisation durch (Seite 45), um die
Verbindung wieder herzustellen.
• Falls die oben genannte Prozedur nicht zum
Erfolg geführt hat, führen Sie zuerst die
“PLC – Gruppierungs - Prozedur“ aus seite
46, dann die Synchronisation des Senders
und Empfängers (Seite 45).
• Stellen Sie sicher, dass die Sendequelle
eingeschaltet ist.
• Prüfen Sie, ob die Sendequelle ein Videosignal sendet (drücken Sie gegebenenfalls
den Playknopf auf der Fernbedienung).
• Überprüfen Sie die Spezifikationen auf der
Rückseite der Beschreibung um sicher zu
gehen, dass das ausgehende Format der
Sendequelle mit denen des DigiSender HD
Pro Systems überein stimmt.
• Dieses Problem behebt sich in der Regel
nach ein bis zwei Minuten von selbst.
• Falls dieses Problem weiterhin auftritt
liegt es in der Regel an der Steckdose.
Versuchen Sie, den DigiSender HD Pro an
einer anderen Steckdose anzuschließen.
• Wenn die Power – LED weiterhin blinkt,
kann es sein, dass das Gerät einen Fehler in
der Stromzufuhr hat. Trennen Sie die Geräte
unverzüglich von der Stromzufuhr und
kontaktieren Sie die Hotline.
• Ihre Sendequelle erkennt normalerweise automatisch das Format, das der
DigiSender HD Pro verwendet und es
ist kein Problem. Wenn die Sendequelle
manuell auf ein nicht unterstütztes Format
konfiguriert wurde, werden Sie anhand
Ihres Handbuches der Sendequelle diese
zurücksetzen müssen auf ein Format, dass
der DigiSender HD Pro unterstützt (siehe
Spezifikationen auf der Rückseite dieser
Anleitung).
Page 50 Lesen Sie diese Instruktionen bitte sorgfältig durch, bevor Sie die Installation beginnen

DEUTSCH (DE)
DGHDP1 - DigiSender® HD Pro - Powerline AV Sendersystem mit einem Eingang
Problemlösung
Synchronisierung und Rücksetzungsvorgehen.
In dem unwahrscheinlichen Fall, dass Sie das System nicht in Betrieb bekommen, gehen Sie bitte wie unten
aufgeführt vor:
Schritt 1: Überprüfen Sie die Verbindungen, die Stromzufuhr und Ihre Geräte.
• Stellen Sie sicher, dass alle Stromleitungen angeschlossen und die Geräte eingeschaltet sind.
• Überprüfen Sie alle HDMI – Kabel und Verbindungen zwischen der Sendequelle (z. B. Ihrem Satellitenempfänger) und dem DigiSender Sender und Empfänger und dem empfangenden Fernsehgerät. Stellen Sie sicher,
dass die HDMI Verbindungen richtig eingesteckt und die Kabel nicht in irgend einer Weise beschädigt sind.
• Stellen Sie sicher, dass die Sendequelle (z. B. Ihr Satellitenempfänger) richtig funktioniert und das ausgehende
Video zu dem für Ihren Sender bestimmten Kabel übertragen wird. Es wird empfohlen, dass Sie Ihre Sendequelle überprüfen, indem sie es direkt an Ihr Fernsehgerät anschließen, um die richtige Funktion zu testen.
• Stellen Sie sicher, dass das empfangende Fernsehgerät richtig funktioniert und auf den richtigen HDMI
– Kanal eingestellt ist.
Wenn das Video auf dem empfangenden Fernsehgerät immer noch nicht angezeigt wird, verfahren Sie bitte
gemäß Schritt 2 (siehe unten):
Schritt 2: Synchronisations- und Rücksetzungsablauf
Die Synchronisations- und Rücksetzungsprozedur ist der letzte Schritt der Problembehebung und sollte nur dann
ausgeführt werden, wenn alle anderen Maßnahmen zur Problembehebung gescheitert sind.
Das Ablaufdiagramm auf Seite 52 wird Sie durch die Prozedur führen.
BEACHTEN SIE BITTE: Es wird davon ausgegangen, dass alle Geräte, Ihre Sendequelle (z. B. der Satellitenempfänger), der Sender und Empfänger und das Fernsehgerät richtig funktionieren und korrekt angeschlossen sind.
BEACHTEN SIE BITTE: Es ist unbedingt erforderlich, dass diese Prozedur mit dem Sender und Empfänger nebeneinander stehend und an der selben Stromquelle angeschlossen durchgeführt wird.
Page 51Lesen Sie diese Instruktionen bitte sorgfältig durch, bevor Sie die Installation beginnen

(DE) DEUTSCH
DGHDP1 - DigiSender® HD Pro - Powerline AV Sendersystem mit einem Eingang
Problemlösung
Synchronisierung und Rücksetzungsvorgehen.
Führen Sie die Synchronisation des Senders und Empfängers gemäß der Anleitung auf Seite 45 durch.
Funktioniert es?
Nein
Führen Sie die PLC - Gruppierung gemäß der Anleitung auf Seite 46 durch.
Funktioniert es?
Nein
Führen Sie die Synchronisation des Senders und Empfängers gemäß der Anleitung auf Seite 48 durch.
Führen Sie die PLC - Gruppierung gemäß der Anleitung auf Seite 46 durch.
Funktioniert es?
Nein
Führen Sie die Synchronisation des Senders und Empfängers gemäß der Anleitung auf Seite 45 durch.
Funktioniert es?
Nein
Führen Sie die Zurücksetzung des Systems auf die Werkseinstellung aus gemäß der Anleitung auf Seite 47.
Führen Sie die Synchronisation des Senders und Empfängers gemäß der Anleitung auf Seite 45 durch.
Ja
Ja
Ja
Ja
Komplett!
Funktioniert es?
Nein
Kontaktieren Sie die Helpline des Verkäufers.
Ja
Page 52 Lesen Sie diese Instruktionen bitte sorgfältig durch, bevor Sie die Installation beginnen

DEUTSCH (DE)
DGHDP1 - DigiSender® HD Pro - Powerline AV Sendersystem mit einem Eingang
Problemlösung
Fernbedienungserweiterung
Wenn Sie Schwierigkeiten bei der Verwendung der Fernbedienung Ihres Hauptgeräts im zweiten Zimmer haben,
befolgen Sie bitte die nachstehenden Ratschläge:
• Stellen Sie sicher, dass der IR-Emitter an den DigiSender® Transmitter angeschlossen ist.
• Stellen Sie sicher, dass Sie im zweiten Raum die richtige Fernbedienung verwenden. Wenn Sie
beispielsweise Einstellungen am Satellitenkanal ändern möchten, müssen Sie dazu die Fernbedienung
für den Satellitenempfänger verwenden.
• Stellen Sie sicher, dass der IR-Emitter auf den Fernbedienungssensor an Ihrem Hauptgerät ausgerichtet
ist.
• Stellen Sie sicher, dass das Verbindungslabel des Infrarot Impulsgebers nicht direkt über oder unter
Ihrem Equipment verläuft. Dies hat den Grund, weil die meisten modernen Set Top Boxen ein Laufwerk
installiert haben, das elektromagnetische Interferenzen verursachen und das Signal des IR- Kabels
unterbrechen kann.
• Stellen Sie den IR-Emitter mithilfe der beiliegenden Fernbedienungserweiterung weiter entfernt vom
Hauptgerät auf.
• Stellen Sie den Transmitter UND den Empfänger weiter entfernt von anderen Elektrogeräten auf.
• Halten Sie die Fernbedienung dichter an den DigiSender® Empfänger.
• Ersetzen Sie die Batterien in der Fernbedienung des Hauptgeräts.
Oft ist es am einfachsten, wenn Ihnen jemand hilft, die Fernbedienung perfekt einzurichten.
• Diese Person sollte zum Empfänger gehen und versuchen, den Satellitenkanal umzuschalten oder
die Blu-Ray auf Pause zu stellen, während das “Auge” der Fernbedienung auf die Vorderseite des
DigiSender Empfängers ausgerichtet wird.
• Während die helfende Person dies ausführt, sollten Sie die Position des IR – Impulsgebers ausrichten.
Bewegen Sie den Emitter langsam von einer Seite auf die andere, beachten Sie, dass der Emitter immer auf die Vorderseite Ihrer Sendequelle ausgerichtet ist.
• Wenn Sie die richtige Position für Ihren IR – Impulsgeber gefunden haben und der Kanal umgeschaltet
wird, oder die CD auf Pause geht, wird dies Ihre Hilfsperson wissen lassen.
Page 53Lesen Sie diese Instruktionen bitte sorgfältig durch, bevor Sie die Installation beginnen

(DE) DEUTSCH
DGHDP1 - DigiSender® HD Pro - Powerline AV Sendersystem mit einem Eingang
Problemlösung
Technischer Support und Zusatzgeräte
Technischer Support
AEI Security & Communications Ltd hat sich dazu verpflichtet, seinen Kunden einen erstklassigen Kundenservice
und technischen Support anzubieten.
1. Im Web
Kostenlose technische Hilfestellung steht Ihnen online kostenlos rund um die Uhr auf unserer speziellen SupportWebseite zur Verfügung: www.aei.eu
2. Per Email
Sie können unsere Techniker per E-Mail kontaktieren. Bitte beschreiben Sie ausführlich Ihr Problem und das von
Ihnen erworbene Modell. hilfe@digisender.net
Zusatzgeräte
Wenn Sie Ihre Sendequelle in mehr als einen Raum übertragen wollen, können Sie das mit dem unten aufgeführten zusätzlichen Empfänger tun.
So erwerben Sie besuchen uns im Internet unter: www.easylife.com oder rufen Sie uns an:
02071 931 413.
DGHDP1RX - DigiSender® HD Pro Zusätzlicher Empfänger
• Empfangen Sie Ihre HD – Kanäle auf zusätzlichen Fernsehern in Ihrer Wohnung!
• Verbinden Sie bis zu 4 Empfängern auf einmal.
Page 54 Lesen Sie diese Instruktionen bitte sorgfältig durch, bevor Sie die Installation beginnen

DEUTSCH (DE)
DGHDP1 - DigiSender® HD Pro - Powerline AV Sendersystem mit einem Eingang
Informationen und Sicherheitshinweise
Wichtige Produktinformationen
Wichtige Produktinformationen
Power Line Communication oder Power Line Carrier (PLC) sind Systeme zur Datenübertragung auf einen
elektrischen Leiter, der auch für eine Stromversorgung gebraucht wird.
Sender und Empfänger sollten mit der selben Stromleitung gebraucht werden, um die Funktion zu garantieren.
Dieses System kann eventuell nicht ausreichend funktionieren, wenn es mit Verlängerungskabeln angeschlossen
wird oder Steckdosen, die mit einem Spannungsschutz oder EMI / RFI – Funktion ausgerüstet sind. Für die besten
Ergebnisse sollten die Geräte direkt in der Steckdose angeschlossen sein. In Wohnungen mit unterschiedlichen
Stromleitungen ist es am besten, wenn eine zusammenhängende Stromleitung ausgewählt wird, damit eine
einheitliche Datenübertragung gewährleistet wird.
Steckdosen und Leitungen sollen alle Teil EINES elektrischen Systems sein. Verschiedene elektrische Bedingungen
wie der Zustand der Leitungen und Konfiguration können die Wiedergabe dieses Produktes beeinflussen.
BEACHTEN SIE BITTE: Interferenzen anderer elektrischer Geräte wie z. B. Staubsauger, Haartrockner, alte elektrische Motoren oder minderwertige Handys können die Wiedergabe dieses Gerätes beeinflussen. Dieses Produkt
kann auf Geräte wie z. B. Lampen mit einem Dimmer reagieren, mit Kurzwellenradios oder anderen Geräten, die
nicht dem Standart entsprechen.
Ungewöhnliche Reaktionen
• Es dauert 30 bis 40 Sekunden, um eine Verbindung zwischen Sender und Empfänger herzustellen.
Wenn nach dieser Zeit kein Signal zum Empfänger kommt, führen Sie bitte die Synchronisation
zwischen Sender und Empfänger durch wie auf Seite 45 beschrieben und verfahren Sie gemäß der
Kapitel der Problembehebung dieser Anleitung. Falls Sie nicht in der Lage sind, die Probleme zu
beheben, kontaktieren Sie bitte die Helpline des Verkäufers.
• Wenn ein Gerät versehentlich mit Wasser in Berührung gekommen ist oder in einer anderen Form
beschädigt wurde, schalten Sie es sofort aus und trennen Sie es vom Stromnetz. Das Gerät sollte
bei nächster Gelegenheit ersetzt werden, ansonsten kann es zu einem Kurzschluss oder sogar
Brand kommen. Bei einer Unsicherheit sollten Sie die Helpline des Verkäufers kontaktieren.
• Wenn Rauch oder seltsame Gerüche aus dem Gerät kommen, schalten Sie das Gerät unverzüglich
aus und trennen Sie es von einer Stromquelle. Wenn Sie das Gerät in diesem Zustand weiter
benutzen kann es zu einem Kurzschluss oder sogar Brand kommen. Bei einer Unsicherheit sollten
Sie die Helpline des Verkäufers kontaktieren.
Page 55Lesen Sie diese Instruktionen bitte sorgfältig durch, bevor Sie die Installation beginnen

(DE) DEUTSCH
DGHDP1 - DigiSender® HD Pro - Powerline AV Sendersystem mit einem Eingang
Informationen und Sicherheitshinweise
Sicherheitsvorkehrungen
Sicherheitsvorkehrungen
Diese Sicherheitshinweise sollen die beste und sicherste Verwendung mit möglichst wenig Umständen ermöglichen. Lesen Sie bitte diese Bedienungsanleitung vor Inbetriebnahme durch. Es wird empfohlen, diese Bedienungsanleitung mit jeder beiliegenden Dokumentation sowie schützendem Material und Rechnung / Kaufbestätigung
aufzuheben.
• Verwenden Sie dieses Gerät nicht außerhalb oder in Umgebungen, wo es mit Wasser oder Dampf
(Badezimmer, Sauna, Swimming Pool) in Berührung kommen kann.
• Öffnen Sie auf keinen Fall das Gehäuse dieser Geräte.
• Stellen Sie nie Behälter mit Flüssigkeiten (Vasen, Tassen, Gläser usw.) auf diese Geräte!
• Benutzen Sie nur trockene Tücher, um die Geräte zu reinigen. Verwenden Sie keine flüssigen
Reinigungsmittel oder Sprays.
• Betreiben Sie diese Geräte nur an ausreichen belüfteten Orten. Stellen Sie es nicht Schränke,
bedeckte Kästen und ähnliches.
• Blockieren Sie nicht die Belüftung der Geräte. Lassen Sie immer 2cm Luftraum um die Geräte
herum, damit die Wärmeentwicklung während des Betriebes abgeleitet werden kann, es wird die
Lebensdauer der Geräte verlängern.
• Stellen Sie die Geräte nicht auf Stoffe (Sofas, Teppiche, usw.) wo die Geräte in den Stoff einsinken
können oder die Umgebung die Ventilation und Hitzeableitung verhindert.
• Stellen Sie die Geräte nie auf Heizungen (Radiatoren, elektrische Heizgeräte, Feuerstellen usw.)
Page 56 Lesen Sie diese Instruktionen bitte sorgfältig durch, bevor Sie die Installation beginnen

DEUTSCH (DE)
DGHDP1 - DigiSender® HD Pro - Powerline AV Sendersystem mit einem Eingang
Informationen und Sicherheitshinweise
Schutzmaßnahmen für Stromleitungen
Schutzmaßnahmen für Stromleitungen
Wenn Sie nicht vorhaben, die Geräte für eine längere Zeit in Gebrauch zu nehmen, trennen Sie diese vom Strom.
Dies ist eine Vorsichtsmaßnahme weil diese Geräte, so lange es an eine Steckdose angeschlossen sind, einen
Strom fließen lassen, auch wenn sie ausgeschaltet sind.
• Klemmen Sie das Stromkabel nicht zwischen das Gerät und die Umgebung (Wände, Möbel,
Schränke usw.)
• Stellen Sie keine Gegenstände auf das Stromkabel.
• Wenn Sie das Kabel aus der Steckdose ziehen, fassen Sie es nicht am Kabel an, sondern am
Stecker selber.
• Wenn das Kabel des Gerätes in irgend einer Form beschädigt wurde, schalten Sie es sofort aus
und Trennen Sie es vom Stromnetz. Das Gerät sollte bei nächster Gelegenheit ersetzt werden,
ansonsten kann es zu einem Kurzschluss oder sogar Brand kommen. Bei einer Unsicherheit sollten
Sie die Helpline des Verkäufers kontaktieren.
Schutzmaßnahmen für HDMI - Kabel
Unsachgemäßer Gebrauch der HDMI – Kabel und Stecker können Schäden am Gerät und Kabel verursachen.
• Bevor Sie ein HDMI – Kabel auf der Rückseite des Gerätes einstecken, überzeugen Sie sich bitte,
dass der Stecker nicht verkehrt herum eingesteckt wird.
• Stecken Sie das Kabel vorsichtig ein, stellen Sie sicher, dass der Steckkontakt direkt und ohne
Probleme eingesteckt wird.
• Halten Sie das HDMI – Kabel immer gerade, wenn Sie es ein- oder ausstecken. Achten Sie darauf,
das es nicht verdreht wird.
• Entfernen Sie das HDMI – Kabel, wenn das Gerät an einen anderen Ort gestellt oder transportiert
wird.
Page 57Lesen Sie diese Instruktionen bitte sorgfältig durch, bevor Sie die Installation beginnen
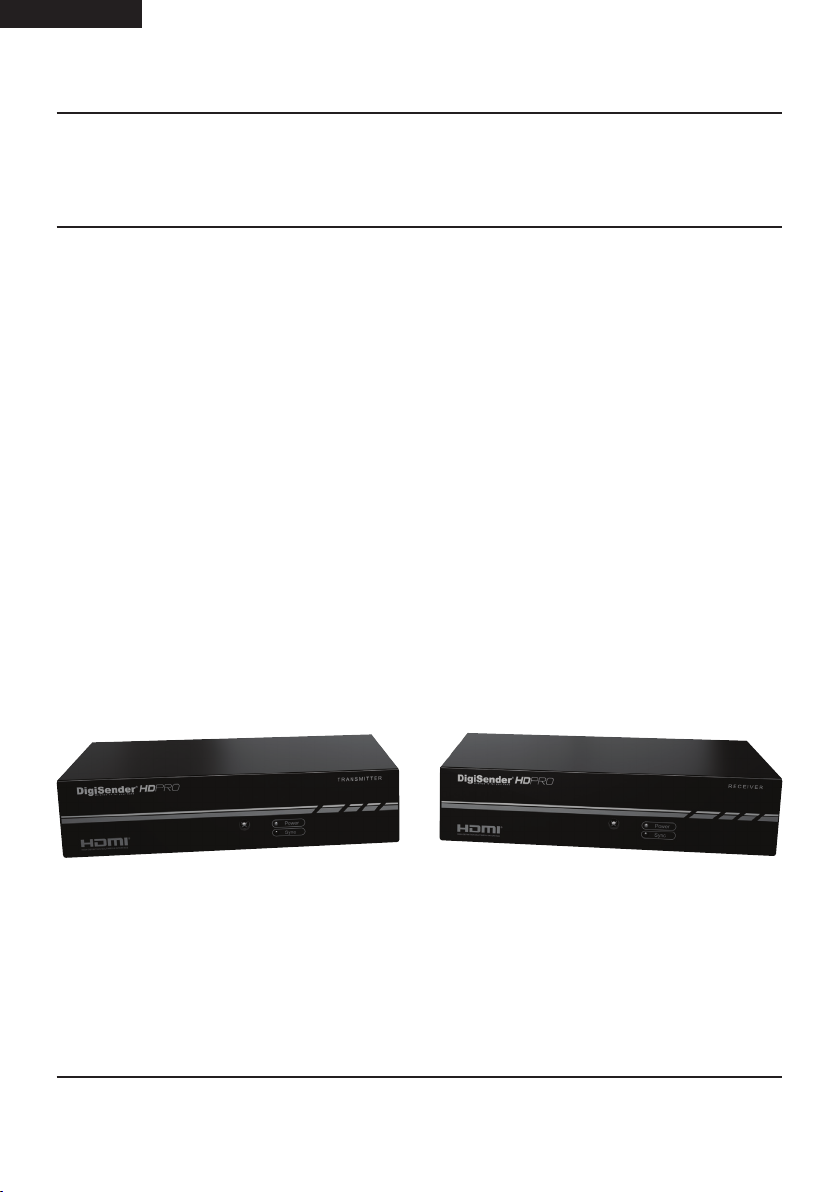
(FR) FRANCAIS
DGHDP1 - DigiSender® HD Pro - Système emetteur AV de lignes d’alimentation d’entrée unique
Présentation
Le DigiSender ® HD Pro est un système émetteur AV ultra moderne de l’AEI Security & Communications Ltd.En
utilisant les plus avancées récentes dans la technologie de distribution de médias haute définition le DigiSender
® HD Pro vous permettra de transmettre des vidéos hautes définitions de 1080p autour de votre maison à l’aide
de vos principales lignes d’alimentation existantes. Cela évite les complexités de recâblage de votre maison ou
l’achat de nouvel équipement AV pour chaque salle de visionnement.
Ce système se compose d’un émetteur et un récepteur qui offre des vidéos H.264 Haute Définition et audio de
haute qualité du HD par récepteurs Satellite HD, décodeurs, lecteurs Blu-Ray ™ et Consoles de jeux HD (etc.) à
compatible l’ afficheage HDTV situé près de de prises d’alimentation principales dans votre maison.
L’installation est rapide et facile. L’appareil de source (par exemple le récepteur satellite HD dans la salon) est
connecté à l’émetteur et le récepteur est connecté au deuxième HDTV (par exemple la TV de Chambre à coucher),
les deux par HDMI™.
Le système comporte également des relais de distance, vous permettant d’utiliser la télécommande de la source
(p. ex. la Télécommandes de récepteur satellite HD ) de l’emplacement de réception.
Il est recommandé de lire la section informations de sécurité & à la page 82 - 84 avant d’installer ce produit.
Page 58 S’il vous plaît lire attentivement les instructions avant l’installation
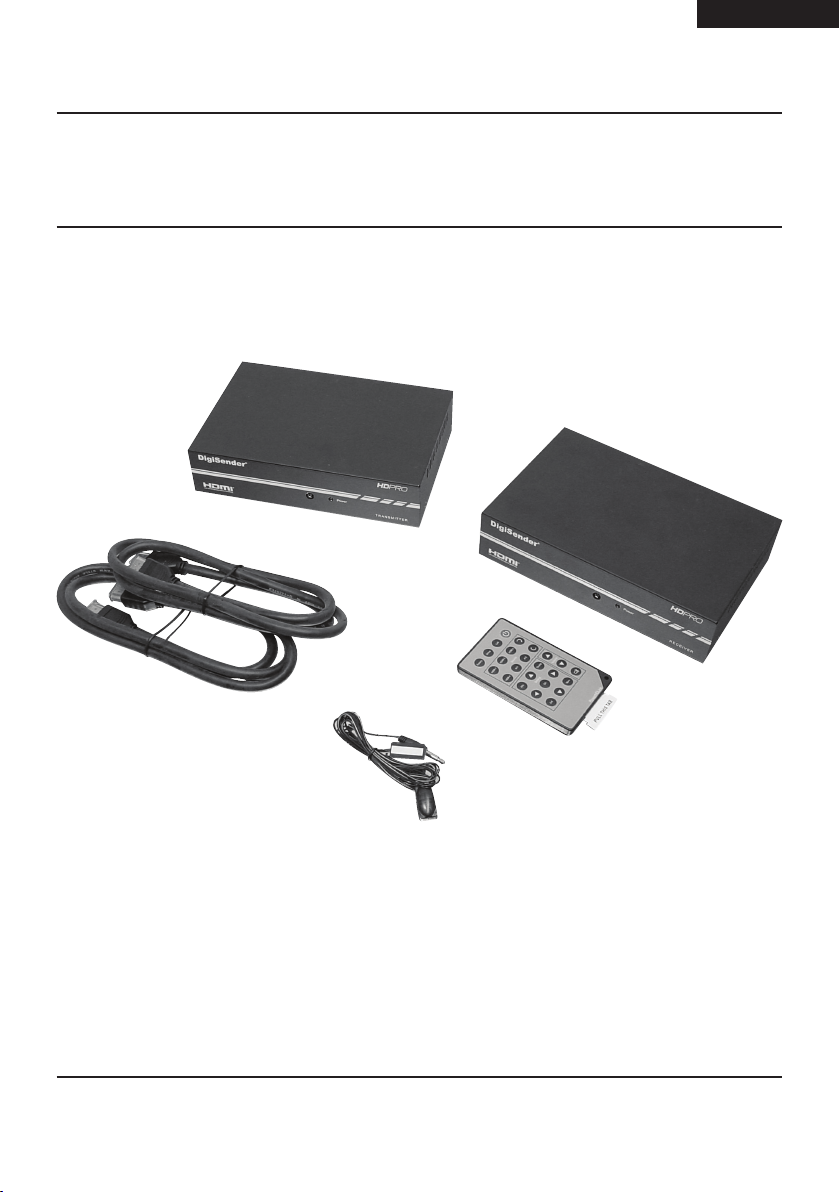
FRANCAIS (FR)
DGHDP1 - DigiSender® HD Pro - Système emetteur AV de lignes d’alimentation d’entrée unique
Installation Du DigiSender®
Étape 1 - Déballage du DigiSender®
Le poids de toutes les boîtes de DigiSender® est contrôlé par ordinateur avant expédition. Toutefois, nous vous
recommandons de vérifier que vous disposez bien de tous les composants avant de commencer l’installation.
1.
2.
3.
1. 1x DigiSender® HD Pro Emetteur
2. 1x DigiSender® HD Pro Réceptuer
3. 2x HDMI Câbles
4. 1x L’émetteur infrarouge
5. 1x Télécommande
5.
4.
Page 59S’il vous plaît lire attentivement les instructions avant l’installation

(FR) FRANCAIS
DGHDP1 - DigiSender® HD Pro - Système emetteur AV de lignes d’alimentation d’entrée unique
Installation Du DigiSender®
Étape 2 - Installation de l’émetteur
Ce chapitre décrit comment installer correctement votre DigiSender ® HD Pro. Après l’installation vous pourrez
visualiser le périphérique source connecté (par exemple le récepteur Satellite HD) sur une autre TV n’importe où
dans votre maison ou au Bureau.
1.
Identifier le câble HDMI reliant votre périphérique
source (par exemple le récepteur Satellite HD) sur
votre téléviseur principal.
3.
2.
Déconnectez ce câble de la TV et connectez-le
à l’étiquette de douille « HDMI In » sur le dos de
l’émetteur de DigiSender®.
4.
Connecter l’émetteur infrarouge à l’étiquette de
Utiliser l’un des câbles HDMI et connectez-le à
l’étiquette de douille “ HDMI OUT’ à l’arrière du
DigiSender ® émetteur et l’entrée HDMI sur votre
téléviseur principal.
Page 60 S’il vous plaît lire attentivement les instructions avant l’installation
douille « infrarouge » sur le dos de l’émetteur de Di-
giSender® et placer l’émetteur IR (infrarouge) face
au capteur de télécommande sur le front de votre
périphérique source (p. ex. HD récepteur Satellite).

DGHDP1 - DigiSender® HD Pro - Système emetteur AV de lignes d’alimentation d’entrée unique
Installation Du DigiSender®
Étape 2 - Installation de l’émetteur
FRANCAIS (FR)
5.
Connecter le câble d’alimentation DigiSender ®
émetteur à une prise de courant conduites disponible et et allumez à l’arrière.
7.
6
Le voyant d’alimentation sur l’avant du DigiSender
intel® émetteur s’allume en vert pour indiquer que
l’émetteur est mis sous tension.
Allumez votre appareil source (par exemple. Récepteur satellite HD).
Page 61S’il vous plaît lire attentivement les instructions avant l’installation
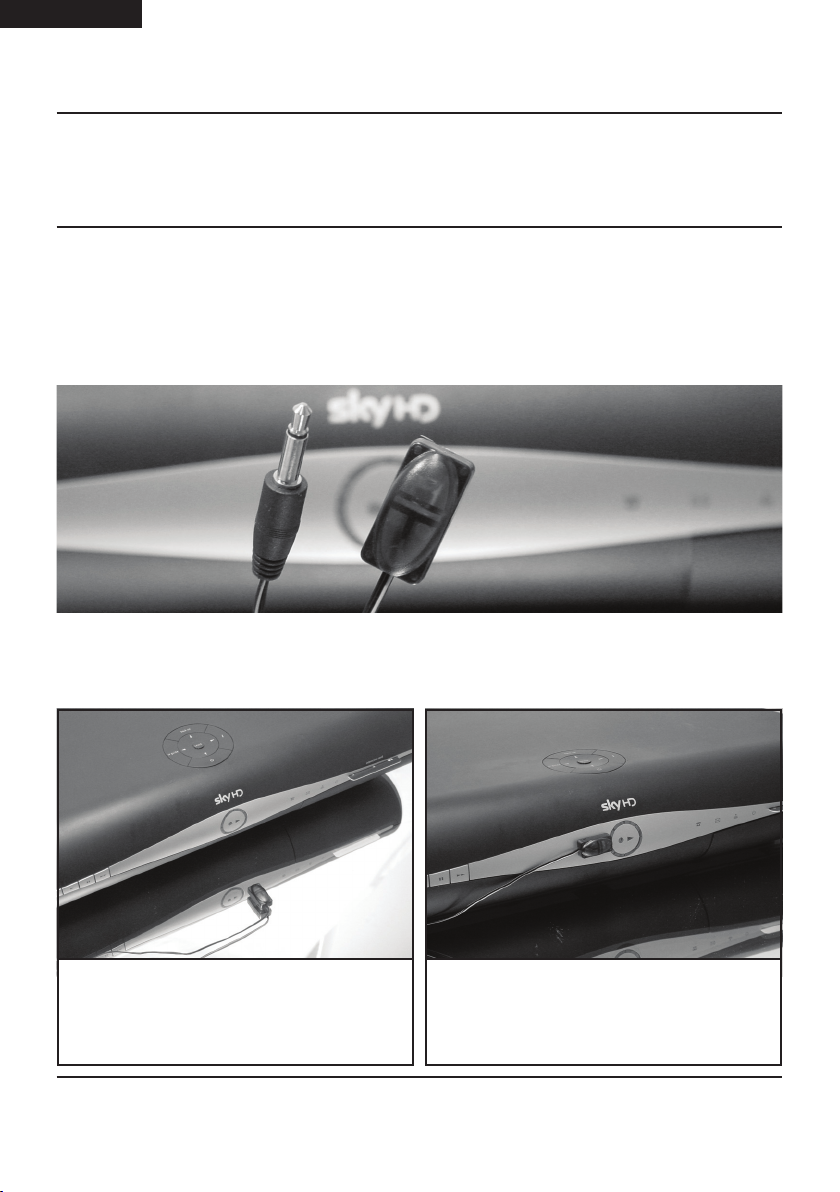
(FR) FRANCAIS
DGHDP1 - DigiSender® HD Pro - Système emetteur AV de lignes d’alimentation d’entrée unique
Installation Du DigiSender®
Étape 3 - Installer l’Emetteur Infrarouge
Le DigiSender ® HD Pro dispose d’un système de relais à distance qui vous permet de contrôler votre périphérique
source (par ex. Récepteur satellite HD), de la deuxième TV. Le DigiSender ® récepteur est équipé d’un capteur
infrarouge qui reprendra le signal IR de votre source télécommande (télécommande HD Satellite par exemple).
Ce signal IR est envoyé sur votre ligne d’ alimentation électrique à l’émetteur de DigiSender ®, où il est ensuite
envoyé à l’appareil source (par exemple le récepteur Satellite HD) par l’intermédiaire de l’émetteur IR.
L’émetteur IR peuvent être montés dans l’une des deux positions différentes et il est préférable d’essayer les deux
positions pour assurer une performance optimale.
Position 1 : Placez l’émetteur IR vers le capteur
de la télécommande sur l’avant de votre appareil
source (par ex. Récepteur satellite HD).
Page 62 S’il vous plaît lire attentivement les instructions avant l’installation
Position 2 : Utilisez le pad collant inclus à l’émetteur
IR à l’avant de votre appareil source, près de,et fai-
sant face, au capteur de la télécommande.
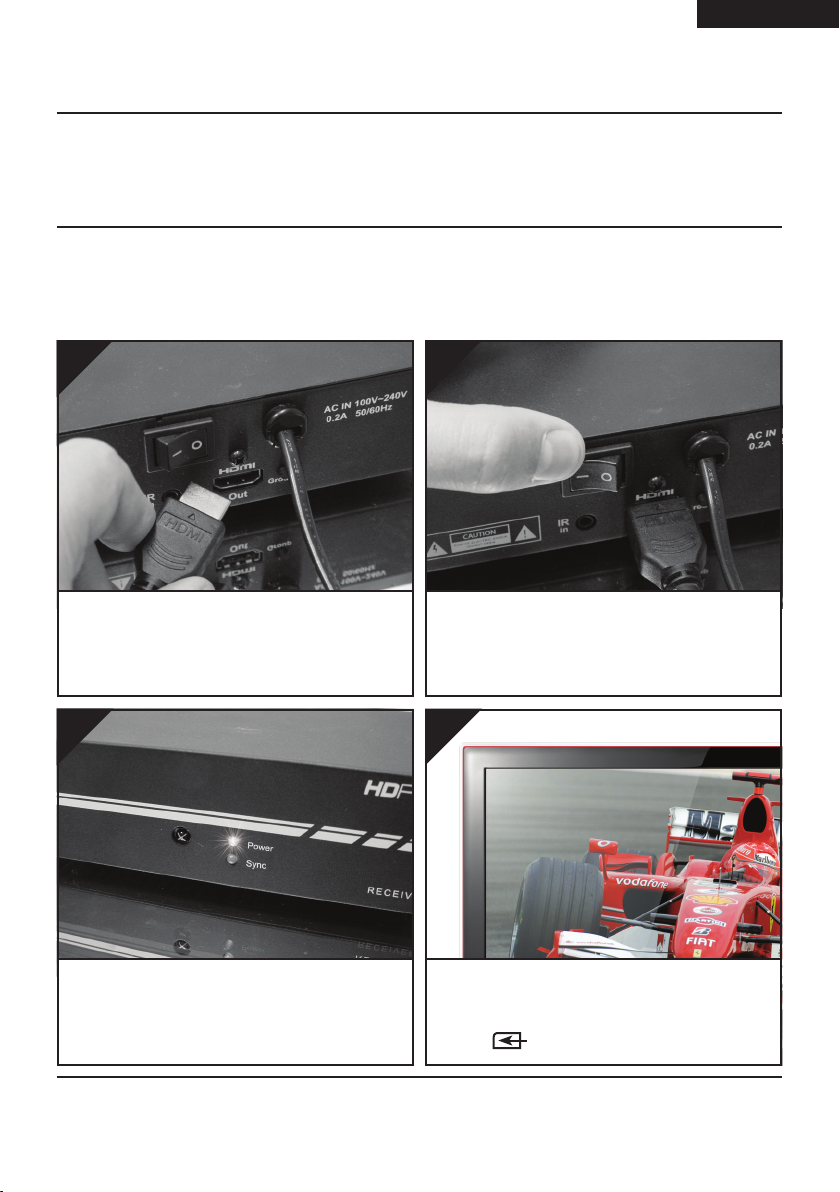
FRANCAIS (FR)
DGHDP1 - DigiSender® HD Pro - Système emetteur AV de lignes d’alimentation d’entrée unique
Installation Du DigiSender®
Étape 4 - Installation du récepteur
Le récepteur détecte les signaux envoyés par l’émetteur et les retransmet sur le téléviseur auquel il est branché.
1.
Utilisez le câble HDMI restant et Connecter le à
l’étiquette de douille « HDMI Out » sur l’arrière du
récepteur DigiSender ® et l’entrée HDMI sur votre
récepteur TV.
3.
2.
Branchez le câble récepteur d’alimentation Di-
giSender ® à une prise de courant disponible et
allumez à l’arrière.
4.
HDMI1
Le voyant d’alimentation sur l’avant du DigiSender
intel® récepteur s’allume en vert pour indiquer que
récepteur est mis sous tension.
Sur le téléviseur, sélectionnez le canal assigné à
la prise péritel à laquelle est branché le récepteur.
Il peut s’appeler SOURCE, INPUT, AUX, AV, VIDEO,
VCR ou .
Page 63S’il vous plaît lire attentivement les instructions avant l’installation

(FR) FRANCAIS
DGHDP1 - DigiSender® HD Pro - Système emetteur AV de lignes d’alimentation d’entrée unique
Installation Du DigiSender®
Étape 4 - Installation du récepteur
En fonction de la rapidité avec laquelle les étapes précédentes ont été accomplies, vous pouvez voir deux messages s’affichent sur le téléviseur.
DigiSender® HD Pro
Establishing Sync with Transmitter
Please wait...
Etablir Synchronisation Synchronisation réussie
Approximativement de 40 seconde après avoir allumé tout votre équipement (l’appareil de source par exemple
l’HD récepteur par satellite, DigiSender® l’Emetteur, DigiSender® le Récepteur et la TV de réception) la vidéo sera
affichée sur la TV de réception.
Sync Successful
Waiting for Video signal...
FELICITATIONS !
L’installation est terminée et vous pouvez maintenant recevoir des vidéos HD 1080p dans une autre pièce de
votre maison.
Page 64 S’il vous plaît lire attentivement les instructions avant l’installation

FRANCAIS (FR)
DGHDP1 - DigiSender® HD Pro - Système emetteur AV de lignes d’alimentation d’entrée unique
Opérations de base
La télécommande DigiSender ® HD Pro
Le DigiSender® HD Pro est fourni avec une télécommande qui vous permettra d’accéder aux divers paramètres via
le Menu sur l’écran ainsi qu’exécuter diverses réglages si vous rencontrez des problèmes.
Se référer aux tableaux sur les deux pages suivantes pour obtenir une description d’à quoi sert chaque bouton.
Rangée du haut
Zone Source
Zone de volume
Zone de paramètres
Page 65S’il vous plaît lire attentivement les instructions avant l’installation

(FR) FRANCAIS
DGHDP1 - DigiSender® HD Pro - Système emetteur AV de lignes d’alimentation d’entrée unique
Opérations de base
La télécommande DigiSender ® HD Pro
Descriptions des touches de laTélécommande
Fig. Zone de touches Nom de la touche Description de touche
Rangée du haut Power/Standby
Rangée du haut Link
Rangée du haut Group
Rangée du haut Factory
Basculer l’émetteur et le récepteur entre le mode marche
et le mode Veille.
Ré-établit un PLC entre l’émetteur et le récepteur. Seulement pour être utilisé lors de l’installation d’un récepteur
supplémentaire ou au cours d’un dépannage.
Synchronise l’émetteur et le récepteur. Seulement pour
être utilisé lors de l’installation d’un récepteur supplémentaire ou au cours d’un dépannage.
Utilisé pour définir les paramètres de PLC vers les
paramètres par défaut. Uniquement pour être utilisé au
cours du dépannage.
Zone Source HDMI 1 Input Ne pas utilisé pour ce modèle.
Zone Source HDMI 2 Input Ne pas utilisé pour ce modèle.
Zone Source HDMI 3 Input Ne pas utilisé pour ce modèle.
Zone Source HDMI 4 Input Ne pas utilisé pour ce modèle.
Zone Source AV 1 Input Ne pas utilisé pour ce modèle.
Zone Source AV 2 Input Ne pas utilisé pour ce modèle.
Zone Source Next Input Ne pas utilisé pour ce modèle.
Zone Source Last Input Ne pas utilisé pour ce modèle.
Page 66 S’il vous plaît lire attentivement les instructions avant l’installation

DGHDP1 - DigiSender® HD Pro - Système emetteur AV de lignes d’alimentation d’entrée unique
Opérations de base
La télécommande DigiSender ® HD Pro
Descriptions des touches de laTélécommande
Fig. Zone de touches Nom de la touche Description de touche
Zone de
paramètres
Display Basculer le système TV
FRANCAIS (FR)
Zone de
paramètres
Zone de
paramètres
Zone de
paramètres
Zone de
paramètres
Zone de
paramètres
Zone de
paramètres
Zone de
paramètres
Zone de
paramètres
Zone de volume Volume Up Augmenter le volume
Zone de volume Volume Down Diminuer le volume
Menu Entrez dans le Menu
Info Affiche les informations de Menu
Up Dans le Menu : Faire défiler vers le haut
Down Dans le Menu : Faire défilez vers le bas
Left Dans le Menu : Faire défilez vers la gauche
Right Dans le Menu : Faire défilez vers la droite
OK Sélectionnez / Entrer / Confirmer
Exit Sortie de menu
Zone de volume Mute Couper le son
Page 67S’il vous plaît lire attentivement les instructions avant l’installation

(FR) FRANCAIS
DGHDP1 - DigiSender® HD Pro - Système emetteur AV de lignes d’alimentation d’entrée unique
Opérations de base
Eléments du menu à l’écran
Le Menu à l’écran est utilisé pour configurer diverses options et vous pouvez y accéder en appuyant sur le bouton Menu de la télécommande. Cela permettra d’afficher le Menu de réglage à l’écran sur le téléviseur relié au
récepteur.
SETUP
Eléments du menu à l’écran
• Langue
• Bande passante réseau
• Contrôle de résolution
• Temps de veille
• Synchronisation labiale
• Sélectionnez la Station TX
• Information
Language
Network Bandwidth
Resolution Control
Sleep
LIP SYNC
Select TX Station
Information
Utilisation du Menu de réglage à l’écran
Vous pouvez naviguer dans le Menu à l’écran en utilisant les boutons suivants de la télécommande :
• Utiliser le défilement vers le haut et vers le bas pour sélectionner un élément de menu.
• Appuyez sur le bouton OK pour sélectionner un élément de menu et afficher les options disponibles.
• Utiliser le défilement vers le haut et vers le bas pour sélectionner une option.
• Appuyez sur le bouton OK pour définir une option.
• Appuyez sur le bouton Exit pour quitter le Menu à l’écran.
Page 68 S’il vous plaît lire attentivement les instructions avant l’installation

DGHDP1 - DigiSender® HD Pro - Système emetteur AV de lignes d’alimentation d’entrée unique
Opérations de base
Eléments du menu à l’écran
Description du menu à l’écran
Eléments du menu Description Options
• Anglais (par défaut)
• Allemand (en option)
Langue
Bande passante réseau
Contrôle de résolution
Temps de veille
Synchronisation labiale
Sélectionnez la Station
TX
Information Version micrologiciel.
Sélectionne la langue qui est utilisée pour ce
Menu à l’écran
Ajustez la qualité du flux vidéo selon laquelle
le paramètre est choisi. Si vous ne savez pas
comment bon votre bande passante réseau est,
sélectionnez Auto Detect.
Sélectionne la résolution de sortie pour la télévision a laquelle que vous êtes connecté.
Définit la durée pour que l’émetteur ou le
récepteur soit au ralenti avant de passer en
mode veille. L’émetteur est considéré comme
«inactif» lorsqu’il n’y a aucune entrée vidéo du
périphérique source du récepteur de Satellite HD
par exemple. Le récepteur est considéré comme
inactif quand il ne reçoit ne pas de signal vidéo
de l’émetteur.
Les sélections dans cette option sont uniquement utilisés comme valeur de référence pour le
système pour régler la synchronisation (utilisé
uniquement pour 60 Hz, ne s’applique pas à 50
Hz PAL ou systèmes).
Chaque récepteur peut être synchronisé avec 4
émetteurs au maximum. Sélectionner n’importe
quel émetteur vous souhaitez récevoir le flux
vidéo à partir d’ici.
• Espagnol (en option)
• Japonais (en option)
• Italien (en option)
• Chinois traditionnel (en option)
• Chinois simplifié (en option)
• Français (en option)
• Détection automatique (par
défaut)
• Faible
• Juste
• Bien
• Excellent
• Par source (par défaut)
• Par TV
• En congé (par défaut)
• 10 minutes
• 30 minutes
• 60 minutes
• 120 minutes
• 60 Hz
• 59.94 Hz (par défaut)
• Voyez la section en mache
de plusieurs émetteurs avec
plusieurs récepteurs aux pages
70 et 71.
FRANCAIS (FR)
Page 69S’il vous plaît lire attentivement les instructions avant l’installation

(FR) FRANCAIS
DGHDP1 - DigiSender® HD Pro - Système emetteur AV de lignes d’alimentation d’entrée unique
Procédures avancées
Installation de récepteurs supplémentaires
Chaque émetteur peut être connecté à un maximum de quatre récepteurs. Lors de l’installation d’un récepteur
supplémentaire, veuillez effectuer les procédures ci-dessous dans l’ordre indiqué :
• Brancher et installer le récepteur comme aux pages 63 et 64.
• Réinitialisez le récepteur PLC aux paramètres par défaut à la page 75.
• Effectuer la procédure de regroupement PLC à la page 73.
• Effectuez la procédure de Synchronisation de l’émetteur et du récepteur à la page 72.
Procédures avancées
Mise en marche de plusieurs émetteurs avec plusieurs récepteurs
Chaque récepteur peut être connecté à un maximum de quatre émetteurs. Cela vous permettrait de choisir parmi
plusieurs dispositifs de source comme votre récepteur Satellite HD,lecteur Blu-Ray™ , enregistreur DVD ou même
de CCTV.
Sélection d’ un émetteur
• Au niveau du récepteur, appuyez sur le bouton Menu de
la télécommande DigiSender Intel® pour afficher le Menu
à l’écran. Utilisez les flèches de Défilement vers haut et
Défilement vers le bas pour passer à option Sélectionnez
TX Station.
• Appuyez sur le bouton OK pour entrer dans l’option Sélectionner TX Station.
• Sur la page Select TX Station, une liste de tous les
émetteurs qui sont actuellement synchronisée avec le récepteur sera affiché. Utiliser les boutons de défilement vers
le haut et vers le bas pour sélectionner l’émetteur désiré.
• Appuyez sur le bouton OK pour confirmer votre sélection.
• Si l’émetteur sélectionné est actuellement en transmission
vidéo, cela s’affichera. Le relais de distance sera automatiquement transféré à l’émetteur sélectionné afin que vous
puissiez contrôler le périphérique source sur lequel il est
connecté.
Page 70 S’il vous plaît lire attentivement les instructions avant l’installation
SETUP
Language
Network Bandwidth
Resolution Control
Sleep
LIP SYNC
Select TX Station
Information
SETUP
Select TX Station
TX Station 1
TX Station 2

DGHDP1 - DigiSender® HD Pro - Système emetteur AV de lignes d’alimentation d’entrée unique
Procédures avancées
Mise en marche de plusieurs émetteurs avec plusieurs récepteurs
Changement du nom d’un émetteur
• Au niveau du récepteur, appuyez sur le bouton Menu de la télécommande DigiSender Intel® pour afficher le Menu à l’écran. Utilisez les flèches Défilement vers haut et Défilement vers le bas pour passer
à l’option Sélectionnez TX Station.
• Appuyez sur le bouton OK pour entrer dans l’option Sélectionner TX Station.
• Sur la page Select TX Station, une liste de tous les émetteurs qui sont actuellement synchronisée avec
le récepteur sera affiché. Utiliser les boutons de défilement vers le haut et vers le bas pour sélectionner
l’émetteur désiré
FRANCAIS (FR)
Appuyez de nouveau sur le bouton Menu pour modifier le nom de
l’émetteur.
Le trait de soulignement sous le nom de l’émetteur indique la position
actuelle du curseur.
Utiliser le défilement vers le haut et vers le bas permettent de faire défiler les caractères disponibles (lettres,
chiffres, etc. )
Utilisez le bouton de défilement à droite pour confirmer le caractère sélectionné et passer à l’espace suivant.
Utilisez le bouton de défilement gauche pour reculer d’un seul espace, suppression d’un caractère.
Appuyez sur le bouton OK pour confirmer le nom de l’émetteur et terminer la modification.
SETUP
Rename Transmitter
TX Station 1
Réinitialisation du nom d’un émetteur au réglage par défaut
Effectuer la réinitialisation des paramètres du système émetteur .Les paramètres par défaut à la page 74.
Page 71S’il vous plaît lire attentivement les instructions avant l’installation

(FR) FRANCAIS
DGHDP1 - DigiSender® HD Pro - Système emetteur AV de lignes d’alimentation d’entrée unique
Procédures avancées
Synchronisation d’emetteur & de récepteur
La procédure de synchronisation de l’émetteur et du récepteur & devrait seulement être utilisée lors de l’installation
d’un récepteur supplémentaire ou pendant le dépannage.
Il y a deux façons dont l’émetteur et le récepteur peuvent être “synchronisé” ou “Synchro”:
• ‘Synchro’ à l’aide des boutons de l’émetteur et du récepteur :
1. Appuyez et maintenez le bouton de groupe sur l’arrière du récepteur jusqu’à ce que le message “
synchronisation “ s’affiche sur le téléviseur.
2. Appuyez et maintenez le bouton de groupe sur l’arrière de l’émetteur pendant 2 secondes jusqu’à
ce que la synchronisation et les voyants DEL clignotent de façon séquentielle.
Si la synchronisation est réussie, le message sur la réception TV passera de “ la synchronisation” à “
synchronisé”, suivie par la vidéo (à condition que l’appareil source soit actuellement en marche et les
médias est en cours de lecture).
• ‘Synchro’ à l’aide de la télécommande :
Appuyez sur le bouton de groupe sur la télécommande DigiSender ® pour synchroniser l’émetteur et le
récepteur.
Remarque : Il est fortement recommandé d’exécuter la procédure ci-dessus avec les deux DigiSender® émetteur et
récepteur dans le même voisinage, de préférence attaché à la même double prise d’alimentation secteur.
Page 72 S’il vous plaît lire attentivement les instructions avant l’installation

FRANCAIS (FR)
DGHDP1 - DigiSender® HD Pro - Système emetteur AV de lignes d’alimentation d’entrée unique
Procédures avancées
Groupement de PLC
La procédure de regroupement PLC devrait uniquement pour être utilisé lors de l’installation d’un récepteur supplémentaire ou au cours du dépannage quand la synchronisation de l’émetteur et du récepteur ne permet pas
de résoudre un problème
1. Appuyez sur le bouton lien de la télécommande DigiSender ® à l’emplacement de l’émetteur du
récepteur.
“Tentative de regroupement PLC” sera affichée sur le téléviseur de réception.
Le voyant Sync de la télécommande clignote et le voyant d’alimentation est éteint.
Si le regroupement de PLC est réussie, le message sur la réception TV passera de “ la synchronisation”
à “ synchronisé”, suivie par la vidéo (à condition que l’appareil source soit actuellement en marche et
les médias est en cours de lecture).
Remarque : Il est fortement recommandé d’exécuter la procédure ci-dessus avec les deux DigiSender® émetteur et
récepteur dans le même voisinage, de préférence attaché à la même double prise d’alimentation secteur.
Page 73S’il vous plaît lire attentivement les instructions avant l’installation

(FR) FRANCAIS
DGHDP1 - DigiSender® HD Pro - Système emetteur AV de lignes d’alimentation d’entrée unique
Procédures avancées
Configuration les paramètres du système par défaut
La procédure suivante va retourner les paramètres du système DigiSender ® HD Pro au défaut d’origine et devrait
être seulement utilisé au cours du dépannage.
1. Réinitialiser les paramètres du système émetteur par défaut d’origine:
Au niveau de l’émetteur, appuyez sur le bouton Groupe de la télécommande DigiSender® en continu (en
succession rapide) jusqu’à ce que les deux le voyant d’alimentation(DEL) s’éteint et le voyant de
Synchronisation s’allume, puis appuyez sur le bouton OK de la télécommande DigiSender®.
Les voyants (DEL) d’alimentation et de synchronisation clignoteront FERMER-ALLUMER-FERMER-
ALLUMER puis l’émetteur redémarrera tout seul.
Les paramètres du système émetteur ont été remis à leurs valeurs par défaut d’origine.
2. Réinitialiser les paramètres du système récepteur par défaut d’origine:
Au niveau du récepteur, appuyez sur le bouton Groupe de la télécommande DigiSender®AU MOINS 5
FOIS (en succession rapide) jusqu’à la réception TV affiche le message “ Confirmer - Réinitialiser le
système aux paramètres d’usine par défaut ? “. Puis appuyez sur et maintenez le bouton de groupe
sur l’arrière du récepteur pour environ 6 secondes.
Le récepteur TV affichera le message “ Réinitialiser le système de réglages par défaut d’origine”, puis
l’écran deviendra blanc et le téléviseur affichera le message “Ne pas synchronisés - S’il vous plaît
effectuer l’opération de Synchronisation”.
Les paramètres du système récepteurs ont été remis à leurs valeurs par défaut d’origine.
Remarque : Après avoir terminé la Réintialisation les paramètres système par défaut d’origine vous aurez besoin de
terminer la procédure de synchronisation de l’émetteur et du récepteur à la page 72.
Page 74 S’il vous plaît lire attentivement les instructions avant l’installation

FRANCAIS (FR)
DGHDP1 - DigiSender® HD Pro - Système emetteur AV de lignes d’alimentation d’entrée unique
Procédures avancées
Réinitialisation des paramètres PLC aux paramètres par défaut
La procédure suivante va retourner les paramètres du système DigiSender ® HD Pro PLC au défaut d’origine et
devrait être seulement utilisé au cours du dépannage
1. Réinitialiser les réglages de l’émetteur PLC aux paramètres par défaut:
Au niveau de l’émetteur, appuyez sur le bouton Factory sur la télécommande DigiSender®en continu
(en succession rapide) jusqu’à ce que le voyant(DEL) d’alimentation et le voyant Sync s’éteint, puis
appuyez sur le bouton OK de la télécommande DigiSender®.
Le voyant (DEL) de l’alimentation et de la synchronisation clignotera ÉTEINT-ALLUMÉ-ÉTEINT-
ALLUMÉ et ensuite l’émetteur va redémarrer de lui-même.
Les paramètres émetteur PLC ont été remis à leurs valeurs par défaut.
2. Réinitialisez le récepteur PLC aux paramètres par défaut d’origine :
Au niveau du récepteur, appuyez sur le bouton Factory sur la télécommande DigiSender®, en
succession rapide, jusqu’à ce que la réception TV affiche le message “ Confirmer : Réinitialiser PLC aux
paramètres par défaut ? “ puis appuyez sur le bouton OK de la télécommande DigiSender®(Vous pouvez
appuyer n’importe quelle autre bouton sur la télécommande DigiSender®pour annuler l’opération.
Les paramètres de récepteur PLC ont été remis à leurs valeurs d’origine.
Remarque : Après avoir terminé la procédure de réinitialisation des paramètres PLC par défaut , vous devrez
achever la procédure de regroupement PLC à la page 73.
Page 75S’il vous plaît lire attentivement les instructions avant l’installation

(FR) FRANCAIS
DGHDP1 - DigiSender® HD Pro - Système emetteur AV de lignes d’alimentation d’entrée unique
Dépannage
Foire aux questions
Dépannage
Scénario Raison possible Résolution
• Assurez-vous que les interrupteurs
d’alimentation à l’arrière de l’émetteur et le
récepteur sont activés.
• Assurez-vous que les câbles d’alimentation
et les câbles HDMI sont correctement
connectés.
• Vérifiez que le périphérique source
fonctionne correctement en le connectant
directement à un téléviseur.
• Si l’appareil source fonctionne correctement lorsqu’il est connecté directement
à un téléviseur, cela pourrait indiquer un
problème avec le format audio/vidéo de
sortie. Vérifiez les spécifications sur la
page arrière pour s’assurer que le format
de l’appareil source est compatible avec le
système DigiSender® HD Pro .
• Entrez le DigiSender ® HD Pro Sur l’écran
du menu et regler le contrôle de résolution
pour sélectionner par TV. Voir les pages 68
et 69 pour plus d’informations.
• Si il ya protection antisurtension électriques
ou circuits de protection EMI à l’intérieur
de la prise de courant à laquelle vous avez
actuellement fait le branchement, essayez
de brancher le DigiSender ® HD Pro à une
prise de courant différente.
• Assurez-vous que les interrupteurs à
l’arrière de l’émetteur et le récepteur sont
activés.
• Assurez-vous que l’interrupteur sur la prise
de courant est sous tension.
• Si il n’y a aucune réponse à la télécommande, essayez de désactiver les appareils
et à l’aide des interrupteurs à l’arrière de
l’appareil.
• Si les suggestions ci-dessus ne remédie au
problème, l’appareil peut avoir développé
une panne d’alimentation. Débranchez
l’appareil de la prise immédiatement.
Réception de TV
(téléviseur connecté
au récepteur) n’affiche
aucun signal vidéo.
L’alimentation de LED
n’est pas allumée.
• La mise hors tension de la prise
secteur.
• Les connexions de câble ne sont
pas sécurisées.
• L’appareil Source (p. ex.
Récepteur satellite HD) ne
fonctionne pas correctement.
• Dispositif de source envoie
un format vidéo qui n’est pas
supportée par le DigiSender®
HD Pro.
• Dispositif de source envoie une
résolution vidéo qui n’est pas
supportée par le récepteur TV.
• Interférence d’un IME ou protection contre les surtensions
électrique.
• Émetteur et/ou récepteur non
activée”.
• Prise de courant n’est pas
activée.
• L’appareil ne demarre pas correctement.
• Faute d’approvisionnement en
électricité.
Page 76 S’il vous plaît lire attentivement les instructions avant l’installation
DGHDP1 - DigiSender® HD Pro - Système emetteur AV de lignes d’alimentation d’entrée unique
Dépannage
Foire aux questions
Dépannage
Scénario Raison possible Résolution
• Essayez la procédure de Synchronisation
“émetteur et récepteur “ à la page 72,
Réception TV affiche
“non synchronisées
- Veuillez effectuer l’
Opération synchronisation “.
La DEL d’alimentation
sur l’avant de l’émetteur
clignote en permanence.
Durant la lecture vidéo,
la réception TV (raccordés au récepteur)
affiche “ Synchronisation réussie - Attente de
signal vidéo”.
Réception TV affiche le
message “ Format vidéo
non pris en charge”.
• Le transmetteur et le récepteur
ne sont pas synchronisés correctement.
• Appareil Source (p. ex. Récepteur satellite HD) n’est pas
sous tension ou est en mode
veille.
• Appareil source envoi d’un
format vidéo qui n’est pas supporté par le DigiSender® HD Pro.
• Le réseau PLC (Power Line
Communication) ne peut pas
soutenir une large de bande
suffisante ou la qualité du
réseau n’est pas assez élevée.
Cela entraîne l’interruption de
l’image vidéo.
• Le récepteur est continuellement en redémarrage.
• La résolution de sortie de
l’appareil source est pas supporté . Le DigiSender® HD Pro
ne prend en charge que les
résolutions allant jusqu’à 1920
x 1080 @ 24P ou 1920 x 1080
@ 60i.
pour rétablir les connexions.
• Si la procédure ci-dessus n’a pas permis de
résoudre le problème, essayez la procédure
de «Groupement PLC à la page le 73 en
premier , puis la procédure de Synchronisation “ émetteur et récepteur » à la page
72.
• S’assurer que l’appareil source est activée.
• Vérifier si le appareil source envoie un
signal vidéo (vous devrez appuyez sur le
bouton « play » de votre télécommande).
• Vérifiez les spécifications sur la dernière
page pour s’assurer que le format de
l’appareil source est compatibles avec le
système DigiSender ® HD Pro.
• Ce problème généralement se résout luimême dans un délai d’une minute ou deux.
• Si ce problème persiste, alors cela peut être
dû à une prise de courant défectueuse.
Essayez de brancher le DigiSender ® HD Pro
à un autre prise de courant à la place.
• Si le voyant d’alimentation continue
de clignoter allumé et éteint alors le
récepteur peut avoir développé une panne
d’alimentation. Débranchez l’appareil de la
prise immédiatement.
• Votre appareil source généralement
«détectera automatiquement» » le format
utilisé par le DigiSender ® HD Pro et donc
normalement il n’y n’aura aucuns problèmes. Cependant, si l’appareil source a été
configuré manuellement pour la sortie d’
un certain format qui n’est supporté par le
DigiSender ® HD Pro , vous aurez besoin de
faire référence à votre manuel d’utilisateur
pour rétablir le format supporté par le
DigiSender ® HD Pro. Voir les spécifications
sur la dernière page de ce manuel.
FRANCAIS (FR)
Page 77S’il vous plaît lire attentivement les instructions avant l’installation

(FR) FRANCAIS
DGHDP1 - DigiSender® HD Pro - Système emetteur AV de lignes d’alimentation d’entrée unique
Dépannage
La procédure de synchronisation et de réinitialisation
Dans le cas peu probable où vous ne pouvez toujours pas faire fonctionner le système, veuillez procéder aux
étapes ci-dessous.
Étape 1 : Vérifier les connexions, l’alimentation et l’équipement
• Assurez-vous que tous les branchements de câble sont sécurisés et que tout équipement est sous tension.
• Inspecter les câbles HDMI et les connexions entre l’appareil source (par ex. le récepteur Satellite HD) ,le DigiSender® émetteur,le DigiSender® récepteur et la réception TV. Veiller à ce que tous les connecteurs HDMI soient entièrement insérés dans les
prises appropriées et qu’aucun des câbles HDMI ne soit endommagé en aucune façon.
• Assurez-vous que l’appareil source (par ex. Récepteur satellite HD) fonctionne correctement ainsi que la
sortie vidéo via la prise HDMI que vous utilisez pour connecter à l’émetteur DigiSender® . Il vous est recommandé de brancher l’appareil source directement à un téléviseur pour confirmer le bon fonctionnement.
• Assurez-vous que la réception TV fonctionne correctement et qu’il est configuré sur le bon canal HDMI.
Si la vidéo n’est toujours pas affiché sur la réception TV, alors passez à l’étape 2 ci-dessous.
Étape 2: procédure de synchronisation et de réinitialisation
La procédure de synchronisation et Réintialisation est la dernière étape de dépannage de votre produit et ne
devrait être tentée que lorsque toutes les autres mesures n’ont pas réussi à résoudre votre problème.
L’organigramme à la page 79 vous instruira sur la façon de poursuivre cette procédure.
Remarque : Il est supposé que l’appareil source (par ex. Récepteur satellite HD), DigiSender® émetteur, DigiSender®
récepteur et la réception TV soient tous correctement connecté et allumé.
Remarque : Il est fortement recommandé que vous effectuer cette procédure à la fois avec le DigiSender ® émetteur
et récepteur dans le même voisinage, de préférence attaché à la même double-prise d’alimentation secteur.
Page 78 S’il vous plaît lire attentivement les instructions avant l’installation
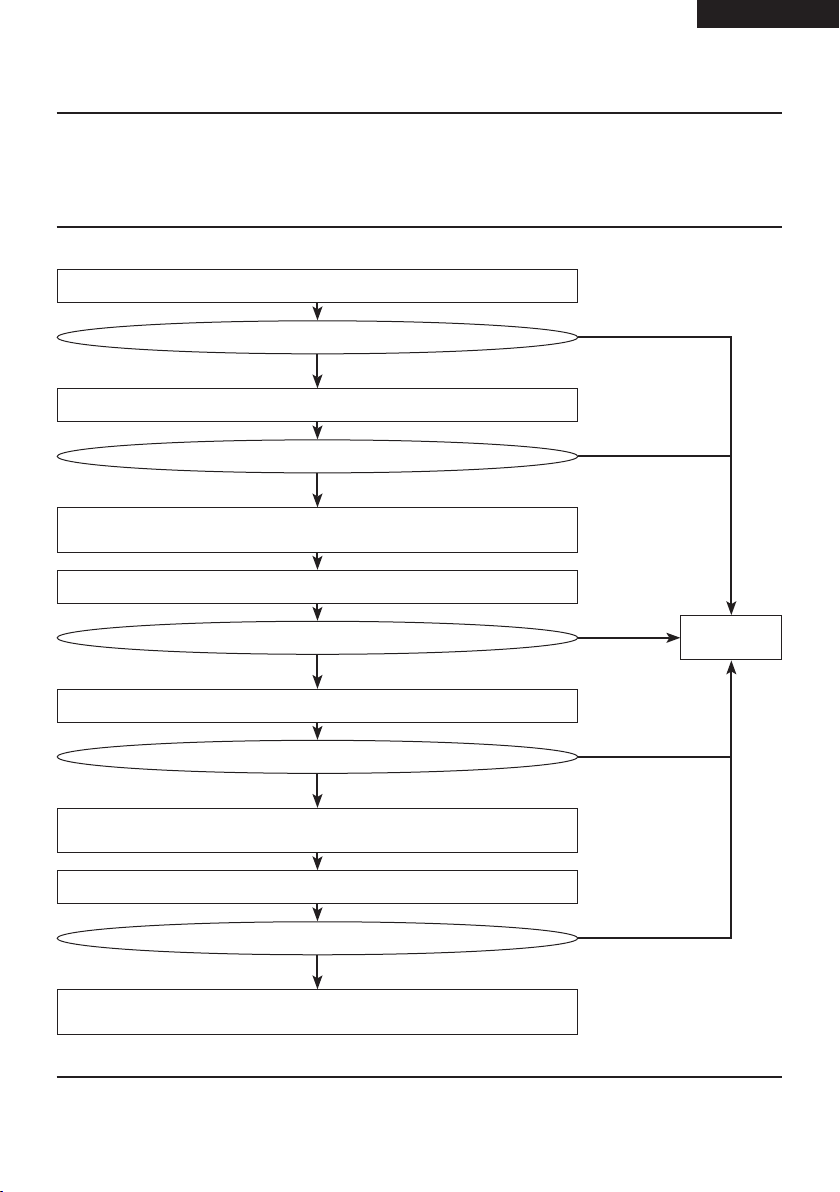
DGHDP1 - DigiSender® HD Pro - Système emetteur AV de lignes d’alimentation d’entrée unique
Dépannage
La procédure de synchronisation et de réinitialisation
Effectuer la procédure de synchronisation de l’émetteur & récepteur à la page 72
FRANCAIS (FR)
Est-ce que ça marche?
Non
Effectuez la procédure de regroupement PLC à la page 73
Est-ce que ça marche?
Non
Effectuer la procédure de réinitialisation des paramètres PLC aux paramètres par défaut à la page 75
Effectuez la procédure de regroupement PLC à la page 73
Est-ce que ça marche?
Non
Effectuer la procédure de synchronisation de l’émetteur & récepteur à la page 72
Est-ce que ça marche?
Non
Effectuer la procédure de réinitialisation des paramètres du système par défaut d’origine à la page 74
Effectuer la procédure de synchronisation de l’émetteur et du récepteur à la page 72
Oui
Oui
Oui
Oui
Succès!
Est-ce que ça marche?
Non
S’il vous plaît contactez la ligne directe de notre service clientèle au aide@digisender.net
Oui
Page 79S’il vous plaît lire attentivement les instructions avant l’installation

(FR) FRANCAIS
DGHDP1 - DigiSender® HD Pro - Système emetteur AV de lignes d’alimentation d’entrée unique
Dépannage
Problèmes de commande de l’équipement source
Si vous rencontrez des difficultés pour faire fonctionner la télécommande de votre équipement dans une autre
pièce, veuillez suivre les conseils ci-dessous:
• Vérifiez que l’émetteur infrarouge est branché sur l’émetteur DigiSender®.
• Vérifiez que vous utilisez la télécommande appropriée dans l’autre pièce. Par exemple, si vous essayez
de régler le canal du décodeur satellite, vous devrez utiliser la télécommande de ce dernier.
• Vérifiez que l’émetteur infrarouge est positionné face au capteur de votre équipement.
• Assurez-vous que ce câble reliant l’émetteur IR au transmetteur ne fonctionne pas directement sur ou
sous votre matériel source. parce que la plupart des décodeurs modernes ont un disque dur intégré qui
peut faire un peu d’interférence électromagnétique, qui perturbe le signal IR qui se déplace le long du
câble.
• Éloignez l’émetteur infrarouge de l’équipement à l’aide de la rallonge fournie.
• Éloignez l’émetteur ET le récepteur des autres appareils électriques.
• Utilisez la télécommande à proximité du récepteur DigiSender®.
• Changez les piles de la télécommande source.
Souvent, la façon la plus facile de permettre à votre système de relais à distance de fonctionner parfaitement
est de trouver quelqu’un pour vous aider.
• HaDemandez à la personne de vous aider à aller au receveur et essayer de changer le canal satellite ou
mettre en pause le lecteur Blu-Ray ™ tout en pointant la télécommande des dispositifs de source vers
l’avant de la DigiSender ® récepteur.
• Pendant que la personne vous aide est de faire ce qui précède, vous devez ajuster la position de
l’émetteur infrarouge(IR). Essayez de déplacer l’émetteur IR lentement, d’un côté de l’appareil source
à l’autre, en s’assurant de garder la face de l’émetteur infrarouge dirigé vers l’avant de votre appareil
source à tout moment.
• Lorsque vous avez trouvé le bon endroit pour l’émetteur IR, le canal va changer ou que le disque se met
en pause et la personne vous aidant peut vous faire savoir que vous avez exactement le bon endroit
pour l’émetteur infrarouge.
Page 80 S’il vous plaît lire attentivement les instructions avant l’installation
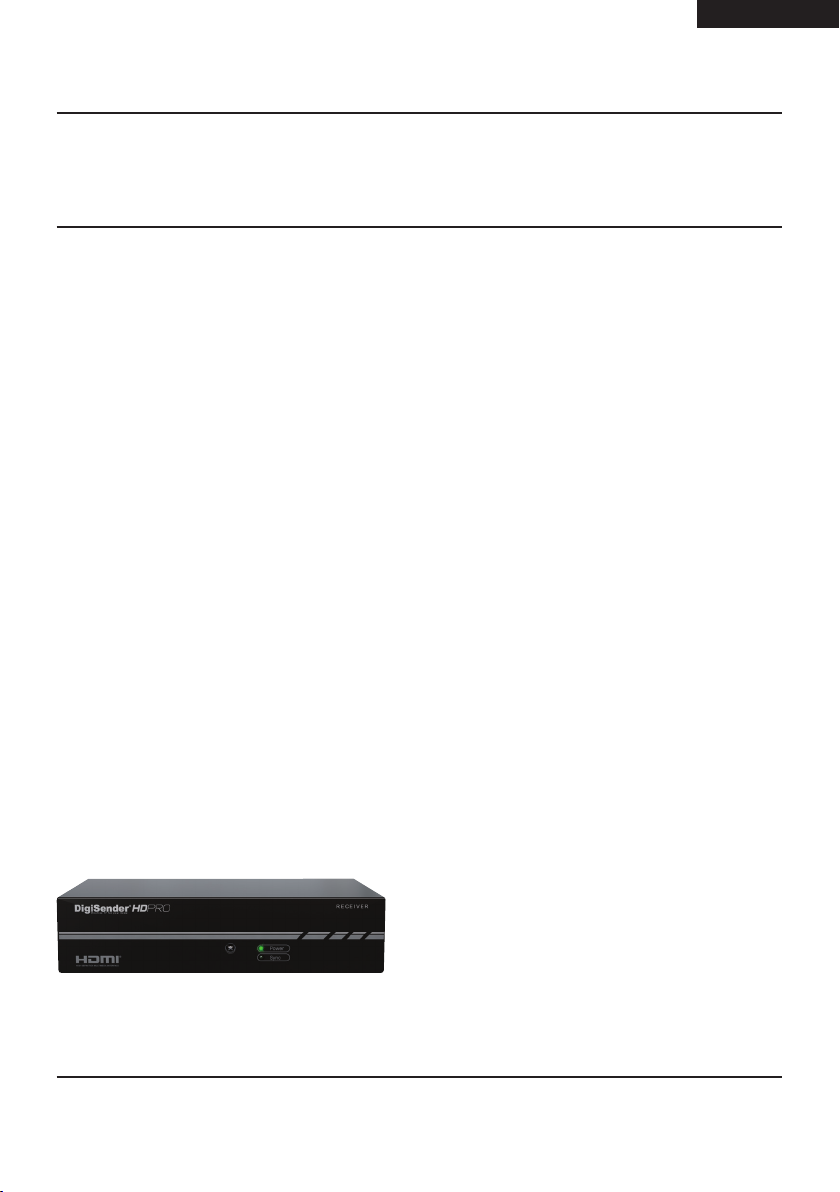
FRANCAIS (FR)
DGHDP1 - DigiSender® HD Pro - Système emetteur AV de lignes d’alimentation d’entrée unique
Dépannage
Assistance technique et Accessoires
Assistance Technique
AEI Security & Communications Ltd s’engage à apporter à nos clients un service à la clientèle et un support
technique de première classe.
1. Sur Internet
Un service technique gratuit est disponible 24 heures/24 et 7 jours/7 sur notre site Internet dédié au support :
www.aei.eu
2. Par Email
Vous pouvez contacter nos ingénieurs par E-mail. Veuillez vous assurer d’expliquer clairement votre modèle et
d’indiquer le modèle d’appareil que vous avez acheté. aide@digisender.net
Accessoires
Si vous souhaitez transmettre votre source à plus de 1 chambre, cela peut être réalisé en utilisant le récepteur
supplémentaire ci-dessous
Pour acheter en ligne à nous rendre visite: www.easylife.com
DGHDP1RX - DigiSender® HD Pro Autre récepteur
• Obtenez vos chaînes HD sur TV supplémentaire
dans votre maison !
• Connectez jusqu’à 4 récepteurs à la fois.
Page 81S’il vous plaît lire attentivement les instructions avant l’installation

(FR) FRANCAIS
DGHDP1 - DigiSender® HD Pro - Système emetteur AV de lignes d’alimentation d’entrée unique
Informations de sécurité
Informations importantes sur le produit et Fonctionnement anormal
Informations importantes sur le produit
La communication de ligne d’alimentation ou puissance porteurs en ligne (PLC), sont des systèmes pour le
transport de données sur un conducteur également utilisé pour la transmission d’énergie électrique.
Les unités de l’émetteur et le récepteur doivent fonctionner sur le même circuit de puissance AC pour une performance garantie.
Ce produit ne peut fonctionner efficacement si branchement sur des rampes électrique (en particulier ceux avec
la protection contre les surtensions et interférences EMI / RFI de filtration) ou les rallonges électriques. Pour de
meilleurs résultats, il est recommandé que vous connectez les unités directement à une prise de courant. Dans les
foyers avec plusieurs circuits courant secteur installés, il est recommandé que les deux unités soient installées sur
le même circuit de sorte qu’ils puissent communiquer efficacement les uns avec les autres.
Les Prises de courant et le câblage électrique doivent tous faire partie du même système électrique. Certaines
conditions électriques de votre domicile tels que les conditions de câblage et de configuration, peuvent affecter les
performances de ce produit.
Remarque : Interférences provenant d’appareils qui émettent un bruit électrique, tels que les aspirateurs, d’un
réfrigérateur, d’un sèche-cheveux, de moteurs électriques et de mauvaise qualité de chargeurs de téléphone
portable par exemple, peut avoir des conséquences néfastes sur les performances de ce produit. Ce produit peutêtre laPossibilité d’interférer avec les appareils tels que les systèmes d’éclairage qui ont un variateur de lumière,
des radios à ondes courtes ou d’autres dispositifs de transport d’électricité qui ne suivent pas la norme de câblage
correcte.
Fonctionnement anormal
• Il faudra de 30 à 40 secondes pour établir une connexion entre l’émetteur et le récepteur. S’il n’y a
aucun signal venant à travers le récepteur après cette période,s’il vous plaît essayez la procédure
synchronisation de l’émetteur et du récepteur à la page 72 et reportez-vous à la section Dépannage de ce manuel.
• Si une unité est accidentellement exposées à de l’eau ou si le boîtier est endommagé de
quelque façon que ce soit, vous devez arrêter immédiatement l’appareil et débrancher la prise
d’alimentation. L’unité doit être remplacée à la prochaine occasion, l’omission de le faire pourrait
entraîner un court-circuit électrique ou un incendie.
• Si de la fumée ou les odeurs émanent des unités, vous devez immédiatement éteindre l’appareil et
débranchez la prise. L’utilisation de ce produit dans ces conditions pourrait provoquer un incendie
ou endommager le produit irrémédiablement.
Page 82 S’il vous plaît lire attentivement les instructions avant l’installation

FRANCAIS (FR)
DGHDP1 - DigiSender® HD Pro - Système emetteur AV de lignes d’alimentation d’entrée unique
Informations de sécurité
Consignes de sécurité
Consignes de sécurité
Ces précautions de sécurité sont prévus pour assurer la meilleure expérience utilisateur la plus sûre et avec le
moins d’inconvénients. S’il vous plaît lisez attentivement ce manuel avant l’installation et le fonctionnement. Il
est conseillé de garder l’emballage d’origine, les matériaux de protection et toute la documentation fournie avec
ce produit, ainsi que votre facture ou le reçu d’achat.
• Ne pas utilisez ce produit à l’extérieur ou dans les environnements où les unités peuvent être
exposés à l’eau ou à l’humidité (salles de bains, des réservoirs d’eau, les sous-sols humides, les
piscines, etc. ).
• En aucune circonstance, n’ouvrez pas le boîtier d’une de ces unités.
• Ne placez pas les récipients contenant le liquide (vases, boissons, etc. ) ou matériaux mouillés ou
humides au-dessus ou à proximité de ces unités.
• Utilisez uniquement un chiffon sec pour essuyer ou nettoyer le boîtier. Ne pas utiliser de nettoyants liquides ou aérosols.
• Ne faire fonctionner ce produit que dans un endroit bien ventilé. Ne placez pas dans des placards,
armoires, boîtes, etc.
• Ne bloquez pas les bouches d’aération sur les unités. Toujours laisser au moins 2cm d’espace libre
autour des unités en cours de fonctionnement afin d’assurer que la chaleur est correctement dissipée, ce qui permettra de maintenir et de prolonger la durée de vie du produit.
• Ne placez pas les unités sur des surfaces douce(canapés, tapis, moquettes, etc. ) où les unités
pourraient sombrer dans la surface ou où la matière environnante peut affecter la ventilation et
dissipation de la chaleur.
• Ne placez pas les unités sur toute surface qui génère de la chaleur (radiateurs, chauffage électrique, cheminée, etc. ).
Page 83S’il vous plaît lire attentivement les instructions avant l’installation

(FR) FRANCAIS
DGHDP1 - DigiSender® HD Pro - Système emetteur AV de lignes d’alimentation d’entrée unique
Informations de sécurité
Précautions pour le câble électriques et HDMI
Précautions pour le câble électriques
Si vous ne prévoyez pas d’utiliser ce produit pour une période prolongée, débranchez les unités de la prise
d’alimentation électrique. Il s’agit d’une mesure de précaution car ce produit, tant qu’il est connecté à une prise
secteur, maintiendra un courant électrique même si les unités sont peut-être désactivée
• Ne pas coincer ou serrer le câble électrique entre les affaires et les éléments environnants (murs,
meubles, placards, etc. )
• Ne rien placer sur le câble d’alimentation ou glisser les objets dessus.
• Lorsque vous débranchez les unités des prises de courant électriques, assurez-vous que vous le
faites en tirant sur la fiche et non le câble électrique.
• Si le câble d’alimentation est endommagé de quelque façon que ce soit, vous devez arrêter
immédiatement l’appareil et débrancher la prise d’alimentation. L’unité doit être remplacée à la
prochaine occasion, l’omission de le faire pourrait entraîner un court-circuit électrique ou un
incendie.
Les Précautions de Câble HDMI
Une mauvaise utilisation du câble HDMI et de la prise peut endommager à la fois le produit et le câble HDMI.
• Avant le branchement d’un câble HDMI à la prise HDMI à l’arrière de l’unité, vérifier soigneusement l’orientation du connecteur et la prise pour vous assurer que vous n’avez pas inséré le
connecteur a l’envers.
• Branchez le câble HDMI avec soin, en veillant à ce que la tête du connecteur s’insère directement
dans la prise, sans aucune inclinaison.
• Maintenir le câble HDMI en ligne chaque fois que vous vous connectez ou déconnectez le câble.
Ne pas tordre ou de forcer le connecteur dans la prise.
• Retirez les câbles HDMI chaque fois que vous déplacer ou de transporter ces unités.
Page 84 S’il vous plaît lire attentivement les instructions avant l’installation

NEDERLANDS (NL)
DGHDP1 - DigiSender® HD Pro - AV- Zendersysteem met Enkelvoudige Electrische Stroomkabel Ingang
Inleiding
De DigiSender® HD Pro is het laatste ultramoderne AV-Zendersysteem van AEI Veiligheid & Communicatie Ltd.
Gebruikmakend van de meest recente vooruitgang in High Defenition (Hoge Definitie) media-distributie zal de
DigiSender® HD Pro u toestaan om 1080p High Definition video rond uw huis uit te zenden door gebruik te maken
van bestaande stroomkabels. Dit vermijdt de complexiteit van het opnieuw bedraden van uw huis of het kopen
van nieuwe AV- uitrusting voor elke bezichtigingskamer.
Dit systeem bestaat uit een Overdrager (Transmitter) en een Ontvanger (Receiver) die H.264 High Definition
video en hoge kwaliteit audio bezorgt van zijn HD Satellietontvangers, HD SET-Topboxen, Blu-Ray-™ spelers en
HD Spelconsolen (enz.) naar compatibele HDTV beeldschermen die zich nabij stopcontacten in uw huis bevinden.
Installeren is vlug en gemakkelijk. Het bronapparaat (bijvoorbeeld HD Satellietontvanger in woonkamer) is aangesloten aan de Overdrager en de Ontvanger is aangesloten aan de tweede HDTV (bijvoorbeeld slaapkamer tv),
beiden via HDMI™.
Het systeem beschikt ook over een Afstandsbediening-Relais (Remote Relay), die u toestaat de bron-(afstands-)
bediening (bijvoorbeeld HD Satellietafstandsbediening) ver van de ontvangende locatie te gebruiken.
Het wordt aangeraden dat u de Informatie & Veiligheidsparagraaf op pagina 109 - 111 leest voordat u dit product installeert.
Page 85Lees de instructies zorgvuldig alvorens het te installeren

(NL) NEDERLANDS
DGHDP1 - DigiSender® HD Pro - AV- Zendersysteem met Enkelvoudige Electrische Stroomkabel Ingang
Uw DigiSender® Installeren
Stap 1 - Pak Uw DigiSender® Uit
Van alle DigiSender®-bestellingen wordt het gewicht na het verpakken gecontroleerd door een computer. Het is
echter toch aan te raden om te controleren of de kit compleet is voordat u doorgaat met de installatie.
1.
2.
3.
5.
1. 1x DigiSender® HD Pro Overdrager
2. 1x DigiSender® HD Pro Ontvanger
3. 2x HDMI Kabels
4. 1x IR Zender
5. 1x Afstandsbediening
Page 86 Lees de instructies zorgvuldig alvorens het te installeren
4.

NEDERLANDS (NL)
DGHDP1 - DigiSender® HD Pro - AV- Zendersysteem met Enkelvoudige Electrische Stroomkabel Ingang
Uw DigiSender® Installeren
Stap 2 - Installeer De Overdrager
Dit hoofdstuk beschrijft hoe uw DigiSender ® HD Pro correct te installeren. Nadat de installatie volledig is zult
u het verbonden bronapparaat (bijvoorbeeld HD Satellietontvanger) op nog een andere tv ergens in uw huis of
kantoor kunnen bekijken.
1.
Identificeer de HDMI kabel die uw bronapparaat
(bijvoorbeeld HD Satellietontvanger) met uw Hoofdtv verbindt.
3.
2.
Koppel deze kabel los van de tv en sluit het aan
op de contactpunt met het etiket ‘HDMI Ingang
(HDMI-In)’ op de achterzijde van de DigiSender®
Overdrager.
4.
Gebruik een van de bijgesloten HDMI kabels en
sluit het aan op de contactpunt met het etiket
‘HDMI Uitgang (HDMI-Out)’ op de achterzijde van
de DigiSender® Overdrager en de HDMI-Ingang op
uw Hoofd-tv.
Verbind de IR Zender (IR-Emitter) met het contactpunt met het etiket “IR” op de achterzijde van de
DigiSender® Overdrager en plaats de IR Zender
(IR-Emitter) zó dat die richt op de afstandsbedieningssensor op de voorkant van uw bronapparaat
(bijvoorbeeld HD Satellietontvanger).
Page 87Lees de instructies zorgvuldig alvorens het te installeren

(NL) NEDERLANDS
DGHDP1 - DigiSender® HD Pro - AV- Zendersysteem met Enkelvoudige Electrische Stroomkabel Ingang
Uw DigiSender® Installeren
Stap 2 - Installeer De Overdrager
5.
Verbind de DigiSender® Overdrager-elektriciteitskabel met een beschikbaar stopcontact en schakel het
aan op de achterkant.
7.
6
Het Power LED-lampje op de voorkant van de DigiSender® Overdrager zal groen verlichten om aan
te duiden dat de Overdrager ingeschakeld is.
Zet uw bronapparaat (bijvoorbeeld HD Satellietontvanger) aan.
Page 88 Lees de instructies zorgvuldig alvorens het te installeren

NEDERLANDS (NL)
DGHDP1 - DigiSender® HD Pro - AV- Zendersysteem met Enkelvoudige Electrische Stroomkabel Ingang
Uw DigiSender® Installeren
Stap 3 - Installeer de IR Zender (IR-Emitter)
De DigiSender® HD Pro beschikt over een Afstandsbedienings-Relais-Systeem (Remote Relay System) dat u toestaat om uw bronapparaat te controleren (bijvoorbeeld HD Satellietontvanger), vanaf de tweede tv. De DigiSender®
Ontvanger is met een IR Sensor uitgerust die het IR signaal van uw bronafstandsbediening (bijvoorbeeld HD
Satellietafstandsbediening) zal opnemen. Dit IR sein wordt verzonden over uw stroom-kabel naar de DigiSender®
Overdrager, waar het vervolgens naar het bronapparaat (bijvoorbeeld HD Satellietontvanger) wordt gestuurd via
de IR Zender.
De IR Zender (IR-Emitter)kan in één van twee verschillende posities geplaatst worden en het is het beste om beide
posities te proberen om optimale prestatie te verzekeren.
Positie 1: Positie 1: Plaats de IR Zender (IR-Emitter)
zó dat die richt op de afstandsbedieningssensor op
de voorkant van uw bronapparaat (bijvoorbeeld HD
Satellietontvanger).
Positie 2: Gebruik het bijgevoegde dubbelzijdig
plakband om de IR Zender (IR-Emitter)op de voorkant van uw bronapparaat te bevestigen, dichtbij- en
gericht op de afstandsbedieningssensor.
Page 89Lees de instructies zorgvuldig alvorens het te installeren

(NL) NEDERLANDS
DGHDP1 - DigiSender® HD Pro - AV- Zendersysteem met Enkelvoudige Electrische Stroomkabel Ingang
Uw DigiSender® Installeren
Stap 4 - Installeer De Ontvanger
De ontvanger vangt de signalen op die door uw zender worden uitgezonden en stuurt deze door naar een aangesloten tv.
1.
Gebruik de overige HDMI kabel en sluit het aan op
het contactpunt met het etiket ‘HDMI Uit’ (HDMI
Out) op de achterzijde van de DigiSender” Ontvanger en de HDMI –In op uw ontvangende tv.
3.
2.
Verbind de DigiSender® Ontvanger-elektriciteitskabel met een beschikbaar stopcontact en schakelaar
het aan op de achterkant.
4.
HDMI1
Zet de ontvangende tv aan en selecteer het HDMI-
Het Power LED-lampje op de voorkant van de DigiSender® Ontvanger zal groen verlichten om aan te
duiden dat de Ontvanger ingeschakeld is.
Page 90 Lees de instructies zorgvuldig alvorens het te installeren
kanaal dat is toegewezen aan de HDMI-aansluiting
die u voor de ontvanger hebt gebruikt. Deze kan de
aanduiding SOURCE, INPUT, AUX, AV, VIDEO, VCR of
hebben.

NEDERLANDS (NL)
DGHDP1 - DigiSender® HD Pro - AV- Zendersysteem met Enkelvoudige Electrische Stroomkabel Ingang
Uw DigiSender® Installeren
Stap 4 - Installeer De Ontvanger
Afhangend van hoe vlug de vorige stappen voltooid zijn, kunt u twee berichten vertoond zien op het ontvangende
tv-scherm.
DigiSender® HD Pro
Establishing Sync with Transmitter
Please wait...
In werking stellen van Op elkaar Afstellen Op elkaar Afstellen succesvol
Ongeveer 40 seconden na het aanzetten van al uw apparaten (het bronapparaat bijvoorbeeld HD Satellietontvanger, DigiSender® Overdrager, DigiSender® Ontvanger en de ontvangende tv) zal de video op de ontvangende tv
getoond worden.
Sync Successful
Waiting for Video signal...
GEFELICITEERD!
De installatie is compleet en u kunt nu 1080p HD video in nog een kamer in uw huis ontvangen.
Page 91Lees de instructies zorgvuldig alvorens het te installeren

(NL) NEDERLANDS
DGHDP1 - DigiSender® HD Pro - AV- Zendersysteem met Enkelvoudige Electrische Stroomkabel Ingang
Basis Handelingen
The DigiSender® HD Pro Afstandsbediening
De DigiSender® HD Pro wordt geleverd met een afstandsbediening die u zal toestaan toegang te hebben tot
verschillende instellingen via het On-Screen Menu(menu op het scherm) evenals het verrichten van verschillende
procedures in het geval dat u problemen tegen zult komen.
Gebruik het schema op de volgende twee bladzijden voor beschrijvingen waarvoor elke knop gebruikt wordt.
Bovendste Rij
Brongebied
Volume-gebied
Instellingen-gebied
Page 92 Lees de instructies zorgvuldig alvorens het te installeren
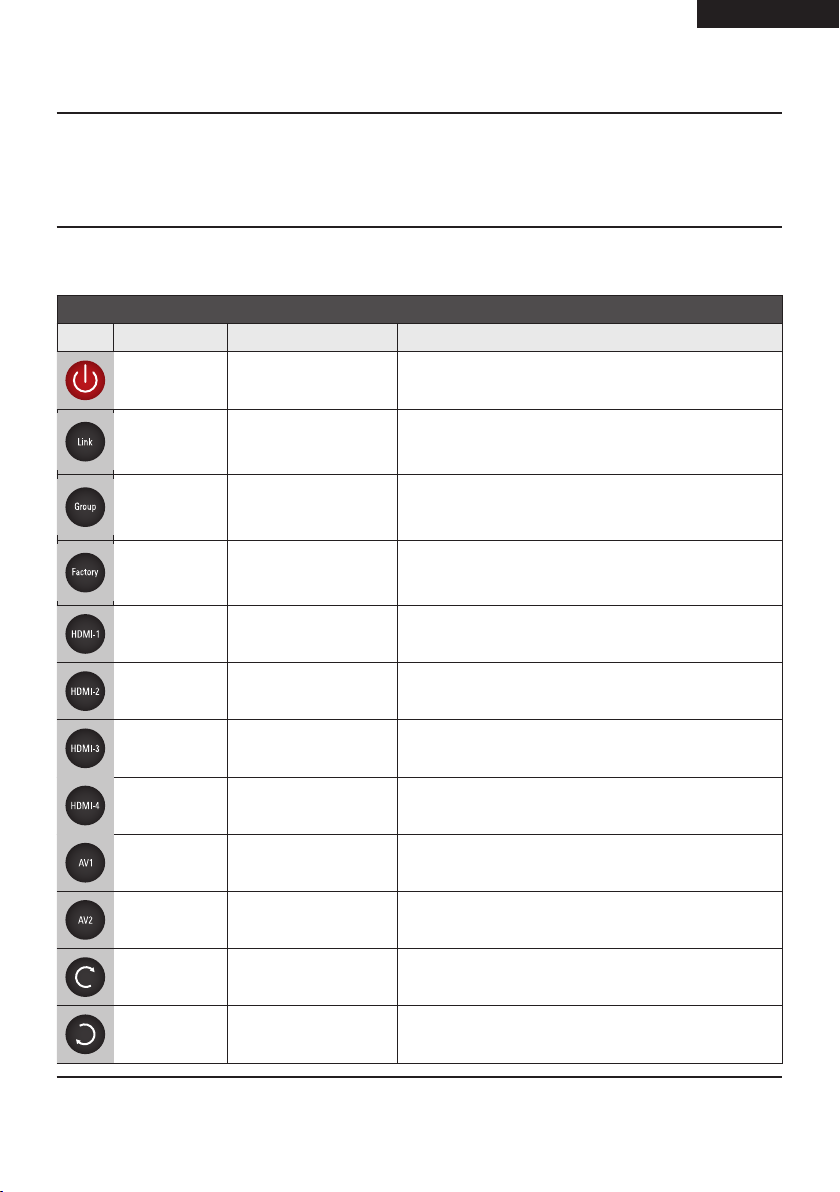
DGHDP1 - DigiSender® HD Pro - AV- Zendersysteem met Enkelvoudige Electrische Stroomkabel Ingang
Basis Handelingen
The DigiSender® HD Pro Afstandsbediening
Afstandsbediening Knop Beschrijvingen
Fig. Knop Gebied Knop Naam Knop Beschrijving
Bovendste Rij Power/Standby
Bovendste Rij Link
Bovendste Rij Group
Bovendste Rij Factory
Schakelt de Overdrager en Ontvanger tussen Aan- en
Reserve- modus.
Herstelt een PLC tussen de Overdrager en Ontvanger.
Enkel voor gebruik tijdens het installeren van een bijkomende ontvanger of tijdens het Fout-zoeken.
Op elkaar Afstellen tussen Overdrager en Ontvanger.
Enkel voor gebruik tijdens het installeren van een bijkomende ontvanger of tijdens het Fout-zoeken.
Gebruikt om de PLC Instellingen terug naar de fabrieksstandaardwaarden te zetten.Enkel voor gebruik
tijdens het Fout-zoeken.
NEDERLANDS (NL)
Brongebied HDMI 1 Input Niet gebruikt voor dit model.
Brongebied HDMI 2 Input Niet gebruikt voor dit model.
Brongebied HDMI 3 Input Niet gebruikt voor dit model.
Brongebied HDMI 4 Input Niet gebruikt voor dit model.
Brongebied AV 1 Input Niet gebruikt voor dit model.
Brongebied AV 2 Input Niet gebruikt voor dit model.
Brongebied Next Input Niet gebruikt voor dit model.
Brongebied Last Input Niet gebruikt voor dit model.
Page 93Lees de instructies zorgvuldig alvorens het te installeren
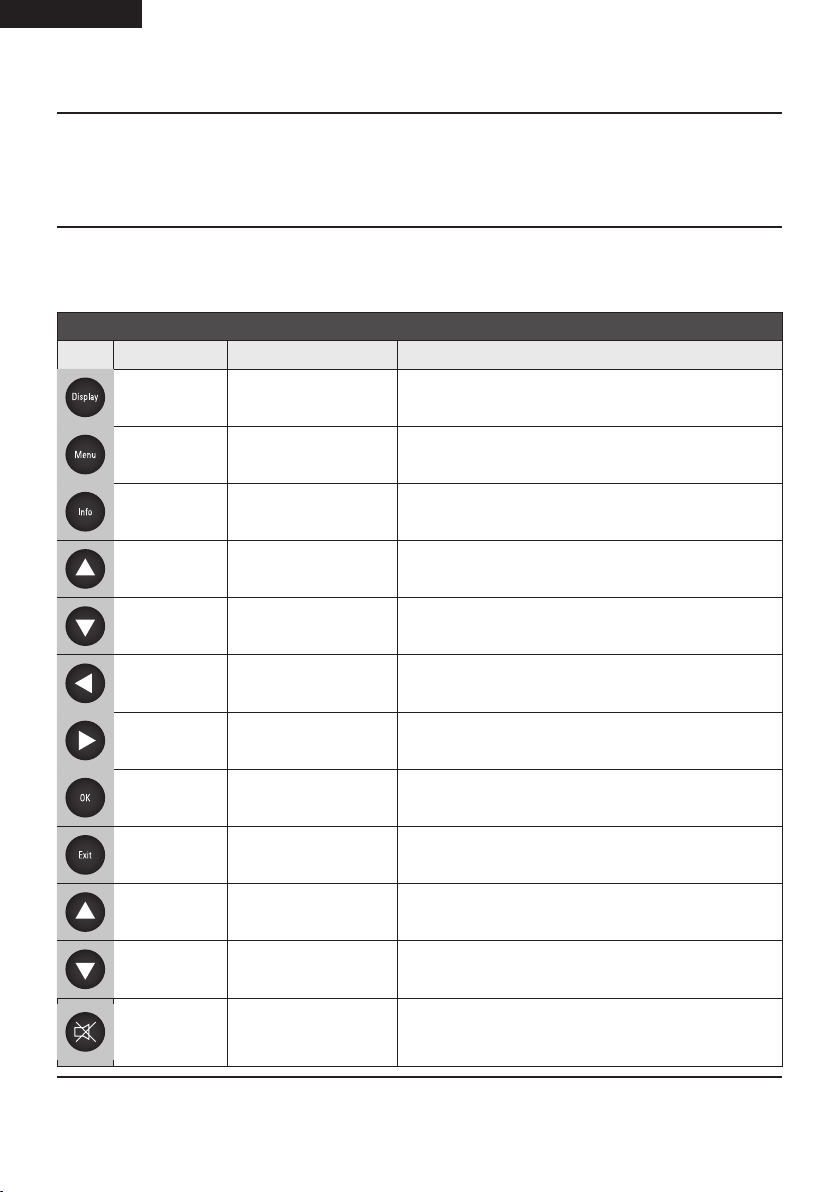
(NL) NEDERLANDS
DGHDP1 - DigiSender® HD Pro - AV- Zendersysteem met Enkelvoudige Electrische Stroomkabel Ingang
Basis Handelingen
The DigiSender® HD Pro Afstandsbediening
Afstandsbediening Knop Beschrijvingen
Fig. Knop Gebied Knop Naam Knop Beschrijving
Instellingen-
gebied
Display Wisselen van het TV Systeem
Instellingen-
gebied
Instellingen-
gebied
Instellingen-
gebied
Instellingen-
gebied
Instellingen-
gebied
Instellingen-
gebied
Instellingen-
gebied
Instellingen-
gebied
Volume-gebied Volume Up Volume Toenemen
Volume-gebied Volume Down Volume Afnemen
Menu Menu Openen
Info Toont Menu Informatie
Up In Menu: Naar Boven schuiven
Down In Menu: Naar Beneden schuiven
Left In Menu: Naar Links schuiven
Right In Menu: Naar Rechts schuiven
OK Selecteren/ Enter/ Bevestigen
Exit Menu Sluiten
Volume-gebied Mute Geluid Dempen
Page 94 Lees de instructies zorgvuldig alvorens het te installeren

NEDERLANDS (NL)
DGHDP1 - DigiSender® HD Pro - AV- Zendersysteem met Enkelvoudige Electrische Stroomkabel Ingang
Basis Handelingen
Het On-Screen-Menu ( Menu op het scherm)
Het On-Screen-Menu wordt gebruikt om verschillende opties te vormen. U kunt toegang verkrijgen door te drukken op de Menu- knop op de afstandsbediening. Dit zal het On-Screen-Menu, op de televisie die verbonden is aan
de Ontvanger, openen.
SETUP
On-Screen-Menu Functies
• Taal
• Netwerk Bandbreedte
• Resolutie Controle
• Slaap Tijd
• Lip Op elkaar Afstellen
• Selecteer TX Station
• Informatie
Gebruik van On-Screen-Menu
Language
Network Bandwidth
Resolution Control
Sleep
LIP SYNC
Select TX Station
Information
U kunt het On-Screen-Menu met de volgende knoppen op de afstandsbediening besturen:
• Gebruik de Schuif naar Boven en Schuif naar Beneden- knoppen om een menu-functie te selecteren.
• Druk op de OK- knop om een functie te selecteren en de verkrijgbare opties te tonen.
• Gebruik de Schuif naar Boven en Schuif naar Beneden knoppen om een optie te selecteren.
• Druk op de OK- knop om een functie te kiezen.
• Druk op de Exit-knop om het On-Screen-Menu te verlaten.
Page 95Lees de instructies zorgvuldig alvorens het te installeren

(NL) NEDERLANDS
DGHDP1 - DigiSender® HD Pro - AV- Zendersysteem met Enkelvoudige Electrische Stroomkabel Ingang
Basis Handelingen
Het On-Screen-Menu ( Menu op het scherm)
On-Screen-Menu Beschrijving
Menu Functies Beschrijving Opties
• Engels (standaard)
• Duits (optioneel)
Taal
Netwerk Bandbreedte
Resolutie Controle
Slaap Tijd
Lip Op elkaar Afstellen
Selecteer TX Station
Informatie Filmware versie.
Selecteer de taal die gebruikt wordt voor het
On-Screen-Menu
Past de kwaliteit van de video-toevoer (videostream) aan afhankelijk van welke instelling
is gekozen. Indien u niet weet hoe goed uw
Netwerk Bandbreedte is, selecteer dan Auto
Detect (Automatisch Zoeken).
Selecteert de outputresolutie voor de televisie
waaraan u bent aangesloten.
Zet de hoeveelheid tijd dat de Overdrager
of de Ontvanger inactief is voordat het in
Reserve modus gaat. De Overdrager wordt als
“inactief” beschouwd wanneer er geen videoinput van het bronapparaat (bijvoorbeeld HD
Satellietontvanger) is. De Ontvanger wordt als
inactief beschouwd wanneer het geen videosignaal van de Overdrager ontvangt.
De keuzes in deze optie zijn enkel als een
referentiewaarde voor het systeem om de tijd
te regelen gebruikt (enkel gebruikt voor 60 Hz,
niet toegepast op 50 Hz of PAL systemen).
Elke Ontvanger kan met een maximum van
4 Overdragers gesynchroniseerd worden.
Selecteer welke Overdrager de video-toevoer
vanuit hier dient te ontvangen.
• Spaans (optioneel)
• Japans (optioneel)
• Italiaans (optioneel)
• Traditioneel Chinees (optioneel)
• Vereenvoudigd Chinees (optioneel)
• Frans (optioneel)
• Automatisch Zoeken (standaard)
• Laag
• Gemiddeld
• Goed
• Uitstekend
• Per Bron (standaard)
• Per TV
• Uit (standaard)
• 10 minuten
• 30 minuten
• 60 minuten
• 120 minuten
• 60 Hz
• 59.94 Hz (standaard)
• Zie het onderdeel Gebruik Meerdere Overdragers met Meerdere
Ontvangers op pagina 97 en 98.
Page 96 Lees de instructies zorgvuldig alvorens het te installeren

NEDERLANDS (NL)
DGHDP1 - DigiSender® HD Pro - AV- Zendersysteem met Enkelvoudige Electrische Stroomkabel Ingang
Gevorderde Procedures
Installeren Meerdere Ontvangers
Elke Overdrager kan op een maximum van vier Ontvangers aangesloten worden. Wanneer u een extra ontvanger
installeert, verricht alstublieft de volgende procedures in de genoemde volgorde:
• Verbind en Installeer de Ontvanger zoals op 90 en 91 staat aangegeven.
• Herstel de Ontvanger PLC Instellingen naar Fabrieksstandaardwaarden als op pagina 102 staat
beschreven.
• Verricht de PLC Groeperings-procedure van pagina 100.
• Verricht de Overdrager & Ontvanger Op elkaar Afstellen procedure van pagina 99.
Gevorderde Procedures
Meerdere Overdragers met Meerdere Ontvangers gebruiken
Elke Ontvanger kan op een maximum van vier Overdragers aangesloten worden. Dit betekend dat u van meerdere
bronapparaten zoals uw HD Satellietontvanger, Blu-Straal™ speler, DVD-recorder of zelfs CCTV kunt kiezen.
Selecteren van een Overdrager
• Bij de Ontvanger, druk op de Menu knop op de DigiSender®
Afstandsbediening om het On-Screen Menu op te brengen.
Gebruik de Schuif naar Boven- en Schuif naar Beneden knoppen
om naar Selecteer TX Stationoptie te gaan.
• Druk de OK knop om de Selecteer TX Stationoptie binnen te
gaan.
• Op de Selecteer TX Stationpagina, zal een lijst van alle Overdragers die momenteel gesynchroniseerd zijn met de Ontvanger,
getoond worden. Gebruik de Schuif naar Boven- en Schuif naar
Beneden knoppen om de gewenste Overdrager te selecteren.
• Klik op de OK knop om je selectie te bevestigen.
• Indien de geselecteerde Overdrager momenteel video uitzendt,
zal dit getoond worden. De Afstandsbediening-Relais(Remote
Relay) zal automatisch naar de geselecteerde Overdrager
verplaatst worden zodat u het bronapparaat waar het aan is
aangesloten kunt controleren.
SETUP
Language
Network Bandwidth
Resolution Control
Sleep
LIP SYNC
Select TX Station
Information
SETUP
Select TX Station
TX Station 1
TX Station 2
Page 97Lees de instructies zorgvuldig alvorens het te installeren

(NL) NEDERLANDS
DGHDP1 - DigiSender® HD Pro - AV- Zendersysteem met Enkelvoudige Electrische Stroomkabel Ingang
Gevorderde Procedures
Meerdere Overdragers met Meerdere Ontvangers gebruiken
Veranderen van de Naam van een Overdrager
• Bij de Ontvanger, druk op de Menu knop op de DigiSender® Afstandsbediening om het On-Screen
Menu op te brengen. Gebruik de Schuif naar Boven- en Schuif naar Beneden knoppen om de Selecteer
TX Station -optie te selecteren.
• Klik op de OK knop om Selecteer TX Station-optie te kiezen.
• Op de Selecteer TX Stationpagina zal een lijst van alle Overdragers die momenteel gesynchroniseerd
zijn met de Ontvanger getoond worden. Gebruik de Schuif naar Boven- en Schuif naar Beneden knoppen om de gewenste Overdrager te selecteren.
Druk opnieuw op de Menu knop om de naam van de geselecteerde
Overdrager aan te passen.
De onderstreping onder de naam van de Overdrager toont de huidige
cursor-positie.
Gebruik de Schuif naar Boven- en Schuif naar Beneden- knoppen om te bladeren door de beschikbare tekens
(letters, nummers, etc.).
Gebruik de Schuif naar Rechts- knop om het geselecteerde teken te bevestigen en door te gaan naar de
volgende.
Gebruik de Schuif naar Links-knop om één teken terug te gaan, om één teken te verwijderen.
Klik op de OK-knop om de naam van de Overdrager te bevestigen en het aanpassen te voltooien.
SETUP
Rename Transmitter
TX Station 1
Herstellen van de Naam van een Overdrager terug naar Fabrieksstandaardwaarde
Verricht de Herstel de Overdragers Systeeminstellingen naar Fabrieksstandaardwaarde-procedure van pagina
101.
Page 98 Lees de instructies zorgvuldig alvorens het te installeren

NEDERLANDS (NL)
DGHDP1 - DigiSender® HD Pro - AV- Zendersysteem met Enkelvoudige Electrische Stroomkabel Ingang
Gevorderde Procedures
Overdrager & Ontvanger Op elkaar Afstellen
De Overdrager & Ontvanger Op elkaar Afstellen- procedure zou enkel gebruikt moeten worden wanneer een Extra
Ontvanger geïnstalleerd wordt of tijdens het Fout-zoeken.
Er zijn twee manieren waarop de Overdrager en Ontvanger gesynchroniseerd kunnen worden:
• ‘Sync’of ‘op elkaar afstellen’ door de knoppen op de Overdrager en Ontvanger te gebruiken:
1. Druk en houd de Group-knop op de achterkant van de Ontvanger ingedrukt, totdat het bericht
“SYNCING” op de ontvangende tv is getoond.
2. Druk en houd de Group-knop op de achterkant van de Overdrager voor 2 seconden ingedrukt,
totdat het Sync- lampje en Power LED-lampje opeenvolgend knipperen.
Indien het Op elkaar Afstellen succesvol is, zal het bericht op de ontvangende tv van “SYNCING” naar
“SYNCED” veranderen, gevolgd door de video (er vanuit gaande dat het bronapparaat momenteel aan
is en media speelt).
• Op elkaar Afstellen met gebruik van de afstandsbediening:
Druk op de Group-knop op de DigiSender® afstandsbediening om de Overdrager en Ontvanger Op
elkaar Aftestellen.
Opmerking: Het wordt ten zeerste aangeraden dat u de bovenstaande procedure met de zowel DigiSender® Overdrager als Ontvanger in dezelfde omgeving verricht, bij voorkeur aangesloten op hetzelfde tweevoudig-stopcontact.
Page 99Lees de instructies zorgvuldig alvorens het te installeren

(NL) NEDERLANDS
DGHDP1 - DigiSender® HD Pro - AV- Zendersysteem met Enkelvoudige Electrische Stroomkabel Ingang
Gevorderde Procedures
PLC Groepering
De PLC Groeperingsprocedure zal alleen gebruikt moeten te worden wanneer een extra ontvanger geïnstalleerd
wordt of tijdens het Fout-zoeken wanneer de Overdrager & Ontvanger Op elkaar Afstellen procedure er niet in
slaagt een probleem op te lossen.
1. Druk op de Link-knop op de DigiSender® afstandsbediening bij de Overdragers en Ontvangers
locaties.
“Proberen PLC te Groeperen”of “Attempting PLC Grouping “ zal op de ontvangende tv getoond
worden.
Het Sunc-Lamptje op de Overdrager zal ononderbroken AAN en UIT flikkeren en het Power LED-lampje
zal UIT zijn.
Indien de PLC Groepering succesvol is, zal het systeem automatisch beginnen met het Op elkaar
Afstellen van de Overdrager en Ontvanger. Nadat dit is beëindigd zal de video getoond worden (er
vanuit gaande dat het bronapparaat momenteel aan is en media speelt).
Opmerking: Het wordt ten zeerste aangeraden dat u de bovenstaande procedure met de zowel DigiSender® Overdrager als Ontvanger in dezelfde omgeving verricht, bij voorkeur aangesloten op hetzelfde tweevoudig-stopcontact.
Page 100 Lees de instructies zorgvuldig alvorens het te installeren
 Loading...