

IMPORTANT: ALWAYS KEEP THIS INSTRUCTION MANUAL FOR FUTURE REFERENCE
WICHTIG: HEBEN SIE DIESE BEDIENUNGSANLEITUNG ZU REFERENZZWECKEN AUF
IMPORTANT : VEUILLEZ CONSERVER CE MODE D’EMPLOI AFIN DE POUVOIR VOUS Y REPORTER SI BESOIN
BELANGRIJK: GELIEVE DEZE INSTRUCTIEHANDLEIDING ALTIJD TE BEWAREN VOOR LATER GEBRUIK
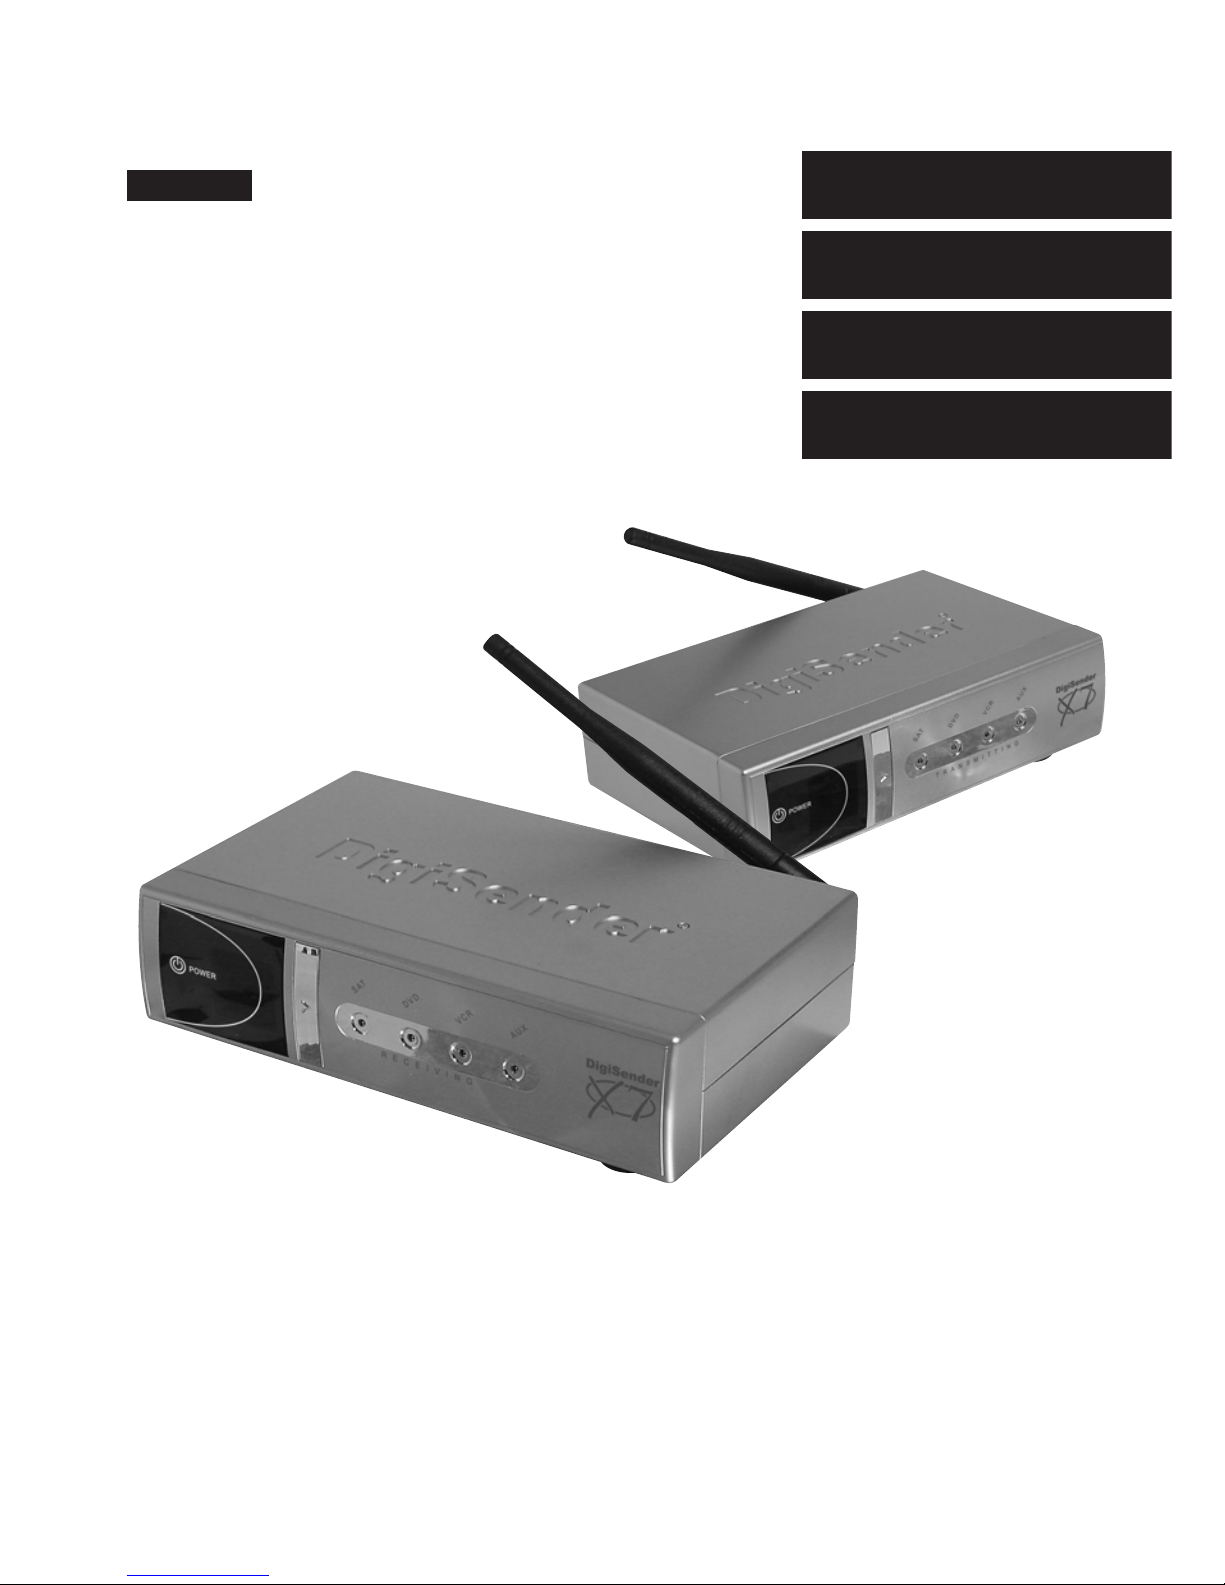
MODEL: DG440
DigiSender
®
X7
ADVANCED WIRELESS VIDEO SENDER SYSTEM
ENGLISH (EN)
DEUTSCH (DE)
FRANCAIS (FR)
NEDERLANDS (NL)
170108-1
Page 2
Online Support at www.digisender.net
DG440 - DigiSender® X7
WARNING
To prevent damage do
not expose this unit to
rain or moisture.
Table of Contents (EN)
Inhalt (DE)
Table des matières (FR)
Matières (NL)
ENGLISH
Page 3 Introduction
SECTION 1: Step by Step Installation Guide
Page 4 Check the kit contents
Page 6 Install the DigiSender® X7 Transmitter Unit
Page 8 Install the IR Systeme Technik™
Page 9 Install the DigiSender® X7 Receiver Unit
SECTION 2: Daily Usage
Page 11 Using your DigiSender® X7 System
Page 13 Audio/Video and Remote Relay Channels
SECTION 3: Setup Troubleshooting
Page 14 Troubleshooting: Picture Problems
Page 16 Troubleshooting: Sound Problems
Page 17 Troubleshooting: Remote Extender Problems
SECTION 3: Further Information
Page 18 Customer Care Options
Page 19 Upgrades and Accessories
DEUTSCH
Seite 20 Einleitung
ABSCHNITT 1: Schritt für Schritt Installation
Seite 21 Überprüfen des Packungsinhalts
Seite 22 Installation der DigiSender® Sendereinheit
Seite 24 Installation der IR Systeme Technik™
Seite 25 Installation der DigiSender® Empfängereinheit
ABSCHNITT 2: Tägliche Verwendung
Seite 27 Verwendung Ihres DigiSender® X7 Systems
Seite 29 Audio/Video-Kanal und Fernbedienungsrelais-Kanal
ABSCHNITT 3: Einrichtung und Problemlösung
Seite 30 Problemlösung: Bildprobleme
Seite 32 Problemlösung: Tonprobleme
Seite 33 Problemlösung: Fernbedienungsprobleme
ABSCHNITT 3: Weiterführende Informationen
Seite 34 Kundenserviceoptionen
Seite 35 Upgrades & Zubehör
FRANCAIS
Page 36 Introduction
SECTION 1 : Guide d’installation étape par étape
Page 37 Vérification du contenu du kit
Page 38 Installation du DigiSender® Emetteur X7
Page 40 Installation du IR Systeme Technik™
Page 41 Installation du DigiSender® Récepteur X7
SECTION 2 : Usage quotidien
Page 43 Utilisation de votre DigiSende® Système X7
Page 45 Canal audio/vidéo et Canal de relais de télécommande
SECTION 3 : Installation Dépannage
Page 46 Dépannage : Problèmes d’image
Page 48 Dépannage : Problèmes de son
Page 49 Dépannage : Problèmes avec le relais à distance
SECTION 3 : Informations supplémentaires
Page 50 Options du service à la clientèle
Page 51 Mises à jour et accessoires
NEDERLANDS
Page 52 Introductie
SECTIE 1: Stap-voor-stap Installatiehandleiding
Page 53 Controleer de inhoud van de kit
Page 54 Installeer de DigiSender® X7 Zendapparaat
Page 56 Installeer de IR Systeme Technik™
Page 57 Installeer de DigiSender® X7
Ontvangapparaat
SECTIE 2: Dagelijks gebruik
Page 59 Uw DigiSender® X7 Systeem gebruiken
Page 61 Audio-/videokanaal en Relaiskanaal voor de
afstandsbediening
SECTIE 3: Opzet Probleemoplossing
Page 62 Probleemoplossing: Beeldproblemen
Page 64 Probleemoplossing: Geluidsproblemen
Page 65 Probleemoplossing: Problemen bij
verlenging-op-afstand
SECTIE 3: Verdere informatie
Page 66 Opties klantendienst
Page 67 Upgrades & Accessoires
Waste electrical products should
not be disposed of with
household waste. Please recycle
where facilities exist. Check with
your local Authority or retailer for
recycling waste
Die Entsorgung elektrischer
Produkte sollte nicht mit dem
normalen Hausmüll erfolgen. Bitte
führen Sie sie dem Recycling zu,
wenn entsprechende
Einrichtungen vorhanden sind.
Befragen Sie dazu Ihre regionalen
Behörden oder den Händler
bezüglich des Abfallrecycling
Les déchets de produits
électriques ne doivent pas être
déposés dans les conteneurs de
déchets ménagers. Veuillez les
déposer dans les conteneurs de
recyclage. Veuillez vous
renseigner auprès des autorités
locales ou auprès de votre
revendeur pour le recyclage des
déchets
Overtollige electrische producten
mogen niet samen met
huishoudelijk afval verwijderd
worden. Gelieve te recycleren
waar die mogelijkheid bestaat.
Controleer bij uw plaatselijke
overheid of kleinhandelaar naar
de mogelijkheden om afval te
recycleren
Page 3
Please read this instruction manual carefully prior to installation
DG440 - DigiSender® X7
INTRODUCTION
DigiSender® X7 - Advanced Wireless Video Sender
ENGLISH
Congratulations on purchasing the DigiSender®
X7. This product represents state of the art
wireless video and infra red technology at
exceptional value for money.
This system is fully upgradable. You can add
additional receivers, aerial convertors, wireless
baby monitor cameras and countless other
upgrades.
What makes the DigiSender® X7 so different is
that it provides compatibility with virtually any
make of Satellite receiver, Cable receiver, VCR,
DVD and Freeview in the market today.
You also have the ability to select which video
source you want to watch whilst you
comfortably rest in bed. You can select between
VCR, DVD and Satellite/Cable without
interfering with the channel being viewed on
your main TV.
Benefit from 4 video channels, stunning hi-fi
quality stereo sound and digital
communication providing an astounding
degree of flexibility.
Your purchase of this DigiSender® system
represents an investment in the very latest
wireless communication technology for the
home.
CUSTOMER CARE
Telephone: 0845 1667940
E-mail: advice@digisender.net
Page 4
Online Support at www.digisender.net
DG440 - DigiSender® X7
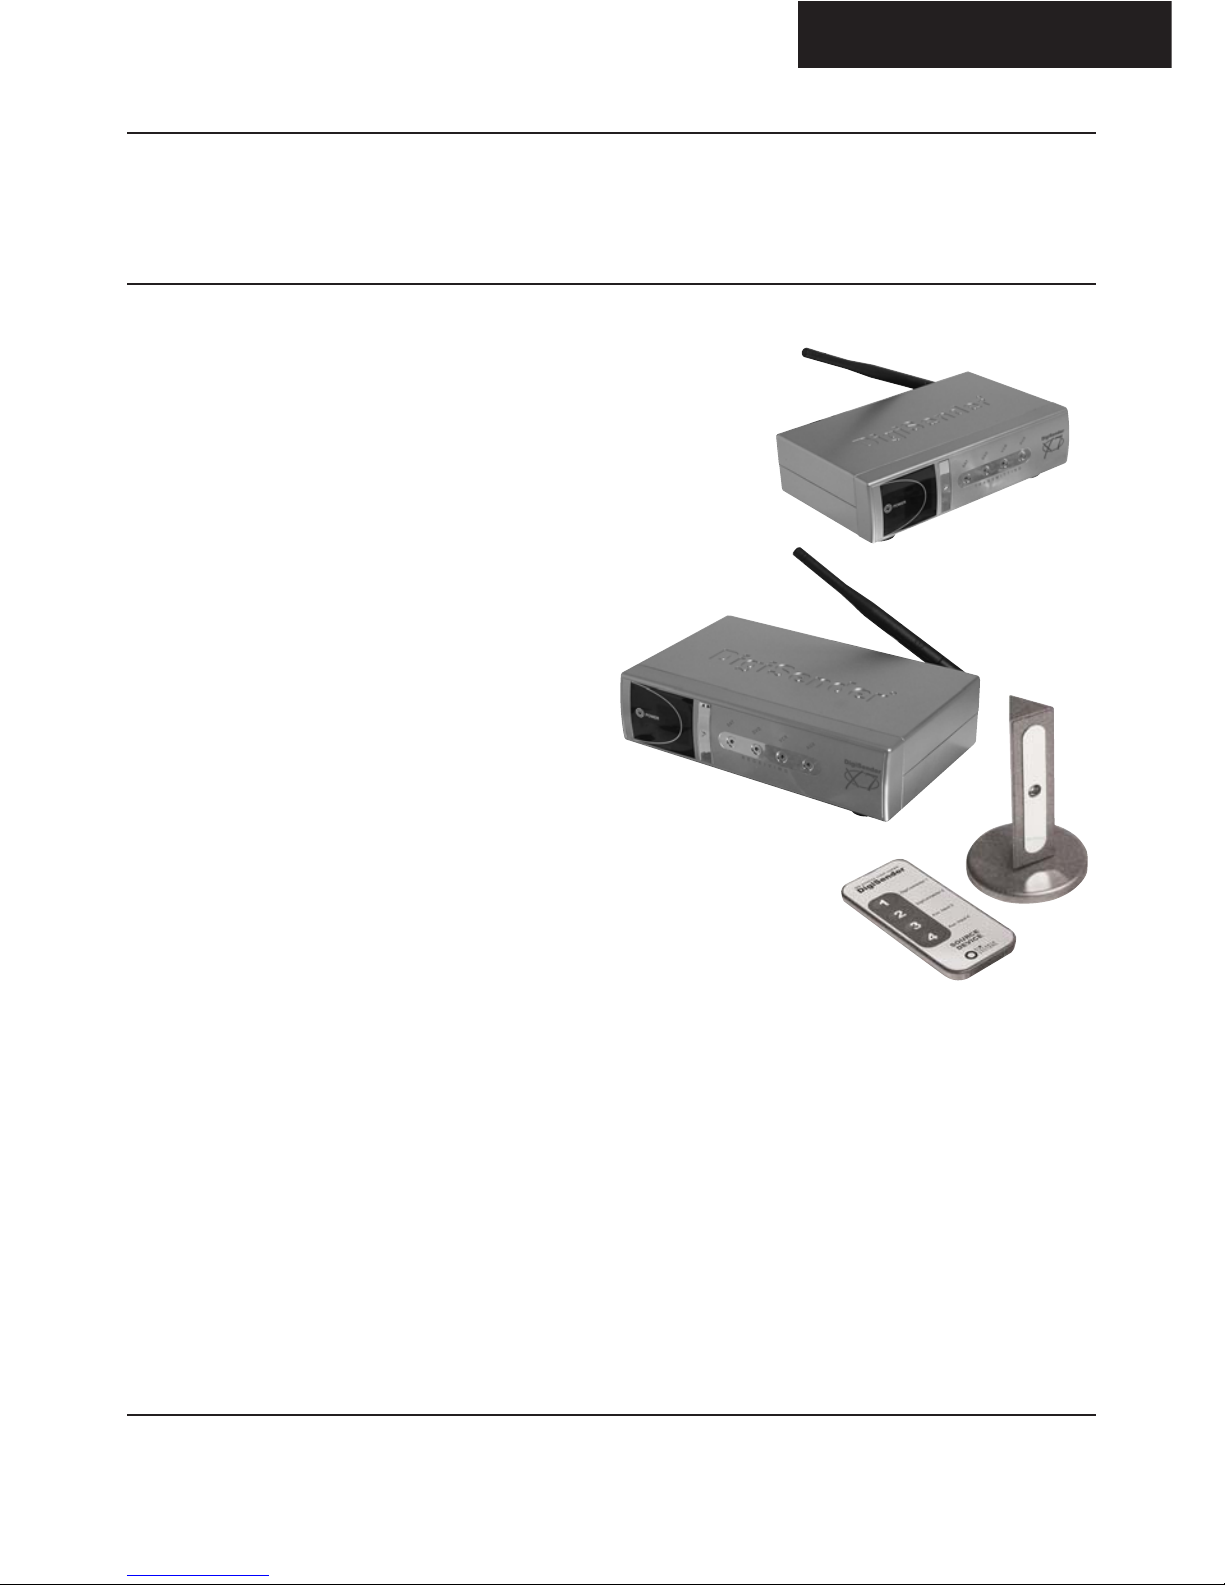
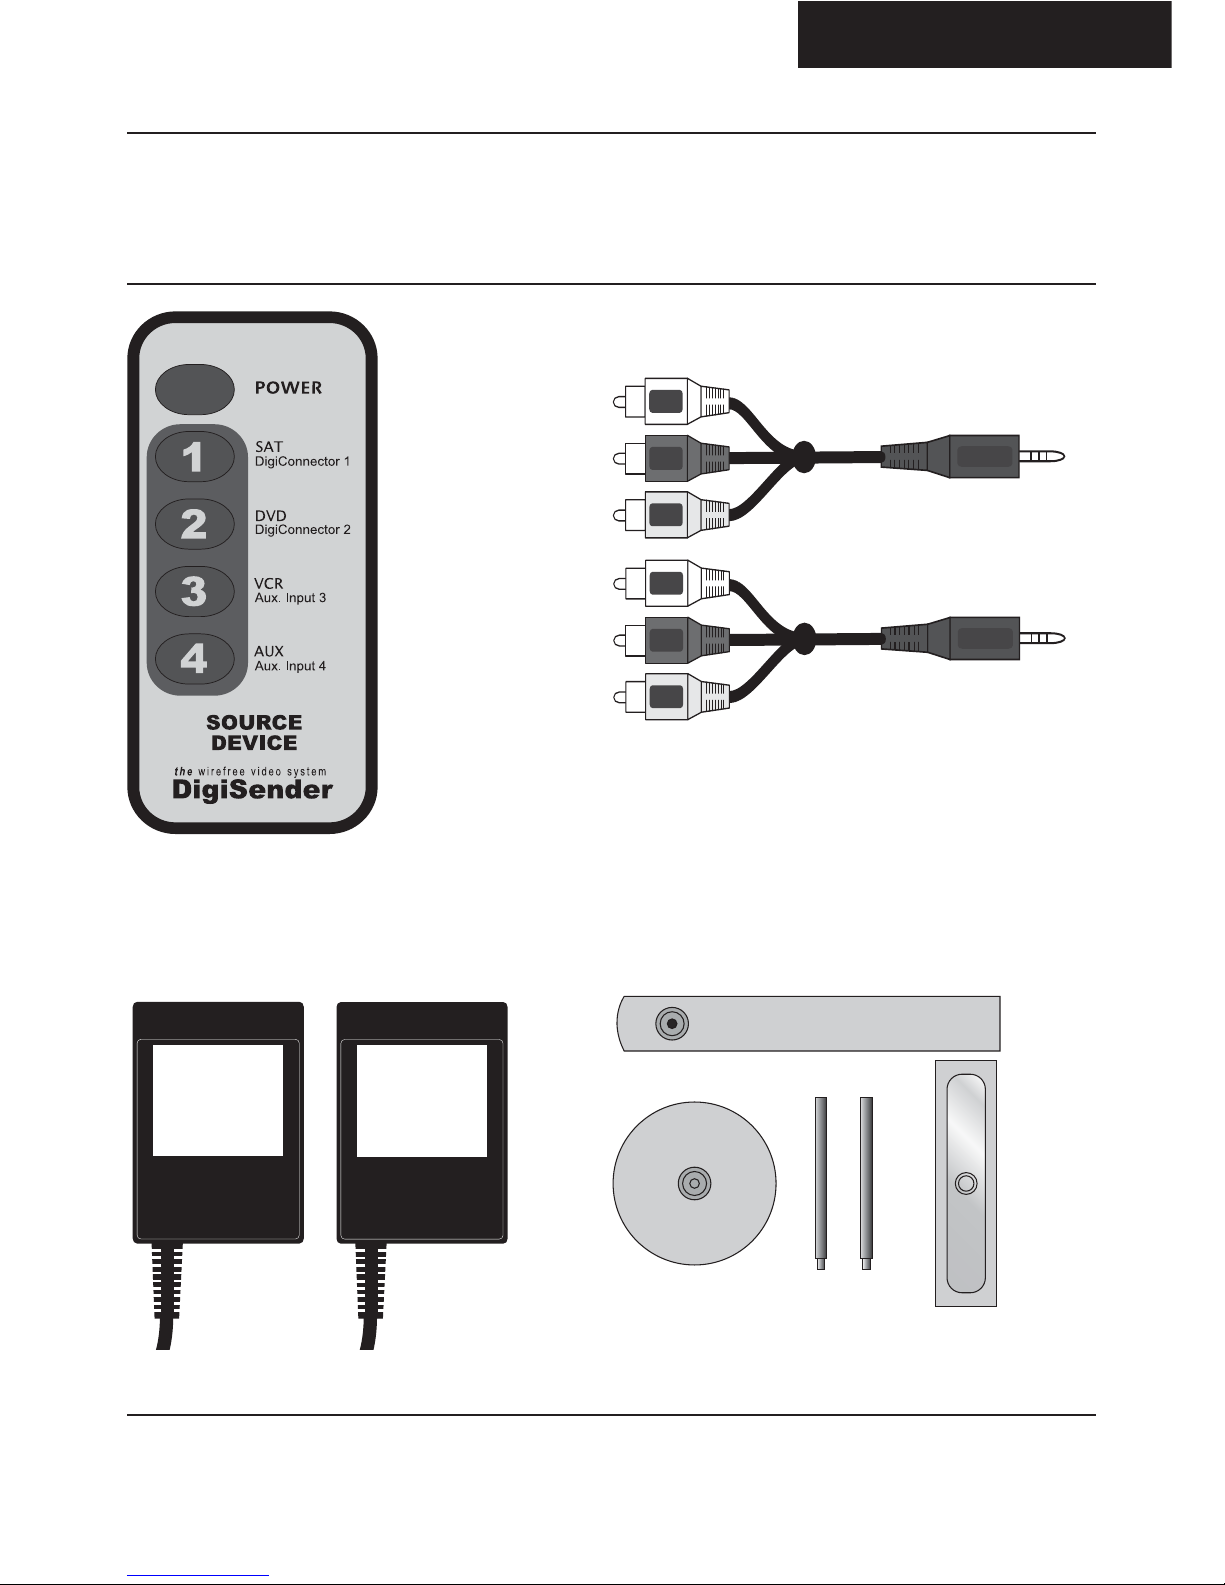
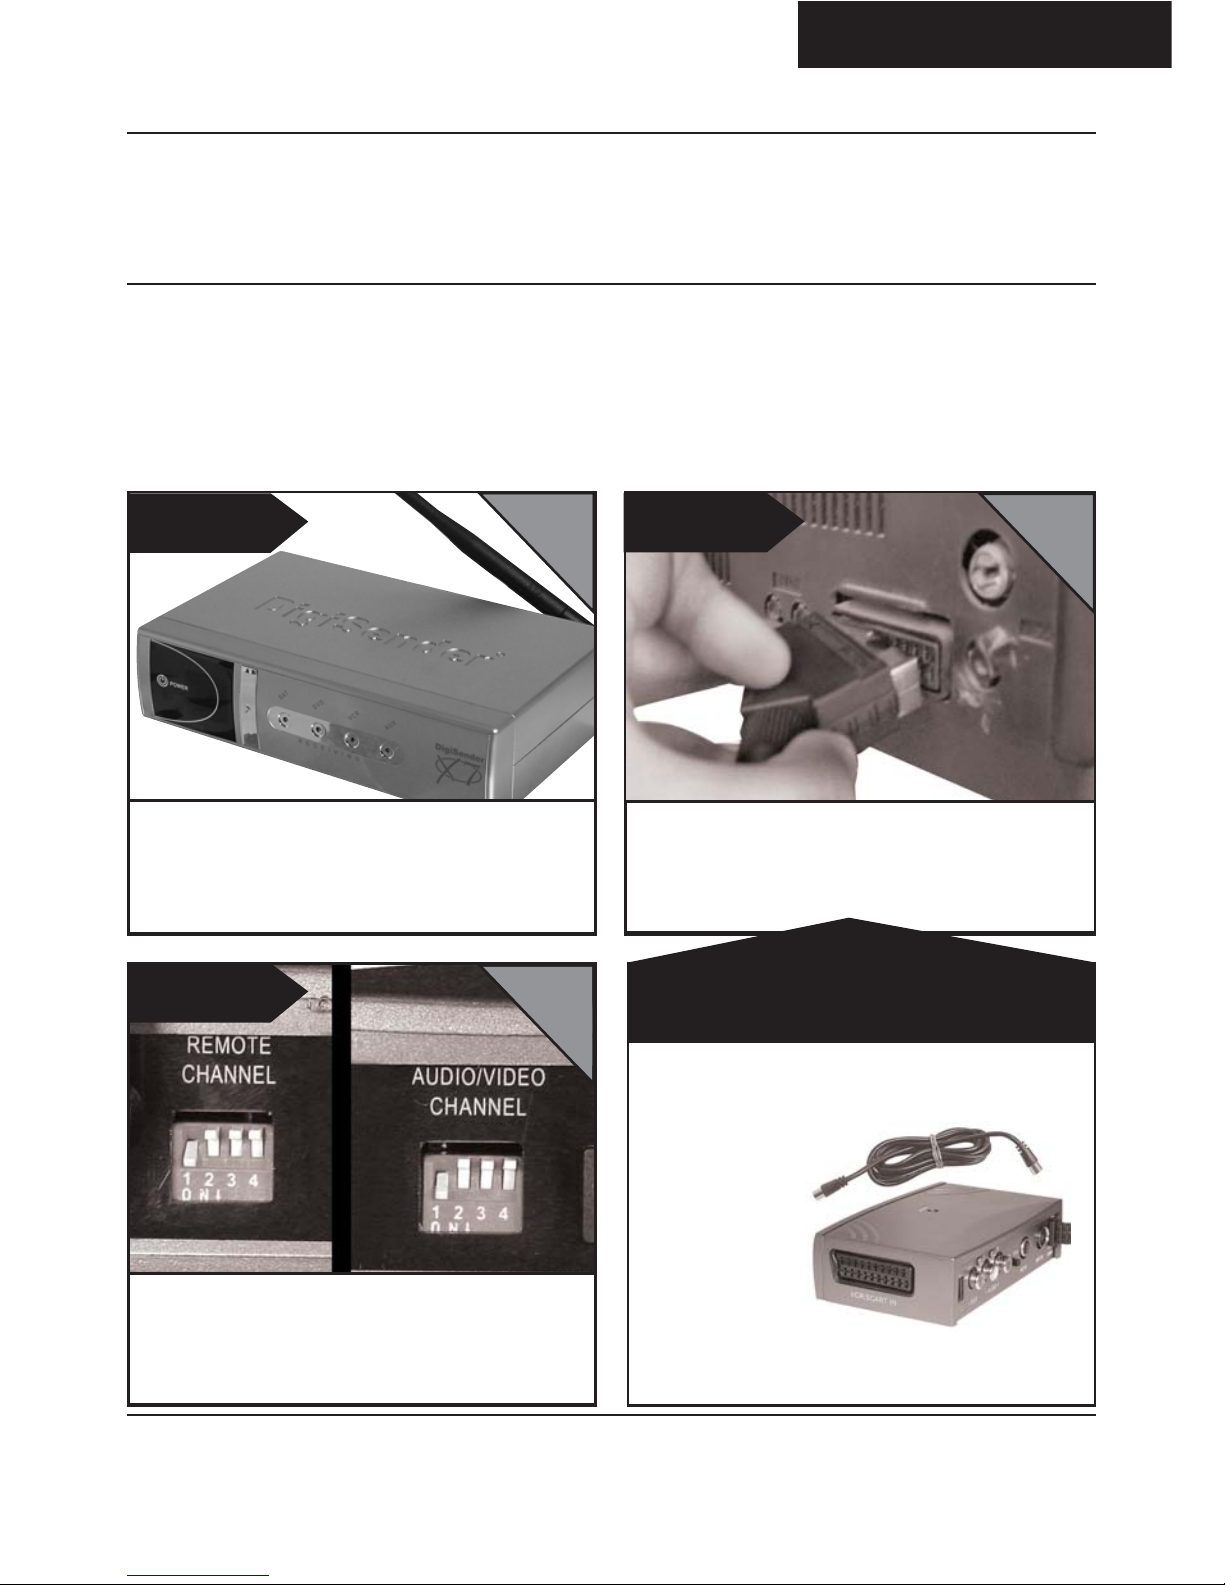
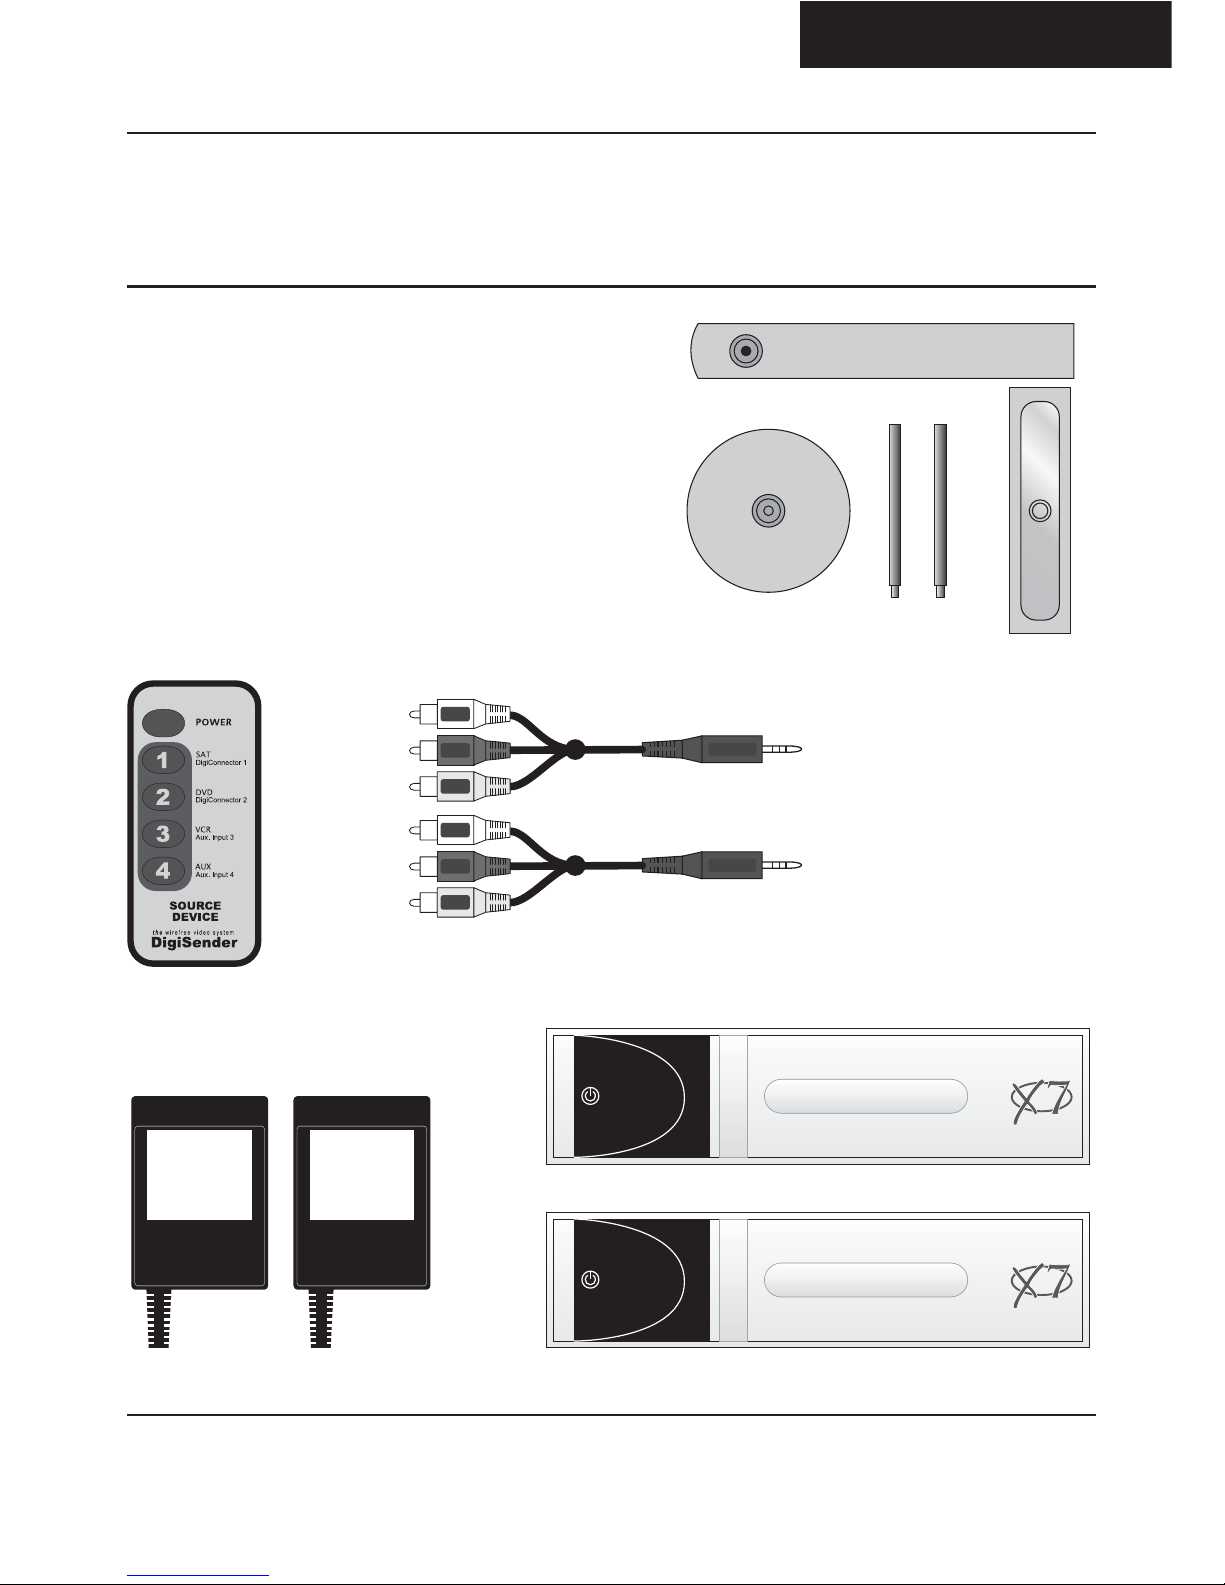
STEP 1
Unpacking your DigiSender® X7
All packs are computer weigh checked when packed. However, it is a good idea to
check all kit contents are present before proceeding with the installation.
DigiSender® Transmitter
DigiSender® Receiver
DigiSenderDigiSender
TRANSMITTINGTRANSMITTING
SATSAT
VCRVCR
DVDDVD
AUXAUX
POWER
DigiSenderDigiSender
RECEIVINGRECEIVING
SATSAT
VCRVCR
DVDDVD
AUXAUX
POWER
Page 5
Please read this instruction manual carefully prior to installation
DG440 - DigiSender® X7
continued...
ENGLISH
Remote Control
2 x RCA Phono - 4.5mm Jack Leads
2 x Power Supply Unit
1x IR Systeme Technik IR Emitter
Page 6
Online Support at www.digisender.net
DG440 - DigiSender® X7
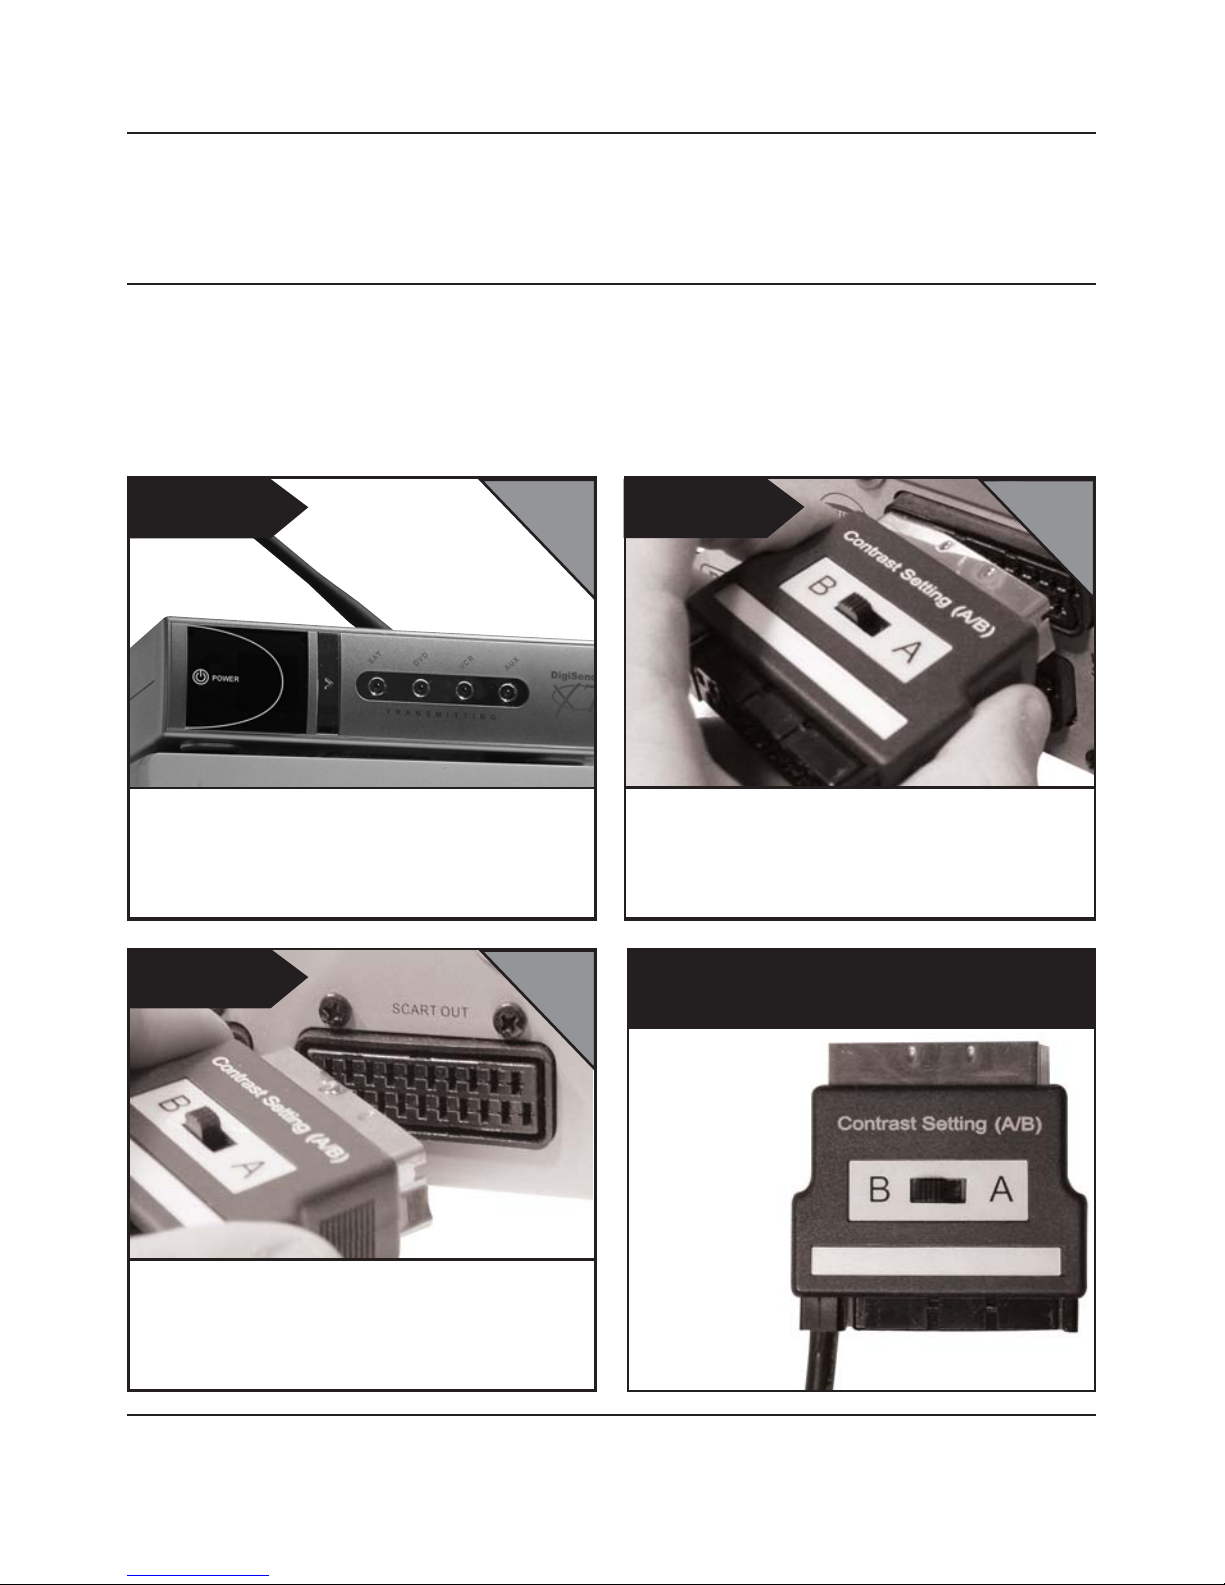
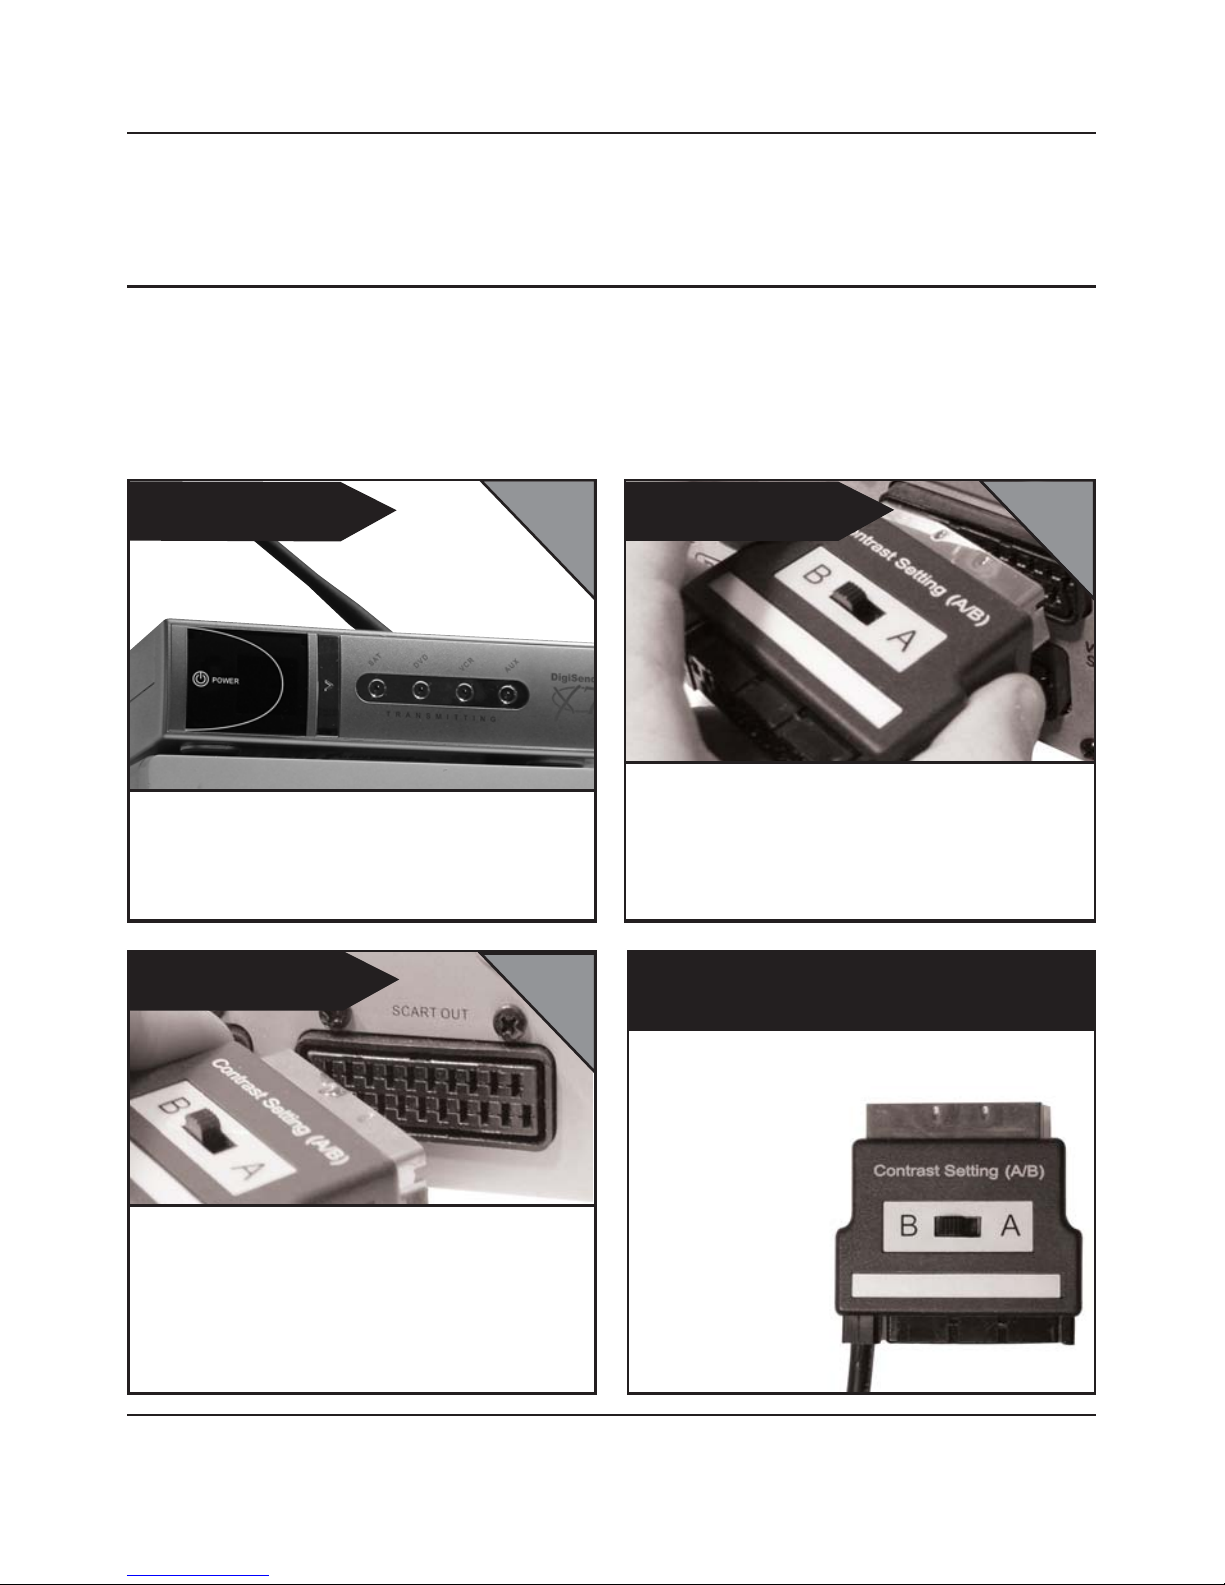
STEP 2
Install the DigiSender® X7 Transmitter Unit
The transmitter unit is designed to send video and sound from one of up to 4
connected sources to a receiver somewhere else in your home.
What’s the A/B switch for??
STEP 1
STEP 2
STEP 3
Connect DigiConnector™ 1 into your satellite or
cable receiver. Use the SCART socket labelled ‘TV’
and connect any existing SCART lead (if present)
into the rear (socket) of the DigiConnector™.
Place the DigiSender® transmitter on a flat
surface near to your source equipment. Avoid
placing the transmitter directly on top of other
electrical devices (see troubleshooting guide)
Connect DigiConnector™ 2 into your VCR or
DVD. Where available, use SCART sockets labelled
OUT or TV. Connect any existing SCART lead in to
the rear socket of the DigiConnector™
The Contrast A/B
switch is present
to compensate
for differences in
equipment/setups.
Once installation
is complete, if
you experience a
poor picture then
adjust the A/B
setting.
LIVING ROOM
LIVING ROOM
LIVING ROOM
Page 7
Please read this instruction manual carefully prior to installation
DG440 - DigiSender® X7
continued...
ENGLISH
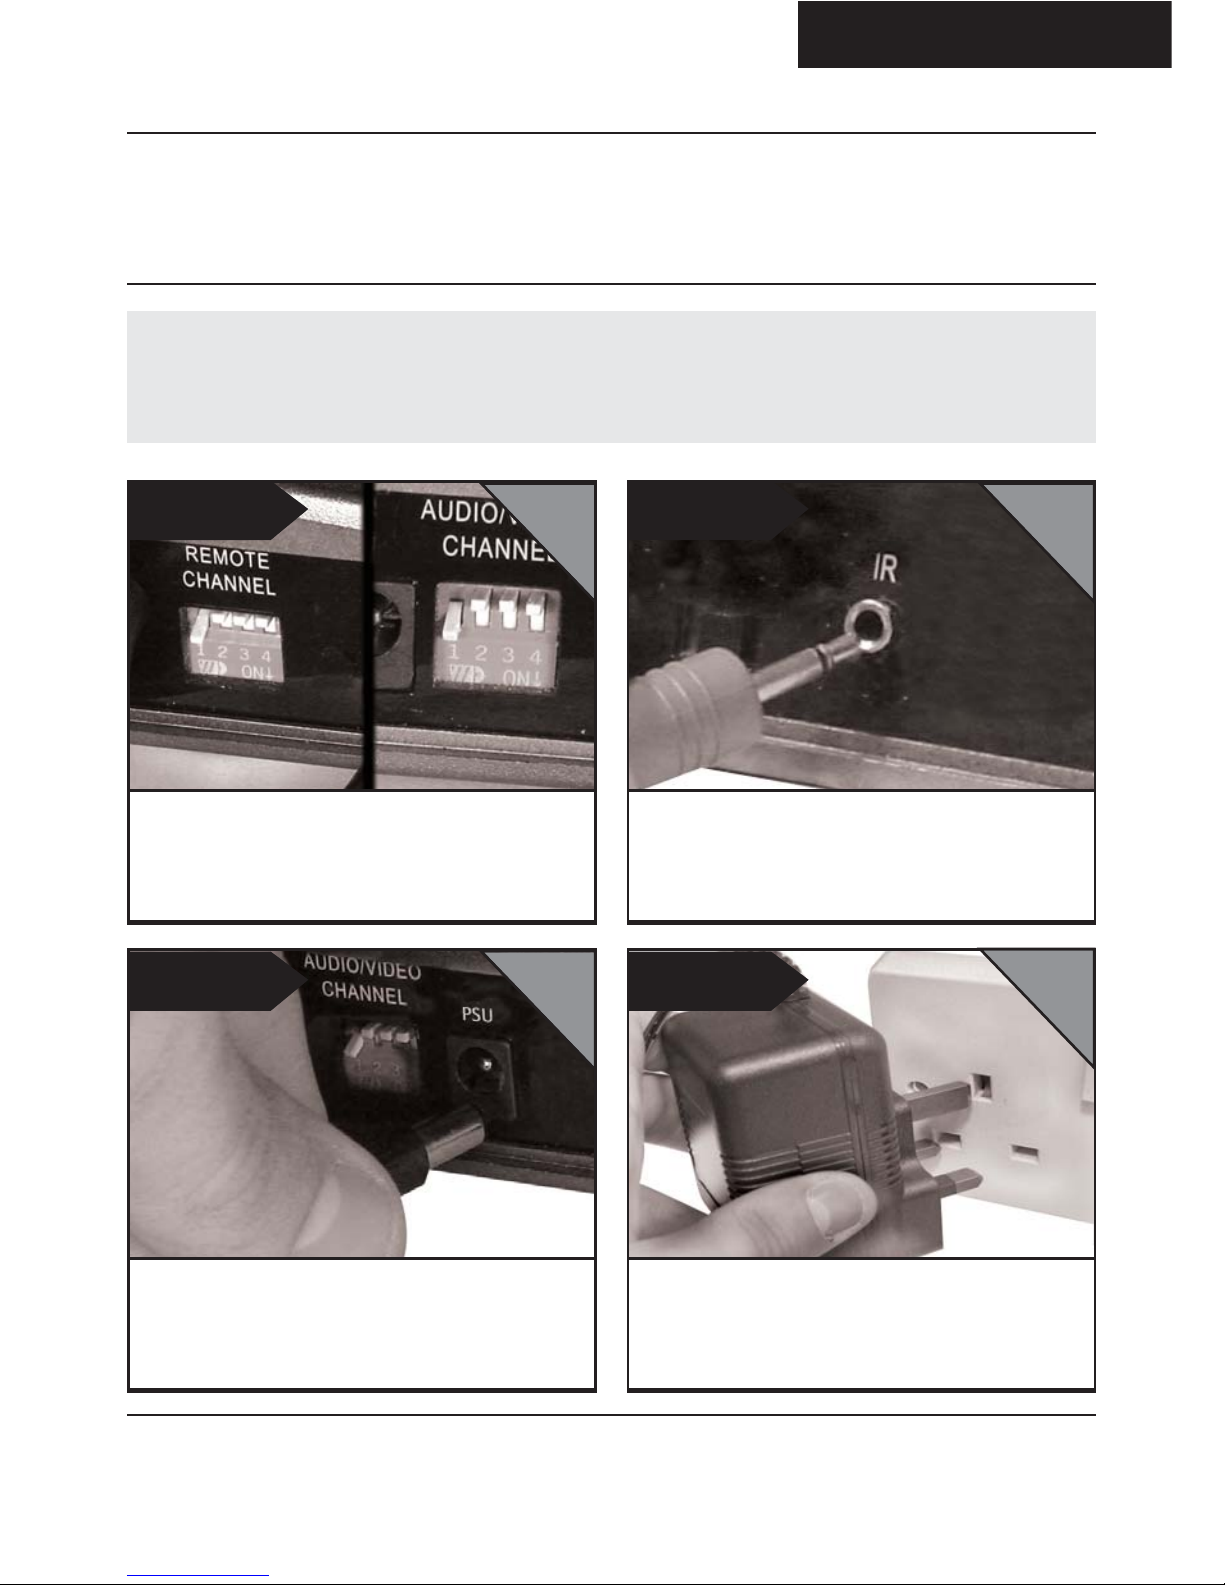
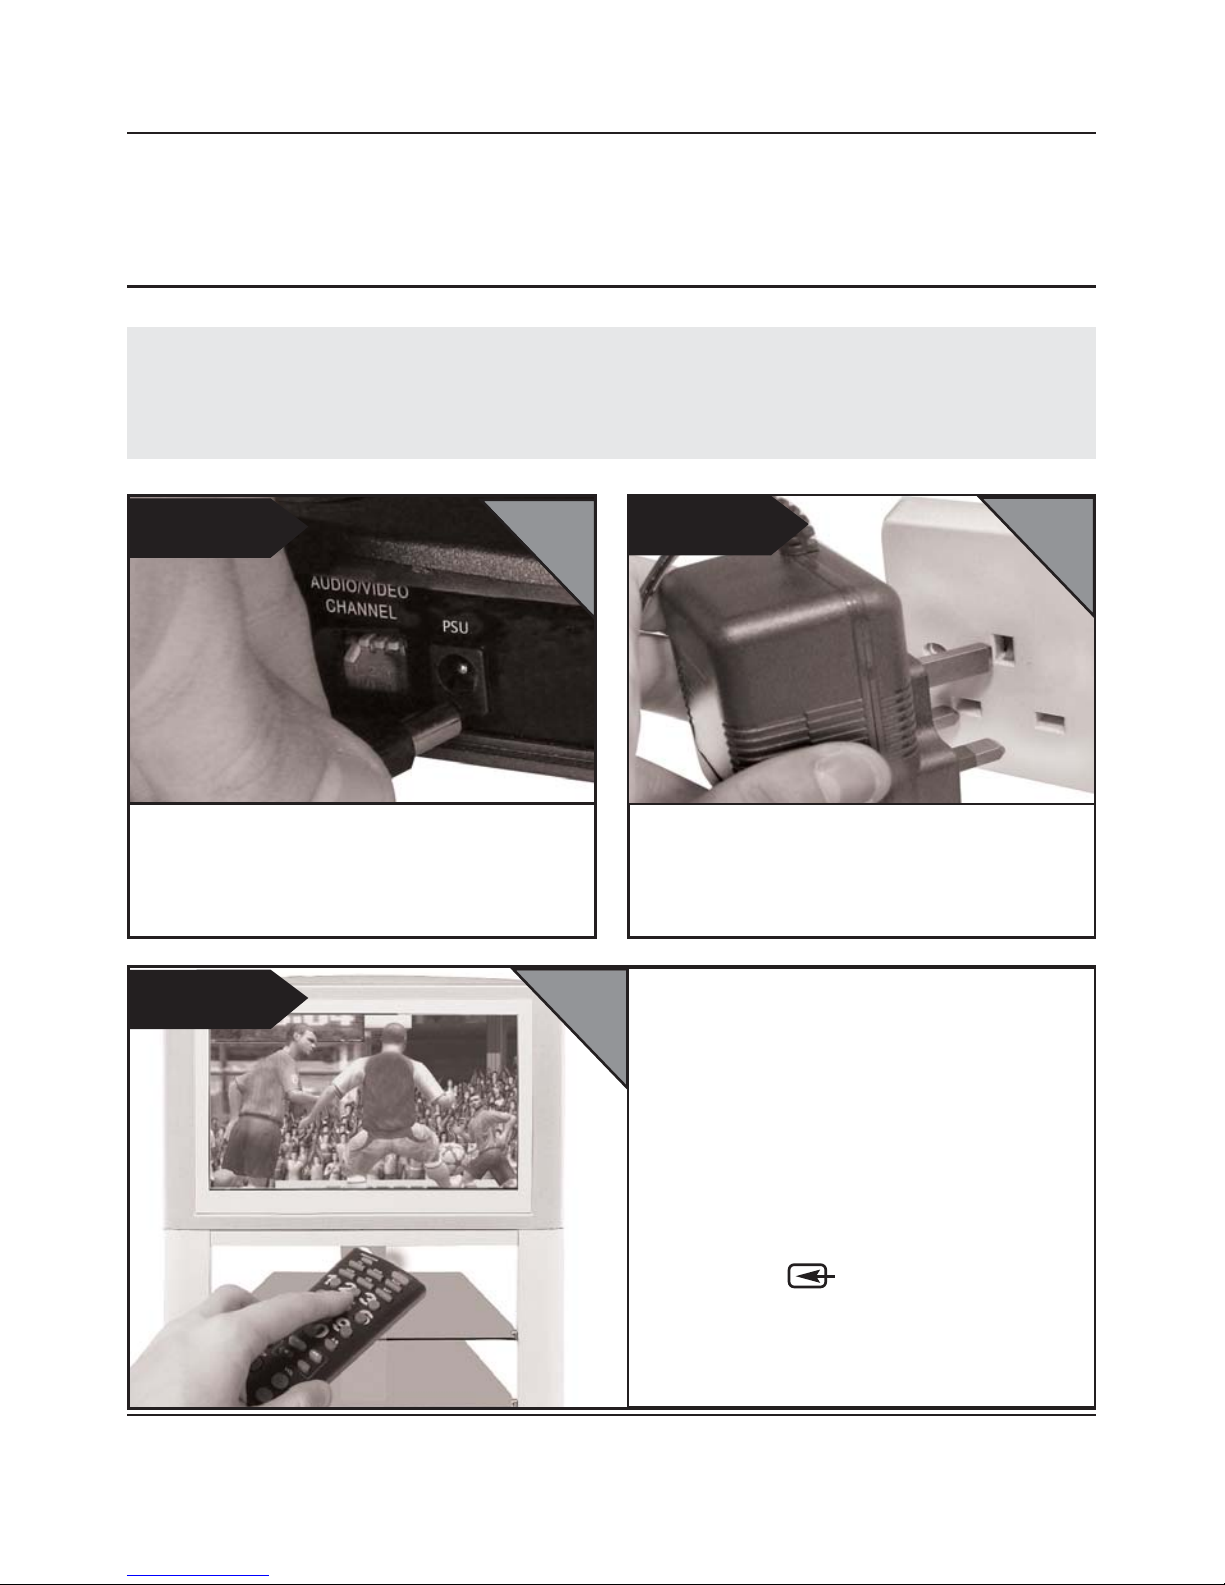
STEP 4
STEP 5
STEP 6 STEP 7
Ensure that both the A/V Channel and IR
Channel are set to 1.
See the trouble shooting sections for further
information on the channel selection process.
Connect the IR Systeme Technik™ IR Emitter to
the socket labelled IR on the rear of the
transmitter. Follow the steps overleaf to install the
IR Systeme Technik™ IR Emitter.
Connect the power supply unit to the socket
labelled PSU.
Connect the power supply unit (PSU) into an
available wall socket.Press the POWER button on
your DigiSender remote control to switch the
transmitter on.
LIVING ROOM
LIVING ROOM
LIVING ROOM
LIVING ROOM
Avoid positioning the transmitter near to 2.4GHz wireless enabled devices
such as modern games consoles, wireless controllers, laptops, DECT phones
or wireless networking equipment.
Page 8
Online Support at www.digisender.net
DG440 - DigiSender® X7
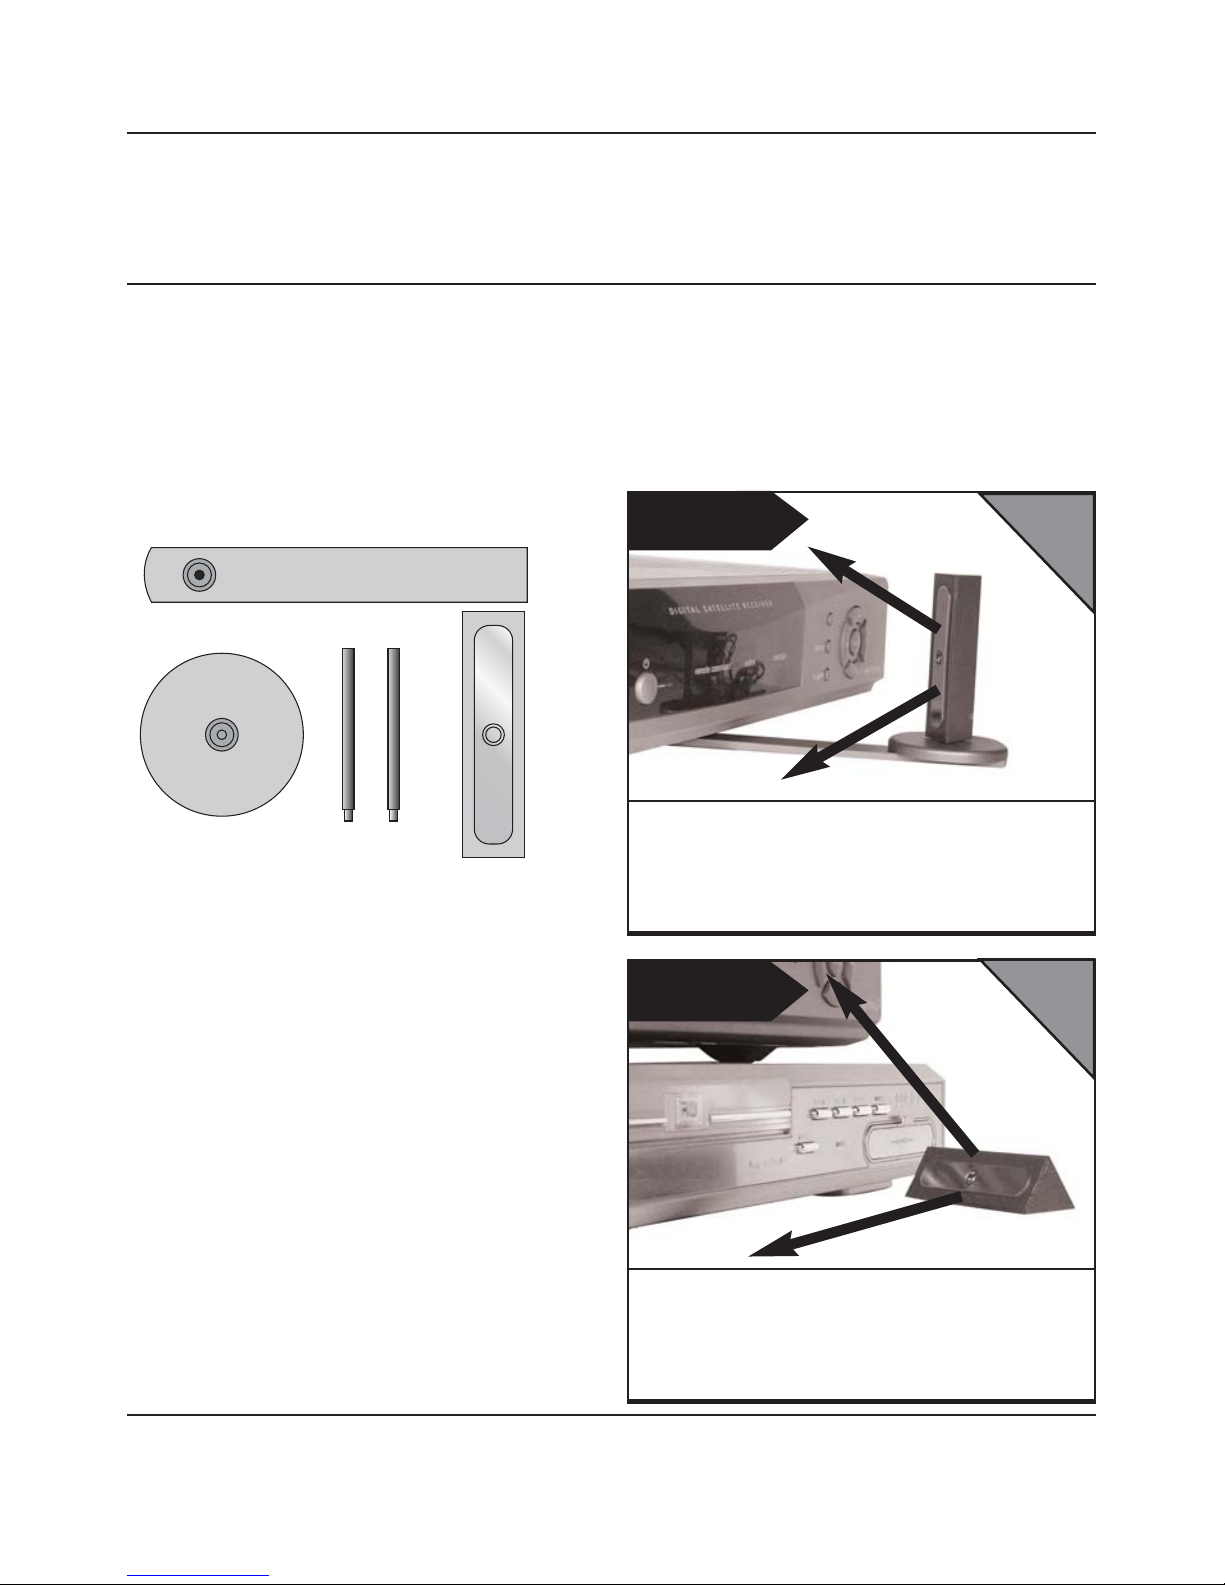
STEP 3
Install the IR Systeme Technik™ remote extender
Once set up correctly, the remote
extender will enable you to utilise your
remote control in the remote location in
your home.
Because everyone’s set up is different
there are many ways you can install the
remote extender system.
Ex. 1
Ex. 2
Use accessories 1 and 2 to mount the IR Emitter
vertically with the IR emitting LED facing the
remote sensor of your source equipment.
Mount the IR Emitter horizontally using the
supplied sticky pad. Ensure the IR emitting LED is
facing the remote sensor of the source equipment.
LIVING ROOM
LIVING ROOM
Accessory #1
Extension Pieces
Accessory #2
IR Emitter
Page 9
Please read this instruction manual carefully prior to installation
DG440 - DigiSender® X7
ENGLISH
STEP 4
Install the DigiSender® X7 Receiver Unit
The DigiSender® X7 Receiver will pick up transmitted signals from the transmitter
unit and output them to a television. In addition, the receiver detects remote
controls being used in the second room and will send those signals to the source
equipment in your main lounge.
STEP 1
STEP 2
STEP 3
Connect the SCART output to the second
television.
Place the DigiSender® receiver on a flat surface
near to your second television. Avoid placing the
receiver directly on top of other electrical devices
such as the television.
Ensure that both the A/V Channel and IR Channel
are set to 1.
See the trouble shooting sections for further
information on the channel selection process.
No SCART socket on the TV??
AEI produce an ‘Aerial
Convertor ‘ enabling
you to connect
the receiver to
any TV without a
SCART socket.
Ask for part
number
MOD01PIS
BEDROOM
BEDROOM
BEDROOM

Page 10
Online Support at www.digisender.net
DG440 - DigiSender® X7
continued...
STEP 4
Connect the power supply unit to the socket
labelled PSU.
STEP 6
STEP 5
Press the POWER button on your DigiSender
remote control to switch the receiver on. The
power LED will be green to indicate the device is
switched on.
Switch on the second television and select it’s
SCART channel. This will be labelled on the
remote control as one of the following buttons:
AV, VIDEO, VCR, AUX, SCART,
EXT, 0
Refer to your tv’s manual for further assistance.
Connect the power supply unit (PSU) to an
available wall socket.
BEDROOM
BEDROOM
BEDROOM
Did you know? The receiver can be connected to a Hi-Fi unit using
the Left & Right Audio outputs on the rear of the DigiSender®receiver unit.
Phono cable may be required.
Page 11
Please read this instruction manual carefully prior to installation
DG440 - DigiSender® X7
ENGLISH
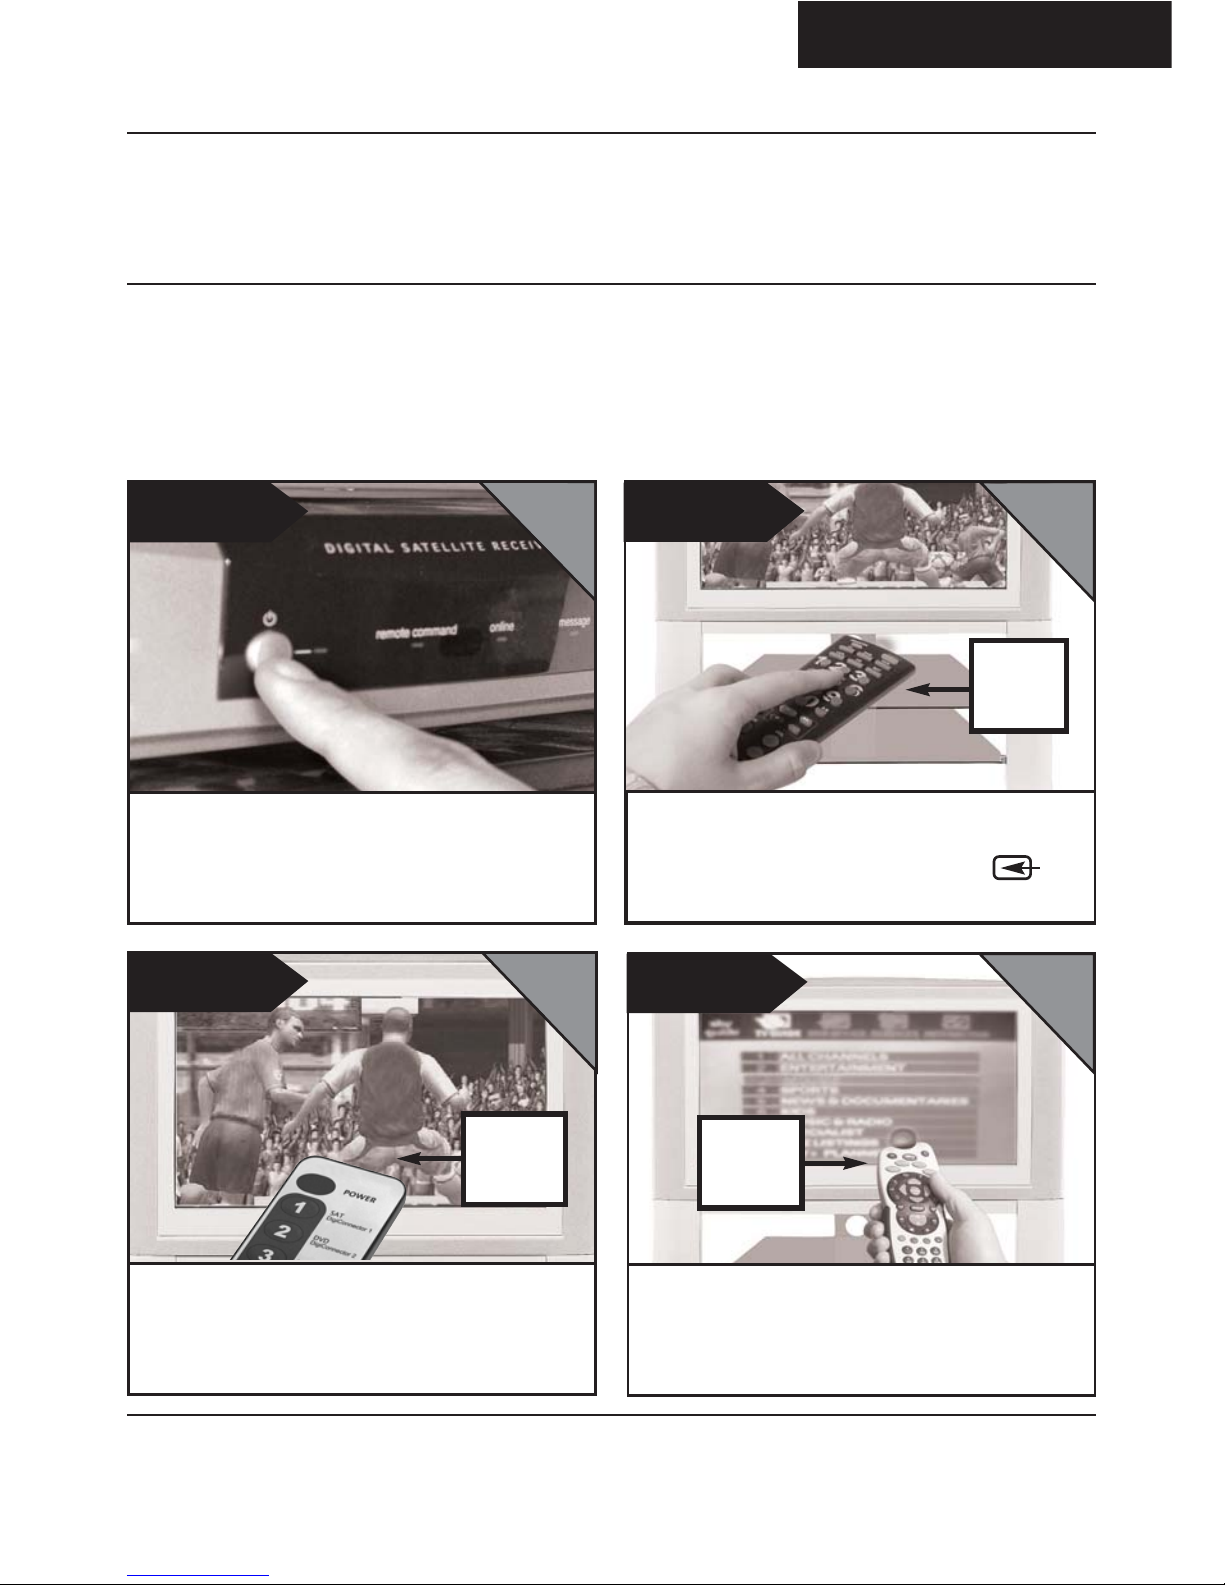
STEP 5
Using the DigiSender® X7
STEP 1
STEP 2
STEP 3
Select the SCART channel on the second television
using the televisions remote control. Look for a
button labelled AUX, AV, VIDEO, VCR or .
Switch on the source equipment such as your
satellite receiver or DVD player.
Select the correct source device using the
supplied remote control pointed at the
DigiSender® receiver - see opposite.
The DigiSender® X7 is designed to be
simple to use once set up.
The supplied remote control can be
used to switch between sources, such
as Satellite/Cable, DVD and VCR.
STEP 4
Use your original source equipment remote control
to control what channel you watch or your DVD
player or VCR.
2nd TV
REMOTE
CONTROL
DIGISENDER
REMOTE
CONTROL
SOURCE
REMOTE
CONTROL
LIVING ROOM
BEDROOM
BEDROOM
BEDROOM
Page 12
Online Support at www.digisender.net
DG440 - DigiSender® X7
continued...
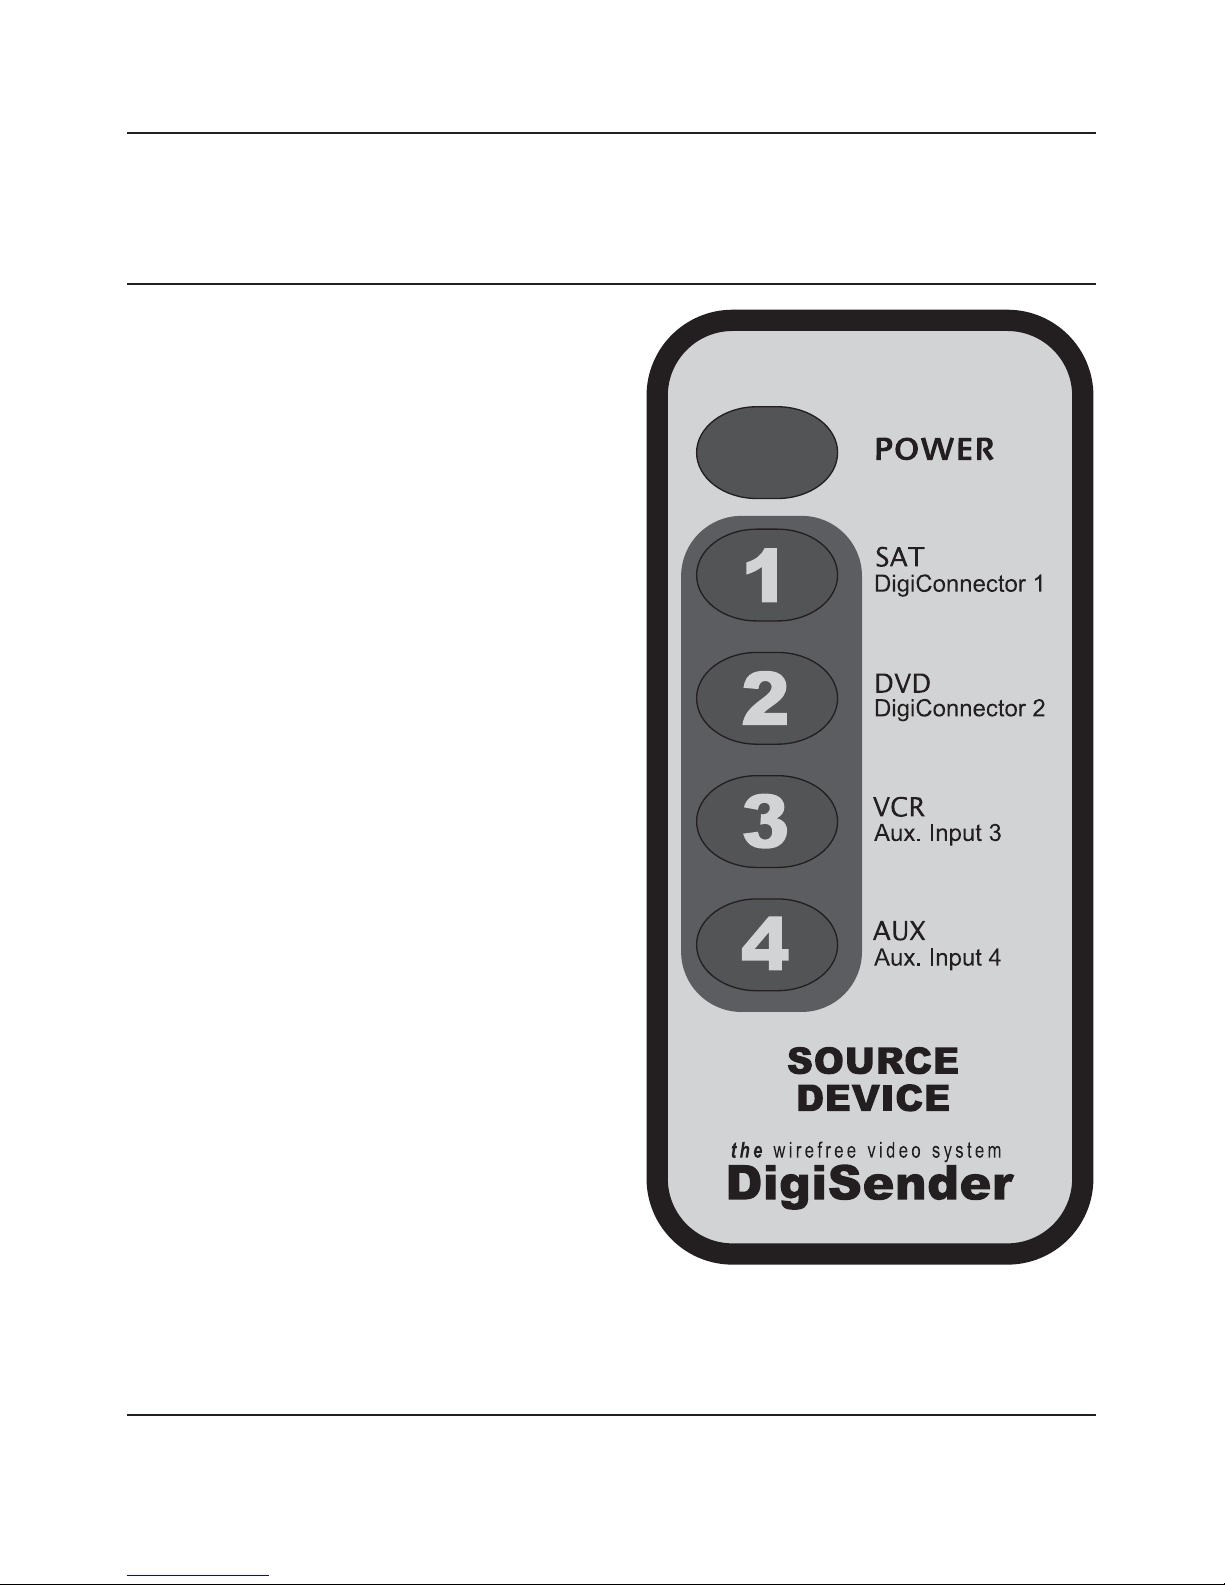
Transmitter Source Select Controls.
The POWER button toggles the
DigiSender transmitter and receiver
mode between STANDBY and ON. The
power LED indicates the current mode
- GREEN for ON, RED for STANDBY.
Press 1,2,3 or 4 with the remote
pointing at your receiver, to select a
device connected to your DigiSender®
transmitter. For example you could
switch between your satellite/cable,
DVD, VCR and CCTV camera from your
bedroom.
1 = DigiConnector 1
2 = DigiConnector 2
3 = RCA Input 3
4 = RCA Input 4
Please use your original or compatible
remote controls to control your source
equipment. The supplied remote
control cannot be used to achieve
this.
Page 13
Please read this instruction manual carefully prior to installation
DG440 - DigiSender® X7
ENGLISH
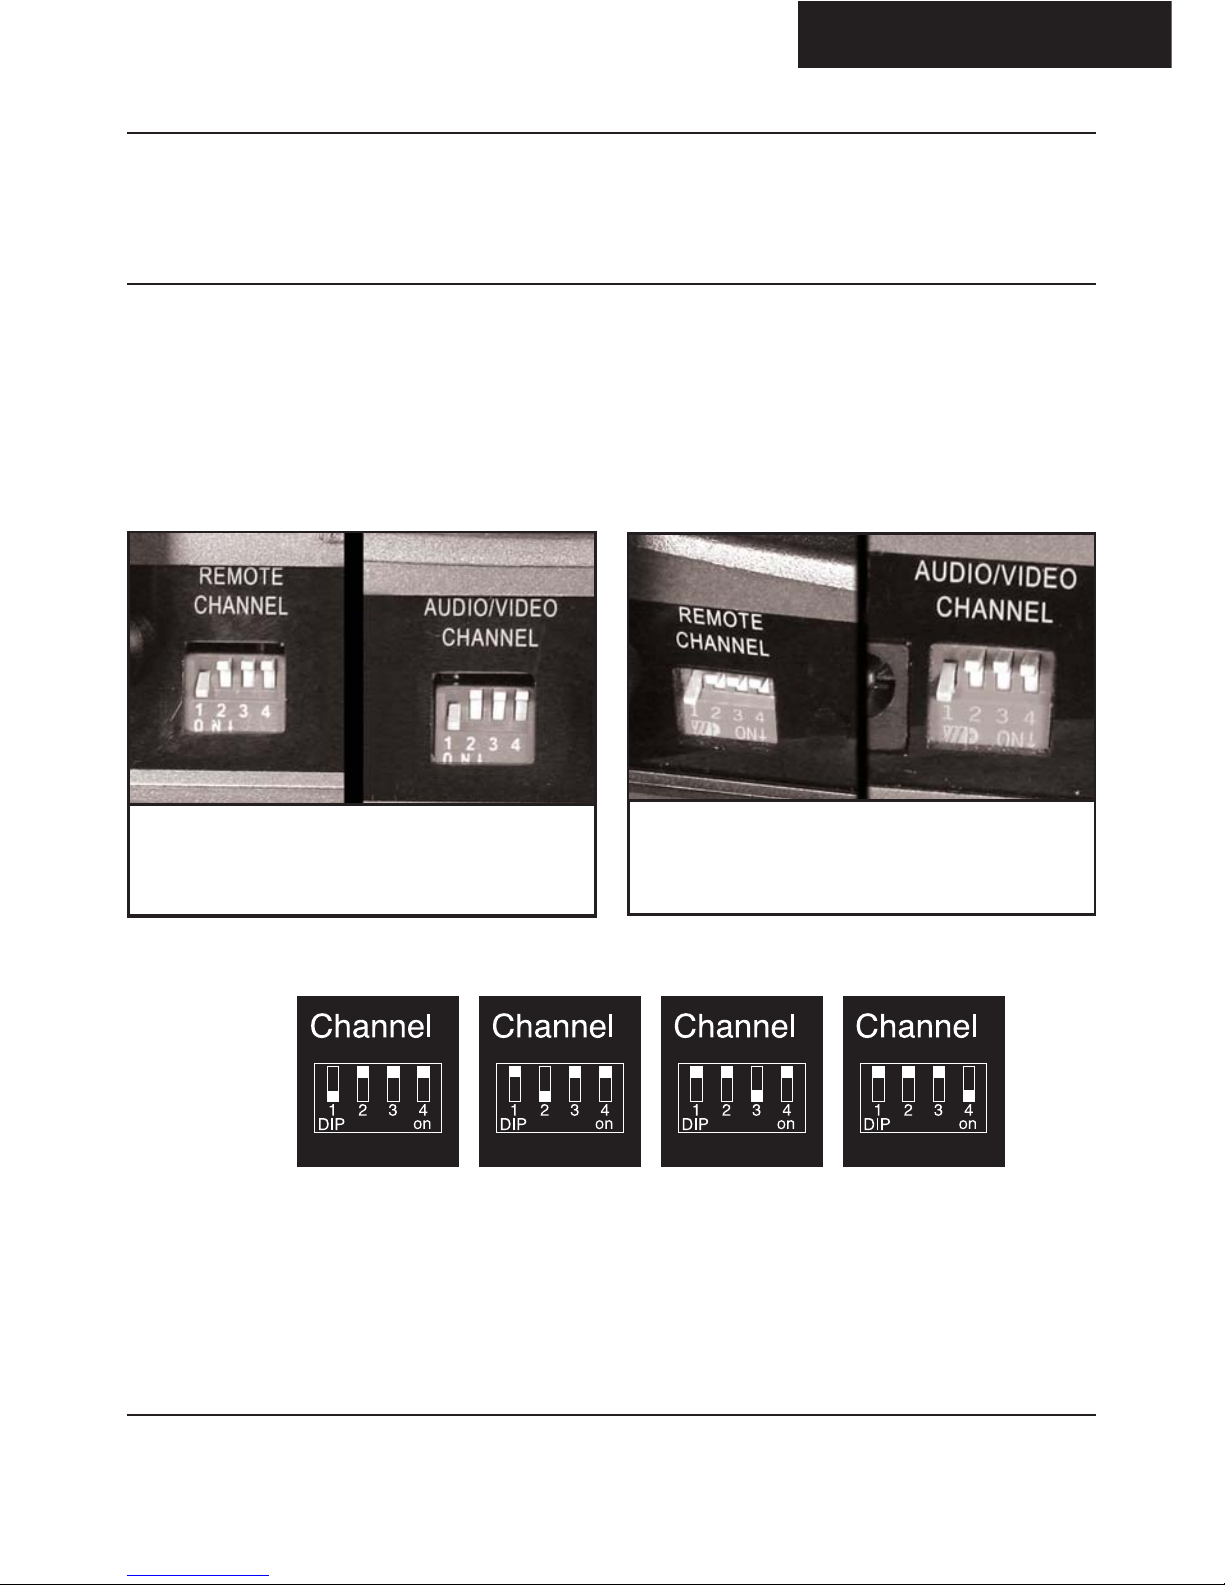
The DigiSender® X7 features 4 audio/video channels and 4 primary remote relay
channels. For the unit to function correctly the audio/video channel must be set
the same on both the transmitter and receiver. Also, the remote relay channel
must be the same on both the transmitter and receiver.
Audio/Video Channel
Remote Relay Channel
Channel 1 Channel 2 Channel 3 Channel 4
ON
OFF
OFF
OFF
OFF
ON
OFF
OFF
OFF
OFF
ON
OFF
OFF
OFF
OFF
ON
1
2
3
4
Receiver Channel Settings
Transmitter Channel Settings
Page 1
Online Support at www.digisender.net
DG440 - DigiSender® X7
Page 14
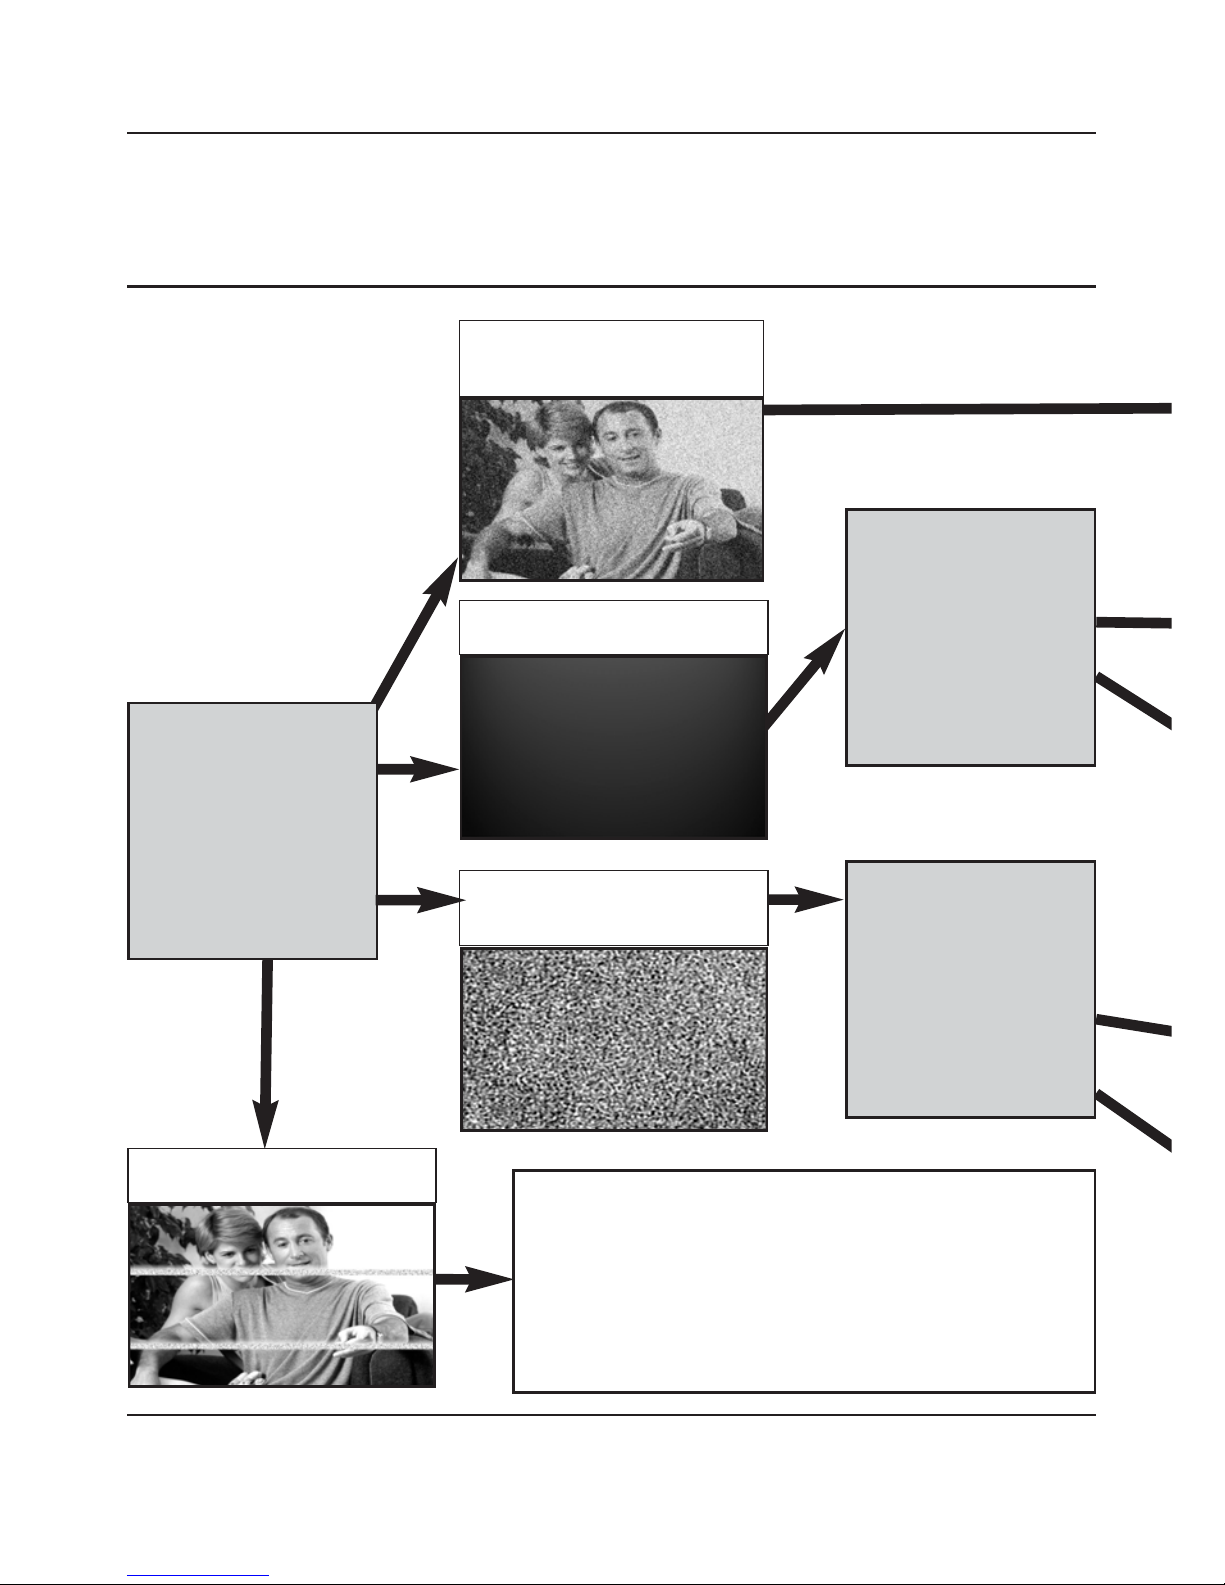
TROUBLESHOOTING
Picture Problems
Q: What do you
see on your
second
television?
The picture is present but
poor quality
I see black or blank screen
I see a snowstorm effect or
plain blue screen
Switch OFF your
DigiSender®
RECEIVER.
Q: What do you now
see at the second
television?
Switch OFF your
DigiSender®
TRANSMITTER.
Q: What do you now
see at the second
television?
I see lines over the picture
This indicates one or more electrical devices are interfering
with the DigiSender®. To ascertain the source of the
interference, switch OFF any wireless networking equipment,
laptops, 2.4GHz DECT phones, games consoles or bluetooth
devices. Try all 4 audio/video channels as one or more may still
be available. Visit digisender.net or contact our helpline for
information on configuring your equipment to work together.
START
HERE
Page 15
Please read this instruction manual carefully prior to installation
DG440 - DigiSender® X7
ENGLISH
continued...
Black Screen
Still Snowstorm or Blue...
1. Switch the DigiSender® Receiver back on
2. Ensure the DigiSender® Transmitter is switched on
3. Select a different audio/video channel ensuring an identical
channel is chosen on both the transmitter and receiver
4. Switch off any wireless cameras and/or networks in your
household.
This indicates the SCART Channel has NOT been selected on
the second television. Look for buttons on this televisions
remote control which could select the AV Channel such as
EXT, AV, VIDEO, VCR, AUX, Channel 0 AND .
Still a Black Screen...
1. Switch the transmitter back on.
2. Ensure the transmitter is connected to your source device not your main television.
3. Ensure that the source equipment is switched on (such as
your satellite, cable or freeview box)
4. Ensure the source device (such as your satellite receiver or
DVD) is set to output CVPAL, PAL or COMPOSITE.
Incompatible types include S-VIDEO and RGB.
1. Switch the transmitter back on.
2. Ensure the correct SCART channel is selected on your
second television. Some televisions feature multiple channels
for one or more SCART, phono and S-Video inputs.
3. If available try another SCART socket on the remote
television
It’s now a snowstorm or blue
1. Adjust the Contrast A/B switch on the transmitter
2. Try the 3 other available channels ensuring that the audio/video channel is set to the same on both the
transmitter and receiver
3. Ensure the units are within the usable range, normally this would be 40m when passing through 2
average internal walls. Thicker or stone/granite walls may lower the usable range of this device.
4. Switch off any wireless computer network devices, 2.4GHz DECT cordless phones & microwave ovens.
Page 1
Online Support at www.digisender.net
DG440 - DigiSender® X7
Page 16
TROUBLESHOOTING
Sound Problems
Please follow the guide below if you experience any trouble with the picture and
sound. If this guide does not solve your problem please call our customer care line
on 0845 1667940 for further assistance or email advice@digisender.net.
Q: What seems to
be the problem
with the sound?
I can see the picture but
can’t hear anything.
The sound is distorted.
There is a buzzing sound
present. It seems to get
worse during on-screen
menus or bright pictures.
1. Disconnect both the transmitter
AND receiver SCART’s. Reconnect the
leads ensuring they are pushed into
the sockets firmly.
2. If you are using a home cinema
DVD player with surround sound,
please ensure the analogue audio
output on SCART is switched on.
Turn down the volume on the source
device such as your satellite/cable
receiver or DVD player.
Change the Contrast A/B setting on
the transmitter DigiConnector™
connected to the offending
equipment.
There is a hissing sound
and the volume must be
turned up high on the
second TV to hear
anything.
1. Turn the output volume UP (if
possible) on the source equipment,
such as your satellite/cable receiver
or DVD player.
2. Ensure the transmitter and receiver
are within the usable range (40m avg)
3. Switch off your microwave oven if
present.
START
HERE

Page 17
Please read this instruction manual carefully prior to installation
DG440 - DigiSender® X7
ENGLISH
TROUBLESHOOTING
Remote Control Extender
If you have any difficulty operating your source equipment remote control in
your second room please follow the advice below below:
1) Ensure the IR Systeme Technik™ IR Emitter is connected to the DigiSender®
transmitter.
2) Ensure you are using the correct remote control in the second room. For
instance, if you are trying to control your satellite channel you will need to use
the satellite remote control.
3) Ensure the IR Systeme Technik™ IR Emitter is facing the remote sensor on your
source equipment.
4) Move the IR Emitter further away from the source equipment using the
supplied extension accessory.
5) Move the transmitter AND receiver further away from other electrical devices.
6) Choose a new remote relay channel taking care that the same channel is
selected on both transmitter and receiver.
7) Operate the remote control closer to the DigiSender® receiver.
8) Replace the batteries in the source remote control.

Page 1
Online Support at www.digisender.net
DG440 - DigiSender® X7
Page 18
Customer Care & Technical Support
AEI Security & Communications Ltd is
dedicated to providing our customers
with first class customer care and
technical support.
We have provided you with 3 methods
of obtaining technical advice on this
product.
During busy periods we would suggest
using the web and e-mail options to
obtain support.
1. On the web...
Free technical advice is available online 24/7 at
our dedicated support web site:
http://www.aei.eu
2. By e-mail...
You can contact our engineers by e-mail. Please
be sure to clearly explain your problem and the
model you have purchased.
advice@digisender.net
3. By telephone...
We have a dedicated helpline, Monday to Friday,
9AM - 5PM. The telephone helpline is available
to UK customers only.
Please note that calls are charged at the local
rate and your call may be recorded for training
purposes.
0845 166 7940

Upgrades & Accessories
DigiSender® Receiver - Part DG44RX
• Add as many receivers as you require
to your DigiSender® system
• Connect to any SCART enabled
television or use with the MOD01PIS
Aerial Converter
• Supplied with PSU
• Requires DigiSender®, PCSender™,
or Baby Monitor transmitter
Aerial Convertor - Part MOD01PIS
• Connect a DigiSender® receiver to an
aerial socket on your T.V.
• Shares the power supply with your
DigiSender
• Test Card signal for easy set up
• Compatible with every UK television
• Adds the DigiSender® signal to your
existing aerial signal
http://www.digisender.net
for the latest info, upgrades and technical support
Page 19
Please read this instruction manual carefully prior to installation
DG440 - DigiSender® X7
ENGLISH
Seite 20
Onlinesupport an www.digisender.net
DG440 - DigiSender® X7
Einführung
DigiSender® X7 – Hochwertiges kabelloses VideoSendesystem
Wir gratulieren Ihnen zum Kauf Ihres
DigiSender® X7. Dieses Produkt bietet
modernste kabellose Video- und InfrarotTechnologie und ist dabei ausgesprochen
preiswert.
Das System lässt sich weiter aufrüsten. Sie
können es durch zusätzliche Empfänger,
Antennenumschalter, kabellose BabyÜberwachungskameras und zahllose andere
Zusatzgeräte erweitern.
Das Besondere am DigiSender® X7 ist, das er mit
nahezu allen aktuellen Satellitenempfängern,
Kabelempfängern, Videorekordern, DVD-Playern
und Freeview-Receivern auf dem Markt
kompatibel ist.
Sie haben auch die Möglichkeit, das
Ausgangsgerät zu wechseln, während Sie
bequem im Bett liegen. Sie können zwischen
Videorekorder, DVD-Player und Satelliten/Kabelempfänger umschalten, ohne den Sender
zu beeinflussen, der auf Ihrem
Hauptfernsehgerät läuft.
Genießen Sie 4 Videokanäle, kristallklaren
Stereosound in Hi-Fi-Qualität und digitale
Kommunikation mit erstaunlicher Flexibilität.
Mit dem Kauf dieses DigiSender® Systems
haben Sie in die neueste kabellose
Kommunikationstechnologie für daheim
investiert.
WARNUNG
Um Schaden zu vermeiden,
setzen Sie dieses Gerät keinem
Regen oder Feuchtigkeit aus.
Seite 21
DG440 - DigiSender® X7
DEUTSCH
SCHRITT 1
INHALT Überprüfung des Packungsinhalts
Alle Pakete werden von einem
Computer bei der Verpackung
auf Ihr Gewicht geprüft. Es ist
jedoch eine gute Idee zu
überprüfen, ob alle
angegebenen Teile vorhanden
sind, bevor Sie mit der
Installation fortfahren.
DigiSenderDigiSender
TRANSMITTINGTRANSMITTING
SATSAT
VCRVCR
DVDDVD
AUXAUX
POWER
DigiSenderDigiSender
RECEIVINGRECEIVING
SATSAT
VCRVCR
DVDDVD
AUXAUX
POWER
2 x Stromversorgung
DigiSender® Empfänger
DigiSender® Sender
IR System Technik™
DigiSender® Fernbedienung
2x Audiokabel
Seite 22
Onlinesupport an www.digisender.net
DG440 - DigiSender® X7
SCHRITT 2 - Installieren Sie die DigiSender® X7
Sendereinheit
Der Transmitter überträgt Videobilder und Ton von einem der bis zu 4
angeschlossenen Ausgangsgeräte an einen Empfänger in einem anderen Raum.
Wozu dient der A/B-Schalter?
Schließen Sie den DigiConnector™ 1 an Ihren
Satelliten- oder Kabelempfänger an. Verwenden
Sie die mit „TV“ beschriftete SCART-Buchse und
schließen Sie ein verfügbares SCART-Kabel an die
Buchse an der Rückseite des DigiConnector™ an.
Stellen Sie den DigiSender® Transmitter auf eine
ebene Fläche in der Nähe Ihres
Hauptfernsehgeräts. Der Transmitter darf nicht
direkt auf andere Elektrogeräte gestellt werden.
Schließen Sie den DigiConnector™ 2 an Ihren
Videorekorder oder DVD-Player an. Verwenden Sie
dazu, falls verfügbar, die SCART-Buchsen mit der
Aufschrift „OUT“ (Ausgang) oder „TV“. Schließen
Sie ein verfügbares SCART-Kabel an die Buchse an
der Rückseite des DigiConnector™ an.
Mit dem Schalter
„Contrast A/B“
(Kontraste) können
Unterschiede bei den
Geräten/Einstellungen
ausgeglichen werden.
Falls die Bildqualität
nach der Einrichtung
des Geräts schlecht
ist, können Sie die
A/B-Einstellung
anpassen.
SCHRITT 1
AUFENTHALTSRAUM
AUFENTHALTSRAUM
AUFENTHALTSRAUM
SCHRITT 2
SCHRITT 3

Seite 23
DG440 - DigiSender® X7
DEUTSCH
Stellen Sie sicher, dass Kanal 1 ausgewählt ist
(DIP Schalter 1 UNTEN, und 2, 3, 4 HOCH). Eine
Anpassung kann später erforderlich werden siehe Abschnitt Problemlösung für Einzelheiten.
Schließen Sie den IR Systeme Technik™ IR-Emitter
an die Buchse mit der Aufschrift „IR“ an der
Rückseite des Transmitters an. Befolgen Sie die
umseitigen Schritte, um den IR Systeme Technik™
IR-Emitter einzurichten.
Schließen Sie das Netzteil an die Buchse mit der
Aufschrift „PSU“ an.
Stecken Sie das Netzteil in eine geeignete
Wandsteckdose. Drücken Sie die EIN/AUS-Taste
auf der DigiSender Fernbedienung, um den
Transmitter einzuschalten.
Vermeiden Sie das Aufstellen von 2,4GHz Funkquellen, wie moderne
Spielekonsolen,Wireless Controller, Laptops, DECT Telefone oder WirelessNetzwerkgeräte in der Nähe des DigiSender® Senders.
AUFENTHALTSRAUM
AUFENTHALTSRAUM
AUFENTHALTSRAUM
AUFENTHALTSRAUM
SCHRITT 4 SCHRITT 5
SCHRITT 6
SCHRITT 7

Seite 24
Onlinesupport an www.digisender.net
DG440 - DigiSender® X7
SCHRITT 3: Einrichten der IR Systeme Technik™
Fernbedienungserweiterung
Wenn sie richtig eingerichtet wird,
ermöglicht Ihnen die
Fernbedienungserweiterung die Nutzung
Ihrer Fernbedienung im ganzen Haus.
Da Anlagen sehr unterschiedlich sein
können, lässt sich das
Fernbedienungserweiterungssystem auf
verschiedene Weise einrichten.
Ex. 1
Ex. 2
Verwenden Sie die Zubehörteile 1 und 2, um den
IR-Emitter vertikal aufzustellen, sodass die LED mit
dem Infrarotsignal auf den Fernbedienungssensor
Ihres Hauptfernsehgeräts ausgerichtet ist.
Mit dem beiliegenden Haftpolster kann der IREmitter horizontal angebracht werden. Die LED mit
dem Infrarotsignal muss auf den
Fernbedienungssensor des Hauptfernsehgeräts
ausgerichtet sein.
Zubehörteile #1
Extension Pieces
Zubehörteile #2
IR Emitter
AUFENTHALTSRAUM
AUFENTHALTSRAUM

Seite 25
DG440 - DigiSender® X7
DEUTSCH
SCHRITT 4 - Installieren Sie die DigiSender® X7
Empfängereinheit
Der DigiSender® X7 Empfänger fängt das Signal des Transmitters auf und leitet es
an ein Fernsehgerät weiter. Außerdem erfasst der Empfänger Fernbedienungen,
die in einem anderen Raum verwendet werden, und sendet diese Signale an das
Hauptfernsehgerät in Ihrem Wohnzimmer.
Schließen Sie den SCART-Stecker an den
Zweitfernseher an.
Stellen Sie den DigiSender® Empfänger auf eine
ebene Fläche in der Nähe Ihres Zweitfernsehers.
Der Empfänger darf nicht direkt auf andere
Elektrogeräte, wie das Fernsehgerät, gestellt
werden.
Stellen Sie sicher, dass Kanal 1 ausgewählt ist
(DIP Schalter 1 UNTEN, und 2, 3, 4 HOCH). Eine
Anpassung kann später erforderlich werden siehe Abschnitt Problemlösung für Einzelheiten.
KEIN SCART ANSCHLUSS?
Dann benötigen Sie den
DigiSender
Antennenumwandler
Fragen Sie nach Teil:
MOD-01-PIS
Der Antennenumwandler
ermöglicht es Ihnen, den
DigiSender Empfänger
an jedem Fernseher
auch ohne SCART
Buchse anzuschließen.
SCHRITT 1
SCHRITT 2
SCHRITT 3
SCHLAFZIMMER
SCHLAFZIMMER
SCHLAFZIMMER

Seite 26
Onlinesupport an www.digisender.net
DG440 - DigiSender® X7
Schließen Sie das Netzteil an die Buchse mit der
Aufschrift „PSU“ an.
Drücken Sie die EIN/AUS-Taste auf Ihrer
DigiSender Fernbedienung, um den Empfänger
einzuschalten. Die grüne LED zeigt an, dass das
Gerät eingeschaltet ist.
Schalten Sie den zweiten Fernseher an und
wählen Sie dessen SCART Kanal aus. Dieser ist
auf der Fernbedienung mit einer der folgenden
Tasten beschriftet:
AV, VIDEO, VCR, AUX, SCART,
EXT, 0 oder
Sehen Sie in die Anleitung Ihres Fernsehers für
weitere Hilfestellungen.
Stecken Sie das Netzteil in eine geeignete
Wandsteckdose.
Wussten Sie schon? Der Empfänger kann über den linken und rechten Audioausgang an
der Rückseite des DigiSender Empfängers mit einer Hi-Fi-Anlage verbunden werden.
Dazu ist möglicherweise ein Audiokabel erforderlich.
SCHLAFZIMMER
SCHLAFZIMMER
SCHLAFZIMMER
SCHRITT 4
SCHRITT 5
SCHRITT 6

Seite 27
DG440 - DigiSender® X7
DEUTSCH
SCHRITT 5 - BEDIENUNG
Verwendung des DigiSender® X7
Wählen Sie den SCART Kanal an Ihrem zweiten
Fernseher mit Hilfe der Fernbedienung des
Fernsehers. Suchen Sie nach einem Schalter mit
der Beschriftung AUX, AV, VIDEO, VCR oder
Schalten Sie das Quellgerät, wie Ihren Satellitoder Kabelreceiver ein.
Wählen Sie das gewünschte Ausgangsgerät,
indem Sie die beiliegende Fernbedienung auf den
DigiSender® Empfänger richten – siehe
nebenstehende Abb.
Der DigiSender® X7 ist so entwickelt, dass er einmal eingerichtet, leicht zu bedienen
ist.
Verwenden Sie die Original-Fernbedienung Ihres
Quellgerätes, um den Kanal zu steuern, den Sie
auf Ihrem DVD-Player oder Videorekorder ansehen
möchten.
AUFENTHALTSRAUM
SCHRITT 1
SCHRITT 2
SCHLAFZIMMER
SCHLAFZIMMER
SCHLAFZIMMER
SCHRITT 3
SCHRITT 4

Seite 28
Onlinesupport an www.digisender.net
DG440 - DigiSender® X7
Die Bedienung zur Auswahl des
Ausgangsgeräts.
Mit der EIN/AUS-Taste wird der
DigiSender Transmitter- und
Empfängermodus auf STANDBY oder EIN
geschaltet. Die LED zeigt den aktuellen
Modus an: GRÜN für EIN, ROT für
STANDBY.
Richten Sie die Fernbedienung auf den
Empfänger und drücken Sie 1, 2, 3 oder
4, um ein Gerät auszuwählen, das mit
Ihrem DigiSender® Transmitter
verbunden ist. Sie könnenz vom
Schlafzimmer aus zwischen Satelliten/Kabelempfänger, DVD-Player,
Videorekorder und Überwachungskamera
umschalten.
1 = DigiConnector™ 1
2 = DigiConnector™ 2
3 = Audiokabel Input 3
4 = Audiokabel Input 4
Verwenden Sie bitte zur Bedienung
Ihres Hauptgeräts dessen ursprüngliche
oder eine kompatible Fernbedienung.
Die beiliegende Fernbedienung kann
dazu nicht verwendet werden.

Seite 29
DG440 - DigiSender® X7
DEUTSCH
Der DigiSender® X7 bietet 4 Audio/Video-Kanäle und 4 FernbedienungsrelaisKanäle. Das Gerät funktioniert nur dann einwandfrei, wenn am Transmitter und
am Empfänger derselbe Audio/Video-Kanal eingestellt ist. Auch der
Fernbedienungsrelais-Kanal muss am Transmitter und am Empfänger gleich sein.
Audio/Video-Kanal
Fernbedienungsrelais-Kanal
Kanal 1 Kanal 2 Kanal 3 Kanal 4
ON
OFF
OFF
OFF
OFF
ON
OFF
OFF
OFF
OFF
ON
OFF
OFF
OFF
OFF
ON
1
2
3
4
Kanaleinstellungen am Empfänger
Kanaleinstellungen am Transmitter

Seite 30
Onlinesupport an www.digisender.net
DG440 - DigiSender® X7
PROBLEMLÖSUNG
Bildprobleme
F: Was sehen Sie
auf Ihrem
zweiten
Fernseher?
Das Bild ist sichtbar aber von
schlechter Qualität
Ich sehe einen schwarzen
oder leeren Bildschirm
Ich sehe Schnee oder einen
blauen Bildschirm
Schalten Sie Ihren
DigiSender®
EMPFÄNGER AUS.
F: Was sehen Sie
jetzt auf dem
zweiten Fernseher?
Schalten Sie Ihren
DigiSender® SENDER
AUS.
F: Was sehen Sie
jetzt auf dem
zweiten Fernseher?
Ich sehe Linien über dem Bild
Dies ist ein Zeichen dafür, dass ein oder mehrere elektrische
Geräte den DigiSender® stören. Um die Quelle der Störung zu
bestimmen, schalten Sie alle Wireless-Netzwerkgeräte, Laptops,
2,4GHz DECT Telefone, Spielekonsolen oder Bluetooth Geräte aus.
Probieren Sie alle 4 Audio/Video Kanäle, da einer oder mehrere
noch frei verfügbar sein können. Besuchen Sie digisender.net
oder kontaktieren Sie unsere Helpline für Informationen zur
Konfiguration und Zusammenarbeit Ihrer Geräte.
HIER
BEGINNEN

Seite 31
DG440 - DigiSender® X7
DEUTSCH
Schwarzer Bildschirm
Schnee oder blauer
Bildschirm...
1. Schalten Sie den DigiSender® Empfänger wieder ein
2. Prüfen Sie, ob der DigiSender® Sender eingeschaltet ist
3. Wählen Sie einen anderen Audio/Video Kanal und achten
Sie darauf, dass derselbe Kanal an Sender und Empfänger
gewählt ist
4. Schalten Sie alle Wireless Kameras und/oder Netzwerke in
Ihrem Haushalt aus.
Dies ist ein Zeichen dafür, dass der SCART Kanal NICHT auf
dem zweiten Fernseher ausgewählt ist. Suchen Sie auf der
Fernbedienung nach Tasten, die den AV Kanal steuern
können, wie EXT, AV, VIDEO, VCR, AUX, Kanal 0 UND .
Immer noch ein schwarzer
Bildschirm...
1.Schalten Sie den Sender wieder ein.
2.Stellen Sie sicher, dass der Sender an Ihr Quellgerät
angeschlossen ist -nicht an Ihren Hauptfernseher.
3.Prüfen Sie, ob das Quellgerät eingeschaltet ist (wie Ihre
Satellit-, Kabel- oder Freeview-Box)
4.Prüfen Sie, ob das Quellgerät (wie Ihr Satellitenreceiver
oder DVD) auf die Ausgabe von CVPAL, PAL oder COMPOSITE
gestellt ist. Inkompatible Typen sind unter anderem S-VIDEO
und RGB.
1.Schalten Sie den Sender wieder ein.
2.Stellen Sie sicher, dass der korrekte SCART Kanal an Ihrem
zweiten Fernseher gewählt ist. Manche Fernseher verfügen
über mehrere Kanäle für ein oder mehr SCART, Phono und SVideo Eingänge.
3.Versuchen Sie falls verfügbar einen anderen SCART
Anschluss am entfernten Fernseher
Jetzt ist es Schnee oder blau
1.Passen Sie den Kontrast A/B Schalter am Sender an
2.Probieren Sie die 3 anderen verfügbaren Kanäle und stellen Sie sicher, dass der Audio/Video Kanal bei
Sender und Empfänger gleich ist
3.Stellen Sie sicher, dass die Geräte innerhalb des Verwendungsbereiches sind, normalerweise beträgt
dieser 40m bei Trennung durch 2 normale Innenwände. Dickere oder Stein/Granit-Mauern können den
Verwendungsbereich dieses Gerätes verringern.
4.Schalten Sie alle Wireless-Computernetzwerkgeräte, 2,4GHz DECT Funktelefone & Mikrowellen aus.

Seite 32
Onlinesupport an www.digisender.net
DG440 - DigiSender® X7
PROBLEMLÖSUNG
Tonprobleme
Bitte befolgen Sie die unten
aufgeführten Anweisungen, wenn Sie
Probleme mit Bild und Ton haben. Falls
dieses Anleitung Ihr Problem nicht löst,
rufen Sie unsere Helpline an.
F: Welcher Art ist
das Problem mit
dem Ton?
Ich kann das Bild sehen,
aber kann nichts hören.
Der Ton ist gestört.
Ich kann ein Brummen
hören. Es scheint
schlechter zu werden,
wenn Menüs oder helle
Bilder angezeigt werden.
Trennen Sie sowohl Sender UND
Empfänger. Schließen Sie die Kabel
wieder an und stellen Sie sicher, dass
sie fest auf die Anschlüsse gesteckt
sind.
Drehen Sie die Lautstärke am
Quellgerät wie Ihrem Satellit-/KabelReceiver herunter.
Ändern Sie die Kontrast A/B
Einstellung am Sender, der an dem
Quellgerät angeschlossen ist.
Es gibt ein Zischen und
die Lautstärke muss am
zweiten Fernseher stark
aufgedreht werden, um
überhaupt etwas zu
hören.
1. Drehen Sie die Ausgabelautstärke
am Quellgerät HOCH falls möglich)
wie Ihrem Satellit-/Kabel-Receiver.
2. Prüfen Sie, ob Sender und
Empfänger innerhalb der
Gebrauchsreichweite sind (ca. 40m)
3. Schalten Sie Ihre Mikrowelle aus,
falls vorhanden.
HIER
BEGINNEN

Seite 33
DG440 - DigiSender® X7
DEUTSCH
Fehlersuche – Fernbedienungserweiterung
Wenn Sie Schwierigkeiten bei der Verwendung der Fernbedienung Ihres
Hauptgeräts im zweiten Zimmer haben, befolgen Sie bitte die nachstehenden
Ratschläge:
1) Stellen Sie sicher, dass der IR Systeme Technik™ IR-Emitter an den
DigiSender® Transmitter angeschlossen ist.
2) Stellen Sie sicher, dass Sie im zweiten Raum die richtige Fernbedienung
verwenden. Wenn Sie beispielsweise Einstellungen am Satellitenkanal ändern
möchten, müssen Sie dazu die Fernbedienung für den Satellitenempfänger
verwenden.
3) Stellen Sie sicher, dass der IR Systeme Technik™ IR-Emitter auf den
Fernbedienungssensor an Ihrem Hauptgerät ausgerichtet ist.
4) Stellen Sie den IR-Emitter mithilfe der beiliegenden
Fernbedienungserweiterung weiter entfernt vom Hauptgerät auf.
5) Stellen Sie den Transmitter UND den Empfänger weiter entfernt von anderen
Elektrogeräten auf.
6) Wählen Sie einen anderen Fernbedienungsrelais-Kanal und achten Sie dabei
darauf, dass für Transmitter und Empfänger derselbe Kanal ausgewählt wird.
7) Halten Sie die Fernbedienung dichter an den DigiSender® Empfänger.
8) Ersetzen Sie die Batterien in der Fernbedienung des Hauptgeräts.

Seite 34
Onlinesupport an www.digisender.net
DG440 - DigiSender® X7
Kundenservice & Technischer Support
AEI Security & Communications Ltd hat
sich dazu verpflichtet, seinen Kunden
einen erstklassigen Kundenservice und
technischen Support anzubieten.
Wir bieten Ihnen hier 2 Verfahren an,
um technische Hilfestellung für dieses
Produkt zu erhalten.
In geschäftigen Zeiten empfehlen wir
Ihnen die Nutzung der Web und E-Mail
Optionen, um Unterstützung zu
erhalten.
1. Im Web...
Kostenlose technische Hilfestellung steht Ihnen
online kostenlos rund um die Uhr auf unserer
speziellen Support-Webseite zur Verfügung:
http://www.aei.eu
2. Per E-Mail...
Sie können unsere Techniker per E-Mail
kontaktieren. Bitte beschreiben Sie ausführlich
Ihr Problem und das von Ihnen erworbene
Modell.
hilfe@digisender.net

Seite 35
DG440 - DigiSender® X7
DEUTSCH
Upgrades & Zubehör
DigiSender® Empfänger - Teil DG44RX
• Fügen Sie so viele Empfänger zu Ihrem
DigiSender® System hinzu, wie Sie wollen.
Antennenanschluss - Teil MOD01PIS
• Schließen Sie einen DigiSender®
Empfänger an einen
Antennenanschluss Ihres TV Gerätes
an.
• Teilt sich die Stromversorgung mit
Ihrem DigiSender®
• Testkarten Signal für einfache
Einrichtung
• Fügt das DigiSender® Signal zu Ihrem
vorhandenen Antennensignal hinzu
http://www.digisender.net
für neueste Infos, Upgrades und technischen Support

Page 36
Support à www.digisender.net
DG440 - DigiSender® X7
Présentation
DigiSender X7 – Émetteur vidéo sans fil avancé
Félicitations, vous venez d'acheter le
DigiSender® X7. Ce produit bénéficie d'une
technologie infrarouge et vidéo sans fil ultra
perfectionnée à un prix défiant toute
concurrence.
Ce système peut également bénéficier d'une
mise à niveau complète. Vous pouvez ajouter
des récepteurs supplémentaires, des
convertisseurs d'antenne, des caméras de
surveillance bébé sans fil et bien d'autres
accessoires.
Le DigiSender® X7 est unique car il est
compatible avec tous les récepteurs
satellite/câble, les magnétoscopes, les lecteurs
DVD actuels ainsi qu'avec la TNT.
Vous avez également la possibilité de choisir la
source vidéo que vous souhaitez regarder sans
bouger de votre lit. Vous pouvez choisir entre le
magnétoscope, le lecteur DVD et le décodeur
câble/satellite, sans que cela n'interfère avec le
canal que vous êtes en train de regarder sur
votre téléviseur principal.
Bénéficiez de 4 canaux vidéo, d'un son hi-fi
en qualité stéréo, de la communication
numérique ainsi que d'un degré de flexibilité
incroyable.
Achetez ce système DigiSender® et découvrez
le nec plus ultra de la technologie de
communication sans fil à domicile.
AVERTISSEMENT – pour
empêcher tout
endommagement, veuillez
ne pas exposer cette unité
à la pluie ou à l'humidité

Page 37
DG440 - DigiSender® X7
FRANCAIS
ETAPE 1 - CONTENU
Vérification du contenu du kit
Tous les poids des paquets
sont vérifiés par ordinateur
lors de l’emballage.
DigiSenderDigiSender
TRANSMITTINGTRANSMITTING
SATSAT
VCRVCR
DVDDVD
AUXAUX
POWER
DigiSenderDigiSender
RECEIVINGRECEIVING
SATSAT
VCRVCR
DVDDVD
AUXAUX
POWER
2 x Blocs d’alimentation
Récepteur DigiSender®
Emetteur DigiSender®
IR System Technik™
DigiSender® télécommande
2x Câble phono

Page 38
Support à www.digisender.net
DG440 - DigiSender® X7
ETAPE 2 - EMETTEUR
Installation du DigiSender® Emetteur X7
L'unité de transmission est conçue pour envoyer les signaux vidéo et sonore
depuis l'une des 4 sources connectées à un récepteur se trouvant dans votre
maison.
À quoi sert le commutateur A/B ?
Branchez le DigiConnector™ 1 sur votre décodeur
satellite ou votre récepteur câble. Utilisez la prise
péritel marquée TV et branchez le cordon péritel (si
fourni) sur la prise arrière du DigiConnector™.
Placez l'émetteur DigiSender® sur une surface
plane à proximité de votre équipement. Ne placez
pas votre émetteur sur un appareil électrique.
Branchez le DigiConnector™ 2 sur votre
magnétoscope ou votre lecteur DVD. Le cas
échéant, utilisez les prises péritels marquées OUT
ou TV. Branchez le câble péritel sur la prise arrière
du DigiConnector™
Le commutateur A/B
sert à équilibrer les
différences
d'équipements/de
configurations. Si la
qualité de l'image
n'est pas bonne après
avoir terminé
l'installation, réglez le
commutateur A/B.
ÉTAPE 1
ÉTAPE 2
ÉTAPE 3
SALON
SALON
SALON

Page 39
DG440 - DigiSender® X7
FRANCAIS
Assurez-vous que le canal 1 est sélectionné (interrupteur
DIP 1 vers le BAS et 2, 3, 4 vers le HAUT). Vous devrez
peut-être procéder à d’autres réglages plus tard – voir le
chapitre dépannage pour les détails
Branchez l'émetteur infrarouge IR Systeme
Technik™ sur la prise marquée IR, située à
l'arrière de l'émetteur. Suivez les étapes au verso
pour installer l'émetteur infrarouge IR Systeme
Technik™.
Branchez l'unité d'alimentation sur la prise
marquée PSU.
Branchez l'unité d'alimentation sur une prise
murale. Appuyez sur le bouton POWER (mise en
marche) de votre télécommande DigiSender pour
allumer l'émetteur.
Evitez de positionner des dispositifs activés sans fil 2,4 GHz tels que les
consoles de jeux modernes, télécommandes, ordinateurs portables,
téléphones ou équipements de réseau à proximité de l’émetteur DigiSender®.
ÉTAPE 4
ÉTAPE 5
ÉTAPE 6 ÉTAPE 7
SALON
SALON
SALON
SALON

Page 40
Support à www.digisender.net
DG440 - DigiSender® X7
ÉTAPE 3 - Installation de l'extension de télécommande IR
Systeme Technik™
Une fois la configuration terminée,
l'extension de télécommande vous permet
d'utiliser votre télécommande dans tous les
endroits de la maison.
Les configurations peuvent varier en
fonction de la façon dont vous installez
l'extension de télécommande.
Ex. 1
Ex. 2
Utilisez les éléments 1 et 2 pour assembler à la
verticale l'émetteur infrarouge. Le voyant
infrarouge doit se trouver face au capteur de votre
équipement.
Assemblez l'émetteur infrarouge à l'horizontale à
l'aide du support antidérapant fourni. Vérifiez que
le voyant infrarouge se trouve face au capteur de
votre équipement.
Accessoire #1
Extension Pieces
Accessoire #2
IR Emitter
SALON
SALON

Page 41
DG440 - DigiSender® X7
FRANCAIS
ETAPE 4 - RECEPTEUR
Installation du DigiSender® Récepteur X7
Le récepteur DigiSender® X7 détecte les signaux transmis depuis l'émetteur et les
restitue au téléviseur. De plus, le récepteur détecte la télécommande utilisée dans
une autre pièce et envoie les signaux à l'équipement situé dans la pièce
principale.
Branchez la prise péritel sur le second téléviseur.
Placez le récepteur DigiSender® sur une surface
plane à proximité de votre second téléviseur. Ne
placez pas le récepteur sur un appareil électrique
(téléviseur ou autres).
Assurez-vous que le canal 1 est sélectionné (interrupteur
DIP 1 vers le BAS et 2, 3, 4 vers le HAUT). Vous devrez
peut-être procéder à d’autres réglages plus tard – voir le
chapitre dépannage pour les détails
PAS DE PRISE PERITEL ?
Il vous faut le
convertisseur aérien
DigiSender®.
Commandez la pièce
MOD-01-PIS
Le convertisseur aérien
vous permet de
connecter le récepteur
DigiSender à toute
télévision sans avoir
besoin d’une prise
Péritel.
ÉTAPE 1
ÉTAPE 2
ÉTAPE 3
CHAMBRE
CHAMBRE
CHAMBRE
Page 42
Support à www.digisender.net
DG440 - DigiSender® X7
Branchez l'unité d'alimentation dans la prise
marquée PSU.
Appuyez sur le bouton POWER (mise en marche)
de votre télécommande DigiSender pour allumer le
récepteur. Le voyant de couleur vert indique que
l'appareil est allumé.
Allumez la seconde télévision et sélectionnez son
canal Péritel. Ceci sera indiqué sur la
télécommande comme l’une des touches suivantss
AV, VIDEO, VCR, AUX, SCART,
EXT, 0 ou
Veuillez vous référer au mode d’emploi de votre TV
pour assistance
Branchez l'unité d'alimentation sur une prise
murale. Appuyez sur le bouton POWER (mise en
marche) de votre télécommande DigiSender pour
allumer l'émetteur.
Le saviez-vous ? Le récepteur peut être branché sur une unité Hi-Fi à l'aide
des sorties audio gauche et droite, situées à l'arrière du récepteur
DigiSender. Un câble phono peut être nécessaire.
ÉTAPE 4
ÉTAPE 6
ÉTAPE 5
CHAMBRE
CHAMBRE
CHAMBRE

Page 43
DG440 - DigiSender® X7
FRANCAIS
ETAPE 5 - FONCTIONNEMENT
Utilisation du DigiSender® X7
Sélectionnez le canal Péritel sur la seconde
télévision en utilisant la télécommande de la
télévision. Cherchez une touche libellée AUX, AV,
VIDEO, VCR ou .
Allumez l’équipement source, par exemple votre
récepteur satellite ou câble.
Sélectionnez l'appareil source de votre choix en
dirigeant la télécommande fournie vers le
récepteur DigiSender® (Voir ci-contre)
Le DigiSender® X7 est conçu pour être simple à utiliser après avoir procédé aux
réglages.
Utilisez la télécommande d’origine de votre
équipement source pour choisir la chaîne que
vous souhaitez regarder ou votre lecteur DVD ou
votre magnétoscope.
ÉTAPE 1
ÉTAPE 3
SALON
CHAMBRE
CHAMBRE
CHAMBRE
ÉTAPE 2
ÉTAPE 4

Page 44
Support à www.digisender.net
DG440 - DigiSender® X7
Commandes de sélection de la source
de l'émetteur.
Le bouton POWER (mise en marche)
permet de passer du mode STANDBY
(mise en veille) au mode ON (marche)
sur le récepteur-émetteur DigiSender.
Lorsque le voyant est vert, l'appareil est
en mode ON (marche), et lorsqu'il est
rouge, il est en mode STANDBY (mise en
veille).
Appuyez sur 1, 2, 3 ou 4 en dirigeant la
télécommande vers votre récepteur pour
sélectionner l'appareil connecté à votre
émetteur DigiSender®. Par exemple, vous
pouvez passer du décodeur
satellite/câble, du lecteur DVD ou du
magnétoscope à la caméra de
surveillance sans bouger de votre lit.
1 = DigiConnector™ 1
2 = DigiConnector™ 2
3 = Câble phono 3
4 = Câble phono 4
Veuillez utiliser votre télécommande
originale et compatible pour contrôler
votre équipement et non la
télécommande fournie.

Page 45
DG440 - DigiSender® X7
FRANCAIS
Le DigiSender® X7 comprend 4 canaux audio/vidéo et 4 canaux de relais de
télécommande principaux. Pour que l'unité fonctionne correctement, le canal
audio/vidéo et le canal de relais de télécommande doivent être configurés de la
même façon sur l'émetteur et le récepteur.
Canal audio/vidéo
Canal de relais de télécommande
Canal 1 Canal 2 Canal 3 Canal 4
ON
OFF
OFF
OFF
OFF
ON
OFF
OFF
OFF
OFF
ON
OFF
OFF
OFF
OFF
ON
1
2
3
4
Paramètres du canal du récepteur
Paramètres du canal de l'émetteur

Page 46
Support à www.digisender.net
DG440 - DigiSender® X7
DEPANNAGE
Problèmes d’image
Q : Que voyezvous sur votre
seconde
télévision ?
J’ai de l’image mais elle est
de mauvaise qualité.
Je vois un écran noir ou blanc
Je vois un effet neigeux ou
un écran tout bleu
ETEIGNEZ votre
RECEPTEUR
DigiSender.
Q : Que voyez-vous
maintenant sur la
seconde télévision ?
ETEIGNEZ votre
EMETTEUR
DigiSender.
Q : Que voyez-vous
maintenant sur la
seconde télévision ?
Je vois des lignes par-dessus
l’image
Ceci indique qu’un ou plusieurs dispositifs électriques sont en
interférence avec le DigiSender. Pour vérifier la source de
l’interférence, ETEIGNEZ tout équipement de réseau sans fil,
ordinateurs portables, téléphones sans fil 2,4 GHz, consoles de
jeux ou dispositifs Bluetooth. Essayez les 4 canaux audio/vidéo
car un ou plus peuvent encore être disponibles. Rendez-vous
sur digisender.net ou contactez notre service d’assistance
téléphonique pour toutes informations sur la configuration de
votre équipement.
COMMENCEZ
ICI

Page 47
DG440 - DigiSender® X7
FRANCAIS
Ecran noir
Toujours neigeux ou bleu…
1. Rallumez le récepteur DigiSender®
2. Assurez-vous que l’émetteur DigiSender® est allumé
3. Sélectionnez un canal audio/vidéo différent en vous assurant que le
même canal est sélectionné à la fois sur l’émetteur et sur le récepteur.
4. Eteignez toutes caméras et/ou réseaux sans fil dans votre maison.
Ceci indique que le canal Péritel N’a PAS été sélectionné sur la
seconde télévision. Cherchez les touches sur la télécommande de
cette télévision qui pourraient sélectionner le canal AV, telles que EXT,
AV, VIDEO, VCR, AUX, canal 0 ou
Toujours un écran noir…
1. Rallumez l’émetteur.
2. Assurez-vous que l’émetteur est connecté à votre dispositif source –
pas à votre télévision principale.
3. Assurez-vous que l’équipement source est allumé (par exemple
votre décodeur satellite, câble ou votre boîtier Freeview)
4. Assurez-vous que le dispositif source (par exemple votre récepteur
satellite ou votre lecteur DVD) est réglé sur la sortie CVPAL, PAL ou
COMPOSITE. Les types incompatibles comprennent S-VIDEO et RGB.
1. Rallumez l’émetteur.
2. Assurez-vous que le bon canal Péritel est sélectionné sur votre
seconde télévision. Certaines télévisions sont équipées de canaux
multiples pour une ou plusieurs entrées Péritel, phono et S-Vidéo.
3. Si disponible, essayez une autre prise Péritel sur la télévision
éloignée.
C’est maintenant de la neige
ou une image bleue
1. Réglez l’interrupteur de contraste A/B sur la Péritel de l’émetteur
2. Essayez les 3 autres canaux disponibles pour vous assurer que le canal audio/vidéo est le même à la fois sur l’émetteur
et sur le récepteur.
3. Assurez-vous que les unités sont dans la zone de portée, cela devrait normalement être 40 mètres pour un passage à
travers 2 murs internes. Des murs plus épais ou en pierre/granite peuvent affaiblir la portée de ce dispositif.
4. Eteignez tous les dispositifs informatiques sans fil, les téléphones sans fil 2,4 GHz et les fours à micro-ondes.

Page 48
Support à www.digisender.net
DG440 - DigiSender® X7
DEPANNAGE
Problèmes de son
Veuillez suivre le guide ci-dessous si
vous avez des problèmes d’image et de
son.
Q : Quel semble
être le problème
avec le son ?
Je peux voir l’image mais
je n’entends rien.
Le son est distordu.
Le son bourdonne. Cela
semble empirer lors de
l’affichage des menus à
l’écran ou quand il y a
des images claires.
1. Débranchez la Péritel de l’émetteur
ET du récepteur. Rebranchez les
câbles en vous assurant qu’ils sont
fermement insérés dans les prises.
Baissez le volume du dispositif source ;
par exemple de votre récepteur
satellite/câble ou de votre lecteur DVD.
Changez le réglage du contraste A/B
sur l’émetteur DigiConnector™
connecté à l’équipement incriminé.
Il y a un sifflement et le
volume doit être
augmenté sur la seconde
TV pour entendre
quelque chose.
1. AUGMENTEZ (si possible) le
volume de sortie de l’équipement
source ; par exemple de votre
récepteur satellite/câble ou de votre
lecteur DVD.
2. Assurez-vous que l’émetteur et le
récepteur sont dans la zone de portée
utilisable (environ 40 mètres)
3. Eteignez votre four à micro-ondes si
vous en avez un.
COMMENCEZ
ICI

Page 49
DG440 - DigiSender® X7
FRANCAIS
Dépannage – Extension de télécommande
Si vous rencontrez des difficultés pour faire fonctionner la télécommande de
votre équipement dans une autre pièce, veuillez suivre les conseils ci-dessous:
1) Vérifiez que l'émetteur infrarouge IR Systeme Technik™ est branché sur
l'émetteur DigiSender®.
2) Vérifiez que vous utilisez la télécommande appropriée dans l'autre pièce. Par
exemple, si vous essayez de régler le canal du décodeur satellite, vous devrez
utiliser la télécommande de ce dernier.
3) Vérifiez que l'émetteur infrarouge IR Systeme Technik™ est positionné face au
capteur de votre équipement.
4) Éloignez l'émetteur infrarouge de l'équipement à l'aide de la rallonge fournie.
5) Éloignez l'émetteur ET le récepteur des autres appareils électriques.
6) Choisissez un nouveau canal de relais de télécommande en sélectionnant le
même canal sur l'émetteur et le récepteur.
7) Utilisez la télécommande à proximité du récepteur DigiSender®.
8) Changez les piles de la télécommande source.

Page 50
Support à www.digisender.net
DG440 - DigiSender® X7
Service à la clientèle et support technique
AEI Security & Communications Ltd
s’engage à apporter à nos clients un
service à la clientèle et un support
technique de première classe.
Nous vous avons fourni 2 méthodes
pour l’obtention d’un avis technique à
propos de ce produit.
Pendant les périodes chargées, nous
vous suggérons d’utiliser les options
Internet et E-mail afin d’obtenir un
support.
1. Sur Internet…
Un service technique gratuit est disponible 24
heures/24 et 7 jours/7 sur notre site Internet
dédié au support :
http://www.aei.eu
2. Par E-mail…
Vous pouvez contacter nos ingénieurs par Email. Veuillez vous assurer d’expliquer
clairement votre modèle et d’indiquer le modèle
d’appareil que vous avez acheté.
aide@digisender.net

Page 51
DG440 - DigiSender® X7
FRANCAIS
Mises à jour et accessoires
Récepteur DigiSender® - DG44RX
• Ajoutez autant de récepteurs que vous
voulez à votre système DigiSender
Convertisseur aérien - MOD01PIS
• Connectez un récepteur DigiSender®
à une prise aérienne sur votre T.V.
• Partage le bloc d’alimentation avec
votre DigiSender®
• Signal test de la carte pour un
réglage facile.
• Ajoute le signal du DigiSender® à
votre signal aérien existant
http://www.digisender.net

Pagina 52
Support à www.digisender.net
DG440 - DigiSender® X7
Inleiding
DigiSender® X7 – geavanceerde draadloze videozender
Gefeliciteerd met de aankoop van uw
DigiSender® X7. Met dit product haalt u zeer
scherp geprijsde en geavanceerde draadloze
video- en infraroodtechnologie in huis.
Het systeem is volledig uitbreidbaar. Zo kunt u
extra ontvangers, antenneconvertors, draadloze
babyfoons met beeld en talloze andere
apparatuur toevoegen.
Wat de DigiSender® X7 zo uniek maakt, is het
feit dat dit systeem compatibel is met bijna alle
satellietschotels, kabelontvangers,
videorecorders, dvd-spelers en freeview-boxen
op de markt.
Bovendien kunt u vanuit uw slaapkamer
selecteren naar welke videobron u wilt kijken.
Zo kunt u kiezen tussen uw videorecorder, uw
dvd-speler en satelliet-/kabeltelevisie zonder dat
dit van invloed is op het kanaal dat op de eerste
tv wordt gekeken.
Profiteer van vier videokanalen, geweldig
stereogeluid van hifi-kwaliteit en digitale
communicatie en geniet van ongekende
flexibiliteit.
Met de aanschaf van dit DigiSender®-systeem
investeert u in de allernieuwste draadloze
communicatietechnologie voor thuisgebruik.
WAARSCHUWING - Stel dit
apparaat niet bloot aan
regen of vocht om het niet
te beschadigen.

Pagina 53
DG440 - DigiSender® X7
NEDERLANDS
STAP 1 - INHOUD
Controleer de kit op inhoud
Alle pakketten worden op
gewicht gecontroleerd door
een computer bij het inpakken.
Toch is het een goed idee om
te controleren of alle
onderdelen van de kit
aanwezig zijn vooraleer u met
de installatie begint.
DigiSenderDigiSender
TRANSMITTINGTRANSMITTING
SATSAT
VCRVCR
DVDDVD
AUXAUX
POWER
DigiSenderDigiSender
RECEIVINGRECEIVING
SATSAT
VCRVCR
DVDDVD
AUXAUX
POWER
2 x stroom
DigiSender®Ontvanger
DigiSender® Zender
IR System Technik™
DigiSender® afstandsbediening
2x De fonokabel

Pagina 54
Support à www.digisender.net
DG440 - DigiSender® X7
STAP 2 - ZENDER
Installeer de DigiSender® X7 Zendapparaat
De zender is ontworpen om beeld en geluid van een van de max. vier aangesloten
bronnen naar een ontvanger elders in huis te sturen.
Waarvoor dient de A/B-schakelaar?
Sluit DigiConnector™ 1 op uw satelliet- of
kabelontvanger aan. Gebruik de SCART-aansluiting
met de aanduiding TV en sluit de reeds gebruikte
SCART-kabel (indien aanwezig) aan op de
aansluiting aan de achterzijde van de
DigiConnector™.
Plaats de DigiSender®-zender op een vlakke
ondergrond in de buurt van de bronapparatuur.
Plaats de zender niet op andere elektronische
apparaten.
Sluit DigiConnector™ 2 op uw videorecorder of
dvd-speler aan. Gebruik indien mogelijk een
SCART-aansluiting met de aanduiding OUT of TV.
Sluit de reeds gebruikte SCART-kabel aan op de
achterzijde van de DigiConnector™.
De A/B-contrastschakelaar
kan worden gebruikt om
problemen met
verschillende soorten
apparatuur/verschillende
instellingen op te lossen.
Als de installatie is
voltooid en de
beeldkwaliteit slecht is,
kunt u dit verhelpen door
de A/B-instelling aan te
passen.
STAP 1
STAP 2
STAP 3
ZITKAMER
ZITKAMER
ZITKAMER

Pagina 55
DG440 - DigiSender® X7
NEDERLANDS
Vergewis u er van dat kanaal 1 is geselecteerd
(DIP schakelaar 1 NEER, en 2, 3, 4 OMHOOG).
Later kunnen aanpassingen nodig zijn - zie de
probleemoplossingssectie voor details.
Sluit de IR Systeme Technik™-infraroodzender op
de aansluiting met de aanduiding IR op de
achterzijde van de zender aan. Voer de stappen op
de achterzijde uit om de IR Systeme Technik™infraroodzender te installeren.
Sluit de voedingsadapter op de aansluiting met de
aanduiding PSU aan.
Sluit de voedingsadapter op een stopcontact aan.
Druk op de aan-uitknop op de afstandsbediening
van de DigiSender om de zender in te schakelen.
Vermijd het plaatsen van 2,4 GHz draadloze toestellen zoals moderne
spelconsoles, draadloze controllers, laptops, DECT telefoons of draadloze
netwerkapparatuur dichtbij de DigiSender® zender.
STAP 4
STAP 5
STAP 6 STAP 7
ZITKAMER
ZITKAMER
ZITKAMER
ZITKAMER

Pagina 56
Support à www.digisender.net
DG440 - DigiSender® X7
STAP 3 - De IR Systeme Technik™-extender voor de
afstandsbediening installeren.
Als de extender voor de afstandsbediening
eenmaal juist is ingesteld, kunt u hiermee
uw afstandsbediening vanuit de andere
kamer in uw huis gebruiken.
Aangezien iedereen andere instellingen
gebruikt, kan de extender voor de
afstandsbediening op verschillende
manieren worden geïnstalleerd.
Ex. 1
Ex. 2
Gebruik accessoires 1 en 2 om de infraroodzender
verticaal te installeren zodat het infraroodlampje
naar de afstandsbedieningssensor van de
bronapparatuur is gericht.
Installeer de infraroodzender horizontaal met de
meegeleverde dubbelzijdige sticker. Zorg ervoor
dat het infraroodlampje naar de
afstandsbedieningssensor van de bronapparatuur
is gericht.
Het onderdeel #1
Extension Pieces
Het onderdeel #2
IR Emitter
ZITKAMER
ZITKAMER

Pagina 57
DG440 - DigiSender® X7
NEDERLANDS
STAP 4 - ONTVANGER
Installeer het DigiSender® X7 Ontvangapparaat
De DigiSender® X7-ontvanger vangt door de zender uitgezonden signalen op en
stuurt deze door naar een televisie. De ontvanger detecteert ook de signalen van
afstandsbedieningen die in de andere kamer worden gebruikt en stuurt deze door
naar de bronapparatuur in de woonkamer.
Sluit de SCART-output op de tweede televisie aan.
Plaats de DigiSender®-ontvanger op een vlakke
ondergrond in de buurt van de tweede televisie.
Plaats de ontvanger niet op andere elektronische
apparaten zoals de televisie.
Vergewis u er van dat kanaal 1 is geselecteerd
(DIP schakelaar 1 NEER, en 2, 3, 4 OMHOOG).
Later kunnen aanpassingen nodig zijn - zie de
probleemoplossingssectie voor details.
GEEN SCART-BUS?
U hebt de DigiSender®
antenneconvertor nodig. Vraag
naar onderdeel MOD-01-PIS
De antenneconvertor
stelt u in staat de
DigiSender ontvanger
aan om het even welk
televietoestel aan te
sluiten zonder dat
daarvoor een SCART-bus
nodig is.
STAP 1
STAP 2
STAP 3
SLAAPKAMER
SLAAPKAMER
SLAAPKAMER

Pagina 58
Support à www.digisender.net
DG440 - DigiSender® X7
Sluit de voedingsadapter op de aansluiting met de
aanduiding PSU aan.
Druk op de aan-uitknop op de afstandsbediening
van de DigiSender om de ontvanger in te
schakelen. Het voedingslampje wordt groen om
aan te geven dat het apparaat is ingeschakeld.
Schakel de tweede televisie en selecteer zijn
SCART-kanaal. Dit zal op de afstandsbediening
vermeld staan als:
AV, VIDEO, VCR, AUX, SCART,
EXT, 0 of
Consulteer de handleiding van uw TV voor verdere
hulp
Sluit de voedingsadapter op een stopcontact aan.
Druk op de aan-uitknop op de afstandsbediening
van de DigiSender om de zender in te schakelen.
U kunt de ontvanger met de linker en rechter audio-output aan de achterzijde
van de DigiSender-ontvanger op een hifi-installatie aansluiten.
Mogelijk hebt u hiervoor een fono-kabel nodig.
STAP 4
STAP 5
STAP 6
SLAAPKAMER
SLAAPKAMER
SLAAPKAMER

Pagina 59
DG440 - DigiSender® X7
NEDERLANDS
STAP 5 - BEDIENING
De DigiSender® X7 gebruiken
Selecteer het SCART-kanaal op de tweede televisie
door de afstandsbediening van de televisie te
gebruiken. Zoek naar een knop met AUX, AV,
VIDEO, VCR of
Schakel de bronapparatuur zoals uw satelliet- of
kabelontvanger aan.
Selecteer het juiste bronapparaat door de
meegeleverde afstandsbediening op de
DigiSender®-ontvanger te richten (zie hiernaast).
De DigiSender® X7 is ontworpen om gemakkelijk te gebruiken eens ingesteld.
Gebruik de originele afstandsbediening van uw
bronapparatuur om te controleren welk kanaal u
wil zien of DVD-speler of VCR.
STAP 1
STAP 2
STAP 3
ZITKAMER
SLAAPKAMER
SLAAPKAMER
STAP 4
SLAAPKAMER

Pagina 60
Support à www.digisender.net
DG440 - DigiSender® X7
Knoppen voor het selecteren van de
zenderbron.
Druk op de aan-uitknop om de
DigiSender-ontvanger en -zender op
STAND-BY of AAN te zetten. Het
voedingslampje geeft aan of de
apparatuur aan of op stand-by staat:
GROEN = AAN, ROOD = STAND-BY.
Richt de afstandsbediening op de
ontvanger en druk op 1, 2, 3 of 4 om het
betreffende, op de DigiSender®-zender
aangesloten apparaat te selecteren. Zo
kunt u vanuit uw slaapkamer wisselen
tussen bijvoorbeeld satelliet-/kabel-tv,
uw dvd-speler, uw videorecorder en uw
bewakingscamera.
1 = DigiConnector™ 1
2 = DigiConnector™ 2
3 = De fonokabel 3
4 = De fonokabel 4
Gebruik de originele of andere
compatibele afstandsbedieningen voor
uw bronapparatuur. De meegeleverde
afstandsbediening kan niet voor deze
apparatuur worden gebruikt.

Pagina 61
DG440 - DigiSender® X7
NEDERLANDS
De DigiSender® X7 beschikt over vier audio-/videokanalen en vier primaire
relaiskanalen voor de afstandsbediening. De eenheid functioneert uitsluitend naar
behoren als op de zender en de ontvanger hetzelfde audio-/videokanaal is
ingesteld. Ook moet op de zender en de ontvanger hetzelfde relaiskanaal voor de
afstandsbediening worden ingesteld.
Audio-/videokanaal
Relaiskanaal voor de afstandsbediening
Kanaal 1 Kanaal 2 Kanaal 3 Kanaal 4
ON
OFF
OFF
OFF
OFF
ON
OFF
OFF
OFF
OFF
ON
OFF
OFF
OFF
OFF
ON
1
2
3
4
Instellingen ontvangstkanaal
Instellingen zendkanaal

Pagina 62
Support à www.digisender.net
DG440 - DigiSender® X7
PROBLEEMOPLOSSING
Beeldproblemen
V: Wat ziet u op
uw tweede
televisie?
Er is beeld maar de kwaliteit
is niet goed
Ik zie een zwart of leeg scherm
Ik zie een sneeuwstormeffect
of een vol blauw scherm
Schakel uw
DigiSender®
ontvanger uit.
V: Wat ziet u nu op
de tweede televisie?
Schakel uw
DigiSender® zender
uit.
V: Wat ziet u nu op
de tweede televisie?
Ik zie lijnen over het beeld
Dit duidt aan dat één of meer elektrische apparaten interfereren met de
DigiSender®. Om zeker te zijn van de bron van de interferentie, schakel
elk draadloos netwerkapparaat, laptops, 2,4 GHz DECT telefoons,
spelconsoles of bluetooth-apparaten uit. Probeer alle 4 audio/videokanalen want er zou één of meer ervan nog beschikbaar kunnen zijn.
Bezoek www.digisender.net of contacteer onze helplijn voor informatie
over het configureren van uw apparatuur zodat het samenwerkt.
BEGIN
HIER

Pagina 63
DG440 - DigiSender® X7
NEDERLANDS
Zwart scherm
Nog steeds sneeuwstorm of
blauw...
1. Schakel de DigiSender® Ontvanger terug aan
2. Zorg er voor dat de DigiSender® Zender ingeschakeld is
3. Kies een ander audio/video-kanaal waarbij u er voor zorgt dat
hetzelfde kanaal gekozen wordt voor zowel de zender als de
ontvanger
4. Schakel elke draadloze camera en/of netwerk uit in uw huis.
Dit duidt er op dat het SCART-kanaal NIET werd geselecteerd op de
tweede televisie. Zoek naar de knoppen op de afstandsbediening van
deze televisie die het AV-kanaal kunnen selecteren zoals EXT, AV,
VIDEO, VCR, AUX, Kanaal 0 of
Nog steeds een zwart scherm...
1. Schakel de zender terug aan.
2. Zorg er voor dat de zender aangesloten is aan uw bronapparaat niet uw eerste televisie.
3. Zorg er voor dat de bronapparatuur ingeschakeld is (zoals uw
satelliet-, kabel- of freeview-box)
4. Zorg er voor dat het bronapparaat (zoals uw satellietontvanger of
DVD) ingesteld is op output CVPAL, PAL of COMPOSITE.
Incompatibele types omvatten S-VIDEO en RGB.
1. Schakel de zender terug aan.
2. Zorg er voor dat het juiste SCART-kanaal is geselecteerd op uw
tweede televisie. Sommige televisies hebben meerdere kanalen voor
één of meer SCART-, fono- en S-Video-inputs.
3. Indien beschikbaar, probeer een andere SCART-stekker op de
tweede televisie
Het is nu een sneeuwstorm of
blauw
1. Regel de A/B contrastschakelaar op de zender
2. Probeer de 3 andere beschikbare kanalen en zorg er voor dat het audio/video-kanaal hetzelfde ingesteld is op zowel de
zender als de ontvanger
3. Vergewis u er van dat de apparaten binnen het gebruiksbereik staan, dit is normal gezien 40 m wanneer het door 2
gewone binnenmuren moet. Dikkere of steen/granieten muren kunnen het bereik van dit toestel inperken.
4. Schakel elk draadloos computernetwerkapparaat, 2,4 GHz DECT draadloze telefoons en microgolfovens uit.

Pagina 64
Support à www.digisender.net
DG440 - DigiSender® X7
PROBLEEMOPLOSSING
Geluidsproblemen
Gelieve de gids beneden te volgen
indien u problemen hebt met het beeld
en geluid.
V: Wat is er aan
de hand met het
geluid?
Ik heb beeld maar ik hoor
niets.
Het geluid is vervormd.
Er is een zoemend geluid.
Het lijkt te verergeren bij
on-screen menu's of
helder beeld.
1. Ontkoppel de SCARTs van zowel de
zender als de ontvanger. Verbind de
lijnen opnieuw waarbij u er voor zorgt
dat ze vast in de stekkers zitten.
Zet het volume op het bronapparaat
zoals uw satelliet-/kabelontvanger of
DVD-speler lager.
Verander de A/B constrastinstelling op
de DigiConnector™ zender die
verbonden is met het storende
apparaat.
Er is een sissend geluid
en de volumeknop moet
hoger gezet worden op
de tweede TV om ook
maar iets te horen.
1. Draai het outputvolume hoger
(indien mogelijk) op de
bronapparatuur, zoals uw satelliet/kabelontvanger of DVD-speler.
2. Zorg er voor dat de zender en de
ontvanger binnen bruikbaar bereik
staan (40 m gemiddeld)
3. Schakel uw microgolfoven uit
indien u die hebt.
BEGIN
HIER

Pagina 65
DG440 - DigiSender® X7
NEDERLANDS
Problemen oplossen – Extender voor de afstandsbediening
Doe het volgende als het u niet lukt uw bronapparatuur vanuit de andere
kamer met de afstandsbediening te bedienen:
1) Controleer of de IR Systeme Technik™-infraroodzender op de DigiSender®zender is aangesloten.
2) Zorg ervoor dat u in de andere kamer de juiste afstandsbediening gebruikt. Zo
dient u als u het satellietkanaal wilt veranderen de afstandsbediening van de
satellietschotel te gebruiken.
3) Controleer of de IR Systeme Technik™-infraroodzender naar de
afstandsbedieningssensor van uw bronapparatuur is gericht.
4) Zet de infraroodzender met behulp van het meegeleverde verlengstuk verder bij
de bronapparatuur vandaan.
5) Zet zowel de zender als de ontvanger verder bij de andere elektronische
apparatuur vandaan.
6) Selecteer een nieuw relaiskanaal voor de afstandsbediening en zorg ervoor dat
op de zender en de ontvanger hetzelfde kanaal is ingesteld.
7) Houd de afstandsbediening dichterbij de DigiSender®-ontvanger.
8) Vervang de batterijen van de afstandsbediening van de bronapparatuur.

Pagina 66
Support à www.digisender.net
DG440 - DigiSender® X7
Klantendienst & Technische Ondersteuning
AEI Security & Communications Ltd
verbindt zich ertoe hun klanten van een
eersteklas klantendienst en technische
ondersteuning te voorzien.
Wij hebben 2 methodes voor u om
technisch advies over dit product te
krijgen.
In drukke periodes zouden we u
voorstellen om het web en de e-mailmogelijkheden te gebruiken om
ondersteuning te krijgen.
1. Op het web...
Gratis technisch advies is on-line beschikbaar
24/7 op onze speciaal daarvoor gemaakte
ondersteunende website:
http://www.aei.eu
2. Per e-mail...
U kan onze ingenieurs contacteren per e-mail.
Zorg er voor dat u uw probleem duidelijk uitlegt
en dat u vermeldt welk model u aangekocht
hebt.
hulp@digisender.net

Pagina 67
DG440 - DigiSender® X7
NEDERLANDS
Upgrades & Accessoires
DigiSender® Ontvanger - DG44RX
• Voeg zoveel ontvangers toe als u nodig
hebt aan uw DigiSender® systeem
Antenneconverter - MOD01PIS
• Verbindt een DigiSender® ontvanger
met een antennestekker op uw TV
• Deelt de stroomvoorziening met uw
DigiSender
• Testkaartsignaal voor makkelijke
instelling
• Voegt het DigiSender® signaal toe
aan uw bestaand luchtsignaal
http://www.digisender.net

Page 68
Online Support at www.digisender.net
DG440 - DigiSender® X7
NOTES

Page 69
Please read this instruction manual carefully prior to installation
DG440 - DigiSender® X7
ENGLISH
NOTES

Page 70
Online Support at www.digisender.net
DG440 - DigiSender® X7
NOTES


SPECIFICATIONS
Transmitter :
Remote Relay Receiver 433.92MHz
Audio/Video Frequency 2.4000GHz ~ 2.4835GHz
Channel Frequency Channel 1 2.414GHz
Channel 2 2.432GHz
Channel 3 2.450GHz
Channel 4 2.468GHz
Modulation FM
Video Input Level 1V PP/75Ω
Colour Video Input Phase Alternate Line (PAL)
Audio Input Level 1.0v PP (Mod 1KHz, Dev 15KHz)
Audio Bandwidth 10Hz - 22KHz (-1dB)
Input Connectors DigiConnector Euro SCART x2, RCA Phono x2
Power Source DC
Receiver :
Remote Relay Transmitter 433.92MHz
Audio/Video Frequency 2.4000GHz ~ 2.4835GHz
Modulation FM
Video Output Level 1V PP/75Ω
Sensitivity -80dBm
Audio Output Level 1.0V PP (Mod 1KHz, Dev 15KHz)
Audio Bandwidth 10Hz - 22KHz (-1dB)
Output Connectors Euro SCART
Power Source DC
Approvals See Decleration of Conformity
Antenna System Internal Omni-directional dipole (2.4GHz)
Omni-directional dipole (433.92MHz)
System Range ≤ 200metres free air space
≈ 40 metres in-building (through walls)
Remote Relay Protocol Coding RC5, RC6, Active Digital
IrDA 16 Channel
(c)2008 AEI Security & Communications Ltd. All rights reserved.
Registered in England: 02831823
AEI Security & Communications Ltd
Weslake Industrial Park
Rye Harbour Road, Rye
East Sussex
TN31 7TE
United Kingdom
DigiConnector, IR Systeme Technik and DigiEye are trademarks of AEI Security & Communications Ltd
DigiSender is a registered trademark of AEI Security & Communications Ltd
 Loading...