

Page 1
Page 2
ai sensi del Decreto Legislativo N° 49 del 14 Marzo 2014
“Attuazione della Direttiva 2012/19/UE sui rifiuti di
apparecchiature elettriche ed elettroniche (RAEE)”
Il simbolo del cassonetto barrato riportato sull’apparecchiatura indica
che il prodotto alla fine della propria vita utile deve essere raccolto
separatamente dagli altri rifiuti. L’utente dovrà, pertanto, conferire
l’apparecchiatura integra dei componenti essenziali giunta a fine vita
agli idonei centri di raccolta differenziata dei rifiuti elettronici ed
elettrotecnici, oppure riconsegnarla al rivenditore al momento
dell’acquisto di nuova apparecchiatura di tipo equivalente, in ragione di
uno a uno, oppure 1 a zero per le apparecchiature aventi lato
maggiore inferiore a 25 cm. L’adeguata raccolta differenziata per
l’avvio successivo dell’apparecchiatura dimessa al riciclaggio, al
trattamento e allo smaltimento ambientale compatibile contribuisce ad
evitare possibili effetti negativi sull’ambiente e sulla salute e favorisce il
riciclo dei materiali di cui è composta l’apparecchiatura. Lo
smaltimento abusivo del prodotto da parte dell’utente comporta
l’applicazione delle sanzioni amministrative di cui al D.Lgs n. 152/2006
nonché quelle previste dal D.Lgs N° 49 del 14 Marzo 2014.
I termini HDMI, Interfaccia
(HDMI HighDefinition Multimedia Interface), immagine
commerciale HDMI (HDMI Trade dress) e i loghi HDMI
sono marchi commerciali o marchi commerciali registrati
di HDMI Licensing Administrator, Inc.
Audio e il simbolo della doppia D sono marchi di Dolby
Laboratories Licensing Corporation.
Fabbricato da DIGIQUEST SOLUTIONS S.p.A. Sede legale
Via Privata Fratelli Gabba, 5 - 20121 Milano | Sede operativa
multimediale ad alta definizione HDMI
Via Avisio, 18 - 00048 Nettuno (RM) - Italy. Made in China
DIGIQUEST SOLUTIONS S.p.A. dichiara
che questo prodotto è conforme alla direttiva
2014/53/UE. Il testo completo della
dichiarazione di conformità UE è disponibile
al seguente indirizzo Internet:
www.digiquest.it /certificazioni.html
Prodotto su licenza di Dolby
Laboratories. Dolby, Dolby
Page 3
SICUREZZA E PRECAUZIONI
ATTENZIONE: per ridurre i rischi di scosse elettriche, non aprire
l’apparecchio. Qualunque intervento dovrà essere affidato ad un
tecnico specializzato. L’apertura del ricevitor e comporta la decadenza
automatica della garanzia.
Questo simbolo indica voltaggio pericoloso all’interno del
prodotto, con rischio di scossa elettrica e danni alle
persone.
Questo simbolo indica che ci sono importanti istruzioni
che accompagnano l’apparecchio.
Leggere attentamente il manuale prima
di iniziare ad utilizzare lo stick.
Conservare le istruzioni per una futura
consultazione. Non aprire l'apparecchio,
toccare i componenti interni potrebbe
provocare scosse elettriche. La mancata
osservanza di queste precauzioni può
provocare danni, incendi o scosse
elettriche, con possibili lesioni gravi!
Azionare l’apparecchio solo con la
tensione indicata sulla targhetta. Questo
apparecchio viene alimentato con
corrente tramite una presa USB.
Assicurarsi che la presa USB possa
erogare il valore di corrente stampato
sull’etichetta dell’apparecchio. Se si
Page 4

collegano ulteriori apparecchi USB al
cavo di attacco USB incluso nella
fornitura, la presa USB dovrà erogare
aggiuntivamente corrente.
Non effettuare operazioni di collegamento o
scollegamento con mani bagnate o a piedi
nudi. Non utilizzare oggetti come leve per
staccare la spina da una presa. In caso di
odore di bruciato o fumo, staccare
immediatamente la spina e contattare
l’assistenza.
LIQUIDI. Non esporre l’apparecchio a
gocce o schizzi di liquidi e non porre
sull’apparecchio nessun oggetto con
liquido all’interno, come vasi o simili. Non
posizionare in luoghi umidi e non toccare
mai con mani bagnate o umide o durante i
temporali. Se un liquido penetra all’interno
dell’apparecchio scollegare
immediatamente e rivolgersi ad un
tecnico.
PULIZIA. Prima di pulire gli apparecchi
disconnettere il cavo di alimentazione
dalla presa. Per spolverare, usare
sempre un panno leggermente umido
(senza solventi, né detergenti).
VENTILAZIONE. Le fessure del
ricevitore devono essere lasciate
scoperte per permettere un’appropriata
ventilazione. Lasciare intorno
all’apparecchio uno spazio sufficiente per
garantire un’areazione corretta (10 cm
ogni lato). Non porre l’apparecchio su
tappeti o simili.
Page 5

Durante il funzionamento l’apparecchio si
riscalda. Ciò non deve essere
interpretato come malfunzionamento.
OGGETTI. Non inserire mai oggetti nelle
fessure del ricevitore. Se ciò accade
scollegare l’apparecchio e rivolgersi ad
un tecnico.
UTILIZZO RISERVATO A PERSONE
ADULTE. Il bene acquistato è un
congegno elettronico sofisticato per cui
assolutamente non idoneo all’uso da parte
di minori. Non si risponde dei danni
verificatisi a persone e cose derivanti
dall’utilizzo del bene da parte di soggetti
minori. Tenere l’apparecchio fuori dalla
portata dei bambini. I sacchetti di plastica
degli imballaggi possono essere pericolosi.
Per evitare soffocamenti, tenere i sacchetti
lontani dalla portata dei bambini. Le
batterie e altri componenti di dimensioni
ridotte possono essere ingeriti dai bambini.
Si raccomanda di tenerle fuori dalla loro
portata.
ACCESSORI. Non utilizzare accessori o
parti di ricambio non originali, potrebbero
causare danni al ricevitore.
CONNESSIONE ALLA TV O AD ALTRI
APPARECCHI. Disconnettere gli
apparecchi dalla presa di corrente prima
di connettere o disconnettere i cavi.
Prima di effettuare collegamenti con altri
apparecchi leggere le istruzioni per l’uso
degli apparecchi stessi. L’antenna deve
essere installata da un tecnico
Page 6

specializzato.
LOCAZIONE. Installare il ricevitore in
luoghi protetti da raggi solari diretti o
pioggia. Non posizionare vicino a fonti di
calore. Non porre nessun altra
apparecchiatura elettronica sul ricevitore.
Non usare l’apparecchio in aree sotto
pressione. Non posizionare candele o
lampade sopra il ricevitore. Posizionare in
orizzontale e su superfici stabili, lontano
da vibrazioni. Se l'apparecchio viene
spostato da un ambiente caldo ad uno
freddo si possono creare problemi.
Spegnere e riaccendere dopo 1-2 ore. Il
prodotto va maneggiato con cautela:
spostamenti veloci e poco attenti possono
danneggiare i componenti.
RIPARAZIONI. Non aprire il ricevitore, la
tensione al suo interno è presente anche
quando è spento. Per eventuali guasti
rivolgersi sempre a personale qualificato.
L’apertura dell’apparecchio comporta la
decadenza automatica della garanzia.
SOFTWARE. La ditta produttrice fornisce
il prodotto con software residente e, fatto
salvo quanto previsto da inderogabili
previsioni di legge, resta esonerata da
ogni responsabilità civile, penale ed
amministrativa nel caso di utilizzo del
Prodotto con qualsivoglia software di
terzi o configurazione che non siano stati
installati o forniti dalla Medesima.
Page 7
CONTENUTO DELLA CONFEZIONE
Prima dell’installazione, controllare il contenuto
della confezione:
Ricevitore HD DVB-T2
Telecomando 2 in 1
Sensore IR telecomando con adesivo
Adattatore per presa antenna IEC
Cavo HDMI™
Cavo USB di alimentazione e per
collegamento memorie USB
Manuale per l’utente e guida rapida
COLLEGAMENTI
ATTENZIONE: quando si eseguono i
collegamenti TUTTI gli apparecchi devono
essere scollegati dalla presa elettrica.
Page 8
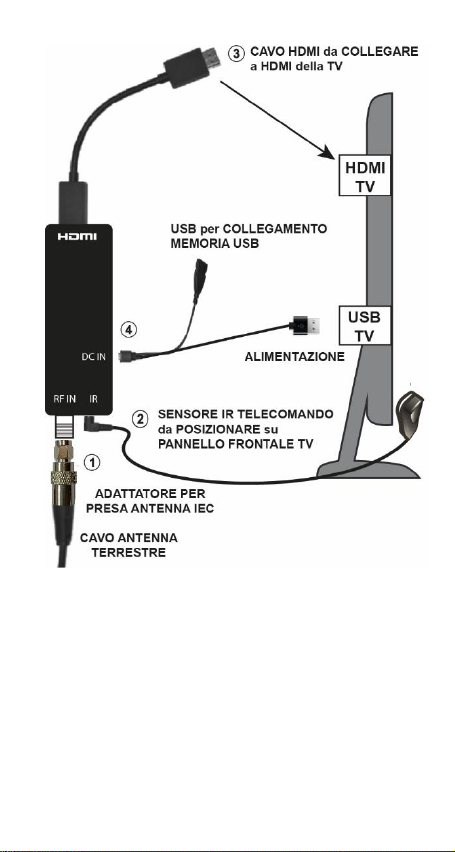
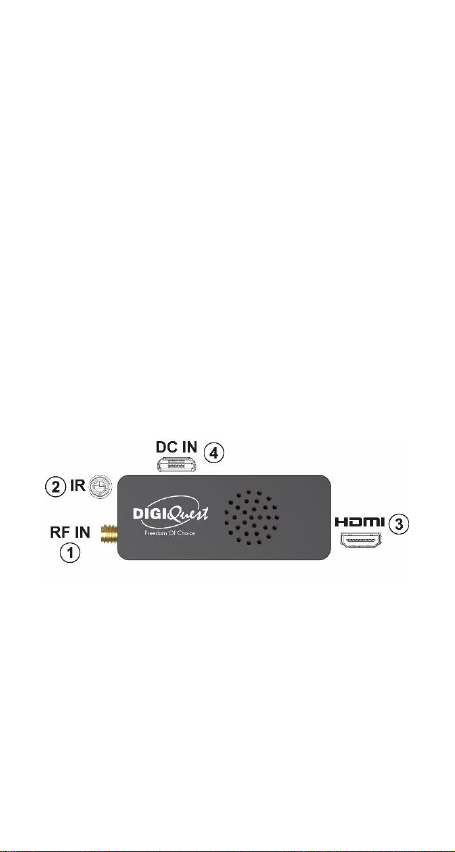
Avvitare l’adattatore per presa antenna IEC incluso
nella confezione alla presa dell’antenna RF IN (1).
Connettere il cavo d’antenna con l’adattatore per
presa dell’antenna IEC (1).
Page 9
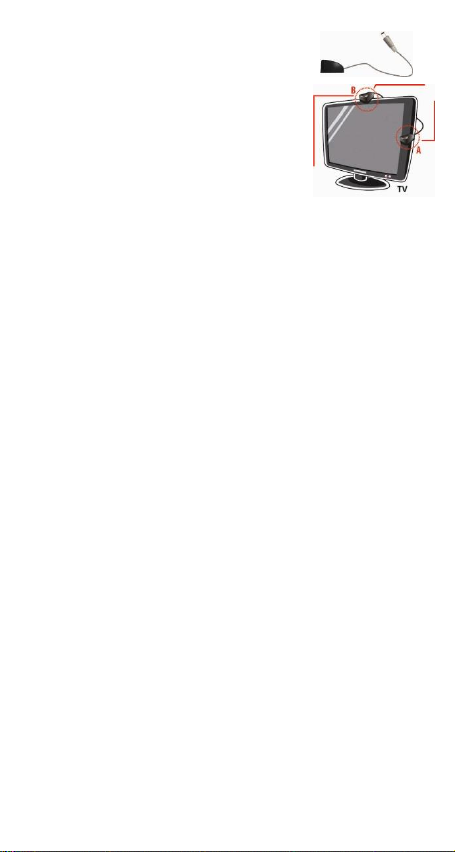
Collegare il sensore IR del
telecomando alla presa IR (2) sullo
stick. Posizionare il sensore di
fronte al televisore, esso deve
essere posizionato in modo che
possa ricevere il segnale dal
telecomando (es. A o B).
L’uscita HDMI (3) deve essere connessa
direttamente al televisore utilizzando il cavo HDMI
fornito.
Collegare il cavo USB alla porta sullo stick DC IN
(4). Attaccare l’altra estremità ad una porta USB
libera del televisore. Il dispositivo si accende
automaticamente appena riceve corrente.
Se il LED sul sensore IR non si accende significa
che l’alimentazione elettrica è insufficiente. In
questo caso collegare il cavo USB ad un'altra porta
USB: se il televisore dispone di poche porte USB,
bisognerà utilizzare un alimentatore esterno con
uscita USB (5V, min. 1000 mA). Gli alimentatori
sono disponibili nei negozi specializzati.
Page 10
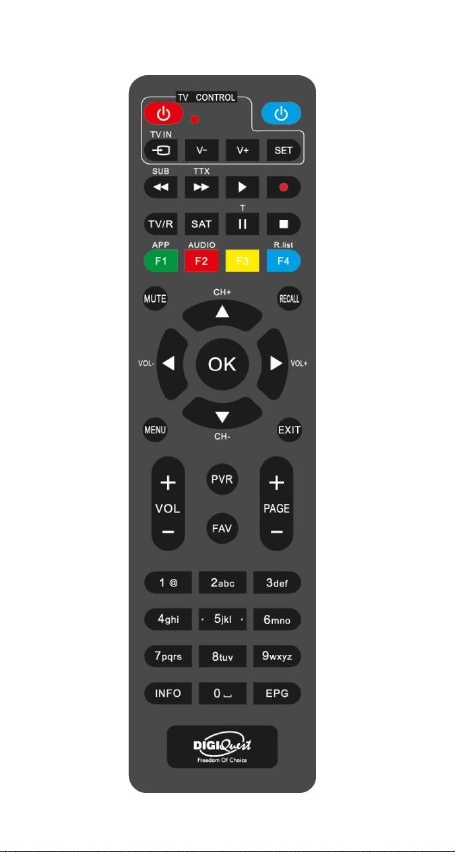
TELECOMANDO 2 in 1
Page 11
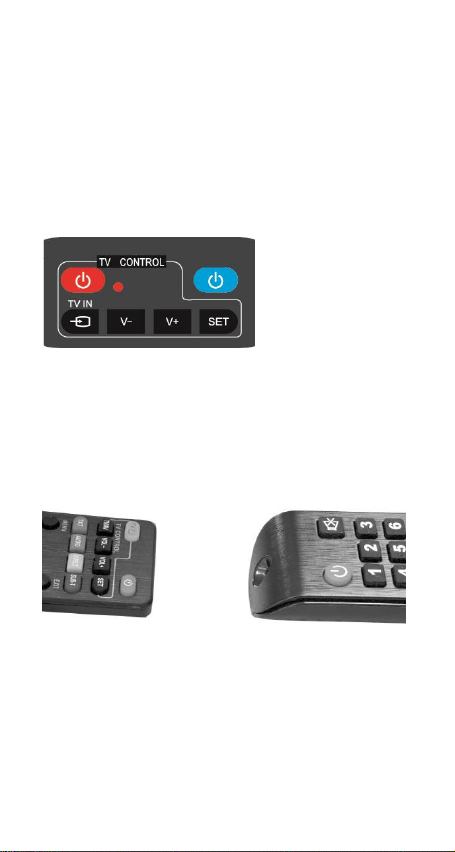
Il telecomando in dotazione ha la possibilità di
essere programmato per poter gestire anche
alcune funzioni del telecomando della TV (es.
gestione del volume, dello spegnimento, sorgente).
Per assegnare le funzioni della TV al telecomando
del ricevitore è necessario agire sulla sezione TV
CONTROL in alto a sinistra nel telecomando:
seguire la procedura seguente, riportata anche sul
retro del telecomando.
il tasto SET, il led rosso aumenterà di intensità.
Sempre nella stessa sezione premere il tasto da
impostare (es. V+), il led rosso lampeggerà.
Posizionare il telecomando del TV di fronte a
quello del decoder (in modo che i due sensori si
guardino) ad una distanza di circa 3 cm.
TV CONTROL
Impostazione
telecomando TV.
Nella sezione TV
CONTROL
premere per 3 sec.
Sul telecomando del TV tenere premuto il tasto da
impostare (es. VOL+) fino a che il led rosso
rimarrà fisso. Premere il tasto SET per salvare.
Impostare un tasto alla volta.
NOTA: le serigrafie riportate sui 3 tasti
programmabili sono indicative perché è possibile
assegnare ad essi la funzione che si desidera.
Page 12

ALTRI TASTI
BLU: per accendere /spegnere (standby).
SUB/◄◄: per visualizzare i sottotitoli (se disponibili)
ed impostarne la lingua. Premere di nuovo per
eliminarli. Quando si riproduce un file per tornare
indietro alla velocità di 2X, 4X, 8X, 16X e 32X.
TTX/►►: per aprire il televideo. Quando si riproduce un
file per andare avanti alla velocità di 2X, 4X, 8X, 16X e 32X.
► (play): per avviare la riproduzione di un file.
● (pallino rosso). Nuova ricerca canali, vedere
paragrafo “Alcuni tasti e funzioni”.
T/II: durante la visione di un programma blocca
l’immagine, premere di nuovo per sbloccare (la
visione riprenderà live); per mettere in pausa la
riproduzione di un file.
■: per interrompere la riproduzione dei file.
TV/R: per cambiare da canali TV a canali radio.
SAT: tasto non attivo.
TASTI COLORATI: attivano diverse funzioni
all’interno dei menu.
APP/F1 (verde): per effettuare alcune funzioni
all’interno del menu.
AUDIO/ F2 (rosso): per aprire la finestra Controllo Audio.
F3 (giallo): tasto non attivo.
F4/ R.List (celeste): cambia da canali TV a quelli
radio e viceversa.
MUTE: per eliminare l’audio. Premere di nuovo per
attivarlo.
RECALL: per tornare all'ultimo canale visualizzato.
CH +▲/▼ CH - : per cambiare canale. Nel menu:
per muovere il cursore su e giù.
OK: per visualizzare la lista canali. Nel menu per
confermare le operazioni, per selezionare o
modificare parametri.
MENU: per entrare nel menu principale.
EXIT: per uscire dal menu. Dentro il menu per
tornare indietro di una operazione.
Page 13

VOL +/ VOL - : per regolare il volume.
PAGE - / PAGE +: per scorrere di pagina in pagina
nella lista canali.
(0~9) TASTI NUMERICI: per inserire il numero di
un canale. Nel menu per inserire valori.
PVR: tasto non attivo.
FAV: per visualizzare la lista favoriti (se create).
Premere due volte per rinominare la lista favoriti.
INFO: per visualizzare la barra informazioni in
basso nello schermo. Se si clicca di nuovo si
visualizza l’EPG, di nuovo ancora le info sul
canale.
EPG (Electronic Program Guide): per aprire la
guida ai programmi.
Batterie
Non incluse. Si consiglia l'uso delle batterie
ricaricabili per la salvaguardia dell'ambiente.
Installazione batterie
Togliere il coperchietto dal telecomando ed inserire
2 batterie AAA: fare riferimento ai disegni
all'interno dell'alloggio per il corretto
posizionamento delle batterie.
• ATTENZIONE: utilizzare pile AAA.
• ATTENZIONE: l'incauto uso delle batterie può causare
esplosioni, corrosioni e produzione di liquido acido. Usarle
con accortezza per evitare perdite di acido. Se viene
prodotto del liquido eliminarlo dall’interno del telecomando
ed inserire nuove batterie. Nell’inserire le batterie badare
ad allineare la polarità + e -. Estrarle se si prevede di non
usare il prodotto per un lungo periodo di tempo. Non
lasciare le batterie scariche inserite. Non gettare le
batterie nel fuoco e non cortocircuitarle, aprirle o
sottoporle a calore eccessivo. Se le batterie non sono
ricaricabili, non cercare di ricaricarle. Sostituire le batterie
con altre di tipo uguale o equivalente consigliate dalla
fabbrica. Non utilizzare una batteria nuova e una vecchia,
o batterie tra loro di tipo diverso, sostituirle entrambe con
nuove uguali tra loro. Non disperdere le batterie
nell’ambiente.
Page 14
Il prodotto funziona con batterie che rientrano
nella direttiva europea 2013/56/UE (recepita in
Italia con D. Lgs. del 15/02/2016 n. 27) e che non
possono essere smaltite con i normali rifiuti
domestici. Informarsi sulle normative locali
relative alla raccolta differenziata delle batterie: un
corretto smaltimento permette di evitare
conseguenze negative per l'ambiente e la salute.
Utilizzo del telecomando
Il telecomando va direzionato verso il sensore IR
collegato al ricevitore. Rimuovere qualsiasi oggetto che
si trovi sulla traiettoria dal telecomando al sensore.
ALCUNI TASTI e FUNZIONI
Nuova ricerca canali
Premendo questo tasto sul telecomando si avvia
l'aggiornamento della lista canali che inserirà nuovi
canali o sposterà i canali che hanno cambiato
numerazione. In questo periodo di passaggio del
segnale ad una risoluzione HD, i canali subiscono
spesso cambiamenti e si ha quindi la necessità di
eseguire spesso l’aggiornamento canali in modo
facile e veloce. Inoltre quello che è stato impostato
dall'utente nella sua lista non verrà modificato
(esempio liste FAV, lingua).
Lista Canali
Durante la visione, premendo il tasto OK si
visualizza la lista dei canali. Scorrere con i tasti /
di canale in canale. Con i tasti colorati è
possibile:
- Tasto VERDE attiva la funzione Cerca, con la
tastiera che compare a video inserire una o più
lettere del canale da ricercare, poi posizionarsi sulla
casella OK e premere il tasto OK.
- Tasto ROSSO per cambiare il tipo di lista da
visualizzare: Tutti, FAV 1, FAV2, ecc.
- Tasto BLU, cambia tra canali radio e quelli TV.
Page 15

- Tasto GIALLO per entrare nella funzione Ordina, i
canali nella lista possono essere visualizzati: in
ordine alfabetico (A-Z e Z-A), visualizzando prima
quelli in chiaro e poi quelli codificati (a pagamento),
Bloccati/Sbloccati, in ordine numerico LCN.
- Tasto OK per visualizzare il canale selezionato.
EPG
La Guida elettronica ai programmi visualizza la
programmazione per ogni canale (se l'emittente la
prevede). È possibile entrare nell'EPG premendo il
tasto EPG sul telecomando. Apparirà la
programmazione del canale selezionato. Per
cambiare canale usare i tasti e , nella finestra
a destra comparirà la lista dei programmi previsti.
Usare il tasto per entrare nella colonna a destra
e i tasti / per selezionare l’evento desiderato.
Premere il tasto INFO per aprire la descrizione del
programma. Con il tasto GIALLO si passa da una
colonna all’altra. Se si vuole programmare la
visione dell’evento selezionato, premere il tasto
OK (timer). Se si desidera visualizzare le varie
programmazioni salvate nel timer, premere il tasto
BLU (Imposta timer). Premere EXIT per uscire
dall’EPG.
PRIMA ACCENSIONE
NOTA BENE: solo dopo aver collegato
correttamente il cavo dell’antenna, il sensore e il
cavo HDMI, procedere con il collegamento del
cavo di alimentazione.
Alla prima installazione o quando si resetta, il
ricevitore avvia in automatico la ricerca canali,
semplificando e riducendo i tempi di installazione.
ATTENZIONE se non compare nessuna immagine
potrebbe essere necessario selezionare la
Page 16

sorgente (es. HDMI 1 o 2 ecc.) relativa all’ingresso
utilizzato, premendo il tasto SOURCE sul
telecomando della TV (a seconda della marca può
essere identificato anche con INPUT, AV, AUX,
ZERO, ecc.).
Al termine della scansione dei canali, potrebbe
verificarsi un conflitto di posizionamento dei canali:
in questo caso apparirà una finestra nella quale
verranno elencati i canali trovati su due o più
frequenze diverse. Usare i tasti e per
posizionarsi su quello desiderato e premere OK.
IMPORTANTE: durante il processo di attesa NON
effettuare alcuna operazione (es. premere tasti del
telecomando, spegnere il ricevitore, scollegare la
presa dalla corrente).
Requisito necessario per l’utilizzo di diverse
funzioni supportate dal ricevitore è inserire il PIN di
accesso ad esse. Nella schermata successiva del
Controllo Genitori, inserire in Nuova password il
PIN desiderato composto da 4 cifre (es. 0000 o
1234, ecc.), usando i tasti numerici del
telecomando e inserirlo nuovamente in Conferma
password: abbiate cura di annotarlo negli spazi
seguenti, in caso di smarrimento del PIN
contattare l’assistenza.
□□□□
Adesso il decoder è pronto per essere utilizzato:
buona visione!
Nota: la procedura di installazione può essere
ripetuta infinite volte, basterà resettare il ricevitore:
- Entrare nel Menu Principale (tasto MENU).
- Con il tasto o posizionarsi su menu Sistema
e con il tasto posizionarsi su Ripristina
Impostazioni. Premere il tasto OK e confermare se
resettare o no il decoder posizionandosi su SI o
Page 17

NO e premere OK. ATTENZIONE: quando il
decoder viene resettato tutte le impostazioni
inserite dall'utente andranno perse.
MENU
Premere il tasto MENU per entrare nel menu del
ricevitore. Con il tasto o è possibile
selezionare diversi menu. Dentro i menu,
premendo il tasto MENU si torna indietro di un
passo alla volta, premendo EXIT si esce
direttamente.
Menu Lista Canali
Questo menu permette di impostare i canali.
- Lista canali TV. In basso nello schermo sono
visualizzati i tasti per compiere le seguenti
operazioni:
Favoriti: il ricevitore dispone di 8 gruppi favoriti. I
canali possono essere salvati in qualsiasi gruppo,
un canale può essere assegnato a diversi gruppi.
Selezionare con i tasti e un canale da
aggiungere alla lista dei gruppi favoriti.
Premendo il tasto ROSSO verrà visualizzato il
menu “Favoriti".
Selezionare con i tasti e la lista FAV nella
quale inserire il canale selezionato.
Premere il tasto OK, il simbolo a cuore verrà
visualizzato a fianco del canale selezionato.
Se si desidera eliminare un canale dal gruppo
FAV, posizionarsi su di esso, premere il tasto
ROSSO, posizionarsi sul gruppo FAV contenente
il canale come indicato dal simbolo del cuore e
premere OK.
Premere il tasto EXIT per uscire dal menu.
Blocca: il ricevitore richiede la password prima di
visualizzare un canale bloccato.
Selezionare con i tasti e il canale da
bloccare.
Page 18

Premere il tasto VERDE, inserire la password, a
fianco del canale comparirà il simbolo del blocco
(lucchetto).
Premere di nuovo il tasto VERDE per annullare il
blocco.
Ordina: premendo il tasto BLU si può ordinare la
lista dei canali secondo varie modalità.
Rinomina: selezionare con tasti e il canale da
rinominare, quindi premere il tasto GIALLO. Verrà
visualizzata una tastiera su schermo. Selezionare
con i tasti freccia / / / le lettere e
confermare la selezione con il tasto OK. Se il
nuovo nome del canale è completo, saltare con i
tasti freccia al campo "OK” e premere il tasto OK. Il
canale avrà un nuovo nome.
Sposta: selezionare con i tasti e il canale da
spostare.
Premere il tasto INFO.
Immettere il nuovo numero di canale con i tasti
numerici 0-9.
Premere il tasto OK. Il canale verrà spostato.
Elimina: selezionare con i tasti e il canale da
cancellare.
Premere il tasto II, verrà visualizzata una X a
fianco del canale.
Premere EXIT, il canale selezionato verrà
spostato nella menu Lista canali TV scartati.
Gruppo: selezionando più canali è possibile
eliminarli tutti insieme.
Elimina tutti: elimina tutti i canali della lista.
- Lista canali Radio. Seguire le stesse istruzioni di
quelli TV.
- Lista canali TV e Lista canali radio scartati. I
canali eliminati nelle liste vengono inseriti in queste
cartelle dove è possibile eliminarli del tutto (tasto
ROSSO) o ripristinarli (tasto VERDE, compare
simbolo di ripristino, premere EXIT per memorizzare).
Page 19

- Controllo genitori. Consente di bloccare con
una password diverse funzioni:
- la visione dei canali (se l'emittente lo prevede) in
base a l’età impostata;
- il blocco del menu, chiamata anche funzione
Hotel, evita modifiche indesiderate alle
impostazione del decoder;
- il blocco dei canali.
Qui è possibile anche impostare una nuova
password.
- LCN. La funzione Logical Channel Number è
impostata per default su Attivo. Permette di
identificare i canali mettendoli in ordine numerico
(es. RAI 1 corrisponde al tasto 1, ecc.).
Menu Ricerca canali
- Ricerca automatica. Avvia la scansione
automatica dei canali.
- Ricerca manuale. È possibile ricercare solo un
pacchetto di canali alla volta. Per avviare questa
procedura occorre conoscere il numero del canale
corrispondente alla frequenza del canale TV che si
vuole ricercare: ogni regione ha la sua
numerazione.
Menu Lingua
Permette di impostare la lingua di vari servizi.
Menu Impostazioni AV
- Sistema TV. Sistema televisivo PAL, NTSC, AUTO.
- Risoluzione Video. Da impostare secondo la
risoluzione del proprio TV.
- Formato immagine. Per impostare lo schermo in
formato 4:3 o 16:9 ecc.
- Tonalità Video
- Uscita Audio
- Audio-Descrizione: abilita/disabilita la funzione di
descrizione delle scene.
- Compensazione Volume AD: è possibile impostare il
Page 20

livello del volume della descrizione rispetto al volume
della traccia audio.
Menu Regolazione Orario Locale
- Orario non modificabile.
- Impostazione Fuso orario modificabile.
Menu Sistema
- Informazioni di Sistema. Per accedere a
informazioni importanti, come la versione software
e il numero matricola del prodotto.
- Ripristina Impostazioni. Per resettare il
ricevitore. È necessario inserire il PIN. Usare
questa funzione con cautela, tutti i dati
memorizzati andranno persi! Sarà necessario
ripetere la ricerca dei canali.
- Imposta Timer: è possibile impostare un timer
per visualizzare un programma quando inizia. Il
decoder si posizionerà sul canale impostato poco
prima dell’evento.
ATTENZIONE: Il reset di fabbrica da menu
comporterà la perdita dei timer precedentemente
impostati.
- Impostazioni OSD: per impostare la
visualizzazione delle informazioni sullo schermo.
- Aggiornamento USB: è necessario usare
dispositivi USB, si raccomanda di usare pennette
USB non di elevata dimensione, dato che il
ricevitore è alimentato dal TV. Assicurarsi che nella
chiavetta utilizzata sia presente solo il file di
aggiornamento.
- Aggiornamento OTA: via antenna se disponibile.
- Altro: Standby automatico. Dopo 3 ore di totale
inattività (nessun comando) per legge il ricevitore
si spegne automaticamente. È possibile disattivarlo
o impostare il tempo di spegnimento desiderato da
un minimo di 3 minuti (premere OK e poi EXIT per
memorizzare).
Page 21
Menu Centro multimediale
SECTION
ITEM
COMMENTS
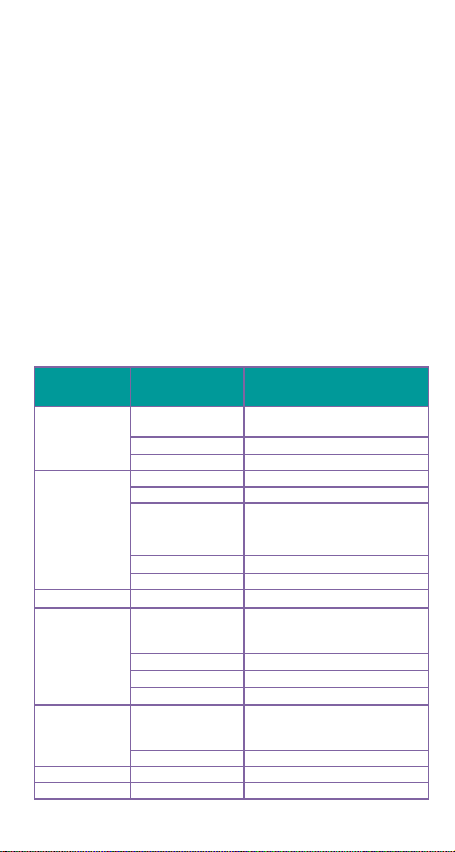
DVB-T2 TUNER
Frequency Range
VHF:7M, 174 – 230MHz; UHF 8M,
470 MHz - 866 MHz
Band
7MHz,8MHz
Input impedance
75 Ω
CHANNEL
DECODING
Standard
DVB-T2
Demodulation
COFDM
Constellation
Combinations
QPSK,16-QAM,64-QAM,
hierarchical 16-QAM, hierarchical
64-QAM
FEC
1/2, 2/3, 3/4, 5/6, 7/8
Reed solomon
204, 188, t = 8
DEMULTIPLEXER
Standard
ISO/IEC 13818-1
VIDEO
DECODING
Standard
H.265/HEVC,H.264/AVC high
profile@level 4(1080i25),level
3.1(720p25),level 3.2(720p50)
Aspect ratio
16:9 4:3
Video format
PAL
Video resolution
1080i,1080p output
AUDIO
DECODING
Decoding
MPEG-1 layer I & layer II,MPEG-2
layer II, MPEG-2, AC-3 Dolby digital,
Dolby digital plus
Output mode
Dual channel,stereo
PROCESSOR
CPU
MT2203-M2010D
Processor speed
2000Dmips
È necessario usare un dispositivo USB, si
raccomanda di usare pennette USB non di elevata
dimensione, dato che il ricevitore è alimentato dal
TV. Note: la porta USB standard nella TV può
fornire un’alimentazione di circa 500 mA. Non è
assicurato il corretto funzionamento di hard disk, si
consiglia di utilizzare chiavette USB.
- Musica / Immagine / Film, si potranno riprodurre
musica, foto e video.
- Informazioni USB: relative alla memoria collegata.
- Formattazione USB: per formattare la memoria
collegata. ATTENZIONE: tutti i dati presenti
andranno persi.
SPECIFICHE TECNICHE
Page 22
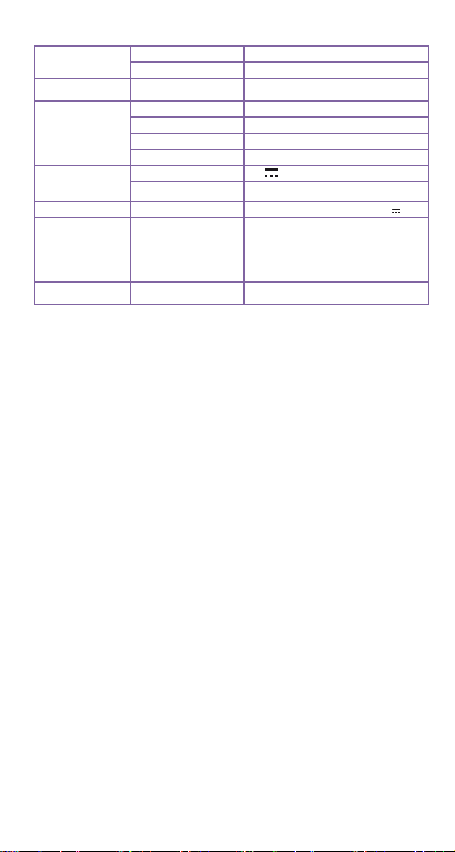
MEMORY
Flash memory
4MB
DDR
64MB (BUILT IN CPU)
RCU
Category
IR(Carrier 38KHz)
INTERFACES
Antenna input
SMA, Female
HDMI 1.4b
X 1
IR port
X 1
USB
X 1 micro USB2.0
POWER SOURCE
Input Voltage
5V 1A
Power Consump
5W max
POWER SUPPLY
Not INCLUDED
100-240V~50/60Hz Outp.: 5V 1A
CABINET
74.7*29.3*16.6mm (cabinate)
80.8*29.3*16.6mm(cabinate
include real panel ports)
AMBIENT
Op.Temperature
-5~40℃
Versione SW V1.1.49
PROBLEMI E RISOLUZIONE
Prima di rivolgersi al Servizio Assistenza, verificare che la
zona di utilizzo del ricevitore sia coperta dal segnale
digitale terrestre e che la vostra antenna riceva il segnale
correttamente. Quando si verifica un inconveniente, prima
di richiedere l'intervento dell'assistenza, consultare la
tabella riportata di seguito per individuare la causa del
problema. A volte basta un semplice controllo o una
semplice regolazione da parte dell'utilizzatore per
risolvere il problema e ripristinare il funzionamento
corretto. Gli inconvenienti più comuni sono generalmente
legati al collegamento dei cavi. Se nessuna delle azioni
indicate nella tabella aiutano a risolvere il problema,
collegatevi al sito www.digiquest.it sarete guidati
velocemente alla risoluzione del problema, grazie alle
diverse possibilità che vi saranno proposte (aggiornamenti
disponibili, form per richiesta assistenza). Attenti alle
esigenze di mercato, ci impegniamo continuamente a
rendere i nostri modelli sempre più performanti e
funzionali, per questo consigliamo di aggiornare il
decoder alle ultime versioni software disponibili, in
quanto un nuovo software potrebbe cambiare o
aggiungere alcune funzionalità del dispositivo.
Registrati ora sul sito ufficiale all'indirizzo: www.digiquest.it
sezione LINK UTILI > REGISTRAZIONE PRODOTTO per essere
informati su aggiornamenti disponibili e per ottenere il
Page 23

massimo delle prestazioni.
Non aprire mai il ricevitore, pericolo! L'apertura
comporta la decadenza automatica della garanzia.
Non si accende il led sul sensore IR del telecomando
• Controllare che tutti i collegamenti siano eseguiti
correttamente e che siano ben inseriti.
• Controllare l'integrità dei cavi.
• Consigliamo di verificare che il sensore sia ben
posizionato e inserito nell’ingresso IR del decoder fino al
click.
• L’alimentazione elettrica è insufficiente. In questo caso
collegare il cavo USB ad un'altra porta USB: se il
televisore dispone di poche porte USB, bisognerà
utilizzare un alimentatore esterno con uscita USB (5V,
min. 1000 mA). Gli alimentatori sono disponibili nei negozi
specializzati.
Odore di bruciato
Scollegare gli apparecchi dalla presa di corrente e
contattare subito l'assistenza.
Il ricevitore non trova canali
• Accertarsi che sia possibile ricevere il segnale digitale
terrestre nella propria zona.
• Controllare il cavo proveniente dall'antenna e i
collegamenti.
• Sostituire i partitori o interporre un amplificatore di linea.
Rivolgersi ad un tecnico antennista.
Le immagini sullo schermo appaiono scomposte
(squadrettate) Per un corretto funzionamento il ricevitore
ha bisogno di una buona qualità del segnale.
• Verificare che l'impianto di ricezione (antenna) funzioni
correttamente.
• Il segnale è troppo debole a causa, ad esempio, di
cattive condizioni atmosferiche: aspettare che il segnale si
ristabilisca.
Il telecomando non aziona il ricevitore
• Assicurarsi che il ricevitore sia acceso.
• Assicurarsi di aver puntato il telecomando in direzione
del sensore IR e che non vi siano ostacoli sulla traiettoria.
• Consigliamo di verificare che il sensore sia ben
posizionato e inserito nell’ingresso IR del decoder fino al
click.
• Controllare le batterie del telecomando: possono essere
state inserite nel verso sbagliato o essere scariche.
• Controllare che non sia fuoriuscito liquido dalle batterie.
• Controllare che non vi siano tasti incastrati.
• Assicurarsi che non arrivi luce solare diretta sul
ricevitore.
Page 24

• Si è verificato un errore di trasmissione temporaneo,
oppure il software del ricevitore ha perso alcune delle sue
impostazioni. Spegnere l'apparecchio e scollegarlo
dall'alimentazione; lasciare passare alcuni minuti, quindi
riaccenderlo.
• Verificare che non vi siano apparecchi trasmittenti nelle
vicinanze che possano annullare le azioni del
telecomando.
• È stata selezionata una funzione sbagliata. Premere il
tasto giusto.
• Verificare che il ricevitore sia correttamente collegato al
televisore.
Nessuna immagine o messaggio “Nessun Segnale”
• Collegato il ricevitore, dopo l’accensione, è necessario
selezionare la sorgente (es. HDMI1) relativa all'ingresso
utilizzato, premendo il tasto SOURCE sul telecomando
della TV (a seconda della marca il tasto SOURCE può
essere identificato anche con INPUT, AV, AUX, ZERO, ecc.).
• Controllare il collegamento HDMI.
• Scollegare e poi ricollegare il ricevitore.
Sul canale già sintonizzato appare la scritta “Assenza
segnale”
• Prima di resettare il dispositivo, premere il tasto ● (pallino
rosso), per lanciare una nuova ricerca dei canali.
• Resettare il ricevitore (vedi paragrafo relativo), o altresì
verificare lo stato dell’impianto.
Appare la scritta Codificato
• Il canale visionato fa parte di un pacchetto a pagamento.
L'immagine appare schiacciata o tagliata
• Il formato immagine nel menu Immagine > Aspetto non è
stato impostato secondo le caratteristiche del televisore.
Provare un altro formato.
Non si sente alcun suono
• Controllare il collegamento HDMI.
• Verificare se la funzione Muto è attivata. Usare il
telecomando del ricevitore o del televisore per disattivarla.
• Verificare che il volume del ricevitore o del televisore sia
abbastanza alto. Premere i tasti del volume del telecomando
del ricevitore o del televisore per la regolazione.
• Controllare che il ricevitore sia correttamente connesso
al televisore.
• Alcune connessioni al ricevitore potrebbero essersi
“allentate”.
Non viene riconosciuta la memoria USB inserita
• Non tutti i dispositivi USB sono compatibili. Non si
garantisce la compatibilità con dispositivi USB di grande
capacità. La porta USB standard nella TV può fornire
Page 25
un’alimentazione di circa 500 mA. Non è assicurato il
corretto funzionamento di hard disk, si consiglia di
utilizzare chiavette USB.
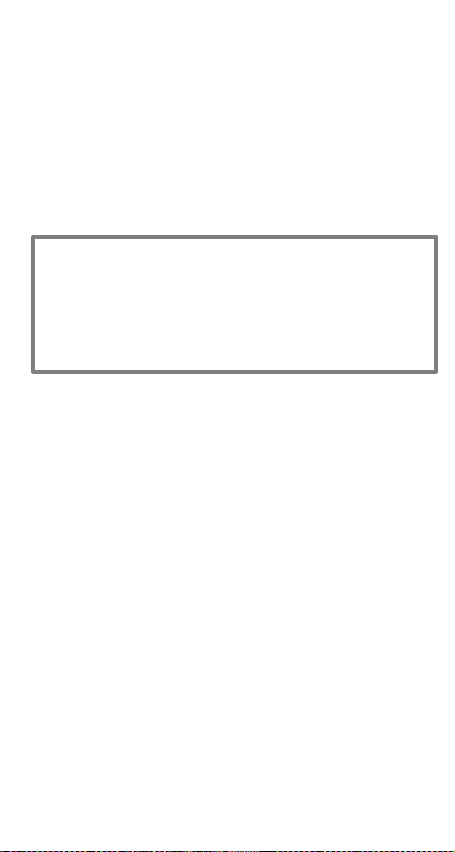
NOTA: Il produttore non è in alcun modo responsabile di
eventuali danni o perdita di dati.
Alcuni file non vengono riconosciuti
• Il produttore non può garantire la riproduzione dei file
nonostante sia supportata l'estensione: ciò dipende dal Codec
usato, dal data bit rate e dalla risoluzione. L’eventuale
aggiornamento dei codec è compito del produttore della main
board, non è possibile farlo tramite SW.
Il ricevitore o la TV si spengono da soli
Come previsto dalle recenti normative europee sul
risparmio energetico, questo ricevitore SI SPEGNE
AUTOMATICAMENTE dopo 3 ore dall’ultima operazione
eseguita, le TV dopo 4 ore (autostandby). NOTA: è
possibile disattivare questa funzione nel decoder andando
nel menu SISTEMA > Altro.
NOTE:
Le specifiche tecniche possono variare senza preavviso.
Il contenuto del manuale potrebbe differire dal prodotto o dal
software fornito ed è soggetto a modifiche senza preavviso.
Un nuovo software potrebbe cambiare alcune funzionalità del
ricevitore.
Tutte le applicazioni riprodotte ed i relativi marchi appartengono ai
loro legittimi proprietari.
In caso di informazioni inesatte, incomplete o erronee o di meri
errori di trascrizione il fornitore (distributore) sarà esonerato da ogni
responsabilità in merito e potrà rifiutare l’esecuzione della
prestazione relativa all’errore.
Le foto e le illustrazioni hanno valore puramente illustrativo e
possono non rispecchiare l’immagine del prodotto.
A causa di aggiornamenti o errori, il contenuto di questo manuale
potrebbe non corrispondere esattamente al prodotto reale.
Page 26
"Implementation of Directive 2012/19/EU on waste electrical
The crossed-out bin symbol on the equipment indicates that the
from other waste. The user must, therefore, deliver the equipment
pursuant to Legislative Decree No. 49 of 14 March 2014
INFORMATION TO USERS
and electronic equipment (WEEE)"
product at the end of its useful life must be collected separately
intact of the essential components reached the end of life to the
appropriate centers for the separate collection of electronic and
electro technical waste, or return it to the dealer at the time of
purchase of new equipment of equivalent type, at the rate of one
to one, or 1 to zero for equipment with a larger side less than 25
cm. Adequate separate collection for the subsequent start-up of
equipment discharged for recycling, treatment and compatible
environmental disposal helps to avoid possible negative effects on
the environment and health and promotes the recycling of the
materials of which the equipment is composed. The abusive
disposal of the product by the user involves the application of the
administrative sanctions referred to in Legislative Decree no.
152/2006 as well as those provided for by Legislative Decree No.
The terms HDMI, HDMI High-Definition Multimedia Interface, HDMI
trade dress and the HDMI Logos are trademarks or registered
trademarks of HDMI Licensing Administrator, Inc.
Manufactured under license from Dolby Laboratories.
Dolby, Dolby Audio, and the double-D symbol are
trademarks of Dolby Laboratories Licensing Corporation.
49 of 14 March 2014.
Manufactured by DIGIQUEST SOLUTIONS S.p.A. Headquarter Via Avisio, 18 - 00048 Nettuno (RM) – Italy
Made in China
DIGIQUEST SOLUTIONS S.p.A. declares
that this product complies with Directive
2014/53 / EU. The full text of the EU
Declaration of Conformity is available at
www.digiquest.it/certificazioni.html
the following Internet address:
Page 27
USER MANUAL
CAUTION
SAFETY AND PRECAUTIONS
CAUTION: to reduce the risk of fire and electric shock, do not open the
unit. All work must be carried out by a specialized technician. Opening
the receiver will automatically void the warranty.
This symbol indicates dangerous voltage inside the product, which
may cause electric shock and personal injury.
This symbol indicates that there are important
instructions accompanying the appliance.
Read the manual carefully before starting
to use the stick. Keep the instructions for
future reference. Do not open the device,
touching internal components may cause
electric shocks. Failure to observe these
precautions can lead to damage, fire or
electric shock, possibly resulting in
serious injury!
Only operate the device with the voltage
indicated on the rating plate. This
appliance is supplied with power via a
USB socket. Ensure that the USB socket
can deliver the current value printed on
the device's label. If additional USB
devices are connected to the USB
connection cable included in the scope of
delivery, the USB socket must supply
additional power.
Do not connect or disconnect with wet
hands or bare feet. Do not use objects
Page 28

such as levers to disconnect the plug
from an outlet. If you smell burnt or
smoke, unplug the power cord
immediately and contact your service
representative.
LIQUIDS. Do not expose this product to
dripping or splashing, and do not place
any objects with liquid inside, such as
vases, etc. Never place in a damp
location or touch with wet or damp hands
or during a thunderstorm. If liquid enters
the decoder, disconnect it immediately
and consult a service technician.
CLEANING. Disconnect the power cord
from the outlet before cleaning the
receiver. Always use a slightly damp cloth
(no solvents, no detergents) for dusting.
VENTILATION. The slots in the receiver
should be left uncovered to allow proper
ventilation. Leave sufficient space around
the equipment to ensure proper
ventilation (10 cm each side). Do not
place the unit on carpets or the like.
The appliance heats up during operation.
This should not be interpreted as a
malfunction.
OBJECTS. Never insert objects in the
slots of the receiver. If this happens,
disconnect the decoder and consult a
technician.
USE BY ADULTS ONLY. The goods
purchased are sophisticated electronic
devices and are therefore not suitable for
use by minors. No liability is accepted for
Page 29

damage to persons or property resulting
from the use of the goods by minors. Keep
the appliance out of the reach of children.
Plastic bags in packaging can be
dangerous. To avoid suffocation, keep the
bags out of the reach of children. Batteries
and other small parts can be swallowed by
children. It is recommended to keep them
out of reach.
ACCESSORIES. Do not use non-original
accessories or spare parts as they may
cause damage to the receiver.
CONNECT TO YOUR TV OR OTHER
EQUIPMENT. Unplug this apparatus from
the wall outlet before connecting or
disconnecting any cables. Before making
connections with other devices, read the
operating instructions for the devices
themselves. The antenna must be installed
by a qualified technician.
LOCATION. Install the receiver in a
location protected from direct sunlight or
rain. Do not place near any heat sources.
Do not place any other electronic
equipment on the receiver. Moving the
device from a warm environment to a cold
one can cause problems. Switch off and
switch on again after 1-2 hours. The
product should be handled with care: quick
and careless movements can damage the
components.
REPAIRS. Do not open the receiver, the
voltage inside is present even when it is
switched off. For any failure always contact
Page 30
qualified personnel. Opening the device will
automatically invalidate the warranty.
SOFTWARE. The manufacturer supplies
the product with resident software and,
except as provided by mandatory legal
provisions, the manufacturer remains
exempt from any civil, criminal and
administrative liability, in the case of use of
the product with any third party software or
configuration that has not been installed or
provided by the same.
CONTENTS OF THE PACKAGE
Before installation, please check the contents of
the package:
HD DVB-T2 receiver
2-in-1 remote control
IR remote control sensor with adhesive
IEC antenna socket adapter
HDMI™ cable
USB cable for power supply and USB
memory connection
User manual and QUG
CONNECTIONS
WARNING: when making any connection, ALL
devices should be unplugged from the
electrical outlet.
Page 31
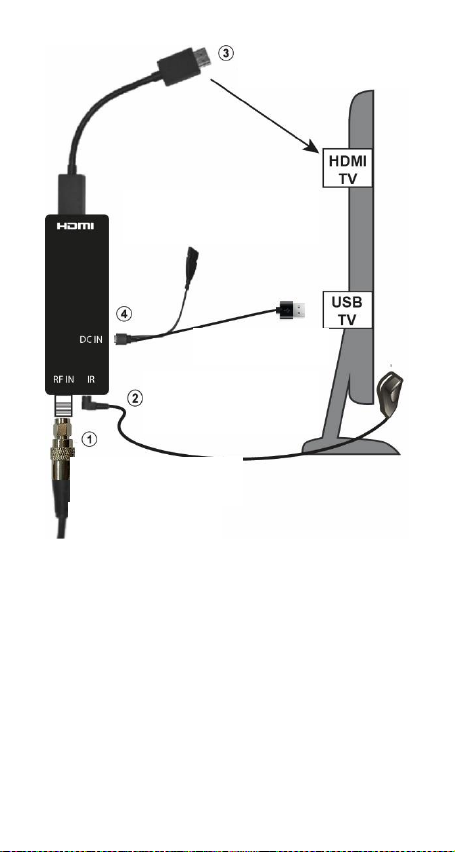
IEC ANTENNA
SOCKET ADAPTER
TERRESTRIAL
ANTENNA CABLE
POWER SUPPLY
HDMI CABLE TO
CONNECT TO THE TV
HDMI
USB FOR USB MEMORY
UNIT
IR REMOTE CONTROL
FRONT PANEL
SENSOR TO BE
PLACED ON THE TV
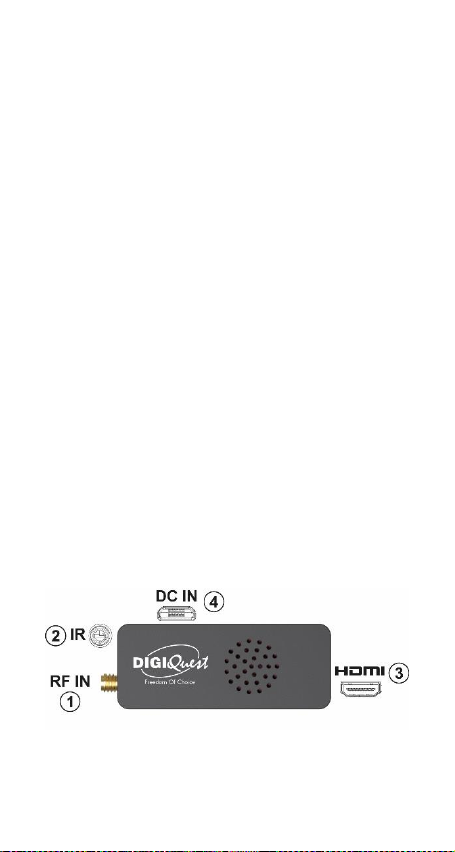
Screw the IEC antenna socket adapter included in
the package to the RF IN antenna socket (1).
Connect the antenna cable with the IEC antenna
socket adapter (1).
Page 32
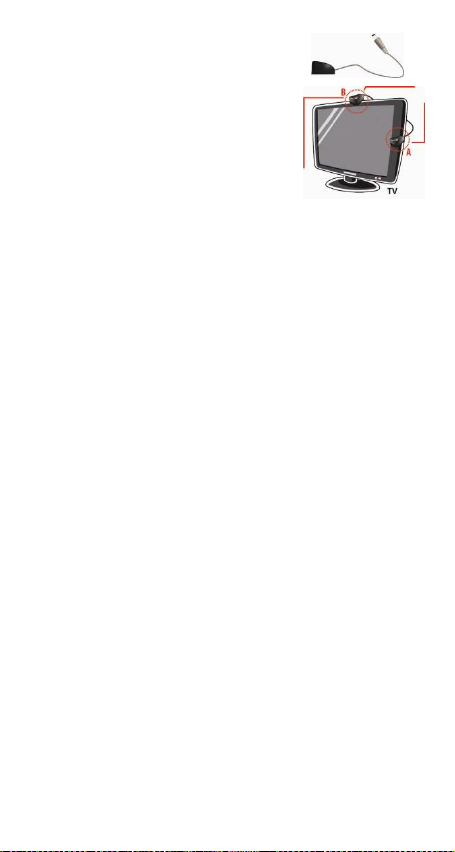
Connect the IR remote control
sensor to the IR socket (2) on the
stick. Place the sensor in front of
the TV, it should be positioned so
that it can receive the signal from
the remote control (e.g. A or B).
The HDMI output (3) should be
connected directly to the TV
using the HDMI cable supplied.
Connect the USB cable to the DC IN port on the
stick (4). Attach the other end to a free USB port
on the TV. The device switches on automatically as
soon as it receives power.
If the LED on the IR sensor does not light up, this
means that the power supply is insufficient. In this
case, connect the USB cable to another USB port:
if the TV has only a few USB ports, use an external
power supply with USB output (5V, min. 1000 mA).
Power supplies are available in specialized shops.
Page 33
2-in-1 REMOTE CONTROL
Page 34
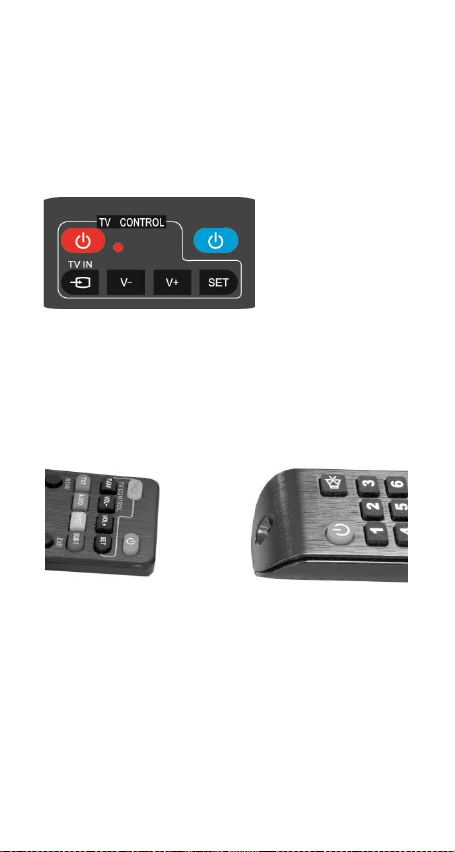
The supplied remote control can be programmed
to also manage some functions of the TV remote
control (e.g. volume management, switch-off,
channel change). To assign TV functions to the
receiver remote control, it is necessary to use the
TV CONTROL section at the top of the remote
control, follow the procedure below:
button for 3 seconds, the red LED will increase in
intensity. In the same section press the key to set
(e.g. V+), the red LED will flash.
Place the TV remote control in front of the decoder
remote control (so that the two sensors face each
other) at a distance of about 3 cm.
On the TV remote control, press and hold the
button to be set (e.g. VOL+) until the red led
remains steady. Press the SET button to save.
Set one button at a time.
NOTE: the screen printing on the 3 programmable
keys is indicative because you can assign them
the function you want.
TV CONTROL
TV remote control
setting.
In the TV
CONTROL section
press the SET
Page 35

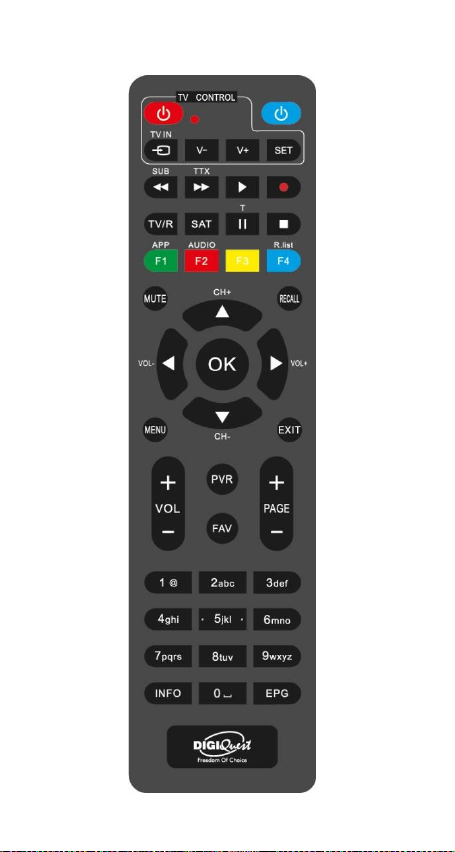
OTHER KEYS
BLUE: switch the STB on and standby mode.
SUB/◄◄: switch on subtitles, if current channel has
this option, and set their language. Press again to
delete them. When playing back a file to rewind at
the speed of 2X, 4X, 8X, 16X and 32X.
TTX/►►: switch on teletext, if current channel has this
option. When playing a file to go forward at the speed of
2X, 4X, 8X, 16X and 32X.
► (play): to start playback of a file.
● (red dot). New channel search, see section
“Some keys and functions”.
T/II: while watching a program freezes the picture,
press again to unlock (viewing will resume live); to
pause playback of a file.
■: to stop the playback of the files.
TV/R: to change from TV channels to radio
channels.
SAT: key not active.
COLOR KEYS: several functions in the menu.
APP/F1 (green): to perform certain functions
within the menu.
AUDIO/ F2 (red): to open the Audio Control
window.
F3 (yellow): key not active.
F4/ R. List (blue): to change from TV channels to
radio channels and vice versa.
MUTE: to mute the audio. Press again to activate.
RECALL: to switch to the previous viewed
channel.
CH +▲/▼ CH - : channel Up and Down. Press to
move the cursor into menu.
OK: to view the channel list. In the menu to confirm
operations, to select or modify parameters.
MENU: to open the menu screen.
EXIT: to exit from current menu. Inside the menu
to go back one operation.
Page 36
VOL +/ VOL - : volume Up and Down.
PAGE - / PAGE +: to scroll from page to page in
the channel list.
(0~9) TASTI NUMERICI: to switch channels. In the
menu to enter values.
PVR: key not active.
FAV: to show favorite list (if create). Press twice to
rename the favorite list.
INFO: to display the info bar at the bottom of the
screen. Press again to display the EPG and
another time to show channel info.
EPG (Electronic Program Guide): to open the
program guide.
Batteries
Not included. We recommend to use rechargeable
batteries to protect the environment.
Installing the Batteries
Remove the battery cover from rear of the remote
control and place 2xAAA size batteries inside the
compartment: refer to the drawings inside for the
correct positioning of the batteries.
• CAUTION: use AAA batteries.
• CAUTION: careless use of batteries can cause
explosions, corrosion and production of acidic liquid. Use
them carefully to avoid acid leaks. If liquid is produced,
remove it from inside the remote control and insert new
batteries. When inserting batteries, take care to align the +
and - polarity. Remove them if you are not going to use
the product for a long period of time. Do not leave empty
batteries inserted. Do not throw batteries into a fire and do
not short-circuit, open or subject them to excessive heat. If
batteries are not rechargeable, do not attempt to recharge
them. Replace batteries with the same or equivalent type
recommended by the factory. Do not use one new and
one old battery, or batteries of different types, replace both
with new ones of the same type. Do not dispose of
batteries in the environment.
The product works with batteries that are
covered by the European Directive
2013/56/EU (implemented in Italy by D. Lgs.
del 15/02/2016 n. 27) and cannot be disposed
Page 37

of with normal household waste. Find out about local
regulations regarding the separate collection of batteries:
proper disposal avoids negative consequences for the
environment and health.
Using the remote control
Point the remote control towards the IR sensor
connected to the receiver. Remove any object place in
the path from the remote control to the sensor.
SOME KEYS AND FUNCTIONS
New channel search
Pressing this button on the remote control starts
the channel list update that will insert new
channels or will move channels that have changed
numbering. In this period of signal changeover to
HD resolution, channels often undergo changes
and it is therefore necessary to update often the
channels quickly and easily. Furthermore, that has
been set by the user on his list will not be changed
(e.g. FAV lists, language).
Channel List
Pressing the OK button while watching displays the
channel list. Scroll from channel to channel with the
/ keys. With the colored buttons you can:
- Press the GREEN key to activate the Search
function, with the keyboard enter one or more letters
of the channel to be searched and then move to the
OK box and press the OK key.
- Press the RED key to change the type of list to be
displayed: All, FAV1, FAV2, etc.
- Press the BLUE key to switch between TV and
Radio channel lists.
- Press the YELLOW key to enter the Sort function,
the channels in the list can be displayed: in
alphabetical order (A-Z and Z-A), by first displaying
Page 38

the FTA Free channels (in clear) and then the
Scramble channels (for a fee), Locked/ Unlocked, in
LCN numerical order.
- Press the OK key to display the selected channel.
EPG
The Electronic Program Guide displays
programming for each channel (if the broadcaster
provides it). You can enter the EPG by pressing
the EPG button on the remote control. The
programming for the selected channel will appear.
Change channels using the and keys, the list
of scheduled programs will appear in the window
on the right. Use the button to enter the column
on the right and the / buttons to select the
desired event. Press the INFO button to open the
program description. Use the YELLOW button to
switch between the columns. Press the OK key
(timer) to book the display of the selected event.
Press the BLUE (Set timer) button to view the
various schedules saved in the timer. Press EXIT
to leave the EPG.
GETTING STARTED
PLEASE NOTE: Only after properly connecting the
antenna cable, sensor and HDMI cable, proceed
with connecting the power cable.
At the first installation or when you reset, the
receiver automatically starts the channel search,
simplifying and reducing installation time.
CAUTION: if no picture appears, you may need to
select the source for the input used (e.g. HDMI 1
or 2 etc.), by pressing the SOURCE button on the
TV remote control (depending on the brand it may
also be identified with INPUT, AV, AUX, ZERO,
etc.).
At the end of the channel scan, a channel
positioning conflict may occur: in this case, a
Page 39

window will appear listing the channels found on
two or more different frequencies. Use the keys
and to navigate to the desired one and press
OK.
IMPORTANT: during the waiting process DO NOT
perform any operations (e.g. press buttons on the
remote control, switch off the receiver, disconnect
the socket from the power supply).
In order to use several functions supported by the
decoder, you need to enter the access PIN. On the
next screen of the Parental Control, enter the
desired PIN under New Password, consisting of 4
digits (e.g. 0000 or 1234 etc.), using the numeric
keys of the remote control and enter it again in
Confirm Password: make sure to write it down in
the following spaces, if you lose your PIN contact
the service department.
Now the stick is ready to be used. Enjoy your
□□□□
viewing!
Note: the installation procedure can be repeated
countless times, simply reset the receiver:
- Enter the Main Menu (MENU button).
- Use the or button to go to the System menu
and use the button to go to Reset Settings.
Press the OK button and confirm whether or not to
reset the decoder by positioning on YES or NO
and press OK. WARNING: when the decoder is
reset all settings entered by the user will be lost.
MENU
Press MENU button to enter the menu. Use the
or keys to move to the desired position. Inside
the menu, press the MENU button to return one
step and press the EXIT button to exit directly.
Page 40

Channel List Menu
This menu allows you to set up the channels.
- TV Channel List. Use the remote control buttons
at the bottom of the screen to activate the following
functions:
Favorites: the receiver has 8 favorite groups.
Cannels can be saved in any group, a channel can
be assigned to several groups.
Press the and buttons to select a channel
to add to the list of favorite groups.
Press the RED button to display the “Favorites”
menu.
Press the and buttons to select the FAV list
into which the selected channels is to be added.
Press the OK button, the heart symbol will be
displayed next to the selected channel.
If you want to delete a channel from the FAV
group, position yourself on it, press the RED
button, position yourself on the FAV group
containing the channel as indicated by the heart
symbol and press OK.
Press the EXIT channel to leave the menu.
Lock: the receiver requests the password before
displaying a locked channel.
Press the and buttons to select the channel
to be locked.
Press the GREEN button, enter the password,
the lock symbol (padlock) will appear next to the
channel.
Press the GREEN button again to cancel the
lock.
Sort: press the BLUE button to sort the channel list
in various ways.
Rename: press the and buttons to select the
channel to be renamed, then press the YELLOW
button. An on-screen keyboard will be displayed.
Use the arrow keys / / / to select the
letters and confirm your selection by pressing the
OK button. If the new channel name is complete,
Page 41

jump with the arrow keys to the “OK” and press the
OK button. The channel will have a new name.
Move: press the and buttons to select the
channel to be moved.
Press the INFO button.
Enter the new channel number with the 0-9
numeric keys.
Press the OK button. The channel will be
moved.
Delete: press the and buttons to select the
channel to be deleted.
Press the II key, an X will be displayed next to
the channel.
Press EXIT, the selected channel will be
moved to the TV discarded channel list menu.
Group: select multiple channels to delete them all
together.
Delete all: delete all the channels in the list.
- Radio Channel List. Follow the same
instructions as for the TV channels.
- TV Channel Recycle List and Radio Channel
Recycle List. Discarded channels in the lists are
placed in these folders where you can delete them
completely (RED button) or restore them (GREEN
button, restore symbol appears, press EXIT to save).
- Parental control. Allows various functions to be
blocked with a password:
- the viewing of channels (if the broadcaster provides
this) according to the set age;
- the menu lock, also called Hotel function, prevents
unwanted changes to the decoder settings;
- channel blocking.
A new password can also be set here.
- LCN. The Logical Channel Number function is set
to Active by default. It allows you to identify
channels by putting them in numerical order (e.g.
RAI 1 corresponds to key 1, etc.).
Page 42
Channel Search menu
- Auto Search. Starts automatic channel search.
- Manual Search. Only one channel packet can be
searched at a time. To start this procedure, you
need to know the channel number corresponding
to the frequency of the TV channel you want to
search: each region has its own numbering.
Language menu
This menu allows you to set up language of
various services.
AV Setting menu
- TV System. TV System PAL, NTSC, AUTO.
- Video Resolution. Set up various video
resolutions.
- Aspect Mode. To set the screen in 4:3 or 16:9
format etc.
- Video Effects
- Audio Out
- Audio Description: enables/ disables the scene
description function.
- AD Volume Compensation: you can set the volume
level of the description relative to the volume of the
audio track.
Local Time Setting menu
- Time. Not adjustable.
- Time Zone Setting. Adjustable.
System menu
- System Information. To access important
information, such as the software version and
product serial number.
- Factory Setting. To reset the decoder. You need
to enter the PIN. Use this function with caution,
all stored data will be lost! It will be necessary
to repeat the channel search.
- Book Manage. A timer can be set to display
when a program starts. The receiver will switch to
Page 43

the set channel just before the event.
CAUTION: Factory reset from menu will result in
the loss of previously set timers.
- OSD Setting. To set the display of information on
the screen.
- USB Upgrade. It is necessary to use USB
devices. We recommend to use USB devices that
have not high dimensions, as the receiver is
powered by the TV. Ensure that only the update file
is on the USB device used.
- OTA Upgrade. Via antenna if available.
- Other: Auto Standby. After 3 hours of total
inactivity (no control) by law the receiver
automatically switches off. You can switch it off or
set the desired switch-off time from a minimum of 3
minutes (press OK and then EXIT to save).
Media Center menu
It is necessary to use USB devices. We
recommend to use USB devices that have not high
dimensions, as the receiver is powered by the TV.
Note: the standard USB port in the TV can provide
a power supply of about 500 mA. Proper
functioning of hard disks is not guaranteed, it is
recommended to use USB devices.
- Music / Picture / Movie, music, photos and
videos can be played.
- HDD Information: related to connected memory.
- Storage Format: to format the connected
memory. WARNING: all stored data will be lost.
Page 44
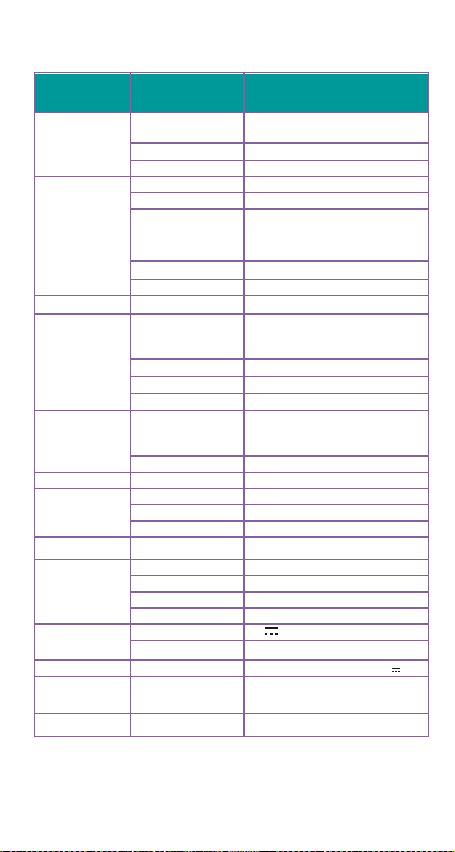
TECHNICAL SPECIFICATIONS
SECTION
ITEM
COMMENTS
DVB-T2 TUNER
Frequency Range
VHF:7M, 174 – 230MHz; UHF 8M,
470 MHz - 866 MHz
Band
7MHz,8MHz
Input impedance
75 Ω
CHANNEL
DECODING
Standard
DVB-T2
Demodulation
COFDM
Constellation
Combinations
QPSK,16-QAM,64-QAM,
hierarchical 16-QAM, hierarchical
64-QAM
FEC
1/2, 2/3, 3/4, 5/6, 7/8
Reed solomon
204, 188, t = 8
DEMULTIPLEXER
Standard
ISO/IEC 13818-1
VIDEO
DECODING
Standard
H.265/HEVC,H.264/AVC high
profile@level 4(1080i25),level
3.1(720p25),level 3.2(720p50)
Aspect ratio
16:9 4:3
Video format
PAL
Video resolution
1080i,1080p output
AUDIO
DECODING
Decoding
MPEG-1 layer I & layer II,MPEG-2
layer II, MPEG-2, AC-3 Dolby digital,
Dolby digital plus
Output mode
Dual channel,stereo
PROCESSOR
CPU
MT2203-M2010D
MEMORY
Processor speed
2000Dmips
Flash memory
4MB
DDR
64MB (BUILT IN CPU)
RCU
Category
IR(Carrier 38KHz)
INTERFACES
Antenna input
SMA, Female
HDMI 1.4b
X 1
IR port
X 1
USB
X 1 micro USB2.0
POWER SOURCE
Input Voltage
5V 1A
Power Consump
5W max
POWER SUPPLY
Not INCLUDED
100-240V~50/60Hz Outp.: 5V 1A
CABINET
74.7*29.3*16.6mm (cabinate)
80.8*29.3*16.6mm(cabinate
include real panel ports)
AMBIENT
Op.Temperature
-5~40℃
SW version: V1.1.49
Page 45

TROUBLESHOOTING
Before contacting the Service Department, check that the
area of use of the decoder is covered by the digital
terrestrial signal and that your antenna receives the signal
correctly. When an incident occurs, consult the table
below before requesting service to identify the cause of
the problem. A simple control or adjustment by the user is
sometimes sufficient to solve the problem and restore
proper operation. The most common drawbacks are
generally connected to the cable connection. If none of the
actions listed in the table help you solve the problem, log
on to www.digiquest.it and you will be guided quickly to
solve the problem, thanks to the different possibilities that
will be offered to you (available updates, form for
assistance request). Attentive to market needs, we
continuously strive to make our models more and more
performant and functional, so we recommend that you
update your decoder to the latest available software
versions, as new software may change or add some
features of the device.
Register now on the official website at: www.digiquest.it
section USEFUL LINKS> REGISTER YOUR PRODUCT to be
informed about available updates and to get the best
performance.
Never open the receiver, danger! Opening will
automatically void the warranty.
The LED on the IR sensor on the remote control does
not light up
• Check that all connections are made correctly and that
they are securely plugged in.
• Check the integrity of the cables.
• Make sure that the sensor is well positioned and inserted
into the IR input of the decoder until it clicks.
• The power supply is insufficient. In this case, connect
the USB cable to another USB port: if your TV has only a
few USB ports, use an external power supply with USB
output (5V, min. 1000 mA). Power supplies are available
in specialized shops.
Odor (smell) of burnt
Disconnect the decoder from the outlet and contact
service immediately.
The receiver does not find channels
• Make sure that you can receive the digital terrestrial
signal in your area.
• Check the cable coming from the antenna and
connections.
Page 46

• Replace the partitions or place a line amplifier.
• Contact an antennist technician.
Pictures on the screen appear split (framed)
• The receiver needs a good signal quality for proper
operation.
• Check that the reception system (antenna) is working
properly.
• The signal is too weak due to, for example, bad weather
conditions: wait for the signal to recover.
Remote control does not operate the decoder
• Make sure the decoder is turned on.
• Make sure that the remote control is pointing toward the
IR sensor and that there are no obstructions on the path.
• Make sure that the sensor is well positioned and inserted
into the IR input of the decoder until it clicks.
• Check the remote control batteries: they may have been
inserted in the wrong direction or discharged.
• Check that no liquid has leaked from the batteries.
• Check that there are no stuck keys.
• Make sure that there is no direct sunlight on the decoder.
• A temporary transmission error has occurred, or the
decoder software has lost of its settings. Turn the unit off
and disconnect to the power; allow a few minutes to
elapse and then turn it on again.
• Make sur that there are no transmitters in the vicinity that
could interfere with remote control actions.
• An incorrect function has been selected. Press the right key.
• Verify that the decoder is properly connected to the
power outlet and TV.
No image or “No Signal” message
• When connecting the decoder with HDMI, you may need
to select the source (e.g. HDMI1) for the input used by
pressing the SOURCE button on the TV remote control
(depending on the brand, it can also be identified with
INPUT, AV, AUX, ZERO, etc.).
• Check the HDMI connection.
•Disconnect and then reconnect the receiver.
“No Signal Absence” appears on the channel already
tuned
• Before resetting the device, press the ● button (red dot),
to launch a new channel search.
• Reset the receiver (see relative paragraph), or check the
system status.
The word “Codified” appears
• The channel viewed is part of a paid package.
The image appears crushed or cut
• The picture format in the Picture > Aspect menu has not
Page 47
been set according to the TV’s characteristics. Try another
format.
No sound heard
• Check the HDMI connection cable.
• Check whether the Mute function is activated. Use the
decoder of TV remote control to turn it off.
• Make sure the volume of your decoder or TV is high
enough. Press the volume buttons on the decoder or TV
remote control to adjust.
• Check that the decoder is properly connected to your TV or
audio system.
• Some connections to the decoder may have been “loose”.
The inserted USB memory is not recognized
• Not all USB devices are compatible. Compatibility with
large-capacity USB devices is not guaranteed. The
standard USB port in the TV can provide a power supply
of about 500 mA. Proper functioning of hard disks is not
guaranteed, we recommend to use USB devices.
NOTE: the manufacturer is not responsible for any
damage or loss of data.
Some files are not recognized
• The manufacturer cannot guarantee the playback of the files
even though the extension is supported: this depends on the
Codec used, the data bit rate and the resolution. Any codec
update is the responsibility of the main board manufacturer, it
is not possible to do it via SW.
The receiver or the TV switches itself off
In accordance with recent European energy saving
regulations, this receiver AUTOMATICALLY SWITCHES
OFF 3 hours after last operation, TVs after 4 hours (autostandby). NOTE: you can deactivate this function in the
decoder by entering the menu, SYSTEM > Other menu.
NOTES:
Technical specifications are subject to change without notice.
The contents of the manual may differ from the product of software
provided and is not subject to change without notice.
New software may change some features of the receiver.
All applications reproduced and the related trademarks belong to
their respective owners.
In case of incorrect, incomplete or erroneous or mere transcription
errors supplier (distributor) will be relieved of any responsibility and
can refuse performance of the obligation related to the error.
Photos and illustrations are for illustrative purposes only and may
not reflect the product image.
Due to updates or errors, the contents of this manual may not
exactly match the actual product.
Page 48
 Loading...