

Page 1
Android TV 9.0 Certified
Page 2
ITALIANO
dal D.Lgs N° 49 del 14 Marzo 2014.
INDICE
SICUREZZA E PRECAUZIONI ………………………………………………………. 2
PANNELLI e COLLEGAMENTI………………………………………………….……. 5
TELECOMANDO ……………………….…..………………………………….……… 6
ACCENSIONE DELLA BOX …………… ……………………………….………...… 7
ALCUNE OPZIONI ……………………..…………………………………………… 7
SCHERMATA HOME …………………………………………………………………. 7
MEMORIE ESTERNE ………………………………………………………………… 8
IMPOSTAZIONI ………………………………………………………..…………….. 8
DISINSTALLARE APPS …………………………………………………………….. 10
AGGIORNAMENTO ……………………………………………………………….... 10
USB ………………………………………………………………….………………… 10
INFORMAZIONI AGGIUNTIVE
- PROBLEMI E RISOLUZIONE …………………..………….….…………….…….… 11
- SPECIFICHE TECNICHE ……………………………..………….………………..… 15
Il simbolo del cassonetto barrato riportato sull’apparecchiatura indica che il prodotto alla fine
della propria vita utile deve essere raccolto separatamente dagli altri rifiuti. L’utente dovrà,
pertanto, conferire l’apparecchiatura integra dei componenti essenziali giunta a fine vita agli
idonei centri di raccolta differenziata dei rifiuti elettronici ed elettrotecnici, oppure riconsegnarla
al rivenditore al momento dell’acquisto di nuova apparecchiatura di tipo equivalente, in ragione
di uno a uno, oppure 1 a zero per le apparecchiature aventi lato maggiore inferiore a 25 cm.
riciclaggio, al trattamento e allo smaltimento ambientale compatibile contribuisce ad evitare
possibili effetti negativi sull’ambiente e sulla salute e favorisce il riciclo dei materiali di cui è
composta l’apparecchiatura. Lo smaltimento abusivo del prodotto da parte dell’utente comporta
l’applicazione delle sanzioni amministrative di cui al D.Lgs n. 152/2006 nonché quelle previste
ai sensi del Decreto Legislativo N° 49 del 14 Marzo 2014
“Attuazione della Direttiva 2012/19/UE sui rifiuti di apparecchiature elettriche ed
L’adeguata raccolta differenziata per l’avvio successivo dell’apparecchiatura dimessa al
INFORMAZIONI AGLI UTENTI
elettroniche (RAEE)”
1
Page 3
DIGIQUEST
Questo simbolo indica
Questo simbolo indica che
l’apparecchio.
SICUREZZA E PRECAUZIONI
voltaggio pericoloso all’interno
del prodotto, con rischio di
scossa elettr i c a e da nni alle
persone.
ATTENZIONE: per ridurre i rischi di scosse elettriche, non
aprire l’apparecchio. Qualunque intervento dovrà essere
affidato ad un tecnico specializzato. L’apertura del ricevitore
comporta la decadenza automatica della garanzia.
ci sono importanti istruzioni
che accompagnano
ATTENZIONE: l’unico modo di scollegare la box dalla rete di
alimentazione è quello di r imuovere la spina dalla pr esa. Assicurarsi
che la presa di corrente sia facilmente accessibile, in modo da poter
disconnettere facilmente il prodotto in caso di necessità. Leggere
attentamente il manuale prima di iniz iare ad utiliz zare la box. Conservare
le istruzioni per una futura consult azione. Non aprire l'apparecchio e/ o
l’alimentatore, toccare i componenti interni potrebbe provocare scosse
elettriche. Il contatto con una tensione di 100-240V~ può essere fatale.
Prima di collegare la box all'alimentazione accertarsi che tutti i
collegamenti siano stati esegui ti corr ettamente. S collegare s empre la b ox
dalla presa di corrente prima di collegare o scol legare i c avi. La mancata
osservanza di queste precauzi oni può provoca re danni, i ncendi o sc osse
elettriche, con possibili lesioni gravi!
RETE DI ALIMENTAZIONE. Se il modello acquistato necessita di un
alimentatore l'utente è tenuto ad uti lizzare quello fornito con l a box onde
evitare danni all'apparecchio s tesso. L' uso di un ali mentato re che non si a
quello fornito comporterà l'aut omatico esoner o da ogni respo nsabilità per
il produttore. Controllare che la prop ria alimentazione di rete corrisponda
a quella necessaria al funzionamento (vedere etichetta su prodotto).
Consultare il gestore di energia se non si è sicuri delle caratteristiche
della propria rete elettrica. Non t entare di riparare o giuntare il cavo di
alimentazione. Non manomettere il cavo di alimentazione o la spina.
Accertarsi prima dell’uso che il cavo dell’alimentazione non sia
danneggiato, annodato o schiacciato. Si consiglia di scollegare la box
dall'alimentazione in caso di non utilizzo per un lungo periodo di tempo,
durante i temporali o fenomeni p articolari. Non staccar e mai la spina da
una presa tirando il cavo, evi tare di toccare gli spinotti. Non effettuare
operazioni di collegamento o scoll egamento con mani bagnate o a piedi
nudi. Non utilizzare oggetti come lev e per stacc are la s pi na da una p resa.
Il cavo di alimentazione dovrebbe essere protetto da una copertura in
plastica per evitare che venga danneggiato o calpestato.
2
Page 4

ITALIANO
In caso di odore di bruciato o fumo, staccare immediatamente la
spina e contattare l’assistenza.
SOVRACCARICO. Non sovracca ri care l a presa di corrent e, l a prolunga o
l’adattatore, per non causar e incendi o scariche elett riche. Us are sempre
cavi standard certificati. Non col legare o modificare cavi mentre la box è
collegato all'alimentazione. Non utilizzare prolunghe di alimentazione
danneggiate: potrebbero essere causa di scossa elettrica o incendio.
LIQUIDI. Non esporre il bene a gocce o schizzi di liquidi e non porre
sull’apparecchio nes sun oggetto con li quido all’interno, come vas i o simili.
Non posizionare i n luoghi umidi e non tocca re mai con mani bagnate o
umide o durante i temporali. Se un liquido penetra all’interno della box
scollegare immediatamente e rivolgersi ad un tecnico.
PULIZIA. Prima di pulire la box disconnettere il cavo di alimentazione
dalla presa. Per spolverare, usare sempre un panno leg germente umido
(senza solventi, né detergenti).
VENTILAZIONE. Le fess ure della box devono essere lasciate scoperte
per permettere un’appropriata ventilazione. Lasciare intorno
all’apparecchio uno spazio sufficiente (almeno 10cm) per garantire
un’areazione corretta. Non porre l’apparecchio su tappeti o simili. Non
posizionare nessun oggetto sopra l a box .
OGGETTI. Non inserire mai oggetti nelle fessure della box. Se ciò
accade scollegare l’apparecchio e rivolgersi ad un tecnico.
UTILIZZO RISERVAT O A PERSONE ADULTE. Il be ne acquistato è un
congegno elettronic o sofisticato per cui assoluta mente non idoneo all’uso
da parte di minori . Non si rispond e dei danni verificati si a persone e c ose
derivanti dall’utilizzo del bene da parte di soggetti minori. Tenere
l’apparecchio fuori dalla portata dei bambini. I sacchetti di plastica degli
imballaggi possono essere pericolosi. Per evitare soffocamenti, tenere i
sacchetti lontani dal la portata dei bambini . Le batterie e altri co mponenti di
dimensioni ridotte pos sono essere ingeriti dai bambini . Si raccomanda di
tenerle fuori dalla loro portata.
ACCESSORI. Non utili zzare accessori o parti di ricambio non original i,
potrebbero causare danni al la box.
CONNESSIONE ALLA TV O AD ALTRI APPARECCHI.
Disconnettere l’ap parecchio dalla presa di co rrente prima di connetter e o
disconnettere i cavi. P rima di effettuare collegamenti c on altri apparecchi
leggere le istruzioni per l’uso degli apparecchi stessi.
LOCAZIONE. Installare l a box in luoghi protetti da raggi solari diretti o
pioggia. Non posizionare vicino a fonti di calore. Non porre nessun altra
apparecchiatura elettronica sul ricevi tore. Non usare l’apparec chi o in aree
sotto pressione. Non posizionare candel e o lampade sopra il ricevitore.
3
Page 5

DIGIQUEST
Posizionare in orizzontale e su s uperfici stabili, lontano da vi brazioni. Se
l'apparecchio viene spostato da un ambiente caldo ad uno freddo si
possono creare problemi. Spegnere e riaccendere dopo 1-2 ore. Il
prodotto va maneggiato con cautela: spostamenti veloci e poco attenti
possono danneggiare i componenti. Tenere lontano da oggetti magnetici.
RIPARAZIONI. Non apri re la box, la tensione al s uo interno è presente
anche quando è spento. Per eventuali guasti rivolgersi sempre a
personale qualificato. L’apertura della box comporta la decadenza
automatica della garanzia.
SOFTWARE. La ditta produttrice fornisce il prodotto con software
residente e, fatto salvo quanto previ s to da inder ogabi l i previ s ioni di legge,
resta esonerata da ogni responsabilità civile, penale ed amministrativa
nel caso di utilizzo del Prodotto con qualsivoglia software di terzi o
configurazione che non siano stati installati o forniti dalla Medesima.
Fabbricato da DIGIQUEST SOLUTIONS s.u.r.l. Sede operativa Via Avisio, 18 - 00048 Nettuno
(RM) - Italy. Made in China
DIGIQUEST S OLUTIONS s.u .r.l. dichiar a che questo prodo tto è conforme
alla diret tiva 20 14/53/ UE. Il testo c ompleto della di chiarazi one di conf ormità
UE è disponibile al seguente indirizzo Internet:
www.digiquest.it/certificazioni.html
4
Page 6
ITALIANO
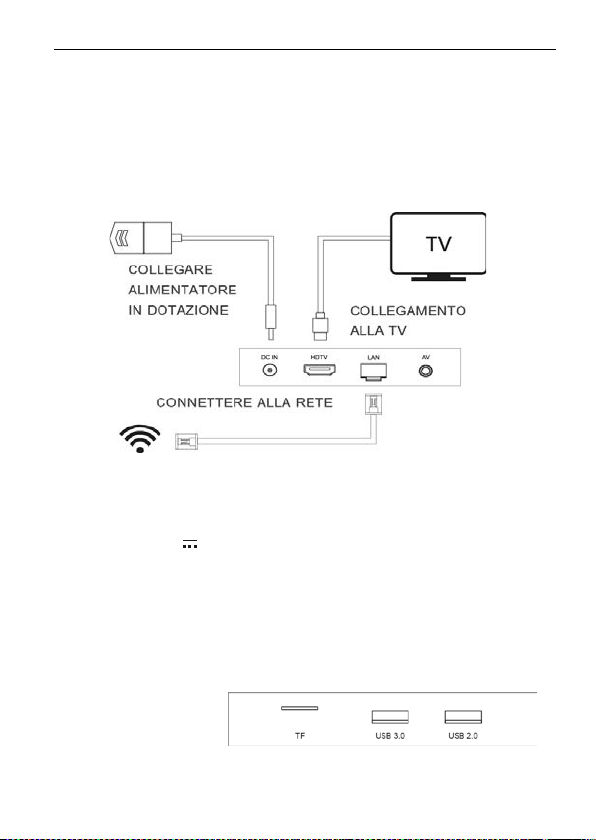
PANNELLI e COLLEGAMENTI
TTENZIONE: quando si eseguono i col legamenti tutti gl i apparecchi devon o
A
essere scollegati dalla presa elettrica.
ANNELLO FRONTALE
P
Led: quando la box è accesa il led è blu, quando è spent a è ros so.
P
ANNELLO POSTERIORE
HDTV per il collegamento alla TV con cavo HDMI incluso.
LAN porta per il collegamento alla rete.
DC IN per il collegamento dell’alimentatore incluso: Input: 100-240V~ 0.5A
50/60Hz Output: 5V
2A.
AV: uscita jack 3,5 Audio/Video SD per il collegamento alla TV tramite
SCART o RCA (cavo non incluso).
C
OLLEGAMENTO DELL’ALIMENT ATORE
Solo dopo aver completato tutti i collegamenti collegare l’alimentatore in
dotazione alla porta DC IN.
PANNELLO LATERALE
TF: micro SD (chip vers o l’alto), USB 3.0, USB 2.0. Per il collegamento di
memorie esterne.
5
Page 7
DIGIQUEST
TELECOMANDO
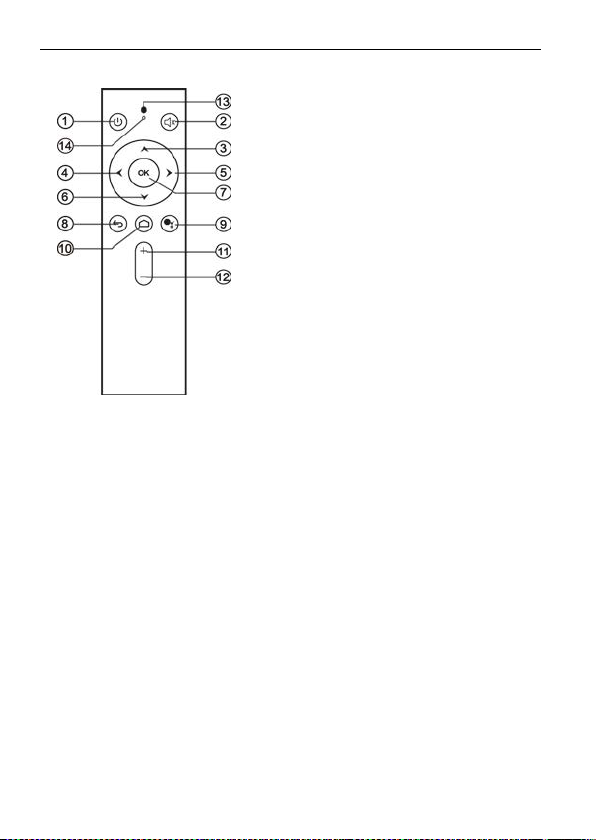
1. Accensione / Spegnimento
2. Elimina l’audio
3. Sposta il cursore in su
4. Sposta il cursore a sinistra
5. Sposta il cursore a destra
6. Sposta il cursore in giù
7. Per confermare operazioni
8. Per tornare indietro
9. Controllo vocale (tasto
Assistente Google)
10. Per andare alla pagina iniziale
(schermata HOME)
11. Per aumentare il volum e
12. Per diminuire il volume
13. Microfono
14. Indicatore luminoso
F
UNZIONE DI INPUT VOCALE
Questo prodotto è del sis tem a Goo gle A ndroid T V. R egist rati pe r acce dere al
tuo account Google! Parla al telecomando vocale premendo il tasto
Assistente Google (tasto 9 vedi legenda telecomando) e la box cercherà
quello che vuoi.
I
NSTALLAZIONE BATTERIE
Togliere il coperchietto dal telecomando ed inserire 2 batterie AAA: fare
riferimento ai disegni all'interno dell'alloggio per il corretto posizionamento
delle batterie.
• A
TTENZIONE: utilizzare sempre pile alcaline (AAA).
TTENZIONE: l'inc auto uso delle batteri e può causare esplosioni, corrosioni
• A
e produzione di liquido acido. Usarle con acc ortezza per evitare perdi te di
acido. Se vi ene prodotto del liquido el iminarlo dall’int erno del telec omando
ed inserire nuove batterie. Nell’inserire le batterie badare ad allineare la
polarità + e -. Estrarle se si prevede di non usare il prodotto per un lungo
periodo di tempo. Non lasciare le batterie scariche inserite. Non get tate le
batterie nel fuoco e non cortocircuitarle, aprirle o sottoporle a calore
eccessivo. Se le batterie non sono ricaricabili, non cercare di ricaricarle.
Sostituire le batteri e con altre di tipo uguale o eq uivalente consigliate dall a
fabbrica. Non utilizzare una batteria nuova e una vecch ia, o batterie tra loro di
tipo diverso, sos tituirl e ent rambe con n uove ug uali tra lor o. N on dis per dere le
batterie nell’ambiente.
6
Page 8
ITALIANO
Il prodotto funziona con batterie che rientrano nella direttiva europea
2013/56/UE (recepita in Italia co n D. Lgs. del 15/02/2016 n. 27) e che non
possono ess ere smaltite c on i normali rifiuti domestici. Informarsi sulle
normative locali relative alla raccolta differenziata delle batterie: un
corretto smaltimento permette di evitare conseguenze negative per
l'ambiente e la salute.
UTILIZZO DEL TELECOMANDO
Il telecomando va direzionato verso il sensore IR presente sul pannello
frontale della box. Rimuov ere qualsiasi oggetto che si trov a sulla traiettoria
dal telecomando al sensore. L'esposizione a forte luce solare potrebbe ridurre
la sensibilità del telecomando.
ACCENSIONE DELLA BOX
- Accendere la TV.
- Premere il tasto di a cce nsi o ne sul telecomando d ella bo x. S e no n com pare
nessuna imma gine s ullo sc herm o selezionare la sorgente (es. HDMI 1 o 2
ecc.) relativa al l’ingresso utili zzato sulla TV , premendo il tasto SOURCE s ul
telecomando della T V (a seconda dell a marca può ess ere identific ato anche
con INPUT, AV, AUX, ZERO, ecc.) altrimenti non compare nessuna
immagine.
La prima volta c he si accende la box sullo schermo apparirà la Schermata
HOME, la macchina è pronta all’uso.
ALCUNE OPZIONI
Connessione alla rete: può essere tramite LAN oppure è possibile
selezionare un’altra rete senza fili (WiFi).
App: si possono installare le A PP consigliate (t utt e o alcune). Si c on s i gli a di
installarle. È possibile aggiungere APP in qualsiasi momento dalla
schermata HOME utilizzando Google Play Store.
In modalità tastiera per confermare e andare avanti posizionarsi sull’icona
a destra nello schermo.
SCHERMATA HOME
Funzione ricerca: per attivare questa funzione si può o premere
direttamente il tasto Controllo vocale (Assistente google vedi tasto 9
legenda telecoma ndo) o usare il tasto ▲ pe r scegliere se la ric erca va fatta
tramite microfono o tastiera.
Microfono: pe r att iv are la rice rca tramite l’assistente Google.
7
Page 9

DIGIQUEST
MEMORIE ESTERNE
Quando si inseris cono delle memorie estern e compare la notifica in al to a
destra sullo schermo, dove sarà possibile visu al i zza re le i nf o tec ni ch e r el ative
alle memorie. Per visualizzare i file è possibile servirsi di una APP a
piacimento oppure aprire l'app sideloa d launche r > galleria per visuali zzare il
contenuto delle memorie e poi avviare la riproduzione sempre scegliendo una
app (come indicato).
Per disconnettere le memorie usare sempre il comando ESPELLI: andare
sulle notifiche, scegliere la memoria con il tasto OK e selezionare Espelli.
N
OTA: la procedu ra di installa zione può essere ripetuta infi nite volte, bast erà
resettare la box: entrare nelle IMPOSTAZ IONI in alto a destra dello s chermo
usando la freccia ► e confermando con OK. Con il tasto ▼ posizionarsi su
Preferenze del dispositivo, premere il tasto OK; nel sottomenu scegliere
Reimposta, prem ere di nuovo OK per entrare. Con il tasto ▼ posizionarsi su
Reimposta e premere OK. Posizionarsi su Annulla e premere OK per
annullare l’oper azione. ATTENZIONE: quando la box viene resettata tutte l e
impostazioni inserite dall'utente andranno perse. Si consiglia di scollegare
qualsiasi memoria esterna collegata alla box, per evitare perdite di dati.
IMPOSTAZIONI
Con i tasti frec cia posizionarsi sull’i cona impostazioni in al to a destra nello
schermo.
• Suggerimenti: impostare nome dispositivo come si desidera.
• Impostazioni generali
- Rete e Inter net: visualizza la con nessione i n uso e le v arie poss ibilità di
collegamento.
- Account e accesso: visualizza l’account in uso e permette di
aggiungerne altri.
- App: visualizza tutte le APP installate, con varie opzioni.
- Preferenze del dispositivo
Informazioni sulla box, aggiornamento, riavvia (reboot).
Data e ora: consente di impostare l'ora GMT e il formato di
visualizzazione dell'ora. Nota: il sistema deve visuali zzare l'ora per la
sincronizzazione con l'o ra dell a rete do po la connessione di rete.
Lingua: per impostare quella desiderata.
Tastiera: per visualizzare le impostazioni della tastiera.
Audio: per visualizzare le impostazioni del suono e dell'audio.
Spazio di archi viazione: 16GB
Schermata Home: per impostare la schermata iniziale.
8
Page 10
ITALIANO
Assistente Google: visualizza le impostazioni dell'assistente.
Chomecast built-in: visualizza le informazioni del chromecast.
Screensaver: tra cui standby dopo 3 ore di inattività.
Geolocalizzazione: per attivare e disattivare la geolocalizzazione.
Utilizzo e diagnostica: per attivare o disattivare l'invio dei dati
diagnostici.
Sicurezza e limit azioni: visualizza l e impostazioni pe r l'installazione di
app di terze parti.
Accessibilità: per visualizzare le impostazioni sui sottotitoli, i servizi etc.
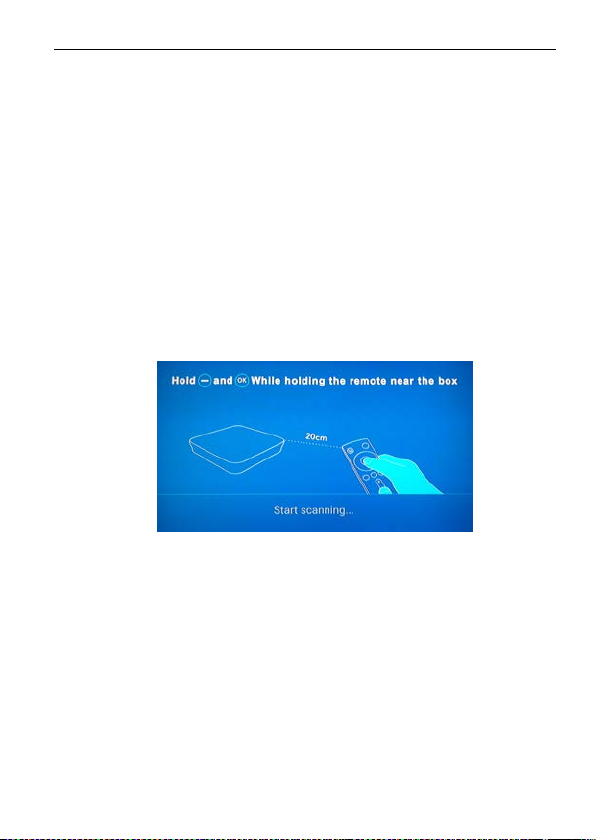
Reimposta (reset): ripristino impostazioni di fabbrica. F are attenzi one a
questa operazione, resettando tutti i dati inseriti dall’utente verranno
cancellati. Sullo schermo apparirà la finestra di Benvenuto. La prima
operazione da fare è il riconoscimento del telecomando: avvicinare il
telecomando alla box (20 cm) e tenere premuti contemporaneamente il
tasto – (tasto 12 vedi legenda telec omando) e il tasto OK fino a che
compare la finestr a di Benve nuto (W elcome). L’inst allazion e sarà gui data
dettagliatamente, seguire le istruzioni a video.
- Telecomandi e accessori: per aggiungere accessori.
- Advanced setting
1. DISPLAY
Screen resolution la box è imposta di default su automatico (auto
switch to best resolution), è possibile regolare manualmente la
risoluzione migliore.
Screen position: è possibile regolar e lo zoom dello sc hermo, in modo
che lo schermo si adatti in modo corretto. Zoom In per aume ntare, Zoom
Out per diminuire
Screen rotation (forceland, original)
HDR to SDR (auto, on, off)
SDR to HDR (on, off)
USB model ( Device, Host)
2. HDMI CEC, disattivato, si attiva con OK.
9
Page 11
DIGIQUEST
3. Playback settings: HDMI self-adaption è dis at tiv at o, si atti v a c on OK.
L'autoadattamento HDMI consente di modificare la frequenza dei
fotogrammi del contenuto di riproduzione in base alla frequenza dei
fotogrammi del televisore.
4. Audio output, per impostare l’uscita audio.
5. Powerkey definition, per scegliere la modalità di spegnimento.
6. Picture, varie opzioni tra cui la luminosità ecc.
DISINSTALLARE APPS
È possibile disinstallare gli APK indesiderati per mantenere il sistema in
ottime condizioni.
N
OTA: questo prodot to è un sistema Android TV OS di Google, consigliamo
agli utenti di ottenere APPS da Google Player Store. L'APK del mercato
elettronico di terze parti non è stato autorizzato e certificato da Google.
Potrebbero esserci problemi di incompatibilità.
AGGIORNAMENTO
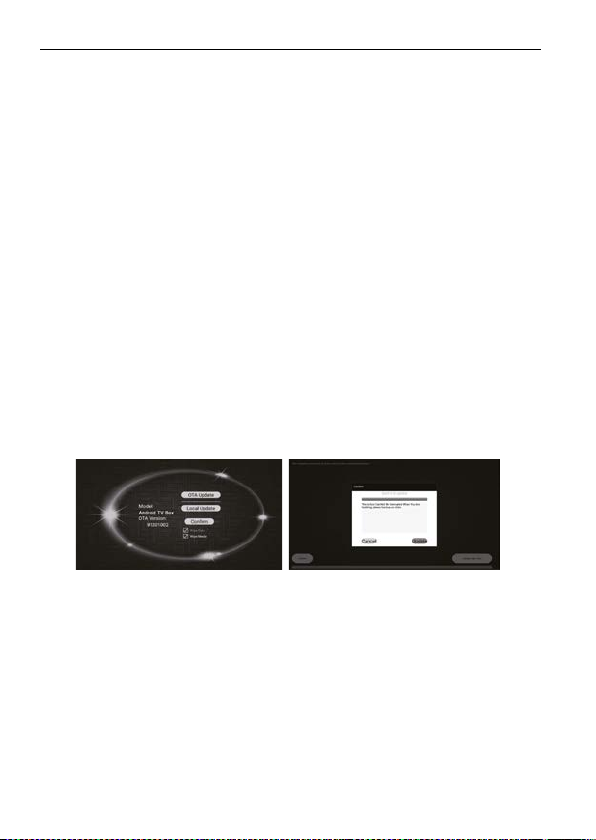
- Alla voce app, scegliere aggiornamento e aprire.
- Selezionare OTA Aggiornamento, il dispositivo rileverà se è disponibile
una nuova versione e aggiornerà alla versione più recente.
N
OTA: durante il processo di aggiornamento, NON spegnere la box.
Si prega di non scaricare software di terze parti per l'aggiornamento.
Questo prodotto è un sistema originale, dovrebbe essere aggiornato solo
tramite OTA o contattando l’assistenza.
USB
Collegando una o più memorie alle porte del ricevitore (USB 2.0, USB 3.0,
TF), è possibile visual izzare immagini, ascoltare musica, riprodurre file video
utilizzando APP.
Il produttore non può garantire la riproduzione dei file nonostante sia
supportata l'estensi on e: ciò di pend e dal C odec usat o, dal data bit rate e d alla
risoluzione.
10
Page 12

ITALIANO
Il ricevitore gestisce sia dis p osit ivi formattati FAT32 sia NTFS.
Non rimuovere l'HDD colle gato me ntre sta la voran do. Ila box non riconosc erà
più la memoria. Non tutti gli HDD sono compatibili: si consigliano HDD
alimentati esternamente, in quanto la box non può garantire la corretta
alimentazione tramite la porta USB. Il produttore non è in alcun modo
responsabile di eventuali danni o perdita di dati.
Formattare. É possibile formattare il proprio dispositivo USB.
A
TTENZIONE tu tti i dat i presenti nella memoria verranno eliminati.
N
OTA: le APP possono variare a discrezione del produttore; un nuovo
aggiornamento software potrebbe cambiare le APP presenti.
INFORMAZIONI AGGIUNTIVE
ROBLEMI E RISOLUZIONE
P
Quando si verifica un inconveniente, prima di richiedere l'intervento
dell'assistenza, consultare la tabella riportata di seguito per individuare la
causa del problema. A volte basta un semplice controllo o una semplice
regolazione da parte dell'utili zzatore per risolv ere il problem a e ripristinare il
funzionamento corretto. Gli inconvenienti più comuni sono generalmente
legati al collegamento dei cavi. Se nessuna delle azioni indicate nella
tabella aiutano a risolvere il problema , collegatevi al sito www.digiquest.it
sarete guidati velocem ente alla risoluzione del probl ema, grazie alle diverse
possibilità che vi saranno proposte (aggiornamenti disponibili, chat online,
form per richiesta assistenza). Registrati ora sul sito ufficiale all'indirizzo:
www.digiquest.it/registrazione.html. Per prendere visione dei termini di
garanzia convenzionale consultare il nostro sito www.digiquest.it
Non aprire mai l a box, pericolo, rischi o di scosse el ettriche! L'apertura
comporta la decadenza automatica della garanzia.
Odore di brucia to
• Scollegare la box dalla presa di corrente e contattare subito l'assistenza.
La TV non ha segnale
• Verificare che il led frontale blu sia ac c eso do po l' acc ensione del prodotto.
• Attendere 1 minuto dopo l'avvio, quindi utilizzare il telecomando per
spegnere la box (nota: premere il tasto solo una volta); attendere 5
secondi, se sulla box si accende il led rosso significa che funziona
normalmente. Si prega quindi di verificare che i cavi siano stati collegati
correttamente e che sia stata sel ezi o n ata la gius ta sor ge nt e (es. HDMI 1
o 2 ecc.) relativa all’ingresso utilizzato sulla TV, premendo il tasto
SOURCE sul telecomando della TV (a seconda della marca può essere
identificato anche con INPUT, AV, AUX, ZERO, ecc.).
Se la luce rossa non si accende, si prega di contattare l’assistenza.
11
Page 13

DIGIQUEST
Nessun led è acceso (la box non si a cce n de)
• La spina non è stata inserita correttamente alla rete elettrica.
• Provare a cambiare la presa di corrente.
• Controllare che tutti i collegamenti siano eseguiti correttamente e che siano
ben inseriti.
• Controllare l'integrità dei cavi.
Il WIFI non si connette
• Verificare che il Wi-Fi sia acceso, riavviare e riprovare.
• Se il Wi-Fi può essere abilitato ma non può essere collegato, si prega di
riavviare il router e provare a connettersi di nuovo.
• Crea un hotspot Wi-Fi dal tuo cellulare e prova a connettere la tv box.
• Una volta connesso alla rete cablata, la macchina disconnetterà
automaticamente la connessione WIFI.
Impossibile usare la funzione vocale
• Confermare se il telecomando funziona correttamente nel menu di
configurazione.
• Se la box è connessa alla rete, riprodurre il video di YouTube per
confermare se la rete è funzionante. Fare riferiment o al cor re tto
funzionamento della voce del telecomando.
Nessuna immagine
• Collegando la box con HDMI, dopo l’accensione, potrebbe essere
necessario selezionare la sorgente (es. HDMI1) relativa all'ingresso
utilizzato, premendo il tasto SOURCE sul telecomando della TV (a seconda
della marca il tasto SOURCE può essere identificato anche con INPUT,
AV, AUX, ZERO, ecc.).
• Verificare che il cavo HDMI o AV sia inserito correttamente, sia sulla TV che
sulla box.
• Scollegare e poi ricollegare la box.
• Spegnere la box, scollegare la presa dall’alimentazione e riaccendere dopo
alcuni minuti.
Le immagini sullo schermo cambiano colore
• Assicurarsi che il cavo HDMI o AV sia collegato correttamente.
• Provare a scollegare e a ricollegare tutti i cavi.
• Spegnere la box, scollegare la presa dall’alimentazione e riaccendere dopo
alcuni minuti.
Il telecomando non risponde
• In caso di malfunzionamento del telecomando vocale, provare a
disassociare e associare nuovamente il dispositivo.
• Verificare che la distanza di utilizzo sia entro 6 metri.
• Verificare che il telecomando funzioni correttam ente nel menu di
configurazione.
12
Page 14

ITALIANO
• Assicurarsi che la box sia accesa.
• Controllare le batterie del telecomando: possono essere state inserite nel
verso sbagliato o essere scariche.
• Controllare che non sia fuoriuscito liquido dalle batterie.
• Controllare che non vi siano tasti incastrati.
• Assicurarsi che non arrivi luce solare diretta sulla box.
• Verificare che non vi siano apparecchi trasmittenti nelle vicinanze che
possano annullare le azioni del telecomando.
• È stata selezionata una funzione sbagliata. Premere il tasto giusto.
• Verificare che la box sia correttamente collegata alla presa di alimentazione
e al televisore.
Impossibile acceder e al sis tem a do p o l'avvi o
• Si prega di conta t ta re dir ettam ente l’assistenza.
Nessun suono durante la riproduzione di video
• Verificare se la funzione Muto è attivata. Usare il telecomando della box o
del televisore per disattivarla.
• Si prega di controllare se la fonte è un formato particolare.
Alcuni file non ve ng ono riconosciu t i
• Il produttore non può garantire la riproduzione dei file nonostante sia
supportata l'estensione: ciò dipende dal Codec usato, dal data bit rate e
dalla risoluzione.
Non c’è audio o è basso
• Il cavo HDMI o AV non è inserito correttamente.
• Controllare che la box sia correttamente connessa al televisore o al vostro
sistema audio.
• Alcune connessioni della box potrebbero essersi “allentate”.
• Verificate che il volume della box o del televisore sia abbastanza alto.
Premere i tasti del volume del telecomando della box o del televisore per la
regolazione.
L'OTA non può ess er e ag giornato
• Controllare che la box sia collegata alla rete.
• Se la box ha già installata la versione software più recente, la funzione OTA
non aggiornerà nuovamente.
L'APK di terze par ti no n è sup p or tato
• NOTA: il sistema di tv box è Google ATV, non supporta l'APK della versione
mobile. Se è necessario scaricare l'APK, scaricarl o e instal la rl o dal go ogl e
playstore.
La funzione del puntatore del mouse non è supportata
• Questo tv box usa il sistema Google ATV e non supporta la funzione del
puntatore del mouse. Si prega di utilizzare il telecomando originale del
prodotto.
13
Page 15

DIGIQUEST
Non vi ene riconosciuta la memoria USB inserita
• Non tutti i dispositivi USB sono compatibili. Si consiglia di utilizzare Hard
Disk alimentati cioè dotati di un proprio alimentato re. U tilizzare USB 2.0 e
di grande capacità. NOTA: Il produttore non è in alcun modo responsabile
di eventuali danni o perdita di dati.
Bluetooth
• E’ possibile, che alcuni dispositivi, con una versione bluetooth antecedente
a quella presente nel KM9, potrebbero avere problemi di collegamento.
La box si spegne
• Come previsto dalle rec enti norm at iv e europee sul risparmio en erg etico,
questo apparecchio si spegne automaticamente dopo 3 ore, se non viene
eseguita nessuna operazione.
NOTE:
Le specifiche tecniche possono variare senza preavviso.
Il contenuto del manuale potrebbe differire dal prodotto o dal software fornito ed è
soggetto a modifiche senza preavviso.
Un nuovo software potrebbe cambiare alcune funzionalità del ricevitore.
Tutte le applicazioni riprodotte ed i relativi marchi appartengono ai loro legittimi proprietari
In caso di informazioni inesatte, incomplete o erronee o di meri errori di trascrizione il
fornitore (distributore) sarà esonerato da ogni responsabilità in merito e potrà rifiutare
l’esecuzione della prestazione relativa all’errore.
Le foto e le illustrazioni hanno valore puramente illustrativo e possono non rispecchiare
l’immagine del prodotto.
A causa di aggiornamenti o errori, il contenuto di questo manuale potrebbe non
corrispondere esattamente al prodotto reale. Consultare il sito www.digiquest.it per
eventuali approfondimenti o rivolgersi all’assistenza tecnica [email protected]
14
Page 16
ITALIANO
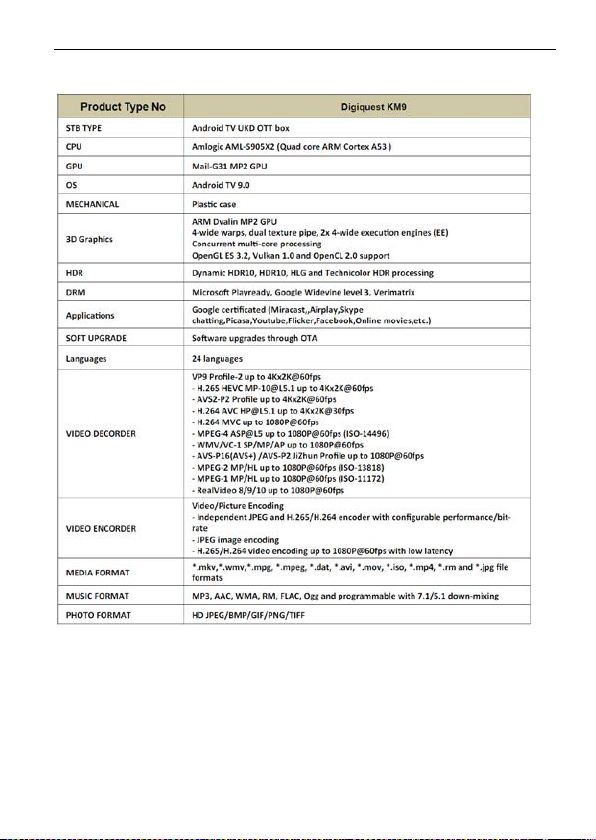
SPECIFICHE TECNICHE
V
ERS android Tv 9.0
15
Page 17
DIGIQUEST
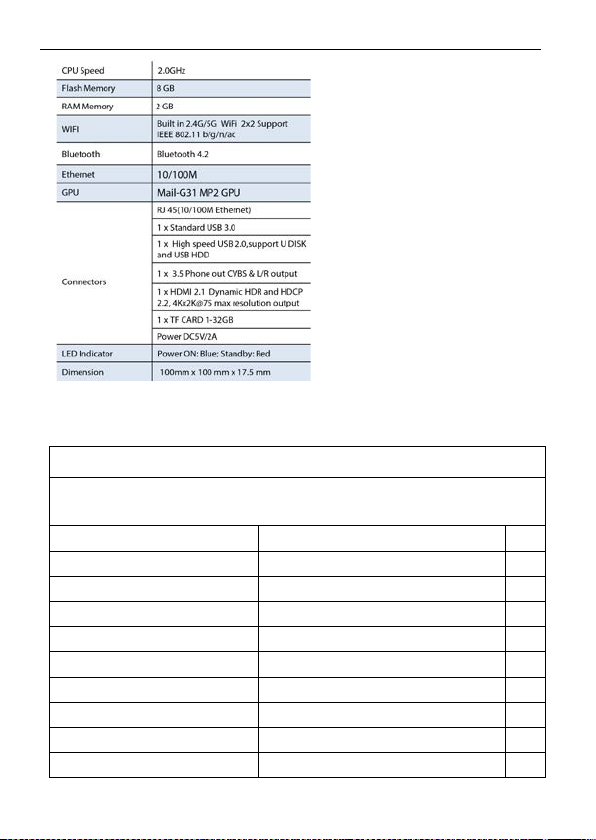
Shenzhen Teka Technology Co., Ltd.
Input voltage
100-240
V
Output current
2,0
A
A
LIMENTATORE IN DOTAZIONE
Ai sensi del Regolamento 2019/1782, Allegato II, lettera b), si rimettono di seguito, le
specifiche relative alla progettazione ecocompatibile dell'alimentatore esterno TEKA 012 0502000EU
Manufacturer’s name or trade mark, commercial registration number and address
Building A, No. 21, XiFu Road, Red Star Community, SongGang Street,
Baoan District, Shenzhen, Guangdong Province, 518105,P.R. China
Information published Value and precision Unit
Model identifier TEKA 012 - 0502000EU
Input AC frequency 50/60 Hz
Output voltage 5,0 V
Output power 10,0 W
Average active efficiency
Efficiency at low load (10 %)
No-load power consumption
79,75%
na
0,059
16
%
%
W
Page 18
ENGLISH
roducts
CONTENTS
SAFETY INFORMATION ………………………………………………………..….… 2
PANELS and SYSTEM CONNECTION ……………………………………….……. 4
REMOTE CONTROL ………………….…..………………………………….….…… 5
SWITCHING ON THE BOX …………………………..…………………………...… 6
SOME OPTIONS ……………………………………..……………………………… 6
HOME SCREEN ……………………………………………………………...……… 6
EXTERNAL MEMORIES …………………………………………………………… 6
SETTING …………………………………………………………………………… 7
UNINSTALL APPS ……………………………..………………………..………….. 8
SW UPDATE ..…………………………………..………………..……………….... 8
USB ………………………………………….…………………………………..…… 9
ADDITIONAL INFORMATION
- TROUBLESHOOTING …………………..………….………………………….…..… 10
- SPECIFICATIONS ……………………………..…………………………………..… 13
Battery Handling: batteries may contain toxic agents that are hazardous to the
environment. Therefore, dispose of the batteries immediately according to the
prevailing stat ut ory r egulat ions . Never t hrow t he batt er ies in nor mal house hol d w ast e.
Information for Users on Disposal of Old Equipment and Batteries [European
Union only] These symbols indicate that equipment with these symbols should not
be disposed of as general household waste. If you want to dispose of the product or
battery, please c ons ider t he col lect ion sy s tems or f acil iti es for appropr iat e r ecy c ling.
Products Battery P
Correct disposal of this product prevents any potentially negative impact on the
environment and human h eal th t hat coul d ari s e from any inappr opr iat e handl i ng of t he
product itself. To receive more det ailed informat ion regarding disposal of your unit , we
recommend that you contact the competent public agencies, the waste collection
service or the s hop where y ou pur chas e d the pr od uc t.
1
Page 19
DIGIQUEST
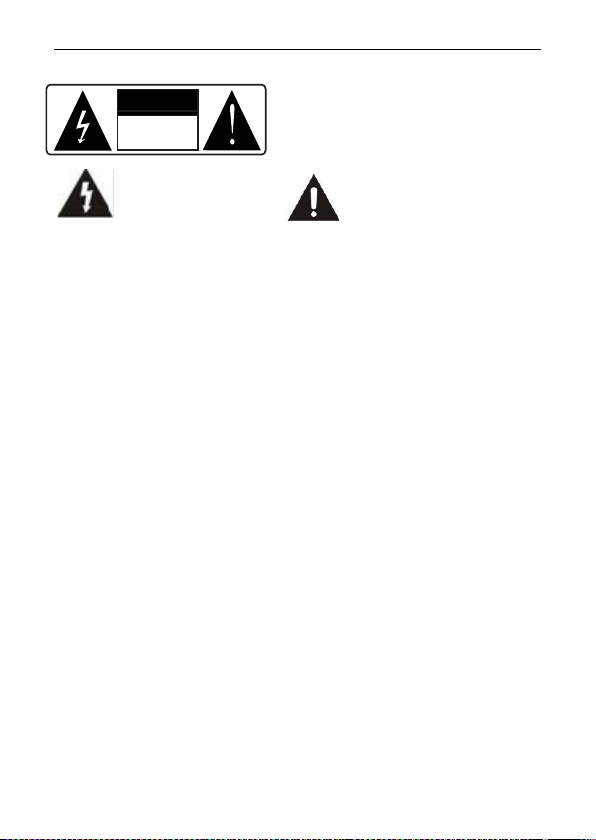
This symbol indicates dangerous
personal injury.
This symbol indicates that
the appliance.
CAUTION
RISK OF ELECTRIC
DO NOT OPEN
CAUTION: to reduce the risk of fire and
SAFETY INFORMATION
SHOCK
voltage inside the product, which
may cause e lect ri c sho ck and
electric shock, do not open the unit. All
work must be carried out by a specialised
technician. Opening the receiver will
automatically void the warranty.
there are important
instructions ac c ompanying
CAUTION: the only way to disconnect the box from the mains is to
remove the plug from the outlet. Make sure that the power outlet i s easily
accessible, so that you can easily disconnect the product if necessary.
Read the manual careful ly before using the box. K eep the instructions for
future reference. Do not open the unit and/or the power supply, touching the
internal components may cause electric sh ock. Contact with a vol tage of
100-240V~ can be fatal . Before connecting t he box to the power supply,
make sure that all connections have been made correctly . Always unplug
the box from the power outlet before connecting or disconnecting the
cables. Failure to obse rve these precautio ns can result in damage, fi re or
electric shock, which can result in serious injury!
POWER SUPPLY. If the model you have purchased requires a power
supply unit, you mus t use the power supply unit supplied with the box to
prevent damage to the uni t. The use of a power suppl y other than th e one
supplied with the box will automatically relieve the manufacturer of all
liability. Check that your power supply corresponds to that required for
operation (see label on product or product specifications). Consult your
energy manager if y ou a re unsu re of the f eat ures of you r pow er sup ply. Do
not attempt to repair or splice the power cor d. Do not tampe r with t he power
cord or plug. Make sure the power cord is not damaged, knotted, or pinched
before use. It is recommended to disconnec t the box from the power su pply
when not in use for a long pe riod of time, during thund erstorms or special
events. Never un pl ug t he u ni t fr om an ou tl et by pulling on the c able. Do not
connect or disconnect with wet hands or bare fee t. Do not use objects such
as levers to disc onnect t he plug fro m an outl et. The power cord s hould be
protected by a plastic cov er t o p reve nt i t from b eing dam aged or walked on.
If you smell burnt or smoke, unplug the power cord immediately and contact
your service representative.
OVERLOADED. Do not overload the power outlet, extension cord, or
adapter as this m ay cause a fire or electrical s hock. Always us e standard
certified cables. Do not connect or modi fy cables whil e the box is connected
2
Page 20

ENGLISH
to the power supply. D o not use damaged powe r extension cords as th ey
may cause electric shock or fire.
LIQUIDS. Do not expose this product to dripping or s plashing, and do not
place any objects with liqui d inside, s uch as vases, etc., on the appara tus.
Never place in a damp location or touch with wet or damp hands or during a
thunderstorm. If l iquid enters the box, disconnect i t i mm ediately and consult
a service technician.
CLEANING. Disconnect the power cord from the outlet before cleaning the
receiver. Always us e a slightly damp cloth (no s olvents, no dete rgents) for
dusting.
VENTILATION. The slots in the recei ver should be left u ncovered t o allow
proper ventilation. Leave suffic ient space aroun d the equipment to ensure
proper ventilation. Do not place the unit on carpets or the like.
OBJECTS. Never insert objects into the slots of the receiver. If this
happens, disconnect the box and consult a technician.
USE BY ADULT S O NLY. The goods pu rchas ed are so phis tica ted elect roni c
devices and are therefore not suitable for use by minors. No liability is
accepted for damage to persons or pro perty resulting from the use of the
goods by minors. Keep the appliance out of the reach of children. Plastic bags
in packaging can be dangerous. To avoid suffocation, keep the bags out of the
reach of children. Batteries and other small parts can be swallowed by
children. It is recommended to keep them out of reach.
ACCESSORIES. Do not use non-original accessories or spare parts as
they may cause damage to the receiver.
CONNECT TO YOUR TV OR OTHER EQUIPMENT. Unplug this apparatus
from the wall outlet bef ore connectin g or disconnecti ng any cables. Bef ore
making connections with other devi ces, read the operating inst ructions for
the devices themselves. The antenna must be installed by a qualified
technician.
LOCATION. Insta ll the r eceiv er in a locati on pro tected from d irect sunl ight or r ain.
Do not place near any heat sources. Do not place any other electronic
equipment on the r ecei ver.
Manufactured by DIGIQUEST SOLUTIONS s.u.r.l. Head-quarter Via Avisio, 18 - 00048
Nettuno (RM) – Italy Made in China
DIGIQUEST SOLUTIONS s.u.r.l. declares that this product complies with
Directive 2014/53 / EU. The full te xt of the EU Declar ation of Confor mit y is
available at the following Int ernet add re ss:
www.digiquest.it/certificazioni.html
3
Page 21
DIGIQUEST
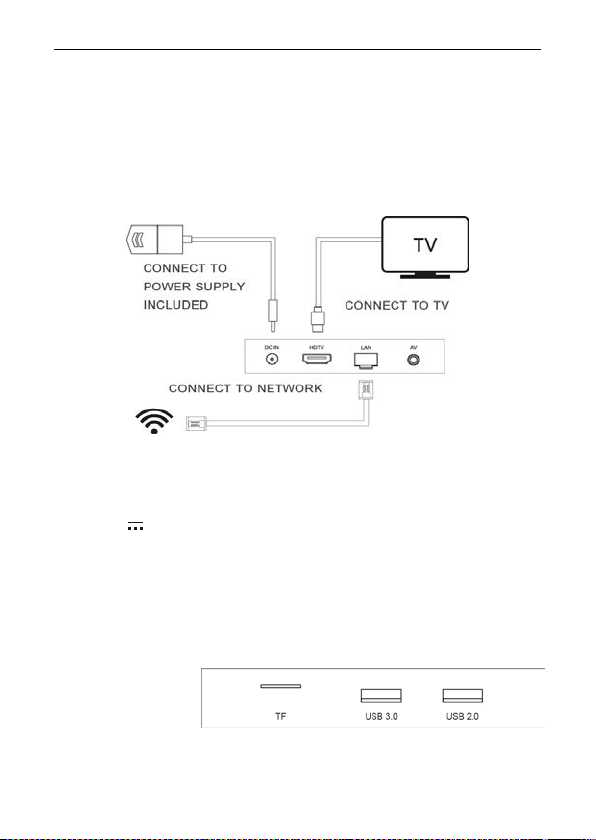
PANELS and SYSTEM CONNECTION
W
ARNING: when mak ing connections all the devices mu st be disconnected
from the electrical socket.
F
RONT PANEL
Led: when the box is on the led is blue, when it is off it is red.
R
EAR PANEL
HDTV for connection to high definition TV with HDMI cable (included).
LAN port for connection to the network.
DC IN for connection of power supply included: Input: 100-240V~ 0.5A 50/60 Hz
Output: 5V
2A.
AV: 3.5 Audio/Video SD jack out put for con nection t o TV via SC ART or RCA
(cable not included).
OWER SUPPLY CONNECTION
P
Solo dopo aver completato tutti i collegamenti collegare l’alimentatore in
dotazione alla porta DC IN.
S
IDE PANEL
For connecting external memories.
TF: micro SD (chip must be inserted upwards), USB 3.0, USB 2.0.
4
Page 22
ENGLISH
REMOTE CONTROL
V
OICE FUNCTION
This product is from Google Android TV system. Register to access your
Google account! Speak to the voice remote control by pressing the Google
Assistant button (button 9 see remote control legend) and the box will search
for what you want.
I
NSTALLING THE BATTERIES.
Remove the battery cover from rear of the remote control and place 2xAAA
size batteries inside the compartment. Please make sure the battery polarities
match the polarity markings inside the compartment.
U
SING THE REMOTE CONTROL
To use the remote control, point it towards the front of the Digital Set Top
Box. The remote control will not operate if its path is blocked. Sunlight or very
bright light will decrease the sensitivity of the remote control.
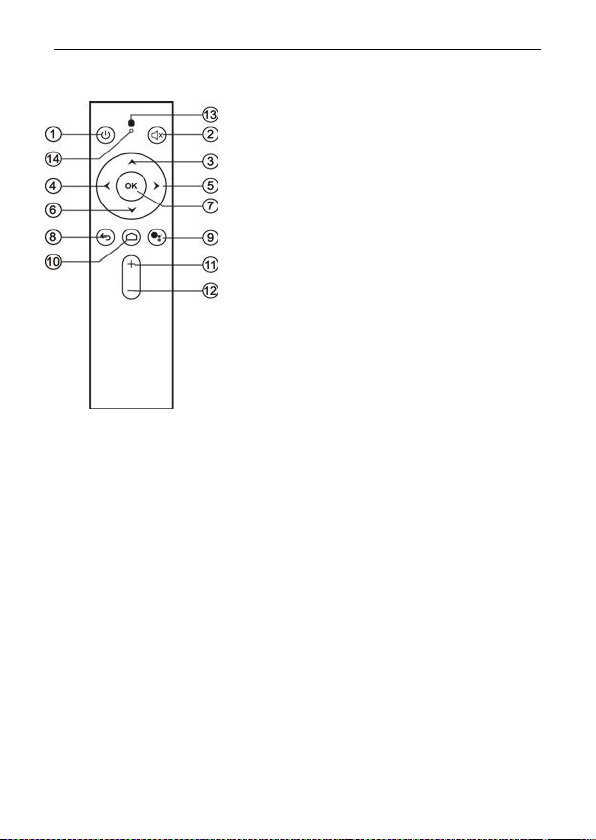
1. Switch on/standby mode
2. Mute, on/off volume
3. To move the cursor up
4. To move the cursor left
5. To move the cursor right
6. To move the cursor down
7. OK, to confirm
8. To go back
9. Voice control (key Google Assistant)
10. To go to the home page
11. To increase the volume
12. To decrease the volume
13. Microphone
14. Indicator light
5
Page 23

DIGIQUEST
SWITCHING ON THE BOX
- Turn on the TV.
- Press t he Switch on button on the re mote control. If no picture app ears on
the screen, select the c or rect inp ut mo de (eg. H DMI 1 or 2 etc. ) b y pressi ng
the SOURCE bu tton on the remote cont rol of TV (depending on the brand,
the button can also be identified with INPUT, AV, AUX, ZERO, etc.),
otherwise no image appears.
The first time you turn on the box the HOME Screen will appear on the
screen, the machine is ready to use.
SOME OPTIONS
Network connection: can be via LAN or you can select another wireles s
network (WiFi).
App: you can install the recommended APPs (all or some). It is
recommended to install them. You can add APPs a t a n y tim e fr om th e HOME
screen using Google Play Store.
In keyboar d mode to confirm and go ahead, position yourself on the ico n
on the right side of the screen.
HOME SCREEN
Search funct ion: to activate this f unction you can either di rectly press the
Voice Control butto n (Google Assistant see b utton 9 remote contr ol legend)
or use the ▲ button to choose whether the search should be done via
microphone or keypad.
Microphone: to activate the search via the Google Assistant.
EXTERNAL MEMORIES
When you enter e xter nal memories, the no ti fication appears at the top right of
the screen, where you c an v i e w tec hni c al i nfo rm ati o n a bo ut th e m emories. To
view the files, you can use an APP of your choice or open the sideload
launcher > gallery app to view the contents of the memories and t hen start
playback by choosing an app (as indicated).
To disconnect the memories always use the Eject command: go to the
notifications, choose the memory with the OK button and select Eject.
N
OTE: the installation p rocedure can be re peated countless times, just reset
the box: enter the SETT INGS at the top right of the screen using the ► arrow
and confirm with OK. W ith the ▼ button g o to D evice Pre ferences , press the
OK button; in the subm enu choose Re set, press OK ag ain to enter. Use th e
▼ button to go to Re set and p ress OK. Go to C ancel a nd pre ss OK t o canc el
the operation. WARNING: when the bo x is reset all the setti ngs entered by
6
Page 24

ENGLISH
the user will be lost. It is recommended to disc onnect any external m emory
connected to the box, to avoid data loss.
SETTING
Use the arrow keys to move to the settings icon at the top right of the screen.
• Tips: Set device nam e as you wan t.
• General Settings
- Networ k and Internet: dis plays the connection in use and the vari ous
connection possibili tie s .
- Account and access : displays the account in use an d a llow s you to add i t.
- App: displays all installed APPs, with various options.
- Device Preferences
Information about the box, update, reset.
Date and Tim e: Allows you to set the G MT time and time di spla y format.
Note: the system must display the time for synchronization with the
network time after the network connection.
Language: to set the desired language.
Keyboard: to display the keyboard settings.
Audio: to view the sound and audio settings.
Storage Space: 16GB
Home screen: to set the home screen.
Google Assistant: view the assistant settings.
Chomecast built-in: displays chromecast information.
Screensaver: including st andby af ter 3 ho urs of inac tivit y. To deacti vate
select Never.
Geolocation: to enable and disable geolocation.
Usage and diagnostics: to enable or disable the s ending of diag nostic
data.
Safety and limitations: view settings for installing third-party apps.
Accessibility: subtitles, contrast text, speech synthesis, shortcuts,
talkback services, switch access.
Reset: Reset to fa cto r y settin gs. Pay attention to thi s op erati on , rese tti n g
all data entered by the user will be del e ted.
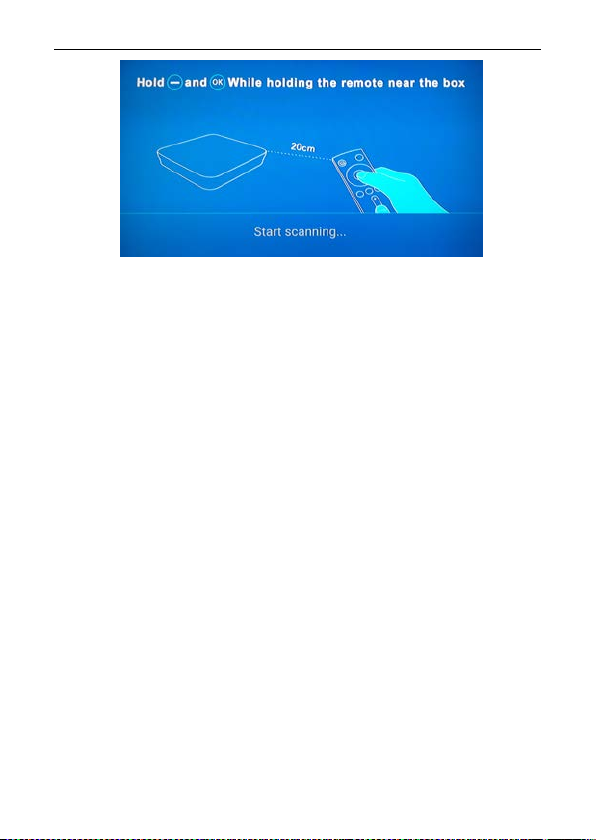
The Welcome window will appear on the screen.
The first operati on to do is to recognize t he remote control: bring t he
remote control cl oser t o the box (20 c m) an d hold down simultaneously
the - button (button 12 see r emote control legend) and the OK bu tton
until the Welcome window appears.
7
Page 25
DIGIQUEST
The installation will be guided in detail, follow the instructions on the
screen.
- Remote controls and accessories: to add accessories.
- Advanced setting
1. DISPLAY
Screen resolution the box is set by default to auto switch to best
resolution, you can manually adjust the best resolution.
Screen position: you can adjus t the screen zoom, so that t h e scr ee n f its
correctly. Zoom In to increase, Zoom Out to decrease.
Screen rotation (forceland, original)
HDR to SDR (auto, on, off)
SDR to HDR (on, off)
USB model (Device, Host)
2. HDMI CEC, deactivated, is activated with OK.
3.Playback settings (HDMI self-adaption is deactivated but activated
with OK)
4. Audio output
5. Powerkey definition
6. Picture (various options including brightness etc.).
UNINSTALL APPS
You can uninstall unwanted APKs to keep your system in top condition.
NOTE: This product is an Android TVOS system from Google, we
recommend users to get APPS from Google Player Store. The third part y
electronic marketpl ace AP K has not b een a uthori zed and ce rtifie d by Go ogle.
There may be incompatibility issues.
8
Page 26
ENGLISH
SW UPDATE
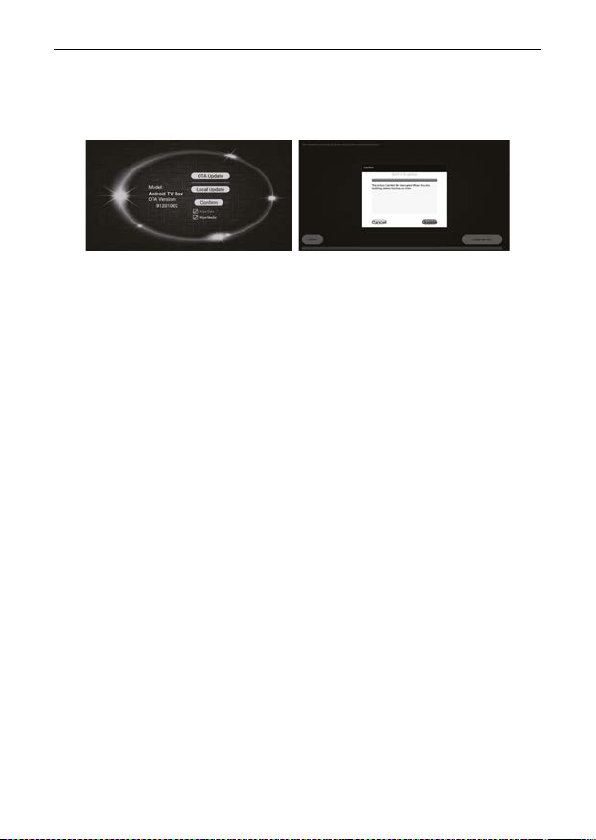
- Start the app "UPDATE"
-Select OTA Update, t he device will detect if a ne w version is av ailable and
update to the latest version.
N
OTE: During the upgrade process, DO NOT turn off the box.
Please do not download third party software for the update.
This product is an ori ginal s ystem, i t shoul d onl y be up dated th rough OT A or
by contacting the vendor (support).
USB
By connecting one o r more memories to the receiver ports (USB 2.0, USB
3.0, TF), you can view images, listen to music, play video files using APP.
The manufacturer ca nnot g uaran tee th e pla yback of the fil es eve n thoug h the
extension is supported: this depends on the Codec used, the data bit rate and
the resolution.
The receiver manages both FAT32 and NTFS formatted devices.
Do not remove the connect ed HDD while it is working. The box will no longer
recognize the memory. Not all HDDs are compatible: externally powered
HDDs are recommended as the receiver cannot guarantee correct power
supply via the USB port. The manufa cturer is in no way responsible for a ny
damage or loss of data.
Format. You c an format your US B device. W
will be deleted.
N
OTE: APPs may vary at the manufacturer's discretion; a new software
update may change the existing APPs.
ARNING all data in t he memory
9
Page 27

DIGIQUEST
ADDITIONAL INFORMATION
ROUBLESHOOTING
T
Before contacting the Service Department, consult the table below before
requesting servic e to identify the caus e of the problem. A sim ple control or
adjustment by the user is sometimes sufficient to solve the problem and
restore proper operation. The most common drawbacks are generally
connected to t he cable connectio n. If none of th e actions listed i n the table
help you solve the p robl em, lo g on to www.di giqu est.it and you will be g uide d
quickly to solve the problem, thanks to the dif ferent possibilities that will be
offered to you (available updates, online chat, form for assistance request).
Register now on the official website at www.digiquest.it/registrazione.html
To view the terms of the conventional warranty please visit our website
www.digiquest.it.
Never open the box, danger! Opening will automa tical l y void the w arr anty.
Smell of burning
• Disconnect the box from the outlet and contact service immediately.
The TV has no signal
• Check that the blue front LED is on after the product is switched on.
• W ait 1 minute after st art-up, then use the rem ote control t o turn off the box
(note: press t he bu tto n only once); wait 5 s ec on ds , if the red led on th e box
lights up it means tha t i t works normally. T he n pl ease check that t he ca bl es
have been connected corre ctl y and tha t the rig ht so urce h as bee n sel ected
(e.g. HDMI 1 or 2 etc.) for the input used on the TV by pressing the
SOURCE button on the T V remote co ntrol (dependi ng on the brand it c an
also be identifi ed with INPUT , AV, AUX, ZERO, etc.). If the red light does
not come on, please contact the seller.
No led is on (the box do es n ot l ig ht )
• The plug has not been properly plugged into the mains.
• Try changing the outlet.
• Check t hat all connections ar e made correctly and that they are properly
plugged in.
• Check the integrity of the cables.
WIFI does not connect
• Make sure Wi-Fi is turned on, reboot and try again.
• If Wi-Fi can be enabl ed but can not be con nected , please restart you r router
and try connecting again.
• Cr eate a W i-Fi hotspot f rom your mobil e phone and tr y connecting the T V
box.
• Once connected to the wired network, the machine will automatically
disconnect the WIFI connection.
10
Page 28

ENGLISH
Cannot use voic e fu nc tion
• Confirm whether the remote control works correctly in the configuration
menu.
• If the bo x is connec ted to t he networ k, pla y the YouTu be video t o confirm if
the network is work ing. Ref er to the co rrect oper atio n of the remo te co ntrol
voice.
No picture
• Connecting the box with HDMI, after powering on, you may need to select
the source (e.g. HDMI1) for the input used by pressing the SOURCE button
on the TV remote c ontrol (depending on the brand, the SOURCE butto n
can also be identified with INP UT , AV, AUX, ZERO, etc.).
• Check that the HDMI or AV cable is correctly plugged in, both on the TV and
the box.
• Disconnect and then reconnect the box.
• Turn off the bo x, unplug it from th e power and turn it on again after a few
minutes.
The images on the screen change color
• Make sure the HDMI or AV cable is connected correctly.
• Try disconnecting and reconnecting all cables.
• Turn off the box, unplug the power and turn it on again after a few minutes.
Remote contr ol do es n ot re s po nd
• If the voic e rem o te control malfunc tio ns , tr y u npairing and pairing the devi ce
again.
• Check that the distance of use is within 6 meters.
• Check that the remote control is working properly in the setup menu.
• Make sure the box is turned on.
• Check the remot e c ontrol batte ries: th ey ma y h ave be en ins ert ed th e wro ng
way round or they may be dead.
• Check that no liquid has leaked from the batteries.
• Check that no buttons are stuck.
• Make sure that there is no direct sunlight on the box.
• Check that t here are no transm itting devices nearb y that could cancel the
actions of the remote control.
• A wrong function has been sel ected. Press the right button.
• Check that the box is correctly connected to the power socket and the TV.
Unable to access the system after startup
• Please contact the service directly.
No sound during v id eo playback
• Check if the Mut e funct ion is activa te d. Use the remot e c ontrol o f the b ox o r
TV to mute it.
• Please confirm if the source is a particular format.
11
Page 29

DIGIQUEST
Some files are not recognized
• The manufact urer cannot guara ntee the playback o f the files even t hough
the extension is sup ported: this depends on t he Codec used, the data bit
rate and the resolution.
There is no sound or it is low
• The HDMI or AV cable is not inserted correctly.
• Check that the box is properly connected to your TV or audio system.
• Some connections on the box may have "come loose".
• C heck that t he volume of the box or TV is high enough. P ress the vol ume
buttons on the remote control of the box or TV to adjust.
OTA cannot be updated
• Check that the box is connected to the network.
• If th e machine is cu rre ntly in the lates t software status, th e O TA fu nc tio n will
not update again.
Third party APK is no t su pp or t ed
• Note: the T V bo x s ystem is Go ogl e AT V, it d oes n ot s uppo rt the APK of t he
mobile version. If you need to downl oad the APK, downl oad and install it
from google playstore.
The mouse point er fu nc tion is not suppor ted.
• This TV box uses Google ATV s ystem and does not supp ort the mouse
pointer function. Please use the original remote control of the product.
The inserted USB memory is not recognized
• Not all USB devi ces are compatible. It is recommended to u se hard disks
that are powered by their own power supply. Use USB 2.0 and larg e capacity.
NOTE: T he man ufactur er is i n no wa y respons ible fo r any dam age or loss of
data.
Bluetooth
• It is possi ble that some d evices, with a Bl uetooth version prior to the on e
present in the KM9, may have connection problems.
The box turn s off
• As required by recent European energy saving regulations, this box
automatically switc hes off after 3 hours if no operation is perfo rm ed.
NOTES:
Specifications are subject to change without notice.
The contents of the manual may differ from the product or software provided and is subject
to change without notice.
New software may change some features of the receiver.
All applications reproduced and the related trademarks belong to their respective owners.
In case of incorrect, incomplete or erroneous or mere transcription errors supplier
(distributor) will be relieved of any responsibility and can refuse performance of the
obligation related to the error.
Photos and illustrations are for illustrative purposes only and may not reflect the product
image.
12
Page 30
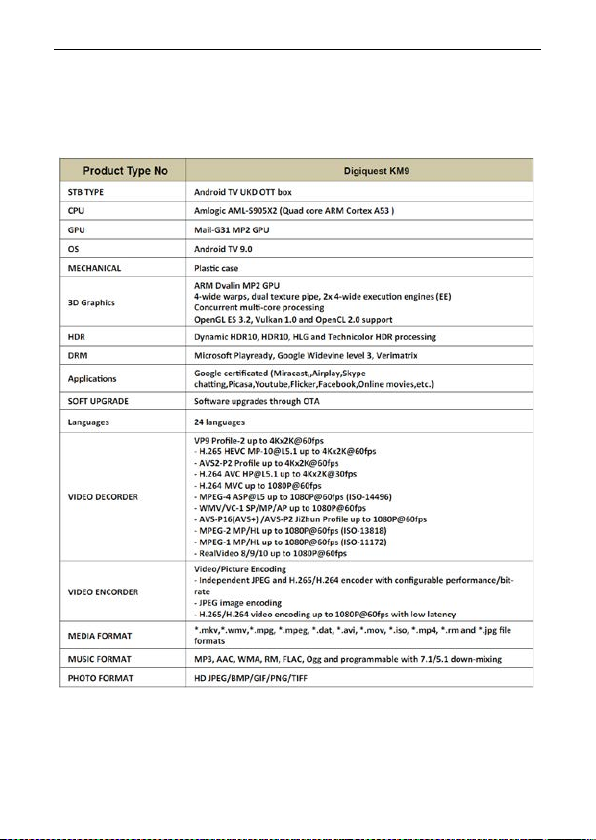
Due to updates or errors, the contents of this manual may not exactly match the actual
product. Please visit www.digiquest.it for further information or contact technical support
[email protected].
S
PECIFICATIONS
ENGLISH
VERS android Tv 9.0
13
Page 31
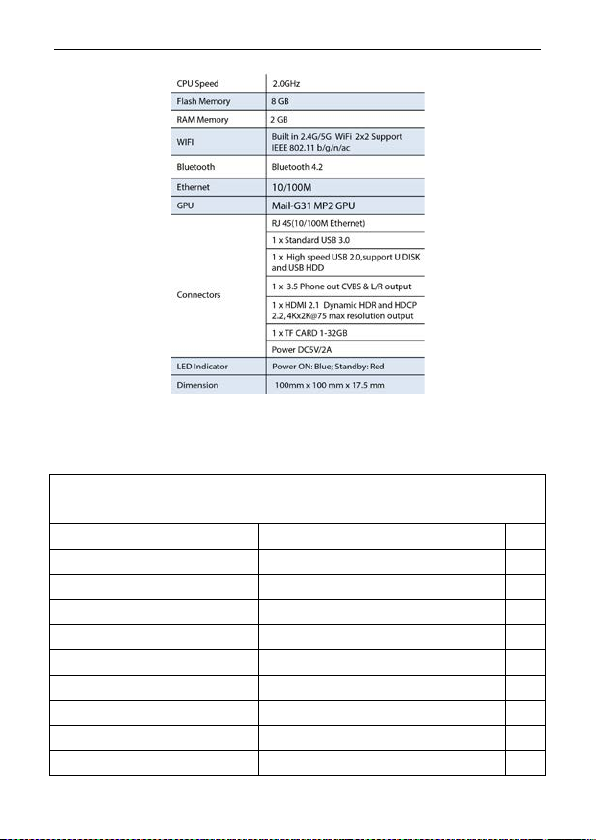
DIGIQUEST
Shenzhen Teka Technology Co., Ltd.
Input voltage
100-240
V
Input AC frequency
50/60
Hz
Output current
2,0
A
P
OWER SUPPLY INCLUDED
Pursuant to Regulation 2019/1782, Annex II, point (b), the ecodesign requirements for the
TEKA 012 - 0502000EU external power supply are set out belowManufacturer’s name or
trade mark, commercial registration number and address
Building A, No. 21, XiFu Road, Red Star Community, SongGang Street,Baoan District,
Model identifier TEKA 012 - 0502000EU
Shenzhen, Guangdong Province, 518105,P.R. China
Information published Value and precision Unit
Output voltage 5 V
Output power 10 W
Average active efficiency
Efficiency at low load (10 %)
No-load power consumption
79,75%
na
0,059
14
%
%
W
 Loading...