

Page 1
ACTIONPACK
RECHARGEABLE
BATTERY
High capacity power for GoPro HERO6 & HERO5
USER GUIDE
Item No. RF-6H50
Item No. RF-6H50KIT
Page 2
2
ENGLISH ENGLISH
PREPARING THE CAMERA FOR USE WITH THE ACTIONPACK
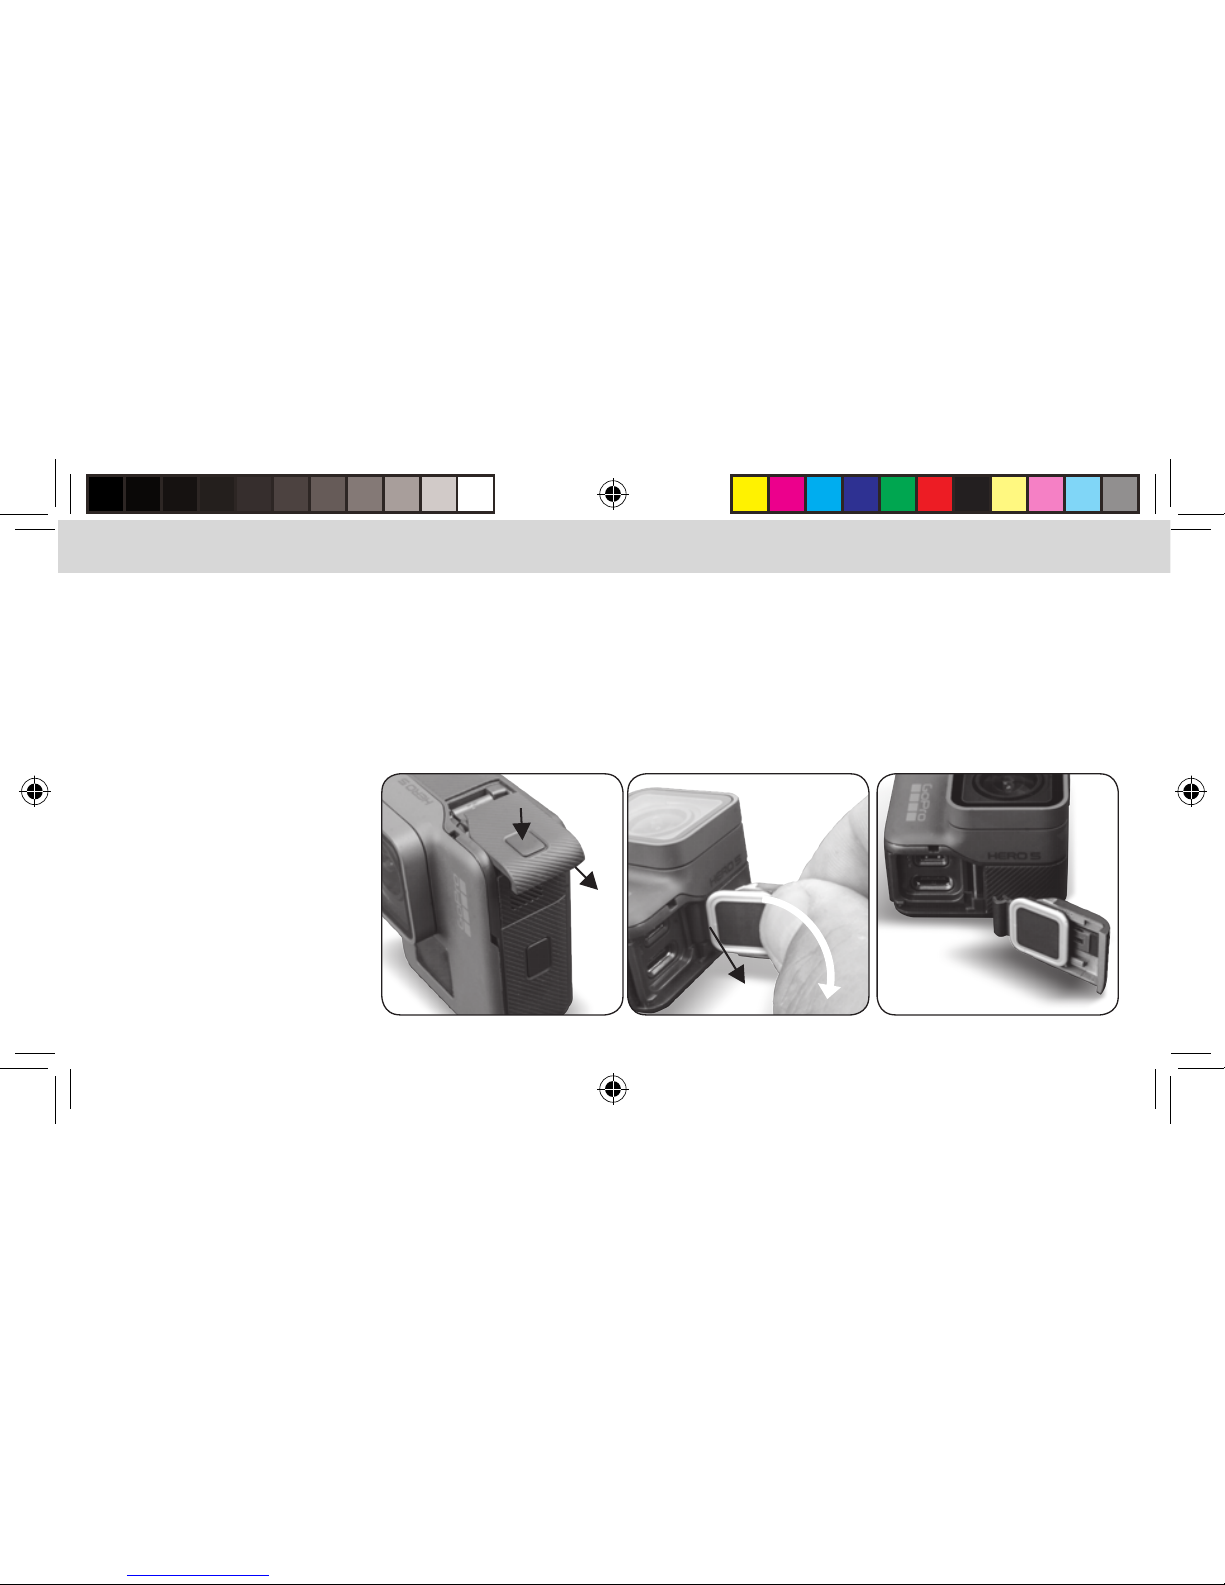
It is necessary to remove the USB door on the HERO6 & HERO5 so the camera can connect to the ActionPack.
The USB door is designed to be safely removed and reinstalled on the camera as needed.
1. Open the USB door on the right side of the camera.
2. With the door open at a 90 degree angle to the camera body gently pull downward at a 45 degree angle
to remove the door.
3. Keep the door in a safe place,
you will need this when not
using the ActionPack on
the camera.
Page 3
3
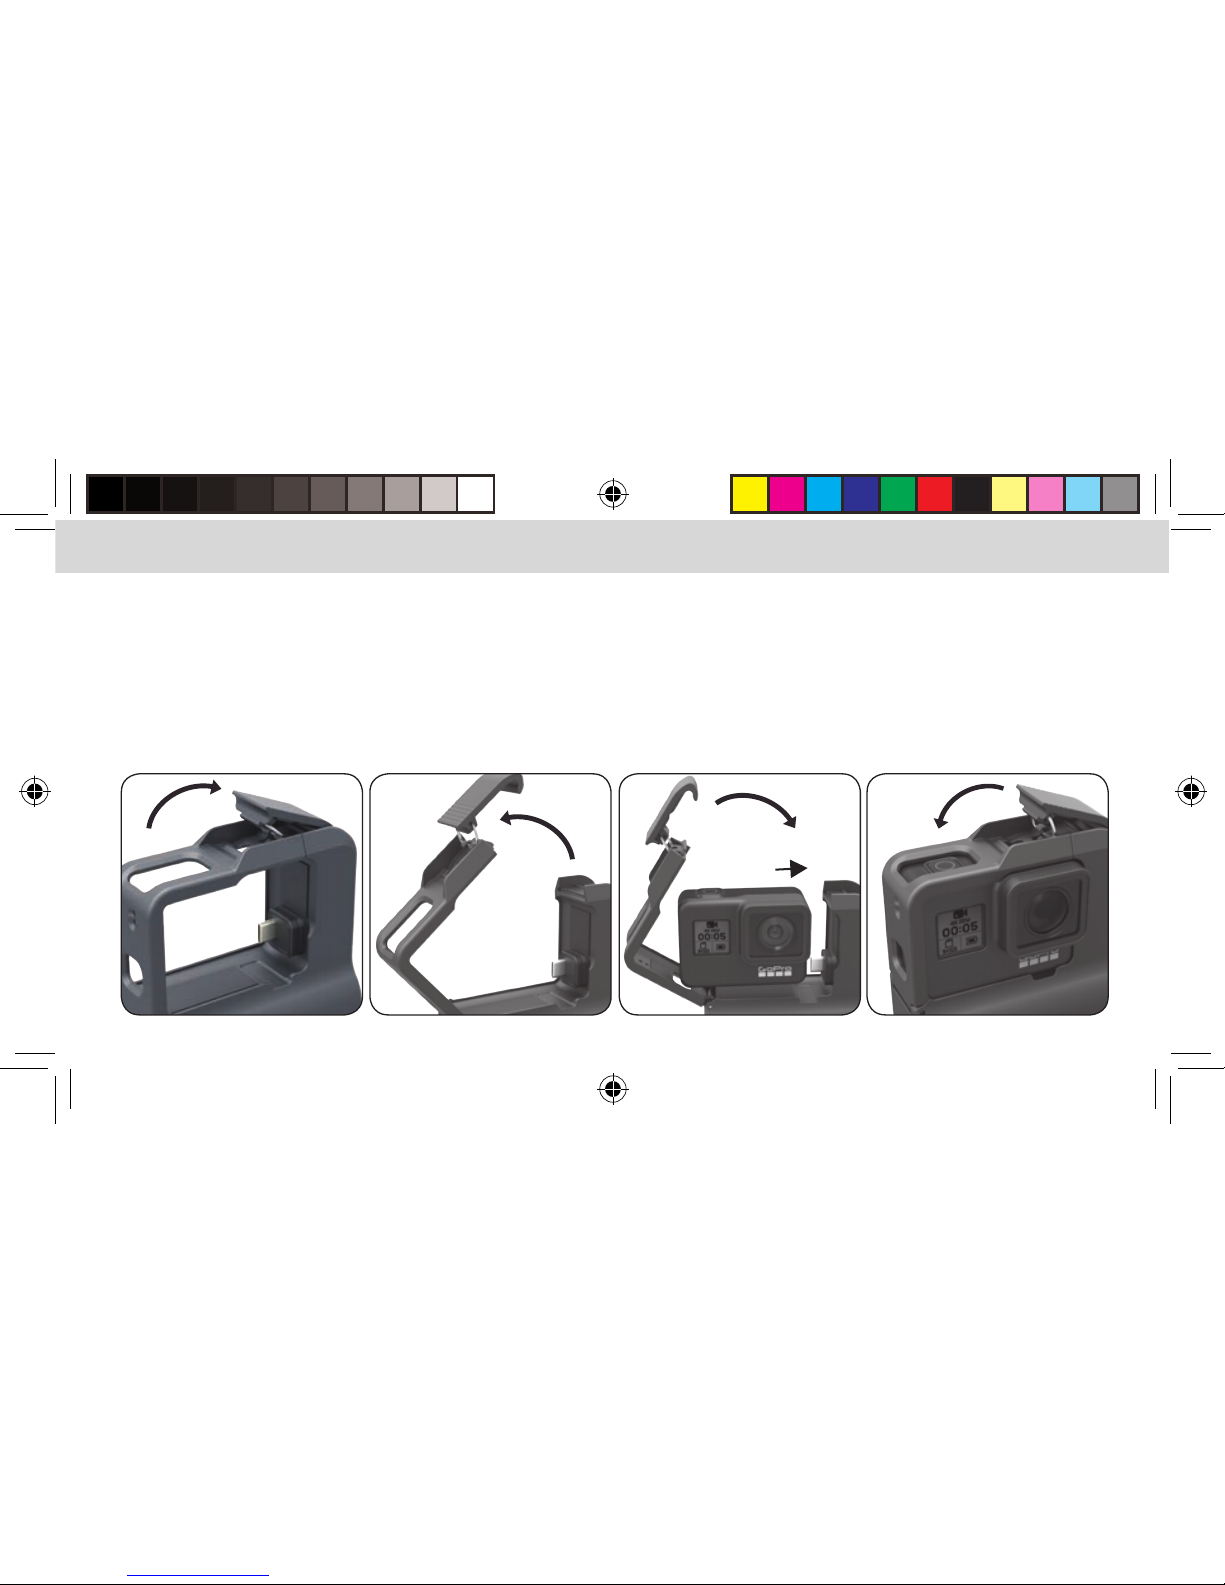
USING THE ACTIONPACK IN 4 EASY STEPS
1. Open the ActionPack housing by pressing up on the security clip
(the security clip is found towards the top/middle of the ActionPack).
2. Move the security clip and pivoting frame to the left so you can install the GoPro camera.
3. Slide the GoPro camera to the right so that it FIRMLY connects to the Type-C plug on the ActionPack,
close the housing.
4. Secure the case latch. IT IS VERY IMPORTANT TO PROPERLY LATCH THE CASING OR THE PRODUC T WILL NOT BE WATERPROOF.
Page 4
4
ENGLISH ENGLISH
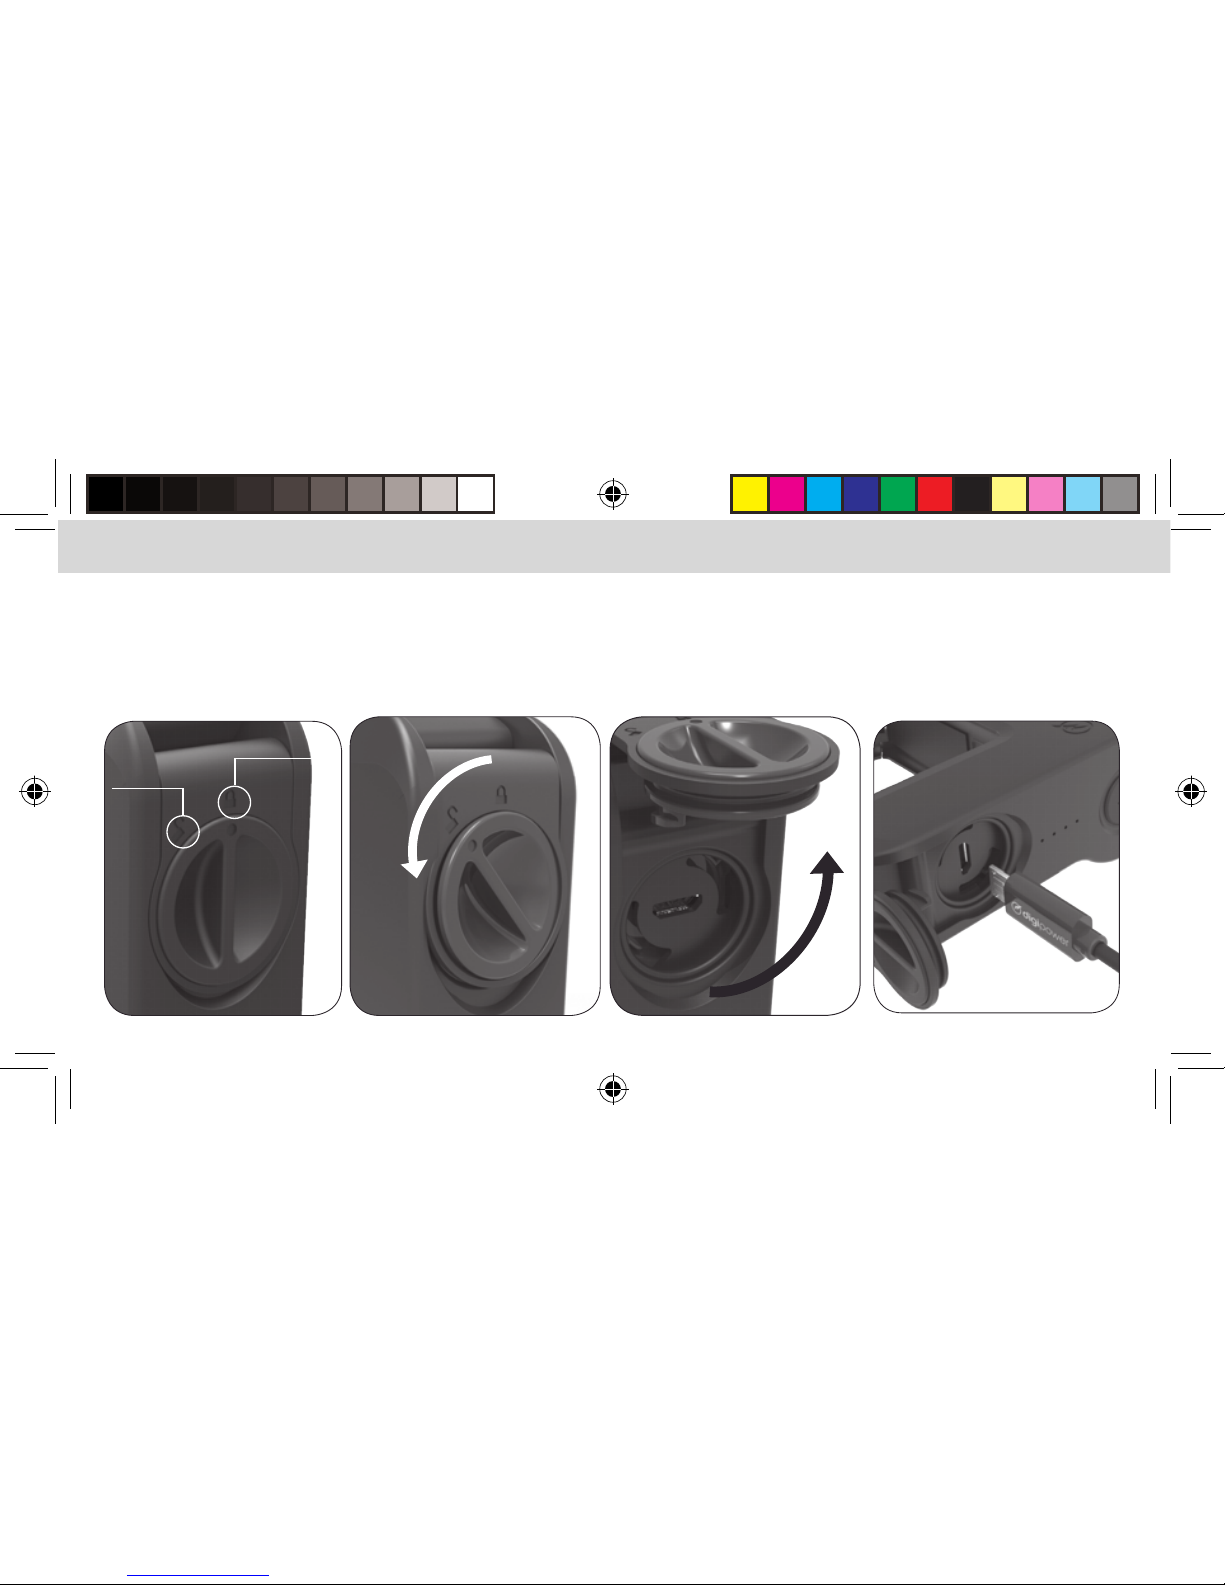
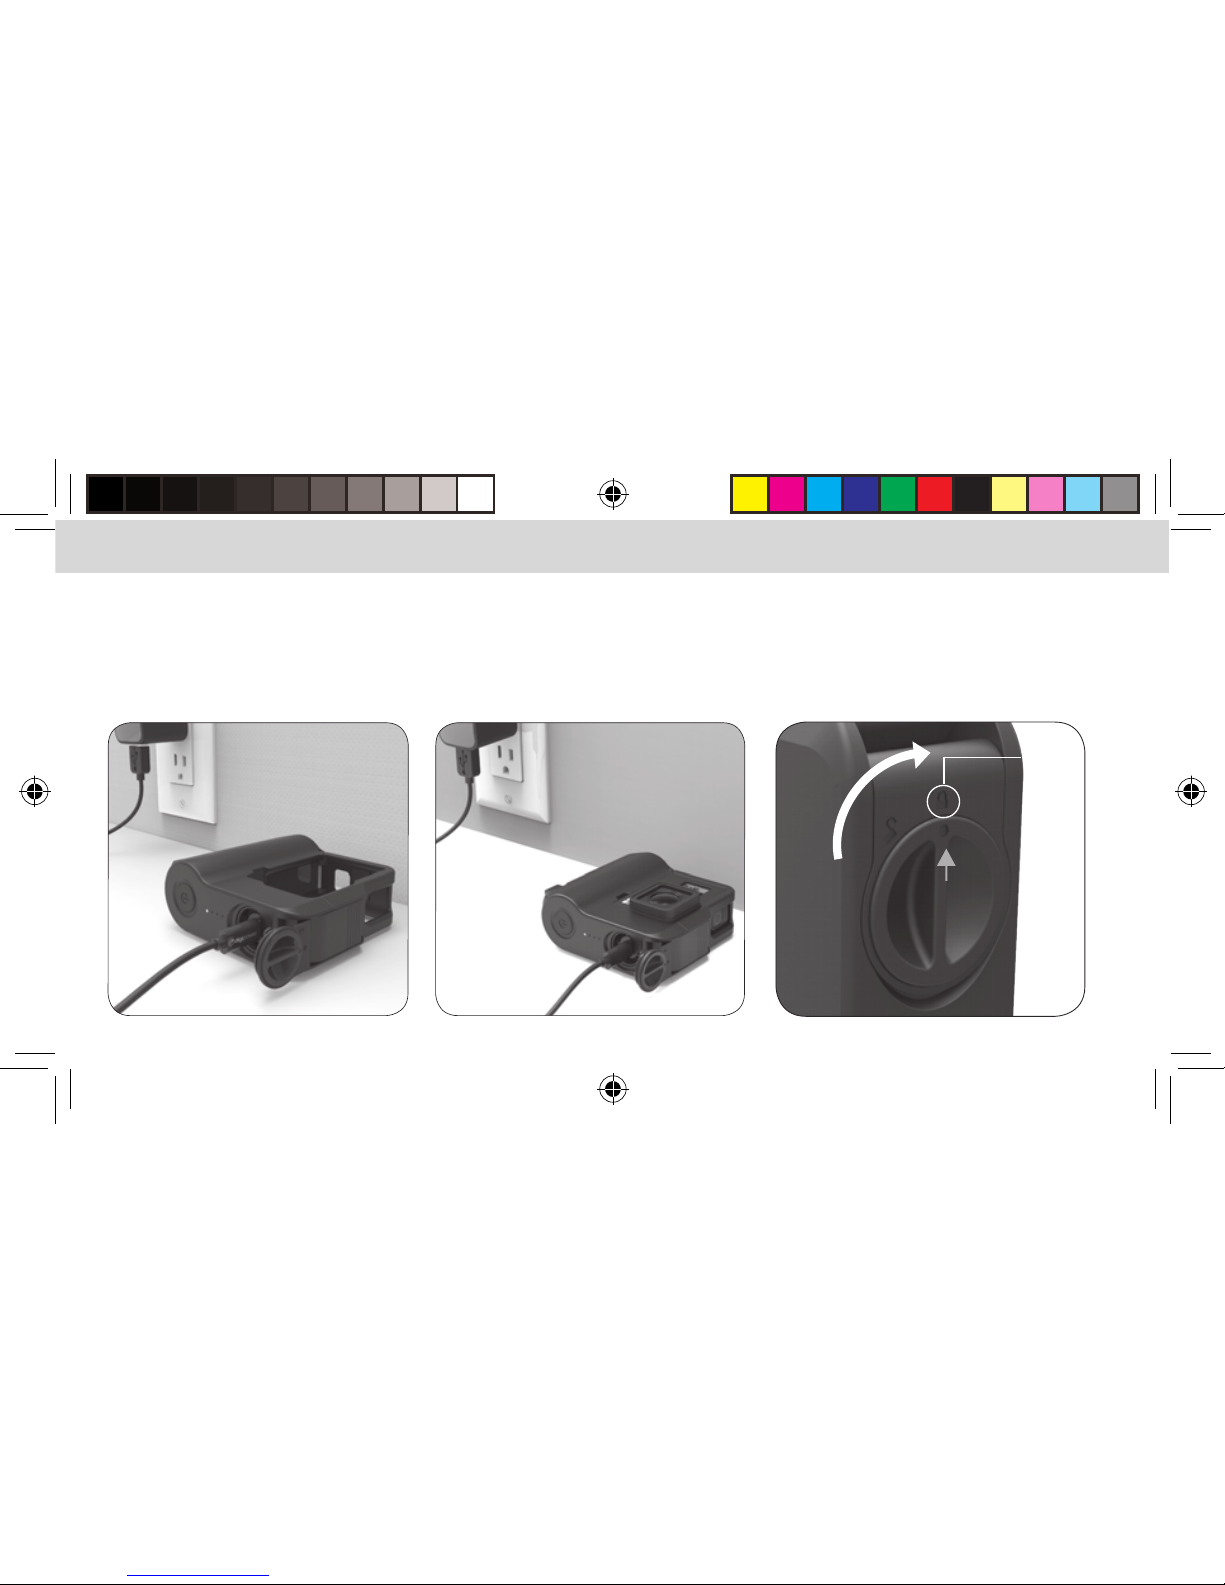
CHARGING THE ACTIONPACK
1. The micro USB charging port is located behind the round cap on the side of the ActionPack
2. Turn the cap door to the unlocked position as shown
3. Remove the cap
4. Insert the included micro USB charging cable
Unlocked
Locked
Page 5
5
5. For fastest charging use a 2 Amp (10 Watt) power supply (not included).
6. If the camera is installed in the ActionPack the camera’s internal battery will also charge.
7. IT IS VERY IMPORTANT TO PROPERLY LOCK THE MICRO USB DOOR AFTER CHARGING OR THE PRODUCT WILL NOT BE WATERPROOF.
8. Press and hold the power button for 2 seconds to turn the ActionPack on. Press and hold for 2 seconds to turn it o.
Locked
Page 6
6
ENGLISH ENGLISH
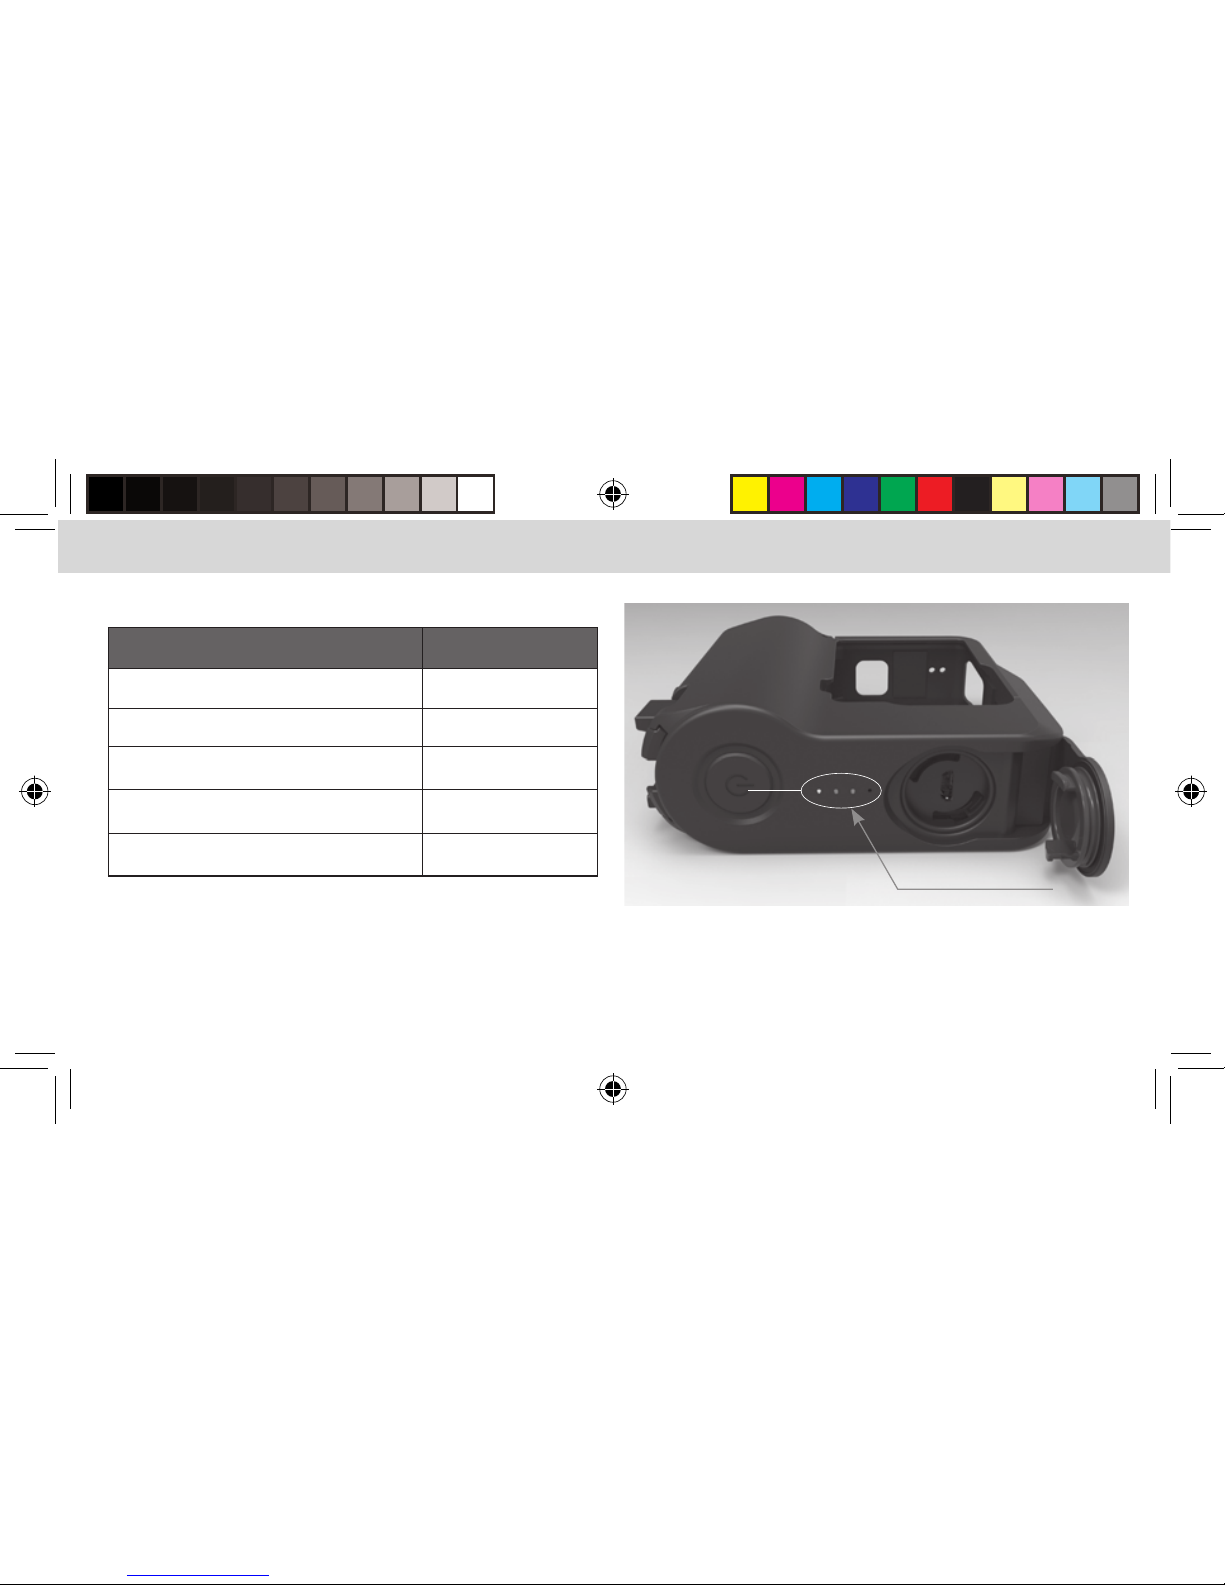
CHARGING STATUS INDICATOR
STATUS DISPLAY STATE CHARGE STATUS
One LED is blinking Below 25%
One LED is on, next LED is blinking 25% - 50%
Two LEDs are on, next LED is blinking 50% - 75%
Three LEDS are on, last LED is blinking 75% - 100%
All four LEDs are on Charging complete
When the ActionPack is fully charged, all 4 LEDs will
remain lit.
When using a 1 amp charger the camera battery will charge
rst, the #1 LED will blink for a long time until the internal battery is fully charged then the ActionPack will begin to charge.
Charge level LEDs
The percent of charge by LED is an approximation, it is best to
wait until all four LEDs are lit, the unit will be fully charged then.
Page 7

7
BATTERY LEVEL INDICATOR
STATUS DISPLAY STATE BATTERY LEVEL
One LED is blinking Very low, recharge soon
One LED is on Below 25%
Two LEDs are on 25% - 50%
Three LEDs are on 50% - 75%
All four LEDs are on 75% - 100%
CHECKING THE BATTERY CHARGE LEVEL
To check the charge level tap the power button.
TIME TO CHARGE (ASSUMING THE CAMERA BATTERY
AND ACTIONPACK ARE COMPLETELY DRAINED)
Power supply
( not included)
C
amera installed Camera not installed
1 Amp (5 Watt) Camera charges then
ActionPack, total charge
time approximately
6 hours 45 minutes
A
ctionPack charge
time
5 hours 45 minutes
2 A
mp (10 Watt) Camera and ActionPack
charge at the same time,
total charge time
approximately
3 hours 45 minutes
A
ctionPack charge
time 3 hours
15 minutes
Page 8
8
ENGLISH ENGLISH
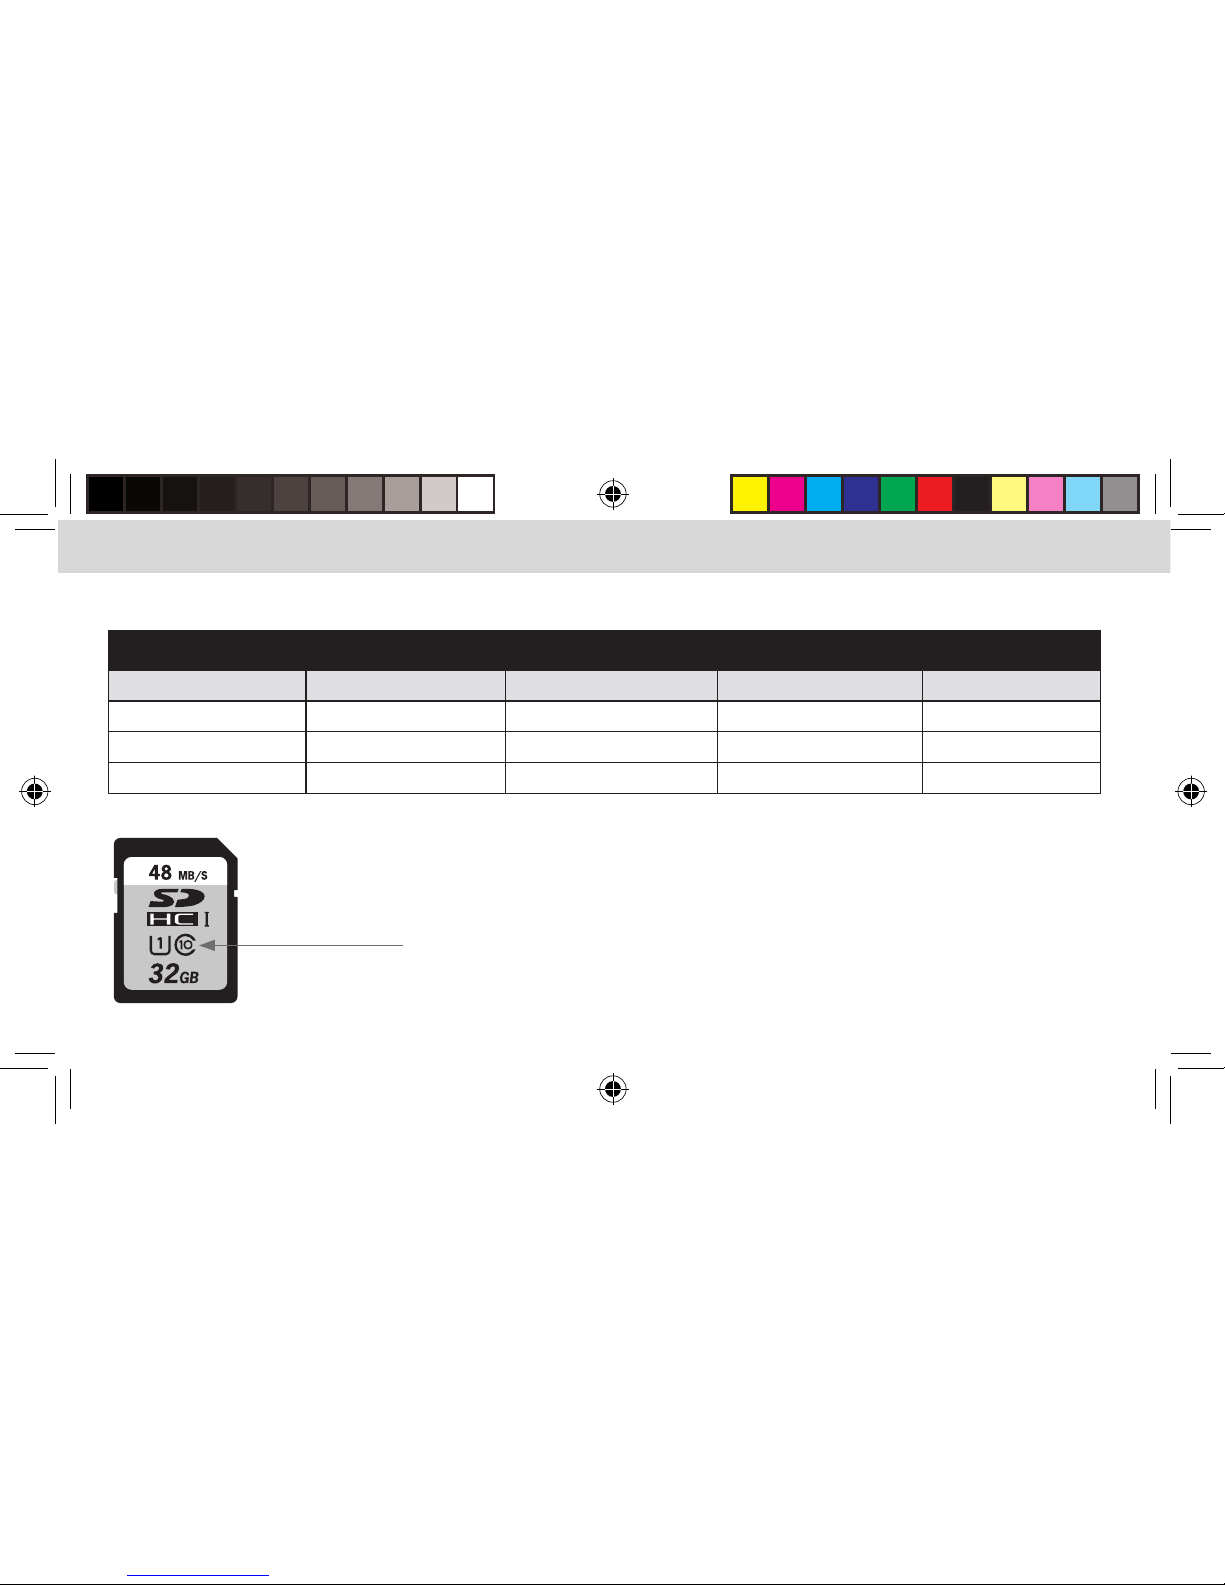
APPROXIMATE USE TIME FOR ACTIONPACK RF6H50
RF6H50
CAMERA VERSION MEMORY CARD RESOLUTION WiFi STATUS TOTAL TIME
HERO6 & HERO5 Class 10 - UHS 1 720/30FPS OFF 9 HOURS
HERO6 & HERO5 Class 10 - UHS 1 1080/60FPS OFF 8 HOURS
HERO6 & HERO5 Class 10 - UHS 1 4K/30FPS OFF 6 HOURS
A Class 10/UHS1 memory card is required for best performance.
Class 10/UHS 1
memory card
Page 9

9
Mounts slide in and
lock onto the body
Standard GoPro Mount
¼” 20 thread standard tripod
mount
USING THE GOPRO AND TRIPOD MOUNTS
• Slide the plate onto the body of the ActionPack
until the tabs click into place.
• To remove, push the tabs inward and slide the
mounting plate out.
Page 10

10
ENGLISH ENGLISH
• The LEDs on the ActionPack remain on when the
ActionPack is powered on. It will tell you the level of
charge remaining in the ActionPack by the number
of LEDs lit.
• The ActionPack provides power to the camera
battery which then powers the camera. The camera’s
b
attery level will not begin to go down until the
ActionPack battery has been fully depleted.
• With the ActionPack powered on and the camera in
standby or playback modes the battery display on
the camera will show charging.
• With the ActionPack powered on and the camera in
record mode the battery display on the camera will
not show charging but it is still charging, the battery
charge percentage number will remain the same or
slowly increase.
• When you are done using the ActionPack power it o
by pressing the power button for 2 seconds. If you do
not press the power button it will continue to provide
power to the internal battery the same way a USB
charger would provide power to your Smartphone.
• Turning on the ActionPack does not turn on the
camera, use the camera’s power button to turn it on.
• Turning o the ActionPack does not turn o the
camera, use the camera’s power button to turn it o.
•
For proper functioning, it is necessary to have the
internal camera battery installed while using the
ActionPack.
• The ActionPack has been tested and approved to IEC
standard IP68 for water and dust ingress. Lab testing
done in a pressurized water tank for 2 hours’
submersion, simulated 33ft/10m depth
IMPORTANT NOTES ABOUT THE ACTIONPACK RF6H50
Page 11

11
PASS THRU POWER
Pass thru power allows you to record indenitely and
keep your battery charged up at the same time.
1. Open the micro USB port door as noted on page 4 .
2. Connect the micro USB cable to a power source such
as a USB car charger, wall charger, or power bank
3. You do not need to press the power button on the
ActionPack, it starts working automatically.
4. Operate the camera as you normally would
REMOVING YOUR CAMERA FROM THE
ACTIONPACK CASE AFTER IT HAS BEEN
IN WATER
1. Visually inspect the camera, dry o any residual
water found before opening the case.
2. Hold the camera so the side with the power button
is facing down.
3. Unlatch the casing and pivot the frame away from
the camera
4. Remove the camera with the USB port side still
facing downward.
5. Visually look for any water around the USB C port on
the camera, if any is found dry it immediately.
Page 12
12
ENGLISH ENGLISH
CARE OF THE ACTIONPACK EXTENDED
BATTERY
• 1. Before using, especially if you plan to use it in water,
visually inspect the ActionPack for signs of dust, dirt,
or anything that may aect its ability to maintain a
waterproof seal.
• 2. If the ActionPack is used in salt water clean the
areas around the USB-C port and the micro USB port
with a damp clean (lint free) cloth then dry
thoroughly.
•
DO NOT IMMERSE THE ACTIONPACK IN WATER
WITHOUT THE CAMERA IN PLACE AND THE LATCH
SECURED OR IT CAN BE PERMANENTLY DAMAGED.
ACTIONPACK RF6H50
SPECIFICATIONS:
• 5000mAh (18.5Wh) Lithium Ion battery
• Micro USB Input: 5V DC, 2A(10W)
• USB-C Output: 5V DC, 1.2A (6W)
• Battery Output: 3.7V DC
• Weight and dims: 4.9oz | 1.37” x 3.5” x 3.3”
Please
recycle
Page 13

13
We want you to have the best possible experience
when using our products, and we’re ready to help you
with any questions or problems. Technical support can
be reached at techsupport@mizco.com. Please allow
up to one business day for email replies.
WARRANTY INFORMATION FOR DIGIPOWER
PRODUCTS, A DIVISION OF MIZCO
INTERNATIONAL, INC.
Mizco’s responsibility with regard to this warranty
shall be limited solely to the repair or replacement,
at its option, of any product that fails during normal
consumeruse for a period of one year from the date of
purchase. This warranty does not extend to damage or
failure resulting from misuse, neglect, accident,
alteration, abuse, or improper installation or
maintenance. This warranty does not extend to
equipment used with the product. If at any time
during the one year period following your purchase
the product fails due to defects in materials or workmanship, please contact us at 800-838-3200 between
the hours of 9AM and 6PM M-F Eastern time, to obtain
an RMA number and return shipping instructions.
For fastest service, have a copy of your product receipt
available with the model number, date, and location of
purchase. This warranty gives you specic legal rights,
and you may have other rights that may vary in certain
states or provinces.
Page 14

Visit: www.digipowersolutions.com
2018 Mizco International, Inc. Avenel, New Jersey.
All rights reserved.
email: digipowersolutions@mizco.com
DigiPower is a registered trademark of
Mizco International, Inc.
Page 15

BLOC-PILES
RECHARGEABLE
ACTIONPACK
Source d’énergie puissante pour
GoPro HERO6 et HERO5
GUIDE D’UTILISATION
Item No. RF-6H50
Item No. RF-6H50KIT
Page 16

ENGLISHFRANÇAIS FRANÇAIS
2
PRÉPARATION DE LA CAMÉRA POUR UTILISATION AVEC L’ACTIONPACK
Il faut enlever la porte USB sur les modèles HERO6 et HERO5 pour pouvoir brancher la caméra sur le bloc-piles
ActionPack. Cette porte est conçue de façon à pouvoir être facilement retirée et réinstallée au besoin sur la caméra.
1. Ouvrez la porte USB située sur le côté droit de la caméra.
2. Tout en maintenant la porte ouverte dans un angle de 90 degrés par rapport au boîtier de la caméra, tirez-la
doucement vers le bas à un angle de 45 degrés pour l’enlever.
3. Gardez la porte dans un endroit
sûr, car vous en aurez besoin
lorsque vous n’utiliserez
pas l’ActionPack sur
la caméra.
Page 17

3
ENGLISHFRANÇAIS FRANÇAIS
UTILISATION DU BLOCPILES ACTIONPACK EN 4 ÉTAPES SIMPLES
1. Ouvrez le boîtier de l’ActionPack en pressant sur l’agrafe de sécurité (située sur le dessus de l’ActionPack).
2. Déplacez l’agrafe de sécurité et le cadre pivotant vers la gauche de façon à pouvoir installer la caméra GoPro.
3. Ensuite, faites glisser la caméra GoPro vers la droite de façon à l’insérer FERMEMENT dans la prise de type C
sur l’ActionPack, puis fermez le boîtier.
4. Fixez le loquet. IL EST TRÈS IMPORTANT DE BIEN FIXER LE LOQUET DU BOÎTIER CAR SINON, LE PRODUIT NE
SERA PAS ÉTANCHE À L’EAU.
3
Page 18

FRANÇAIS FRANÇAIS
4
CHARGEMENT DU BLOCPILES ACTIONPACK
1. Le port de charge micro-USB est situé derrière le capuchon rond sur le côté de l’ActionPack.
2. Tournez le capuchon pour le mettre à la position Déverrouillé, comme on le voit sur l’illustration.
3. Enlevez le capuchon.
4. Insérez le câble de charge micro-USB fourni.
Déverrouillé
Verrouillé
Page 19

5
5. Pour une charge plus rapide, utilisez un bloc d’alimentation de 2 A (10 Watts) (non inclus).
6. Si la caméra est installée sur l’ActionPack, la pile interne de la caméra se chargera aussi.
7. IL EST TRÈS IMPORTANT DE BIEN VERROUILLER LA PORTE DU PORT USB UNE FOIS LA CHARGE TERMINÉE CAR SINON, LE PRODUIT NE SERA
PAS ÉTANCHE À L’EAU.
8. Appuyez sur bouton d’alimentation pendant 2 secondes pour allumer l’ActionPack. Appuyez et maintenez-le enfoncé
pendant 2 secondes pour l’éteindre.
Verrouillé
Page 20

ENGLISHFRANÇAIS FRANÇAIS
6
INDICATEUR D’ÉTAT DE CHARGE
AFFICHAGE D’ÉTAT
ÉTAT DE LA CHARGE
Un voyant clignote Moins de 25%
Un voyant est allumé, le suivant clignote 25% - 50%
Deux voyants sont allumés, le suivant clignote
50% - 75%
Trois voyants sont allumés, le dernier clignote
75% - 100%
Les quatre voyants sont allumés
L’opération de
charge est terminée
Si vous utilisez un chargeur de 1 A, la pile de la caméra
se chargera en premier; le premier voyant clignotera
longtemps jusqu’à ce que la pile interne soit
complètement chargée, puis l’ActionPack commencera
à se charger.
Voyants indicateurs de charge
Le pourcentage de charge indiqué par les voyants est
approximatif; il est préférable d’attendre que les quatre
voyants soient tous allumés, ce qui conrmera que l’unité
est complètement chargée.
Page 21

7
ENGLISHFRANÇAIS FRANÇAIS
INDICATEUR DE NIVEAU DE CHARGE DU BLOCPILES
AFFICHAGE D’ÉTAT NIVEAU DE CHARGE
Un voyant clignote Très faible, rechargez bientôt
Un seul voyant allumé Moins de 25 %
Deux voyants allumés 25% - 50%
Trois voyants allumés 50% - 75%
Quatre voyants allumés 75% - 100%
VÉRIFICATION DU NIVEAU DE CHARGE DU
BLOCPILES
Pour vérier le niveau de charge, appuyez sur
le bouton d’alimentation
TEMPS DE CHARGE (EN SUPPOSANT QUE LA PILE DE LA
CAMÉRA ET L’ACTIONPACK SOIENT COMPLÈTEMENT
DÉCHARGÉS)
Bloc d’alimentation
(non inclus)
Caméra installée Caméra non
installée
1 A (5 watts) La caméra se charge, puis
l’ActionPack; le temps de
charge total est de 6 heu
-
res 45 minutes environ
L
e temps de
charge de
l’ActionPack est
de 5 heures
45 minutes
2 A (10 w
atts) La caméra et l’ActionPack
se chargent en même
temps; le temps de charge
total est de 3 heures 45
minutes environ
Le temps de
charge de
l’ActionPack est
de 3 heures
15 minutes
Page 22

FRANÇAIS FRANÇAIS
8
DURÉE D’AUTONOMIE APPROXIMATIVE DE L’ACTIONPACK RF6H50
RF6H50
VERSION DE LA CAMÉRA CARTE MÉMOIRE RÉSOLUTION ÉTAT Wi-Fi DURÉE TOTALE
HERO6 et HERO5 Classe 10 - UHS 1 720/30IPS OFF 9 HEURES
HERO6 et HERO5 Classe 10 - UHS 1 1080/60IPS OFF 8 HEURES
HERO6 et HERO5 Classe 10 - UHS 1 4K/30IPS OFF 6 HEURES
Une carte mémoire de classe 10/UHS 1 est nécessaire pour obtenir un rendement optimal.
Carte mémoire de classe 10/UHS 1
Page 23

9
Les supports de
montage se glissent en
place et se verrouillent
sur le corps
Support de montage sur
trépied standard ¼ po - 20
UTILISATION DES SUPPORTS DE
MONTAGE GOPRO ET SUR TRÉPIED
• Faites glisser la plaque sur le corps de
l’ActionPack jusqu’à ce que les languettes
s’encliquètent en place.
• Pour la retirer, poussez les languettes vers
l’intérieur, puis sortez-la.
Support de montage GoPro standard
Page 24

FRANÇAIS FRANÇAIS
10
• Les voyants sur l’ActionPack restent allumés lorsqu’il
est sous tension. Vous pourrez voir le niveau de charge
restant sur l’ActionPack d’après le nombre de voyants
allumés.
• L’ActionPack fournit du courant à la pile de la caméra,
laquelle alimente ensuite la caméra. La charge de la
pile de la caméra ne commencera pas à baisser tant
que le bloc-piles ActionPack ne sera pas complètement
déchargé.
• Lorsque l’ActionPack est sous tension et que la caméra
est en mode Attente ou Lecture, l’achage de la pile sur
la caméra indiquera qu’il est en cours de charge.
• Lorsque l’ActionPack est sous tension et que la caméra
est en mode Enregistrement, l’achage de la pile sur la
caméra n’indiquera pas qu’elle est en train de se charger
bien qu’elle le soit; le pourcentage de charge de la pile
restera le même ou augmentera lentement.
• Une fois que vous avez ni d’utiliser l’ActionPack,
éteignez-le en appuyant sur le bouton d’alimentation
pendant 2 secondes. Si vous omettez de le faire,
il continuera de fournir du courant à la pile interne
exactement comme le ferait un chargeur USB pour
v
otre téléphone intelligent.
• Le fait de mettre l’ActionPack sous tension n’allume pas
automatiquement la caméra; pour l’allumer, appuyez
sur le bouton d’alimentation de la caméra.
• Le fait de mettre l’ActionPack hors tension n’éteint pas
automatiquement la caméra; pour l’éteindre, appuyez
sur le bouton d’alimentation de la caméra.
• Pour assurer un fonctionnement adéquat, il est néces
saire que la pile interne de la caméra soit installée
p
endant que vous utilisez l’ActionPack.
• L’ActionPack a été testé et approuvé conformément à la
norme IP68 de l’IEC relative à la protection contre la
poussière et l’eau. Le test en laboratoire a été eectué dans
u
n réservoir d’eau sous pression, avec submersion pendant
deux heures, à une profondeur simulée de 33 pi (10 m).
REMARQUES IMPORTANTES CONCERNANT L’ACTIONPACK RF6H50
Page 25

11
ALIMENTATION INTERMÉDIAIRE
L’alimentation intermédiaire vous permet d’enregistrer
à l’inni n tout en gardant la pile chargée.
1. Ouvrez la porte du port micro-USB comme on
l’indique à la page 4.
2. Branchez le câble micro-USB sur une source de
courant telle qu’un chargeur USB pour la voiture,
un chargeur mural ou un bloc d’alimentation.
3. Il n’est pas nécessaire d’appuyer sur le bouton
d’alimentation de l’ActionPack, car il se met en
marche automatiquement.
4. Utilisez la caméra comme vous le feriez
normalement.
RETRAIT DE LA CAMÉRA DE L’ÉTUI DE
L’ACTIONPACK APRÈS UNE UTILISATION
DANS L’E A U
1. Inspectez visuellement la caméra et essuyez toute
trace d’eau restante avant d’ouvrir l’étui.
2. Tenez la caméra de façon que le côté où se trouve le
bouton d’alimentation soit orienté vers le bas.
3. Déverrouillez l’étui et faites pivoter le cadre en
l’éloignant de la caméra.
4. Retirez la caméra en veillant à ce que le côté du port
USB soit toujours orienté vers le bas.
5. Inspectez visuellement la caméra du côté du port
USB C pour vous assurer qu’il ne reste pas d’eau.
S’il en reste, essuyez-la immédiatement.
Page 26

FRANÇAIS FRANÇAIS
12
ENTRETIEN DU BLOCPILES LONGUE DURÉE
DE L’ACTIONPACK
• 1. Avant de l’utiliser, surtout si vous prévoyez l’utiliser
dans l’eau, inspectez visuellement l’ActionPack pour
vous assurer qu’il n’y a pas de poussière, de saleté ou
autre élément pouvant nuire à son étanchéité.
• 2. Si vous utilisez l’ActionPack dans l’eau salée,
nettoyez la surface autour des ports USB-C et
micro-USB à l’aide d’un chion humide (sans charpie),
p
uis asséchez-le complètement.
• NE PLONGEZ PAS L’ACTIONPACK DANS L’EAU SANS
QUE LA CAMÉRA SOIT EN PLACE ET QUE LE LOQUET
SOIT BIEN FERMÉ, CAR SINON VOUS RISQUERIEZ DE
CAUSER DES DOMMAGES PERMANENTS.
ACTIONPACK RF6H50
SPÉCIFICATIONS :
• Pile au lithium-ion de 5000 mAh (18,5 Wh)
• Entrée micro-USB : 5V c.c., 2A (10 W)
• Sortie USB-C : 5V c.c., 1,2A (6 W)
• Puissance de sortie de la pile : 3,7 V c.c.
• Poids et dimensions : 139g | 35mm X 91mm X 84mm
Veuillez
recycler
Page 27

13
Nous voulons que vous ayez la meilleure expérience
possible lorsque vous utilisez nos produits, et nous
sommes prêts à vous aider si vous avez des questions ou
d
es problèmes à nous soumettre. Vous pouvez joindre le
Soutien technique à l’adresse techsupport@mizco.com.
Veuillez prévoir jusqu’à un jour ouvrable avant d’obtenir
une réponse par courriel.
RENSEIGNEMENTS CONCERNANT LA
GARANTIE DES PRODUITS DIGIPOWER, UNE
DIVISION DE MIZCO INTERNATIONAL, INC.
La responsabilité de Mizco relativement à cette garantie se
limite uniquement à la réparation ou au remplacement, à
son gré, de tout produit qui se révèle défectueux pendant
une utilisation normale pour une période d’un (1) an à
compter de la date d’achat. Cette garantie ne s’applique
pas dans le cas de dommage ou de panne découlant d’un
mauvais usage, de négligence, d’accident, de modication,
d’abus, d’installation inadéquate ou de mauvais entretien.
Cette garantie ne s’applique pas à l’équipement utilisé avec
ce produit. Si, au cours de la période de garantie d’un an
suivant l’achat, le produit tombe en panne à cause
de défauts de matériel ou de fabrication, veuillez
communiquer avec le Soutien technique au numéro
1 800 838-3200 entre 9 h et 18 h (HNE), du lundi au
vendredi, pour obtenir un numéro d’autorisation de retour
d
e marchandise (RMA) et les instructions d’expédition.
Pour un service plus rapide, assurez-vous d’avoir en main
une copie du reçu d’achat de votre produit sur lequel
apparaissent le numéro de modèle, la date et le lieu
d
’achat. Cette garantie vous confère des droits légaux
spéciques, et vous pouvez aussi avoir d’autres droits
pouvant varier d’un état ou d’une province à l’autre.
Page 28

14
ENGLISH ENGLISH
Rendez-vous sur : www.digipowersolutions.com
2018 Mizco International, Inc. Avenel, New Jersey.
Tous droits réservés.
Courriel : digipowersolutions@mizco.com
DigiPower est une marque de commerce enregistrée
de Mizco International, Inc.
Page 29

15
BATERÍA
RECARGABLE
ACTIONPACK
Potencia de alta capacidad para
GoPro HERO6 y HERO5
GUÍA DEL USUARIO
Item No. RF-6H50
Item No. RF-6H50KIT
Page 30

ENGLISHESPAÑOL ESPAÑOL
2
PREPARACIÓN DE LA CÁMARA PARA SU USO CON EL ACTIONPACK
Es necesario retirar la tapa del compartimento de USB en los dispositivos HERO6 y HERO5 para que la cámara
pueda conectarse al ActionPack. La tapa USB está diseñada para ser retirada y vuelta a colocar de manera segura
en la cámara, según sea necesario.
1. Abra la tapa USB del lado derecho de la cámara.
2. Con la tapa abierta en un ángulo de 90° respecto del cuerpo de la cámara, jale suavemente hacia abajo en un
ángulo de 45° para retirarla.
3. Guarde la tapa en un lugar
seguro; la necesitará
cuando no use el Action
Pack en la cámara.
Page 31

3
ENGLISHESPAÑOL ESPAÑOL
CÓMO USAR EL ACTIONPACK EN 4 PASOS FÁCILES
1. Abra la carcasa del ActionPack haciendo presión sobre el broche de seguridad
(este broche se encuentra hacia la parte media/superior del ActionPack).
2
. Mueva el broche de seguridad y el marco pivotante hacia la izquierda para poder instalar la cámara GoPro.
3. Deslice la cámara GoPro hacia la derecha para que se conecte CON FIRMEZA con el enchufe tipo C del ActionPack. Luego,
cierre la carcasa.
4. Asegure el cierre del estuche. ES MUY IMPORTANTE QUE SE CIERRE PERFECTAMENTE EL CIERRE DEL ESTUCHE.
DE LO CONTRARIO, EL PRODUCTO NO SERÁ IMPERMEABLE.
Page 32

ENGLISHESPAÑOL ESPAÑOL
4
CÓMO CARGAR EL ACTIONPACK
1. El puerto de carga micro USB se encuentra detrás de la tapa redonda, del lado del ActionPack.
2. Lleve la tapa a la posición de apertura (“desbloqueado”) como se muestra en la imagen.
3. Retire la tapa.
4. Inserte el cable de carga micro USB incluido.
Desbloqueado
Bloqueado
Page 33

5
ENGLISHESPAÑOL ESPAÑOL
5. Para una carga más rápida, use una fuente de alimentación de 2 amperios (10 vatios) (no incluida).
6. Si la cámara está instalada en el ActionPack, su batería interna también se cargará.
7. ES MUY IMPORTANTE QUE CIERRE PERFECTAMENTE LA TAPA DEL MICRO USB DESEPUÉS DE REALIZAR UNA
CARGA. DE LO CONTRARIO, EL PRODUCTO NO SERÁ IMPERMEABLE.
8. Mantenga presionado el botón de encendido por 2 segundos para encender el ActionPack. Manténgalo
presionado durante 2 segundos para apagarlo.
Bloqueado
Page 34

ENGLISHESPAÑOL ESPAÑOL
6
INDICADOR DE ESTADO DE LA CARGA
PANEL DE LUCES DEL ESTADO
ESTADO DE LA CARGA
Una luz LED parpadea Menos del 25%
Una luz LED encendida, la siguiente luz
LED parpadea
25% - 50%
Dos luces LED encendidas, la siguiente
luz LED parpadea
50% - 75%
Tres luces LED encendidas, la última luz
LED parpadea
75% - 100%
Las cuatro luces LED están encendidas La carga está completa
Cuando el ActionPack tiene carga completa, las 4 luces
LED permanecerán encendidas.
Al usar un cargador de 1 amperio, la batería de la cámara
se cargará primero. La luz LED n° 1 parpadeará por un largo
tiempo hasta que la batería interna esté completamente
cargada; luego, empezará a cargarse el ActionPack.
Luces LED indicadoras del
nivel de carga
El porcentaje de carga por luz LED es un valor aproximado. Es
mejor esperar hasta que las cuatro luces LED estén encendidas;
entonces, la unidad estará completamente cargada.
Page 35

7
ENGLISHESPAÑOL ESPAÑOL
INDICADOR DE NIVEL DE CARGA DE LA BATERÍA
PANEL DE LUCES DEL ESTADO NIVEL DE CARGA DE
LA BATERÍA
Una luz LED parpadea
Muy bajo, necesita
recargarse pronto
Una luz LED está encendida Menos del 25%
Dos luces LED están encendidas 25% - 50%
Tres luces LED están encendidas 50% - 75%
Las cuatro luces LED están encendidas 75% - 100%
PARA VERIFICAR EL NIVEL DE CARGA DE LA BATERÍA
Para vericar el nivel de carga, oprima el botón de encendido.
TIEMPO DE CARGA (SUPONIENDO QUE LA BATERÍA DE LA CÁMARA
Y EL ACTIONPACK ESTÁN COMPLETAMENTE DESCARGADOS
Fuente de energía
(no incluida)
C
ámara instalada Cámara no instalada
1 Amp (5 vatios) La cámara carga primero
y luego el ActionPack. El
tiempo total de carga es
de aproximadamente
6 horas con 45 minutos.
T
iempo de carga del
ActionPack 5 horas
45 minutos
2 Amp (10 vatios) La cámara y el
ActionPack se cargan al
mismo tiempo
.
El tiempo total de carga
es de apr
oximadamente
3 horas con 45 minutos.
Tiempo de carga del
ActionPack 3 horas
15 minutos
Page 36

ESPAÑOL ESPAÑOL
8
TIEMPO DE USO APROXIMADO DEL ACTIONPACK RF6H50
RF6H50
VERSIÓN DE LA CÁMARA TARJETA DE MEMORIA
RESOLUCIÓN ESTADO DEL WiFi TIEMPO TOTAL
HERO6 y HERO5 Clase 10 - UHS 1 720/30FPS DESACTIVADO 9 HORAS
HERO6 y HERO5 Clase 10 - UHS 1 1080/60FPS DESACTIVADO 8 HORAS
HERO6 y HERO5 Clase 10 - UHS 1 4K/30FPS DESACTIVADO 6 HORAS
Se requiere una tarjeta de memoria clase 10/UHS 1 para el mejor desempeño.
Tarjeta de memoria clase 10/UHS 1
Page 37

9
Las monturas se deslizan
para insertarlos y se
traban en su lugar
Montaje GoPro estándar
Montaje de trípode estándar
con rosca de ¼” de 20 hilos
PARA USAR LOS SOPORTES PARA
GOPRO Y TRÍPODES
• Deslice la placa en el cuerpo del ActionPack
hasta que las pestañas se traben en su lugar
• Para retirar, empuje las pestañas hacia adentro y
deslice la placa de montaje hacia afuera.
Page 38

ESPAÑOL ESPAÑOL
10
• Las luces LED del ActionPack permanecen encendidas
cuando el ActionPack está encendido. Esto le indicará el
nivel de carga remanente en el ActionPack de acuerdo
con la cantidad de luces LED encendidas.
• El ActionPack suministra alimentación a la batería de
la cámara, la que a su vez alimenta a la cámara. El nivel
de la batería de la cámara no comenzará a bajar hasta
que la batería del ActionPack se haya descargado por
completo.
• Con el ActionPack encendido y la cámara en modo de
reserva o de reproducción, la pantalla de la batería en la
cámara indicará que se está cargando.
• Con el ActionPack encendido y la cámara en modo de
grabación, la pantalla de la batería en la cámara no
indicará que se está cargando, aunque siga haciéndolo.
El porcentaje de carga de la batería seguirá siendo el
mismo o aumentará lentamente.
• Cuando termine de usar el ActionPack, apáguelo
presionando el botón de encendido durante 2
s
egundos. Si no lo hace, se seguirá suministrando
alimentación a la batería interna de la misma manera
que un cargador USB proporcionaría alimentación a su
Smartphone.
• Encender el ActionPack no enciende la cámara; use el
botón de encendido de la cámara para ello.
• Apagar el ActionPack no apaga la cámara; use el botón
de encendido de la cámara para ello.
• Para su funcionamiento adecuado, es necesario que la
batería interna de la cámara esté instalada mientras se
usa el ActionPack.
• El ActionPack ha sido probado y aprobado según el
estándar IEC IP68 para entrada de agua y polvo. Pruebas
de laboratorio realizadas en un tanque de agua
presurizado para una inmersión de 2 horas simularon
u
na profundidad de 33 pies (10 metros).
NOTAS IMPORTANTES ACERCA DEL ACTIONPACK RF6H50
Page 39

11
ALIMENTACIÓN DIRECTA
1. Abra la tapa del puerto micro USB como se indicó en
la página 4.
2. Conecte el cable micro USB a una fuente de
alimentación, como un cargador USB para auto
móviles, un cargador de pared o un banco de
energía.
3. No es necesario que presione el botón de encendido
del ActionPack; este comienza a funcionar
automáticamente.
4. Opere la cámara como lo haría normalmente.
RETIRE LA CÁMARA DEL ESTUCHE DEL
ACTIONPACK DESPUÉS QUE HAYA
ESTADO EN EL AGUA
1. Inspeccione visualmente la cámara; seque todo
residuo de agua hallado antes de abrir el estuche.
2. Sostenga la cámara de modo que el lado con el
botón de encendido mire hacia abajo.
3. Abra la carcasa y aleje el marco pivotante de la
cámara.
4. Retire la cámara con el lado del puerto USB todavía
mirando hacia abajo.
5. I nspeccione visualmente para ver si hay agua
alrededor del puerto USB C de la cámara. Seque
inmediatamente de haber restos de agua.
Page 40

ESPAÑOL ESPAÑOL
12
CUIDADOS DE LA BATERÍA EXTENDIDA
ACTIONPACK
• 1. Antes de usar, y especialmente si planea usarlo
en el agua, inspeccione visualmente el ActionPack
para ver si hay polvo, suciedad o cualquier cosa que
pudiera afectar su capacidad para mantener un sello
impermeable.
• 2. Si el ActionPack se usa en agua salada, limpie las
áreas alrededor del puerto USB-C y del puerto micro
USB con un paño húmedo y limpio (libre de pelusa).
Seque por completo.
• NO SUMERJA EL ACTIONPACK EN AGUA SIN LA
CÁMARA EN SU LUGAR Y EL BROCHE CERRADO. DE LO
CONTRARIO, PODRÍA HABER DAÑOS PERMANENTES.
ACTIONPACK RF6H50
ESPECIFICACIONES:
• Batería de iones de litio de 5000mAh (18.5Wh)
• Entrada micro USB: 5 V C.C., 2 A (10 W)
• Salida USB-C: 5 V C.C., 1.2 A (6 W)
• Salida de la batería: 3.7 V C.C.
• Peso y dimensiones: 4.9 oz (139g) | 1.37” x 3.5” x 3.3”
(35mm x 91mm x 84mm)
Por favo r
recicle.
Page 41

13
Queremos que usted tenga la mejor experiencia posible
al usar nuestros productos, y estamos a sus órdenes para
ayudarle con cualquier pregunta o problema. Puede
contactar al departamento de asistencia técnica a
techsupport@mizco.com. Espere hasta un día de trabajo
para recibir una respuesta por correo electrónico.
INFORMACIÓN SOBRE LA GARANTÍA PARA
LOS PRODUCTOS DIGIPOWER, UNA
DIVISIÓN DE MIZCO INTERNATIONAL, INC.
La responsabilidad de Mizco con lo que respecta esta
garantía limitada se limita exclusivamente a la reparación
o el reemplazo, a su discreción, de cualquier producto
que falla durante su uso normal por parte del consumidor
durante un periodo de un año a partir de la fecha de
compra. Esta garantía no abarca daños o fallas que
pudieran resultar de su mal uso, descuido, accidente,
modicación, abuso, o la instalación o mantenimiento
no apropiado. Esta garantía no se extiende a daños a
los equipos utilizados con el producto. Si en cualquier
momento durante el periodo de un año después de l
a compra del producto, éste falla debido a un defecto
de materiales o fabricación, comuníquese con el
departamento de soporte técnico al 800-838-3200 entre
las 9 a.m. y 6 p.m. de lunes a viernes Hora del Este, para
obtener un número de RMA e instrucciones para enviarlo
de regreso. Para un servicio más rápido, tenga a la mano
una copia del recibo del producto con el número de
modelo y la fecha y lugar de compra. Esta garantía le
da derechos legales especícos, y también podría tener
otros derechos que varían en ciertos estados o provincias.
Page 42

Visite: www.digipowersolutions.com
2018 Mizco International, Inc. Avenel, New Jersey.
Todos los derechos reservados. correo
electrónico: digipowersolutions@mizco.com
Refuel por DigiPower es una marca comercial registrada
de Mizco International, Inc.
 Loading...