

Page 1

T R AV E L C H A R G E R
CARGADOR DE VIAJES
CHARGEUR DE VOYAGE
DSLR500, TC500
USER GUIDE • GUÍA DEL USUARIO • GUIDE D’UTILISATION
Page 2

Page 3

TABLE OF CONTENTS
CONTENIDO
TABLE DES MATIÉRES
ENGLISH
Operating Instructions. . . . . . . . . . . . . . . . . . . . . . . . . . . . . . . 1
ESPAÑOL
Instrucciones de Operación . . . . . . . . . . . . . . . . . . . . . . . . . . 9
FRANÇAIS
Consignes d’utilisation. . . . . . . . . . . . . . . . . . . . . . . . . . . . . . 17
Page 4

Page 5

| 1
OPERATING INSTRUCTIONS FOR TRAVEL CHARGER,
ITEMS DSLR-500, TC-500
Please read the information and follow all instructions before
using this product.
IMPORTANT WARNING!
This charger is for charging rechargeable Li-Ion digital camera
and camcorder batteries ONLY! Attempting to charge any other
batteries may damage the device, destroy the batteries and/or
cause injury to the user. Charging other batteries will void the
warranty.
CAUTIONS:
• Always unplug the charger when not in use.
• Do not store, place or use the charger where it could come
into contact with water or moisture.
• Always replace frayed or damaged wire and broken plugs
immediately.
• To reduce the risk of electric shock, unplug your charger
from the wall outlet before cleaning.
• Do not open or disassemble the charger unit.
Before using the charger, it is important to get familiar with the
international plug mechanism.
English
Page 6
2 |
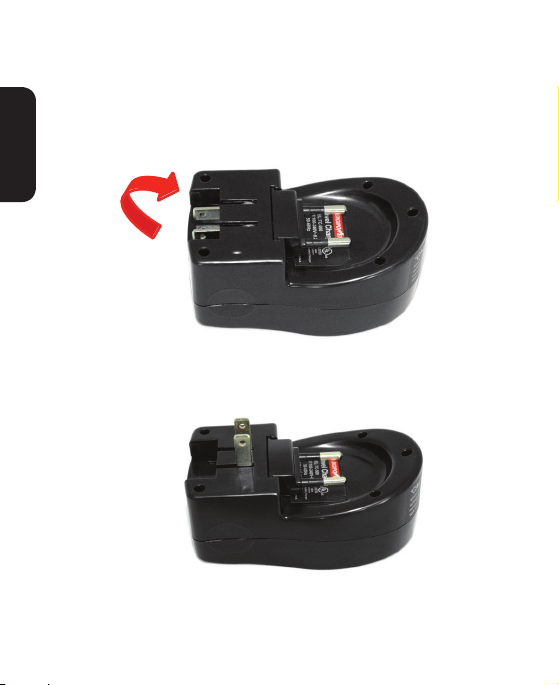
1. Lift the plug from stored position until it locks in a 90
degree position.
English
2. Plug directly into a wall outlet or power strip.
FOR USE IN USA
Page 7
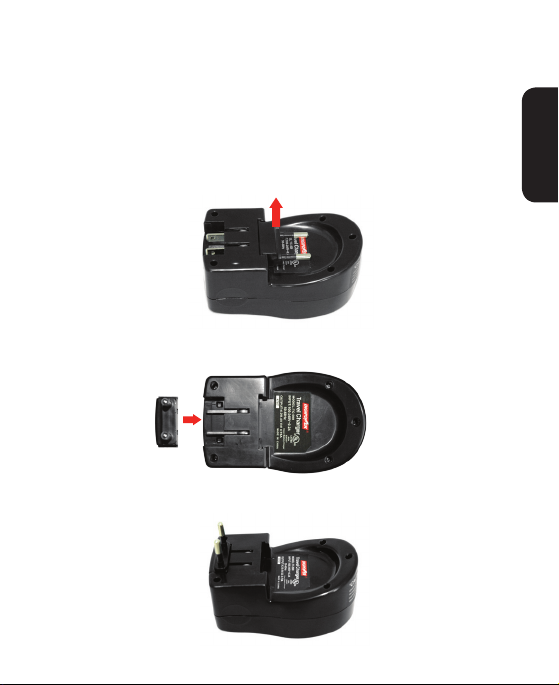
FOR USE IN EUROPE
USA plug remains in stored position.
| 3
1. Remove European plug adaptor by lifting up and out of
stored position.
2. Slide the EU plug into the stored US plug.
3. Plug directly into a wall outlet or power strip.
English
Page 8
4 |
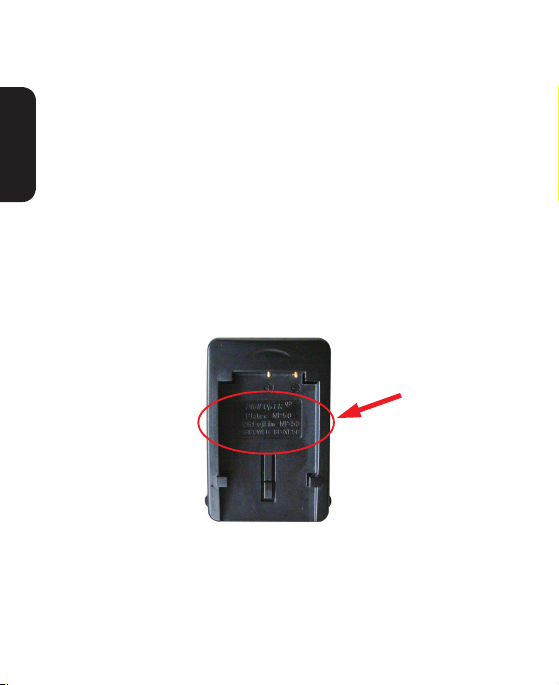
CHOSING THE CORRECT BATTERY PLATE
The charger is designed to work with changeable battery plates
to t and charge various Li-Ion digital camera and camcorder
batteries. Each charger is packaged with battery plates to t the
dierent battery models from the same camera manufacturer.
English
1. Find the Plate labeled with the battery model for your
camera. (Battery plates are inscribed with the OEM battery #,
as well as the DigiPower battery #. The battery model can be
found on the battery label, or check the camera instruction
manual.)
Page 9
| 5
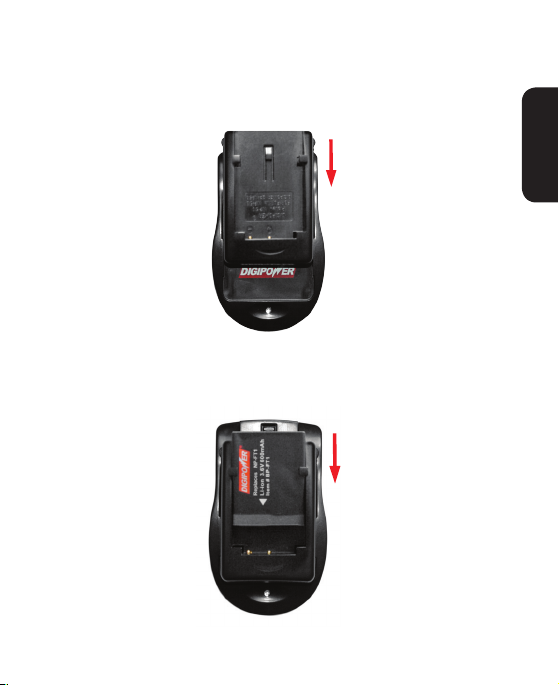
2. Attach the battery plate by sliding it onto the Base Charger.
(Contacts on the plate should slide towards the LED at the
bottom of the charger.)
3. Slide the battery onto the cradle matching the battery
terminals with the plate contacts.
English
Page 10

6 |
OPERATING INSTRUCTIONS
While the battery is on the charger, connect the base charger to a
power source.
English
Charging status:
• Standby mode: without any batteries installed, the LED will
light steady green.
• Charging mode: when a battery is inserted and being
charged LED will light steady red.
• Charge complete: when the battery is fully charged the LED
will switch back to steady green.
(Typical charge time is 1-hour for batteries up to 900mAh.)
NOTE:
The charger or battery may become warm when charging, this is
normal.
MAINTENANCE:
Remove from power outlet before cleaning. Use a clean, DRY
cloth when necessary to keep the metal contacts of both charger
and battery clean.
Page 11

| 7
LIMITED WARRANTY
Mizco’s responsibility with regard to this limited warranty shall
be limited solely to the repair or replacement at its option, of any
product, which fails during normal consumer use for a period of 1
Year from the date of purchase. This warranty does not extend to
damage or failure, which results from misuse, neglect, accident,
alteration, abuse, improper installation or maintenance. If at any
time during the 1 Year period following the purchase the product
fails due to defects in materials or workmanship, return the
defective product with freight prepaid and proof of purchase.
All brands represented herein are registered trademarks of their
respective manufacturers. Design and specications are subject
to change without notice.
©2010 Mizco International, Inc. Avenel, New Jersey
www.mizco.com tel: 800•266•4026
email: digipowersolutions@mizco.com
All rights reserved.
DIGIPOWER is a registered trademark of Mizco International Inc.
Year Warranty
Garantía De Año
1
Garantie D'Un An
260 8
English
Page 12

Page 13

| 9
INSTRUCCIONES DE OPERACIÓN PARA EL CARGADOR PARA
VIAJES, ÍTEMS DSLR-500,TC-500
Por favor lea la información y siga todas las instrucciones antes
de usar este producto.
¡ADVERTENCIA IMPORTANTE!
¡El uso de este CARGADOR es SÓLO para recargar las baterías
recargables Li-Ion de cámaras y videograbadoras digitales!
El intento de cargar otro tipo de baterías sólo puede dañar el
aparato, destruir las baterías y/o causar lesiones al usuario.
Cargar otras baterías anula la garantía.
PRECAUCIONES:
• Siempre desconecte el cargador cuando no se encuentre en uso.
• No guarde, coloque o use el cargador en sitios donde pueda
entrar en contacto con agua o humedad.
• Remplace de inmediato los cables desgastados o dañados y
los enchufes rotos.
• Para reducir el riesgo de una descarga eléctrica, desconecte
su cargador del contacto en la pared, antes de limpiar.
• No abra ni desarme el cargador.
Antes de usar el cargador, es importante familiarizarse con el
mecanismo del enchufe internacional.
Español
Page 14

10 |
PARA USO EN ESTADOS UNIDOS
1. Levante el enchufe de su posición de guardado hasta que
cierre en una posición de 90 grados.
Español
2. Conecte directamente en el contacto de la pared o en una
extensión con tira de contactos.
Page 15

| 11
PARA USO EN EUROPA
El enchufe para Estados Unidos permanece en la posición de
guardado.
1. Retire el enchufe del adaptador para Europa, levantándolo
de su posición de guardado.
2. Inserte el enchufe para Europa en el enchufe de Estados
Unidos guardado.
3. Conecte directamente a la conexión en la pared o a la tira de
conexión.
Español
Page 16

12 |
PARA ELEGIR LA PLACA DE BATERÍA DE CORRECTA
El cargador está diseñado para funcionar con placas de batería
cambiables para adaptarse y cargar diversas baterías Li-Ion para
cámaras y videograbadoras digitales. Cada cargador incluye las
placas de baterías para adaptarse a los diferentes modelos de
baterías de un mismo fabricante de cámaras.
1. Busque la placa etiquetada con el modelo de la batería
adecuado para su cámara. (Las placas de las baterías
presentan la inscripción con el número de la batería OEM así
como el número de batería de DigiPower. El modelo de la
Español
batería suele encontrarse en la etiqueta de la batería o bien
en el manual de instrucciones de la cámara).
Page 17

| 13
2. Coloque la placa de batería deslizando ésta en el Cargador
Base (Los contactos en la placa deben deslizarse hacia la luz
LED en la parte inferior del cargador).
3. Deslice la batería en la base, de tal manera que las
terminales de la batería correspondan a los contactos en la
placa.
Español
Page 18

14 |
INSTRUCCIONES DE OPERACIÓN
Cuando la batería se encuentra en el cargador, conecte la base
del cargador a una fuente de energía.
Estado de la carga:
• Modo de espera: Sin las baterías instaladas, la luz LED se
encenderá en color verde sólido.
• Modo de carga: Cuando se inserta una batería y se está
cargando, la luz LED se encenderá en color rojo sólido.
• Carga completa: Cuando la batería esté completamente
cargada, la luz LED cambiará a color verde sólido.
(El tiempo de carga típico es de una hora para baterías de
Español
hasta 900 mAh).
NOTA:
El cargador o batería puede calentarse durante la carga. Esto es
normal.
MANTENIMIENTO:
Retire el polvo del contacto antes de limpiar. Use un trapo limpio
y SECO cuando sea necesario limpiar los contactos de metal,
tanto del cargador como de la batería.
Page 19

| 15
GARANTÍA LIMITADA
La responsabilidad de Mizco con lo que respecta esta garantía
limitada se limita exclusivamente a la reparación o el reemplazo,
a su discreción, de cualquier producto que falla durante el uso
normal del consumidor durante un periodo de 1 año a partir
de la fecha de compra. Esta garantía no abarca daños o fallas
que pudieran resultar de su mal uso, descuido, accidente,
modicación, abuso, instalación incorrecta o mantenimiento.
Si en cualquier momento durante el periodo de 1 año después
de la compra del producto, éste falla a causa de un defecto
de materiales o fabricación, por favor devuelva el producto
defectuoso con el porte prepagado y el comprobante de compra.
Todas las marcas representadas aquí son marcas comerciales
registradas de sus fabricantes respectivos. El diseño y sus
especicaciones están sujetos a cambio sin previo aviso.
©2010 Mizco International, Inc. Avenel, New Jersey
www.mizco.com tel: 800•266•4026
email: digipowersolutions@mizco.com
Todos los derechos reservados.
DIGIPOWER es una marca registrada de Mizco International Inc.
Year Warranty
Garantía De Año
1
Garantie D'Un An
260 8
Español
Page 20

Page 21

| 17
CONSIGNES D’UTILISATION DU CHARGEUR DE VOYAGE
ARTICLES DSLR-500, TC-500
Veuillez lire et suivre attentivement toutes les instructions avec
d'utiliser ce produit.
MISE EN GARDE IMPORTANTE!
Ce CHARGEUR est conçu pour NE charger QUE les piles au
lithium-ion rechargeables pour caméscopes et appareils photos
numériques ! Toute tentative de chargement d’autres types de
piles pourrait endommager l’appareil, détruire les piles et /ou
causer des blessures à l’utilisateur. Le fait de charger d’autres
types de piles annulera la garantie.
MISE EN GARDE :
• Débranchez toujours le chargeur lorsque vous ne vous en
servez pas.
• Évitez de ranger, de placer ou d’utiliser le chargeur dans
un endroit où il pourrait entrer en contact avec l’eau ou la
moisissure.
• Remplacez toujours immédiatement les ls éraillés ou
endommagés, ainsi que les ches brisées.
• Pour réduire le risque de choc électrique, débranchez le
chargeur et laissez-le refroidir avant de le nettoyer.
• N’ouvrez pas ou ne démontez le chargeur.
Avant d'utiliser le chargeur, il est important de se familiariser
avec le mécanismes des ches internationales.
Français
Page 22

18 |
UTILISATION AUX ÉTATSUNIS
1. Relevez la che jusqu’à ce qu’elle se bloque en place dans
un angle de 90 degrés.
2. Branchez directement sur une prise murale ou une barre
d’alimentation.
Français
Page 23

| 19
UTILISATION EN EUROPE
La che Américaine reste en position de rangement.
1. Enlevez l’adaptateur de che européenne en le relevant,
puis en le sortant de sa position de rangement.
2. Insérez la che européenne dans la che américaine en
position de rangement.
3. Branchez directement sur une prise murale ou une barre
d’alimentation.
Français
Page 24

20 |
CHOIX DE LA PLAQUE DE PILE APPROPRIÉE
Le chargeur est conçu pour fonctionner avec des plaques de pile
interchangeables, ce qui permet de charger diérents types de
piles Li-Ion pour caméscopes et appareils photos numériques.
Chaque chargeur est fourni avec des plaques de piles permettant
de l’ajuster aux diérents modèles de piles du même fabricant
d’appareils photos.
1. Prenez la plaque sur laquelle est indiqué le modèle de pile
pour votre appareil photo. (Ces plaques portent le numéro de
pile OEM ainsi que le numéro de pile DigiPower. Le modèle
de pile est indiqué sur l’étiquette de la pile; sinon, consultez
le guide d’utilisation de votre appareil photo.)
Français
Page 25

| 21
2. 2. Fixez la plaque en la faisant glisser dans le chargeur.
(Les contacts sur la plaque doivent glisser en direction du
témoin lumineux au fond du chargeur.)
3. 3. Faites glisser la pile sur le socle, en vous assurant que les
bornes de la pile correspondent aux contacts de la plaque.
Français
Page 26

22 |
INSTRUCTIONS D’UTILISATION
Placez la pile sur le chargeur, puis branchez-le sur une source
d’alimentation.
État de la charge :
• Mode Attente : lorsqu’il n’y a pas de pile, le voyant reste allumé
en vert (xe).
• Mode Charge : lorsque vous insérez une pile et qu'elle
commence à se charger, le voyant s'allume en rouge (xe).
• Charge complète : une fois la pile complètement chargée, le
voyant s’allume à nouveau en vert (xe).
(Le temps de charge est habituellement d’une (1) heure pour
les piles de 900 mAh ou moins.)
REMARQUE :
Le chargeur ou la pile pourrait chauer pendant la charge. Ceci
est normal.
Français
Entretien :
Débranchez de la prise d’alimentation avant de nettoyer. Au
besoin, utilisez un chion propre et SEC pour garder les contacts
de métal du chargeur et de la pile propres.
Page 27

| 23
GARANTIE LIMITÉE
La responsabilité de Mizco relativement à cette garantie limitée
s’applique uniquement à la réparation ou au remplacement, à
son gré, de tout produit qui se révèle défectueux pendant une
utilisation normale pour une période d’un (1) an à compter de
la date d’achat. Cette garantie ne s’applique pas dans le cas
de dommage ou de panne découlant d’un mauvais usage, de
négligence, d’accident, de modication, d’abus, d’installation
inadéquate ou de mauvais entretien. Advenant que le produit
cesse de fonctionner en raison d’un défaut de matériau ou de
fabrication dans l’année suivant son achat, veuillez retourner le
produit défectueux (fret payé d’avance) avec une preuve d’achat.
Toutes les marques représentées ici sont des marques déposées
de leurs fabricants respectifs. Le design et les spécications
peuvent changer sans préavis.
©2010 Mizco International, Inc. Avenel, New Jersey
www.mizco.com tel: 800•266•4026
email: digipowersolutions@mizco.com
Tous droits réservés.
DIGIPOWER est une marque de commerce enregistrée de Mizco
International, Inc.
Year Warranty
Garantía De Año
1
Garantie D'Un An
260 8
Français
Page 28

Page 29

Page 30

Page 31

Page 32

©2010 Mizco International, Inc. Avenel, New Jersey
www.mizco.com tel: 800•266•4026
email: digipowersolutions@mizco.com
All rights reserved
Todos los derechos reservados.
Tous droits réservés.
DIGIPOWER is a registered trademark of Mizco International Inc.
DIGIPOWER es una marca registrada de Mizco International Inc.
DIGIPOWER est une marque de commerce enregistrée de
Mizco International, Inc.
 Loading...