

Page 1
DIGIOXI
DIGIOXI
Model PO-930
PULSE OXIMETER MONITOR
Operator’s Manual
Page 2

Digicare Biomedical Technology Inc.
Quality and Technology... To Touch Life
Operators Manual Pulse Oximeter Monitor DIGIOXI “PO-930” 2
Page 3

Digicare Biomedical Technology Inc.
Table of Contents
SECTION 1 - Introduction
A. About this Manual .......................................................................... 2
B. Manufacture's Responsibility ........................................................ 2
C. Warranty ...................................................................................... 2
D. Unpacking and Accessories ........................................................... 2
E. General Safety .............................................................................. 3
SECTION 2 - Technical Specification
A. Mechanical Description .................................................................. 4
B. Power Requirements ...................................................................... 4
C. SpO2 - Pulse Oximeter...................................................................... 4
D. Heart Rate ..................................................................................... 4
E. Display .... ................... .................................................................. 4
F. Trends .... ................... .................................................................. 4
G .Environment Specifications.............................................................. 5
H. RS232 output (Optional)................................................................. 5
SECTION 3 - Controls, Connectors and Indicators
A. Front Panel .................................................................................... 6
B. Rear Panel ..................................................................................... 7
C. Monitoring Mode Screen .................................................................. 8
D. Alarms Indicators ............................................................................... 8
SECTION 4 - Operation Instructions
A. Initial Operation ............................................................................ 9
B. Alarm Sound ON -OFF ................................................................... 9
C. Alarm limits selection....................................................................... 9
D. Beep volume adjust.......................................................................... 10
E. Alarm volume adjust........................................................................ 10
F. Trends ON/OFF............. .................................................................. 10
SECTION 5 - Oxygen Saturation Monitoring
A. Theory of Operation ..................................................................... 11
B. Patient Connections ....................................................................... 12
C. SpO2 Monitoring ........................................................................... 13
D. Plethysmogram Wa veform ............................................................... 13
E. Alarms Messages ....... .................................................................. 14
SECTION 6 - Maintenance
A. The Monitor .................................................................................... 15
B. Probes ........................................................................................... 15
C. Patient cables.................................................................................. 15
Warranty Terms & Conditions .......................................................... 16
Operators Manual Pulse Oximeter Monitor DIGIOXI “PO-930” 1
Page 4

Digicare Biomedical Technology Inc.
SECTION 1 - Introduction
A. About This Manual
This operator’s manual has been prepared to provide information on the correct use of the DIGICARE
BIOMEDICAL TECHNOLOGY INC. DIGIOXI PO-930 Pulse Oximeter patient monitor. It contains performance
specifications and installation, operation and maintenance information. It is intended for trained health-care
professionals.
Follow each chapter in the manual sequentially, (specially) if the monitor is being used for the first time.
B. Manufacturer's Responsibility
The manufacturer of this equipment is responsible for the effects on safety, reliability, and performance of the
equipment only if:
-The equipment is used in accordance with the instructions in this manual.
-The electrical installation complies with all applicable regulations.
-Assembly operations, extensions, re-adjustments, or repairs are carried out by persons authorized by the
manufacturer.
It is up to the user to ensure that any applicable regulations respecting the installation and operation of the
monitor be observed. The operator should read this manual carefully and thoroughly before attempting to use
the monitor.
Incorrect operation or failure of the user to maintain the monitor in accordance with proper
maintenance procedures relieves the manufacturer or his agent from all consequent noncompliance, damage or injury.
C. Warranty
All products manufactured by Digicare Biomedical Technology Inc. are warranted to be free from defects in
material and workmanship and to operate within published specifications, under normal use, for a period of two
years from date of original shipment. The warranty on accessories is ninety (90) days.
If an examination by Digicare, discloses such products or component parts be been defective, then our
obligation is limited to repair or replacement (at our option).
During the first year of service, there is no charge for parts or labor. In the second year of service, the customer
is charged for labor only.
D. Unpacking and Accessories
Operators Manual Pulse Oximeter Monitor DIGIOXI “PO-930” 2
Page 5
Digicare Biomedical Technology Inc.
Carefully remove the monitor and its accessories from the shipping carton. Save the packing materials in case
the monitor must be shipped or stored. Ensure your DIGIOXI PO-930 has the items listed in the SHIPPING LIST
inside the carton.
E. General Safety
1 - INDICATIONS
The DIGIOXI PO-930 is intended for use in the hospital/clinic environment to measure and monitor these
parameters:
-Blood oxygen saturation ( SpO2 or pulse Oximeter );
-Pulse Rate;
- PLETHYSMOGRAM Waveform
The DIGIOXI PO-930 is intended for use by persons trained in professional health care. The operator must be
thoroughly familiar with the instructions in this manual before using the instrument.
2 - CONTRAINDICATIONS
Situations where risks associated with the use of the monitor are greater than the benefits.
The DIGIOXI PO-930 IS NOT intended to be used as an apnea monitor.
The DIGIOXI PO-930 IS NOT intended to be used during MRI (magnetic resonance imaging).
3 - WARNINGS
+ Indicate the possibility of injury due to patient or operator associated with the use or the misuse of the
monitor.
4 - CAUTIONS
Indicates a condition that may lead to equipment damage or malfunction.
Operators Manual Pulse Oximeter Monitor DIGIOXI “PO-930” 3
Page 6

Digicare Biomedical Technology Inc.
SECTION 2 - Technical specification
A. Mechanical Description
Size : 94x254x254mm
Weight : 3,5 Kg
Color : White and Black
B. Power Requirements
AC voltage Input : 120VAC; 60Hz (220VAC and/or 50Hz Optional)
Internal Battery : 12 VDC/2,9Ah Sealed
Battery Duration : 7 Hours.
Recharge Time : 18 Hours in use on AC line.
C. SpO
SpO2 Range : 0% to 100% adult/pediatric/neonate
SpO2 Accuracy : ± 2% (70 - 100%), ± 3% (50 - 69%) unspecified (0 - 49%)
Pulse Rate Range : 30 to 250 BPM
Pulse Rate Accuracy : ± 2%
Pulse Tone : Pitch adjusted by SpO2
Sensor Types : Finger, Universal, Wrap, Disposable.
- Pulse Oximeter
2
D. Heart Rate
Heart Rate Range : 30 to 255 BPM
Heart Rate Accuracy : 2%
E. Display
Type : High Intensity CFL-LCD
Dot Matrix : 240x64 Dots
Effective Display Area : 178 mm x 69 mm x 25mm
Viewing Angle : 150°
Operators Manual Pulse Oximeter Monitor DIGIOXI “PO-930” 4
Page 7
Digicare Biomedical Technology Inc.
8765321
4
141312111
0
9
F. Trends
15min, 1, 4, 12 and 14 hours
G. Environment Specifications
Temperature : Operating 19°c to 35°c
: Storage 4.5°c to 43.5°c
Relative Humidity : Operating 20 - 80% (Non-Condensing)
: Storage 10 - 90% (Non-Condensing)
H. RS232 OUTPUT ( Optional)
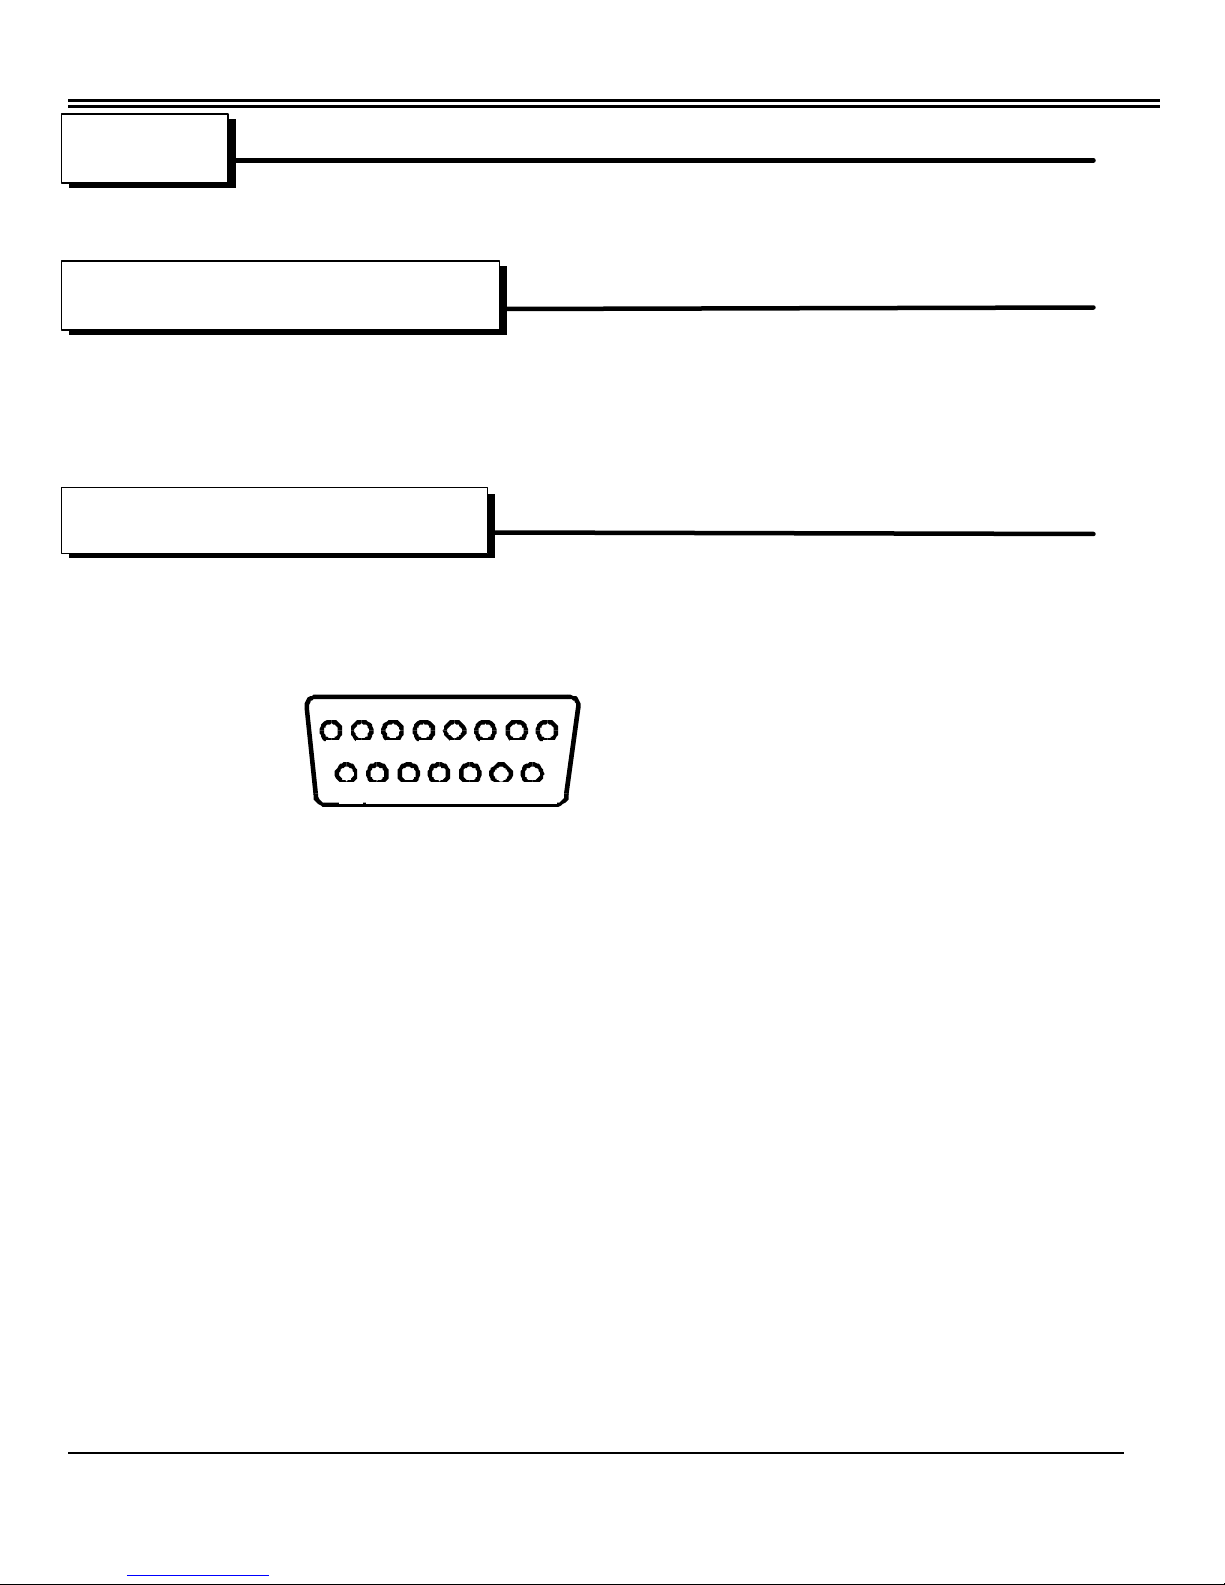
Serial Output to connect the Monitor to one microcomputer.
Supply SpO2, Pulse and PLETHYSMOGRAM data.
DB15
3 - GND
7 - RXD
6- TXD
Operators Manual Pulse Oximeter Monitor DIGIOXI “PO-930” 5
15
Page 8
Digicare Biomedical Technology Inc.
SECTION 3 - Controls, Connectors and Indicators
A. Front Panel
01 02 03
AC
ON
OFF
L
C
D
C
O
N
T
R
A
S
T
DIGIO XI PO-930 Pulse Oximeter
TRENDS
ON/OFFS
p
O
2
ALARM
SELECT
P
U
L
S
E
04
05
04
0607080910
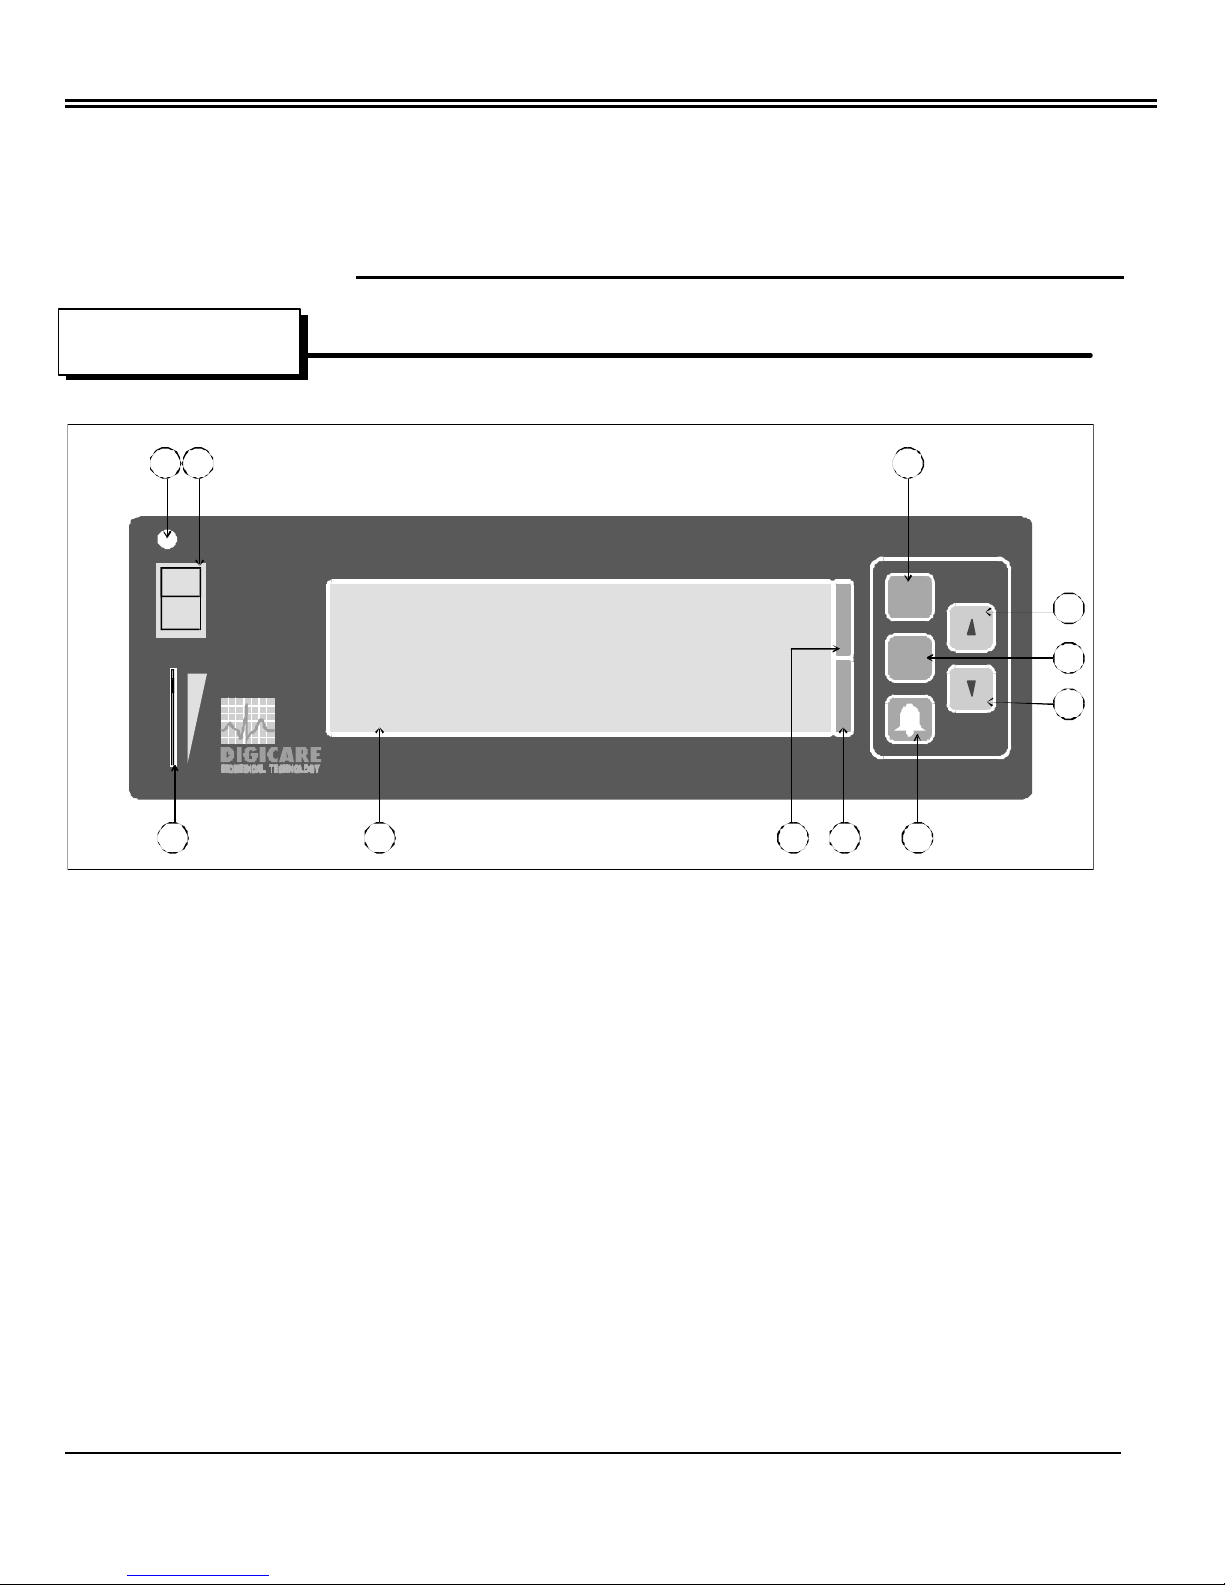
01 - AC indicator
02 - ON/OFF Switch
03 - Trends ON/OFF Push -button
04 - Increment and decrement alarm limits and pulse and alarm sounds
05 - Alarm limits select push -button
06 - Alarm Silence push -button
07 - Pulse area indicator
08 - SpO2 area indicator
09 - High Intensity CFL-LCD
10 - Backlight Contrast Adjust Trimmer
Operators Manual Pulse Oximeter Monitor DIGIOXI “PO-930” 6
Page 9
Y
MADEINU.S.A
.
Y
dangerouselectricalshockhazard.
t
f
f
f
f
f
1
1
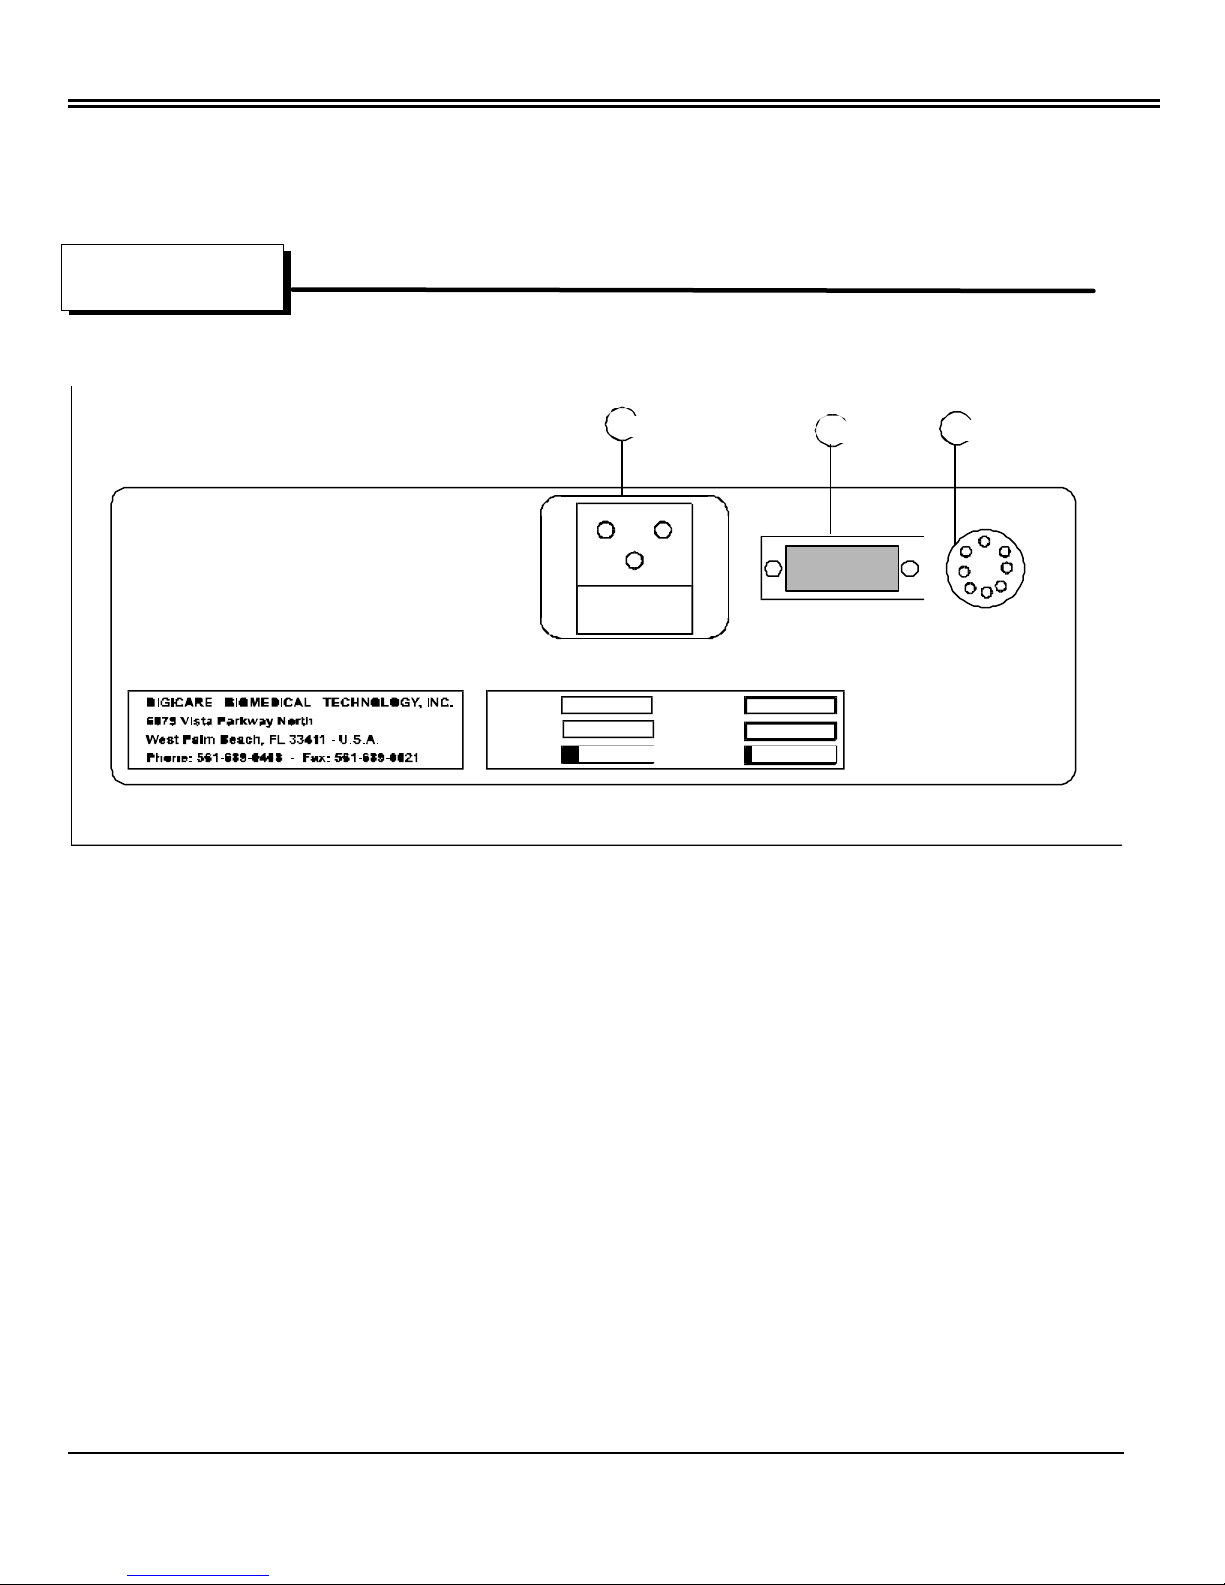
B. Rear Panel
Digicare Biomedical Technology Inc.
CAUTION - E quipmentmustbe grounded atalltim esto avoid
WARNING - For continued prote ction agains
only with sam ety pe andrating o
DANG ER - Explosion hazard. Do notuse inthe presence o
la mmable anesthetic s.
WARNING - Disc onnectsupply before servicing.
us e.
ire ha zard, replace
MNF DATE FREQ UENC
S ERIAL N.
11 - IEC type with fuse holder AC line input connector
12 - RS232 Serial output connector
13 - SpO2 Probe input connector
FU SE
AC MAINS
V OLTAGE
FUSEPO WER
12
AUXILIAR
0,5 A - 20AGÁX 4 WATT
13
SpO2
ISOLATED
CONNECTION
Operators Manual Pulse Oximeter Monitor DIGIOXI “PO-930” 7
Page 10
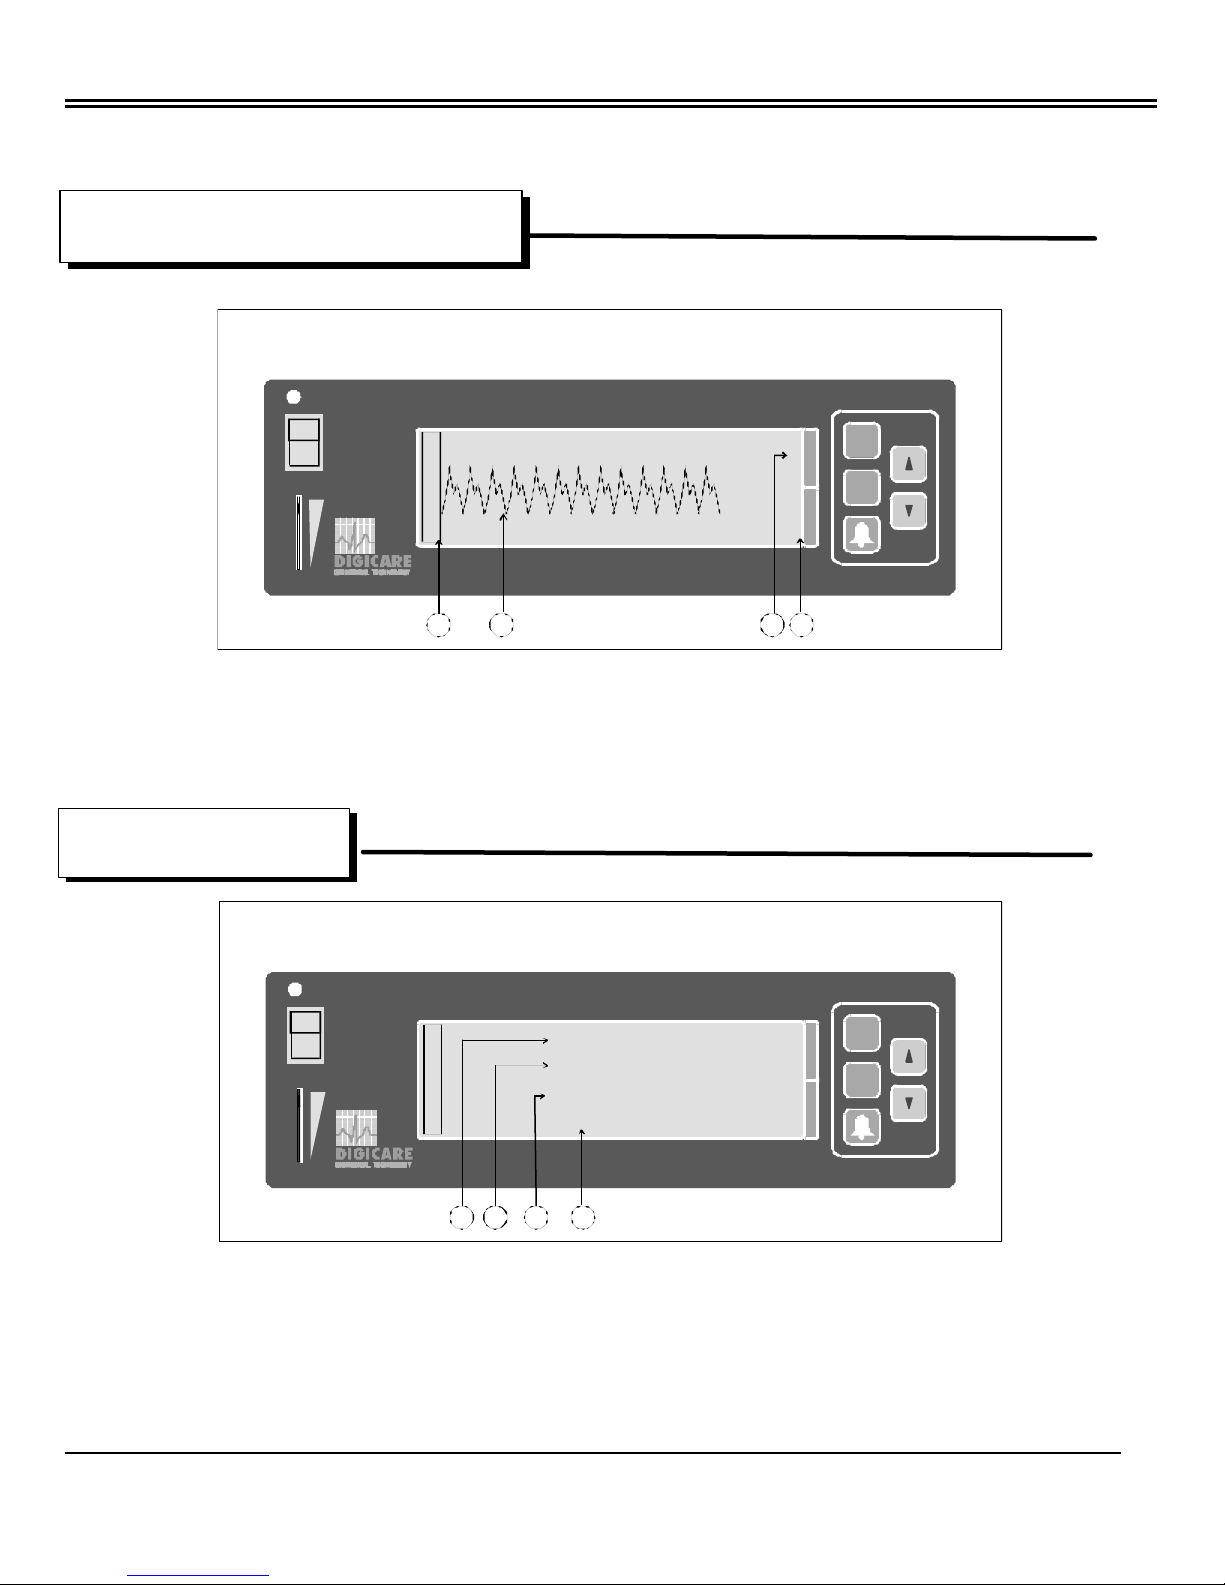
C. Monitoring Mode Screen
Digicare Biomedical Technology Inc.
AC
ON
OFF
L
C
D
C
O
N
T
R
A
S
T
DIGIOXI PO-9 30 Pulse Oximeter
8
7
6
5
4
3
2
1
01 - BAR-GRAPH - Indicates the SpO2 pulse intensity
02 - SpO2 PLETHYSMOGRAM WAVEFORM
03 - SpO2 - Indicates the SpO2 value LOW and HIGH alarm limits
04 - PULSE - Indicates the Pulse Rate value LOW and HIGH limits
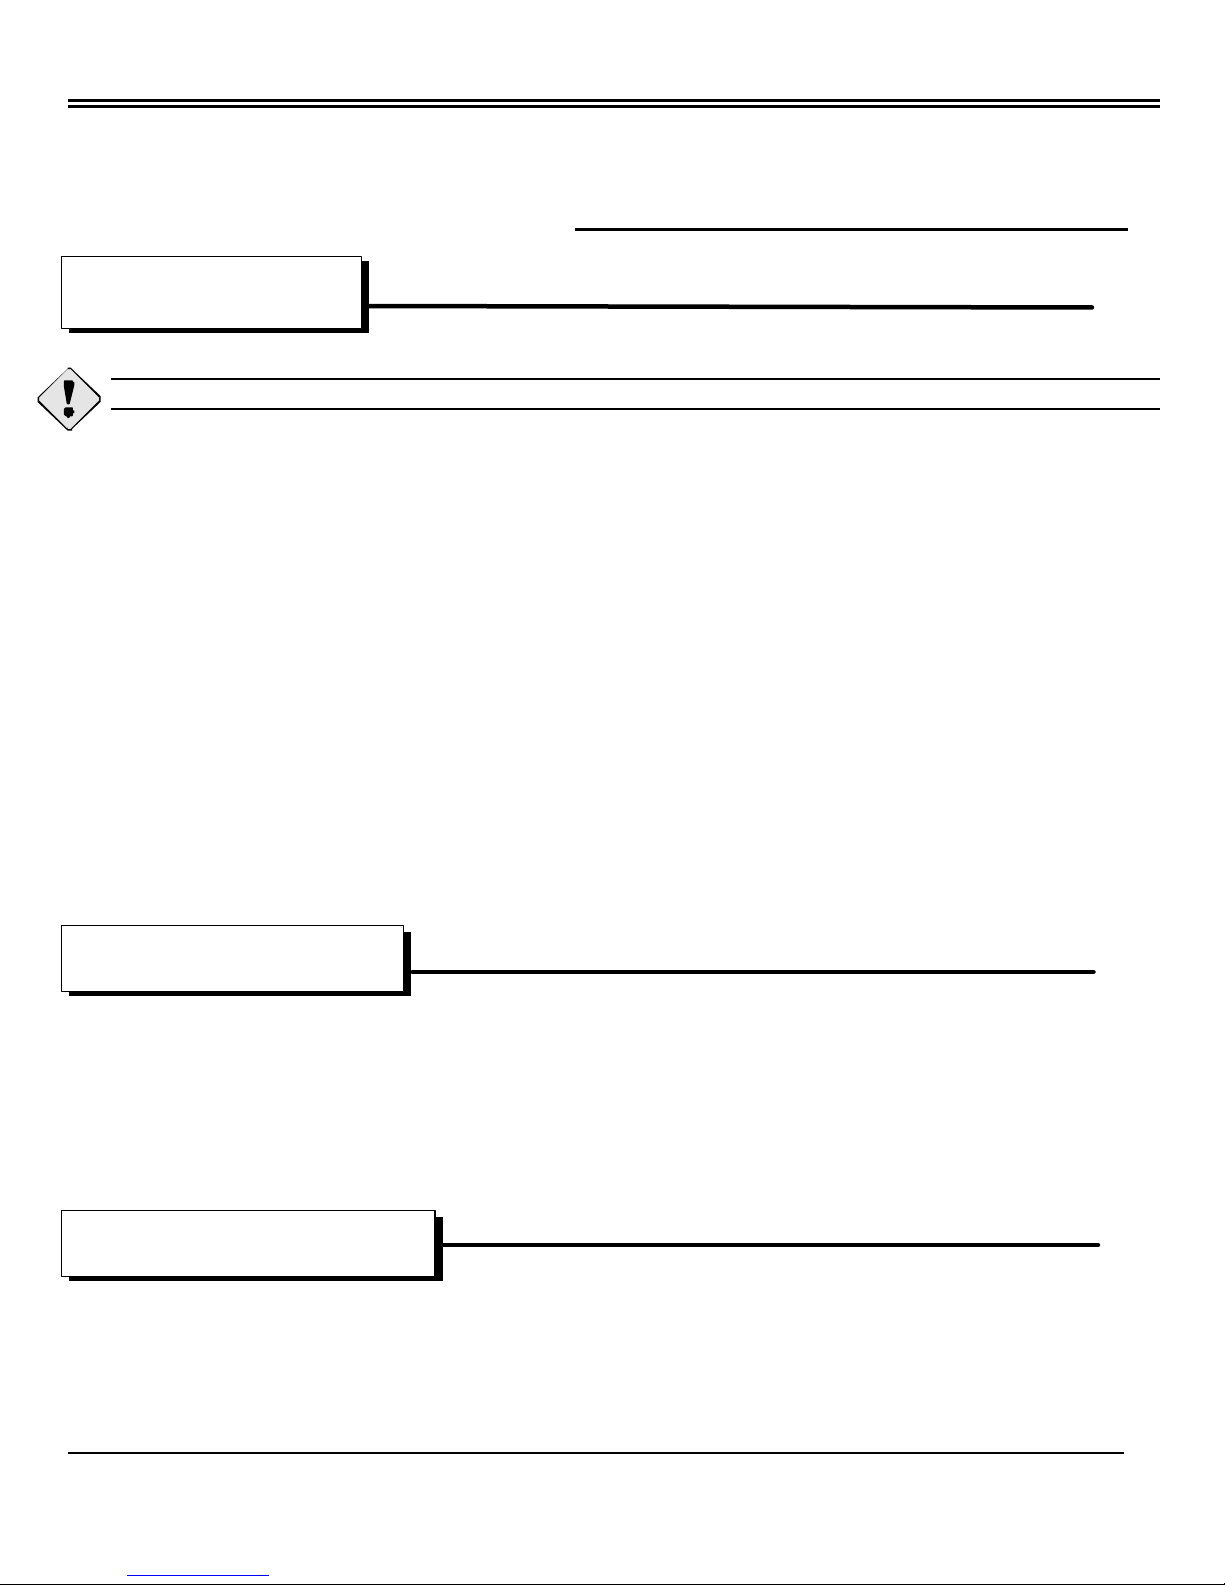
D. Alarm Indicators
98
88
99
87
140
TRENDS
ON/ OFFS
p
O
2
ALARM
SELECT
P
U
L
S
E
60
040301 02
AC
ON
OFF
L
C
D
C
O
N
T
R
A
S
T
01 - Indicates the following alarms:
“SENSOR OFF”, “NO SENSOR”, “SEARCHING”, “LOW SpO2”, “HIGH SpO2”
02 - Indicates the following alarms:
“LOW PULSE”, “HIGH PULSE”
03 - Indicates the following alarms:
Operators Manual Pulse Oximeter Monitor DIGIOXI “PO-930” 8
DIGIOXI PO-9 30 Pulse Oximeter
8
7
6
5
4
3
2
1
SENSOR OFF
HIGH PULSE
CHECK SITE
ALARMS OFF
04030201
98
88
99
87
140
60
TRENDS
ON/OFFS
p
O
2
ALARM
SELE CT
P
U
L
S
E
Page 11
Digicare Biomedical Technology Inc.
“CHECK SITE”, “WEAK PULSE”, “LOW BAT”
04 - Indicates “ALARMS OFF” ( No alarm sound)
SECTION 4 - Operation Instructions
A. Initial Operation
CAUTION: Read this manual completely before initiate the monitor’s installation and operation.
1 - Plug the AC power cord in AC MAINS receptacle ( 11 ) in rear panel and in the AC OUTLET. Verify if the
mains voltage corresponds to the voltage specified in the Rear Panel.
2 - The electrical installation of the room must have three pins outlets with earth connection for better protection
of patients, users and equipment’s.
3 - Press the switch ( 02 ) in front panel to power-on the monitor.
4 - The monitor begins a self-test and displays the monitorization screen.
5 - At power-on the monitor assume standards values for the following items:
- Audible Alarm : Two minutes OFF
- Pulse Rate High Limit : 140 BPM
- Pulse Rate Low Limit : 60 BPM
- SpO2 High Limit : OFF ( -- -- )
- SpO2 Low Limit : 87%
B. Alarm Sound On-Off
Pressing one time the key (ALARM SOUND ON-OFF) % disables the ALARM SOUND for 2 minutes and
ALARM OFF message flashes in screen.
Pressing again the (ALARM SOUND ON-OFF) % key enables the ALARM SOUND. Pressing (ALARM
SOUND ON-OFF) key for 4 seconds, disables permanently the ALARM SOUND and the message ALARM OFF
appear in screen permanently.
C. Alarm Limits Selection
At power-on the SpO2 and pulse alarm limits are pre-selected.
To modify the limits, press the alarm select (05) push-button until the desired limit ( SpO2 High, SpO2 Low,
Pulse High, Pulse Low ) flashes. Press the é or ê push -button to select the limit value. Press again the alarm
select (05) push -button until no alarm limit indicator is flashing.
Operators Manual Pulse Oximeter Monitor DIGIOXI “PO-930” 9
Page 12
Digicare Biomedical Technology Inc.
D. Beep Volume Adjust
At POWER-ON the BEEP VOLUME is pre-adjusted. To increase or decrease the BEEP VOLUME, press the
alarm disable % push-button. The “alarm off” message is displayed. Press the é or ê push-button to
increase or decree the pulse alarm volume.
E. Alarm Volume Adjust
At POWER-ON the Alarm Sound is pre-adjusted. To increase or decrease the Alarm Sound, the “alarm off”
message could not be displayed. ( Alarm Sound Enabled ). Press the é or ê push-button to increase or
decree the alarm sound.
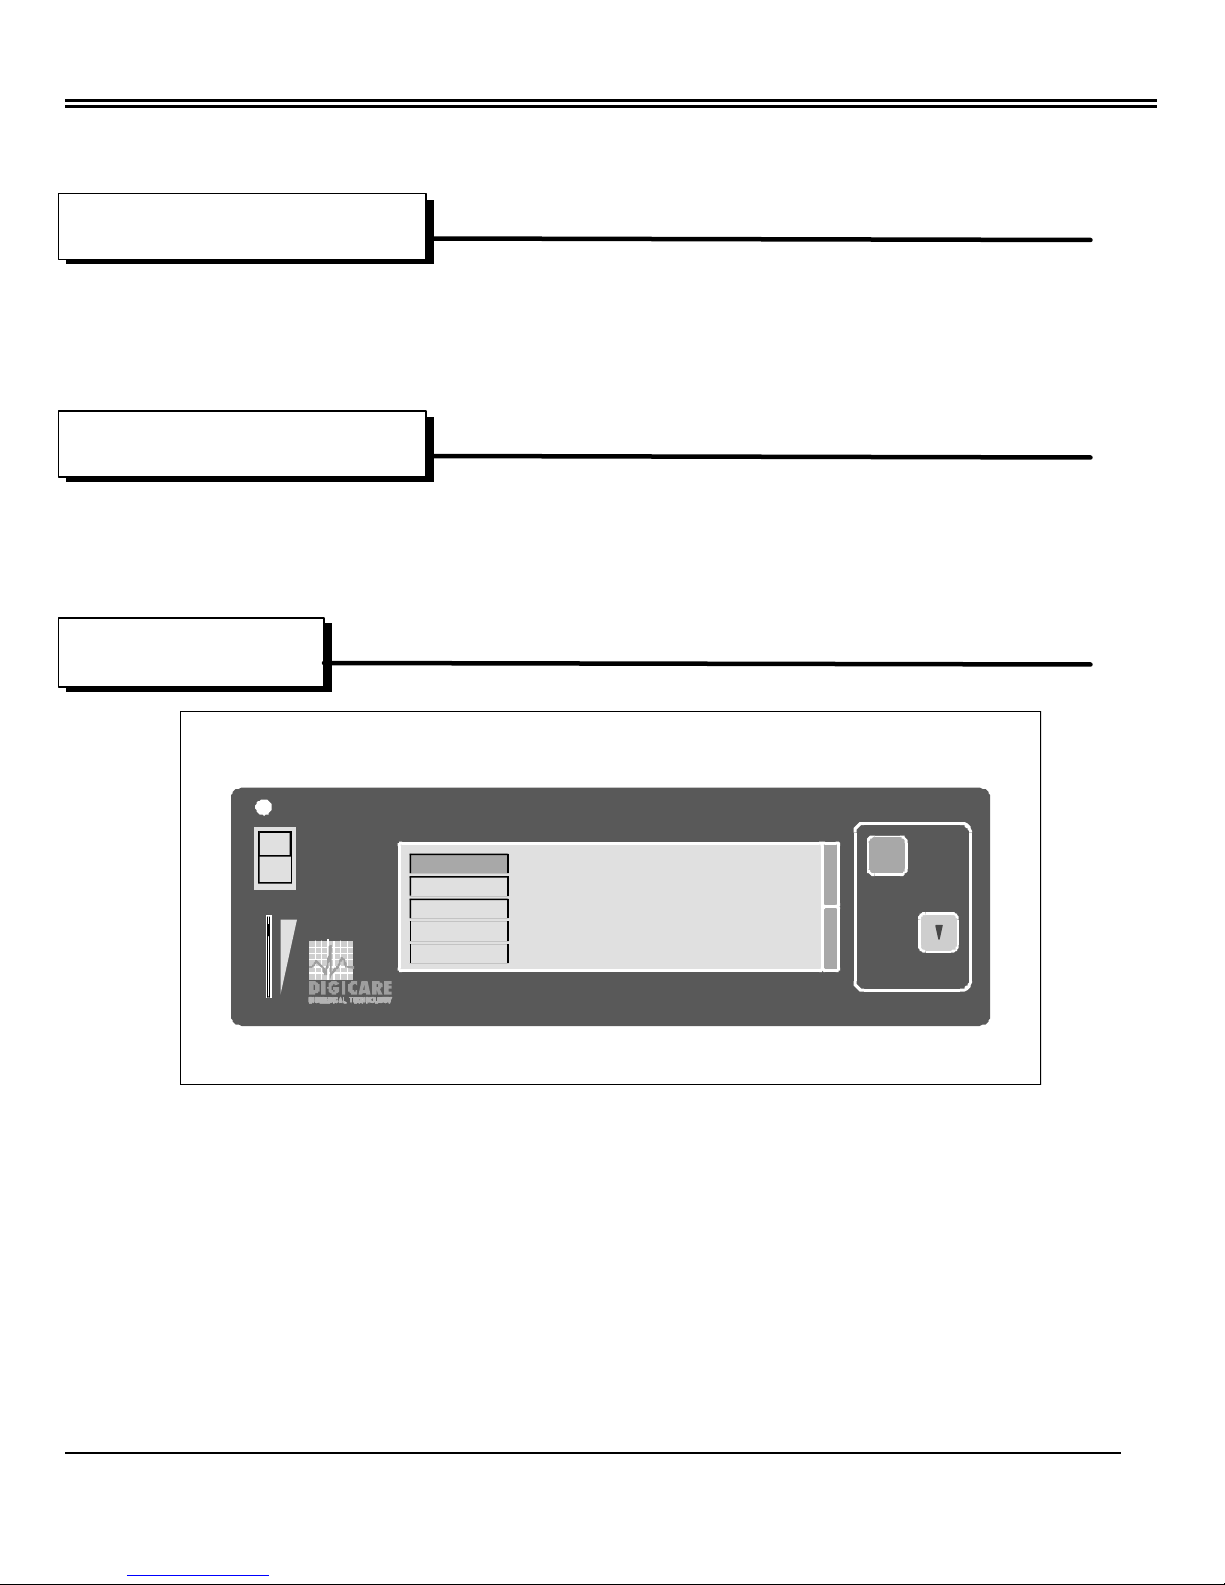
F. Trends ON/OFF
AC
ON
OFF
L
C
D
C
O
N
T
R
A
S
T
Press the TRENDS ON/OFF push -button.
At the left side of the display the time period options are displayed. (15min, 1H, 4H, 12H and 24H).
The selected time period flashes. To modify the time period press the ê push-button until the desired option
flashes. To confirm the selection press again the TRENDS ON/OFF push-button and the Trends waveforms
are displayed. To Return to normal display press the TRENDS ON/OFF push -button again.
DIG IOXI PO-930 Pulse Oximeter
15 MIN
1 HOUR
4 HOURS
12 HOURS
24 HOURS
TRENDS
ON/OFFS
p
O
2
P
U
L
S
E
Operators Manual Pulse Oximeter Monitor DIGIOXI “PO-930” 10
Page 13
Digicare Biomedical Technology Inc.
10x
660
SECTION 5 - Oxygen Saturation Monitoring
A. Theory of Operation
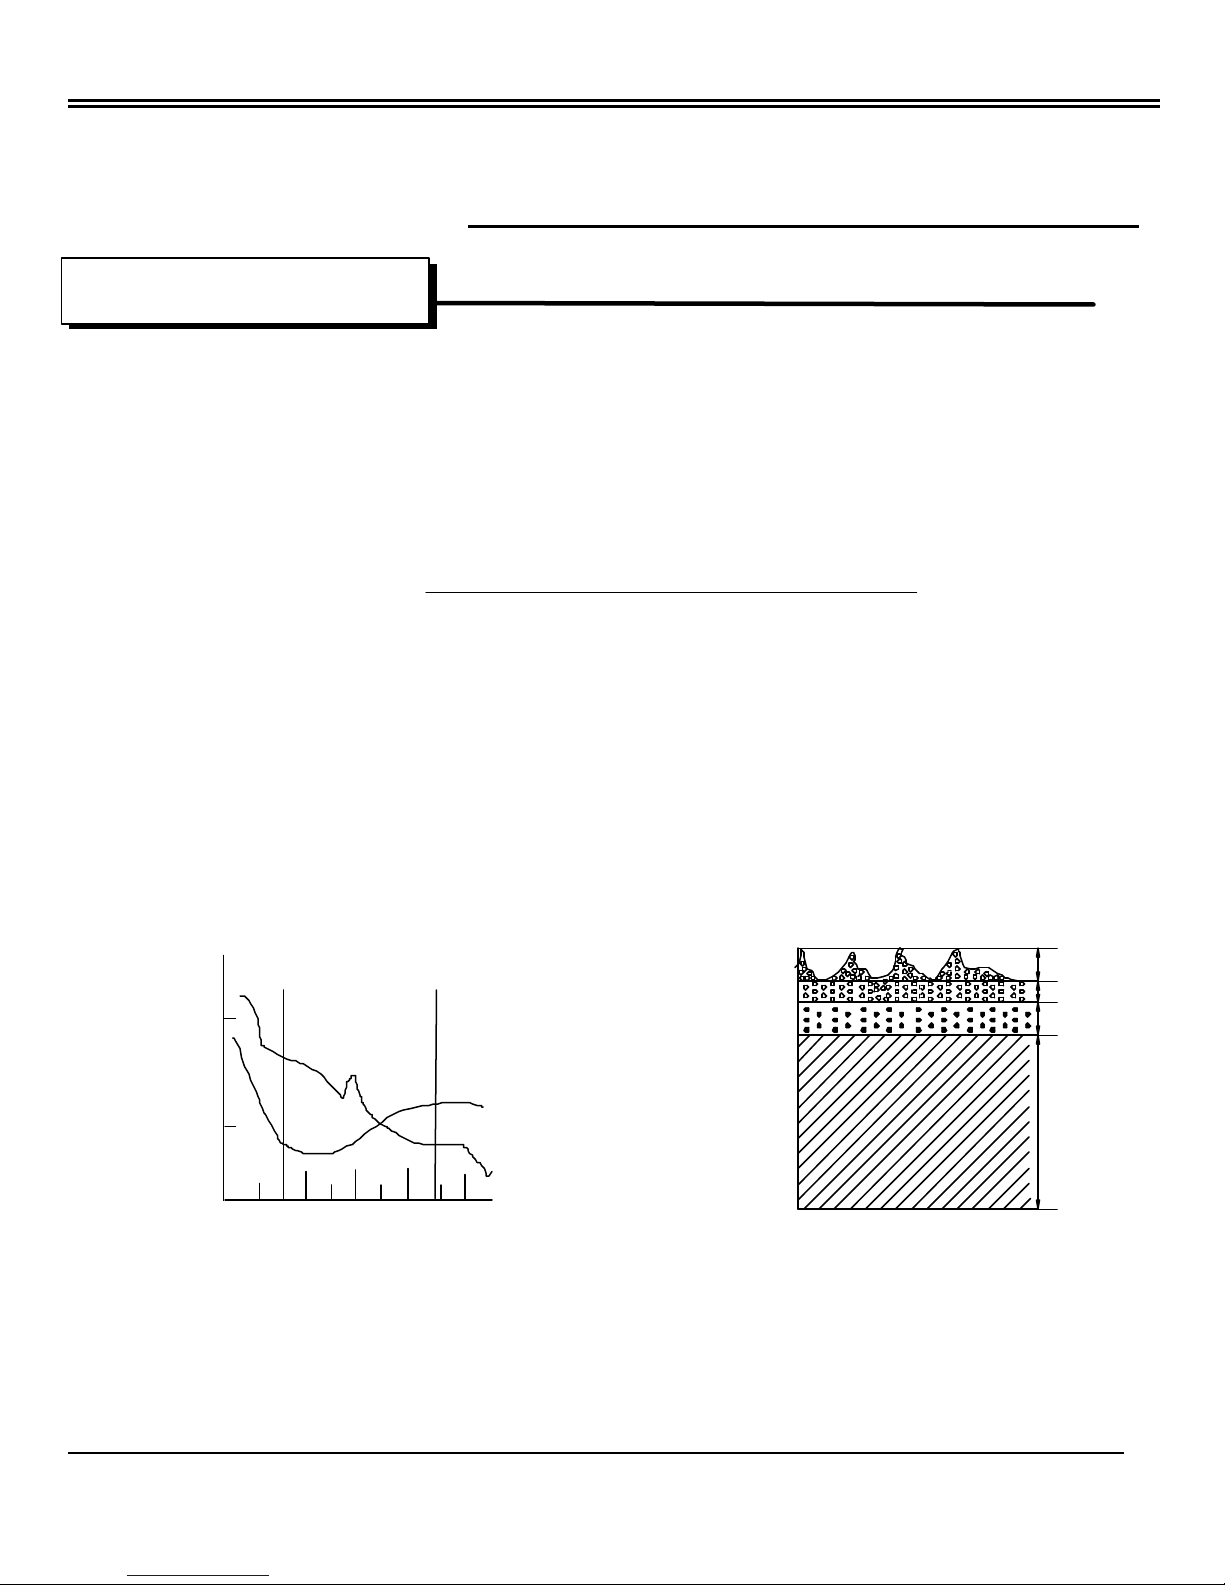
The functioning of the DIGIOXI PO-930 pulse oximetry is based on the assumption that hemoglobin exists in
two principle forms in the blood:
- Oxygenated ( With O2 molecules loosely bound) or HbO2.
- Reduced ( With No O2 molecules bound ) or Hb.
Arterial oxygen saturation ( SpO2 ) is defined as the ratio of oxygenated hemoglobin ( HbO2 ) to total hemoglobin
( HbO2 + Hb + other types of hemoglobin’s ).
An Oximeter measures the absorption of selected wavelengths of light passing throughout a living, tissue
sample. Since oxygenated hemoglobin and reduced hemoglobin absorb light as know functions of wavelengths,
the relative percentage of these two constituents, and SpO2 are calculated. The problem is translating oximetry
theory into a medical device is differentiating between the absorption due to oxygenated and reduced
hemoglobin and the absorption due to all other tissue constituents.
The problem is solved with a two wavelength pulsatile system. The pulsation of arterial blood flow present, at a
particular test site modulates the light the oximeter’s probe detects. Since other fluids and tissues present at
the test site generally don’t pulsate, they do not modulate the light passing, through the test site area. Therefore
the attenuation of light energy due to arterial blood flow can be detected, and isolated. Thus providing the basis
for the necessary calculations, by using the pulsatile portion of the incoming signal.
FIG.1 FIG.2
Two wavelengths of light, red and infrared, are utilized to gauge the presence of oxygenated and reduced
hemoglobin.
Oxygenated hemoglobin (HbO2) and reduced hemoglobin (Hb) exhibit markedly different abs orption (extinction)
characteristics to red and infrared lights. (FIG.1).
The probe’s photodetector converts the light, which is partially absorbed and modulated as it passes through the
tissue sample, into an electronic signal. FIG.2.
SpO2 =
HbO2 + Hb + (others Hemoglobin’s)
940nm
HbO2
ABSORPTION
TIME
Operators Manual Pulse Oximeter Monitor DIGIOXI “PO-930” 11
Page 14
Digicare Biomedical Technology Inc.
B. Patient Connections
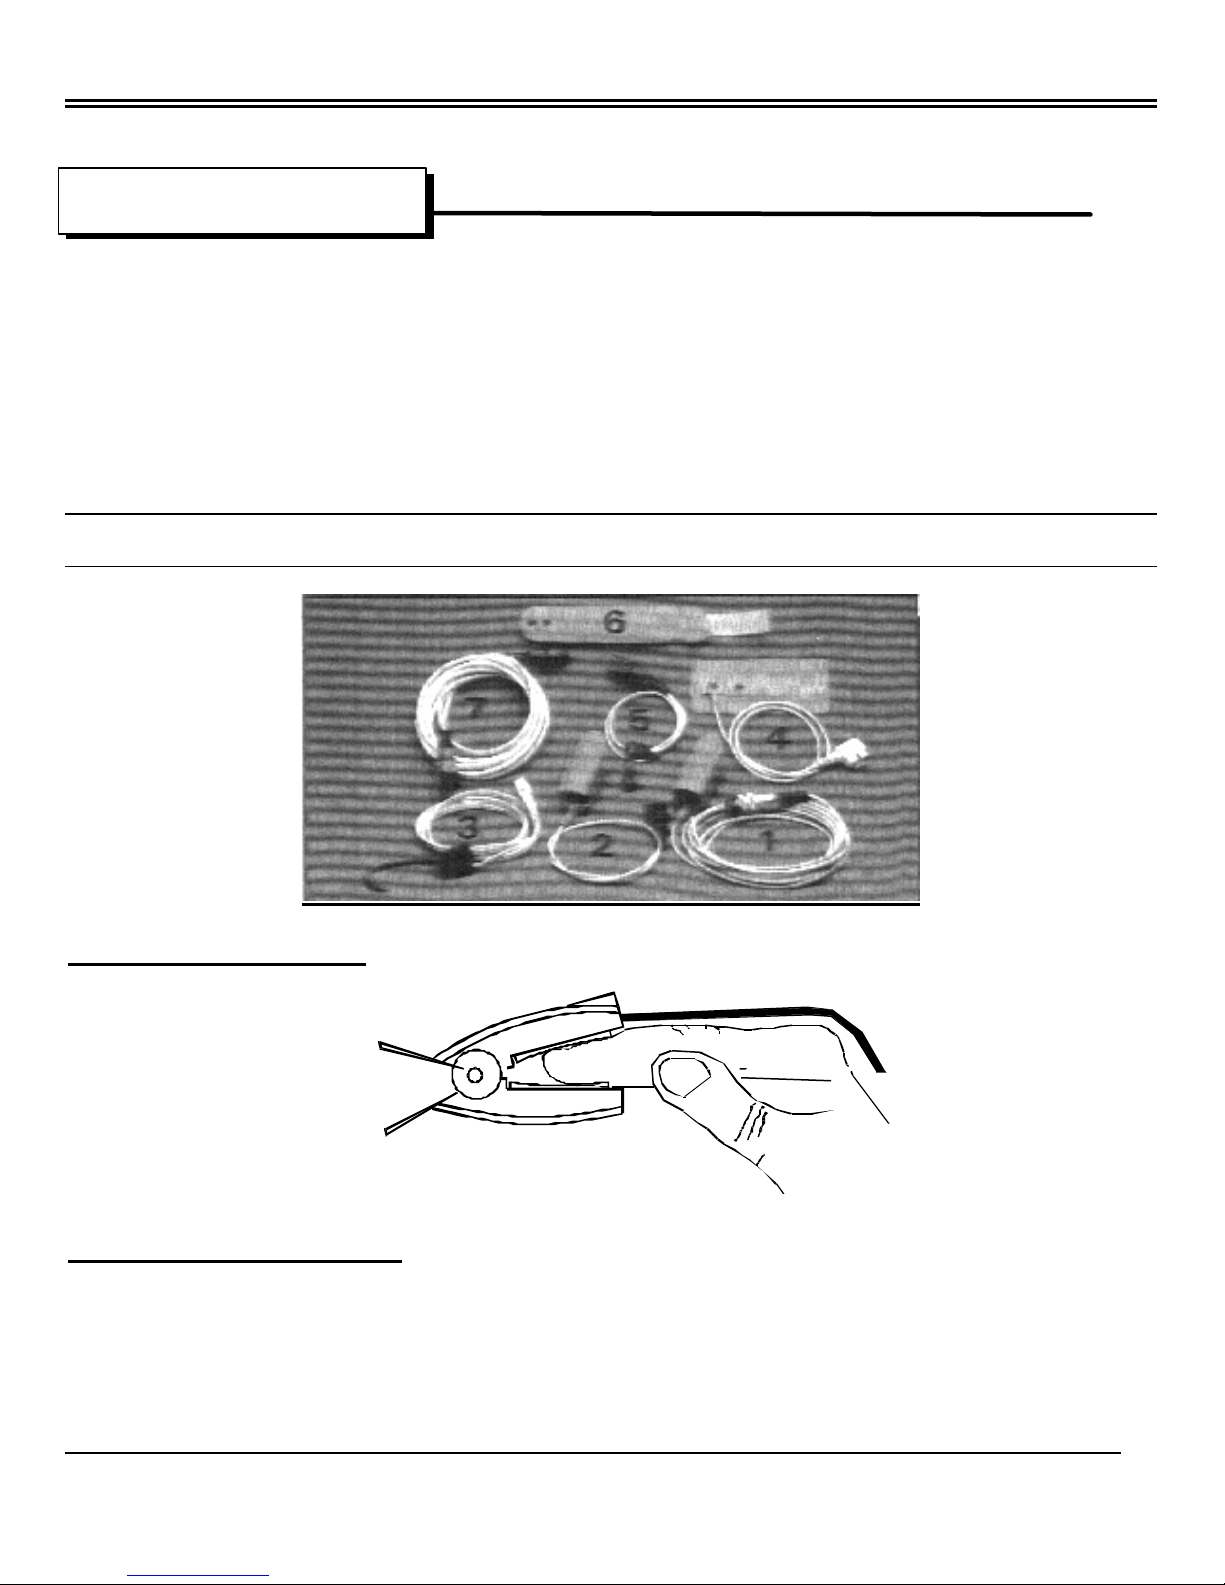
To ensure conformance with all safety and performance, use only the recommended accessories. These are
available from DIGICARE using the following part number:
1 - Finger Probe 10’cord P/N -PO-710
2 - Finger Probe 1.5’cord P/N -PO-711
3 - Ear Probe P/N -PO-730
4 - Disposable Wrap Probe P/N -PO-724
5 - Wrap Probe P/N -PO-720
6 - Band for Wrap Probe P/N -PO-721
7 - SpO2 Patient Cable 10” cord P/N -PO-722
F 2,3,4 and 5 requires SpO2 Patient Cable P/N PO-722
FINGER PROBE - ADULT
A
R
C
I
E
I
G
D
WRAP PROBE - NEONATAL
Operators Manual Pulse Oximeter Monitor DIGIOXI “PO-930” 12
Page 15
Digicare Biomedical Technology Inc.
C. SpO
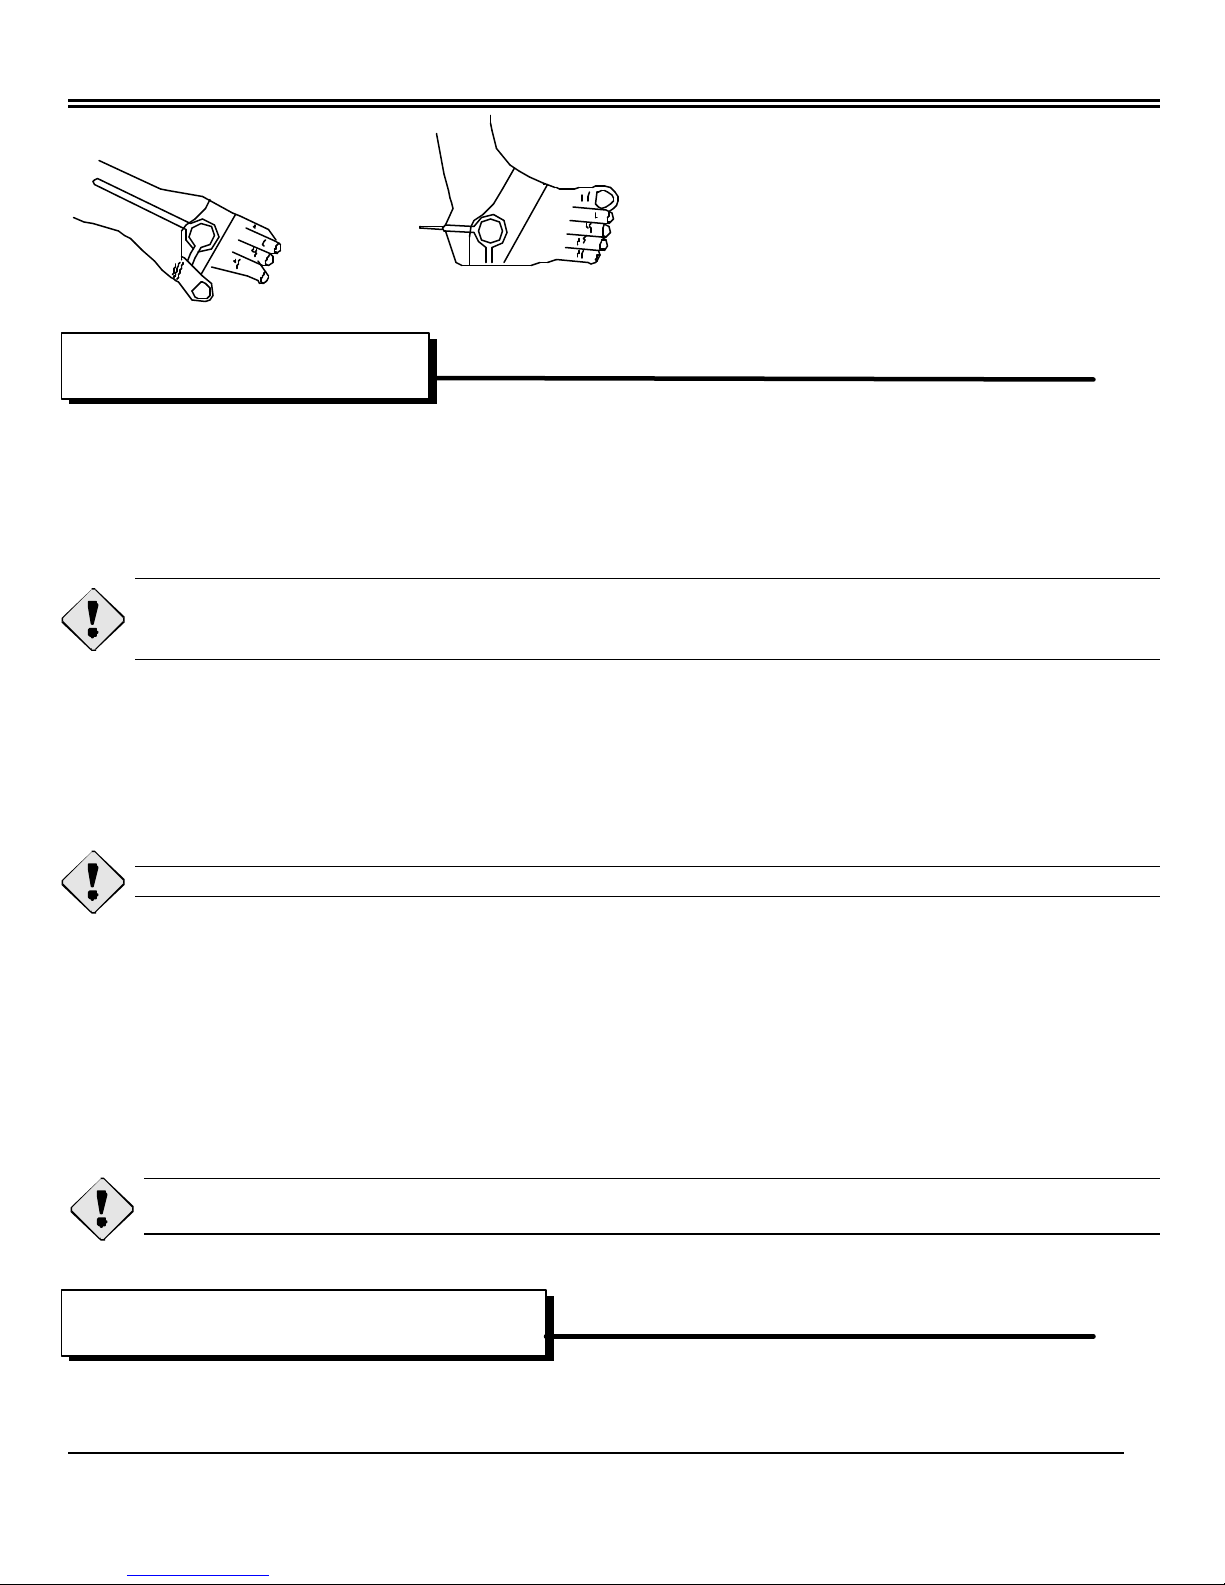
Until the patient cable is connected and the probe is placed in patient, the message SENSOR OFF is displayed
in screen.
In normal operation, the monitor displays SpO2 and Pulse Rate values, a bar graph indicating pulse height and
alarm limits.
Reposition the probe at least once every 18-20 hours to allow the patient’s skin to respire.
Loss of pulse signal can occur if:
- The sensor is to tight.
- There is excessive illumination (e.g., a surgical or bilirubin lamp or direct sunlight).
- The sensor is placed on an extremity with a blood pressure cuff, arterial catheter or intravascular line.
- The patient experiences shock, hypertension, severe vasoconstriction, severe anemia, hypothermia,
arterial occlusion to the sensor, or cardiac arrest.
Inaccurate measurements may be caused by:
- Incorrect application of dysfunctional hemoglobin’s, such as carboxyhemoglobin or methemoglobin.
- Significant, levels of indocyanine green, ethylene blue or other intravascular dyes.
- Exposure to excessive illumination, such as surgical lamps, especially ones with a xenon light source;
bilirubin lamps, fluorescent lights; infrared heating lamps; or direct sunlight.
- Excessive patient movement.
- Venous pulsation’s.
- Electrosurgical interference.
- Placement of the sensor on an extremity that has a blood pressure cuff, arterial catheter or intravascular
line.
Monitoring
2
Do not attach a probe to the same limb with a blood pressure cuff. The data received will not be valid
when the cuff is inflated. Attach the probe to the limb opposite the site used for the blood pressure cuff.
D. PLETHYSMOGRAM Waveform
The amplitude of the PLETHYSMOGRA M waveform is automatically adjusted in screen.
Operators Manual Pulse Oximeter Monitor DIGIOXI “PO-930” 13
Page 16

Digicare Biomedical Technology Inc.
The Bar graph indicates the pulse signal height and varies from 1 to 8. Increasing the signal amplitude
increases the Bar graph value. Bellow number 2 in bar graph, the message WEAK PULSE is displayed.
E. Alarm messages
HIGH SpO2 - Light when selecting the high SpO2 alarm limit and when the high SpO2 alarm
limit is violated.
LOW SpO2 - Light when selecting the low SpO2 alarm limit and when the low SpO2 alarm
limit is violated.
HIGH PULSE - Light when the high pulse alarm limits is being selected or is violated.
LOW PULSE - Light when the low pulse alarm limits is being selected or is violated.
LOW BAT - This alarm is triggered when the battery needs to be recharged.
WEAK PULSE - This message is displayed if the amplitude of the pulse signal is low causing
instability in SpO2 monitoring. Check the probe installation, site perfusion and
body temperature.
SEARCHING - This message is displayed when the monitor is self adjusting the ideal point of
signal monitoring.
CK SITE - This “CHECK SITE” message is displayed when the monitor have not
encountered a good point to signal monitoring. Check the probe installation.
PULSE - This message is displayed when the operator is adjusting the pulse alarm
volume.
ALARM OFF - This message indicates the disable of the alarm sound for 2 minutes
(flashing message) or disable (continue display message permanently).
PULSE OFF - This message indicates the pulse volume was reduced to minimum.
SENSOR OFF -This alarm message indicates that the sensor is not installed to the patient or a
problem in the sensor.
NO SENSOR - This alarm message indicates that no sensor is connected to the monitor.
AC - This indicator light when the monitor is connected to the AC line and the battery
is recharging.
F This indicator always lights with AC connected, even with the battery fully charged.
Operators Manual Pulse Oximeter Monitor DIGIOXI “PO-930” 14
Page 17

Digicare Biomedical Technology Inc.
SECTION 6 - Maintenance
A. The Monitor
When necessary, clean the exterior surfaces of the monitor with a cloth or swab dampened with warm
and a mild detergent solution. Do not allow fluids to enter the interior of the instrument.
WARNING: Electrical shock and flammability hazard - always turn the monitor off and
disconnect it from AC mains power before cleaning.
CAUTION: Do not autoclave or pressure sterilize this monitor. Do not stack or immerse this
monitor in any liquid. Do not gas sterilize this monitor.
Do not touch, or rub the display panel with abrasive cleaning compounds, instruments, brushes, rough
surfaced materials or make contact with anything that can scratch the panel.
B. Probes
The probes are the only surfaces of this monitor that come in contact with the patient. Clean the probes after
each patient use.
Clean the monitor’s probes with a commercial cleaning solution before attaching a new patient. Probes should
be cleaned until signs of wear or splitting occur. At this time a new probe is required.
If disinfecting is required, wipe the surfaces with Isopropyl alcohol or cidex and use a water rinse. When
sterilization is required, use ethylene oxide and be sure to follow hospital procedures.
Inspect the probe for wear or splitting after every disinfecting/sterilization process is complete. If wearing or
splitting of the probe is found upon visual inspection, a new probe should be used.
C. Patient cables
Do not autoclave the patient cables.
Operators Manual Pulse Oximeter Monitor DIGIOXI “PO-930” 15
Page 18

Digicare Biomedical Technology Inc.
Wipe the cables using soap and water or alcohol. Never submerge the cables in any liquid or allow liquids to
enter the electrical connections.
WARRANTY TERMS & CONDITIONS
DIGICARE BIOMEDICAL TECHNOLOGY, INC. covers all of their monitors with a 2 year warranty:
Monitors
1st year parts and labor
2nd year labor only
Accessories
90 days on accessories warrranty
DIGICARE BIOMEDICAL TECHNOLOGY, INC. will provide the necessary parts and labor to maintain the
monitor (s) listed on the Warranty Certificate in a usable condition during the covered period.
DIGICARE BIOMEDICAL TECHNOLOGY, INC. will, at its option, repair or replace any product which proves to
be defective during the warranty period, if returned to the factory with prior authorization, transportation prepaid.
Not covered by this agreement are repairs necessitated by any of the following conditions:
1 - Inadequate power or power failure.
2 - Neglect, abuse or misuse of equipment.
3 - Servicing of equipment by persons other than DIGICARE INC.
4 - Any unit opened or tampered with, without prior authorization.
When returning a monitor for extended warranty repair, you must first contact DIGICARE BIOMEDICAL
TECHNOLOGY, INC. to receive a Returned Goods Authorization Number (RGA #) that is to be clearly marked
on top of the shipping carton. Please make sure that your company name, shipping address, area code and
telephone number and person to contact is located in and/or on the box. ANY UNIT THAT IS RETURNED TO
THE FACTORY WITHOUT AN RGA# WILL BE REFUSED.
F O R Y O U R R E C O R D S
Model # _________________ Serial # ___________________ Dealer Name: ______________________
Operators Manual Pulse Oximeter Monitor DIGIOXI “PO-930” 16
Page 19

Digicare Biomedical Technology Inc.
Date Equip. Purch.: ________________________ Expiration Date: ___________________
DIGICARE BIOMEDICAL TECHNOLOGY INC.
107 Commerce Road
Boynton Beach, Florida 33426 - USA
Operators Manual Pulse Oximeter Monitor DIGIOXI “PO-930” 17
 Loading...