

Digimate L-1721 User Manual

1
Contents
English .……………………………………………………………………………2
繁體中文 .………………………………………………………………………..12
简體中文 .………………………………………………………………………..22
Français .…………………………………………………………………………32
Deutsh .…………………………………………………………………………..42
Italiano .…………………………………………………………………………..52
Español …………………………………………………………………………..62
Dutch ….…………………………………………………………………….……72
Português .………………………………………………………………….……82
Warning :
Read this instruction carefully.
1. Keep this equipment from humidity. The equipment shall not be exposed to dripping or splashing.
2. The equipment is for indoor use in dry locations.
3. The socket-outlet shall be installed near the equipment and shall be easily accessible.
4. Operate the equipment only on maximum ambient temperature 40 degreeC, without any cover.

2
Getting Start
Table of content........................................................................................................... 2
View of Monitor............................................................................................................3
Unpacking ................................................................................................................... 4
Warning.......................................................................................................................4
Hardware Installation...................................................................................................5
Menu control button ....................................................................................................6
Key introduction ..........................................................................................................6
Cleaning Notices.........................................................................................................7
Precaution...................................................................................................................7
Troubleshooting...........................................................................................................7
OSD (On-Screen Display) Menu Mode....................................................................8-9
Display Mode ............................................................................................................10
Specification.............................................................................................................. 11
All Information in this manual may change from time to time without prior notice.

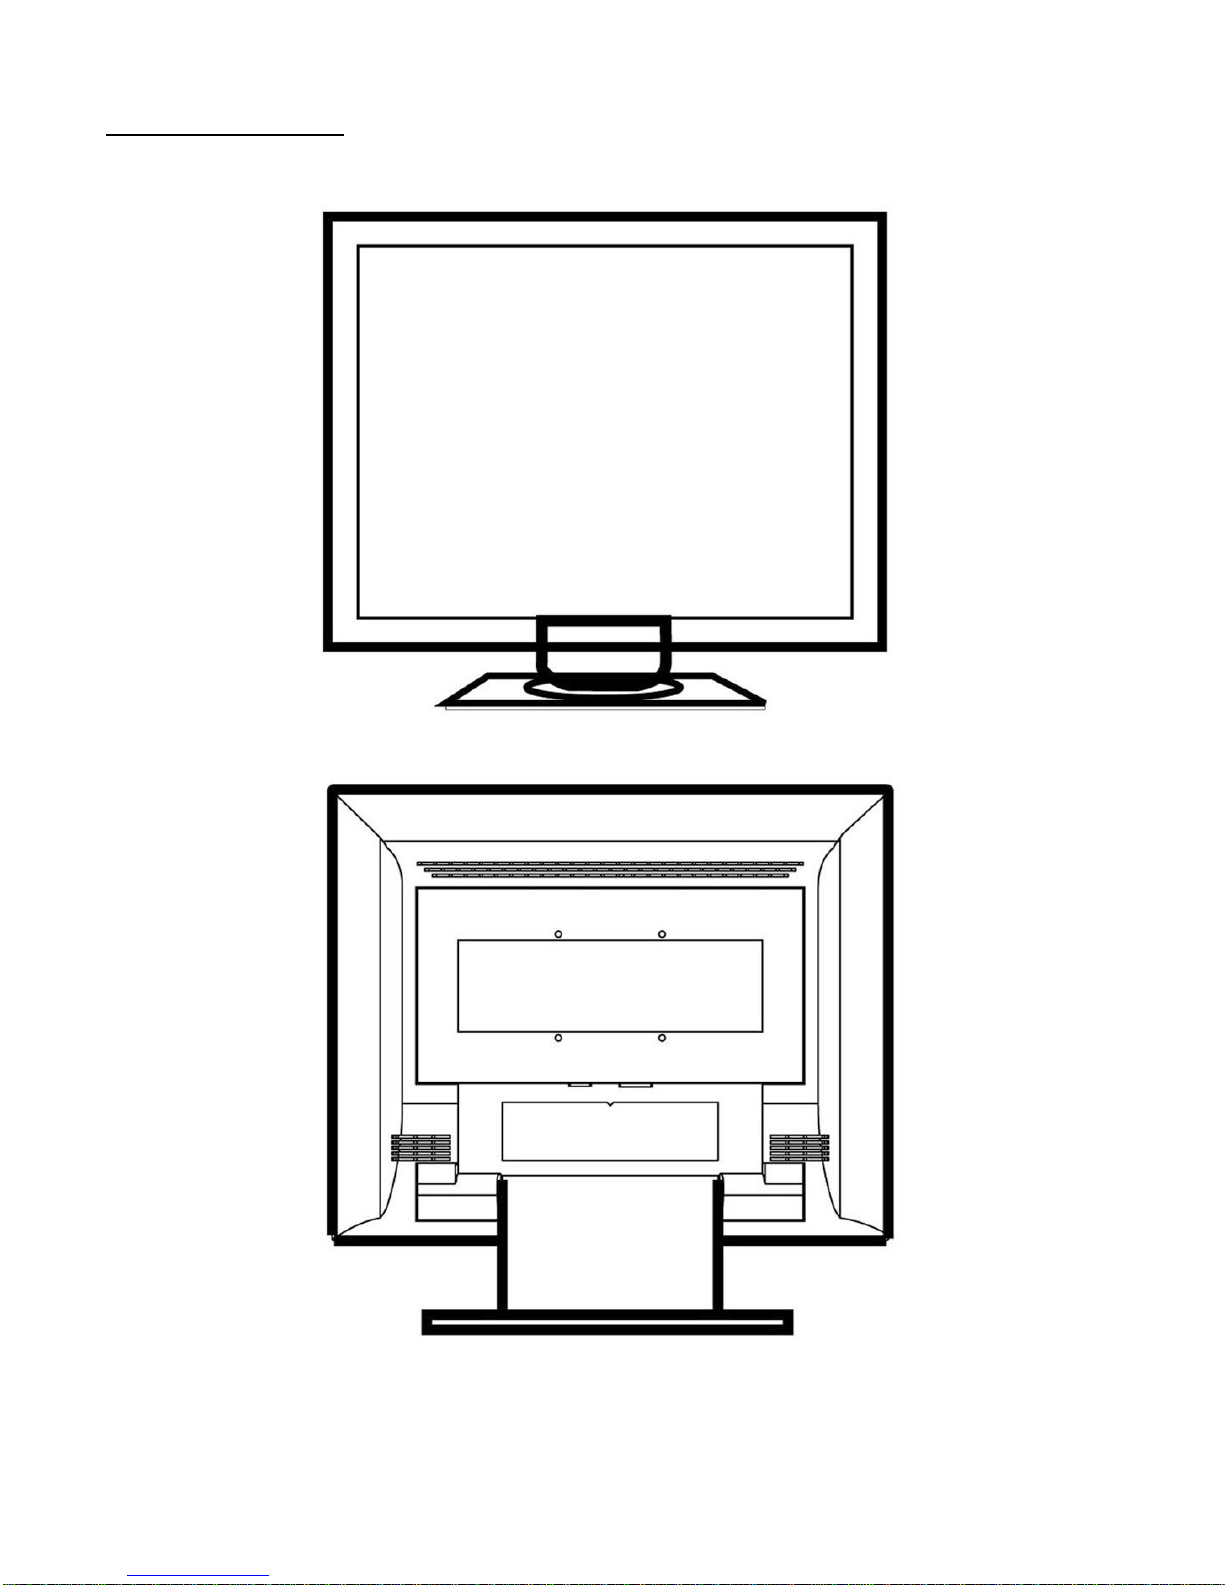
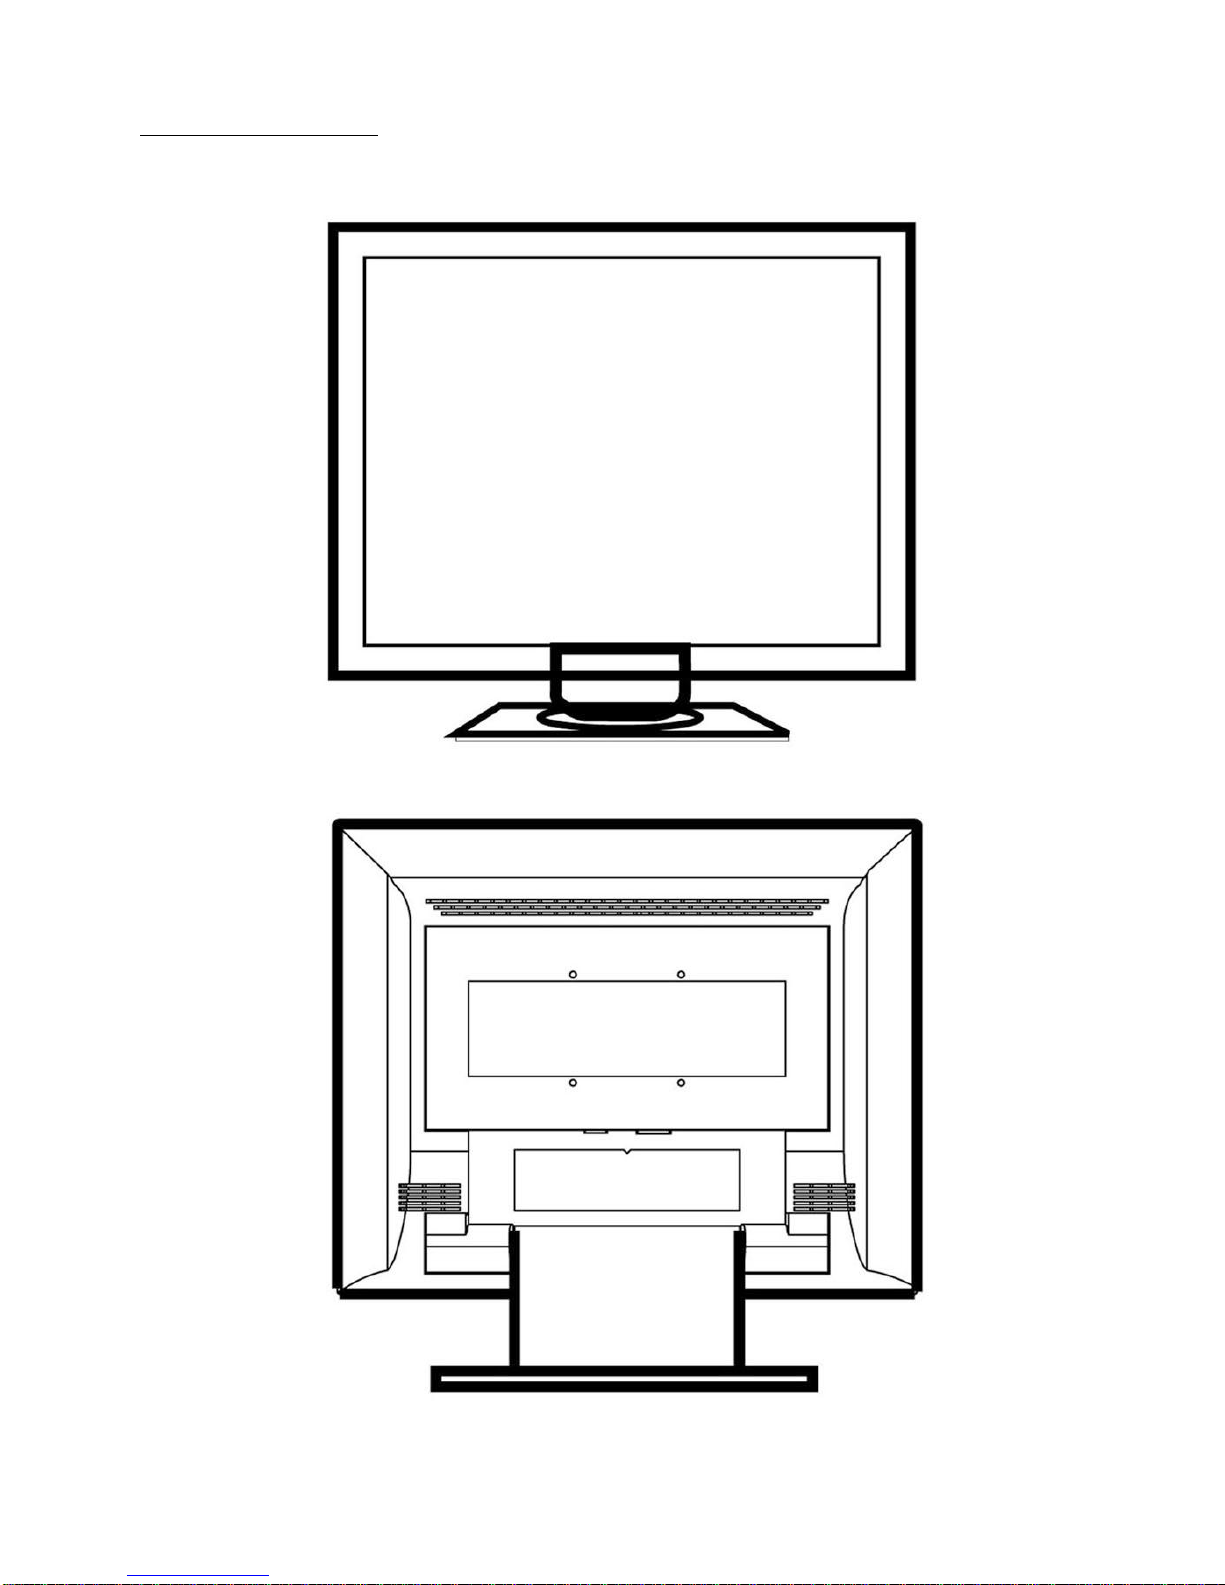
3
View of Monitor

4
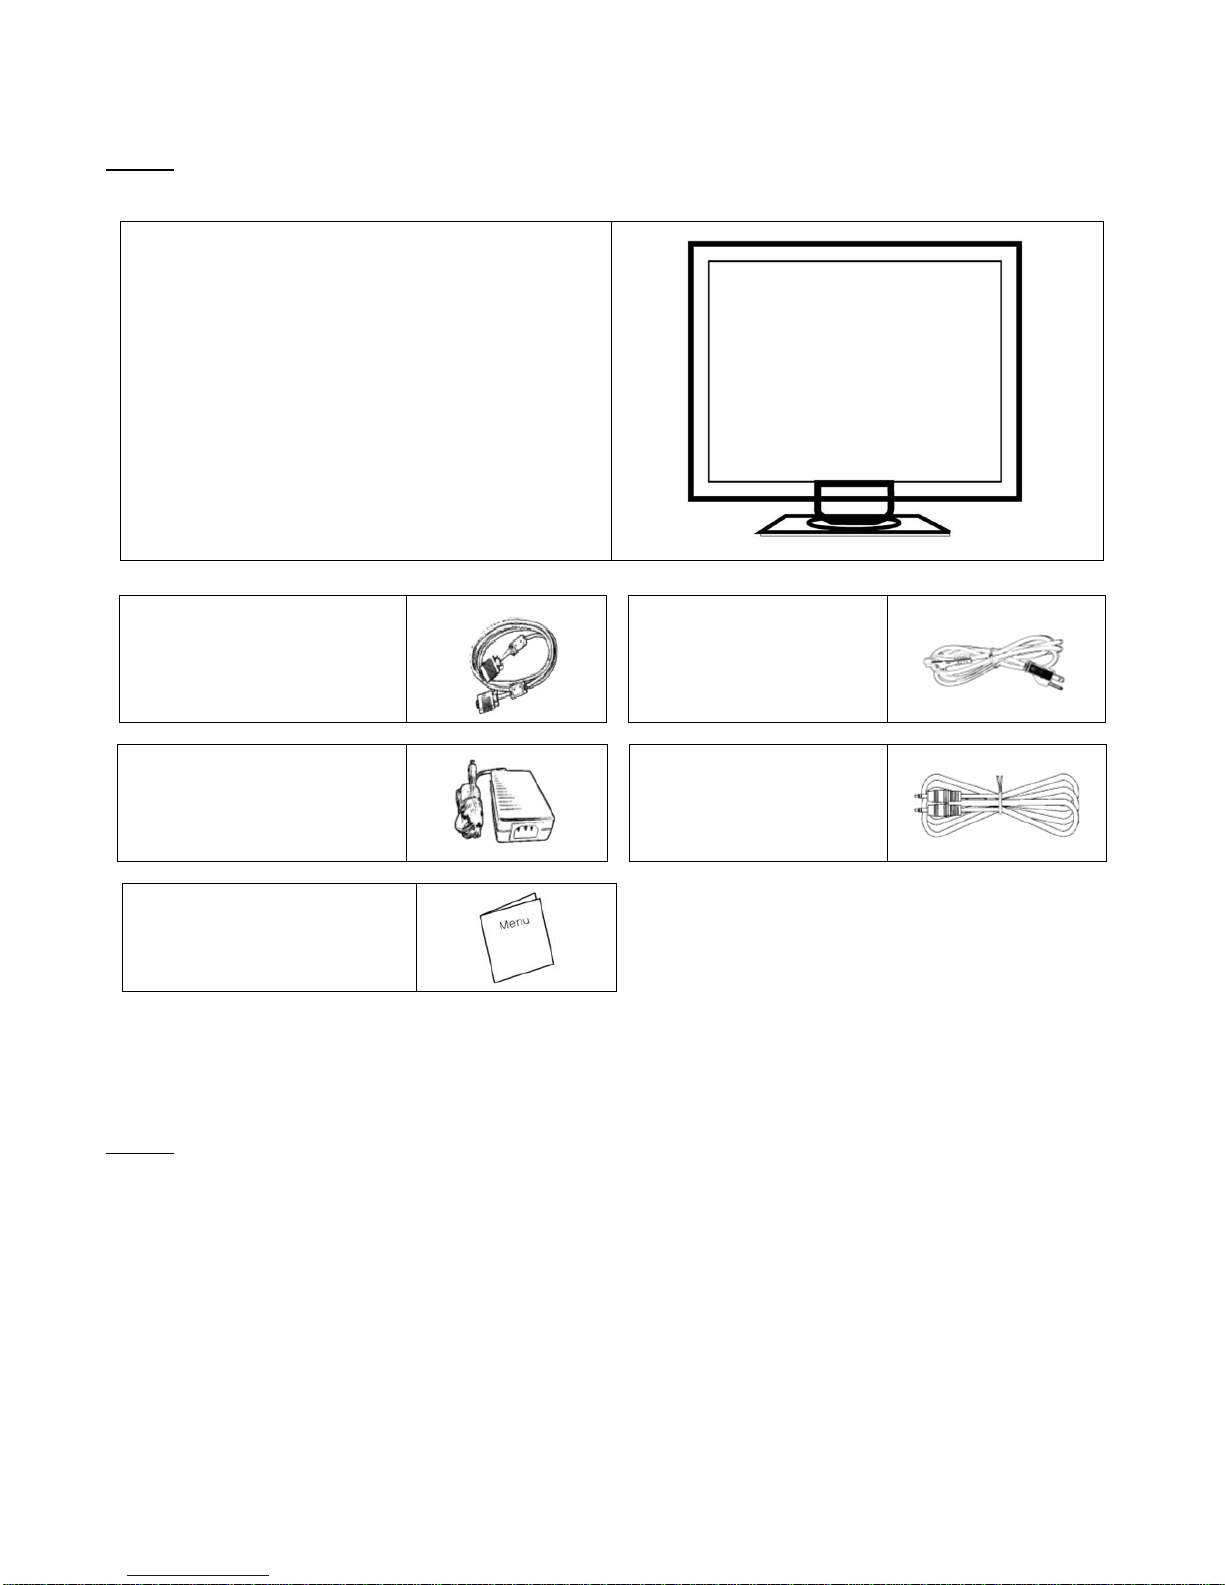
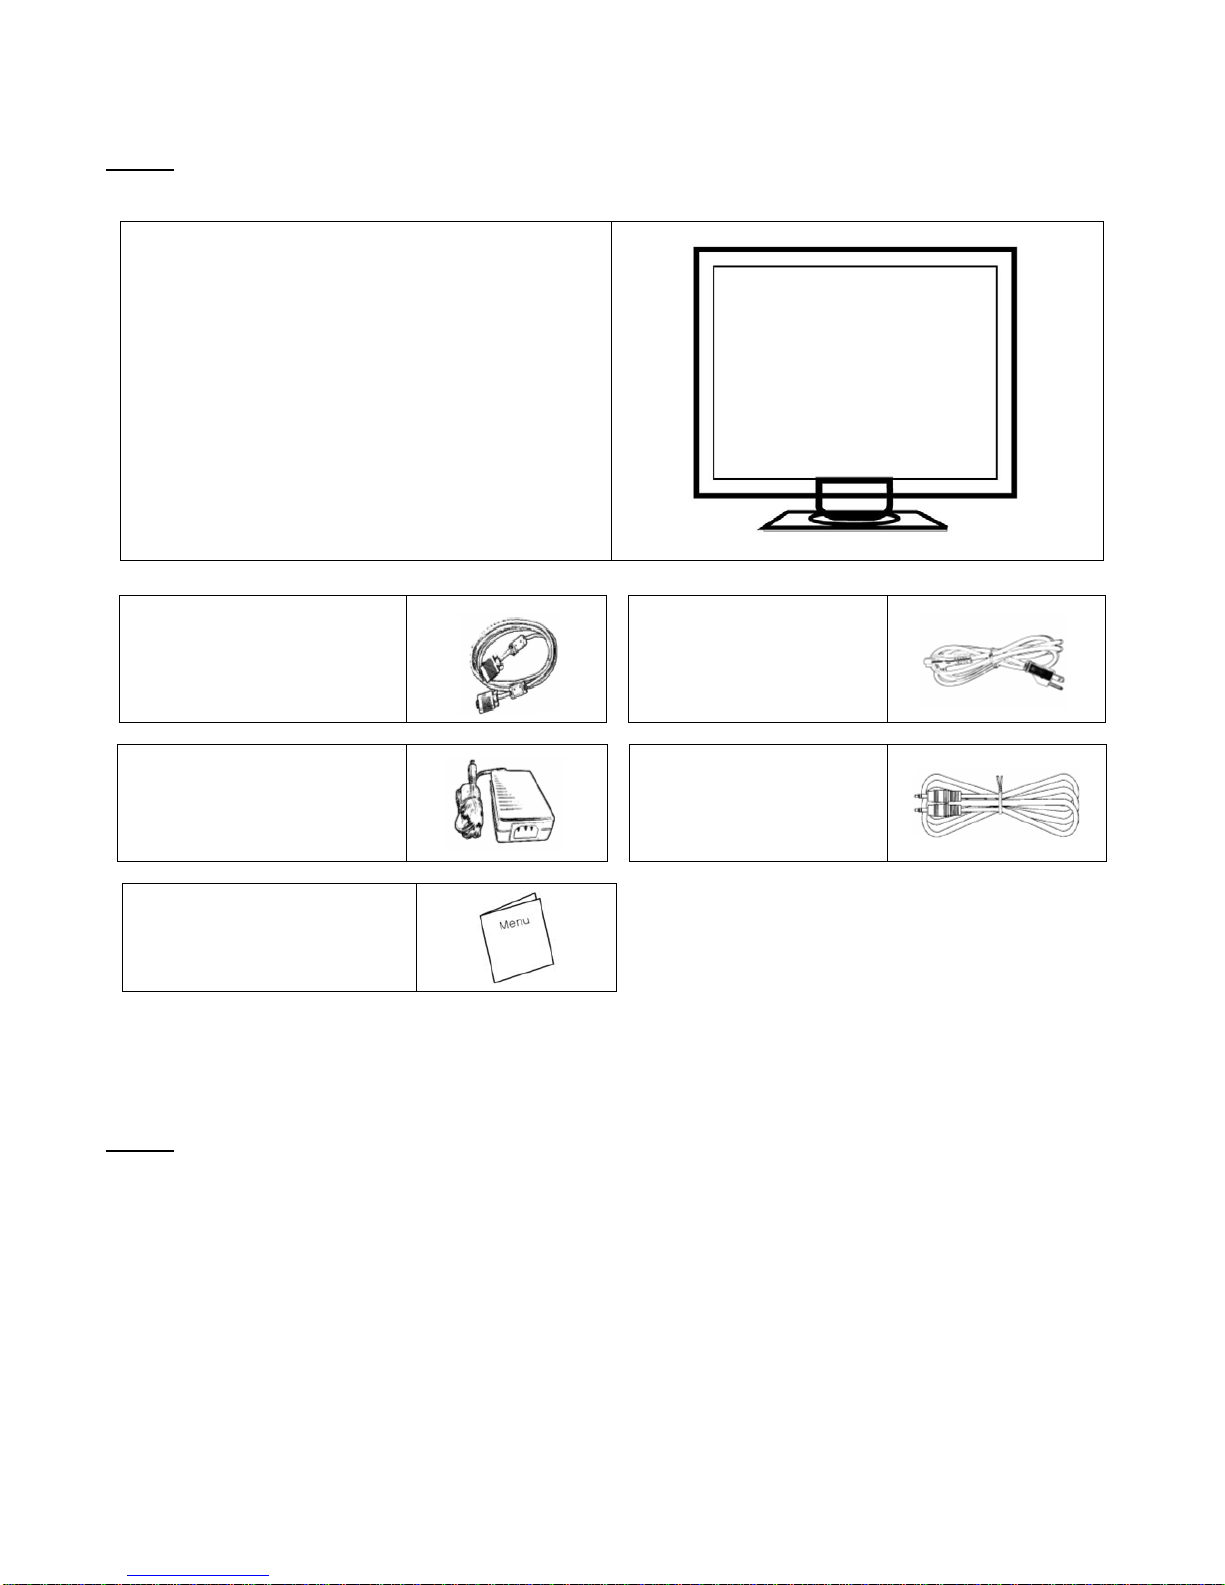
Unpacking
Our 17” LCD monitor shall be content with these following items. Make sure you get all these set ready, otherwise
contact to your dealer or store which you purchased it. At last, feel free to contact us.
17” TFT LCD Monitor
External Univ15 pin D-sub
(RGB Analog) input signal cable
Power Cord
External Universal AC Adaptor
(100-240V, 50/60Hz)
Audio connector
User’s manual
Warning
1. Make sure that the system power is turned off.
2. Plug the signal cable to the signal connector at the rear of PC.
3. Plug adapter output cable to the jack at the rear of LCD monitor and the power cord to the adapter.
4. Connect the power cord to power source.
5. Turn on the computer and the monitor.
6. For the best quality of the performance, we suggest you to set resolution as “Display Mode”.
5
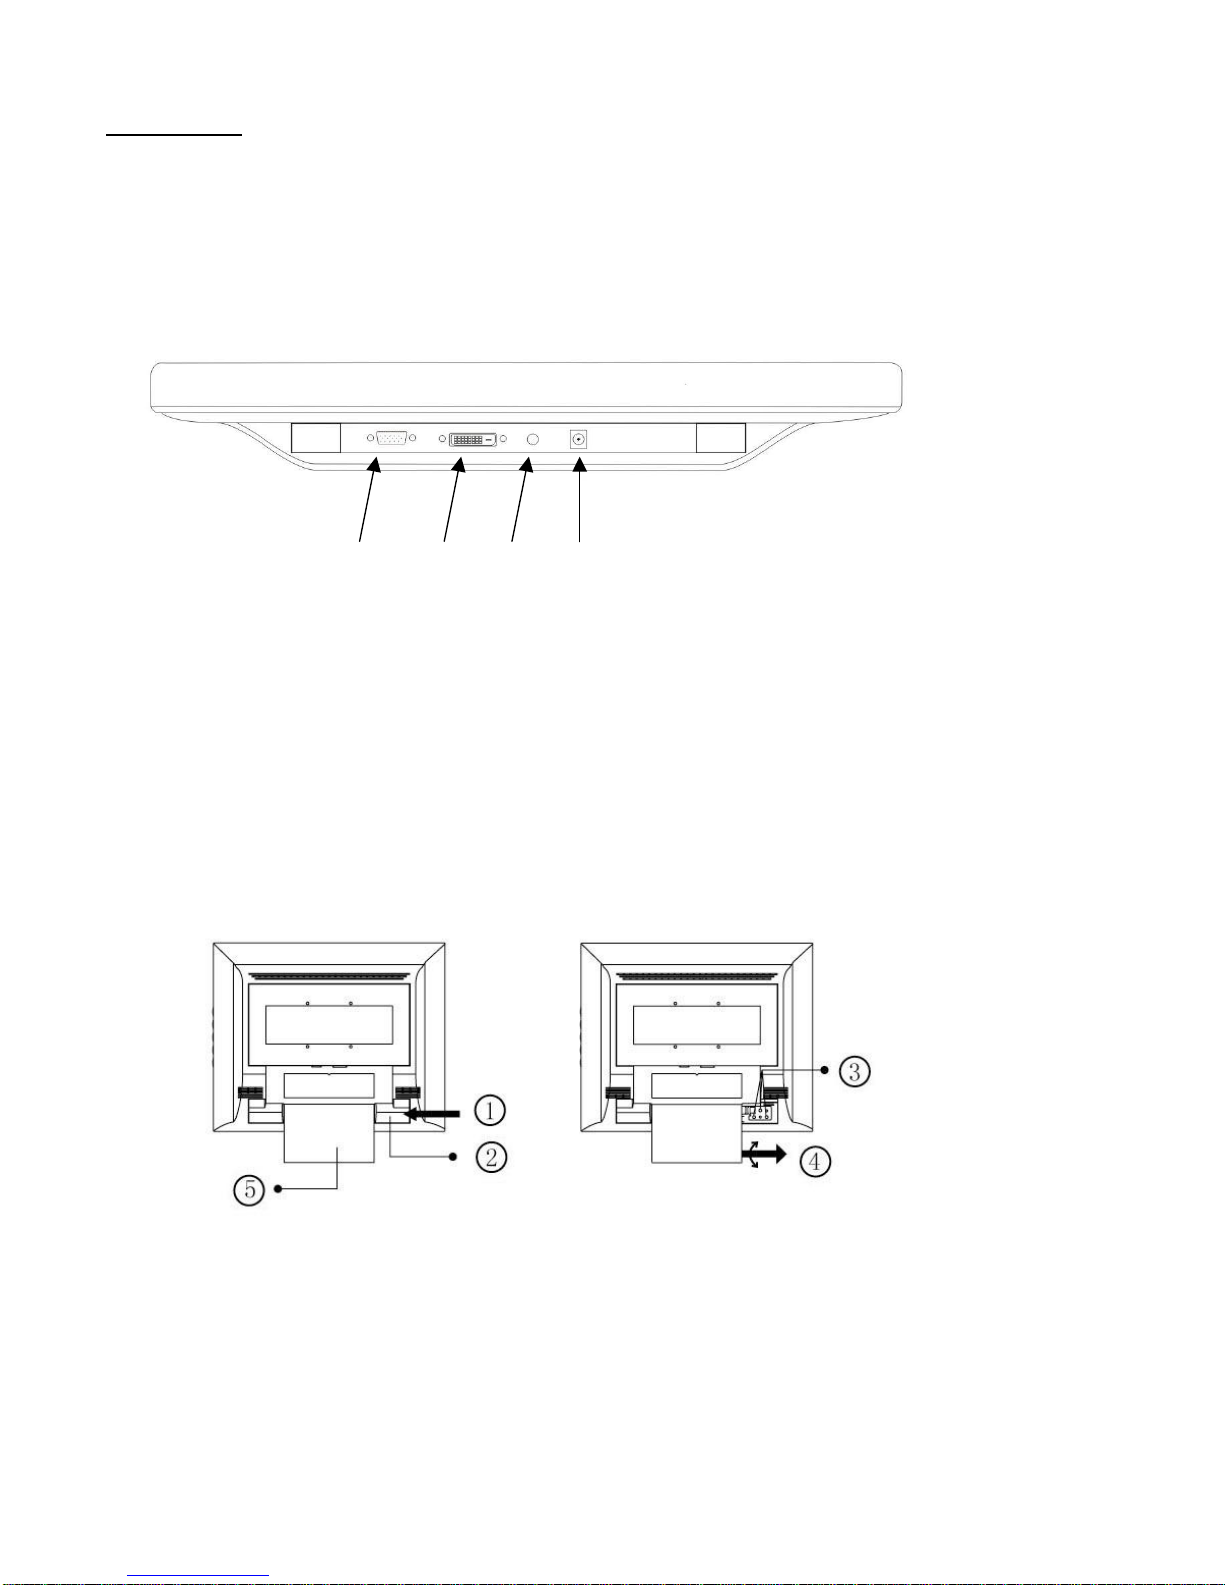
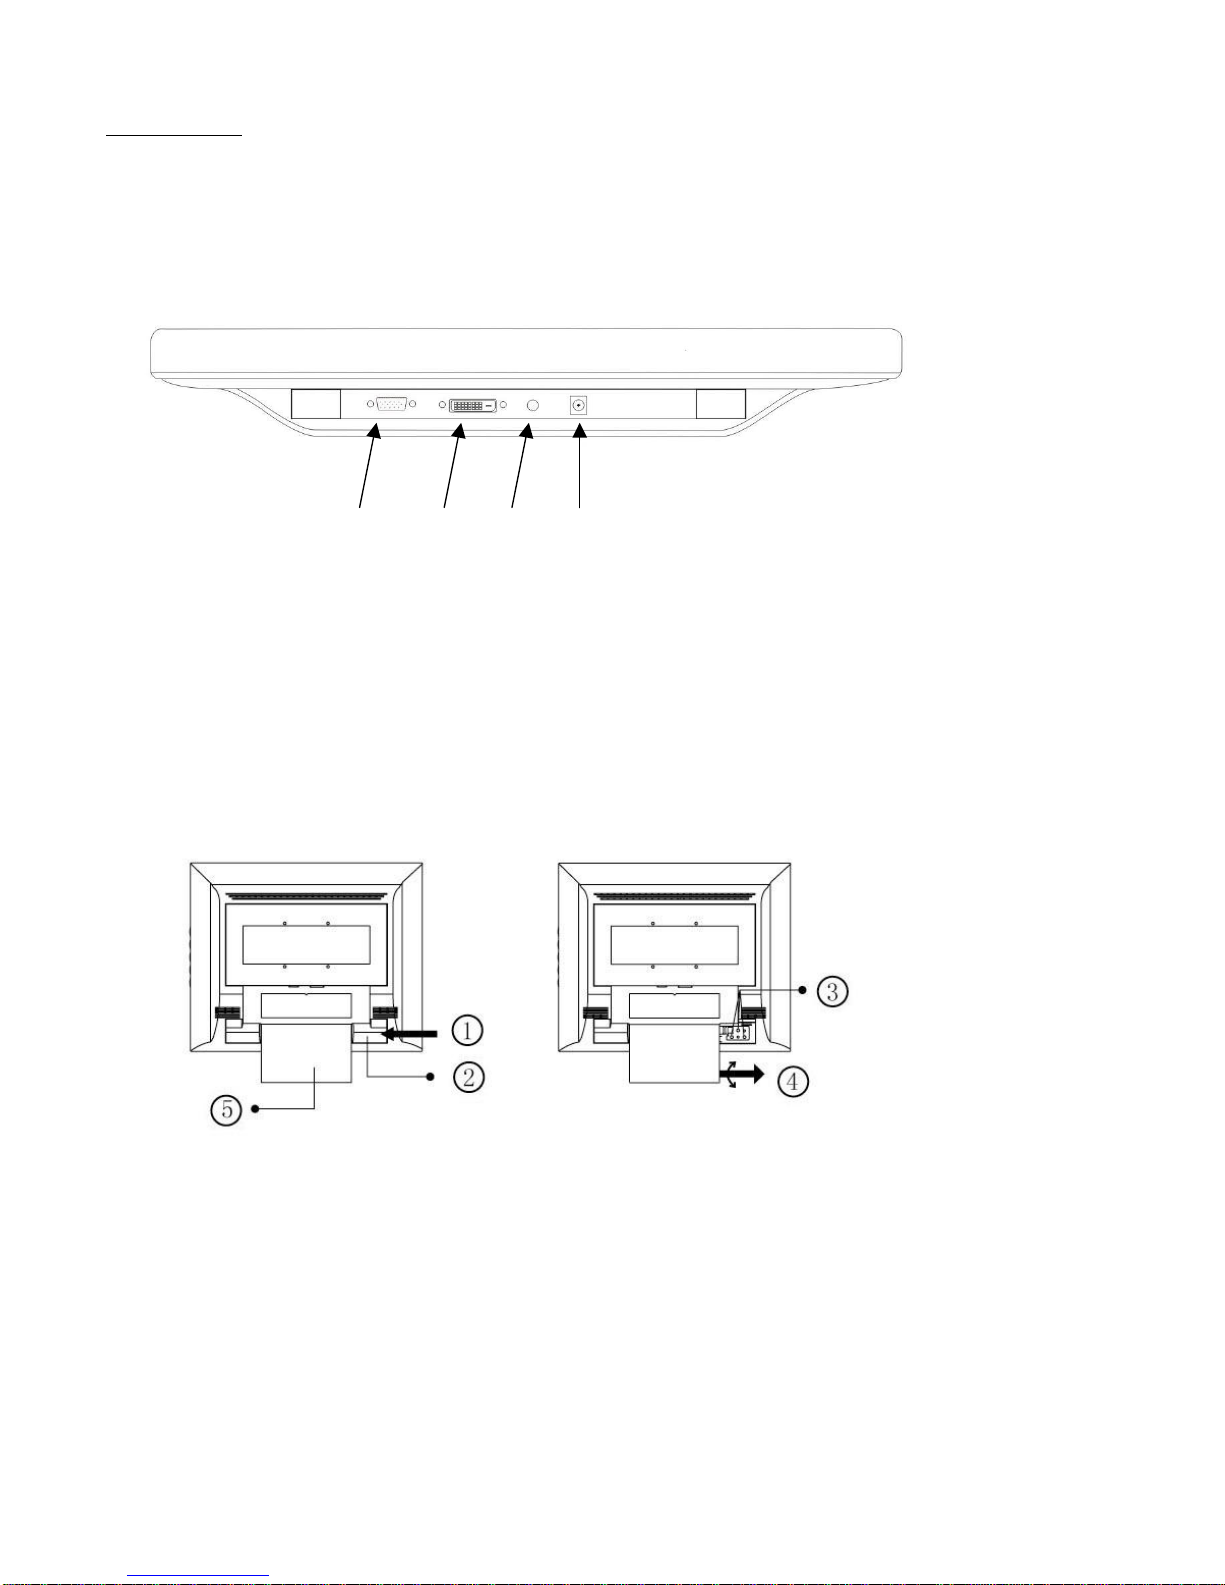
Hardware Installation
Be carefully to your LCD monitor, it’s very exquisite but easy to broken. Turn off LCD’s and PC’s power before you
set it up. Follow our installation step by step.
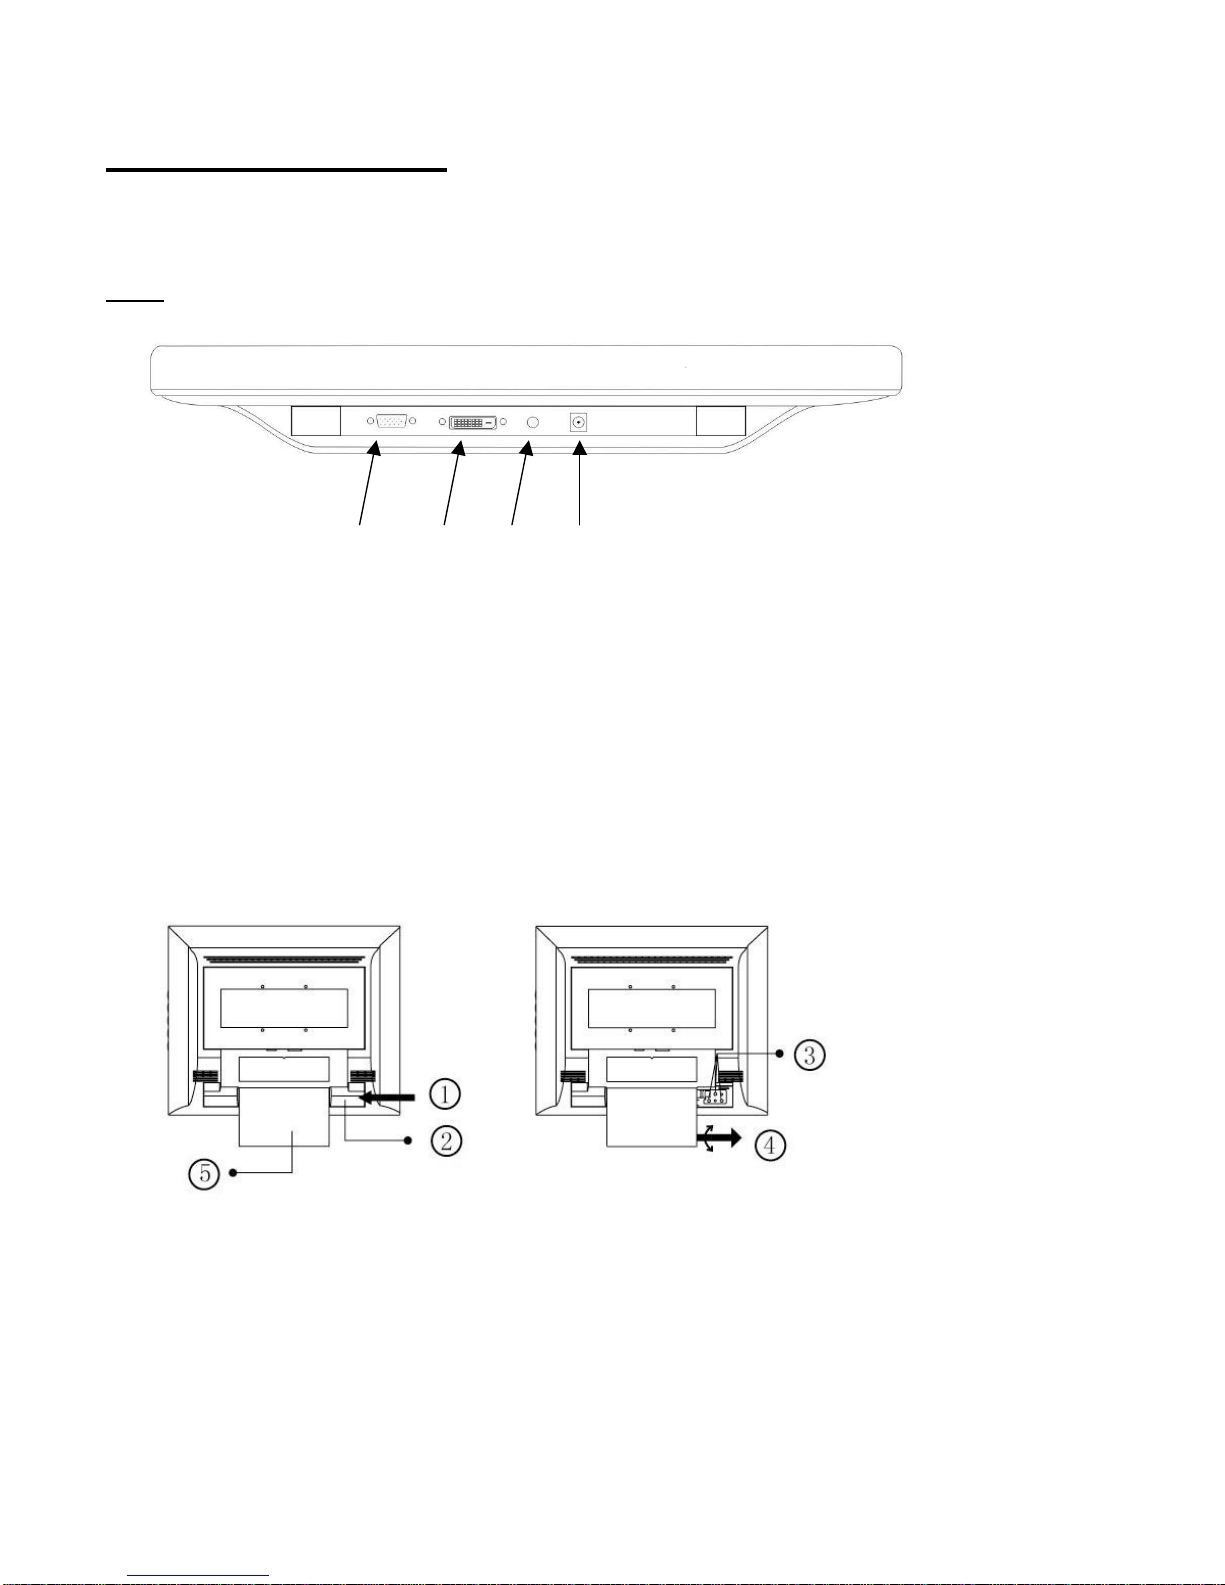
Input
【1】PC In : This can be connected with the D-Sub 15 pin signal Cable.
【2】DVI Port : This can be connected with the DVI signal Cable. * DVI function is optional.
【3】LINE in:This can be connected to the audio-out connector of any sound resource.
【4】DC port:This is for connecting the power cable.
Wall mount instruction
【1】 PUSH
【2】 Hinge Cover
【3】 Pivot Screw
【4】 Turn & Pull Base
【5】 Base
1 2 3 4

6
Monitor Adjusting
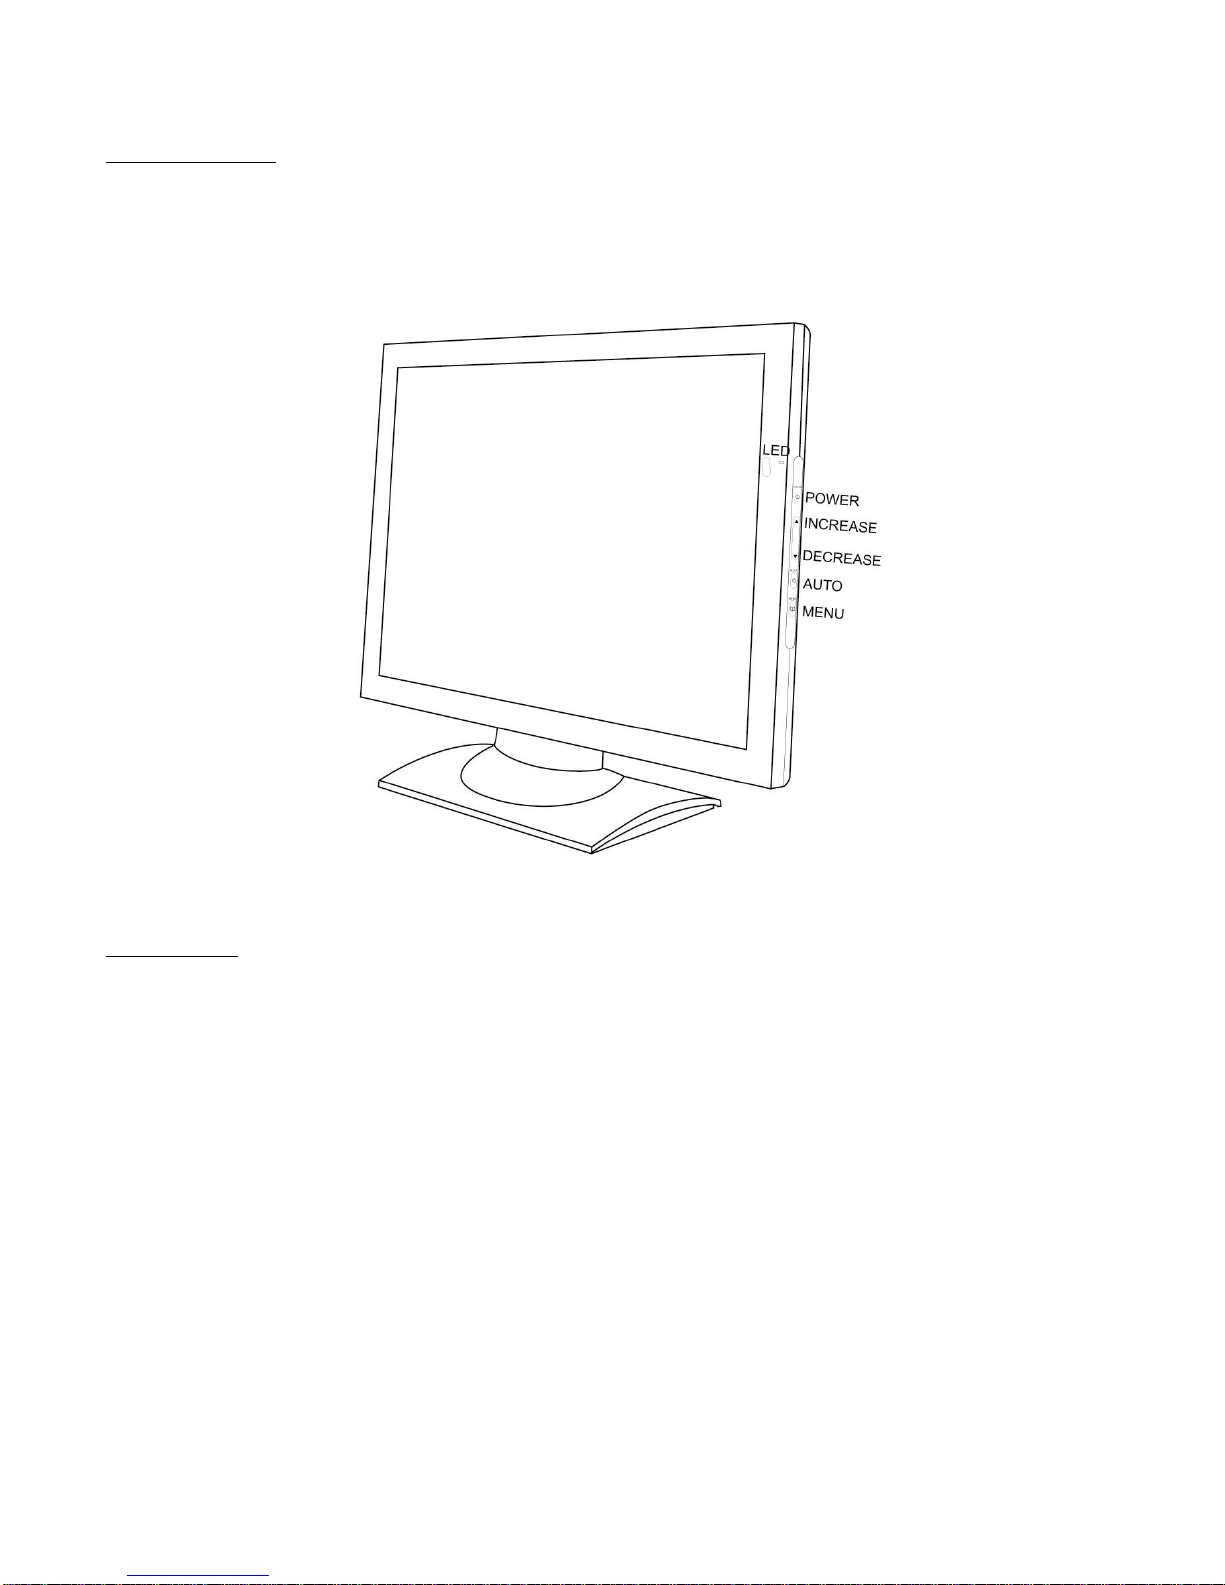
Menu control button
Key introduction
Power: Turn the LCD power on and off. When the power is on, the light is showing green,
stand by will be orange.
OSD Menu: Press the button to OSD menu, menu right adjustment.
Auto Tune: Auto adjust, menu left adjustment.
Decrease < - >: Hot-key of volume adjust ment. Decrease the option value in the OSD menu.
Increase < + >: Switch from DVI operating environment to VGA. Increase the option value in the OSD menu.

7
Cleaning Notice
1. Be gentle to clean the screen.
2. Never, ever, using any kind of corrosiveness chemical dissolvent to clean the screen, it may hurt your
screen surface.
3. We suggest that using a clean camel hair brush or a soft, clean, lint-free cloth to wipe the screen.
4. Don’t give any pressure directly to the LCD
Precaution
1. Do not expose the monitor to direct sunlight or heat.
2. Do not spill liquid on the monitor.
3. Do not attempt to open the monitor. You may be hurt by electric shock. For service, call your place of
purchase.
4. Do not use your monitor when magnets or electronic products are operating nearby.
5. Do not use harsh chemicals or strong cleaning solvents to clean the monitor screen. Wipe it with clean,
soft clothes applied with mild solution.
6. Do not place anything on your monitor. Bad ventilation may elevate temperature in the monitor.
7. Don’t use your fingers to touch the LCD Screen, directly. Fingerprint that contains oil and may by
difficult to clear.
Troubleshooting
Make sure that your monitor is properly installed if you have encountered any trouble using this product.
˙ There is no picture on the screen.
Check:
1. Power saving mode. Press any key and move the mouse to deactivate the mode.
2. Signal cable connector pins. If there are bent or missing pins, consult your place of purchase.
˙ Characters look too dark or too light
Check:
1. Using OSD Menu to adjust the Brightness.
˙ When your monitor shall be Adjusted?
Check:
1. If the resolution of frequency is being changed.
. The Text appears on the screen are unclear.
Check
1. Make sure the resolution or refresh rate match with the Display Mode.
8
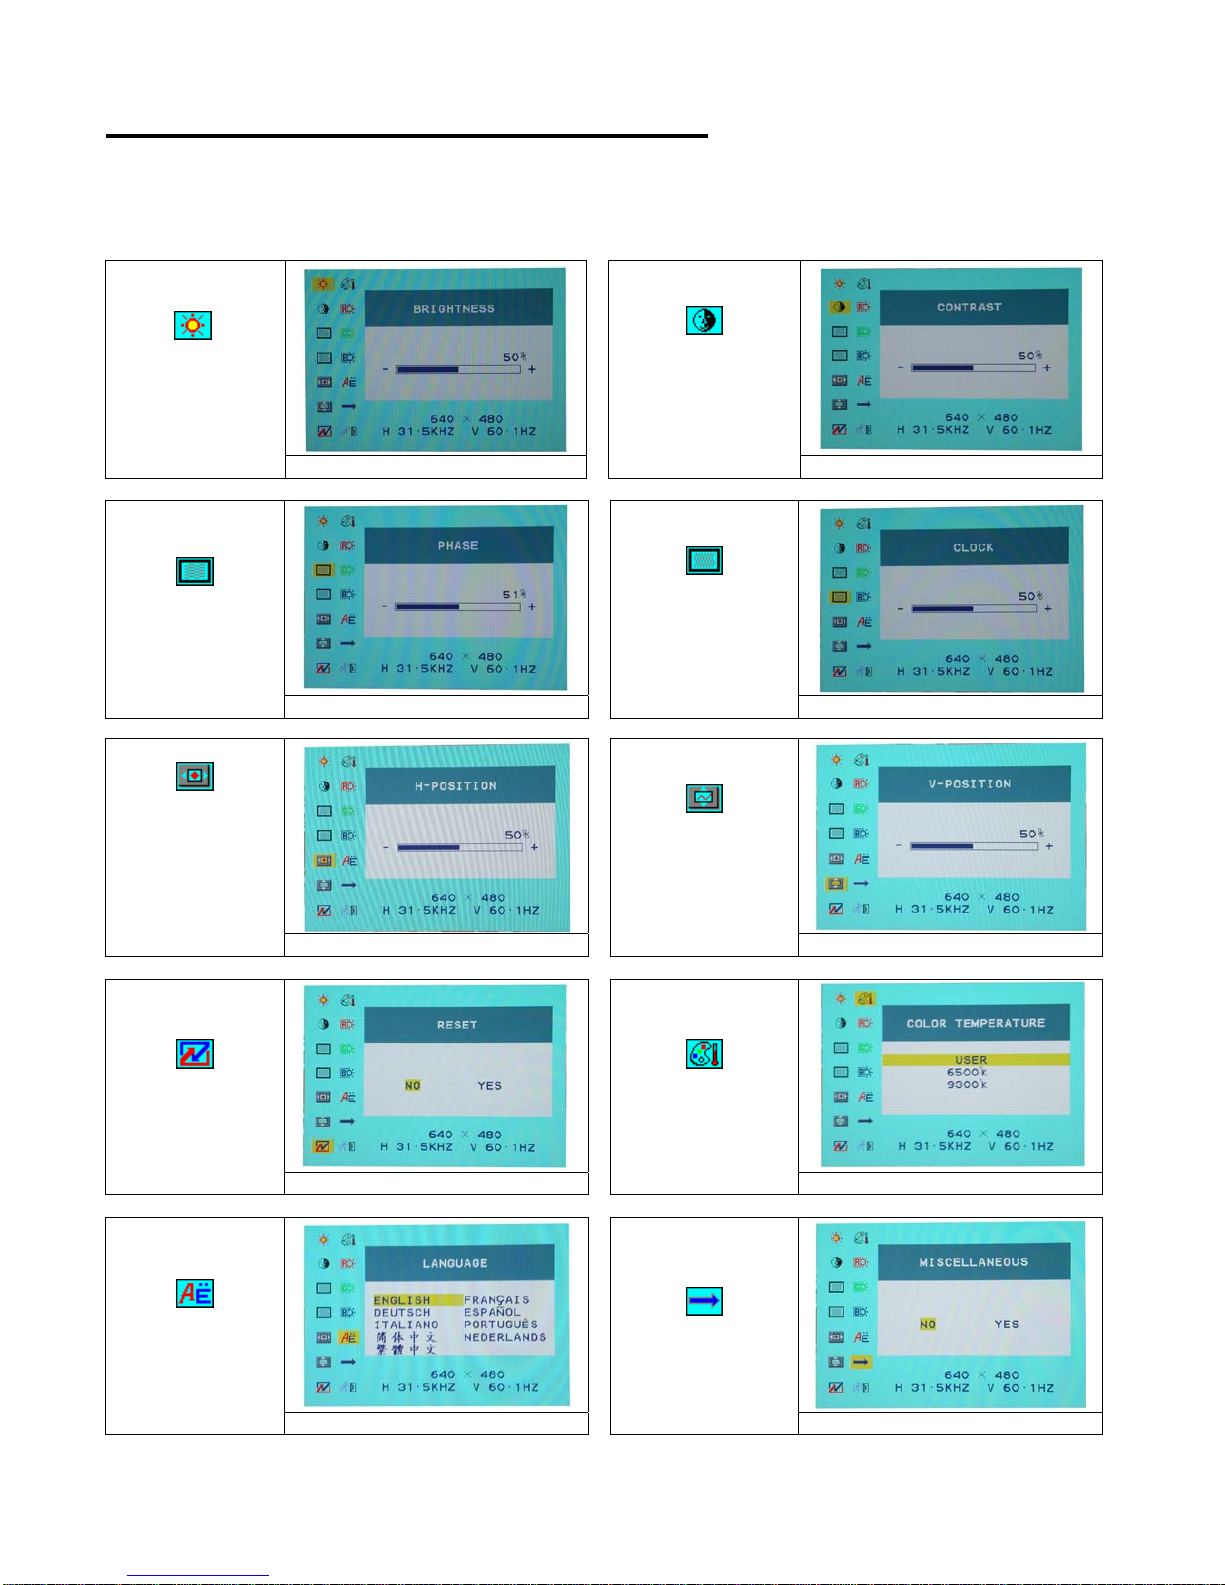
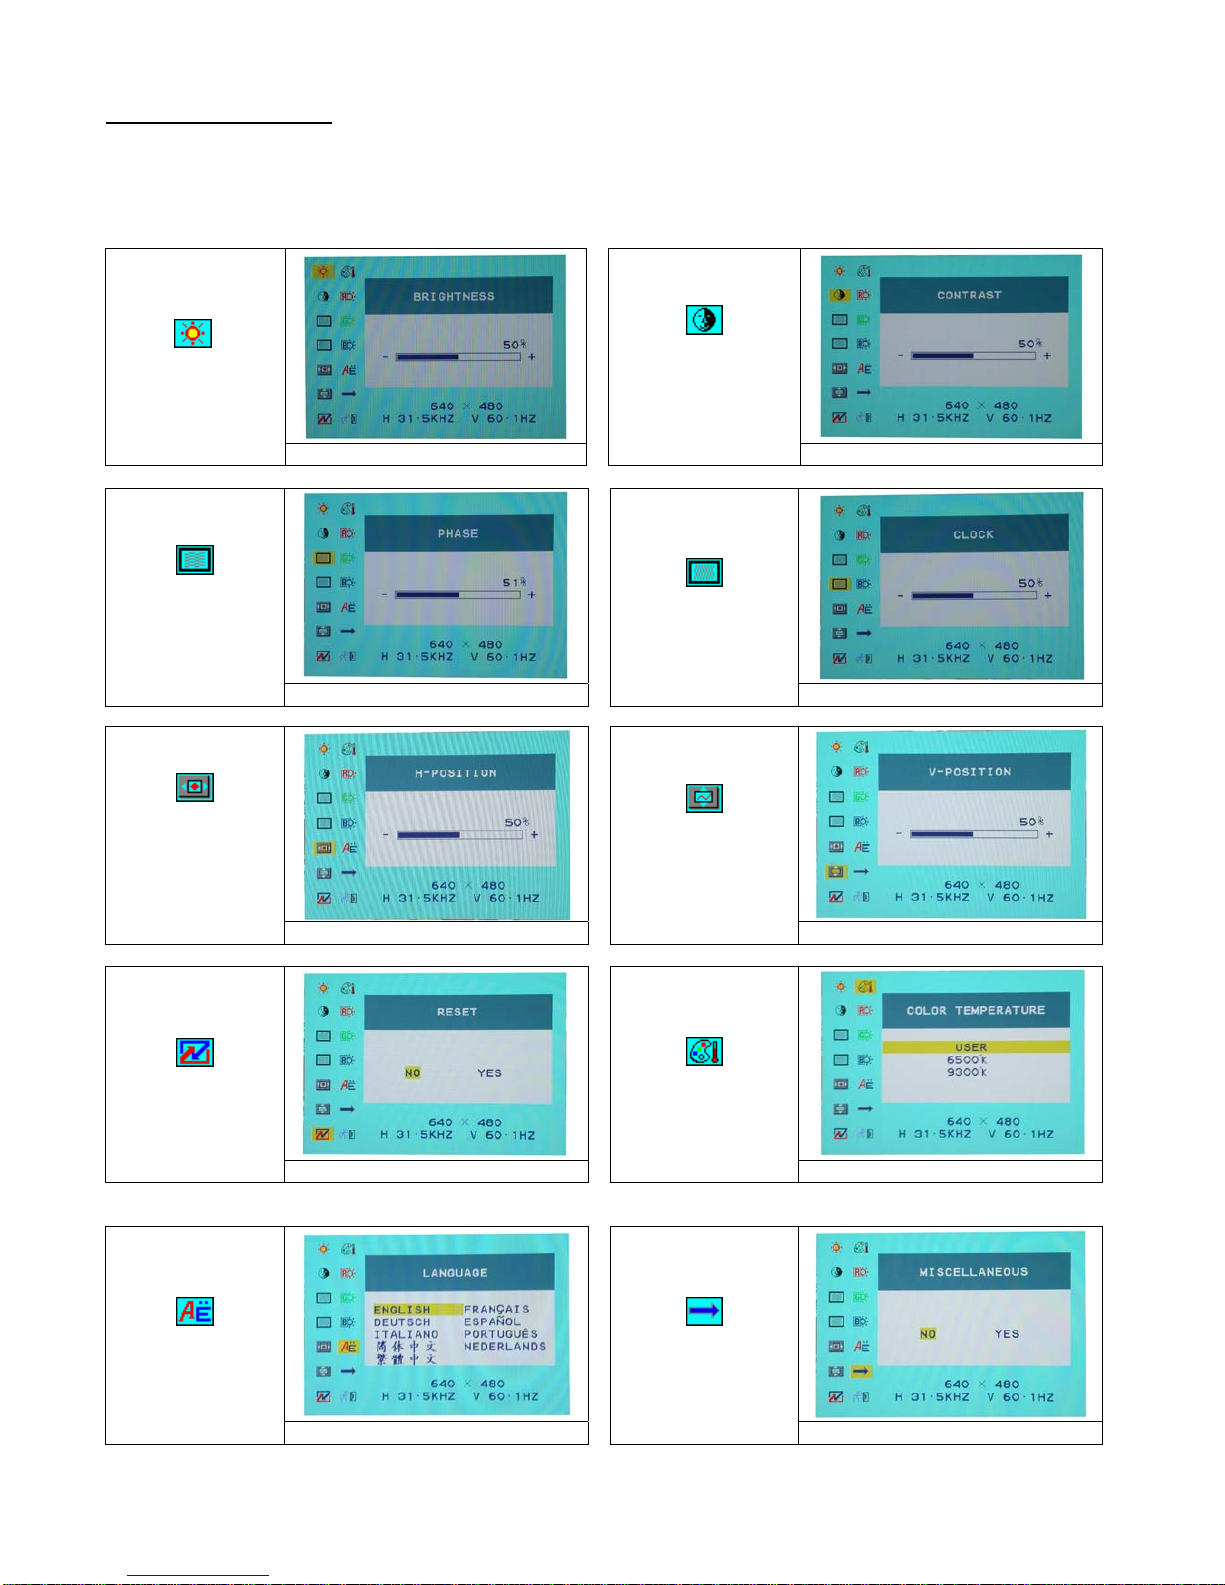
OSD (On-Screen Display) Menu Mode
Option select
1. Press the OSD button to access menu.
2. Using Auto Tune for left adjustment.
3. Press OSD again for right adjustment.
Brightness:
Adjust the
brightness of the
display.
Main menu brightness adjust
Contrast:
Adjust the
difference between
light and dark area.
Main menu contrast adjust
Phase:
Adjust the phase
of pixel clock.
Main menu phase adjust
Clock:
Adjust the
frequency of the
pixel.
Main menu clock adjust
Horizontal
Position:
Adjust the
horizontal
position of the
display.
Main menu H position adjust
Vertical Position:
Adjust the vertical
position of
display.
Main menu V position adjust
Reset :
Recall the default
setting.
Main menu Reset
Color Temp :
Adjust the color
Temperature.
Main menu color temp. adjust
Language :
Language
support.
Main menu language adjust
Miscellaneous :
9
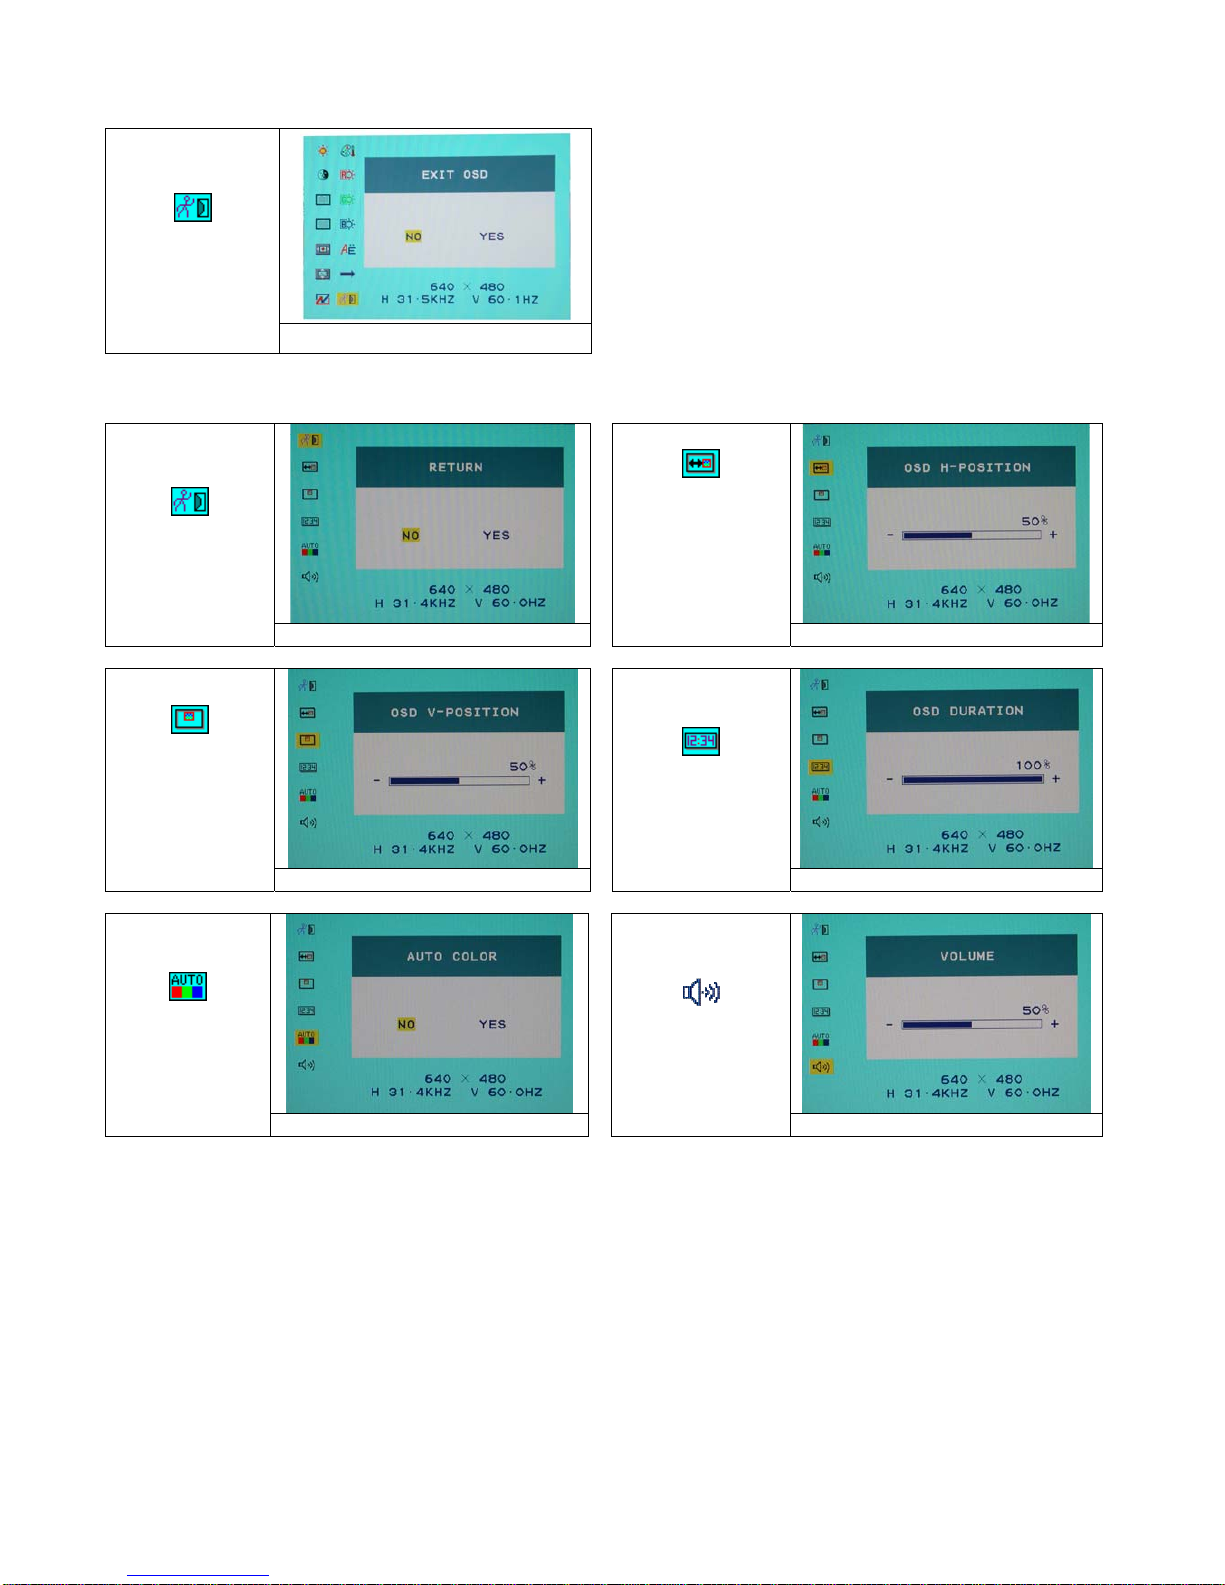
EXIT :
Saving and
Leave.
Main menu EXIT adjust
Miscellaneous
Return :
Return to main
menu.
Return
Horizontal
Position:
Adjust the
horizontal
position of the
OSD.
OSD H position adjust
Vertical
Position:
Adjust the
vertical position
of the OSD.
OSD V position adjust
OSD Duration:
Adjust the timing
of the OSD menu.
OSD duration adjust
Auto color:
Adjust the color
automatically.
Auto color adjust
Volume :
Adjust of
speaker.
Menu Volume adjust
10
DISPLAY MODE
Incoming Display Mode
Resolution Horizontal Frequency (KHz) Vertical Frequency (Hz)
640X350 31.475 70.100
640X480 31.469 59.940
640X480 37.500 75.000
720X400 31.469 70.087
800X600 37.879 60.317
800X600 46.875 75.000
1024X768 48.363 60.004
1024X768 60.023 75.029
1280X1024 63.981 60.020
1280X1024 79.976 75.024
1. We offer you 10 available modes compatible with Windows.
2. If any interference occurs on your screen while you modulating your PC or OSD. It is normal.
3. To have Best quality present on the PC, remember to upgrade your video card Driver. We strongly
recommend you to choose a Mode listed in the table.
4. The other Modes may not be supported that are not list on the table above
5. You may use the power management on your computer. It’s good for last service life of the product.

11
Specification
LCD Panel Type
Viewing Angle
Contrast Ratio
Brightness
Response Time(Tr+Tf)
Display Colors
Max Resolution
Pixel Pitch
17.0” TFT Active Matrix LCD Display
H:140° , V:130°
500 : 1 (Typical)
300 cd/m
2
(Typical)
16 ms
16.7M colors
1280X1024(SXGA)
0.264mm(H)x0.264mm(V)
Input Signals RGB Analog
*
DVI*
Video Level:0.7Vp-p(75)
Sync TTL with 75 internal pull-up resistors
Frequency FH:30~80KHz
FV:56~75Hz
Support digital RGB signal with TMDS signaling type
Compatibility PC Up to 1280X1024@75Hz(Non-interlaced)
Connector RGB Analog
DVI*
Audio
Power
D-sub 15-pins
DVI-D*
Stereo Phone Jack
12V/DC Power Jack
Power Voltage
Consumption
Power saving mode
100-240V, 50/60Hz(universal) via external AC Adapter
Active < 48 Watt Max
Standby < 3 Watt
Internal Speaker 2Wx2(Stereo)
User Interface LED Indicator Active - Blue
Standby - Blue Flash
Off - Turn off
Operating Condition Temperature
Air Humidity
5°C~40°C
20% ~ 80% R.H.
Dimensions
(W x H x D)
Physical 400mm(W) x 390mm(H) x 155mm (D)
Net Weight 3.3 Kg
DDC DDC1/DDC2B Compliant
Power Management VESA DPMS, EPA Energy Star
Regulation
(Certifications)
CE, FCC, TUV, BSMI
* DVI function is optional.

12
開始
目錄.....................................................................................................................12
顯示器前後視圖................................................................................................... 13
包裝.....................................................................................................................14
警示.....................................................................................................................14
硬體安裝..............................................................................................................15
主要功能鍵..........................................................................................................16
功能鍵介紹……..……………………………………………………………………….16
清潔要點..............................................................................................................17
注意事項..............................................................................................................17
簡易故障排除.......................................................................................................17
OSD 視控模式 ...........................................................................................…18-19
支援顯示模式.......................................................................................................20
產品規格表..........................................................................................................21
此手冊內的內容可能隨時更改,並不另行通知。
13
顯示器前後視圖
14
包裝
我們 17 吋的液晶顯示器包含下列組件,如有缺件,請向所購買之商店或經銷商聯絡,如有任何疑問歡迎來電。
17 吋 TFT 液晶螢幕顯示器
外接式 15 針 D-sub
(RGB Analog) 訊號線
電源線
外接式通用變壓器
100-240 伏特, 50/60 赫茲
音源線
使用手冊
警示
1. 確定全部系統電源已關上。
2. 將 VGA 訊號線 連接至液晶螢幕及電腦。
3. 將變壓器接上液晶螢幕。
4. 電源線接上變壓器,另一端接上插座。
5. 將電腦及液晶螢幕的電源打開。
6. 想要有最佳的顯示效果, 我們建議您參考支援顯示模式來調整螢幕解析度。
15
硬體安裝
請小心對待您的液晶螢幕,它是非常精緻的產品。在安裝前請務必先將液晶螢幕及電腦的電源關閉,以免發生危險。請依照
指示一步一步地安裝。
輸入
【1】電腦輸入端口 : 這裡用來連接 D-Sub 15 孔 VGA 影像訊號線。
【2】DVI 數位埠 : DVI 影像訊號線接頭。 * DVI 功能為選配.
【3】耳機插孔 : 這裡用來連接耳機。
【4】電源端口:這裡用來連接電源。
壁挂功能說明
【1】 推
【2】 轉軸蓋
【3】 轉軸鏍絲
【4】 轉動並拉出底座
【5】 底座
1 2 3 4

16
顯示器控制
主要功能鍵
功能鍵介紹
Power: 電源開關。當電源開啟時,指示燈的顯示為綠,待命狀態為橙色。
OSD Menu: 進入功能目錄。功能目錄下為右鍵。
Auto Tune: 自動調整。功能目錄下為左鍵。
Decrease < - >: 音量調節之熱鍵。功能目錄下為減少調整選項。
Increase < + >:視頻信號輸入(VGA / DVI)之切換熱鍵; 功能目錄下為增加調整選項。

17
清潔要點
1. 在清潔本產品前, 請先將電源拔除。
2. 絕不使用任何含腐蝕性的化學清潔劑來清潔您的螢幕,這可能會傷害螢幕的表面。
3. 我們建議您使用細毛或軟直的刷子來清潔及刷拭螢幕的表面。
4. 不可直接對螢幕施壓。
注意事項
1. 別讓液晶螢幕直接曝曬在陽光下及高溫旁。
2. 切勿讓液體濺到螢幕上。
3. 請勿自行嘗試打開機器內部,您有可能會因而觸電。如需任何服務,請向您所購買的經銷商查詢,或聯絡我們。
4. 請勿將液晶螢幕靠近有磁場的電器用品。
5. 請勿使用有害的化學清潔劑或強力清潔劑來清潔螢幕。應用軟質刷毛和溫和的清潔劑。
6. 不可在液晶螢幕上堆放雜物,不良的通風可能導致機器的高溫。
7. 請勿直接用手指觸碰螢幕表面,皮膚所含的油脂是相當不易被清除的。
簡易故障排除
確定您的螢幕以妥善安裝,如有下列問題........
˙ 沒有螢幕 ?
檢查
是否已進入省電模式,按下任何一鍵或移動滑鼠來離開省電模式。
˙ 顏色不對或只有黑白螢幕?
檢查
訊號接頭是否接妥,如有訊號針腳針頭斷裂,請聯絡經銷商。
˙ 影像看起來太暗或太亮 ?
檢查
進入功能模式調整亮度。
˙ 文字看不清楚 ?
檢查
是否設定為支援的顯示模式。
18
OSD 視控模式
選項
1. 按下 OSD鍵進入功能目錄。
2. 使用 Auto Tune 鍵來向左調整選項。
3. 使用 OSD 鍵來向右調整選項.
Brightness:
調整螢幕的亮度。
Main menu brightness adjust
Contrast:
調整螢幕明暗的對
比。
Main menu contrast adjust
Phase:
調整圖元頻率的相
位。
Main menu phase adjust
Clock:
調整圖元的頻率。
Main menu clock adjust
Horizontal
Position:
調整螢幕左右的位
置。
Main menu H position adjust
Vertical /Position:
調整螢幕上下的位
置。
Main menu V position adjust
RESET:
恢復出廠預設值。
Main menu reset adjust
Color Temp :
調整色溫。
Main menu color temp. adjust
Language :
語言支援
Main menu language adjust
Miscellaneous :
其他

19
EXIT :
儲存設定及離開。
Main menu EXIT adjust
Miscellaneous : (其他)
Return :
返回主選項。
Return
OSD Horizontal
Position:
調整螢幕左右的位
置。
Main menu H position adjust
OSD Vertical
/Position:
調整螢幕上下的位
置。
Main menu V position adjust
OSD Duration:
調整 OSD 延遲時
間。
Main menu OSD Duration adjust
Auto Color :
自動調整螢幕顏
色。
Main menu auto tune adjust
Volume :
調整喇叭音量。
Main menu volume adjust

20
支援顯示模式
Incoming Display Mode
解析度 水準頻率 (KHz) 垂直頻率 (Hz)
640X350 31.475 70.100
640X480 31.469 59.940
640X480 37.500 75.000
720X400 31.469 70.087
800X600 37.879 60.317
800X600 46.875 75.000
1024X768 48.363 60.004
1024X768 60.023 75.029
1280X1024 63.981 60.020
1280X1024 79.976 75.024
1. 我們提供 10 種適合 Windows 的最佳顯示模式。
2. 如有干擾線產生當您調整螢幕時,為正常現象,不必擔心。
3. 想要有最優的畫質,建議您更新您的顯示卡驅動程式。
4. 不在表上記載的顯示模式,可能不被支援,建議您調整解析度如上表。
5. 使用電源管理程式,將大大提高產品的使用年限。
21
產品規格
液晶面版 尺寸
可視角
對比
亮度
反應時間(Tr+Tf)
支持色彩
最大解析度
畫素點距
17.0 吋 動態液晶
水準:140° , 垂直:130°
500: 1 (典型)
300 cd/m2 (典型)
16 毫秒
16.7 百萬色
1280X1024(SXGA)
0.264mm(H)x0.264mm(V)
訊號輸入 RGB 仿真訊號
DVI*
影像 位元准:0.7Vp-p(75)
同步訊號 TTL with 75 internal pull-up resistors
頻率 FH:30~80KHz
FV:56~75Hz
支援 TMDS 的數字訊號
相容性 PC 最高支持到 1280X1024@75Hz
連接介面
RGB 仿真訊號
DVI*
音源
電源
D-sub 15-針
DVI-D*
立體聲連接線插孔
12V/DC 電線插頭
電源 電壓
耗電
省電模式
100-240V, 50/60Hz(國際通用)外接式交流變壓器
作業中 < 48 瓦 (最大值)
待命 < 3瓦
內建揚聲器 2 瓦 x2 (立體聲)
使用介面 LED 指示燈
作業中 - 藍色
關機 - 熄燈
待命 - 藍色閃爍
作業環境 溫度
濕度
5°C~40°C
20% ~ 80% R.H.
尺寸(寬 x 長 x 深) 實體 400mm (寬) x 390mm (長) x 155mm(深)
淨重
3.3公斤
DDC DDC1/DDC2B 支援
電源管理程式 VESA DPMS, EPA 能源之星
安規認證
CE,FCC,TUV, BSMI
* DVI 功能為選配.

22
开始
目录.....................................................................................................................22
显示器前后视图 ................................................................................................... 23
包装.....................................................................................................................24
警示.....................................................................................................................24
硬件安装..............................................................................................................25
主要功能键 ..........................................................................................................26
功能键介绍 ..........................................................................................................26
清洁要点..............................................................................................................27
注意事项..............................................................................................................27
简易故障排除.......................................................................................................27
OSD 视控模式 ...............................................................................................28-29
支持显示模式.......................................................................................................30
产品规格表 ..........................................................................................................31
此手册内的内容可能随时更改,并不另行通知。
23
显示器前后视图
24
包装
我们 17 吋的液晶显示器包含下列组件,如有缺件,请向所购买之商店或经销商联络,如有任何疑问欢迎来电。
17 吋 TFT 液晶屏幕显示器
外接式 15 针 D-sub
(RGB Analog) 讯号线
电源线
外接式通用变压器
100-240 伏特, 50/60 赫兹
音源线
使用手册
警示
1. 确定全部系统电源已关上。
2. 将 VGA 讯号线 连接至液晶屏幕及计算机。
3. 将变压器接上液晶屏幕。
4. 电源线接上变压器,另一端接上插座。
5. 将计算机及液晶屏幕的电源打开。
6. 想要有最佳的显示效果, 我们建议您参考支持显示模式来调整屏幕分辨率。
25
硬件安装
请小心对待您的液晶屏幕,它是非常精致的产品。在安装前请务必先将液晶屏幕及计算机的电源关闭,以免发生危险。请依
照指示一步一步地安装。
输入
【1】计算机输入端口 : 这里用来连接 D-Sub 15 孔 VGA 影像讯号线。
【2】DVI 数位端口 : DVI 影像讯号线接头。 * DVI 功能为选配.
【3】耳机插孔 : 这里用来连接耳机。
【4】电源端口:这里用来连接电源。
壁挂功能说明
【1】推
【2】转轴盖
【3】转轴镙丝
【4】转动并拉出底座
【5】底座
1 2 3 4
26
显示器控制
主要功能键
功能键介绍
Power: 电源开关。当电源开启时,指示灯的显示为绿,待命状态为橙色。
OSD Menu: 进入功能目录。功能目录下为右键。
Auto Tune: 自动调整。功能目录下为左键。
Decrease < - >: 音量调节之热键。功能目录下为减少调整选项。
Increase < + >:视频信号输入(VGA / DVI)之切换热键;功能目录下为增加调整选项。

27
清洁要点
1. 在清洁本产品前, 请先将电源拔除。
2. 绝不使用任何含腐蚀性的化学清洁剂来清洁您的屏幕,这可能会伤害屏幕的表面。
3. 我们建议您使用细毛或软直的刷子来清洁及刷拭屏幕的表面。
4. 不可直接对屏幕施压。
注意事项
1. 别让液晶屏幕直接曝晒在阳光下及高温旁。
2. 切勿让液体溅到屏幕上。
3. 请勿自行尝试打开机器内部,您有可能会因而触电。如需任何服务,请向您所购买的经销商查询,或联络我们。
4. 请勿将液晶屏幕靠近有磁场的电器用品。
5. 请勿使用有害的化学清洁剂或强力清洁剂来清洁屏幕。应用软质刷毛和温和的清洁剂。
6. 不可在液晶屏幕上堆放杂物,不良的通风可能导致机器的高温。
7. 请勿直接用手指触碰屏幕表面,皮肤所含的油脂是相当不易被清除的。
简易故障排除
确定您的屏幕以妥善安装,如有下列问题........
˙ 没有屏幕 ?
检查
是否已进入省电模式,按下任何一键或移动鼠标来离开省电模式。
˙ 颜色不对或只有黑白屏幕?
检查
讯号接头是否接妥,如有讯号针脚针头断裂,请联络经销商。
˙ 影像看起来太暗或太亮 ?
检查
进入功能模式调整亮度。
˙ 文字看不清楚 ?
检查
是否设定为支持的显示模式。
 Loading...