

Digilite Pulse MX, Pulse EX User Manual
PULSE MX-EX
PROFESSIONAL LIGHT DESK
FOR UPDATE AND FIXTURE VISIT www.digilite.eu
USER MANUAL
English version
Rev. 03 -10/13
digilite.eu


TABLE OF CONTENTS
PULSE MX
3
Safety
General instructions
Warnings and installation precautions
General information
Introduction
Description
Technical specications
PART 1: QUICK-START GUIDE
1 Overview of the console
1. 1 Operating elements and connections
1. 2 Edit Keys
1. 3 Playback keys
1. 4 Controllers
1. 5 Grand Master and DBO
1. 6 Pan/Tilt pointing
1. 7 Encoder wheels
1. 8 Console setup
2 Create a new show
2. 1 Adding xtures to the library
2. 2 Fixture patch
2. 3 Editor
2. 4 Saving a cue
2. 5 Editing cue
2. 6 Palette
2. 7 Playing or transmitting a cue
2. 8 Store menu
PART 2: USER MANUAL
4
5
5
6
6
8
9
10
10
10
11
11
11
12
13
14
16
17
17
17
19
2. 3 Grand master and group masters gruppo
3 Cue list
3. 1 Qlist mode
3. 2 Chase mode
3. 3 Sequence mode
3. 4 Live mode
3. 5 Context-specic menu
4 Controllers
4. 1 Controller conguration
5 Setup
5. 1 Add Fixtures
5. 2 General Options
5. 3 Fixture conguration
5. 4 Controller conguration
5. 5 Pan/Tilt options
5. 6 Artnet conguration
5. 7 Backup/restore
5. 8 Library manager
5. 9 Diagnostic
5. 10 Fixture builder
6 SMPTE Timecode
7 MIDI Interface
8 DMX-IN Ingresso
9 Expansion
9. 1 Operating elements and connections
9. 2 Connection to the console
9. 3 How the expansion works
32
33
35
36
37
38
39
44
46
47
47
47
48
50
52
54
56
62
64
66
70
71
71
1 Editor
1. 1 Fixture display
1. 2 Group display
1. 3 Palette display
1. 4 Predened palettes
1. 5 Context-specic menu
1. 6 Fan
1. 7 Eects
1. 8 Color picker
2 Playback
2. 1 Cue input
2. 2 Controllers input
20
22
22
24
24
26
27
29
30
31
10 Appendix
10. 1 Glossary
Warranty
Packing content:
• PULSE MIXER
• Main cable
• USB keys
• User manual
72

4
WARNING! Before carrying out any operations with the unit, carefully read this instruction
manual and keep it with cure for future reference. It contains important information about
the installation, usage and maintenance of the unit.
NOTE
This manual is divided into two parts: the Quick-Start Guide, which gives a general overview of the console and enables the operator to be immediately operational using the basic functions. The second part
is the actual user manual where many of the concepts seen in the rst part are examined in greater detail.
It is recommended that you rst read the Quick-Start Guide in order to have a global overview of the
console's features and settings and to be able to contextualize the information in the second part more
accurately.
PULSE MX
SAFETY
General instruction
• The products referred to in this manual conform to the European Community Directives and are
therefore marked with .
• The unit is supplied with hazardous network voltage (230V~). Leave servicing to skilled personnel
only. Never make any modications on the unit not described in this instruction manual, otherwise
you will risk an electric shock.
• Connection must be made to a power supply system tted with ecient earthing (Class I appliance
according to standard EN 60598-1). It is, moreover, recommended to protect the supply lines of the
units from indirect contact and/or shorting to earth by using appropriately sized residual current
devices.
• The connection to the main network of electric distribution must be carried out by a qualied electrical installer. Check that the main frequency and voltage correspond to those for which the unit is
designed as given on the electrical data label.
• This unit is not for home use, only professional applications.
• Never use the xture under the following conditions:
- in places subject to vibrations or bumps;
- in places with a temperature of over 45 °C or lower than 2°C.
• Make certain that no inammable liquids, water or metal objects enter the xture.
• Do not dismantle or modify the xture.
• All work must always be carried out by qualied technical personnel. Contact the nearest sales point
for an inspection or contact the manufacturer directly.
• If the unit is to be put out of operation denitively, take it to a local recycling
plant for a disposal which is not harmful to the environment.

PULSE MX
5
Warnings and installation precautions
• The unit for indoor use only. To prevent or reduce the risk of electrical shock or re, do not expose the
unit to rain or moisture.
• If this device will be operated in any way dierent to the one described in this manual, it may suer
damage and the guarantee becomes void. Furthermore, any other operation may lead to dangers like
short circuit, burns, electric shock, etc.
• When carrying out any work, always comply scrupulously with all the regulations (particularly regarding safety) currently in force in the country in which the xture’s being used.
• Keep any inammable material at a safe distance from the xture.
• Before starting any maintenance work or cleaning the xture, cut o power from the main supply.
GENERAL INFORMATION
Warranty and returns
The guarantee covers the xture in compliance with existing regulations. You can nd the full version of
the “General Guarantee Conditions” on our web site www.digilite.eu
All rights reserved by Digilite No part of this instruction manual may be
reproduced in any form or by any means for any commercial use.
In order to improve the quality of products, Digilite reserves the right to modify the characteristics stated in
All revisions and updates are available in the ‘manuals’ section on site www.digilite.eu
this instruction manual at any time and without prior notice.

6
PULSE MX
INTRODUCTION
PULSE MX
DESCRIPTION
PULSE-MX is a professional lighting console by DIGILITE featuring a familiar and exible GUI interface,
ideal for controlling large and small lighting systems. PULSE-MX has been designed to be easily transportable and compact in its sizes, without the need of external monitors or control hardware for the
setup and programming. The large integrated touch-screen LCD color display and linear fader displays
make additional external monitors unnecessary, every control are at your ngertips. PULSE-MX can
support up to 3072 DMX channels, 2 independent direct output and 4 universes over ArtNet, and all
programming operations are executed through 4 encoder wheels (for controlling the parameters of Palettes during editing or for assigning values in programs), one JogBall for Pan/Tilt control (with Fine and
Lock control), Grand Master fader and DBO. Playback section is composed by 12 programmable control
buttons and faders (playback master, master group, manual cue) and 24 playback keys, which can be
expandable with 24 extra controllers and 48 playback keys with 2 PULSE-EX playback wings. PULSE-MX
is a versatile and multi-purpose console, ideal for rental companies and professionals who are in search
of a high-performance work tool, with compact sizes and fast/easy programming, which can be used in
almost all events.
TECHNICAL SPECIFICATIONS
Controls
• 7’’ 800x480 pixel touchscreen TFT LCD color display
• 2 backlit LCD display with 72 characters (2 lines x 36 digits) to show the fader congurations
• 12 controllers buttons for direct access to playback and programming functions
• 12 faders with key buttons individually congurable as Playback master, Group master, Manual Cue
• 24 keys for direct access to playback registers
• 4 Encoder wheels to control the features and eects during programming
• Jog Ball for Pan and Tilt control with Lock and Fine resolution buttons
• GrandMaster fader and DBO button
• Internal memory with SD slot
Performance
• Powerful GUI interface able to easily manage the programming and playback up to 576 Cue-lists (organized in 24 pages with 24 cue-list each), each having a maximum of 999 cues
• 3072 DMX channels: 2 direct univere DMX OUT through XLR 3p e 5p, 4 universes over Art-Net ethernet, 1 DMX IN line (independent)
• Playback up to 48 simultaneous cue-lists
• Advanced eect generator
• Updatable personalities library
• 6 genres of programmable palettes for a quick and exible programming of moving projectors
• Pre-programmed Chris/Gam/Lee/Rosco palettes for use on all xtures with RGB or CMY color mixing
• Maximum number of cues per show: 9999
• 1 Flexible LED light
• Universal switching power supply: 85-265 Volt
• Internal processor 454 Mhz with 128Mb RAM
• Internal 4Gb SD memory card to store libraries, cues and data

PULSE MX
Connections
• DMX out: 2 x XLR-3p; 2x XLR-5p; 1x RJ45 Art-net
• DMX in: 1 x XLR-5p
• SMPTE in: 1x XLR-3p
• MIDI in/out/thru: DIN-3p
• Backup and memory: USB port
• Service light: 1x USB port
• PULSE-EX wings: 2x RJ12
Dimensions and weight
• Net weight: 12 kg
• Dimensions: 692x288x105 mm
288
7
692
105
PULSE EX
DESCRIPTION
PULSE-EX is a playback wing for PULSE-MX DIGILITE console, conceived to oer a wider surface of available controls. The playback wing PULSE-EX is composed by 12 programmable fader, 12 control buttons
and 24 playback key. PULSE-EX connects to PULSE-MX via cable, no extra software required, just connect
the Wing to the console and the Playbacks are ready to control your show.
TECHNICAL SPECIFICATIONS
• 2 backlit LCD display with 72 characters (2 lines x 36 digits) to show the fader congurations
• 12 controllers buttons for direct access to playback and programming functions
• 12 faders with key buttons individually congurable as Playback master, Group master, Manual Cue
• 24 keys for direct access to playback registers
• Power supply directly from PULSE-MX
• Weight: 5kgs
288
422
105
8
PULSE MX
PART 1: QUICK-START GUIDE
- 1 - OVERVIEW OF THE CONSOLE
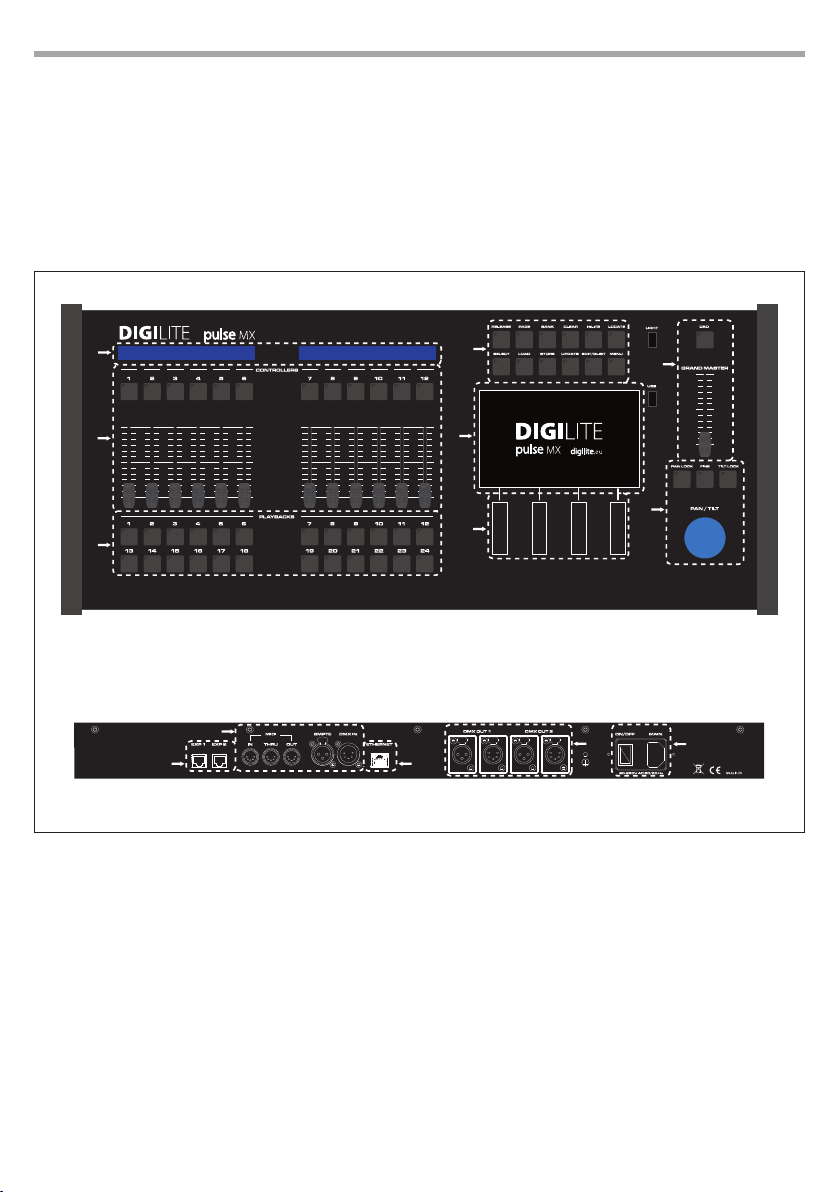
1.1 OPERATING ELEMENTS AND CONNECTIONS
1
2
3
Front panel
Rear panel
4
7
5
8
6
10
9
1. CONTROLLER STATUS
2. CONFIGURABLE CONTROLLERS
3. PLAYBACKS
4. EDIT KEYS
5. MAIN TOUCHSCREEN
6. ENCODER WHEELS
7. GRAND MASTER E DBO
8. PAN & TILT POINTINGS
9. EXPANSION CONNECTOR 1 AND 2
10. MIDI, SMPTE AND DMX-IN SOCKETS
11. ARTNET OUTPUT 6 UNIVERSES
12. DMX OUTPUT UNIVERSE 1 AND 2
13. POWER SOCKET WITH SWITCH
11
12
13
Fig.1

PULSE MX
1.2 EDIT KEYS
Release
Used to interrupt:
• a single playback (Release + playback key)
• a single controller (Release + ash controller key)
• all playbacks (Release + Page)
• all controllers (Release + Bank)
• all registers and all controllers (double click on the key releases in quick succession)
Page
Used to select a new playback page; the console manages 24 pages each of which contains 24 cue
lists. To select a new page, simultaneously press the Page key and playback key corresponding to
the new desired page (or press these two keys in quick succession). Press the Page key twice in quick
succession to go to the next page.
Bank
Used to select a new controller bank; the console manages 24 ‘banks’ each of which contains up to
12 controllers (depending on the conguration of the console). To select a new bank, press Bank +
the playback key corresponding to the new desired bank (or press the two mentioned keys in quick
succession). Press the Bank key twice in quick succession to go to the next bank.
Clear
Pressing once only erases the contents of the editor limited to the selected xtures; pressing twice in
quick succession erases the entire content of the editor and unchecks all xtures (“Clear all” function)
9
Hilite
Two-state key, alternatively activates and deactivates the hilite status. When the hilite is active, the
Hilite palette, which usually opens the shutter and sets the dimmer at 100%, is forced in the xtures
selected in the editor. The hilite is typically used to create a cue without dimmer information; in fact,
the operator can see the xture’s behaviour, but such information is not inserted into the editor and
therefore is not saved in the cue.
Locate
Apply the Locate palette to the selected xtures; it denes a denitive status for all cue parameters
(typically dimmer = 100%, pan & tilt = 50%, wheel color = white, etc.). Normally used before starting
to program a series of cues.
Select
Used to display the current playback or select a new playback.
By pressing the Select key, the current playback LED turns on; if while the LED is turned on you press
the new playback key, this playback becomes the current new playback. You can also select a current new playback by pressing the Select key and the playback key in quick succession. Selecting
the current playback also occurs when pressing a playback key to transmit a cue; the selected key is
therefore used to change the current playback without transmitting any further cue.
Pressing the select key twice in quick succession selects the next playback.

10
Load
Used to load a cue or a palette into the editor for any amendments. The Load key loads the last cue or
palette selected into the editor or, if pressed simultaneously with the ash key of a controller, it loads
the controller cue into the editor (only if the controller is congured in ‘manual cue’).
Store
Activates the Store menu. When the store menu is active, it is possible to save a palette (yellow buttons), a cue (brown buttons) or save the currently selected xtures as a new group.
If a controller is congured in manual cue, by simultaneously pressing the Store key and its ash key,
the contents in the editor are saved in the cue associated with the controller itself.
Pressing the Store key twice in quick succession saves the contents of the editor as a new cue in the
current playback.
Update
Updates and saves the last cue or palettes loaded into the editor. During loading, the console keeps
track of the amount loaded into the editor; the Update key overwrites the original cue or palette with
the current contents of the editor.
Edit/Qlist
Key that alternately recalls the windows of the editor and cue lists.
Menu
Activates a pop-up menu that allows access to auxiliary functions of a particular window. In each
window, for reasons of space or opportunity, less frequently used functions are placed in the context
specic menu.
PULSE MX
1.3 PLAYBACK KEYS
When you press a playback key, it activates the rst cue on the cue-list contained in the playback, or
activates the next cue, if the cue list was already active (“Go” function); this last playback also becomes
the current registry playback.
Can be used in conjunction with the Release Select, Page and Bank keys (see Edit Keys section).
1.4 CONTROLLERS
The controllers can be individually congured in three dierent ways: Playback master, manual cue or
group master. Conguration of the controllers is carried out by means of the Controller conguration
window retrievable from the Setup menu (see Chap. 4 — Controllers.); the default value (after a Clear
show) is Playback master.
1.5 GRAND MASTER AND DBO
The grand master slider only regulates the level of the console HTP channels (usually the channels that
regulate the brightness of the xtures);
Pressing the DBO key (Dead Blackout) will immediately force all HTP channel levels to zero and these will
remain at zero as long as the key is pressed.

PULSE MX
1.6 PAN/TILT POINTING
For all pan and tilt pointing, the console features a 38 mm trackball and three keys: Pan lock, Tilt lock
and Fine. The Pan lock and Tilt lock keys are two-state keys which allow to respectively lock the pan and
tilt movements while the Fine key is a three-state key that, when repeatedly pressed, activates three
dierent types of trackball sensitivity: 8, 12 and 16 bits. The Fine key aects the behavior of the encoder
wheels too.
1.7 ENCODER WHEELS
Encoder wheels are used dierently depending on which windows are active, but their main use is to
change values or scroll to lists of names and/or objects. On a case by case basis, on the graphic screen in
correspondence of each wheel, the function completed by the wheel itself will be indicated.
1.8 CONSOLE SETUP
The setup of the console is very easy and consists of the following points:
• Plug the power cable into the corresponding socket. The console can be supplied with a voltage between 90 and 260 volts at a frequency of between 40 to 60 Hertz.
• Connect the DMX outputs to the xtures or, alternately, the Artnet output to an Artnet/DMX converter; in the case of the latter, enable the Artnet output (see Cap. 5—Setup, Artnet paragraph).
• Connect any expansion units
• Turn on the power switch located on the rear panel of the console
IMPORTANT: Each DMX output foresees two xlr connectors, one 5 pin and one 3 pin, that are internally
connected in parallel. Connect the xtures to only one of these two connectors; do not use both otherwise a
mismatching of impedances may occur, leading to a malfunction of the DMX.
11
12
PULSE MX
- 2 - CREATE A NEW SHOW
The creation of a new show requires a conguration phase in which the console is congured with all
the settings, and more importantly the number and type of xtures involved in the show are set on the
console.
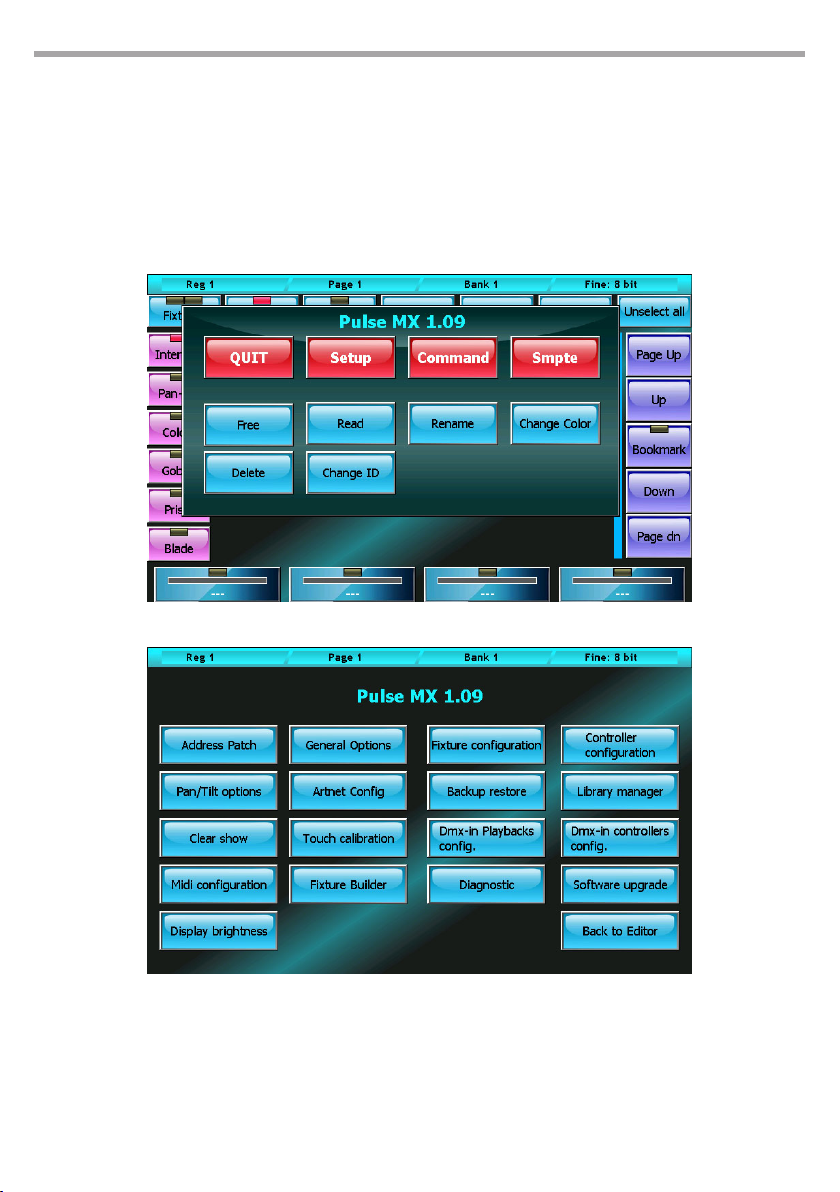
All these operations are accessible from the Setup menu which in turn can easily be recalled by pressing
the Menu key and selecting the Setup button (located on the context-specic menu).
Fig.2Context-specic menu
Fig.3Setup menu
2.1 ADDING FIXTURES TO THE LIBRARY
The console uses FDF les (xture denition les) or Pilot 3000 FXR les as it is fully compatible with the
latter.
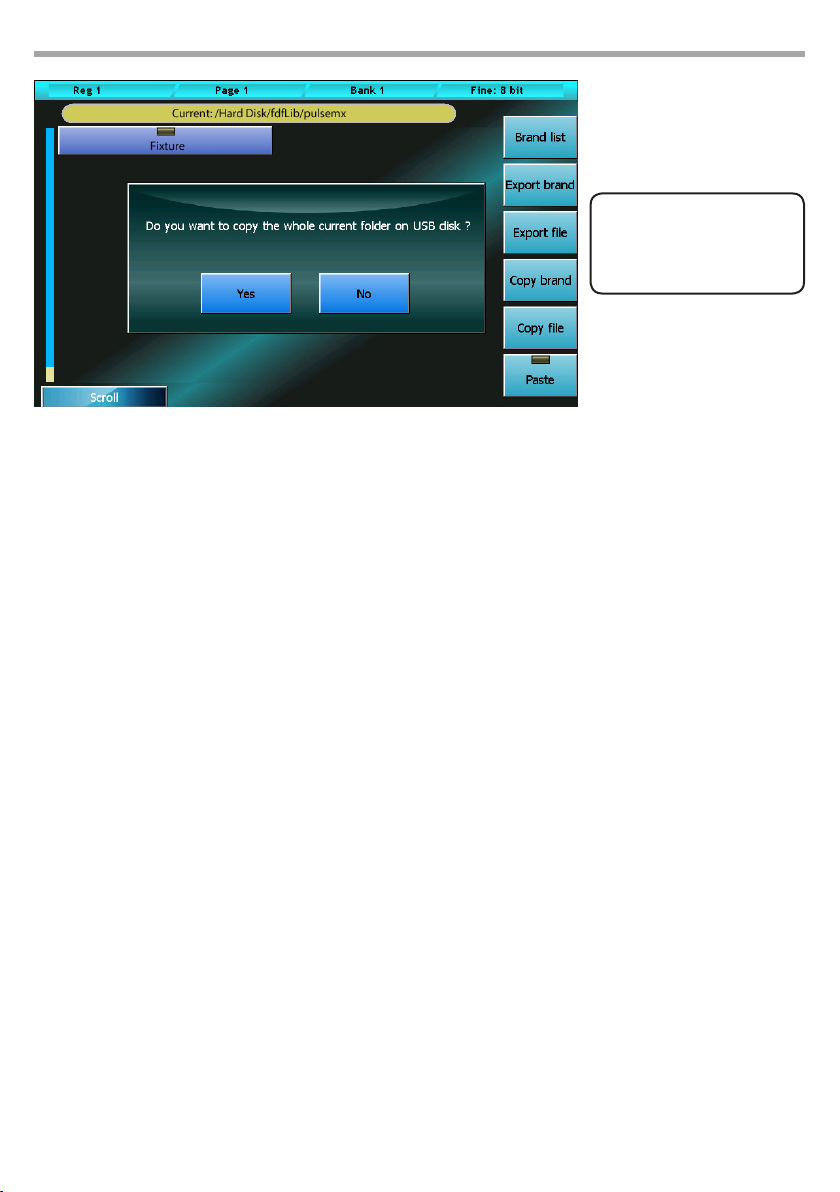
To import fdf (or fxr) les into the console, use a normal USB drive: on the USB, create an FDFLIB folder
which will contain the folders of the brands which contain fdf les; then, place the USB in the USB port
of the console and, using the Library manager (Setup menu), import/copy single les or entire folders.
PULSE MX
13
THE FIXTURE PROFILES
CAN BE DOWNLOADED
FROM THE WEB SITE AT
www.digilite.eu
Importing a xture into the console library
For example: importing a FIXTURE Ex.fxr le
Supposing the USB memory is recognised as a disk G: of our PC
1. We create the G:\FDFLIB folder and then a G:\FDFLIB\BRAND folder; we then copy the FIXTURE.fxr le
into the G:\FDFLIB\BRAND we have just created.
2. We place the USB drive into the USB port of the console, press the Menu key to recall the Setup menu
and select Library manager.
3. From the Library manager, we press the Menu key and then USB disk: all the folders available in FDFLIB will be displayed; by pressing the BRAND button, all existing les in the \FDFLIB\BRAND folder
will be displayed
4. We select our xture by pressing the BRAND button and then again on the FIXTURE. fxr button; the
LED of the FIXTURE button will turn red to conrm the selection.
5. We press the Import button and conrm. In this way, by going back to the internal disk (Internal disk
button of the context-specic menu) we will nd the new FIXTURE xture in the BRAND.
2.2 FIXTURES PATCH
This window enables you to tell the console which and how many xtures are involved in the show and
the information related to their DMX addressing.
Pressing the Address Patch button from the Setup Menu activates the patch window. This window is
divided into two sections: the left section allows us to navigate in the xtures library, while the right section show the xtures which have already been added to the show enabling us to edit them.
For example, if we wanted to add 8 identical xtures, connected to the DMX 2 line and mapped next to
one another starting from the DMX 120 addressing, we would rst have to select the BRAND button on
the left-hand side of the window and then the FIXTURE button; the Add xtures window will appear and,
using the encoder wheels, we will set 8 in the Fixtures to add eld, 2 in the DMX universe eld and 120
in the DMX start add eld; nally, we will have to conrm the data by pressing the Add xtures button.
Fig.4
Once this has been completed, the Add xtures window disappears and the right-hand side of the Address patch window is populated with 8 buttons, one for each xture added.

14
PULSE MX
(Add xtures window)
2.3 EDITOR
The console manages 24 pages of 24 playbacks, each of which contains a cue-list which in turn can be
made up of, in the simplest of cases, one single cue, or a maximum of 999 cues.
To create or edit a cue, use the editor window (or simply editor); the editor allows you to control all attributes of all xtures of the show and save their values as playback cues, manual cues or palettes.
To edit a parameter of one or more xtures, rst select them by pressing the buttons of the xtures involved (editor in xture mode) or by pressing the group buttons (editor in group mode); then with the
buttons on the left select the family of attributes you wish to edit and nally, using the wheels, set the
values.
To set the value of a previously set attribute to Empty, click on the button of the wheel which controls it.
The trackball is always active on the pan and tilt of the selected xtures.
Values can be conveniently set by using the palettes instead of the wheel and trackball (see Palette paragraph). In this case, programming the cue is limited to selecting the xtures (single or in groups) and to
selecting the various palettes to use (position, colors, gobo, etc.)
Fig.5Inserting new xtures in the show
Fig.6Address patch window
PULSE MX
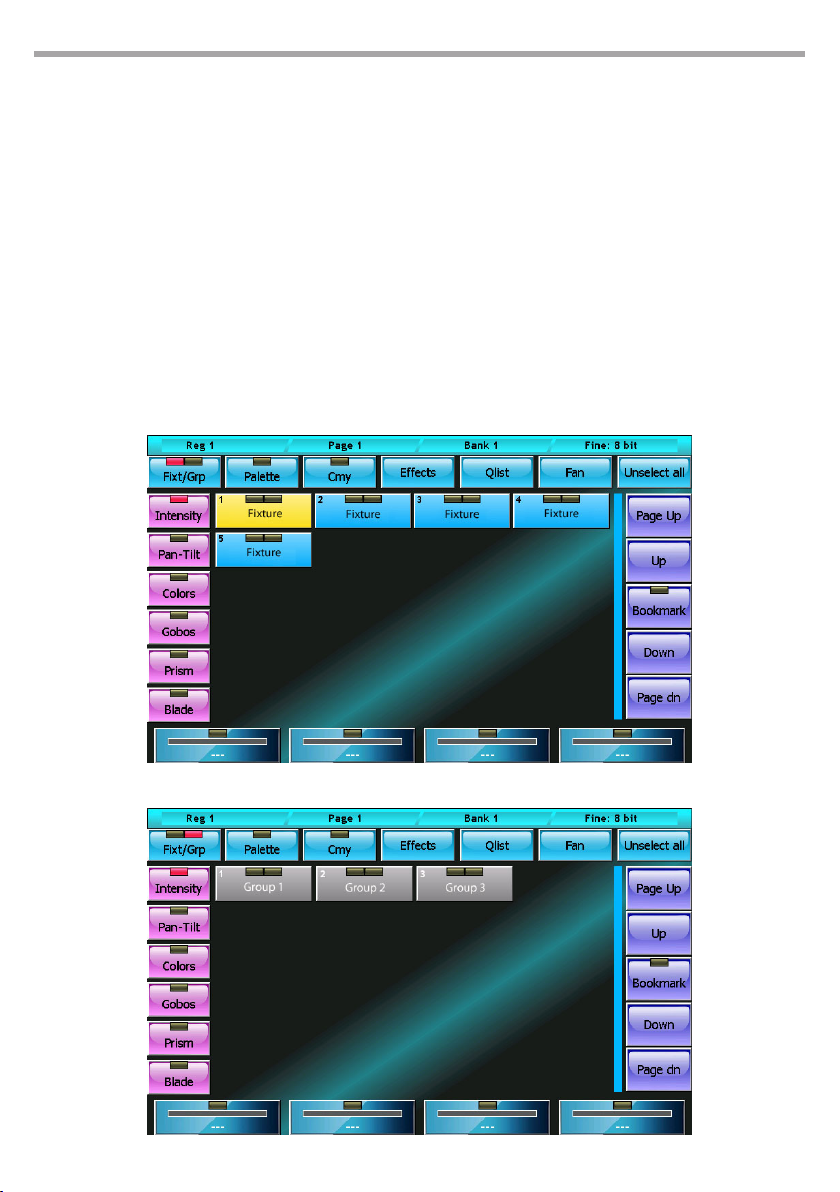
Each button of the xtures and groups has two “leds”: the left LED shows the status of the xture parameters:
• Green: all xture/group parameters are under the editor’s control,
• Orange: not all xture/group parameters are under the editor’s control,
• O: the editor does not control any parameter.
The right LED indicates whether the xture/group is selected or not. In the case of the groups, it can also
turn yellow to indicate that the group has been partially selected.
By pressing the Fixt/Grp button, you switch from xture to group display and vice versa.
The Clear key deletes all editor content of the selected xtures. Pressing the same key twice in quick succession deletes ALL editor content.
The wheels enable you to set or edit the attribute values of the selected xtures. The left buttons (Intensity, Colors, ...) allow you to scroll through the attributes which are controlled by the wheels.
The trackball is always active on the pan and tilt of the selected xtures.
15
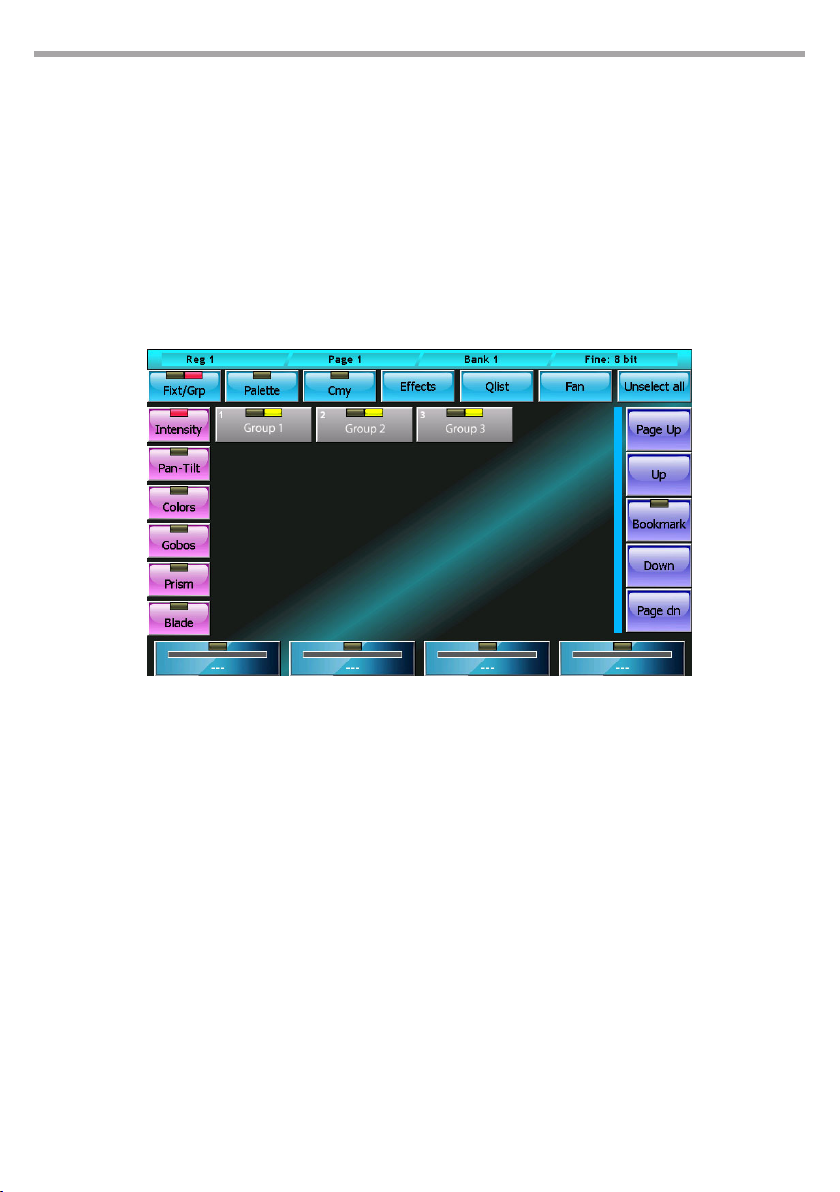
Editor: xture display mode Fig.7
Fig.8Editor: group display mode

16
2.4 SAVING A CUE
When you want to save a new cue, press the Store key to activate the Store menu and then select the
Cue button; doing this will add a new cue to the current playback in which the contents of the editor
will be copied.
WARNING: normally the programming of a cue begins by selecting the xtures involved and pressing the
Locate key in order to set all the xture attributes to a dened value. Only in advanced use for expert users it is
possible to program the cues by leaving Empty attribute
Press the Qlist button at the top of the editor to activate the cue-list window.
By selecting one or more cues and moving the encoder wheels it is possible to modify the Delay, Fadein, Wait and Fade-out times of each cue; if you omit the Wait and Fade-out times, the cue continues to
control the channels until a second cue intervenes or the Release playback is performed.
PULSE MX
Menu store (1=store palette, 2=store cue) Fig.9
Fig.10Cue-list window

PULSE MX
2.5 EDITING A CUE
From the cue-list display windows (Qlist, Chase, Sequence or Live windows), select the cue you wish to
edit and press the Load key; in this way, a copy of the cue in question is loaded into the editor. Thanks
to the editor, it is now very easy to perform the required editing tasks. Finally, press the Update key to
substitute the original cue.
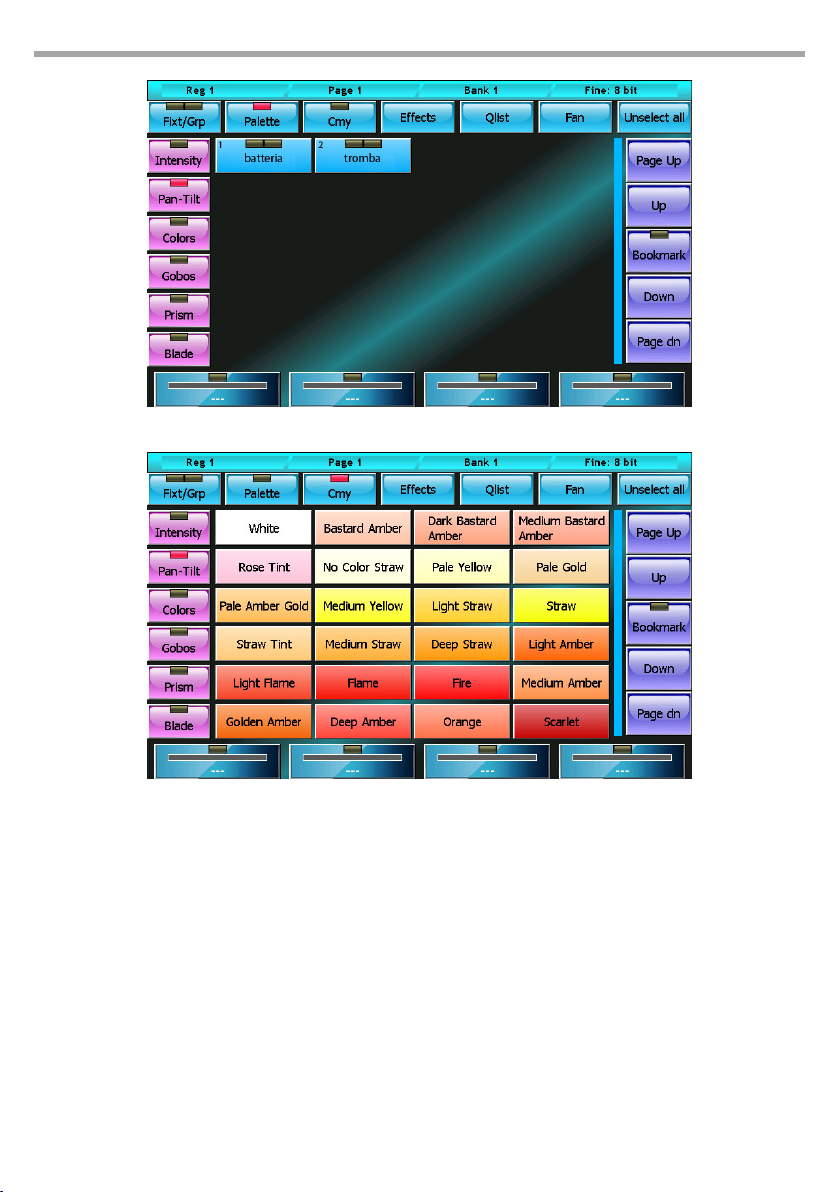
2.6 PALETTE
Palettes are predened memories which speed up programming; each xture usually already has some
predened palettes in the fdf le, but the user can create new personalised ones. The preparation of pantilt palettes is very useful in that, once having nished preparing the palettes, xture pointing is done
by simply by selecting the xtures concerned and then clicking on the palette of the desired location.
IMPORTANT: it is useful to program a show by using the palettes, because the time spent preparing the palettes
is recovered with interest during the programming phase which entails selecting the xtures (individual or in
groups), and various palettes to use (positions, colors, gobo, etc.)
To recall the palette window, simply press the Palette button located at the top in the editor.
To save a new palette bring up the Store menu by pressing the Menu key and then select one of the yellow buttons relating to the ‘family’ of values that we want to save; in fact when saving a palette, not all
the content in the editor is saved, but only the parameter values that belong to the same family of the
button pressed.
The palettes, like the parameters of the xtures, are organized into 6 families: Intensity, Pan/tilt, Colors,
Gobos, Prism and Blade; the palettes displayed in the window are those relating to the current family
(which can be changed by pressing the buttons on the left of the screen) and ONLY those relating to the
selected xtures. In the case that no xture is selected, all xtures of the current family are displayed.
17
The console also contains 4 sets of default palettes (Chris, Gam, Lee and Rosco) usable on all xtures that
have RGB or CMY color mixing systems. The current set can be selected in the General options window
accessible from the Setup menu.
2.7 PLAYING OR TRANSMITTING A CUE
To activate a cue, just press the corresponding playback key. Once the playback key is pressed, the following cue is activated (once the last one is reached, it starts again from the rst one.)
The intensity master is set at 100% with the exception of playbacks which have controllers congured as
playback masters, in which case the slider becomes the intensity master.
When two cues belonging to two dierent playbacks clash on a same channel, the console applies the
following criteria:
• if the channel is LTP, the LTP criteria is always applied (the most recently activated cue has priority)
• if the channel is HTP, the LTP or HTP criteria is applied (the highest values appears) as specied in the
Playback mode eld of the General options page (Setup Menu)
You can productively choose the Live window to transmit cues without a predened order.
ATTENTION: The editor has priority over the playbacks, therefore ensure it is not checking any xtures prior to
transmitting a cue. To reset the editor, press the Clear key twice in quick succession.
18
PULSE MX
Pan/tilt palette window
Predened Rosco palettes
To ‘turn o’ a playback, press the Release key and the playback key in quick succession (before the LED of
the Release key switches o) or alternatively press and hold the Release key while pressing the playback
key. This action puts all projectors involved by the cue to Stand-By mode (dened by the Stand-by values
in the xture conguration window); the dimmer is typically reset to 0, while the remaining channels
stay set the way they are.
Fig.11
Fig.12
PULSE MX
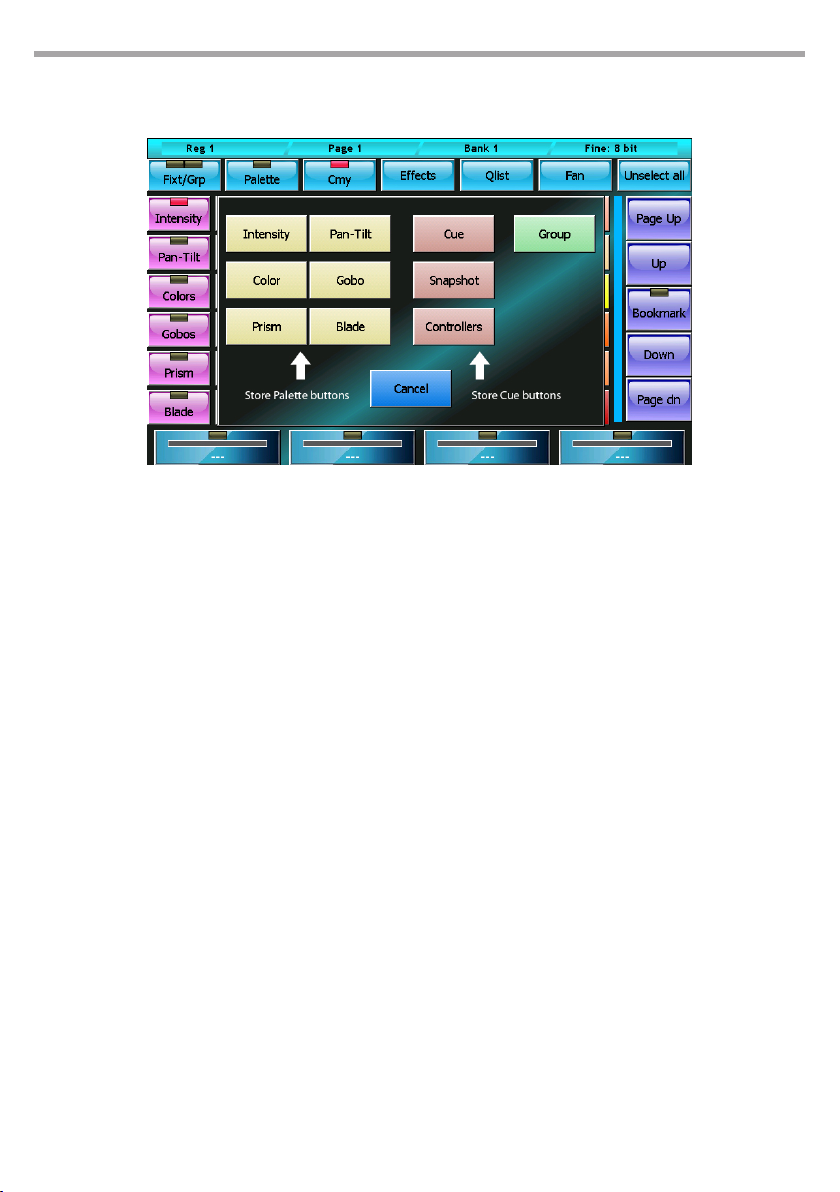
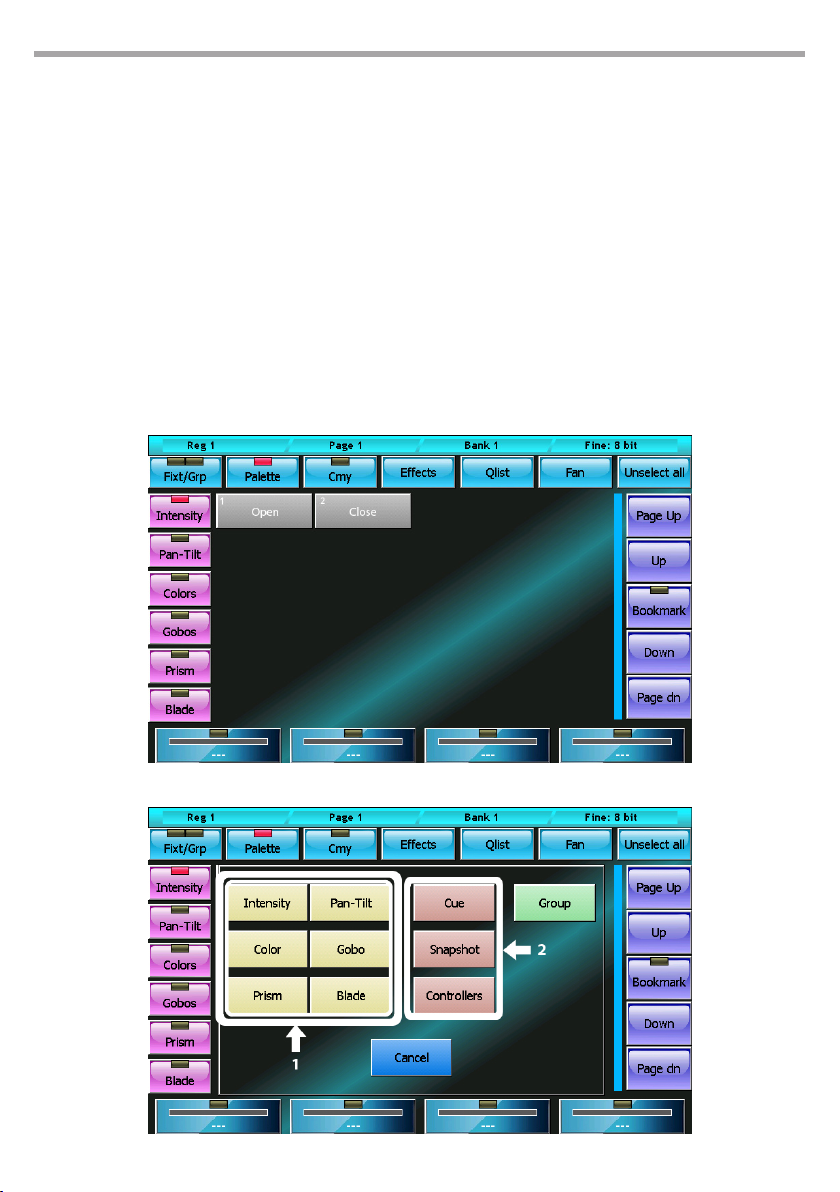
2.8 STORE MENU
The Store menu, which is activated by pressing the Store key, enables you to save dierent types of objects:
Menu store Fig.13
BUTTONS
Intensity, Pan-Tilt, Color, Gobo, Prism and Blade
Save the editor content, limited to the selected type of parameters, in a new corresponding palette.
19
Cue
saves the editor content, adding it as new cue into the current playback
Snapshot
Saves the status of the channels controlled by the Editor, Playbacks and Controllers by adding it like
a new cue to the current playback
Controllers
Saves the status of the channels controlled by the Controllers, adding it like a new cue to the current
playback
Group
Creates a new group containing the selected xtures
20
PULSE MX
PART 2: USER MANUAL
- 1 - EDITOR
The editor is the programme which enables you to set (and edit) the values of all parameters of the xtures and to save their status as a cue or palette.
The editor has various windows and displays; when switched on, the console shows the editor in display
xtures mode.
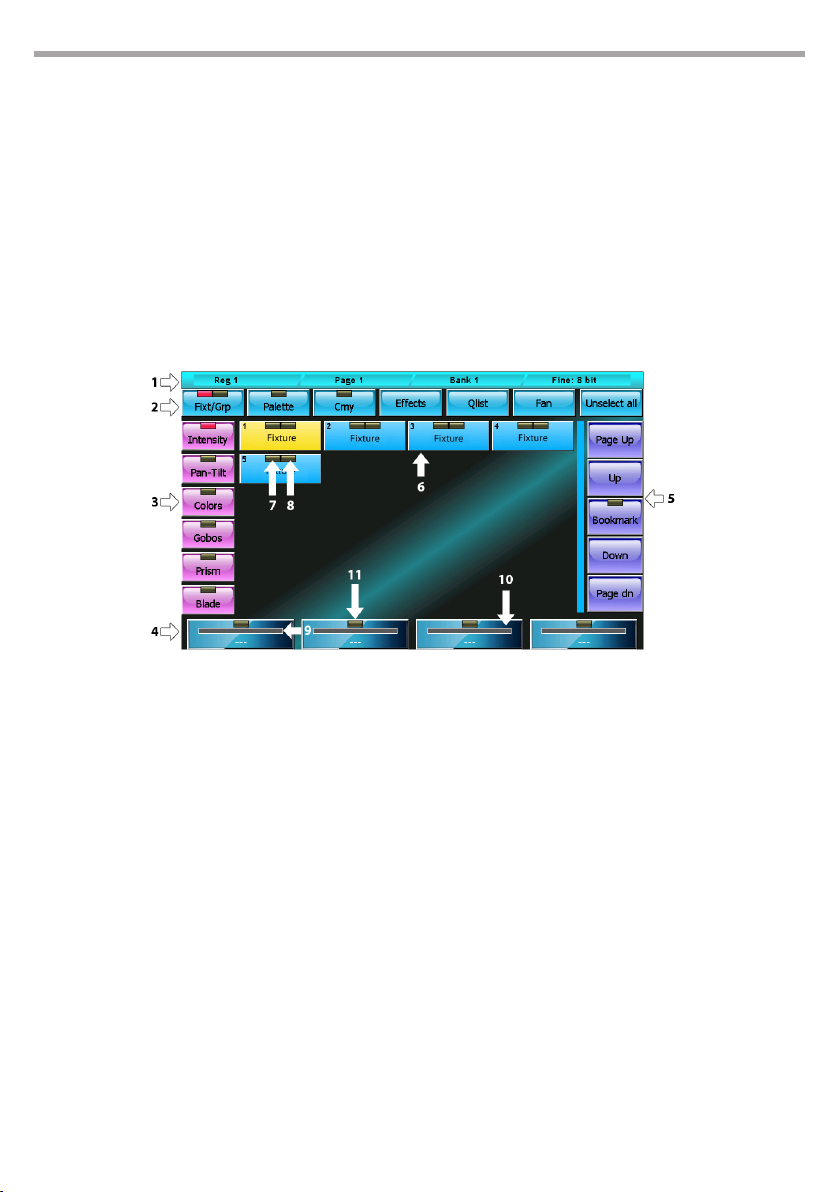
1.1 FIXTURES DISPLAY
Fixture display editor mode
Window contents
1 – status bar
From left to right: Current playback, Current page and Current Bank.
2 – command buttons
Each of these buttons carries out a specic command or opens a dierent window:
• Fixt/Grp: Switches between Fixture display and Group display
• Palette: recalls the Palette display
• Cmy: Recalls the default palette window which can be used on all xtures with RGB or CMY color
mixing systems
• Eects: Recalls the Eects window
• Fan: Recalls the Fan window
• Unselect All: Deselects all selected xtures
3 – parameter selection buttons
Pressing one of these buttons, the 4 parameters of the corresponding family, limited to selected
xtures, are displayed on the wheels and can be edited. If the selected family has more than 4 parameters, press the button again to scroll through them all, 4 at a time.
Fig.14

PULSE MX
4 – Wheel buttons
Each wheel is associated with the parameter displayed on the corresponding button relating to all
selected xtures; with the wheel, it is possible to contemporaneously edit the xture values.
Pressing the wheel button resets all the attributes associated with it to ‘Empty’
There are three reporting and status features on each button: The tag (9), the representation of the
anaplayback value (10) and the status of the LED channels (11).
5 – Slider fixture buttons (scroll bar)
The scroll bar is also provided with a Bookmark button. This button is used to move quickly to an
exact location on the list. Press and hold the Bookmark button for more than 0.5 seconds; in doing
so, the current position is saved and the LED on the button is lit; each time you press the Bookmark
button, the list is taken to the stored position.
6 – list of fixtures that make up the show
Each button has two ‘leds ‘; the rst (7) indicates whether the xture is being controlled by the editor:
if it is green, then all parameters are controlled by the editor; if it is switched o, the editor does not
control any parameter of the xture; in the other cases, the LED turns orange.
The second LED (8) indicated whether the xture is selected (red led) or not (led o).
7 – report of fixtures controlled by the editor
This LED can be:
• switched o: the editor does not control any parameter of the xture
• green: the editor controls all xture parameters
• orange: the editor controls only certain channels of the xture
21
8 – report of selected fixture
This LED can be:
• switched o: the xture is not selected
• red: the xture is not selected
9 – wheel tag
This tag indicates both which attribute is being controlled by the wheels and its value. If the value is
not absolute, but “paletted”, the name of the palette is displayed.
When the wheel controls the parameters of two or more xtures that do not have the same value, ‘
*** ‘ is displayed.
If the wheel does not control any attribute, the string ‘----’ is displayed.
10 – value bar
Anaplayback representation of the parameter value controlled by the wheels
11 – parameter status
This LED can be:
• switched o: all parameters associated to the wheel are ‘Empty’ (i.e. they are free, the editor is not
controlling them)
• red: all parameters associated to the wheel are controlled by the editor
• yellow: only some parameters associated to the wheel are controlled by the editor; the remaining
are ‘Empty’
22
1.2 GROUP DISPLAY
The groups window is identical, in both form and features, to the xtures window, except for the fact that
the selection is made for groups; by pressing a group button, all the xtures therein can be alternately
selected and de-selected.
The organization of the xtures into groups is particularly useful when a show includes many xtures
and these are often managed together in recurring groups.
As for the xtures, each group button has two leds: the rst informs us on the status of the channels
(when switched o, all parameters of all the group xtures are Empty; when red, all parameters of all the
group xtures are controlled by the editor; for all other cases, the LED is orange).
The context-specic menu is identical to the context-specic menu of the xtures window, with the
exception of the Select Range button which does not appear here.
PULSE MX
Group display editor mode Fig.15
Create/edit a group
To create a new group you must select the xtures that will be part of the group, press the Group button
on the Store Menu (recall by pressing the Store key), and then type the name of the new group to be
created using the virtual keyboard.
IMPORTANT: If a group already exists with the same name, the old group is overwritten.
To edit a group you proceed as just described, paying attention when inserting the name of the group
you want to edit
1.3 PALETTES DISPLAY
Palettes are predened memories which speed up programming; each xture usually already has some
predened palettes in the fdf le, but the user can create new personalised ones. The preparation of
pan-tilt palettes is very useful in that, once preparation of the palettes is complete, the pointing of the
xtures is done simply by selecting the xtures concerned and then clicking on the palette of the desired
location.
IMPORTANT: When programming the cues with the palette, make sure the reference to the palette is saved
rather than the values contained in it; in this way, when you edit a palette, the changes made will be reected
on all its cues. This photo is particularly useful to make positioning amendments on previously programmed
shows.
The palettes are organised in the 6 parameter families: Intensity, Pan/Tilt, Colors, Gobos, Prism and Blade
PULSE MX
which can be selected by pressing the corresponding button.
The palette window displays all available palettes for the set of xtures selected in the current family; if
no xture is selected, then all the palettes in the current family’s show will be displayed.
The palette window shows a context-specic menu which button is practically identical to the contextspecic menu of the xtures window, however the Select Range does not appear.
CREATING A NEW PALETTE
After having set the parameters of the xtures to the desired value, you can save their status in a new
palette by recalling the Store menu which is done by clicking the Store key; select the type of palette
you wish to save (buttons 1) and then insert the name of the new palette you wish to create by using
the virtual keyboard.
IMPORTANT: when creating a new palette, only the parameters which belong to the same type of the created
palette are saved.
23
Palette display editor mode
Store menu
Fig.16
Fig.17
 Loading...