

Page 1

1300 Henley Court
Pullman, WA 99163
509.334.6306
www.digilentinc.com
ZYBO™ FPGA Board Reference Manual
Revised April 11, 2016
This manual applies to the ZYBO rev. B
DOC#: 502-279
Copyright Digilent, Inc. All rights reserved.
Other product and company names mentioned may be trademarks of their respective owners.
Page 1 of 26
Overview
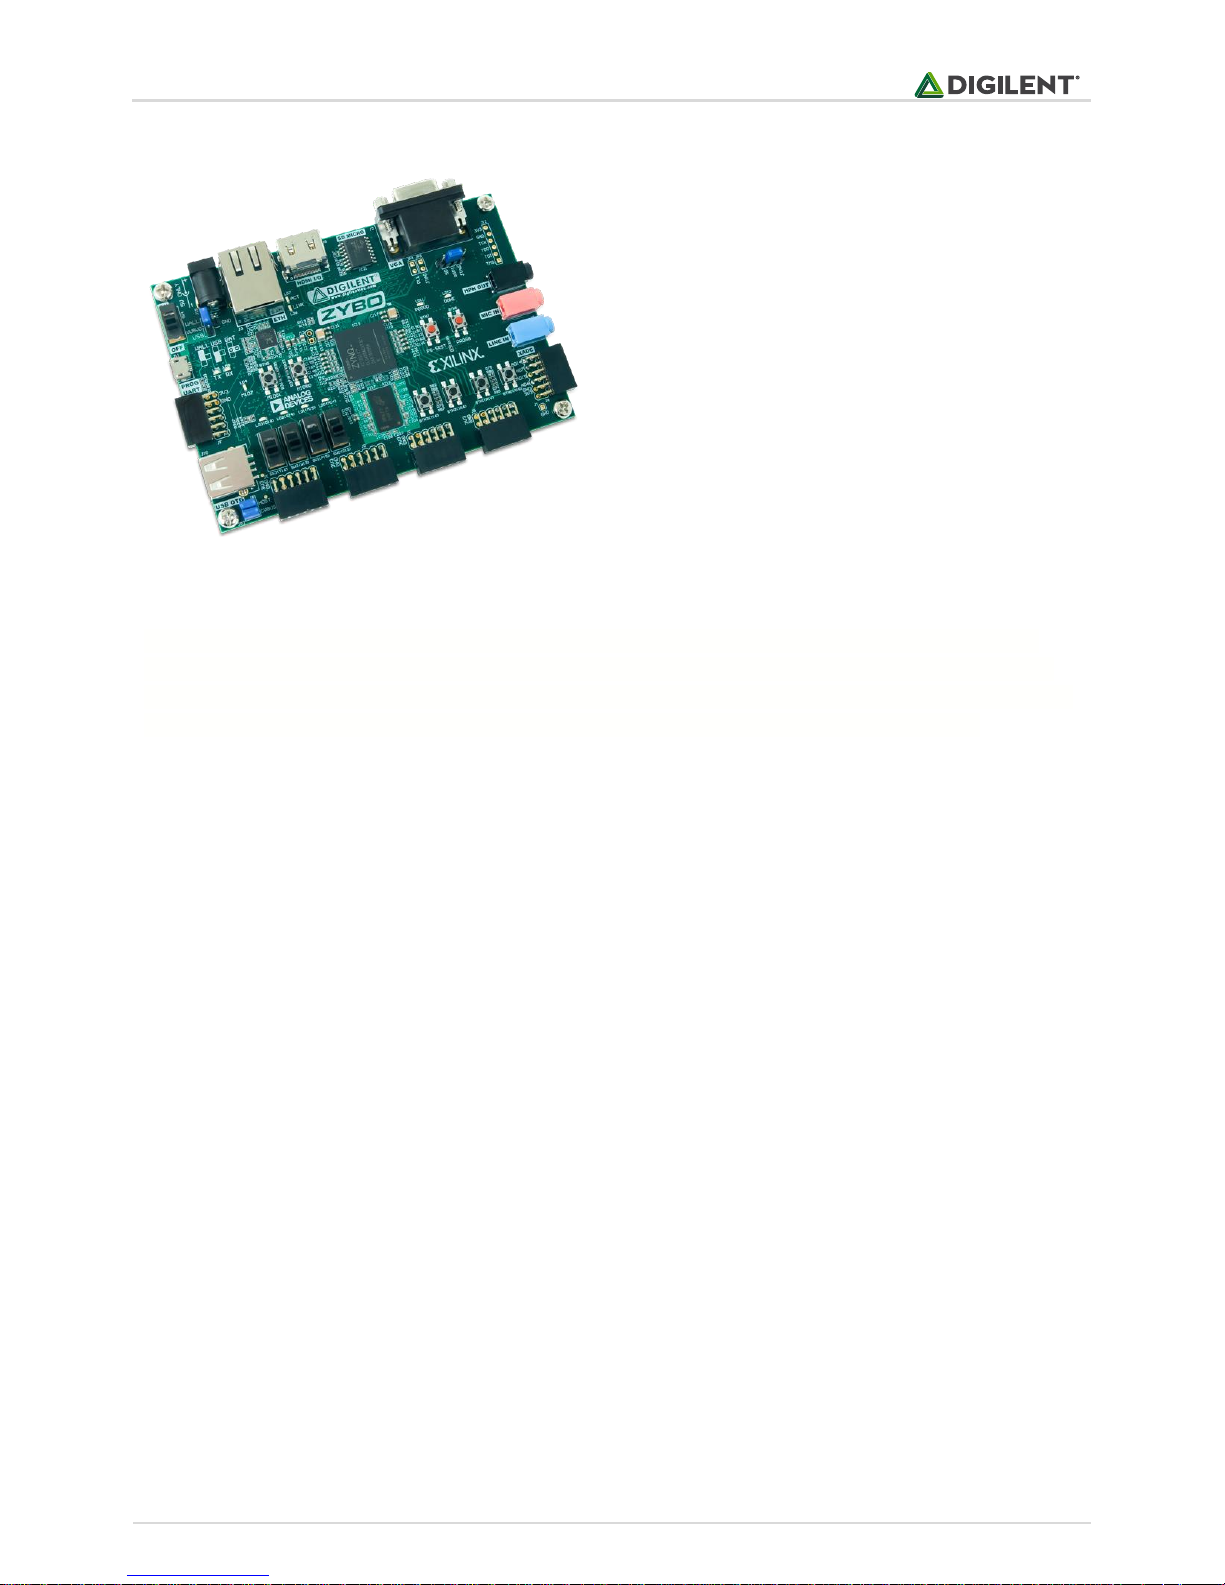
The ZYBO (ZYnq BOard) is a feature-rich, ready-to-use, entry-level embedded software and digital circuit
development platform built around the smallest member of the Xilinx Zynq-7000 family, the Z-7010. The Z-7010 is
based on the Xilinx All Programmable System-on-Chip (AP SoC) architecture, which tightly integrates a dual-core
ARM Cortex-A9 processor with Xilinx 7-series Field Programmable Gate Array (FPGA) logic. When coupled with the
rich set of multimedia and connectivity peripherals available on the ZYBO, the Zynq Z-7010 can host a whole
system design. The on-board memories, video and audio I/O, dual-role USB, Ethernet, and SD slot will have your
design up-and-ready with no additional hardware needed. Additionally, six Pmod ports are available to put any
design on an easy growth path.
The Zynq 7010 AP SoC offers the following features:
650Mhz dual-core Cortex-A9 processor
DDR3 memory controller with 8 DMA channels
High-bandwidth peripheral controllers: 1G Ethernet, USB 2.0, SDIO
Low-bandwidth peripheral controller: SPI, UART, CAN, I
Reprogrammable logic equivalent to Artix-7 FPGA
o 4,400 logic slices, each with four 6-input LUTs and 8 flip-flops
o 240 KB of fast block RAM
o Two clock management tiles, each with a phase-locked loop (PLL) and mixed-mode clock
manager (MMCM)
o 80 DSP slices
o Internal clock speeds exceeding 450MHz
o On-chip analog-to-digital converter (XADC)
2
C
Page 2
ZYBO™ FPGA Board Reference Manual
Copyright Digilent, Inc. All rights reserved.
Other product and company names mentioned may be trademarks of their respective owners.
Page 2 of 26
The ZYBO Zynq-7000 development board.
ZYNQ XC7Z010-1CLG400C
512MB x32 DDR3 w/ 1050Mbps bandwidth
Dual-role (Source/Sink) HDMI port
16-bits per pixel VGA source port
Trimode (1Gbit/100Mbit/10Mbit) Ethernet PHY
MicroSD slot (supports Linux file system)
OTG USB 2.0 PHY (supports host and device)
External EEPROM (programmed with 48-bit
globally unique EUI-48/64™ compatible
identifier)
Audio codec with headphone out, microphone
and line in jacks
128Mb Serial Flash w/ QSPI interface
On-board JTAG programming and UART to USB
converter
GPIO: 6 pushbuttons, 4 slide switches, 5 LEDs
Six Pmod ports (1 processor-dedicated, 1 dual
analog/digital, 3 high-speed differential, 1 logicdedicated)
The ZYBO is compatible with Xilinx's new high-performance Vivado Design Suite as well as the ISE/EDK toolset.
These toolsets meld FPGA logic design with embedded ARM software development into an easy to use, intuitive
design flow. They can be used for designing systems of any complexity, from a complete operating system running
multiple server applications in tandem, down to a simple bare-metal program that controls some LEDs.
An accessory kit that contains a 5V/2.5A power adapter, a USB A to Micro B cable, an 8GB speed class 10 microSD
card, and a Xilinx voucher for a Vivado Design Suite license will be available to purchase separately off of the
Digilent website in the near future. The Vivado Design Suite license enables use of the Logic Analyzer tools, which
accelerate debug and testing. This license is a 1 year, device-locked license, and will only work with the Z-7010
Zynq part on the ZYBO. After the license expires, any version of Vivado Design Suite that was released during this 1
year period can continue to be used indefinitely.
Page 3

ZYBO™ FPGA Board Reference Manual
Copyright Digilent, Inc. All rights reserved.
Other product and company names mentioned may be trademarks of their respective owners.
Page 3 of 26
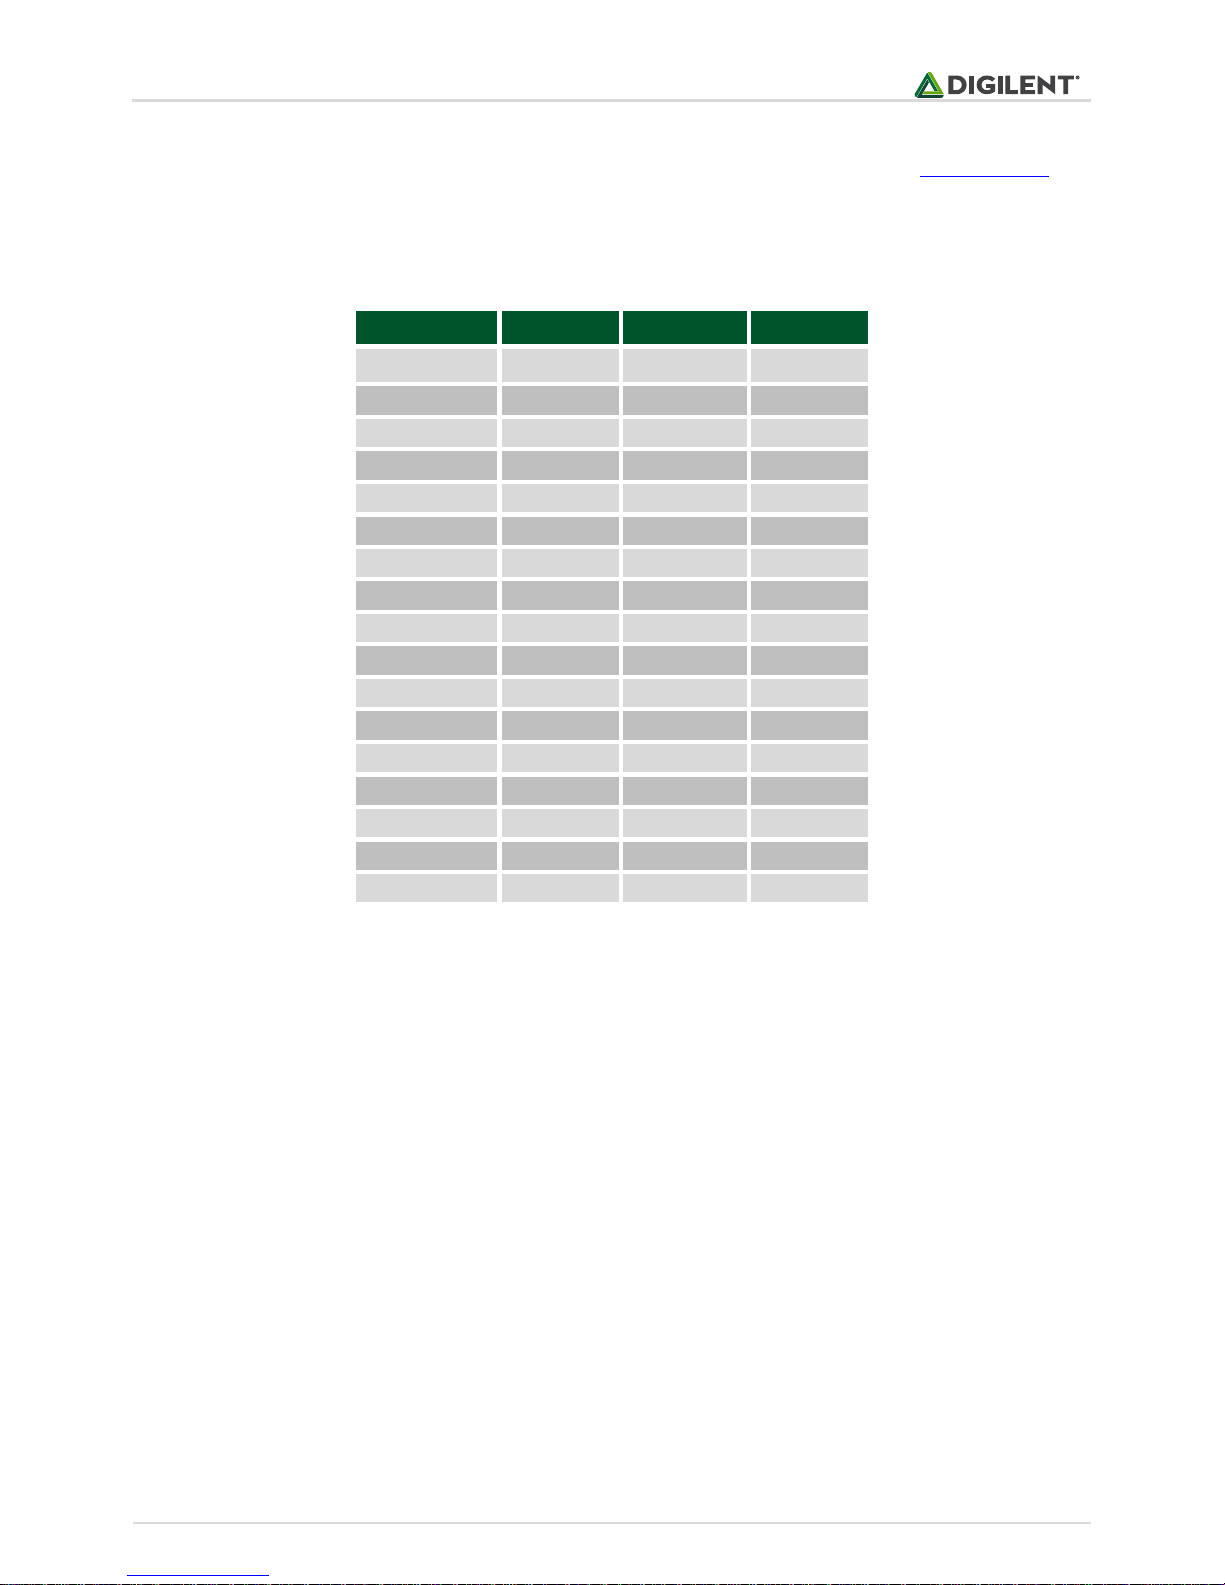
Callout
Component Description
Callout
Component Description
1
Power Switch
15
Processor Reset Pushbutton
2
Power Select Jumper and battery header
16
Logic configuration reset Pushbutton
3
Shared UART/JTAG USB port
17
Audio Codec Connectors
4
MIO LED
18
Logic Configuration Done LED
5
MIO Pushbuttons (2)
19
Board Power Good LED
6
MIO Pmod
20
JTAG Port for optional external cable
7
USB OTG Connectors
21
Programming Mode Jumper
8
Logic LEDs (4)
22
Independent JTAG Mode Enable Jumper
9
Logic Slide switches (4)
23
PLL Bypass Jumper
10
USB OTG Host/Device Select Jumpers
24
VGA connector
11
Standard Pmod
25
microSD connector (Reverse side)
12
High-speed Pmods (3)
26
HDMI Sink/Source Connector
13
Logic Pushbuttons (4)
27
Ethernet RJ45 Connector
14
XADC Pmod
28
Power Jack
1 2 3
4
5 6 7 8 9
10
11
12
13
14
15
16
17
18
19
20
21
22
23
24
25
26
27
28
Table 1. ZYBO Device Diagram.
Page 4

ZYBO™ FPGA Board Reference Manual
Copyright Digilent, Inc. All rights reserved.
Other product and company names mentioned may be trademarks of their respective owners.
Page 4 of 26
Power
Jack
(J15)
3.3V (III)
IC26: ADP5052
Power
Switch
(SW4)
Micro-USB
Port (J11)
VU5V0
J14
IC27: ADR127
REFVIN
1.25V (III)
Power Source Select
JP7
J14
USB WALL BATTERY
EN
PGOOD
1.5A
PVIN1-4
JP7
Power On
LED (LD11)
PVIN5
1.0V (I)
2.1A
1.5V (III)
1.2A
1.8V (II)
0.6A
1.8V (III, analog)
0.1A
IC6: ADP150
0.1AVIN
3.3V (IV, analog)
EN
R281
D13
Power-on Reset
1 Power Supplies
The ZYBO can be powered from the Digilent USB-JTAG-UART port (J11), or from an external power supply. Jumper
JP7 (near the power switch) determines which power source is used. There are three valid configurations for this
jumper corresponding to the three powering options: USB, wall wart with barrel jack, and battery pack. There is a
diagram on the board silkscreen indicating all three.
All on-board power supplies are enabled or disabled by the power switch SW4. The power indicator LED (LD11) is
on when all the supply rails reach their nominal voltage. An overview of the power circuit is shown in Fig.2
A USB 2.0 port can deliver maximum 0.5A of current according to the specifications. This should provide enough
power for lower complexity designs. An idling blank board consumes around 0.2A from the 5V input supply. As an
example, the standalone lwIP echo server sample project replying to ping requests consumes 0.38A on average.
More demanding applications, including any that drive multiple peripheral boards or other USB devices, might
require more power than the USB port can provide. In this case, power consumption will increase until it’s limited
by the USB host. This limit varies a lot between manufacturers and depends on many factors. When in current
limit, once the voltage rails dip below their nominal value, the Zynq is reset by the Power-on Reset signal and
power consumption returns to its idle value. Also, some applications may need to run without being connected to
a PC’s USB port. In these instances an external power supply or battery pack can be used.
An external power supply (wall wart) can be used by plugging into to the power jack (J15) and setting jumper JP7
to "wall". The supply must use a coax, center-positive 2.1mm internal-diameter plug, and deliver 4.5VDC to
5.5VDC and at least 2.5A of current (i.e., at least 12.5W of power). Suitable supplies can be purchased from the
Digilent website or through catalog vendors like DigiKey. Power supply voltages above 6VDC might cause
permanent damage.
An external battery pack can be used by connecting the battery’s positive terminal to the center pin of JP7 and the
negative terminal to the pin labeled J14 next to JP7. The external battery pack must be limited to 5.5VDC. The
minimum voltage of the battery pack depends on the application: if the USB Host (J10) or HDMI Source (J8)
function is used, at least 4.6V need to be provided. In other cases the minimum voltage is 3.6V.
Figure 2. Power circuit overview.
Page 5

ZYBO™ FPGA Board Reference Manual
Copyright Digilent, Inc. All rights reserved.
Other product and company names mentioned may be trademarks of their respective owners.
Page 5 of 26
Supply
Circuits
Device
Current (max/typical)
3.3V
FPGA I/O, USB ports, Clocks,
Ethernet, SD slot, Flash, HDMI
IC26#1: ADP5052
2.5A/0.1A to 1.5A
1.0V
FPGA, Ethernet Core
IC26#2: ADP5052
2.5A/0.2A to 2.1A
1.5V
DDR3
IC26#3: ADP5052
1.2A/0.1A to 1.2A
1.8V
FPGA Auxiliary, Ethernet I/O,
USB OTG
IC26#4: ADP5052
1.2A/0.1A to 0.6A
1.8V
XADC Analog
IC26#5: ADP5052
200mA/20mA
3.3V
Audio Analog
IC6: ADP150
150mA/50mA
1.25V
XADC Precision Reference
IC27: ADR127
5mA/50uA
Voltage regulator circuits from Analog Devices create the required 3.3V, 1.8V, 1.5V, and 1.0V supplies from the main power input.
Table 2 provides additional information (typical currents depend strongly on FPGA configuration and the values
provided are typical of medium size/speed designs).
Table 2. ZYBO power supplies.
The supply rails are daisy-chained to follow the Xilinx-recommended start-up sequence. Flicking the power switch
(SW4) will enable the 1.0V rail, which enables the 1.8V digital supply rail, which in turn enables the I/O supply rails
3.3V and 1.5V. The 1.25V reference and 1.8V analog supply ramp together with the 3.3V rail. Once all the channels
of the ADP5052 (IC26) supply reach regulation, the PGOOD signal will assert, enabling the 3.3V audio supply,
lighting up the power LED (LD11), and de-asserting the Power-On Reset signal (PS_POR_B) of the Zynq.
Each power supply uses a soft-start ramp of 1-10ms to limit in-rush current. There is an additional delay of at least
130ms after the power rails reach regulation and before the Power-On Reset signal de-assert to allow for the
PS_CLK (IC22) to stabilize.
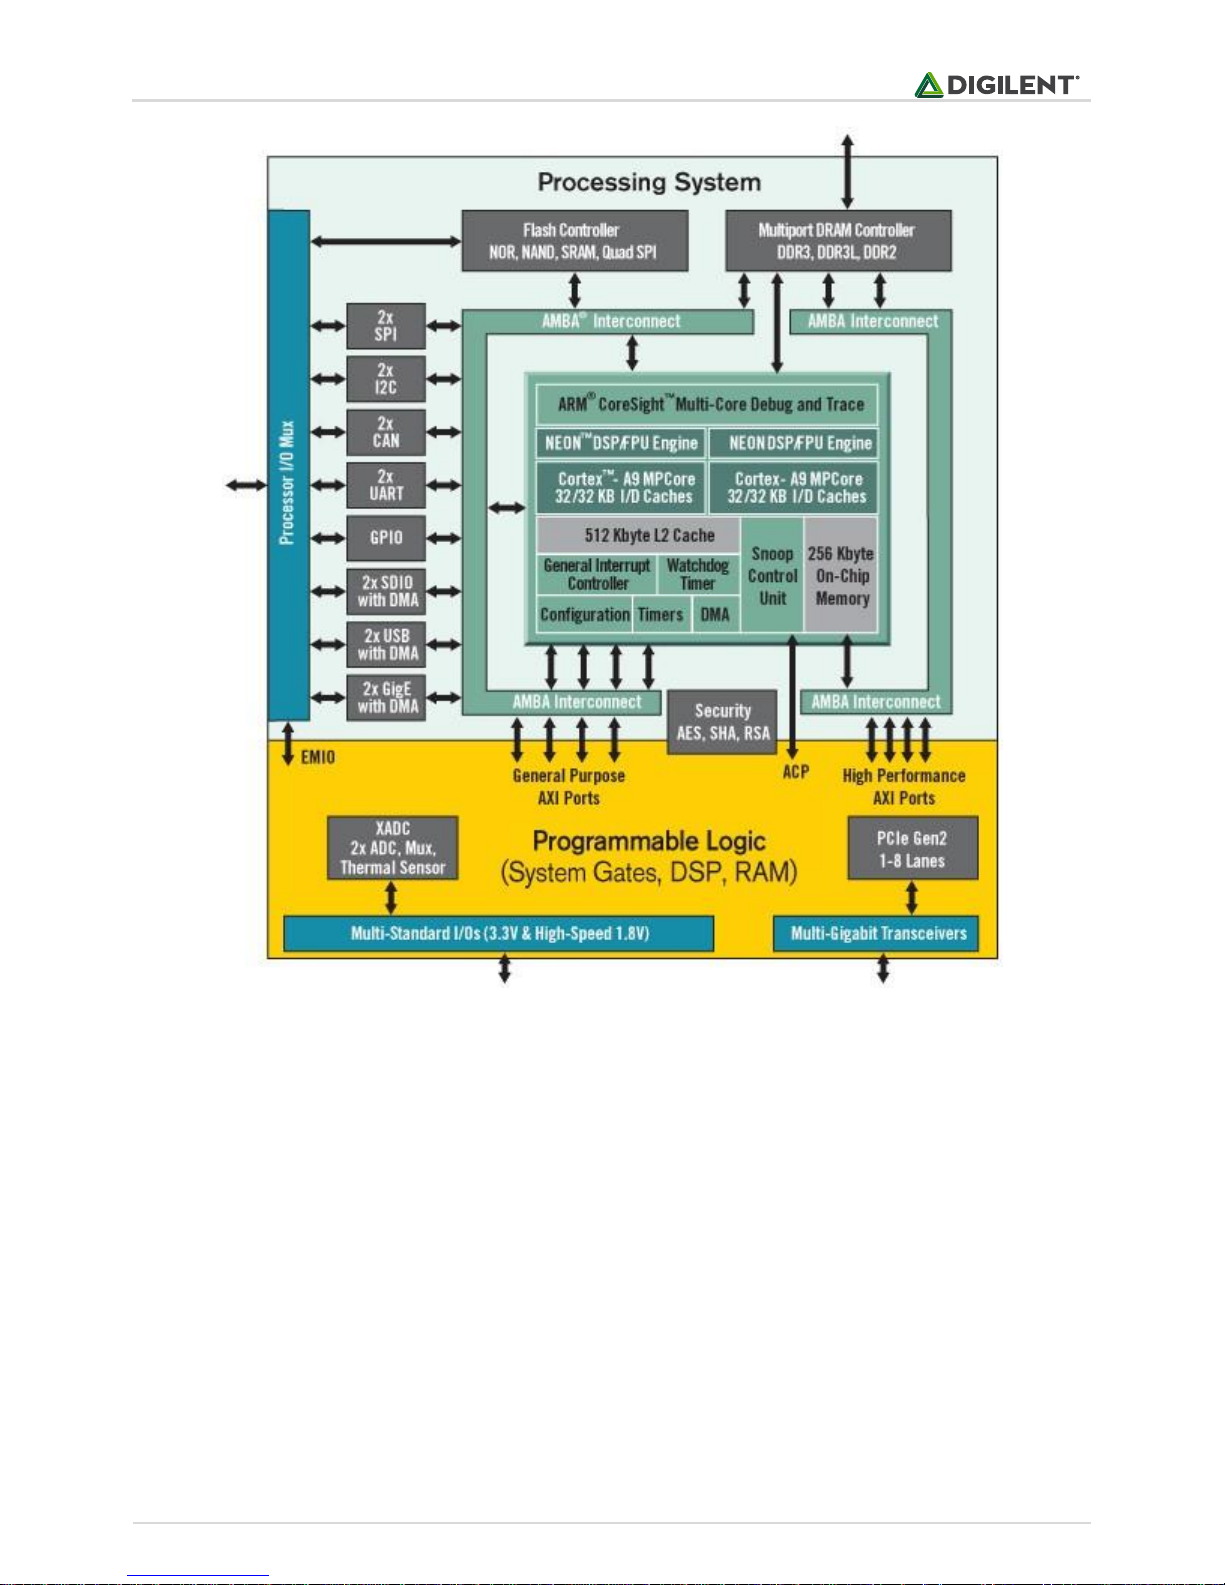
2 Zynq AP SoC Architecture
The Zynq AP SoC is divided into two distinct subsystems: The Processing System (PS), and the Programmable Logic
(PL). Figure 3 shows an overview of the Zynq AP SoC architecture, with the PS colored light green and the PL in
yellow. Note that the PCIe Gen2 controller and Multi-gigabit transceivers are not available on the Zynq-7010
device.
Page 6
ZYBO™ FPGA Board Reference Manual
Copyright Digilent, Inc. All rights reserved.
Other product and company names mentioned may be trademarks of their respective owners.
Page 6 of 26
Figure 3. Zynq AP SoC architecture.
The PL is nearly identical to a Xilinx 7-series Artix FPGA, except that it contains several dedicated ports and buses
that tightly couple it to the PS. The PL also does not contain the same configuration hardware as a typical 7-series
FPGA, and it must be configured either directly by the processor or via the JTAG port.
The PS consists of many components, including the Application Processing Unit (APU, which includes 2 Cortex-A9
processors), Advanced Microcontroller Bus Architecture (AMBA) Interconnect, DDR3 Memory controller, and
various peripheral controllers with their inputs and outputs multiplexed to 54 dedicated pins (called
MultiplexedI/O, or MIO pins). Peripheral controllers that do not have their inputs and outputs connected to MIO
pins can instead route their I/O through the PL, via the Extended-MIO (EMIO) interface. The peripheral controllers
are connected to the processors as slaves via the AMBA interconnect, and contain readable/writable control
registers that are addressable in the processors’ memory space. The programmable logic is also connected to the
interconnect as a slave, and designs can implement multiple cores in the FPGA fabric that each also contain
addressable control registers. Furthermore, cores implemented in the PL can trigger interrupts to the processors
(connections not shown in Fig. 3) and perform DMA accesses to DDR3 memory.
Page 7
ZYBO™ FPGA Board Reference Manual
Copyright Digilent, Inc. All rights reserved.
Other product and company names mentioned may be trademarks of their respective owners.
Page 7 of 26
MIO 500 3.3 V
Peripherals
Peripherals
Peripherals
Pin
Pmod
SPI Flash
GPIO
0
JF7 1
CS
2 DQ0
3
DQ1
4 DQ2
5 DQ3
6 SCLK
7
LED4
8 SLCK FB
9 JF8
10
JF2
11
JF3
12
JF4
13
JF1
14
JF9
15
JF10
There are many aspects of the Zynq AP SoC architecture that are beyond the scope of this document. For a
complete and thorough description, refer to the Zynq Technical Reference Manual, available at www.xilinx.com.
Figure 3 depicts the external components connected to the MIO pins of the ZYBO. The Zynq Board Definition File
found on the Digilent ZYBO product page can be imported into EDK and Vivado Designs to properly configure the
PS to work with these peripherals.
Page 8
ZYBO™ FPGA Board Reference Manual
Copyright Digilent, Inc. All rights reserved.
Other product and company names mentioned may be trademarks of their respective owners.
Page 8 of 26
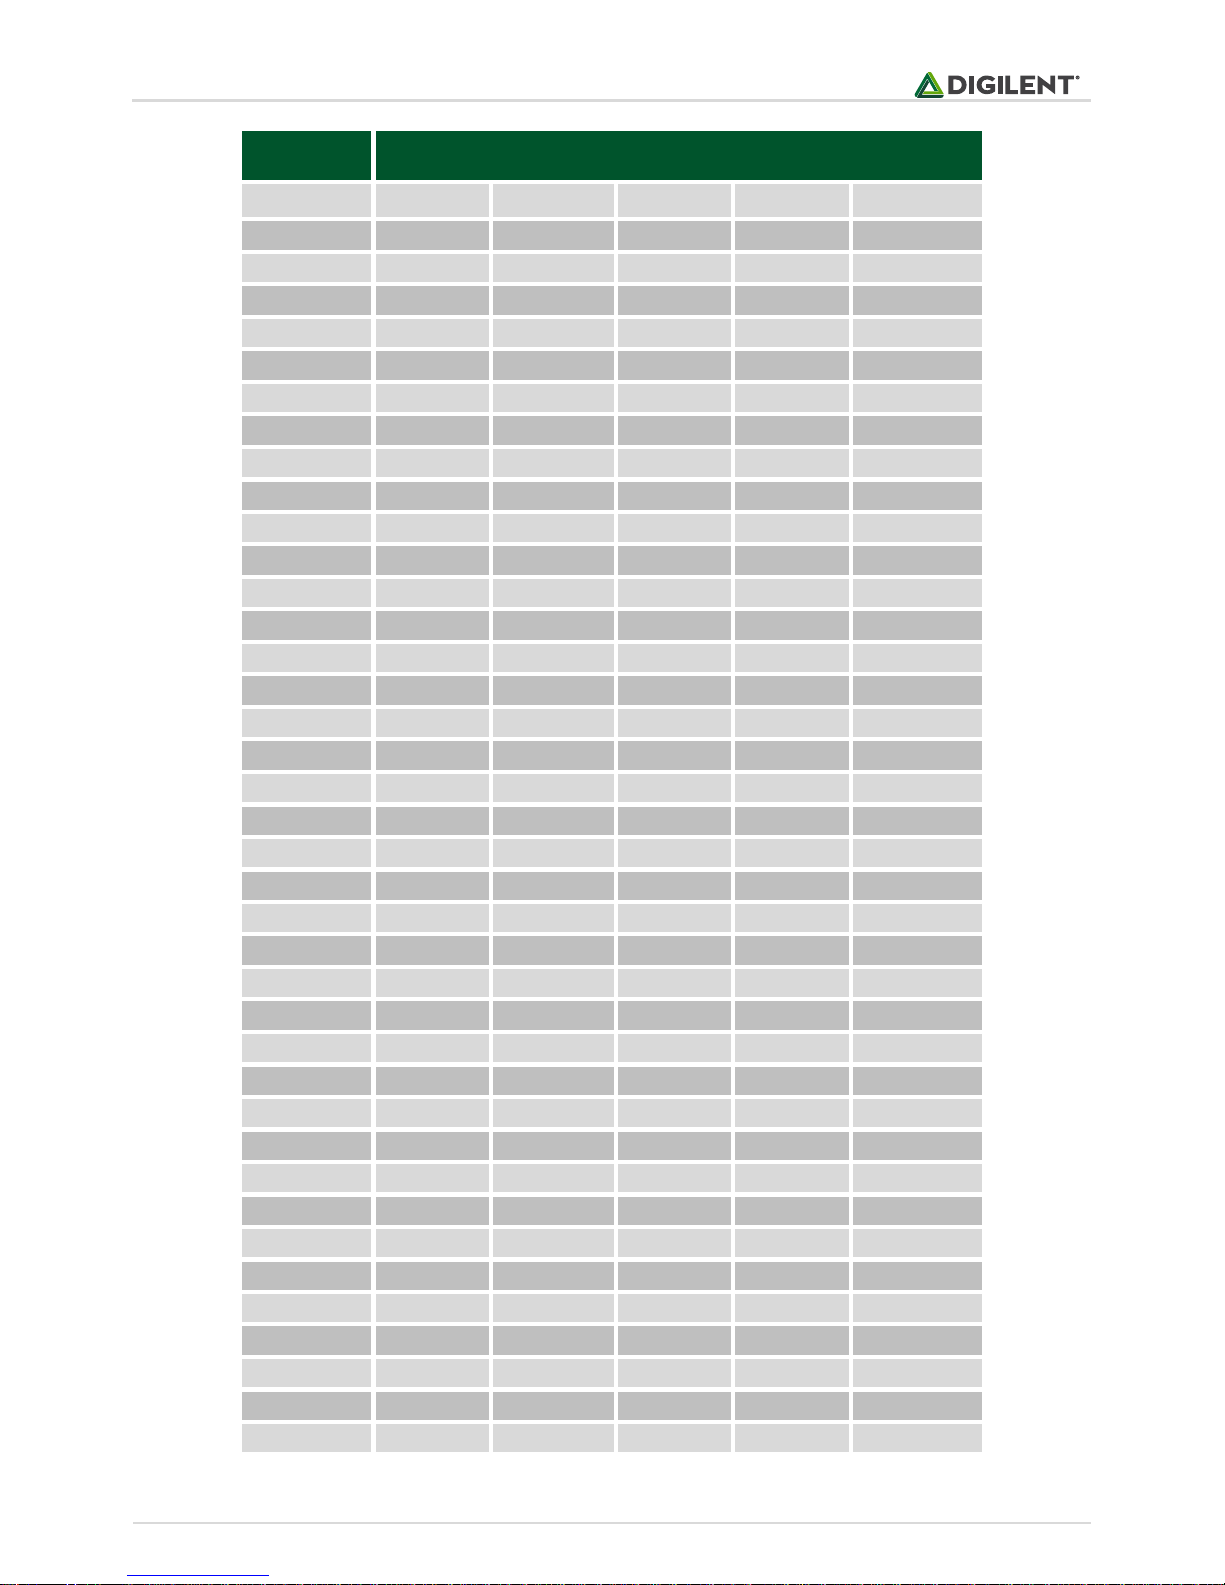
MIO 501
1.8V
Peripherals
Pin
ENET 0
USB 0
SDIO 0
UART 1
GPIO
16
TXCK
17
TXD0
18
TXD1
19
TXD2
20
TXD3
21
TXCTL
22
RXCK
23
RXD0
24
RXD1
25
RXD2
26
RXD3
27
RXCTL
28 DATA4
29 DIR 30 STP
31 NXT
32 DATA0
33 DATA1
34 DATA2
35 DATA3
36 CLK 37 DATA5
38 DATA6
39 DATA7
40
CCLK
41
CMD
42
D0
43
D1
44
D2
45
D3
46 RESETN
47
CD
48 RXD 49 TXD 50
BTN4
51
BTN5
52
MDC
53
MDIO
Table 3. MIO Pinout.
Page 9

ZYBO™ FPGA Board Reference Manual
Copyright Digilent, Inc. All rights reserved.
Other product and company names mentioned may be trademarks of their respective owners.
Page 9 of 26
3 Zynq Configuration
Unlike Xilinx FPGA devices, AP SoC devices such as the Zynq-7010 are designed around the processor, which acts as
a master to the programmable logic fabric and all other on-chip peripherals in the processing system. This causes
the Zynq boot process to be more similar to that of a microcontroller than an FPGA. This process involves the
processor loading and executing a Zynq Boot Image, which includes a First Stage Bootloader (FSBL), a bitstream for
configuring the programmable logic (optional), and a user application.
The boot process is broken into three stages:
Stage 0
After the ZYBO is powered on or the Zynq is reset (in software or by pressing PS-SRST), one of the
processors (CPU0) begins executing an internal piece of read-only code called the BootROM. If and only if
the Zynq was just powered on, the BootROM will first latch the state of the mode pins into the mode
register (the mode pins are attached to JP5 on the ZYBO). If the BootROM is being executed due to a reset
event, then the mode pins are not latched, and the previous state of the mode register is used. This
means that the ZYBO needs a power cycle to register any change in the programming mode jumper (JP5).
Next, the BootROM copies an FSBL from the form of non-volatile memory specified by the mode register
to the 256 KB of internal RAM within the APU (called On-Chip Memory, or OCM). The FSBL must be
wrapped up in a Zynq Boot Image in order for the BootROM to properly copy it. The last thing the
BootROM does is hand off execution to the FSBL in OCM.
Stage 1
During this stage, the FSBL first finishes configuring the PS components, such as the DDR memory
controller. Then, if a bitstream is present in the Zynq Boot Image, it is read and used to configure the PL.
Finally, the user application is loaded into memory from the Zynq Boot Image, and execution is handed off
to it.
Stage 2
The last stage is the execution of the user application that was loaded by the FSBL. This can be any sort of
program, from a simple “Hello World” design, to a Second Stage Boot loader used to boot an operating
system like Linux. For a more thorough explanation of the boot process, refer to Chapter 6 of the Zynq
Technical Reference Manual.
The Zynq Boot Image is created using Vivado and Xilinx Software Development Kit (Xilinx SDK). For a tutorial on
how to build an image using these tools that properly targets the ZYBO, download the ZYBO Base System Design
from the Digilent ZYBO product page and follow the included documentation.
The ZYBO supports three different boot modes: microSD, QSPI Flash, and JTAG. The boot mode is selected using
the Mode jumper (JP5), which affects the state of the Zynq configuration pins after power-on. Figure 4 depicts how
the Zynq configuration pins are connected on the ZYBO. Note that MIO2-MIO8 are shared with the QSPI Flash and
MIO LED, but not pictured in Fig. 4.
Page 10

ZYBO™ FPGA Board Reference Manual
Copyright Digilent, Inc. All rights reserved.
Other product and company names mentioned may be trademarks of their respective owners.
Page 10 of 26
MIO2/M3
JTAG
Port
USB
Controller
1x6 JTAG
Header
Micro-AB USB
Connector (J11)
USB-JTAG/UART Port
Zynq
DONE
6-pin JTAG
Header (J12)
PROGRAM_B
Mode (JP5)
Programming Mode
JP5
MicroSD
QSPI Flash
JTAG
MIO3/M1
MIO4/M2
MIO5/M0
MIO6/M4
MIO7/VCFG0
MIO8/VCFG1
PS_SRST_B
JP6
JP4
Figure 4. ZYBO configuration pins.
The three boot modes are described in the following sections.
3.1 MicroSD Boot Mode
The ZYBO supports booting from a microSD card inserted into connector J4. The following procedure will allow you
to boot the Zynq from microSD:
1) Format the microSD card with a FAT32 file system.
2) Copy the Zynq Boot Image created with Xilinx SDK to the microSD card.
3) Rename the Zynq Boot Image on the microSD card to BOOT.bin.
4) Eject the microSD card from your computer and insert it into connector J4 on the ZYBO.
5) Attach a power source to the ZYBO and select it using JP7.
6) Place a single jumper on JP5, shorting the two leftmost pins (labeled “SD”).
7) Turn the board on. The board will now boot the image on the microSD card.
3.2 QSPI Boot Mode
The ZYBO has an onboard 128-Mbit Quad-SPI (QSPI) serial Flash that the Zynq can boot from. The ZYBO Base
System Design includes a tutorial for how to configure the QSPI Flash with a Zynq Boot Image using the iMPACT
tool included with Xilinx ISE and Vivado. Once the QSPI Flash has been loaded with a Zynq Boot Image, the
following steps can be followed to boot from it:
1) Attach a power source to the ZYBO and select it using JP7.
2) Place a single jumper on JP5, shorting the two center pins (labeled “QSPI”).
3) Turn the board on. The board will now boot the image stored in the QSPI flash.
The ZYBO ships with a demonstration application pre-loaded into QSPI. For information on this image and how to
restore it if erased, download the Factory Loaded Demo project from the ZYBO page at www.digilentinc.com.
3.3 JTAG Boot Mode
When placed in JTAG boot mode, the processor will wait until software is loaded by a host computer using the
Xilinx tools. After software has been loaded, it is possible to either let the software begin executing, or step
Page 11

ZYBO™ FPGA Board Reference Manual
Copyright Digilent, Inc. All rights reserved.
Other product and company names mentioned may be trademarks of their respective owners.
Page 11 of 26
1
through it line by line using Xilinx SDK. The ZYBO Base System Design includes a tutorial for debugging software
over JTAG in Xilinx SDK.
It is also possible to directly configure the PL over JTAG, independent of the processor. This can be done using
iMPACT or the Vivado Hardware Server.
The ZYBO is configured to boot in Cascaded JTAG mode, which allows the PS to be accessed via the same JTAG port
as the PL. It is also possible to boot the ZYBO in Independent JTAG mode by loading a jumper in JP6 and shorting it.
This will cause the PS to not be accessible from the onboard JTAG circuitry, and only the PL will be visible in the
scan chain. To access the PS over JTAG while in independent JTAG mode, users will have to route the signals for the
PJTAG peripheral over EMIO, and use an external device to communicate with it.
4 SPI Flash
The ZYBO features a 4-bit SPI (quad-SPI) serial NOR flash. The Spansion S25FL128S is used on this board. The MultiI/O SPI Flash memory is used to provide non-volatile code and data storage. It can be used to initialize the PS
subsystem as well as configure the PL subsystem (bitstream). Spansion provides Spansion Flash File System (FFS)
for use after booting the Zynq-7000 AP SoC.
The relevant device attributes are:
128Mbit
x1, x2, and x4 support
Speeds up to 104 MHz, supporting Zynq configuration rates @ 100 MHz. In Quad-SPI mode, this
translates to 400Mbs
Powered from 3.3V
The SPI Flash connects to the Zynq-7000 AP SoC supporting up to Quad-I/O SPI interface. This requires connection
to specific pins in MIO Bank 0/500, specifically MIO[1:6,8] as outlined in the Zynq datasheet. Quad-SPI feedback
mode is used, thus qspi_sclk_fb_out/MIO[8] is left to freely toggle and is connected only to a 20K pull-up resistor
to 3.3V. This allows a QSPI clock frequency greater than FQSPICLK2.
5 DDR Memory
The ZYBO includes two Micron MT41J128M16JT-125 or MT41K128M16JT-125 DDR3 memory components creating
a single rank, 32-bit wide interface and a total of 512MiB of capacity. The DDR3 is connected to the hard memory
controller in the Processor Subsystem (PS), as outlined in the Zynq documentation. The PS incorporates an AXI
memory port interface, a DDR controller, the associated PHY, and a dedicated I/O bank. DDR3 memory interface
speeds up to 533 MHz/1066 Mbps are supported1.
The DDR3 uses 1.5V SSTL-compatible inputs. The two components are organized in a tree topology with a series
termination scheme while keeping traces as short as possible and matched.
ZYBO was routed with 40 ohm (+/-10%) trace impedance for single-ended signals, and differential clock and
strobes set to 80 ohms (+/-10%). A feature called DCI (Digitally Controlled Impedance) is used to match the drive
Maximum actual clock frequency is 525 MHz due to PLL limitation.
Page 12

ZYBO™ FPGA Board Reference Manual
Copyright Digilent, Inc. All rights reserved.
Other product and company names mentioned may be trademarks of their respective owners.
Page 12 of 26
TXD
MIO48
Micro-USB
(J11)
2
RXD
Zynq-7
FT2232
JTAG
4
JTAG
MIO49
LD9
LD8
TX LED
RX LED
strength and termination impedance of the PS pins to the trace impedance. On the memory side, each chip
calibrates its on-die termination and drive strength using a 240 ohm resistor on the ZQ pin.
Due to layout reasons, the two lower data byte groups (DQ[0-7], DQ[8-15]) were swapped. To the same effect, the
data bits inside byte groups were swapped as well. These changes are transparent to the user. During the whole
design process the Xilinx PCB guidelines were followed.
Both the memory chips and the PS DDR bank are powered from the 1.5V supply. The mid-point reference of 0.75V
is created with a simple resistor divider and is available to the Zynq as external reference.
For proper operation it is essential that the PS memory controller is configured properly. Settings range from the
actual memory flavor to the board trace delays. For your convenience the board definition file provided on our
website will automatically configure the correct parameters.
For best DDR3 performance, DRAM training is enabled for write leveling, read gate, and read data eye options in
the PS Configuration Tool in Xilinx tools. Training is done dynamically by the controller to account for board delays,
process variations and thermal drift. Optimum starting values for the training process are the board delays
(propagation delays) for certain memory signals.
Board delays are specified for each of the byte groups. These parameters are board-specific and were calculated
from the PCB trace length reports. The DQS to CLK Delay and Board Delay values are calculated specific to the
ZYBO memory interface PCB design.
For more details on memory controller operation, refer to the Xilinx Zynq TRM (ug585).
6 USB UART Bridge (Serial Port)
The ZYBO includes an FTDI FT2232HQ USB-UART bridge (attached to connector J11) that lets you use PC
applications to communicate with the board using standard Windows COM port commands. Free USB-COM port
drivers, available from www.ftdichip.com under the "Virtual Com Port" or VCP heading, convert USB packets to
UART/serial port data. Serial port data is exchanged with the Zynq using a two-wire serial port (TXD/RXD). After the
drivers are installed, I/O commands can be used from the PC directed to the COM port to produce serial data
traffic on the Zynq pins. The port is tied to PS (MIO) pins and can be used in combination with the UART 1
controller. A 3.3V->1.8V voltage level translation interfaces the FT2232 with MIO Bank 501, a process transparent
to the user.
The board definition file takes care of mapping the correct MIO pins to the UART 1 controller and uses the
following default protocol parameters: 115200 baud rate, 1 stop bit, no parity, 8-bit character length.
Page 13

ZYBO™ FPGA Board Reference Manual
Copyright Digilent, Inc. All rights reserved.
Other product and company names mentioned may be trademarks of their respective owners.
Page 13 of 26
Signal Name
Description
Zynq Pin
SD Slot Pin
SD_D0
Data[0]
MIO42
7
SD_D1
Data[1]
MIO43
8
SD_D2
Data[2]
MIO44
1
SD_D3
Data[3]
MIO45
2
SD_CCLK
Clock
MIO40
5
SD_CMD
Command
MIO41
3
SD_CD
Card Detect
MIO47
9
Figure 5. USB-UART bridge.
Two on-board status LEDs provide visual feedback on traffic flowing through the port: the transmit LED (LD9) and
the receive LED (LD8). Signal names that imply direction are from the point-of-view of the DTE (Data Terminal
Equipment), in this case the PC.
The FT2232HQ is also used as the controller for the Digilent USB-JTAG circuitry, but the USB-UART and USB-JTAG
functions behave entirely independent of one another. Programmers interested in using the UART functionality of
the FT2232 within their design do not need to worry about the JTAG circuitry interfering with the UART data
transfers, and vice-versa. The combination of these two features into a single device allows the ZYBO to be
programmed, communicated with via UART, and powered from a computer attached with a single Micro USB
cable.
7 MicroSD Slot
The ZYBO provides a microSD slot (J4) for non-volatile external memory storage as well as booting the Zynq. The
slot is wired to Bank 1/501 MIO[40-47], including Card Detect. On the PS side peripheral SDIO 0 is mapped out to
these pins and controls communication with the SD card. The pinout can be seen in Table 4Error! Reference
ource not found.. The peripheral controller supports 1-bit and 4-bit SD transfer modes, but does not support SPI
mode. Based on the Zynq TRM, SDIO host mode is the only mode supported.
The SD slot is a powered from 3.3V, but is connected through MIO Bank 1/501 (1.8V). Therefore, a TI TXS02612
level shifter performs this translation. The TXS02612 is actually 2-port SDIO port expander, but only its level shifter
function is used. The connection diagram can be seen on Figure 6. Mapping out the correct pins and configuring
the interface is handled by the ZYBO board definition file.
Table 4. MicroSD pinout.
Page 14

ZYBO™ FPGA Board Reference Manual
Copyright Digilent, Inc. All rights reserved.
Other product and company names mentioned may be trademarks of their respective owners.
Page 14 of 26
Zynq-7
MIO43
SD MICRO
DAT2
DAT3
CMD
VDD
CLK
GND
DAT0
3.3V
MIO42
MIO40
MIO41
MIO45
MIO44
DAT1
CD
TXS02612RTWR
Voltage Level Translator
MIO47
SD_D1
SD_D0
SD_CCLK
SD_CMD
SD_D3
SD_D2
1.8V
Figure 6. MicroSD slot signals.
Both low speed and high speed cards are supported, the maximum clock frequency being 50 MHz. A Class 4 card or
better is recommended.
Refer to section 3.1 for information on how to boot from an SD card. For more information, consult the Xilinx Zynq
TRM (ug585).
8 USB OTG
The ZYBO implements one of the two available PS USB OTG interfaces on the Zynq device. A Microchip USB3320
USB 2.0 Transceiver Chip with an 8-bit ULPI interface is used as the PHY. The PHY features a complete HS-USB
Physical Front-End supporting speeds of up to 480Mbs. The PHY is connected to MIO Bank 1/501, which is
powered at 1.8V. The usb0 peripheral is used on the PS, connected through MIO[28-39]. The USB OTG interface
can act as an embedded host or a peripheral device. The USB mode is controlled from software by manipulating
the USB0 peripheral controller in the Zynq. When acting as a peripheral, the USB Micro AB connector (J9) should
be used to connect to a USB host device, and JP1 should not be shorted. When acting as an embedded host, the
USB A connector (J10) should be used to connect to a USB peripheral device, and JP1 should be shorted. The ZYBO
should never have a peripheral device and a host device connected to these two connectors at the same time.
While in host mode, the ZYBO is technically an "embedded host", because it does not provide the required 150 µF
of capacitance on VBUS required to qualify as a general purpose host. It is possible to modify the ZYBO so that it
complies with the general purpose USB host requirements by loading C64 with a 150 µF capacitor and shorting JP2.
Only those experienced at soldering small components on PCBs should attempt this rework. Many USB peripheral
devices will work just fine without loading C64. Whether the ZYBO is configured as an embedded host or a general
purpose host, it can provide 500 mA on the 5V VBUS line.
Note that if your design uses the USB OTG feature in host mode (embedded or general purpose), then the ZYBO
should not be powered via USB (J11), but instead by a battery or wall adapter capable of providing more power.
9 Ethernet PHY
The ZYBO uses a Realtek RTL8211E-VL PHY to implement a 10/100/1000 Ethernet port for network connection. The
PHY connects to MIO Bank 501 (1.8V) and interfaces to the Zynq-7000 AP SoC via RGMII for data and MDIO for
management. The auxiliary interrupt (INTB) and reset (PHYRSTB) signals connect to PL pins to be accessed via
EMIO. The connection diagram can be seen on Fig. 7.
Page 15

ZYBO™ FPGA Board Reference Manual
Copyright Digilent, Inc. All rights reserved.
Other product and company names mentioned may be trademarks of their respective owners.
Page 15 of 26
MIO24
MIO52
MIO53
Zynq-7
MDIO
8
MDC
MIO23 RXD0/SELRGV
Realtek RTL8211E
RJ-45 with
magnetics
RXD1/TXDLY
RXD2/AN0MIO25
MIO27
MIO26 RXD3/AN1
RXCTL/PHY_AD2
RXCMIO22
MIO18
MIO17 TXD0
TXD1
TXD2MIO19
MIO21
MIO20 TXD3
TXCTL
TXCMIO16
E17
F16 INTB
PHYRSTB
CLK125L16
DSC1121CE5
50 MHz
Oscillator
CKXTAL1PS_CLK
ACT LED (LD7)
LINK LED (LD6)
LED0/PHY_AD0
LED1/PHY_AD1
Function
Designator
State
Description
LINK
LD6
On
Link 10/100/1000
Blinking 0.4s ON, 2s OFF
Link, Energy Efficient Ethernet (EEE) mode
ACT
LD7
Blinking
Transmitting or Receiving
After power-up the PHY starts with Auto Negotiation enabled, advertising 10/100/1000 link speeds and full duplex.
If there is an Ethernet-capable partner connected, the PHY automatically establishes a link with it, even with the
Zynq not configured.
Two status indicator LEDs are on-board near the RJ-45 connector that indicate traffic (LD7) and valid link state
(LD6). Table 5 shows the default behavior.
Figure 7. Ethernet PHY signals.
The Zynq incorporates two independent Gigabit Ethernet Controllers. They implement a 10/100/1000 half/full
duplex Ethernet MAC. Of these two, GEM 0 can be mapped to the MIO pins where the PHY interfaces. Since the
MIO bank is powered from 1.8V, the RGMII interface uses 1.8V HSTL Class 1 drivers. For this I/O standard an
external reference of 0.9V is provided in bank 501 (PS_MIO_VREF). Mapping out the correct pins and configuring
Table 5. Ethernet status LEDs.
the interface is handled by the ZYBO board definition file.
Page 16

ZYBO™ FPGA Board Reference Manual
Copyright Digilent, Inc. All rights reserved.
Other product and company names mentioned may be trademarks of their respective owners.
Page 16 of 26
Signal
Role
Description
Direction (Zynq POW)
How to control
HPD
Source
Hot-plug detect; signals the
presence of a Sink to a Source
Input
HDMI_OUT_EN = 1
Sink
Output
HDMI_OUT_EN = 0
5V0
Source
Auxiliary power for Sink
Output
HDMI_OUT_EN = 1
Sink
Input
HDMI_OUT_EN = 0
Although the default power-up configuration of the PHY might be enough in most applications, the MDIO bus is
available for management. The RTL8211E-VL is assigned address 00001b. With simple register read and write
commands, status information can be read out or configuration changed. The Realtek PHY follows industrystandard register map for basic configuration.
The RGMII specification calls for the receive (RXC) and transmit clock (TXC) to be delayed relative to the data
signals (RXD[0:3], RXCTL and TXD[0:3], TXCTL). Xilinx PCB guidelines also require this delay to be added. The
RTL8211E-VL is capable of inserting a 2ns delay on both the TXC and RXC so that board traces do not need to be
made longer.
The PHY is clocked from the same 50 MHz oscillator (IC22) that clocks the PS too. The parasitic capacitance of the
two loads is low enough to be driven from a single source.
On an Ethernet network each node needs a unique MAC address. To this end, a Microchip 24AA02E48 EEPROM is
provided on the ZYBO. On one hand it is a read-writeable EEPROM that can be accessed via I2C. On the other hand
it features a read-only memory section that comes pre-programmed with a unique identifier. This unique identifier
can be read and used as a MAC address, avoiding a possible address conflict on the network. The I2C interface
connects to the PL side and can be accessed from the PS over EMIO as well. The device address of the EEPROM is
1010000b.
For more information on using the Gigabit Ethernet MAC, refer to the Xilinx Zynq TRM (ug585).
10 HDMI Source/Sink Port
An input and output-capable HDMI Port connects to the programmable logic pins. Over this connector an HDMI or
DVI-compatible video stream can be driven in or out of the ZYBO. Encoding or decoding the HDMI/DVI video
stream needs to be implemented in logic, as well as auxiliary functions, like DDC or CEC. Depending on the actual
design, it can take the Source role driving a monitor/TV display, or behave as a Sink accepting a video stream from
any HDMI/DVI Source, like a laptop or smartphone.
On-board auxiliary buffers and electronic switches control the direction of signals that differ between Source and
Sink. These signals are summarized Table 6.
Table 6. HDMI signal direction in Source and Sink roles.
The CEC function is bi-directional by definition, so it is treated the same no matter what role the port takes. If the
CEC function is not used, declare it as input and constrain it to the correct PL pin to leave other devices on the CEC
bus unaffected.
When operating as Sink, the DDC function is required to be implemented so that a connected Source can read out
important characteristics of the device. This can be done by emulating an I2C-capable EEPROM in programmable
logic. Likewise, in Source mode DDC can be used to find out the capabilities of the connected display.
Page 17

ZYBO™ FPGA Board Reference Manual
Copyright Digilent, Inc. All rights reserved.
Other product and company names mentioned may be trademarks of their respective owners.
Page 17 of 26
2
15
10
5
11
6
1
Pin 1: Red
Pin 2: Grn
Pin 3: Blue
Pin 13: HS
Pin 14: VS
Pin 5: GND
Pin 6: Red GND
Pin 7: Grn GND
Pin 8: Blu GND
Pin 10: Sync GND
HD-DB15F
100W
100W
RED5
RED4
RED3
RED
GRN
BLU
HS
VS
Zynq- 7
F19
G20
J20
P19
F20
H20
J19
R19
HSYNC
VSYNC
536W
RED2
L20
L19
J18
K19
M20
P20
M19
N20
H18
G19
536W
RED1
536W
536W
536W
270W
270W
270W
270W
GRN5
GRN4
GRN3
536W
GRN2
536W
GRN1
536W
536W
536W
270W
270W
270W
270W
536W
GRN0
270W
536W
536W
BLU5
BLU4
BLU3
536W
BLU2
536W
BLU1
536W
536W
536W
270W
270W
270W
270W
536W
Figure 8. ZYBO VGA circuit.
The HDMI/DVI protocol uses TMDS (Transition-minimized differential signaling) as I/O standard. It is supported on
Zynq by the I/O buffers on the programmable logic side. 50 ohm external parallel termination resistors are
provided on-board. HDMI specifications only require terminations on the Sink side, but optional Source-side
terminations reduce reflections, resulting in improved signal quality. Do not connect powered HDMI/DVI devices to
an unpowered ZYBO, as it might result in back-powering the board through the termination resistors.
Resolutions up to 720p (1280x720) have been tested.
HDMI and DVI are high-speed source-synchronous serial protocols. Implementations on FPGA are required to use
certain built-in primitives to properly synthesize the correct clock frequency, serialize the transmission, and keep a
lock on the signal. The actual implementation of the HDMI/DVI protocols is outside the scope of this manual.
Check for upcoming reference projects on our website or consult relevant specifications and Xilinx documentation.
11 VGA Port
The ZYBO board uses 18 programmable logic pins to create an
analog VGA output port. This translates to 16-bit color depth and
two standard sync signals (HS – Horizontal Sync, and VS – Vertical
Sync).
The digital-to-analog conversion is done using a simple R-2R
resistor ladder2. The ladder works in conjunction with the 75-ohm
termination resistance of the VGA display to create 32 and 64
analog signal levels red, blue, and green VGA signals. This circuit,
shown in Fig. 8, produces video color signals that proceed in equal
increments between 0V (fully off) and 0.7V (fully on). With 5 bits
each for red and blue and 6 bits for green, 65,536 (32×32×64)
different colors can be displayed, one for each unique 16-bit
pattern.
A video controller circuit must be created in programmable logic
to drive the sync and color signals with the correct timing in order
to produce a working display system.
http://en.wikipedia.org/wiki/Resistor_ladder
Page 18

ZYBO™ FPGA Board Reference Manual
Copyright Digilent, Inc. All rights reserved.
Other product and company names mentioned may be trademarks of their respective owners.
Page 18 of 26
Anode (entire screen)
High voltage
supply (>20kV)
Deflection coils
Grid
Electron guns
(Red, Blue, Green)
gun
control
grid
control
deflection
control
R,G,B signals
(to guns)
Cathode ray tube
Cathode ray
VGA
cable
11.1 VGA System Timing
VGA signal timings are specified, published, copyrighted, and sold by the VESA organization (www.vesa.org). The
following VGA system timing information is provided as an example of how a VGA monitor might be driven in 640
by 480 mode.
NOTE: For more precise information, or for information on other VGA frequencies, refer to documentation
available at the VESA website.
CRT-based VGA displays use amplitude-modulated moving electron beams (or cathode rays) to display information
on a phosphor-coated screen. LCD displays use an array of switches that can impose a voltage across a small
amount of liquid crystal, thereby changing light permittivity through the crystal on a pixel-by-pixel basis. Although
the following description is limited to CRT displays, LCD displays have evolved to use the same signal timings as
CRT displays (so the “signals” discussion below pertains to both CRTs and LCDs). Color CRT displays use three
electron beams (one for red, one for blue, and one for green) to energize the phosphor that coats the inner side of
the display end of a cathode ray tube (see Fig. 9).
Figure 9. Color CRT display.
Electron beams emanate from “electron guns” which are finely-pointed heated cathodes placed in close proximity
to a positively charged annular plate called a “grid.” The electrostatic force imposed by the grid pulls rays of
energized electrons from the cathodes, and those rays are fed by the current that flows into the cathodes. These
particle rays are initially accelerated towards the grid, but they soon fall under the influence of the much larger
electrostatic force that results from the entire phosphor-coated display surface of the CRT being charged to 20kV
(or more). The rays are focused to a fine beam as they pass through the center of the grids, and then they
accelerate to impact on the phosphor-coated display surface. The phosphor surface glows brightly at the impact
point, and it continues to glow for several hundred microseconds after the beam is removed. The larger the
current fed into the cathode, the brighter the phosphor will glow.
Between the grid and the display surface, the beam passes through the neck of the CRT where two coils of wire
produce orthogonal electromagnetic fields. Because cathode rays are composed of charged particles (electrons),
they can be deflected by these magnetic fields. Current waveforms are passed through the coils to produce
magnetic fields that interact with the cathode rays and cause them to transverse the display surface in a “raster”
pattern, horizontally from left to right and vertically from top to bottom, as shown in Fig. 10. As the cathode ray
Page 19

ZYBO™ FPGA Board Reference Manual
Copyright Digilent, Inc. All rights reserved.
Other product and company names mentioned may be trademarks of their respective owners.
Page 19 of 26
Current
waveform
through
horizontal
defletion
coil
Stable current ramp - information
is displayed during this time
Retrace - no
information
displayed
during this
time
Total horizontal time
Horizontal display time
Horizontal sync signal
sets retrace frequency
retrace
time
time
HS
"back porch""front porch"
Display Surface
640 pixels per row are displayed
during forward beam trace
pixel 0,639
pixel 0,0
pixel 479,0 pixel 479,639
moves over the surface of the display, the current sent to the electron guns can be increased or decreased to
change the brightness of the display at the cathode ray impact point.
Information is only displayed when the beam is moving in the “forward” direction (left to right and top to bottom),
and not during the time the beam is reset back to the left or top edge of the display. Much of the potential display
time is therefore lost in “blanking” periods when the beam is reset and stabilized to begin a new horizontal or
vertical display pass. The size of the beams, the frequency at which the beam can be traced across the display, and
the frequency at which the electron beam can be modulated determine the display resolution.
Modern VGA displays can accommodate different resolutions, and a VGA controller circuit dictates the resolution
by producing timing signals to control the raster patterns. The controller must produce synchronizing pulses at
3.3V (or 5V) to set the frequency at which current flows through the deflection coils, and it must ensure that video
data is applied to the electron guns at the correct time. Raster video displays define a number of “rows” that
corresponds to the number of horizontal passes the cathode makes over the display area, and a number of
“columns” that corresponds to an area on each row that is assigned to one “picture element”, or pixel. Typical
displays use from 240 to 1200 rows and from 320 to 1600 columns. The overall size of a display and the number of
rows and columns determines the size of each pixel.
Figure 10. VGA horizontal synchronization.
Video data typically comes from a video refresh memory; with one or more bytes assigned to each pixel location
(the ZYBO uses 16 bits per pixel). The controller must index into video memory as the beams move across the
display, and retrieve and apply video data to the display at precisely the time the electron beam is moving across a
given pixel.
A VGA controller circuit must generate the HS and VS timings signals and coordinate the delivery of video data
based on the pixel clock. The pixel clock defines the time available to display one pixel of information. The VS signal
defines the “refresh” frequency of the display, or the frequency at which all information on the display is redrawn.
The minimum refresh frequency is a function of the display’s phosphor and electron beam intensity, with practical
Page 20

ZYBO™ FPGA Board Reference Manual
Copyright Digilent, Inc. All rights reserved.
Other product and company names mentioned may be trademarks of their respective owners.
Page 20 of 26
T
S
T
disp
T
pw
T
fp
T
bp
T
S
T
disp
T
pw
T
fp
T
bp
Sync pulse
Display time
Pulse width
Front porch
Back porch
16.7ms
15.36ms
64 us
320 us
928 us
416,800
384,000
1,600
8,000
23,200
521
480
2
10
29
Symbol Parameter
Time Clocks Lines
Vertical Sync
32 us
25.6 us
3.84 us
640 ns
1.92 us
800
640
96
16
48
Clks
Horiz. Sync
Time
Horizontal
Counter
Zero
Detect
3.84us
Detect
Horizontal
Synch
Set
Reset
Vertical
Counter
Zero
Detect
64us
Detect
Vertical
Synch
Set
Reset
CE
VS
HS
Pixel
CLK
refresh frequencies falling in the 50Hz to 120Hz range. The number of lines to be displayed at a given refresh
frequency defines the horizontal “retrace” frequency. For a 640-pixel by 480-row display using a 25MHz pixel clock
and 60 +/-1Hz refresh, the signal timings shown in Fig. 11 can be derived. Timings for sync pulse width and front
and back porch intervals (porch intervals are the pre- and post-sync pulse times during which information cannot
be displayed) are based on observations taken from actual VGA displays.
Figure 11. Signal timings for a 640-pixel by 480 row display using a 25MHz pixel clock and 60Hz vertical refresh.
A VGA controller circuit, such as the one diagramed in Fig. 12, decodes the output of a horizontal-sync counter
driven by the pixel clock to generate HS signal timings. You can use this counter to locate any pixel location on a
given row. Likewise, the output of a vertical-sync counter that increments with each HS pulse can be used to
generate VS signal timings, and you can use this counter to locate any given row. These two continually running
counters can be used to form an address into video RAM. No time relationship between the onset of the HS pulse
and the onset of the VS pulse is specified, so you can arrange the counters to easily form video RAM addresses, or
to minimize decoding logic for sync pulse generation.
Figure 12. VGA display controller block diagram.
Page 21

ZYBO™ FPGA Board Reference Manual
Copyright Digilent, Inc. All rights reserved.
Other product and company names mentioned may be trademarks of their respective owners.
Page 21 of 26
Zynq
L16
PS_CLK
Ethernet PHY (IC1)
CKXTAL1
CLK125
50 MHz Oscillator
(IC22)
OUT
PS
PL
PLL
FCLK_CLK[0:3]
E17
PHYRSTB
3.3V
12 Clock Sources
The ZYBO provides a 50 MHz clock to the Zynq PS_CLK input, which is used to generate the clocks for each of the
PS subsystems. The 50 MHz input allows the processor to operate at a maximum frequency of 650 MHz and the
DDR3 memory controller to operate at a maximum of 525 MHz (1050 Mbps). The ZYBO Base System Design
configures the PS to work properly with this input clock, and should be used as a reference when creating custom
designs.
The PS has a dedicated PLL capable of generating up to four reference clocks, each with settable frequencies, that
can be used to clock custom logic implemented in the PL. Additionally, The ZYBO provides an external 125 MHz
reference clock directly to pin L16 of the PL. The external reference clock allows the PL to be used completely
independently of the PS, which can be useful for simple applications that do not require the processor.
The PL of the Zynq-Z7010 also includes two MMCM’s and two PLL’s that can be used to generate clocks with
precise frequencies and phase relationships. Any of the four PS reference clocks or the 125 MHz external reference
clock can be used as an input to the MMCMs and PLLs. For a full description of the capabilities of the Zynq PL
clocking resources, refer to the “7 Series FPGAs Clocking Resources User Guide” available from Xilinx.
Figure 13 outlines the clocking scheme used on the ZYBO. Note that the reference clock output from the Ethernet
PHY is used as the 125 MHz reference clock to the PL, in order to cut the cost of including a dedicated oscillator for
this purpose. Keep in mind that CLK125 will be disabled when the Ethernet PHY (IC1) is held in hardware reset by
driving the PHYRSTB signal low.
13 Basic I/O
The ZYBO board includes four slide switches, four push buttons, and four individual LEDs connected to the Zynq PL,
as shown in Fig. 14. There are also two additional pushbuttons and one LED connected directly to the PS via MIO
pins, also shown in Fig. 14. The pushbuttons and slide switches are connected to the Zynq via series resistors to
prevent damage from inadvertent short circuits (a short circuit could occur if a pin assigned to a pushbutton or
slide switch was inadvertently defined as an output). The pushbuttons are "momentary" switches that normally
generate a low output when they are at rest, and a high output only when they are pressed. Slide switches
generate constant high or low inputs depending on their position.
Figure 13. ZYBO clocking.
Page 22

ZYBO™ FPGA Board Reference Manual
Copyright Digilent, Inc. All rights reserved.
Other product and company names mentioned may be trademarks of their respective owners.
Page 22 of 26
Zynq
V16
Y16
P16
BTN3
BTN2
BTN1
3.3V
LEDs
Slide
Switches
3.3V
Buttons
R18
BTN0
T16
W13
P15
G15
SW1
SW3
SW2
SW0
LD3
LD2
LD1
LD0
D18
G14
M15
M14
PL
PS
MIO51
BTN5
MIO50
BTN4
LD12
MIO7
3.3V
MIO
Buttons
MIO
LED
Audio Jack
Description
Channels
Color
SSM2603 pin
J5
Headphone Out
Stereo
Black
L/RHPOUT
J6
Microphone In
Mono
Pink
MICIN, MICBIAS
J7
Line In
Stereo
Light Blue
L/RLINEIN
Figure 14. ZYBO GPIO.
The high-efficiency LEDs are anode-connected to the Zynq via 330-ohm resistors, so they will turn on when a logic
high voltage is applied to their respective I/O pin. Additional LEDs that are not user-accessible indicate power-on,
FPGA programming status, and USB and Ethernet port status.
The LED and two pushbuttons attached directly to the PS are accessed using the Zynq GPIO controller. This core is
described in full in Chapter 14 of the Zynq Technical Reference Manual.
14 Audio
An Analog Devices SSM2603 Audio Codec provides integrated digital audio processing to the Zynq-7000 AP SoC. It
allows for stereo record and playback at sample rates from 8 kHz to 96 kHz.
On the analog side, the codec connects to three 3.5 mm standard audio jacks. There are two inputs: a mono
microphone and a stereo line in. There is one stereo output, the headphone jack. Analog power is provided by a
dedicated linear power supply (IC6).
Table 7. Analog audio signals.
Page 23

ZYBO™ FPGA Board Reference Manual
Copyright Digilent, Inc. All rights reserved.
Other product and company names mentioned may be trademarks of their respective owners.
Page 23 of 26
SSM2603 pin
Protocol
Direction (Zynq POW)
Zynq pin
BCLK
I2S (Serial Clock)
Output
K18
PBDAT
I2S (Playback Data)
Output
M17
PBLRC
I2S (Playback Channel Clock)
Output
L17
RECDAT
I2S (Record Data)
Input
K17
RECLRC
I2S (Record Channel Clock)
Output
M18
SDIN
I2C (Data)
Input/Output
N17
SCLK
I2C (Clock)
Output
N18
MUTE
Digital Enable (Active Low)
Output
P18
MCLK
Master Clock
Output
T19
PB/RECLRC
BCLK
PB/RECDAT
1/f
s
N 1 2 3
N
1 2 3
N
The digital interface of the SSM2603 is wired to the programmable logic side of the Zynq. Audio data is transferred
via the I2S protocol. Configuration is done over an I2C bus. The device address of the SSM2603 is 0011010b. All
digital I/O are 3.3V level and connect to a 3.3V-powered FPGA bank.
Table 8. Digital audio signals, with the SSM2603 in default slave mode.
The audio codec needs to be clocked from the Zynq on the MCLK pin. This master clock will be used by the audio
codec to establish the audio sampling frequency. This clock is required to be an integer multiple of the desired
sampling rate. The default settings require a master clock of 12.288 Mhz, resulting in a 48 kHz sampling rate. For
other frequencies and their respective configuration parameters, consult the SSM2603 datasheet.
The codec has two modes: master and slave, with the slave being default. In this mode, the direction of the signals
is specified in Table 8. When configured as master, the direction of BCLK, PBLRC and RECLRC is inverted. In this
mode, the codec generates the proper frequencies for these clocks. No matter where are the clocks are generated,
PBDAT needs to be driven out and RECDAT sampled in sync with them. The master clock is always driven out of the
Zynq. The timing diagram of an I2S stream can be seen on Figure 15. Note the one-cycle delay of the data stream
with respect to the left/right clock changing state. Audio samples are transmitted MSB first, noted as 1 in the
diagram.
Figure 15. I2S timing diagram.
The digital mute signal (MUTE) is active-low, with a pull-down resistor. This means that when not used in the
design, it will stay low and the analog outputs of the codec will stay muted. To enable the analog outputs, drive
this signal high.
To use the audio codec in a design with non-default settings, it needs to be configured over I2C. The audio path
needs to be established by configuring the (de)multiplexers and amplifiers in the codec. Some digital processing
Page 24

ZYBO™ FPGA Board Reference Manual
Copyright Digilent, Inc. All rights reserved.
Other product and company names mentioned may be trademarks of their respective owners.
Page 24 of 26
Pin 1
Pin 12
Pin 6
8 signalsVCC GND
can also be done in the codec. Configuration is read out and written by accessing the register map via I2C transfers.
The register map is described in the SSM2603 datasheet.
15 Reset Sources
15.1 Power-on Reset
The Zynq PS supports external power-on reset signals. The power-on reset is the master reset of the entire chip.
This signal resets every register in the device capable of being reset. The ZYBO drives this signal from a comparator
that holds the system in reset until all power supplies are valid. Several other IC’s on the ZYBO are reset by this
signal as well.
15.2 Program Push-button Switch
A PROG push switch, BTN6, toggles Zynq PROG_B. This resets the PL and causes DONE to be de-asserted. The PL
will remain unconfigured until it is reprogrammed by the processor or via JTAG.
15.3 Processor Subsystem Reset
The external system reset, labeled PS_SRST/BTN7, resets the Zynq device without disturbing the debug
environment. For example, the previous break points set by the user remain valid after system reset. Due to
security concerns, system reset erases all memory content within the PS, including the OCM. The PL is also cleared
during a system reset. System reset does not cause the boot mode strapping pins to be re-sampled.
16 Pmod Ports
Pmod ports are 2x6, right-angle, 100-mil spaced female connectors that mate with standard 2x6 pin headers. Each
12-pin Pmod port provides two 3.3V VCC signals (pins 6 and 12), two Ground signals (pins 5 and 11), and eight logic
signals, as shown in Fig. 16. The VCC and Ground pins can deliver up to 1A of current, but care must be taken not
to exceed any of the power budgets of the onboard regulators or the external power supply.
Figure 16. Pmod diagram.
Page 25

ZYBO™ FPGA Board Reference Manual
Copyright Digilent, Inc. All rights reserved.
Other product and company names mentioned may be trademarks of their respective owners.
Page 25 of 26
Pmod JA
(XADC)
Pmod JB
(Hi-Speed)
Pmod JC
(Hi-Speed)
Pmod JD
(Hi-Speed)
Pmod JE
(Std.)
Pmod JF
(MIO)
JA1: N15
JB1: T20
JC1: V15
JD1: T14
JE1: V12
JF1: MIO-13
JA2: L14
JB2: U20
JC2: W15
JD2: T15
JE2: W16
JF2: MIO-10
JA3: K16
JB3: V20
JC3: T11
JD3: P14
JE3: J15
JF3: MIO-11
JA4: K14
JB4: W20
JC4: T10
JD4: R14
JE4: H15
JF4: MIO-12
JA7: N16
JB7: Y18
JC7: W14
JD7: U14
JE7: V13
JF7: MIO-0
JA8: L15
JB8: Y19
JC8: Y14
JD8: U15
JE8: U17
JF8: MIO-9
JA9: J16
JB9: W18
JC9: T12
JD9: V17
JE9: T17
JF9: MIO-14
JA10: J14
JB10: W19
JC10: U12
JD10: V18
JE10: Y17
JF10: MIO-15
Table 9. Pmod pinout.
Digilent produces a large collection of Pmod accessory boards that can attach to the Pmod expansion connectors
to add ready-made functions like A/D’s, D/A’s, motor drivers, sensors, and other functions. See
www.digilentinc.com for more information.
The ZYBO has six Pmod ports, some of which behave differently than others. Each Pmod port falls into one of four
categories: standard, MIO connected, XADC, or high-speed Table 9 specifies which category each Pmod falls into,
and also lists the Zynq pins they are connected to. The following sections describe the different types of Pmods.
16.1 Standard Pmod
The standard Pmod port is connected to the PL of the Zynq via 200 Ohm series resistors. The series resistors
prevent short circuits that can occur if the user accidently drives a signal that is supposed to be used as an input.
The downside to this added protection is that these resistors can limit the maximum switching speed of the data
signals. If the Pmod being used does not require high-speed access, then the standard Pmod port should be used
to help prevent damage to the devices.
16.2 MIO Pmod
The MIO Pmod port is connected to the MIO bus in the PS of the Zynq via 200 Ohm series resistors. Like the
standard Pmod port, these series resistors add protection at the cost of maximum switching speed. Since these
data signals are connected to the MIO interface, they can only be accessed by the PS peripheral controller cores.
The GPIO, UART, I2C, and SPI cores can all be used to drive devices connected to this Pmod. Note that the pin
layout of the UART and I2C cores will not align perfectly with the typical Pmod pinouts for these interfaces. This
means that UART or I2C devices connected to this Pmod may require some of the pins to be swapped around
externally using individual wires between the ZYBO and the Pmod.
16.3 Dual Analog/Digital Pmod (XADC Pmod)
The on-board Pmod expansion connector labeled “JA” is wired to the auxiliary analog input pins of the PL.
Depending on the configuration, this connector can be used to input differential analog signals to the analog-todigital converter inside the Zynq (XADC). Any or all pairs in the connector can be configured either as analog input
or digital input-output.
In analog input mode, the voltage on these pins must be limited to 1V peak-to-peak. In digital mode, the regular
VCCO-dependent limits apply. See Xilinx datasheets for more information.
Page 26

ZYBO™ FPGA Board Reference Manual
Copyright Digilent, Inc. All rights reserved.
Other product and company names mentioned may be trademarks of their respective owners.
Page 26 of 26
The Dual Analog/Digital Pmod on the ZYBO differs from the rest in the routing of its traces. The eight data signals
are grouped into four pairs, with the pairs routed closely coupled for better analog noise immunity. Pins 1 and 7,
pins 2 and 8, pins 3 and 9, and pins 4 and 10 are paired up. Furthermore, each pair has a partially loaded anti-alias
filter laid out on the PCB. The filter does not have capacitors C94-C97. In designs where such filters are desired, the
capacitors can be manually loaded by the user.
NOTE: The coupled routing and the anti-alias filters might limit the data speeds when used for digital signals.
The XADC core within the Zynq is a dual channel 12-bit analog-to-digital converter capable of operating at 1 MSPS.
Either channel can be driven by any of the auxiliary analog input pairs connected to the JXADC header. The XADC
core is controlled and accessed from the PL via the Dynamic Reconfiguration Port (DRP). The DRP also provides
access to voltage monitors that are present on each of the FPGA’s power rails, and a temperature sensor that is
internal to the FPGA. For more information on using the XADC core, refer to the Xilinx document titled “7 Series
FPGAs and Zynq-7000 All Programmable SoC XADC Dual 12-Bit 1 MSPS Analog-to-Digital Converter.” It is also
possible to access the XADC core directly using the PS, via the “PS-XADC” interface. This interface is described in
full in chapter 30 of the Zynq Technical Reference Manual.
16.4 High-Speed Pmod
The High-speed Pmods use the standard Pmod port, but have their data signals routed as impedance matched
differential pairs for maximum switching speeds. They have pads for loading resistors for added protection, but the
ZYBO ships with these loaded as 0-Ohm shunts. With the series resistors shunted, these Pmods offer no protection
against short circuits, but allow for much faster switching speeds. The signals are paired to the adjacent signals in
the same row: pins 1 and 2, pins 3 and 4, pins 7 and 8, and pins 9 and 10.
Traces are routed 100 ohm (+/- 10%) differential.
These connectors should be used only when high speed differential signaling is required or the other Pmods are all
occupied. If used as single-ended, coupled pairs will have significant crosstalk. In applications where this is a
concern, the standard Pmod port shall be used. Another option would be to ground one of the signals (drive it low
from the FPGA) and use its pair for the signal-ended signal.
Since the High-Speed Pmods have 0-ohm shunts instead of protection resistors, the operator must take precaution
to ensure that they do not cause any shorts.
Page 27

Mouser Electronics
Authorized Distributor
Click to View Pricing, Inventory, Delivery & Lifecycle Information:
Digilent:
410-279P-KIT 410-279
 Loading...