

Page 1
Genesys™ Board
Reference Manual
Revision: September 5, 2013
Note: This document applies to REV C of the board.
Overview
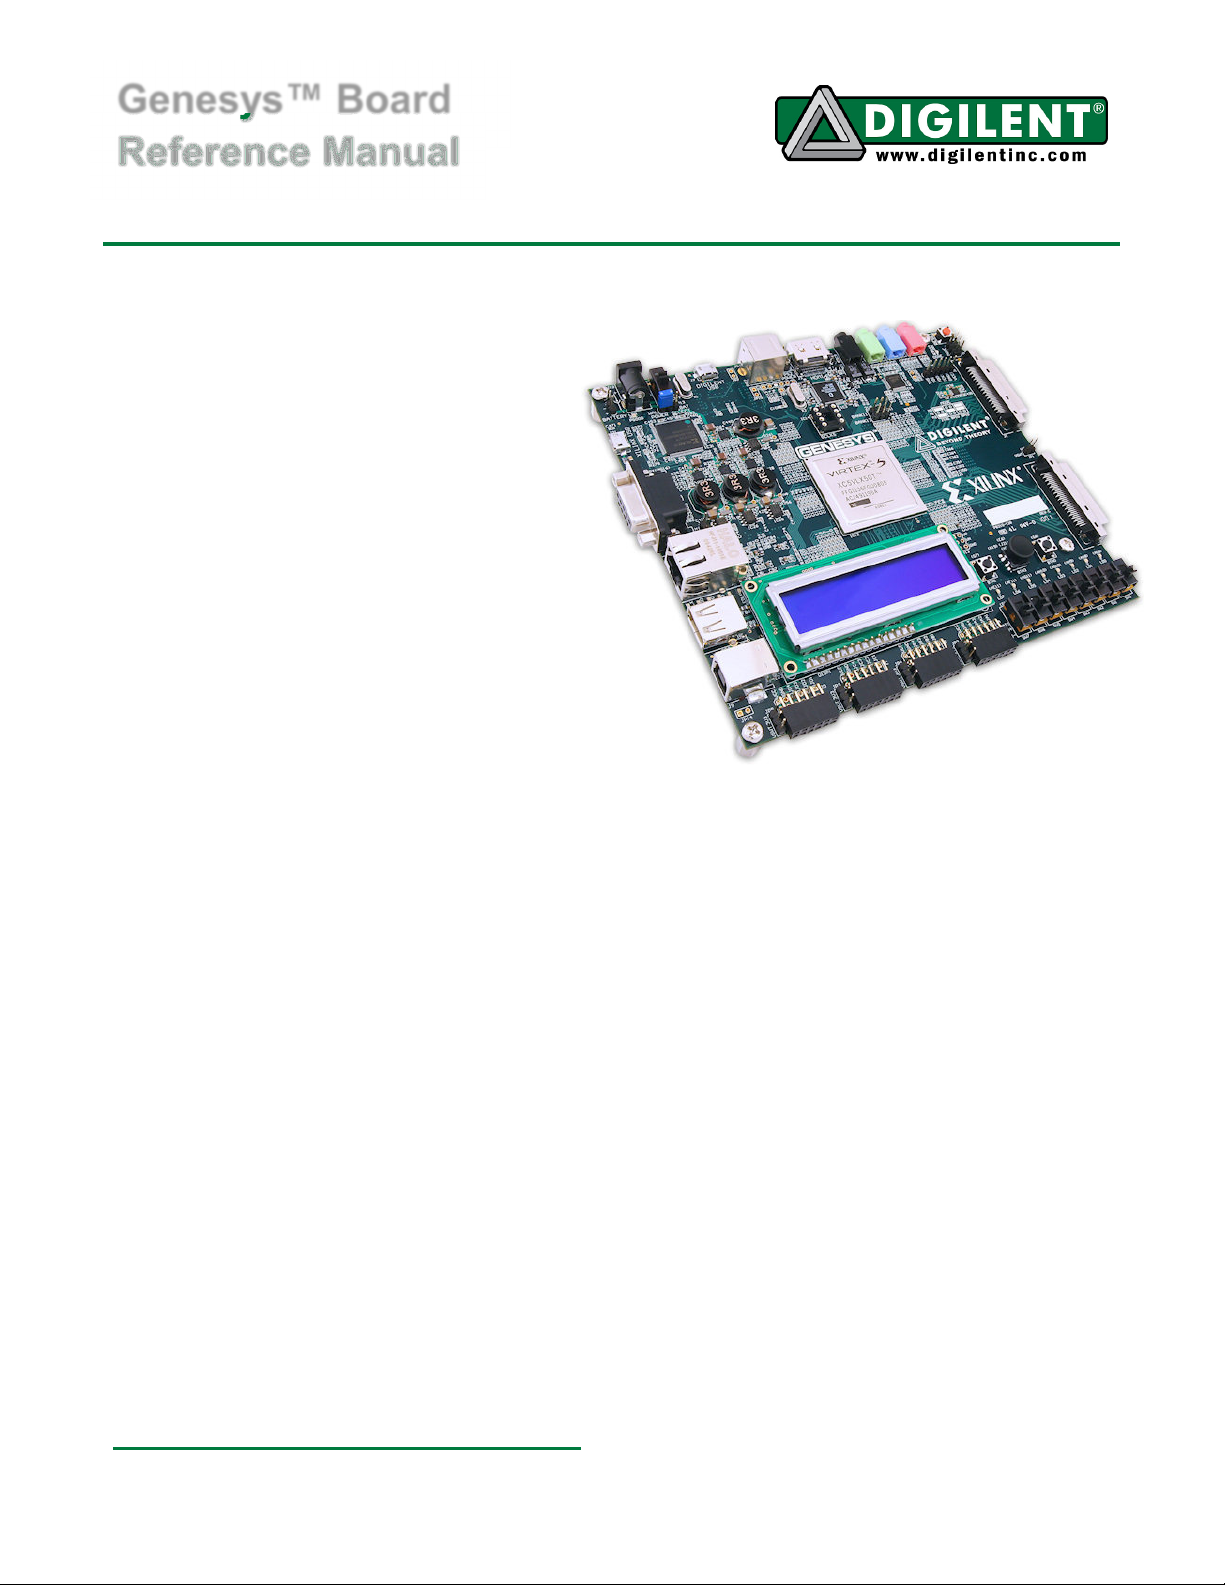
The Genesys circuit board is a complete,
ready-to-use digital circuit development
platform based on a Xilinx Virtex 5 LX50T.
The large on-board collection of high-end
peripherals, including Gbit Ethernet, HDMI
Video, 64-bit DDR2 memory array, and audio
and USB ports make the Genesys board an
ideal host for complete digital systems,
including embedded processor designs
based on Xilinx’s MicroBlaze. Genesys is
compatible with all Xilinx CAD tools, including
ChipScope, EDK, and the free WebPack, so
designs can be completed at no extra cost.
The Virtex5-LX50T is optimized for highperformance logic and offers:
• 7,200 slices, each containing four 6input LUTs and eight flip-flops
• 1.7Mbits of fast block RAM
• 12 digital clock managers
• six phase-locked loops
• 48 DSP slices
• 500MHz+ clock speeds
The Genesys board includes Digilent's
newest Adept USB2 system, which offers
device programming, real-time power supply
monitoring, automated board tests, virtual I/O,
and simplified user-data transfer facilities. A
second USB programming port, based on the
Xilinx programming cable, is also built into the
board.
A comprehensive collection of board support
IP and reference designs, and a large
collection of add-on boards are available on
the Digilent website. See the Genesys page
at www.digilentinc.com for more information.
1300 Henley Court | Pullman, WA 99163
(509) 334 6306 Voice and Fax
Doc: 502-138 page 1 of 28
Copyright Digilent, Inc. All rights reserved. Other product and company names mentioned may be trademarks of their respective owners.
Page 2
Genesys Reference Manual
Features
• Xilinx Virtex 5 LX50T FPGA, 1136-pin BGA package
• 256Mbyte DDR2 SODIMM with 64-bit wide data
• 10/100/1000 Ethernet PHY and RS-232 serial port
• multiple USB2 ports for programming, data, and hosting
• HDMI video up to 1600x1200 and 24-bit color
• AC-97 Codec with line-in, line-out, mic, and headphone
• real-time power monitors on all power rails
• 16Mbyte StrataFlash™ for configuration and data storage
• Programmable clocks up to 400MHz
• 112 I/O’s routed to expansion connectors
• GPIO includes eight LEDs, two buttons, two-axis navigation switch, eight slide switches, and a 16x2
character LCD
• ships with a 20W power supply and USB cable
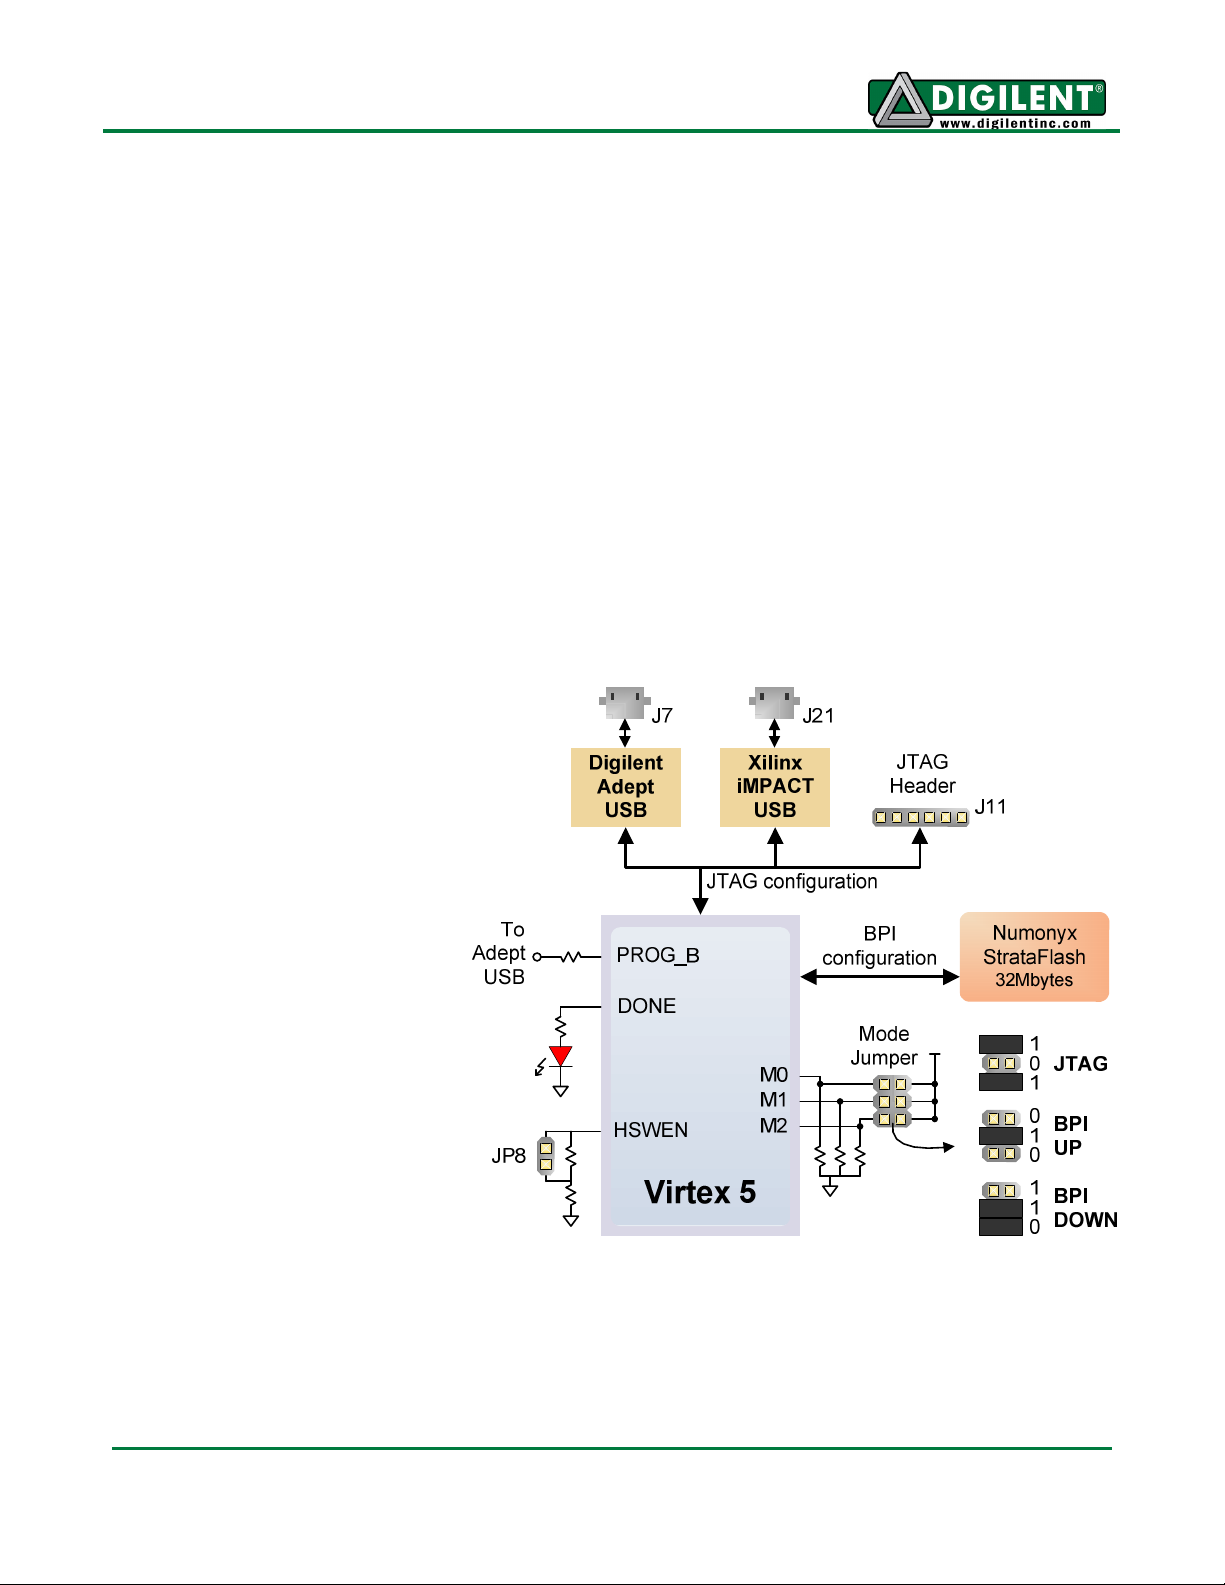
Configuration
After power-on, the FPGA on
the Genesys board must be
configured (or programmed)
before it can perform any
functions. A USB-connected
PC can configure the board
using the JTAG interface
anytime power is on, or a file
can be automatically
transferred from the
StrataFlash ROM at power-on.
An on-board "mode" jumper
selects which programming
mode will be used.
Both Digilent and Xilinx freely
distribute software that can be
used to program the FPGA and
the Flash ROM. Configuration
files stored in the ROM use the
Byte Peripheral Interface (BPI)
mode. In BPI UP mode, the
FPGA loads configuration data
from the StrataFlash in an
ascending direction starting at address 000000. In BPI DOWN mode, configuration data loads in a
descending direction starting at address 03FFFF.
www.digilentinc.com page 2 of 28
Copyright Digilent, Inc. All rights reserved. Other product and company names mentioned may be trademarks of their respective owners
Page 3
Genesys Reference Manual
Once transferred, programming files are stored in SRAM-based memory cells within the FPGA. These
SRAM cells define the FPGA’s logic functions and circuit connections until they are erased, either by
removing power or asserting the PROG_B input.
FPGA configuration files transferred using the JTAG interface use the .bin and .svf file types, and BPI
files use the .bit, .bin, and .mcs file types. Xilinx’s ISE WebPack and EDK software can create .bit,
.svf, .bin, or .mcs files from VHDL, Verilog, or schematic-based source files (EDK is used for
MicroBlaze™ embedded processor-based designs). Digilent's Adept software and Xilinx's iMPACT
software can be used to program the Genesys board from a PC's USB port.
During FPGA programming, a .bit or .svf file is transferred from the PC to the FPGA using the USBJTAG port. When programming the ROM, a .bit, .bin, or .mcs file is transferred to the ROM in a twostep process. First, the FPGA is programmed with a circuit that can transfer data from the USB-JTAG
port into the ROM, and then data is transferred to the ROM via the FPGA circuit (this complexity is
hidden and a simple “program ROM” interface is shown). After the ROM has been programmed, it can
automatically configure the FPGA at a subsequent power-on or reset event if the Mode jumpers are
set to the proper BPI mode. A programming file stored in the StrataFlash ROM will remain until it is
overwritten, regardless of power-cycle events.
Adept System
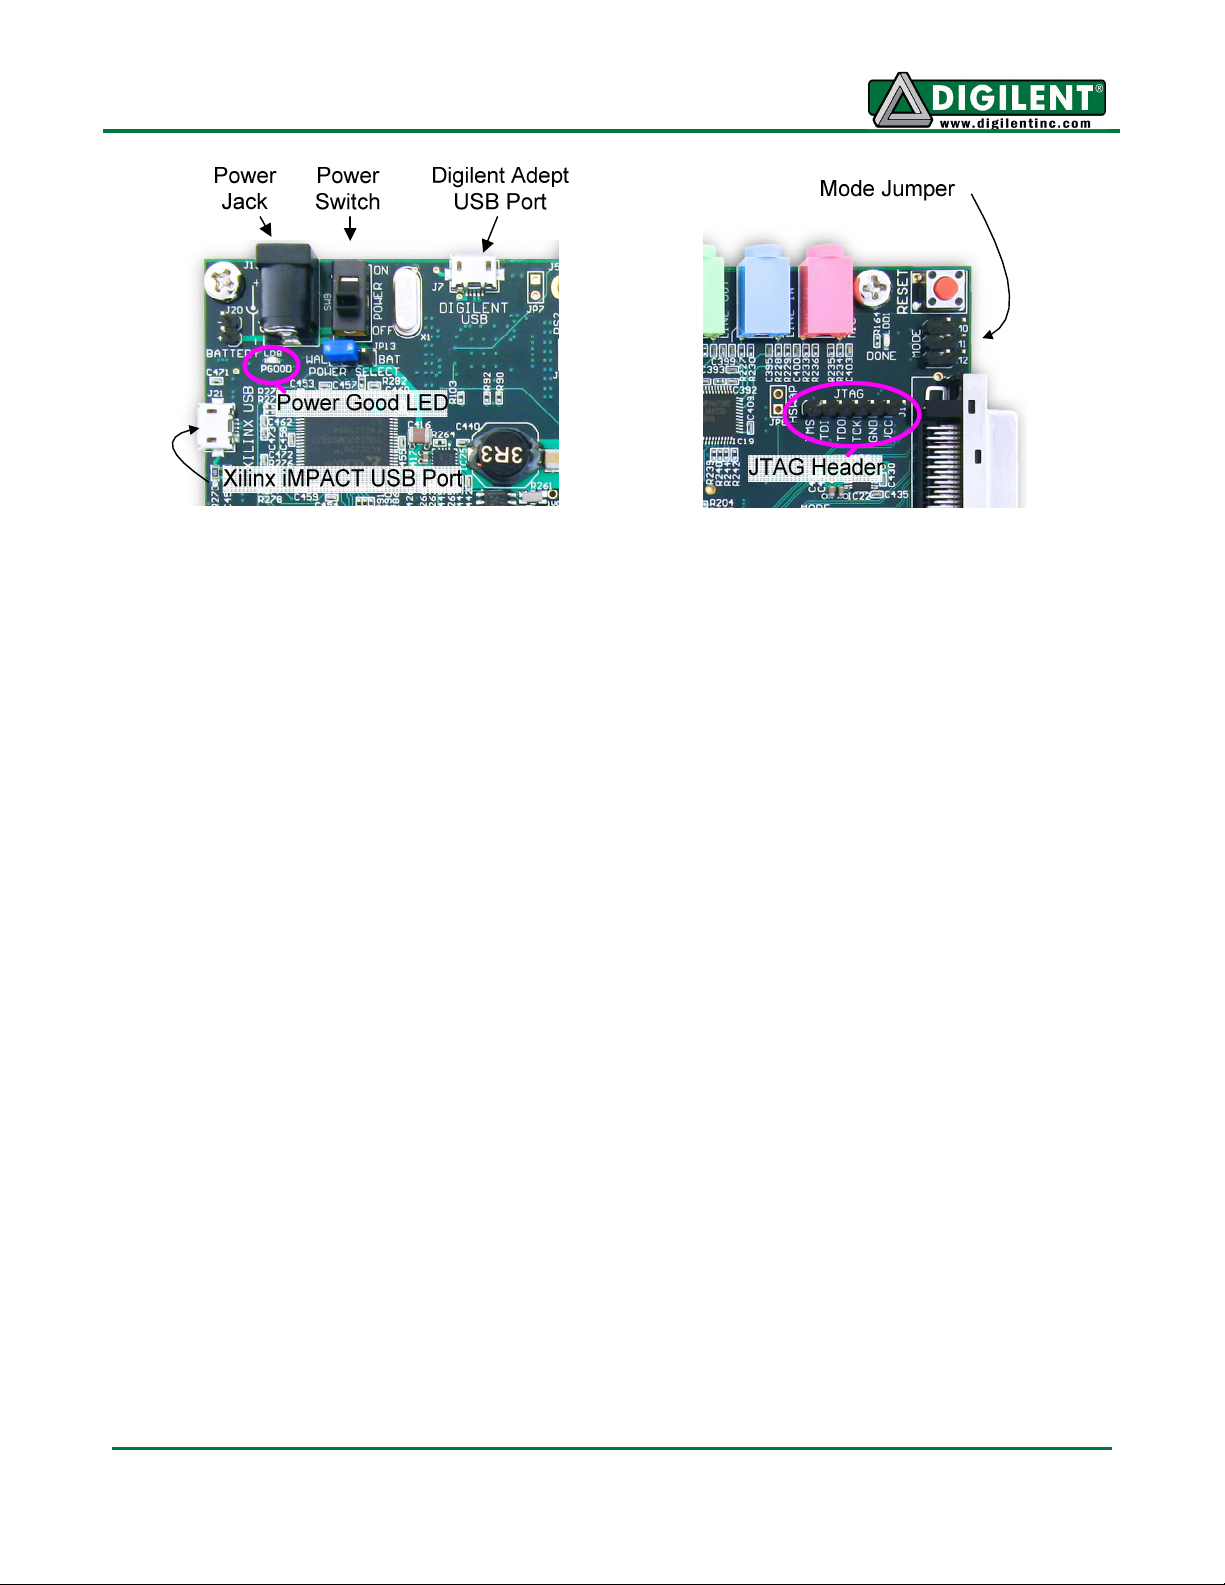
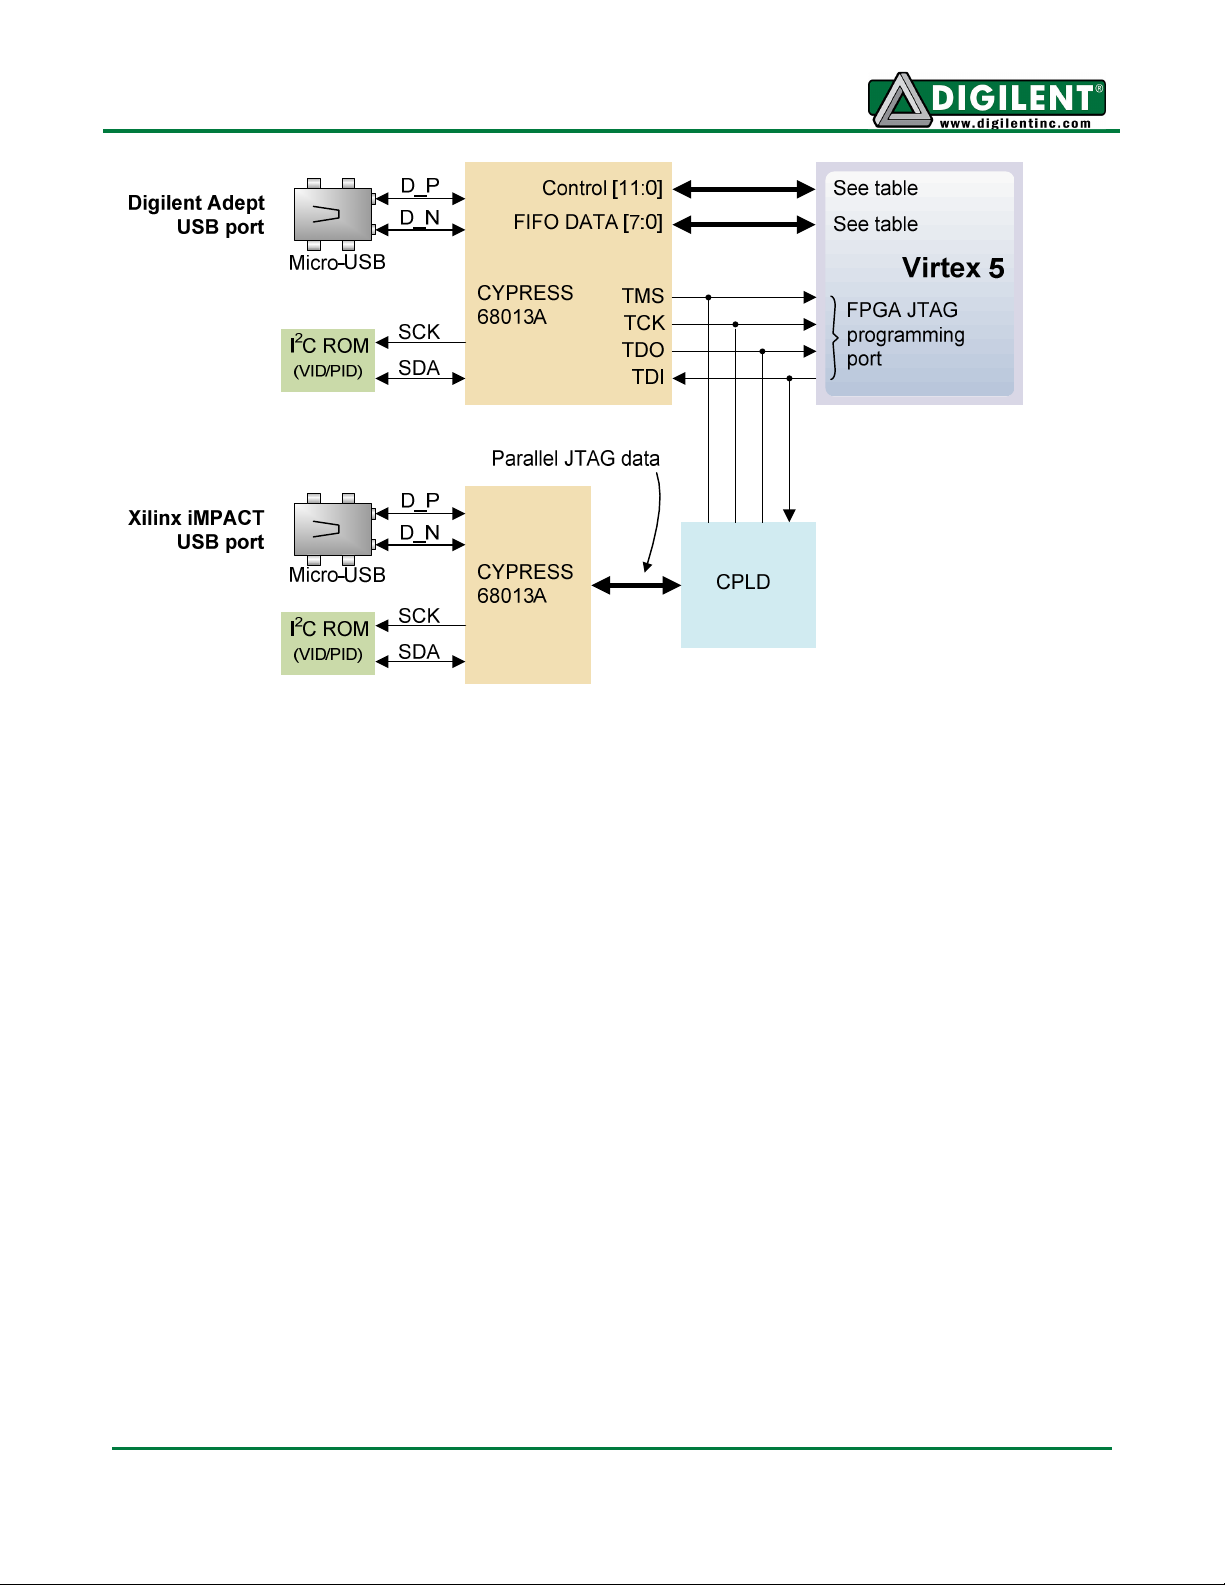
Adept and iMPACT USB Ports
The Genesys board includes two USB peripheral ports – one for Adept software and another for
Xilinx's iMPACT software. Either port can program the FPGA and StrataFlash, but Adept offers a
simplified user interface and many additional features such as automated board test and user-data
transfers. The Adept port is also compatible with iMPACT, if the Digilent Plug-In for Xilinx Tools is
installed on the host PC (download it free from the Digilent website).
www.digilentinc.com page 3 of 28
Copyright Digilent, Inc. All rights reserved. Other product and company names mentioned may be trademarks of their respective owners
Page 4
Genesys Reference Manual
The plug-in automatically translates iMPACT-generated JTAG commands into formats compatible
with the Digilent USB port, providing a seamless programming experience without leaving the Xilinx
tool environment. All Xilinx tools (iMPACT, ChipScope, EDK, etc.) can work with the plug-in, and they
can be used in conjunction with Adept tools (like the power supply monitor).
Adept’s high-speed USB2 system can be used to program the FPGA and ROM, run automated board
tests, monitor the four main board power supplies, add PC-based virtual I/O devices (like buttons,
switches, and LEDs) to FPGA designs, and exchange register-based and file-based data with the
FPGA. Adept automatically recognizes the Genesys board and presents a graphical interface with
tabs for each of these applications. Adept also includes public APIs/DLLs so that users can write
applications to exchange data with the Genesys board at up to 38Mbytes/sec. The Adept application,
an SDK, and reference materials are freely downloadable from the Digilent website.
The Xilinx USB port is based on the Xilinx USB programming cable. It can be accessed by all Xilinx
CAD tools and iMPACT.
www.digilentinc.com page 4 of 28
Copyright Digilent, Inc. All rights reserved. Other product and company names mentioned may be trademarks of their respective owners
Page 5
Genesys Reference Manual
Programming Interface
Flash Interface
Adept System
To program the Genesys board using Adept, first
set up the board and initialize the software:
• plug in and attach the power supply
• plug in the USB cable to the PC and to the
USB port on the board
• start the Adept software
• turn on Genesys' power switch
• wait for the FPGA to be recognized.
Use the browse function to associate the desired
.bit or .svf file with the FPGA, and click on the
Program button. The configuration file will be sent
to the FPGA, and a dialog box will indicate
whether programming was successful. The
configuration “done” LED will light after the FPGA
has been successfully configured.
Before starting the programming sequence, Adept ensures that any selected configuration file
contains the correct FPGA ID code – this prevents incorrect .bit files from being sent to the FPGA.
In addition to the navigation bar and browse and program buttons, the Config interface provides an
Initialize Chain button, console window, and status bar. The Initialize Chain button is useful if USB
communications with the board have been interrupted. The console window displays current status,
and the status bar shows real-time progress when downloading a configuration file.
The Flash programming application allows .bin,
.bit, and .mcs configuration files to be transferred
to the on-board StrataFlash ROM for BPI
programming, and allows user data files to be
transferred to/from the Flash at user-specified
addresses.
The configuration tool supports BPI UP and BPI
DOWN programming from any valid ROM file
produced by the Xilinx tools (be sure the mode
jumpers are set to BPI UP/DOWN appropriately,
or Genesys will not auto-configure properly.)
The Read/Write tools allow data to be exchanged
between files on the host PC and specified
address ranges in Flash.
www.digilentinc.com page 5 of 28
Copyright Digilent, Inc. All rights reserved. Other product and company names mentioned may be trademarks of their respective owners
Page 6
Genesys Reference Manual
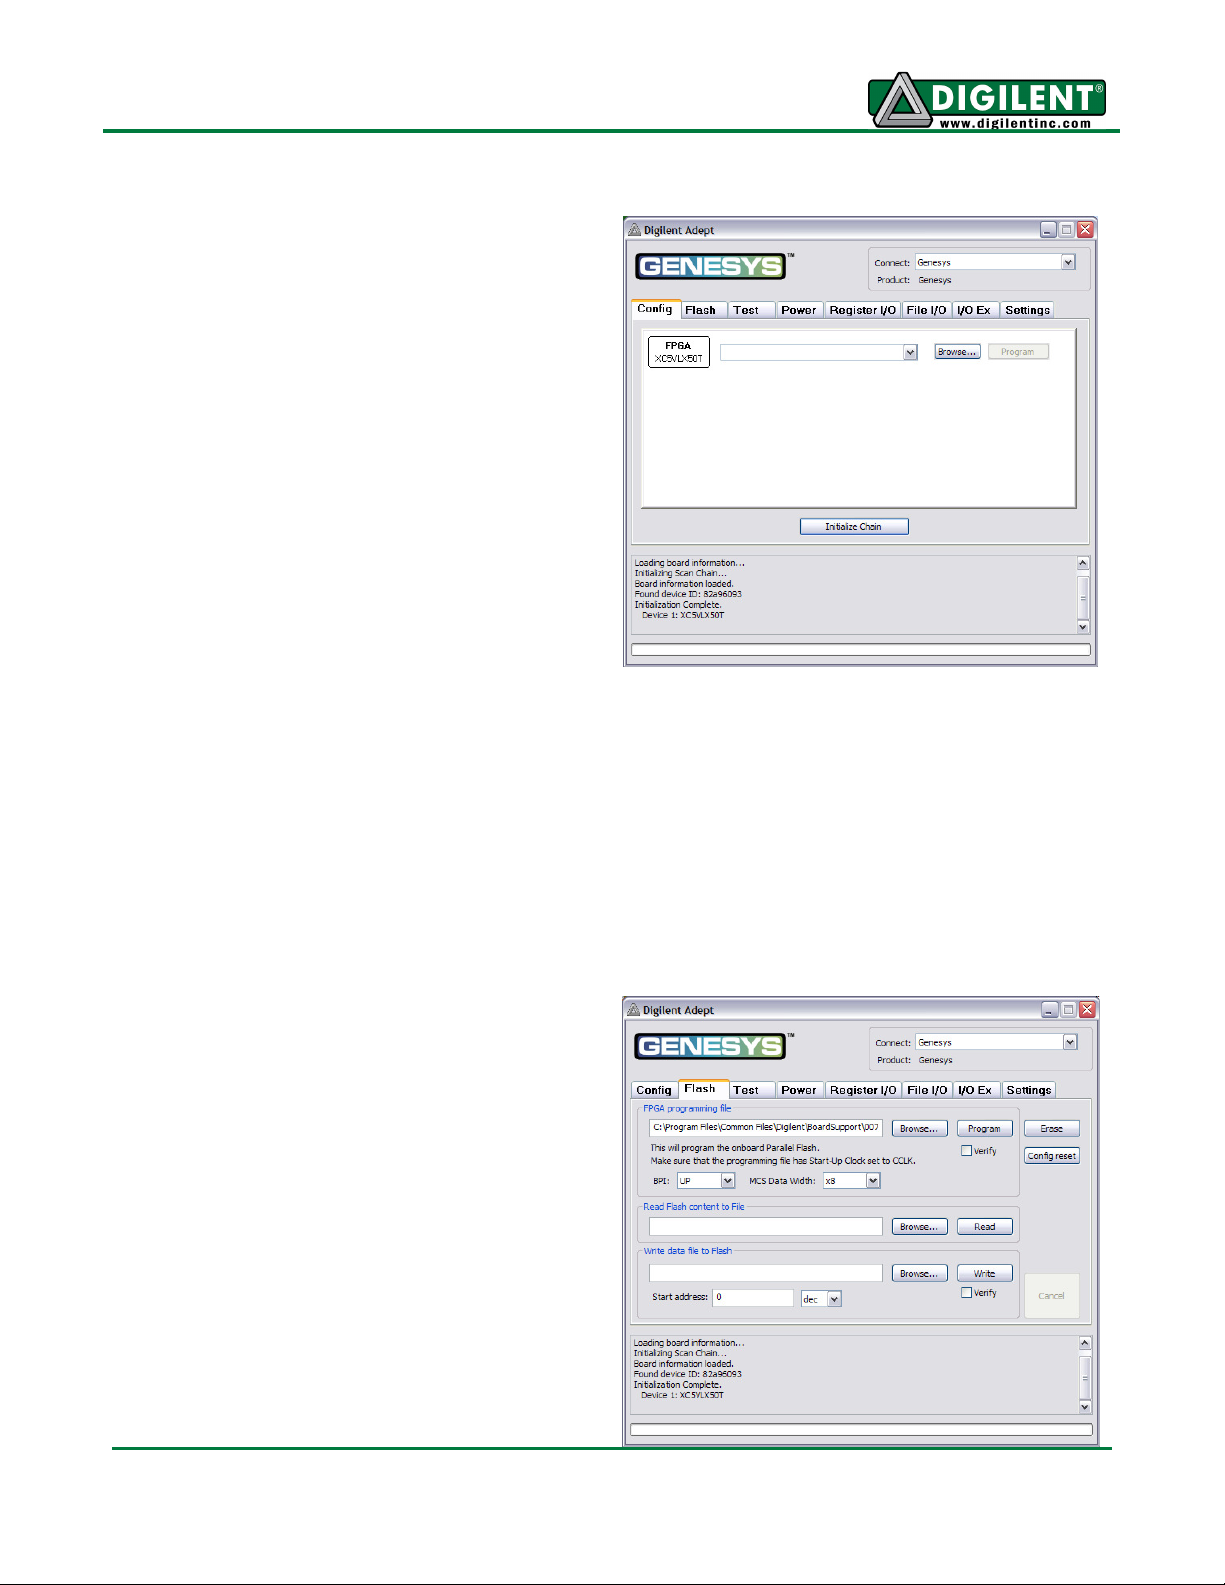
Power
Test Interface
The test interface provides a quick and easy way
to verify many of the board's hardware circuits
and interfaces. Clicking Start Test will configure
the FPGA with test and PC-communication
circuits, overwriting any FPGA configuration that
may have been present. Once the indicator near
the Start Test button turns green, all available
tests can be run.
The Test RAM and Test Flash utilities write/read
data to/from all pages, ensuring the devices are
working properly and no signals have shorts or
opens.
The Test Shorts feature checks all discrete I/O’s
for shorts to Vdd, GND, and neighboring I/O pins.
The switches and buttons graphics show the
current states of those devices on the Genesys
board.
Future releases of Adept may add additional
tests, and more board features can be tested
using reference projects available on the Digilent
website.
The power application provides highly-accurate
(better than 1%) real-time voltage, current, and
power readings from four on-board TI powersupply monitors. The monitors are based on the
TI INA219 high-side current and power monitors,
which are configured to return 16-bit samples for
each channel at 16Hz, with each returned sample
being the average of 128 sub-samples. A 5mOhm
shunt resistor and selected INA219 gain setting
provide 4mV and 2mA measurement resolution.
Real-time voltage, current, and power data is
displayed in tabular form and updated
continuously when the power meter is active (or
started).
Historical data is available using the Show Graph
feature, which shows a graph with voltage,
current, and power plots for all four power
www.digilentinc.com page 6 of 28
Copyright Digilent, Inc. All rights reserved. Other product and company names mentioned may be trademarks of their respective owners
Page 7
Genesys Reference Manual
supplies for up to ten minutes. Recorded values
are also stored in a buffer that can be saved to a
file for later analysis. Save Buffer and Clear
Buffer are used to save and clear the historical
data in the buffer.
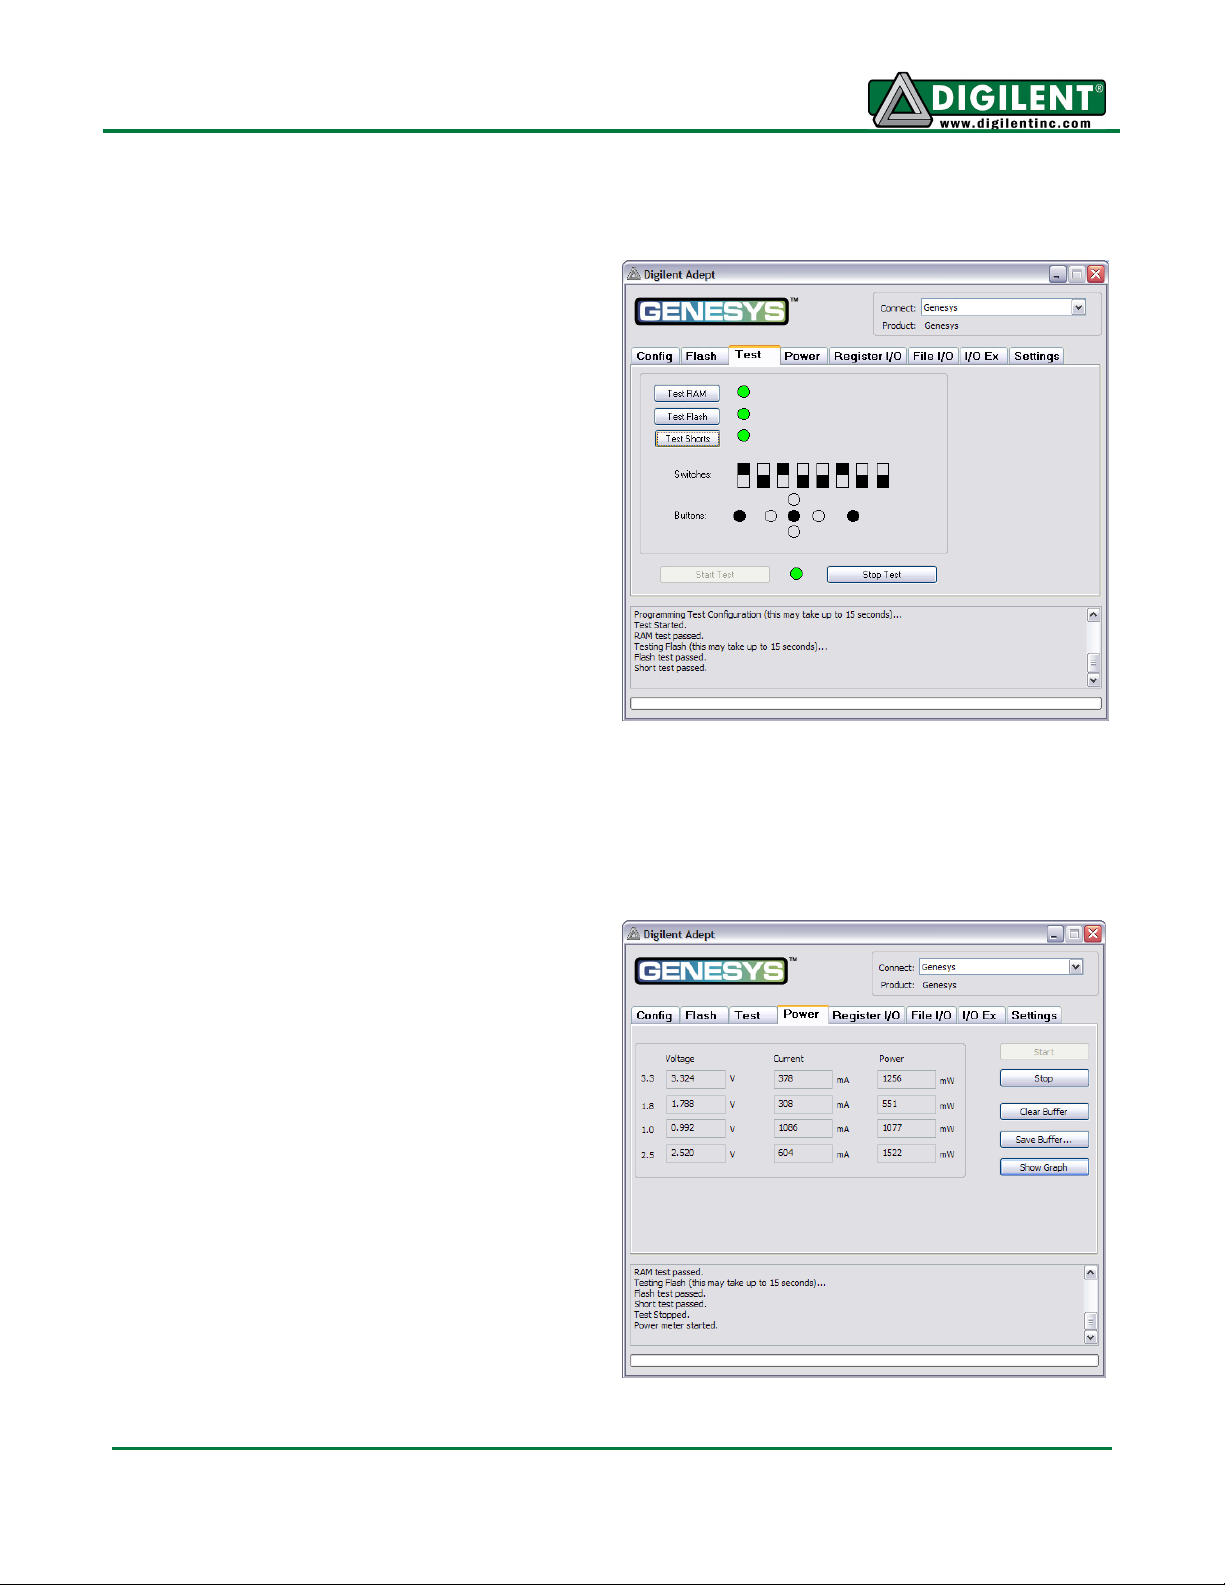
Register I/O
The register I/O tab requires that a corresponding
IP block, available in the Parallel Interface
reference design (DpimRef.vhd) on the Adept
page of the Digilent website, is included and
active in the FPGA. This IP block provides an
EPP-style interface, where an 8-bit address
selects a register, and data read and write
buttons transfer data to and from the selected
address. Addresses entered into the address field
must match the physical address included in the
FPGA IP block.
Register I/O provides an easy way to move small
amounts of data into and out of specific registers
in a given design. This feature greatly simplifies
passing control parameters into a design, or
reading low-frequency status information out of a
design.
File I/O
The File I/O tab can transfer arbitrarily large files
between the PC and the Genesys FPGA. A
number of bytes (specified by the Length value)
can be streamed into a specified register address
from a file or out of a specified register address
into a file. During upload and download, the file
start location can be specified in terms of bytes.
As with the Register I/O tab, File I/O also requires
specific IP to be available in the FPGA. This IP
can include a memory controller for writing files
into the on-board DDR2 and Flash memories.
www.digilentinc.com page 7 of 28
Copyright Digilent, Inc. All rights reserved. Other product and company names mentioned may be trademarks of their respective owners
Page 8
Genesys Reference Manual
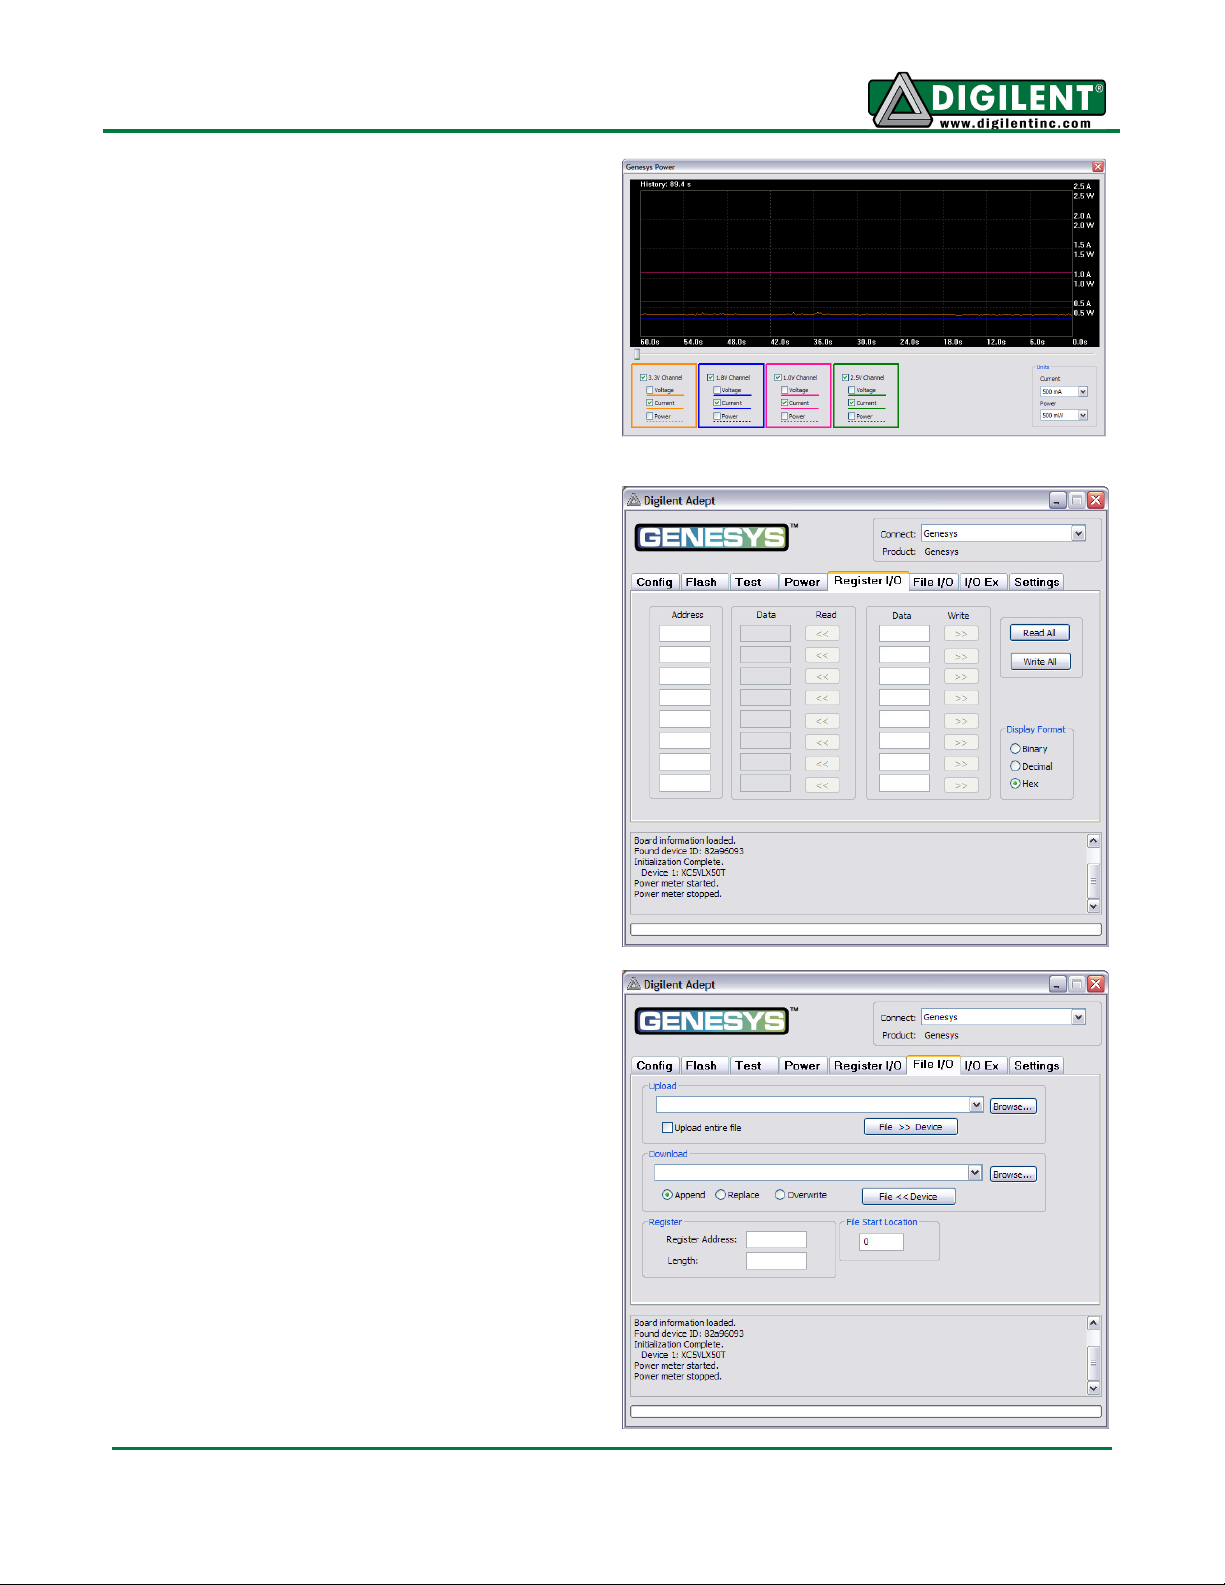
I/O Expand
The I/O Expand tab works with an IP block in the
FPGA to provide additional simple I/O beyond the
physical devices found on the Genesys board.
Virtual I/O devices include a 24-LED light bar, 16
slide switches, 16 push buttons, 8 discrete LEDs,
a 32-bit register that can be sent to the FPGA,
and a 32-bit register that can be read from the
FPGA. The IP block, available in the Adept I/O
Expansion reference design
(AdeptIOExpansion.zip) on the Adept page of the
Digilent website, provides a simple interface with
well-defined signals. This IP block can easily be
included in, and accessed from, user-defined
circuits.
For more information, please see the Adept documentation available at the Digilent website.
Power Supplies
The Genesys board requires an external 5V 4A or greater power source with a coax center-positive
2.1mm internal-diameter plug (a suitable supply is provided as a part of the Genesys kit). Voltage
regulator circuits from Texas Instruments create the required 3.3V, 2.5V, 1.8V, 1.0V, and 0.9V
supplies from the main 5V supply. The table below provides additional information (typical currents
depend strongly on FGPA configuration; the values provided are typical of medium size/speed
designs).
Table 1: Genesys Power Supplies
Supply
3.3V FPGA I/O, Video, RS-232, USB, Clocks, ROM, Audio IC20: TPS54620 6A / 700mA
2.5V FPGA Aux, VHDC, Ethernet PHY I/O, GPIO IC21: TPS54620 6A / 400mA
1.0V FPGA Core, Ethernet PHY core IC25: TPS54620 6A / 0.8 – 1.2A
1.8V DDR & FPGA DDR I/O IC23: TPS54620 6A / 1A
0.9V DDR SODIMM Termination Voltage (VTT) IC22: TPS51100 3A / 1A
The four main voltage rails on the Genesys board use TI INA219 power supply monitors to
continuously measure voltage, current, and power. Measured values may be viewed on a PC using
Digilent’s power meter that is a part of the Adept software.
Circuits Device Amps (max/typ)
www.digilentinc.com page 8 of 28
Copyright Digilent, Inc. All rights reserved. Other product and company names mentioned may be trademarks of their respective owners
Page 9
Genesys Reference Manual
Power
Switch
Power
Jack
Battery
Connector
OFF
ON
Power Select
Jumper JP13
VU
To Digilent
Adept USB
TPS54620
6A Regulator
EN
TPS54620
6A Regulator
EN
TPS54620
6A Regulator
EN
TPS54620
6A Regulator
EN
Load Switch
EN
I2C Bus
PG
IC20
PG
IC21
PG
IC23
PG
IC25
IC24
Power On
LED (LD8)
Vswt
.005
INA219
.005
INA219
.005
INA219
.005
INA219
TPS51100
DDR Term. Reg.
3.3V
2.5V
1.8V
1.0V
IC22
0.9V
To Expansion
Connectors, LCD,
HDMI, USB
Genesys power supplies are controlled by a logic-level switch (SW9) that enables/disables the power
supply controller IC’s. A power-good LED (LD8), driven by the “power good” outputs on all supplies,
indicates that all supplies are operating within 10% of nominal.
A load switch (the TPS51100) passes the input voltage VU to the "Vswt" node, depending on the state
of the power switch. Vswt is assumed to be 5V, and is used by many systems on the board including
the LCD, HDMI ports, I2C bus, and USB host. Vswt is also available at expansion connectors, so that
any connected boards can be turned off along with the Genesys board.
DDR2 Memory
A single small outline dual in-line memory module (SODIMM) connector is provided and loaded with a
Micron MT4HTF3264HY-667D3 (or equivalent) single-rank unregistered 256Mbyte DDR2 module
(additional address lines and chip selects are routed, so that similar SODIMMs with densities up to
2GB may be used). Serial Presence Detect (SPD) using an IIC interface to the DDR DIMM is also
supported.
The Genesys board has been tested for DDR2 operation at a 400MHz data rate. Faster data rates
might be possible but are not tested.
www.digilentinc.com page 9 of 28
Copyright Digilent, Inc. All rights reserved. Other product and company names mentioned may be trademarks of their respective owners
Page 10

Genesys Reference Manual
The DDR2 interface follows the pinout and routing guidelines specified in the Xilinx Memory Interface
Generator (MIG) User Guide. The interface supports SSTL18 signaling, and all address, data, clocks,
and control signals are delay-matched and impedance-controlled. Address and control signals are
terminated through 47-ohm resistors to a 0.9V VTT, and data signals use the On-Die-Termination
(ODT) feature of the SODIMM. Two well-matched DDR2 clock signal pairs are provided to the
SODIMM that can be driven with low-skew clocks from the FPGA.
x14
Virtex 5
See Table
H30
E31
K29
G31
J30
R31
L29
J29
F31
14
64
16
RAS#
CAS#
WE#
BA0
BA1
BA2
S0#
S1#
ODT0
ODT1F30
AD[13:0]
DQ[63:0]
DS[7:0] (differential)
8
2
6
DM[7:0]
I2C (SDA, SCK)
Clocks (differential)
DDR2
SODIMM
www.digilentinc.com page 10 of 28
Copyright Digilent, Inc. All rights reserved. Other product and company names mentioned may be trademarks of their respective owners
Page 11

Genesys Reference Manual
DDR2 SODIMM Pinout
Data Address Strobes Clk,Mask,I2C Control
DQ0: AF30 DQ16: AC28 DQ32: V29 DQ48: M28 AD0: L30 DS0P: AA29 CK0P: AK29 RAS#: H30
DQ1: AK31 DQ17: AB25 DQ33: Y27 DQ49: L28 AD1: M30 DS0N: AA30 CK0N: AJ29 CAS#: E31
DQ2: AF31 DQ18: AC27 DQ34: Y26 DQ50: F25 AD2: N29 DS1P: AK28 CK1P: E28 WE#: K29
DQ3: AD30 DQ19: AA26 DQ35: W24 DQ51: H25 AD3: P29 DS1N: AK27 CK1N: F28 BA0: G31
DQ4: AJ30 DQ20: AB26 DQ36: V28 DQ52: K27 AD4: K31 DS2P: AK26 CKE0: T28 BA1: J30
DQ5: AF29 DQ21: AA24 DQ37: W25 DQ53: K28 AD5: L31 DS2N: AJ27 CKE1: U30 BA2: R31
DQ6: AD29 DQ22: AB27 DQ38: W26 DQ54: H24 AD6: P31 DS3P: AB31 DM0: AJ31 S0: L29
DQ7: AE29 DQ23: AA25 DQ39: V24 DQ55: G26 AD7: P30 DS3N: AA31 DM1: AE28 S1: J29
DQ8: AH27 DQ24: AC29 DQ40: R24 DQ56: G25 AD8: M31 DS4P: Y28 DM2: Y24 ODT0: F31
DQ9: AF28 DQ25: AB30 DQ41: P25 DQ57: M26 AD9: R28 DS4N: Y29 DM3: Y31 ODT1: F30
DQ10: AH28 DQ26: W31 DQ42: N24 DQ58: J24 AD10: J31 DS5P: E26 DM4: V25
DQ11: AA28 DQ27: V30 DQ43: P26 DQ59: L26 AD11: R29 DS5N: E27 DM5: P24
DQ12: AG25 DQ28: AC30 DQ44: T24 DQ60: J27 AD12: T31 DS6P: H28 DM6: F26
DQ13: AJ26 DQ29: W29 DQ45: N25 DQ61: M25 AD13: H29 DS6N: G28 DM7: J25
DQ14: AG28 DQ30: V27 DQ46: P27 DQ62: L25 DS7P: G27 SDA: F29
DQ15: AB28 DQ31: W27 DQ47: N28 DQ63: L24 DS7N: H27 SCK: E29
Flash Memory
The Genesys board uses a 256Mbit Numonyx P30 parallel flash memory device (organized as 16-bit
by 16Mbytes) for non-volatile storage of FPGA configuration files. Configuration files are stored using
the byte-peripheral interface mode (BPI) in either up or down configurations. A single FPGA
configuration file requires less than 16Mbits, leaving 140Mbits available for user data. Data can be
transferred to/from the Flash by user applications, or by facilities built into the Adept software. A
reference design on the Digilent website provides an example of driving the Flash memory.
D13: AH12
D14: AH22
D15: AG22
Address Signals Data Signals
A0: K12 A13: K16 D0: AD19
A1: K13 A14: K21 D1: AE19
A2: H23 A15: J22 D2: AE17
A3: G23 A16: L16 D3: AF16
A4: H12 A17: L15 D4: AD20
A5: J12 A18: L20 D5: AE21
A6: K22 A19: L21 D6: AE16
A7: K23 A20: AE23 D7: AF15
A8: K14 A21: AE22 D8: AH13
A9: L14 A22: AG12 D9: AH14
A10: H22 A23: AF13 D10: AH19
A11: G22 A24: AG23 D11: AH20
A12: J15 D12: AG13
www.digilentinc.com page 11 of 28
Copyright Digilent, Inc. All rights reserved. Other product and company names mentioned may be trademarks of their respective owners
Page 12

Genesys Reference Manual
A board test/demonstration program is loaded into the StrataFlash during manufacturing. That
configuration, also available on the Digilent webpage, can be used to demonstrate and check all of
the devices and circuits on the Genesys board.
Ethernet PHY
The Genesys board includes a Marvell Alaska Tri-mode PHY (the 88E1111) paired with a Halo
HFJ11-1G01E RJ-45 connector. Both MII and GMII interface modes are supported at 10/100/1000
Mb/s. Default settings used at power-on or reset are:
• MII/GMII mode to copper interface
• Auto Negotiation Enabled, advertising all speeds, preferring Slave
• MDIO interface selected, PHY MDIO address = 00111
• No asymmetric pause, no MAC pause, automatic crossover enabled
• Energy detect on cable disabled (Sleep Mode disabled), interrupt polarity LOW
The data sheet for the Marvell PHY is available from Marvell only with a valid NDA. Please contact
Marvell for more PHY-specific information.
EDK-based designs can access the PHY using either the xps_ethernetlite IP core for 10/100 Mbps
designs, or the xps_ll_temac IP core for 10/100/1000 Mbps designs. The xps_ll_temac IP core uses
the hard Ethernet MAC hardware core included in the Virtex 5 FPGA.
U10
N5
T6
L4
K6
L5
N8
L19
See Table
MDIO
MDC
INT#
RESET#
COL
CRS
RX_DV
RX_CLK
8
RX_ER
RXD
CONFIG
7
Halo HFJ11
Integrated magnetics
8
x14
0001101
RXD Signals
RXD0: N7
RXD1: R6
RXD2: P6
RXD3: P5
RXD4: M7
RXD5: M6
RXD6: M5
RXD7: L6
TXD Signals
TXD0: J5
TXD1: G5
J20
J16
R8
T10
8
See Table
GTX_CLK
TX_CLK
TX_ER
TX_EN
TXD
CLK
25MHz
(from IDT5V9885)
TXD2: F5
TXD3: R7
TXD4: T8
TXD5: R11
TXD6: T11
TXD7: U7
Virtex 5
Marvell M88E1111
www.digilentinc.com page 12 of 28
Copyright Digilent, Inc. All rights reserved. Other product and company names mentioned may be trademarks of their respective owners
Page 13

Genesys Reference Manual
The Genesys BSB support package automatically generates a test application for the Ethernet MAC;
this can be used as a reference for creating custom designs. Another example Ethernet-based design
(the web server) can be found on the Digilent website.
ISE designs can use the IP Core Generator wizard to create a tri-mode Ethernet MAC controller IP
core.
USB Host
A Cypress CY7C67300 USB controller provides the Genesys board with USB host and peripheral
capability. The CY7C67300 includes two serial interface engines (SIE) that can be used
independently. SIE1 is connected to a Type A USB host connector (J8), and SIE2 is connected to a
Type B USB peripheral connector (J9).
The USB controller has an internal microprocessor to assist in processing USB commands; a
dedicated IIC EEPROM (IC9) is available for storing firmware. Firmware can be developed for the
processor and/or written to the EEPROM using the Cypress CY3663 EZ-OTG™/EZ-Host™
development kit available from Cypress.
To assist with debug, the USB controller's two-wire serial port is connected to two FPGA pins (USBRX to FPGA pin V9, USB-TX to FPGA pin W7) using LVCMOS33 I/O standards. Jumper JP14 can be
installed to prevent the USB controller from executing firmware stored in the IIC EEPROM.
To access the USB host controller, EDK designs can use the xps_epc IP core. Reference designs
posted on the Digilent website show an example for reading characters from a USB keyboard
connected to the USB host interface.
USB Periph
AD4
AE6
AF6
AE7
AD5
AD6
V9
W7
See Table
Virtex 5
16
A0
A1
CS
WR
RD
INT
RX
TX
RESETAJ6
D[15:0]
2
V_INT
2
I2C
CLK
Vswt
HOST_EN
Over_Current
2
Type B
Vusbp
I2C ROM
24AA128
12MHz
(from IDT5V9885)
USB Power
Switch
EN
OC#
TPS2041
Vusbh
Data Signals
D0: Y6
D1: AA6
D2: Y7
D3: Y9
D4: W10
D5: AC5
D6: Y11
D7: AJ7
D8: AH7
D9: AH5
D10: AG6
D11: AG7
D12: AK7
D13: AK6
D14: AG5
D15: AF5
Cypress CY7C67300
www.digilentinc.com page 13 of 28
Copyright Digilent, Inc. All rights reserved. Other product and company names mentioned may be trademarks of their respective owners
USB Host
Type A
Page 14

Genesys Reference Manual
Video Output
Video output is accomplished using a Chrontel CH7301C DVI transmitter device connected to a
standard Type A HDMI connector (J3). DVI and HDMI share a common TMDS signaling standard, so
a simple adaptor can be used to convert the HDMI connector to a DVI connector (VGA signals are not
available on the HDMI connector).
The Chrontel CH7301C (IC3) supports up to 1600 X 1200 resolutions with 24-bit color. Status and
control information can be moved between the FPGA and the CH7301C using an I2C bus (SCL to
FPGA pin U8, and SDA to FPGA pin V8, both using the LVCMOS33 I/O standard). The I2C bus is
also routed to the HDMI connector to allow direct communications with external monitors.
EDK designs can use the xps_tft IP core (and its associated driver) to access the Chrontel device.
The xps_tft core reads video data from the DDR2 memory, and sends it to the Chrontel device for
display on an external monitor. The IP core is capable of resolutions of 640X480 at 18 bits per pixel.
An EDK reference design available on the Digilent website (and included as a part of the User Demo)
reads a bitmap file from the StartaFlash memory and displays it on the monitor. Another second EDK
reference design (included in the User test available though Adept) displays a gradient color bar and a
text in the center of the screen.
An ISE reference design is available that displays a color bar. This reference design provides and
example of using the DVI circuit with an ISE project.
Audio (AC-97)
The Genesys board includes a
National Semiconductor LM4550 AC
‘97 audio codec (IC19) with four 1/8”
audio jacks for line-out (J16),
headphone-out (J18), line-in (J15)
and microphone-in (J17). Audio data
Data Signals
D0: G10
D1: G8
D2: B12
D3: D12
D4: C12
D5: D11
D6: F10
D7: D10
D8: E9
D9: F9
D10: E8
D11: F8
www.digilentinc.com page 14 of 28
Copyright Digilent, Inc. All rights reserved. Other product and company names mentioned may be trademarks of their respective owners
Page 15

Genesys Reference Manual
at up to 18 bits and 48-kHz sampling is supported, and the audio in (record) and audio out (playback)
sampling rates can be different. The microphone jack is mono; all other jacks are stereo. The
headphone jack is driven by the audio codec's internal 50mW amplifier. The table below summarizes
the audio jacks.
The LM4550 audio codec is compliant to the AC ‘97 v2.1 (Intel) standard and is connected as a
Primary Codec (ID1 = 0, ID0 = 0). The table below shows the AC ‘97 codec control and data signals.
All signals are LVCMOS33.
www.digilentinc.com page 15 of 28
Copyright Digilent, Inc. All rights reserved. Other product and company names mentioned may be trademarks of their respective owners
Page 16

Genesys Reference Manual
Signal
N
ame
FPGA
Pin
Pin
Function
AUD-BIT-CLK AH17 12.288MHZ serial clock output, driven at one-half the frequency of the
24.576MHz crystal input (XTL_IN)
AUD-SDI AE18 Serial Data In (to the FPGA) from the codec. SDI data consists of AC
’97 Link Input frames that contain both configuration and PCM audio
data. SDI data is driven on the rising edge of AUD-BIT-CLK.
AUD-SDO AG20 Serial Data Out (to the codec) from the FPGA. SDO data consists of AC
’97 Link Output frames that contain both configuration and DAC audio
data. SDO is sampled by the LM4550 on the falling edge of AUD-BITCLK.
AUD-SYNC J9 AC Link frame marker and Warm Reset. SYNC (input to the codec)
defines AC Link frame boundaries. Each frame lasts 256 periods of
AUD-BIT-CLK. SYNC is normally a 48kHz positive pulse with a duty
cycle of 6.25% (16/256). SYNC is sampled on the rising edge of AUDBIT-CLK, and the codec takes the first positive sample of SYNC as
defining the start of a new AC Link frame. If a subsequent SYNC pulse
occurs within 255 AUD-BIT-CLK periods of the frame start it will be
ignored. SYNC is also used as an active high input to perform an
(asynchronous) Warm Reset. Warm Reset is used to clear a power
down state on the codec AC Link interface
AUD-RESET E12 Cold Reset. This active low signal causes a hardware reset which
returns the control registers and all internal circuits to their default
conditions. RESET must be used to initialize the LM4550 after Power
On when the supplies have stabilized. RESET also clears the codec
from both ATE and Vendor test modes. In addition, while active, it
switches the PC_BEEP mono input directly to both channels of the
LINE_OUT stereo output.
The EDK reference design (available on the Digilent website) leverages our custom AC-97 pcore to
accomplish several standard audio processing tasks such as recording and playing back audio data.
Serial Port
The Genesys board hosts two 2-wire RS-232 serial ports, one with a DB9F connector (for a DTE
connection), and one with a three-pin 100-mil header connector (including TX, RX, and GND). An
ST3232 level-shifting buffer is used to provide RS-232 signal levels on both ports. The serial port,
supported by standard EDK IP, is useful for user-data transfers as well as embedded processor
debugging.
www.digilentinc.com page 16 of 28
Copyright Digilent, Inc. All rights reserved. Other product and company names mentioned may be trademarks of their respective owners
Page 17

Genesys Reference Manual
Oscillators/Clocks
The Genesys board has several clock sources available, including a 3.3V 100MHz crystal oscillator, a
socket for a user-supplied half-size DIP oscillator, and two high-speed and highly stable differential
clock sources produced by an IDT 5V9885 programmable clock generator. The IDT clock generator is
programmed during manufacturing to produce several clocks required by the Genesys board,
including a 25MHz clock for the Ethernet PHY, a 24.576MHz clock for the Audio codec, a 12MHz
clock for the USB circuit, and two differential clocks (100MHz and 200MHz) for use by user circuits in
the FPGA.
IDT5V9885
Programming
header (SPI)
Clock Generator
OUT1
25MHz
Ethernet Clock
25MHz
Crystal
J12
OUT2 24.576MHz
OUT3
OUT4P
OUT4N
OUT5P
OUT5N
IC15
200MHz
100MHz
100MHz
Oscillator
IC13
Oscillator
DIP socket
IC14
12MHz
Audio Clock
USB Clock
J14
H13
H19
H20
AG18
Virtex 5
AH15
Differential
clock input
Differential
clock input
www.digilentinc.com page 17 of 28
Copyright Digilent, Inc. All rights reserved. Other product and company names mentioned may be trademarks of their respective owners
Page 18

Genesys Reference Manual
The IDT clock generator chip is
JTAG programmable using
iMPACT. If users change the
factory default configuration of the
clock generator, reference designs
and automated tests might not
work as designed. The same
IDT5V9885 configuration file used
during board manufacturing is
available from the Digilent website
and it can be used to restore the
IDT default settings.
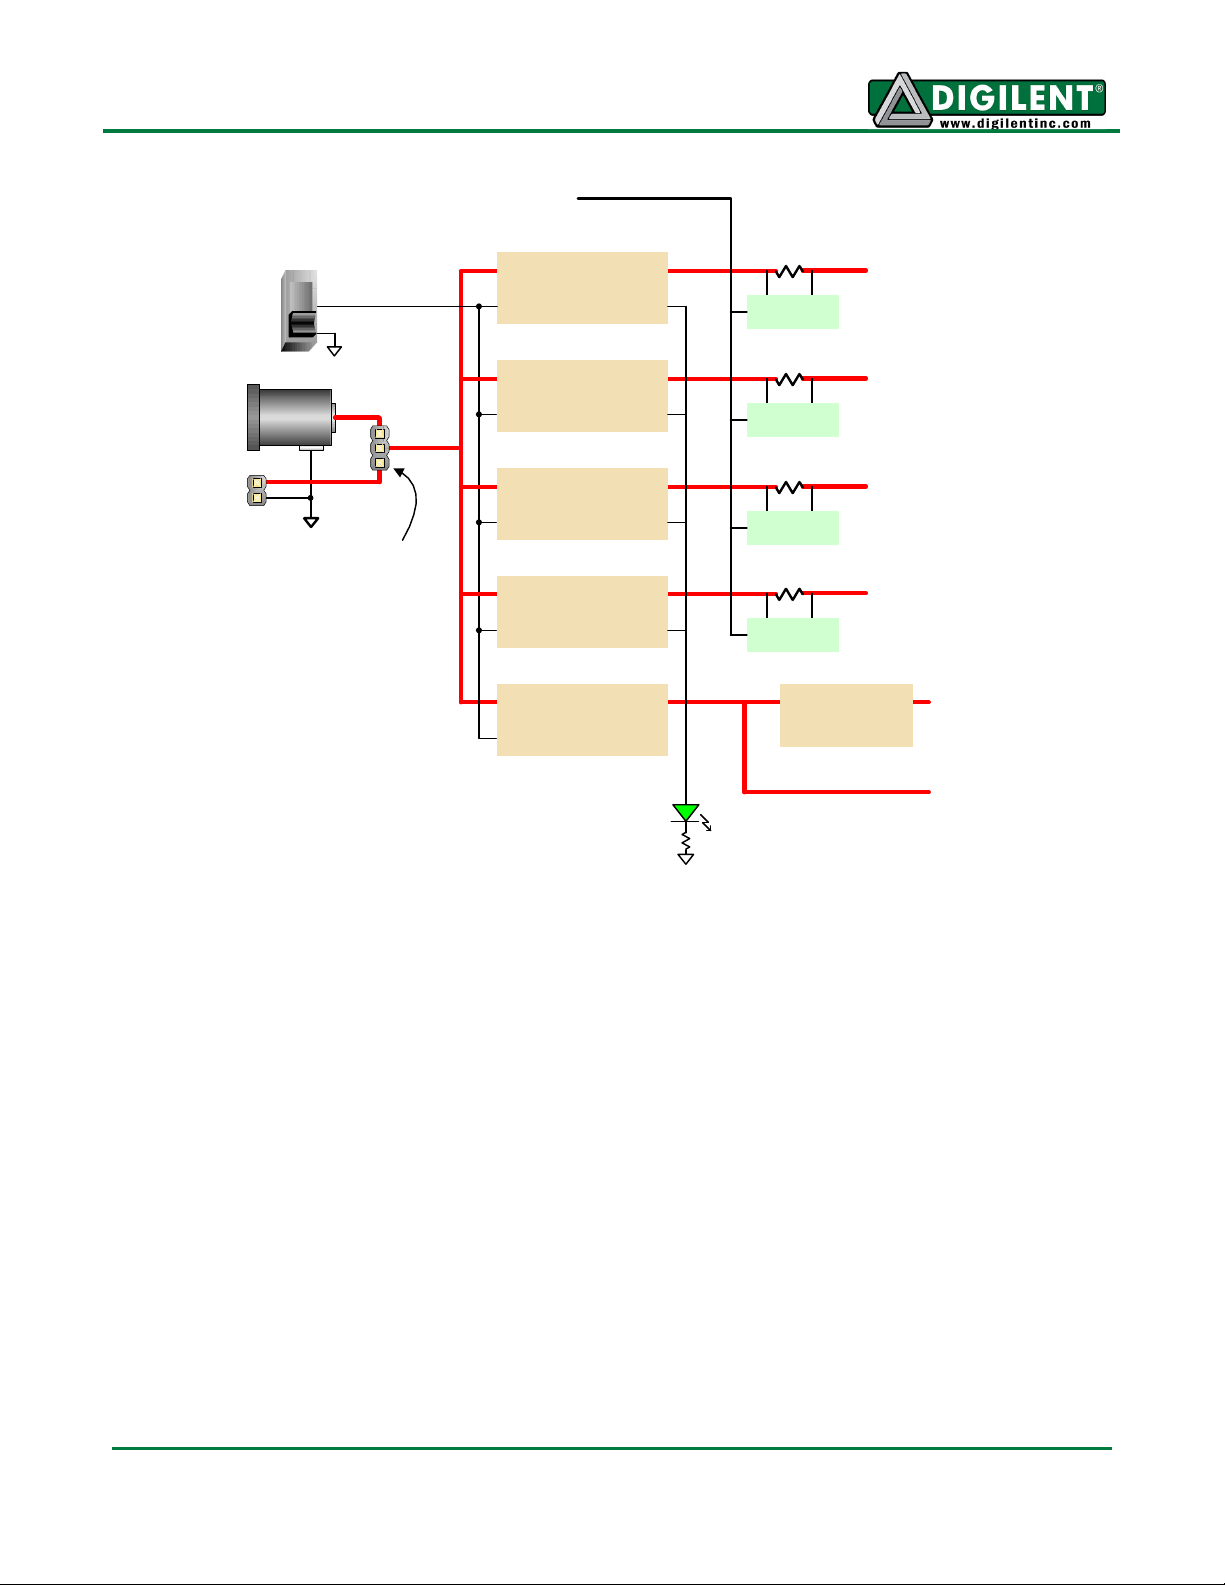
Basic I/O
Genesys includes three
pushbuttons, a navigation switch
comprised of five pushbuttons
packaged in a two-axis rocker
switch, eight slide switches, and
eight LEDs for basic digital input
and output. The buttons,
navigation switch, and slide
switches are connected to the
FPGA via series resistors to
prevent damage from short
circuits. The high efficiency LED
anodes are connected to a 3.3V
bank on the FPGA via 390-ohm
resistors, so they are illuminated
by about a 1mA current when a
logic high is placed on the
corresponding pin.
Character LCD
The Genesys board contains a standard 2x16 character LCD, typified by the Powertip 1602D (see
www.powertip.com.tw). The display uses a Sitronix ST7066U or compatible controller. Pertinent parts
of the controller data sheet are recreated below. Please refer to the vendor data sheet for more
detailed information.
The LCD controller contains a character-generator ROM (CGROM) with 208 preset 5x8 character
patterns, a character-generator RAM (CGRAM) that can hold eight user-defined 5x8 characters, and a
display data RAM (DDRAM) that can hold 80 character codes. Character codes written into the
DDRAM serve as indexes into the CGROM (or CGRAM). Writing a character code into a particular
DDRAM location will cause the associated character to appear at the corresponding display location.
Display positions can be shifted left or right by setting a bit in the instruction register (IR). The writeonly IR directs display operations (such as clear display, shift left or right, set DDRAM address, etc).
www.digilentinc.com page 18 of 28
Copyright Digilent, Inc. All rights reserved. Other product and company names mentioned may be trademarks of their respective owners
Page 19

Genesys Reference Manual
LCD
FPGA
Available instructions (and the
associated IR codes) are shown in the
right-most column of the “LCD
Instructions and Codes” table below. A
busy flag shows whether the display
has competed the last requested
operation; prior to initiating a new
operation, the flag can be checked to
see if the previous operation has been
completed.
The display has more DDRAM locations
than can be displayed at any given
Data Signals
D0: Y8 D4: AB6
D1: AB7 D5: AC5
D2: AB5 D6: AC7
D3: AC4 D7: AD7
time. DDRAM locations 00H to 27H
map to the first display row, and
locations 40H to 67H map to the second row. Normally, DDRAM location 00H maps to the upper left
display corner, and 40H to the lower left. Shifting the display left or right can change this mapping.
The display uses a temporary data register (DR) to hold data during DDRAM /CGRAM reads or
writes, and an internal address register to select the RAM location. Address register contents, set via
the IR, are automatically incremented after each read or write operation. RAM read/write requests will
be directed to DDRAM or CGRAM, depending on which address register was most recently accessed.
The LCD display uses ASCII character codes. Codes up through 7F are standard ASCII (which
includes all “normal” alphanumeric characters). Codes above 7F produce various international
characters – please see the Sitronix ST7066U data sheet for more information on international codes.
The display is connected to the Vitex FPGA by a 16-pin connector (pins 15 and 16 are for an optional
backlight, and they are not used). The 14-pin interface includes eight data signals, three control
signals, and three voltage supply signals. The eight bidirectional data bus signals communicate data
to the control registers or RAM locations. The RS (Register Strobe) signal clocks data into registers or
into RAM, the R/W signal determines bus direction, and the E signal enables the bus for read or write
operations. LCD bus signals and
timings are illustrated below.
A startup sequence with specific
timings ensures proper LCD
operation. After power-on, at least
20ms must elapse before the
function-set instruction code can
be written to set the bus width,
number of lines, and character
patterns (8-bit interface, 2 lines,
and 5x8 dots are appropriate).
After the function-set instruction,
at least 37us must elapse before
the display-control instruction can
be written (to turn the display on,
turn the cursor on or off, and set
the cursor to blink or no blink).
After another 37us, the displayclear instruction can be issued.
LCD Signals
Signal
Pin
Vss 1 Ground
Vdd 2 5V Power Supply
Vo 3 Contrast Voltage (typically 100mV-200mV at 20C)
RS 4 V7
R/W 5 W6
E 6 AA5
DB0 7
DB1 8
DB2 9
DB3 10
DB4 11
DB5 12
DB6 13
DB7 14
Signal Description
Pin
Register select: high for data, low for instructions
Read/write signal: high for read, low for write
Read/write: high for OE; falling edge writes data
Bidirectional data bus 0
Y8
AB7
AB5
AC4
AB6
AC5
AC7
AD7
Bidirectional data bus 1
Bidirectional data bus 2
Bidirectional data bus 3
Bidirectional data bus 4
Bidirectional data bus 5
Bidirectional data bus 6
Bidirectional data bus 7
www.digilentinc.com page 19 of 28
Copyright Digilent, Inc. All rights reserved. Other product and company names mentioned may be trademarks of their respective owners
Page 20

Genesys Reference Manual
Instruction Bit Assignments
Description
RS R/W DB7 DB6 DB5 DB4 DB3 DB2 DB1 DB0
After another 1.52ms, the entry-mode instruction can set address increment (or address decrement)
mode, and display shift mode (on or off). After this sequence, data can be written into the DDRAM to
cause information to appear on the display.
LCD Instructions and Codes
Instruction
Clear
Display
Return
Home
Entry Mode
Set
Display
ON/OFF
Control
Cursor or
Display Shift
Function Set 0 0 0 0 1 DL N F X X
Set CGRAM
Address
Set DDRAM
Address
Read Busy
Flag/ Address
Write Data
to RAM
Read Data
from RAM
0 0 0 0 0 0 0 0 0 1
0 0 0 0 0 0 0 0 1 X
0 0 0 0 0 0 0 1 I/D SH
0 0 0 0 0 0 1 D C B
0 0 0 0 0 1 S/C R/L X X
0 0 0 1 AC5 AC4 AC3 AC2 AC1 AC0
0 0 1 AC6 AC5 AC4 AC3 AC2 AC1 AC0
0 1 BF AC6 AC5 AC4 AC3 AC2 AC1 AC0
1 0 D7 D6 D5 D4 D3 D2 D1 D0
1 1 D7 D6 D5 D4 D3 D2 D1 D0
Clear display, set DDRAM address
register to 00H, and return cursor to
home. 1.52ms
Return cursor to upper left, set
DDRAM address to 0H. DDRAM
contents not changed. 1.52ms
I/D = ‘1’ for right-moving cursor and
address increment, SH = ‘1’ for
display shift (direction set by I/D
bit). 37us
Set display (D), cursor (C), and
blinking cursor (B) on or off (‘1’ in all
bits for “on”). 37us
S/C = ‘0’ to shift cursor right or left,
‘1’ to shift entire display right or left.
R/L = ‘1’ for right. 37us
Set interface data length (DL = ‘1’
for 8 bit), number of display lines (N
= ‘1’ for 2 lines), display font (F = ‘0’
for 5x 8 dots). 37us
Set CGRAM address counter. 37us
Set DDRAM address counter. 37us
Read busy flag and address
counter. 0us
Write data into DDRAM or CGRAM,
depending on which address was
last set. 37us
Read data from DDRAM or
CGRAM, depending on which
address was last set. 37us
www.digilentinc.com page 20 of 28
Copyright Digilent, Inc. All rights reserved. Other product and company names mentioned may be trademarks of their respective owners
Page 21

Genesys Reference Manual
Reading Data from LCD
RS
tsu th
RW
DB7-DB0
Writing Data to LCD
RS
RW
thtpw
tr tf
E
trdsu tdh
Valid Data
tc
tsu
tr tf
th
thtpw
E
twdsu tdh
DB7-DB0
Valid Data
tc
www.digilentinc.com page 21 of 28
Copyright Digilent, Inc. All rights reserved. Other product and company names mentioned may be trademarks of their respective owners
Enable cycle time tc 1200 ns E
Enable High pulse width tw 480 ns E
Enable rise/fall time tr, tf 25 ns E
RS, R/W setup time tsu 0 ns RS, R/W
RS, R/W hold time th 10 ns RS, R/W
Read data setup trdsu 60 320 ns DB0-DB7
Data hold time tdh 300 ns DB0-DB7
Write data setup time twdsu 80 ns DB0-DB7
Parameter Symbol Min Max Unit Pin
LCD Bus Timings
Page 22

Genesys Reference Manual
Power On
WAIT
40ms
Function Set
RS
R/W0DB70DB60DB50DB41DB31DB20DB1-DB0
0
DB4: 8-bit interface
DB3: Two lines
DB2: 5x8 dot font
WAIT
37us
“Function Set” may
need to be repeated
Display ON/OFF Control
RS
R/W0DB70DB60DB50DB40DB31DB21DB11DB0
0
DB2: Display On
DB1: Cursor On
DB0: No blink
WAIT
37us
-
0
Display Clear
RS
R/W0DB70DB60DB50DB40DB30DB20DB10DB0
0
DB0: Clear
1
WAIT
1.52ms
Entry Mode Set
RS
R/W0DB70DB60DB50DB40DB30DB21DB11DB0
0
DB1: Right-moving
DB0: Move cursor
0
Init Complete
LCD Start-Up Sequence
PS/2 Port
The 6-pin mini-DIN connector can accommodate a PS/2 mouse or keyboard. Most PS/2 devices can
operate from a 3.3V supply, but older devices may require a 5VDC supply. A 3-pin jumper on the
immediately adjacent to the PS/2 connector selects whether regulated 3.3V or the main input power
bus voltage (VU) is supplied to the PS/2 connector. To send 5V to the PS/2 connector, set the PS2
power jumper to VU (the main input power bus), and ensure the board is powered from USB or a
5VDC wall-plug supply. To send 3.3V to the connector, set the jumper to 3.3V.
www.digilentinc.com page 22 of 28
Copyright Digilent, Inc. All rights reserved. Other product and company names mentioned may be trademarks of their respective owners
Page 23

Genesys Reference Manual
Both the mouse and keyboard use a two-wire serial bus (clock and data) to communicate with a host
device. Both use 11-bit words that include a start, stop, and odd parity bit, but the data packets are
organized differently, and the keyboard interface
allows bi-directional data transfers (so the host
device can illuminate state LEDs on the keyboard).
Bus timings are shown in the figure. The clock and
data signals are only driven when data transfers
occur, and otherwise they are held in the “idle”
state at logic ‘1’. The timings define signal
requirements for mouse-to-host communications
and bi-directional keyboard communications. A
PS/2 interface circuit can be implemented in the
FPGA to create a keyboard or mouse interface.
Keyboard
The keyboard uses open-collector drivers so the keyboard or an attached host device can drive the
two-wire bus (if the host device will not send data to the keyboard, then the host can use input-only
ports).
PS/2-style keyboards use scan codes to communicate key press data. Each key is assigned a code
that is sent whenever the key is pressed; if the key is held down, the scan code will be sent repeatedly
about once every 100ms. When a key is released, an “F0” key-up code is sent, followed by the scan
code of the released key. If a key can be “shifted” to produce a new character (like a capital letter),
then a shift character is sent in addition to the scan code, and the host must determine which ASCII
character to use. Some keys, called extended keys, send an “E0” ahead of the scan code (and they
may send more than one scan code). When an extended key is released, an “E0 F0” key-up code is
sent, followed by the scan code. Scan codes for most keys are shown in the figure. A host device can
also send data to the keyboard. Below is a short list of some common commands a host might send.
ED Set Num Lock, Caps Lock, and Scroll Lock LEDs. Keyboard returns “FA” after receiving “ED”,
then host sends a byte to set LED status: bit 0 sets Scroll Lock; bit 1 sets Num Lock; and bit 2
sets Caps lock. Bits 3 to 7 are ignored.
EE Echo (test). Keyboard returns “EE” after receiving “EE”.
F3 Set scan code repeat rate. Keyboard returns “F3” on receiving “FA”, then host sends second
byte to set the repeat rate.
FE Resend. “FE” directs keyboard to re-send most recent scan code.
FF Reset. Resets the keyboard.
www.digilentinc.com page 23 of 28
Copyright Digilent, Inc. All rights reserved. Other product and company names mentioned may be trademarks of their respective owners
Page 24

Genesys Reference Manual
The keyboard can send data to the host only when both the data and clock lines are high (or idle).
Since the host is the “bus master”, the keyboard must check to see whether the host is sending data
before driving the bus. To facilitate this, the clock line is used as a “clear to send” signal. If the host
pulls the clock line low, the keyboard must not send any data until the clock is released. The keyboard
sends data to the host in 11-bit words that contain a ‘0’ start bit, followed by 8-bits of scan code (LSB
first), followed by an odd parity bit and terminated with a ‘1’ stop bit. The keyboard generates 11 clock
transitions (at around 20 - 30KHz) when the data is sent, and data is valid on the falling edge of the
clock.
Scan codes for most PS/2 keys are shown in the figure below.
PS/2 Keyboard Scan Codes
Mouse
The mouse outputs a clock and data signal when it is moved; otherwise, these signals remain at logic
‘1’. Each time the mouse is moved, three 11-bit words are sent from the mouse to the host device.
Each of the 11-bit words contains a ‘0’ start bit, followed by 8 bits of data (LSB first), followed by an
odd parity bit, and terminated with a ‘1’ stop bit. Thus, each data transmission contains 33 bits, where
bits 0, 11, and 22 are ‘0’ start bits, and bits 11, 21, and 33 are ‘1’ stop bits. The three 8-bit data fields
contain movement data as shown in the figure above. Data is valid at the falling edge of the clock, and
the clock period is 20 to 30KHz.
The mouse assumes a relative coordinate system wherein moving the mouse to the right generates a
positive number in the X field, and moving to the left generates a negative number. Likewise, moving
the mouse up generates a positive number in the Y field, and moving down represents a negative
number (the XS and YS bits in the status byte are the sign bits – a ‘1’ indicates a negative number).
The magnitude of the X and Y numbers represent the rate of mouse movement – the larger the
number, the faster the mouse is moving (the XV and YV bits in the status byte are movement overflow
indicators – a ‘1’ means overflow has occurred). If the mouse moves continuously, the 33-bit
transmissions are repeated every 50ms or so. The L and R fields in the status byte indicate Left and
Right button presses (a ‘1’ indicates the button is being pressed).
www.digilentinc.com page 24 of 28
Copyright Digilent, Inc. All rights reserved. Other product and company names mentioned may be trademarks of their respective owners
Page 25

Genesys Reference Manual
Mouse Data Format
Expansion Connectors
The Genesys board offers two 68-pin VHDC connectors for high-speed parallel I/O, and four 8-pin
Pmod connectors for lower speed and lower pin-count I/O. Data sheets for VHDC connectors can be
found on the Digilent website and on many vendor and distributor websites as well.
The VHDC connectors include 40 data signals (routed as 20 impedance-controlled matched pairs), 20
grounds (one per pair), and eight power signals. These connectors, commonly used for SCSI-3
applications, can accommodate data rates of several hundred megahertz on every pin. Both board-toboard and board-to-cable mating connectors are available. Digilent and several distributors carry
mating connectors and cables of various lengths.
External circuits connected the VHDC expansion connectors can receive 2.5V or 3.3V supplies from
Genesys, depending on the position of power supply selection jumpers. Jumper JP11 selects the
voltage provided to VHDC connector J1 and the associated FPGA I/O bank 11, and jumper JP12
selects the supply for VHDC connector J2 and FPGA I/O bank 12 (all I/O’s to the connectors are
routed as matched pairs to support LVDS signaling). The VHDC connectors also include two pins
connected directly to in the input voltage VSWT; jumper JP1 can break that connection if required.
The VHDC connectors, labeled J1 and J2 on the first page of the schematic, use symmetrical pinouts
(as reflected around the vertical axis of the physical connector) so that peripheral boards as well as
other system boards can be connected. Connector pins 15 and 49 are routed to FPGA clock input
pins.
The Genesys board’s unregulated input voltage (VU) is routed to the four center pins of the connector,
providing up to 1A of current (250mA per pin) to connected boards. VU is routed to the connectors
through the main power switch, and through jumper JP1 (so that VU can be removed from peripheral
boards if desired).
All I/O pins on connector J1 are routed to FPGA I/O bank 11, and all I/O pins on connector J2 are
routed to FPGA I/O bank 13. The VCC voltage driving these I/O banks is also routed to four VCC pins
on each connector, using pins immediately distal to the four VU pins. The shared I/O bank and
www.digilentinc.com page 25 of 28
Copyright Digilent, Inc. All rights reserved. Other product and company names mentioned may be trademarks of their respective owners
Page 26

Genesys Reference Manual
VHDC Connector J1
VHDC Connector
J2
connector VCC may be set to 3.3V, 2.5V, left unconnected or driven from an external source using
jumpers JP11 (J1) and JP12 (J2).
Switched VU
JP1
3.3V 2.5V
Bank 11
JP11
VCCO
Pins (x3)
20 Matched Pairs
Virtex 5
3.3V 2.5V
J1
Bank 13
JP12
VCCO
Pins (x3)
20 Matched Pairs
J2
Name Pin Name Pin Name Pin Name Pin
IO1-P B32 IO1-N A33 IO21-P W34 IO21-N V34
IO2-P C32 IO2-N D32 IO22-P V32 IO22-N V33
IO3-P B33 IO3-N C33 IO23-P AA34 IO23-N Y34
IO4-P E32 IO4-N E33 IO24-P Y33 IO24-N AA33
IO5-P C34 IO5-N D34 IO25-P AC33 IO25-N AB33
IO6-P G32 IO6-N H32 IO26-P Y32 IO26-N W32
IO7-P F33 IO7-N E34 IO27-P AC34 IO27-N AD34
IO8-P J32 IO8-N H33 IO28-P AC32 IO28-N AB32
IO9-P G33 IO9-N F34 IO29-P AF34 IO29-N AE34
IO10-P K33 IO10-N K32 IO30-P AF33 IO30-N AE33
IO11-P H34 IO11-N J34 IO31-P AG33 IO31-N AH33
IO12-P L34 IO12-N K34 IO32-P AH34 IO32-N AJ34
IO13-P L33 IO13-N M32 IO33-P AD32 IO33-N AE32
IO14-P N33 IO14-N M33 IO34-P AK34 IO34-N AK33
IO15-P P32 IO15-N N32 IO35-P AG32 IO35-N AH32
IO16-P P34 IO16-N N34 IO36-P AM33 IO36-N AM32
IO17-P R33 IO17-N R32 IO37-P AJ32 IO37-N AK32
IO18-P T33 IO18-N R34 IO38-P AN34 IO38-N AN33
IO19-P U32 IO19-N U31 IO39-P AL34 IO39-N AL33
IO20-P U33 IO20-N T34 IO40-P AN32 IO40-N AP32
www.digilentinc.com page 26 of 28
Copyright Digilent, Inc. All rights reserved. Other product and company names mentioned may be trademarks of their respective owners
Page 27

Genesys Reference Manual
Pmods use 2x6 right-angle, 100-mil connectors that mate with standard 2x6 pin headers available
from a variety of catalog distributors. Each 12-pin Pmod connector provides two VCC signals (pins 6
and 12), two Ground signals (pins 5 and 11), and eight logic signals. VCC and Ground pins can
deliver up to 1A of current, and a jumper block is available for each connector to choose the VCC
voltage: regulated 3.3V or the unregulated board input voltage (VU). Pmod data signals are not
matched pairs, and they are routed using best-available tracks without impedance control or delay
matching.
Digilent produces a large collection of accessory boards that can attach to the Pmod and VHDC
expansion connectors to add ready-made functions like A/D’s, D/A’s, motor drivers, sensors, cameras
and other functions. See www.digilentinc.com for more information.
Pmod Connector Pinouts
Pmod A Pmod B Pmod C Pmod D
Signal Pin Signal Pin Signal Pin Signal Pin
JA1 AD11 JB1 AE9 JC1 AL11 JD1 AN14
JA2 AD9 JB2 AC8 JC2 AJ10 JD2 AN13
JA3 AM13 JB3 AB10 JC3 AK9 JD3 AP12
JA4 AM12 JB4 AC9 JC4 AF9 JD4 AL10
JA7 AD10 JB7 AF8 JC7 AK11 JD7 AP14
JA8 AE8 JB8 AB8 JC8 AC10 JD8 AN12
JA9 AF10 JB9 AA10 JC9 AJ9 JD9 AM11
JA10 AJ11 JB10 AA9 JC10 AA8 JD10 AK8
System Monitor
The Genesys board supports the dedicated analog inputs (VP and VN pins on J13) to the Virtex 5
FPGA System Monitor block. The PCB layout for the VP and VN pins is designed using differential
pairs and anti-alias filtering in close proximity to the FPGA as recommended in the Virtex 5 FPGA
System Monitor User Guide. The Virtex 5 FPGA System Monitor function is built around a 10-bit, 200kSPS Analog-to-Digital Converter (ADC). The System Monitor is fully functional on power up, and
measurement data can be accessed via the JTAG port pre-configuration. The Xilinx ChipScope™ Pro
tool provides access to the System Monitor over the JTAG port. The System Monitor control logic
implements some common monitoring features. For example, an automatic channel sequencer allows
www.digilentinc.com page 27 of 28
Copyright Digilent, Inc. All rights reserved. Other product and company names mentioned may be trademarks of their respective owners
Page 28

Genesys Reference Manual
a user-defined selection of parameters to be automatically monitored, and user-programmable
averaging is enabled to ensure robust noise-free measurements.
The System Monitor also provides user-programmable alarm thresholds for the on-chip sensors.
Thus, if an on-chip monitored parameter moves outside the user-specified operating range, an alarm
logic output becomes active. In addition to monitoring the on-chip temperature for user-defined
applications, the System Monitor issues a special alarm called Over-Temperature (OT) if the FPGA
temperature becomes critical (> 125°C). The OT signal is deactivated when the device temperature
falls below a user specified lower limit. If the FPGA power-down feature is enabled, the FPGA enters
power down when the OT signal becomes active. The FPGA powers up again when the alarm is
deactivated. For additional information about the System Monitor, see
http://www.xilinx.com/systemmonitor and consult the Virtex 5 FPGA System Monitor User Guide. The
table below shows the System Monitor connections.
J13 Pin Signal Function
1 DXP Anode of the FPGA temperature-sensing diode
2 VP System Monitor dedicated differential analog input (positive side)
3 DXN Cathode of the FPGA temperature-sensing diode
4 VN System Monitor dedicated differential analog input (negative side)
5 GND
6 GND
Built-In Self Test
A demonstration configuration is loaded into the StataFlash ROM on the Genesys board during
manufacturing. This demo, also available on the Digilent website, can serve as a board verification
test since it interacts with all devices and ports on the board. To configure the FPGA from the demo
file stored in StrataFlash, set the mode jumper to BPI UP and cycle power. When Genesys powers
up, the DDR is tested, and then an image file will be transferred from the StrataFlash into DDR2. This
image will be driven out the HDMI port for display on a DVI/HDMI compatible monitor. The slide
switches are connected to the user LEDs, and user buttons BTN0, BTN1, and BTN3 cause varying
sine-wave frequencies to be driven on the LINE IN and LINE OUT audio ports. The LCD screen
(DISP1) will initially display “Genesys User Demo / BIST” on startup, and then display text whenever
the state of a user button or switch is changed.
If the self test is not resident in the StrataFlash ROM, it can be programmed into the FPGA or
reloaded into the ROM using the Adept programming software.
All Genesys boards are 100% tested during the manufacturing process. If any device on the Genesys
board fails test or is not responding properly, it is likely that damage occurred during transport or
during use. Typical damage includes stressed solder joints and contaminants in switches and buttons
resulting in intermittent failures. Stressed solder joints can be repaired by reheating and reflowing
solder, and contaminants can be cleaned with off-the-shelf electronics cleaning products. If a board
fails test within the warranty period, it will be replaced at no cost. If a board fails test outside of the
warranty period and cannot be easily repaired, Digilent can repair the board or offer a discounted
replacement. Contact Digilent for more details.
www.digilentinc.com page 28 of 28
Copyright Digilent, Inc. All rights reserved. Other product and company names mentioned may be trademarks of their respective owners
 Loading...