

Digihome 32914LCD Operating Instructions Manual
32914LCD
OPERATING INSTRUCTIONS
COLOUR TELEVISION WITH REMOTE CONTROL

- 1 -
Contents
Package Contents .................................................. 2
Features ................................................................. 2
Introduction ............................................................. 2
Preparation ............................................................. 2
Safety Precautions ................................................. 2
Information for users in the EU ............................... 3
Remote Control Handset ........................................ 4
Inserting Batteries ............................................... 4
Environmental Information ..................................... 5
Repair Information .............................................. 5
Remote Control Buttons ......................................... 6
TV and Operating Buttons ...................................... 7
Viewing the Connections - Back Connectors ......... 7
Viewing the Connections - Side Connectors .......... 8
Aerial Connection ................................................... 8
Power Connection .............................................. 8
Switching On/Off ..................................................... 9
To Switch the TV On ........................................... 9
To Switch the TV Off ........................................... 9
First Time Installation.............................................. 9
Connecting to a DVD Player................................. 10
Using USB Media ..................................................11
USB Memory Connection ..................................11
Connecting the TV to a PC ....................................11
Using Side AV Connectors ....................................11
Input Selection .......................................................11
Basic Operations .................................................. 12
Operation with the Buttons on the TV ............... 12
Volume Setting .............................................. 12
Programme Selection ................................... 12
Viewing Main Menu ....................................... 12
AV Mode ....................................................... 12
Operation with the Remote Control .................. 12
Volume Setting .............................................. 12
Programme Selection (Previous or Next
Programme) .................................................. 12
Programme Selection (Direct Access) .......... 12
Viewing Electronic Programme Guide (EPG) ....... 12
EPG Timeline Schedule .................................... 12
EPG Channel Schedule .................................... 13
EPG Now and Next........................................... 13
Installation ............................................................ 13
Auto Channel Scan (Retune) Menu Operation .... 13
Manual Tuning ..................................................... 13
Digital Manual Search....................................... 14
Analogue Manual Search ................................. 14
Analogue Fine Tune.......................................... 14
Managing Stations: Channel List .......................... 14
Operating the Channel List ............................... 14
Moving a Channel ............................................. 14
Deleting a Channel ........................................... 15
Renaming a Channel ........................................ 15
Locking a Channel ............................................ 15
Managing Stations: Favourites ............................. 15
Button Functions ............................................... 15
Managing Stations: Sorting the Channel List ....... 15
On-Screen Information ......................................... 16
Media Playback Using Media Browser ................. 16
Viewing Videos via USB .................................. 16
Viewing Photos via USB ................................... 17
Slideshow Options ............................................ 17
Playing Music via USB ..................................... 17
Media Browser Settings .................................... 17
Changing Image Size: Picture Formats ................ 18
Confi guring Picture Settings ................................. 19
Operating Picture Settings Menu Items ............ 19
Picture Settings Menu Items ............................. 19
PC Picture Settings........................................... 19
Confi guring Sound Settings .................................. 20
Operating Sound Settings Menu Items ............. 20
Sound Settings Menu Items.............................. 20
Confi guring Your TV’s Settings ............................. 20
Operating Settings Menu Items ........................ 21
Settings Menu Items ......................................... 21
Using a Conditional Access Module (not
included) ............................................................... 21
Viewing Conditional Access Menu (*) ............... 21
Confi guring Language Preferences ...................... 21
Parental Control.................................................... 22
Parental Settings Menu Operation ................... 22
Timers ................................................................... 22
Setting Sleep Timer .......................................... 22
Setting Programme Timers ............................... 22
Adding a Timer .............................................. 22
Editing a Timer .............................................. 22
Deleting a Timer ............................................ 22
Confi guring Date/Time Settings ............................ 23
Confi guring Source Settings ................................. 23
Confi guring Other Settings ................................... 23
Operation .......................................................... 23
Other Features ..................................................... 24
Teletext ................................................................. 25
Tips ....................................................................... 25
Appendix A: PC Input Typical Display Modes ....... 26
Appendix B: AV and HDMI Signal Compatibility
(Input Signal Types) .............................................. 26
Appendix C: Supported DVI Resolutions.............. 27
Appendix D: Software Upgrade ............................ 27
Appendix E : Supported File Formats for USB
Mode..................................................................... 28
Specifi cations ....................................................... 29
Important Instruction ............................................. 30
01_MB62_[GB]_[VESTEL_UK]_woypbpr_IDTV_NICKEL17_3902UK_32884W_10076269_50202676.indd 101_MB62_[GB]_[VESTEL_UK]_woypbpr_IDTV_NICKEL17_3902UK_32884W_10076269_50202676.indd 1 26.10.2011 13:18:2526.10.2011 13:18:25
- 2 -
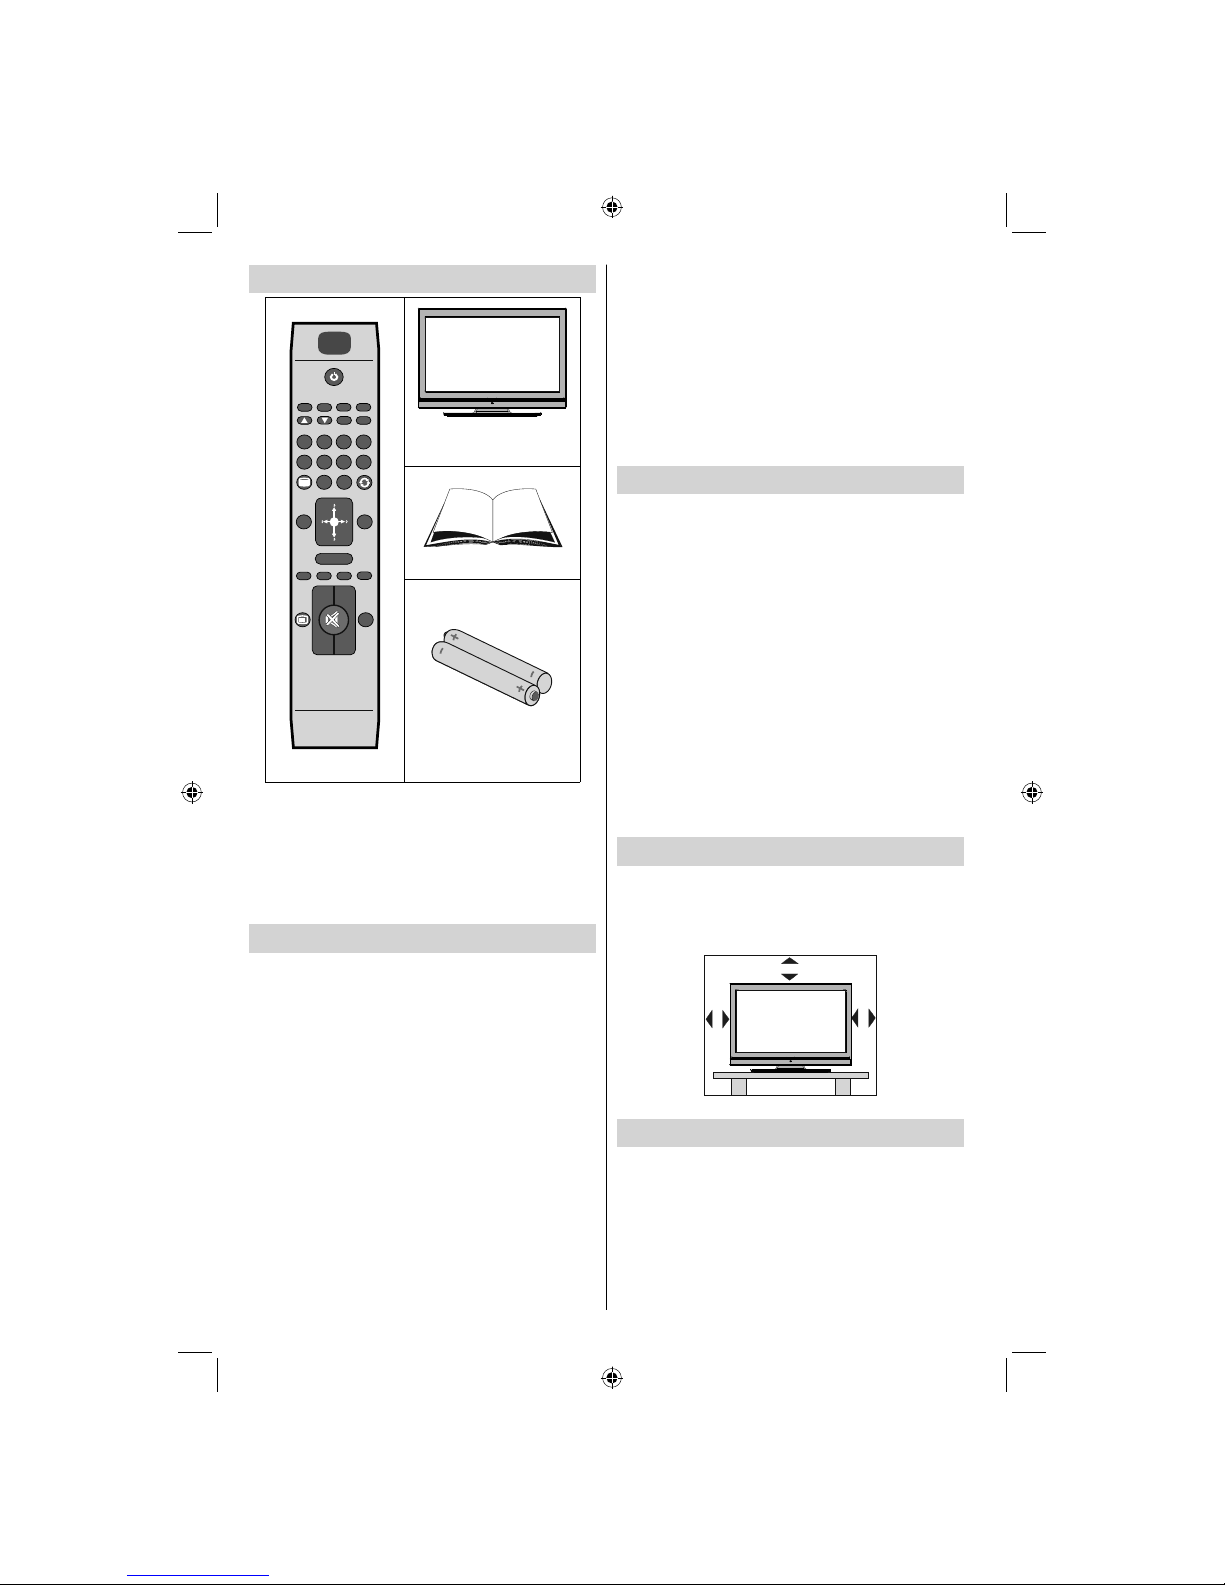
Package Contents
SCREEN
SCREEN
LANG
LANG
MENU
MENU
RETURN
RETURN
OK
OK
SOURCE
SOURCE FAV
PRESETS
PRESETS
SLEEP
SLEEP
?
INFO
INFO
EPG
EPG
V+
V+
V-P-P-
P+
P+
1
2
3
4
6
5
9
7 8
0
PIP
PIP
SUBTITLE
SUBTITLE
Remote Control
LCD TV
Instruction Book
Batteries: 2 X AAA
Note: You should check the contents after opening
your purchase and make sure that every item is
included.
NoteThe HDMI connection between PC and TV
may cause radio interference in which case it is
recommended to use VGA(DSUB-15) connection.
Features
Remote controlled colour LCD TV.•
Fully integrated Terrestrial digital TV (DVB-T MPEG2).•
HDMI connectors for digital video and audio.•
USB input.•
1000 programmes (analogue+digital).•
On Screen Display (OSD) menu system.•
•Integrated tuner DVB-T, MPEG 2
compatible.
Scart socket for external devices.•
Stereo sound system. (Nicam)•
Teletext, fastext, TOP text.•
Headphone connection.•
Automatic programming system.•
Forward or backward manual tuning.•
Sleep timer / Child lock.•
Automatic sound mute when no transmission.•
NTSC playback. •
AVL (Automatic Volume Limiting).•
Auto power down.•
PLL (Frequency Search).•
PC input. •
Plug&Play for Windows 98, ME, 2000, XP, Vista, •
Windows 7.
Game Mode •
Introduction
Thank you for choosing this product. This manual
will guide you through the proper operation of your
TV. Before operating the TV, please read this manual
thoroughly. Please keep this manual in a safe place
for future reference.
This device is intended to receive and display TV
programmes. The different connection options make
an additional expansion of the reception and display
sources possible (receiver, DVD player, DVD recorder,
VCR, PC etc.).
This device is only suitable for dry indoor use. This
appliance is intended solely for private domestic use
and may not be used for industrial and commercial
purposes. We exclude liability in principle, if the device
is not used as intended, or unauthorized modifi cations
have been made. To operate your LCD TV in extreme
ambient conditions may cause the damage of the
device.
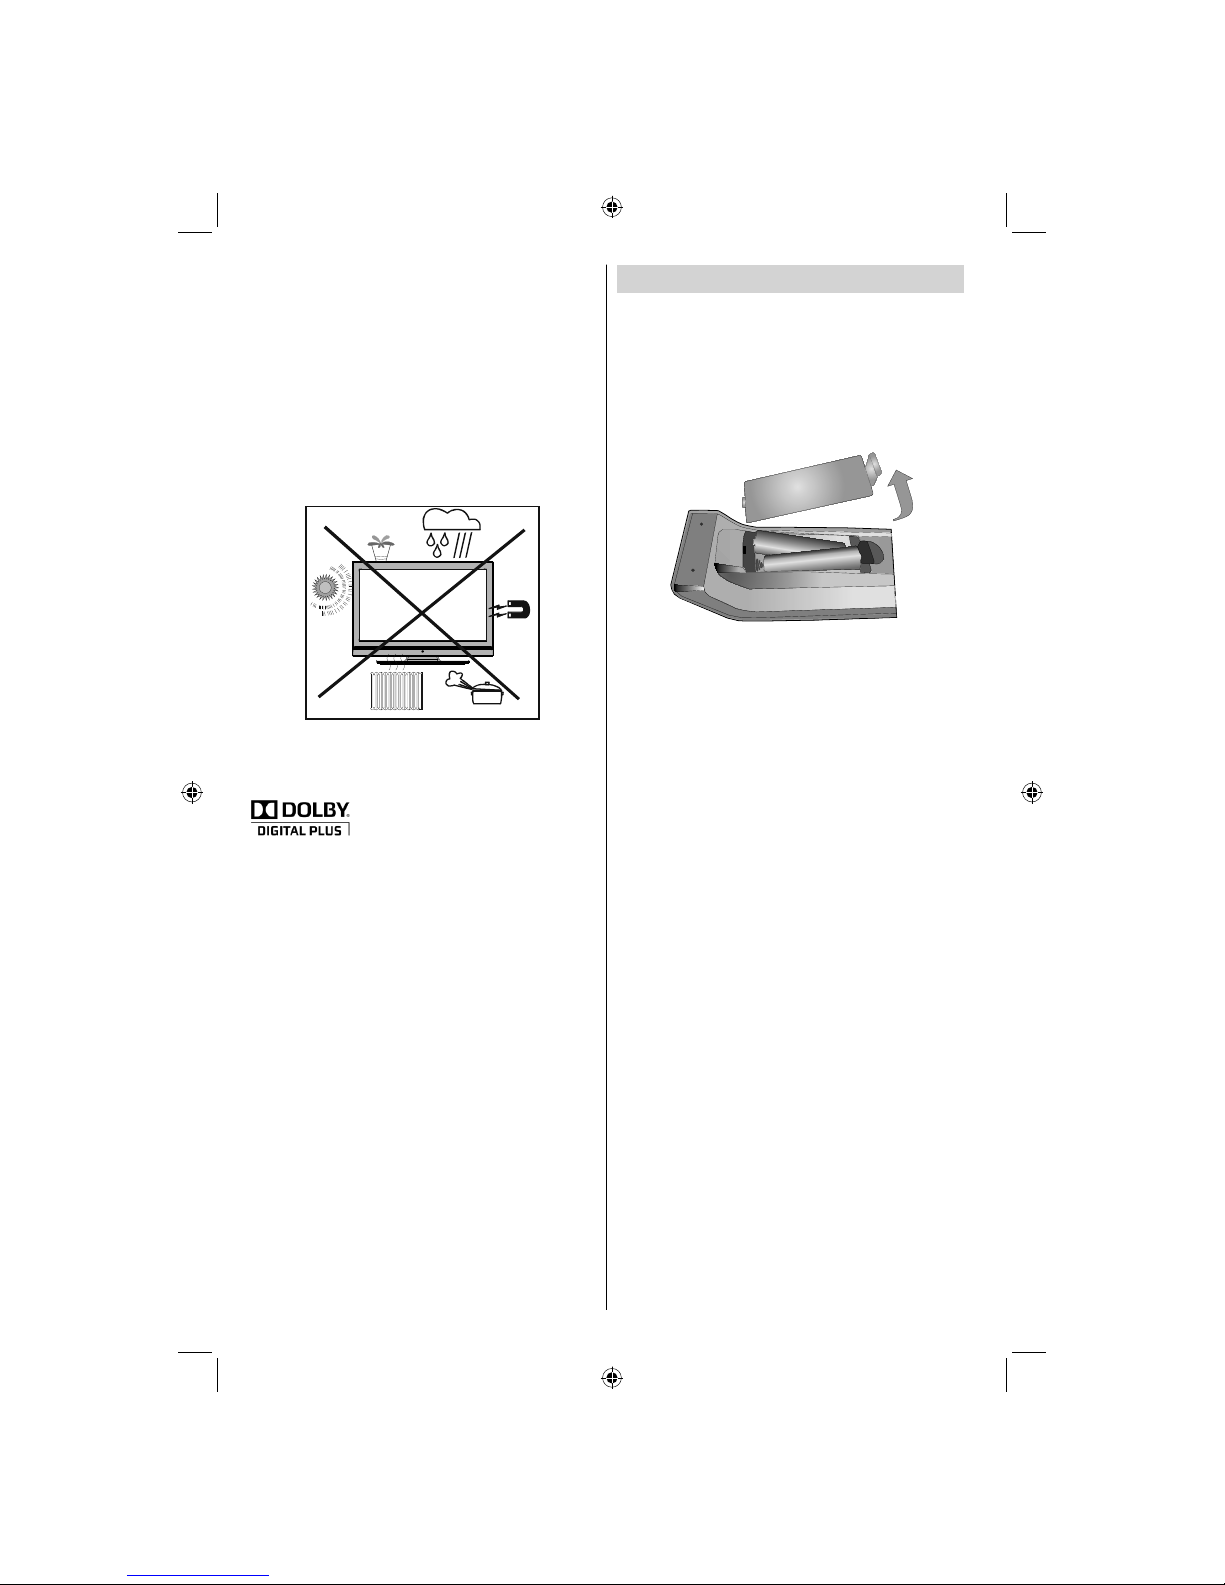
Preparation
For ventilation, leave a free space of at least 10 cm
all around the set. To prevent any fault and unsafe
situations, please do not place any objects on top of
the set. Use this device in moderate climates.
10 cm
10 cm
10 cm
Safety Precautions
Read the following recommended safety
precautions carefully.
Power Source
The TV set should be operated only from a 220-240V
AC, 50 Hz outlet. Ensure that you select the correct
voltage setting for your convenience.
01_MB62_[GB]_[VESTEL_UK]_woypbpr_IDTV_NICKEL17_3902UK_32884W_10076269_50202676.indd 201_MB62_[GB]_[VESTEL_UK]_woypbpr_IDTV_NICKEL17_3902UK_32884W_10076269_50202676.indd 2 26.10.2011 13:18:2626.10.2011 13:18:26
- 3 -
Power Cord
Do not place the set, a piece of furniture, etc. on the
power cord or pinch the cord. Handle the power cord
by the plug. Do not unplug the appliance by pulling from
the power cord and never touch the power cord with wet
hands as this could cause a short circuit or electric shock.
Never make a knot in the cord or tie it with other cords.
The power cord should be placed in such a way that they
are not likely to be stepped on. A damaged power cord
can cause fi re or give you an electric shock. When it is
damaged and needs to be replaced, it should be done
by qualifi ed personnel.
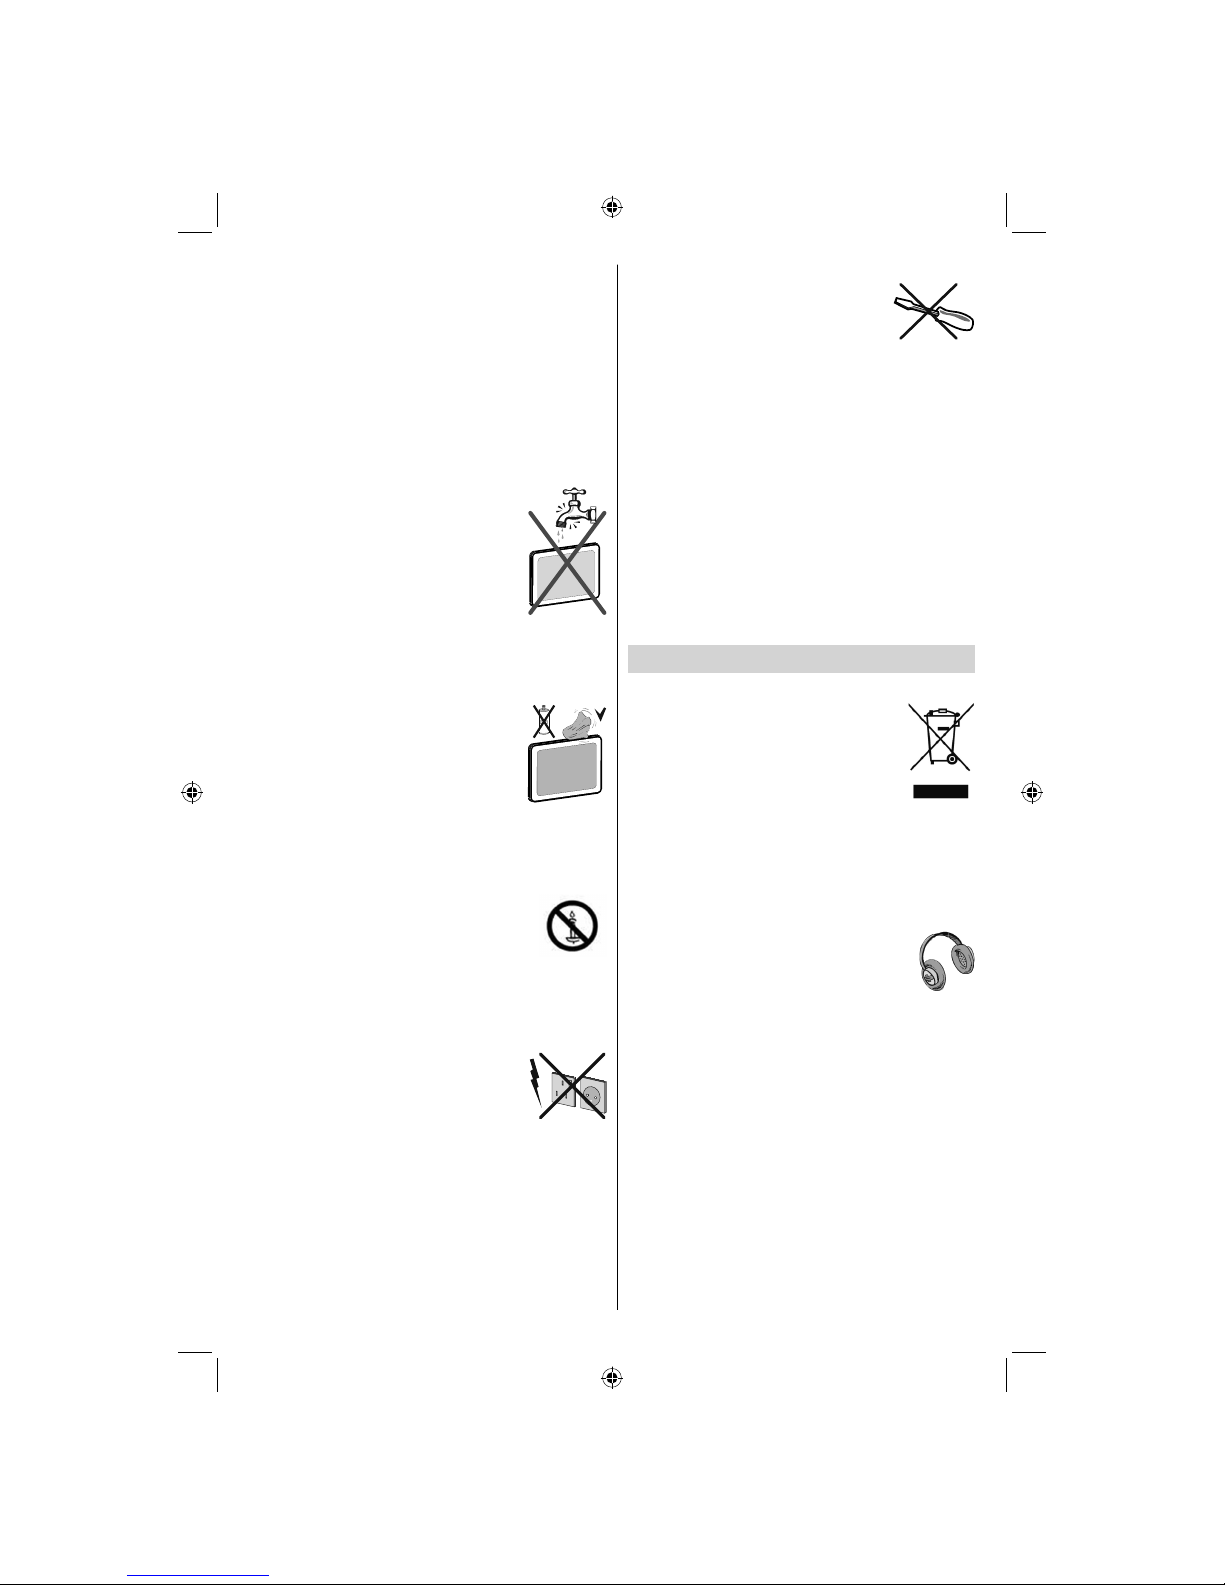
Moisture and Water
Do not use this device in a humid and
damp place (avoid the bathroom, the
sink in the kitchen etc). Do not expose
this device to rain or water, as this may
be dangerous and do not place objects
fi lled with liquids, such as fl ower vases,
on top.
If any solid object or liquid falls into the cabinet, unplug
the TV and have it checked by qualifi ed personnel
before operating it any further.
Cleaning
Before cleaning, unplug the TV set
from the wall outlet. Do not use liquid or
aerosol cleaners. Use a soft, dry cloth.
Ventilation
The slots and openings on the TV set
are intended for ventilation and to ensure reliable
operation. To prevent overheating, these openings
must not be blocked or covered in anyway.
Heat and Flames
The set should not be placed near to
open fl ames or sources of intense heat
such as an electric heater. Ensure that
no open fl ame sources, such as candles,
are placed on top of the TV. Batteries should not be
exposed to excessive heat such as sunshine, fi re or
the like.
Lightning
In case of storm and lightning or when
going on holiday, disconnect the power
cord from the wall outlet.
Replacement Parts
When replacement parts are required, make sure that
the service technician has used replacement parts,
which are specifi ed by the manufacturer or have the
same specifi cations as the original one. Unauthorized
substitutions may result in fi re, electrical shock or
other hazards.
Servicing
Please refer all servicing to qualifi ed
personnel. Do not remove the cover
yourself as this may result in an electric
shock.
Waste Disposal
Instructions for waste disposal:
• Packaging and packaging aids are recyclable
and should principally be recycled. Packaging
materials, such as a foil bag, must be kept away
from children.
• Batteries, including those which are heavy metalfree, should not be disposed of with household
waste. Please dispose of used batteries in an
environmentally friendly manner. Find out about the
legal regulations which apply in your area.
Do not try to recharge batteries, there is a danger •
of explosion. Replace batteries only with the same
or equivalent type.
Information for users in the EU
This symbol on the product or on its packaging means
that your electrical device should be
disposed at the end of its service life
separately from your household wastes.
There are separate collection systems for
recycling in the EU. For more information,
please contact the local authority or the
dealer where you purchased the
product.
Disconnecting the Device
The mains plug is used to disconnect the TV set
from the mains and therefore it must remain readily
operable.
Headphone Volume
Excessive sound pressure from earphones
and headphones can cause hearing loss.
Installation
To prevent injury, this device must be securely
attached to the wall in accordance with the installation
instructions when mounted to the wall (if the option
is available).
LCD Screen
The LCD panel is a very high technology product with
about a million thin fi lm transistors, giving you fi ne
picture details. Occasionally, a few non-active pixels
may appear on the screen as a fi xed blue, green or
red point. Please note that this does not affect the
performance of your product.
Warning! Do not leave your TV in standby or operating
mode when you leave your house.
01_MB62_[GB]_[VESTEL_UK]_woypbpr_IDTV_NICKEL17_3902UK_32884W_10076269_50202676.indd 301_MB62_[GB]_[VESTEL_UK]_woypbpr_IDTV_NICKEL17_3902UK_32884W_10076269_50202676.indd 3 26.10.2011 13:18:2626.10.2011 13:18:26
- 4 -
Connection to a Television Distribution
System (Cable TV etc.) from Tuner
Devices connected to the protective earthing of the
building installation through the mains connection or
through other apparatus with a connection to protective
earthing-and to a television distribution system using
a coaxial cable, may in some circumstances create
a fi re hazard.
Connection to a cable distribution system has
therefore to be provided through a device providing
electrical isolation below a certain frequency range
(galvanic isolator, see EN 60728-11).
TRADEMARK ACKNOWLEDGMENT
“Dolby” and the double-D symbol are trademarks of
Dolby Laboratories.
Licence Notifi cation (Optional)
Manufactured under license from Dolby
Laboratories.
Electrical devices not in the hands of children
Never let children use electrical devices unsupervised.
Children cannot always recognize properly any
possible danger. Batteries / accumulators can be life
threatening when swallowed. Store batteries out of
the reach of small children. In case of swallowing a
battery, medical aid has to be sought immediately.
Also keep the packaging away from children as there
is danger of suffocation.
The Standby button does not fully switch off this
product. Moreover, the device continues to consume
power in standby mode. In order to separate the
device completely from mains, the mains plug has to
be pulled from the mains socket. Because of that the
device should be set up in a way, that an unobstructed
access to the mains socket is guaranteed, so that
in case of emergency the mains plug can be pulled
immediately. During periods of prolonged non-use,
the TV should be disconnected from the mains power
supply.
Remote Control Handset
Inserting Batteries
Remove the battery cover located on the back of •
the handset by gently pulling backwards from the
indicated part.
Insert two • AAA/R3 or equivalent type batteries
inside. Observe the correct polarity (+/-) when
inserting batteries and replace the battery cover.
+
+
-
-
Note: Remove the batteries from the remote control
handset when it is not to be used for a long period.
Otherwise it can be damaged due to any leakage of
batteries. Remote range is approximately 7m/23ft.
01_MB62_[GB]_[VESTEL_UK]_woypbpr_IDTV_NICKEL17_3902UK_32884W_10076269_50202676.indd 401_MB62_[GB]_[VESTEL_UK]_woypbpr_IDTV_NICKEL17_3902UK_32884W_10076269_50202676.indd 4 26.10.2011 13:18:2726.10.2011 13:18:27

- 5 -
Environmental Information
This television is designed to consume less energy to save environment. •
You not only help to save the environment but also you can save money by reducing electricity bills thanks to the
energy effi ciency feauture of this TV. To reduce energy consumption, you should take the following steps:
You can use Power Save Mode setting, located in the Other settings menu. If you set Power Save Mode as •
On, the TV will switch to energy-saving mode and luminance level of TV set will be decreased to optimum level.
Note that some picture settings will be unavailable to be changed when the TV is in Power Save Mode.
When the TV is not in use, please switch off or disconnect the TV from the mains plug. This will also reduce •
energy consumption.
Disconnect power when going away for longer time.•
Note that annually, using the TV set in Power Save Mode has more power effi ciency than disconnecting the •
TV from the mains plug instead of keeping stand-by mode. Therefore it is highly recommended to activate
Power Save Mode setting to reduce your annual power consumption.And also it is recommended to disconnect
the TV from the mains plug to save energy more when you do not use.
• Please helps us to save environment by following these steps.
Repair Information
Please refer all servicing to qualifi ed personnel. Only qualifi ed personnel must repair the TV. Please contact
your local dealer, where you have purchased this TV for further information.
01_MB62_[GB]_[VESTEL_UK]_woypbpr_IDTV_NICKEL17_3902UK_32884W_10076269_50202676.indd 501_MB62_[GB]_[VESTEL_UK]_woypbpr_IDTV_NICKEL17_3902UK_32884W_10076269_50202676.indd 5 26.10.2011 13:18:2726.10.2011 13:18:27
- 6 -
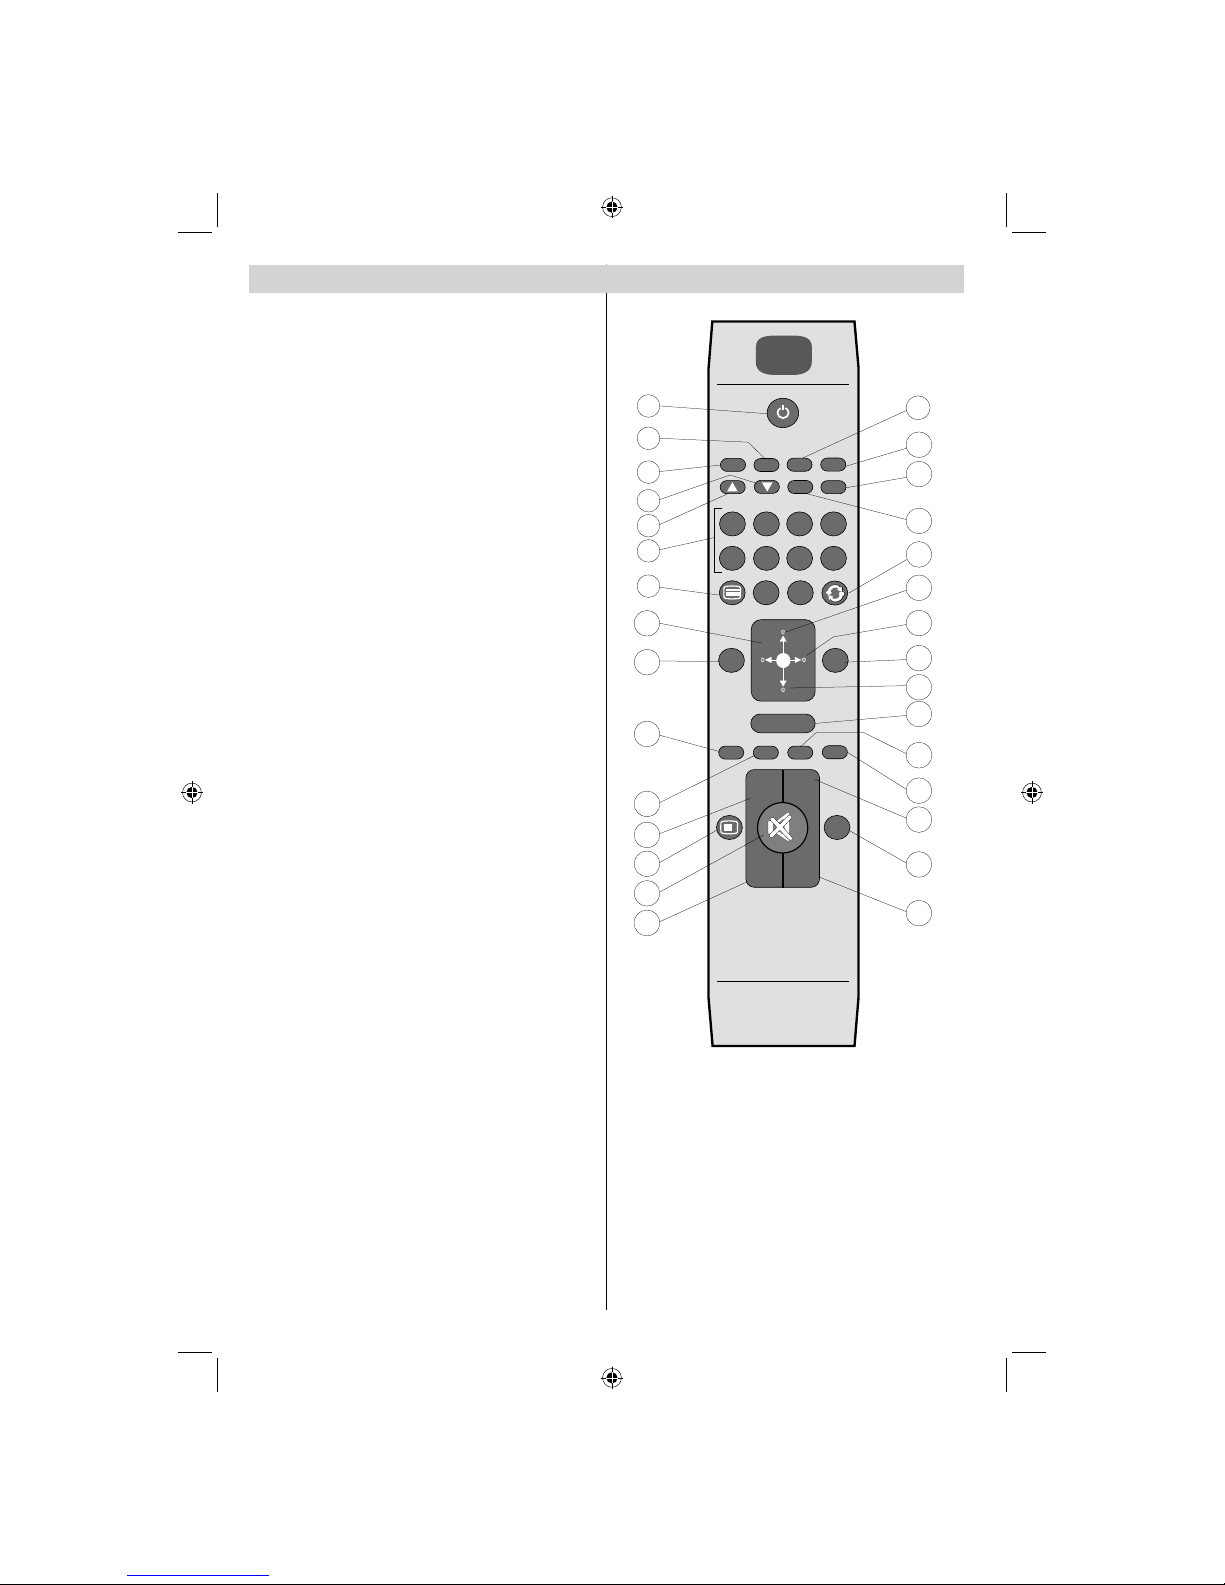
Remote Control Buttons
V
V
SCREEN
SCREEN
LANG
LANG
SUBTITLE
SUBTITLE
PIP
PIP
MENU
MENU
RETURN
RETURN
OK
OK
SOURCE
SOURCE FAV
PRESETS
PRESETS
SLEEP
SLEEP
?
INFO
INFO
EPG
EPG
V+
V+
V-P-P-
P+
P+
1
2
3
4
6
5
9
7 8
0
V
8
9
10
11
15
28
29
12
13
14
16
17
27
26
25
20
23
22
21
19
18
1
2
3
4
5
6
7
24
30
Standby1.
Mono/Stereo - Dual I-II / Currrent Language 2.
(in DVB channels)
Image size 3.
Green button4.
Red button5.
Numeric buttons6.
Teletext / Mix(in TXT mode) 7.
Cursor Left 8.
Menu on-off9.
AV / Source selection10.
Favourite Mode Selection(in DVB channels)11.
Volume Up12.
Info / Reveal (in TXT mode)13.
Mute14.
Volume Down15.
Programme Down / Page up(in DVB channels)16.
Electronic programme guide(in DVB channels)17.
Programme Up / Page down(in DVB channels)18.
Sleep Timer19.
Picture mode selecion20.
Okay (Confi rm) / Hold (in TXT mode)/ Edit 21.
Channel List
Cursor Down22.
Exit / Return / Index page (in TXT mode)23.
Cursor Right / Subpage (in TXT mode)24.
Cursor Up 25.
Previous programme26.
Yellow button27.
Blue button28.
No function29.
Subtitle on-off (in DVB channels)30.
01_MB62_[GB]_[VESTEL_UK]_woypbpr_IDTV_NICKEL17_3902UK_32884W_10076269_50202676.indd 601_MB62_[GB]_[VESTEL_UK]_woypbpr_IDTV_NICKEL17_3902UK_32884W_10076269_50202676.indd 6 26.10.2011 13:18:2726.10.2011 13:18:27
- 7 -
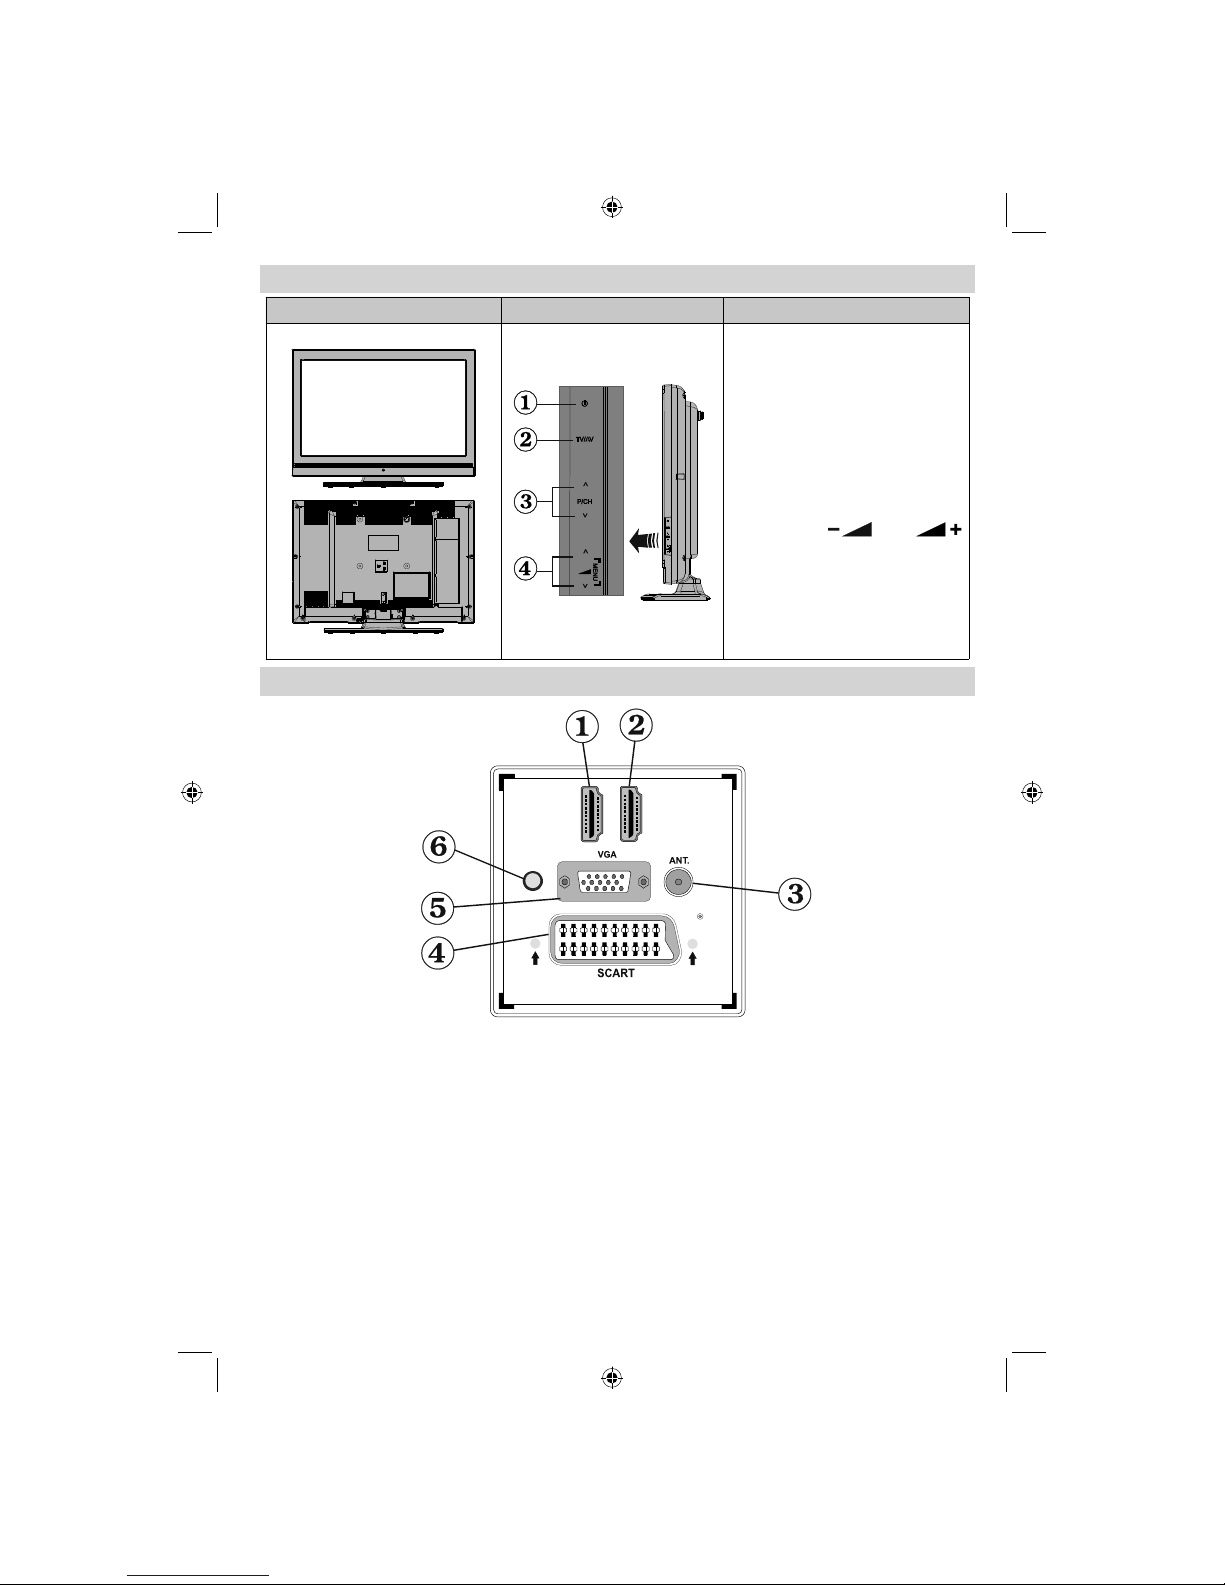
TV and Operating Buttons
FRONT and REAR VIEW Control switch VIEW Control Switch
1. Standby/On button
2. TV/AV button
3. Programme Up/Down buttons
4. Volume Up/Down buttons
Note: Press “
” and
buttons at the same time to view
main menu.
Viewing the Connections - Back Connectors
DI HM1
SPDIF
Coax.OUT
DI HM2
HDMI 2: HDMI Input1.
HDMI 1: HDMI Input2.
HDMI Inputs are for connecting a device that has a HDMI socket. Your TV is capable of displaying
High Defi nition pictures from devices such as a High Defi nition Satellite Receiver or DVD Player. These
devices must be connected via the HDMI or Component source. These sockets can accept either 720p
or 1080i signals. No sound connection is needed for a HDMI to HDMI connection.
RF Input3. connects to an aerial antenna system.
Note: If you use a decoder or a media recorder, you should connect the aerial cable through the device to
the television with an appropriate antenna cable, as shown in the illustration in the following pages.
SCART 4. input or output for external devices. Connect the SCART cable between the SCART socket on the
TV and the SCART socket on your external device (such as a decoder, a VCR or a DVD player).
Note: If an external device is connected via the SCART socket, the TV will automatically switch to AV mode.
Note: S-VHS signal is supported via the scart socket(optional).
01_MB62_[GB]_[VESTEL_UK]_woypbpr_IDTV_NICKEL17_3902UK_32884W_10076269_50202676.indd 701_MB62_[GB]_[VESTEL_UK]_woypbpr_IDTV_NICKEL17_3902UK_32884W_10076269_50202676.indd 7 26.10.2011 13:18:2726.10.2011 13:18:27
- 8 -
VGA Input5. is for connecting a personal computer to the TV set.
Connect the PC cable between the PC INPUT on the TV and the PC output on your PC.
Note: You can use YPbPr to VGA cable(not supplied) to enable YPbPr signal via PC input.
SPDIF Out6. outputs audio signals of the currently watched source.
Use an SPDIF cable to trasfer audio signals to a device that has SPDIF input.
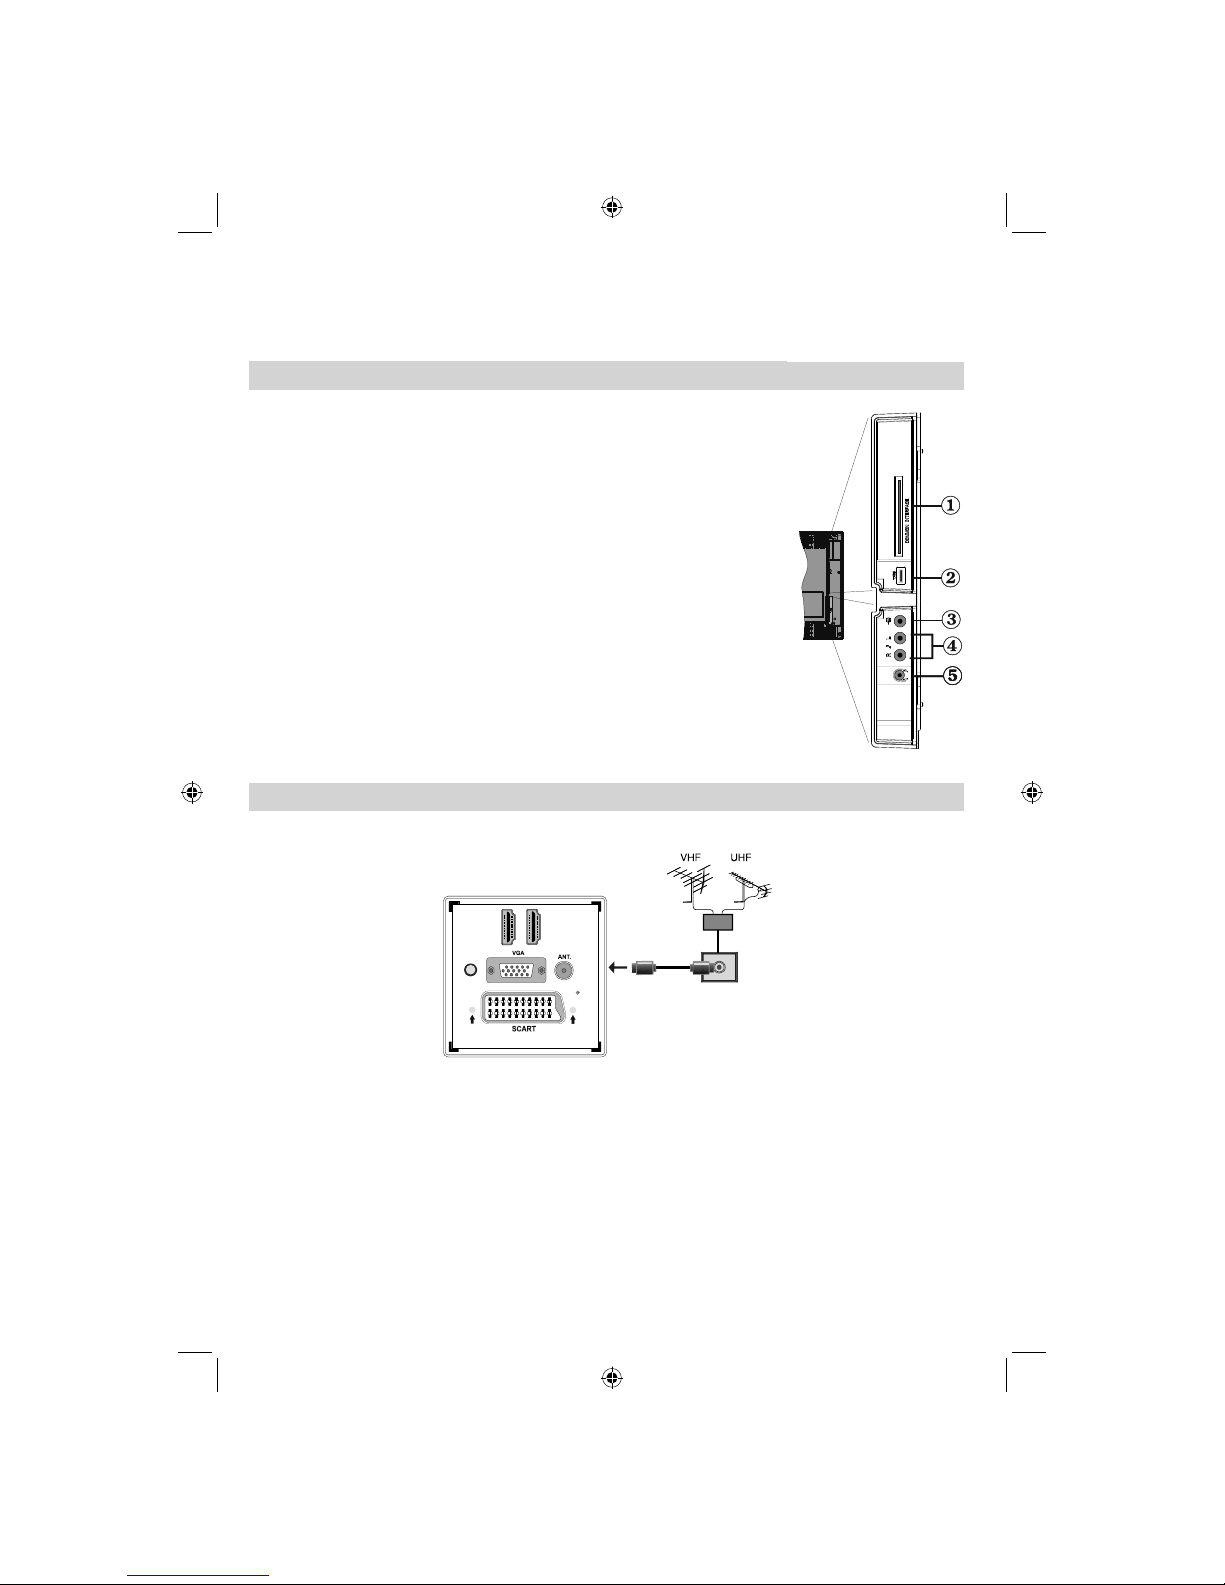
Viewing the Connections - Side Connectors
The CI Slot is used for inserting a CI card. A CI card allows you to view all 1.
the channels that you subscribe to. For more information, see “Conditional
Access” section.
Side USB input.2.
Video Input is used for connecting video signals of external devices.Connect 3.
the video cable between the VIDEO IN socket on the TV and the VIDEO OUT
jack on your device.
Audio Inputs are used for connecting audio signals of external devices. Connect 4.
the audio cable between the AUDIO INPUTS on the TV and the AUDIO OUTPUT
jacks on your device.
Note: If you connect a device to the TV via the VIDEO INPUT, you should also
connect your device with an audio cable to the AUDIO INPUTS of the TV to enable
audio.
The headphone jack is used for connecting an external headphone to 5.
the system. Connect to the HEADPHONE jack to listen to the TV from
headphones.
Aerial Connection
Connect the aerial to the • AERIAL INPUT (ANT) socket located at the rear of the TV.
D
I
HM1
SPDIF
Coax.OUT
D
I
HM2
Power Connection
IMPORTANT: The TV set is designed to operate on 220-240V AC, 50 Hz.
After unpacking, allow the TV set to reach the ambient room temperature before you connect the set to the •
mains.
5Vdc-Max500mA
01_MB62_[GB]_[VESTEL_UK]_woypbpr_IDTV_NICKEL17_3902UK_32884W_10076269_50202676.indd 801_MB62_[GB]_[VESTEL_UK]_woypbpr_IDTV_NICKEL17_3902UK_32884W_10076269_50202676.indd 8 26.10.2011 13:18:2826.10.2011 13:18:28
- 9 -
Switching On/Off
To Switch the TV On
Connect the power cord to the 220-240V AC, 50 Hz. •
Then the standby LED lights up (The led will blink
during the standby On/Off).
To switch the TV on from standby mode either:•
Press the “•
” button, P+ or P- or a numeric button
on the remote control.
Press the control switch on the left hand side of the •
TV. The TV will then switch on.
Note: If you switch on your TV via P+ or P- buttons on
the remote control or on the TV set, the programme
that you were watching last will be reselected.
To Switch the TV Off
Press the “• ” button on the remote control or hold
the on the TV until shut down, so the TV will switch
to standby mode.
To power down the TV completely, unplug the •
power cord from the mains socket.
Note: When the TV is switched to standby mode, the
standby LED can blink to indicate that features such
as Standby Search, Over Air Download or Timer is
active
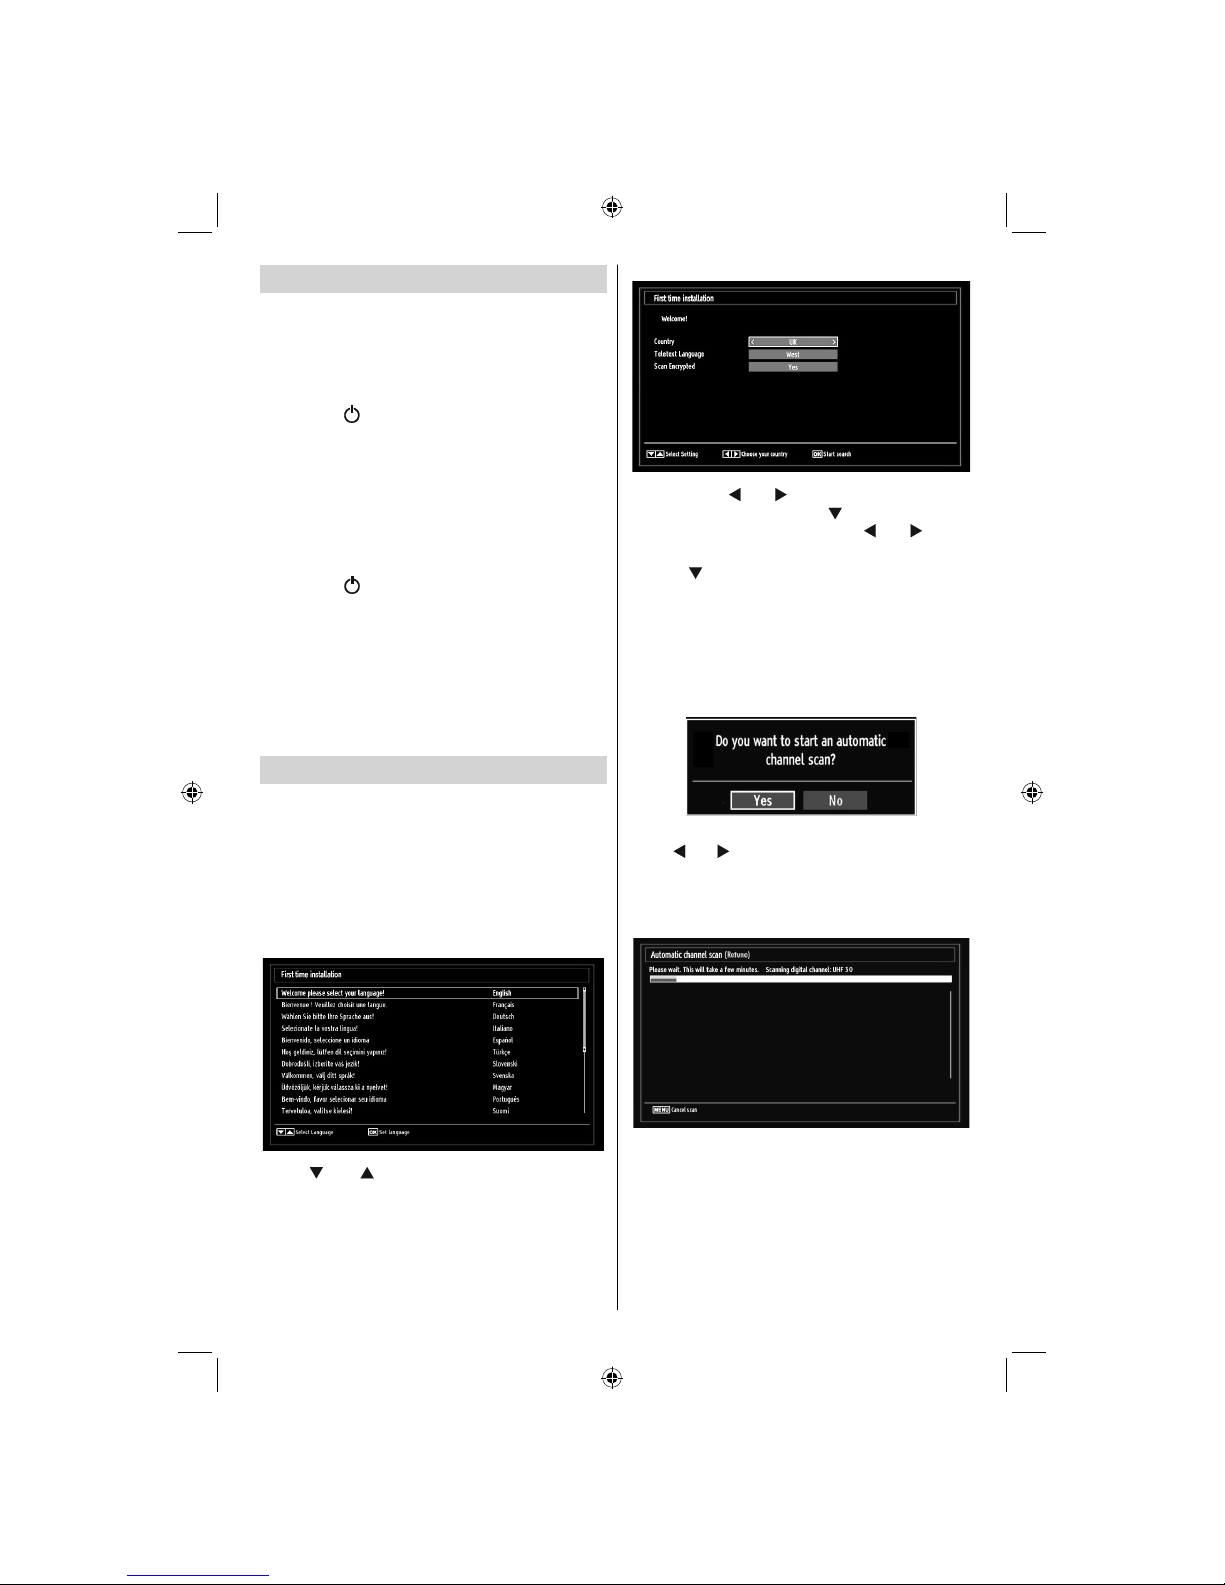
First Time Installation
IMPORTANT: Ensure that the aerial is connected
and a Common Interface module is not inserted
before switching on the TV for the first time
installation.
When the TV is operated for the fi rst time, the •
installation wizard will guide you through the
process. First, the language selection screen will
be displayed:
Use “• ” or “ ” buttons to select your language
and press OK button to set the selected language
and continue.
After selecting the language, “• Welcome!” screen will
be displayed, requiring you to set Country,Teletext
Language and Scan Encrypted options.
By pressing “• ” or “ ” button, select the country
you want to set and press “ ” button to highlight
Teletext Language option. Use “ ” or “ ” button
to select desired Teletext Language.
Press “•
” button after setting Teletext Language
option. Scan Encrypted will be then highlighted.
You should set the Scan Encrypted as Yes if you
want to scan coded stations.Afterwards select the
desired Teletext Language.
Press • OK button on the remote control to continue
and the following message will be displayed on the
screen:
To select the “Yes” or “No” option, highlight the item by
using “ ” or “ ” buttons and press OK button.
Afterwards the following OSD will be displayed on
the screen and the TV will search for both digital and
analogue TV broadcasts.
Note: You can press • “MENU” button to cancel.
End of the search process, “Choose Region” osd will
be displayed on the screen (if any multiple region
variants are detected).Please select country and
region choice then press OK to continue.
01_MB62_[GB]_[VESTEL_UK]_woypbpr_IDTV_NICKEL17_3902UK_32884W_10076269_50202676.indd 901_MB62_[GB]_[VESTEL_UK]_woypbpr_IDTV_NICKEL17_3902UK_32884W_10076269_50202676.indd 9 26.10.2011 13:18:3126.10.2011 13:18:31
 Loading...